1
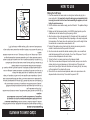
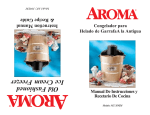
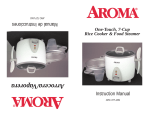
Modelo: AIC-107
Twisty Treat
Soft Serve Ice Cream Maker
Instruction Manual
& Recipe Guide
Model AIC-107
Manual De Instrucciones y
Recetario De Cocina
Felicidades por la compra de su máquina para hacer helados cremosos
Twisty Treat.
Hacer helados ricos, suaves y cremosos jamás fue más fácil: ¡basta colocar los
ingredientes en el recipiente congelado y encender el aparato! El dosificador,
igual al que puede encontrar en una heladería, en verdad hace conos rizados.
Este manual incluye recetas fáciles de hacer. Pero, además, con esta máquina,
usted podrá preparar otras recetas de yogur congelado bajo en grasas y
sorbetes, aunque los resultados varían según la receta que se utilice.
Para garantizar su seguridad y el disfrute de este producto, conviene que lea
todas las instrucciones cuidadosamente, antes de usar su máquina para hacer
helados.
Publicada Por:
Aroma Housewares Co.
6469 Flanders Drive
San Diego, CA 92121
U.S.A.
1-800-276-6286
www.aromaco.com
© 2006 Aroma Housewares Company. Todos los derechos reservados.
© 2006 Aroma Housewares Company. All rights reserved.
Aroma Housewares Co.
6469 Flanders Drive
San Diego, CA 92121
U.S.A.
1-800-276-6286
www.aromaco.com
Published By:
To ensure your safety and enjoyment of this product, please read all instructions
carefully before using this product.
Easy to make recipes are included in this manual. Additional soft serve, frozen yogurt
or sorbet recipes may be created with this machine, although the results may vary by
recipe.
Congratulations on your purchase of the
Twisty Treat Soft Serve Ice
Cream Maker. Making rich, delicious soft ice cream has never been easier - just place
the ingredients in the frozen canister and turn the unit on! The authentic ice-cream
shop style dispenser lets you make true twisty cones.
1
SAVE THESE INSTRUCTIONS
1. To protect against electric shock, do not immerse any part of this appliance in water or any
other liquid.
2. This appliance is not intended for use by young children without supervision. Children should
be supervised at all times while using this appliance.
3. Never leave this appliance unattended while in use.
4. Do not operate the ice cream maker when empty. Always have ice cream mixture in the unit
when turned on.
5. Switch off and remove the plug from the wall outlet when not in use, before assembling or
disassembling parts and before cleaning.
6. To unplug, grasp plug at the base and pull from outlet. Do not grasp, pull on, or carry by the
power cord.
7. Avoid contact with moving parts. Keep hands, hair, clothing, spatulas, and other utensils
away during operation to prevent injury and/or damage to the appliance.
8. Do not operate the appliance with a damaged cord or plug or after it malfunctions, has been
dropped or damaged in any manner. Return appliance to the nearest authorized service
facility for examination, repair, or adjustment.
9. Do not place complete unit in the refrigerator or freezer. Only the canister is freezer-safe.
10. Make sure that the canister and lid cover are fitted correctly before operating this appliance.
11. Do not use outdoors.
12. Store unit in a dry location.
13. Do not let cord hang over the edge of a table or counter, or touch hot surfaces.
14. Do not operate or place any part of this appliance on or near hot surfaces such as on a gas
or electric burner or in a heated oven.
15. The use of attachments or accessories not recommended or sold by the manufacturer may
cause fire, electric shock, or injury.
16. Always operate on a sturdy, level surface. Do not operate this appliance in a sink, on a drain
board, or any other uneven surface.
17. Do not use this appliance for anything other than its intended use. This product is intended
for household use only.
18. Do not attempt to repair, disassemble, or modify this appliance in any way. It contains no
user serviceable parts.
Basic safety precautions should always be followed when using electrical appliances,
including the following:
IMPORTANT SAFEGUARDS
INSTRUCCIONES IMPORTANTES
Al usar aparatos eléctricos siempre deberán observarse las precauciones básicas de
seguridad, incluyendo las siguientes:
1. Para evitar descargas eléctricas, no sumerja ninguna de las piezas de la máquina en agua o
en cualquier otro líquido.
2. Este aparato no debe ser usado por niños pequeños sin supervisión de adultos. Cuando los
niños usen este aparato deben estar supervisados en todo momento.
3. Jamás deje el aparato encendido sin estar presente.
4. No opere la máquina para hacer helados cuando esté vacía. Coloque siempre la mezcla de
helado en el recipiente antes de encender el aparato.
5. Antes de ensamblar o desarmar el aparato, o antes de limpiarlo, apague el aparato y retire el
cable de la toma de corriente en la pared, cuando no esté encendido.
6. Para desenchufarlo, tome el enchufe por la base y retire de la toma de corriente. No cargue
ni jale el aparato por el cable de corriente.
7. Evite el contacto con las piezas móviles. Mantenga las manos, el cabello, la ropa, espátulas y
otros utensilios lejos del aparato, cuando esté se encuentre en funcionamiento. Así evitará
lesiones personales y/o daños al aparato.
8. No opere el aparato si el cable o el enchufe están dañados, o si ha presentado un
funcionamiento defectuoso, si se ha caído o dañado. Regrese el aparato al servicio
autorizado más cercano para que sea examinado, reparado o ajustado.
9. No coloque la unidad completa en el refrigerador o el congelador. Sólo el recipiente está
diseñado para colocarse en el congelador.
10. Asegúrese de que el recipiente y la tapa estén correctamente colocados antes de iniciar
cualquier operación.
11. No se use al aire libre.
12. Guarde el aparato en un lugar seco.
13. No deje que el cable cuelgue de la orilla de una mesa o barra, ni que entre en contacto con
superficies calientes.
14. No opere ni coloque ninguna de las piezas del aparato cerca o sobre superficies calientes,
como son los quemadores de la estufa o el horno caliente, bien sea que ésta sea de gas o
eléctrica.
15. El uso de aditamentos o accesorios que no recomienda o vende el fabricante puede provocar
incendios, descargas eléctricas o lesiones.
16. Para operar el aparato, colóquelo siempre sobre una superficie plana y firme. No opere el
aparato en el fregadero, o sobre el escurridor u otra superficie desnivelada.
17. Este aparato debe usarse sólo para el uso indicado. Este aparato está diseñado sólo para
uso doméstico.
18. No intente reparar, desarmar o modificar el aparato. No contiene piezas que el usuario pueda
componer o modificar.
GUARDE BIEN ESTAS INSTRUCCIONES
1
ESTE APARATO ES PARA USO DOMESTICO.
¡MANTÉNGASE
LEJOS DE LOS
NIÑOS!
1. A short power-supply cord is provided to reduce the risk of becoming entangled in
or tripping over a longer cord.
2. Longer extension cords are available and may be used if care is exercised in their use.
3. If a longer extension cord is used:
a. The marked electrical rating of the extension cord should be at least as great as
the electrical rating of the appliance.
b. The longer cord should be arranged so that it will not drape over the counter top
or tabletop where it can be pulled by children or tripped over unintentionally.
2
SHORT CORD INSTRUCTIONS
POLARIZED PLUG
This appliance has a polarized plug (one blade is wider than the other); follow the
instructions below:
¡NO DEJE QUE EL CABLE CUELGUE!
To reduce the risk of electric shock, this plug is intended to fit into a polarized outlet
only one way. If the plug does not fit fully into the outlet, reverse the plug. If it still does
not fit, contact a qualified electrician. Do not attempt to modify the plug in any way.
Para reducir el riesgo de descarga eléctrica, este ploya intencionalmente solo debe de
enchufar un lado en enchufes de luz de ploya polarisada. Si la clavija no entra
completamente, da vuelta a la clavija. Si aun la clavija no puede entrar, llame a un
electricista calificada. No intente de modificar la clavija, es muy peligroso.
Si este aparato tiene ploya polarizada:
PLOYA POLARISADA
a. Asegúrese de que la extensión sea no mas, o menos, del voltaje del aparato.
b. Asegúrese de que el cordón no cuelge del mostrador o de la mesa,
donde pueda ser jaludo por niño, o tropesear por accidente.
INSTRUCCIONES DE CABLE CORTO
2
1. Un cable de corriente de medida corta es provido cone la finalidad de reducir los
riesgos de que se envede.
This appliance is for household use only.
3
IDENTIFICACIÓN DE LAS REFACCIONES
9
1
8
2
1.
2.
3.
4.
5.
6.
7.
8.
9.
7
6
Lid
On/Off Switch
Gear Unit
Mixing Paddle
Canister
Body
Tap Dispenser
Base
Removable Drip Tray
5
4
1. Tapa
2. Interruptor de encendido/apagado
3. Unidad de velocidad
4. Aspa para batir
5. Recipiente para batir
6. Cuerpo de la unidad
7. Grifo del dosificador
8. Base de la unidad
9. Bandeja escurridora removible
3
4
5
6
7
3
2
8
1
9
PARTS IDENTIFICATION
3
!
4
Los tres pasos siguientes SON MUY
IMPORTANTES para preparar helado cremoso. Por
favor, lea con atención y siga las instrucciones
cuidadosamente, pues de lo contrario corre el riesgo
de que su helado no resulte bien.
1) Make sure that the mixing canister is placed in the
freezer for at least 24 hours prior to making ice cream.
Freezer should be set at 0°F.
3) Retire el recipiente del aparato y la mezcla del helado
cuando ya se disponga a preparar el helado. No
enjuague el recipiente. Enjuagarlo o dejarlo a
temperatura ambiente durante demasiado tiempo lo
calentará y afectará los resultados.
2) It is best to prepare the ice cream recipe a day before
you plan to use your ice cream maker. Placing it,
covered, in the refrigerator for 12-24 hours will ensure
that it is completely chilled.
2) Es mejor preparar la receta del helado un día antes de
usar la máquina para hacer helados. Coloque la mezcla,
cubierta, en el refrigerador durante 12-24 horas, para
asegurarse de que se enfrié completamente.
3) Only take out the canister and ice cream mixture when
you are ready to make ice cream. Do not rinse the
canister. Rinsing or allowing to sit out for too long will
cause them to warm up and will affect the results of
your ice cream making.
1) Asegúrese de colocar el recipiente para batir en el
congelador, al menos 24 horas antes de preparar el
helado. La temperatura del congelador debe estar a 0°F.
!
instructions carefully - or there is a chance
that your ice cream will not turn out!
The following three steps are VERY
IMPORTANT in making soft serve ice
cream. Please read and follow all
4
5
When both the canister and mixture are fully chilled, you may begin to make soft
serve ice cream.
Select your favorite recipe, prepare ingredients per recipe instructions. In order to
achieve a soft-serve consistency, it is important that the ingredients be VERY
COLD before you begin to mix. Chill the mixture in the refrigerator overnight or for
a minimum of 4 hours prior to mixing, or you may place the mixture in the freezer for
15-30 minutes to ensure that it is completely chilled.
Preparing the Mixture
Once the canister has been cleaned and is completely dry, place the canister in the
freezer for a minimum of 24 hours. This allows the canister to become cold enough
to freeze the soft serve mixture. It is recommended to keep the canister wrapped in
a plastic bag and placed in the back of your freezer when not in use. This ensures
that it is available for immediate use the next time you would like to make soft ice
cream.
Chilling the Canister
IMPORTANT FIRST STEPS
1. Read all instructions and important safeguards.
2. Remove all packaging materials and make sure items have been received in good
condition.
3. Tear up all plastic bags, as they can pose a risk to children.
4. Wash the canister, lid, and mixing paddle in warm, soapy water. These parts are NOT
dishwasher safe.
5. Rinse and dry all parts thoroughly.
6. Wipe the exterior body and gear unit of the appliance with a damp cloth. Do not
immerse in water.
7. Place clean, dry canister in the back of your freezer. It must freeze for a
minimum of 24 hours before you may begin to make soft ice cream.
• Do not use abrasive cleaners or scouring pads.
• Do not immerse the body, cord, gear unit or plug in water at any time.
Before First Use:
BEFORE FIRST USE
ANTES DE USARLO POR PRIMERA VEZ
1. Lea todas las instrucciones y las advertencias de seguridad.
2. Retire todos los materiales de empaque y verifique que ha recibido todos los ítems en
buenas condiciones.
3. Rompa todas las bolsas de plástico, pues representan un riesgo para los niños.
4. Lave el recipiente, la tapa y el aspa para batir, con agua jabonosa tibia. Estas piezas
NO deben lavarse en lavadora de vajilla.
5. Enjuague y seque todas las piezas por completo.
6. Limpie el cuerpo exterior del aparato y la unidad de velocidad con un trapo húmedo.
No sumerja en agua.
7. Coloque el recipiente limpio y seco en el fondo de su congelador. Debe mantenerse
en el congelador durante un lapso mínimo de 24 horas, antes de que comience a
preparar el helado cremoso.
*No use limpiadores abrasivos ni estropajos o escobetas que provoquen
ralladuras.
*Jamás sumerja en agua el cuerpo del aparato, el cable, la unidad de velocidad ni
el enchufe.
INSTRUCCIONES IMPORTANTES
Instrucciones para enfriar el recipiente
Una vez que haya limpiado y secado perfectamente el recipiente, colóquelo en el
congelador durante un lapso mínimo de 24 horas. Lo anterior permite que el recipiente
se enfríe lo suficiente para congelar la mezcla de helado cremoso. Se recomienda
mantener el recipiente envuelto en una bolsa de plástico y en el fondo del congelador,
cuando no se encuentra en uso. Esto asegura tenerlo disponible para su uso
inmediato, la próxima vez que usted quiera preparar helado cremoso.
Preparación de la mezcla
Elija su receta favorita; prepare los ingredientes, siguiendo las indicaciones de la
receta. Para obtener una consistencia suave y cremosa, es muy importante que
los ingredientes estén MUY FRÍOS, antes de comenzar a batirlos. Enfríe la mezcla
en el refrigerador durante toda la noche o durante un lapso mínimo de 4 horas antes
de comenzar a batirlos; también puede colocar la mezcla en el congelador durante 1530 minutos para asegurarse de que esté completamente helada.
Cuando el recipiente y la mezcla estén completamente helados, puede empezar a
preparar su helado cremoso.
5
CÓMO USAR SU APARATO
Instrucciones para ensamblar la unidad
1. Coloque el cuerpo del aparato para preparar helados en la base (ver la página
titulada Identificación de las Partes para una diagrama detallada).
2. Justo antes de que se disponga a preparar el helado, retire el recipiente helado del
congelador y colóquelo de inmediato en el cuerpo del aparato. No enjuague el
recipiente ni permita que repose en la mesa, pues esto puede causar que la
temperatura del recipiente se eleve considerablemente. Enrosque el recipiente
ligeramente, al tiempo que hace presión hacia abajo para asegurarse de su correcta
colocación en el aparato.
3. Coloque el aspa para batir en la unidad de velocidad (vea a la Figura 1 abajo) y coloque
la tapa de la unida.
4. Coloque el grifo del dosificador en el cuerpo del aparato (vea a la Figura 2 abajo).
Sostenga el grifo del dosificador y levántelo para que entre en el hoyo. Gire el grifo del
dosificador en dirección opuesta a las manecillas del reloj, hasta que cierre en su lugar.
Presione la manija del grifo del dosificador hacia ABAJO, para asegurarse de que
esté en posición de cierre.
5. Coloque la tapa sobre la unidad, asegurándose de que cierre en su lugar.
6
Figure 2
Figura 1
Figure 1
Figura 2
6
1. Refer to the Parts Identification page for a more detailed diagram.
2. Fit the body of the soft serve maker onto the base.
3. Just before you are ready to make ice cream, remove the chilled canister from freezer
and immediately place into the body. Do not rinse the canister or allow it to sit out
on the counter, as this may cause the temperature of the canister to rise
substantially. Turn the canister slightly while pressing down to ensure that it fits properly
into the machine.
4. Attach the mixing paddle to the gear unit (Figure 1) and place over the top of the unit.
5. Fit the tap dispenser into the body (Figure 2). Hold the tap dispenser and lift up so the
tap dispenser fits into the hole. Rotate the tap dispenser counterclockwise until it locks
into place. Push the tap dispenser handle DOWN to ensure it is in the closed
position.
6. Place the lid on the top of the unit, making sure that it locks into place.
Assembling the Unit
HOW TO USE
HOW TO USE
7
Mixing the Soft Serve
1. Place the assembled soft serve maker on a sturdy, level surface and plug into a
power cord outlet. It is important to begin the mixing process immediately after
removing the canister from the freezer and assembling the appliance, to avoid
letting the canister warm up.
2. With the chilled ice cream mixture ready, press the ON switch. The paddle will begin
to rotate.
3. Making sure that the dispenser handle is in the DOWN (closed) position, pour the
chilled mixture into the canister through the opening in the lid.
4. Allow the mixture to churn for approximately 20-40 minutes until it has reached softserve consistency. The churning time will vary depending on the recipe being made,
the temperature of the freezer where the canister was frozen, and the length of time
the canister and ice cream mixture were allowed to chill.
5.Turning off the appliance at any time during the churning process may cause the
mixture to harden and restrict the operation of the mixer.
6. Once the mixture has reached the desired consistency, hold a cone or small bowl
under the dispenser and lift up on the handle. Do not turn off the power. The soft
serve ice cream will dispense as the motor churns.
7. To stop the flow of ice cream, press down on the dispenser handle.
8. If all of the ice cream does not dispense from the canister, as may occur when the
mixture churns too long and becomes very thick, simply turn off the motor and
remove the lid (see Figure 3 below for instructions on removing the lid), then scoop
out the remainder of the contents with a spoon.
9. When all of the ice cream has been dispensed, make sure to press down on the
dispenser handle to close the tap. Then switch the power to OFF.
Figure 3
7
Figura 3
1. Coloque la máquina para hacer helados ya ensamblada, sobre una superficie firme y
nivelada, y enchufe el cable a la toma de corriente. Es importante comenzar el
proceso de batido inmediatamente después de retirar el recipiente del
congelador y de ensamblar el aparato, para evitar el calentamiento del
recipiente.
2. Una vez que la mezcla fría del helado esté lista, presione el interruptor de encendido
(ON). El aspa comenzará a girar.
3. Una vez que se haya asegurado de que la manija del dosificador esté ABAJO
(cerrada), vierta la mezcla fría en el recipiente, a través de la abertura en la tapa.
4. Permita que la mezcla se bata durante 20-40 minutos, aproximadamente, hasta que
haya alcanzado una consistencia suave. El tiempo de batido dependerá de la receta
que elija, la temperatura del congelador en el que se enfrió el recipiente y el tiempo
durante el cual el recipiente y la mezcla del helado se enfriaron.
5. Una vez que la mezcla haya adquirido la consistencia deseada, sostenga un cono o
un plato pequeño debajo del dosificador y levante la manija. No apague el aparato. El
dosificador servirá el helado mientras el motor continúa batiendo.
6. Para detener el flujo del helado, presione hacia abajo la manija del dosificador.
7. Si no sale todo el helado del recipiente, como ocurre cuando se ha batido la mezcla
durante demasiado tiempo y se ha espesado demasiado, simplemente apague el
motor y retire la tapa (vea a la Figura 3 de abajo), y sirva con una cuchara el helado
restante.
8. Cuando haya servido todo el helado, asegúrese de presionar hacia abajo la manija
del dosificador para cerrar el grifo. Después apague el interruptor (OFF).
Preparación de la mezcla
CÓMO USAR SU APARATO
CONSEJOS ÚTILES
8
• Recomendamos envolver el recipiente en una bolsa de plástico y colocarlo en el fondo
del congelador una vez que haya terminado de usarlo y que lo haya limpiado. Este es un
método magnífico para asegurarse de tenerlo listo para usarlo de inmediato la próxima
vez que quiera preparar helado cremoso. Envolver el recipiente en una bolsa de plástico
ayuda a protegerlo de la llamada quemadura por congelamiento.
• Cuando retire el recipiente congelado del congelador, NO LO ENJUAGUE ni permita que
permanezca a temperatura ambiente durante más de unos cuantos minutos, antes de
comenzar a preparar el helado. Es muy importante que el recipiente esté lo más
heladorío posible durante el proceso de batido, a fin de que el helado adquiera una
consistencia cremosa.
• Se recomienda preparar la mezcla del helado el día anterior, cubrirla y colocarla en el
refrigerador. Así la mezcla podrá enfriarse y expandirse por completo. Enfriar
previamente cualquier receta para helados es indispensable para alcanzar los mejores
resultados.
• Mientras más espesa sea la crema que usted use, el helado será más cremoso. Se
sugiere usar doble crema, a fin de obtener el helado más suave y cremoso.
• También se puede utilizar crema normal, en lugar de doble crema, pero la textura y el
sabor del helado pueden cambiar. Asimismo, puede considerar usar una
combinación de leche y crema para obtener un helado más saludable.
• El azúcar se puede substituir por edulcorantes artificiales. Utilice las siguientes
equivalencias como referencia:
1 sobrecito de edulcorante = 2 cucharaditas de azúcar
6 sobrecitos = 1⁄4 de taza
8 sobrecitos = 1/3 de taza
12 sobrecitos = 1/2 de taza
• Puede probar la mezcla, a fin de ajustar la cantidad de azúcar que vaya a agregar.
Tenga en cuenta que el helado real, final, tendrá un sabor menos dulce que la
mezcla.
8
• You may taste the mixture to adjust the amount of sugar to be added. Note that the
actual ice cream will taste less sweet than the mixture.
• Artificial sweeteners may be substituted for sugar. Use the following proportions for
reference:
1
packet of sweetener = 2 tsp. sugar
6
packets = 1/4 cup
8
packets = 1/3 cup
12
packets = 1/2 cup
• The richer the cream you use, the richer the ice cream will be. Heavy whipping cream is
suggested for the creamiest, smoothest ice cream. Light cream can also be substituted
for cream, but the texture and taste of the ice cream may change.
• It is recommended that you make the ice cream mixture a day ahead, cover it and place
it in the refrigerator. The mixture will then be able to cool completely and expand. Prechilling any ice cream recipe is necessary for achieving the best results.
• When removing the frozen canister from the freezer, DO NOT RINSE the canister or
allow it to sit out in room temperature for more than a few minutes before you begin to
make your ice cream. It is very important that the canister be as cold as possible during
the mixing process in order to achieve a soft-serve consistency.
• We recommend that you wrap the canister in a plastic bag and place it in the back of
your freezer after you have finished using it and once it has been cleaned. This is a
great way to make sure that it is ready for immediate use the next time you make soft
serve ice cream. Wrapping it in a plastic bag helps to protect it from freezer burn.
HELPFUL TIPS
9
freezer after cleaning is a great way to have it ready for immediate use the next
time you’d like to make soft serve ice cream.
Helpful Hint: Wrapping the canister in a plastic bag and placing it back into the
1. Turn the power switch to the OFF position and unplug unit from the wall outlet before
disassembling or cleaning.
2. Remove the lid by pressing the self-lock at the rear and lifting upward. See Figure 3
on page 6 for a diagram.
3. Remove the mixing paddle and motor unit by lifting upward.
4. Remove the dispenser tap by turning it to the left and then pulling straight down.
See Figure 2 on page 5 for a diagram.
5. Remove canister by pushing it up from underneath.
6. Remove the mixing paddle from the gear unit. See Figure 1 on page 5 for a diagram.
7. Wash the lid, dispenser tap, mixing paddle and canister in soapy water.
8. Rinse and dry all parts thoroughly.
NOTE: Do not immerse the gear unit or the body of the ice cream maker in water.
Do not place any parts of the soft serve ice cream maker in the dishwasher.
This appliance is not dishwasher safe.
9. Wipe the exterior of the ice cream maker and the gear unit with a soft damp cloth.
Do not submerge in water. Dry thoroughly. Sharp utensils, scouring pads, or
abrasive detergents may cause damage to this appliance.
CÓMO LIMPIAR EL APARATO
1. Apague el interruptor a la posición de OFF y desenchufe la unidad de la toma de
corriente en la pared, antes de desensamblar y limpiar el aparato.
2. Retire la tapa, presionando el cierre en la parte posterior, y levantándolo hacia arriba
(vea la Figura 3 de la página 6 para una diagrama).
3. Retire el aspa para batir y la unidad del motor, levantando hacia arriba.
4. Para retirar el grifo del dosificador, gírelo hacia la izquierda y después levántelo en
posición vertical (vea a la Figura 2 de la página 5 para una diagrama).
5. Retire el recipiente, presionando desde abajo.
6. Retire el aspa para batir de la unidad de velocidad (vea la Figura 1 de la página 5
para una diagrama ).
7. Lave la tapa, el grifo del dosificador, el aspa para batir y el recipiente, con agua
jabonosa.
8. Enjuague y seque todas las piezas por completo.
NOTA: No sumerja en agua la unidad de velocidad ni el cuerpo de la máquina
para hacer helados cremosos. Ninguna de las piezas de la máquina para
hacer helados debe lavarse en lavadora de vajilla. Este aparato no debe
lavarse en lavadora de vajilla.
9. Limpie el exterior de la máquina para hacer helados y la unidad de velocidad con un
trapo suave y húmedo. No sumerja en agua. Seque por completo. Utensilios afilados,
estropajos que rallan o detergentes abrasivos pueden dañar el aparato.
Consejo útil: Después de limpiar el recipiente, conviene envolverlo en una bolsa
de plástico y colocarlo en el fondo del congelador, pues así estará listo para
usarlo la próxima vez que quiera preparar helado cremoso.
Always unplug unit and allow to cool completely before cleaning.
HOW TO CLEAN
9
RECETAS
Helado fácil y cremoso de vainilla
2/3 de taza de leche entera
1/2 taza de azúcar granulada
1 1/3 de taza de crema
1 cucharadita de extracto puro de vainilla
Coloque la leche y el azúcar en un recipiente para batir. Bata la leche y el azúcar
con batidora de manija o a baja velocidad, durante 1 o 2 minutos. También puede
usar batidor manual. Bata hasta que se haya disuelto el azúcar. Agregue la crema y
la vainilla. Cubra el recipiente con papel de plástico y refrigere durante toda la noche
o durante un lapso mínimo de 4 horas.
Cuando la mezcla se haya enfriado y el recipiente para batir esté completamente
helado, siga las instrucciones para batir, que aparecen en la sección Cómo usar, en
este manual.
10
When the mixture has chilled and mixing canister is completely frozen, follow the
mixing instructions in the How To Use section of this manual.
Place the cocoa and the sugars in a medium bowl and stir with a wire whisk to
combine and remove any lumps. Add the whole milk and, using a hand mixer on
low speed for 1 to 2 minutes, mix together the milk, cocoa, and sugar mixture.
You may also use whisk to mix until the cocoa and sugar are completely
dissolved. Stir in the heavy cream and vanilla. Cover the bowl with plastic wrap
and refrigerate overnight, or for a minimum of 4 hours.
1/3 cup unsweetened cocoa powder
1/3 cup granulated sugar
1/4 cup firmly packed brown sugar
2/3 cup whole milk
1 1/3 cup heavy cream
1/2 teaspoon pure vanilla extract
Helado fácil y cremoso de chocolate
1/3 de taza de chocolate en polvo sin azúcar
1/3 de taza de azúcar granulada
1/4 de taza de azúcar morena (moscabado)
2/3 de taza de leche entera
1 1/3 de taza de crema
1/2 cucharadita de extracto puro de vainilla
Coloque el chocolate, el azúcar granulada y el azúcar morena en un recipiente
mediano y mezcle con un batidor manual hasta que se integren los ingredientes, y
desaparezcan los grumos. Agregue la leche entera y, con un batidor eléctrico de
mano a baja velocidad, bata durante 1 o 2 minutos, mezclando la leche, el chocolate
y la mezcla de azúcar. Puede usar batidor manual hasta que el chocolate y el
azúcar se disuelvan por completo. Agregue la crema y la vainilla. Cubra el
recipiente con papel de plástico y refrigere durante toda la noche, o durante un
lapso mínimo de 4 horas.
Cuando la mezcla esté helada y el recipiente para batir esté completamente
congelado, siga las instrucciones que aparecen en la sección Cómo usar, en este
manual.
10
Easy Chocolate Soft Serve
When mixture has chilled and mixing canister is completely frozen, follow the
mixing instructions in the How To Use section of this manual.
Place the milk and the sugar in a mixing bowl. Using a hand mixer on low speed
for 1 to 2 minutes, mix together the milk and sugar. You may also use a whisk to
mix until all of the sugar is dissolved. Stir in the heavy cream and the vanilla.
Cover the bowl with plastic wrap and refrigerate overnight, or for a minimum of 4
hours.
2/3 cup whole milk
1/2 cup granulated sugar
1 1/3 cup heavy cream
1 teaspoon pure vanilla extract
Easy Vanilla Soft Serve
RECIPES
11
RECETAS
Helado fácil y cremoso de fresa
5 1/4 oz. de fresas (muy maduras) o fresas congeladas, que haya descongelado
1/2 taza de azúcar granulada
1/8 de cucharadita de extracto puro de vainilla
1/2 taza de leche entera
1 taza de crema
Coloque las fresas, el azúcar granulada, la vainilla y la leche entera en la licuadora o
procesadora de alimentos y licue a alta velocidad hasta que adquiera una
consistencia totalmente tersa y homogénea, alrededor de 1 minuto. Vierta en un
recipiente y agregue la crema. Cubra con papel de plástico y refrigere durante toda
la noche o durante un lapso mínimo de 4 horas.
Cuando la mezcla esté helada y el recipiente para batir esté completamente
congelado, siga las instrucciones para batir que aparecen en la sección Cómo usar
de este manual.
When the mixture has chilled and the mixing canister is completely frozen, follow
the mixing instructions in the How To Use section of this manual.
Place strawberries, granulated sugar, vanilla, and whole milk in a blender jar or
food processor and blend on high speed until completely smooth and
homogenous, about 60 seconds. Pour into a bowl and stir in heavy cream.
Cover bowl with plastic wrap and refrigerate overnight, or for a minimum of 4
hours.
5 1/4 oz. red strawberries (very ripe) or frozen strawberries, thawed
1/2 cup granulated sugar
1/8 teaspoon pure vanilla extract
1/2 cup whole milk
1 cup heavy cream
Easy Strawberry Soft Serve
RECIPES
11
GARANTÍA LIMITADA
Aroma Housewares Company garantiza que este producto no tenga defectos en
sus materiales y fabricación durante un período de un año a partir de la fecha
comprobada de compra dentro de la parte continental de los Estados Unidos.
Dentro de este período de garantía, Aroma Housewares Company reparará o
reemplazará, a su opción, las partes defectuosas sin ningún costo, siempre y
cuando el producto sea devuelto, con el flete prepagado, con comprobación de
compra y $10.00 dólares para cargos de envío y manejo a favor de Aroma
Housewares Company. Antes de devolver un producto, sírvase llamar al número
telefónico gratuito que está más abajo para obtener un número de autorización de
devolución. Espere entre 2-4 semanas para recibir el aparato nuevamente.
Esta garantía no cubre la instalación incorrecta, el uso indebido, maltrato o
negligencia por parte del usuario. La garantía también es inválida en caso de que
el aparato sea desarmado o se le dé mantenimiento en un centro de servicio no
autorizado.
Esta garantía le da derechos legales específicos los cuales podrán variar de un
estado a otro y no cubre áreas fuera de los Estados Unidos.
AROMA HOUSEWARES COMPANY
6469 Flanders Drive
San Diego, California 92121
1-800-276-6286
L-V, 8:30 AM - 5:00 PM, Tiempo del Pacífico
Sitio Web: www.aromaco.com
AROMA HOUSEWARES COMPANY
6469 Flanders Drive
San Diego, California 92121
1-800-276-6286
M-F, 8:30 AM - 5:00 PM, Pacific Time
Website: www.aromaco.com
This warranty gives you specific legal rights and which may vary from state to state
and does not cover areas outside the United States.
This warranty does not cover improper installation, misuse, abuse or neglect on the
part of the owner. Warranty is also invalid in any case that the product is taken
apart or serviced by an unauthorized service station.
Within this warranty period, Aroma Housewares Company will repair or replace, at
its option, defective parts at no charge, provided the product is returned, freight
prepaid with proof of purchase and U.S. $10.00 for shipping and handling charges
payable to Aroma Housewares Company. Before returning an item, please call the
toll free number below for a return authorization number. Allow 2-4 weeks for
return shipping.
Aroma Housewares Company warrants this product free from defects in material
and workmanship for one year from the provable date of purchase in the
continental United States.
LIMITED WARRANTY