1
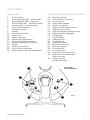
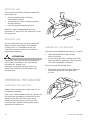
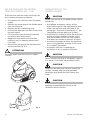
EnviroMate TANDEM EV1 MULTI-PURPOSE STEAM CLEANER AND VACUUM SYSTEM SYSTEME D’ASPIRATEUR ET DE NETTOYAGE A VAPEUR MULTI-FONCTION LIMPIADOR A VAPOR Y ASPIRADORA MULTI-USO INSTRUCTION MANUAL GUIDE D’UTILISATION MANUAL DE INSTRUCCIONES INTRODUCTION. ......................................................... 2 GENERAL INFORMATION. .......................................... 5 Machine description ......................................... 5 Type and model .................................................. 5 Technical specifications..................................... 6 Composition of the basic machine ................... 7 Various accessory parts .................................... 7 Packaging dimensions ....................................... 7 Weights ............................................................... 7 Identification ...................................................... 7 Symbols shown on the machine and/or on accessories ...................................... 8 List of the parts .................................................. 8 MAINTENANCE......................................................... 23 Maintenance jobs ............................................ 23 Cleaning the boiler ........................................... 23 Cleaning the filters ........................................... 23 Cleaning the air filter of dust collecting tank.. 24 Eliminating dirt/impurities from drain hose ... 25 Inactivity of the machine ................................. 25 Disposal ............................................................ 26 Possible problems, causes & solutions .......... 27 SAFETY. .................................................................... 11 General safety instructions.............................. 11 USE OF THE MACHINE. ............................................ 12 Intended use .................................................... 12 Improper use .................................................... 12 Preparing the machine..................................... 12 Unpacking the machine ................................... 12 Assembling the machine ................................. 12 Filling the machine for steam .......................... 13 Filling the dust collecting tank with water ....... 14 Connecting to the power source ..................... 14 Starting the machine........................................ 15 Using machine as steam and/or vacuum cleaner................................................ 15 Steam suction .................................................. 16 Using the machine as a vacuum cleaner........ 16 If the red water indicator light comes on ........ 16 If the dust collecting tank is full ...................... 17 Using the machine accessories ...................... 17 Universal brush................................................. 17 Window squeegee ............................................ 19 Brush for upholstery ......................................... 20 Cleaning brush for carpets/moquettes .......... 20 Steam nozzle .................................................... 21 Upholstery nozzle ............................................. 21 End of use ........................................................ 22 No part of this publication may be reproduced, stored in a retrieval system or transmitted in any form or by any means without prior written permission from the manufacturer Pictures, descriptions, references and technical data in this manual are indicative and not binding. In pursuing a policy of constant quality improvement, the manufacturer reserves the right to effect changes at any time without undertaking to update this manual every time. 1 IMPORTANT SAFETY INSTRUCTIONS READ ALL INSTRUCTIONS BEFORE USING THIS APPLIANCE When using an electrical appliance, basic precautions should always be followed. WARNING: To reduce the risk of fire, electric shock, or injury: 1. Do not leave appliance when plugged in. Unplug from outlet when not in use and before servicing. 2. Do not use outdoors or on wet surfaces. 3. Do not allow to be used as a toy. Close attention is necessary when used by or near children. 4. 5. 6. Use only as described in this manual. Use only manufacturer’s recommended attachments. Do not use with damaged cord or plug. If appliance is not working as it should, has been dropped, damaged, left outdoors, or dropped into water, return it to a service center. Do not pull or carry by cord, use cord as a handle, close a door on cord, or pull cord around sharp edges or corners. Do not run appliance over cord. Keep cord away from heated surfaces. 7. Do not unplug by pulling on cord. To unplug, grasp the plug, not the cord. 8. Do not handle plug or appliance with wet hands. 9. Do not put any object into openings. Do not use with any opening blocked; keep free of dust, lint, hair, and anything that may reduce air flow. 10. Keep hair, loose clothing, fingers, and all parts of body away from openings and moving parts. 11. Turn off all controls before unplugging. 12. Use extra care when cleaning on stairs. 13. Do not use to pick up flammable or combustible liquids, such as gasoline, or use in areas where they may be present. 14. Use only tap water to refill the boiler and water tank. Do not use chemicals, perfumes or other liquid. 15. The hose contains electrical wires. Do not use when damaged, cut, or punctured. Avoid picking up sharp objects. 16. Connect to a properly grounded outlet only. See Grounding Instructions. 17. This appliance is provided with double insulation. Use only identical replacement parts. 18. Do not pick up anything that is burning or smoking, such as cigarettes, matches, or hot ashes. 19. To Reduce the Risk of Fire, do not use a flammable or combustible liquid to clean a floor. 20. Do not use without dust filters in place. SAVE THESE INSTRUCTIONS 2 GROUNDING INSTRUCTIONS This appliance must be grounded. If it should malfunction or breakdown, grounding provides a path of least resistance for electric current to reduce the risk of electric shock. This appliance is equipped with a cord having an equipment-grounding conductor and grounding plug. The plug must be inserted into an appropriate outlet that is properly installed and grounded in accordance with all local codes and ordinances. WARNING – Improper connection of the equipment-grounding conductor can result in a risk of electric shock. Check with a qualified electrician or service person if you are in doubt as to whether the outlet is properly grounded. Do not modify the plug provided with the appliance – if it will not fit the outlet, have a proper outlet installed by a qualified electrician. This appliance is for use on a circuit having a nominal rating more than 120 volts and is factory-equipped with a specific electric cord and plug to permit connection to a proper electric circuit. Make sure that the appliance is connected to an outlet having the same configuration as the plug. No adaptor should be used with this appliance. If the appliance must be reconnected for use on a different type of electric circuit, the reconnection should be made by qualified service personnel. 3 CONGRATULATIONS We would like to thank you, and congratulate you for purchasing the ultimate steam / vacuum cleaner from Reliable Corporation. Dry vapor steam cleaning can deep clean and sanitize your home safely and effectively. Vapor steam is effective for killing dust mites, bacteria and mildew. It’s ideal for cleaning, sanitizing and deodorizing all the rooms in CAUTION your house, particularly bathrooms and the kitchen. For family members with chemical sensitivities, vapor steam cleaning is a great way to keep the house clean without using potentially harmful chemicals. Birdcages, aquariums, and pet areas; upholstery, drapery and bedding are all made cleaner and safer for you, your family and your pets when you clean with vapor steam. For your safety and to fully enjoy the advantages of this product, please take a few minutes to read all the important safeguards ATTENTION and care instructions. Keep this manual handy and review the product warranty card for your reference. Note: your new steam / vacuum cleaner may contain small amounts of water as all are factory tested prior to shipping. ATTENTION This manual is an integral part of the machine kit. It must be carefully kept within reach andCAUTION consulted in case of doubt. If the machine is given to a third party, even only if it is lent out, please provide the manual together with the machine, specifying to the CAUTION new user to carefully read its content before operating the machine. IMPORTANT Risk symbols used in this manual: CAUTION Indicates a potentially hazardous situation ATTENTION exists which, if not avoided, may result in injury. ATTENTION Alerts of situations or troubles which can affect the machine efficiency. ATTENTION IMPORTANT Draws the attention to important information which does not involve the operators safety IMPORTANT or the machines efficiency. IMPORTANT Carefully read this manual to avoid any improper use. The Manufacturer accepts no responsibility for damage to people or things deriving from improper use of the machine, incompetence, lack of caution or negligence and from the lack of compliance with the instructions provided in this manual. IMPORTANT The pictures shown in this manual will help explain the running, safety instructions and maintenance operations of the machine. The Manufacturer reserves the right to make changes to its machines, as a result of performance optimisation. 4 INTRODUCTION MACHINE DESCRIPTION CAUTION The machine has been designed to clean household surfaces. t 4UFBNEJTTPMWFTEJSUXIJDIJTBVUPNBUJDBMMZ sucked up and collected in a special tank. t The power of steam lets you clean and sanitise your home in an ecologically sound way. t The kit of optional accessories lets you turn the machine into a powerful vacuum cleaner. TYPE AND MODEL ATTENTION The steam/vacuum cleaning system is supplied with the basic accessories as specified in paragraph “Machine Composition.” TEnviroMateTANDEM EV1 IMPORTANT The quantity of supplied accessories is subject to changes according to the product distribution area and the selling price. This manual includes instructions for all accessories, even if some of them are not part of the basic equipment of this machine. GENERAL INFORMATION 5 TECHNICAL SPECIFICATIONS All components are built with high-quality materials to ensure maximum safety and reliability. BOILER With Continuous Steam System (CSS) Max volume Max steam pressure Steam cleaning autonomy Max vacuum STAINLESS STEEL BOILER lt Bar h mm_H2O 0.8 5 unlimited 2300 TANK Max clean water tank capacity lt 1.1 Max dust collecting tank capacity lt 1.5 V 120 POWER SUPPLY Voltage Frequency Hz 60 Vacuum motor (rated power) W 1000 Steel electrical heaters W 1700 Total power output W 1700 V 12 CONTROL CIRCUITS Voltage at accessory handle NOISE LEVEL PROTECTION DEGREE 6 dB 74 IP24 GENERAL INFORMATION MACHINE COMPOSITION PACKAGING DIMENSIONS The machine is supplied in a practical and sturdy cardboard package that contains the basic machine and the accessories it is equipped with. Width ........................................ mm Length ...................................... mm Height ....................................... mm 405 535 525 The basic composition includes: t 7BDVVNBOETUFBNHFOFSBUPS t )BOEMFXJUInFYJCMFIPTF WEIGHTS Standard and/or optional accessories: CAUTION Weight, without accessories ......kg With accessories ........................kg t&YUFOTJPOXBOET t4NBMMNFUBMCSVTI CAUTION t$SFWJDFOP[[MF t4UFBNOP[[MF t4NBMMCSVTI tNNTNBMMXJOEPXDMFBOFS tNNCSJTUMFGSBNF tNNXJOEPXTRVFFHFFGSBNF tNNXJOEPXTRVFFHFF t'JMMJOHCPUUMF t$SFWJDFOP[[MF t3BEJBUPSCSVTI t%VTUJOHCSVTI t6QIPMTUFSZOP[[MF ATTENTION t#SVTIGPSVQIPMTUFSZ t#SVTIGPSDBSQFUTNPRVFUUFT t "JSJOUBLFmMUFS t6OJWFSTBMCSVTI t'SBNFXJUICSJTUMFTGPSEVTU tRigid frame for carpets with steam function t3VCCFSTDSBQFS t ,FZGPSESBJOQMVH 14 17.5 IDENTIFICATION The data plate of the machine with ETL compliance mark is placed on the rear part of the steam generator. ATTENTION When asking for information and/or technical assistance, always specify the model and the serial number stamped on the plate. IMPORTANT IMPORTANT The various accessories and/or optional parts are extra features available for the machine and increase the usage possibilities. The proper functioning of the machine is not related to the quantity of accessories supplied. GENERAL INFORMATION 7 SYMBOLS SHOWN ON THE MACHINE AND/OR ON ACCESSORIES IMPORTANT SYMBOL MEANING This symbol indicates that there is no water in the boiler. If the indicator light comes on, please refer to “Possible problems, causes and solutions” These instructions show all the available accessories that can be used with the machine. Steam symbol Vacuum symbol This symbol indicates a change in the steam density Risks of burns and scalding 8 GENERAL INFORMATION LIST OF PARTS MACHINE BODY STANDARD AND/OR OPTIONAL ACCESSORIES 1 2 3 4 5 6 7 8 11 12 41 34 9 10 13 14 15 33 16 17 18 19 20 21 22 23 24 25 27 28 29 30 31 32 35 37 38 39 On/off switch Green indicator light – steam ready Green indicator light – power on Red indicator light – no water in boiler Indicator light – water container Clean water tank plug Socket for handle Handle Dust collecting tank Power cord Steam regulator Handle with flexible hose Vacuum pushbutton (on-off) Vacuum regulation pushbutton Handle Steam control lever Quick-fit male connector Steam lever safety stop pushbutton 40 Extension wands Small metal brush 30mm Crevice nozzle Steam nozzle nozzle Small brush 30mm 150mm small window cleaner 150mm bristle frame 150 mm window squeegee frame 250mm window squeegee Filling bottle Crevice nozzle Radiator brush Dusting brush Upholstery nozzle Brush for upholstery Brush for carpets Air intake filter Universal brush Frame with bristles for dust Rigid frame for carpets with steam function Rubber scraper Key for drain plug REAR VIEW OF THE MACHINE 1 4 2 5 GENERAL INFORMATION 3 fig. 1 9 41 12 6 8 9 33 10 13 7 14 34 19 15 11 37 20 18 17 24 38 CAUTION 16 21 39 22 25 40 35 23 ATTENTION 29 28 30 27 31 IMPORTANT All the accessory parts that are not supplied with the machine, can be purchased separately at one of our sales points. 32 fig. 2 10 GENERAL INFORMATION GENERAL SAFETY INSTRUCTIONS This chapter provides a list of the general precautions for the safe use of the machine. Detailed instructions are available in the chapters that follow. t5IPSPVHIMZSFBEBOEVOEFSTUBOEUIFTF instructions before turning on the machine. t %POPUDPOOFDUUIFNBDIJOFUPUIFQPXFS source with wet or damp hands or in the vicinity of wet surfaces or jets of water. t /FWFSQMVOHFUIFNBDIJOFJOUPXBUFSPS other liquids. t %POPUTIJGUPSNPWFUIFNBDIJOFCZ pulling the power cord or accessories. t %POPUMFBWFUIFNBDIJOFPO raised surfaces. t #FGPSFDPOOFDUJOHUIFNBDIJOFUPUIF power source, make sure the power cord is not defective or damaged. t %VSJOHVTFNBLFTVSFUIFQPXFSDPSE does not come in contact with hot, sharp or abrasive surfaces to avoid damage to its protective sheathing. t %POPUBMMPXDIJMESFOUPQMBZXJUIUIF machine and do not use it for purposes other than those specified in chapter “Use of the machine”. t %POPUEJSFDUTUFBNUPXBSETBQQMJBODFT with electrical parts. t %POPUEJSFDUTUFBNUPXBSETQFSTPOT animals, plants, hot or cold objects, food and food containers. t "MXBZTVOQMVHUIFNBDIJOFGSPNUIF power source before storing it. t %POPUBUUFNQUUPPQFOSFQBJSPSNPEJGZ the machine or its components. t 6TFUIFmMMJOHCPUUMFQSPWJEFEUPmMM the tank. t "MXBZTDIFDLUIBUUIFWPMUBHFPG the power source match the voltage indicated in paragraph “Technical specifications”. t "MXBZTNBLFTVSFUIBUUIFTVSGBDFTCFJOH cleaned can withstand the temperature given in paragraph “Technical specifications” without suffering from damage. t 6TFPOMZUBQXBUFSUPSFmMMUIFNBDIJOF t %POPUVTFPUIFSMJRVJEDIFNJDBM fragances, etc.) in the water tank for boiler refilling. t *GUIFQPXFSDPSEJTOPUMPOHFOPVHIVTF approved extensions. If you buy coiled extension cables, always unwind them completely before use. t %POPUDPWFSUIFNBDIJOFXIFOJU is running. t5IFNBDIJOFTIPVMECFVTFEJOTIFMUFSFE and ventilated places. t %POPUSFEVDFUIFTUFBNQBTTBHFJOUIF tubes with obstructions or kinks in the hose. SAFETY 11 EXPECTED USE The machine has been designed and built exclusively for: t TUFBNDMFBOJOHBOETBOJUJTJOH household surfaces t FYUSBDUJOHUIFTUFBNSFTJEVFDSFBUFE during cleaning t WBDVVNJOHIPVTFIPMEEVTUEJSU A B Note: The room temperature must be between +5° and +40°C for effective use of the machine. CAUTION IMPROPER USE Any use different from the ones specified above shall be considered as improper. In particular, it is forbidden to use the machine in areas or places classified as potentially explosive. ATTENTION Conformity with the use and maintenance instructions provided in this manual are essential for proper use. Improper use of the machine voids any warranties, liability and the longevity of the machine. fig. 3 ASSEMBLING THE MACHINE Connecting the flexible hose (see fig. 3 and 4) t 0QFOUIFQSPUFDUJPOnBQ"PGUIF quick-fit socket. t *OTFSUUIFQMVH#GVMMZNBLJOHTVSFUIBU once the flap is released, it lines up with slot C on the handle, locking it. Disconnecting the flexible hose t 3BJTFUIFnBQUPGSFFUIFQMVHBOEQVMM outwards to remove the hose from its slot. IMPORTANT PREPARING THE MACHINE UNPACKING THE MACHINE Unpack the machine and make sure it is in the proper condition. C If you are in doubt about anything, do not use the machine and address concerns to your dealer or the Technical Service Centre. Keep the package for any returns to the manufacturer should maintenance under warranty be necessary. 12 fig. 4 USE OF THE MACHINE Assembling the extension wands (fig. 5) t .PWFUIFDPOOFDUJPOCVUUPOUPUIF central position 0. t *OTFSUUIFFYUFOTJPOXBOE t 5VSOUIFCVUUPOUPUIFSJHIUUPCMPDLUIF wand in position (position 1 of Fig. 5). FILLING THE MACHINE FOR STEAM Disconnect the machine from the power supply. Remove the tank cap 6 and fill with tap water up to the recommended level. Refit the cap. For this operation it is advisable to use the drip catch bottle supplied. Removing the extension wands t 5VSOUIFMPDLJOHCVUUPOUPUIFDFOUSBM position and pull off the wands. 6 CAUTION REAR VIEW OF THE MACHINE fig. 6 ATTENTION fig. 5 ASSEMBLING THE ACCESSORIES Choose the accessory that best suits your cleaning needs and insert it either in the handle or in the extension wands following the procedure described above. USE OF THE MACHINE Your steam cleaner has been designefor use with normal tap water. In order to extend the life of this product, if the degree of water hardness is very high in your area, we recommend using 50% tap water with 50% distilled water. Do not use other liquid (chemical, fragances, etc...). IMPORTANT 13 FILLING THE DUST COLLECTING TANK WITH WATER (FIG. 7–8) To fill the tank with the water necessary for dust removal, proceed as follows: t %JTDPOOFDUUIFNBDIJOFGSPNUIFQPXFS supply. t Remove the male plug of the flexible hose from the machine. CAUTION t Remove the dust collecting tank. t Pull out the lower part of hook E and raise the tank cover. t 'JMMXJUIXBUFSVQUPUIFMFWFMJOEJDBUFE inside the tank (white mark). t Reposition the tank on the machine making sure it is properly placed until limit stop. t Re-connect the plug of the flexible hose to the machine (fig. 3-4). ATTENTION A wrongly fitted tank will result in a poor suction. CONNECTION TO THE POWER SOURCE CAUTION Before connecting to the power power source check that: tUIFWPMUBHFBOEQPXFSSBUJOHTPGUIF machine printed on the data plate located under the machine and indicated in the paragraph “Technical characteristics”, are compatible with the electrical system; tUIFFMFDUSJDBMTZTUFNUPXIJDIUIFNBDIJOF will be plugged complies with the norms and has a safety switch for fault current that does not exceed a value of 20 amps; ATTENTION tUIFFMFDUSJDBMPVUMFUUPXIJDIUIFNBDIJOF must be plugged has a rating of 16 A and it is properly grounded; tUIFQPXFSDPSEIBTOPEBNBHFPS abrasions and is in perfect condition. CAUTION Never connect the plug to the power supply if it is wet orIMPORTANT if you have wet or damp hands. CAUTION Never pull the electrical cord to unplug the socket. Instead, take the plug between forefinger and thumb and pull slowly and firmly. IMPORTANT fig. 7 ATTENTION CAUTION If the power cord is damaged, it must be replaced by qualified personnel of the Technical Service Centre. ATTENTION IMPORTANT ATTENTION E fig. 8 14 IMPORTANT USE OF THE MACHINE STARTING THE MACHINE Once the plug of the power cord has been connected to the power source, the machine can be operated in three different ways: 1 as a steam cleaner 2 as a steam and vacuum cleaner 3 as a vacuum cleaner t 1VTIMFWFSmH POUIFIBOEMFBOE CAUTION start cleaning; to interrupt the steam flow release the lever. t *GZPVIBWFUPUFNQPSBSJMZMFBWFUIF machine unattended, block the steam lever pressing button 33 (fig. 10). 33 USING THE MACHINE AS A STEAM AND/OR VACUUM CLEANER ATTENTION 14 1 fig. 10 2 IMPORTANT While in function, the green “steam” light 2 will turn on and off automatically according to the steam pressure in the boiler. 3 REAR VIEW OF THE MACHINE fig. 9 t $IFDLUIBUUIFHSFFOWPMUBHFMJHIUJT0/ t 1SFTTCVUUPO"GUFSBGFXNJOVUFTUIF green light 2 will come on indicating that steam can be supplied. You can change the steam flow by rotating the knob 41 (fig.11). Rotate the knob clockwise to increase the flow. Rotate the knob counter-clockwise to decrease the flow. 41 fig. 11 USE OF THE MACHINE 15 STEAM SUCTION t 1SFTTCVUUPOmH POUIFIBOEMF (with the symbol of the fan) to start suction. To interrupt suction push the same button. IF THE RED WATER INDICATOR LIGHT COMES ON 6 USING THE MACHINE AS A VACUUM CLEANER t $IFDLUIBUUIFHSFFOQPXFSMJHIUJTMJU t 'JMMXJUIXBUFSVQUPUIFMFWFMJOEJDBUFE inside the tank (white mark). t 1SFTTCVUUPOmH POUIFIBOEMF to activate suction, fit the accessory you wish and start cleaning. To interrupt WBDVVNJOHQSFTTBHBJOCVUUPOmH t 1SFTTCVUUPOmH XJUIUIFTZNCPM +/-) to change the vacuum intensity. t *GZPVLFFQCVUUPOQSFTTFEGPSBGFX seconds, you can modify the intensity from maximum to minimum value. If you release button 10, the intensity set will be automatically saved by the machine. t 'PSTNBMMWBSJBUJPOTJOTVDUJPOQPXFS press button 10 on and off intermittently. t 0ODFUIFWBDVVNDMFBOFSJTUVSOFEPGG next time you use the machine is used the suction intensity will return to the maximum value. 9 5 REAR VIEW OF THE MACHINE fig. 13 When the indicator light 5 turns on and an intermittent beep sounds, the tank is running out of water. Therefore the steam flow will be interrupted. If the light turns on, proceed as follows: t %JTDPOOFDUUIFNBDIJOFGSPNUIF power supply. t 3FNPWFUIFQMVHBOEmMMJUDPNQMFUFMZ with tap water. t 3FDPOOFDUUIFNBDIJOFUPUIFQPXFS supply and continue cleaning. 10 fig. 12 16 USE OF THE MACHINE IF THE DUST/DIRT COLLECTING TANK IS FULL USING THE ACCESSORIES When the maximum level in the dirty water tank is reached, suction stops and the motor makes a different noise. Suitable for: cleaning any kind of surface. In this case, proceed as follows: Use: the cleaning brush can release steam to clean floors and at the same time extract the dirty liquid; it must be used moving it alternately backwards and forwards on the surface to be cleaned. UNIVERSAL BRUSH t %JTDPOOFDUUIFNBDIJOFGSPNUIF power supply. t 3FNPWFUIFQMVHPGUIFnFYJCMFIPTF from the machine. t 3FNPWFUIFEVTUDPMMFDUJOHUBOLGSPN its slot (fig. 7). t 1VMMPVUIPPL&mH BOESBJTFUIF tank cover. CAUTION t &NQUZUIFUBOL t 'JMMXJUIXBUFSVQUPUIFMFWFMJOEJDBUFE inside the tank (white mark). t $MPTFUIFDPWFSBOESFQPTJUJPOUIFUBOL on the machine making sure it is firmly in place (otherwise, there will be a poor suction). t 3FDPOOFDUUIFQMVHPGUIFnFYJCMFIPTF to the machine and re-start your work. To be mounted: on the extension wands. Use on dirty floors: After turning the machine on and after the green light 2 comes on (fig.9): t 0QFSBUFUIFTUFBNMFWFSmH PO the handle, then press button 9 (fig. 12) to activate suction. t $MFBOUIFTVSGBDFVTJOHUIFCSVTI t 'PSJEFBMESZJOHJOUFSSVQUUIFTUFBNnPX by releasing lever 14 but maintaining suction activated. ATTENTION Do not remove the dirty water tank before the vacuum motor has stopped completely. 14 fig. 15 IMPORTANT E fig. 14 USE OF THE MACHINE 17 Use on very dirty floors: t 0QFSBUFUIFTUFBNMFWFSmH PO the handle. t %JTTPMWFUIFEJSUXJUITUFBNBDUUJWBUJPO and gently rubbing the brush bristles on the surface. t 1SFTTCVUUPOmH UPBDUJWBUF suction. t 3FNPWFUIFTPJMFEMJRVJEVTJOHUIFSVCCFS scraper with alternate backward and forward movements. t 'PSJEFBMESZJOHJOUFSSVQUUIFTUFBNnPX by releasing lever 14 but maintaining suction activation. Use with steam on carpets: In order to use the brush on carpets, remove the rubber frame and fit the rigid frame. t 4IJGUUIFTUPQCVUUPOT'PVUXBSETmH to free the frame fitted to the brush. t 'JUUIFOFXGSBNFBOENBLFTVSFJUTJUT correctly in its slot. t 4IJGUUIFTUPQCVUUPOT'JOXBSETUPMPDL the frame. t 0QFSBUFTUFBNMFWFSBOEWBDVVN button 9 on the handle. t 4JNVMUBOFPVTMZDMFBOBOEWBDVVNUIF carpet using the brush with alternate, backwards and forwards movements. Use without steam on carpets: In order to use the brush on carpets, remove the rubber frame and fit the one with bristles. t 4IJGUUIFTUPQCVUUPOT'PVUXBSETmH to free the frame fitted to the brush. t 'JUUIFOFXGSBNFBOENBLFTVSFJUTJUT correctly in its slot. Shift the stop buttons F inwards to block the frame. F F RIGID FRAME RUBBER SCRAPER FRAME WITH BRISTLES fig. 16 18 USE OF THE MACHINE WINDOW SQUEEGEE Suitable for: cleaning glass surfaces. To be mounted: on the handle with or without extension wand. ATTENTION Use of the window squeegee: After turning the machine on and after the green light 2 comes on (fig. 9): t 0QFSBUFTUFBNMFWFSBOEWBDVVN button 9 on the handle. t 6TFBOPWFSIBOENPWFNFOUBOEJG necessary, scrape the surface with the rubber blade. IMPORTANT To clean areas next to the floor surface, hold the squeegee horizontal (fig.17). Steam nozzle fig. 17 USE OF THE MACHINE 19 BRUSH FOR UPHOLSTERY CLEANING BRUSH FOR CARPETS/ MOQUETTES Suitable for: cleaning upholstery. To be mounted: on the extension wands or directly to the handle. Use: the upholstery brush can release steam to clean upholstery and at the same time extract the soiled liquid. Use of the upholstery brush: After turning the machine on and after the green light 2 (fig. 9) comes on: t Press suction button 9 on the handle (fig. 12). t *GOFFEFEPQFSBUFMFWFSmH on the handle to release steam. t FYUSBDUUIFTPJMFEMJRVJEXJUIBMUFSOBUF backward and forward movements. t 'PSJEFBMESZJOHJOUFSSVQUUIFTUFBNnPX by releasing lever 14 while maintaining suction activation. Fig. 18 20 Suitable for: cleaning carpets or moquettes. To be mounted: on the extension wands. Use: the carpet brush can release steam to clean carpets and/or moquettes and at the same time suck the dirty liquid. It must be used moving it alternatively backwards and forwards on the surface to be cleaned. Use of the carpet cleaning brush: After turning the machine on and after the green light 2 (fig. 9) comes on: t Press suction button 9 on the handle (fig. 12). t *GOFFEFEPQFSBUFMFWFSmH on the handle to release steam. t &YUSBDUUIFTPJMFEMJRVJEXJUIBMUFSOBUF backward and forward movements. t 'PSJEFBMESZJOHJOUFSSVQUUIFTUFBNnPX by releasing lever 14 while maintaining suction activation. Fig. 19 USE OF THE MACHINE CLEANING WITH CREVICE NOZZLE AND BRUSH For this kind of cleaning, it is advisable to clean the floor in manageable sections. Suitable for: cleaning surfaces (with or without suction) such as radiators, toilets, washbasins or sinks, ovens, hard-to-reach gaps between tiles, etc. Upholstery nozzle Suitable for: armchairs, sofas, mattresses, car interiors, etc. To be mounted: on the handle with or without extension wands. Use of the crevice nozzle: After turning the machine on and after the green light 2 comes on (fig. 9): t 0QFSBUFTUFBNMFWFSmH on the handle. t %JSFDUUIFKFUPGTUFBNUPXBSEUIF surface to be cleaned. t *GUIFTVSGBDFUPCFDMFBOFEJTWFSZ dirty, fit a small brush in the spout of the steam nozzle (fig. 20). Cleaning hard-to-reach gaps between tiles: t "TTFNCMFUIFFYUFOTJPOXBOETBOEmUUIF steam nozzle. t 1VUUIFTNBMMCSVTIJOUIFTQPVUPGUIF steam nozzle (fig. 20) and crevice nozzle 18 in the adaptor (19). t %JSFDUUIFKFUPGTUFBNUPXBSEUIFHBQBOE loosen the dirt with an alternate back and forth movement. t 4XJUDIPGGUIFTUFBNnPXBOEFYUSBDUUIF dissolved residue with the brush touching the surface. To be mounted: on the handle with or without extension wands. Use of the upholstery nozzle: Fit brush 30 to adaptor 19. Vacuum the surface with or without steam. 19 30 fig. 21 19 18 20 fig. 20 USE OF THE MACHINE 21 END OF USE Once you have finished cleaning, all you need to do is to turn off the main switch 1 and unplug the appliance from the power supply. Then, roll up cord 12 in the cord storage. Empty and wipe clean the dust/dirt collecting tank. 1 REAR VIEW OF THE MACHINE 22 fig. 22 USE OF THE MACHINE MAINTENANCE CLEANING THE FILTERS Disconnect the machine from the power supply before any maintenance. Check that the Hepa filter, the activated carbon filter and the filter of the motor air inlet are clean. If necessary, replace these filters using original spare parts. It is recommended that these filters be replaced yearly. The machine is built with extremely reliable technology and components; therefore it does not require any special maintenance. Careful use and strict compliance with these instructions are the best way to achieve the desired results and maximum performance. CAUTION This job must be performed after the machine has cooled down completely. REPLACING THE HEPA FILTER t %JTDPOOFDUUIFNBDIJOFGSPNUIF power supply. t 0QFOUIFHSJMMPOUIFSJHIUTJEFCZQVTIJOH the relevant fixing. t 3FQMBDFmMUFS4BOESFmUUIFHSJMMF We recommend eliminating any scale deposits from the boiler at least twice a year as follows: t %JTDPOOFDUUIFNBDIJOFGSPNUIF power supply. t 1MBDFBDPOUBJOFSVOEFSUIFNBDIJOF then remove plug X by turning it counterATTENTION clockwise using round nose pliers or the key provided (fig. 23). t %SBJOUIFCPJMFSJOUPUIFDPOUBJOFSUIFO refit plug X with the relevant washer R. S fig. 24 IMPORTANT T R fig. 25 X fig. 23 MAINTENANCE 23 REPLACING THE ACTIVATED CARBON FILTER CLEANING THE AIR FILTER OF THE DUST COLLECTING TANK t %JTDPOOFDUUIFNBDIJOFGSPNUIF power supply. t 0QFOUIFHSJMMFPOUIFMFGUTJEFCZQVTIJOH the relevant fixing. t 3FQMBDFmMUFS5BOESFmUUIFHSJMMF Every time the air intake filter has to be cleaned, proceed as follows: REPLACING THE MOTOR AIR FILTER t %JTDPOOFDUUIFNBDIJOFGSPNUIF power supply. t 3FNPWFUIFCPUUPNHSJMMF6BGUFS loosening the relevant fixing screws. t 3FQMBDFmMUFS7BOESFmUUIFHSJMMF. Disconnect the machine from the power supply. Remove the male plug of the flexible hose from the machine. CAUTION Remove the dust collecting tank from its seat on the machine (fig. 27) and lift up the protection cover. Remove the filtering element Z and wash it thoroughly with clean water. Refit the filtering element being very careful not to damage it Close the cover and reposition the tank on the machine. ATTENTION If the filtering element is damaged, replace it immediately. V U IMPORTANT fig. 26 Z fig. 27 24 fig. 28 MAINTENANCE ELIMINATING DIRTY IMPURITIES FROM THE DRAIN HOSE If the suction tends to be reduced and the water level in the dust collecting tank is correct, check the water drain hose as follows: t %JTDPOOFDUUIFNBDIJOFGSPNUIF power supply. AFTER USE ATTENTION Disconnect the machine from the power source before doing the following operations. Once finished using the machine: t 3FNPWFUIFQMVHPGUIFnFYJCMFIPTFGSPN the machine. t 3FNPWFUIFEVTUDPMMFDUJOHUBOLGSPNJUT slot on the machine (fig. 29) and lift up the protection cover. t 3FNPWFUIFESBJOIPTF+QVMMJOHJU upwards and check it is not clogged. If the hose is clogged, clean it. t 3FmUIPTF+DMPTFUIFDPWFSBOE reposition the tank on the machine. t drain the water from the dust/dirt collecting tank and wipe the tank with a clean dry cloth IMPORTANT t store the machine in a dry place which is not subject to sudden temperature changes t clean the machine with a soft cloth and some water; do not use any solvent or detergent t store the machine on a horizontal surface (on the floor, if possible) t clean the accessories with gentle soap and warm water. J fig. 29 MAINTENANCE 25 DISPOSAL Any product or packing bearing the symbol above cannot be regarded as a normal household waste and should be separated and delivered to an agreed collection and recycling centre for waste electrical and electronicCAUTION appliances. By disposing of this product in the recommended way, you will avoid potential negative consequences that could result from an improper disposal of the product. For more information on the recycling of this product, consult your local municipal office, the local waste disposal centre or the location where you purchased the product. ATTENTION Immediately after you decide to dispose of the machine, remove the power cord. IMPORTANT 26 MAINTENANCE POSSIBLE PROBLEMS, CAUSES AND SOLUTIONS PROBLEM POSSIBLE CAUSE SOLUTION Poor suction t 5IFBJSmMUFSJTEJSUZ t 5IFSVCCFSTDSBQFSTPGUIF cleaning brush have not been fitted correctly t -PXTVDUJPOQPXFSPG the machine t 5IFnFYJCMFIPTFJT clogged/kinked t 5IFXBUFSESBJOIPTF is clogged t 5IFMFWFMPGDMFBOXBUFSJOUIF tank is too high (above the white mark inside the tank) Clean the filter Check they have been fitted Anomalous noise of the motor t 5IFXBUFSJOUIFEVTU collecting tank is at max level Drain water off the dust collecting tank The machine is at pressure but it does not release steam t 5IFTUFBNSFHVMBUPSLOPC is closed Turn regulator 41 (fig. 11) anticlockwise Extension wands or accessories come loose easily t 5IFMPDLJOHMFWFSJTOPUMPDLFE Shift the lever to position 1 (fig. 5) Extension wands or accessories are hard to fit t 5IFDPOOFDUJOHHBTLFUT produce friction t 5IFMPDLJOHMFWFSJTOPUJOUIF central position Lubricate the gaskets with some oil Turn the lever to the central position t 5IFXBUFSSFTFSWFIBT been used Fill the tank with water and wait some 30 minutes. If the light does not go off, address to the Technical Service Centre. t 5IFXBUFSSFTFSWFIBT been used Fill with water The red light indicating that the tank is running out of water, comes on The red light indicating that the tank is running out of water, comes on MAINTENANCE Operate button 10 (fig. 12) on the handle and increase the suction power Disconnect the hose from the machine and eliminate any dirt Eliminate any impurities from the drain hose (fig. 29) Empty any water in excess of to the correct level 27 1 800 268 1649 www.reliablecorporation.com