1
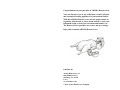
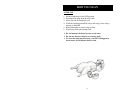
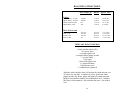
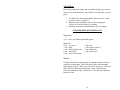
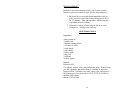
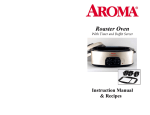
Roaster Oven
Instruction Manual
& Recipes
Model: ART-628
Congratulations on your purchase of AROMA Roaster Oven.
Your new Roaster Oven is one of the most versatile, efficient,
and economical cooking appliances in your modern kitchen.
With this AROMA Roaster Oven, you can prepare meats or
vegetables, bake breads or cakes, steam seafood or cook your
homemade soups or stews in a convenient and healthy way.
The Roaster Oven is portable, easy to use, and saves energy.
Enjoy this wonderful AROMA Roaster Oven.
Published By:
Aroma Housewares, Co.
6469 Flanders Drive
San Diego, CA 92121
U.S.A.
www.aromaco.com
© 2003 Aroma Housewares Company
IMPORTANT SAFEGUARDS
Basic safety precautions should always be followed when using electrical
appliances, including the following:
1. Read all instructions before using.
2. Do not touch hot surfaces. Use handles or knobs.
3. To protect against electrical shock, do not immerse the appliance,
cord, or plug in water or other liquid.
4. Close supervision is necessary when any appliance is used by or near
children.
5. Unplug from outlet when not in use and before cleaning. Allow to
cool before putting on or taking off parts, and before cleaning the
appliance.
6. Do not operate any appliance with a damaged cord or plug or after
the appliance malfunctions or has been damaged in any manner.
Return appliance to the nearest authorized service facility for
examination, repair or adjustment.
7. The use of accessory attachments not recommended by the appliance
manufacturer may result in fire, electric shock or injuries.
8. Do not use outdoors.
9. Do not let cord hang over edge of table or counter, or touch hot
surfaces.
10. Do not place on or near a hot gas or electric burner, or in a heated
oven.
11. Extreme caution must be used when using or moving an appliance
containing hot oil or other hot liquids.
12. Do not use the appliance for other than intended use.
13. Do not clean with metal scouring pads. Pieces can break off the pad
and touch electrical parts, creating a risk of electric shock.
14. Be sure to use on a heat resistant and even surface. Keep at least
4"away from walls and other flammables in a well-ventilated area.
15. Prior to plugging appliance into the wall outlet ensure temperature
control is set to the "OFF" position. To disconnect, turn the
temperature control to the "OFF" position then remove plug from
wall outlet.
16. Extreme caution must be used when removing the lid during
operation as the escaped steam is hot and might cause burn.
This appliance is intended for Household Use Only.
SAVE THESE INSTRUCTIONS
1
SHORT CORD INSTRUCTIONS
1. A short power-supply cord is provided to reduce risks resulting
from becoming entangled in or tripping over a longer cord.
2. Longer extension cords are available and may be used if care is
exercised in their use.
3. If a longer extension cord is used:
a. The marked electrical rating of the extension cord should
be at least as great as the electrical rating of the appliance.
b. The longer cord should be arranged so that it will not drape
over the counter top or tabletop where it can be pulled on
by children or tripped over unintentionally.
POLARIZED PLUG
This appliance has a polarized plug (one blade is wider than the
other) follow the instructions below:
To reduce the risk of electric shock, this plug is intended to fit into
a polarized outlet only one way. If the plug does not fit fully into
the outlet, reverse the plug. If it still does not fit, contact a qualified
electrician. Do not attempt to modify the plug in any way.
2
PARTS IDENTIFICATION
ROASTER OVEN:
1. Lid: The lid has a cool-touch handle. When lifting or
removing lid, try to tilt the lid away to divert the escaping
steam.
2. Removable Cooking Pan: The cooking pan can be removed
for easy cleaning after each use.
3. Roasting Rack with Handles: The rack permits easy
placement of food into or removal of food from the cooking
pan and allows grease to drain from food during cooking.
4. Flat Rack: The flat rack can be used together with the
Roasting rack for two level cooking (such as baking pork chop
on the bottom rack and potatoes on the top).
5. Roaster Oven Body: It is heated with an electrical band heater
surrounding the side wall to provide a “Ring of heat” for
uniform heating of food inside the cooking pan.
6. Temperature Control: for adjusting to the desired cooking
temperature.
CAUTION: DO NOT PLACE THE STORAGE LID ON
TRAYS WHEN CONTAINING HOT FOOD. DO NOT
COOK WITH THE STORAGE LIDS ON.
3
PARTS ILLUSTRATION
2
1
6
3
5
4
4
BEFORE USING
CLEAN
1. Remove all packaging materials.
2. Wash the Roasting Pan, Lid, and any accessories with warm
soapy water using a sponge or dishcloth.
3. Rinse and dry thoroughly to remove soap residue.
4. Wipe body clean with a damp cloth.
Do not use abrasive cleaners or scouring pads.
Do not immerse the body in water at any time.
PRE-HEAT BEFORE FIRST USE OF ROASTER OVEN
1. Due to the manufacturing process, smoke and odor may be
emitted during the first few uses.
2. We recommend pre-heating the Roaster Oven to eliminate the
smoke and odor.
3. Ensure temperature control is set to the "OFF" position and
plug into a 120V AC outlet.
4. Pre-heat the oven for 30 minutes at 400°F or until smoke and
odors no longer exist.
Note: The indicators light will shut-off when the oven has reached the
selected temperature elements.
5. Turn the temperature control to the "OFF" position, remove the
plug from wall outlet; allow it to cool completely.
Note: You’ll expect smoke and odors during your first pre-heating,
which is considered normal, as it is part of “curing” the heating
HELPFUL TIPS
1. The Roaster oven has been designed to utilize everyday
recipes. Keep in mind, that temperatures and times may vary.
We recommend checking your meals two to three times during
operation to insure ideal cooking results.
2. Always pre-heat the oven unless recipe specifies otherwise.
5
HOW TO USE
1. Always preheat the oven before use.
2. Place the cooking pan into the oven body. Place the lid on the
cooking pan.
3. Set the temperature dial to the “OFF” position.
4. Plug in the power cord into proper wall outlet: AC 120V.
5. Set Roaster Oven to desired temperature.
• The indicator light will shut-off when the oven has reached
the selected temperature.
6. Place food into the cooking pot and replace lid.
7. During operation, the light will turn on and off indicating the
proper temperature is being maintained.
8. When finished, turn the temperature dial to the off position and
unplug.
CAUTION: DO NOT USE ANY METAL UTENSILS IN ROASTER
OVEN TO PREVENT FROM ANY DAMAGE OF THE ENAMEL
COOKING SURFACE.
IMPORTANT NOTES:
• Never place food or liquid directly into the oven body.
Always place food in the cooking pan.
• Do not overfill the roasting pan.
• When removing the lid, carefully lift lid so steam escapes
away from you.
• Repeatedly removing the lid will result in heat loss and
increase cooking time. Always cook with the lid in place.
• Be sure to use on a heat resistant and even surface. Keep at
least 4 inches away from walls and other flammables in a
well-ventilated area.
• When in use, make sure the oven is the only appliance
operating on the circuit.
• Never immerse the oven body and the cord in water or
other liquid.
• Always use oven mitts when you remove food from the
cooking pan.
6
HOW TO USE THE RACKS
Roasting Rack with handles: This rack is used for fat free
roasting. It has a reversible feature.
When the rack is used for roasting, it should be placed in the oven
cooking pan as shown in Fig. 1.
When the rack is used with the flat rack for two level cooking, it
should be placed in the cooking pan as shown in Fig. 2.
Flat Bake Rack: This rack is used together with the Roasting
Rack for two level cooking. Simply slide the Flat Bake Rack into
the handles of the Roasting Rack as shown in Fig. 2.
Fig.1
Fig.2
CAUTION: BE AWARE OF THE HEAT WHEN SLIDING
THE RACKS IN.
7
HOW TO CLEAN
AFTER USE
1.
2.
3.
4.
Set the temperature to the OFF position.
Disconnect the plug from the wall outlet
Allow the unit to completely cool.
Wash the cooking pan and lid with warm soapy water using a
sponge or dishcloth.
5. Rinse thoroughly to remove soap residue.
6. Wipe body clean with a damp cloth.
Do not immerse the body in water at any time
Do not use abrasive cleaners or scouring pads.
To clean the built ups effectively, soak the cooking pan in
warm water for 10 minutes before wash.
8
COOKING TIPS AND INSTRUCTION
ROASTING:
Roasting in your AROMA Roaster Oven will produce moist and
tender meats. As a rule of thumb, you may use the same
temperature and cooking time as a conventional oven.
1. To sear the meat before roasting, place butter or margarine on
the cooking pan. Cover with the lid and sear meat on each side
for 5-10 minutes or until lightly browned.
2. For the best browning result on poultry, brush melted
margarine or honey evenly over the skin before roasting.
Follow roasting chart directions to cook. In the last 30-45
minutes, increase temperature 20°-50° for additional browning
if needed.
3. If you would like to add liquid, for example beer, to enhance
flavor, add the last 30 minutes of cooking.
4. Since the thickness and condition of the meat may vary, you
should check the meat 10 to 15 minutes before the finishing
time to ensure best results.
5. Keep juice collected in the cooking pan for the meat while
serving. It is delicious and nutritious.
6. Cooking meat to your desired doneness, use a meat
thermometer to measure meat temperature at the final cooking
time. Suggested temperatures are 140°F for rare, 160°F for
medium and 170-180°F for well done. Please remember that
pork should always be cooked to well done.
7. While roasting poultry or meat with fat content, add 2 cups of
water to the bottom of the cooking pan to prevent smoke from
the dripping oil.
8. It is recommended to roast dry for tender cuts of meat.
Examples of these meats are, ribs or sirloin.
9. The roasting times in the chart are approximated and should be
used only as a guideline. Several factors may affect the actual
cooking times like meat temperature, thickness, bone content,
ingredients of stuffing, etc.
Remember:
Pre-heat before use.
9
ROASTING GUIDE CHART:
Oven Temp.(°F)
Min./lb. Approx. Time
Poultry
Whole Turkey, 10-17lb
Whole Turkey, 18-20 lb.
Whole Chicken, 4-6lb.
Whole Duck, 4-6lb.
350-400
350-400
350
400
13 to 18
12 to 16
15 to 18
18 to 24
325-350
325-350
325-350
325
15 to 20
20 to 35
20 to 20
15 to 25
2 to 3½ hrs.
3 to 4½ hrs.
1 to 1½ hrs.
1¼ to 3hrs.
Beef/ Pork/ Lamb
Beef, 3-5lb.
Pork, 3-5lb.
Lamb, 5-8lb.
Ham, 6-10lb.
¾ to 1¾hrs.
1 to 2¼ hrs.
1½ to 3½ hrs.
1½ to 3½ hrs.
TERIYAKI ROAST CHICKEN
1 whole chicken (about 4 lb.)
1/2-cup soy sauce
¼ teaspoon garlic salt
¼ teaspoon white pepper powder
¼ cup dry sherry
¼ cup sugar
3 slices fresh ginger root
1-½ teaspoons honey
3 tablespoons water
1 ½ tablespoons cornstarch
Wash the whole chicken; rinse well and pat dry inside and out; cut
off excess fat. Set aside. Combine soy sauce, garlic salt, white
pepper powder, dry sherry, ginger and sugar in a small saucepan.
Bring to boil, and then simmer over medium heat for 2-3 minutes.
Mix water with cornstarch. Stir to thicken the sauce. Set aside to
cool.
10
Place the chicken in a large bowl. Brush or rub sauce all over the
chicken, inside and out. Cover and refrigerate for a couple of
hours. Place the chicken on the rack and you are ready to cook.
Use the Time and Temperature Chart in the book as a reference of
your cooking time. Makes 4-6 Servings.
ROAST LAMB
1 5-6 pound leg of lamb
½ large onion, thinly sliced
5-6 cloves garlic, chopped
1/3-cup extra virgin olive oil
½ cup dry red wine
½ cup light soy sauce
2 ½ teaspoons fresh thyme leaves
salt and freshly ground black pepper to taste
Preheat the oven to 325°F. Wash and trim the thicker portions of
fat from the boned lamb. Marinate lamb with all the ingredients,
except for onion. Cover and refrigerate overnight. Take meat out
from marinade, saving the remaining marinade for basting. Place
sliced onion on the meat. Follow Roasting instructions, basting
with reserved marinade. Let it sit and cool before slicing. Makes
6-8 servings.
ROASTING BEEF RIBS
one 3-pound beef rib
olive oil
salt and garlic pepper
lemon Juice
Wash, rinse and dry the meat. Let it come to room temperature
before preparing it for roasting. Trim off all excess fat. Rub it
well with olive oil, salt, garlic pepper and lemon juice. Set aside
for 1 hour. Place the ribs on the rack with the ribs facing upward.
11
Baste with fat halfway through roasting. Use Cooking Time and
Temperature Chart as a guide for the roasting. Make adjustment
based on how you’d like your meat cooked. After it is done, let it
sit for 10-15 minutes. Makes 6-8 servings.
BAKING:
AROMA Roasting Oven can bake your favorite cakes, pies,
breads, pizza and casseroles to perfection. Always preheat the
oven at 400°F for 20 minutes.
1. Place food on pan or foil paper for convenience and better
results.
2. For even baking, use rack and place foods in the center of
the rack.
3. Packaged convenience foods can be heated up in your
roasted oven. Follow packaged directions for temperature
and time.
4. If space allows, use the Flat Bake Rack together with the
Roasting Rack for even and better baking results.
NOTE: Do not place any baking pans or casserole dishes
directly on the bottom of the cooking pan. Always use one
of the racks.
BAKING GUIDE/ CHART:
Oven Temp.(°F)
Min./lb. Approx. Time
Bread
375
--
Pie
375
--
45 to 60 min.
Cake
325
--
45 to 60 min.
Cookies
375
--
10 to 15 min.
Rolls
375
--
15 to 20 min.
Muffins
400
--
20 to 25 min.
12
45 to 75 min.
LOW-FAT OAT BRAN BLUEBERRY MUFFINS
¾ cup oat bran
½ cup flour
2 ½ tablespoons brown sugar
¼ cup milk
1 ½ teaspoons baking powder
½ teaspoon salt
1 tablespoon vegetable oil
1 egg
1 teaspoon vanilla extract
2 cups blueberries
Preheat the oven to 400°F.
Place the egg, sugar, milk, salt and vanilla extract in a large bowl.
Mix them well. Add flour, bran and baking powder into the bowl.
Stir it until it looks lumpy and uneven. Add blueberries. Grease a
6-cup muffin pan or line with paper cupcake liners. Fill each
muffin cup 2/3 full. Bake about 18 minutes, or until the muffins
split open and are golden brown.
CAULIFLOWER & CARROT CASSEROLE
1/2 Ib. cauliflower
2 medium carrots
1 can cream of mushroom soup
1/8 teaspoon black pepper
½ cup milk
2.8 oz. can French fried onions
salt
Cut the cauliflower and the carrots similar in size. Mix them
together with soup, black pepper, and milk in 1.5 qt. Casserole
dish. Cover with foil and bake at 350° F until hot; stir
occasionally; arrange French fried onions on top of vegetable
mixture, along the casserole rim. Bake another 3-5 minutes at
425°F until onions are golden brown. Makes 6-8 servings.
13
STEAMING:
Due to the temperature range and oven shape design, your roaster
can serve as an ideal steamer, especially for serving in the case of a
party.
1. Use both racks for steaming foods (please refer to " How
to use the racks" on page 6).
2. Add the proper amount of water to the cooking pan.
Always cover the lid while it is cooking.
3. Steaming is the easiest and healthiest way of cooking.
STEAMED BEEF WITH BROCCOLI
Ingredients:
½ lb. beef (sliced thin against the grain.)
Marinade:
2 tsp. soy sauce
½ tsp. sugar
1 tsp. minced gingerroot
1 tsp. sesame oil
1-cup broccoli flowerets
1 tsp. wine
1 clove garlic, minced
1-tsp. cornstarch
1 tsp. oyster sauce
Method:
Combine sliced beef with marinade in a heatproof dish. Pour hot
water into cooking pan. Place Flat Bake Rack on the Roasting
Rack (please refer to " How to use the racks" on page 6). Place the
dish on the Flat Bake Rack and steam. Open lid and arrange
broccoli around outer edge of the dish. Cover and steam until the
broccoli is soft.
14
STEAMED STUFFED TOFU
Ingredients:
1 16oz cube tofu
½ lb. boneless white fish fillet
½ lb. shrimp shelled and deveined
Seasoning:
½ tsp. salt
1tbsp. sesame oil
1 tbsp. finely grated ginger
1 clove minced garlic
3 tbsp. soy sauce
1/8 cup green onion, chopped
¼ tsp. white pepper
1 tbsp. rice wine
1 tbsp. cornstarch
½ egg white
Method:
Gently rinse tofu cubes and place on a plate and allow to drain off
excess liquid for several hours. Mince fish and shrimp, and
combine with seasoning ingredients. Cut tofu in half lengthwise,
and then divide each half into 4 pieces. Remove 1 tbsp. tofu from
each piece and stuff with a heaping tbsp. filling (wet finger to
smooth top of filling). Arrange stuffed tofu on heatproof plate and
sprinkle with ginger. . Place Flat Bake Rack on the Roasting Rack
(please refer to " How to use the racks" on page 6). ). Place the
dish on the Flat Bake Rack and set the steam temperature for
steaming. Drain off liquid; pour on soy sauce and sesame oil.
Garnish with green onion. Makes 4 servings.
15
SLOW COOKING:
Because of the circular heating system, your roaster oven has
become a great slow cooker for your favorite soups and stews.
1. For better flavor, meat and certain ingredients, such as
garlic, can be browned first in the roasting pan at 425°F
for 3-5 minutes. Then add vegetables, liquids and other
ingredients for slow cooking
2 When slow cooking, always keep the lid on to avoid
losing water. Stirring is not necessary.
VEGETARIAN SOUP
Ingredients:
4 tbsp. peanut oil
7 quarts water
3 medium cabbage heads
3 1/2 tbsp. soy sauce
2 cups carrots
1 tbsp. sherry
7 celery stalks
1 tbsp. salt
3 scallions
3/4 tbsp. pepper
Method:
Preheat at 450°
Cut cabbage, carrots, celery and scallion into strips. Heat oil in the
pot, add vegetables and stir-fry about 2-3 minutes or until they
begin to soften. Add water, soy sauce, sherry, salt, and pepper to
the cooking pot. Cover and cook at 250°F -275°F for 2 hours or
until the soup is done.
Makes 18-20 servings.
16
BRAISED ABALONE MUSHROOM
Ingredients:
35 pieces dried abalone (to be soaked overnight)
20 pieces dried scallops
25 pieces black mushrooms
35 pieces button mushrooms
1/2- cup oyster sauce
1/2-cup oil
1 garlic clove (crushed)
1/4-cup corn flour for thickening
Method:
Preheat at 450°
Combine all ingredients into slow cooker.
Set temperature to 275°F for 2 hours, change temperature to 250°F
for 4 – 6 hours. To serve, thicken it with corn flour and garnish
with spring onion and parsley. Makes 18-20 servings.
17
LIMITED WARRANTY
Aroma Housewares Company warrants this product free from
defects in material and workmanship for one year from provable
date of purchase in continental United States.
Within this warranty period, Aroma Housewares Company will
repair or replace, at its option, defective parts at no charge,
provided the product is returned, freight prepaid with proof of
purchase and U.S. $8.00 for shipping and handling charges to
Aroma Housewares Company. Please call the toll free number
below for return authorization number. Allow 2-4 weeks for return
shipping.
This warranty does not cover improper installation, misuse, abuse
or neglect on part of the owner. Warranty is also invalid in any
case that the product is taken apart or serviced by an unauthorized
service station.
This warranty gives you specific legal rights and they may vary
from state to state and does not cover areas outside the United
States.
AROMA HOUSEWARES COMPANY
6469 Flanders Drive
San Diego, California 92121
1-800-276-6286
M-F, 8:30 AM - 5:00 PM, Pacific Time
18