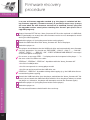
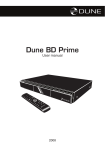
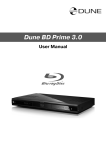
1
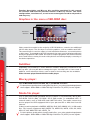
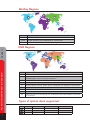
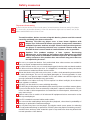
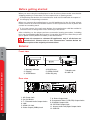
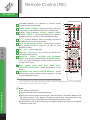
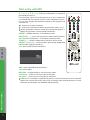
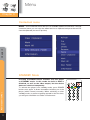
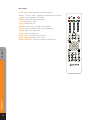
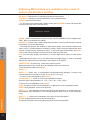
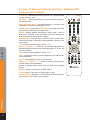
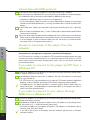
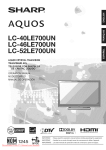
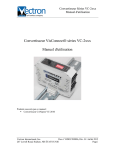
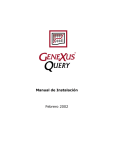
Dune HD Center
User manual
This manual is suitable for firmware version:
dune_firmware_hdcenter_sony_090424_0218_beta.dff
or higher
Table of contents
3. Key features
● Player features
● General features of Blu-ray discs
● Graphics in the menu of BD-ROM disc
● Subtitles
● Blu-ray player
● Media file player
● Operations with HDD
● Package contents
● Notes on Discs
● Notes on Copyright
● Information on regional content protection
● Blu-Ray Regions
● DVD Regions
● Types of optical discs supported
● Safety measures
● Restrictions in respect of content playback
● Before getting started
● Exterior
11. Remote Control (RC)
● Text entry with RC
13. Menu
● Contextual menu
● STANDBY Mode
● Quick setting of video output
● Menu: Settings
● General
● Video
● Audio
● Network
● Information
● Others
● Display view
● IPTV
● Internet radio
● Coding
29. Playback
● Blu-ray operations
● Playback of BD-ROM
● DVD-Video playback
32. Mediacenter
● File browser
● Selection of files and folders
● Copy and relocation of files/folders
● File player
● Photo viever
41. Network disks operation
Table of contents
14. Connections
2
● Connection to a TV set with HDMI/DVI output
● Connection to a TV set with component video
signal input (Component Video, Y, Cb, Cr)
● Connection to a TV set with composite video
or S-Video signal
● Transmission of digital audio signal to an AV
receiver with HDMI input
● Transmission of digital audio signal to an AV
receiver using an optical cable
● Transmission of analog audio signal to an
external stereo amplifier (or TV set)
● Transmission of analog 7.1 audio signal to an
external amplifier(reciever)
● Connection to LAN and Internet
● Connection of external USB drives
● Connection through SMB protocol
● Connection with NFS protocol
● Access to hard disk of the player from the
network
● If you wish to connect to the player by FTP from
a Windows PC
● If you wish to connect to your player through
SMB from a Windows PC
44. Troubleshooting
● General
● BD-ROM player
● Mediaplayer
50. Firmware recovery procedure
51. Specifications
19. System setup
● Setup menu
● DUNE HD Center dimensions
Key features of DUNE HD
Center media player
Chapter 1
Key features of DUNE HD Center media player
Chapter 1
Player features:
3
Blu-Ray discs playback
● BD-ROM (Profile 1.1/2.0), as well as DVD and CD.
Media content playback
● Video, Music and Pictures.
Network drive operation
● NFS, SMB and some other HTTP clients.
Mobile rack with SATA Direct Link for fast and easy HDD exchange
● Supports any audio and video collection on any number of hard discs w/o need to
create expensive multi-disc NAS solutions. Any 3.5» SATA HDDs can be used.
HDMI v1.3
● Up-to-date HDMI v1.3 interface ensures peerless quality of digital video and audio
signal.
Three USB 2.0 ports
● Three high-speed USB 2.0 ports ensure an easy-to-use playback of media content
from such external data storage devices, as USB-HDD, flash drives, cardreaders,
etc.
Upgradeability
● availability of connection of optional modules: Wi-Fi 802.11n, Ethernet 1000 Mb/s
and 2 x eSATA
General features of Blu-ray discs
Blu-ray optical media can store up to 25 GB on a single-layer disc, or 50 GB on duallayer disc. Blu-ray discs support video signals of high-definition TV (HDTV) with
definition up to 1920x1080p. Data stream read from the disc may reach 40 Mbit/s.
Function description and Blu-ray disc partition contained in this manual
are common and describe potential features of Blu-ray format. The menu
configuration, functions set, as well as menu navigation are disc-dependent
and may vary.
Graphics in the menu of BD-ROM disc:
Chapter 1
Interactive
elements
Video
Video material recorded on the majority of BD-ROM discs, contains two additional
full HD video layers. The first layer is used for graphics, such as subtitles and OSD.
The second layer is used for output of such interactive elements, as control buttons
or disc menu. Compared to the DVD standard, the menu may be displayed directly
during the playback of BD-ROM. No need to stop the playback, the menu elements
and sound effects overlay the main video picture and allow promptly correcting of
the device operation.
Key features of DUNE HD Center media player
Subtitles:
4
Depending on possibility to select different subtitles displaying contained on the
Blu-ray disc, you may be able to change the style, size and color of fonts used. In
addition, some animation effects, such as fade-in and scrolling are also available.
Video formats played back with the media player
Blu-ray player:
Use of BD-ROM media and AVC, VC-1 and MPEG-2 codecs
For best picture quality when viewing Blu-Ray discs, your other attached equipment
shall support 1920x1080 or 1280x720 High-Definition TV (HDTV) format signals.
Media file player:
Use of optical BD-ROM (provided that the content is not protected), BD-R (RE),
DVD-ROM, DVD-R (RW), CD-ROM, CD-R (RW) media, or embedded HDD, or
external media, such as USB HDD and USB Flash drive. The media content may
also be played via HDD-equipped LAN of your personal PC or NAS. And from the
Internet.
Codecs used for playback of MPEG2, MPEG4, DivX, XVID, WMV9, VC1, H.264 media
files. File formats supported: MKV, MPEG-TS, MPEG-PS, M2TS, VOB, AVI, MOV,
MP4, QT, ASF, WMV, DVD-ISO, VIDEO_TS.
For best picture quality when viewing media files, your other attached equipment
shall support 1920x1080 or 1280x720 High-Definition TV (HDTV) format signals.
Operations with HDD
How to tаke out the HDD
1. Shift the clamp upwards.
2. Keeping the clamp, turn the
handle outside
3. Pull out the internal container
from a player
Ключевые
Key
features
особенности
of DUNE HD медиаплеера
Center media player
DUNE HD Center
Chapter
Глава 11
How to insert the HDD
3
5
1. Having convinced that the container
handle is slightly opened, insert the
internal container and push it inside
all the way.
2. Turn the handle inside till the
clamp clicks.
How to change the HDD in the internal container
1. Shift the top cover of the internal
container in an arrows direction.
3. Be convinced that the HDD is densely pressed to a rear side of the container and fixed to an emphasis.
2. Insert the HDD into the internal
container.
4. Close the top cover
of the internal container.
Only such placing provides correct functioning of the device.
Package contents:
1. Dune HD Center media player
2. Remote control (batteries not
included)
3. Power supply cord
4. AV cable
5. Quick start guide
2
1
3
4
5
Chapter 1
Notes on Discs
Key features of DUNE HD Center media player
The regional code of BD-DVD discs is shown on the rear
panel of your player. Please refer to the end of this manual
for description of regional codes of BD-DVD discs.
6
Notes on Copyright:
The law prohibits copying, transmitting, displaying, broadcasting via cable network,
public playback and letting on lease of copyright-protected materials without the
rightholder’s authorization. The video discs are encoded with copy protection, and
any picture recorded from this disc will be distorted. This product incorporates a
copyright protection technology which is protected by requirements of certain U.S.
patents and other intellectual property rights owned by Macrovision Corporation
and other rights owners. Use of this copyright protection technology must be
authorized by Macrovision Corporation and is intended for home viewing uses.
Reverse engineering or disassembly is prohibited.
Information on regional content protection:
This media player has been developed and manufactured under Region Management
Information conditions available on the disc. If the regional code shown on BD-DVD
disc does not match the regional code of this player, this device will not play back
this disc. You will not be able to play back some BD-DVD disc with this media player,
if they were bought outside your home region or intended not for in-home use.
Blu-Ray Regions
А1
C3
B2
А1
Code
Region
1 or A
Eastern and South-Eastern Asia, USA
2 or B
Europe, Oceania, Africa, Meadle East,, Greenlandia
3 or С
Russia, PRC, Central and South Asia, Mongolia
Chapter 1
DVD Regions
5
1
2
6
5
3
4
4
Key features of DUNE HD Center media player
2
7
Code
Region
1
Canada, United States; U.S. territories; Bermuda
2
Western and Central Europe; Western Asia; Egypt, Japan, South Africa, Swaziland;
United Kingdom, French overseas territories
3
Southeast Asia; South Korea; Taiwan; Hong Kong
4
Australia; Oceania; Central and South America; Caribbean; Mexico
5
Ukraine, Belarus, Russia, Africa, Central and South Asia, Mongolia, North Korea.
6
China
7
Reserved for future use
8
International venues such as aircraft, cruise ships, etc.
All
Region ALL discs have all 8 flags set, allowing the disc to be played in any locale
on any player.
Types of optical discs supported
Type
ROM
R
RE (RW)
BD
+
+
+
DVD
+
+
+
CD
+
+
+
Safety measures
10cm
5cm
5cm
To prevent Overheating
If you install your device in the closed space, for maintenance of correct work of the player
it is necessary to provide distances: from left and on the right not less than 5 cm, at the
above and behind not less than 10 cm.
Chapter 1
To avoid troubles, before to start using this device, please read this manual
carefully and keep it for future reference.
Warning: This Blu-ray player uses a laser beam sightless with
human eye. If directed to human eye retina, it may cause hazardous
radiation exposure and loss of sight. Please make sure that you use
the player in conformity with the user’s manual. Please make sure
that the device is out of reach of small children as far as possible.
Caution: This product employs a laser system. Performing
adjustments, or carrying out procedures other than those specified
herein may result in hazardous radiation exposure. Do not open the
safety enclosure: this product does not contain any parts that can
be repaired by the user.
1
Key features of DUNE HD Center media player
2
8
3
4
5
6
7
8
9
10
Do not try to repair the device. Only authorized after-sales centers are entitled to
carry out repair and preventive maintenance.
To avoid electric shock, do not touch the plugged in device with wet hands and do
not allow moisture within the case. If it happened, immediately unplug the device
and contact an authorized Dune service center.
Clean the device only with a dry soft cotton, or alike, cloth preventing accumulation
of static discharges. Do not use any liquid detergent or scouring powder. In case
of hard dirt, use special wipes suitable for PC care. Make sure that the wipe is dry
enough (otherwise fluid drops may get inside).
The device is for indoor use only. Do not expose it to direct sunlight, do not leave it
near a heater or radiator.
DO NOT use the device in rooms with high humidity.
DO NOT plug in the player immediately after moving it from a cold into a warm place.
If you move the device from an extremely cold place, unpack it and leave for 1.5 to 2
hours in order to allow evaporation of condensate on internal parts, afterwards you
may start using it.
Please make sure to switch off all relevant AV equipment before connection to the
Blu-ray media player.
Use EU-standard screened cables and sockets.
Do not move the media player during the disc playback, since there is probability of
damage of optical drive and internal parts.
Do not place any items on the player. The device needs some space for releasing
of heat produced during its operation. DO NOT place any liquid-containing vessels,
metallic items and any other materials upon its top enclosure that may disturb the
normal operation of the device.
11
12
13
14
15
Do not hinder the opening of the tray of the media player. If something hinders the
tray opening, remove it and try again.
Please remove the disc out of the player after viewing and turn off the player.
Do not press the disc tray. Do not place any items on the tray.
Voltage fluctuations in AC mains may result in improper operation of the device. In
this case, please turn off the player with the POWER button on the front panel of the
device or unplug, and after 10 to 15 seconds plug in back. The media player will
restart, and its functionality will be restored.
If you intend not to use the Blu-ray media player for a long period of time, for safety
reasons and to spare power, please make sure to unplug from the AC mains. Please
be aware that even in standby mode the device consumes the power.
Key features of DUNE HD Center media player
Chapter
Глава 11
Restrictions in respect of content playback
9
When playing some BD-DVD-CD disks, some operations, commands and functions
may not be available. It is connected with the software features recorded on the
media. This feature is not a trouble.
Although the player supports the majority of the most common file formats (containers
and codecs), it does not mean that it will play any files. It is not guaranteed that
this media player will play without fail absolutely all Blu-ray, DVD and CD labeled
discs either. It is due to possible faults during recording of these discs: software
errors or poor quality of the optical drive. Frequently media files are recorded with
violation of certain rules, and although they may be properly played with some builtin PC players, this media player may not be able to do this (play back these ‘exotic’
files). These restrictions and errors may be potentially eliminated in new updates of
firmware. Please refer to the ‘Specifications’ section for the full list of optical media
and supported audio and video codecs.
Before getting started
When you start using the media player for the first time, please make sure that the
shipping packing is not broken, has no compression or opening marks.
If the packing was broken, the manufacturer shall not be held liable in respect of
the integrity of the package contents.
When you connect the media player to your AV appliances for the first time, please
make sure that all seals and retainer screws on the top enclosure are in place and
contain no unsealing mark.
If for some reason, the seals were broken, the manufacturer shall be entitled to
refuse the free of charge after-sales servicing of the device.
After switching on the player performs automatic booting procedure, including
boot-up of embedded operating system. It may take 30 to 60 sec. After that you will
get to splash screen (Main root folder) of the file browser.
Please do connect to relevant AV appliances only if all devices are
switched off. Please refer to the ‘Connections’ section below for
description of the majority of connections.
Chapter 1
Exterior
Front view
Key features of DUNE HD Center media player
1
10
4
2 3
5
6
1. Standby Indicator
2. Display
3. STOP Button
7
8
4. PLAY Button
5. OPEN/CLOSE
6. Blu-Ray tray
7. Mobile rack
8. USB 2.0
Rear view
BLU-RAY DISC PLAYER
MODEL: HD Center
DTS is a registered trademark & the DTS
logos and Symbol are trademarks of DTS,
lnc. 1996-2008 DTS, lnc. All Rights Reserved.
Manufactured under license from Dolby Laboratories. Dolby
and the double-D symbol are trademarks of Dolby Laboratories.
USB
AC~100-240V
50/60Hz, 27W min.
Do not remove covers hazard - life parts
5
1
2
C
Made in Israel
3
1. AC Power Jack
2. On/Off Button
3. 7.1 Channel Audio Output Jacks
4. LAN
5. HDMI 1.3 Jack
6. Video Output (CVBS) Jack
ETHERNET
4
HDMI
5 6 7 8
9
10 11 12
7. S-Video Output Jack
8. Component Video (Y, PB, PR) Output Jacks
9. COAXIAL Output Jack
10. OPTICAL Output Jack
11. Stereo Audio Left/Right Output Jacks
12. USB 2.0
Remote Control (RC)
Chapter2
Command indicator (i.e. indicator of remote control
response to button pressing)
1
2
EJECT, MUTE, POWER – opening/closing of disk tray,
sound on/off and standby mode on/off, respectively
3
3
A (Red) - INFO, B (Green) - ZOOM, C (Yelow) - MODE,
D (Blue) - SETUP – control menu buttons for setting of
internal functions, as well as some playback modes.
4
0 - 9 – numeric buttons. Allow controlling of player in
playback mode, as well as text entry.
1
2
A
6
Vol+ / Vol- – volume adjusting
7
Page Up / Page Down – for scrolling up and down to
see and change settings.
8
SUBTITLE, AUDIO, RETURN, POP UP/MENU,
ENTER and control menu buttons UP, DOWN, RIGHT,
LEFT – to control main player modes and cursor motions
through file browser.
9
PLAY, PAUSE, STOP, REW, FWD, PREV, NEXT,
SLOW REW, SLOW FWD – media file playback control
buttons.
10
TOP MENU/URL, ANGLE/ROTATE, SEARCH – control
menu buttons, allow setting of internal functions, as well
as some playback modes.
D
4
5
i
6
...
.
.
INFO, ZOOM, MODE, SETUP – control menu buttons,
allow setting of internal functions, as well as some
playback modes.
C
.
Chapter 2
5
B
7
8
POP UP/
10
TOP
9
Remote Control (RC)
*Some buttons may have several functions, depending
on mode. For more details, please refer to Text entry with Remote control, System
adjustments and Playback sections.
11
Note:
● Use alkaline AA batteries.
● Observe polarity when inserting batteries.
● Direct the remote control to the player. There must be no obstacles between the
RC and the player. If the player is installed inside a desk with tinted glass, the
manufacturer may not guarantee an undisturbed functioning of RC.
● If RC functions only at short distances or stopped functioning, make sure to replace
batteries to new ones.
Text entry with RC
B
C
D
i
...
.
.
Chapter 2
A
.
0, 1, 2, 3, 4, 5, 6, 7, 8, 9: Entry of characters to a position
pointed by the cursor.
First pressing: entry of first character from a set of characters
connected with the remote control. Each subsequent pressing: you may change the entered character to the sequent one
from the list.
● 0: entering of space character.
● 1: entering of special characters (punctuation marks, etc.).
● during character selection mode connected with button 1:
Right/Left/Up/Down: select required character.
ENTER – validate selection, exit selection mode.
SUBTITLE (...) – enter full stop mark or other special characters. Functions like button 1 in character entering mode.
CLEAR (<-) – delete a character to the left of cursor mark.
SELECT (cap|num) – select another input mode. Supported
input modes (display indication):
abc: enter small Roman characters.
POP UP/
TOP
abc
Remote Control (RC)
ABC: enter capital Roman characters.
123: enter digits.
RETURN – change direction, exit text entry mode.
Left/Right – move cursor by one point left/right.
Up/Down – move cursor to top/end of a text line.
● If the cursor is already in top/end line position: select an element of user interface
under/over current text entry area (only for dialogs with several elements of user
interface; text changes are validated automatically).
12
Menu
Chapter 3
Contextual menu
Chapter 3
MENU – show contextual menu with a list of available additional commands. Through
contextual menu you can copy the edited text line to clipboard and paste the text line
from the clipboard (into cursor position)
Remote Control (RC)
STANDBY Mode
13
Pressing of POWER button switches over the player
to STANDBY mode. In this mode the built-in HDD is
disabled, as well as the video output, but the device
does not switch off completely.
To activate the player from standby mode, press POWER
button once again. It allows immediate switching on of the
player (within several seconds). When switching on after
standby mode, as well as at getting started for the first time,
you will get to the Main root folder of file browser.
A
B
C
D
Connections
Chapter 4
This section describes different connection possibilities of media player to
AV equipment.
Depending on model and design of TV or projection set, after connecting in one of the
ways described below and plugging the power supply, the player initialization may take
up to 10 sec. If after this time there is no picture (DUNE logo) on screen, it shall mean that
there are connection errors. Please check Troubleshooting section in such a case.
If after the initial screen (DUNE logo) disappears there is no other picture on screen in
10 sec. and more, this problem is usually caused by the currenly preset incorrect video
mode on the player. Please address the “Quick setting of video output” section below
in such a case.
Chapter 4
Connection to a TV set with HDMI/DVI output:
HDMI IN
Since Dune HD Center is designed first of all for playback of high definition (HD) video
(up to 1080p), the best way of signal transmission from player to a TV set or projector
is the HDMI interface. In this case, video and audio streams are transmitted in digital
form, without losses, allowing enjoying excellent picture and sound. It is recommended
to connect the player to any compatible equipment using original DUNE HDMI cable
(option).
If your TV set has no HDMI socket, but it is equipped with DVI one, you can use an
original DUNE HDMI-DVI adapter (to be connected to HDMI-HDMI cable) or Dune
HDMI-DVI cable (no adapter needed). In this case, transmission of audio stream is
only available separately, from an analog audio or digital optical output.
1
Connections
2
14
3
4
Make sure that the player and the TV set are switched off. Do not switch on until the
end of connection procedure.
Connect the HDMI output of the player with appropriate HDMI/DVI input of the TV set
using a HDMI-HDMI cable for HDMI input of your TV set, or HDMI-DVI cable or HDMIHDMI cable with HDMI-DVI adapter, for DVI input of your TV set.
Using RC of TV or projector (depending on what you use), select required input and
display mode. For more instructions please refer to the manual of your displaying
equipment.
Wait until you see a picture on screen of your TV (or projection) set received from the
player.
Connection to a TV set with component video
signal input (Component Video, Y, Cb, Cr)
For this connection you should
use a 3RCA-3RCA video cable
and (optionally) a 2RCA2RCA audio cable for sound
transmission to your TV set.
Please note that video cable
shall have an impedance of
75 Ohm, i.e. specially fitted
for transmission of analog
video signal
1
2
Chapter 4
3
4
AUDIO IN
R
L
COMPONENT
VIDEO IN
Make sure that the player and TV set are switched off. Do not switch on until the end
of connection procedure.
Connect the component video output of media player with relevant TV input using
a 3RCA-3RCA cable.
Optionally connect audio output AUDIO L R of the player with relevant input of TV
set using a 2RCA-2 RCA cable (note: you can use optical cable to transmit digital
audio to your A/V receiver; this way better audio quality result may be expected).
Using RC of TV or projector (depending on what you use), select required input and
display mode. For more instructions please refer to the manual of your displaying
equipment.
Connection to a TV set with composite video or
S-Video signal
Since both these kinds of
connection do not allow a highquality picture, we recommend
to use them only in case that
your TV or projection set
does not have modern video
interfaces, such as HDMI or
Component Y, Cb, Cr.
Connections
1
2
3
4
15
AUDIO IN
R
L
S VIDEO IN
Make sure that the player and TV set are switched off. Do not switch on until the end
of connection procedure.
Connect the media player with relevant TV input using a RCA-RCA or S-Video cable,
depending on equipment.
Optionally connect audio output AUDIO L R of the player with relevant input of TV set
using a 2RCA-2 RCA cable (note: you can use optical cable to transmit digital audio
to your A/V receiver; this way better audio quality result may be expected).
Using RC of TV or projector (depending on what you use), select required input and
display mode. For more instructions please refer to the manual of your displaying
equipment.
Transmission of digital audio signal to an AV
receiver with HDMI input
1
2
Chapter 4
3
This media player is equipped with an up-to-date HDMI v 1.3 interface allowing transmission of digital video and audio streams using a single cable.
If your AV receiver has a HDMI v1.3 input and decoders of up-to-date audio
formats, you may enjoy a HD multi-channel sound in full. For this connection
it is suggested to use an original DUNE HDMI-HDMI cable (not included, can
be ordered separately).
Make sure that the player and the AV receiver are switched off. Do not switch on until
the end of connection procedure.
Connect HDMI output of the media player with relevant HDMI input of your AV receiver using a HDMI-HDMI cable.
Using RC of the AV receiver select relevant mode (ref. to your AV receiver manual).
HDMI IN
We recommend you to turn down the volume of your audio equipment before
connection, in order to avoid lesion of your hearing ability and eliminate risk of
damage of your audio systems.
Transmission of digital audio signal to an AV
receiver using an optical cable
1
Connections
2
An optical Toslink–Toslink or coaxial (75 Om) audio cable shall be used (not
included).
Connect digital audio output of the player with digital audio input of the AV receiver
Select relevant input and sound mode on the AV receiver.
Optical
16
We recommend you to turn down the volume of your audio equipment before connection, in order to avoid lesion of your hearing ability and eliminate risk of damage of your audio systems.
Chapter 4
Transmission of analog audio signal to external
stereo amplifier (or TV set)
An analog 2RCA-2RCA cable shall be used (not included).
1 Connect audio output AUDIO L R of your playAUDIO IN
er with audio input of your stereo amplifier
R
L
2 Select relevant input using INPUT SELECTOR switch.
We recommend you to turn down the
volume of your audio equipment before
connection, in order to avoid lesion of
your hearing ability and eliminate risk of
damage of your audio systems.
You may send an analog audio signal from
your player to the TV set, if you use DVI,
Component Video, S-Video or CVBS for
video signal transmission and don’t use
AV received for digital audio decoding. In
case of connection using HDMI, video and audio signals will be transmitted using
a single HDMI cable, that’s why there is no need of additional analog audio connections in this case.
We recommend you to turn down the volume of your audio equipment before connection, in order to avoid lesion of your hearing ability and eliminate risk of damage of your audio systems.
Transmission of analog 7.1 audio signal to an
external amplifier(reciever)
Connections
An analog 2RCA-2RCA cable shall be used (not included). It is better to use
four identikal pairs.
We recommend you to turn down the volume of your audio equipment before connection, in order to avoid lesion of your hearing ability and eliminate risk of damage of your audio systems.
17
Connection to LAN and Internet
A standard Cat5 or Cat6 Ethernet cable with RJ45 connectors should be used
(not included).
Chapter 4
Connection of external USB drives
Your media player is equipped with a socket for connection of external data
storage devices with USB interface. There are two standard A-type USB
ports for this purpose.
1
Connections
2
18
Connect a USB cable of external device to your media player.
Wait until popup of an icon in Main root folder showing start of initialization of equipment connected to your player.
Playback and other operations with USB drives are described in the section below.
Ref. Playback section.
System setup
Chapter 5
This chapter describes a list of settings of different functions of your media
player.
Setup menu
Access to the setup menu only in file browser mode
WARNING During playback of media files and DVDs any access to the
setup menu is disabled. In order to enter the menu you need to stop
playback first
Chapter 5
To enter the setup menu press SETUP on your RC or use Setup folder of the main
menu of the player.
To exit the setup menu, press SETUP once again or RETURN button.
To browse the setup menu use RC buttons Up, Down, RETURN/Left, ENTER/Right.
Quick setting of video output
MODE button on the RC allows quick setting of video output without use
of setup menu. This type of video output configuration may be required in
case that after connection of your player to a TV or projector, you see no
picture on screen (and no setup menu displayed accordingly).
After pressing MODE button you will enter quick setting mode of video
output. Pressing one of the digit buttons 1, 2, 3, 4, 5 right after that on
your RC, you may switch to one of the following settings of video output
respectively:
1 Composite/S-Video/Component, PAL
i
...
2 Composite/S-Video/Component, NTSC
.
3 HDMI, 480i 60Hz
4 HDMI, 720p 60Hz
5 HDMI, 1080i 60Hz
To exit quick setting mode of video output after successful settings, press
ENTER on your RC.
After pressing the MODE and a digit buttons please wait for up to 15 sec.
before the new video mode is settled.
The pointed five video settings are only to ensure that you can quickly
set up some usable video mode for any type of video connection you are
using, regardless the previous settings of your player.
After getting picture on screen with one of these modes, please go
into Setup menu and choose the most appropriate video output and
resolution.
During any video playback the MODE button is deactivated. To change parameters of video
output, stop playing back by pressing STOP button.
In case of any problems, to make sure that the playback is stopped and you are in file browser
mode, switch off and then switch on the player and wait until player booting during up to 60
sec. Ref. STANDBY mode.
A
B
C
D
.
.
POP UP/
System setup
TOP
19
System setup
Chapter 5
Menu: Settings
20
General
In this menu section you may adjust general interface language and time of
screensaver activation.
Video
System setup
Chapter 5
In this section you will find settings of video output type (digital HDMI or
analog) and adjusting of video resolution on selected output.
Resolution value adjusted will be used by default for any file played with the media
player.
Read carefully your TV or projection set instructions. Some video modes may not be
supported by your equipment.
In case of using of HDMI connection, depending on HDMI support in your TV/
projection set, intermediate HDMI equipment (if any) and the player, some video
modes may not be available or may function improperly. In this case, use other
video modes or other connection type.
To have the best picture quality it is advisable to use an HDMI connection. Ref.
Connection to a TV set with HDMI input.
21
Audio
Chapter 5
This section of settings allows setting of connection type of relevant audio
equipment
System setup
Digital audio output mode: you may switch the mode of digital output
22
PCM (Pulse Code Modulation, forced conversion): a mode in which original
track, i.e. Dolby Digital or DTS, is converted in Pulse Code form. It is supported
by decoders of virtually any up-to-date audio equipment. But this mode is only
recommended in case that your AV receiver does not support full decoding of multichannel sound of formats above, or a TV set (no home theater system) is connected
through a digital cable to your player
if specific sound track and specific playback mode are supported
Original (Bitstream): a mode, in which original sound tracks, i.e. Dolby Digital or
DTS, are transmitted to an external decoder in original form. Ref. Transmission of
digital audio signal to AV receiver
if specific sound track and specific playback mode are supported
System setup
Chapter 5
HDMI audio: turn on and off transmition of audio signal via HDMI
23
Blu-Ray audio
When set to «Best quality» and «Digital audio output mode» set to «bitstream», the primary
audiotrack is sent to S/PDIF and HDMI as bitstream not depending on the presence of
secondary audiotrack; secondary audio/video functions («PiP») are disabled.
When set to «PiP support», secondary audio/video functions are enabled, and, to support
these functions, the player is allowed to use «decode» mode instead of «bitstream» mode
on digital audio outputs (so audio quality may suffer, e.g. stereo-PCM may be sent to S/
PDIF output, and S/PDIF, and multichannel-PCM may be sent to a HDMI output).
Network.
Chapter 5
This section describes main parameters of functioning of media player in
LAN or Internet.
Connection. You may select a type of connection which will be used by default. It may
be Wire (twisted-pair cable connection) or Wireless (Wi-Fi connection; optional). Or
you may select a LAN-free use by selecting No.
System setup
Selection of networking mode: Auto (DHCP): selection of networking mode
allowing the media player to receive automatically an IP address and other parameters
required for TCP/IP networks.
Manually: selection of networking mode when all TCP/IP parameters are set by the
user.
24
Information
System setup
Chapter 5
Includes all system information on your device.
25
Others
This section describes additional settings of your media player.
Display view
System setup
Chapter 5
You may select shape and type of the player menu which will be displayed by
default.
You may use the menu type that is most suitable for you. It may be icons, or text
messages for displaying all functions of your media player.
26
IPTV
Chapter 5
This section describes media player setting for reception of IPTV channels.
You only need to choose the name of your IPTV provider from the list in Setup. All
other steps will be made by the player automatically.
• List of IPTV providers may vary depending on programming time.
IPTV protocols: Multicast UDP (raw), RTP. Formats: MPEG-TS container, MPEG2,
H.264 video codec (SD and HD), MPEG and AC3 audio codecs.
Internet radio
System setup
List of Internet radio stations may vary depending on programming time.
27
System setup
Chapter 5
Coding
28
Display of text information in the menu and submenus of media player.
Playback
Chapter 6
Blu-ray operations
Chapter 6
Playing of a standard Blu-ray or normal DVD disc.
Before playing any optical discs, we suggest you to refer to the ‘Settings. Other. Optical
drive’. In this section you will need to select an operation that will be performed by the
media player by default, after inserting of a BD-ROM or DVD-ROM disc, respectively.
Playback
Playback of BD-ROM
29
After inserting of a BD-ROM in your media player, please wait until the disc
menu is displayed. Depending on the record conditions and materials content
available on the BD-ROM disc, its initialization may take up to two minutes.
All features of BD-ROM discs are described on the start pages of this manual,
cf. ‘Notes on discs’ section. If after this time the disc is not initialized, try to
refer to the ‘Troubleshooting’ section.
The following Remote Control operated commands are available in BD-ROM
playback mode.
EJECT - opening/closing of disc tray
MUTE - sound off/on
POWER – Standby on/off.
A (red)– INFO
B (green) – ZOOM
C (yelow) – MODE
D (blue) – SETUP
A
B
C
D
i
.
...
.
.
POP UP/
Playback
Chapter 6
TOP
30
Vol+ / Vol- – volume control
INFO – information on current status of media player.
• current operation: PLAY, PAUSE, etc.
• type of optical media used currently: BD-ROM, BD-R, etc.
• type of sound track: Stream type DD, DD+, DTS, etc.
• type of content and current playback time: HDMV 00:25:53
• current disc chapter: Title 1/11
• current disc episode: Chapter 8/27
• current bit rate: Bit rate 34.43 Mbp
ZOOM – first pressing: switch to picture zoom mode, display information on current
zoom settings.
Subsequent pressings: switch to subsequent zoom setting: 2X, 4X, 8X, 16X, ZOOM
OFF.
• Left/Right/Up/Down – navigation through the frame enlarged in ZOOM mode.
SETUP – picture parameters setting mode (Contrast, Brightness, Hue, saturation)
• Left/Right – adjusting of selected parameter.
0 - 9 – digit buttons. Disabled when playing a BD-ROM disc.
SUBTITLE: first pressing: display information on current subtitles.
• Subsequent pressings: switch to subsequent subtitles.
AUDIO: first pressing: display information on current sound track.
• Subsequent pressings: switch to the next sound track.
RETURN – return to preceding disc/menu status.
POP UP/MENU – displays an interactive menu of BD-ROM disc (selection of scenes,
switching between episodes, additional materials, etc.)
PLAY, ENTER: start the playback.
PAUSE/STEP: first pressing: switch to the pause mode.
• Subsequent pressings: frame-by-frame playback (switching to the next frame). To exit
the pause mode, press PLAY.
STOP: end the playback, return to the Main page of the file browser.
FWD (>>) REW (<<) – switch to rapid forward/backward playback mode, increase speed
(switching between acceleration modes: 1x, 2x, 4x, 8x, 16x).
• To return to normal playback, press PLAY.
PREV (<<|): start playing back the current episode from the beginning or switch to
playback of the previous episode.
NEXT (>>|): move to playback of the next episode on the disc.
SLOW FWD (|>) / SLOW REW (<|): switch to slow-motion playback forward/backward.
Decrease the speed (switching between modes: 1x, 1/2x, 1/4x, 1/8x, 1/16x).
• To return to normal playback, press PLAY.
TOP MENU – switch to the root menu of the disc.
ANGLE/ROTATE – picture rotation.
SEARCH – switch to the preset playback time.
If after pressing of a RC button, the INVALID KEY indication is displayed, it shall
mean that the procedure assigned to this button is currently disabled and/or
disabled on this disc in general. Cf. ‘Notes on discs’.
DVD-Video playback
After starting playback of a DVD disk from external optical drive
or a material in a DVD-Video format from a folder on HDD, you
will get to the DVD player.
● This interface is only intended for operation of DVD-Video.
● f you play a DVD-Video disk already inserted in the device, its playback starts from the point where it stopped playing previously. Your
media player stores such data for 200 last played DVD disks, earlier
i
stored items will be deleted as they are replaced by more recent
ones.
Item storage runs as with regular DVD-Video disks played from optical drive, as well as DVD-Video material stored on hard drive of media
player or external drive. To playback the DVD-Video from the very
beginning, press twice CLEAR button on your RC.
Following RC buttons are enabled for DVD player:
Left/Right/Up/Down
Page-Up/Page-Down: first pressing: switch to played item change
mode.
Subsequent pressings: change of desired playback item backward/
forward by 10 min)
Left/Right: backward/forward by 10 sec.
Up/Down: backward/forward by 1 min.
● To exit item selection mode and switch over to item selected, press ENTER (or wait
until automatic switch to selected item after short idle time).
0, 1, 2, 3, 4, 5, 6, 7, 8, 9: switch to a DVD-Video chapter with specified number.
You may select a two-digit chapter number by entering both digits consecutively. If
it’s a one-digit number, please wait shortly after its input. All these operations shall
be made during the playback. Also with digital buttons you may select DVD-Video
menu item.
INFO: display/hide the information on played DVD: media (name of folder name;
optical drive), type of media container, format (code type), resolution of video
stream in file, maximal bitrate (statistics for the current file playback session), average bitrate (statistics for the current file playback session), current bitrate (playback
statistics), duration.
AUDIO: first pressing: display information on current sound track, subsequent
pressings: switch to the next sound track.
SUBTITLE: first pressing: display information on the current subtitles, subsequent
pressings: switch between available subtitle versions.
Volume-Up/Volume-Down: first pressing: display information on the current volume level. Subsequent pressings: volume level increase/decrease.
MUTE: switch off/on the sound.
ZOOM: first pressing: switch to picture zoom setting mode with display of the current status. Subsequent pressings: change zooming modes.
A
B
C
D
.
...
.
.
POP UP/
Playback
Chapter 6
TOP
31
Mediacenter
Chapter 7
Mediacenter
Chapter 7
File browser
32
File browser allows browsing of all files and folders available. Browsing starts from
the Main page, which includes sub-divisions corresponding to connected drives,
including network resources.
Up: select previous file/folder from the list. Move the cursor to the area of indication
of the current path (in case of selection of the first element from the list).
Down: select next file/folder from the list.
Chapter 7
Mediacenter
33
Page-Up: select a file from the top of the page displayed / move one page up.
Page-Down: select a file from the end of the page displayed / move one page
down.
RETURN/Left: return to the main folder
ENTER/Right: enter the folder (when selected).
…or start playing of selected media file / showing of digital picture.
…or start playback of DVD-Video (i.e. a local copy thereof). It is possible in case of
prior selection of external optical drive with inserted DVD-video disk.
…or start firmware update (in case of selection of firmware file).
PLAY: start playing of all media files in the current folder (except for files in attached
folders) starting from the current file.
Before this you need to select a start file using cursor buttons.
…or start DVD-Video playback (i.e. a local copy thereof). It is possible in case of
prior selection of external optical drive with inserted DVD-video disk. You may also
start playback of your own contents prepared in the DVD-Video format by this way
from a folder, (it must contain a subfolder named VIDEO_TS).
… or start playback of all files in selected folder, including files in subfolders, in alphabetical order.
… or start playback of all files selected (one time, in the same order as displayed).
MENU: show contextual menu with a list of available additional commands for the
file/folder selected and the current folder. Using the contextual menu you may execute the following commands:
● Display information on the file/folder selected (also allows testing of file reading
speed rate).
● Open a DVD-Video structure (browse disk content instead of playback start).
● Select or deselect the file/folder selected.
● Select or deselect all files/folders in the current folder.
● Delete file(s)/folder(s) selected.
● Copy file(s)/folder(s) selected (files/folders are put to clipboard).
● Cut file(s)/folder(s) selected (files/folders are put to clipboard).
● Paste previously copied/cut files/folders from the clipboard to the current folder
(i.e. execute copy/moving of files/folders).
● Update current folder content.
● Create a folder.
● Create a network folder (only on Main page).
● Change network folder definition.
● Delete network folder.
SELECT: select or deselect file/folder selected, afterwards select next file/folder
from the list.
CLEAR (<-): delete current file/folder or selected files/folders
(to be validated).
INFO: display information on files/folders or drive selected (also allows
testing of file reading speed rate).
ROTATE (ANGLE): refresh contents of the current folder.
REPEAT: return to splash screen (Main root directory) of the file browser.
SETUP: switch to setup menu.
MODE: switch to quick setting mode of video output.
SHUFFLE: (if three clicks in a row): generate a debugging data file (debug dump) in
the current folder.
Selection of files and folders
To execute operations with several files/folders at the same time, you may
select these files/folders. Use SELECT button on your RC or commands of
contextual menu.
You may select files/folders only within the current folder. In case of switch to
another folder, the information on selections will be reset.
i
.
...
.
Mediacenter
Chapter 7
.
34
Copy and relocation of files/folders
● Copying and relocating of files/folders is executed using so-called clipboard
functioning on the same principle as Windows clipboard:
● To copy files/folders you need first to copy them to the clipboard, afterwards go to
the target folder and click paste.
● To move files/folders, you should first cut them to the clipboard, then go to the
target folder and click paste.
● Copy, Cut, Paste commands may be executed using the contextual menu.
● In case of copying or relocation of a folder, its content will be copied/moved
entirely, including all attached folders and their contents.
Chapter 7
● To copy or relocate several files/folders at once, you should select these files/
folders.
In case of moving of files/folders within one section of a drive, there is no physical
copying thereof (only the drive catalog is refreshed), files/folders are moved to the
new location instantly. In case of moving files/folders between different sections
or different drives, files/folders will be first copied to the new location, and then
deleted from the old location. During copying you should not unplug the player or
disable the drive currently enabled. Otherwise the information may be damaged
and become unrestorable.
File player
In case of playback of one or several files, you switch over to the file player.
This section describes only playback of a single media file.
After connection of an external DVD drive for playback of DVD disks, an icon is
automatically added in the Main folder.
Mediacenter
Following RC buttons are enabled for the file player:
35
.
Left/Right/Up/Down
Page-Up/Page-Down. First pressing: switch to playback
item change mode.
C
A
B
D
● Subsequent pressings: change desired playback item:
Left/Right: backward/forward by 10 sec.
Up/Down: backward/forward by 1 min.
Page-Up/Page-Down: backward/forward by 10 min.
● To exit the item selection mode and switch over to selected
item, press ENTER button (or wait until automatic switch to selected item after a short idle time).
i
0, 1, 2, 3, 4, 5, 6, 7, 8, 9: switch to playback item:
...
0%, 10%, 20%, 30%, 40%, 50%, 60%, 70%, 80%, 90%
.
(from playback start).
INFO: display/hide information on the current file:
File name. Container type. Format (codec type). Rethsolution
of video stream in the file. Maximum bitrate (statistics of the
current session of file playback). Average bitrate (statistics of
POP UP/
the current session of file playback). Current bitrate (playback
statistics). Duration.
TOP
AUDIO: First pressing: display information on current sound
track.
● Subsequent pressings: switch to the next sound track.
SUBTITLE: First pressing – display information on current
subtitles.
● Subsequent pressings: switch to the next subtitles.
Volume-Up/Volume-Down: First pressing: display information on current volume level.
● Subsequent pressings: increase/decrease volume level.
MUTE: turn the sound off/on.
ZOOM: First pressing: switch to picture zoom mode, display information on current
zoom setting.
● Subsequent pressings: switch to subsequent picture zoom.
● In case of Special setting selection, following RC buttons are enabled:
Left/Right: zoom in/out (proportionate picture stretching).
Up/Down: increase/decrease vertical stretching (proportions adjusting).
Page-Up/Page-Down: increase/decrease overscan area (to equalize picture cropping by TV set).
● To exit ZOOM setting mode, press ENTER and wait until automatic exit from the mode
after short idle time.
SETUP: display picture parameters setup menu (brightness, contrast, saturation,
chromatic level).
Mediacenter
Chapter 7
.
36
Photo viever
Mediacenter
Chapter 7
The media player have a Photo viewing function. Supported formats: JPG, PNG,
BMP.
37
In options of a mode of a Photo viewing it is possible to adjust the time of display of
pictures with an interval of a delay from 3 seconds till 1 day. As it is possible to set the type
of effect which will be used from one picture to another.
If you use a mode «randomly» transition modes will be used in a random order.
RC usage:
Chapter 7
Mediacenter
B
C
D
i
...
.
.
38
A
.
INFO: show \ hide info about current Photo file:
format – file type, width – quantity of horizontal dots, Height
- quantity of vertical dots, Bit Depth.
MENU: show\hide Playlist of Photos
● [7] – Slideshow on/of.
● [8] – Random on/of
RETURN: goes one step back (hide Playlist).
PLAY: creates the Playlist and starts a Slideshow.
PAUSE: pause the Slideshow.
STOP: stops the Slideshow.
PREV (left): backward to one Picture.
NEXT (right): forward to one Picture.
ANGLE/ROTATE - rotates the picture to 90 degrees
POP UP/
TOP
Following RC buttons are enabled in the mode of
picture parameters setting:
Up/Down: select previous/subsequent proportion parameter.
Left/Right: decrease/increase parameter value (proportionate).
CLEAR: reset to default value.
● To exit from picture parameter setting mode, press ENTER (or wait until automatic
exit from the mode after short idle time).
Mediacenter
Chapter 7
Deinterlace: adaptive
39
MODE: switch of deinterlacer function mode. Modes available: motion adaptive (default), bob, constant blend, disabled.
SHUFFLE: first pressing: switch to adjustment mode of sound synchronization, display
information on current adjustment.
● Following RC buttons are enabled in adjustment mode: Left: decrease adjustment
value (“move” sound backward, relatively to video). Right: decrease adjustment value
(“move” sound forward, relatively to video). To exit from adjustment mode, press ENTER or wait until automatic exit from the mode after short idle time.
A-B: first pressing: display information on current adjustment status of video frame
rate.
● Subsequent pressings: turn on/off video frame rate adjustment. In case of activated
adjustment, video frame rate increases with a factor of 25/23.976.
PAUSE/STEP: first pressing: switch over to pause mode.
Subsequent pressings: frame-by-frame display (switch to next frame).
To exit the pause mode, press PLAY.
FWD (>>)
REW (<<): switch over to accelerated forward/backward playback, increase rate
(switch between acceleration modes 1x, 2x, 4x, 8x, 16x, 32x).
● To return to normal playback, press PLAY.
SLOW FWD (|>): switch to slow-motion playback forward,
decrease rate (switch between 1x, 1/2x, 1/4x, 1/8x, 1/16x, 1/32x).
To return to normal playback, press PLAY.
PLAY: exit pause mode (resume playback) or speed/slow-motion playback mode.
STOP: finish playback, return to file browser.
PREV (<<|): start playback of the current file from the beginning or switch to previous
file playback from the playlist (if the current playback item is close to the file beginning).
NEXT (>>|): switch over to playback of the next file from the playlist.
MENU: display the browser of the current playlist.
The browser displays the current playlist and the current item played.
Mediacenter
A
B
C
D
i
...
.
.
3
40
Left/Right: decrease/increase picture size (proportionate
change of frame size).
Up/Down: increase/decrease vertical stretching (proportion adjustment).
Page-Up/Page-Down: increase/decrease overscan area
(equalizing of picture cropping by TV set).
To exit ZOOM mode, press ENTER (or wait until automatic
exit from the mode after short idle time).
SETUP: display picture parameters setup menu, such as
brightness, contrast, color-saturation. For more information
please refer Picture parameters setting
PAUSE/STEP: first pressing: switch to pause mode. Subsequent pressings: frame-by-frame playback (switch to the
next frame).
● To resume normal playback, press PLAY.
FWD (>>)/REW (<<): switch to accelerated playback forward/backward, increase rate (switch between 1x, 2x, 4x, 8x,
16x, 32x modes).
● To resume normal playback, press PLAY.
PLAY: exit pause mode (resume playback). Exit rapid/slowmotion playback.
STOP: stop playback, return to file browser.
PREV (|<<) / NEXT (>>|): switch to previous/next section
of DVD-Video during playback.
Switch to previous/next menu item (in DVD menu display
mode).
MENU: switch to main menu of DVD-Video.
TITLE: jump to Title menu of DVD-Video (if any).
CLEAR (twice): playback of DVD-Videofrom the very beginning. Click CLEAR twice consecutively.)
.
Chapter 7
In case of Special setting selection, following RC
buttons are enabled:
POP UP/
TOP
Network disks operation
Chapter 8
You may connect to your player network disks with SMB and NFS protocols.
ВIt is possible to connect any number of network disks. Each network disk connected is displayed in root directory of the file browser (Main page) as a special
folder or an icon.
Chapter 8
Warning: current firmware version does not support network disks, if they are only
accessible with UPnP/DLNA or HTTP/ HTML protocols, and if using of SMB or NFS
is impossible.
Network disks operation
To create new network folder (i.e. to initialize the network disk):
1 Enter the root directory of the file browser on the Main page.
41
3
2
Execute the Create a network folder command using the contextual menu (MENU
button of the RC).
3
In pop-up dialog box adjust network folder parameters.
4
In Name area enter any name which you like. This name will be displayed in the file
browser for this external resource.
5
In Type area select SMB or NFS, depending on protocol supported by your network
disk.
If you wish to connect to a Windows-operated PC and do not know what is NFS
server, the easiest way is to use SMB protocol: in this case, you do not need installation of additional software, standard Windows tools will be sufficient (2000, XP
or Vista).
If you wish to connect to NAS (Network Attached Storage), and your NAS supports
NFS, use NFS protocol.
Chapter 8
● By default, there is no standard Windows software supporting NFS protocol. If
you wish to use NFS to access files on a Windows-operated PC, you need to
install and adjust NFS server software, e.g. HaneWin NFS Server (User Manual
available in English on developer’s web site).
Connection through SMB protocol:
1
In Server area enter IP address of your server. E.g.: 10.0.0.2.
In case of connection to Windows PC, you may find the required IP address in
network connection features on Windows PC (for example, in Windows XP you can
see the symbol of network connection in the right bottom corner of the display;
double click on it and you have a window with the connection status; choose “Support” folder here and you see the needed “IP Address”).
Network disks operation
● Indication of Windows name of the server is currently not supported.
● If your LAN is adjusted for DNS resolution of names and the player network settings contain correct DNS parameters, you may use the DNS name of your server
in the place of IP address.
In the Folder area enter name of common access folder at SMB server. E.g.: VID2
EO.
After connection to a Windows PC, the name of common access folder may be
found in folder properties (for example, in Windows XP file browser: right-click with
mouse on the shared folder name, choose “Sharing and Security…” and you have
the needed name in the “Share name” field of the appeared window. The same
window can be used to add new shared folder on your Windows computer for any
folder you need to share).
42
● Name of common access folder displayed in the network may not be the same as
its name on hard disk. You should use a network name. If SMB server requires user
name/password, enter these data in the relevant fields (usually not required).
Connection with NFS protocol:
1
2
3
In the Server area specify IP address of your NFS server. E.g.: 10.0.0.2.
After connection to a Windows PC, you may find your IP address in network properties of Windows PC (in the way as described for SMB protocol above).
● Indication of Windows-name of server is not supported.
● If your LAN supports DNS resolution of names and network settings of your player
contain correct DNS parameters, you may use DNS name of server instead of IPadress.
In the Folder area, specify the full path to the folder on NFS server. E.g.: /data/video.
● path to folder should begin with “/” mark. Folder path is specified by specific NFSserver and its settings.
Press OK. New network folder will be displayed in the root directory of file browser.
Enter network folder displayed for browsing contents of connected network disk.
● If at an attempt to enter a network folder you see ‘No access to network folder’
message, refer to Troubleshooting section.
Chapter 8
Access to hard disk of the player from the
network:
You may use your player as network file storage (NAS), and have a local network access to storage drives contents connected to the player.
For FTP access it is enough to establish a FTP connection with the player. No need
to enter user name and password (i.e. so-called anonymous FTP access). If a FTP
client asks to enter user name and password, enter ‘ftp’ as user name, and leave
password line blank.
If you wish to connect to the player by FTP from a
Windows PC:
1
Network disks operation
2
43
Find out IP-address of your player (you can find it through the player Setup menu,
ref. System information section).
Start Windows Explorer and enter in address line ftp://IP-address-of the player
(e.g.: ftp://10.0.0.3).
● for FTP access it is recommended to use special FTP-clients instead of Windows
Explorer, such as FileZilla; specialized FTP-clients frequently operate better.
For SMB access, the player provides a common (open) access folder titled ‘internal_hard_disk’, corresponding to internal hard disk of your player. No need to
enter user name and password.
If you wish to connect to your player through
SMB from a Windows PC:
1
2
Find out IP-address of your player (you can find it through the player Setup menu,
System information section).
Start Windows Explorer and enter in address line \\IP-address-of-the-player\internal_hard_disk (e.g.: \\10.0.0.3\internal_hard_disk).
● You can also address to your player as follows: \\IP-address-of-the player\\dune\
internal_hard_disk and \\dune.
If you fail to get access to the player from the network, please refer to Troubleshooting section.
Troubleshooting
Chapter 9
General
TROUBLE: the device does not switch on.
SOLUTION: check, if the media player is connected to AC mains.
TROUBLE: the device is properly connected to the mains, but works improperly.
SOLUTION:
Chapter 9
1. it is possible that the temperature requirements were not observed, and there is
condensate on internal parts. Immediately switch the device into Standby mode,
and unplug it of the AC mains. Wait until the condensate evaporates, cf. ‘Safety
measures’, and afterwards restart using of the media player in normal mode.
2. it is possible that the device needs to be rebooted. Switch to Standby mode, and
unplug of the AC mains. Wait ca. 1 minute, afterwards turn on.
3. some functions can work improperly or not be enabled, it is due to the software
recorded on the media. Make sure that functions required are enabled/disabled in
the specific media fragment. If after all the remedies above you still think that the
media player works improperly, please refer to the service center.
TROUBLE: the remote control does not work or works improperly.
SOLUTION: Please refer to the ‘Remote control’ section for proper operation of the
remote control.
TROUBLE: The player turns on, but there is no picture.
SOLUTION: If during 60 sec after switching on, there is no picture on the screen of your
TV, and the player operation indicator is lighted, most probably video output parameters
of your player or video input of your TV/projection set are incorrect. If you are sure that
the equipment is duly connected, but (using appropriate cable connected to appropriate
sockets), try to adjust video input settings using MODE button of your RC. Ref. ‘Quick
adjusting of video output’.
TROUBLE: Player switched on, but no picture on the screen
Troubleshooting
SOLUTION: If during 60 sec after switching on there is no picture on the screen of
your TV set, and the player operation indicator is lighted, most probably video output parameters of your player or video input of your TV set/projector are incorrect.
If you are not sure that the equipment is duly connected (using appropriate cable
connected to appropriate sockets), try to change video input settings using MODE
button of your RC. Ref. Quick setting of video output
44
TROUBLE: HDMI connection does not function or function improperly (picture disappears/jumps, etc.)
This kind of troubles results from bad compatibility of the player with some models
of HDMI equipment. Symptoms may be the following:
1. HDMI-connection is not available at all, although everything is duly connected and adjusted.
2. Recurrent failure or jumping of picture during video playback or operation of file
browser.
3. Recurrent warning on TV screen about change of video mode during video playback or operation of file browser.
4. Sound troubles of TV set (during sound transmission through HDMI).
5. Color bars on screen.
6. Other artefacts
Note: reinitializing of HDMI-video output of the player at switching between file browser and video playback (in the form of several second delay before playback start and
return to the file browser) is an expected and normal player behavior with current firmware versions installed in any HDMI-equipment which does not prevent from using the
player. This feature does not relate to above troubles.
Chapter 9
If you encounter the problems above:
First of all, make sure that the problem relates to HDMI connection: try to use
an analog connection to TV set (e.g., component). If problem persists after
using of analog connection, it shall mean that it relates not to HDMI, but to
your TV set.
● Try to switch on/off the sound transmission through HDMI (setup menu, Sound
setting section), sometimes it has a considerable effect on the situation.
● Try different settings of video output: 480i/720p/1080i/1080p, 23.976/24/
30/50/59.94/60Hz. Your TV set may not support some video modes, or does it
improperly. Change of video mode to another compatible with your TV set may
help solving the problem. You should test by consecutive examination of video
modes. It is suggested to start with the lowest picture resolutions.
● If possible, try to use another HDMI cable.
● If possible, try to change the mode of connection of the player to your HDMIequipment: e.g., instead of connection through a receiver, connect directly to a
TV set.
● If possible, try to connect the player to another TV set or AV-receiver. Since the
problem may be caused by another equipment, and not the player or HDMI cable.
If the problem persists, it is quite probable that the player is not compatible or
hardly compatible with HDMI-equipment. It is probable that the future firmware will
have modifications/updates eliminating problems with your HDMI-equipment.
Troubleshooting
You may post a written description of your problem on the manufacturer’s forum
or e-mail it (you may find its address at www.hdi.co.il). In such cases, please describe your problem in details as much as possible, including conditions and situations in which it manifests.
45
BD-ROM player:
TROUBLE: none of optical media is played back or is played with noise or hang-up.
SOLUTION: make sure that there is a disc in the tray duly inserted (printed labels upward). Check for deep scratches and dirt on the optical data carrier. Check the media
content, it is possible that the media player does not play back this type of media or materials. Please refer to ‘Key features of DUNE HD Center’ and ‘Notes on discs’ sections
for full list of discs and AV codec types.
TROUBLE: BD-ROM and DVD-ROM are not played back.
SOLUTION: check the regional code on your disc. The disc coding shall match the
coding on the rear panel of your media player. Please refer to information on regional protection of content, cf. ‘Notes on discs’ section.
TROUBLE: Some functions of BD-ROM differ from their description.
SOLUTION: set of functions, as well as internal menu of BD-ROM disc may vary. Try
playing back of another disc. Cf. ‘Main features of Blu-ray discs’.
Chapter 9
TROUBLE: the default language of the media player menu is not displayed in the
subtitles or not sounded.
SOLUTION: it is possible that this media simply does not contain a sound track and
subtitles with support of a specific language. Check these parameters on the disc
cover or try another disc.
TROUBLE: no subtitles displayed.
SOLUTION: it is possible that this media simply does not contain subtitles or they are
disabled. Press Subtitle button several times and select one of subtitles versions, if
they are available on the disc. Check the availability of subtitles on the disc cover or try
another disc.
TROUBLE: when playing a program from a BD-ROM the current camera angle does
not change (Angle).
SOLUTION: it is possible that this disc does not support the angle selection. Not all
movie scenes may change the angle. Check the availability of such scenes on the
disc cover or try another disc.
TROUBLE: Player hangs up on an attempt to read the optical disk, and the EJECT
button does not work.
SOLUTION:
1. Switch the player off (using the power button on the player).
2. Switch the player on.
3. Press and hold the EJECT button on the front panel of the player.
4. Wait for the player to finish loading process (may take about 1 minute).
Troubleshooting
5. The player should eject the disk in the end of the loading process.
46
Mediaplayer
TROUBLE: Jerking playback of high bitrate video files, with recurrent hang-up of
video image
SOLUTION: Make sure during playback of high bitrate video files that the player has
sufficient media data reading rate (even with some reserve) of used data storage
drive. If reading rate is insufficient, there will be playback failures. To avoid this kind
of failures, it is advisable to store the file on a drive ensuring best reading rate and
playback the file from this device. Tip: the quickest drive is the internal hard drive of
your media player.
● You may find a table of approximate reading rates for different kinds of drives on the
manufacturer’s site
You may evaluate the speed potential of a specific drive as follows:
Select the file from the file browser, press INFO button on RC and select “Reading
check”. The player will check the file reading and display the information on maximum possible rate of media data reading from this file. For smooth playback of the
file, this rate shall exceed the maximum file bitrate. In some cases, the reserve may
not be sufficient compared to an average file bitrate.
File bitrate may be evaluated during file playback by the player by pressing the INFO
button.
Chapter 9
Note: the information on bitrate delivered by the player is very rough and may be
erroneous, that’s why it is advisable to use this function only during a file playback
from the drive which reading rate is a priori sufficient (e.g.: from internal EXT2/EXT3formatted hard disk).
During file playback by the player, the information box activated with INFO button
may display “Clipboard underflowing: ...”, displaying the duration of time span in
seconds during which underrun of input buffer of the decoder took place. If you see
this warning, it shall mean the insufficient reading rate from the drive.
During playback of a file from the built-in EXT2/EXT3-formatted hard drive, the maximum possible data transmission rate is reached. It is suggested to copy a problematic file to the internal hard disk of the player. If during playback from the internal
hard disk the the problem disappers, it’s most probably caused by the insufficient
reading rate from the external resource used earlier.
In the same time, jumps and other playback failures may result from properties of
the media file. For instance, it may be coded so that the player’s decoder does not
simply ‘understand’ it. You may check it easily: if file playback failures happen even
when playing it from the internal hard disk, then the problem is caused by the file
itself. It is probable that with future firmware versions it may be played correctly, but
the manufacturer cannot guarantee it.
TROUBLE: Selected file is not played back, although its format seems to be supported by the player
SOLUTION: The problem may be due to several causes:
Troubleshooting
File error. To eliminate this factor you may try to play back the file with different software player installed on your PC. If all of these players warn about the failure, then
this file may not be used.
47
File coding specifics. Although the DUNE player supports the majority of most popular file formats (containers and codecs), it shall not mean that it will normally play
back any file of these formats encoded by any way. Frequently, these files are made
with violation of certain rules, and although they may be correctly played back with
different embedded PC players, the DUNE player may not do this (since the HW
decoder of the player and/or player software are not designed for playback of such
‘exotic’ files).
Player software or hardware limitations or errors. These limitations or errors may be
potentially eliminated in future firmware updates. Please watch for updates.
* If you think that a file is not played back by the player by mistake (or is played back
improperly) and wish to draw attention of program developers, you may inform
HDI about it by e-mail. Give as much details as possible about the essence and
way of problem occurrence, as well as about the file: size in bytes, type of container (e.g.: MKV, TS, AVI), type of video codec (e.g.: MPEG2, H.264, VC1, MPEG4),
type of audio codec for all sound tracks (e.g.: AC3, DTS), frame rate (e.g.: 23.976,
24.0, 25.0, 29.97, 30.0), bitrate (e.g.: 20 Mbit/sec). If possible, give the link for
downloading of this file. In case of availability of such link, the probability of finding
the solution rises significantly. In case of sound problems please do not forget to
specify the way of connection to the relevant audio equipment, specific model of
your receiving audio equipment and setting values of the player from the Sound
adjusting section.
TROUBLE: after an attempt to enter the network folder there is a popup: “No access to network folder”
SOLUTION: several reasons and solutions of this problem are possible
Incorrect type of network folder. Rectify by specifying the correct path to the folder.
Chapter 9
If you connect to a Windows-operated PC (2000, XP or Vista) and do not know what
is a NFS-server, then specify SMB.
Incorrect IP-address (or DNS-name) of the server.
If you use a DNS-name, try to use the IP-address of the server. Make sure that the
IP-address of the server is correct.
You may find this information on a Windows PC, in network connection properties.
Incorrectly adjusted or disabled network connection between the player and the server.
Make sure that the player and the server are duly connected to the network (check
connection of network cables).
Make sure that the player’s network parameters are set correctly (Setup menu,
please check the “Network setting” section).
Enter the player setup menu, System information section, and make sure that the
IP-address line displays correct check the IP-address and that to the right of the
IP-address it is displayed: “On”.
If you connect to a Windows PC, do the following: firstly, find the IP-address of the
player (cf. setup menu, System information section). Afterwards, on the PC: press
Start, Run and enter in the command line ‘ping IP-address-of-the-player’ (e.g.:
ping 10.0.0.3). If successful transmission of packages is displayed, it shall mean
that the network connection between the player and the Windows PC is correct.
Troubleshooting
Incorrect name of network folder. Make sure that the correct name is entered.
48
After connection to a Windows PC: name of common access folder may be found
in folder properties on the PC. Make sure that the server is correctly setup (required folder is open for common access). Make sure that you may have an access to the common folder from another PC or other network device.
Incorrect user name/password (in case of SMB connection). Make sure that you
enter correct user name and password.
Make sure that you may get access to common folder with specified user name and
password from another PC of network device.
● To change network folder settings: select the network folder in the file browser. Execute
the “Change the network folder” command using the contextual menu. In pop-up dialogbox modify network folder parameters. Press OK.
● To delete the network folder: select the network folder in file browser. Execute the “Delete the network folder” command using the contextual menu.
TROUBLE: no access to internal hard disk of the player through the network
SOLUTION: several reasons and solutions of this problem are possible
Incorrectly adjusted or disabled network connection between the player and the client PC.
● Make sure that the player and the client PC are correctly connected to the network
(check the network cable connection).
● Make sure that the network parameters of the player are correct (Cf.: Setup menu,
“Network setting” section).
Troubleshooting
Chapter 9
● Enter the player setup menu, System information section, and make sure that the
IP-address in the IP-address line is correct, and to the right of the IP-address “On”
is indicated.
49
● If you connect to a Windows PC, do the following: firstly, find the IP-address of
the player (cf. setup menu, “System information” section). Afterwards, on the PC:
press Start, Run and enter in the command line ‘ping IP-address-of-the-player’
(e.g.: ping 10.0.0.3). If successful transmission of packages is displayed, it shall
mean that the network connection between the player and the Windows PC is correct.
Incorrect IP-address of the player.
● Make sure that you enter the IP-address currently assigned to the player. You may find
the IP-address currently assigned in the player Setup menu, “System information”
section.
Firmware recovery
procedure
Chapter 10
In a case of firmware upgrade crashed (e.g. the player is switched off during firmware upgrade), firmware recovery is possible in most cases (except
the case when the new firmware version has a modified “kernel” part and
the upgrade crashes exactly when rewriting this “kernel” part (first 15% of
upgrade progress).
1
Copy a firmware DFF file into “dune_firmware.dff” file at the top level of a USB flash
drive (preferably use exactly the same firmware version as was attempted to install
during the failed upgrade).
2
Switch the player off (using the power button on the player).
3
Attach the USB flash drive with “dune_firmware.dff” file to the player.
4
Switch the player on.
Chapter 10
The player should detect the the USB flash drive and automatically start firmware
recovery procedure. You should see “RECOVER”, “CHK 0”, “CHK 1”,..., “CHK 99”,
“REC 0”, “REC 1”, ..., “REC 99”, “OK”, “EJECT STORAGE AND REBOOT” messages
on the front panel of the player.
On an error, a message “ERR ...” is displayed on the front penal of the player. “...” is
the error code. Possible error codes:
“ERR Ann”, “ERR Bnn”, “ERR Cnn”: A problem with the “dune_firmware.dff”
● the file is invalid/broken
● the file corresponds to a wrong player model
● the file can not be read from the USB drive, etc.
Firmware recovery procedure
“ERR Dnn”, “ERR Enn”: A problem during data copying (e.g. the USB drive disconnected during data copying).
50
5
Detach the USB flash drive from the player, and delete the “dune_firmware.dff” file
from it (do not attach the USB flash drive with this file to the player when you switch
the player on, otherwise, the player will attempt to recover the firmware again).
6
Switch the player off (using the power button on the player).
7
Switch the player on.
The recovered firmware should load in the usual way.
DUNE HD Center
specifications
Chapter 11
Cahapter 11
Optical discs
BD-ROM, BD-R (RE), DVD-ROM, DVD-R (RW), CD, CD-R (RW)
Video file formats
MKV, MPEG-TS, MPEG-PS, M2TS, VOB, AVI, MOV, MP4, QT, ASF,
WMV, DVD-ISO, VIDEO_TS
Video compression algorithms
MPEG2, MPEG4, DivX, XVID, WMV9, VC1, H.264
Audio formats
DD: AC3 (DD), EAC3 (DD+), Dolby True HD [lossless]; DTS: DTS HD
High Resolution Audio (HRA), DTS HD Master Audio (MA) [lossless],
decoding in PCM/analog, Bitstream on HDMI1.3.
Digital images
JPG, PNG, BMP
Subtitle formats
Plain text, SSA/AAS (MKV containers), SRT (with any supported
video file format), VOB
Processor
Sigma Designs 8634 SoC
System memory
RAM: 384 Mb
ROM: 64 Mb (for control microprogramm)
1GB NAND flash
Available picture
modes through
HDMI v1.3
● 480i, 480p (60 Hz) ● 576i, 576p (50 Hz) ● 720p (50 Hz, 60 Hz)
●1080i (50 Hz, 60 Hz) ●1080p (24 Hz, 25 Hz, 30 Hz, 50 Hz, 60 Hz)
●1024х768, 1280х1024, 1280х768, 1280х960, 1360х768,
1366х768, 1400х1050, 1440х900, 1600х1200, 1680х1050,
1920х1200 (60 Hz)
Analog video
output
Component (Y, Pb, Pr), S-Video, composite (CVBS)
Audio output
Digital: optical Toslink and Сoaxial, analog: 7.1 output and stereo
2RCA
USB 2.0 ports
3 x USB Host
LAN connection
LAN Ethernet 100 Mbit/sec Wi-Fi
Size, mm
435,5mm (width) x 301,5mm (depth) x 81mm (height)
DUNE HD Center dimensions
301,5mm
DUNE HD Center specifications
81,1mm
51
435,5mm
* Note: Files with specific coding features or specific combinations of containers/
codecs may not be played, or played with limitations or improperly. Follow release
of firmware updates (control micro-programs). Firmware update may resolve
problems of playback of some files. This procedure may be made by the user or by
a technician of post-sales service center.
** Note: basic modes of music files playback are currently supported (single file playback,
M3U and PLS play lists are supported). More advanced mechanisms will be available in
future firmware releases.
*** Note: only very basic mode of picture viewing is currently supported (single
picture view only). More advanced mechanisms, including slide shows, will be
available in future firmware releases.
www.HDI.co.il