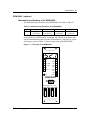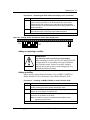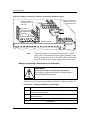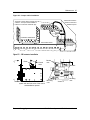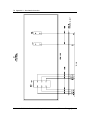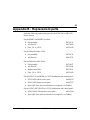
1
Emerson Energy Systems UM6C28C ( 167-9021-102 ) MFA150 Modular Front Access Power SystemNT6C28C User Manual P0728920 Standard 11.00 October 2001 3 MFA150 Modular Front Access Power SystemNT6C28C User Manual Manual Number : UM6C28C ( 167-9021-102 ) Manualt Issue : 11.00 Manual Status : Standard Release Date : October 2001 P0728920 Copyright 2001 Astec International Ltd All Rights Reserved Published in Canada The information contained in this manual is the property of Astec International Ltd and is subject to change without notice. Astec International Ltd reserves the right to make changes in design or components as progress in engineering and manufacturing may warrant. Except as specifically authorized in writing by the V.P. of Engineering and Product Manufacturing of Astec International Ltd, the holder of this manual shall keep all information contained herein confidential and shall protect same, in whole or in part, from disclosure and dissemination to all third parties, and use the same for start-up, operation, troubleshooting, and maintenance purposes only. Changes or modifications not expressly approved by the party responsible for compliance could void the user’s authority to operate this equipment. The equipment generates, uses, and can radiate radio frequency energy, and if not installed and used in accordance with the instructions contained in the Installation and User Manuals, can cause harmful interference to radio communications. Operation of this equipment in a residential area is likely to cause harmful interference, in which case the user sill be required to correct the interference at his own expense. Helios and Helios Candeo are trademarks of Astec International Ltd. The Emerson logo is a trademark and service mark of Emerson Electric Co. Emerson Energy Systems MFA150 Power System NT6C28C User Manual 5 Publication history October 2001 Standard Issue 11.00. In Tables 31 and 32 the prefix of the CPC Numbers was A0. The manual was modified to reflect the Emerson Energy Systems and Emerson Network Power identities. In the “ Technical service assistance “ chapter the telephone numbers were updated. ( EC 102-28532 ) April 2001 Standard Issue 10.00. Manual modified to reflect Emerson identity. ( EC 102-26046 ) May 2000 Standard Issue 9.0. Modifications throughout and reference to manual number UM6C28C added. ( ECN 102-17192 ) June 1999 Standard 8.0. Revised to remove the “Installation” Chapter now covered in a new Installation Manual (167-9021-133), to replace Nortel information by Astec information, and general revision to improve illustrations and procedures. December 1995 Issue 7.0 Standard. Revisions to the “Specifications” and “Installation” Chapters. August 1995 Issue 6.0 Standard. Revised to update the functional description of the equipment. April 1995 Issue 5.0 Standard. Revised to include information about the LVD Manual Reconnect optional feature. December 1994 Issue 4.0 Standard. Emerson Energy Systems MFA150 Power System NT6C28C User Manual 6 Publication history May 1992 Issue 3.0 Standard. November 1991 Issue 2.0. Standard. June 1991 Issue 1.0. Standard. UM6C28C P0728920 Standard 11.00 April 2001 Emerson Energy Systems 7 Contents About this manual.............................................................................................. 13 Purpose of this manual ........................................................................................ 13 Applicability of this manual................................................................................... 13 How this manual is organized .............................................................................. 13 Other documents ................................................................................................. 14 Introduction ........................................................................................................ 15 Description ........................................................................................................... 15 Equipment applications ........................................................................................ 16 Mounting configurations ....................................................................................... 16 Specifications..................................................................................................... 19 Frameworks ......................................................................................................... 19 NT6C14G control and distribution panel.............................................................. 19 Mechanical specifications of the control and distribution panel ...................... 19 Electrical specifications of the control and distribution panel.......................... 20 Power shelves, 75 A and 150 A ........................................................................... 21 Mechanical specifications of the power shelves ............................................. 21 Electrical specifications of the power shelves ................................................. 22 Rectifiers .............................................................................................................. 22 MPR15 ............................................................................................................ 22 Electrical specifications MPR15 rectifier......................................................... 24 MPR25 ............................................................................................................ 24 Electrical specifications of the MPR25 rectifier............................................... 26 Helios Rectifier 25/48...................................................................................... 26 Electrical specifications Helios Rectifier 25/48 ............................................... 28 Helios Rectifier 50/48...................................................................................... 28 Electrical specifications Helios Rectifier 50/48 ............................................... 30 RPM1000C ( optional )......................................................................................... 31 Mechanical specifications of the RPM1000C ................................................. 31 Electrical specifications of the RPM1000C ..................................................... 32 Helios TCM/48 temperature compensation module ( optional ) .......................... 32 Mechanical specifications Helios TCM/48 ...................................................... 32 Electrical specifications Helios TCM/48.......................................................... 32 NT6C18EA/EB battery disconnect panel ( optional ) ........................................... 33 Mechanical specifications of the battery disconnect panel ............................. 33 Electrical specifications of the battery disconnect panel................................. 33 NT6C18IFA/FD supplementary battery return busbar ( optional ) ....................... 33 Mechanical specifications of the NT6C18IFA/FD battery return busbar......... 33 Electrical specifications of the NT6C18IFA/FD battery return busbar ............ 33 Emerson Energy Systems MFA150 Power System NT6C28C User Manual 8 Contents Overall power system specifications .................................................................... 34 Mechanical specifications of a complete NT6C28C(x) MFA150 .................... 34 Color ............................................................................................................... 34 Electrical ......................................................................................................... 34 Electromagnetic interference (EMI) compliance............................................. 34 Electrostatic discharge (ESD) immunity ......................................................... 34 Environmental ................................................................................................. 34 Floor and point loading ................................................................................... 35 Operation ............................................................................................................ 37 General ................................................................................................................ 37 NT6C14G control and distribution panel.............................................................. 37 Front of the NT6C14GA/GM and NT6C14GP control and distribution panels...................................................................................................... 37 Internal connecting features of the NT6C14GA/GM and NT6C14GP control and distribution panels ................................................................ 41 Front of the NT6C14GC/GN control and distribution panels .......................... 42 Internal connecting features of the NT6C14GC/GD/GN and NT6C14GG/GH/GQ control and distribution panels ............................... 46 Rectifiers .............................................................................................................. 47 RPM1000C ( optional )......................................................................................... 47 Helios TCM/48 temperature compensation module ( optional ) .......................... 47 NT6C18EA/EB battery disconnect panel ( optional ) ........................................... 48 NT6C18FA/FD supplementary battery return busbar ( optional ) ........................ 48 Maintenance ....................................................................................................... 49 Routine maintenance ........................................................................................... 49 Addition / replacement procedures ...................................................................... 52 Replacing the RPM1000C .............................................................................. 52 Replacing the NT6C14PF controller card ( NT6C14GA/GM and NT6C14GP control and distribution panels only ) ................................... 52 Replacing the NT6C14PG meter display card ( NT6C14GA/GM and NT6C14GP control and distribution panels only ) ................................... 55 Adding or replacing a rectifier ......................................................................... 57 Adding a rectifier ............................................................................................. 57 Replacing a rectifier ........................................................................................ 59 Adding a power shelf ...................................................................................... 60 Adding or replacing a battery string ................................................................ 60 Adding or replacing a distribution circuit breaker............................................ 62 Replacement of the LVD contactor................................................................. 65 Appendix A : Associated schematics .............................................................. 69 Appendix B : Replacement parts...................................................................... 85 Appendix C : Technical service assistance .................................................... 89 Local toll-free prefixes.......................................................................................... 89 Toll-free technical assistance numbers ............................................................... 90 UM6C28C P0728920 Standard 11.00 April 2001 Emerson Energy Systems Contents 9 Appendix D : Reference documents ................................................................ 91 Abbreviations and acronyms............................................................................ 93 List of Figures Figure 1 – Front view of a typical NT6C28C(x) MFA150 power system with shelf mounted batteries ......................................................................................17 Figure 2 – Front view of a typical NT6C28C(x) MFA150 power system with larger VRLA batteries mounted beside the framework ..........................................18 Figure 3 – Front view of the NT6C14G control and distribution panel equipped with the analog controller card...........................................................................20 Figure 4 – Front view of the NT614G control and distribution panel equipped with the RPM1000C intelligent controller...........................................................20 Figure 5 – Front view of the MPS75 power shelf (shown without the rectifiers)..........21 Figure 6 – Front view of the MPS150 power shelf (shown without the rectifiers) .......22 Figure 7 – Front view of the MPR15 rectifier ..............................................................23 Figure 8 – Front view of the MPR25 rectifier ..............................................................25 Figure 9 – Front view of the Helios Rectifier 25/48 .....................................................27 Figure 10 – Front view of the Helios Rectifier 50/48 ...................................................29 Figure 11 – Front view of the RPM1000C ...................................................................31 Figure 12 – Front view of the Helios TCM/48 temperature compensation module ........32 Figure 13 – Front view of the battery disconnect panel ...............................................33 Figure 14 – Front view of the NT6C18FA/FD battery return busbar (cover removed)...33 Figure 15 – Control, alarm and operational features on the front panel of the NT6C14GA/GM and NT6C14GP control and distribution panels .................38 Figure 16 – Enlarged view of the controller card section..............................................38 Figure 17 – Control, alarm and operational features on the front panel of the NT6C14GC/GN control and distribution panels ...........................................43 Figure 18 – Enlarged view of the RPM1000C section..................................................43 Figure 19 – Locking the LVD contactor in the closed position ......................................55 Figure 20 – Setting the S3 dip switches on the meter display card..............................57 Figure 21 – Rectifier shelf connections inside the control and distribution panel ..........60 Figure 22 – Battery connections inside the control and distribution panel....................62 Figure 23 – Cross-section of an installed circuit breaker..............................................64 Figure 24 – Jumper cable installation ..........................................................................67 List of Tables Table 1 – Mechanical specifications of the frameworks ..............................................19 Table 2 – Mechanical specifications of the control and distribution panel ....................19 Emerson Energy Systems MFA150 Power SystemNT6C28C User Manual 10 Contents Table 3 – Mechanical specifications of the MPS75 and MPS150 power shelves .........21 Table 4 – Mechanical specifications of the MPR15 rectifier ........................................22 Table 5 – Electrical specifications of the MPR15 rectifier............................................24 Table 6 – Mechanical specifications of the MPR25 rectifier ........................................24 Table 7 – Electrical specifications of the MPR25 rectifier............................................26 Table 8 – Mechanical specifications of the Helios Rectifier 25/48 ...............................26 Table 9 – Electrical specifications of the Helios Rectifier 25/48...................................28 Table 10 – Mechanical specifications of the Helios Rectifier 50/48 .............................30 Table 11 – Electrical specifications of the Helios Rectifier 50/48 ................................30 Table 12 – Mechanical specifications of the RPM1000C.............................................31 Table 13 – Mechanical specifications of the Helios TCM48 temperature compensation module ...............................................................................32 Table 14 – Mechanical specifications of the battery disconnect panel.........................33 Table 15 – Mechanical specifications of the NT6C18IFA/FD battery return busbar .....33 Table 16 – Mechanical specifications of a complete NT6C28C(x) MFA150 .................34 Table 17 – Floor and point loading of a complete NT6C28C(x) MFA150 ......................35 Table 18 – Visual indicators ........................................................................................39 Table 19 – Switches ...................................................................................................39 Table 20 – Potentiometers ..........................................................................................40 Table 21 – Test points ................................................................................................40 Table 22 – Fuses.........................................................................................................40 Table 23 – TB1 and TB2 pin assignment on the controller card...................................41 Table 24 – TB3 pin assignment on the controller card .................................................42 Table 25 – J1 to J6 connector pin assignment ............................................................42 Table 26 – J7 connector pin assignment .....................................................................42 Table 27 – Visual indicators ........................................................................................44 Table 28 – Potentiometers ..........................................................................................45 Table 29 – Fuses.........................................................................................................46 Table 30 – Fault diagnosis...........................................................................................50 Table 31 – Standard trip circuit breakers e/w circuit breaker guard.............................86 Table 32 – Mid trip circuit breakers e/w circuit breaker guard.....................................87 Table 33 – QFF fuses and designation discs ................................................................87 List of Procedures Procedure 1 – Replacing the NT6C14PF controller card ..............................................53 Procedure 2 – Replacing the NT6C14PG meter display card........................................56 Procedure 3 – Installing an MPR15, MPR25 or Helios Rectifier 25/48.........................57 Procedure 4 – Installing a Helios Rectifier 50/48 .........................................................58 Procedure 5 – Replacing a rectifier..............................................................................59 Procedure 6 – Connecting a rectifier shelf ...................................................................60 Procedure 7 – Adding or replacing a battery string ......................................................61 Procedure 8 – Adding a distribution circuit breaker......................................................62 UM6C28C P0728920 Standard 11.00 April 2001 Emerson Energy Systems Contents 11 Procedure 9 – Replacing a distribution circuit breaker .................................................65 Procedure 10 – Replacing the LVD contactor...............................................................66 Emerson Energy Systems MFA150 Power SystemNT6C28C User Manual 12 Contents This page is left blank intentionally. UM6C28C P0728920 Standard 11.00 April 2001 Emerson Energy Systems 13 About this manual Purpose of this manual This manual provides all the necessary information to operate and maintain an NT6C28C(x) MFA150 power system. The installation procedures for the NT6C28C(x) MFA150 power system are covered in installation manual IM6C28C ( 167-9021-133 ). Applicability of this manual This manual applies to NT6C28C(x) MFA150 power systems having any configuration of controller, rectifier, distribution, monitoring and battery equipment. How this manual is organized This manual is divided into six parts: 1) Front matters: contain the manual information, the table of Contents and this chapter. 2) Introduction: provides a brief description of the NT6C28C(x) MFA150 power system, as well as its applications and configurations. 3) Specifications: describes the technical characteristics of the NT6C28C(x) MFA150 power system. 4) Operation: describes the operational features of the NT6C28C(x) MFA150 power system. 5) Maintenance: describes the maintenance procedures to maintain the power system in a good operational state, and to replace or add equipment to the power system. 6) Appendices: provide schematics, technical service assistance, and feedback information for the manual, as well as a list of abbreviations and acronyms used throughout this manual. Emerson Energy Systems MFA150 Power System NT6C28C User Manual 14 About this manual Other documents In addition to the present manual, the following documentation may also be required for the operation and maintenance of the NT6C28C(x) MFA150 power system: • User Manual for other Emerson Energy Systems products, such as the rectifiers, the RPM1000C, and the Helios TCM/48 as required ( see the list in Appendix D ) • configuration sheets for the RPM1000C • User Guides for the products of other manufacturers ( for example : batteries ). UM6C28C P0728920 Standard 11.00 April 2001 Emerson Energy Systems 15 Introduction Description The NT6C28C(x) MFA150 power system is a positive ground, –48 V dc nominal, 150 A capacity power system consisting of a control and distribution panel and power shelves which support plug-in rectifiers mounted on a relay rack type framework. An intelligent controller/monitor (RPM1000C), a temperature compensation module ( Helios TCM/48 ), a low voltage disconnect (LVD) feature, a battery disconnect panel, a supplementary battery return busbar, and battery shelves for rack mounted batteries are available as options. The NT6C28C(x) MFA150 power system is a front access power system. All installation, operation and maintenance activities can be done from the front and top of the power system. A minimum space of 3 inches ( 7.6 cm ) is required behind the NT6C28C(x) MFA150 power system for ventilation. The NT6C28C(x) MFA150 power system is intended for non-seismic and seismic applications up to zone 4 (Bellcore) depending upon the relay rack selected. • The standard 7-foot ( 2.13 m ) rack is for non-seismic applications. • The earthquake braced 7-foot ( 2.13 m ) rack is for top braced applications. • The 4-foot ( 1.22 m ) and 7-foot ( 2.13 m ) seismic racks are for seismic freestanding applications (no top support required). • The 25.36-inch ( 64.41 cm ) rack is for wall mount applications. All of the various panels used in making the System 200/48 can be mounted on frameworks having mounting holes with either 1.0-inch or 1.75-inch spacing. The NT6C28C(x) MFA150 power system provides a variety of monitoring, alarm and control features, such as low voltage alarm, fuse and circuit breaker alarms, rectifier failure alarms, equalize, and an optional low voltage disconnect (LVD). Emerson Energy Systems MFA150 Power System NT6C28C User Manual 16 Introduction Distribution is achieved through the circuit breakers and fuses on the control and distribution panel. The NT6C28C(x) MFA150 utilizes 15, 25, or 50 A rectifiers connected in parallel as building blocks to reach the maximum capacity of 150 A. The rectifiers operate from a 208 V or 240 V single phase 50/60 Hz AC source, except for the 15 A rectifier which operates from a 115 V ac source. Equipment applications The NT6C28C(x) MFA150 power system is designed to operate with any telecommunication system requiring up to 150 A capacity. The NT6C28C(x) MFA150 power system can be used to provide power to the following products: OC-12, OC-48, DMS-1U, Access Node, DMS-100 remotes installed in huts, controlled environment vaults (CEVs) and customer premise equipment (CPE). In many applications, a consistent single point ground topology should be maintained for all associated equipment. The NT6C28C(x) MFA150 power system complies with the requirements for single point grounding. Mounting configurations The NT6C28C(x) MFA150 can be configured in many ways to meet specific customer requirements. Typical examples are shown in Figures 1 and 2. Figure 1 shows a standard relay rack equipped with the following equipment : • A control and distribution panel equipped with a RPM1000C intelligent controller/monitor • MPS 75 power shelves • 25 A rectifiers • rack-mounted VRLA batteries Figure 2 shows a free standing seismic relay rack equipped with the following equipment : • a control and distribution panel equipped with an analog controller card • • • • MPS150 power shelves 50 A rectifiers a battery disconnect panel equipped with two circuit breakers larger VRLA batteries stacked beside the framework UM6C28C P0728920 Standard 11.00 April 2001 Emerson Energy Systems Introduction 17 Figure 1 – Front view of a typical NT6C28C(x) MFA150 power system with shelf mounted batteries RPM1000C intelligent controller/monitor MPS75 power shelves NT6C14G control and distribution panel MFA150 RPM1000C F1 F4 . . . . . ¨ Helios Rectifiers 25/48 . Framework mounted VRLA batteries Standard framework Emerson Energy Systems MFA150 Power SystemNT6C28C User Manual 18 Introduction Figure 2 – Front view of a typical NT6C28C(x) MFA150 power system with larger VRLA batteries mounted beside the framework Battery disconnect panel MPS150 power shelves Externally mounted VRLA batteries NT6C14G control and distribution panel Helios Rectifiers 50/48 Free standing seismic framework UM6C28C P0728920 Standard 11.00 April 2001 Emerson Energy Systems 19 Specifications Frameworks The NT6C28C(x) MFA150 mounts on a variety of relay rack type frameworks from 25.36 inches ( 64.41 cm ) to 84 inches ( 213.36 cm ) high. The mechanical specifications of these frameworks are listed in Table 1. Table 1 – Mechanical specifications of the frameworks Framework type Standard Height Depth Width Weight 7 feet 15.0 inches 24.13 inches 51 lbs ( 2.13 m ) ( 38.1 cm ) ( 61.29 cm ) ( 23.13 kg ) Seismic, top 7 feet 15.0 inches 24.13 inches 55 lbs braced ( 2.13 m ) ( 38.1 cm ) ( 61.29 cm ) ( 24.95 kg ) Seismic, free 7 feet 15.0 inches 26.1 inches 107 lbs standing ( 2.13 m ) ( 38.1 cm ) ( 66.29 cm ) ( 48.53 kg ) 4 feet 15.0 inches 26.1 inches 80 lbs ( 1.22 m ) ( 38.1 cm ) ( 66.29 cm ) ( 36.29 kg ) Wall mount 25.36 inches 21.0 inches 24.13 inches 55 lbs ( 64.41 cm ) ( 53.34 cm ) ( 61.29 cm ) ( 24.95 kg ) Note: Refer to Figures 1 and 2 for typical views of frameworks with equipment. NT6C14G control and distribution panel Mechanical specifications of the control and distribution panel The mechanical specifications of the NT6C14G control and distribution panel are listed in Table 2. Table 2 – Mechanical specifications of the control and distribution panel Model With basic controller card Figure 3 Height Depth Width 7 inches 12.96 inches 23.0 inches ( 17.78 cm ) ( 32.91 cm ) ( 58.42 cm ) With RPM100C intelligent controller 4 7 inches 12.96 inches 23.0 inches ( 17.78 cm ) ( 32.91 cm ) ( 58.42 cm ) Emerson Energy Systems Weight 54 lbs ( 24.49 kg ) 58 lbs ( 26.31 kg ) MFA150 Power System NT6C28C User Manual 20 Specifications Figure 3 shows a front view of the NT6C14G control and distribution panel equipped with the analog controller card and without an LVD feature, while Figure 4 shows a front view of the NT6C14G control and distribution panel equipped with the RPM1000C intelligent controller and with an LVD feature. Figure 3 – Front view of the NT6C14G control and distribution panel equipped with the analog controller card MFA150 SENSE EQL 0FF EQL ON VOLTS NT6C14G RFA MAJ VOLTS/AMPS REL RFA MIN SER 1 1/3 A FA AMPS NORMAL BYPASS LVD ADJ F1 LVD ALM F2 F3 F4 TST ADJ TST BYPASS LVDR LV ALM CB1 LV ADJ 1 2 3 4 CB5 6 7 8 9 CB10 11 12 13 14 15 CB16 CAUTION / ATTENTION SENSE 6 BAT GRD -48V Figure 4 – Front view of the NT614G control and distribution panel equipped with the RPM1000C intelligent controller MFA150 FA BOD REL RFA M I N LVD SER RFA MAJ F1 F2 F3 F4 NT6C14G EQL UN IT LVD BYP NORM FAN AC AUX LVD BYP HVSD FLOAT LVD LVR HVSD MODE S1 RPM1000C CAUTION / ATTENTION RS-232 SENSE MAIN R.I.C. AN1 CB1 F1 F2 CAUTION F3 2 3 4 CB5 6 7 8 9 CB10 11 12 13 14 15 CB16 F4 Electrical specifications of the control and distribution panel The electrical specifications of the NT6C14G control and distribution panel are as follows: • • • • • Charge and discharge battery busbars capacity: 250 A Battery return busbars capacity: 250 A System discharge capacity: 150 A Shunt rating (50 mV drop): 250 A LVD (optional) capacity: 150 A UM6C28C P0728920 Standard 11.00 April 2001 Emerson Energy Systems Specifications 21 • Operating voltage nominal: –48 V dc range: • • • • • –45 to –60 V dc Number of circuit breakers: up to 16 Circuit breaker capacity (see Appendix B for list): 1-100 A Number of fuses: 5 or 8 Fuse type: QFF QFF fuse rating (see Appendix B for list): .180 to 5 A Power shelves, 75 A and 150 A Mechanical specifications of the power shelves The mechanical specifications of the MPS75 (75 A) and MPS150 (150 A) power shelves are listed in Table 3. Table 3 – Mechanical specifications of the MPS75 and MPS150 power shelves Model MPS75 Figure 5 MPS150 6 Height 7.0 inches ( 17.78 cm ) 13.0 inches ( 33.02 cm ) Depth 12.0 inches ( 30.48 cm ) 15.0 inches ( 38.10 cm ) Width 23.0 inches ( 58.42 cm ) 23.0 inches ( 58.42 cm ) Weight 23.0 lbs ( 10.43 kg ) 33.0 lbs ( 14.97 kg ) Each MPS75 and MPS150 power shelf supports three plug-in rectifiers. Figure 5 shows a front view of the MPS75 power shelf without the rectifiers installed, while Figure 6 shows a front view of the MPS150 power shelf without the rectifiers installed. Figure 5 – Front view of the MPS75 power shelf (shown without the rectifiers) Position 3 Emerson Energy Systems Position 2 Position 1 MFA150 Power SystemNT6C28C User Manual 22 Specifications Figure 6 – Front view of the MPS150 power shelf (shown without the rectifiers) J9 J8 J7 AC INPUT TB1 1 2 GRD 3 4 5 6 J2 J1 Position 3 48 J3 J11 J10 Position 2 J12 J6 J5 Position 1 Electrical specifications of the power shelves Each rectifier position provides interconnection points for AC input, DC output and control and alarm signals. The total output capacity for each shelf is 75 amperes for the MPS75 power shelf and150 amperes for the MPS150 power shelf. The MPS75 is available in two versions: • One that provides for common AC feed for the three rectifiers. • One that provides for individual AC feed for each of the three rectifiers. Rectifiers Four models of rectifiers can be used with NT6C28C(x) MFA150 power system: the MPR15, the MPR25, the Helios Rectifier 25/48 and the Helios Rectifier 50/48. MPR15 Mechanical specifications of the MPR15 rectifier The mechanical specifications of the MPR15 rectifier are listed in Table 4. Table 4 – Mechanical specifications of the MPR15 rectifier UM6C28C P0728920 Standard 11.00 April 2001 Emerson Energy Systems Specifications 23 Figure 7 Height 6.60 inches ( 16.76 cm ) Depth 11.25 inches ( 28.58 cm ) Width 6.0 inches ( 15.24 cm ) Weight 14.3 lbs ( 6.49 kg ) Figure 7 – Front view of the MPR15 rectifier EQL FLT FAN HVSD ON/RFA DC/CC AC/CA F1 OUTPUT V+ V– SORTIE Emerson Energy Systems 3/4A 250V LOAD/ CHARGE MPR15 MFA150 Power SystemNT6C28C User Manual 24 Specifications Electrical specifications MPR15 rectifier The electrical specifications of the MPR15 rectifier are listed in Table 5. Table 5 – Electrical specifications of the MPR15 rectifier Parameter Input voltage: Input current: Recommended AC service input: Output voltage: Output current: Input protection: Output protection: Efficiency: Power factor: Heat dissipation: Specifications 110/120 V ac, one phase, 47-63 Hz Input voltage range: 96 to 132 V ac 10.5 A nominal at 120 V ac input and –56 V dc, 15 A output 60 A, single pole AC circuit breaker for each shelf for common AC feed 20 A, single pole AC circuit breaker for each rectifier for individual AC feed Float: –46 to –57 V dc Equalize: 0 to 2.5 V dc above Float Maximum: –59.5 V dc 15 A for each rectifier 45 A for a three position shelf A 2-pole / 13 A circuit breaker opens both lines. The rectifier is protected by a single pole 30 A circuit breaker at the output. The output current limiting circuit is factory set 16.5 A ±10% and is not field adjustable. Efficiency is 88% at a nominal input voltage of 120 V ac and loads greater than 9 A. Power factor is 0.60 at a nominal input voltage of 120 V ac and an output load of 15 A. 100 W (341 Btu/hr) at –58 V/15 A output MPR25 Mechanical specifications of the MPR25 rectifier The mechanical specifications of the MPR25 rectifier are listed in Table 6. Table 6 – Mechanical specifications of the MPR25 rectifier Figur e 8 Height Depth Width Weight 6.60 inches ( 16.76 cm ) 11.25 inches ( 28.58 cm ) 6.0 inches ( 15.24 cm ) 15.0 lbs ( 6.80 kg ) UM6C28C P0728920 Standard 11.00 April 2001 Emerson Energy Systems Specifications 25 Figure 8 – Front view of the MPR25 rectifier EQL FLT FAN HVSD ON/RFA DC/CC AC/CA F1 OUTPUT V+ V– SORTIE Emerson Energy Systems 3/4A 250V LOAD/ CHARGE MPR25 MFA150 Power SystemNT6C28C User Manual 26 Specifications Electrical specifications of the MPR25 rectifier The electrical specifications of the MPR25 rectifier are listed inTable 7. Table 7 – Electrical specifications of the MPR25 rectifier Parameter Input voltage: Input current: Recommended AC service input: Output voltage: Output current: Input protection: Output protection: Efficiency: Power factor: Heat dissipation: Specifications 208/240 V ac, one phase, 47-63 Hz Input voltage range: 176 to 264 V ac 12 A nominal at 208 V ac input and –56 V dc, 25 A output 50 A, 2-pole AC circuit breaker for each shelf for common AC feed 20 A, 2-pole AC circuit breaker for each rectifier for individual AC feed Float: –46 to –57 V dc Equalize: 0 to 2.5 V dc above Float Maximum: –59.5 V dc 25 A for each rectifier 75 A for a three position shelf A 2 pole / 20 A circuit breaker opens both lines. The rectifier is protected by a single pole 30 A circuit breaker at the output. The output current limiting circuit is factory set 27.5 A and is not field adjustable. Efficiency is 88% at a nominal input voltage of 208 V ac and loads greater than of 15 A. Power factor is 0.60 at a nominal input voltage of 208 V ac and an output load of 25 A. 190 W ( 649 Btu/hr ) Helios Rectifier 25/48 Mechanical specifications Helios Rectifier 25/48 The mechanical specifications of the Helios Rectifier 25/48 are listed in Table 8. Table 8 – Mechanical specifications of the Helios Rectifier 25/48 Figure 8 Height 6.60 inches ( 16.76 cm ) Depth 11.25 inches ( 28.58 cm ) UM6C28C P0728920 Standard 11.00 April 2001 Width 6.0 inches ( 15.24 cm ) Weight 14.3 lbs ( 6.49 kg ) Emerson Energy Systems Specifications 27 Figure 9 – Front view of the Helios Rectifier 25/48 EQL FLT FAN HVSD RFA CL FS SLS OUTPUT DC/CC AC/CA HELIOS V+ Rectifier 25/48 V– SORTIE V D E LOAD/CHARGE Emerson Energy Systems MFA150 Power SystemNT6C28C User Manual 28 Specifications Electrical specifications Helios Rectifier 25/48 The electrical specifications of the Helios Rectifier 25/48 are listed in Table 9. Table 9 – Electrical specifications of the Helios Rectifier 25/48 Parameter Input voltage: Input current: Recommended AC service input: Output voltage: Output current: Input protection: Output protection: Efficiency: Power factor: Heat dissipation: Specifications 208/240 V ac, one phase, 47-63 Hz Input voltage range: 176 to 264 V ac 7.5 A nominal at 208 V ac input and –56 V dc, 25 A output 45 or 60 A, 2-pole AC circuit breaker for each shelf for common AC feed 15 or 20 A, 2-pole AC circuit breaker for each rectifier for individual AC feed Float: –46 to –56 V dc Equalize: 0 to 4 V dc above Float Maximum: –59.5 V dc 25 A for each rectifier 75 A for a three position shelf A 2 pole / 20 A circuit breaker opens both lines. The rectifier is protected by a single pole 35 A circuit breaker at the output. The output current limiting circuit is factory set 30 A and is field adjustable between 12.5 and 30 A. Efficiency is better than 90% at a nominal input voltage of 240 V ac and an output load greater than 15 A. Power factor is better than 0.98 at loads greater than 10 A and 0.99 at loads greater than 20 A. 156 W (532 Btu/hr) Helios Rectifier 50/48 Mechanical specifications Helios Rectifier 50/48 The mechanical specifications of the Helios Rectifier 50/48 are listed in Table 10. UM6C28C P0728920 Standard 11.00 April 2001 Emerson Energy Systems Specifications 29 Figure 10 – Front view of the Helios Rectifier 50/48 3/4A EVITER TOUT RISQUE D'INCENDIE NE REMPLACER LES ATTENTION POUR FUSIBLES QUE PAR DES FUSIBLES DU MEME TYPE ET DU MEME CALIBRE PROTECTION AGAINST RISK OF CONTINUED CAUTION FOR FIRE REPLACE ONLY WITH SAME TYPE AND RATING OF FUSE 250 v CA/AC CL ADJ VOLT AMP EQL ADJ EQL HELIOS FLT Rectifier 50/48 FLT VOLT CUR CAL ADJ V CAL AMP CC/DC AC ON HVSD SEN FAIL Emerson Energy Systems FAN ALM CL RFA EQL VOUT+ VOUT- HVSD ADJ SLS FS ST UP DLY MFA150 Power SystemNT6C28C User Manual 30 Specifications Table 10 – Mechanical specifications of the Helios Rectifier 50/48 Figure 10 Height 12.9 inches ( 32.77 cm ) Depth 12.0 inches ( 30.48 cm ) Width 6.0 inches ( 15.24 cm ) Weight 22.0 lbs ( 9.98 kg ) Electrical specifications Helios Rectifier 50/48 The electrical specifications of the Helios Rectifier 50/48 are listed in Table 11. Table 11 – Electrical specifications of the Helios Rectifier 50/48 Parameter Input voltage: Specification 208/240 V ac, 1-phase, 47-63 Hz Input voltage range: 176 to 264 V ac 15 A nominal at 208 V ac input and –56 V dc, 50 A output Input current: Recommended AC 20 A, 2- pole AC circuit breaker service input: Float: –46 to –56 V dc Output voltage: Equalize: 0 to 4 V dc above Float Maximum: –59.5 V dc 50 A for each rectifier Output current: 150 A for a three position shelf Input protection: A two pole / 20 A circuit breaker opens both lines. Output protection: The rectifier is protected by a 60 A circuit breaker at the output. The output current is limited to a value adjustable from 50% to 105% of the rated capacity of the rectifier ( factory set to 52.5 A ). Output regulation: The rectifier output voltage is automatically regulated to remain within ±0.5% of the selected value under all load conditions and within the specified input voltage, frequency, and ambient temperature ranges. And within + 1% for any combinations of specified input, output and environmental conditions. Efficiency is better than 88% at a nominal input voltage of Efficiency: 208/240 V ac and an output load greater than 20 A. Power factor is 0.99 at a nominal input voltage of 208 V Power factor: ac and an output load of 50 A. Electromagnetic The rectifier meets the FCC requirements for conducted interference (EMI): and radiated EMI for Class “A” equipment. Heat dissipation: 380 W ( 1298 Btu/hr ) UM6C28C P0728920 Standard 11.00 April 2001 Emerson Energy Systems Specifications 31 RPM1000C ( optional ) Mechanical specifications of the RPM1000C The mechanical specifications of the RPM1000C are listed in Table 12. Table 12 – Mechanical specifications of the RPM1000C Figure 11 Height 6.6 inches ( 16.76 cm ) Depth 8. 5 inches ( 21.59 cm ) Width 2.2 inches ( 5.59 cm ) Weight 4.15 lbs ( 2.04 kg ) In the MFA150, the RPM1000C is plugged and inserted at the front of the control and distribution panel in order to maintain the “front access” status of the power system. Figure 11 shows a front view of the RPM1000C. Figure 11 – Front view of the RPM1000C EQL UNIT FA BOD RFA MIN LVD RFA MAJ FAN AUX AC FLOAT HVSD LVD MODE LVR S1 HVSD RPM1000C RS-232 SENSE MAIN R.I.C. AN1 F1 F2 F3 F4 CAUTION Emerson Energy Systems MFA150 Power SystemNT6C28C User Manual 32 Specifications Electrical specifications of the RPM1000C The input voltage of the RPM1000C is –48 V dc nominal with a range of -42 V dc to –60 V dc. The input current drain is 200 mA. For more detailed electrical specifications of the RPM1000C, refer to the appropriate user manual listed in Appendix D. Helios TCM/48 temperature compensation module ( optional ) Mechanical specifications Helios TCM/48 The mechanical specifications of the Helios TCM/48 temperature compensation module are listed in Table 13. Table 13 – Mechanical specifications of the Helios TCM48 temperature compensation module Figur e 12 Height Depth Width Weight 1.44 inches ( 3.66 cm ) 4.48 inches ( 11.38 cm ) 9.0 inches ( 22.86 cm ) 1.1 lbs ( 5.5 kg ) Figure 12 shows a front view of the Helios TCM/48 temperature compensation module. Figure 12 – Front view of the Helios TCM/48 temperature compensation module DEFAULT Helios TCM48 TEMP Temperature Compensator UNIT HV CLAMP LV CLAMP – CAL TEMP ALARM BAT RS COMPENSATION + AUTOFOLDBACK OPEN NT6C18HB CLOSED REL SER NO 3A TP1 TP2 TP3 TP4 10 1 Electrical specifications Helios TCM/48 The input voltage of the Helios TCM48 temperature compensation module is –48 V dc nominal with a range of –42 V dc to –57 V dc and a typical input current drain of 350 mA. The output voltage range is 2.00 V dc to 7.80 V dc. For more detailed electrical specifications of the Helios TCM/48 temperature compensation module, refer to appropriate user manual listed in Appendix D. UM6C28C P0728920 Standard 11.00 April 2001 Emerson Energy Systems Specifications 33 NT6C18EA/EB battery disconnect panel ( optional ) Mechanical specifications of the battery disconnect panel The mechanical specifications of the NT6C18EA/EB battery disconnect panel are listed in Table 14. Table 14 – Mechanical specifications of the battery disconnect panel Figure 13 Height 1.71 inches ( 4.34 cm ) Depth 3.61 inches ( 9.17 cm ) Width 23.0 inches ( 58.42 cm ) Weight 5.1 lbs ( 2.31 kg ) Figure 13 shows a front view of a NT6C18EA/EB battery disconnect panel equipped with two 175 A circuit breakers. Figure 13 – Front view of the battery disconnect panel CBA 175 AMP OFF ON 175 AMP ON CB-1 OFF CB-2 Electrical specifications of the battery disconnect panel The NT6C18EA/EB battery disconnect panel can be equipped with one or two 175 A circuit breakers. NT6C18IFA/FD supplementary battery return busbar ( optional ) Mechanical specifications of the NT6C18IFA/FD battery return busbar The mechanical specifications of the NT6C18IFA/FD battery return busbar are listed in Table 15. Table 15 – Mechanical specifications of the NT6C18IFA/FD battery return busbar Figure 14 Length 23.44 inches ( 59.54 cm ) Width 2 inches ( 5.08 cm ) Thickness 0.25 inch ( 0.64 cm ) Weight 3.5 lbs ( 1.59 kg ) Figure 14 – Front view of the NT6C18FA/FD battery return busbar (cover removed) Electrical specifications of the NT6C18IFA/FD battery return busbar The NT6C18IFA/FD battery return busbar has a total current carrying capacity of 400 A. Emerson Energy Systems MFA150 Power SystemNT6C28C User Manual 34 Specifications Overall power system specifications Mechanical specifications of a complete NT6C28C(x) MFA150 The mechanical specifications of a complete NT6C28C(x) MFA150 power system are listed in Table 16. Note: The weight of the system is based on the power system configuration shown in Figure 2, but without the batteries as too many different battery options are available. Table 16 – Mechanical specifications of a complete NT6C28C(x) MFA150 Parameter Height Depth Width Total weight (without batteries) Color Specifications 84.0 inches ( 213.36 cm ) 15.0 inches ( 38.1 cm ) 24.0 inches ( 60.96 cm ) 300 lbs ( 136.08 kg ) The NT6C28C(x) MFA150 is available in two colors, dolphin gray or maple brown. Electrical Refer to the individual component specifications. Electromagnetic interference ( EMI ) compliance The equipment contained in the power system complies with the specifications of FCC, Part 15, Subpart B for class A equipment, and CSA 108.8 Class A. Electrostatic discharge ( ESD ) immunity No equipment damage or malfunction shall occur when electrostatic discharge voltages of severity levels 2 and 4, as specified by IEC-801-2, are applied to exposed parts of the power system. Environmental Operating • Temperature: 0° to +50°C (32° to 122 °F) • Humidity: 0 to 95% non-condensing • Altitude: Sea level to 7000 fee ( 2134 m ) UM6C28C P0728920 Standard 11.00 April 2001 Emerson Energy Systems Specifications 35 Transportation Note: Do not ship with the rectifiers installed in the rectifier framework(s). During transportation the equipment may be subjected to the following conditions without damage: • Temperature: -50° to +75°C (-58° to +167°F) • Humidity: 0 to 95% (non condensing) 4kPa max. WVP for 10 days • Vibration: GR-63-CORE section 5.4.3 Transportation Vibration-Packaged Equipment • Shock: GR-63-CORE, Section 5.3.1 Handling Drop Tests-Packaged Equipment and section 4.4.4 Transportation Vibration Criteria Storage • Temperature: -50° to +75°C (-58° to +167°F) • Humidity: 0 to 95% (non condensing) 4kPa maximum WVP for 10 days Heat dissipation An MFA150 power system equipped with 7 Helios Rectifiers 25/48 will dissipate a maximum of 1,092 watts or 3,729 Btu/hr. An MFA150 power system framework equipped with 4 Helios Rectifiers 50/48 will dissipate a maximum of 1,520 watts or 5,190 Btu/hr. Floor and point loading The floor and point loading calculations in Table 17 are based on the total weight without batteries in Table 16. The floor loading is based on a footprint of 24.38 inches by 15 inches ( 61.92 cm by 38.1 cm ) plus a 30-inch ( 76.2 cm ) aisle width (15 inches [ 38.10 cm ] front and rear). The point loading is based on distributing the framework weight over four shims, each with an assumed area of 4 inches2 ( 25.8 cm2 ). Table 17 – Floor and point loading of a complete NT6C28C(x) MFA150 Rack type Standard Emerson Energy Systems Floor loading 39.4 lb/sq ft ( 17.9 kN/sq m ) Point loading 18.75 lb/sq inches ( 12.9 N/sq cm ) MFA150 Power SystemNT6C28C User Manual 36 Specifications This page is left blank intentionally. UM6C28C P0728920 Standard 11.00 April 2001 Emerson Energy Systems 37 Operation General This chapter describes the control, adjustment and operational features of the NT6C28C(x) MFA150 power system. NT6C14G control and distribution panel The NT6C14G control and distribution panel uses a very compact design, but without compromising on the accessibility and functionality. It is available in three versions: • the NT6C14GA/GM equipped with the analog controller card and the LVD feature • the NT6C14GP equipped with analog controller card but without the LVD feature • the NT6C14GC/GN equipped with the intelligent microprocessor based controller/monitor and the LVD feature The operational features of the control and distribution panel are described in the following sections. Front of the NT6C14GA/GM and NT6C14GP control and distribution panels The front of the NT6C14GA/GM and NT6C14GP control and distribution panels are provided with the control, alarm and operational features shown in Figures 15 and 16, and described in the following sub-sections. Note: Emerson Energy Systems On the NT6C14GP control and distribution panel, which is not equipped with the LVD feature, the LVD ALM indicator and the LVD ADJ and LVDR potentiometers are still present on the controller card, but should be deactivated by turning the LVD potentiometer fully clockwise and the LVDR potentiometer fully counterclockwise. MFA150 Power System NT6C28C User Manual 38 Operation Figure 15 – Control, alarm and operational features on the front panel of the NT6C14GA/GM and NT6C14GP control and distribution panels EQL 0FF ON MFA150 SENSE EQL RFA MAJ RFA MIN FA VOLTS NT6C14G VOLTS/AMPS REL SER 1 1/3 A AMPS NORMAL BYPASS LVD ADJ F1 LVD ALM F2 F3 F4 TST ADJ TST BYPASS LVDR LV ALM LV ADJ 1 6 CB1 2 3 4 CB5 6 7 8 9 CB10 11 12 13 14 15 CB16 CAUTION / ATTENTION SENSE BAT GRD -48V Figure 16 – Enlarged view of the controller card section EQL OFF EQL ON RFA MAJ RFA MIN FA NORMAL BYPASS LVD ADJ LVD ALM TST ADJ TST BYPASS LVDR LV ALM LV ADJ 1 6 SENSE BAT GRD –48V Visual indicators A red LED readout displays the system current and voltage, and seven LED indicators display the conditions described in Table 18. UM6C28C P0728920 Standard 11.00 April 2001 Emerson Energy Systems Operation 39 Table 18 – Visual indicators Designation EQL RFA MIN RFA MAJ FA LVD ALM* TST BYPASS LV ALM Description To indicate that the equalize function is activated. To indicate a minor rectifier failure alarm. To indicate a major rectifier failure alarm. To indicate a fuse and circuit breaker alarm. To indicate a low voltage disconnect alarm. To indicate that the LV alarm and LVD alarm and control adjustment circuits of the controller card are in the test mode and, if provided, that the LVD contactor is placed in the bypass mode for maintenance purposes. To indicate a low voltage alarm. Note: Color yellow yellow red red red red red * See the Note in the “Front of the NT6C14GA/GM and NT6C14GP control and distribution panels” section. Switches There are three switches to control the functions described in Table 19. Table 19 – Switches Designation EQL OFF/ON Description Used to activate and deactivate the equalize function of the rectifiers. NORMAL/BYPASS Used to place the LV alarm and LVD alarm and control adjustment circuits of the controller card in the test mode for adjustment purposes, and, if provided, the LVD contactor in the bypass mode in order to prevent accidental release of the LVD contactor during test and maintenance routines. VOLTS/AMPS Used to select the system current or voltage on the display. Dip switches There is one six-position DIP switch module on the controller card to activate and deactivate rectifier sense leads 1 to 6. Potentiometers There are four potentiometers for the adjusting the functions described in Table 20. Emerson Energy Systems MFA150 Power SystemNT6C28C User Manual 40 Operation Table 20 – Potentiometers Designation LVD ADJ* TST ADJ LVDR* LV ADJ Note: Description To adjust the low voltage disconnect threshold To adjust the internal test voltage used for the setting of other thresholds To adjust the low voltage disconnect reconnect threshold To adjust the low voltage alarm threshold * See the Note in the “Front of the NT6C14GA/GM and NT6C14GP control and distribution panels” section. Test points There is one set of test points for calibrating the thresholds shown in Table 21. Table 21 – Test points Designation BAT GRD –48V Description The positive side of the display The negative side of the display Fuses There are five QFF type fuses for protecting the circuits listed in Table 22. Table 22 – Fuses Designation SENSE F1 to F4 Description Protection fuse for the sense leads of the rectifiers. Protection fuse for loads as required. Circuit breakers Up to 16 standard trip or mid trip circuit breakers, in capacities from 1 A to 100 A, protect the loads as required. Refer to “Appendix B : Recommended replacement parts” for a list of circuit breakers. The standard trip circuit breaker will trigger an alarm when it is electrically tripped ( for example : overload ) or by manually putting it in the OFF position. UM6C28C P0728920 Standard 11.00 April 2001 Emerson Energy Systems Operation 41 The mid trip circuit breaker will trigger an alarm only when it is electrically tripped ( for example : overload ), not when it is manually put in the OFF position. Note : Circuit breakers with a capacity of more than 80 A must be located adjacent to circuit breakers having a capacity of less than 65 A. Internal connecting features of the NT6C14GA/GM and NT6C14GP control and distribution panels The inside of the NT6C14GA/GB/GM and NT6C14GE/GF/GP control and distribution panels contain the following terminal blocks and connectors. Terminal blocks There is one 4-position screw-type terminal block (TB1) on the back of the front door of the control and distribution panel to connect small loads to QFF type fuses F1 to F4. There are three 8-position screw type terminal blocks (TB1, TB2 and TB3) on the controller card itself to interface with alarm signals, sensing signals from busbars, FA IN signals from distribution fuses and circuit breakers, and the battery disconnect panel, if provided. Table 23 – TB1 and TB2 pin assignment on the controller card TB1 pin No. 1 2 3 4 5 6 Description LVD ALARM (NC) LVD ALARM (C) LVD ALARM (NO) LVA (NC) LVA (C) LVA (NO) TB2 pin No. 1 2 3 4 5 6 7 8 EQL STAT (C) EQL STAT (NO) 7 8 Emerson Energy Systems Description RFA (C) RFA MINOR (NC) RFA MINOR (NO) RFA MAJOR (NC) RFA MAJOR (NO) FUSE ALARM (NC) FUSE ALARM (C) FUSE ALARM (NO) MFA150 Power SystemNT6C28C User Manual 42 Operation Table 24 – TB3 pin assignment on the controller card Pin number 1 2 3 4 Description + to LVD contactor coil – to LVD contactor coil Charge busbar (–48 V) BRG busbar Pin number 5 Description FA IN (–48 V) 6 FA IN (–48 V) 7 VR+ (BRG) 8 VR– (–48 V) Connectors There are ten connectors on the controller card for internal wiring terminated with connectors, as shown in Tables 25 and 26. Note: Connector J8 is for internal use only. Connectors J9 and J10 interface with the LVD control relay, if provided, in which case they are factory wired. Connectors J1 to J6 are used to interface with up to six rectifiers. Table 25 – J1 to J6 connector pin assignment Pin number 1 2 3 4 Description EQL RG+ RC– FAN ALM (NC) Pin number 5 6 7 8 Description HVSDR HVSD RFA (NC) TR Connector J7 interfaces with the optional remote signals and controls. Table 26 – J7 connector pin assignment Pin number 1 Description FAN ALM (NC) - output Pin number 5 2 3 4 HVSDR - input REM LVD - input REM EQL - input 6 7 8 Description HVSD - remote input unused unused unused Front of the NT6C14GC/GN control and distribution panels The front of the NT6C14GC/GN control and distribution panels are provided with the control, alarm and operational features shown in Figures 17 and 18, and described in the following sub-sections. UM6C28C P0728920 Standard 11.00 April 2001 Emerson Energy Systems Operation 43 Figure 17 – Control, alarm and operational features on the front panel of the NT6C14GC/GN control and distribution panels MFA150 UN IT FA BOD REL RFA M I N LVD SER RFA MAJ AC FLOAT MODE S1 F1 F2 F3 F4 NT6C14G EQL LVD BYP NORM FAN AUX LVD BYP HVSD LVD LVR HVSD RPM1000C CAUTION / ATTENTION RS-232 SENSE MAIN R.I.C. AN1 CB1 F1 F2 CAUTION F3 2 3 4 CB5 6 7 8 9 CB10 11 12 13 14 15 CB16 F4 Figure 18 – Enlarged view of the RPM1000C section EQL UNIT BOD FA RFA MIN LVD RFA MAJ FAN AC AUX FLOAT HVSD LVD MODE LVR S1 HVSD RPM1000C RS-232 SENSE MAIN R.I.C. AN1 F1 F2 F3 F4 CAUTION Emerson Energy Systems MFA150 Power SystemNT6C28C User Manual 44 Operation Visual indicators A red LED readout displays the values of the analog channels selected with the MODE push-button (S1), and 12 or 13 LED indicators to display the conditions described in Table 27. Table 27 – Visual indicators Designation UNIT FA RFA MIN RFA MAJ AC FLOAT EQL BOD LVD FAN AUX HVSD LVD BYP (NT6C14 GC/GN only) * Note : Description Normal operation RPM1000C failure RPM1000C low memory back-up battery voltage Fuse and circuit breaker Alarm Minor rectifier failure alarm Major rectifier failure alarm Rectifier AC supply failure alarm Normal operating voltage High or low float voltage High or low voltage Equalize function activated Battery on discharge alarm Low voltage disconnect alarm Rectifier fan failure alarm Auxiliary alarm (user programmable) High Voltage Shutdown To indicate that the LVD contactor is placed in the bypass mode Color green red flashing red yellow red red green yellow red yellow red red yellow red red red * Although it is designated on the front panel, the LVD BYP LED indicator location is filled with a blank plate on the NT6C14GG/GQ control and distribution panel not equipped with the LVD feature. Switch The LVD BYP/NORM switch, which is used to place the LVD contactor in the bypass mode, is present on the NT6C14GC/GN control and distribution panel only. On the NT6C14 GC/GN, although it is designated, the switch location is filled with a blank panel. UM6C28C P0728920 Standard 11.00 April 2001 Emerson Energy Systems Operation 45 LVD MANUAL RECONNECT ( option ) This option consists of adding a strap identified as “Manual reconnect jumper” between pins 3 and 9 of TB1 on the NT6C14PA LVD circuit board (located on the back of the front door of the control and distribution panel). When this option is provided, the load will not reconnect automatically after disconnecting due to a low voltage condition. To reconnect the load to the system, the LVD BYP/NORM switch must be put in the BYPASS position and back to the NORMAL position. If this option was furnished, the additional stamping “MANUAL RECONNECT” should have been added beside the switch. Note : If the LVD BYP/NORM switch is left in the BYPASS position, the LVD will not disconnect if the voltage decreases below the LVD threshold. Potentiometers There are three potentiometers for adjusting the functions described in Table 28. Table 28 – Potentiometers Designation LVD* LVR* HVSD Description To adjust the low voltage disconnect threshold To adjust the low voltage disconnect reconnect threshold To adjust the global rectifier high voltage shutdown threshold Note: * On the NT6C14GC/GN control and distribution panel, which is not equipped with the LVD feature, the LVD and LVR potentiometers are still present on the RPM1000C, but are inactive. Push-button The MODE push-button (S1) is used to display the measured value for each of the eight analog channels on the RPM1000C. Refer to the RPM1000C user manual listed in Appendix D for additional details on the MODE push-button. Fuses There are eight QFF type fuses for protecting the circuits described in Table 29. Emerson Energy Systems MFA150 Power SystemNT6C28C User Manual 46 Operation Table 29 – Fuses Designation SENSE MAIN R.I.C. AN1 F1 to F4 Description Protection fuse for the sense leads of the rectifiers. Protection fuse for the main board inside the RPM1000C. Protection fuse for the rectifier interface board inside the RPM1000C. Protection fuse for the analog channel 1 of the RPM1000C. Protection fuses for loads as required. Circuit breakers There are up to 16 standard trip or mid trip circuit breakers for the protection of loads as required. The standard trip circuit breaker will provide alarm when electrically tripped ( for example : overload ) or when manually put in the OFF position. The mid trip circuit breaker will provide alarm only when electrically tripped ( for example : overload ), not when manually put in the OFF position. Connector There is one DB9 connector for local access to the database and stored data in the RPM1000C through the RS-232 serial port. Internal connecting features of the NT6C14GC/GD/GN and NT6C14GG/GH/GQ control and distribution panels The inside of the NT6C14GC/GN control and distribution panels are provided with the following terminal blocks and connectors. Terminal block There is one 4-position screw type terminal block (TB1) on the back of the front door of the control and distribution panel to connect small loads to QFF type fuses F1 to F4. Connectors There are 12 connectors on the RPM1000C for internally wiring the interface with the components inside the control and distribution panel, as well as for external interface with probes, detectors and transducers for the input channels and the external alarm circuits, as required. For detailed connector pin assignment for the RPM1000C, refer to the appropriate user manual listed in Appendix D. UM6C28C P0728920 Standard 11.00 April 2001 Emerson Energy Systems Operation 47 Rectifiers The rectifiers provide isolated, filtered and regulated DC power, from a single-phase AC source, for powering the load while charging a positive grounded battery. The output is adjustable over a range of –46 to –59.5 V for floating a 23or 24-cell battery string. The rectifiers are equipped with AC input and DC output circuit breakers, a digital ammeter, potentiometers for adjusting the thresholds, and LED indicators for alarm indications. The rectifiers use high frequency switching technology and are forced aircooled. Refer to the appropriate rectifier user manual listed in Appendix D for detailed operation information on the MR15 rectifier, the MPR25 rectifier, the Helios Rectifier 25/48, and the Helios Rectifier 50/48. RPM1000C ( optional ) The RPM1000C is a microprocessor-based controller/monitor which, in addition to providing the basic controller functions found on analog controllers, provides advanced control and monitoring functions. It can monitor and record the operational data of the power systems that can be locally or remotely accessed or retrieved for further analysis. The recorded data can be accessed by means of the push-button or the RS-232 port on the front panel, or remotely through the modem link. If an RPM1000C was supplied with your system, refer to the appropriate user manual listed in Appendix D for the detailed operational characteristics. Helios TCM/48 temperature compensation module ( optional ) The temperature compensation module ( Helios TCM/48 ) is used to control the output voltage of the rectifiers according to the variations in the temperature input. When the temperature rises, the Helios TCM/48 modifies the rectifier reference voltage to reduce it according to a preprogrammed algorithm. The Helios TCM/48 controls the battery voltage according to the temperature to extend the life of the batteries and to eliminate the possibility of a thermal runaway condition. If a Helios TCM/48 was supplied with your system, refer to the appropriate user manual listed in Appendix D for the detailed operational characteristics. Emerson Energy Systems MFA150 Power SystemNT6C28C User Manual 48 Operation NT6C18EA/EB battery disconnect panel ( optional ) The NT6C18EA/EB battery disconnect panel is used to manually disconnect the battery strings (up to two) from the power system for maintenance purpose. When a circuit breaker is in the OFF position, the FA indicator on the panel itself is lit, and an alarm signal (FA) is sent to the control and distribution panel for further extension to the external alarm circuits. NT6C18FA/FD supplementary battery return busbar ( optional ) The NT6C18FA/FD supplementary battery return busbar is mounted at the top of the MFA150 framework and is used to provide external battery return connecting points from the control and distribution panel. It provides easier access for the battery return connections, it permits the use of larger cables and lugs, and it provides more space inside the control and distribution panel. UM6C28C P0728920 Standard 11.00 April 2001 Emerson Energy Systems 49 Maintenance Routine maintenance The following is a list of general preventive maintenance procedures which should be performed periodically as required by the environmental conditions and the local maintenance policy to ensure trouble-free operation of NT6C28C(x) MFA150 power system: • • • • • • • clean all ventilation openings clean, or replace the filters ( if provided ) tighten all the electrical connections check for hot fuses or breakers ( loose, undersized, or overloaded ) verify the alarm thresholds verify the meter calibration verify the rectifier settings The detailed recommended maintenance and adjustment procedures for the rectifiers and other components of the NT6C28C(x) MFA150 are covered in their respective user manual ( refer to list in Appendix D ). The following tools and test equipment are required to adjust equipment in the power system. Also, have available User Manual Voltage_level entitled Voltage Level Limits for Power Plants, Rectifiers and Controllers : • potentiometer screwdriver, Bourns No. 60 or equivalent • digital voltmeter, Fluke 8050A or equivalent • dummy load, 100 A (or use the office load if available) Emerson Energy Systems MFA150 Power System NT6C28C User Manual 50 Maintenance Troubleshooting Table 30 provides a list of the problems which can occur on NT6C28C(x) MFA150 power system, along with their possible causes. Blown fuses and tripped circuit breakers must always be investigated before referring to this table. WARNING Precautions to take to avoid service interruptions When working on a live power system, the low voltage disconnect contactor ( if provided ) should be kept from tripping. To do this, insert a 1/4-inch ( 3 mm ) wide electrically isolated tool ( preferably plastic ) in the small opening on the side of the contactor assembly to lock it closed. See Figure 19. Table 30 – Fault diagnosis Fault symptom No DC output current Incorrect indication of the DC output current Meter display is OFF Low voltage High voltage Failure to generate alarms during an alarm conditions Failure to generate an FA alarm Possible causes Open AC supply or AC circuit breaker Open DC circuit breaker Faulty connection between the power shelf and the controller Low voltage disconnect is open Sense leads are open Incorrect meter calibration Loose shunt leads connection Meter display failure Faulty rectifier(s) Shorted battery cell(s) Prolonged power failure Incorrect float voltage adjustment Sense leads are open Discharge load is greater than the rectifier's capacity Helios TCM/48 failure ( if provided ) Faulty rectifier(s) Incorrect Float/Equalize adjustment Incorrect connections between the control and distribution panel or the rectifier shelves or the RPM1000C or the TCM/48 Faulty wiring Faulty fuse or circuit breaker Faulty FA LED Loose connection Mid trip circuit breaker continued UM6C28C P0728920 Standard 11.00 April 2001 Emerson Energy Systems Maintenance 51 Table 30 – Fault diagnosis ( continued ) Fault symptom Failure to generate an RFA alarm under appropriate conditions Rectifiers are not sharing the load Possible causes Faulty rectifier Faulty wiring Faulty RFA MIN or RFA MAJ LED Incorrect float or equalize adjustment on one or more of the rectifiers Sense leads are open on one or more rectifiers Share mode incorrectly set on one or more rectifiers LVD contactor does not Incorrect LVR or LVDR threshold setting reconnect the load Faulty controller card or RPM1000C Blown F1 fuse on the controller (NT6C14GA/GB/GM and NT6C14GE/GF/GP) or LVD (NT6C14GC/GD/GN and NT6C14GG/GH/GQ) card Faulty contactor On NT6C14GA/GM and NT6C14GP control and distribution panels only: LV ALM lamp is lit Low discharge voltage condition Incorrect LV level adjustment TST BYPASS lamp is lit The NORMAL/BYPASS switch is in the BYPASS position on the controller card. On NT6C14GC/GN control and distribution panels only: UNIT lamp is lit red Failure of the RPM1000C UNIT lamp is flashing Low voltage on the memory back-up battery of the RPM1000C AC lamp is lit AC supply for the rectifiers has failed. FLOAT lamp is lit yellow Slightly high or low discharge voltage condition Incorrect HF or LF level adjustment Incorrect float or equalize level adjustment on one or more rectifiers FLOAT lamp is lit red High or low discharge voltage condition Incorrect HV or LV level adjustment Incorrect float or equalize level adjustment on one or more rectifiers BOD lamp is lit Low discharge voltage condition Incorrect BOD level adjustment Incorrect float or equalize level adjustment on one or more rectifiers HVSD lamp is lit A high voltage shutdown signal was sent to the rectifiers by the RPM1000C Incorrect HVSD level adjustment FAN lamp lit Fan failure on one or more rectifiers AUX lamp lit Auxiliary equipment failure (when programmed) continued Emerson Energy Systems MFA150 Power SystemNT6C28C User Manual 52 Maintenance Table 30 – Fault diagnosis ( continued ) Fault symptom Possible causes On all models of control and distribution panels: EQL lamp is lit The equalize mode is activated RFA MIN lamp is lit One rectifier has failed RFA MAJ lamp is lit Two or more rectifiers have failed FA lamp is lit Blown fuse or tripped circuit breaker on the control and distribution panel LVD ALM lamp is lit Low voltage disconnect condition initiated by the controller LVD BYP lamp is lit The low voltage disconnect contactor has been manually bypassed by means of the LVD BYP/NORM switch. Addition / replacement procedures Replacing the RPM1000C Refer to the maintenance chapter of the appropriate RPM1000C user manual, listed in Appendix D for the procedure to replace the RPM1000C. Replacing the NT6C14PF controller card ( NT6C14GA/GM and NT6C14GP control and distribution panels only ) The NT6C14PF controller card can be easily replaced without taking the NT6C28C(x) MFA150 power system out of service. Proceed as described in Procedure 1. CAUTION Protect the equipment against an electro static discharge ( ESD ) The control card contains some discrete and microelectronic solid state devices that can be permanently damaged by electrostatic potentials that may occur during handling and installation unless the necessary precautions are taken. UM6C28C P0728920 Standard 11.00 April 2001 Emerson Energy Systems Maintenance 53 CAUTION Precautions to take to avoid service interruptions When working on a live power system, the low voltage disconnect contactor (if provided) should be kept from tripping. To do this, insert a 1/4-inch ( 3 mm ) wide electrically isolated tool ( preferably plastic ) in the small opening on the side of the contactor assembly to lock it closed. See Figure 19. Procedure 1 – Replacing the NT6C14PF controller card Step 1 2 3 4 5 6 7 8 9 10 11 12 13 Action Notify the alarm centre of the possibility of incoming alarms during the execution of this procedure. If possible, use the TEST mode to record the existing alarm settings of the control card. Remove the top cover and open the front door of the control and distribution panel. If the system is provided with an LVD feature, insert a 1/4-inch ( 3 mm ) wide electrically isolated tool in the small side opening of the contactor assembly to lock it closed as shown in Figure 19. Remove the sense fuse on the front door of the control and distribution panel and open the connector going to the controller card. Disconnect and insulate the red lead coming from TB3-4 on the battery (–) charge busbar. Remove and tag the power leads on TB3-3 and TB3-4 of the controller card, as well as all the other alarm and control leads on terminal block TB1, TB2 and TB3. Unplug the rectifier and power plant alarm cable assemblies from connectors J1 to J7. Remove the mounting screw securing the controller card in place, then pull the card slightly forward, slightly to the right, and pull it forward completely to remove it. Install the new card by reversing the operation in step 10 and securing it in place with the mounting screw. Reconnect all wires and cables by reversing steps 6, 7 and 8. Adjustments Put the BYPASS/NORMAL switch in the BYPASS position. The TST BYPASS indicator should light up. Connect an external digital multimeter set for a 60 V dc reading across the test points located on the front of the control and distribution panel. continued Emerson Energy Systems MFA150 Power SystemNT6C28C User Manual 54 Maintenance Procedure 1 – Replacing the NT6C14PF controller card ( continued ) Step 14 15 16 17 18 19 20 21 22 23 24 25 Action Turn the TST ADJ potentiometer slowly counterclockwise and verify that the LV ALM indicator lights up at the appropriate voltage level. If the LV ALM indicator lights up before the appropriate voltage level is reached or does not light up, adjust the LV ADJ potentiometer until the LV ALM indicator lights up at the appropriate voltage level. If the system is provided with an LVD feature, slowly turn the TST ADJ potentiometer counterclockwise and verify that the LVD ALM indicator lights up at the appropriate voltage level. If the LVD ALM indicator lights up before the appropriate voltage level is reached or does not light up, adjust the LVD ADJ potentiometer until the LVD ALM indicator lights up at the appropriate voltage level. Turn the TST ADJ potentiometer slowly clockwise and verify that the LV ALM indicator extinguishes at the appropriate voltage level. If the system is provided with an LVD feature, slowly turn the TST ADJ potentiometer clockwise and verify that the LVD ALM indicator extinguishes at the appropriate voltage level. If the LVD ALM indicator extinguishes before the appropriate voltage level is reached, or does not extinguish, adjust the LVDR ADJ potentiometer until the LVD ALM indicator extinguishes at the appropriate voltage level. Put the BYPASS/NORMAL switch in the NORMAL position. The TST BYPASS indicator should extinguish. Reinstall the sense fuse on the front door of the control and distribution panel, and close the connector going to the controller card ( opened in step 5 ). Operational tests Put the EQL switch in the ON position. Verify that the voltage on the rectifiers increases to the equalize voltage level and stays at that level until the EQL switch is returned to the OFF position. Verify that the circuit breaker and fuse alarm is functional by depressing the alarm pin on one of the F1 to F4 QFF fuses, or by inserting a blown fuse in one of the fuse positions. Verify that the red FA LED lights up and that a major alarm is triggered. Release the alarm pin or remove the blown fuse. Verify that the alarm conditions have been canceled. Test the RFA alarms by shutting down one rectifier. Verify that the yellow RFA MIN LED lights up and that a minor alarm is triggered. Shut down a second rectifier. Verify that the red RFA MAJ LED lights and that a major alarm is triggered. Restart the rectifiers and verify that the alarm conditions have been canceled. If the system is provided with an LVD feature, remove the electrically isolated tool installed in step 4. continued UM6C28C P0728920 Standard 11.00 April 2001 Emerson Energy Systems Maintenance 55 Procedure 1 – Replacing the NT6C14PF controller card ( continued ) Step 26 27 Action Reinstall the top cover and close the front door securing it with the captive screw. Notify the alarm centre at the end of the procedure. –end– Figure 19 – Locking the LVD contactor in the closed position INSERT TOOL HERE Replacing the NT6C14PG meter display card ( NT6C14GA/GM and NT6C14GP control and distribution panels only ) The NT6C14PG meter display card can be easily replaced without taking the NT6C28C(x) MFA150 power system out of service. Proceed as described in Procedure 2. CAUTION Protecting the equipment against an electro static discharge ( ESD ) The meter display card contains some discrete and microelectronic solid state devices that can be permanently damaged by electrostatic potentials that may occur during handling and installation unless the necessary precautions are taken. Emerson Energy Systems MFA150 Power SystemNT6C28C User Manual 56 Maintenance WARNING Precautions to take to avoid service interruptions When working on a live power system, the low voltage disconnect contactor (if provided) should be kept from tripping. To do this, insert a 1/4-inch ( 3 mm ) wide electrically isolated tool ( preferably plastic ) in the small opening on the side of the contactor assembly to lock it closed. See Figure 19. Procedure 2 – Replacing the NT6C14PG meter display card Step 1 2 3 4 5 6 7 8 9 10 11 12 13 Action Open the front door of the control and distribution panel. If the system is provided with an LVD feature, insert a 1/4-inch ( 3 mm ) wide electrically isolated tool in Figure 19. Disconnect and insulate the ends of the brown, yellow, black and red wires connected to terminals E1, E2, E3 and E4 on the meter display card. Remove the nut that secures the VOLT/AMPS switch to the font door. Remove the four mounting screws securing the meter display card in place, then remove the card. Install the new meter display card and secure it in place by installing the four mounting screws. Secure the VOLT/AMPS switch to the font door with the appropriate nut. If the new card is not provided with wires on terminals E1, E2, E3 and E4, connect the wires disconnected in step 4 directly to the E1, E2, E3 and E4 terminals. If the new card is provided with wires on terminals E1, E2, E3 and E4, cut these wires approximately 2” long, then splice them to the wires disconnected instep 4, matching the colors. Set the switches of the S3 DIP switch module as follows: 1 and 4 in the ON position, 2, 3, 5 and 6 in the OFF position ( see Figure 20 ). If the system is provided with an LVD feature, remove the electrically isolated tool installed in step 2. Calibration Putthe VOLT/AMPS switch on the front door in the AMPS position. Connect an external digital multimeter set for a 2 V dc reading across system shunt E1 and E2 terminals on the meter display card. Verify that the reading in amperes on the meter display of the control and distribution panel is equal to five times the reading in millivolts on the external digital multimeter. continued UM6C28C P0728920 Standard 11.00 April 2001 Emerson Energy Systems Maintenance 57 Procedure 2 – Replacing the NT6C14PG meter display card ( continued ) Step 14 15 Action If the reading on the meter display of the control and distribution panel is off by more than 1% of what it should be, slowly rotate potentiometer R30 (located on the right side of the meter display card) clockwise or counterclockwise until the reading is within 1% of what it should be. Disconnect the external digital multimeter connected in step 12 and close the front door of the control and distribution panel. –end– Figure 20 – Setting the S3 dip switches on the meter display card ON S3 Edge of meter display card OFF 6 5 4 3 2 R30 1 Adding or replacing a rectifier WARNING Precautions to take to avoid service interruptions When installing a rectifier, the FLOAT and EQUALIZE voltages must be set according to the type of batteries used with the system. Failure to set these voltages properly may result in battery under charging or over charging and battery damage. Adding a rectifier Add a rectifier as described in Procedure 3 for an MPR15, MPR25 or Helios Rectifier 25/48, or Procedure 4 for a Helios Rectifier 50/48. Procedure 3 – Installing an MPR15, MPR25 or Helios Rectifier 25/48 Step 1 Action Using a flat blade screwdriver lossen the captive screws on the rectifier retaining bar of the rectifier and swing it down. 2 Remove the rectifier blank filler plate by putting a finger in the hole, lifting it up, and pulling it out towards you. 3 With the angle up and oriented towards the rear of the shelf, put the blank filler on the bottom of the shelf. Note: If a rectifier is removed, reinstall the blank plate to meet regulatory requirements. continued Emerson Energy Systems MFA150 Power SystemNT6C28C User Manual 58 Maintenance Procedure 3 – Installing an MPR15, MPR25 or Helios Rectifier 25/48 ( continued ) Step 4 Action Ensure that the AC and DC circuit breakers on the front panel of the rectifier are in the OFF position. 5 Slide the rectifier into position, making sure that it is fully inserted. 6 Rotate the rectifier retaining bar up and tighten the captive screws to secure the rectifiers into position. 7 Test the new rectifier as described in the appropriate user manual ( see the list in Appendix D ). –end– Procedure 4 – Installing a Helios Rectifier 50/48 Step 1 Action Using a flat blade screwdriver loosen the captive screw on the rectifier retaining bar where the rectifier is to be installed and swing the bar down. 2 Remove the rectifier blank filler plate by putting a finger in the hole, lifting it up, and pulling it out towards you. 3 With the hole for the screw at the back and the sliding tape up, place the blank filler plate on the bottom of the shelf. Note: If a rectifier is removed, reinstall the blank plate to meet regulatory requirements. 4 Ensure that the AC and DC circuit breakers on the front panel of the rectifier are in the OFF position. 5 Carefully slide the rectifier into position, making sure that it is fully inserted. If the batteries are connected, the RFA lamp should light up. 6 Rotate the rectifier retaining bar up and tighten the captive screw to secure the rectifier into position. 7 Test the new rectifier as described in the appropriate user manual (see list in Appendix D). –end– UM6C28C P0728920 Standard 11.00 April 2001 Emerson Energy Systems Maintenance 59 Replacing a rectifier Replace a rectifier as described in Procedure 5. Procedure 5 – Replacing a rectifier Step 1 2 3 4 5 6 7 8 9 10 11 12 13 14 Action Notify the alarm centre of the possibility of incoming alarms during the execution of this procedure. Ensure that the AC and DC circuit breakers on the rectifier being replaced are in the OFF position. For a system equipped with an analog controller card, open the sense switch on the SENSE DIP switch module on the control and distribution panel associated with the rectifier being replaced. For a system equipped with an RPM1000C, disconnect the corresponding rectifier connector on the RPM1000C. Using a flat blade screwdriver loosen the captive screw(s) on the rectifier retaining bar and swing the bar down. Slide the rectifier out of the shelf carefully. Pack the rectifier in the shipping carton of the new rectifier. Ensure that the AC and DC circuit breakers on the front panel of the new rectifier are in the OFF position. Carefully slide the new rectifier into position, making sure that it is fully inserted. For a Helios Rectifier 50/48, the RFA lamp should light up. Rotate the rectifier retaining bar up and tighten the captive screw(s) to secure the rectifier into position. With the DC breaker in the “OFF” position, adjust the float and equalize voltage levels to the same level ( approximately ) as that of the other rectifiers. For rectifiers equipped with the SLS/FS feature, ensure that the SLS/FS switch is set to the same position as that of the other rectifiers. For a system equipped with an analog controller card, close the sense switch associated with the new rectifier on the SENSE DIP switch module on the control and distribution panel. For a system equipped with an RPM1000C, reconnect the corresponding rectifier connector on the RPM1000C. Put the DC circuit breaker in the “ON” position. Verify that the replacement rectifier is sharing the load by observing its ammeter. It should display approximately the same value as the ammeter on the other rectifiers. If not, adjust its Float and Equalize voltage levels as described in the appropriate user manual (see Appendix D). Notify the alarm center at the end of the procedure. –end– Emerson Energy Systems MFA150 Power SystemNT6C28C User Manual 60 Maintenance Adding a power shelf Refer to the applicable rectifier user manual listed in Appendix D for the installation and the AC cabling procedures for your specific model of rectifier shelf. Connect the new shelf to the NT6C28C control and distribution panel as described in the following procedure. Procedure 6 – Connecting a rectifier shelf Step 1 2 3 Action Connect the alarm cable of the rectifier shelf to connector J1, J2 and J3, or J4, J5 and J6, as applicable, on the controller card, or JE1, JE2 and JE3, or JE4, JE5 and JE6, as applicable, on the RPM1000C, inside the control and distribution panel. Connect an appropriately sized cable to each of the –48 V and BR+ output terminals of the shelf. Connect these cables to the charge + and charge – busbars inside the control and distribution panel as shown in Figure 21. –end– Figure 21 – Rectifier shelf connections inside the control and distribution panel Preferred locations for the rectifier shelf cables (see note) Partial view inside the MFA150 control and distribution panel CHG BAT busbar Shunt CHG/DISCH GRD busbar DISCH BAT busbar LVD contactor (if provided) Note: Use minimum No. 4 AWG cables for 75 A rectifier shelf intrabay cabling, and minimum No. 1/0 AWG cables for 150 A rectifier shelf intrabay cabling. Adding or replacing a battery string For additions, go to step 4 of Procedure 7. For replacements, proceed from step 1 of Procedure 7. UM6C28C P0728920 Standard 11.00 April 2001 Emerson Energy Systems Maintenance 61 WARNING This procedure implies that all or part of the batteries will be momentarily taken out of service This work should be completed during reduced traffic hours or with a diesel generator backup IS available to ensure no loss of service during a possible AC outage. If more than one string is to be replaced, replace only one string at a time and do not disconnect the next string before the previous one has been reconnected. WARNING Generator requirements for Astec APS Power Systems For information on selecting AC generators that will effectively maintain peak performance and operating characteristics, for all Astec APS power systems to to the partners’ section of the Emerson Energy Systems web site at www.EmersonEnergy-NA.com. To obtain access to the partners’ section follow the instructions found on the partners’ page, or dial your local 1−800 technical support line. Procedure 7 – Adding or replacing a battery string Step 1 2 3 4 5 6 7 Action Notify the Alarm Center of the possibility of incoming alarms during the execution of this procedure. Disconnect the inter-cell connectors or wiring harness from the individual battery cells, and insulate each exposed terminal with electrical tape. The removed batteries must be disposed of in accordance with local, provincial, state, national or federal environmental legislation. Install the new batteries and use the new connecting material (typically furnished with the new batteries) to interconnect them. Note: If specified, install the new batteries in the space vacated by the removed batteries. Complete the initial charge of the new battery string according to the battery manufacturer's specifications using an external power supply. If required, install two new battery leads. Connect the new batteries to the charge + and charge – busbars inside the NT6C28C control and distribution panel. Refer to Figure 22. If a battery disconnect panel is provided, refer to the appropriate battery disconnect panel drawing for the connection details. Notify the Alarm Center at the completion of the procedure. –end– Emerson Energy Systems MFA150 Power SystemNT6C28C User Manual 62 Maintenance Figure 22 – Battery connections inside the control and distribution panel Preferred locations for the battery cables (see note) Partial view inside the MFA150 control and distribution panel CHG BAT busbar This location is normally reserved for the BRR cable connection Shunt CHG/DISCH GRD busbar DISCH BAT busbar LVD contactor (if provided) Note: Connection positions are optimal if maximum 1/0 AWG cable is used. If the batteries are not in the proximity of the MFA150 power system, up to 4/0 AWG cables can be used. If 4/0 flex cable is used, narrow tongue lugs must be used. Adding or replacing a distribution circuit breaker WARNING Precautions to take to avoid service interruptions Use properly insulated tools when working inside the control and distribution panel. Add a new circuit breaker as described in Procedure 8. Refer to Figure 23. Procedure 8 – Adding a distribution circuit breaker Step Action 1 Notify the alarm center of the possibility of incoming alarms during the execution of this procedure. 2 Open the front door and remove the top panel of the control and distribution panel. 3 Ensure that the new circuit breaker is in the “OFF” position. continued UM6C28C P0728920 Standard 11.00 April 2001 Emerson Energy Systems Maintenance 63 Procedure 8 – Adding a distribution circuit breaker ( continued ) Step Action 4 Position the “L” shaped Glastic separator for the new circuit breaker as shown in Figure 23. 5 Align the new circuit breaker with the appropriate position and insert the upper stud of the circuit breaker into the hole in the DISCH BAT busbar. 6 Install the “C” alarm wire as shown in Figure 23. 7 Secure the small busbar at the bottom of the circuit breaker and the “L” shaped Glastic insulator to the main isolated support with the screw provided for that purpose as shown in Figure 23. 8 Use a properly insulated wrench to secure the hex nut holding the circuit breaker and the “C” alarm wire to the DISCH BAT busbar. 9 Connect the “NC” or “NO” alarm wire to the circuit breaker as shown in Figure 23, depending on whether standard trip or mid trip circuit breakers are used ( see note below Figure 23 ). 10 If a load is to be connected to the new circuit breaker, feed the load cable through the rear of the control and distribution panel, install the appropriate one-hole lug at the end of the cable and connect it to the vertical stud behind the circuit breaker as shown in Figure 23. Note: If no load is to be connected and the circuit breaker is a standard trip type, leave the circuit breaker in the ON position to prevent annoyance alarms. 11 Remove the appropriate filler position from the black filler plate mounted on the back of the front door. 12 Reinstall the top panel and close the front door of the control and distribution panel. 13 Notify the alarm center at the end of the procedure. –end– Replace an existing circuit breaker as described in Procedure 9. Refer to Figure 23. Emerson Energy Systems MFA150 Power SystemNT6C28C User Manual 64 Maintenance Figure 23 – Cross-section of an installed circuit breaker Main discharge busbar (DISCH BAT) Push-on alarm leads (see note) Glastic separator C NO Load NC Isolated support Note: The position of the “C” (common) “NO” (normally open) and “NC” (normally closed) alarm pins at the rear of circuit breakers will vary upon the manufacturer of the circuit breakers. However, the “C” pin should always be connected to the main discharge bar of the power plant. The alarm lead should be connected to the “NO” or “NC” pin of the circuit breakers as follows: for standard trip circuit breakers, connect the alarm lead to the “NC” contact, for mid trip circuit breakers, connect the alarm lead to the “NO” contact. UM6C28C P0728920 Standard 11.00 April 2001 Emerson Energy Systems Maintenance 65 Procedure 9 – Replacing a distribution circuit breaker Step 1 2 3 4 5 6 7 8 9 10 11 12 13 14 Action Notify the alarm center of possible incoming alarms during this procedure. Open the front door and remove the top panel of the control and distribution panel. Operate the circuit breaker to be replaced to the “OFF” position (down). Disconnect the “NC” or “NO” alarm wire from the circuit breaker to be replaced. Use a properly insulated wrench to remove the hex nut holding the circuit breaker and the “C” alarm wire to the top busbar, then the hex nut holding the circuit breaker to the bottom busbar. Carefully remove the circuit breaker from the distribution panel by pulling on it forward. Ensure that the new circuit breaker is in the “OFF” position. Remove also the small “L” shaped busbar from the new circuit breaker. Align the new circuit breaker with the appropriate position and insert the studs into the holes in the top and bottom busbars. Use a properly insulated wrench to secure the hex nut holding the circuit breaker to the bottom busbar. Install the “C” alarm wire on the circuit breaker itself. Use a properly insulated wrench to secure the hex nut holding the circuit breaker and the “C” alarm wire to the top busbar. Connect the “NC” or “NO” alarm wire to the circuit breaker as shown in Figure 23, depending if standard trip or mid trip circuit breakers are used ( see note below Figure 23 ). Reinstall the top panel and close the front door of the control and distribution panel. Notify the alarm center at the end of the procedure. –end– Replacement of the LVD contactor WARNING Precautions to take to avoid service interruptions Make sure to use properly insulated tools when working inside the control and distribution panel. Emerson Energy Systems MFA150 Power SystemNT6C28C User Manual 66 Maintenance Replace the LVD contactor as described in the following procedure. Refer to Figures 24 and 25. Procedure 10 – Replacing the LVD contactor Step 1 2 3 4 5 6 7 8 9 10 11 12 13 14 Action Notify the Alarm Center of the possibility of incoming alarms during the execution of this procedure. Open the front door and remove the top panel of the control and distribution panel. Install a size 1/0 AWG jumper cable between the negative charge busbar and the negative discharge busbar in such a way as to bridge out the LVD contactor ( see Figure 24 ). Disconnect the two control wires from the coil of the contactor. Remove the two nuts connecting the contactor to the busbars. Remove the three mounting nuts securing the contactor to the cabinet. Carefully remove the contactor from the control and distribution panel. Carefully install the new contactor in the space vacated by the old contactor. Secure the contactor to the cabinet with the three mounting nuts removed in step 6. Connect the contactor to the busbars with the two nuts removed in step 5. Reconnect the two control wires on the coil of the contactor. If the new contactor was not provided with a diode across the two center terminals of the coil, remove the diode on the old contactor and reinstall it on the new contactor observing the polarity (direction of arrow). Reinstall the top cover and close the front door of the control and distribution panel. Notify the alarm center at the completion of the procedure. –end– UM6C28C P0728920 Standard 11.00 April 2001 Emerson Energy Systems Maintenance 67 Figure 24 – Jumper cable installation Temporary jumper cable to bypass the LVD contactor : use spare holes available in busbars to connect the cable with lugs. Partial view inside the MFA150 control and distribution panel CHG BAT busbar Shunt CHG/DISCH GRD busbar DISCH BAT busbar LVD contactor (if provided) Figure 25 – LVD contactor installation A Diode Busbar nuts Control wires Busbars A Contactor as viewed from the front of the system with the front cover of the control and distribution opened Emerson Energy Systems Mounting nuts View A-A Mounting nuts MFA150 Power SystemNT6C28C User Manual 68 Maintenance This page is left blank intentionally. UM6C28C P0728920 Standard 11.00 April 2001 Emerson Energy Systems 69 Appendix A : Associated schematics Drawing number Description IS6C28CA Interconnect Schematic Emerson Energy Systems MFA150 Power System NT6C28C User Manual PART OF IS1 70 Appendix A : Associated schematics UM6C28C P0728920 Standard 11.00 April 2001 Emerson Energy Systems PART OF IS1 Appendix A: Associated schematics 71 Emerson Energy Systems MFA150 Power SystemNT6C28C User Manual 72 Appendix A : Associated schematics UM6C28C P0728920 Standard 11.00 April 2001 Emerson Energy Systems IS3 Appendix A: Associated schematics 73 Emerson Energy Systems MFA150 Power SystemNT6C28C User Manual IS4 74 Appendix A : Associated schematics UM6C28C P0728920 Standard 11.00 April 2001 Emerson Energy Systems PART OF IS5 Appendix A: Associated schematics 75 Emerson Energy Systems MFA150 Power SystemNT6C28C User Manual PART OF IS5 76 Appendix A : Associated schematics UM6C28C P0728920 Standard 11.00 April 2001 Emerson Energy Systems Emerson Energy Systems REAR VIEW IS6 Appendix A: Associated schematics 77 MFA150 Power SystemNT6C28C User Manual IS7 78 Appendix A : Associated schematics UM6C28C P0728920 Standard 11.00 April 2001 Emerson Energy Systems Appendix A: Associated schematics 79 Emerson Energy Systems MFA150 Power SystemNT6C28C User Manual IS9 80 Appendix A : Associated schematics UM6C28C P0728920 Standard 11.00 April 2001 Emerson Energy Systems PART OF IS10 Appendix A: Associated schematics 81 Emerson Energy Systems MFA150 Power SystemNT6C28C User Manual PART OF IS10 82 Appendix A : Associated schematics UM6C28C P0728920 Standard 11.00 April 2001 Emerson Energy Systems PART OF IS1 Appendix A: Associated schematics 83 Emerson Energy Systems MFA150 Power SystemNT6C28C User Manual 84 Appendix A : Associated schematics This page is left blank intentionally. UM6C28C P0728920 Standard 11.00 April 2001 Emerson Energy Systems 85 Appendix B : Replacement parts Order the following replacement parts for the NT6C28C(x) MFA150 Power System. For the MPR15 and MPR25 rectifiers: • Fan assembly : • Air filter kit : • Fuse, 3/4 A, 250 V : P0710139 A0370200 A0351850 For the Helios Rectifier 25/48: • Fan assembly : • Air filter kit : P0710139 P0834732 For the Helios Rectifier 50/48: • • • • Fan assembly : P0734037 Air filter kit : P0736368 Replacement filter : P0734555 Fuse, 3/4 A, 250 V A0351850 For the NT6C14GA/GB/GM or CE/CP distribution and control panel: • NT6C14PF control circuit pack : A0400370 • NT6C14PG display circuit pack : A0403327 • Spare QFF fuses and circuit breakers as required ( see Tables ) For the NT6C14GC/GD/GN or CG/CQ distribution and control panel: • NT6C14PA LVD interface circuit pack : A0367086 • Spare QFF fuses and circuit breakers as required ( see Tables ) Emerson Energy Systems MFA150 Power System NT6C28C User Manual 86 Appendix B : Replacement parts For the RPM1000C: • Memory back-up battery (Sanyo No. CR2430) : • MSL2A fuse : • 1-1/3 A QFF1A fuses as required : A0603214 A0285632 A0614339 Note 1: Circuit breakers rated 80 A or less may be installed side by side. Circuit breakers over 80 A may only be installed next to circuit breakers rated 65 A or less. Note 2: Circuit breakers are ordered separately. Each circuit breaker is shipped with mounting hardware for mounting into the panel. Table 31 – Standard trip circuit breakers e/w circuit breaker guard CPC number P0743472 P0743473 P0743474 P0743475 P0743476 P0743477 P0743478 P0743483 P0743479 P0743480 P0743481 P0743482 P0878231 P0878232 P0878233 P0878234 P0878235 Note: Description 1A circuit breaker, 65/80 V dc maximum coil voltage 2A circuit breaker, 65/80 V dc maximum coil voltage 3A circuit breaker, 65/80 V dc maximum coil voltage 5A circuit breaker, 65/80 V dc maximum coil voltage 10A circuit breaker, 65/80 V dc maximum coil voltage 15A circuit breaker, 65/80 V dc maximum coil voltage 20A circuit breaker, 65/80 V dc maximum coil voltage 25A circuit breaker, 65/80 V dc maximum coil voltage 30A circuit breaker, 65/80 V dc maximum coil voltage 35A circuit breaker, 65/80 V dc maximum coil voltage 40A circuit breaker, 65/80 V dc maximum coil voltage 50A circuit breaker, 65/80 V dc maximum coil voltage 60A circuit breaker, 65/80 V dc maximum coil voltage 70A circuit breaker, 65/80 V dc maximum coil voltage 80A circuit breaker, 65/80 V dc maximum coil voltage 90A circuit breaker, 65/80 V dc maximum coil voltage 100A circuit breaker, 65/80 V dc maximum coil voltage Standard trip circuit breakers will generate an alarm when tripped manually or due to an overload. UM6C28C P0728920 Standard 11.00 April 2001 Emerson Energy Systems Appendix B : Replacement parts 87 Table 32 – Mid trip circuit breakers e/w circuit breaker guard CPC number P0743225 P0743226 P0743227 P0743228 P0743229 P0743230 P0743231 P0743465 P0743232 P0743233 P0743234 P0743235 P0878236 P0878237 P0878238 P0878239 P0878240 Note: Description 1A circuit breaker, 53 delay curve 2A circuit breaker, 53 delay curve 3A circuit breaker, 53 delay curve 5A circuit breaker, 53 delay curve 10A circuit breaker, 53 delay curve 15A circuit breaker, 53 delay curve 20A circuit breaker, 53 delay curve 25A circuit breaker, 53 delay curve 30A circuit breaker, 53 delay curve 35A circuit breaker, 53 delay curve 40A circuit breaker, 53 delay curve 50A circuit breaker, 53 delay curve 60A circuit breaker, 52 delay curve 70A circuit breaker, 52 delay curve 80A circuit breaker, 52 delay curve 90A circuit breaker, 52 delay curve 100A circuit breaker, 52 delay curve Mid trip circuit breakers will generate an alarm only when tripped due to an overload. They will not generate an alarm when tripped manually. Table 33 – QFF fuses and designation discs Fuse CPC number Description A0614343 A0614344 A0614345 A0614346 A0614339 A0614340 A0614341 A0614342 0.18 A QFF1E fuse 0.25 A QFF1F fuse 0.50 A QFF1G fuse 0.75 A QFF1H fuse 1.33 A QFF1A fuse 2.0 A QFF1B fuse 3.0 A QFF1C fuse 5.0 A QFF1D fuse Emerson Energy Systems Designation disc CPC number and color P097P239 (yellow) P097P240 (violet) P097P241 (red) P097P242 (brown) P097P235 (white) P097P236 (orange) P097P237 (blue) P097P238 (green) MFA150 Power SystemNT6C28C User Manual 88 Appendix B : Replacement parts This page is left blank intentionally. UM6C28C P0728920 Standard 11.00 April 2001 Emerson Energy Systems 89 Appendix C : Technical service assistance For technical assistance, 24-hours a day / 7 days a week, dial one of the following toll-free numbers. This service complements the services offered by field support organizations such as, the Emergency Technical Assistance Service (ETAS), and the Installation Technical Assistance Service (ITAS). Local toll-free prefixes The following prefixes give access to toll-free numbers in various countries. For further information please contact the local service provider. Country Australia Belgium Brazil Denmark Finland France Germany Hong Kong Ireland Japan Korea Malaysia Netherlands New Zealand Singapore Switzerland United Kingdom Emerson Energy Systems Prefix 0011 00 000815 00 00 or 990 00 00 001 00 001 (KDD) 041 (ITJ) 0061 (IDC) 001 (Korea Telecom) 002 (Dacom) 003 (Once) 00 00 00 001 00 00 MFA150 Power System NT6C28C User Manual 90 Appendix C : Technical service assistance Toll-free technical assistance numbers United States: 1-800-992-8417 In Europe: Austria Belgium Denmark Finland France Germany Ireland Italy Netherlands Norway Sweden Switzerland United Kingdom 800-213-49156 800-213-49156 800-213-49156 800-213-49156 800-213-49156 800-213-49156 800-213-49156 800-213-49156 800-213-49156 800-213-49156 800-213-49156 800-213-49156 800-213-49156 *1 In the Caribbean and Latin America (CALA): Bahamas 1-800-389-0081 Barbados 1-800-534-0225 Brazil 7101-2288 Colombia 980-192288 Dominican 1-888-7514232 Republic Jamaica 1-800-850-1755 Mexico 001-800-514-2288 Puerto Rico 1-888-680-2288 Trinidad & 1-800-363-2288 Tobago *1 Canada: 1-800-363-2288 In Asia and the Pacific: Australia 800-213-49156 Hong Kong 800-213-49156 Japan 800-213-49156 Malaysia 800-213-49156 New Zealand 800-213-49156 Philippines 1-800-1-110-0131 Singapore 800-213-49156 South Korea 800-213-49156 Taiwan 800-213-49156 In the Middle-East: Israel 800-213-49156 The United Kingdom includes England, Guernsey, the Isle of Man, Jersey, Northern Ireland, and Scotland. For countries not covered by a toll-free service dial Canada (country code 001) at 514−832−0201. UM6C28C P0728920 Standard 11.00 April 2001 Emerson Energy Systems 91 Appendix D : Reference documents Manual number Description UM6C18HB/HC TCM/48 temperature compensation module Voltage_level Voltage level limits for Power Plants, Rectifiers and Controllers UM7C19A RPM1000C intelligent controller/monitor unit IM6C28C MFA150 Modular Front Access power system Installation manual UM5C07 Helios Rectifier 50/48 UM5C06D Helios Rectifier 25/48 Emerson Energy Systems MFA150 Power System NT6C28C User Manual 92 Appendix D : Reference documents This page is left blank intentionally. UM6C28C P0728920 Standard 11.00 April 2001 Emerson Energy Systems 93 Abbreviations and acronyms A ampere AC or ac alternating current AD assembly drawing ADJ adjust ALM alarm AMPS amperes AUD audible AWG American wire gauging BAT battery BAT RTN battery return BD Battery disconnect BMU battery management unit BOD battery on discharge BODA battery on discharge alarm BPG building principal ground BR battery return BRKR breaker BYP bypass C Celsius CAL calibrate CH channel Emerson Energy Systems MFA150 Power System NT6C28C User Manual 94 Abbreviations and acronyms CHG charge COM common CTRL control DC or dc direct current DISCH discharge EMI electromagnetic interference EQL equalize EQL STAT equalize status ESD electrostatic discharge F Fahrenheit F fuse FA fuse alarm FG frame ground FGB floor ground bar FS forced sharing ft foot ft-lb foot-pound GRD or GRND ground HV high voltage HVA high voltage alarm HVSD high voltage shutdown HVSDA high voltage shutdown alarm HVSDR high voltage shutdown reconnect in. inch in.-lb inch-pound IS interconnect schematic ISG isolated system ground UM6C28C P0728920 Standard 11.00 April 2001 Emerson Energy Systems Abbreviations and acronyms 95 L line (AC) lb pound LED light emitting diode LV low voltage LVA low voltage alarm LVD low voltage disconnect LVDA low voltage disconnect alarm LVDR low voltage reconnect m meter MAJ major MFA modular front access MGB main ground bar MIN minor MNL manual MOP method of procedure MPR modular power rectifier MPS modular power shelf mV millivolt NC normally closed N-m Newton-meter NO normally open NORM normal PLT plant psi pound per square inch RC rectifier control RECT rectifier REQ remote equalize Emerson Energy Systems MFA150 Power SystemNT6C28C User Manual 96 Abbreviations and acronyms RFA rectifier failure alarm RPM remote power monitor RST reset SH shunt SLS slope load sharing SPG single point ground (connection) SW switch TB terminal block TCM temperature compensation module TP test point TR temporary release UL Underwriters Laboratories V volt VRLA valve regulated lead acid (batteries) WD wiring diagram UM6C28C P0728920 Standard 11.00 April 2001 Emerson Energy Systems MFA150 Modular Front Access Power SystemNT6C28C User Manual Emerson Energy Systems 2280 Alfred-Nobel Blvd St-Laurent ( Quebec ) Canada H4S 2A4 Manual Number : UM6C28C ( 167-9021-102 ) Manual Issue : 11.00 Manual Status : Standard Release Date : October 2001 P0728920 Copyright 2001 Astec International Ltd All Rights Reserved Published in Canada The information contained in this manual is the property of Astec International Ltd and is subject to change without notice. Astec International Ltd reserves the right to make changes in design or components as progress in engineering and manufacturing may warrant. Except as specifically authorized in writing by the V.P. of Engineering and Product Manufacturing of Astec International Ltd, the holder of this manual shall keep all information contained herein confidential and shall protect same, in whole or in part, from disclosure and dissemination to all third parties, and use the same for start-up, operation, troubleshooting, and maintenance purposes only. Changes or modifications not expressly approved by the party responsible for compliance could void the user’s authority to operate this equipment. The equipment generates, uses, and can radiate radio frequency energy, and if not installed and used in accordance with the instructions contained in the Installation and User Manuals, can cause harmful interference to radio communications. Operation of this equipment in a residential area is likely to cause harmful interference, in which case the user will be required to correct the interference at his own expense. Helios and Helios Candeo are trademarks of Astec International Ltd. The Emerson logo is a trademark and service mark of Emerson Electric Co. Emerson Energy Systems a part of Emerson Network Power