1
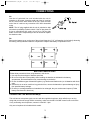
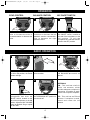
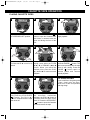
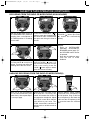
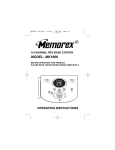
MKS1009KARAOKE O/M.QXD
7/3/02
9:13 AM
Page 10
PORTABLE KARAOKE WITH AM/FM
RADIO AND CASSETTE RECORDER
MODEL: MKS1009
BEFORE OPERATING THIS PRODUCT, PLEASE READ THESE
INSTRUCTIONS COMPLETELY.
OPERATING INSTRUCTIONS
MKS1009KARAOKE O/M.QXD
7/3/02
9:13 AM
Page 1
WARNING
TO PREVENT FIRE OR SHOCK HAZARD, DO NOT USE THIS PLUG WITH AN EXTENSION CORD, RECEPTACLE
OR OTHER OUTLET UNLESS THE BLADES CAN BE FULLY INSERTED TO PREVENT BLADE EXPOSURE. TO
PREVENT FIRE OR SHOCK HAZARD, DO NOT EXPOSE THIS APPLIANCE TO RAIN OR MOISTURE.
CAUTION
RISK OF ELECTRIC SHOCK
DO NOT OPEN
The lightning flash with
arrowhead symbol, within an
equilateral triangle is intended
to alert the user to the
presence of uninsulated
‘dangerous voltage’ within the
product’s enclosure that may
be of sufficient magnitude to
constitute a risk of electric
shock to persons.
CAUTION: TO REDUCE THE
RISK OF ELECTRIC SHOCK DO
NOT REMOVE COVER (OR
BACK), NO USER
SERVICEABLE PARTS INSIDE.
REFER SERVICING TO
QUALIFIED SERVICE
PERSONNEL.
The exclamation point within
an equilateral triangle is
intended to alert the user to the
presence of important
operating and maintenance
(servicing) instructions in the
literature accompanying the
appliance.
IMPORTANT SAFETY INSTRUCTIONS
1.
2.
3.
4.
5.
6.
7.
8.
9.
10.
11.
12.
13.
14.
15.
16.
17.
18.
Read these instructions.
Keep these instructions.
Heed all warnings.
Follow all instructions.
Do not use this apparatus near water.
Clean only with dry cloth.
Do not block any ventilation openings. Install in accordance with the manufacturer’s instructions.
Do not install near any heat sources such as radiators, heat registers, stoves, or other apparatus
(including amplifiers) that produce heat.
Do not defeat the safety purpose of the polarized or grounding-type plug. A polarized plug has two
blades with one wider than the other. A grounding type plug has two blades and a third grounding prong.
The wide blade or the third prong are provided for your safety. If the provided plug does not fit into your
outlet, consult an electrician for replacement of the obsolete outlet.
Protect the power cord from being walked on or pinched particularly at plugs, convenience receptacles,
and the point where they exit from the apparatus.
Only use attachments / accessories specified by the manufacturer.
Unplug this apparatus during lightning storms or when unused for long periods of time.
Refer all servicing to qualified service personnel. Servicing is required when the apparatus has been
damaged in any way, such as power-supply cord or plug is damaged, liquid has been spilled or objects
have fallen into the apparatus, the apparatus has been exposed to rain or moisture, does not operate
normally, has changed its performance, or has been dropped.
This appliance shall not be exposed to dripping or splashing water and that no object filled with liquids
such as vases shall be placed on the apparatus.
Do not overload wall outlet. Use only power source as indicated.
Use replacement parts as specified by the manufacturer.
The product may be mounted to a wall only if recommended by the manufacturer.
Upon completion of any service or repairs to this product, ask the service technician to perform safety
checks.
1
MKS1009KARAOKE O/M.QXD
7/3/02
9:13 AM
Page 2
LOCATION OF CONTROLS
1
2
3
4
12
5
13
6
7
8
14
9
10
15
16
11
1.
2.
3.
4.
5.
6.
FM Antenna
Carrying Handle
Cassette Compartment
Cassette Buttons (right to left):
PAUSE ( )
STOP/EJECT (
)
F.FWD (❿❿)
REWIND (➛➛)
PLAY (❿)
RECORD ( )
AC Jack (Rear of Unit)
AM/FM Dial Scale and Pointer
7.
8.
9.
10.
11.
12.
13.
14.
15.
Battery Compartment (Rear of Unit)
MASTER VOLUME Control
BALANCE Control
ECHO Control
MIC 1 Jack
TUNING Control
POWER Indicator
MIC VOLUME Control
FUNCTION (TAPE (RADIO OFF)/AM/FM)
Control
16. MIC 2 Jack
2
MKS1009KARAOKE O/M.QXD
7/3/02
9:13 AM
Page 3
CONNECTIONS
AC:
Use the AC polarized line cord included with the unit for
operation on AC power. Insert the small end of the AC cord into
the AC socket on the back cabinet of the unit. Insert the other
end of the AC cord into any convenient 120V 60Hz household
outlet.
NOTE: The AC plug supplied with the unit is polarized to help
minimize the possibility of electric shock. If the AC plug does not
fit into a nonpolarized AC outlet, do not file or cut the wide
blade. It is the user’s responsibility to have an electrician replace
the obsolete outlet.
AC Outlet
AC Plug
DC:
Remove the battery cover on the rear of the unit and insert six (6) “C” cell batteries (not included), observing
the battery polarity indicated inside the compartment. Replace the Battery Compartment cover.
+ Ð
+
Ð
+ Ð
+ Ð
+
Ð
Ð
+
BATTERY PRECAUTIONS
Follow these precautions when using batteries in this device:
1. Use only the size and type of batteries specified.
2. Be sure to follow the correct polarity when installing the batteries as indicated in the battery
compartment. Reversed batteries may cause damage to the device.
3. Do not mix different types of batteries together (e.g. Alkaline and Carbon-zinc) or old batteries with fresh
ones.
4. If the device is not to be used for a long period of time, remove the batteries to prevent damage or injury
from possible battery leakage.
5. Do not try to recharge batteries not intended to be recharged; they can overheat and rupture. (Follow
battery manufacturer’s directions.)
CONNECTING THE MICROPHONE(S)
This unit has two microphone jacks, use one with the supplied microphone, which will allow you to sing
along with your favorite songs. Before connecting, make sure the MIC VOLUME control is set to minimum.
If only connecting one microphone, connect it to the MIC 1 jack.
Only one microphone is included with this model.
3
MKS1009KARAOKE O/M.QXD
7/3/02
9:13 AM
Page 4
OPERATION
ECHO CONTROL
BALANCE CONTROL
MIC ON/OFF SWITCH
1
1
1
Rotate the ECHO control clockwise to increase the echo or
counterclockwise to decrease the
echo.
Rotate the BALANCE control
clockwise to decrease the left
speaker’s sound or counterclockwise to decrease the right
speaker’s sound
To turn the microphone on, slide
the ON/OFF switch, located on
the side of the microphone, to the
ON position. To turn the
microphone off, slide the ON/OFF
switch to the OFF position.
RADIO OPERATION
1
2
3
1
2
Slide the FUNCTION control to
the AM or FM position; the Power
indicator will light.
Rotate the TUNING control to Adjust the MASTER VOLUME ❶
select a station.
and BALANCE ❷ controls as
desired.
4
5
ANTENNAS
AM – This unit has a built-in
ferrite rod antenna, which
provides adequate reception in
most areas. If reception is weak,
turn the unit to improve reception.
If desired, plug in one or two
microphones and slide the
ON/OFF switch, located on the
side of the microphone, to the ON
position. Adjust the MIC VOLUME
control as desired. Sing or speak
with the radio.
Slide the FUNCTION control to
the TAPE/RADIO OFF position to FM – This unit has an FM rod
antenna. If reception is weak,
turn the unit off.
extend and rotate the rod
antenna.
4
MKS1009KARAOKE O/M.QXD
7/3/02
9:13 AM
Page 5
CASSETTE TAPE OPERATION
PLAYING CASSETTE TAPES
1
2
3
Slide the FUNCTION control to
the TAPE/RADIO OFF position.
Press the STOP/EJECT (
)
button to open the Cassette Door
and insert a cassette with the
open end facing the front of the
unit.
Press the PLAY ( ❿ ) button to
begin playback.
4
5
6
2
3
1
1
2
Adjust the MASTER VOLUME ❶
and BALANCE ❷ controls as
desired.
To advance or rewind the tape
rapidly, press either the F.FWD
(❿❿) ❶ or REWIND (➛➛) ❷
button. When you reach the
desired point, press the PLAY
(❿) button ❸ to resume normal
playback.
To pause playback momentarily,
press the PAUSE ( ) button. The
tape movement stops but the tape
motor is still running. Press the
PAUSE ( ) button again to
release pause and resume
normal playback.
7
8
TO SING ALONG
If you would like to sing along with
a tape, simply play the tape,
insert one or two microphones
and sing along!
To stop playback before the tape
ends, press the STOP/EJECT
(
) button. The PLAY (❿)
button is released and the tape
motor shuts off.
When the tape reaches the end,
the auto-stop mechanism
activates, the PLAY (❿) button is
released and the tape motor
shuts off. Press the STOP/EJECT
(
) button to open the Cassette
Door and remove the tape.
5
MKS1009KARAOKE O/M.QXD
7/3/02
9:13 AM
Page 6
CASSETTE TAPE OPERATION (CONTINUED)
RECORDING FROM THE RADIO OR MICROPHONE (NON-KARAOKE)
1
2
3
Slide the FUNCTION control to
the TAPE/RADIO OFF position if
recording from a microphone or
the FM/AM position if recording
from the radio.
Press the STOP/EJECT (
)
button to open the Cassette Door
and insert a blank cassette with
the open end facing the front of
the unit.
4
5
1
2
Adjust the MASTER VOLUME ❶
and BALANCE ❷ controls as
desired. This does not affect the
recording due to the ALC circuit.
To pause playback momentarily,
press the PAUSE ( ) button. The
tape movement stops but the tape
motor is still running. Press the
PAUSE ( ) button again to release
pause and resume recording.
When ready to record, press the
RECORD ( ) button (the PLAY
(❿) button will automatically
depress).
NOTES:
• Refer to SAFEGUARD
AGAINST ACCIDENTAL
ERASURE section (page 7) if
the RECORD button cannot
be pressed.
• Keep the microphones away
from the unit to avoid
feedback.
KARAOKE RECORDING FROM THE RADIO OR MICROPHONE(S)
1
2
3
1
2
Insert one or two microphones
into the MICROPHONE jacks
shown above, then repeat steps 1
to 3 on top of page.
Adjust the MIC VOLUME control
❶ as desired. Increasing this
control will increase the volume of
the respective microphone. Adjust
the ECHO control ❷ to add an
echo effect to your voice. The
ECHO control ❷ is variable so
add as much or as little reverb as
desired.
6
Slide the ON/OFF switch, located
on the side of the microphone, to
the ON position. Sing or talk into
the microphone(s) and both the
audio and the microphone(s) will
be recorded onto the cassette
tape.
MKS1009KARAOKE O/M.QXD
7/3/02
9:13 AM
Page 7
CARE AND MAINTENANCE
SAFEGUARD AGAINST ACCIDENTAL ERASURE
SIDE
When a new recording is made, any program material
previously recorded is automatically erased and only the
new recording remains. To safeguard valuable
recordings from being erased accidentally, the cassette
and the deck are equipped with a special device.
Tab for side 2
On the back of the cassette there is an erase prevention
tab on each side. To prevent accidental erasing, break
out these tabs with a screwdriver. If only one side of the
tape is to be protected, break out the tab on the left side
Tab
with the side desired facing you.
To record on a tape in which the tab has been broken,
place a piece of adhesive tape over that area.
1
Tab for side 1
Break out the tab
to prevent recording
NOTE: When a tab is broken out, the record button
cannot be depressed.
Cover with tape to record again
CASSETTE TAPE RECOMMENDATIONS
Standard tape lengths have 15 (C-30), 30 (C-60) and 45 (C-90) minutes of
recording time on each side. Longer length tapes of 60 (C-120) minutes of
recording time on each side are not recommended. Use only high quality
tapes. If a problem develops, check the unit first with another cassette to
determine if the problem is with the cassette, and not with the unit.
If there is any slack in the cassette, it should be removed before inserting
the cassette. Place a pencil in one of the hubs and rotate it clockwise
until all slack is taken up.
Cleaning the unit
• To prevent fire or shock hazard, disconnect your unit from the AC power source when cleaning.
• The finish on your unit may be cleaned with a dust cloth and cared for as other furniture. Use caution
when cleaning and wiping the plastic parts.
• Mild soap and a damp cloth may be used on the front panel.
• Periodic cleaning of the tape heads, capstan and pinch roller is necessary to maintain good sound
reproduction. Clean them after every 100 hours of use or less if playback has deteriorated. Use a cotton
swab moistened with head cleaning solution or isopropyl alcohol, then wipe dry with another swab.
Cotton Swab
Erase
Head
Capstan
R/P
Head
Pinch Roller
NOTE: Never use metal objects on or near the tape heads. Do not allow any cleaning material to fall into the
tape assembly.
7
MKS1009KARAOKE O/M.QXD
7/3/02
9:13 AM
Page 8
TROUBLESHOOTING GUIDE
Should this unit exhibit a problem, check the following before seeking service:
Symptom
Possible Cause
Solution
Station not tuned properly for
AM or FM.
Retune the AM or FM broadcast
station.
FM: FM Rod Antenna is not fully
extended.
Fully extend FM Rod Antenna.
AM: Unit is not positioned
correctly.
Rotate unit until best reception is
obtained.
FUNCTION control not on AM or FM.
Rotate to select AM or FM .
Volume at minimum.
Increase volume.
FUNCTION control not set to TAPE.
Rotate to the TAPE position.
Volume at minimum.
Increase volume.
Sound distorted.
Dirty head.
Clean the head.
Speed varies.
Tape old.
Replace the tape.
Cassette tape worn out.
Replace the tape.
Will not record.
Erase prevention tab removed.
Cover hole with adhesive tape.
Distorted sound
on playback.
Defective tape or dirty tape head.
Replace tape or clean tape head.
Microphone is too close to unit
or MIC VOLUME is too high.
Move microphone away from
unit or decrease MIC VOLUME.
Power cord disconnected.
Connect power cord.
Radio
Noise or sound distorted
on radio broadcasts.
AM or FM, no sound.
Cassette Player
No sound.
Cassette Recorder
Karaoke
Feedback is heard
when singing.
General
No sound.
FOR ADDITIONAL SET-UP OR OPERATING ASSISTANCE, PLEASE VISIT OUR WEBSITE AT
WWW.MEMCORPINC.COM
OR CONTACT CUSTOMER SERVICE AT 1-800-919-3647.
PLEASE KEEP ALL PACKAGING MATERIAL FOR AT LEAST 90 DAYS IN CASE YOU NEED
TO RETURN THIS PRODUCT TO YOUR PLACE OF PURCHASE OR MEMOREX.
FOR PARTS AND ACCESSORIES, CONTACT FOX INT’L AT 1-800-321-6993.
8
MKS1009KARAOKE O/M.QXD
7/3/02
9:13 AM
Page 9
Memcorp, Inc.
Weston, FL
Printed in Hong Kong
Visit our website at www.memcorpinc.com