1
Final Cut Pro
User’s Manual
Includes instructions for installing and using your software
K Apple Computer, Inc.
© 1999 Apple Computer, Inc. All rights reserved.
Under the copyright laws, this manual may not be copied, in whole or in part, without the written consent of Apple.
Your rights to the software are governed by the accompanying software license agreement.
The Apple logo is a trademark of Apple Computer, Inc., registered in the U.S. and other countries. Use of the
“keyboard” Apple logo (Option-Shift-K) for commercial purposes without the prior written consent of Apple may
constitute trademark infringement and unfair competition in violation of federal and state laws.
Every effort has been made to ensure that the information in this manual is accurate. Apple Computer, Inc. is not
responsible for printing or clerical errors.
Apple Computer, Inc.
1 Infinite Loop
Cupertino, CA 95014-2084
408-996-1010
http://www.apple.com
Apple, the Apple logo, AppleTalk, Final Cut, FireWire, Mac, Macintosh, MacPaint, Power Macintosh, QuickTake, and
QuickTime are trademarks of Apple Computer, Inc., registered in the U.S. and other countries.
Final Cut Pro and Finder are trademarks of Apple Computer, Inc.
Adobe is a trademark of Adobe Systems, Inc.
Times is a registered trademark of Heidelberger Druckmaschinen AG, available from Linotype Library GmbH.
Portions Copyright © 1991-1997 Compuware Corporation. All Rights Reserved.
Portions Copyright © 1995-1996 DataPak Software, Inc. All Rights Reserved.
EDL Translation Library Copyright © 1991-1999 Alba Editorial, Inc. All Rights Reserved.
The VtrEngine videotape control engine is a product of Pipeline Digital, and is licensed to Apple Computer, Inc.
Copyright © 1993-1999 Pipeline Digital. All Rights Reserved.
Other company and product names mentioned herein are trademarks of their respective companies. Mention of
third-party products is for informational purposes only and constitutes neither an endorsement nor a
recommendation. Apple assumes no responsibility with regard to the performance or use of these products.
Contents
1
Getting Started
17
Where to Find Information 17
System Requirements 18
Preparing to Install Final Cut Pro 18
Installing QuickTime Components 18
Installing Final Cut Pro 19
Hardware Setup and Configuration 20
Connecting Video Devices to Your Computer 20
Controlling Video Devices With Your Computer 22
About Apple FireWire 22
Apple FireWire Basic 22
System Configurations 23
Ultra Wide SCSI Hard Disk Drive and PCI Card Specifications 24
Optimizing Performance 26
Troubleshooting 27
2
Final Cut Pro Tutorial
29
Getting the Tutorial Files and Starting the Program 29
The Final Cut Pro Workspace 30
Setting Up Your Environment 31
Editing in Final Cut Pro 31
Creating Your Own Project 31
Adding the Base Track for Your Sequence 35
Finishing the Rough Edit 38
Advanced Editing Techniques 39
3
Match-Frame Editing 42
Applying and Editing a Dissolve Transition 44
Audio Editing 48
Compositing and Special Effects 51
Opening and Saving a New Project 52
Previewing the Introduction’s Titles 52
Building the Background 52
Putting Dancers on the Background 54
Adding Circles Around the Dancers 59
Adding Titles for the Introduction 64
Copying a Title’s Attributes to Other Titles 68
Adding the Titles to the Introductory Sequence 69
Rendering the Sequence 70
Finishing a Project 70
Printing to Video 71
Exporting a Sequence for Multimedia or the Web 71
Moving Forward With a New Project 72
3
Understanding Final Cut Pro
73
The Working Environment 73
The Viewer 73
The Canvas 74
The Timeline 74
The Browser 75
The Tool Palette 76
Other Windows You Will Use 78
Log and Capture 78
Edit to Tape 79
Preferences 80
Sequence Settings 81
Project Properties 81
Item Properties 82
Trim Edit 82
Using Menus, Shortcuts, and Controls 83
Shortcut Menus 83
4
Contents
Keyboard Shortcuts 84
Tabbed Windows 84
Customizing the Screen Layout 86
Undoing Changes 87
Working With Timecode 87
Navigating by Entering New Timecodes 88
Moving to a New Time by Adding or Subtracting Frames 88
Moving to a New Time by Entering Numbers That Are Converted 89
Separators for Timecode Entry and Logging 89
Timecode Keyboard Shortcuts 90
Editing in Final Cut Pro 91
Editing With the Tool Palette Tools 92
Background Information and Concepts 92
4
Preferences and Presets
95
Setting General Preferences 96
Setting Device Control Preferences 99
Specifying Capture Preferences 101
Using Sequence Presets 106
Creating, Editing, and Deleting Presets 107
Setting Scratch Disk Preferences 110
5
Getting Media Into Final Cut Pro
113
Log and Capture Window 114
Changing Device Control, Capture, or Scratch Disk Preferences 117
Calibrating the Timecode Signal You Are Capturing 118
Calibrating Capture Settings With Bars and Tone From Tape 118
Capturing Video Without Device Control 120
Choosing a Logging Bin for Offline and Captured Clips 121
Capturing Video With Device Control 121
Troubleshooting Your Video Deck 123
Logging Offline Clips 124
Batch Capturing Clips 126
Changing Duplicate Clip Names and Filenames 128
Importing a Batch List 128
Contents
5
Changing a Clip’s Source Timecode 129
Importing Media 130
Importing Still Images and Audio Files 130
Importing Layered Photoshop Files 131
Importing Audio Files From Audio CDs 132
6
Creating and Organizing Projects
133
Creating, Opening, Closing, and Saving Projects 133
Autosaving Projects 134
Customizing the Browser Display 134
Selecting Items in the Browser 136
Sorting Items in the Browser 136
Organizing Projects With the Browser 136
About the Browser Columns 137
Using Bins to Organize Clips 138
Modifying Clip Properties in the Browser 139
Renaming Clips, Sequences, and Bins 139
Searching for Items in the Browser 140
Changing the Properties of a Project 141
7
Working With Clips and the Viewer
143
Using Clips in Sequences 143
Using the Viewer 144
The Video Tab 144
The Audio Tab 145
The Filters Tab 146
The Motion Tab 147
Opening Clips in the Viewer 147
Playing Clips and Locating Specific Frames 148
Marking In and Out Points 149
Creating Subclips 150
Adding and Editing Markers 151
Renaming Markers and Attaching Comments 152
Moving and Extending the Duration of Markers 152
Using Markers as Subclips 153
6
Contents
Viewing Clips 153
Opening Clips From the View Menu 153
Changing Magnification in the Viewer or Canvas 154
Viewing Title and Action Safe Boundaries 155
Viewing Overlays 156
Viewing With Different Backgrounds 156
Working With Audio 156
Understanding Audio Formats 157
Compressed Audio Formats 157
Turning Off Audio Scrubbing 157
Using the Viewer to Display Audio Waveforms 157
Changing Your Computer’s Audio Level 158
Adjusting Audio Levels and Pan or Spread for a Clip 158
Synchronizing Audio and Video 159
Getting Information About the Properties of Clips 160
8
Creating Sequences and Editing
163
About Sequences 163
Working With the Timeline and Canvas 163
About Three-Point Editing 164
About Audio in Sequences 164
Mixing Audio in Real Time 165
How Tracks Are Composited to Create the Final Sequence 165
About Presets and Sequence Settings 166
Creating a New Sequence 166
Changing the Settings for an Existing Sequence 167
Creating Sequences Using Edit Decision Lists 168
Viewing a Sequence 168
Copying Sequences 169
Setting Up an Edit 169
Specifying the Target Tracks for Editing 169
Positioning the Playhead at a Specific Edit Point 170
Marking Edit Points 171
Performing Edits in the Canvas 171
The Canvas Edit Overlay 172
Contents
7
Editing in the Timeline 174
The Canvas Two-Up Display 175
Marking Split Edits 175
Setting the Edit Points to the Current Selection 176
Locating a Match Frame 176
9
Working in the Timeline and Canvas
177
The Timeline Window 177
Elements in the Timeline Window 178
Colors of Items in the Timeline Window 180
Customizing the Timeline Track Display 181
Timeline Scaling and Scrolling 182
Scaling the Timeline Display 182
Positioning the Playhead in a Sequence 182
Working With Tracks in the Timeline 183
Selecting Track Contents in the Timeline 185
Working With Markers in the Timeline and Canvas 186
Selecting Items in the Timeline 187
Selecting Clips 188
Linked Selection 188
Selecting Items Between the In and Out Points 189
Moving Clips Into the Timeline 189
Moving Clips Within the Timeline 190
Snapping in the Timeline 190
Deleting Clips 191
Copying and Pasting Clips and Clip Attributes 192
Modifying Clips in a Sequence 193
Making Individual Clips Visible or Invisible 193
Using Offline Clips 193
Changing the Playback Speed of a Clip 194
Working With Keyframes in the Timeline 195
Displaying Keyframes in the Timeline 195
Modifying Keyframes in the Timeline 196
Adding and Adjusting the Values of Overlay Keyframes 196
Searching for Items in the Timeline 197
8
Contents
Finding and Closing Gaps 198
Making Still Frames From Clips in the Canvas 199
Correcting Clips That Are Out of Sync 199
10
Trimming Edits
201
Accessing Trimming Functions 201
Using Trimming Functions With Linked Selection and Snapping 201
Types of Trimming Operations 202
Selecting One or More Edit Points in the Timeline 203
Using the Trim Edit Window 204
Trimming in the Trim Edit Window 205
Slipping an Edit in the Trim Edit Window 206
Trimming Edits in the Timeline and Viewer 206
Performing a Ripple Edit 206
Performing a Roll Edit 207
Slipping a Clip 208
Sliding a Clip 209
Changing the Duration of a Clip 209
Understanding Error Messages When Trimming 210
11
Creating Transitions
211
Adding Transition Effects 211
Changing Transition Settings 212
Using the Transition Viewer to Change Settings and Edit Transitions 212
Trimming and Moving Transitions in the Viewer 214
Trimming or Performing Ripple and Roll Edits on Transitions 215
Modifying Audio Transitions 216
Saving Transition Settings by Creating a Favorite Transition 216
Previewing Transitions 217
Viewing a Transition in the Canvas 217
Rendering Transitions 217
12
Compositing and Special Effects
219
Locating and Applying Effects 219
Using the Viewer Effects Tabs 219
Setting Effects Parameters 220
Contents
9
Using Video Filters 220
Applying Filters From the Timeline or the Browser 221
Applying Filters to a Range of Clips 222
Changing Filters Over Time 222
Changing the Rendering Order of Filters 223
Saving Filter Settings by Creating a Favorite Filter 223
Using After Effects Third-Party Filters 223
Custom User Interfaces 224
Performance 224
Additional Filters 225
Using Generators 225
Editing Motion Properties 226
The Motion Properties 226
Changing the Position of a Clip in the Viewer or Canvas 227
Scaling a Clip in the Viewer or Canvas 228
Rotating a Clip 228
Distorting the Shape of a Clip 229
Cropping a Clip 230
Setting a Clip’s Opacity 230
Adding a Drop Shadow to a Clip 231
Adding Motion Blur to a Clip 231
Using Keyframes to Change Effects Over Time 232
Types of Keyframes 233
Working With Keyframes in the Viewer 233
Editing Keyframes in the Viewer 234
Creating a Motion Path 235
Editing a Motion Path 237
Creating Curves and Corners Along a Motion Path 237
Controlling Speed Along a Motion Path 237
Using Alpha Channels 239
Importing Transparent Images 239
Setting the Clip Composite Mode 239
13
Rendering
241
About Rendering 241
10
Contents
Rendering Versus Real-Time Playback 241
How Sequences Are Rendered 241
Setting a Sequence’s Render Qualities 242
Editing Render Quality Levels 242
Video Rendering 244
Audio Rendering 244
Using Nested Sequences 244
Using Nested Sequences to Render Transitions 245
Rendering Indicators 245
How to Avoid Rendering 246
Rendering 246
Specifying Storage Locations for Render Files 247
Using Cache Manager to Manage Rendered Files 247
Automatically Rendering Before Playing 248
14
Creating Final Output
249
Printing to Video 249
Editing to Tape 251
Edit to Tape Operations 252
The Difference Between Insert and Assemble Editing 253
Choosing Which Tracks to Record 253
Setting Up for Editing to Tape 254
Performing an Edit to Tape 254
Setting Mastering Options 255
Edit to Tape Device Settings 256
Preparing a Videotape With Black and Code 257
Working With Edit Decision Lists 257
Exporting an EDL 257
Setting EDL Export Options 258
Importing an Edit Decision List 259
Working With Batch Lists 260
Exporting a Batch List 260
Exporting FXScripts as Text 260
Exporting Sequences and Clips 261
Exporting Sequences and Clips in a Batch Operation 263
Contents
11
Batch Export Columns 264
Naming Options Dialog Box 266
15
Managing Complex Projects
267
Placing Sequences Within Other Sequences 267
Nesting Clips 268
Using the Sequence Trimmer 268
Relinking Offline Files 269
Moving a Project and Its Media 269
Managing Projects With Multiple Users 270
16
Building Effects With FXBuilder
271
What Is Scripting? 271
How Does FXBuilder Work? 272
Opening FXBuilder 272
Opening and Applying Scripts 272
The FXBuilder Tabs 273
Running a Script in FXBuilder 274
Applying a Script in the Timeline 274
Rendering 275
Modifying Scripts 275
How Is a Script Structured? 275
Exporting Scripts 277
Exporting Scripts as Text Files 277
Preventing Scripts From Being Modified or Viewed 278
Making a Favorite Effect From a Script 278
Installing Scripts 278
Building Scripts 278
About the FXScript Commands 279
Statements 279
Appendix A
FXScript Reference
285
Scripting Parameters 285
Expressions in FXScript 285
Operators 286
12
Contents
Data Types 287
Functions 288
Geometry 289
Shapes 291
Transform 293
Blit 294
Process 296
Distort 300
Composite 303
Key 306
External 308
String 310
Text 311
Clip 312
Utility 312
Constants and Predeclared Variables 314
General 315
Color 315
Formatting 315
Shapes 316
Text 316
Key 316
Variables 317
Input 318
Definition 320
Assignment 321
Flow Control 322
Appendix B
List of Audio and Video Effects
325
Audio Transitions 325
Audio Filters 326
Video Transitions 328
3D Simulation 328
Dissolve 328
Contents
13
Iris 329
Map 329
Page Peel 329
Slide 329
Stretch 330
Wipe 330
Video Filters 332
Blur 332
Border 332
Channel 332
Distort 333
Image Control 333
Key 334
Using a Color Key 334
Using a Luma Key 335
Matte 335
Perspective 336
Sharpen 337
Stylize 337
Video 337
Video Generators 338
Text 338
Appendix C
Keyboard Shortcuts
339
General Controls 339
Application Windows 340
Select, Cut, Copy, and Paste 341
Navigation 342
Finding Items 343
Scrolling 344
Screen Layout and Display 344
Projects and Sequences 344
Browser 345
Timeline 345
14
Contents
Logging and Capturing 346
Playing Video 347
In and Out Points 347
Markers 348
Editing 349
Output 351
Compositing and Special Effects 351
Quick Navigation Keys and Modifiers 353
Tools and Modifier Keys 354
Index
357
Contents
15
C H A P T E R
1
1
Getting Started
‘Welcome to Apple Final Cut Pro, the all-in-one solution for professional digital video editing,
compositing, and special effects. Final Cut Pro has been designed to work with professional
broadcast equipment in post-production environments. In addition, the program has been
thoughtfully designed to take advantage of leading-edge digital technologies, enabling you to
be creative as well as productive. Final Cut Pro supports Digital Video (DV ) as well as all
QuickTime formats, including MJPEG and streaming video. Final Cut Pro includes powerful
production management capabilities in an intuitive interface. There are also powerful, builtin effects generators as well as support for Adobe™ After Effects third-party plug-in filters.
With Final Cut Pro you can produce broadcast-quality productions in a flexible, easy-to-use
environment.
In this chapter you will find information resources and system requirements for Final Cut
Pro. Installation instructions will step you through the installation process. You will also be
given hardware setup and configuration information to help you put together hardware
components designed for use with Final Cut Pro. At the end of this chapter there are tips for
optimizing and troubleshooting Final Cut Pro.
Where to Find Information
m Final Cut Pro User’s Manual: This book documents all of the features of Final Cut Pro. It
contains installation instructions and informative material as well as an instructional
tutorial that can be taken using the video and audio clips included on the Final Cut Pro
CD-ROM disc. Appendixes contain a complete list of effects scripting commands, sample
effects, keyboard shortcuts, and indexes.
m Help system: Online help is built into the application. You can search it for information
while using Final Cut Pro. To open the Help system, choose Context Sensitive Help from
the Help menu or press the F1 key.
m Read Me file: You can find late-breaking information in this file on the Final Cut Pro CD.
m Updates: Look in the box for other essential information.
17
For general product information and updates, visit the Apple Final Cut Pro Web site at
www.apple.com/finalcutpro
System Requirements
m A Power Macintosh G3/266 computer or faster (G3/300 or faster required for DV ), or a
PowerBook G3/300 or faster
m Mac OS 8.6 or later
m 128 MB of RAM
m A CD-ROM drive
m A 6 GB, A/V (Audio/Video rated) drive (16 GB recommended)
m A true-color display
m ATI built-in video support on G3 models (required for DV )
m An Apple FireWire or other QuickTime-compatible digital video card for capturing video
from an external source or exporting video to tape
m The correct FireWire or device control cable and any additional cables you may need for
connecting your deck or camcorder to your computer
Preparing to Install Final Cut Pro
Final Cut Pro requires certain software components to be installed on your hard disk.
QuickTime is required by Final Cut Pro and has been included with this program. Be sure to
install QuickTime before installing Final Cut Pro.
Installing QuickTime Components
1
Insert the Final Cut Pro CD into your CD-ROM drive.
2
Double-click the Final Cut Pro CD icon on your desktop.
3
Locate and open the QuickTime Installer folder and double-click the QuickTime Installer
icon.
4
Follow the onscreen instructions in the QuickTime Installer.
On the “Choose Installation Type” panel, choose Custom and click Continue.
Click the Select All button on the next screen and click Continue.
Important
18
Chapter 1
5
Complete the QuickTime installation process by restarting your computer.
6
Unlock QuickTime Pro by following the instructions on the update sheet in your box.
Installing Final Cut Pro
Installation places the Final Cut Pro application and its components on your hard disk.
Installation of certain software components is determined by the type of capture hardware
you will be using with Final Cut Pro. If you have not yet installed and configured the
additional hardware you will be using with your computer, read the section “Hardware Setup
and Configuration” on page 20. If you already have a system configured with capture
hardware and a camcorder or deck, proceed with the installation instructions in this section.
1
Insert the Final Cut Pro CD into your CD-ROM drive.
2
Double-click the Install Final Cut Pro icon.
3
Choose a destination disk from the pop-up list and click Select.
Note: Final Cut Pro can only be installed on a hard disk with Mac OS 8.5 or later.
4
Read the Software License Agreement and click Continue.
m Click Agree to continue with the installation.
m Click Disagree to cancel the installation.
5
Specify the video capture hardware you will be using:
m Select Pinnacle Systems Targa Series if you will use a Targa video capture card.
m Select DV (digital video) if you will use Apple FireWire and DV devices. When you select
DV, your default video frame size is set to 720 x 480.
Note: Selecting DV will install FireWire extensions in your System Folder. These
extensions are optimized for Final Cut Pro. If you have existing FireWire extensions in
your System Folder that you want to retain, move them out of the Extensions folder
before you continue.
m Select None/Don’t Know if you will use hardware other than DV or Pinnacle Systems
Targa.
6
To specify a default video frame size (Pinnacle Systems Targa only):
m Select NTSC Standard for a 640 x 480 frame size.
m Select NTSC (CCIR 601) for a 720 x 486 frame size.
7
To specify the type of video source connection:
m Select Composite to sample video over a single cable using a BNC or RCA connector.
m Select S-Video to sample video over a single cable using a 4-pin S-video connector.
m Select Component to sample video over three cables using Betacam (r-y, b-y, Y )
Component BNC or RCA connectors.
8
Click Start to install Final Cut Pro.
9
Restart your computer.
Getting Started
19
10
Open the Final Cut Pro application and enter your registration information and serial
number. The serial number can be found on the Final Cut Pro CD sleeve.
Note: Final Cut Pro is configured to use a standard set of preferences and preset controls
based on answers given during installation. You may want to change these before you
proceed any further. See Chapter 4, “Preferences and Presets,” on page 95, and “About
Presets and Sequence Settings” on page 166.
Hardware Setup and Configuration
Final Cut Pro is designed to work with DV and Pinnacle Systems Targa Series hardware. If you
are using DV equipment, use the FireWire cable included with this package to connect your
camcorder or deck to your computer. DV devices with FireWire transmit device control data,
timecode, video, and audio over a single FireWire cable.
If you are using Pinnacle Systems Targa equipment, device control and timecode signals are
transmitted over one cable while video and audio data use another set of cables depending
on the type of video source connection you choose. See your Targa manual for details.
You can also connect camcorders or decks that do not support device control to capture
video clips and export edited sequences. To print to video or edit to tape, the card must have
video out capabilities. To connect these devices, you need a QuickTime-compatible video
capture card. Go to the Final Cut Pro Web site at www.apple.com/finalcutpro for a list of
vendors and qualified products.
Connecting Video Devices to Your Computer
Devices can be connected to your computer through a dedicated video capture card or
FireWire connection. It is recommended that you connect and turn on the device before
opening Final Cut Pro so the application can detect the device.
If you are connecting devices to your computer with video and audio cables:
m Connect the video and audio cables to the output jacks of your camcorder or deck.
m Connect the other ends of the cables to the corresponding input jacks of your capture
hardware.
m Connect an appropriate device control cable between your camcorder or deck and the
serial port of your computer.
20
Chapter 1
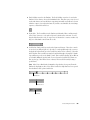
If you are connecting a DV device to your computer with FireWire:
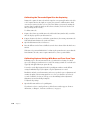
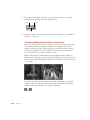
m Use a 2-meter, 6-pin to 4-pin FireWire cable to connect the DV device to your computer.
4-pin 1394 (FireWire) connector
6-pin 1394 (FireWire) connector
m Plug the 6-pin connector into the computer’s FireWire port and the 4-pin connector into
the device’s DV port. (FireWire ports on external devices are sometimes labeled IEEE 1394
or DV IN/OUT.)
The Apple FireWire port on your Macintosh is a 6-pin port.
Warning Do not attempt to force the 4-pin connector into the computer’s 6-pin FireWire
port. 4-pin connectors and ports can be especially fragile. Before connecting a 4-pin
connector to its corresponding port, be sure it is aligned properly by matching an indent
on the connector to the indent in the port. Do not force the two together.
Both connectors snap into place when properly engaged.
Once you have connected a camcorder or deck to your computer, turn on the device. If you
are using a camcorder, switch it to VCR mode (sometimes labeled VTR.) In VCR mode, the
camcorder operates as a playback/record deck and uses the video and audio connectors or
FireWire for input and output. In Camera mode, the camcorder acquires video and audio
through the CCD sensor and built-in Mic, not through the input connectors or FireWire. Final
Cut Pro cannot record to the camcorder while it is in Camera mode.
Getting Started
21
Controlling Video Devices With Your Computer
Final Cut Pro can control devices through a serial or FireWire cable. If your camcorder or
deck supports one of the following device control protocols, Final Cut Pro can transmit and
receive timecode and transport control data to and from the device. Search mechanisms
within some decks can also be controlled by Final Cut Pro.
Note: If your computer does not have a serial port, but does have a USB port, you can use a
third-party product such as the Keyspan USB Serial Adapter, which allows you to attach serial
devices to the USB port.
The following device protocols are supported:
m Apple FireWire or Apple FireWire Basic
m JVC RS-232
m Panasonic RS-232 or RS-422
m Sony RS-422 or RS-232
m Sony VISCA or LANC
Note: The Panasonic RS-422 and Sony RS-422 protocols require special cables. For more
information about the various protocols and their cables, see the Final Cut Pro Read Me file
in the Final Cut Pro application folder or visit the Final Cut Pro Web site at
www.apple.com/finalcutpro
For full functionality of Final Cut Pro, your video device needs to support auto editing VTRs
and protocols.
Note: An auto editing VTR is a device that can take In Point and Out Point timecode, along
with an Edit mode, and perform the edit accurately, regardless of the state of the controlling
device or its software.
About Apple FireWire
Apple FireWire is designed to work with digital video camcorders and decks that have a
FireWire port and use the DV format. With Final Cut Pro and a FireWire connection, you can
control external DV devices and capture DV movie clips to your hard disk. You can then view,
edit, and apply effects to the DV clips and render movies in the DV format. Final Cut Pro can
also play the movies to your camcorder or deck through the FireWire connection where the
output can then be recorded on tape.
Apple FireWire Basic
FireWire (IEEE 1394) is a serial bus currently supported by many professional and consumer
level camcorders and decks. However, there is a wide range of functionality and adherence to
the FireWire specifications among these devices. For this reason, two versions of the FireWire
protocol (Apple FireWire and Apple FireWire Basic) are provided in Final Cut Pro’s Device
Control preferences.
22
Chapter 1
If your deck or camcorder uses FireWire, begin by using the Apple FireWire protocol. This is
the default protocol if you selected DV during the installation setup. While all decks and
camcorders support the most basic functions like returning timecode and accepting basic
transport commands, other commands may not be supported. If you find that the device
does not accurately go to specified timecodes or fails to execute special commands, try the
Apple FireWire Basic protocol.
To switch between FireWire protocols in Final Cut Pro:
m Choose Preferences from the Edit menu and click the Device Control tab.
m Choose Apple FireWire or Apple FireWire Basic from the Protocol pop-up menu.
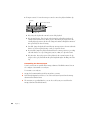
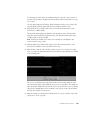
System Configurations
Final Cut Pro works best with the following hardware configuration:
Computer
Monitor
Video out
External
A/V HD
External
Speakers
Stereo Audio Out
FireWire
DV Camcorder
or Deck
Component, S-Video,
or Composite
Video Signal Out
NTSC Video
Monitor
A basic configuration includes a computer, a high-resolution monitor, and a video camcorder
or deck. Your source footage will be sampled to the internal hard disk of the computer via
FireWire or other video/audio connection. Footage can then be edited on the computer with
Final Cut Pro and output back to tape through FireWire or other video/audio connection.
Getting Started
23
A recommended setup also includes an Ultra Wide A/V hard disk drive, an external set of
speakers, and an NTSC or PAL monitor.
m An Ultra Wide A/V hard disk drive provides a dedicated, high-throughput storage medium
where video and audio can be recorded or rendered. The benefit of using a dedicated
drive for your media is that the drive contains no operating system software or other
applications and files that can fragment the disk. Fragmentation can interfere with the
continuous data flow of video and audio to and from the disk. You can add an internal
drive to your existing SCSI bus or you can install an Ultra Wide SCSI card to support an
external A/V drive.
m External speakers allow you to hear audio output from your video camcorder or deck.
Many camcorders come with a built-in speaker, but external speakers will provide you
with higher quality audio output.
Audio is output through the camcorder or deck
m when playing back video with audio in the Viewer, Canvas, or Timeline
m when printing or editing video to tape
Note: When playing video in the Canvas, audio output through the external speakers will
be slightly out of sync with the video. Audio from the external speakers will, however, be
in sync with video displayed on an NTSC or PAL monitor.
m An NTSC or PAL monitor is highly recommended for previewing video output from your
hard disk if you intend to output to videotape or broadcast on television. Final Cut Pro
outputs video to the NTSC or PAL monitor through the camcorder or deck. Many video
camcorders have built-in LCD displays that can also be used for this purpose. An NTSC or
PAL monitor can also be used to view the playback from your video device when you are
searching for edit points. Connect the NTSC or PAL monitor to your video deck or
camcorder using the Component, S-Video, or Composite output jacks.
Ultra Wide SCSI Hard Disk Drive and PCI Card Specifications
Digital video and audio demands high data throughput to and from the hard disk drive. For
the best performance when working with digital media, use a high-capacity, Ultra Wide SCSI
drive. Depending on your system configuration, you may be able to add an internal drive if
you have an existing Ultra Wide SCSI bus. If you do not have an internal Ultra Wide SCSI bus,
install an Ultra Wide SCSI card in one of your computer’s PCI slots. Refer to the Final Cut Pro
Web site at www.apple.com/finalcutpro for a list of vendors and qualified products.
24
Chapter 1
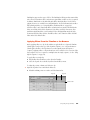
About the Internal Ultra Wide SCSI Bus
If your computer came with an Ultra Wide SCSI card, all devices on the same SCSI bus must
have unique ID numbers. However, devices on different SCSI buses may use the same SCSI
ID number. (For example, you can have a removable media drive with ID number 3
connected to the computer’s built-in regular SCSI bus and a hard disk with ID number 3
connected to the Ultra Wide SCSI bus.)
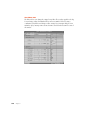
Hard disks installed in your computer at the factory and the SCSI card have
reserved certain SCSI ID numbers on the Ultra Wide SCSI bus. Other ID numbers are available
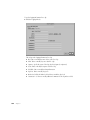
for assignment to SCSI devices that are added later, as described in the following table.
Important
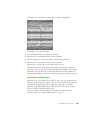
Ultra Wide SCSI ID Number
Device
0
Factory-installed hard disk drive (terminated)
1 through 6
Available1
7
SCSI PCI card (terminated)
8 through 15
Available
1
If your computer came with two or more Ultra Wide SCSI hard disk drives, use the System Profiler program (available in the
Apple menu) to find out the SCSI ID numbers of your drives.
Getting Started
25
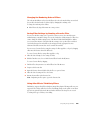
If you want to install an internal SCSI-3 drive, use the internal ribbon cable with the 68-pin
connector to connect the device to the Ultra Wide SCSI bus.
68-pin connector
Warning Do not connect any SCSI devices to the external 68-pin SCSI-3 connector or to
the internal 50-pin SCSI-2 connector on the PCI card that supports the internal hard disk.
Connecting even one external SCSI device to the external 68-pin connector extends the
overall cable length of the SCSI bus beyond the limit for which error-free operation can be
guaranteed; the combined length of the internal cable and the external cable reduces the
reliability of all the devices connected to the Ultra Wide SCSI bus. Connecting a device to
the internal 50-pin SCSI-2 connector will cause your Ultra Wide SCSI devices to transfer
data at the slower, SCSI-2 rate.
Optimizing Performance
These tips will help you to get the best from Final Cut Pro:
m When a project is finished and archived, delete all files from the disk you used to create
the project. Defragment the drive with a disk-optimizing utility. This helps prepare the
disk for the next project you work on.
m Make sure that windows displaying video are not obscured or overlapped.
m Don’t place windows so that they overlap monitors.
m Defragment disk drives regularly, especially those used for capturing.
m Store your project files on your startup disk. Store your media and rendered files on
another disk.
m Turn off virtual memory in the Memory control panel. (This is required.)
m Keep your disk cache as small as possible.
m Turn off all applications and processes that run in the background, such as networking
(which you can turn off by making AppleTalk inactive using the Chooser).
26
Chapter 1
m Attempting to open clips or media over a network will cause poor performance in Final
Cut Pro. Copy files from the network to your local disk before importing them.
m Do not set Final Cut Pro’s memory allocation to an amount higher than the currently
available RAM.
Troubleshooting
If you encounter problems after installing Final Cut Pro and configuring your hardware, the
following tips may help.
My camcorder or deck is not recognized.
m
m
m
m
Make sure your device control cable or FireWire cable is properly connected.
Verify that the camcorder is set to VCR mode.
Turn on the device and restart Final Cut Pro.
Make sure the appropriate protocol for your device is selected in the Device Control tab
in the Preferences window. See “Setting Device Control Preferences” on page 99 for more
details.
Video is not visible on an external NTSC or PAL monitor.
m Make sure your cables are properly connected.
m Verify that the camcorder is set to VCR mode.
m Make sure the appropriate hardware setting is selected in the “View External Video Using”
pop-up menu in the General preferences tab. See “Setting General Preferences” on
page 96 for more details.
m Choose Rendered Frames from the “View External Video Using” pop-up menu in the
General preferences tab to view rendered frames before they are output to NTSC or PAL
video.
m Choose “All frames” or “Single frames” from the External Video submenu in the View
menu.
I noticed dropped frames on my NTSC or PAL monitor during DV playback from
the Timeline.
m
m
m
m
Reduce the Canvas or Viewer view size to 50%.
Turn off “Mirror on desktop during Playback” in the General preferences tab.
Disable View As Sq. Pixels in the View pop-up menu.
Reduce monitor bit depth from millions to 16-bit (thousands).
Getting Started
27
Video does not play through to the computer screen.
m Make sure your cables are properly connected.
m Check your QuickTime video settings in the Capture preferences tab. For details on
QuickTime source and compression settings, see “Specifying Capture Preferences” on
page 101.
I am experiencing poor playback and stuttering video when trying to edit.
m Make sure you are not editing with media using keyframe compression such as Sorenson
or Cinepak.
m Recompress the media with Final Cut Pro or Media Cleaner without keyframes.
I don’t hear audio on my computer’s speakers when playing video from my
camcorder or deck.
m Make sure your audio cables are properly connected.
m Check your QuickTime audio settings in the Capture preferences tab. For details on audio
sample and source settings, see “Specifying Capture Preferences” on page 101.
I don’t hear audio through my camcorder speakers.
m Make sure your cables are properly connected.
m If you are scrubbing audio in the Viewer’s Audio tab, increase the volume of your
computer’s audio output.
I can’t control certain functions of my camcorder or deck.
m Make sure your device control cable is properly connected.
m Make sure the appropriate protocol for your device is selected in the Device Control tab
in the Preferences window. See “Setting Device Control Preferences” on page 99 for more
details.
m If you are using a device with FireWire, try switching the device control protocol from
Apple FireWire to Apple FireWire Basic.
28
Chapter 1
C H A P T E R
2
2
Final Cut Pro Tutorial
This tutorial is designed to give you a hands-on introduction to Final Cut Pro. Working through
the step-by-step procedures in the tutorial, you will create a short video using a variety of the
editing, effects, and compositing features of the application. You will
m create a Final Cut Pro project and sequence
m play clips and mark edit points
m perform several types of edits
m add special effects to your sequence
m render and play the sequence you’ve put together
m output your final sequence to videotape or a QuickTime file for use on the World Wide Web
or in multimedia
The tutorial should take about one hour to complete.
Getting the Tutorial Files and Starting the Program
If you haven’t installed Final Cut Pro, follow the instructions in Chapter 1, “Getting Started,” on
page 17. Next, consult the Read Me file installed with the program for the location of the
tutorial files on the Final Cut Pro CD-ROM disc. Then copy the necessary files from the CD and
open the project you will use for the tutorial.
Note: The tutorial files require about 90 megabytes (MB) of free space on your hard disk.
1
If necessary, clear 90 MB of space on your hard disk.
2
Copy the Tutorial folder from the Final Cut Pro CD to your hard disk.
3
Double-click the Final Cut Pro icon to start the program.
29
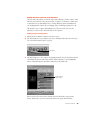
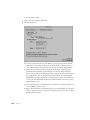
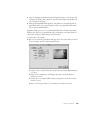
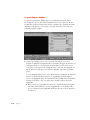
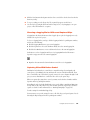
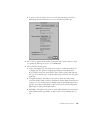
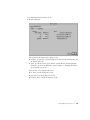
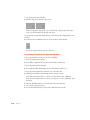
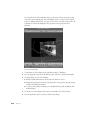
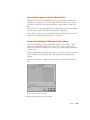
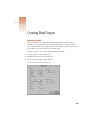
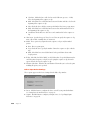
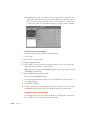
The Final Cut Pro Workspace
In Final Cut Pro, you work in four main windows: the Viewer, Canvas, Timeline, and Browser.
These windows open the first time you start the program. In addition, the Tool palette opens
with the program.
Viewer
Browser
Canvas
Timeline
Tool palette
Each of the four main windows has multiple functions. Functions are grouped by tabs within
the windows. You can drag tabs out of their parent windows to customize the workspace for
your individual needs. ( When you drag a tab, its content opens in a new window.)
Note: In some instances, the windows on your screen may look slightly different from the
pictures in this tutorial.
30
Chapter 2
Setting Up Your Environment
When you install Final Cut Pro, you provide information about your system that the program
uses to establish its basic settings. You don’t have to change those settings for this tutorial.
Before you begin working, however, you should specify a scratch disk for storing video,
audio, and render files.
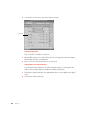
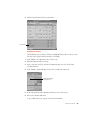
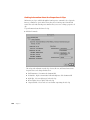
To specify the scratch disk and file type:
1
Open the Edit menu and choose Preferences.
2
Click the Scratch Disks tab and specify a scratch disk for your video, audio, and render files.
Note: You can specify that these files be stored on a single disk, on separate disks, or in
folders within a disk.
3
Click the Sequence Presets tab and choose Software Preset.
4
Click the Set Default button.
If the button is dimmed, that option is already the default.
5
Click OK.
Now you’re ready to begin editing in Final Cut Pro.
Editing in Final Cut Pro
This section gives you practice with the basic editing features of Final Cut Pro, including
adding clips to a sequence, trimming, slip editing, match frame editing, using transitions, and
audio manipulation.
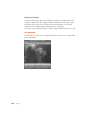
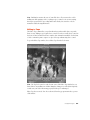
“The Lindy Hop” sequence in the project “Swing.fcp” is a section of a documentary about
swing dancing in the 1990s. This sequence introduces you to the power and productivity of
Final Cut Pro. In the tasks that follow, you will recreate this video segment and learn some of
the ways the program facilitates the creative process.
Creating Your Own Project
To begin, open the program, create your own project, and play the sequence named “The
Lindy Hop.” This sequence is the model for the learning tasks in the tutorial.
1
Choose Open from the File menu, locate the Tutorial folder on your hard disk, open the
Projects folder inside it, select the file “Swing.fcp” (one of the tutorial’s project files), and
click Open.
Final Cut Pro Tutorial
31
A tab named “Swing.fcp” appears in the Browser, and the Timeline and Canvas windows
close.
The Browser is the central storage area for all media. It provides management features, such
as sorting and finding, and allows for complex organization of media combined with quick
access to files. The program organizes clips, sequences, and other data in a project. Projects
are represented by tabs in the Browser.
2
Open the File menu and choose Save Project As, type “My Project 1.fcp,” and click Save.
It’s a good idea to save your project with a new name to be sure that your work is saved in a
separate file and to prevent inadvertent changes in the model project, “Swing.fcp.”
3
In the Browser, expand the Dance Shots folder, called a “bin,” to view its contents.
4
Double-click “The Lindy Hop” to open it.
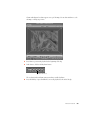
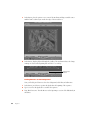
The Canvas and Timeline windows open, with “The Lindy Hop” displayed.
32
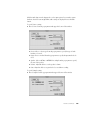
Chapter 2
The Canvas is analogous to a “record” monitor; it displays edited material. The Canvas has
the same transport controls as the Viewer and the two windows work in a similar way.
Playhead
The Timeline displays clips and sequences over time. Each open sequence is displayed on its
own tab in the Timeline. You can customize the appearance and functions of the Timeline
and perform editing tasks in this window.
5
Click in the Canvas to make it active.
6
Press the Home key to move the playhead to the beginning of the sequence.
7
Press the Space bar to play the sequence in the Canvas.
Creating a New Sequence
Next, create a new sequence and open a clip to use in it.
1
Open the File menu and choose New, then choose Sequence from the submenu.
The new sequence appears in the Browser as Sequence 2.
2
Double-click “Sequence 2” in the Browser to open it.
Final Cut Pro Tutorial
33
3
In the Canvas window, choose 100% from the zoom level pop-up menu at the top center of
the window.
4
Double-click the clip named “Rob Dialog.mov” in the Browser to open it in the Viewer.
The clip opens in the Viewer window.
When you open a clip in Final Cut Pro, it appears in the Viewer, which is analogous to your
“source” monitor. The Viewer provides features for viewing and marking source clips;
customizing transitions; and viewing and editing effects, filters, and special-effect clips called
generators.
34
Chapter 2
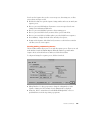
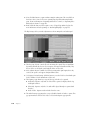
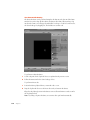
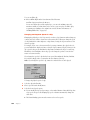
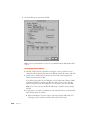
Adding the Base Track for Your Sequence
The base track is the primary set of media—clips, audio, still images—for the sequence. Many
times, the base track may be the only one used in a sequence; at other times, you may want
to add other tracks to make multiple layers, creating a finished sequence that might show
one clip playing inside another clip or a changing collage of still images playing over a clip.
This tutorial creates a sequence with multiple layers. The next several tasks create the
primary layer—the base video and audio tracks for the sequence.
Adding a Clip to Your Sequence
1
Click in the Viewer window to make it active (if necessary).
2
Play “Rob Dialog.mov” by pressing the Space bar or clicking the Play button. Press the Space
bar or click the Play button again to stop play.
Play button
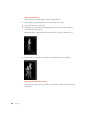
3
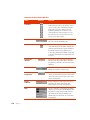
Add “Rob Dialog.mov” to the sequence by dragging it from the Viewer to the Canvas window.
The Edit Overlay appears in the Canvas window, and the Overwrite section is highlighted
when you drag the image into the window. (Overwrite is the default edit.)
Overwrite section
of Edit Overlay
When you release the mouse button, an image from “Rob Dialog.mov” appears in the
Canvas, and the clip’s one video track and two audio tracks appear in the Timeline.
Final Cut Pro Tutorial
35
4
Click in the Canvas window to make it active (if necessary).
5
Press Home and then press the Space bar to play the new sequence.
Note: Final Cut Pro provides several ways to add clips to a sequence. These include dragand-drop (used in step 3 above); a source/record metaphor using the Viewer and the Canvas;
an assembly timeline/film metaphor using the Viewer and the Timeline; and keyboard
commands to execute specific types of edits. All these methods of moving clips are detailed
in later chapters of the Final Cut Pro User’s Manual. This flexibility makes Final Cut Pro easy
to use and lets you choose the work flow that best suits your needs and work style.
Identifying Part of a Clip for Use
In this sequence, you don’t want to show Rob’s “talking head” for the entire sequence, but
you want to use all of his speaking in the clip. You can set In and Out points to mark the
starting and ending points for a section of the clip and then substitute other video for Rob’s
image in that section, or even eliminate the section between In and Out points. (The clip
itself is not changed by marking In and Out points.)
Next, you’ll set In and Out points on one clip and then overwrite that section of the clip with
part of another clip.
1
Click in the Canvas window to make it active.
2
Press Home to position the playhead at the beginning of the clip.
3
In the Canvas window, press the Space bar to begin playing the clip.
4
When you hear Rob say “the Lindy Hop,” press the Space bar to stop the clip.
5
Click the Mark In button or press I to mark the In point. The current time in the upper-right
corner of the Canvas should be approximately 1:00:01:23.
Mark Out button
Mark In button
Don’t worry if you didn’t mark the point immediately after the phrase “the Lindy Hop.” You
can adjust the point later (in step 10, below).
36
Chapter 2
6
Press Home to reposition the playhead at the beginning of the clip.
7
Press the Space bar to play the clip.
8
When you hear Rob say “constantly moving,” press the Space bar to stop play.
9
Click the Mark Out button or press O to mark the Out point. The current time should be
approximately 1:00:05:20.
10
In the Canvas, drag the indicators for the In and Out points in the ruler (just above the row
of buttons) to match them to the desired timecodes.
In point
Out point
When you drag the In or Out point’s indicator, the current time is displayed for that point.
Get the points as close to 1:00:01:23 and 1:00:05:20 as you can.
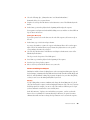
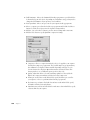
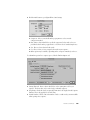
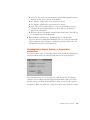
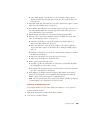
Targeting Audio Tracks
In an upcoming task, you will overwrite the part of “Rob Dialog.mov” that you marked with
another video clip. But you want to hear Rob’s voice continuously as the original and
overwritten sections of “Rob Dialog.mov” are playing. So you should protect Rob’s voice in
this clip by turning off the audio target in “Rob Dialog.mov.”
m In the Timeline, click the audio targeting icon (a double speaker) for tracks A1 and A2 to
turn off targeting.
Target track indicators,
currently on
When you click the side of the speaker containing a numeral, targeting is turned off and the
numeral and color in the icon disappear. Clicking a speaker icon that contains no numeral
turns targeting on for the track.
Setting In and Out Points for Another Clip
In the next two tasks you will set an Out point for another clip and then perform an
overwrite edit to replace the marked section of the original clip (“Rob Dialog.mov”). You’ll be
using “three-point editing,” Final Cut Pro’s system for calculating the boundaries of an edit
from the information it has. In this case, you mark the Out point for the new clip and the
program calculates the In point for that clip, based on the In and Out points you set
previously for “Rob Dialog.mov.”
For the new clip, “Bloomies.mov,” you’ll mark the Out point in the Viewer.
1
Double-click “Bloomies.mov” in the Browser to open it in the Viewer.
2
Press Home to position the playhead at the beginning of the clip.
Final Cut Pro Tutorial
37
3
Type +500 and press Return to go to the frame 5 seconds into the clip.
As you type, the number appears in the current time box at the upper-right corner of the
Viewer.
4
Press O to set the Out point at the position you entered.
Performing an Overwrite Edit
Now you’ll replace the marked section of “Rob Dialog.mov” with the section you just marked
in “Bloomies.mov” with an Overwrite edit.
1
Drag the “Bloomies.mov” clip from the Viewer to the Overwrite section of the Edit Overlay in
the Canvas.
2
Select the Canvas window, press the Home key, and play the sequence.
Finishing the Rough Edit
Final Cut Pro allows you to add multiple clips in one step. For this tutorial task, you’ll add two
more clips to your sequence.
Positioning the Playhead to Add More Clips
To make sure the added clips appear in the right place, use the Timeline to check or adjust
the position of the playhead in the sequence. The Up and Down arrow keys move the
playhead from one edit point to another; Up moves the playhead to the previous edit point,
Down moves the playhead to the next edit point. In this sequence, the edit points are the
points where the sequence begins and where each clip meets another clip.
1
Click in the Timeline window to make it active (if necessary).
2
Use the Up Arrow (backward movement) or Down Arrow (forward movement) to position
the playhead at the end of “Bloomies.mov,” the clip you just added to the sequence.
Adding Multiple Clips at One Time
Now add the two additional clips to your sequence.
1
In the Browser, click the Name field so that the sort arrow at the right is pointing down.
This sorts the contents of the Browser in alphabetical order by name.
38
Chapter 2
2
Select the following clips: “Johnny n Cari.mov” and “Round n Round.mov.”
Command-click to select separated items.
3
Drag the selected clips from the Browser to the Overwrite section of the Edit Overlay in the
Canvas.
4
In the Canvas, position the playhead at the beginning and then play the sequence.
Your sequence now begins and ends with Rob talking onscreen, and there are three different
clips of dancers in between.
Adding One More Clip
To provide a greater focus on the dancers at the end of the sequence, add one more clip at
the end.
1
In the Canvas, type 01:00:20:00 and press Return.
As you type, the numbers—a timecode—appear in the Current Timecode box at the upperright corner of the window. When you press Return, the playhead moves to the position
corresponding to the timecode you typed.
2
Select the clip “Overhead.mov” in the Browser and drag it to the Overwrite section of the
Edit Overlay in the Canvas.
The clip covers the last portion of “Rob Dialog.mov.”
3
Press Home to position the playhead at the beginning of the sequence.
4
Press the Space bar to play the sequence.
5
Choose Save Project from the File menu to save your work.
Advanced Editing Techniques
Final Cut Pro includes advanced editing features such as moving In and Out points (slip and
slide techniques), trimming in the Trim Edit window and in the Timeline with the Ripple and
Roll tools, and Match-Frame editing. The program is designed to let you refine edits quickly,
so that you can focus on the timing and rhythm of your work.
Slipping
Use slip editing when you want to simultaneously change the In and Out points of a placed
edit (one already in the sequence) without changing the duration of the edit or its location in
the final program. For example, you can use a slip edit to indicate a different part of a clip if
you have unwanted content in the section currently in use.
In the “Bloomies.mov” clip that you’ve included in your sequence, you discover that the
dancers do not catch hands for a moment when they both turn at one point. You want to
eliminate that small error but not change the clip’s duration or its location in the sequence.
Final Cut Pro Tutorial
39
To make a slip edit that avoids the dancers’ missed hands:
1
In the Timeline, use the Up or Down Arrow to position the playhead at the beginning of
“Bloomies.mov” (the second clip in the sequence).
2
Press the Space bar to play the clip.
Notice that the dancers are not clasping hands as they swing around at the very beginning of
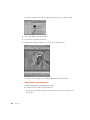
the clip. ( You can see the man’s empty hands as he faces the camera while turning.) They
clasp hands again—right hand to right hand—at approximately 1:00:02:20.
If you have trouble seeing the missed hand clasp, use the Shuttle control in the Canvas to
move slowly through the clip, or move frame by frame using the Right and Left arrow keys.
Shuttle control
3
Click the Slip tool in the Tool palette to select it.
4
Choose Snapping from the View menu to turn snapping off. (No checkmark should appear
next to Snapping.)
With snapping off, the playhead won’t snap to the nearest edit point, so small movements are
easier to make.
5
In the Timeline, press and hold down the mouse button on “Bloomies.mov” with the Slip
tool. The Canvas window displays the head (left) and tail (right) images from the clip, with
their times in that clip.
6
Using the images as a reference, slip the edit past the point of the mistake by dragging to the
left. The mistake will be fixed when the dancers’ hands meet in the left (head) reference
image. Release the mouse button when you have finished the slip operation.
Pressing the Command key as you drag provides more precise control.
40
Chapter 2
You can check your edit with the numbers for the head and tail frames displayed in the
Canvas when you hold down the mouse button with the Slip tool. The times in the head and
tail reference windows should be approximately 03:11:47:16 and 03:11:51:13.
7
Press Home and then press the Space bar to play the sequence.
8
Choose Save Project from the File menu to save your work.
Trimming an Edit
To make precise adjustments where two clips meet, you can trim one or both clips. Trimming
fine-tunes the In or Out point of a clip within a sequence.
Final Cut Pro offers many ways to trim an edit. These include using the Trim Edit window, the
Ripple and Roll tools, and keyboard commands.
In this task, you’ll trim some frames from one clip to eliminate a moment in which the male
dancer in the clip “Johnny n Cari.mov” looks upward, directly into the camera.
To trim an edit using a Trim tool:
1
Click the Zoom In tool in the Tool palette or press Z.
2
In the Timeline, double-click on “Bloomies.mov” to zoom in on that area of the sequence.
Zooming in makes the view of each clip longer in the Timeline, providing a better view of the
clips and the points where they meet.
3
Click the Arrow tool in the Tool palette or press A.
4
In the Timeline, click once on the edge between the second and third clips (“Bloomies.mov”
and “Johnny n Cari.mov”) to select the edit. The pointer changes to indicate that it is over an
edit point.
Be careful not to double-click, because this will open the Trim Edit window.
5
Click the Roll tool in the Tool palette (or press R). (The Roll tool affects both clips; the Ripple
tool adjusts only one side of the edit.)
Final Cut Pro Tutorial
41
6
In the Timeline, press and hold down the mouse button on the selected edit and drag the
Roll tool to the right.
The edit is represented in the Canvas as a small window for each clip that displays the frame
points and adjustments.
7
Trim the edit by dragging to the right until the male dancer’s eye contact with the camera is
edited out of “Johnny n Cari” in the right window (about five frames).
8
Press A to select the Arrow tool in the Tool palette.
Note: You can also trim an edit by double-clicking a clip in the Timeline to open it in the
Viewer, then dragging the In and Out point indicators in the Viewer to adjust those points. In
this method of trimming, you don’t see the changes in the adjoining clip, as you do when
using the Roll tool in the Timeline.
Match-Frame Editing
Final Cut Pro provides powerful tools to perform sync-point editing—edits in which you need
a visual to match an audio cue. Audio cues can easily be marked using Final Cut Pro’s
markers.
When a clip is already in a sequence, the Match Frame button cues the original version of the
clip in the Viewer with the playhead. Then you can use the Replace edit mode to select the
video frame that will synchronize to the playhead in the sequence.
In your sequence, you’ll mark frames and use the Match Frame command to align the
voiceover at the point where Rob says “stops” with a frame in the sequence where a dancer
actually stops.
To create a Match-Frame edit that matches a dancer’s movement to a specific phrase in Rob’s
narration:
1
Select the Zoom Out tool from the Tool palette.
To locate the tool, press on the Zoom In tool.
2
Click once in the Timeline to zoom out.
3
Press A to select the Arrow tool.
4
Press Home to go to the beginning of the sequence.
5
Play through the sequence until Rob says “there’s a lot of stops” (approximately 13 seconds
in).
Notice the male dancer jumps to a stop at a different point from where Rob says “stops.”
42
Chapter 2
6
Play the sequence again and press M to place a marker where Rob says “stops.”
A green marker appears in the Timeline at the point you marked and a yellow marker
appears in the Canvas.
Marker in Canvas
Marker in Timeline
Note: When the sequence is not playing, you can jump to the next marker (moving forward)
by pressing Shift-M or to the previous marker (moving backward) by pressing Option-M.
7
Position the playhead on the marker you just added (by pressing Shift-M or Option-M).
8
Choose Markers from the Mark menu, then choose Edit from the submenu.
9
Name the marker “Stops,” add the comment “he says stops,” and click OK.
10
Click the Match Frame button in the Canvas.
Match Frame button
The Match Frame button opens a copy of the marked clip in the Viewer and cues it to the
frame displayed in the Canvas window.
11
If the image in the Viewer appears jagged, make sure the zoom level is set to 100% (using the
pop-up menu above the image).
12
In the Viewer, use the Jog control to locate the frame where the dancer lands from his jump.
The timecode in the Viewer is approximately 00:00:07;00 when the dancer lands.
Jog control
Final Cut Pro Tutorial
43
13
Drag the clip from the Viewer to the Replace section of the Edit Overlay in the Canvas.
Replace section
of Edit Overlay
Notice that the image in the Canvas now matches the Viewer. Replacing the clip with the
playhead at the marker (after using the Match Frame button) aligns the frame showing in the
Viewer with the marker in the Timeline.
14
Select the Canvas window, press the Up Arrow to go back one or two edits, and press the
Space bar to play the completed edit.
Applying and Editing a Dissolve Transition
You can make the transition between clips less abrupt—and more interesting—by adding a
transition, one type of special effect provided in Final Cut Pro. You can see a list of the video
and audio transitions in the Effects tab of the Browser.
Transitions can be applied automatically using either of the “Edit with Transition” buttons in
the Canvas. You can edit transitions in the Timeline.
44
Chapter 2
Adding a Transition Along With a Clip
In the next task, you’ll add a transition at the same time you add a new clip to the sequence.
1
In the Browser, double-click the clip “Jeremy Solo.mov” to open it in the Viewer.
2
In the Timeline, position the playhead at the end of “Round n Round.mov.”
You may want to turn Snapping on to help position the playhead. If so, press N.
3
Drag the clip “Jeremy solo.mov” from the Viewer to the “Overwrite with Transition” section
of the Edit Overlay in the Canvas.
Overwrite with
Transition section
The icon for a transition appears in the Timeline between the clips “Round n Round.mov”
and “Jeremy Solo.mov.”
Final Cut Pro Tutorial
45
Note: This edit uses the default transition, in this case, a cross dissolve. If you position the
playhead over the transition in the Timeline, you can see the effect in the Canvas.
Render bar (red) over
transition that must be
rendered
Transition icon
The render bar over the transition is red, indicating that this part of the sequence must be
rendered before you can play the transition.
Replacing the Transition
Now you can replace the current transition with one of the other video transition effects
available in Final Cut Pro.
46
Chapter 2
1
In the Timeline window, drag the playhead to position it anywhere in the transition.
2
Choose Video Transitions from the Effects menu, choose Wipe from the submenu, and then
choose Center Wipe from the second submenu.
3
Position the playhead over the transition to see the change.
4
Choose Save Project from the File menu to save your work.
Editing the Transition
Once you’ve replaced the transition, you can edit it by changing its length and type.
To edit the transition in the Timeline:
1
Click the transition to select it in the Timeline.
2
Control-click on the transition to open the shortcut pop-up menu, and then choose
Duration.
3
Type “.25” in the Duration dialog box and click OK to change the duration of the transition to
25 frames.
You can also edit a transition in the Viewer by double-clicking it in the Timeline.
Rendering the Transition
To play the transition in the sequence, you need to render it.
1
In the Timeline, click the transition to select it (if necessary).
2
Choose Render Quality from the Sequence menu, then choose Hi Res from the submenu.
3
Choose Render Selection from the Sequence menu.
A status bar shows the progress of rendering.
4
Position the playhead to the left of the transition and play through the transition.
Final Cut Pro Tutorial
47
Performing an Insert Edit
To perform an Insert edit in the Timeline:
1
In the Timeline, press Home to move the playhead to the beginning of the sequence.
2
In the Browser, drag the clip named “Intro.mov” to the Insert section of the Edit Overlay in
the Canvas.
The clip is inserted at the location of the playhead (the beginning of the sequence). All the
items to the right of the playhead are moved further to the right—and further out in time.
3
In the Timeline, press Home to move to the new starting point for the sequence and press
the Space bar to play the title section.
4
Choose Save Project from the File menu to save your work.
Now you’re ready to add sound to the sequence’s new opening.
Audio Editing
Final Cut Pro can use up to 99 tracks of audio, which you can edit and adjust without leaving
the application. A minimum of eight tracks can be manipulated and mixed in real time, and
some computer models permit working with 24 or more audio tracks in real time.
The program includes audio pitch shifting, which mimics how audio sounds when played at
a variety of speeds using analog tape. In addition, Final Cut Pro displays separate waveforms
for left and right audio tracks, and offers independent fade controls, panning controls, and a
variety of audio filters.
Adding an Audio Introduction
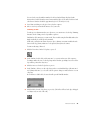
You can give this Swing Dance sequence a lively introduction by adding a music file. Then
you’ll adjust the music’s volume so that it fades to the background when Rob begins
speaking.
1
48
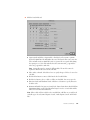
Chapter 2
In the Browser, double-click “Jumptown.aiff ” to open it into the Viewer.
Notice that when you open an audio file, audio controls become available in the Viewer.
Shuttle control
2
Using the Shuttle control, move the shuttle button to various locations.
You should hear the audio playing at different speeds. This is pitch-shifting at various levels
depending on the speed.
3
Press the Tab key to select the duration (in the upper-left corner of the Viewer), type “43.”
(the number 43 and a period), and press Return.
Entering the new duration sets an Out point for the audio clip at 43 seconds past the In
point.
4
Click in the Timeline window to make it active.
5
Choose Insert Tracks from the Sequence menu.
6
In the dialog box, type 2 in the Insert Audio Tracks box, then click OK.
7
In the Timeline, click the target track indicator (a dual speaker icon) for tracks A3 and A4 to
make them the target tracks.
Click the left side of the dual speaker icon in audio track A3; then click the right side of the
dual speaker icon in audio track A4.
Target track indicators,
currently on
Final Cut Pro Tutorial
49
The numeral 1 appears in the left part of the target indicator in A3 and the numeral 2 appears
in the right part of the indicator in A4.
8
Select the Timeline window (if necessary) and press Home to put the playhead at the start of
the sequence.
9
Using the Drag Hand (the hand icon) in the upper-right corner of the Viewer, drag the audio
clip to the Overwrite section of the Edit Overlay in the Canvas.
Drag Hand
10
Select the Timeline window and press Home to put the playhead at the start of the sequence.
11
Play the sequence.
Notice that the volume of the music is too loud when Rob starts talking and needs to be
adjusted.
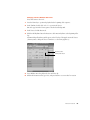
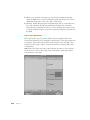
Adjusting the Volume Over Time
To change the music’s volume to hear the voiceover:
1
In the Timeline, find the point where the interview footage starts and move the playhead to
that location.
2
Click the Clip Overlays button at the lower-left area of the Timeline to display audio volume
levels.
Clip Overlays button
Notice that a thin line, the volume level indicator, appears over the audio tracks.
3
50
Chapter 2
Press Option and click the volume level line of “Jumptown.aiff ” to set a keyframe about 2
seconds before the “Rob Dialog.mov” audio clip begins (at approximately 15 seconds).
A small diamond appears at the keyframe location.
Keyframe indicator
4
Move about 2 seconds further to where the “Rob Dialog.mov” audio clip actually begins and
set another keyframe (at approximately 17 seconds).
5
Drag the second keyframe’s indicator (the diamond at 17 seconds) down to adjust the
volume level to about –8.
If you can’t set an exact value, choose a number between –8 and –10 if possible. (Holding
down the Command key while dragging allows for more precise control.)
6
Play back the sequence with the audio mixed in real time.
7
Choose Save Project from the File menu to save your work.
You’re now finished with the current project. The concluding section of the tutorial uses a
different project.
Compositing and Special Effects
Compositing is the process of combining multiple layers of video, usually along with special
effects such as animation, painting, or retouching images, and a variety of digital alterations
using filters.
In this section you will use the introduction piece for the Swing Dance video to explore Final
Cut Pro’s special effects and compositing features. The tasks include compositing a
background, animating multilayered elements, and applying filter effects to add elements to a
composition.
Final Cut Pro Tutorial
51
You use a different project, named “Compositing,” for the tutorial’s compositing and special
effects.
Opening and Saving a New Project
Next, you’ll open the new project for this part of the tutorial.
To open the files for compositing:
1
Choose Open from the File menu, select the project “Compositing.fcp” in the Projects folder,
and click Open.
2
Choose Save Project As from the File menu, type “My Project 2.fcp,” and click Save.
Previewing the Introduction’s Titles
Next, you’ll open the sequence for this part of the tutorial and preview it.
1
Double-click “Intro.mov” in the Browser to open it in the Viewer.
2
Press Home to reposition the playhead at the beginning of the sequence.
3
Press the Space bar to play the clip.
This is the title portion of the introductory sequence you’ll create.
Building the Background
The background for the introduction is a still image of velvet that you’ll animate by changing
its size, or scaling it.
Adding the Background Image to the Sequence
The first task in preparing the background is to add it to your sequence.
1
Double-click Sequence 1 in the Browser to open it.
The sequence opens in the Canvas and Timeline. No clips are in the sequence yet.
2
Double-click “Velvet Background.pict” in the Browser to open it in the Viewer.
3
Drag “Velvet Background.pict” from the Viewer to the Canvas.
Scaling the Background Over Time
Next, you’ll change the size of the background image over time.
52
Chapter 2
1
Click the Canvas window to make it active.
2
Open the View menu and choose Image+Wireframe to change the display mode for the
background image.
3
Click the image in the Canvas.
A frame with diagonal crosshairs appears on top of the image. You use this wireframe to scale
the image or change its position.
4
Press Home to position the playhead at the beginning of the clip.
5
In the Canvas, click the Add Keyframe button.
Add Keyframe button
The crosshairs in the wireframe turn green when you add a keyframe.
6
Press the End key or press Shift-Home to move the playhead to the end of the clip.
Final Cut Pro Tutorial
53
7
In the Canvas, place the pointer at one corner of the wireframe and drag toward the center
until the frame’s outline is just outside the edges of the viewable area.
8
In the Canvas, drag the playhead through the Scrubber. The wireframe indicates the change
in image size between the beginning and end of the 17-second clip.
Playhead in the
Scrubber
Putting Dancers on the Background
Next, you’ll add a pair of dancers to the velvet background, add a filter, and add motion.
54
Chapter 2
1
In the Canvas, press Home to position the playhead at the beginning of the sequence.
2
Type 1:00 to move the playhead 1 second into the sequence.
3
Drag “Blue Dance.mov” from the Browser to the Superimpose section of the Edit Overlay in
the Canvas.
“Blue Dance.mov” appears on track V2 in the Timeline.
Adding a Filter to the Clip
Next, you’ll add a filter to the dancers.
1
Select “Blue Dance.mov” in the Timeline.
2
Open the Effects menu and choose Video Filters, then choose Key from the submenu and
Blue and Green Screen from the second submenu.
You can use a blue and green screen key to isolate a subject that was shot against a specially
lit blue or green background.
Editing the Filter
Once you’ve applied a filter, you can change its parameters.
1
Double-click “Blue Dance.mov” in the Timeline to open it in the Viewer.
2
If the image in the Viewer appears jagged, make sure the zoom level is set to 100% (using the
pop-up menu above the image).
3
Click the Filters tab.
Final Cut Pro Tutorial
55
4
Select the Color Level text box, type 40 in it, and press Return.
Color Level
Adding Another Filter
Next, you’ll add a second filter to the dancers.
1
Open the Effects menu, choose Video Filters, then choose Image Control from the submenu
and Desaturate from the second submenu.
2
Choose Save Project from the File menu to save your work.
Adding Motion and a Drop Shadow
To ensure that the titles and dancers are visible in the final sequence, you’ll reposition the
dancers. Then you’ll give them more definition by adding a drop shadow.
56
Chapter 2
1
In the Canvas, drag the wireframe to the right until the dancers are just slightly to the right of
center.
2
In the Viewer, click the Motion tab.
3
Click the Drop Shadow checkbox to put an X in it.
Drop Shadow
Doubling the Dancers
The introduction uses two images of dancers in slightly different positions on the screen. In
this task, you’ll copy them and reposition the second image.
1
In the Timeline, select “Blue Dance.mov” (if necessary).
2
Open the Edit menu and choose Copy.
3
Create a new video track ( V3) by Control-clicking in the gray area above track V2 and
choosing Add Track.
4
In the Timeline, click the filmstrip icon in track V3 to make it the target track.
Target Track indicator
(yellow when on)
5
Position the playhead at the beginning of “Blue Dance.mov” (if necessary).
6
Choose Paste from the Edit menu.
A copy of “Blue Dance.mov” appears on track V3 in the Timeline.
Final Cut Pro Tutorial
57
Stretching the Dancers
Next, you’ll stretch one of the images of dancers and reposition it.
1
In the Timeline, position the playhead over the “Blue Dance.mov” clips.
2
Select “Blue Dance.mov” on track V2.
3
In the Canvas, press the Shift key and drag upward from a top corner of the wireframe to
stretch the image of the dancers.
Elongate the image so that the dancers’ heads are just below the edge of the image area.
4
Drag the dancers to the right a short distance to offset them from the second image.
Changing the Opacity of an Image
Next, change the opacity of the pair of dancers you stretched to add yet another effect in the
introduction.
58
Chapter 2
1
In the Timeline, click the Clip Overlays button at the lower-left side of the window.
Clip Overlays button
2
Select “Blue Dance. mov” on track V2 (if necessary).
3
Drag the overlay (a white line) on track V2 downward to a value of approximately 40.
As you drag, numerical values appear next to the overlay. (Press the Command key as you
drag to make more precise adjustments.)
4
Choose Save Project from the File menu to save your work.
Overlay and numeric value
Adding Circles Around the Dancers
In this task you’ll work with two circles that move with the dancers.
1
Double-click “Circle Rules.psd” in the Browser.
This file is an Adobe™ Photoshop file, which opens as a new sequence with video tracks for
“circle 1” ( V1) and “circle 2” ( V2).
2
In the Timeline, select “circle 1.”
3
Choose Image+Wireframe from the View menu (if necessary).
Final Cut Pro Tutorial
59
4
In the Tool palette, press the Crop tool, then select the Distort tool from the pop-up menu.
Distort tool
5
Click the center point of the wireframe and drag to the left about one-fourth of an inch.
This movement offsets the point around which the circle rotates.
60
Chapter 2
Changing a Circle’s Rotation Over Time
Next, add rotation to the circle.
1
Press the Home key to position the playhead at the beginning of the sequence.
2
In the Timeline, double-click “circle 1” to open it in the Viewer.
One circle appears in the Viewer, against a checkerboard background.
3
In the Viewer, click the Motion tab.
4
Click the Add Keyframe button for Rotation to add a motion keyframe at the beginning of the
clip.
A diamond-shaped keyframe symbol appears at the left edge of the graph area in the Viewer.
( You may want to enlarge the Viewer’s window to see the entire graph area.)
Keyframe symbol
Add Keyframe button
5
Press Shift-O to move the playhead to the end of the clip.
6
Click in the Rotation text box, type 1000, and press Return to set a new value for rotation.
Final Cut Pro Tutorial
61
The program adds a motion keyframe at the end of the clip and displays a graph of the
rotation values at the right side of the Viewer window.
Rotation text box
Rotation graph
Rotating the Second Circle
Next, you’ll rotate the other circle around a different center point.
62
Chapter 2
1
In the Timeline, select “circle 2.”
2
Select the Distort tool from the Tool palette.
3
In the Canvas, click the center of the wireframe and drag to the right about one-eighth of an
inch.
4
In the Timeline, double-click “circle 2” to open it in the Viewer.
5
Click the Motion tab.
6
Press the Home key to position the playhead at the beginning of the clip.
7
Click the Add Keyframe button for Rotation.
8
Press Shift-O to position the playhead at the end of the clip.
9
Click in the Rotation text box, type “500,” and press Return.
Adding the Circles to the Sequence
Next, you’ll add the circles to the sequence with the dancers.
1
In the Timeline, select the Sequence 1 tab.
2
Choose Snapping from the View menu to turn it on.
A checkmark appears next to Snapping to indicate that it is turned on.
3
Drag “Circle Rules.psd” from the Browser to the blank area above video track V3 in the
Timeline, aligning it with the beginning of “Blue Dance.mov.”
Final Cut Pro Tutorial
63
A track ( V4) is added automatically and “Circle Rules.psd” appears on it in the Timeline.
4
Select “Circle Rules.psd” in the Timeline.
5
Select the Arrow tool in the Tool palette.
6
In the Canvas, drag the wireframe to place the circles around the dancers.
If you don’t see the wireframe, choose Image+Wireframe from the View menu.
Adding Titles for the Introduction
To finish the introduction, you’ll animate several titles.
m Double-click “Dance Names.psd” in the Browser.
Because it’s an Adobe Photoshop file, “Dance Names.psd” opens as a new sequence in
the Timeline.
64
Chapter 2
Animating One Title
First, you’ll add motion to one of the titles.
1
Select the “Dance Names.psd” tab in the Timeline.
2
Press the Home key to position the playhead at the beginning of the sequence.
3
Open the View menu and choose Image+Wireframe.
4
In the Canvas, drag the BOOGIE WOOGIE image to the lower-left corner of the screen.
5
In the Timeline, double-click “BOOGIE WOOGIE” to open it in the Viewer.
6
Click the Motion tab in the Viewer.
7
Click in the Scale text box, type 0 (zero), and press Return.
8
Click the Add Keyframe button for Scale.
Final Cut Pro Tutorial
65
9
Click the Add Keyframe button for Center.
10
Click the arrow to expand the Opacity section, then click the Add Keyframe button for
Opacity.
11
Press Shift-O to position the playhead at the end of the clip.
12
Press the Left arrow once to move the playhead back one frame.
13
Click in the Scale text box, type 150, and press Return.
14
In the Canvas, drag the wireframe and title image to the middle of the screen.
If you don’t see the wireframe, choose Image+Wireframe from the View menu.
A motion path appears to show the movement of the image.
15
Control-click at the beginning of the motion path (a green circle) and choose Ease In/Ease
Out from the pop-up menu.
A tiny purple dot appears on the motion path.
66
Chapter 2
16
Place the pointer on the purple dot and drag it up and to the left to create a curved motion
path.
17
In the Canvas, scrub through the part of the sequence with “BOOGIE WOOGIE” to see the
title’s motion.
Fading a Title In and Out
Next, you’ll change the title’s opacity so that it fades in and out as it moves across the screen.
1
In the Timeline, press Home to position the playhead at the beginning of the sequence.
2
Press the Tab key to select the Timecode box at the lower-left side of the Timeline window.
Timecode
3
Type +15 and press Return.
The playhead moves forward 15 frames.
4
In the Timeline, double-click “BOOGIE WOOGIE” to open it in the Viewer.
5
Click the Motion tab.
6
Click the Add Keyframe button for Opacity.
7
In the Viewer, click the previous keyframe indicator in the opacity graph to move the
playhead to it.
8
Click in the Opacity textbox, type 0 (zero), and press Return.
Final Cut Pro Tutorial
67
9
Press Shift-O to move the playhead to the end of the clip.
10
Click in the timecode field in the bottom-left corner of the Viewer.
11
Type –15 and press Return.
12
Click the Add Keyframe button for Opacity.
13
Press Shift-O to move the playhead to the end of the clip.
14
Click in the Opacity textbox, type 0 (zero), and press Return.
The opacity graph in the Viewer shows the fade in-fade out effect you created.
Copying a Title’s Attributes to Other Titles
In Final Cut Pro you can copy and paste attributes from one clip to another. In this task,
you’ll copy the motion and fade effects from “BOOGIE WOOGIE” to the other title images in
the introduction.
68
Chapter 2
1
In the Timeline, select “BOOGIE WOOGIE.”
2
Open the Edit menu and choose Copy.
3
Option-click the visibility indicator for track V1 in the Timeline (the bright green bar at the
left edge of the track) so that all tracks’ indicators are turned on.
Visibility indicator
When visibility for other tracks is off, Option-clicking the visibility indicator of the visible
track turns on visibility for all tracks.
4
In the Timeline, select the clips in tracks V2 to V6 above “BOOGIE WOOGIE.”
Command-click clips individually or drag across the clips to select them.
5
Open the Edit menu and choose Paste Attributes.
6
Select Basic Motion and Opacity in the Paste Attributes dialog box, then click OK.
7
In the Canvas, drag the playhead through the Scrubber to see the titles in motion.
Adding the Titles to the Introductory Sequence
The final task in preparing the introduction is to add the titles to the dancers and
background.
1
In the Timeline, click the Sequence 1 tab.
2
Click the target indicator (filmstrip) in video track V1 to make it the target track.
3
Position the playhead over the clip on track V1 (if necessary).
4
Open the Mark menu and choose Mark Clip.
This sets In and Out points at the boundaries of the clip on track V1.
Final Cut Pro Tutorial
69
5
Drag “Dance Names.psd” from the Browser to the Superimpose section of the Edit Overlay in
the Canvas.
Superimpose section
Rendering the Sequence
Now it’s time to render the introductory sequence so you can play it with all the new effects.
The Timeline indicates which sections of the sequence need to be rendered by displaying a
red bar above the Ruler.
Depending on the computer you’re using and size of the media files, rendering can take a
few minutes or longer. Rendering time for this sequence is approximately 10 minutes.
To render and play the sequence:
1
Choose Render All from the Sequence menu.
A status bar reports the progress of rendering.
2
When rendering is complete, press the Space bar to play the sequence.
Finishing a Project
When you’ve completed the editing for your project, you have several options for saving your
work in the format that’s best suited to the way you’ll use it. The formats available in Final
Cut Pro include printing or editing on videotape; saving as a QuickTime movie, a digital
video stream, a still image, or a series of still images; and saving as an audio file.
70
Chapter 2
Printing to Video
Use the Print to Video command to print a sequence or clip to video tape. You can use the
Print to Video command without device control. If you have device control, the Edit to Tape
command (in the Tools menu) lets you perform insert and assemble edits to tape.
Note: You must have a videotape recorder ( VCR) connected to your computer and
operating before you can actually print a sequence on videotape. You can follow the steps in
this procedure without having a VCR connected, however.
To print a sequence on videotape:
1
Click the tab for “My Project 1.fcp” in the Browser.
2
Double-click “Sequence 2” in the Browser to open it.
3
Select the Sequence 2 tab in the Timeline.
4
Choose Print to Video from the File menu.
5
In the dialog box, specify the Print to Video options and click OK.
(For this tutorial, use the default settings. For more information on Print to Video, see
Chapter 14, “Creating Final Output,” on page 249.)
6
The sequence is rendered if necessary and a message appears, prompting you to start
recording on your VCR.
7
Start recording and press OK.
Exporting a Sequence for Multimedia or the Web
Final Cut Pro offers several ways to export your work. You can create a QuickTime movie, a
format that is widely used and has relatively small files. Or you can export an Edit Decision
List (EDL), a record of all the files, edits, effects, and other essential details of the project in
text format. An EDL is especially useful for projects in which several people are working with
the media.
For this task, you’ll export a sequence as a QuickTime movie. These files are quite popular
for delivering video on Web sites and in multimedia presentations.
To export a sequence as a QuickTime movie:
1
Select the Sequence 2 tab in the Timeline.
2
Choose Export from the File menu, then choose Movie from the submenu.
3
In the dialog box, specify the options for the exported file, type a name for it, and click Save.
(For this tutorial, use the default settings. Or experiment with changing options if you prefer,
and view the changes when you replay the video.)
Final Cut Pro Tutorial
71
Moving Forward With a New Project
Before you start working on your own project, complete the following steps to close the
tutorial and create a new project with sequence presets appropriate for the format you will
be working in.
72
Chapter 2
1
Close the Browser window and save your project if necessary.
2
Open the Edit menu and choose Preferences.
3
Click the Sequence Presets tab and select the particular format (such as DV or Targa) you will
be working in, then click the Set Default button and click OK.
4
Open the File menu and choose New Project.
C H A P T E R
3
3
Understanding Final Cut Pro
The Working Environment
You use four windows for most tasks in Final Cut Pro. You also use the Tool palette to make
selections, navigate, and perform edits in the Timeline and Canvas.
The Viewer
The Viewer is analogous to a source monitor. You use it to watch individual clips, mark edit
points, and apply effects. You can also load clips from the current sequence into the Viewer
to refine details such as edits, effects, and audio volume. For more information on the
Viewer, see Chapter 7, “Working With Clips and the Viewer,” on page 143.
Viewer
73
The Canvas
The Canvas window is analogous to a record monitor and looks like the Viewer. It displays
the composited results of the edited sequence as you are creating it. You also use the Canvas
to edit clips in relation to one another in the sequence. For more information on the Canvas,
see Chapter 9, “Working in the Timeline and Canvas,” on page 177.
Canvas
The Timeline
The Timeline displays a chronological view of a sequence. As you drag the playhead along
the Timeline ruler, the current frame of the sequence is updated in the Canvas window and
vice versa. Video tracks are displayed in descending order. Track V1 is the base layer. Clips
placed on track V2 are composited onto the clips in track V1, and so on. For more
information on the Timeline, see Chapter 9, “Working in the Timeline and Canvas,” on
page 177.
74
Chapter 3
The Browser
You use the Browser to organize and locate the source material for your project and the
finished product. The Browser is not a collection of files; it is a collection of references to
files, which you organize in the context of your project. You can group Browser items in bins,
which are similar to folders. The Browser’s scrollable columns provide information about
your files.
When you move Browser resources from one bin to another, their corresponding files are
not moved. This means that disk organization is independent of Browser organization. It also
means that you can place the same clip in the Browser for several projects. For detailed
information about the Browser, see Chapter 6, “Creating and Organizing Projects,” on
page 133.
Understanding Final Cut Pro
75
The Tool Palette
The Tool palette contains tools for selecting and manipulating items in the Timeline and
Canvas. These tools are explained in more detail later in the manual.
The Tool palette contains the following tools:
Tool Name
76
Chapter 3
Icon
Function
Arrow1
Selects individual items
Edit Selection
Selects an edit point
Group
Selection
Selects multiple contiguous items
Range Selection
Selects a range across multiple contiguous items
Select Track
Forward
Selects all the contents of the track after the selection point
Select Track
Backward
Selects all the contents of the track before the selection point
Track Selection
Selects the entire contents of a single track
Tool Name
Icon
Function
Select All Tracks
Forward
Selects the contents of all tracks after the selection point
Select All Tracks
Backward
Selects the contents of all tracks before the selection point
Roll
Rolls edit points
Ripple
Ripples edit points
Slip
Slips a clip’s In or Out point
Slide
Slides a clip in a sequence and creates an edit point
Razor Blade
Cuts a single clip into two sections
Razor Blade All
Cuts clips on all tracks at the selection point into two clips
Zoom In
Zooms in on an image, or in the Timeline
Zoom Out
Zooms out from an image, or in the Timeline
Hand
Moves the Timeline or image view from side to side. This can be
used to move around a zoomed-in view of a video image.
Crop
Crops a selection
Distort
Distorts a selection by click-dragging corner points
Pen
Adds a keyframe
Understanding Final Cut Pro
77
Tool Name
Icon
Function
Pen Delete
Deletes a keyframe
Pen Smooth
Smooths a curve by adding bezier handles to the selected keyframe
1
This arrow may sometimes function as a custom “wait” cursor during render processes. It will be hollow and gradually fill with
black as rendering takes place.
Other Windows You Will Use
Although you do most of your work in Final Cut Pro’s four main windows, you also
occasionally use several other windows to perform other important tasks.
Log and Capture
To collect your source material together and store it on disk, you use the Log and Capture
window. Log and Capture functions are explained in detail in Chapter 5, “Getting Media Into
Final Cut Pro,” on page 113.
78
Chapter 3
Edit to Tape
Some projects involve editing directly onto videotape. You do this using the Edit to Tape
window, available in the Tools menu. For details on the Edit to Tape window, see “Editing to
Tape,” on page 251.
Understanding Final Cut Pro
79
Preferences
When you need to change various options and settings in Final Cut Pro, use Preferences,
available in the Edit menu. Preferences are explained in detail in Chapter 4, “Preferences and
Presets,” on page 95.
80
Chapter 3
Sequence Settings
You can modify the group of settings specific to an individual sequence by choosing
Sequence Settings from the Sequence menu. For more information on Sequence Settings,
see, “Creating, Editing, and Deleting Presets,” on page 107.
Project Properties
This window allows you to view or change information about a project. The Project
Properties window is explained in detail in the section “Changing the Properties of a Project,”
on page 141.
Understanding Final Cut Pro
81
Item Properties
This window allows you to view or change information about media within a project. The
Item Properties window is explained in detail in the section “Getting Information About the
Properties of Clips,” on page 160.
Trim Edit
The Trim Edit window shows a specific edit point. You use it to refine or trim an edit in detail.
For more information on Trimming edits, see Chapter 10, “Trimming Edits,” on page 201.
82
Chapter 3
Using Menus, Shortcuts, and Controls
Final Cut Pro offers several methods for performing video editing tasks. Experiment to find
out which control methods work best for you. Some people work fastest using keyboard
shortcuts; others prefer to use the menu bar or shortcut menus as much as possible.
Note: When working with multiple windows in the Viewer, Timeline, Canvas, or Browser,
menu commands and keyboard shortcuts apply to the default, or labeled, window. To use
commands and shortcuts in other windows, you must drag the desired window to one of the
main labeled windows.
Apart from the menu bar and window buttons, there are several other ways to access Final
Cut Pro’s functions.
Shortcut Menus
These contain functions relevant to the location of the pointer on the screen. They exist in
almost every window.
To use shortcut menus:
m Control-click to make a shortcut menu appear.
Understanding Final Cut Pro
83
Keyboard Shortcuts
These are listed in Appendix C, “Keyboard Shortcuts,” on page 339. You may find that these
shortcut keys help you work more efficiently.
Tabbed Windows
In the Viewer, Preferences, and other windows, tabs give you access to functions within the
window. In the Canvas, Timeline, and Browser, tabs give you access to the same functions or
information, but for a different sequence or project. You can drag the tab out of the Browser,
Viewer, Canvas, and Timeline windows to display the tab in its own window independently.
This is useful when you are working on more than one sequence or project at a time. You can
also put a tab back into its original window by dragging the tab to the tab header of the
parent window.
Other Important Controls
m Target track controls in the Timeline: You can have a maximum of one video and two
audio tracks selected as the target tracks for new edits. You can change any of the target
tracks by clicking the target track controls in the Timeline.
m Track Lock and Unlock controls in the Timeline: The track Lock/Unlock controls are
located in the Timeline. You use them to stop tracks from being changed. Locked tracks
can still be viewed in the Canvas window, and can be rendered, but you can’t make any
changes to any clip on a locked track.
84
Chapter 3
m Track Visibility controls in the Timeline: The Track Visibility controls are located in the
Timeline. You use them to show or hide individual tracks. This allows you to view selected
tracks in the Canvas, and is useful when compositing. An invisible track will not be shown
when the sequence is viewed in the Canvas. If you make a track invisible after rendering a
sequence, rendered files will be lost.
m Zoom Slider: The Zoom Slider is in the Timeline and the Audio, Filters, and Motion tabs
of the Viewer. You use it to scale and scroll part of a window at the same time. To scroll,
drag the slider from side to side. To expose more of the window’s contents on either side,
drag one of the thumb controls from side to side.
m Scrubber bar, Shuttle, and Jog controls in the Viewer and Canvas: These three controls
are used to locate different parts of a clip easily. To scrub rapidly though a clip, you move
the playhead back and forth across the Scrubber bar in the Viewer or Canvas, or the ruler
in the Timeline. This is useful for moving back and forth through a clip rapidly. To shuttle
clips at different speeds, use the Shuttle control. This is useful for playing clips at different
speeds while shifting the pitch of audio. To move forward or backward a few frames at a
time, use the Jog control in the Viewer or Canvas. This is useful for visually locating a
specific frame.
Note: In the Viewer, Final Cut Pro distinguishes clips that have been opened from the
Timeline by displaying two lines of dots in the Scrubber bar. Clips that have been opened
from the Browser have a plain Scrubber bar.
Scrubber bar
Shuttle control
Jog control
Understanding Final Cut Pro
85
m Transport controls: You use the transport controls to move the playhead within a clip.
Previous
Edit
Play
Play Around Current
Next Edit
Play In to Out
m Play: Plays the clip from the current location of the playhead
m Play Around Current: This is based on the Preview Pre-roll and Preview Post-roll
settings in General Preferences. When you press this button, play begins before the
current playhead position at the Pre-roll setting and continues through the amount of
time specified by the Post-roll setting.
m Next Edit: Jumps the playhead forward from its current position to the next edit in the
Canvas or to the next point (In, Out, or end) of a clip in the Viewer.
m Previous Edit: Jumps the playhead backward from its current position to a preceding
edit in the Canvas or to a preceding point (start, In, or Out) of a clip in the Viewer.
m Play In to Out: Resets the position of the playhead to the current In point of a clip
and proceeds to play forward from that point straight through to the Out point of the
clip.
Customizing the Screen Layout
Several screen layouts are available in the Arrange submenu of the Window menu. You can
also configure a customizable screen layout.
To customize a screen layout:
86
Chapter 3
1
Arrange the four main windows in the layout and sizes you want.
2
Hold down the Option key and choose one of the two Custom Layouts from the Arrange
submenu of the Window menu.
3
The next time you open Final Cut Pro, you can choose the layout you created from the
Arrange submenu of the Window menu.
Undoing Changes
You can undo every action you do in your projects, sequences, and clips. You can also redo
actions that you have undone. Up to 99 changes can be undone. You set the number in the
Levels of Undo preference.
The Undo feature does not distinguish sequences or projects from one another.
If you are working with more than one sequence or project, be sure you are in the correct
sequence or project when you choose Undo. The change you undo may not occur in the
current project, so take care when undoing multiple changes.
Important
To undo the last action:
m Open the Edit menu and choose Undo.
To redo the last undone action:
m Open the Edit menu and choose Redo.
To specify the number of actions that can be undone:
1
Open the Edit menu and choose Preferences.
2
Click the General tab.
3
Set the Levels of Undo to any number between 1 and 99.
Note: More levels may require more memory and disk space.
Working With Timecode
Timecode is essential to navigation and accuracy when working with video, and it allows you
to locate specific frames quickly. Final Cut Pro uses standard timecode, which follows the
format
Hours: Minutes: Seconds: Frames
Typing “01221419” sets the timecode to 01:22:14:19.
You can copy the timecode from one field and paste it into another if the timecode is valid in
the location where it is being pasted. You can also drag a timecode from one field to another
by pressing Option while dragging.
The types of timecode boxes in the Canvas and Viewer are
m Duration: This appears in the upper-left corner of the Canvas or Viewer. It displays the
duration between the In and Out points of a clip or sequence. The Browser has a
corresponding duration column for clips and sequences.
Understanding Final Cut Pro
87
m Playhead position: This appears in the upper-right corner of the Canvas or Viewer. It
displays the current position of the playhead. You can change the playhead position by
entering a new timecode in the box.
Navigating by Entering New Timecodes
You can move the playhead around in a clip by entering a new timecode into the right-hand
playhead position box in the Canvas or Viewer. You don’t need to click in the box to begin
entering a new timecode, just type the numbers.
You only need to type the numbers that change to go to a specific point. Numbers that don’t
change, like the hour or minute, don’t need to be entered.
You can also change the Out point for a clip or sequence by entering a new timecode in the
Duration box, in the upper-left corner of the Canvas or Viewer.
In the Browser, you can change the In, Out, and Duration timecodes to change the length of
time between a clip’s In and Out points.
Note: Typing a partial timecode keeps numbers that don’t change in the playhead position
box only. In the duration and other timecode fields, the entire timecode is reset. For
example, if you have a timecode of 01:22:05:23 and you type 1612 in the position field, the
playhead moves to 01:22:16:12 and this timecode appears in the playhead position box. In
the duration field, 00:00:16:12 appears.
The following examples are based on an original timecode of 01:22:05:23.
m To go to timecode 01:22:08:10, type 810 (for 8 seconds, 10 frames) and press Enter. The
timecode moves to 01:22:08:10. The hour and minutes do not change in the new
timecode location, so there is no reason to re-type the hour or minute entries.
m To go to 01:22:16:12 (same hour and minute, but 16 seconds, 12 frames), type 1612. The
time moves to 01:22:16:12.
m To go to timecode 01:25:22:18, type 252218.
If you leave out 25, the time changes to 01:22:22:18 instead.
Moving to a New Time by Adding or Subtracting Frames
When you type a timecode, entering the timecode value preceded by the + (plus) or –
(minus) key changes the current time by that amount.
You can move to a different time with the + (plus) and – (minus) keys in two ways: using
time (hours: minutes: seconds: frames) or using the total number of frames, which can be
converted to time plus frames.
m Typing –209 moves the time back 2 seconds and 9 frames.
88
Chapter 3
m Typing +101223 moves the time ahead 10 minutes, 12 seconds, and 23 frames.
Moving to a New Time by Entering Numbers That Are Converted
If you enter a number that is greater than the maximum for a position in a timecode, the
number is converted so that whole units (seconds, minutes, or hours) are “carried over” into
the next position to the left.
m Hours: For the hours position in a timecode, a 2-digit number less than 24 is treated as a
valid entry for that position. Numbers between 24 and 99 are converted, for example:
A timecode of 24 hours, 0 minutes, 0 seconds, and 0 frames (24:00:00:00) is equivalent to
00:00:00:00.
A timecode of 25 hours, 0 minutes, 0 seconds, and 0 frames (25:00:00:00) is equivalent to
01:00:00:00.
m Minutes and seconds: For the minutes and seconds positions in a timecode, each 2-digit
number less than 60 is treated as a valid entry for that field and does not have to be
converted. So, entering 00006700 results in a timecode of 0 hours, 1 minute, 7 seconds,
and 0 frames (00:01:07:00).
m Frames: In the frames position in the timecode, any 2-digit value between 30 and 99 is
converted to the correct number of seconds (30 frames=1 second). Entering 00000032
results in a timecode of 0 hours, 0 minutes, 1 second, and 2 frames (00:00:01:02).
Entering –87 frames moves back 87 frames, which is 2 seconds and 27 frames.
Entering +33 frames moves ahead 1 second, 3 frames, or 33 frames.
Using Both Systems Together
You can use either system or a combination to enter timecodes. The values are automatically
converted to the correct timecode, as shown in these examples:
m Entering –199 moves back 4 seconds and 9 frames. The 1 provides one second in the
seconds position. The 99 frames translates into 3 seconds and 9 frames, making the total 4
seconds and 9 frames.
m 71:23:00 becomes 1:01:23:00.
m With a current time of 01:00:02:02, entering 29 changes the timecode to 01:00:02:29.
m With a current time of 01:00:02:02, entering 30 changes the timecode to 01:00:01:00.
Separators for Timecode Entry and Logging
m A colon (:) indicates a non-drop frame timecode. A semi-colon (;) indicates a drop frame
timecode. You can use either when typing timecode. The base timecode of the clip is
either drop frame or non-drop frame timecode. The field converts the separator to the
correct one.
Note: Drop frame timecode is only applicable to NTSC format and is not applicable to PAL.
Understanding Final Cut Pro
89
Drop frame timecode is a frame-labeling scheme used to compensate for the difference
between the NTSC rate of 29.97 frames per second (fps) and the common 30 fps rate. No
actual video frames are dropped. Numbers in drop frame progress in this fashion:
01:08:59;28
01:08:59;29
01:09:00;02 (frame labels 01:09:00;00 and 01:09:00;01 have been dropped)
.
.
.
01:09:59;29
01:10:00;00
01:10:00;01
01:10:00;02
01:10:00;03
m Periods (.) and commas (,) can also be used as separators and are automatically converted
to the appropriate separator in the timecode field (based on what the type of timecode
is).
m Any separator can be used. The drop/non-drop state is controlled by the field. Separators
are not required when entering timecode. You can enter numbers without separators and
let Final Cut Pro convert them to timecode.
Timecode Keyboard Shortcuts
To avoid typing zeros when moving by larger amounts, type a period instead, as in the
following examples:
m To move to timecode 00:00:03:00, type 3. (3 and a period). The period inserts 00 in the
frames field automatically.
m To move to 00:03:00:00 from the previous position, type 3.. (3 and two periods). The
periods insert 00 in the frames and seconds fields.
m Type 3... to move to 03:00:00:00.
m Use the + and – keys plus a numerical value to add and subtract frames from the current
timecode position.
90
Chapter 3
Editing in Final Cut Pro
Editing video and audio in Final Cut Pro follows an overall rule known as three-point editing.
There are four possible points that can be specified when editing a clip into a sequence.
These are the In and Out points in the source clip, and the In and Out points for where the
clip is to be placed in the sequence. When you perform a three-point edit, you specify three
of the possible four points for the edit. An exception to the three-point editing rule is Fit-toFill editing, which requires four points: In and Out in the source media, and In and Out in
the destination sequence.
You use controls in the Canvas to edit clips displayed there. When you perform an edit, you
follow the overall rules of three-point editing, and the edit is placed on your chosen target
track or tracks. Target tracks are briefly explained on page 94. For more detailed information,
see “Setting Up an Edit,” on page 169 and “Target track control,” on page 179.
Overwrite
Insert
Replace
m Insert editing: Places the selected video or audio so that everything after the insertion
point, on any unlocked track, is shifted forward in time.
m Overwrite editing: Replaces the current video or audio of equal length on the selected
tracks with the selected video or audio.
m Replace editing: A form of overwrite editing that replaces the current frame in the Canvas
with the current frame displayed in the Viewer, together with enough additional frames of
video on either side, to replace the entire clip currently displayed in the Canvas. If you
have set In and Out points in the Canvas, a replace edit fills the space between these
points only. If you have not set In and Out points in the Canvas, a replace edit fills the
clip’s entire boundary as it appears on the target track in the Timeline.
m Superimpose editing: Superimposes by placing the source clip in the Viewer in the
marked area in the Canvas, but on the track above it. You can use this type of edit to
overlay titles and other text onto video. If you perform several superimpose edits in the
same location, each is placed above the previous one.
m Fit-to-Fill editing: Inserts and then speeds or slows the selected material so that it fits the
available space exactly. You need four edit points: the In and Out points for the material in
the Viewer, and the In and Out points where it will be fitted into the Canvas.
m Transition editing (Insert with Transition and Overwrite with Transition): Performs an
insert or overwrite edit and places the default transition at the beginning of the clip in the
Canvas. To set the default transition, select a transition in the Browser and use the
shortcut menu.
Understanding Final Cut Pro
91
Editing With the Tool Palette Tools
You perform additional types of edits using tools from the Tool palette.
m Ripple editing: Ripple editing affects the overall duration of a sequence by moving the In
or Out point of a clip. Ripple editing lengthens or shortens the In-Out point of a clip as it
is edited into a sequence, without affecting the duration of any other clip or creating gaps
in the sequence.
m Roll editing: Roll editing moves the Out point of one clip and the In point of the clip next
to it, so that the overall duration of the sequence is not affected, but the location of the
edit in the sequence is changed.
m Slip editing: Slip editing moves both the In and Out points of a single clip simultaneously
in the same direction, so that the duration of the clip is unaffected.
m Slide editing: Slide editing moves a single clip in relation to those before and after it, so
that the durations of the clips on either side are changed, but the In and Out points of the
clip on which the slide is being performed remain the same.
Background Information and Concepts
This information will help you to understand how you work with Final Cut Pro, especially if
you are unfamiliar with non-linear video editing. The terms explained in this section are used
throughout this manual.
m Capturing: Capturing is the process of getting copies of video and audio into Final Cut
Pro, in the form of files on one of your disk drives. When you have captured your source
media, you can begin to edit it and put it together into a sequence.
m Channels: Channels control the color and opacity of a video image. RGB video, for
example, has three color channels (red, green, and blue), plus a fourth channel, the alpha
channel, which determines opacity.
m Clips: A clip is an individual section of video, audio, or graphics files.
m Effects (Transitions, Filters, and Generators): Effects change the appearance or sound of
video or audio. In Final Cut Pro, you can apply more than 50 effects using the Viewer
(Final Cut Pro also supports third-party After Effects plug-ins). A transition moves from
one piece of video or audio into another. A filter changes a single clip in some way. A
generator creates video, such as text, that can be composited into a sequence.
m Favorites: A favorite is an effect that you use frequently. You can set the parameters for an
effect and then choose Make Favorite from the Effects menu to place the effect, together
with the parameters you have set, into the Favorites bin in the Browser. This saves time if
you want to apply the same effect in the same way to multiple clips.
m Gap: A gap is a location in a sequence where there is no media on any track.
92
Chapter 3
m Importing: Importing is the process of getting files of various types into Final Cut Pro.
Imported files have usually been created in another application. Examples are still images,
CD audio files, Edit Decision Lists, Batch Lists, video files, and audio files.
m In and Out points: These correspond to the beginning and end of the media as it will be
used in a sequence. Often, not all of the media on a disk is needed in a sequence, so you
use the In and Out points to specify exactly which frames are needed. An In or Out point
is also used for selection and three-point editing.
m Keyframes: A keyframe is a special-purpose marker that denotes the change in value in an
applied effect parameter. When two keyframes are set in Final Cut Pro, the application
calculates a transition between the keyframes based on their values. Video, audio level,
and pan change by setting keyframes over time.
m Logging: Logging is the process of recording detailed information about source media
before you capture it from videotape. In Final Cut Pro, you use the Log and Capture
window for this task.
m Markers: Markers are used throughout the process of creating a sequence. You use them
to mark and make notes about important sections of the media before you begin to make
a rough cut. You also use them to pinpoint the locations of In or Out points, edit points,
places where effects are to be applied, or any special area of interest.
m Offline clips: Offline clips are specifications for clips that have not yet been captured. You
can place offline clips into a sequence in the Timeline. Final Cut Pro colors offline clips
white in the Timeline.
m Presets: A preset is a saved group of settings that can be applied to a sequence when it is
created. Presets determine items such as the frame rate, editing timebase, and Timeline
options used for creating new sequences or exporting media.
m Projects: A project is all of the clips, effects settings, and sequences involved in a single
finished product.
m Rendering: Rendering is necessary whenever motion or special effects are used.
Rendering applies any motion or effects to the media and then copies the result to disk.
Rendering can take time depending on the complexity of your project, filters applied,
processor speed, and other factors. See Chapter 13, “Rendering,” on page 241 for tips on
improving rendering performance.
Note: Pressing the Caps Lock key temporarily disables rendering. This allows you to
adjust all of your settings before rendering a preview. It does not speed up final
rendering, but allows you to work faster without the processing overhead of background
rendering.
m Sequences: A sequence is a series of video and audio clips that are being edited together.
A project may consist of several sequences, and sequences can be used as source clips
and edited into another sequence.
Understanding Final Cut Pro
93
m Subclips: A subclip is a shortened view of a piece of media that can be easier to work with
than a full clip. For example, if you have a piece of media that is 10 minutes long, you
could create ten 1-minute subclips so you don’t have as much media to move through in
the Viewer at one time. You mark the In and Out points on a clip to indicate the portion
of a clip that is a subclip. Subclips can also be references to other sequences that have
been created with the Make Subclips command in the Modify menu. You can use subclips
to prepare complex effects, dramatic scenes, or even audio submixes which can be used
in other sequences or projects.
m Target tracks: The target tracks specify the destination tracks for the edits you perform.
When you work with multiple video and audio tracks, you need to choose the track where
you want edits to be placed. You do this by using the target track controls in the Timeline.
m Wireframes: A wireframe is a view of the outline of a clip’s video frame. You use the
handles on wireframes to scale, distort, rotate, and move images. In the Canvas and
Viewer, you can view an image, its wireframe, or both.
94
Chapter 3
C H A P T E R
4
4
Preferences and Presets
Final Cut Pro includes many preferences and settings that you can customize to reflect your
choice of capture hardware and storage options, and the needs of individual projects and
sequences. These options do not need to be changed frequently, but it is important to set
them up correctly when you first begin using Final Cut Pro, or if you change your hardware
or the type of project you are working on.
To access preferences and presets:
1
Open the Edit menu and choose Preferences.
2
Click the appropriate tab for the preferences you want to modify.
m General
m Device Control
m Capture
m Sequence Presets
m Scratch Disks
95
Setting General Preferences
The General preferences tab lets you configure various options for working in Final Cut Pro.
To configure General preferences:
1
Choose Preferences from the Edit menu.
2
Click the General tab.
m Levels of Undo: Adjust this slider to specify the number of actions that can be undone.
The total number of undo’s depends on how much memory is installed in your system.
m List Recent Clips: Adjust this slider to set the number of recently accessed clips available
in the Viewer’s Recent Clips pop-up menu.
m Automatic Save Every: Check this box to save projects automatically at regular intervals.
Use the slider to select the desired time interval.
m Multi-Frame Trim Size: Enter the desired number of frames in this field to set the multiframe trim size. The maximum is 9. This number appears in the multi-frame trim buttons
in the Trim Edit window as well as the shortcut keys.
96
Chapter 4
m Real-time Audio Mixing: Enter a number in this box to specify the number of audio
tracks that are mixed in real time. The maximum is 8 tracks. The maximum number of
tracks you will be able to mix depends on multiple factors. Your processor’s speed,
number and types of filters used, data transfer rate of your hard disk, and available
memory are all factors which determine the maximum number of tracks that can be
mixed in real time.
m Render Ahead: Check this box to enter the number of seconds to render ahead in a
sequence in the box. This will pre-render any effects ahead of the current play position
when you click the Play button.
m Still Image Duration: Enter a value in this field to determine the duration between In
and Out points for imported images. Still images are, by default, imported with 10
seconds of frames between In and Out points.
m Preview Pre-roll and Preview Post-roll: Enter durations into these fields to specify the
amount of a clip played when the Play Around Current control is used. This is used for all
clips that are files on disk.
m AutoSyncCompensator for movies: Hardware variations occasionally lead to
synchronization problems between audio and video. Check this box if you experience A/V
sync drifts on long clips. The AutoSyncCompensator analyzes clips and compensates for
any audio drift by adjusting the sampling rate of audio to match the duration of video in a
clip. This adjustment is only applied to the timing of clips in the Browser or Timeline and
does not affect the media on disk. Enter a value in the minutes field to specify a minimum
duration limit to trigger the AutoSyncCompensator. The AutoSyncCompensator will only
analyze clips longer than this duration. The default duration of 5 minutes is suitable for
most circumstances.
m View External Video Using: Choose a setting from this pop-up menu to specify how you
will view external video.
Depending on your hardware configuration, you may need to decompress frames when
viewing video on an external monitor. To do this, click the Options button and check the
box labeled “Also Decompress.”
m Mirror on desktop during Playback: Check this box to mirror video on the desktop
when playing back video. Turn off this option if you notice dropped frames in your output
during video playback.
m Mirror on desktop during Print to Video: Check this box to mirror video on the desktop
when using the Print to Video function. Turn off this option if you notice dropped frames
in your output during Print to Video or Edit to Tape.
Note: Displaying video on the computer monitor while printing to video or editing to
tape taxes the computer’s processing power and can cause performance problems. If you
notice dropped frames in your output when performing these operations, try reducing
your monitors bit depth from millions to 16-bit (thousands of colors) or turn “Mirror on
desktop” off.
Preferences and Presets
97
m Pen Tools Can Edit Locked Item Overlays: Check this box to allow modification of
overlays in locked tracks or clips.
m Show ToolTips: Check this box to show descriptions of interface elements when you
move the pointer over them.
m Linked Selection: Check this box to link selections. Uncheck the box to unlink selections.
Linked selection allows you to select audio and video for a clip together in the Timeline. If
linked selection is off, you can select them separately.
m Snapping: Check this box to turn snapping on. This feature can also be toggled on and
off on the fly by pressing the N key.
m Fit Full Size: Check this box to open all clips in the Viewer to “Fit to Window.”
m Visibility Warning: Check this box to see a warning about loss of render files when track
visibility is turned off.
m Report Drops: Check this box to be warned when frames are dropped during playback.
m Thumbnail Cache (Disk) and (RAM): Enter a desired cache size in these boxes to change
the sizes of the thumbnail caches.
You may want to have large thumbnail caches if you are working with a large number of
clips and want to display thumbnails, or if you are using the Browser’s icon view. If you
often scrub through thumbnails in the Browser’s icon view, you can optimize the quality
of this feature by increasing the thumbnail RAM cache. To set a location for the thumbnail
cache, see “Setting Scratch Disk Preferences” on page 110.
98
Chapter 4
Setting Device Control Preferences
The Device Control tab lets you configure options for external devices so you can begin
logging and capturing clips.
To configure device control preferences:
1
Choose Preferences from the Edit menu.
2
Click the Device Control tab.
m Enable Device Control: Check this box to activate device control. Refer to the
documentation that came with your camcorder or deck to find out if it supports device
control.
Preferences and Presets
99
m Protocol: Choose a protocol from this pop-up menu to specify the protocol your
camcorder or deck uses.
m FireWire (IEEE 1394): As FireWire is being adopted for the full range of digital
equipment from professional decks down to consumer camcorders, there is a wide
range of functionality and adherence to the FireWire specifications among these
devices. For this reason, two versions of the FireWire protocol (Apple FireWire and
Apple FireWire Basic) are provided in the device control preferences. If your deck or
camcorder uses FireWire, begin by using the Apple FireWire protocol. While all decks
and camcorders support the most basic functions like returning timecode and
accepting basic transport commands, other commands may not be supported. If you
find that the device does not accurately go to specified timecodes or fails to execute
commands, then try the Apple FireWire Basic protocol.
m Other protocols: Check your deck or camcorder manual for the type of protocol it
uses and select the appropriate protocol from the Protocol pop-up menu.
m For additional information on compatible devices, check the Final Cut Pro Web site at
www.apple.com/finalcutpro
m Time Source: Choose a format from this pop-up menu to specify the timecode format
supported by your deck or camcorder. Refer to the manual that came with your device to
determine which format is supported.
m LTC: Longitudinal Timecode is recorded on a linear track of the tape and can be read
while the tape is moving.
m VITC: Vertical Interval Timecode is contained in the vertical blanking of a signal and
can be read when the tape is paused on a frame.
m LTC+VITC: A combination of Longitudinal Timecode and Vertical Interval Timecode
ensures that timecode can be read while the tape is in motion or paused.
m Timer: A clock-based value timecode.
m DV Time: Digital Video Timecode is available for FireWire, Sony VISCA, and LANC
protocols and should be selected when using Digital Video formats.
m Port: Choose a port from this pop-up menu to specify the computer port that your
device control cable is connected to.
m System: Choose a standard from this pop-up menu to specify the broadcast standard for
your system.
m Use Deck Search Mechanism: Check this box to use a deck’s internal search mechanism.
Turn off this option if your deck has problems moving the playhead to a specified
timecode during capture.
m Pre-roll: Enter a value in this field to determine the amount of video played before the
current position.
100
Chapter 4
m Post-roll: Enter a value in this field to determine the amount of video played after the
current position. This is applicable when you click the Play Around Current button in the
Viewer or Canvas, and when you choose the Preview command in the Edit to Tape
window.
m Timecode Offset: Enter a value in this field to calibrate your system to your tape deck
when using Log and Capture.
m Handle Size: Enter a value in this field to determine handle sizes for clips captured in a
batch capture. These handles provide “padding” on either end of the capture for editing
flexibility.
m Playback Offset: Enter a number in this field to compensate for delays between the start
of playback and the start of recording on the deck when editing to tape. This is normally
set to zero. Enter a positive number to start playback before recording begins. Enter a
negative number to start playback after recording begins. If you experience a frame being
repeated for the first few frames during Edit to Tape, enter a value into this field
equivalent to the number of frames being repeated.
After you’ve specified device control preferences, you should capture some footage from a
tape with burned-in timecode to determine if you need to calibrate your system. For more
information, see “Calibrating the Timecode Signal You Are Capturing” on page 118.
Specifying Capture Preferences
Capture preferences specify the capture board you are using, the compression method,
frame rate, frame size, and audio sampling rate. These capture settings determine the quality
at which Final Cut Pro captures video and must be specified before capturing any video. If
you always capture at the same quality settings, you’ll need to specify these settings only
once. If, however, you occasionally need to capture at different quality settings, you can save
up to four different quality settings and then choose the one you want to use before
capturing footage.
Preferences and Presets
101
To specify capture settings:
1
Choose Preferences from the Edit menu.
2
Click the Capture tab.
m Use the pop-up menu at the top of the window to choose from a list of four Capture
quality presets. Any changes you make are saved with the preset. When you choose a
preset, attributes in the panel will change to reflect the new capture quality settings.
m Frame Size: This defines the frame size that the media will be captured at. This is
dependent on the QuickTime capture hardware. Not all cards support all formats.
Choose a preset frame size from the Aspect Ratio pop-up menu or choose Custom from
the pop-up menu to enter an arbitrary non-constrained frame size in the Width and
Height fields. If you type a number into a field with an Aspect Ratio other than Custom
selected, the other field will be automatically calculated using the current aspect ratio
displayed in the pop-up.
m Abort: Check this box to automatically stop any capture process if dropped frames are
detected during a capture session.
m Report: Check this box if you want Final Cut Pro to report which frames were dropped
after the capture process has completed. Dropped frames will be reported in red in the
Browsers Capture column.
102
Chapter 4
m Capture Card Supports Simultaneous Play Through and Capture: Some capture cards
can display video frames while a window is opened for Video Capture. Check this box if
your card supports this feature.
m Always Turn Off AppleTalk When Capturing: Check this box to automatically turn off
AppleTalk whenever you use Log and Capture or Edit to Tape. AppleTalk will be turned
back on after you quit Final Cut Pro.
QuickTime Settings give you access to standard QuickTime Video and Audio input dialogs.
Click the Video button to specify QuickTime Source and Compression settings. Details for
current video settings are displayed next to the Video button.
To specify video source settings:
m Choose Source from the pop-up menu in the upper-left corner of the window. A preview
shows you whether the video signal is getting through.
m Digitizer: Choose a method from this pop-up menu to specify the digitizer hardware
to be used.
m Input: Choose an input device from this pop-up menu to specify the playback
hardware to be used.
m Format: Choose a format standard from this pop-up menu to specify the broadcast
format to be used.
m Filter: Select the type of filter to be used when processing the source video.
Preferences and Presets
103
To specify video compression settings:
m Choose Compression from the pop-up menu in the upper-left corner of the window.
m Compressor: Choose a codec from this pop-up menu to select a compression method
for captured video.
m Depth: Choose a color depth from this pop-up menu to specify a bit-depth resolution
for captured video.
m Quality: Adjust this slider to determine the image quality for your video. Least image
quality will yield a high data compression. Best image quality will yield the lowest data
compression.
m Frames per second: Enter a value in this field or choose a preset value from the
pop-up menu to specify the number of frames sampled per second.
m Key frame every n frames: Check this box to manually assign key frame intervals. Type
a numerical value in the field to define the number of frames between keyframes.
m Limit data rate to n K/Second: Check this box to manually limit the data rate while
capturing video. Type a numerical value in the field to define the data throughput in
kilobytes per second.
104
Chapter 4
Click the Audio button on the Capture tab to select input options for your audio capture
hardware. Details for current QuickTime audio settings are displayed next to the Audio
button.
To specify Source settings:
m Choose Source from the pop-up menu in the upper-left corner of the window.
m Device: Choose a device type from this pop-up menu to specify the type of audio
hardware to be used.
m Input: Choose a method from this pop-up menu to specify the input method to be
used.
m Speaker: Choose Off, On, or Off While Recording from this pop-up menu to specify
the state of the speaker.
m Volume: Adjust this slider to set the speaker’s volume.
m Gain: Adjust this slider to set gain levels to be used when recording.
To specify Sample settings:
m Choose Sample from the pop-up menu in the upper-left corner of the window.
Preferences and Presets
105
m Rate: Choose a predefined rate from this pop-up menu to specify an audio sample
rate.
m Size: Choose a bit size/resolution for the audio sample.
Note: Depending on your hardware setup, the audio can turn off around 12 instead of 0.
Using Sequence Presets
Sequence presets are a group of saved settings that are applied to a specific sequence or to
exported files. Final Cut Pro includes several presets that you can choose from, or you can
create your own. Normally, you choose a single preset that is always applied to each new
sequence. You can also choose to be prompted to specify the preset for each new sequence
you create.
To choose a sequence preset:
1
Choose Preferences from the Edit menu and click the Sequence Presets tab.
2
Select the preset you want.
The default preset is indicated by a sequence icon. The Preset Summary box lists the
properties of the selected preset. The preset you choose will be applied to all new sequences
until you change it. Existing sequences are not affected.
Note: A sequence preset determines the editing timebase for a sequence. Once a sequence
is created, its editing timebase cannot be changed.
106
Chapter 4
You also use the Sequence Presets tab to create new presets, edit existing ones, or delete
presets that are no longer needed.
m Click the New button to open the Sequence Settings window and create an entirely new
sequence preset.
m Choose a preset and click Duplicate if you want to create a new preset based on an
existing version with minor modifications.
m Choose a preset and click Edit if you want to edit an existing preset.
m Choose a preset and click Delete if you want to delete a preset from the list.
m Choose a preset and click Set Default to make a preset the default for new sequences.
m Preset Summary: Displays the details of the currently selected preset.
m Prompt on New Sequence: Check this box if you want to see the Preferences window
each time you create a new sequence.
Creating, Editing, and Deleting Presets
The Preset Editor window allows you to create and edit sequence presets. There are two tabs
in this window, General and Timeline Options. When this window is opened from the
Sequence Presets tab in the Preferences window, it is labeled Preset Editor.
To edit general settings for a sequence preset, click the General tab.
m Editing Timebase: Use this pop-up menu to change the editing timebase. In the
Sequence Settings panel, the currently selected editing timebase is displayed.
m Frame Size: Enter a custom frame size in the Width and Height fields or choose a
predefined frame size in the Aspect Ratio pop-up menu.
Preferences and Presets
107
m Field Dominance: Choose the dominant field in this pop-up menu to specify the field to
be drawn first by your video device. Depending on your hardware setup, you may need to
change the field dominance if you experience onscreen flicker.
m Pixel Aspect Ratio: Choose an aspect ratio for your sequence in this pop-up menu.
m Choose a sequence preset from the Load Preset pop-up menu and click the Load Preset
button to load the selected preset into the Sequence Settings window.
m Click the “Save as New Preset” button to save the current settings under a new name.
m Click the Video button to specify QuickTime compression settings.
m Compressor: Choose a compression method (codec) to be applied to your sequence
from the first compressor pop-up menu. The second Compressor pop-up menu may
have additional color depth resolutions available depending on the type of codec
chosen. Certain codecs display an Option button next to the Cancel button. This
button provides access to additional options specific to that codec.
m Quality: Adjust this slider to select the visual image quality level. Least yields the
highest data compression and Best yields the lowest data compression.
m Frames per second: Enter a value in this field to specify the frames per second for
your sequence or choose a predefined value from the pop-up menu.
m Key frames every n frames: Check this box and enter a value in this field to specify
the number of frames between keyframes.
m Limit data rate to n K/Second: Check this box and enter a value in this field to specify
a data rate limit for your sequence.
108
Chapter 4
m Click the Audio button to specify QuickTime Sound settings.
m Compressor: Choose a method from this pop-up menu to select an audio
compression method.
m Rate: Enter a value in this field to specify the output rate for the audio or choose a
predefined value from the pop-up menu to select from a list of standard sample rates.
m Size: Choose a bit resolution for the audio.
m Use: Choose Mono or Stereo output for the audio in your sequence.
m Other options may be available, depending on the compression method you choose.
To edit timeline options for a sequence preset, click the Timeline Options tab.
m Starting Timecode: Enter a value in this field to set the starting timecode for your
sequence. The hour value can be used to help you identify sequences.
m Drop Frame: Check this box if you want drop frame timecode displayed in the Sequence
Timeline. This is only applicable to NTSC format.
m Default Number of Tracks: Enter the number of video or audio tracks you want available
when opening a new sequence.
Preferences and Presets
109
m Track Size: Choose a setting from this pop-up menu to specify a default track size.
m Thumbnail Display: Choose a setting from this pop-up menu to specify how a clip will be
displayed in the Timeline.
m Audio Track Labels: Choose a setting from this pop-up menu to specify how an audio
track will be labeled on the audio target track button.
m Show Filter and Motion Bars: Check this box to display filter and motion bars below the
clip in the Timeline.
m Show Keyframe Overlays: Check this box to display keyframe overlays above the clip in
the Timeline.
m Show Audio Waveforms: Check this box to display the audio waveform along the audio
clip in the Timeline.
m Choose a sequence preset from the Load Preset pop-up menu and click the Load Preset
button to load the selected preset into the Sequence Settings window.
m Click the “Save as New Preset” button to save the current settings under a new name.
Setting Scratch Disk Preferences
A scratch disk is where Final Cut Pro stores captured or rendered files. By default, Final Cut
Pro uses the disk on which the application is installed. Final Cut Pro also uses the disk with
the most available space as its storage area for both captured and rendered files. You can
have Final Cut Pro store captured clips on specified disks in order. Final Cut Pro uses the next
disk in the list when the current disk runs out of space. You can specify separate disks for
captured video and audio files for better quality at higher data rates and improved playback
performance.
Note: There is a file size limit of 2 gigabytes. If a file exceeds this limit during the capture or
export process, a second file is created and named with the original name plus v_0 if it is a
video file or a_0 if it is an audio file. Each time the 2 gigabyte limit is reached, a new file is
created and the last digit in the name is increased by 1. The original file contains the first 2
gigabytes of data, but only references the additional files. Playthrough will be seamless in the
original file.
To set scratch disk preferences:
1
110
Chapter 4
Open the Edit menu and choose Preferences.
2
Click the Scratch Disks tab.
m Capture Audio and Video to Separate Files: Check this box if you want to optimize
playback for QuickTime files with higher data rates. This feature allows you to write the
video and audio tracks in a QuickTime movie to separate files on separate disks during
the capture process. Video and audio files have the same name with _v appended to
video and _a appended to audio files.
Note: Separate files must be captured to different disks. The two files cannot be
captured to different directories on the same disk.
m Video, Audio, or Render: Check these boxes to specify the types of files to be stored on
each disk.
m Click the Clear button to remove a disk from the list of available disks.
m Click the Set button to choose a disk or a folder on a hard disk. You can set up to five.
m Waveform Cache and Thumbnail Cache: Click these Set buttons to specify directories
for either cache.
m Minimum Allowable Free Space on Scratch Disks: Enter a limit value in this field. When
this minimum limit is reached, the disk will no longer be used as a scratch disk and files
will be stored on the next disk in the list.
Note: When a disk or folder is added to the scratch disk list, subfolders are created (based
on the file types selected) named “Capture Scratch,” “Audio Capture Scratch” and “Render
Files.”
Preferences and Presets
111
C H A P T E R
5
5
Getting Media Into Final Cut Pro
You can bring media files into Final Cut Pro by importing a variety of video, still image, and
audio file formats, and by capturing from a videotape or other video source. If you are using
a tape deck that can be controlled from a computer, Final Cut Pro can control the deck for
you and capture clips from several tapes, in batches that have been previously logged. If your
deck can’t be controlled from your computer, Final Cut Pro can still capture clips that are
logged and manually captured while the tape is playing.
You can use the Log and Capture window to log the media on a tape and then capture clips
that you want as a batch. Batch capturing can be performed unattended for the duration of
one tape if you have a controllable deck connected to your computer.
The logging and capturing process consists of the following general tasks:
m Change device control, capture, and scratch disk preferences.
You only need to do this the first time you use the Log and Capture window, or if you
change your deck, capture board, or disks. For more information, see Chapter 4,
“Preferences and Presets,” on page 95.
m Calibrate the timecode signal you are capturing.
m Calibrate the capture settings with bars and tone from tape.
This ensures that the media on disk is consistent with the quality of the video and audio
being captured from tape.
m Choose a logging bin for your offline and captured clips.
m Log and mark the clips and make individual clip settings where needed.
m Capture the video.
113
Log and Capture Window
To open the Log and Capture Window, choose Log and Capture from the File menu.
The Logging tab is used to enter all the information needed to log a clip into the Browser.
You must first specify a Reel name in this tab before capturing a clip. Specifying a Reel name
differentiates clips that have come from tape versus clips from other sources such as an
animation program for graphics.
m Log Bin: Since multiple projects can be open at the same time, it is necessary to
designate a Logging Bin. A Logging Bin is the location where all logged clips from the Log
and Capture window are saved. By default, the parent directory of the last opened or
created project is designated as the Logging Bin. There can be only one Logging Bin at a
time no matter how many projects are opened. Logging Bin status is not saved within a
project.
To set a Logging Bin within a project, choose Bin from the New submenu in the File menu
then choose the Bin in the Browser. Choose Set Logging Bin from the File menu or
choose Set Logging Bin from the shortcut menu by Control-clicking on the selected Bin in
the Browser. You will see a Slate icon appear next to the Bin to indicate that it is the
Logging Bin.
m Once you have set a Logging Bin, the button next to Log Bin will display the Logging
Bin’s name. Click this button to open the Logging Bin into it’s own window. If the
project is designated as the Logging Bin, the Browser will come to the foreground on
your monitor.
114
Chapter 5
m
m
m
m
m
m
m
m
m
m
m
m The first button to the right of the Log Bin button lets you designate the directory
above the current Logging Bin location as the new Logging Bin. If the Project is the
designated Logging Bin, this button will be grayed out. The second button lets you
create a new Logging Bin at your current location.
Reel: Enter the name of the tape in your VCR in this field. The slate button to the right of
this field lets you add a number at the end of the name for incremental labeling. Click this
button to increment the number by 1. Option-click this button to clear the contents of
the field. Control-click in the text field to select from a list of recent reel names.
Name: The name in this field is compiled from information entered in the Label, Scene,
and Shot/Take fields. Clip names cannot exceed 25 characters.
Prompt: Check this box for a prompt to name a clip when you click the Log Clip button
at the bottom of this tabbed window. You can use this dialog to quickly name your clips as
you log them. You can also add log notes or mark the clip good at the same time.
Label: Enter descriptive text in this field. Click the slate button to add an incremental
label. Option-click this button to clear the contents of the field. Check the box to the right
of this field to add this description to the Name field.
Scene: Enter a scene number or descriptive text in this field. Click the slate button to add
an incremental label. Option-click this button to clear the contents of the field. Check the
box to the right of this field to add the contents of this field to the Name field.
Shot/Take: Enter a number or descriptive text in this field. Click the slate button to add an
incremental label. Option-click this button to clear the contents of the field. Check the
box to the right of this field to add the contents of this field to the Name field.
Log Note: This is a special comment field used to append notes to clip while logging.
Control-click in this field to get a list of all other Log Note comments in the currently
opened project.
Mark Good: Check this box to place a “Yes” marker in the Browser’s Good column for
easy sorting. You can also choose Find from the Edit menu while in the Browser to search
for clips marked Yes in the Good column.
Markers: Label and define segments between In and Out points of a clip in this part of
the Logging tab. Click the triangle next to the Markers label to gain access to the Markers
controls. You can name the marker, set In and Out points, and add notes in this area. For
more information on adding markers, see “Logging Offline Clips” on page 124.
Log Clip: Click this button to log the current clip into the Logging Bin in the Browser
with all the information in the current Logging window.
Clip: Click this button to capture a clip immediately. A log will not be placed in the
Browser.
Getting Media Into Final Cut Pro
115
m Now: Click this button to capture without setting In or Out points. This is useful if you
don’t have device control or if you are capturing long clips without knowing the Out
point. For more information on capturing without device control, see “Capturing Video
Without Device Control” on page 120.
m Batch: Click this button to batch capture a series of logged clips within a log bin. For
more information on batch capturing, see “Batch Capturing Clips” on page 126.
The Clip Settings tab lets you make adjustments to the incoming video and audio signal.
m The first group of slider controls affect the incoming video signal. They are QuickTime
dependent and will only be active if your capture card supports that functionality. They
have no affect on a DV signal even though the sliders are moveable.
m Gain: Adjusts the gain or audible level of the incoming audio signal. Again, this is only
active if your capture card supports this QuickTime feature.
m Use Digitizer’s Default Settings: Click this button to reset the Video levels and Audio gain
back to defaults set by the manufacturer of the card.
m The Capture pop-up menu lets you specify the type of media to be captured.
m Audio Only: Captures only audio. No video will be captured or displayed in the Log
and Capture window.
m Video Only: Captures only video. No audio will be played through or captured with
the video.
m Audio+Video: Captures audio and video from the source
m The Audio Format pop-up menu lets you specify which channels of audio to capture. This
pop-up menu has no affect if Video only is selected in the Capture pop-up menu.
116
Chapter 5
m Ch 1+Ch 2: This sets the two audio channels as separate, linked channels but not an
official “Stereo Pair.” Pan is centered for both channels.
m Ch 1: Captures only Ch 1 of the source media. Pan is centered.
m Ch 2: Captures only Ch 2 of the source media. Pan is centered.
m Stereo: This sets the two audio channels as a stereo pair. Both channels of a stereo
pair must be the same length and any levels or effects applied to one channel are
applied to the other channel.
m Mono Mix: Captures both channels of audio but mixes them together. There will only
be one channel represented in Final Cut Pro.
m Waveform Monitor and Vectorscope: Click this button to open the Waveform
Vectorscope monitor to examine an incoming signal. This scope looks at the entire frame
of the incoming video signal and displays a graphical representation of where the colors
and brightness levels fall on a predetermined scale.
Changing Device Control, Capture, or Scratch Disk
Preferences
To set device control, capture, or scratch disk preferences directly from the Log and Capture
window, click the Preferences tab and then click the button for the desired preference.
Device Control preferences let you set appropriate settings for your video deck. Capture
preferences let you configure your video input and your QuickTime capture card. Scratch
Disk preferences let you define the disk and folder to which you want video files captured.
See Chapter 4, “Preferences and Presets,” on page 95 for details on these preference settings.
Getting Media Into Final Cut Pro
117
Calibrating the Timecode Signal You Are Capturing
During video capture, the timecode and video signals are sent separately from the video deck
to the computer. Because the signals are separate, they can arrive at different times, which
causes incorrect timecode values to be recorded. You calibrate your system by entering the
amount of time by which the signals are offset from each other. ( You need to do this each
time you change decks or cables.)
To calibrate timecode:
1
Capture video from a tape with the timecode visible in the frame (window dub), or with the
timecode display option for your deck turned on.
2
Compare the timecode value recorded in the captured movie (the current position timecode
field) with the burned-in timecode on the video frame.
3
Open the Edit menu and choose Preferences.
4
Enter the difference in the Timecode Offset box, in the Device Control tab in the Preferences
window.
If the timecode position in Final Cut Pro for a frame in the captured movie is greater than the
burned-in timecode value, enter a negative number. If less, enter a positive number.
Calibrating Capture Settings With Bars and Tone From Tape
Calibrating a tape to bars and tone matches the color and audio level settings for a whole
tape to the settings present when it was recorded. The settings you make are saved with each
logged clip and applied when you capture the clip.
You can also use the Clip Settings tab in the Log and Capture window to make different
settings for individual clips. If you redigitize a clip, the adjustments are re-used.
Final Cut Pro includes a waveform monitor and vectorscope that let you see adjustments and
examine the quality of the incoming signal. For ease of use, you should record at least 30
seconds of standard color bars on each tape to use when making baseline adjustments.
Adjustments are made in the Clip Settings tab.
To adjust the clip settings:
1
Open the File menu and choose Log and Capture.
If you haven’t set device control preferences, the Preferences window appears. For more
information, see Chapter 4, “Preferences and Presets,” on page 95.
118
Chapter 5
Use the transport controls in the Log and Capture window to play the color bar portion of
your tape. The tape must be playing for the measurements in the waveform and vectorscope
to be accurate.
Select the Clip Settings tab and click the “Waveform Monitor and Vectorscope” button. The
waveform monitor will only update while the Log and Capture window is active.
2
Adjust the black level so that the black reference bar in the waveform monitor is at the
desired level (7.5 IRE for NTSC).
The waveform monitor displays the luminance and chrominance values of the incoming
signal. The vertical axis displays the dynamic range of the signal from black at the bottom
(7.5 IRE) to white at the top (100 IRE).
Note: If black level and white level controls are not available, use the brightness and
contrast controls for steps 2 and 3.
3
Adjust the white level so that the white reference bar in the waveform monitor is at the
desired level (100 IRE for a 100 percent white reference bar).
4
Adjust the hue so that the ends of the lines in the vectorscope are as near the color target
boxes as possible. The diagonal line marker FT is the flesh tone target. All flesh tones should
center around this line.
The vectorscope displays the hue and saturation values of the incoming signal. The hue is
represented by the angle of a line within the circle (its 12 o’clock position). The saturation is
represented by the length of the line from the circle’s center point. The vectorscope displays
targets for the optimum values for the six primary colors (red, green, blue, yellow, magenta,
and cyan) in a standard color bar pattern.
5
Adjust the saturation so that the ends of the lines in the vectorscope reach the center of the
target boxes as closely as possible.
Getting Media Into Final Cut Pro
119
6
Use the transport controls to shuttle the tape to a portion with a 1 kHz audio reference tone
and use the Gain slider to adjust the audio signal so that it does not peak into the red areas
of the audio meters.
Note: You may still need to make adjustments to individual clips when you log them prior to
capture.
Capturing Video Without Device Control
If you do not have a controllable video deck, you capture video by controlling the video
source locally, as you monitor the signal and indicate the clips you want to capture. The
captured clip opens in the Viewer as an untitled clip that is not associated with any project. If
you have entered information about the clip in the Log and Capture window, this will be
used for the clip.
When you log clips using a device that you can’t control from your computer, you need to
enter the clip timecodes and other information by hand while watching the tape. You can’t
capture previously logged clips unless you have a deck with device control.
To capture video without device control:
1
Open the File menu and choose Log and Capture.
If you haven’t set device control preferences, the Preferences window appears. For more
information, see Chapter 4, “Preferences and Presets,” on page 95.
120
Chapter 5
2
If you have color bars recorded on the tape, you can shuttle the tape to the color bars and
use them to calibrate the incoming signal. (See “Calibrating Capture Settings With Bars and
Tone From Tape” on page 118.)
3
If you are capturing the audio signal, select the audio format. You can capture both channels
of audio individually. You can also have them mixed into a mono signal or have a single
channel split into stereo fields. The available audio formats are
m Ch 1: The audio consists of only the left channel from the tape (Ch 1), with pan centered.
m Ch 2: The audio consists of only the right channel from the tape (Ch 2), with pan
centered.
m Mono Mix: The audio consists of both channels from the tape, mixed into a single track.
m Stereo: Both channels have been captured as a stereo pair. Stereo pairs are always linked,
and anything that is applied to one track is applied to both.
m Ch 1 + Ch 2: Both tracks have been captured, but are distinct and can be adjusted
independently of one another.
4
Use the deck’s transport controls to shuttle the tape to the portion you want to capture and
press the Play button.
5
Click the Now button in the Capture window a few seconds before the deck reaches the first
frame in your clip.
6
To stop recording, press the Escape key. The captured clip appears in the Viewer.
7
Save the clip by opening the File menu and choosing Save As, or by dragging it to an open
project or into the Timeline for a sequence.
Choosing a Logging Bin for Offline and Captured Clips
A logging bin is the bin in the Browser where logged clips are placed. A logging bin is set by
default to the top level of a project.
To choose a logging bin for your clips, click the Logging tab in the Log and Capture window,
and do any of the following:
m Click the Logging Bin button to open a new logging bin.
m Click the Up button to choose the bin hierarchically above the current logging bin.
m Click the New Bin button to create a sub-bin and select it as the current logging bin.
In the Browser, select a logging bin and choose Set Logging Bin from the File menu. A
clapstick icon appears next to the current logging bin.
m Open the shortcut menu for a bin in the Browser and choose Set Logging Bin.
Capturing Video With Device Control
Final Cut Pro has built-in device control that is compatible with professional-quality edit
control protocols, including both Sony and Panasonic versions of RS-232 and RS-422. If you
have a controllable source deck that is properly connected to your computer through a serial
port, you can use Final Cut Pro to control the video deck as you capture clips.
When you capture clips using device control, you must enter both the reel number and the
clip name in the Log and Capture window.
Controlling the video deck with Final Cut Pro gives you the ability to mark In and Out points
for clips and save the edit points in a log. You can then capture the logged clips you want to
capture as a batch. For more information, see “Batch Capturing Clips” on page 126.
To make settings for an individual logged clip:
You may want to save specific settings for some or all of the clips you log and capture. You do
this using the Clip Settings tab in the Log and Capture window.
Getting Media Into Final Cut Pro
121
Clip settings that are saved with individual logged clips include
m all video controls for controlling image quality (in the Clip Settings tab)
m audio levels (in the Clip Settings tab)
m capture format (video, audio, or video and audio)
m audio format (Ch 1, Ch 2, Ch 1 + Ch 2, stereo, or mono mix)
To capture a single clip with device control:
1
If your deck has a local/remote control switch, set this to remote control.
2
Open the File menu and choose Log and Capture.
If you haven’t set device control preferences, the Preferences dialog box appears. For more
information, see Chapter 4, “Preferences and Presets,” on page 95.
3
Enter the reel and clip name for the clip you are capturing.
4
Click the Clip Settings tab to adjust the incoming video signal using color bars recorded on
your tape, if desired. (See “Calibrating Capture Settings With Bars and Tone From Tape” on
page 118.)
5
Choose whether to capture video, audio, or both.
6
If you are capturing the audio signal, select the audio signal format. You can capture both
channels of audio individually. You can also have them mixed into a mono signal or have a
single channel split into stereo fields. The available audio formats are
m Ch 1: The audio consists of only the left channel from the tape (Ch 1), with pan centered.
m Ch 2: The audio consists of only the right channel from the tape (Ch 2), with pan
centered.
m Mono Mix: The audio consists of both channels from the tape, mixed into a single track.
m Stereo: Both channels are captured as a stereo pair. Stereo pairs are always linked, and
anything that is applied to one track is applied to both.
m Ch 1 + Ch 2: Both tracks are captured, but they are distinct and can be adjusted
independently of one another.
7
Use the transport controls in the Log and Capture window to control your source deck and
find the clip you want to capture.
You can also enter a timecode in the current timecode field to shuttle the playhead to a
location on the tape.
122
Chapter 5
8
Do one of the following to mark a clip:
m Click the Mark In and Mark Out buttons, or press I to set the In point and O to set the
Out point (or the / and the * on the numeric keypad). You can mark points this way when
the tape is playing or is stopped.
m Enter a specific timecode in the In and Out timecode fields at the bottom of the Log and
Capture window.
9
Click Clip to capture the marked section of tape.
Troubleshooting Your Video Deck
If you experience problems capturing video or controlling your deck from Final Cut Pro, the
following tips may help you.
Final Cut Pro monitors the state of controlled devices.
If your camcorder or deck malfunctions while printing to video or editing to tape, you may
receive an error warning. Cancel the operation before proceeding further and consult your
camcorder or deck manual for troubleshooting information.
If you see “No Communication” in the Deck Status area of the Log and Capture
window:
m Check to make sure that your deck is plugged in, switched on, and properly connected to
your computer.
m Check your device control preferences. Make sure that device control is enabled, and that
the computer port is selected. Check that you have selected the correct protocol for your
deck.
m If the deck’s serial cable is connected after the computer starts up, the device may not be
recognized. Connect the serial cable and restart the computer.
m If the deck’s power is not turned on when the computer starts up, the device may not be
recognized. Turn on the deck and restart the computer.
If you experience problems using a deck or camcorder:
Not all decks and camcorders support all functions, such as hard recording, high-speed
searching, insert editing, assemble editing, preview editing, or accurately moving to
timecodes entered. You may need to use a different protocol.
Note: The Panasonic and Sony RS-422 protocols require special cables. For more
information, see the Final Cut Pro Read Me file in the Final Cut Pro application folder or visit
the Final Cut Pro Web site at www.apple.com/finalcutpro
m Check to make sure you’re using the protocol specified for your deck or camcorder. ( You
choose protocols in the Device Control tab in the Preferences window.)
Getting Media Into Final Cut Pro
123
m If you’re using the Apple FireWire protocol, try Apple FireWire Basic instead. Click the
Device Control tab in the Preferences window and choose the Apple FireWire Basic
protocol.
m If your deck or camcorder supports LANC, try using the LANC protocol.
Logging Offline Clips
Logging is the process of viewing videotapes and marking clips with reference to their
timecodes. You can add notes that can be used to search for the clip later. You can also mark
clips as “good,” so that you only have to capture the clips that you intend to use, rather than
capturing all the logged clips, or for search later when you begin to edit clips together.
To use all of the logging options in Final Cut Pro, you need a controllable video deck. If you
don’t have a controllable deck, you can only log the duration and In and Out points for
individual clips.
Final Cut Pro logs content by storing offline clips in the Browser bin of your choice. Offline
clips specify capture preferences for video or audio you will capture later. When you finish
logging, you can select all the offline clips you want on a single tape, and capture them as an
unattended batch. Clips logged from different tapes cannot be captured unattended.
To log a series of offline clips:
1
Open the File menu and choose Log and Capture.
If you haven’t set device control preferences, the Preferences window appears (see
Chapter 4, “Preferences and Presets,” on page 95).
If AppleTalk is on, Final Cut Pro prompts you to turn it off. When you quit Final Cut Pro,
AppleTalk will be turned back on. You can set this option in the Capture tab in the
Preferences window.
2
Specify the logging bin for your clips, if necessary.
3
Type a name for the reel (a reel corresponds to the name of an individual videocassette).
When you insert a new tape, Final Cut Pro prompts you for a reel name. You can click the
slate button next to the Reel name box to add 1 to the reel name.
4
124
Chapter 5
Do one of the following to name clips:
m Turn on the “Prompt for Name” option if you want to enter the name of each clip as you
log it. This option is useful if you are using keyboard shortcuts during logging.
m To append the label, scene, and shot/take fields to create the clip’s name, click the
checkboxes next to the fields you want to use (Label, Scene, and Shot/Take), and type any
text you want to use in the text box. Final Cut Pro’s auto-renaming function creates clip
names by combining the chosen fields, such as Label_Scene01_Take01, into the name
field.
m To add 1 to a name field manually, click the slate button next to it. When you do this, the
Label or Scene goes to 01 in the Scene field; the Shot/Take field is reset to zero.
You can Option-click the slate button to delete its contents.
5
Use the transport controls in the Capture window to control your source deck and find the
media you want to log.
You can also enter a timecode in the current timecode box at the top-left corner of the Log
and Capture window to move to a location on the tape. (See “Working With Timecode” on
page 87.)
6
Do one of the following to mark a clip’s In and Out points:
m Click the Mark In and Mark Out buttons, or press I to set the In point and O to set the
Out point. You can mark In and Out points this way when the tape is playing or stationary.
m Enter a specific timecode in the In and Out timecode fields at the bottom of the Capture
window.
7
To add a marker to a logged clip, click the triangle next to Markers at the bottom of the
Logging tab. Enter the marker’s name, In and Out timecodes, and comment information as
desired. When the clip is captured, these markers will be set automatically within the
captured clip.
8
To log a clip, click the Log button.
m If the “Prompt for Name” option is selected, you are prompted to enter name
information.
m If the “Prompt for Name” option is not selected, the information you log is saved in the
logging bin.
After any clip is logged, the last item included in the name is increased by one.
9
Follow steps 5 through 8 until you have logged all the desired clips. For information on
capturing the logged clips, see “Batch Capturing Clips,” next.
To log a series of clips back-to-back:
1
Set your first In point.
2
Play the clip and press F2 at the desired Out point.
This sets the Out point.
Getting Media Into Final Cut Pro
125
3
Enter a name and any notes into the Log Clip dialog box and click OK.
Your new In point is the previous Out point.
4
Press F2 to set your next Out point and log the clip.
As you log clips, Final Cut Pro stores them in the logging bin you have chosen. The clips are
stored as offline clips and are indicated by a red slash through them in the Browser. You can
modify the logged clips before you capture them. This is useful if you want to add or alter
any comments.
Batch Capturing Clips
You can batch capture a group of clips you’ve logged with Final Cut Pro. You can also import
a log you’ve created in another application, or one that you’ve exported from another Final
Cut Pro project, and capture those clips as a batch. See “Importing a Batch List” on page 128.
You can also import an Edit Decision List (EDL) and capture the clips used in the EDL
sequence. For more information, see “Importing an Edit Decision List” on page 259.
You can also use the batch capture feature to recapture clips at a higher resolution.
Recapturing conserves storage space and maximizes system resources by creating sequences
using low-resolution clips until you are ready to create your final output using the Sequence
Trimmer.
Note: Before batch capturing clips, be sure your tape does not have timecode breaks in it.
Otherwise logged offline clips will not be able to capture the correct media.
To batch capture clips:
1
Open the File menu and choose Log and Capture.
If you haven’t set device control preferences, the Preferences window appears. (See
Chapter 4, “Preferences and Presets,” on page 95.)
126
Chapter 5
2
Specify the logging bin for your clips.
3
Do one of the following to select clips to capture:
Note: A clip that does not include a reel name can’t be captured.
m To capture the offline clips in the current logging bin, click Batch Capture in the Log and
Capture window.
m To capture all offline clips in a project, make sure everything in the project’s tab in the
Browser is selected and choose Batch Capture from the File menu.
m To capture a selection of clips in a project, select the clips in the Browser and choose
Batch Capture from the File menu. You can select both online and offline clips.
4
Choose what to capture from the Capture pop-up menu at the top of the dialog box. If you
are capturing all offline clips in a project, choose Offline Only.
5
Choose from the following options:
m Coalesce Overlapping Clips: Check this box if you want to combine the media files for
overlapping clips. The captured overlapping clips still appear independently in the
Browser, but all reference the same media file. This is useful for saving capture time and
disk space. If you want the clips to be captured with separate media files, leave this option
unchecked.
m Use Logged Clip Settings: Check this box if you want to capture clips using settings
specified in the Clip Settings tab of the Log and Capture window during the initial log and
capture process. (See the instructions for making settings for an individual logged clip on
page 121.) Leave this box unchecked if you don’t want to use the current settings in the
Clip Settings tab of the Log and Capture window.
m Add Handles: Check this box if you want to capture additional media before and after the
marked duration within a clip. Handles are always relative to the In and Out points of a
clip.
Getting Media Into Final Cut Pro
127
When capturing a newly logged offline clip with handles, the In and Out points will be set
to the original logged duration. When capturing without handles, the In and Out points
will be cleared.
6
Choose a capture preset from the Capture Settings pop-up menu. For more information, see
Chapter 4, “Preferences and Presets,” on page 95.
Note: The Total Media Time and Disk Space calculations that are displayed at the bottom of
the dialog box are based on the data rate settings specified in the current Capture
preferences. For more information about preferences, see Chapter 4, “Preferences and
Presets,” on page 95.
7
Click OK.
m To stop batch capture, press the Esc key.
If you stop a batch capture, Final Cut Pro displays “error” next to all clips that were not
captured in the Digitize column of the Browser. You can use the Batch Capture command
to automatically redigitize all aborted clips.
Changing Duplicate Clip Names and Filenames
When you log offline clips, it is possible to create two or more clips with the same name.
When you batch capture both clips, one of them must be given a new name, since all clips in
the same folder must have unique filenames when they are captured.
If you set up a batch capture that includes two clips of the same name, a dialog box appears
to allow you to change the name of one of the clips.
If a clip that is to be captured already exists on disk, a dialog box appears to give you the
option of renaming or skipping the new clip, or replacing the old clip with the new one.
Importing a Batch List
You can import a log that you’ve created with another application to use for batch capture in
Final Cut Pro. For example, you can log clips with a field log during production and then
export the log to another application. Use your logging application to save the log as a tabdelimited text file. The first record should have field headers that match at least the following
column headers in the Browser:
m Name
m Duration
m In
m Out
128
Chapter 5
Column names must match the names in the Browser exactly, but capitalization is ignored.
Subsequent records are the tab-delimited data. When you import the file into Final Cut Pro,
the logged clips appear as offline clips that you can then capture.
To import a batch list:
1
In Final Cut Pro, select a Browser bin for the batch list.
2
Open the File menu and choose Batch List from the Import submenu.
3
Select the batch list and click OK.
Changing a Clip’s Source Timecode
You can change the source timecode of a clip if necessary. This is useful if you have
transferred media to a higher-resolution format. For example, it is common to shoot on Hi-8
and then transfer material to Beta-SP for the greater durability of the higher-grade tape stock.
In this case, the timecode on the new tape will differ from the original.
Changing a clip’s timecode saves the changes on the disk. This changes all references to the
clip in all projects in which it is used. You can modify the timecode by changing the value of
the clip’s starting frame or the current frame displayed in the Viewer. You can also change
auxiliary timecodes.
To change a clip’s timecode:
1
Double-click a clip in the Browser to open it into the Viewer.
2
Move the playhead to the frame at which you want to establish the new timecode.
3
Open the Modify menu and choose Timecode.
4
Choose Current Frame or Starting Frame from the pop-up menu at the top of the dialog box.
5
Enter a new timecode value in the source field and click OK. This changes the starting
timecode value in the media file on disk.
To change a clip’s auxiliary timecode:
1
Double-click a clip in the Browser to open it into the Viewer.
2
Move the playhead to the frame at which you want to establish the new timecode.
3
Open the Modify menu and choose Timecode.
4
Choose Current Frame or Starting Frame from the pop-up menu at the top of the dialog box.
5
Enter a new timecode value in the AUX field and click OK.
Auxiliary timecodes can only be changed one clip at a time.
Getting Media Into Final Cut Pro
129
Importing Media
You can import QuickTime-compatible media files as well as MacroMedia Flash files into a
Final Cut Pro project. You can use commands to import a single file or folder, or you can drag
files from folders on your desktop directly into a Final Cut Pro project.
Files you import into a project are not copied into the project file. The clip that appears in
the Browser is only a reference to the actual media file on disk.
To import files:
1
Select a destination in the Browser.
m To import files or folders into the root level of a project, click the project’s tab.
m To import files into a bin within a project, double-click the bin to open it.
2
Do one of the following:
m Drag the desired files or folders from your desktop to a project tab or bin within the
Browser.
m Drag the desired files or folders from your desktop to the Timeline of a sequence. This
places a reference to the media in the Timeline, but does not place a reference in the
Browser.
m Open the File menu and choose File or Folder from the Import submenu. Select the item
and click Open.
m Control-click in the Browser or Bin window and choose Import File or Import Folder from
the shortcut menu.
Folders are imported with their internal hierarchies intact.
Importing Still Images and Audio Files
When you import still images, they become clips that contain two minutes of identical video
frames, with a default duration of 10 seconds between In and Out points.
You can change the duration between In and Out points for a still image in the Viewer, or
change the default duration of still images using the Still Image Duration option in the
General tab in the Preferences window. For more information about General preferences, see
Chapter 4, “Preferences and Presets,” on page 95.
Note: Still images are not visible on an NTSC or PAL monitor until they are rendered in the
sequence containing them.
130
Chapter 5
You can import graphics files in the following formats:
m SGI
m BMP
m GIF
m JPEG
m PICT
m PNG
m PNTG (MacPaint)
m PSD (Photoshop)
Note: For best compatibility with Final Cut Pro, be sure to save Photoshop files as 2.5
compatible.
m QTIF (QuickTime Image)
m TGA (Targa)
m TIFF
m Photo CD
m QuickTake (QuickTake is a PICT format and available only on computers with QuickTake
software installed.)
Note: This is only a partial list of formats supported. Check the QuickTime Read Me file for
a more complete list.
Importing Layered Photoshop Files
Final Cut Pro preserves the layers in a layered Photoshop file, importing the file as a
sequence. Each layer in Photoshop corresponds to a video track in the sequence. To view
layers in separate video tracks, double-click the clip. The Photoshop clip expands into a
tabbed subsequence. Layer opacity settings and layer modes are preserved, but layer masks
are not. If a Photoshop layer mode has no corresponding compositing mode in Final Cut Pro,
the layer mode is ignored. For more information on compositing modes and compositing
images in Final Cut Pro, see Chapter 12, “Compositing and Special Effects,” on page 219.
Note: A layered Photoshop file will not be updated if you make changes after it has been
imported. To update the sequence, you need to delete the original file from the project and
import the updated file.
To import a layered Photoshop file as a clip instead of a sequence, flatten the image in
Photoshop before importing it.
Getting Media Into Final Cut Pro
131
Importing Audio Files From Audio CDs
You can import audio tracks from an audio CD into a Final Cut Pro project. When importing
audio tracks, QuickTime converts the audio tracks to digital audio files that can be edited
within Final Cut Pro. When converting, you can convert an entire audio track or a portion of
it and set audio sampling and bit rates.
Note: You cannot import a CD audio track by dragging it to the Browser.
Follow these steps:
132
Chapter 5
1
Open the File menu and choose File from the Import submenu, or open the shortcut menu
in the Browser and choose Import File.
2
Locate the audio track you want to import and click Convert.
3
Click Options.
4
Do any of the following:
m To audition the track, click Play. Drag the timecode marker in the slider bar to shuttle the
playhead to a different location in the track.
m To convert only a portion of the track, mark In and Out points by entering starting and
ending times in the Start and End text boxes or drag the ends of the sliders to set the start
and end times.
5
Select an audio sampling rate, bit rate, and audio format (stereo or mono). Click OK.
6
Name the audio track and specify a location to save it.
7
Click Save.
Note: If working with a DV sequence, convert audio CD files from 44.1 kHz to 48 or 32 kHz,
matching them to what your DV sequence is set to, using an audio conversion application
before importing them into your sequence. If you import audio CD files directly, you may
experience audible distortions in the audio.
C H A P T E R
6
6
Creating and Organizing Projects
A project is a Final Cut Pro file that stores references to all of the media files that you use in
creating a particular end product. A project file also includes all the information about how
you’ve arranged your material in sequences, including special effects settings you’ve applied
to clips.
Creating, Opening, Closing, and Saving Projects
To start a new project in Final Cut Pro, you create a project file in the Browser and insert
sequences and clips into it. New projects include an empty sequence. You can have multiple
projects open in Final Cut Pro. Each project appears in its own tab in the Browser.
When saving projects, Final Cut Pro saves the arrangement of project items in the Browser
window, the sequences within the project, and all settings that have been applied to clips.
Sequences cannot be saved separately from a project, but they can be exported as movies or
clips.
To create a new project:
m Open the File menu and choose New Project.
To open a project:
m Open the File menu, choose Open, and locate the project.
To close a project, do one of the following:
m Click the project’s tab to bring it to the front of the Browser and choose Close Project
from the File menu.
m Control-click the project’s tab and choose Close Tab from the shortcut menu.
m Close the Browser window. This closes all open projects in that tab (others may be open
in tabs that have been dragged out of the main Browser window).
133
To save a project:
1
Select the Project tab in the Browser.
2
Open the File menu and choose Save Project.
To save a project with a different name:
1
Select the Project tab in the Browser.
2
Open the File menu and choose Save Project As.
3
Name the project and select a destination.
4
Click Save.
To save all open projects:
1
Open the File menu and choose Save All.
2
Name the projects and select destinations.
3
Click Save.
Autosaving Projects
Final Cut Pro can automatically save copies of all open projects at a regular interval in the
directory with each project. Project files are modified only when you specifically use the Save
or Save All command. If your computer fails while working in a project, restart Final Cut Pro.
You can open the autosaved version of the project or the original. If you open the original,
the autosaved version of the project will not be deleted until you choose Save from the File
menu and save over the original project. If you open the autosaved version of the project,
Final Cut Pro treats it as a separate project and does not modify the original.
For more information about the autosave option, see “Setting General Preferences” on
page 96.
Customizing the Browser Display
You can customize the appearance of the Browser so that items appear as icons or in a list.
You can also tidy up the display of icons with the Arrange command, available in the View
menu or in the Browser through the shortcut menu.
When items are displayed as a list, the Browser displays information about the items in
columns. You can rearrange, resize, hide, and show individual columns, sort by certain
columns, and switch between a predefined set of standard columns or a set of columns
designed for logging. You can also edit the Comment column names.
134
Chapter 6
To display items as a list or as icons:
1
Make the Browser the active window.
2
Open the View menu and choose the desired display option from the Browser Items
submenu, or Control-click in the Name column and choose “View as List” from the shortcut
menu.
To clean up the display of the Browser when items are displayed as icons:
m Make the Browser active and choose Arrange from the View menu.
To display thumbnails in the Browser in list view:
m In the Browser window, Control-click in any column heading other than Name and
choose Show Thumbnail from the shortcut menu.
m Control-click in the Thumbnail column heading and choose Hide Column from the
shortcut menu to hide Thumbnails.
Note: You can scrub through a clip’s thumbnail by clicking it and dragging in the
direction you want to scrub.
To rearrange and resize Browser columns:
Do any of the following:
m To rearrange columns: Drag the column header to the new location.
m To resize a column: Drag the edge of the column header.
To show, hide, or change the display of columns:
Do any of the following:
m To hide a column: Control-click in the column header and choose Hide Column from the
shortcut menu.
Note: You can’t hide the Name column.
m To display a hidden column: Control-click in the column header next to where you want
to display the column, and choose the column’s name from the shortcut menu.
m To display standard or logging columns: Control-click in a column header and choose
either Standard columns or Logging columns from the shortcut menu. Use logging
columns when you are logging clips.
Note: Some Browser columns are hidden by default when you first use Final Cut Pro.
Access to these columns is available through the shortcut menu.
To edit the Comment column header, do one of the following:
m Open the shortcut menu in a Comment column header, choose Edit Heading from the
Context menu, type a new name in the edit box, and press Enter.
Creating and Organizing Projects
135
m Choose Project Properties from the Edit menu, type new names in the Comment text
boxes, and click OK.
To show the markers for a clip:
m Click the triangle next to the clip’s icon. The markers appear below it. If there are no
markers associated with the clip, there is no triangle next to the clip.
Selecting Items in the Browser
You can use several methods to select items in the Browser:
m Click the item.
m Type the first few letters of an item’s name.
m Use the arrow keys to move between adjacent items.
m Use the Tab key to move between items alphabetically. Use Shift-Tab to move backward.
m Command-click to add or subtract individual items from a group selection.
m Drag a bounding box around a group to select multiple items.
Sorting Items in the Browser
You can sort the clips, sequences, and bins in a project by most columns. You can refine the
sorted items by performing additional secondary sorts on other columns.
The primary sort column has an indented header and is indicated by a green arrow in the
column header. Additional sorted columns are indicated by light blue arrows in the column
header.
To sort items in the Browser:
1
To specify the primary column by which to sort, click the column header. Click the header
again to reverse the sort order.
2
To specify secondary columns by which to sort, Shift-click the additional column headers.
Shift-click the headers again to reverse their sort orders.
Organizing Projects With the Browser
The Browser acts as an organizational resource for the clips and sequences you have in a
project. You can organize your clips and sequences into folder-like bins. The properties of
clips and sequences are displayed in columns. You can search for and sort clips (in most
columns) based on any clip property. Some clip and sequence properties can also be
modified directly in the Browser using the shortcut menu. The Browser also contains details
of any markers that have been placed in clips.
136
Chapter 6
About the Browser Columns
Most of the Browser’s columns are easy to use and understand. Those that follow need
additional explanation:
m Aux TC 1 and 2: The starting timecode numbers for auxiliary timecodes 1 and 2. These
can be used when synchronizing clips.
m Capture: The capture state of a clip in the Batch Capture list
m Duration: The duration between a clip’s In and Out points
m Good: Indicates whether a clip has been marked Good in the Log and Capture window
m Length: The length of the source media on disk
m Source: The pathname of the media file on disk
m TC: The timecode displayed in the Viewer. It can be the source timecode or either of the
auxiliary timecodes.
m Thumbnail: Shows the first frame of the clip. You can click a thumbnail to scrub through
the clip.
m Timecode: The starting timecode number for the source timecode (the source timecode
is for the media on disk)
m Tracks: The number of video and audio tracks in the item
m Type: The type of each item. This can be clip, subclip, sequence, bin, or effect.
m Icons: The table below describes icons found in the Browser.
Icon
Name
Description
Sequence
A structured collection of media clips, edit information, render
properties, and output information
Clip
A media file containing video, audio, graphics, or any other
content imported into Final Cut Pro
Subclip
A segment of a clip defined by In and Out points. There may be
any number of subclips referenced to one master clip.
Offline Clip
A placeholder clip referencing media not stored on a local hard
disk
Marker
A reference point in a clip
Audio Clip
A media clip containing audio samples
Creating and Organizing Projects
137
Icon
Name
Description
Video Transition
A transition effect that can be applied to a video track
Audio Transition
A transition effect that can be applied to an audio track
Video Filter
An effects filter that can be applied to a video clip
Audio Filter
An effects filter that can be applied to an audio clip
Generator
An effects utility that generates screens and tones that can create
distinctive breaks between live action
Using Bins to Organize Clips
You can use Browser bins to organize and group files into a logical structure, making them
easier to manage. Bins are similar to folders in the Finder. Bins can be organized
hierarchically, and they can be opened in their own windows and made into Browser tabs.
When you import a folder into a project, it appears as a Browser bin (see “Importing Media”
on page 130). Changes you make to the contents of that bin, such as deleting, moving, and
renaming clips, or renaming the bin itself, have no effect on the disk files or folders where
the source material is stored. If you delete a clip from a bin, it is not deleted from the disk.
Likewise, inserting a bin does not create a folder on your disk. The bin is located only in the
project file.
To add a new bin to a project:
m Open the File menu and choose Bin from the New submenu or Control-click in an empty
portion of the Name column and choose New Bin from the shortcut menu.
To open a bin and create a tab in the Browser for it:
1
Double-click the bin.
2
Drag the tab from the bin to the Browser window’s Name column.
To move items between bins in list view:
138
Chapter 6
1
Drag the items onto the selected bin.
2
With the mouse button pressed down, pause over a closed bin to open it.
3
Release the mouse button to drop the items into the bin.
4
Click the arrow to the left of the bin to expand it and view its contents.
Note: To move an item to the top level of a project, drag the item to the Name column
header.
To make a copy of a Browser item:
m Hold down the Option key and drag the item to a new bin.
To remove a clip, sequence, or bin from a project:
m Select the item and press Delete. Deleting clips from a project does not delete them from
any sequences in the project or on the disk.
Modifying Clip Properties in the Browser
You can modify the properties of clips directly in the Browser and enter up to four separate
comments for each clip. Some properties can be modified by choosing an option from a
shortcut menu. Others can be changed by typing directly into the Property column in the
Browser.
Changing the properties of clips in the Browser is a convenient way to modify the properties
of multiple clips at once. For example, you can set a group of clips to the same composite
mode before they are edited into a sequence. For more information about the difference
between a clip in the Browser and a clip in a sequence, see “Using Clips in Sequences” on
page 143.
To modify the properties of a clip in the Browser:
m Control-click a clip and choose Item Properties from the shortcut menu. See “Getting
Information About the Properties of Clips” on page 160.
To make changes to multiple items or column entries in list view:
m When your Browser is in list view, you can change multiple Browser items, or all the
entries in one column if it has a shortcut menu. Select the items you want to change, then
use the shortcut menu to change them.
Renaming Clips, Sequences, and Bins
You can rename clips, sequences, and bins directly in the Browser. Renaming a clip only
changes the clip name in the project. It does not change the name of the media file on your
disk. Likewise, changing the name of a bin that corresponds to a folder on your disk only
changes the name of the bin in the project, not the folder on the disk or clips in a sequence.
To rename clips, sequences, and bins in a project:
1
Select the clip, sequence, or bin.
2
Click the name.
Creating and Organizing Projects
139
3
Type a new name.
Note: You can have clips with the same name in the same bin, but the names of the media
files on the disk must be different.
Searching for Items in the Browser
You can search for items in a project by any property or combination of properties. The most
simple search for a clip is by name, but you can also search for clips by timecode, by audio
type, by video type, and so on. You can search in all open projects, or restrict the search to
any single tab in the Browser.
You can search for a single item or multiple items. When searching for multiple items in the
Browser, Final Cut Pro compiles the list of found items in the Find Results window. The items
in this window are references or pointers to the clips in the Browser. You can use the Find
Results window to delete found items from a project, move or copy them to another location
in the Browser, or edit the items into a sequence. You can also search in the Find Results
window itself as a means to narrow a search, and perform additional searches and combine
the results in the Find Results window.
To search for items in the Browser:
140
Chapter 6
1
Make the Browser the active window.
2
Open the Edit menu and choose Find.
3
Type the criteria for which you want to search. You can limit the search to a single column by
selecting the column name from the Column option.
4
Choose a criterion from the search criteria option. For example, you can search for items that
start or end with a character string, or that are greater than or less than a timecode value.
Options available depend on the search column selected.
5
To search for an item based on the contents of multiple columns, click More and specify
options as desired. Select an option from the Match option to find items that match all or any
specified criteria.
6
To search for items by excluding specified criteria, turn on the Omit option for the desired
search criteria.
7
Specify the search location (project, individual Browser tab, or all open projects) from the
Search option.
8
Start searching:
m To search for a single item, click Find Next. Final Cut Pro highlights the found item in the
Browser.
m To search for multiple items, choose a Results option to add all found items to the last
results or to replace the last results. Click Find All.
9
If you are searching for multiple items, use the Find Results window to do any of the
following:
m To delete items from the project, select the desired items and click “Delete from Project.”
m To move items to another bin, drag them from the Find Results window to the new bin.
m To copy items to another bin, Option-drag them from the Find Results window to the
desired bin.
m To search in the Find Results window, choose Find from the Edit menu. Specify search
criteria as described in steps 3 through 6 and choose Find Results as the search location.
To locate the Browser bin for an item in the Viewer:
m Select the item or click the Viewer tab it is in and choose Browser Bin from the “Go to”
submenu of the Mark menu.
Changing the Properties of a Project
Each project has a set of properties that are saved with it. This set of properties applies to all
sequences in a project and is independent of the Sequence preset that has been applied. To
view or change the properties of a project, click the Project tab and choose Project
Properties from the Edit menu.
You can use the Project Properties window to do the following:
m Display timecode or frames in the Duration column of the Browser’s Project tab.
m Edit render qualities for a project.
m Change heading labels for Comment columns in the Browser’s Project tab.
For more information about render qualities, see “Editing Render Quality Levels” on
page 242.
Creating and Organizing Projects
141
C H A P T E R
7
7
Working With Clips and the Viewer
A clip is the basic unit of media that you use to create movies in Final Cut Pro. Clips can be
movies, still images, nested sequences, generators, and audio files.
When you insert a clip into a project, you are not copying the original media file onto the
disk. The clip is actually a reference to that file. Therefore, if you delete the original media
file, your clip will still appear in the Browser and Timeline, but it will not show the frames or
play. Additionally, when you apply special effects and perform edits on clips, you are not
affecting the media file.
If you are working with an individual clip, you use the Viewer window. The Viewer window’s
tabs let you select specific aspects of the clip to work with: video, audio, motion, and filters.
Using Clips in Sequences
When you insert a clip from the project into a sequence, you’ve copied the clip into the
sequence. The clip in the sequence is a reference to the actual media file on the disk. It is not
a reference to the clip in the project file.
The implications of making changes to clips in sequences or in the Browser are important:
m If you make changes to a clip in the Browser and then insert it into a sequence, the clip
that is placed in the sequence includes the changes that have been made in the Browser.
m Once you’ve inserted a clip into a sequence, changes you make to that clip from the
Browser will not be reflected in any sequence where the clip is used.
m Clips that appear in multiple sequences are independent of each other. Changes to one
will not affect the others.
m Any changes you make to a clip in a sequence are not made to the clip in the Browser.
In the Viewer, Final Cut Pro distinguishes clips that have been opened from the
Timeline by displaying two lines of dots in the Scrubber bar. Clips that have been opened
from the Browser have a plain Scrubber bar.
Important
143
Using the Viewer
You use the Viewer to play clips, locate and mark specific frames, and change audio, video,
and effects settings for the clip. To apply or modify a transition between two clips, you use
the Timeline and a special version of the Viewer. For more information, see “Using the
Transition Viewer to Change Settings and Edit Transitions” on page 212.
Viewer tabs contain controls that you use to change settings for different properties of a clip.
The Video Tab
The Video tab lets you view, locate, and mark video frames. You also use it to set In and Out
points and keyframes.
144
Chapter 7
The Audio Tab
The Audio tab lets you view the audio waveform channels and has controls to change level
and pan or spread settings. You can also use this tab to set In and Out points, markers, and
keyframes for audio clips.
The Level slider adjusts the amplitude or volume of the audio clip. The button to the right
places keyframe markers at the current playhead location in the clip timeline. These
keyframe markers can be used for editing audio levels between two points.
The Spread slider enables stereo panning or swapping of left and right channels. The base
setting of –1 outputs the left audio channel to the left and the right audio channel to the
right. A setting of 0 outputs the left and right audio channels equally to both sides. A setting
of +1 swaps the channels and outputs the left audio channel to the right and the right audio
channel to the left. The button to the right places keyframe markers at the current playhead
location in the clip timeline. These keyframe markers can be used for panning audio output
between two points.
The X button next to the Level and Spread marker buttons deletes all marked points in the
audio timeline and resets the level and spread values to their original settings.
Drag the hand on the speaker to move the audio clip with edits to another window such as
the Browser or Timeline.
Working With Clips and the Viewer
145
The Filters Tab
The Filters tab lets you change the settings for any filter effect you have applied to the clip.
You can change settings for individual effects and create animated effects by using a
combination of keyframes and changes to filter settings. You can navigate with precision
within the clip by entering a timecode into the timecode field in the bottom-left corner of
the window.
146
Chapter 7
The Motion Tab
The Motion tab lets you apply and modify motion effects to a clip. You can also apply
animated effects by using a combination of keyframes and changes to motion settings. You
can make very fine adjustments to motion properties using the Motion settings. You can
navigate with precision within the clip by entering a timecode into the timecode field in the
bottom-left corner of the window.
To toggle motion effects off when playing clips in the Viewer, check the box labeled “Play
Base Layer Only” in the Render Qualities Editor. See “Editing Render Quality Levels” on
page 242 for details.
Opening Clips in the Viewer
When you open a clip, it appears in its own Viewer window with the Video tab selected.
You can open clips from the project tab of the Browser or from the Timeline. You can open
single or multiple clips, and any recently viewed clips. You can also open clips from outside
an open project.
To open clips in the Viewer, do one of the following:
m Double-click the clip in the Browser or Timeline, or select it and press Enter.
Note: The Viewer treats out-of-sync video and audio as separate elements. Even though the
out-of-sync video and audio may be linked in the Timeline, the Viewer will only display the
track or channel you have selected.
Working With Clips and the Viewer
147
m Select the clip in the Browser or Timeline and choose “Clip in New Window” from the
View menu.
m Drag multiple clips from the Browser to the Viewer. The first clip is opened in the Viewer
and the remainder are listed in the recent clips control.
m Select a recently viewed clip from the recent clips control in the Viewer.
m Choose Open from the File menu and select a clip.
Any changes you make to an opened clip, such as marking edit points or creating
markers, are not saved with the clip. To save any changes, you have to insert the clip into
a project or export the clip.
m Drag a clip from the video frame in the Viewer to the project tab in the Browser to insert a
clip from the Viewer into an open project.
Note: You can also open generator effects directly from the Browser’s Effects tab in a Viewer
window, as if they were clips.
Playing Clips and Locating Specific Frames
You use the transport controls in the Viewer to play and scrub clips. You can play clips
forward, backward, between In and Out points, one frame at a time, looped, and, with the
proper video card, on an external NTSC or PAL monitor. You can also move the playhead by
jogging, shuttling, and scrubbing.
To navigate using timecode values:
m To navigate to a specific frame in a clip, open the clip in the Viewer and enter the
timecode value in the playhead position timecode box at the top-right corner of the
Viewer, then press the Enter key.
The playhead moves to the specified timecode.
For more information, see “Working With Timecode” on page 87.
Note: You can change the duration between In and Out points of a clip by changing the
timecode in the Duration box in the top left of the Viewer window. This moves the Out point
for the clip.
To play clips in the Viewer:
Do one of the following:
m To begin playing a clip, click the Play button or press the Space bar. To stop playing the
clip, click any play button or press the Space bar.
m To play the clip in reverse, press Shift–Space bar, or Shift-click the Play button.
m To play the clip between the In and Out points, click the “Play In to Out” button or press
Shift–\ (backslash).
148
Chapter 7
m To play the clip from the current playhead position to the Out point, Command-click the
Play button.
m To play the clip footage that is centered around the current playhead position, click the
Play Around Current button or press \ (backslash). The duration of video that is played is
determined by the pre-roll and post-roll preferences.
m To loop playback, choose Loop Playback from the View menu. All playback methods are
looped. Choose Loop Playback again to turn off looped playback.
To jog, shuttle, scrub, and move the playhead:
Do one of the following:
m To jog one frame at a time, drag the jog control. You can drag off the control area if you
continue to hold down the mouse button. You can also jog by dragging the playhead in
the Scrubber bar.
m To play at various speeds, drag the shuttle control. The shuttle control plays the clip at a
variable rate. Drag further from the center to play the clip faster. Drag right to play
forward; drag left to play in reverse.
m To scrub through a clip, drag the playhead in the Scrubber bar above the transport
controls.
m To move the playhead to a location within the clip relative to the clip’s length, click in the
Scrubber bar. You can also move to an exact frame by entering a timecode in the Current
field.
m To move the playhead frame by frame, use the arrow keys.
m To shuttle playback forward, press the L key. This starts playback at 1x speed. Press the
key repeatedly to accelerate forward playback up to four times normal speed.
m To shuttle playback in reverse, press the J key. This starts playback at 1x speed. Press the
key repeatedly to accelerate reverse playback up to four times normal speed.
Marking In and Out Points
The In and Out points determine the start and end frames of the clip. This is the portion of
the clip that is used when the clip is placed into a sequence, although there may be
additional media at either end of the clip. Many editing functions are performed by moving
either of these points, either within the clip itself or from within a sequence.
To mark the In or Out point for a clip:
1
Open the clip in the Viewer.
2
Navigate to the frame where you want to place the In or Out point.
3
Click Mark In or Mark Out.
Working With Clips and the Viewer
149
Note: You can drag the In or Out point icons along the Scrubber bar to change their
location, or drag them off the Scrubber bar to remove them.
You can perform these actions using modifier keys in combination with mouse clicks on
interface elements:
m Option-click the Mark Clip button to clear both In and Out points.
m Option-click the Mark In button to clear In points.
m Option-click the Mark Out button to clear Out points.
m Shift-click the Mark In button to go to the In point.
m Shift-click the Mark Out button to go to the Out point.
m Shift-click either the In or Out point to slip the edit.
Creating Subclips
Subclips enable you to create multiple clips from a single master clip. For example, you can
open a 20-minute clip in the Viewer and divide it into as many subclips as necessary at one
time. As you create subclips, the master clip remains open in the Viewer. You can then work
with the subclips in the same way as any other clip, but independently of the master clip.
Final Cut Pro places new subclips in the same project bin as the master clip, numbering each.
For example, if the master clip is named “Long interview,” the first subclip is named “Long
interview subclip1,” the second is “Long interview subclip2,” and so on. Once you create a
subclip, you can rename it and you can trim the edit points as in any other clip. However, you
can’t extend the subclip’s In and Out points to the surrounding media as you can the master
clip’s. To do so, you need to open the master clip, change its In and Out points and then
create a new subclip.
To create a subclip:
1
Open a clip in the Viewer and mark In and Out points.
2
Open the Modify menu and choose Make Subclip.
To find a subclip’s master clip:
150
Chapter 7
1
Open the subclip in the Viewer.
2
Open the Mark menu.
3
Choose Master Clip from the Go To submenu.
Adding and Editing Markers
Markers create points of reference in a clip that let you do the following:
m Align other clip markers, clip boundaries, or transition boundaries to a marker in the
Timeline.
m Align the clip marker to a marker in the sequence.
m Align a filter or motion keyframe to the marker.
m Quickly move the playhead to a marker in the clip or sequence.
m Mark a range of the clip to use as you might a subclip.
You can have any number of markers in a clip. You can set markers while a clip is playing or
while the playhead is stationary. Marker overlays are displayed in the video frame whenever
the playhead is positioned over a marker, and marker icons appear in a clip’s Scrubber bar as
shown in the picture below.
Note: If you add a marker to a clip that you’ve opened from the Browser, the marker is also
displayed in the Browser. This lets you work with the marker as a subclip.
To add markers to a clip or sequence in the Viewer:
1
Open the clip in the Viewer.
2
Play the clip or sequence and when playback reaches the desired point, press M or click the
Add Marker button. Press M a second time to add a custom label or comments to the marker.
To delete a marker:
1
Move the playhead to the marker.
2
Open the Mark menu and choose Delete Marker from the Markers submenu.
To move the playhead to a marker:
Do one of the following:
m Drag the playhead in the Scrubber bar to the marker location.
m Open the Mark menu and choose Marker from the Previous submenu.
m Open the Mark menu and choose Marker from the Next submenu.
m Open the shortcut menu in the current timecode position field or Timeline ruler and
choose a marker.
When you place the playhead on a marker, the marker overlay appears in the Viewer or
Canvas. (See “Viewing Overlays” on page 156.)
Working With Clips and the Viewer
151
The following actions are performed using modifier keys in combination with mouse clicks
on interface elements.
m Shift-click the Marker button to set a marker and open the Edit Marker dialog box.
m Option-click the Marker button to delete a Marker if parked on one.
Renaming Markers and Attaching Comments
The default names Final Cut Pro uses for markers only indicate the order in which you’ve
added them to a clip. The first marker you add is named Marker 1, the second Marker 2, and
so on. You may want to rename markers to indicate the location they mark.
You can also attach comments. Both the name and the comments appear as overlays in the
Viewer whenever the frame containing the marker is displayed.
To rename a marker:
1
Move the playhead to the marker.
2
Press M, click the Add Marker button, or open the Mark menu and choose Edit from the
Markers submenu.
3
Type a name and comment in the corresponding text boxes and click OK.
Note: You can also rename clip markers in the Browser by opening the shortcut menu on
the marker’s name, choosing Edit Marker, and typing a new name. (See “Renaming Clips,
Sequences, and Bins” on page 139.)
Moving and Extending the Duration of Markers
You can move placed markers and extend their duration by editing the timecode values with
the Edit Marker command. You can also move a marker forward in time and extend its
duration.
To move or extend the duration of a marker with the Edit Marker command:
152
Chapter 7
1
Move the playhead to the marker.
2
Press M, click the Add Marker button, or open the Mark menu and choose Edit from the
Markers submenu.
3
Do one of the following:
m To move the marker, enter a new start time.
m To extend the duration of a marker, enter a duration value.
An extended duration marker appears on the Scrubber bar as a marker icon with a bar
extending along the Scrubber bar.
To extend the duration of a marker to the playhead location:
1
Position the playhead ahead of the marker.
2
Open the Mark menu and choose Extend from the Markers submenu.
The marker’s duration will extend from the original location of the marker to the location of
the playhead.
To move a marker forward in time:
1
Move the playhead to the location where you want the marker to be repositioned. You can
only move a marker forward. Final Cut Pro moves the marker nearest the new location. If
there are multiple markers, the one immediately to the left of the playhead will be moved.
2
Open the Mark menu and choose Reposition from the Markers submenu.
Using Markers as Subclips
An extended duration marker acts as a subclip, but you can explicitly make subclips from
extended duration markers.
To make a subclip from a marker in the Browser:
1
Select the marker.
2
Choose Make Subclip from the Modify menu.
The subclip appears in the same bin as the master clip, with names of both the marker and
master clip appended together.
If you double-click a marker in the Browser, it opens a subclip in the Viewer.
Viewing Clips
The Viewer controls and the Zoom and Hand tools let you view the current clip or sequence
in different ways. You can change the magnification and move a magnified view. You can also
view action and title safe zones, and display or hide overlays (visual cues that indicate
significant points, such as edit points, in a clip).
Note: Changing the magnification alters the display only, not the output resolution.
Opening Clips From the View Menu
You can select a clip in the Browser, Timeline, or Canvas and open it using the View menu:
m Choose Clip to replace the current contents of the Viewer with the selected clip.
m Choose “Clip in New Window” to open a new Viewer containing the selected clip.
Working With Clips and the Viewer
153
Opening the Application a Clip Was Created in
You can open the application a clip was created in directly from Final Cut Pro. This is
sometimes useful when working with imported still images.
To open the application:
1
Open the clip in the Viewer or Canvas.
2
Open the View menu and choose Clip Editor.
If the clip was created in Final Cut Pro, a new Viewer window opens for it. Clips created in an
application other than Final Cut Pro open in that application. If the application used to create
the clip is not on your computer, a dialog box opens that allows you to choose an application
to edit the clip in.
Note: Opening clips in applications other than Final Cut Pro requires additional memory. Be
sure you have enough available RAM installed in your computer.
Changing Magnification in the Viewer or Canvas
To zoom in, do one of the following:
m Select the Zoom In tool and click inside the Viewer or Canvas, or click in the video image
and drag a marquee to zoom in on the desired area of the image.
m Choose a higher magnification level from the Zoom pop-up menu at the top of the
Viewer or Canvas.
m Open the View menu and choose the amount you want to zoom in from the Level
submenu.
Note: Clips will not play smoothly when you have zoomed in on a clip in the Viewer.
To view different parts of a magnified image:
m Select the Hand tool from the Tool palette and drag it over the image to move the view.
m Use the scroll bars to move around the image.
To zoom out, do one of the following:
m Select the Zoom Out tool and click inside the Viewer or Canvas.
m Choose a lower magnification level from the Zoom pop-up menu at the top of the Viewer.
m Open the View menu and choose the amount you want to zoom out from the Level
submenu.
To fit the clip or sequence into the window size:
m Choose Fit to Window from the Zoom pop-up menu at the top of the Viewer or Canvas.
154
Chapter 7
To fit all items into view plus a 10% margin:
m Choose Fit All from the Zoom pop-up menu at the top of the Viewer or Canvas or open
the View menu and choose Fit All from the Level submenu.
To view at actual size:
m Choose 100% from the Zoom pop-up menu at the top of the Viewer or Canvas.
To shrink the window to the current clip size:
m Make the Viewer or Canvas active, then double-click the Zoom tool in the Tool palette.
To preview any non-square pixel aspect ratio clips on your computer’s display in square
pixels:
m Choose Show As Sq. Pixels from the Level submenu in the View menu or from the Zoom
pop-up menu at the top of the Viewer or Canvas.
Viewing Title and Action Safe Boundaries
Most NTSC or PAL monitors do not display the entire video image on the screen, obscuring
the top, bottom, and sides. This is known as overscan. You can ensure that important
elements in your work are not obscured by overscanning if you keep them within the title
and action safe boundaries.
To view or hide title and action safe boundaries:
m Choose Title Safe from the View menu.
m Choose Title Safe from the View Control pop-up menu at the top of the Viewer or Canvas.
m Choose Title Safe again to remove boundaries.
Working With Clips and the Viewer
155
Viewing Overlays
Overlays are visual cues that indicate significant points, such as In and Out points, in a clip or
sequence. Overlays are displayed on top of the video when the playhead is parked on the
significant frame. Overlays only display in the Viewer and Canvas and are not rendered to
output. They are displayed by default. Final Cut Pro displays the following overlays:
m In and Out points: Show when the playhead is positioned on the In or Out point frame
m Start and End of media: A filmstrip symbol along the left or right side of the video frame
indicates the start or end of the video media.
m Start and End of edits: An L shape at the lower left indicates the start of an edit, and a
backward L shape at the lower right indicates the end of an edit. This only appears in the
Canvas.
m Marker: Marker overlays appear as translucent boxes containing the marker’s name and
comment text.
m Title Safe: The title safe boundaries are rectangular boxes around the edges of the video.
To view or hide overlays, choose Overlays from the View Control pop-up menu at the top of
the Viewer or Canvas.
Viewing With Different Backgrounds
You can choose different backgrounds against which a clip with an alpha channel is viewed to
make it easier to edit. Translucent clips or generated text may be more visible if you choose a
background that emphasizes them. For example, generated black text is more visible against
a white background. When a clip is rendered, the background is always set to black.
To choose a background for viewing a clip:
m Choose the desired background from the View Control pop-up menu at the top of the
Viewer or Canvas.
m Open the View menu and choose the desired background from the Background
submenu.
Working With Audio
You use the Viewer’s Audio tab to edit the audio for a clip. Because audio is captured in
subframes as a continuous waveform, you can edit it in a different timebase from that of
video. Video is captured as frames, audio is captured as samples. Audio In points can be set
to an accuracy of 1/100 of a frame.
156
Chapter 7
Understanding Audio Formats
A clip’s audio can be in one of several formats. The format appears in the top center of the
Viewer’s Audio tab.
m Ch 1: The audio consists of only the left channel from the tape (Ch 1), with pan centered.
m Ch 2: The audio consists of only the right channel from tape (Ch 2), with pan centered.
m Mono Mix: The audio consists of both channels from the tape, mixed into a single track.
m Stereo: Both channels have been captured as a stereo pair. Stereo pairs are always linked,
and anything that is applied to one track is applied to both.
m Ch 1 + Ch 2: Both tracks have been captured but are distinct and can be adjusted
independently of one another.
Compressed Audio Formats
Do not use compressed audio as source media when editing in Final Cut Pro. Compressed
audio will produce audible distortions during playback and in your final output due to the
lower quality of the file.
You can export audio in a variety of compressed formats when exporting a QuickTime movie.
See “Exporting Sequences and Clips” on page 261 for more details.
Turning Off Audio Scrubbing
You can turn off audio scrubbing in the Viewer, so that you don’t hear any sound when you
scrub the playhead or use the jog wheel.
To turn off audio scrubbing, choose Audio Scrubbing from the View menu.
To turn audio scrubbing back on, choose it in the menu again.
Using the Viewer to Display Audio Waveforms
When you open a clip with audio into the Viewer, Final Cut Pro displays one or two audio
tabs depending on how the audio tracks are formatted in the clip. One tab appears for clips
with a single audio track and for clips with stereo audio. Two tabs appear for clips with audio
in separate channels.
For clips with stereo audio, Final Cut Pro displays both the left and right audio waveforms on
a single tab, enabling you to simultaneously adjust settings for both channels of audio. For
clips with a single channel or two separate channels of audio, each channel appears on its
own tab, enabling you to individually adjust settings for the two channels.
Note: If you do not hear audio from speakers attached to your camera when scrubbing or
playing audio in the Viewer’s Audio tab, increase the volume on your computer’s speakers.
You can also configure your system with dual input speakers to hear audio from the camera
and computer on the same set of speakers.
Working With Clips and the Viewer
157
Changing Your Computer’s Audio Level
You can change your computer’s audio level with Final Cut Pro if you have a
QuickTime-compatible video capture card installed. To do this, open the Modify menu and
choose the desired level from the Audio Level submenu.
Adjusting Audio Levels and Pan or Spread for a Clip
Final Cut Pro enables you to control the volume (levels) and placement of sound (pan or
spread) using the slider controls at the top of the Audio tab. This changes the settings for the
entire clip.
Note: You can also make multiple changes to audio levels in a single clip using keyframes.
For more information about using keyframes, see “Using Keyframes to Change Effects Over
Time” on page 232.
You can change audio level and pan in the Viewer. Pan refers to the distribution of sound
between the left and right channels. By adjusting this, you can make the audio sound as if it
is coming from the right channel or from the left channel.
For stereo clips, the Pan control is replaced by the Spread control, which enables you to swap
the two audio tracks, moving the left track to the right and the right track to the left. As both
of these settings change, the correspondingly colored line graphs over the audio waveform
change also.
Level adjusts the overall volume or amplitude of a clip. Zero decibels (dB) is the default. You
can adjust the level with positive or negative values.
Basic values for spread are
m –1 where the left channel is output to the left and the right channel is output to the right
(L = L, R = R)
m 0 where the left and right channels are equally distributed to both sides (LR = LR)
m +1 where the left channel is output to the right and the right channel is output to the left
(L = R, R = L)
158
Chapter 7
Level and spread can be adjusted to varying degrees over time using keyframes.
To vary audio levels or spread over time:
1
Position the playhead where you want the effect to begin.
2
Adjust the level or spread with the slider bar and set a keyframe.
3
Move the playhead to the next position where you want a change in the effect.
4
Adjust the level or spread with the slider bar and set a keyframe.
Repeat this process at intervals to vary the range of level or spread.
The distinction between editing a clip from the Timeline or from the Browser applies to
audio clips as it does to video clips. If you open the clip from the Timeline, you are editing
that instance of the clip only. If you open the clip from the Browser before editing it, the
changes you make will appear whenever you insert that clip into any subsequent sequences.
Synchronizing Audio and Video
When audio is out of sync with video by a fraction of a frame, you can perform sub-frame
slipping to synchronize the audio and video clips. To do this, hold down the Shift key while
positioning the playhead along the ruler in the Audio tab. This allows for sub-frame
placement of the playhead. Mark an In point while in the Viewer. The video track slips a
fraction of a frame to synchronize with the audio.
You can also check the AutoSyncCompensator checkbox in the General tab of the
Preferences window. See “Setting General Preferences” on page 96.
Working With Clips and the Viewer
159
Getting Information About the Properties of Clips
Information on a clip is available through the Item Properties command. Select a clip in the
Browser or Timeline or open it in the Viewer, then choose Item Properties from the Edit
menu. Three tabs in the Item Properties window allow you to view or change properties of a
clip.
To get information about the format of a clip:
m Click the Format tab.
This tab provides information on the clip’s location, file size, and format characteristics.
Properties that can be changed in this tab are
m Field Dominance: Determines the dominant field
m De-Interlace: Replaces intermediate fields with duplicates of the dominant field
m Alpha Type: Selects an alpha type for the video clip
m Reverse Alpha: Reverses alpha of the video clip
m Composite Mode: Selects mode to be used when compositing the video clip
160
Chapter 7
To get information about the timing of a clip:
m Click the Timing tab.
This tab provides information on the timing of a clip.
m Duration: Specifies the total media length, the location of the In and Out points, and
the duration of the clip
m Speed: Specifies the current speed, duration, original duration, and frame blending
option for a clip. For more information on these settings, see “Changing the Playback
Speed of a Clip” on page 194.
Properties that can be changed in this tab are
m In: Enter or modify the In point of a clip
m Out: Enter or modify the Out point of a clip
m Duration: Enter or modify the duration of a clip
Working With Clips and the Viewer
161
To get the logging information for a clip:
m Click the Logging Info tab.
This tab provides logging information for a clip.
m Reel: Enter or modify the name of the source for a clip
m Label: Enter or modify objective detail for a clip
m Capture: Specify the status of the clip (Not Yet, Captured, or Queued)
m Scene: Enter or modify descriptive detail for a clip
m Shot/Take: Enter or modify tracking information
m Log Note: Enter or modify a log note
m Mark Good: Click the Mark Good checkbox to mark the clip Good
m Comments 1– 4: Enter or modify additional comments for the clip in these fields
162
Chapter 7
C H A P T E R
8
8
Creating Sequences and Editing
About Sequences
When you create a sequence, you place multiple pieces of source media (video, audio, and
still images) together to create new content. Sequences are viewed in the Canvas and in the
Timeline (the chronological representation of the sequence data). A sequence is part of a
project. There can be multiple sequences in one project. To save the changes made to a
sequence, save the project that holds the sequence by choosing Save Project from the File
menu.
A sequence can be treated like any other piece of clip media. It can be played in the Viewer
and manipulated like any other clip in Final Cut Pro. You can also place one sequence into
another sequence as if it were a clip, thereby creating a nested sequence. When a sequence is
nested, it acts like any other clip in the sequence. For more information, see “Placing
Sequences Within Other Sequences” on page 267.
Working With the Timeline and Canvas
The Timeline and Canvas give you different views of the sequence you’re editing. If you have
multiple sequences open, the Timeline and Canvas contain a tab for each sequence. The
Timeline shows a chronological view of the sequence and the relationships between the
contents of each track, with each clip indicated graphically. The Canvas shows what the
sequence will actually look like when it is played (unless you have added effects, in which
case you must render the sequence before you can play the results of your work). You edit
clips together by taking clips or parts of clips and editing them into the sequence, using the
rules of three-point editing. In the Timeline, you can adjust the placement of the In and Out
points using the Ripple, Roll, Slip, and Slide controls. You can also create edits using the
Razor Blade tools to divide clips, and then perform trimming functions on them as separate
clips.
Although the Timeline and Canvas are used together when you are editing, you can work in
the Canvas alone and close the Timeline to save screen space. This can be useful when you
are doing a rough cut.
163
Note: You can drag tabs out of their original window to display them separately.
Once you have finished assembling your clips in the sequence, you can trim them using the
trim functions in the Timeline and the Trim Edit window. For more details about trimming
functions such as the Slip, Slide, Ripple, and Roll tools, see Chapter 10, “Trimming Edits,” on
page 201.
About Three-Point Editing
When you edit clips together into a sequence, you use a method called three-point editing.
An example of three-point editing is choosing your source media by specifying its In and Out
points in the Viewer, and choosing a destination for it by specifying the In point for that
media in the Canvas. Final Cut Pro then uses the length of the media and the type of edit to
calculate the Out point for the destination in the Canvas.
You perform the different types of edits using the edit style buttons or the overlay in the
Canvas.
The following rules govern three-point editing in most situations.
m At least three edit points must be set in the Viewer and Canvas to perform an edit.
m If all edit points are specified in both the Viewer and the Canvas, then the Out point of
the Viewer is ignored.
m If no In or Out point is set in the Canvas, the playhead is used as the In point.
m If only one edit point (either In or Out) is set for both the Viewer and the Canvas, then
the beginning of the media in the Viewer acts as the In point, or the end of the media acts
as the Out point, to create the third edit point.
About Audio in Sequences
Final Cut Pro includes several audio filters that you can use to sweeten the audio tracks in
your movies. You can also use transitions to create cross-fades between audio clips. If you use
audio effects, you must rerender your sequence before you play back all tracks in a multitrack sequence. For more information about audio filters and transitions, see Appendix B,
“List of Audio and Video Effects,” on page 325.
164
Chapter 8
Mixing Audio in Real Time
Final Cut Pro can mix and play back multiple audio tracks in a sequence in real time. You can
have more than eight audio tracks in a sequence, but the maximum number of tracks you
can mix and play back depends on your computer system’s configuration (processor speed,
number and types of filters used, data transfer rate of your hard disk, available RAM, and so
on). For example, an audio crossfade or transition increases the track count by one. Thus, if a
sequence contains eight audio tracks, adding a single crossfade increases the count to nine
tracks and requires rendering to preview.
The number of tracks that Final Cut Pro will attempt to mix in real time is determined by the
Real-Time Audio Mixing preference (see “Setting General Preferences” on page 96).
Increasing the number of tracks is no guarantee that you’ll be able to mix as many tracks in
real time as you specify. If you set this preference too high, you may experience dropped
frames during playback, or dropouts in audio.
One way to reduce audio track overhead is to choose Mixdown Audio from the Sequence
menu. This renders all of the audio tracks in a sequence along with their transitions, and
filters and consolidates the combined track costs into one render file. This sequence can
then be placed into another sequence as a base set of tracks with minimum overhead. Once
mixdown audio has been applied to a sequence, the menu item is dimmed and a checkmark
appears next to it indicating that the sequence has been rendered. If files are moved within
the sequence after being rendered, mixdown audio will again become available in the
Sequence menu. Rerender the sequence with mixdown audio to optimize track costs.
The mixdown audio feature is also available in the Nest Item(s) selection in the Sequence
menu. For more information on this approach, see “Placing Sequences Within Other
Sequences” on page 267.
How Tracks Are Composited to Create the Final Sequence
Sequences can have multiple video and audio tracks. For video tracks, the first track is the
base layer. Video frames on track 2 are placed in front of any video frames at the same point
in time on track 1. The result appears in the Canvas. Media on a higher-numbered track
obscures the media on tracks below it. Use compositing modes and opacity to reveal the
tracks underneath.
All audio tracks are mixed together to create the final audio output. Final Cut Pro can mix
several tracks together in real time.
Creating Sequences and Editing
165
About Presets and Sequence Settings
Every Final Cut Pro sequence has a set of properties that determines the sequence’s editing
timebase (or frame rate), frame size, compression settings, and various display options. This
set of properties is known as a preset. When a sequence is created, the chosen preset
becomes the sequence settings for the new sequence. Final Cut Pro comes with a collection
of presets that you can apply to your sequences. The following rules determine the way that
sequence presets are used:
m When you create a new sequence, the default preset is automatically applied to it.
m If you have selected the “Prompt on New Sequence” box in Sequence Presets, you will be
prompted to choose a preset from those which have been previously saved.
m You can create, delete, and edit presets. Creating a preset doesn’t apply it to any
sequences. It just saves it for future use.
m If you want to change the settings for an existing sequence, you use the Settings
command in the Sequence menu. This allows you to change everything except the frame
rate for the sequence. Changing a sequence’s settings has no effect on the preset that was
applied to the sequence, and changing a preset does not affect any sequences to which
that preset was previously applied.
For more information about sequence presets and preferences, see Chapter 4, “Preferences
and Presets,” on page 95.
You don’t normally need to change sequence presets unless you change your
audio/video input device. Final Cut Pro chooses a preset based on questions you answer at
installation time.
Important
Creating a New Sequence
A new project opens with a new sequence by default. This sequence uses the default
sequence preset, unless you opted to select a preset on creating a new sequence.
When you start Final Cut Pro for the first time, a new project with a sequence is created
automatically. Likewise, new projects always contain a sequence by default.
To create a new sequence and add it to the current project:
1
166
Chapter 8
Open the File menu and choose Sequence from the New submenu.
m If the “Prompt on New Sequence” checkbox is selected in the Sequence Presets tab of the
Preferences window: The Sequence Presets tab appears, where you select an existing
preset or create a new one.
m If “Prompt on New Sequence” is not selected: The new sequence uses the current default
preset. You can still select a preset before inserting the new sequence by pressing the
Option key when choosing the New Sequence command.
2
A new sequence with a default, highlighted name appears at the top level of the current bin.
Type a new name for the sequence to rename it.
The settings associated with the preset are copied into the sequence settings for the new
sequence. You can modify most of these settings by selecting the sequence in the Browser
and choosing Settings from the Sequence menu.
For best results, make sure that the sequence’s editing timebase matches the
frame rate of your source media before editing into the new sequence. If the editing
timebase does not match the frame rate of the source media, you will need to render the
sequence.
Important
To open a sequence for editing:
m Double-click the sequence in the Browser or select the sequence and choose Sequence
Editor from the View menu.
The sequence opens in both the Canvas and the Timeline.
To move the view of a sequence’s Timeline:
1
Select the Hand tool.
2
Drag back and forth in the Timeline.
Alternatively, use the Zoom slider at the bottom of the Timeline to scale and scroll the
Timeline view.
Changing the Settings for an Existing Sequence
The Sequence Settings dialog box contains all pertinent information on the selected
sequence, such as the codec (type of compression/decompression method used), frame size,
frame rate (or editing timebase), and so on.
To view and modify the settings for a sequence:
1
Select the sequence in the Browser, Timeline, or Canvas and choose Settings from the
Sequence menu.
Creating Sequences and Editing
167
You can also Control-click the sequence in the Browser and choose Sequence Settings from
the shortcut menu.
For details on the Sequence Settings dialog box, see “Creating, Editing, and Deleting Presets”
on page 107.
2
Modify the options and click OK.
Creating Sequences Using Edit Decision Lists
You can create sequences from Edit Decision List files imported from other applications. For
more information, see “Importing an Edit Decision List” on page 259.
Viewing a Sequence
You can view a sequence that you have selected in the Browser using the View menu:
m Choose Sequence from the View menu to see the sequence in the Viewer window.
m Choose “Sequence in New Window” from the View menu to see the sequence in a new
Viewer window.
m Choose Sequence Editor from the View menu to see the sequence in the Canvas and
Timeline.
168
Chapter 8
Copying Sequences
This is a valuable tip if you want to save a project and associated media files after a
time-consuming render process.
1
Select the sequence in the Browser.
2
From the Edit menu, choose Duplicate.
3
Rename the new sequence in the Browser with a unique name.
4
Open and edit the new sequence in the Timeline.
Changes will not affect the previous sequence or its rendered files.
You can also do this:
1
Select the sequence in the Browser and choose Save As from the File menu to save your
project with a new name.
2
Before any changes are made, use Media Mover to copy rendered files to a new partition. See
“Moving a Project and Its Media” on page 269 for instructions on using Media Mover.
New changes will be made on the new copies and the old project will remain intact with its
rendered files.
Setting Up an Edit
To set up an edit in Final Cut Pro, you identify the target track or tracks for the sequence in
the Timeline. Then you mark the edit points to specify the source media that will be used in
the edit.
Specifying the Target Tracks for Editing
A source clip in the Viewer may contain a maximum of one track of video and two tracks of
audio, but you may want to edit only one or two of the tracks contained in the source clip.
The tracks you want to edit are called target tracks.
You specify target tracks using the Timeline’s target track controls (the speaker and film icons
located on the left of the Timeline). You can specify a maximum of three target tracks at a
time: one for channel 1 of audio, one for channel 2 of audio, and one for video.
When you perform an edit using the editing controls in the Canvas, the media will be placed
on the specified target tracks, until you change these. If you are editing audio on one track
only, select the target audio track in the Timeline.
Creating Sequences and Editing
169
To select target tracks in the Timeline:
m Click the target track controls to target a track.
When selecting audio target tracks, you can click the left or right speaker of the audio
track icon. This determines the channel of the track.
To prevent video or audio from being added to a track when media is dragged directly onto
the track:
m Lock the track by clicking the track lock control on the left of the Timeline.
If you lock a target track, you can’t place edits on it.
Positioning the Playhead at a Specific Edit Point
To move the playhead to an edit point, use these techniques:
To move the playhead to the In point:
m Press Shift-I, or Shift-click the In point icon in the Canvas Scrubber bar.
To move the playhead to the Out point:
m Press Shift-O, or Shift-click the Out point icon in the Canvas Scrubber bar.
To move the playhead backward or forward to one of the edit points:
m Click the Previous Edit or Next Edit button in the transport controls.
In the Canvas, the playhead moves to the closest edit point, In point, or Out point.
In the Viewer, the playhead moves to the closest edit point, or to the beginning or end of
the media.
m Open the Mark menu and choose from the Next or Previous submenu.
m Press the Up or Down Arrow keys.
m Press Control-Shift-E (for the previous edit) or Shift-E (for the next edit).
170
Chapter 8
Marking Edit Points
The edit points define the In and Out points for the clip in the Viewer that will be added to
the sequence.
To define the edit points for a clip:
1
Open the clip in the Viewer.
2
Click Play or press the Space bar to view the clip.
3
While the clip is playing, click the Mark In button on the transport controls to set the In
point. You can also choose Mark In from the Mark menu, press I on the keyboard, or press /
(backslash) on the keypad to set the In point.
The In point indicator appears in the Viewer if the playhead is parked on the In point frame
and overlays are on.
4
As the clip continues playing, click the Mark Out button to set the Out point. You can also
choose Mark Out from the Mark menu, press O on the keyboard, or press * on the keypad to
set the Out point.
The Out point indicator appears in the Viewer if the playhead is parked on the Out point
frame and overlays are on.
Tips for defining edit points:
m You don’t have to play the clip to set its In and Out points. You can drag the playhead to
locate a particular frame and then set the edit point. This is called scrubbing. You can also
drag the In and Out points to a new position.
m While video is playing, you can continually set the In and Out points. For example, if you
identify a better In point after setting the In point, press I again as the video plays. The In
point is reset to the new position.
To modify In and Out points in the Viewer:
m Drag the In or Out point to a new position.
To move the In and Out points simultaneously:
m Press Shift while dragging either point.
The marked duration of the clip is not changed, but the frames that are included in the
marked clip shift forward or backward. This is called slipping.
Performing Edits in the Canvas
Each time you insert or edit a clip in the Canvas, you use one of the Canvas’s editing controls
to perform the edit. The basic method for performing each type of edit is the same, and
follows the three-point editing rules. Edits are placed on the target tracks.
Creating Sequences and Editing
171
The Canvas Edit Overlay
All edits in the Canvas can be performed using the edit buttons at the bottom of the Canvas
window. You can also drag clips directly into the Canvas video frame. When you drag a clip
into the video frame, an overlay appears with fields for each type of edit. You can then select
the desired edit type by dragging to it. The default is an overwrite edit.
To perform an edit in the Canvas:
1
Set the edit points for the clip in the Viewer, as explained in the previous section.
2
Follow the instructions for the desired edit type below.
To perform an Insert edit:
1
Position the Canvas playhead where you want the edit to occur.
2
Drag the clip from the Viewer to the Insert edit overlay or button in the Canvas.
Clips after the playhead position in the Canvas are moved forward in time to make room for
the clip being inserted.
Note: If you drag a clip into the Canvas, an overwrite edit is performed automatically.
172
Chapter 8
To perform an Overwrite edit:
1
Make sure In and Out points are not set in the Canvas.
2
Position the Canvas playhead where you want the edit to start.
3
Drag the clip from the Viewer to the Overwrite overlay or button in the Canvas.
The clip overwrites an amount of media after the playhead position equal to its In-Out point
duration. No material is moved to make room.
To perform a Replace edit:
1
Position the Viewer playhead on the frame you want to match with a frame in the Canvas.
2
Position the Canvas playhead on the frame you want to match with that selected in the
Viewer.
3
Drag the clip from the Viewer to the Replace overlay or button in the Canvas.
To replace a subsection of a clip:
m Set the Canvas In and Out points to that section of the clip.
If you have edit points specified in the Canvas/Timeline that you don’t need, press
Control-Shift-X to remove them. (In and Out points take precedence and can sometimes
result in an invalid edit.)
Replace editing ignores the In and Out points in the Viewer, and uses the In and Out
points for the sequence (in the Canvas and Timeline) to calculate how much material
from the Viewer should be added. If the sequence has no In and Out points, the clip
boundaries for the clip under the playhead in the Timeline are used.
To perform a Fit-to-Fill edit:
1
Set the In and Out points in the Canvas and Viewer to define the part of the sequence you
want to fill.
2
Drag the clip in the Viewer to the Fit-to-Fill overlay or button in the Canvas.
The material in the Viewer overwrites the material between the specified In and Out points
in the Canvas. If necessary, the speed of the material from the Viewer is changed to
compensate for any duration difference.
To perform a Superimpose edit:
1
Position the Canvas playhead or set In and Out points where you want the Viewer clip to
start.
2
Drag the clip from the Viewer to the Superimpose overlay or button in the Canvas.
Creating Sequences and Editing
173
The Viewer clip is placed on the track above the target track, starting at the playhead
location. The target track is not changed. If there is no track above the target track, another
one is created.
Insert with Transition editing:
m An Insert with Transition edit is exactly the same as an ordinary Insert edit, but it places
the default transition for the clip into the Canvas, at the beginning of the clip. This is a
quick way to include a frequently used transition in your sequences.
Overwrite with Transition editing:
m An Overwrite with Transition edit is exactly the same as an ordinary Overwrite edit, but it
places the default transition for the clip into the Canvas, at the beginning of the clip. This
is a quick way to include a frequently used transition in your sequences.
When using either of the transition edit types, make sure that there is enough source media
to create the transition. Each source clip must have additional frames outside the defined
edit points equal to half of the duration of the transition.
m Open the shortcut menu on the selected effect in the Browser and choose Make Default
Transition.
Note: When working with multiple windows in the Viewer, Timeline, Canvas, or Browser,
menu commands and keyboard shortcuts apply to the default, or labeled, window. To use
commands and shortcuts in other windows, you must drag the desired window to one of the
main labeled windows.
Editing in the Timeline
m Drag the clip into the Timeline. Final Cut Pro adds the clip to the Timeline where you
drag it in relation to the target tracks. This method performs either an Insert or Overwrite
edit, depending on where you drag the clip.
Drag the clip in the upper third of the track to perform an Insert edit. Drag the clip in the
lower two-thirds of the track to perform an Overwrite edit. The pointer changes to
indicate the type of edit, and the corresponding edit button is highlighted in the Canvas
window.
The smallest timeline track size performs an Overwrite edit by default. To perform an
Insert edit, hold down the Option key.
Note: When you drag multiple clips from the Browser to the Timeline, Final Cut Pro
places the clips in the Timeline based on the Browser sort order. Use this technique to
create a storyboard in the Browser and then drag all of the clips at once into the
sequence. If the Browser tab from which you drag the clips is in icon mode, the clips are
placed in left/right order, from top to bottom.
You can also perform all edits in the following ways:
m By loading a clip in the Viewer and clicking the edit buttons in the Canvas
174
Chapter 8
m Through keyboard commands. For more information, see Appendix C, “Keyboard
Shortcuts,” on page 339.
The Canvas Two-Up Display
When you drag a clip from the Browser onto a clip or transition in the Timeline, a two-up
display appears in the Canvas. This two-up display shows the frame just before your insert on
the left and the frame after your insert on the right. The clip name of the affected incoming
and outgoing clip appears at the top of each display. Each frame’s timecode appears at the
bottom of the display.
Marking Split Edits
A split edit, or an L-cut edit, is one where the video and audio edit points are in separate
positions. This is useful for editing clips with dialog where the clip’s audio might start or end
at a different time from its corresponding video.
Video In
Audio In
Video Out
Audio Out
To mark a split edit:
1
Open the clip in the Viewer. Play the clip or move the playhead to the desired position.
2
For each edit point you want to set, choose Mark Split from the Mark menu, and choose a
command from the Mark Split submenu.
You can also access these commands from the shortcut menu on the Scrubber bar in the
Viewer. The edit point is set at the position of the playhead, so you can open the shortcut
menu from anywhere on the Scrubber bar.
To move split edit points:
m Drag either the video or audio In or Out edit point to a new position. The other edit point
follows it.
By default, video or audio In or Out edit points move together.
To move split edit points together:
m Press Shift while dragging any of the edit points. All of the edit points move in unison.
The marked video and audio durations do not change, but the frames that are included in
the marked clip shift forward or backward.
Creating Sequences and Editing
175
To move only one edit point in a split edit:
m Press Option and drag the edit point for a video or audio track in the Timeline. A ToolTip
pops up as you drag to indicate the number of frames between the edit points.
The Scrubber bar in the Viewer updates to reflect the new edit points.
To remove a split edit point:
m Control-click the split edit point and choose an option from the pop-up menu.
Setting the Edit Points to the Current Selection
Use the Mark Clip and Mark Selection commands to set the sequence In and Out points to
the boundaries of either a single clip or a selection in the Timeline.
m Place the playhead over a clip in the Timeline, make sure that the track is the target track,
and choose Mark Clip from the Mark menu.
The sequence In and Out points are set to the boundaries of the clip.
m In the Timeline, select one or more clips, or part of a clip, and choose Mark Selection
from the Mark menu.
The sequence In and Out points are set to the boundaries of the selection. If linked
selection is on, linked audio is included in the selection, and a split edit is marked if the
audio and video are of different durations.
For more information about linked selection, see “Setting General Preferences” on
page 96.
Locating a Match Frame
Use the Match Frame command to quickly open a clip from the sequence in the Viewer and
position the playhead at the exact frame you are looking at. This is a useful way to find the
source video for a clip. The Match Frame command opens a copy of the source clip for the
frame at the playhead position on the target track. If you make changes to this clip, nothing
else in the project is affected.
To find a particular frame of video in a clip in the sequence:
1
Position the playhead in the Canvas or Timeline at the frame that you want to locate.
2
Set the target track to the track that contains the desired frame.
3
Click the Match Frame button in the Canvas.
You can also choose Match Frame from the Go To submenu of the Mark menu, or press F on
the keyboard.
The source clip (on disk) is opened in the Viewer with the In and Out points set. The current
frame in the Viewer matches the current frame on the target track in the Canvas.
176
Chapter 8
C H A P T E R
9
9
Working in the Timeline and Canvas
When you open a sequence, it is displayed simultaneously in the Canvas and the Timeline.
These two windows mirror one another, so that if you move the Timeline’s playhead, the
Canvas display changes accordingly. You can have multiple sequences in the Timeline. Each
sequence has its own tab in the header of the Timeline.
The video that is displayed in the Canvas is not the same as the video that is displayed in the
Viewer. You can double-click a clip in the Timeline to open a Viewer window for it, in which
case the Viewer Scrubber bar shows two lines of dots. If you change the clip, it may affect the
sequence. However, moving the Viewer playhead will not move the Canvas or Timeline
playhead, except when you move the playhead in the Filter or Motion tabs of the Viewer.
Opening the same clip directly from the Browser into a Viewer window opens a different
copy of the clip. Anything you do to a clip in this circumstance is not reflected in the Canvas.
The Timeline Window
The Timeline displays the layers of video and audio tracks in a sequence along a time axis.
You can use it for a variety of editing tasks.
For precision movement of clips, edits, or levels in the Timeline:
m Use “gear down” dragging by holding down the Command key while dragging an item.
177
Elements in the Timeline Window
Name
178
Chapter 9
Element
Function
Vertical
scroll bars
Scroll the video and audio tracks separately. Use the
thumb tabs between the scroll controls to create a
static area in the center of the Timeline. Drag the
thumb tabs up or down to define static track
boundaries. Defining static tracks allows you to
scroll through layers without losing view of your
base tracks. Use the center tab to move the static
area up or down in the window.
Timeline ruler
Displays the timecode for the current sequence as
well as the sequence In and Out points.
Playhead
Reflects the chronological position in the sequence
of the frame displayed in the Canvas. Dragging the
playhead scrubs through the sequence. Clicking in
the Timeline ruler moves the playhead to that
location. The playhead in the Timeline is equivalent
to the playhead in the Canvas. Both playheads move
in concert.
Current time
indicator
Indicates the position of the playhead. Entering a
timecode moves the playhead. This is analogous to
the playhead position timecode boxes in the Viewer
and Canvas.
Sequence tabs
Appear for each sequence opened in the Timeline.
Click the tab to make its sequence active.
Render Quality
pop-up menu
Switch between the available render quality
settings, which determine the video resolution and
other render options for the sequence. You can also
edit the render qualities.
Render
status bar
Indicates which parts of the sequence have been
rendered at the current render quality. Red
indicates that the area needs to be rendered.
Clips
Appear as solid bars or as video frames depending
on options specified on the Timeline Options tab in
the Sequence Settings dialog box. Clips that have
clip visibility turned off appear dimmed in the
Timeline. Clips on locked tracks are cross-hatched
in the Timeline.
Name
Element
Function
Link indicators
Appear as underlined names. They link up to one
video and two audio clips on separate tracks. When
one is selected, moved, or trimmed, items linked to
it are affected in the same way if the linked selection
preference is on.
Stereo pair
indicators
Appear as two triangles. They indicate that two
audio clips are linked as a stereo pair.
Out-of-sync
indicators
Appear as red rectangles to indicate the number of
frames that a clip’s video and audio tracks are out of
sync. If the selected track is ahead of its associated
video or audio, a + appears in the rectangle. If
behind, a – appears.
Target track
control
Indicates the target tracks (one video track and up
to two audio tracks) for certain edit operations.
Click the target track control to make a track the
target track. Many edit operations occur on the
target tracks at the position of the playhead.
Track visibility
control
Determines whether the contents of the track are
included in the sequence. When the track is
invisible, the contents remain in the Timeline, but
are not played or rendered with the sequence.
Invisible tracks appear dimmed in the Timeline.
Render cache files for a track are deleted if it is
made invisible.
Lock track
control
Sets a track so that its contents can’t be changed.
Locked tracks are cross-hatched in the Timeline.
Track size
control
Switches among the four track sizes in the Timeline
Clip keyframes
A filter bar is green and a motion bar is blue. They
toggle the display of filter and motion bars
underneath tracks, which indicate that effects or
motion have been applied to a clip, and where any
keyframes for filters or motion have been placed.
Working in the Timeline and Canvas
179
Name
Element
Function
Clip overlays
Toggles the display of opacity graphs that have been
applied to video clips and level graphs showing the
audio clips
Zoom control
Lets you zoom in and out on the contents of your
sequence in the Timeline
Zoom slider
Scales or scrolls the Timeline. Drag thumb controls
on either side to extend or condense the view of
the sequence in the Timeline. Drag the center slider
to scroll back and forth.
Colors of Items in the Timeline Window
The following colors can help you identify the various kinds of items in the Timeline window:
180
Chapter 9
Color
Item
Purple
Video sequences
Cyan
Video clips
Aquamarine
Video graphics
Green
Audio clips
Light green
Audio sequences
White
Offline video or audio clips
Customizing the Timeline Track Display
At the center of the Timeline window are the base layers of video and audio. Additional video
tracks extend upward, additional audio tracks extend downward. Audio tracks are one
channel. Stereo tracks from source clips are split with the left and right channels going into
two separate tracks.
Several options let you customize the appearance of tracks and clips in the Timeline.
m Video tracks can display clips as name (only), name and thumbnail frame, or filmstrip. All
video tracks in the sequence share the same display properties. If you are displaying the
Timeline in reduced track size view, you can’t see thumbnails.
m Audio tracks can be displayed in the Timeline with waveforms turned on or off and audio
tracks can be labeled as pairs or as sequential tracks.
m You can change the size of the tracks and toggle the display of keyframe details. These
options affect all tracks in the current sequence.
To modify the display of thumbnail images on video tracks for the current sequence:
1
When the Timeline or Canvas is active, choose Settings from the Sequence menu and select
the Timeline Options tab.
2
Select a thumbnail display option.
m Name: Displays the name of the clip and no thumbnail images.
m Name Plus Thumbnail: Displays the first frame of every clip as a thumbnail image and
then the name of the clip.
m Filmstrip: Displays as many thumbnail images as possible for the current zoom level of
the Timeline.
To modify the appearance of audio tracks for the current sequence:
1
When the Timeline is active, choose Settings from the Sequence menu and select the
Timeline Options tab.
2
Click the Show Audio Waveforms checkbox to toggle the display of waveforms for audio
tracks.
3
Select the style of audio track labels that you prefer. Paired is useful if you are working with
stereo audio tracks; sequential is useful if you are working with independent audio tracks,
such as dialogue.
To change the display of track details in the Timeline:
m Click the Track Size control located in the lower-left corner of the Timeline. This slider has
four positions corresponding to reduced, small, medium, and large track sizes.
m When the Timeline is active, choose Settings from the Sequence menu, select the
Timeline Options tab, and select the desired options.
Working in the Timeline and Canvas
181
To modify the time display in the Timeline:
m Choose a time display option from the Timeline ruler’s shortcut menu.
Timeline Scaling and Scrolling
Final Cut Pro provides various methods for viewing the contents of the Timeline.
m You can scale the view of the Timeline to see a representation of several minutes of
footage or a very small portion of the sequence, such as every single frame.
m You can quickly scroll to the desired section of the sequence in the Timeline.
Scaling the Timeline Display
Final Cut Pro provides several methods for scaling your view of the sequence in the Timeline.
m Use the Zoom tools or keyboard shortcuts to scale the view of the sequence by
incremental steps.
m Use the center Zoom control to scale the view.
m Use the Zoom slider, situated within the horizontal scroll bar, to scale the view of the
sequence.
To zoom the view of the Timeline, do one of the following:
m Choose Zoom In or Zoom Out from the View menu.
m Select the Zoom In or Zoom Out tool and click in the Timeline, or drag to select a
particular section to focus on. When the Timeline is zoomed in or out as far as it can go,
the plus sign (+) or minus sign (–) does not appear in the Zoom tool’s pointer.
m Drag either thumb control on the Timeline’s Zoom slider to the left or right.
Note: Press Option to toggle the current Zoom tool.
Positioning the Playhead in a Sequence
The playhead indicates the current sequence time when the sequence is playing or parked
on a frame. It always displays the sequence’s current frame in the Canvas window. While
working in Final Cut Pro, you are constantly moving the playhead to view certain frames in
the sequence, edit points, and markers.
The playhead ruler in the Timeline functions in the same way as the Scrubber playhead in
the Viewer and Canvas.
To move the playhead to a specific timecode location:
1
182
Chapter 9
Make sure the Canvas or Timeline is active. (If the Timeline is active, make sure that all clips
are deselected.)
2
Type a new timecode and press Enter.
The playhead moves to the new position in both the Timeline and Canvas.
For more information about timecode entry, see “Working With Timecode” on page 87.
To move the playhead to the closest previous or next edit, do one of the following:
m Click the Previous Edit or Next Edit button in the Canvas.
Final Cut Pro looks for the next or previous edit, In point, or Out point.
m Press the Up Arrow (previous) or Down Arrow (next) on the keyboard.
m Open the Mark menu and choose Edit from the Previous or Next submenu.
m Press Control-Shift-E (for the previous edit) or Shift-E (for the next edit).
The playhead moves in the desired direction and is positioned at the beginning of the edit. If
Show Overlays on the View menu is enabled, an icon appears in the lower left or right of the
Canvas window, indicating that you are on the first or last frame of the edit.
Working With Tracks in the Timeline
You can modify tracks in the Timeline to control how they are used in a sequence.
m Any track in the Timeline can be locked using the Track lock control, which means that
the items on the track cannot be modified, and nothing can be added to the track. This
lets you protect the track from accidental changes. Items on locked tracks are still
included in the sequence. All tracks in the sequence are unlocked by default.
m You can temporarily hide a track by clicking the track visibility control at the far left of a
track. If the track is made invisible, it acts as if it has been removed from the sequence—
its contents do not appear in the sequence when you play it. You can still edit invisible
tracks.
Note: Changing track visibility will cause a loss of any render files associated with the
track.
m You can also single out a track by making all of the other tracks in the sequence invisible.
This allows you to focus on the contents of a single track temporarily. You can single out
video and audio tracks separately.
m You can add or delete tracks in a sequence.
To single out a track for visibility:
m Press Option and click the Track Lock or Visibility icon.
The contents of all of the video or audio tracks except the selected one are hidden from
view in the Canvas.
Working in the Timeline and Canvas
183
To add tracks to a sequence:
1
Open the sequence in the Timeline.
2
Choose Insert Tracks from the Sequence menu.
3
Choose your options for inserting tracks:
m Video and audio tracks can be inserted independently. Click the checkbox to select track
types.
m Enter the desired number of tracks for either video or audio. Final Cut Pro supports up to
99 tracks for video and 99 tracks for audio.
m Choose Before Base Track to insert the desired number of tracks before the first track in
the Timeline.
m Choose After Target Track to insert the desired number of tracks after the last target track
for audio or after the current target track for video in the Timeline.
m Choose After Last Track to insert the desired number of tracks after the last track in the
Timeline.
4
Click OK to insert the tracks.
Note: You can add a track by dragging a clip to the area above the top video track or below
the bottom audio track. Or you can Control-click anywhere on the track header and choose
Add Track from the shortcut menu.
To delete tracks from a sequence:
1
Open the sequence in the Timeline.
You can delete the current target tracks or several empty tracks from a sequence. When
tracks have been deleted, remaining tracks in the sequence are renumbered.
2
184
Chapter 9
To delete a specific track, make that track the target track.
3
Choose Delete Tracks from the Sequence menu.
4
Choose your options for deleting tracks.
m Video and audio tracks can be deleted independently. Check the box next to Video or
Audio to select track types.
m Choose Current Target Track to delete the current target track in the Timeline.
m Choose All Empty Tracks to delete any empty track in the Timeline.
m Choose “All Empty Tracks at End of Sequence” to delete all empty tracks after the last
used track in the Timeline.
5
Click OK to delete the tracks.
Note: You can also Control-click any track header and choose Delete Track from the
shortcut menu. Choose Undo from the Edit menu immediately after deleting a track if you
want to restore the track.
Selecting Track Contents in the Timeline
The Track Selection tools provide many ways of selecting the contents of one or more tracks.
When selecting the contents of a track, remember that linked items on other tracks will also
be selected if linked selection is enabled. (See “Linked Selection” on page 188.)
After selecting the track contents, you can perform basic operations such as moving,
copying, or deleting them.
You can deselect an individual item by pressing Command and clicking the item.
To select all of the items on a single track:
m Choose the Select Track tool and click anywhere in the track.
Working in the Timeline and Canvas
185
To select all of the items on a single track forward or backward from the selected point:
1
Choose the Select Track Forward or Select Track Backward tool.
2
Click in the track on the first clip that should be included in the selection. The entire
selected clip plus all of the items in front of it or behind it are selected. These tools select
entire clips only; they do not make range selections.
To select all of the items on all tracks in the sequence forward or backward from the selected
point:
1
Choose the All Tracks Forward or All Tracks Backward tool.
2
Click a clip on any track that should be included in the selection. All of the contents of all
tracks from that point forward or backward are selected. These tools select entire clips only;
they do not make range selections.
Performing Editing Functions on Selected Track Contents
To remove selected items without changing the duration of the sequence:
m Press the Delete key.
To remove selected items and adjust the duration of the sequence:
m Press Shift-Delete.
m Choose Ripple Delete from the Sequence menu.
This removes the selected items and ripples the sequence to close gaps.
To apply a single filter to several clips:
m Select the clips and drag the filter from the Effects tab of the Browser to one of the clips.
Working With Markers in the Timeline and Canvas
You can add markers in the Timeline and Canvas. You can also edit markers by selecting them
and choosing Edit from the Markers submenu of the Mark menu.
Final Cut Pro has two types of markers:
m Clip markers appear on individual clips in the Timeline. For more information about clip
markers, see “Adding and Editing Markers” on page 151.
m Sequence markers appear on the Timeline ruler.
When working with sequence markers in the Timeline, you should not have any items
selected in the Timeline.
m If you open a clip from the Timeline in the Viewer, the clip’s markers appear in the
Scrubber bar. The sequence markers that fall within that clip appear in the ruler at the top
of the Viewer window in the Filter and Motion tabs.
186
Chapter 9
To add a marker to a sequence:
1
Make sure no items are selected in the Timeline.
2
Move the playhead to the location where you want to add a sequence marker.
3
Open the Mark menu and choose Add from the Markers submenu.
To position the playhead on a specific sequence marker:
m Control-click the Timeline ruler and choose the marker from the ruler’s shortcut menu.
The playhead moves to that marker’s position.
To move the playhead to the next or previous sequence marker:
1
Open the Mark menu and choose Marker from the Previous or Next submenu.
2
Press Option-M for the previous marker, or Shift-M for the next marker.
When you choose these commands in the Canvas or Timeline, they look for sequence
markers only.
To edit a sequence marker:
1
Control-click the Timeline ruler and choose the marker.
2
Open the Mark menu and choose Edit from the Markers submenu.
To extend a sequence marker:
1
Control-click the Timeline ruler and choose the marker.
2
Move the playhead to the desired location.
3
Open the Mark menu and choose Extend from the Markers submenu.
To delete a sequence marker:
1
Control-click the Timeline ruler and choose the marker.
2
Open the Mark menu and choose Delete from the Markers submenu.
Selecting Items in the Timeline
You can select clips, transitions, and edit points in the Timeline and perform complex editing
functions. You can also create, move, and delete keyframes displayed on the keyframe
overlays.
Note: If you display the selected clip in the Canvas, it appears with a cyan border around it.
These items can be selected in the Timeline:
m Clips, including multiple clips or range clips. For more information, see “Selecting Clips”
on page 188.
Working in the Timeline and Canvas
187
m Transitions, which can then be trimmed or deleted. For more information, see
Chapter 11, “Creating Transitions,” on page 211.
m Edits, which can then be modified in several ways. For more information, see “Trimming
Edits in the Timeline and Viewer” on page 206.
m Gaps, which can be closed or filled with media.
These items can’t be selected in the Timeline:
m Filter and motion bars and their keyframes: Double-click the clip to view filter and
motion details in the Viewer. Even though you can’t select the keyframes, you can move
them by dragging them.
m Overlay keyframes: These display opacity information for video clips, and level
information for audio clips. You can move these in the Timeline by dragging them. For
more information, see “Working With Keyframes in the Timeline” on page 195.
m Tracks: Although tracks can’t be explicitly selected, the contents of tracks can be selected.
For more information, see “Selecting Items Between the In and Out Points” on page 189.
Selecting Clips
You can select clips in the Timeline in different ways, depending on which tool is used.
m To select an entire clip, click it with the Arrow tool.
The Canvas indicates the selection by displaying a cyan border around the video.
m To select a portion of a clip, or a range of clips on a track, drag the Range Selection tool to
select the desired range.
m To select multiple whole clips, use the Group Selection tool to drag a marquee around all
of the desired clips. The entire clip does not need to be inside the marquee to be
included in the selection; any clip that is touched is included.
m Command-click to select clips with the Selection tool. This method allows you to select
multiple non-contiguous clips. Use the same keys to deselect a selected item.
Linked Selection
Linked selection tells Final Cut Pro to honor or ignore the status of linked clips for some
editing operations and when making selections.
When clips are linked, any action performed on one clip affects the other clips as well. For
example, deleting a linked clip will also delete clips it is linked to. When linked selection is
turned on, Final Cut Pro treats linked items as a single entity for most operations. When it is
turned off, linked items are treated as if they were not linked.
Note: If a linked item is on a locked track, it is not modified.
Final Cut Pro automatically links video and audio clips that originated from the same media
file. You can also link or relink audio and video clips together regardless of their origin.
188
Chapter 9
To link a group of unrelated clips:
m Select one video and up to two audio clips from different tracks in the Timeline and
choose Link from the Modify menu.
To turn linked selection on or off, do one of the following:
m Choose Linked Selection from the Sequence menu.
m Use the General tab of the Preferences window.
To select an item without selecting any that are linked to it:
m Hold down the Option key when you select the item.
To break links to items outside a selection:
m Select an item and choose Link from the Modify menu.
Selecting Items Between the In and Out Points
Use the “Select In to Out” command to select all of the items on the target track that fall
between the marked edit points. This command can select partial clips.
To select all items between the In and Out points:
1
Set the In and Out points in the Canvas.
2
Specify the target tracks.
3
Choose “Select In to Out” from the Mark menu.
To set In and Out points around a selected part of a sequence:
1
Use the Group Selection tool to select the desired clips (or use the Range Selection tool to
select a range within a single clip).
2
Open the Mark menu and choose Mark Selection.
The bounds of the selection become the In and Out points for the clip.
Moving Clips Into the Timeline
When moving a clip into the Timeline, the pointer changes to an edit pointer. Moving the
pointer to the upper or lower section of a track determines whether the clip will be inserted
or overwritten.
m When the pointer is in the upper portion of the track it displays a right arrow. If you
release the clip with the pointer in the upper section of the track, the clip will be inserted.
m When the pointer is in the lower portion of the track it displays a down arrow. If you
release the clip with the pointer in the lower section of the track, the clip will overwrite
material in the chosen location.
Working in the Timeline and Canvas
189
Moving Clips Within the Timeline
There are two methods of moving clips within a sequence:
m Drag the clip to a new position. You can move the clip to a new position on the same
track or to a different track, and you can do an Insert or Overlay edit to make room for
the clip.
Note: You can also make copies of clips by dragging them from the Timeline into the
Browser. Dragging multiple clips creates copies of each clip.
m Select the clip and enter a timecode to move the clip by that number of frames. There
must be a large enough gap to accommodate the new position of the clip. You cannot
insert or overlay a clip using this method.
To drag a clip to a new position:
m Select the clip and drag it to a new position.
If you hold down the Shift key when dragging a clip vertically to another track, it
maintains the exact time location in the Timeline.
Holding down the Option key while dragging a clip to a new position in the Timeline has
the following effects:
m When selecting a clip, hold down the Option key to toggle the link selection state on
or off.
m When dragging a clip with the Option key held down, the clip will be copied to the
new location.
m When dropping a clip into a new position, press the Option key to perform an Insert
edit.
To reposition an item in the Timeline by entering a timecode:
1
Select the clip.
2
Type the number of frames that the clip should move and press Enter.
As you type, a timecode field appears below the ruler. Use a positive number to move the
clip forward in time; use a negative number to move the clip backward.
Note: If the Slip tool is used, the clip slips in the direction indicated by the timecode.
For more information on entering timecodes, see “Working With Timecode” on page 87.
Note: This moves the item only if there is space for it to move.
Snapping in the Timeline
When snapping is on, a clip snaps to an edit point when dragged close to it. The playhead
snaps to edits, clip and sequence markers, and keyframes (if displayed) on all visible tracks.
190
Chapter 9
m When you drag a clip from the Browser or Viewer, both the In and Out points of the clip
can snap to an edit point.
m When you drag a clip from another Timeline tab, or move a clip within a Timeline tab,
Final Cut Pro snaps the In and Out points.
m When you drag the playhead, it snaps to items in the Timeline when it encounters them,
and a small arrow appears above or below the edit, marker, or keyframe to indicate that
the playhead has snapped to this item.
m You can also drag a marker to snap it to other items in the Timeline.
To turn snapping on, do one of the following:
m Choose Snapping from the View menu.
You can turn snapping off by choosing it again from the View menu.
m Click the Snapping checkbox in the General tab of the Preferences window.
To toggle snapping on and off on the fly:
m Press the N key while dragging.
Deleting Clips
Deleting in the Timeline follows the basic rule that if an item is selected, then that item is
deleted, but if no selection is made, then all material between the Timeline and Canvas In
and Out points is deleted on all unlocked tracks.
There are two types of delete operations in the Timeline:
m A ripple delete removes the item and ripples all unlocked tracks, if there is a gap.
m A lift (or “cut”) removes the item and leaves a gap in the track.
To delete a clip and ripple the sequence, do one of the following:
m Choose Ripple Delete from the Sequence menu.
m Choose Ripple Delete from the shortcut menu for the clip.
m Press Shift-Delete.
To delete a clip and leave a space in the track, select the clip and do one of the following:
m Press the Delete key.
m Choose Lift from the Sequence menu.
m Press Command-X.
Note: You can also choose Cut from the Edit menu to delete a clip and leave a gap. This
places the deleted item on the Clipboard so that you can paste it elsewhere.
Working in the Timeline and Canvas
191
Copying and Pasting Clips and Clip Attributes
You can copy and paste clips between two sequences or within the same sequence. Clips are
always pasted at the playhead position as an Overwrite edit, so the duration of the track
where the clip is pasted is not changed.
You can also paste the attributes of one clip onto another clip in the Timeline or Canvas. The
Paste Attributes command lets you paste some of the settings of a clip onto another clip
while leaving other attributes untouched. For example, you can apply the motion settings
from clip A to clip B without changing the video frames of clip B. Conversely, you can replace
the video frames of clip B without disturbing the filters that have been applied to it by
pasting only the contents of a clip.
Note: Pasting attributes in clips that have different frame rates will give you erratic results.
To copy and paste a clip into the Timeline:
1
Select the clip and cut or copy it to the Clipboard.
You can copy clips from multiple tracks by using the Group Selection tool.
2
Position the playhead where you want to paste the clip and choose Paste from the Edit
menu.
The clip overwrites the content at the playhead location in the target track. (Press Option
while pasting to insert the clip.)
To paste the attributes of a copied clip onto another clip:
1
Select a clip whose attributes you want to use and copy it to the Clipboard.
2
Select the clip that will inherit the attributes and choose Paste Attributes from the Edit menu.
If you paste into a sequence without selecting a clip in the Timeline or Canvas, the clip
contents are included in addition to the attributes you specify.
3
192
Chapter 9
In the Paste Attributes dialog box, select the attributes to apply to the selected clip. The
attributes you can paste are
m Scale Attribute Times: Shrinks or stretches the keyframes to fit into the duration of the
clip inheriting the attributes. If this option is not selected, the keyframes are cropped.
m Video Attributes: Determines which attributes of the video clip are pasted
m Content pastes the video frames only. If the content is pasted onto a selected clip, it is
cropped or lengthened to match the duration of the selected clip. The clip speed is
not affected.
m Basic Motion, Crop, Opacity, Drop Shadow, and Filters apply the parameter values and
keyframes you have set for each attribute.
m Speed applies the same speed settings.
m Capture Settings pastes all the capture settings that are logged with a clip (using the
settings in the Clip Settings tab in the Log and Capture window).
m Audio Attributes: Determines which attributes of the audio clip are pasted
m Content pastes the audio waveform only. If the content is pasted onto a selected clip,
it is cropped or lengthened to match the duration of the selected clip. The speed is
not affected.
m Levels and Filters apply the parameter values and keyframes you have set for each
attribute.
Modifying Clips in a Sequence
When a clip from the Browser or Viewer is added to a sequence, Final Cut Pro makes a copy
of the clip. Changes made to a clip in the sequence, such as motion effects, filters, and so on,
only apply to that copy of the clip. The version of the clip in the Browser or Viewer is
untouched.
To modify a clip in a sequence, open the clip from the Timeline by double-clicking it or
selecting it and choosing Clip from the View menu.
To set aside a copy of a clip that you have applied effects to after placing it in a sequence,
drag it back into the Browser. For more information, see “Using Clips in Sequences” on
page 143.
Making Individual Clips Visible or Invisible
Clips can be temporarily “switched off ” with the Clip Visibility command, which is similar to
the Track Visibility control in the Timeline. When clip visibility is turned off, the clip still
appears in the Timeline, but it is excluded from the sequence so it doesn’t appear in the
Canvas. You can still make modifications in the Timeline or Viewer to clips that have been
made invisible.
To make a clip invisible:
m Select it in the Timeline and choose Clip Visibility from the Modify menu.
The clip appears dimmed in the Timeline and the contents of the clip are never seen in
the Canvas.
Using Offline Clips
An offline clip is a placeholder for an actual media file. A clip is offline because it has been
logged but not yet captured, or because the actual media file has been moved or deleted.
You can also create an offline clip to use as a stand-in for media that is not yet available.
Working in the Timeline and Canvas
193
To create an offline clip:
m Choose Offline Clip from the New submenu of the File menu.
An offline clip is inserted into the Browser.
You can treat offline clips just like regular clips: you can set In and Out points, add
transitions and filters, rename them, and so on. Later, you can replace an offline clip by
recapturing it or relinking to the original source media. For more information, see
“Relinking Offline Files” on page 269.
Changing the Playback Speed of a Clip
Changing the playback speed of a clip extends or reduces a clip’s duration without losing any
content, and creates either a slow-motion or fast-motion effect. When you change the speed
of a clip, Final Cut Pro either duplicates or skips frames, forcing the clip’s movement to slow
down or speed up.
For example, if you create a slow-motion effect by setting a 1-minute clip to play back at 50
percent, Final Cut Pro duplicates frames so that the clip is 2 minutes long. If you increase the
clip’s speed by 200 percent, Final Cut Pro skips frames and makes the clip 30 seconds long.
Final Cut Pro can blend frames when a clip’s speed is changed to produce a smooth slowmotion or fast-motion effect.
If you change the speed of a clip that has been opened from within the Timeline, Final Cut
Pro performs a Ripple edit to accommodate the new duration of the clip.
Note: If you change the speed of a clip, it must be rendered before it can be played.
To change the playback speed of a clip:
194
Chapter 9
1
Select the clip in the Timeline.
2
Choose Speed from the Modify menu.
3
Select the desired speed options.
m You can modify the clip speed percentage, or the marked duration. Unmodified clips have
a clip speed of 100 percent. Changing clip speed or duration automatically changes the
other value.
m The Frame Blending option smoothes motion at slow or fast speeds.
m The Reverse checkbox makes the clip play in reverse.
4
Click OK.
m The clip will be resized based on original In and Out points.
Note: The Speed command acts on the entire clip, not on a selected range of a clip. If you
want to apply speed effects to only a portion of the clip, use the Razor Blade tool to divide
the clip into sections.
Working With Keyframes in the Timeline
Keyframes indicate that effects parameters are changing over time. Final Cut Pro has two
types of keyframes that can be displayed in the Timeline.
m Keyframes appear in the filter and motion bar beneath clips that have filter and motion
effects applied to them. Keyframes indicate where parameters change for filter and
motion effects. For each filter and motion parameter, you can select which keyframes to
display in the filter and motion bar.
m Keyframe overlays show clip opacity for video clips and volume level for audio clips.
The Timeline display of keyframes is useful for getting an overall idea of how effects are
changing over time and for aligning keyframes to each other. Because you can have hundreds
of keyframes in a sequence, this view is not ideal for adjusting keyframes on a detailed level.
For very fine control of keyframes, double-click the clip in the Timeline to open it in the
Viewer, then select the Filter or Motion tab. For more information, see “Using Keyframes to
Change Effects Over Time” on page 232.
Keyframes in the Timeline are very useful for linking up keyframes for other clips.
Displaying Keyframes in the Timeline
It is useful to view keyframes in the Timeline to compare how filters affect multiple clips in
the sequence. To view filter and motion keyframes, you display filter and motion bars in the
Timeline and then specify which keyframe parameters you want to view keyframes for, using
the shortcut menu for the filter or motion bar.
To display keyframes for individual effects parameters:
1
Use the Show Filter & Motion Bars button in the lower-left corner of the Timeline to show
filter and motion bars if they are not currently on.
Working in the Timeline and Canvas
195
2
Toggle the keyframe display by doing one of the following:
m Open the shortcut menu for the filter or motion bar.
This menu lists all of the parameters for each filter that has been applied to the clip.
Select the name of a parameter to toggle the display of its keyframes. Select the filter
name to toggle all of its parameters.
m Open the clip in the Viewer, find the effect in the list of filters or motion effects, and
toggle the keyframe display for each parameter by choosing it from the pop-up menu at
the right of the effect names.
To toggle the display of keyframe overlays in the Timeline for the current sequence:
m Click the Keyframe Overlays button in the lower-left corner of the Timeline.
Modifying Keyframes in the Timeline
Keyframes can be modified in a limited way in the Timeline. You can move effects keyframes,
but you can’t delete them or change their values. (Effects keyframes can be deleted only from
the Viewer.) You can add overlay keyframes directly in the Timeline, adjust their positions
and values, and also delete them. For information about modifying effects keyframes in their
viewer windows, see “Editing Keyframes in the Viewer” on page 234.
To move keyframes in the Timeline:
m Drag an effect keyframe left or right to move it to a new position in time.
m Press the Command key while dragging overlay keyframes to move them in time.
If snapping is on, the keyframe snaps to other keyframes and markers to help you align
keyframes to particular points in the sequence. To toggle snapping on and off on the fly,
press the N key while dragging a keyframe.
Adding and Adjusting the Values of Overlay Keyframes
Overlay keyframes display the opacity level of video clips and the volume level of audio clips.
The keyframes are right on the track, not below it, and the position of the keyframe on the
track indicates the keyframe’s value.
To add an overlay keyframe to a track:
m Select the Pen tool and click where you want to place the keyframe.
To adjust the values of individual overlay keyframes:
m Drag them vertically to adjust their values.
A ToolTip appears as you drag, displaying the parameter’s value.
To adjust the position of the graph line between two overlay keyframes:
m Shift-drag the line to the desired position.
196
Chapter 9
To delete overlay keyframes:
m Drag them off the track completely to delete them.
The keyframes (except for the last one) are removed and the keyframe path is adjusted to
reflect the change.
Searching for Items in the Timeline
Use the Find command to search for clip names, marker text, and clip timecodes in the
Timeline. You can search for items forward or backward. You can also search for and close
gaps in all tracks in a sequence or in individual tracks.
To search for text or timecode in the sequence:
1
Open the sequence in the Timeline.
2
Open the Edit menu and choose Find.
3
Choose the type of item to search for from the Search pop-up list.
m Names/Markers: Searches for the text in clip names, marker names, and marker
comments
m Timecode Options: Searches for any source or auxiliary timecode in a clip
4
Choose which tracks to search from the Where pop-up menu.
m All Tracks: Searches all tracks in the sequence
m Target Tracks: Searches only the current target tracks
m From In to Out: Searches between the sequence In and Out points on all tracks
5
Click Find to find the item. Final Cut Pro finds all items that match the selected criteria. It
searches from the current position of the playhead until the end of the sequence.
Note: The Find feature searches for items that begin on or after the position of the
playhead. It does not find clips that begin before the position of the playhead, nor does it
wrap around to the beginning of the sequence. To find every occurrence of an item, position
the playhead at the start of the sequence.
6
Click Find All to find all occurrences of clips that match the search criteria.
m All clips that are found are selected in the Timeline.
m When a marker is found, the playhead is positioned on the marker. To view the contents
of a clip marker, double-click the clip to open it into the Viewer and then open the marker
from the Viewer.
To cycle through items in the Timeline that match the criteria:
m After specifying the Find options, open the Edit menu and choose Find Next. You can also
press the F3 key.
Working in the Timeline and Canvas
197
To search for an item backward from the position of the playhead:
m After specifying the Find dialog box options, press Shift-F3.
Finding and Closing Gaps
There are gaps and track gaps. Gaps are empty spaces in time in a sequence on all unlocked
tracks. Track gaps are empty spaces in time in sequences on individual tracks. Many
operations such as Ripple Delete only work with gaps, not track gaps. To close track gaps,
you may need to lock the other tracks that contain clips where the track gap occurs.
To find gaps in a sequence:
m Make the sequence active and choose Gap from the Next or Previous submenu of the
Mark menu.
The playhead moves to the beginning of the first gap found. (A gap appears on all tracks
in the sequence.)
To close a gap, do one of the following:
m Position the playhead anywhere within the gap and choose Close Gap from the Sequence
menu.
m Select the gap and press Delete.
To find track gaps in the sequence:
1
Determine the track on which you want to search for track gaps and make it the target track.
2
Open the Mark menu and choose Track Gap from the Next or Previous submenu.
The playhead moves to the beginning of the first track gap found.
To close a track gap:
m Position the playhead anywhere within the gap and choose Close Gap from the Sequence
menu.
m Open the shortcut menu over the gap and choose Close Gap.
m Select the gap and press the Delete key.
Note: Sometimes a gap can’t be closed because clips on other tracks can’t move back. If it is
not possible to close the gap, this command is dimmed.
To close a track gap without affecting any other tracks in the sequence:
198
Chapter 9
1
Press Option while clicking the Lock Track control. This singles out the selected track.
2
Position the playhead anywhere within the gap and choose Close Gap from the Sequence
menu.
3
Press Option while clicking the track label again to lock the other tracks.
Making Still Frames From Clips in the Canvas
You can make a still image from the current frame in the Canvas and edit it into a sequence.
To make a still image from a canvas frame:
1
Position the playhead on the desired frame.
2
Open the Modify menu and choose Make Still Frame.
The new still image has the default duration as specified in the General tab of the
Preferences window for stills. It opens in the Viewer window.
Note: If you want to make this image into a file, you need to export it using the Export
command in the File menu.
Correcting Clips That Are Out of Sync
Linked items are selected and move together. If linked selection is off, it is possible to move
an item out of sync. When a clip is out of sync, a red box appears on the clip, indicating the
number of frames that the clip has moved out of sync.
You can move a clip into sync, which repositions the clip so that the sync is corrected. You
can slip a clip into sync, which corrects the sync problem by performing a slip edit on the clip
(keeping the clip in the same position and shifting the contents of the clip). You can also
mark a clip in sync if the sync does not need to be corrected and you don’t want to be
warned of the sync problem.
For more information about slip editing, see “Trimming Edits” on page 201.
To move a clip into sync:
m Open the shortcut menu on the out-of-sync indicator (the red box on the clip) and
choose “Move into Sync.”
Note: You can only move a clip into sync if a gap exists.
To slip a clip into sync:
m Open the shortcut menu on the out-of-sync indicator (the red box on the clip) and
choose “Slip into Sync.”
To mark a clip in sync:
m Select the clip or clips in the Timeline and choose “Mark in Sync” from the Modify menu.
Working in the Timeline and Canvas
199
C H A P T E R
10 Trimming Edits
10
Accessing Trimming Functions
You can trim edits in the Trim Edit window, the Timeline, and the Viewer. Each way of
trimming offers different capabilities so that trimming a single edit or several edits is flexible
and fast.
m For very precise control when trimming, use the Trim Edit window. It displays both sides
of the edit—the outgoing clip and the incoming clip—and lets you refine an edit by one
frame or many.
m Use the Timeline to perform any trimming actions, either quickly or very precisely. When
the Timeline is zoomed out, you can modify edits quickly with trimming tools or by
adding or subtracting frames. By zooming in, you can get very fine control of trimming.
m To make simple adjustments to a clip in the sequence, open it into the Viewer.
m Click the Edit Selection tool in the Tool palette and drag a marquee around a group of
edit points (one per track). Then open the Trim Edit window to edit all of them.
Using Trimming Functions With Linked Selection and Snapping
When you select an edit point to trim, remember that edit points of linked items are also
selected if linked selection is on. If you find that you can’t trim an edit point, there may be
conflicts on other tracks.
If you turn snapping on and drag an edit point in the Timeline or Viewer, the edit point will
snap to markers, keyframes, the playhead, and edit points on other tracks. This helps to line
up edits with other items in the sequence. To toggle snapping on and off on the fly, press the
N key while dragging edit points.
201
Types of Trimming Operations
Tool Name
202
Chapter 10
Icon
Function
Ripple
Use the Ripple tool to perform a Ripple edit. A Ripple edit affects
the overall duration of the sequence. Clips that are to the right of
the edit on other unlocked tracks move to accommodate the
change and maintain sync in the sequence. The In and Out points
of clips can be rippled.
Roll
Use the Roll tool to roll the selected edit. A Roll edit affects the
two clips that share the edit point. The overall duration of the
sequence is unchanged, but the Out point of the first clip and the
In point of the second clip are moved together.
Slip
Use the Slip tool to change a clip’s In and Out points
simultaneously while maintaining the clip’s duration.
Surrounding clips are not affected. You can slip a clip in the
Timeline or slip either clip displayed in the Trim Edit window.
Slide
Use the Slide tool to move a clip in the sequence, performing a
Roll edit on the clips surrounding it (the Out point of the clip
before the sliding clip is modified; the In point of the clip after
the sliding clip is modified). A slide operation can be performed
in the Timeline only, and can only be performed within the limits
of the clip’s media duration (as opposed to the In-Out point
duration).
Group Selection
Use the Group Selection tool to resize a clip in the Timeline by
dragging an edit point. You can drag the edit point to create a gap
(by making the duration of the clip smaller) or to cover an
existing gap. In the Viewer, the group selection tool is current by
default. The group selection tool always does a Ripple edit when
you drag an edit point of a clip in the Viewer.
Selecting One or More Edit Points in the Timeline
Whether you want to trim an edit directly in the Timeline or in the Trim Edit window, you
need to select one or more edits in the Timeline first. By using a trimming tool to select the
edit, you can also define the type of trim to perform at the same time. You can select only
one edit per track.
To select one or more edits:
m Use the Edit Selection tool to draw a marquee around the edit point of one or more
tracks. As you drag in the Timeline, this tool selects one edit point per track. The edits
don’t have to be aligned in time. When you release the mouse button, the Trim Edit
window opens.
m Use the Arrow tool and click the edge of the clip. Press Command-7 or Control-7 to select
multiple edits.
Note: If you are zoomed out too far, it may be very difficult to select the edit. Use the Zoom
slider to get a more detailed view and select the edit again, or switch to the Ripple or Roll
tool, which are more sensitive to the edit points.
To select one or more edit points and assign the editing mode:
When you select an edit point with the Ripple or Roll tool, you also specify the type of trim
operation to be performed. When using a Trim tool to select an edit, you cannot accidentally
select a clip. Only edit points can be selected with Ripple and Roll tools.
m Use the Ripple or Roll tool and click the edge of the clip.
m Press Command-7 or Control-7 to select multiple edits in the Timeline and identify them
as ripple or roll trimming operations.
m This image indicates a Roll edit.
m This image indicates an incoming Ripple edit.
m This image indicates an outgoing Ripple edit.
Trimming Edits
203
Using the Trim Edit Window
You can trim one or more edits very precisely by using the Trim Edit window. This window
gives a close-up view of all the trimming functions you can use in the Timeline. You can
modify the selected edit by one frame or several frames, quickly switch between Ripple and
Roll edits, and play the edit back to make sure it is correct.
The play controls on each side of the Trim Edit window are for viewing only. They don’t
change the position of any edit.
The multi-frame trim buttons can be configured to trim a different number of frames.
Clicking these buttons adds or subtracts frames from the duration between the In and Out
points. The –1 and +1 buttons cannot be modified. Values for the –5 and +5 buttons can
be modified in the General tab in the Preferences window.
For more information, see Chapter 4, “Preferences and Presets,” on page 95.
To open the Trim Edit window, do one of the following:
m Press Command-7.
The playhead jumps to the closest edit on the target track and the Trim Edit window
opens. The edit is selected as a roll.
m Click the edit in the Timeline with the edit selection tool. The Trim Edit window opens
automatically.
m Choose Trim Edit from the Sequence menu.
204
Chapter 10
m Double-click an edit.
To close the Trim Edit window, do one of the following:
m Move the playhead in the Timeline or Canvas away from the edit.
m Click anywhere in the Timeline away from an edit to deselect all edits in the Timeline.
m Close the Trim Edit window.
Trimming in the Trim Edit Window
Use the Trim Edit window to trim one edit or multiple edits at one time. When trimming
multiple edits at once, you can perform different edits on each of the edit points. If you
change the edit type in the Trim Edit window, this change affects all selected edit points.
1
Select one or more edit points to trim.
m If you used the Edit Selection tool, the Trim Edit window opens automatically.
m If you used any other tool to select edits, open the Trim Edit window by double-clicking
an edit or pressing Command-7.
2
In the Trim Edit window, select the type of trim operation by positioning the pointer over the
video. The pointer changes to indicate whether you have selected Ripple Left, Roll, or Ripple
Right.
3
Do any of the following to trim the edit:
m Use the trim buttons to add or subtract frames from the edit points.
m Use the playback controls for the clip in either video window to play the clip and set new
In and Out points.
m Add or subtract frames by typing + or – and the number of frames to add or subtract.
Then click Enter.
m Drag an edit point in the Scrubber bar. The In Shift and Out Shift fields update to show
the number of frames modified in the edit.
4
If trimming multiple edits, choose the track you want to view during the edit operation from
the pop-up list of tracks. The frames from that track appear in the display.
5
Use the transport controls to review the changes.
m Click the “Play In to Out” button to play both clips from beginning to end.
m Click the Play Around Current button to play the edit with pre- and post-roll and loop.
m Click the Stop button to stop playback and position the playhead on the edit point.
6
To trim another edit on the same track, use the Previous and Next Edit buttons to move to
the next edit on the current track. You can also select one or more edits in the Timeline and
then go back to the Trim Edit window to perform additional trim operations.
Trimming Edits
205
7
When you are finished trimming, move the playhead off the edit point in the Canvas or
Timeline, or click in the Timeline to deselect all edits. The Trim Edit window closes. You can
also close the Trim Edit window.
Slipping an Edit in the Trim Edit Window
You can slip either clip displayed in the Trim Edit window. A slip edit changes the clip’s In
and Out points simultaneously while maintaining the clip’s duration. Surrounding clips are
not affected.
To slip an edit in the Trim Edit window:
1
Select an edit and open the Trim Edit window. (Press Command-7 or double-click the edit.)
2
Shift-drag the active edit point on either Scrubber bar to slip that clip. You can also drag the
edit point with the Slip tool.
As you drag, the display changes to show the In and Out point frames for the clip you are
slipping.
3
Release the mouse button to complete the slip edit.
The display changes back to the frames at the current edit point.
Trimming Edits in the Timeline and Viewer
You can perform many trim edits in the Timeline or Viewer.
To trim in the Timeline, use a trim tool to select an edit point. The selection determines the
type of trim operation that will be performed on that edit point. You can do all types of trim
edits in the Timeline: ripple, roll, slip, slide, and resize.
To trim in the Viewer, open the clip in the Viewer and change an In or Out point. The Viewer
can accommodate three types of trim operations: ripple, roll, and slip. To do any of these
edits, you must open the clip from the Timeline into the Viewer. If the clip has been opened
from the Browser, you cannot trim it.
Note: You can cancel an edit at any time by pressing the Esc key while the timecode field is
visible. You can also undo an edit at any time by dragging a selected track up or down in the
Timeline and reverting to a zero offset.
Performing a Ripple Edit
Use the Ripple tool to perform a ripple on the selected edit. A Ripple edit affects the overall
duration of the sequence. Clips that are to the right of the edit on other unlocked tracks
move to accommodate the change so that sync is maintained in the sequence.
206
Chapter 10
To perform a Ripple edit in the Timeline:
1
Select the Ripple tool.
2
Select the edit by clicking near the edge of the clip. If linked selection is on, the edit points of
linked clips are also selected.
3
Ripple the edit using one of the following methods:
m Drag the edit to lengthen or shorten the clip in the sequence.
m Type the number of frames you want to add to or subtract from the current In or Out
point. (Use the + or – key followed by the number of frames to add or subtract, then
click Enter.)
To perform a Ripple edit in the Viewer:
1
Open the clip in the Viewer by double-clicking it in the Timeline.
2
Select the Ripple tool.
3
Drag the In or Out point to ripple the clip.
As you drag, the Viewer displays the Out point of the outgoing clip; the Canvas displays the
In point of the incoming clip.
Tips for rippling edits:
m If you lengthen the clip, clips on the same track move forward in time. Clips on other
unlocked tracks that begin after the playhead point also move forward in time.
m If you shorten the clip, clips on the same track move backward in time, as do clips after
the playhead position on other unlocked tracks.
m If you can’t ripple backward, it is because clips on other tracks can’t move back in time
without bumping into other clips.
m If you don’t want a Ripple edit to affect another track in the sequence, lock that track.
Locked tracks do not ripple.
m To ripple across multiple tracks simultaneously, press Command or Control to select
multiple edit points, then use the Ripple tool to perform the Ripple edit across all of the
tracks.
Note: The Shift key toggles between the Ripple and Roll tools.
Performing a Roll Edit
Use the Roll tool to roll the selected edit. A Roll edit affects the two clips that share the edit
point. The overall duration of the sequence is unchanged. When the Roll tool is active, you
can roll an edit directly in the Timeline or open the clip in the Viewer and adjust its In and
Out points.
Trimming Edits
207
To perform a Roll edit in the Timeline:
1
Select the Roll tool.
2
Select the edit point. If linked selection is enabled, the edit points of linked clips are also
selected.
3
Roll the edit using one of the following methods:
m Drag in either direction.
As you drag, the Canvas displays the Out point of the outgoing clip on the left and the In
point of the incoming clip on the right.
m Type the number of frames you want to add to or subtract from the current edit point.
(Use the + or – key followed by the number of frames to add or subtract, then press
Enter.)
To perform a Roll edit in the Viewer:
1
Open the clip in the Viewer by double-clicking it or select it and choose Clip from the View
menu.
2
Select the Roll tool.
3
Drag the In or Out point to roll the edit.
Tips for rolling edits:
m If you can’t drag any further during a Roll edit, you have reached the end of the media.
m To roll multiple tracks simultaneously, press the Command key to select multiple edit
points, then use the Roll tool to perform the Roll edit across all of the tracks.
Slipping a Clip
Use the Slip tool to change the clip’s In and Out points simultaneously while maintaining the
clip’s duration. Surrounding clips are not affected.
To slip a clip in the Timeline:
208
Chapter 10
1
Select the Slip tool.
2
Select the clip and drag it left or right. As you drag, an outline of the clip appears, indicating
the amount of media available. The Canvas displays the In point frame and the Out point
frame.
To slip a clip in the Timeline using numerical timecode entry:
1
Select the Slip tool.
2
Select the clip in the Timeline.
3
Type + or – and the number of frames to slip, then click Enter.
To slip a clip in the Viewer:
1
Open the clip in the Viewer by double-clicking it or select it and choose Clip from the View
menu.
2
Do one of the following:
m Select the Slip tool and drag one of the edit points.
m Press Shift and drag one of the edit points.
Sliding a Clip
Use the Slide tool to move a clip in the sequence, performing a Roll edit on the clips
surrounding it. The Out point of the clip to the left of the sliding clip is modified; the In
point of the clip to the right of the sliding clip is modified. A slide operation can be
performed in the Timeline only.
To slide a clip in the Timeline:
1
Select the Slide tool.
2
Select the clip and drag it left or right.
As you drag, the Canvas displays the Out point frame of the clip to the left of the sliding clip
and the In point frame of the clip to the right of the sliding clip.
To slide a clip in the Timeline using numerical timecode entry:
1
Select the Slide tool.
2
Select the clip in the Timeline.
3
Type + or – and the number of frames to slide, then click Enter.
Changing the Duration of a Clip
The Selection tool lets you change the duration of a clip in the Timeline by dragging an edit
point.
To resize the duration of a clip in the Timeline:
1
Select the Arrow tool.
Trimming Edits
209
2
Select an edit point and drag it.
You can drag the edit point to create a gap (by making the duration of the clip smaller) or to
cover an existing gap. You cannot do a Ripple or Roll edit with the Selection tool in the
Timeline.
You can change the duration of a clip in the sequence by extending its Out point.
To extend the duration of an edit:
1
Select the edit in the Timeline.
2
Move the playhead to the position that the edit will extend to.
3
Choose Extend Edit from the Sequence menu, or press the E key.
The selected edit is rolled over any gaps or clips that are encountered, up to the position of
the playhead. The edit can only be extended to the length of the clip’s media. If there is not
enough media, an alert sounds and the clip is extended as far as possible.
Understanding Error Messages When Trimming
If you try to perform a trimming operation that is not possible, Final Cut Pro displays an error
message.
m You cannot set the In point later than a disabled Out point: When you set an In/Out
point in the source clip in the Trim Edit window, In points cannot be placed beyond an
Out point. Likewise, Out points cannot be placed before an In point.
The following messages include the track number where the error occurs:
m Clip Collision: A trimming operation would cause clips to collide or overwrite another.
m Transition Conflict: A transition would have to change its duration to accommodate the
trimming change.
m Media Limit: There is not enough media in the source clip to change the edit.
210
Chapter 10
C H A P T E R
11 Creating Transitions
11
The simplest transition between two clips is a cut, in which a clip begins immediately after
the previous clip ends. You create a cut by arranging two clips tail to head on the same video
track in the Timeline.
To create more elaborate transitions between clips, such as fading in one clip over another
(dissolve), or revealing the frames of the next clip through a selected pattern (irises and
wipes), you can use one of the more than 50 transition effects included with Final Cut Pro.
For information about changing effects settings, see Chapter 12, “Compositing and Special
Effects,” on page 219. For descriptions of the transition effects, see Appendix B, “List of Audio
and Video Effects,” on page 325.
Adding Transition Effects
You add transition effects between two adjacent clips in the same video track in the Timeline.
You can add transition effects when editing a clip into a sequence or after a clip has been
edited into a sequence. For information on adding a transition effect as you edit a clip into a
sequence, see “Performing Edits in the Canvas” on page 171.
You can place a transition so that it is centered on the cut, starts at the cut, or ends at the cut.
When adding a transition effect as you edit a clip into a sequence, the transition is centered
on the cut between the two clips. If you want a transition effect to either start or end at the
cut, you have to add the transition after the clips are placed in the sequence. You can also
edit the transition in the Transition Viewer after it has been placed.
Note: When you add a transition effect, the two clips on either side of the cut must have
enough material in the source media for Final Cut Pro to create the effect.
To add a transition effect that is centered on a cut:
1
Align two clips in the same track sequentially so that their edges meet.
2
Select the edit point between the two clips by doing one of the following:
m With the Arrow tool, click a cut in the video track and choose a transition effect from the
Video Transitions submenu in the Effects menu.
211
m Drag a transition effect from the Effects tab in the Browser onto the cut, centering it over
the cut.
m Open the shortcut menu over the cut and choose Add Transition to add the default
transition.
To add a transition effect that starts or ends at a cut:
m Drag a transition effect from the Effects tab in the Browser onto the cut, aligning it so that
it starts or ends at the cut.
To set the default transition effect:
m Open the shortcut menu on a transition effect.
m Choose Set Default.
To clear the default transition effect:
m Choose Clear Default from the Effects menu.
To apply the default transition effect:
m Select the edit point where you want to place the transition and choose the default
transition from the Effects menu.
m Open the shortcut menu on the edit point and choose Add Transition.
To delete a transition from a sequence:
m Select the transition and press the Delete key.
Changing Transition Settings
Once you have added a transition to a sequence, you can modify the settings of the transition
to customize its appearance. Most transitions have controls that let you add a border to a
transition, set the width and color of the border, reverse the effect’s direction, and specify
the center of the effect, among others. These controls are explained in the section “Setting
Effects Parameters” on page 220.
Using the Transition Viewer to Change Settings and Edit Transitions
You change settings for transitions in the Timeline by opening them in the Transition Viewer.
All Final Cut Pro transitions let you set the starting and ending percentages of the effect. This
is the percentage of the total transition effect over time that is applied to the clips. This is
different from the amount of media over which the transition is applied (its duration).
212
Chapter 11
The starting percentage determines the point where the transition process begins, and the
ending percentage determines the point where the transition stops. The default is a starting
percentage of 0 percent and an ending percentage of 100 percent, which encompasses the
whole transition effect. If, for example, a transition involves a colored vertical bar moving
from far left to far right across the video frame, setting the starting percentage to 50 percent
begins the effect with the bar at the center. Setting the ending percentage to 100 percent
ends the transition with the bar at the far right.
To change the settings for a transition:
1
Do one of the following:
m Double-click the transition in the Timeline to open the Transition Viewer.
m Select the transition’s icon in the Timeline and choose Transition Editor from the View
menu.
m Choose Open from the shortcut menu for the transition in the Browser (before it is
applied to a sequence) or the Timeline.
2
To change the starting and ending effect percentages, drag the Start and End sliders or type a
percentage in the text boxes.
3
To change the direction of the effect, click the Reverse button.
Creating Transitions
213
4
To have the transition center on, begin on, or end on the edit, click the corresponding
placement button at the top center of the Transition Viewer.
End on
Begin on
Center on
5
Make other settings as desired for the transition. For more information, see “Setting Effects
Parameters” on page 220.
Trimming and Moving Transitions in the Viewer
Once you’ve placed a transition effect in a sequence, you can move and trim it in the Viewer.
You can trim a transition by specifying a new duration or by dragging either end of the
transition to lengthen or shorten it. When specifying a new duration, Final Cut Pro moves
both ends of the transition effect by extending it from its center. You can only extend or
move a transition if the clip contains enough source media.
When you trim and move transitions in the Viewer by dragging, the Canvas displays one
frame from the incoming clip and one frame from the outgoing clip. The name of each clip is
at the top of each display and the Out and In timecode for each frame is visible at the bottom
of each display.
Icons at the ends of the clips in the transition viewer indicate which frames are currently
displayed in the Canvas. The first icon indicates the frame on the right side of the Canvas,
and the second indicates the frame on the left side of the Canvas.
214
Chapter 11
When you trim either the In point or the Out point of the transition, the Canvas displays the
frames of each clip where the transition effect is starting or ending. When you move a
transition by dragging, the Canvas displays the frame of the outgoing clip where the
transition effect ends and the frame of the incoming clip where the transition effect begins.
Trimming or Performing Ripple and Roll Edits on Transitions
To change the duration of a transition in the Viewer:
1
Enter a new duration in the Duration field or position the pointer at either end of the
transition.
2
When the pointer changes shape to a resize cursor, drag the end of the transition.
Shift-drag to move both ends of the transition simultaneously.
To perform a Ripple edit on a transition in the Viewer:
1
Place the pointer below the leading edge or above the trailing edge of the transition.
2
When the pointer changes to the Ripple tool, drag the transition in the edit.
To perform a Roll edit on a transition in the Viewer:
1
Place the pointer anywhere on the transition.
2
When the pointer changes to the Roll tool, drag the transition in the edit.
Creating Transitions
215
Modifying Audio Transitions
Final Cut Pro includes two audio cross-fade transitions. The first is a 0 decibel cross-fade. This
transition fades the first clip out, while simultaneously fading the second clip in. This effect
applies a linear ramp to the volume level. The second is a +3 decibel cross-fade. This
transition performs the same operation as the 0 decibel cross fade, but applies an
exponential, equal-power ramp to the volume level.
Control-click an audio transition to access a shortcut menu that contains the two cross-fade
transitions and the duration of the transition. You can apply either cross fade or you can
modify the duration for the audio transition.
For more information about audio transitions, see Appendix B, “List of Audio and Video
Effects,” on page 325.
Saving Transition Settings by Creating a Favorite Transition
You can save the transition settings you’ve specified so that you can use the same transition
again without having to remember or note settings. This is also an effective method for
changing the default settings for a transition. You create another instance of the transition
with the settings you’ve specified. The new transition is saved in the Favorites bin on the
Effects tab and appears in the Favorites submenu. You can also rename the new transition.
You can create a favorite transition by saving the settings of a transition in a sequence, or by
dragging a transition into the Favorites bin on the Effects tab and then modifying its settings.
To create a favorite transition by saving its settings:
1
Make the desired changes to the settings of a transition.
2
Do one of the following:
m Choose Make Favorite Effect from the Modify menu.
m Drag the transition icon in the Viewer to the Favorites folder on the Effects tab in the
Browser.
To create a favorite transition before changing its settings:
216
Chapter 11
1
In the Effects tab in the Browser, find the transition that you want to use and drag it to the
Favorites bin.
2
Open the Favorites bin and double-click the transition.
3
Make changes to the settings and close the Viewer.
4
Rename the new transition in the Favorites bin.
m You can also select the transition in the Browser and choose Duplicate from the Edit
menu. A copy of the transition appears in the Favorites submenu of the Effects menu.
Previewing Transitions
You can preview a transition effect in the Canvas by placing the playhead in the Viewer within
the area covered by the transition. As you change transition settings, Final Cut Pro changes
the previewed effect in the Canvas as the playhead is stationary.
Viewing a Transition in the Canvas
You can view a transition or other effect a frame at a time in the Canvas by pressing the Right
Arrow key to move the transition forward and the Left Arrow key to move the transition
backward. This gives a slow-motion view of the transition.
You can disable this view by pressing the Caps Lock key.
Rendering Transitions
If you want to play a transition in the Canvas, you must render it first.
To render a single transition:
1
Select the transition.
2
Choose Render Selection from the Sequence menu.
Creating Transitions
217
C H A P T E R
12 Compositing and Special Effects
12
You can use Final Cut Pro to add many effects to video and audio, and to create unique
composite effects by altering the layers of video.
Locating and Applying Effects
You can locate and apply effects in the following ways:
m Select them from the Browser’s Effects tab and drag them onto clips.
m Select a clip and then choose an effect from the Effects menu.
m Use the Motion tab in a clip’s Viewer window to turn on and set the motion effects.
m Select a saved motion from the Favorites folder in the Effects tab of the Browser.
The motion effects that you set from the Motion tab are not available in the Effects menu.
Note: You can open a Viewer window for a previously applied effect by double-clicking the
Timeline’s filter and motion bar in the clip where the effect was applied.
Using the Viewer Effects Tabs
When you apply effects to clips, you set their parameters using the Effects tabs in the Viewer.
There are three Effects tabs. You can turn an effect on or off using the triangle next to its
name.
The Filters Tab
Use the Filters tab to work with the filters you have applied to a clip.
The Motion Tab
Use the Motion tab to work with the basic motion effects that are applied to every clip by
default.
The Audio Tab
Use the Audio tab to work with the level and pan or spread for a clip.
219
Setting Effects Parameters
When you apply an effect to a clip, you can set parameters to fine-tune it. You can view and
change an effect’s parameters within a clip by clicking the Audio, Filters, or Motion tab in a
clip’s Viewer.
There are several types of effects parameters:
m Slider controls: Some of these are logarithmic, rather than linear, and vary depending on
the type of setting. You can also click the arrows at either end of a slider to change the
setting at single increments.
m Rotation and Angle controls: Set these by moving the needle to the desired angle.
m Point Control: Use this to choose pixel locations. The coordinates are x and y
parameters.
m Color Selector: Use this to select colors for borders, tints, and other colored effects.
m Text Entry: Use this with a generator effect to enter the text to be generated.
m Clip Control: Drag a clip to this box if you want to use the clip’s content to affect the
filter. (The way the filter is affected depends on the filter.) The Clip Control box looks like
this:
This is the equivalent control to the Layer pop-up control in Adobe After Effects.
Other effects settings can be chosen using checkboxes, pop-up menus, or buttons.
To reset the parameters for an effect:
m Click the Reset button in the Viewer tab for the effect.
Using Video Filters
Final Cut Pro includes more than 50 video filters that you can use to create special effects,
transitions, color corrections, and more. See Appendix B, “List of Audio and Video Effects,”
on page 325 for a list of the effects that can be created with the included video filters. Most
video filters can be changed over time with keyframes, letting you animate the intensity of an
effect. You can also save the settings of a filter as a Favorite with the Make Favorite command
so that you can use it again without having to specify filter settings.
In a few cases, alpha channels may have an effect on filters, especially when transitioning
between composite modes. See “Using Alpha Channels” on page 239.
220
Chapter 12
Final Cut Pro supports three types of effects. The Final Cut Pro FXScript architecture includes
video effects for transitions, filters, and generators. QuickTime 3.0 filters are also recognized.
In addition, Final Cut Pro works with many After Effects third-party filters. Not all of these
plug-ins, however, are certified for use with Final Cut Pro. For more information about After
Effects third-party filters, see “Using After Effects Third-Party Filters” on page 223.
All of these filters can be found in the Effects tab in the Browser window. The Final Cut Pro
filters are in folders labeled Video Transitions, Video Filters, and Video Generators. After
installation, QuickTime filters can be found in a folder called QuickTime inside the Video
Transitions and Video Filters Folders. After Effects filters can be found in a folder called AE
Filters in the Video Filters Folder.
Applying Filters From the Timeline or the Browser
Before applying a filter to a clip, decide whether to apply the filter to a clip in the Timeline
(which applies it only to that copy of the clip in that sequence) or to a clip in the Browser
(which applies the filter to the clip whenever you subsequently insert that clip into a
sequence). Applying a filter to a clip in the Browser can be useful for color correction of clips
that you plan to use across sequences or multiple times in a single sequence. See also “Using
Clips in Sequences” on page 143.
To apply a filter to a single clip:
m Drag the filter from the Browser to the clip in the Timeline.
m Select the clip and choose the filter by name from the Effects menu.
To adjust the position or duration of a filter in a clip:
1
Open the clip in the Viewer and click the Filters tab.
m Default In and Out points are at either end of the duration bar.
In point
Out point
Duration bar
Compositing and Special Effects
221
2
Move the cursor over an In or Out point in the duration bar.
m The cursor changes to this symbol.
3
Drag the ends of the duration bar to set a filter’s In and Out points within a clip.
4
Drag between the In and Out points on the duration bar to move the position of the filter’s
duration within the clip.
To turn a filter off:
1
Open the clip in the Viewer and click the Filters tab.
2
Click the checkbox next to the filter’s name.
The filter remains applied to the clip, but is temporarily disabled.
Applying Filters to a Range of Clips
You can apply a filter so that it covers a portion of a single clip or so that it covers a range
across multiple clips.
1
Open the clip in the Viewer and select the Filters tab.
2
Change the filter’s settings as desired.
Note: To turn off rendering while changing settings, press the Caps Lock key.
3
Choose the Range Selection tool from the Tool palette.
4
Click within the clip in the Timeline and drag across the desired range.
5
Drag a filter from the Effects tab in the Browser to the selected range in the Timeline.
Note: When you apply a filter to a range across multiple clips, Final Cut Pro adds an
individual copy of the filter to each clip. If you want the filter settings to be different for each
clip in the range, you can change them in each clip’s Viewer window.
Changing Filters Over Time
Using keyframes enables you to change the settings of a filter over time so that you can
animate the intensity of a filter. See “Using Keyframes to Change Effects Over Time” on
page 232.
222
Chapter 12
Changing the Rendering Order of Filters
The order in which filters are listed on the Filters tab is the order in which they are rendered.
You can affect the final results of a filtered clip by changing the rendering order.
To change the rendering order of filters:
m In the Filters tab, drag a filter name into a new position.
Saving Filter Settings by Creating a Favorite Filter
You can save the filter settings you’ve specified so that you can use the same filter again
without having to remember settings. You can also change the default settings for a filter. You
cannot change the default settings for any of the filters included with Final Cut Pro. Rather,
you create another instance of the filter with the settings you’ve specified. The new filter is
saved in the Favorites bin on the Effects tab and appears in the appropriate Favorites
submenu of the Effects menu. You can also rename the new filter.
You can create a favorite filter by saving the settings of a filter applied to a clip or by dragging
a filter into the Favorites bin on the Effects tab.
To create a favorite filter by saving a filter applied to a clip:
1
Make the desired changes to the settings of a filter.
2
With the Timeline active, choose Make Favorite Effect from the Modify menu.
To create a favorite filter by dragging:
1
Find the effect that you want to use in the Effects bin of the Browser.
2
Drag it to the Favorites bin.
3
Open the Favorites bin and double-click the effect to open its Viewer.
4
Make the desired settings and close the Viewer.
5
Rename the new filter in the Favorites bin.
Note: Duplicating an effect puts a copy in the Favorites bin.
Using After Effects Third-Party Filters
Final Cut Pro supports After Effects third-party image filter plug-ins. File import filters are not
supported. These filters will be listed as they load during startup on the splash screen. Filters
appear in categorized folders in the Browser under the Filters tab. Categories are created
according to the types of filters you’re adding.
Compositing and Special Effects
223
Final Cut Pro also supports QuickTime Effects. The files are automatically loaded during
startup and appear as QuickTime Transitions or QuickTime Filters in the Browser under the
Effects tab and menu.
To install After Effects third-party filters:
m Drag the After Effects third-party filters to the Plug-ins folder in the Final Cut Pro
application folder.
Or create an alias of the folder where the After Effects plug-ins reside and place it in the
Plug-ins folder in the Final Cut Pro folder.
m If the third-party filter requires a hardware key or dongle, install the key or dongle and the
Plug-ins folder in the Final Cut Pro application folder.
To apply an After Effects third-party filter to a clip:
m Drag a filter from the Browser to a clip in the Timeline, or select the clip and choose the
filter from the Effects menu.
Custom User Interfaces
Some After Effects third-party filters have custom user interfaces. Final Cut Pro supports
these interfaces in the Filters tab in the Viewer window. You can control a filter’s effects
through these interfaces just as you would in After Effects.
Some After Effects third-party filters have a Clip Control box. This is a target where you can
drag and drop a clip from the Browser. These are similar in function to the Layer pop-up
control in After Effects. When the Control Clip has not had an image dragged to it, the layer
has an effect equivalent to none. If a clip has been dragged to the Clip Control, a thumbnail
of the clip appears in the box.
In After Effects, the origin or anchor point of a filter is registered in the upper-left corner of
the clip at (0, 0). In Final Cut Pro, the origin is at the center.
For information about a third-party filter, click the filter’s About button on the Filters tab in
the Viewer window.
Performance
When using After Effects third-party filters, you can choose from low-resolution and
high-resolution settings, and draft or field rendering. High-resolution and field-rendered
filters provide higher quality but take longer to render. High-resolution rendering is
equivalent to a Layer Quality mode of Best in After Effects.
224
Chapter 12
If an image doesn’t appear when you use a third-party filter, try the following:
m If the filter uses Clip Controls, drag a clip to all Clip Control boxes.
m Change the alpha type in the Modify menu.
m Choose Reverse Alpha from the Modify menu.
m If the filter uses a hardware key or dongle, make sure you’ve installed it.
To process effects faster:
m Turn on Draft Render in the Render Quality Editor.
m Turn Field Rendering off in the Render Quality Editor.
m Scale down the Viewer window.
Factors that contribute to slow rendering performance:
m Clips with large frame sizes (640 x 480 pixels or larger) with field rendering on
m Applying multiple filters to a single clip
m Complex filter settings
Note: Pressing the Caps Lock key temporarily disables rendering. This allows you to adjust
all of your settings before rendering a preview. It does not speed up final rendering, but
allows you to work faster without the processing overhead of background rendering.
If you move your project to a new disk, make sure you reinstall your plug-ins on the new
disk. Plug-in information is stored in the Final Cut Pro MOA Cache file (in the Final Cut Pro
application folder) to reduce program launch time.
Additional Filters
For a current list of compatible third-party After Effects filters, consult the Apple Final Cut Pro
Web site at www.apple.com/finalcutpro
Using Generators
Final Cut Pro has video generators in the Effects tab of the Browser. These generators allow
you to create original content that can be added to the sequence in a video track. For
example, you can use the Text generator in combination with motion, filters, and effects to
create custom titles such as crawling text or rolling credits in your sequence.
To use a generator, follow these steps:
1
Click the Effects tab in the Browser and open the Video Generators folder.
2
Drag a generator such as the Text generator to a track in the Timeline.
If you want to superimpose text over your sequence, drag the text generator to the
uppermost track in your sequence.
Compositing and Special Effects
225
Dragging a generator to the Canvas will also place the generator in the Timeline.
3
Double-click the generator in the Timeline to open the generator in the Viewer.
If the generator can be configured, a Controls tab appears in the Viewer.
4
Click the Controls tab in the Viewer.
5
Adjust the parameters to suit your needs.
You can manipulate and apply the settings over the duration of the generator using
keyframes in the timeline of the Viewer.
Editing Motion Properties
Video and still-image clips have a set of associated motion effects that determine the size of a
clip, its position in the Canvas, its rotation, and its shape. You can change these properties
graphically in the Canvas or Viewer. You can also change the properties numerically in the
clip’s Motion tab. You can change most of these properties over time using keyframes to
create animation. (See “Using Keyframes to Change Effects Over Time” on page 232.)
The Motion Properties
m Scale: Changes the overall size of the clip without changing its proportions
m Rotation: Rotates the clip through an axis about its center without changing its shape.
Clips can be rotated plus or minus 90 rotations.
m Center: Specifies the center point of the clip
m Anchor Point: Specifies a point that is used to center the clip for rotation relative to its
actual center
m Crop: Crops the clip from the specified side. The Edge Feather option applies a soft
border at the crop line.
m Distort: Changes the shape of the clip by moving its corners
m Opacity: Makes a clip opaque or translucent
m Drop Shadow: Places a drop shadow of the specified color, softness, and opacity, offset
by the specified amount, behind the clip
m Motion Blur: Blurs moving images by the specified amount, using the specified sample
rate
Note: Before editing any motion property, decide whether to edit the motion property of a
clip in the Timeline (which applies the changes only to that copy of the clip in that sequence)
or to a clip in the Browser (which applies the changes to the clip whenever you insert that
clip into a sequence). See also “Using Clips in Sequences” on page 143.
226
Chapter 12
When you change any motion property graphically in the Viewer or Canvas, it must be in one
of the two wireframe modes.
Note: Green crosshairs indicate that there is a keyframe for scale on that frame. A green
center handle indicates that the center has a point keyframe applied. A green border
indicates a rotation keyframe.
To use wireframe mode, do one of the following:
m Press W once to place the Viewer or Canvas into Image+Wireframe mode. Press W again
to turn on wireframe mode. Press W again to return to image mode.
m Choose Wireframe from the View menu.
m Choose Wireframe from the View pop-up menu at the top of the Viewer or Canvas.
Changing the Position of a Clip in the Viewer or Canvas
You can use the Viewer or Canvas to change the motion properties for a clip graphically using
one of the wireframe modes.
By default, clips are positioned in the center of the Canvas. You can move a clip by dragging
or by specifying a different location for the center point of the clip. You can move a clip
partially or completely outside the Canvas.
To move a clip by dragging:
1
In the Viewer or Canvas, turn on a wireframe mode.
2
Select the Arrow tool and drag the layer to a new position.
Compositing and Special Effects
227
To move a clip in the Viewer’s Motion tab:
1
Double-click a clip in the Timeline or in the Browser.
2
Click the Motion tab in the Viewer.
3
Do one of the following:
m Enter new values for the center property.
m Click the button with the plus sign to the left of the center property and then click the
Canvas or the Video tab of the Viewer to specify new center coordinates.
Scaling a Clip in the Viewer or Canvas
Clips play in Final Cut Pro at their native size, which is the size at which they were captured,
regardless of the sequence frame size. Clips that are the same size as or smaller than the
sequence frame size appear entirely within the sequence frame. Clips that are larger than the
sequence frame size are partially obscured. You can scale a clip by dragging or by entering a
scaling percentage. You can also scale a clip in one step so that it is the same size as the
sequence.
To scale a clip by dragging:
1
In the Viewer or Canvas, turn on a wireframe mode.
2
Select the Arrow tool and do one of the following:
m To scale both dimensions proportionally, drag a corner handle.
m To scale either dimension unproportionally, Shift-drag a corner handle.
m To scale and rotate the clip simultaneously, Command-drag a corner handle.
To scale a clip in the Viewer’s Motion tab:
1
Double-click a clip in the Timeline or in the Browser.
2
Click the Motion tab in the Viewer.
3
Drag the Scale slider or enter a new value in the text box to the right of the slider.
To scale a clip to fit entirely in the sequence:
m Select the clip and choose “Scale to Sequence” from the Modify menu.
Rotating a Clip
You can rotate a clip any number of degrees in relation to its original orientation. You can
rotate a clip either by dragging or by entering a degree of orientation. You can rotate a clip
partially or completely outside the Canvas. By default, clips rotate around their center point,
but you can rotate a clip around a different point by changing the center of rotation.
228
Chapter 12
You can rotate a clip multiple times, when you want to rotate an object over time, such as a
spinning wheel. (See “Using Keyframes to Change Effects Over Time” on page 232.)
To rotate a clip by dragging:
1
Open a clip in the Viewer or Canvas and turn on a wireframe mode.
2
Select the Arrow tool and point to the outside border of the clip.
3
Click any edge of the border and drag in an arc around the clip’s center point.
The wider the arc from the center point, the finer control you have. Drag away from the
clip’s center point to provide more precise control over the rotation. To constrain dragging
to 45-degree increments, hold down the Shift key. Drag around the clip continuously for the
desired number of rotations.
To scale and rotate a clip simultaneously in the Canvas:
Option-drag a clip’s corner handle in wireframe mode.
To rotate a clip in the Viewer’s Motion tab:
1
Double-click a clip in the Timeline or in the Browser.
2
Select the clip.
3
Click the Motion tab in the Viewer.
4
Drag around the rotation control or enter a new value in the text box.
To constrain dragging to 45-degree increments, hold down the Shift key.
Distorting the Shape of a Clip
You can distort the shape of a clip by separately moving its corner points as you drag with the
Distort tool, or by specifying the location of the four corner points numerically. By distorting
a clip you can create effects such as perspective.
To distort the shape of a clip:
1
In the Viewer of Canvas, turn on a wireframe mode.
2
Select the Distort tool and drag a corner handle of the wireframed clip. Command-drag to
change the perspective of the image.
To distort a clip numerically:
1
Double-click a clip in the Timeline or Browser.
2
Click the Motion tab in the Viewer and click the triangle to the left of the Distort effect.
3
To specify new locations for the corner points, do one of the following:
m Enter new values for the corner points you want to move.
Compositing and Special Effects
229
m Click the button with the plus sign next to the corner property you want to adjust and
then click the Canvas or the Video tab of the Viewer.
Cropping a Clip
You can crop a clip to remove unwanted elements from a clip’s image. This is a useful
technique if you want to remove rough, overscan edges on captured clips. Cropping hides
the selected parts of a clip rather than deleting them, so you can always reset the cropped
image to reveal the original image. You can crop a clip by either dragging with the Crop tool
or by specifying how many pixels to crop from the borders. You can also feather the edges of
the frame to make them blend smoothly with the background.
To crop a clip by dragging:
1
In the Viewer or Canvas, turn on a wireframe mode.
2
Select the Crop tool.
3
Drag from the edges of the clip to eliminate the unwanted elements in the image. (Press
Shift while dragging to constrain the aspect ratio, or press Option while dragging to move the
clip symmetrically while cropping.)
To crop a clip in the Viewer’s Motion tab:
1
Double-click a clip in the Timeline or Browser.
2
Click the Motion tab in the Viewer and click the triangle to the left of Crop.
3
Drag a slider or enter a new value to crop the clip from the specified side.
To feather the edges of a clip:
1
Double-click the clip and click the Motion tab.
2
Click the triangle to the left of Crop.
3
Drag the Feather Edge slider or enter a new value.
Setting a Clip’s Opacity
Clips are completely opaque by default, except for the portions within an alpha channel. You
can reduce the opacity of a clip to less than 100 percent to make it appear semi-transparent,
displaying the image on the layer beneath it.
You can change a clip’s opacity either with controls on the Motion tab or in the Timeline.
To set a clip’s opacity from the Viewer’s Motion tab:
230
Chapter 12
1
Double-click a clip in the Timeline or the Browser.
2
Click the Motion tab in the Viewer and click the triangle to the left of Opacity.
3
Drag the slider or enter a new value in the text box.
To set a clip’s opacity in the Timeline:
1
Click the Clip Overlays button in the Timeline.
2
Select the Pen tool and Shift-drag from the top of the clip’s video track. The pointer changes
shape to indicate when you can drag the opacity control. Final Cut Pro displays the opacity
setting next to the pointer as you drag.
Adding a Drop Shadow to a Clip
For clips that are smaller than the sequence frame size, you can display a drop shadow. A clip
may be smaller because it was small when captured (native size), or because you have scaled,
cropped, moved, or distorted it. Drop shadows are also useful for full-size clips with alpha
channels. You can control how far the drop shadow is offset from the image, its angle, color,
softness, and opacity.
To add a drop shadow to a clip:
1
Double-click a clip in the Timeline or Browser.
2
Click the Motion tab and turn on the Drop Shadow option.
3
To set the appearance of the drop shadow, click the triangle to the left to reveal the drop
shadow properties.
4
Use the controls to set the shadow’s distance from the clip (offset), its opacity, softness, and
direction (angle).
5
To choose a color for the drop shadow, do one of the following:
m Drag the hue, saturation, and brightness sliders, or enter values in the text boxes, so that
the color swatch displays the desired color.
m Click the eye dropper and click in the Canvas to sample a color.
m Click the color swatch and use one of the color pickers to choose the desired color.
Adding Motion Blur to a Clip
The most dramatic effects using motion blur involve rapid changes between two adjacent
frames using keyframes such as rotation or scaling.
1
Double-click a clip in the Timeline or Browser.
2
Click the Motion tab and turn on the Motion Blur option.
3
Use the slider to set the blur percentage, and the pop-up menu to set the number of
samples.
Compositing and Special Effects
231
Note: The blur is applied to one frame’s duration. The quality and rendering time of
samples is decreased as the number of samples is increased.
Using Keyframes to Change Effects Over Time
You can create many time-varying effects by applying a combination of keyframes and
changes to effects parameters to a clip.
A keyframe is a point where a parameter for an effect changes. If you want to create an
animated effect such as rotating a clip, you place keyframes at every point in the clip where
the rotation changes to build up an animated rotation. This is different from changing an
effect parameter a single time within a clip. In this instance, the parameter setting remains in
effect for the duration of the clip. In the rotation example, you can change the rotation
settings one time only to display the whole clip at the same degree of rotation, or you can
change the rotation settings and set keyframes at each change point, to create, for example, a
spinning or oscillating effect.
You can add and edit keyframes in the Audio, Motion, and Filters tabs of the Viewer. You can
also add them in the Timeline or Canvas. Each effect parameter that you want to animate has
separate keyframes.
For precision tuning of a keyframe’s parameters or its point in time:
m In the timeline of the Viewer, hold down the Command key while you drag a keyframe.
This enables “gear down” dragging which allows you to move the keyframe in precise
increments.
m Drag the keyframe up or down to adjust the value of the parameters effect.
m Drag the keyframe left or right to adjust the keyframe’s point in time.
m Hold down the Shift and Command keys while dragging the keyframe to adjust both the
value of the parameter and the keyframe’s point in time simultaneously.
You can also set keyframes by graphically scaling, rotating, distorting, and cropping clips in
either the Canvas or Viewer. In addition, you can use the Pen tool to visually fine-tune the
motion path. (See “Creating a Motion Path” on page 235.)
Keyframes are placed wherever any effects parameters are changing over time. If you apply a
special effect, such as a color tint, and choose a color for the tint, you do not need keyframes
in the clip as long as the color does not change. If you decide, for example, that the tint
should change through a series of colors during the clip, then you need to add keyframes at
each point where the color begins to change. Final Cut Pro calculates the color for each
frame in between two keyframes. You may choose to place only a small number of keyframes
to create a small number of changes, or you may decide that the color parameter should be
changed many times within the clip, and place a large number of keyframes.
232
Chapter 12
The Nav column in the Viewer’s Filters and Motion tabs lets you view, add, delete, or change
the position of keyframes.
Note: After you have added a keyframe to a clip for the first time, a new keyframe will be
added whenever you change the parameters for an effect applied to that clip at a different
point in time.
Types of Keyframes
There are two types of keyframes:
m One-dimensional: These relate to absolute specifications, such as points or colors.
m Two-dimensional: These relate to parameters that can change on a sliding scale, such as
size, height, audio level, or speed. You can drag these up and down on a line graph in the
Timeline or Viewer to change the values.
Working With Keyframes in the Viewer
You add keyframes for a filter setting or motion property in the Viewer’s Filters and Motion
tabs. When you add a keyframe, Final Cut Pro displays a diamond corresponding to the
location of the keyframe in the keyframe graph in the tabs and in the Timeline (if you have
chosen to display keyframes in the Timeline).
When creating keyframes, you must explicitly add the first keyframe for the property you
want to animate. Once you add a keyframe for a property, moving the playhead off that
keyframe and modifying the property value automatically creates an additional keyframe.
To begin working with keyframes in the Viewer:
1
Display the Filters tab or the Motion tab for a clip.
2
Display the property you want to animate.
Compositing and Special Effects
233
3
Move the playhead in the Canvas or the playhead above the keyframe graph in the Filters or
Motion tab to the point at which you want to create a keyframe.
4
Adjust the value for the property you want to set. Alternatively, you can graphically edit the
motion properties for position, scale, rotation, and crop.
To set a keyframe:
1
Move the playhead to a position in time where you want to place a keyframe.
2
Click the Set Keyframe button for the desired effect.
Previous Keyframe
Next Keyframe
Set Keyframe
3
To set additional keyframes for the same effect property, move the playhead to the next point
at which you want to create a keyframe and adjust the value for the property. Final Cut Pro
automatically adds a keyframe at that point.
You can also use the Pen tool to set keyframes along the Timeline of any effect property.
To move keyframes:
1
Select the Arrow tool or the Pen tool.
2
Drag any keyframe in the effects Timeline.
m Drag vertically to modify the parameter of the property for the keyframe.
m Drag horizontally to reposition the keyframe in the effects Timeline.
To navigate between keyframes:
m Click the Next or Previous Keyframe button for the desired keyframe graph.
To refine a keyframe:
m Control-click a keyframe and choose Smooth from the shortcut menu.
Editing Keyframes in the Viewer
You can edit the values for keyframes using the keyframe graphs in the Motion and Filter tabs
of the Viewer. Additionally, you can edit motion keyframe properties for scale, position,
rotation, and crop graphically in the Canvas. You can also change the location in time of
keyframes in the Timeline, but not the property values of keyframes.
To edit or delete keyframes:
234
Chapter 12
1
Display the Filter or Motion tab for a clip.
2
Display the effect you want to edit.
3
Click the Next or Previous Keyframe button to move the playhead to the desired keyframe.
4
Adjust the property values for the keyframe. You can also make changes graphically for
motion properties of scale, position, rotation, and crop in the Canvas.
5
To expand the keyframe graph, drag the Zoom control in the right corner of the keyframe
graph.
6
To delete a keyframe, click the Add Keyframe button while the playhead is over a keyframe.
To delete all the keyframes for an effect setting, click the red reset button to the left of the
keyframe graph.
To move a keyframe in the Timeline:
1
Click the Clip Keyframes button in the bottom-left corner of the Timeline.
2
Place the pointer over a keyframe in the Timeline. The pointer changes to a crosshair.
3
Drag the keyframe to the desired position in the Timeline.
To move a group of keyframes in the Timeline:
1
Click the Clip Keyframes button in the bottom-left corner of the Timeline.
2
Place the pointer between keyframes in the Timeline. The pointer changes to a Slip cursor.
3
Click the line between any two keyframes and drag the group of keyframes to the desired
position in the Timeline.
Creating a Motion Path
You create a motion path by altering the clip’s center point in the Canvas or Viewer when in a
wireframe mode, adding keyframes at desired points in time. The motion path appears as
lines connected by squares and dots. Squares indicate keyframes and the smaller dots
indicate the relative speed of the clip’s movement as it moves between keyframe positions.
Compositing and Special Effects
235
You can use the Pen tool for maximum control over the shape of the motion path, creating
curves and corners along the path, and controlling the speed of a clip as it travels along the
path. (See “Editing a Motion Path” on page 237.) You can also control the position of the clip
at keyframe locations by modifying the center (position) motion property for those
keyframes.
To create a motion path:
236
Chapter 12
1
Set the Canvas or Viewer display mode to Wireframe+Image or Wireframe.
2
Move the playhead to the point on the Timeline where you want to add the first keyframe.
3
To add a keyframe, do one of the following:
m Click the Add Keyframe button at the bottom of the Canvas or Viewer.
m Display the Motion tab for the desired clip, display the center (position) motion property,
and click the Add Keyframe button.
m To add a specific parameter keyframe, press the Right Arrow key while clicking the Add
Keyframe button.
4
Use the Arrow tool and drag the clip from the center handle to the desired position.
5
Move the playhead to where you want to add the next keyframe.
6
Drag the clip to a new position. Final Cut Pro automatically adds a new keyframe.
7
Repeat steps 5 and 6 to add as many keyframes as you want.
Editing a Motion Path
You can edit a motion path directly in the Viewer or Canvas by moving or deleting motionpath keyframes. Because a motion path defines spatial as well as temporal changes, the
playhead doesn’t need to be over a keyframe for you to be able to move or delete it, nor does
the playhead location prohibit you from adding a motion-path keyframe.
Creating Curves and Corners Along a Motion Path
By default, when you create a motion-path keyframe, it is a corner. A corner creates an abrupt
change in direction. You can create a smooth change by converting the corner to a curve
through the shortcut menu. Curves can also be converted to corners.
Curve points have Bezier handles that enable you to shape the curve. They also include ease
handles that you can use to control the speed of the clip as it approaches and leaves the
keyframe. For more information, see “Controlling Speed Along a Motion Path,” next.
To toggle a keyframe between a corner and a curve:
Control-click a keyframe in the Viewer and choose Smooth or Corner from the shortcut
menu. In the Canvas, Control-click a keyframe in wireframe mode and choose Ease In/Ease
Out, Linear, or Make Corner Point.
To convert a curve point into a corner point, Command-click and drag a Bezier handle.
Controlling Speed Along a Motion Path
The speed at which a clip travels along a motion path is determined by the spatial and
temporal difference between keyframes. For example, you can increase the speed of a clip
between two keyframes by moving the keyframes further apart without changing their
location in time. Thus, the clip travels further in the same amount of time.
Compositing and Special Effects
237
You can also fine-tune the rate at which a clip approaches and leaves a keyframe if the
keyframe is a curve. The ease handles are located between the Bezier handles and the center
point. You can drag the handles so that the clip eases in and eases out at the same rate, or
you can drag the handles separately to set different ease-in and ease-out rates.
Keyframe
Keyframe
Bezier
handle
Ease In/Out
handle
Motion path
This motion path has Bezier handles at the ends of the straight line. You adjust the path by
dragging the handles.
To make a clip ease in and ease out of a keyframe:
238
Chapter 12
1
If necessary, convert a corner into a curve.
2
Select the Arrow tool.
3
Click the curve keyframe.
4
Do one of the following:
m Drag either ease handle to move both an equal amount. Dragging the handle away from
the keyframe increases clip speed to and away from the keyframe. Dragging the handle
towards the keyframe slows the clip’s speed.
m Shift-drag either the incoming or outgoing ease handle to change only the ease-in or easeout effect.
Using Alpha Channels
An alpha channel is a fourth 8-bit channel in an image that describes which areas of the
image are transparent. Because an alpha channel has 8 bits of information per pixel, an image
can be partially transparent or have areas that change from opaque to transparent. An image
can have an alpha channel if the hardware or software that produced it has alpha channel
support. Many digital-image and video-editing applications can create alpha channels in an
image.
When you place a clip with an alpha channel in a sequence, Final Cut Pro automatically
makes the alpha channel area transparent.
m To view the alpha of an image, choose Channel from the View menu and then choose
Alpha from the submenu.
When you create a transparent image, it’s best to create drop shadows by creating another
layer behind the image, rather than using the Drop Shadow function.
Importing Transparent Images
Images created in other programs may pre-multiply colors with black or white to create the
effect of a more transparent or opaque layer. When you import these images into Final Cut
Pro, you may need to choose an alpha type other than None/Ignore from the Alpha Type
submenu (in the Modify menu) to achieve the correct alpha type for the image. In most
cases, however, Final Cut Pro automatically imports the image with the appropriate alpha
type.
Setting the Clip Composite Mode
Composite modes are applied to clips and control how the colors in a clip combine with the
colors in clips in underlying video layers or how the clip visually interacts with the clip on the
track immediately below it.
You can place clips in the same timecode location in a sequence, on multiple tracks, and
blend them together in many ways by setting each clip’s composite mode.
Note: If you change the opacity of a clip, this can allow the clip on the track below it to
show through. The opacity setting influences the result of setting the composite mode.
If a transition is attached to a clip, the transition takes on the composite mode of the
incoming clip. This can result in dramatic changes in composite modes if two clips, with
different composite modes, have a transition between them. To maintain each clip’s
composite mode, keep the clips on separate tracks with the transitions.
Gradients are helpful test images for trying out the effect of composite modes.
Compositing and Special Effects
239
To set the clip composite mode:
240
Chapter 12
1
Select the clip in the Timeline.
2
Open the Modify menu and choose the mode you want from the Composite Mode submenu.
m Normal: Displays the clip without any changes
m Add: Combines the color values of the clips, not exceeding absolute white. The resulting
image is lighter. Where the added values are greater than one, absolute white is displayed.
m Subtract: Subtracts the color values of the clips, not going below absolute black. The
resulting image is darker. Where the subtracted values are less than one, absolute black is
displayed.
m Difference: Subtracts the color values of the underlying clip from the selected clip,
displaying the absolute color values.
m Multiply: Compares the color values for each pixel on the clip and the track below and
multiplies them together. If the image is already dark, there is little or no effect. If the
image is light, Multiply darkens it.
m Screen: Compares the color values for each pixel in the clip with those of the track below
and multiplies the inverse of each. If the image is already light, there is little or no effect. If
the image is dark, Screen lightens it.
m Overlay: Wherever the color value is greater than 128, Screen is applied. Wherever the
color value is less than 128, Multiply is applied.
m Hard Light: Darkens or lightens the colors, depending on the color values for the clip.
The effect is similar to shining a hard spotlight on the clip.
m Soft Light: Darkens or lightens the colors, depending on the color values for the clip. The
effect is similar to shining a diffused spotlight on the clip.
m Darken: Compares the color values for each pixel in the clip with those for the clip on
the track below, and selects the darker of the two
m Lighten: Compares the color values for each pixel in the clip with those for the clip on
the track below, and selects the lighter of the two
m Travel Matte: Applies a matte that moves with an image and makes the layer transparent,
displaying the layer underneath. The Luma option averages the RGB values to gray. The
Alpha option ignores RGB values.
Note: Travel Mattes always involve 3 tracks. The foreground clip goes on an upper track.
The matte track goes on the middle track, and the background clip goes on the lowest
track. The Travel Matte composite mode is then applied to the foreground clip. When the
Travel Matte is on Track V1, Final Cut Pro will use black as the default background.
C H A P T E R
13 Rendering
13
About Rendering
Rendering is the process of computing frames of video and sections of audio so that they can
be played smoothly in Final Cut Pro. Once rendered, the audio and video are stored in
render cache files.
This section describes the fundamental concepts that you need to understand about
rendering when creating sequences in Final Cut Pro. Most Final Cut Pro sequences
(containing transitions, motion, and filters) need to be rendered before they can be played in
real time.
Rendering Versus Real-Time Playback
Because you can create very simple or very complex sequences, the amount of rendering
that is required depends on many factors.
Sequences consisting of cuts only can be created in Final Cut Pro and played back in real
time, without rendering. For more information, see “How to Avoid Rendering,” on page 246.
How Sequences Are Rendered
For the most part, you can create sequences in Final Cut Pro without knowing anything
about how rendering occurs or in what order. For some special effects and compositing
techniques, it may be useful to understand how the sequence is rendered in order to achieve
a particular result.
241
Setting a Sequence’s Render Qualities
The Render Quality Editor lets you specify four render qualities for the current project. This
lets you work at lower frame rates, smaller frame sizes, and with various rendering options
disabled for some effects, while viewing full-frame video at another quality level. By
customizing the quality settings, you can manage the quality-speed trade-offs of video editing
by quickly switching between quality levels while you work.
Final Cut Pro maintains a separate render cache for each render quality level. This means that
once a segment is rendered at a particular render quality level, you can switch to a different
render quality setting and then back without losing the rendered frames.
To set the sequence render quality:
1
Open the Sequence menu and choose Render Quality.
2
Select the desired render quality.
You can also choose the render quality by using the pop-up menu in the top-left corner of
the Timeline.
Editing Render Quality Levels
Final Cut Pro has four render quality levels. You can customize the definition of each render
quality. While creating a sequence in Final Cut Pro, you can switch among render qualities to
influence the time it takes to render and the quality of the rendered result.
When a render quality is current, any rendering that is required is indicated in the Timeline
by a red line over the ruler. Once rendered, the frames are saved in the render cache storage
locations specified in the Scratch Disks tab of the Preferences window. Switching to a
different render quality changes how the output appears in the Canvas, but Final Cut Pro
does not delete or discard previously rendered material of a different quality unless new edits
invalidate part of the rendered sequence.
To edit the sequence render quality levels:
1
242
Chapter 13
Do one of the following:
m Open the Sequence menu and choose Edit Render Qualities from the Render Quality
submenu.
m Choose Project Properties from the Edit menu and click the Edit Render Qualities button.
m Open the Render Quality pop-up menu in the Sequence tab in the Timeline and choose
Edit Render Quality.
2
Specify the options for each render quality and click OK.
m Quality Name: You can assign names to each render quality.
m Draft Render: Check this box to render filters at the lowest possible quality. This is useful
to speed up previewing, but should be left unchecked before final rendering and export.
m Field Rendering: Check this box to turn field rendering on.
m Motion Blur: Check this box to apply motion blur when rendering.
m Include Filters: Check this box to include filters when rendering.
m Enable Frame Blending: Check this box to enable motion smoothing effects where the
speed of the video has been changed.
m Play Base Layer Only: Check this box to render the base tracks ( V1 and A1) and cuts
only. No transitions are rendered. Motion will not be applied to clips or sequences when
played back in the Viewer.
m High Quality Playback: Renders the playback at the highest quality. It plays back DV clips
at the highest visual quality, but at the expense of frame rate on the computer monitor.
This does not affect render quality or speed of playback when exporting to a camcorder
or deck. This should only be used for checking the visual quality of filtered or composited
clips.
m Frame Rate: Allows you to render at frame rates proportional to the sequence editing
timebase.
m Resolution: Allows you to render at a resolution proportional to the sequence’s frame
size.
The Render Quality settings are independent of the sequence settings. They
apply only to rendered output.
Important
Rendering
243
Video Rendering
Video frames in sequences are rendered in the following order:
m The top layer of video (the highest numbered track) is processed first and then
composited onto the track below it.
m Within each track, motion effects, filters, and transitions are processed, in that order.
Note: It is possible to change the order of rendering by using nested sequences. See “Using
Nested Sequences,” on page 244 for more details.
Audio Rendering
In many cases, audio can be played in real time without rendering. Rendering is necessary in
the following circumstances:
m If the sequence has more audio tracks than the number of tracks specified in the
Real-time Audio Mixing preference (see “Setting General Preferences,” on page 96). Final
Cut Pro can mix up to 8 tracks of audio in real time. The maximum number of tracks you
will be able to mix depends on multiple factors (see “Mixing Audio in Real Time,” on
page 165). You can specify a lower number to dedicate more processing resources to
video playback.
m Real-time audio capabilities can be explained based on track equivalent costs. Track costs
can accumulate quickly when combining any or all of the following items:
m Each track to mix has a cost of 1.
m Filters have a certain cost depending on complexity. Most filters have a cost of 3 tracks.
m Compressor/Limiter, Expander/Gate, Vocal De-Esser, and Vocal De-Popper have costs
of 6 tracks each.
m Each track referencing a sub-sequence counts as the cost of all audio tracks in the
sub-sequence. Use the mixdown audio feature to reduce this cost. For more
information, refer to “Mixing Audio in Real Time,” on page 165.
m A stereo track referenced as a sub-sequence has a cost of 4 tracks (two for each
channel).
Using Nested Sequences
Nested sequences are sections of the sequence that have been converted using the Nest
Item(s) command or sequences that have been placed within other sequences. Nested
sequences are treated like other clips in a sequence. For more information on nested
sequences, refer to “Placing Sequences Within Other Sequences,” on page 267.
Tips for rendering nested sequences:
Make sure that the nested sequence has the same render settings (frame rate, frame size, and
compression settings) as the main sequence to avoid rendering the nested sequence again.
244
Chapter 13
The nested sequence inherits the render quality of the parent sequence. If render files
already exist for the nested sequence at that render quality, then they are used. If render files
don’t yet exist, they are created when the parent sequence is rendered and saved with the
nested sequence.
Nested sequences may require separate rendering in a parent sequence in these
circumstances:
m If a parent sequence modifies a nested sequence, then the nested sequence needs to be
rerendered as a sub-sequence. Modifications include any compositing, filters, transitions,
speed changes, and so on.
m If movement, such as rotation, has been applied to a sequence and then rendered, then
the sequence needs to be rerendered if it is nested inside another sequence.
m If a nested sequence is on the base track, the Alpha Channel type is set to none. If it is on
a higher track, the Alpha Channel type is set to straight. If the alpha channel for the
nested sequence is set to none, the clips it contains do not need to be rerendered. The
rendered files will be retained as long as they do not need to be combined with other
tracks in the sequence, but the clip will be opaque.
Using Nested Sequences to Render Transitions
For clips in V2 or higher with a motion path applied, it may be necessary to nest the clip as a
sequence in order to render it properly if it has a transition such as 3D, Slide, Push, Zoom,
Stretch, or Squeeze applied.
Rendering Indicators
As you create a sequence, the following indicators appear when rendering is required:
m The rendering indicator above the Timeline ruler indicates which sections of the
sequence require rendering in order to play back smoothly. Red indicates that the section
needs to be rendered; gray indicates that no rendering is required.
m When video material that requires rendering is playing in the Viewer or Canvas, and the
Play Base Layer Only option in Render Quality Editor is not enabled for the current render
quality, a blue background with the word “Unrendered” appears, indicating that the video
can’t play in real time. If the Play Base Layer option is enabled, the base tracks play, but
without any transitions or other special effects.
m When audio material that requires rendering is playing in the Viewer or Canvas, a steady
beeping sound occurs, indicating that the material can’t play in real time.
Rendering
245
How to Avoid Rendering
In general, you need to render transitions, effects, and composited layers to play a sequence
smoothly. Sequences consisting of cuts only do not require rendering for playback as long as
sequence size and frame rate match the original source material.
To avoid rendering when creating a sequence with cuts only, make sure that the sequence’s
editing timebase, frame rate, and compression settings are the same as the frame rate, frame
size, and compression settings of your source media. If the frame rate, frame size, or video or
audio compression settings in your source media are different from those settings in your
sequence, those frames need to be rendered before the sequence can be exported or printed
to video.
To view the compression settings for source material:
1
Select the clip in the Browser or Timeline.
2
Choose Item Properties from the Edit menu.
You can also avoid unnecessary rendering by nesting sequences within other sequences.
Refer to the previous section, “Using Nested Sequences,” on page 244.
Note: Pressing the Caps Lock key temporarily disables rendering. This allows you to adjust
all of your settings before rendering a preview. It does not speed up final rendering, but
allows you to work faster without the processing overhead of background rendering.
Rendering
To render an entire sequence:
m Choose Render All from the Sequence menu.
A progress bar is displayed while the sequence is being rendered. Click Cancel to stop
rendering. All rendered frames are saved, even if rendering is canceled.
To render a section of a sequence:
1
Select one or more contiguous clips or transitions, or set the In and Out points to the area
that you want to render.
2
Choose Render Selection from the Sequence menu, or press Command-R.
A progress bar is displayed while the sequence is being rendered. Click Cancel to stop
rendering.
246
Chapter 13
Specifying Storage Locations for Render Files
Final Cut Pro lets you specify multiple disk locations for storing render cache files. When
render files are created, they are stored on the disk with the most available space. You can
specify up to five disks for storing either captured video, captured audio, or render cache
files.
If no disk locations are specified, Final Cut Pro saves the render files in a folder called Render
Files, which is located in the same folder as the Final Cut Pro application.
You specify the storage locations for rendered files using scratch disk preferences. For more
information, see “Setting Scratch Disk Preferences,” on page 110.
Using Cache Manager to Manage Rendered Files
You use the Cache Manager to delete unwanted render files or to free disk space. This is
useful for removing render cache files for deleted or obsolete projects, or for removing
unnecessary render files for existing projects, such as those at render quality levels that you
no longer need.
The Cache Manager finds files from unopened projects as well as open projects. If you delete
render cache files for projects in which you are still working, some rerendering may be
required.
If you run out of disk space, a dialog box opens in which you can delete old render cache
files.
To view or delete render cache files:
1
Choose Cache Manager from the Tools menu.
Rendering
247
The Cache Manager displays a list of all of the Final Cut Pro render files on designated scratch
disks.
2
Click next to the file name in the Remove column to designate a file to be deleted.
3
When you click OK, all of the files tagged for removal are deleted from your hard disk.
Automatically Rendering Before Playing
The render ahead preference tells Final Cut Pro to render a specified amount of material
ahead of the current playhead position before attempting to play it. For example, with the
render ahead preference set to 5 seconds, when you click Play, all material up to 5 seconds
ahead of the playhead position is rendered first. Then Final Cut Pro begins playing the clip or
sequence.
This preference is an alternative to explicitly specifying a section of the sequence to render
and choosing Render Selection from the Sequence menu. The rendered material is added to
the render cache just as explicitly rendered material is.
248
Chapter 13
C H A P T E R
14 Creating Final Output
14
Printing to Video
You use the Print to Video command in the File menu to output a sequence or clip to
videotape. You can use the Print to Video command without device control. If you have
device control, the Edit to Tape command in the Tools menu lets you perform precise Insert
and Assemble edits to tape in addition to previewing an edit.
To print a sequence or clip to video using the current render quality:
1
Select the sequence or clip in the Browser.
2
Open the File menu and choose Print to Video.
3
Specify options in the Print to Video dialog box.
You can specify the duration for all options.
249
m Leader: These options create lead-in frames that precede the actual footage. The options
are applied in order. A duration for each option can be defined by typing a time value into
the field next to the option.
m Color Bars: Check this box to add color bars and a 1 kHz tone, preset to –12 dB,
before the beginning of the sequence or clip.
m Black: Check this box to add black frames between Color Bars and Slate or before the
beginning of the sequence or clip.
m Slate: Check this box to add the content specified in the Slate Source pop-up menu.
m Black: Check this box to add black frames between Slate and Countdown or before
the beginning of the sequence or clip.
m Countdown: Check this box to add a 10-second countdown before the sequence or
clip.
m Slate Source: Specifies the type of slate to be used. You can specify the sequence or clip
name, a file on disk, or multiple lines of custom text.
m Media: These options let you print the entire sequence or clip or only the marked
portion.
m Print: Select a print option from this pop-up list.
m Loop: Check this box to specify the number of times the sequence or clip is edited to
tape.
m Black: Check this box to insert black frames for the specified time between the
looped portions.
m Trailer: Check the box labeled “Black” to add a black trailer of a specified duration at the
end of the printed sequence or clip. If you are looping the sequence or clip, the trailer
appears after the last looped sequence or clip.
m Duration Calculator: Calculates the total duration of the media you’ve selected to print
including all options you’ve specified.
The sequence is rendered if necessary and a message tells you to start recording on your
video deck.
Note: The image dimensions and codec selected in the current render settings directly
affect the size and quality of the video playback window in Print to Video.
4
Start recording on your video deck and click OK.
Note: If you have turned “Mirror on desktop during Print to Video” on in General
preferences, you may notice dropped frames in your final output. To eliminate this problem,
turn off this option in the General preferences tab.
This prints the selected clip or sequence using the current render quality. To print to video at
a different render quality, use the Render Qualities pop-up menu in the Timeline.
250
Chapter 14
Note: Final Cut Pro monitors the state of controlled devices. If your camcorder or deck
malfunctions while printing to video or editing to tape, you may receive an error warning.
Cancel the operation before proceeding further and consult your camcorder or deck’s
manual for troubleshooting information.
Editing to Tape
The Edit to Tape command lets you perform linear Insert and Assemble edits to tape with
frame accuracy. Editing to tape requires device control. If you do not enable device control in
the Device Control tab in the Preferences window, this command is unavailable. Use the Print
to Video command to print a sequence or clip to videotape without using device control.
To open the Edit to Tape window, choose Edit to Tape from the Tools menu.
Note: The Tape Deck status box at the bottom center of the Edit to Tape window lets you
know if there is any malfunction or failure during the editing process. Check this frequently
to make sure your deck is functioning properly and the tape is undamaged.
Edit to Tape has two modes. You choose the mode from the pop-up menu in the top center
of the window.
Creating Final Output
251
m Editing: Uses exactly the content that you select and doesn’t include any mastering
options. In editing mode, you can do standard three-point edits directly to tape. You use
editing mode if you want to replace video, audio, or both on tape.
m Mastering: Includes mastering options in the final output such as color bars and tone, a
slate, and a countdown. The Duration and Out fields are dimmed, since mastering
options affect the overall duration of the piece. You use mastering mode when you want
to output your finished sequence to tape from a specified starting timecode. This mode is
the default.
Edit to Tape Operations
Edit to Tape has three types of operations, which you choose using the buttons at the
bottom left of the window or by activating the overlay function. To edit to tape using the edit
mode buttons, click any of the three buttons in the bottom-left corner of the Edit to Tape
window. You can also drag a sequence or clip into the window to activate the Edit to Tape
overlay function.
Note: Edit to Tape buttons only work on clips loaded into the Viewer. To load a sequence
into the Viewer, close the opened sequence (if it’s in the Canvas), and drag the sequence
from the Browser to the Viewer.
252
Chapter 14
m Insert: Preserves the existing timecode on the tape. Insert requires black and coded
tapes, which you can create using the “Black and Code” button. This is the default mode if
you drag the clip directly into the Edit to Tape window.
m Assemble: Writes the sequence or clip to tape at the designated In point, or at the current
point (after pre-roll). It overwrites the existing timecode on the tape.
Note: Assemble will not work on non-coded tapes. Use the “Black and Code” button to
format a tape with timecode. See “Preparing a Videotape With Black and Code” on
page 257.
Be sure that your deck is capable of insert and assemble editing if you want
to use these features. Play-only decks cannot perform edits. DV devices only support
assemble editing. If your deck or camcorder is not capable of performing certain
functions, buttons or functions in the overlay are dimmed.
Important
m Preview: Plays a preview of the sequence or clip on your external monitor, if present. It
renders the sequence or clip first (if necessary) and it includes all selected mastering
options in the preview.
Note: Dragging a clip from the Browser or Timeline to the Preview button in the Edit to
Tape window simulates an insert operation. Nothing is actually edited to tape.
When working with multiple windows in the Viewer, Timeline, Canvas, or Browser, menu
commands and keyboard shortcuts apply to the default, or labeled, window. To use
commands and shortcuts in other windows, you must drag the desired window to one of the
main labeled windows.
The Difference Between Insert and Assemble Editing
An insert edit is “clean in, clean out.” This means that the deck starts recording at exactly the
specified frame and ends at exactly the specified frame. It also means that timecode
continuity can be maintained because you don’t record timecode along with the video and
audio. An Insert edit uses the chosen In and Out points based on media plus any extras such
as black, color bars, and so on. The edit is frame-accurate when written to tape (assuming
you have a frame-accurate deck).
In contrast to an Insert edit, an Assemble edit overwrites the timecode (in addition to laying
down video and audio) on the tape. To avoid timecode breaks on the Out point, an assemble
operation extends the edit beyond the Out point on the tape anywhere from 2 to 15 frames
on professional equipment. With DV, this value may range from .5 to 1.5 seconds. Any
material will be overwritten at that point. This avoids discontinuities in the timecode around
the requested Out point on the tape.
Creating Final Output
253
Choosing Which Tracks to Record
Click the track selection controls on the bottom right of the Edit to Tape window to choose
which tracks are recorded. When you play the clips in Final Cut Pro, you will hear and see all
three tracks, but only the selected ones will actually be recorded onto the tape. This allows
you to record audio with no video, or vice versa.
Setting Up for Editing to Tape
To perform an edit to tape, there must be timecode on the tape. If you are editing to a new
tape, you must first prepare at least 30 seconds of the tape with black and code. This will
allow you to set an In point in Final Cut Pro. If you are using a previously edited tape, be sure
you begin your edit at a point on the tape with timecode. If you have blank spaces between
your edits, begin your edit at a point with timecode or use black and code to format the
blank space between edits. See “Preparing a Videotape With Black and Code” on page 257.
Before editing to tape:
1
Select the correct device control settings for your system.
Open the Tools menu and choose Edit to Tape. You can use the Device Settings tab to specify
device control settings. The Input button allows you to configure your capture card, which is
receiving a signal from the deck. For information on device control settings, see “Setting
Device Control Preferences” on page 99.
2
Set an In point for your edit.
Click the Video tab in the Edit to Tape window. In mastering mode, the In point field located
at the bottom-left corner of the window is by default not set. You must enter an In point in
this field. Setting an Out point is only necessary in editing mode.
3
Configure your deck so that it directs output to your NTSC or PAL monitor.
This allows you to view the results of your edits in their final form.
Performing an Edit to Tape
Editing to tape is very much like editing source material into a sequence. Once you are set
up, the only difference is that the result is edited to videotape as you work.
To edit a sequence to tape:
1
Choose Edit to Tape from the Tools menu.
2
Choose editing or mastering mode.
Mastering mode includes mastering options in the final output; editing mode does not.
254
Chapter 14
3
Insert a tape.
Note: If you notice that the tape you inserted is not displaying the type of timecode you
expected (drop frame or non-drop frame), play the tape first to register its timecode in Final
Cut Pro.
4
If you are working in mastering mode, click the Mastering Settings tab and specify the
desired mastering options.
Mastering options let you add items such as a leader with a countdown, color bars, tone, and
a slate.
5
Select the type of Edit to Tape operation (preview, insert, or assemble) to perform. You can
use the edit operation buttons or the Edit to Tape overlay interface. See the section titled
“Edit to Tape Operations” on page 252 for more details.
6
If you selected the Insert or Assemble edit, insert a tape into the video deck at the prompt.
Any material that needs to be rendered at the current render quality will be rendered before
being edited to tape. You can monitor edit to tape results on an NTSC or PAL monitor. This
allows you to accurately preview the results.
Note: If you have turned “Mirror on desktop during Print to Video” on in General
preferences, you may notice dropped frames in your final output. To eliminate this problem,
turn off this option in the General preferences tab.
Setting Mastering Options
These options appear on the Mastering Settings tab in the Edit to Tape window.
m Leader: These options create lead-in frames that precede the actual footage. The options
are applied in order. A duration for each option can be defined by typing a time value into
the field next to the option.
Creating Final Output
255
m
m
m
m
m Color Bars: Check this box to add color bars and a 1 kHz tone, preset to –12 dB,
before the beginning of the sequence or clip.
m Black: Check this box to add black frames between Color Bars and Slate or before the
beginning of the sequence or clip.
m Slate: Check this box to add the content specified in the Slate Source pop-up menu.
m Black: Check this box to add black frames between Slate and Countdown or before
the beginning of the sequence or clip.
m Countdown: Check this box to add a 10-second countdown before the sequence or
clip.
Slate Source: Specifies the type of slate to be used. You can specify the sequence or clip
name, a file on disk, or multiple lines of custom text.
Media: These options let you print the entire sequence or clip or only the marked
portion.
m Print: Choose a print option.
m Loop: Check this box to specify the number of times the sequence or clip is edited to
tape.
m Black: Check this box to insert black frames for the specified time between the
looped portions.
Trailer: Check the box labeled “Black” to add a black trailer of a specified duration at the
end of the printed sequence or clip. If you are looping the sequence or clip, the trailer
appears after the last looped sequence or clip.
Duration Calculator: Calculates the total duration of the media you’ve selected to print
including all options you’ve specified.
Edit to Tape Device Settings
These options appear on the Device Settings tab in the Edit to Tape window.
m Device: Click this button to configure the device control for your particular hardware.
See “Setting Device Control Preferences” on page 99.
m Capture: Click this button to configure your input source. See “Specifying Capture
Preferences” on page 101.
256
Chapter 14
Preparing a Videotape With Black and Code
The “Black and Code” button is to the right of the pop-up menu at the top center of the Edit
to Tape window. Black and code formats the tape in a connected deck with a black screen
and user-defined timecode.
To prepare a tape with black and code:
1
In the Edit to Tape window, click the “Black and Code” button.
2
Verify that the settings are correct for your video card, to be sure that the card will output
black.
3
Enter the starting timecode and click OK.
The tape rewinds to the beginning and then records black and timecode starting from the
timecode specified. To cancel the “Black and Code” process, press the Esc key.
Note: Some decks do not allow remote setting of the timecode.
Working With Edit Decision Lists
You can export a sequence as an Edit Decision List (EDL) and use this with a linear editing
system to create sequences.
When you export an EDL, be sure the disk you use is correctly formatted for linear editing
decks. This must be done using special formatting software. Check with your
post-production facility to find out the correct format.
Exporting an EDL
EDLs can have up to one video track, four audio tracks, and one static superimpose layer.
Transitions are limited to standard dissolves and 20 standard wipe patterns.
To export a sequence as an EDL:
1
Select a sequence in the Browser, or open the sequence into the Timeline and make the
Timeline active.
2
Open the File menu and choose EDL from the Export submenu.
Creating Final Output
257
3
Specify the EDL export options and click OK.
Note: If you exceed the number of events for a specified EDL format, additional files will be
created.
Setting EDL Export Options
m EDL Title: Displays the title of the EDL as it will appear at the top of the file. You can
change the name in this field. This name can be different from the file’s name on the disk.
m Format: Choose an EDL format. It should correspond to the format required by the
linear system that will use the EDL.
If you will be going to film, select the CMX 3600 or GVG 4 Plus format. Then use Trakker
Technologies’ Slingshot to translate your EDLs into frame-accurate cut lists, dupe lists,
pull lists, and optical count sheets. Bring these to your negative cutter for conforming.
Note: If you select Sony 5000, the EDL Title will change to “Untitled” when you import
the EDL.
m Sorting: Choose an option to determine how video and audio edits are sorted in the EDL.
The following options are available:
m Master, Audio Merged: Sorts the sequence edits chronologically. Linked video and
audio appear on the same line, even if the audio ends before the video.
258
Chapter 14
m
m
m
m
m
m
m Source, Audio Merged: Sorts edits first by source reel number, then by sequence
chronology. Linked video and audio appear on the same line, even if the audio ends
before the video.
Target Video Track Only: Check this box to export the edits from the sequence’s current
target video track. All audio edits are still exported.
Pre-read Edits: Check this box to create a transition between two clips on the same reel.
This only works with digital video decks that support this feature. If this option is not
selected, Final Cut Pro creates a B-reel EDL.
Omit Transitions: Check this box to omit transitions when exporting an EDL.
EDL Notes: These options export editing information to the EDL for use by the online
editor. The following types of notes can be exported:
m Clip Name: Check this box to export the clip name as used in the sequence. It
appears in the EDL each time the clip is used.
m Filters: Check this box to export the names of filters or effects that are applied to a
clip or a range in the sequence, along with the effects’ starting and ending sequence
timecode.
m Comments 4: Check this box to export the contents from the Comments 4 column of
the Effects tab in the Browser.
m Video Levels: Check this box to export video key levels (opacity).
m Audio Levels: Check this box to export audio levels.
Master: Specifies export mastering options.
m Start Time: Specifies the starting timecode of the master reel in the EDL. By default,
the starting timecode of the sequence is used.
m Drop Frame: The Drop Frame checkbox specifies the timecode format for the master
tape. This is only applicable to NTSC format.
Audio Mapping: Determines how audio is mapped to EDL channels. Each sequence
audio track can be mapped to one of a maximum of four EDL channels or turned off.
Multiple sequence tracks can be mapped to a single EDL channel.
Note: Sony 5000 and 340 formats do not support four channels. You will be prompted to
set audio mapping to two channels if you select these formats.
Importing an Edit Decision List
You can import an EDL created on a linear editing system and use it to create sequences.
To import an Edit Decision List:
1
Open the File menu and choose EDL from the Import submenu.
2
Locate and select the EDL’s filename.
Creating Final Output
259
3
Click the Options button to
m recapture or relink media when importing
m specify handle sizes for capturing additional media
m enable or disable the feature that makes filenames unique. Check this box if you will be
recapturing clips. Leave the box unchecked if you will be relinking to clips that are already
on disk.
4
Click Import.
After you import an EDL, the sequence is placed in the Browser. The clips are in the
sequence as they appear in the EDL. Clips are named in two ways. If the EDL clip was
exported from a non-linear system, the name may have been exported with the clip in the
format of “Clip Name:”. Final Cut Pro interprets this format and uses this name as the clip’s
name. In all other cases, Final Cut Pro uses the reel number and starting timecode numbers
as the clip name. Example: 0001 01:02:20:05.
Note: If you selected Sony 5000 as the EDL format when you exported the file, the EDL Title
changes to “Untitled” when you import the EDL.
Working With Batch Lists
A batch list is a tab-delimited text file containing a list of logged clips for a batch capture. It is
saved as a text file when exported. When you import a batch list, the first record of the list
must have the Browser column names, and all subsequent records must be aligned under
their respective columns.
Exporting a Batch List
To export a sequence as a batch list:
1
Set your Browser display to List View.
2
Select a project tab.
3
Open the File menu and choose Batch List from the Export submenu.
4
Specify a destination for the file and click OK.
All columns that are visible at the time of export are generated into a batch list. To exclude
columns from the batch list, hide the columns before export. To hide a column, Control-click
in the header of the column and choose Hide from the shortcut menu.
Exporting FXScripts as Text
You can save the scripts that build Final Cut Pro filters and transitions as text files.
260
Chapter 14
To export an effect as text:
1
Select the effect in the Browser and choose Effect Editor from the View menu.
The text version of the effect is loaded into FXBuilder.
2
Open the File menu and choose Text from the Export submenu.
3
Specify a file destination and click OK.
Exporting Sequences and Clips
You can export clips, sequences, or portions of either as a Final Cut Pro Movie or in a variety
of movie and audio formats using QuickTime. When you export a sequence or clip, only the
material between the In and Out points is exported.
To export a clip or sequence using your predefined sequence settings:
1
Select a clip or sequence in the Browser, or open the sequence in the Timeline.
2
Open the File menu and choose Final Cut Pro Movie from the Export submenu.
3
Specify settings, output quality, and whether to include video, audio, or both in the three
pop-up menus.
m Settings: The QuickTime settings used for the export. Choose Current Settings to use the
current QuickTime settings for the sequence, or choose from the available presets.
m Quality: The render quality for the item you are exporting. This allows you to export at a
different render quality from the current setting chosen for the sequence.
m Include: Export video, audio, or both.
4
Check the box labeled Recompress All Frames to rerender all frames in the item to be
exported. If the item has already been rendered, leaving this box unchecked exports a copy
of the current rendered files.
5
Specify a filename and destination folder then click Save.
To export a sequence using the QuickTime export settings:
1
Select a clip or sequence in the Browser, or open the sequence in the Timeline.
2
Open the File menu and choose QuickTime from the Export submenu.
3
Choose an export format from the Export pop-up menu.
m Choose a preset setting from the Use pop-up menu if you want to use a preset export
method rather than customize the settings.
m If you want to customize the export settings, click the Options button to specify video and
audio compression settings and other settings for the selected format, then click OK.
4
Specify a filename and destination folder and click Save.
Creating Final Output
261
To export a still image:
1
Place the playhead in the Canvas or Viewer on the frame that you want to export.
2
Open the File menu and choose Still Image from the Export menu.
3
Click the Options button to select the format, resolution, and compression settings for the
image and click OK.
4
Specify a filename and destination folder and click Save.
To export an image sequence:
1
Set the Still Image Duration field in the General preferences tab to 1 frame (00:00:00:01).
Note: The default is 10 seconds. When you export an image sequence, this results in an
extremely long export time.
2
Select a clip or sequence in the Browser, or open the sequence in the Timeline.
3
Open the File menu and choose QuickTime from the Export submenu.
4
Choose “Movie to Image Sequence” from the Export pop-up menu.
5
Choose a preset setting from the Use pop-up menu if you want to use a preset export
method rather than customize the settings.
6
Click the Options button if you want to customize the export settings and select the format,
frame rate, or additional options; then click OK.
7
Specify a filename and destination folder and click OK.
8
Reset the Still Image Duration field in the General preferences tab to 10 seconds
(00:00:10:00).
To export the audio only from a clip or sequence into a movie format:
262
Chapter 14
1
Select a clip or sequence in the Browser, or open the sequence in the Timeline.
2
Open the File menu and choose QuickTime from the Export submenu.
3
Choose a preset audio export method from the Use pop-up menu if you want to use a preset
audio export method rather than customize the export settings.
4
Choose one of the following from the Export pop-up menu if you want to customize the
export settings:
m Movie to AVI
m Movie to QuickTime Movie
5
Uncheck the box next to Video.
6
Check the box next to “Prepare for Internet Streaming” if you will deliver your audio over the
Web. This is only available in the “Movie to QuickTime Movie” export selection.
7
Choose a method from the pop-up menu and specify settings, if available.
8
Click the Sound Settings button.
9
Choose a method from the Compressor pop-up menu and make the appropriate selections
for Rate and Size. The Options button offers additional settings for certain compressor types.
10
Select either Mono or Stereo output.
11
Click OK in this and the next window.
12
Specify a filename and destination folder and click Save.
To export the audio only from a clip or sequence into an audio file format:
1
Select a clip or sequence in the Browser, or open the sequence in the Timeline.
2
Open the File menu and choose QuickTime from the Export submenu.
3
Choose one of the following audio file export methods from the Export pop-up menu:
m Sound to AIFF: Audio Interchange File Format. A standard format for use across multiple
platforms. Be sure to leave the .aif extension on your filename if the file will be used on
the Windows platform.
m Sound to System 7 Sound: A Mac OS audio file format recommended for short audio
sound effect clips or desktop sounds. Not recommended for lengthy audio segments such
as CD audio tracks.
m Sound to Wave: Windows audio file format
m Sound to µLaw: A standard audio compression format
4
Choose a preset audio export method from the Use pop-up menu if you want to use a preset
audio export method rather than customize the export settings.
5
Click the Options button to specify audio export settings if you want to customize your
settings.
6
Specify a filename and destination folder and click Save.
Exporting Sequences and Clips in a Batch Operation
Batch export lets you build a list of sequences and individual clips for exporting in a single
operation. This makes it easy to export several sequences or clips without waiting by the
computer. Each Batch folder in the Batch Export window can contain multiple clips and
sequences. All of the items within a Batch folder, including items in nested folders, share the
same export settings.
To export items in a batch process:
1
Click on items in the Browser then choose Batch Export from the File menu. The Batch
Export window opens with a Batch folder containing the selected items.
Creating Final Output
263
You can also choose Export Queue from the Window menu to open the Batch Export
window. Items can then be dragged from the Browser to the Batch Export window.
Final Cut Pro creates new Batch folders in the Export Queue tab for each group of items that
are dragged to the Batch Export window. Items can also be dragged into existing Batch
folders. All of the items in a top-level Batch folder share the same export settings, so be sure
to group items into batches based on which export options you want to use.
2
Click on individual or multiple Batch folders, then click the Settings button at the bottom of
the Batch Export window to specify export options.
The Settings button opens an export options dialog that allows you to set parameters that are
displayed in certain columns of the Batch Export window, including output format selection
and preset options. An alternative way to set parameters for a batch is to Control-click in a
column for a particular batch and choose a parameter.
m If a single Batch folder is selected, the title bar of the export options dialog box displays
the name of the Batch. Any changes made to the settings will apply to the batch.
m If multiple batches are selected, the title bar of the export options dialog box displays
“(Multiple Batches Selected).” Changes to export settings will apply to all selected batches
in the Batch Export window. The initial settings of the parameters in the dialog box will be
taken from the first selected Batch folder.
Note: Depending on the selected output format, certain parameters may be disabled.
3
Click the Export button at the bottom of the Batch Export window to begin exporting the
items.
Items marked Done in the Status column have already been exported and are excluded from
the Export. If one or more batches, or items within them, are selected when the batch export
begins, only items in those folders are exported.
4
After the batch export is completed, select any item in a folder and click View Exported to
open it into the Viewer.
Note: Each exported file selected will be displayed in its own Viewer.
This option is available only after the item has been successfully exported and the Status
column displays Done. If any errors occurred during the batch export, an error message
appears in the Status column.
Batch Export Columns
The columns in the Batch Export window display all of the details about the batch export
items. Many of the columns display information that can also be specified in the Export
Settings dialog box. You can change details for some items by Control-clicking the detail.
m Name: Displays the name of the item
m Type: Displays the type of item
264
Chapter 14
m Status: Displays the current export status for the item
m Queued: Appears when an item is added to the batch queue
m Done: Appears when the item has been successfully exported. Items marked Done are
ignored when a batch export operation is started.
m Canceled: Appears when the export process has been canceled
m If there is an error during export, a message explaining the problem will appear in this
column.
m Output Filename: Lets you specify new filenames for clips and sequences. If nothing is
specified in this column, the item name is used as the output filename. Naming options
specified in the Export Settings dialog box are also applied to the filename specified here.
m Length: Displays the total length of the clip or sequence
m Destination: Indicates the folder location for saving the exported files associated with
this top-level Batch folder. The last specified batch export folder is used by default. (If no
target has been specified, the first render scratch location is used by default.)
m Settings: Defines the compression settings and other movie options for the exported
sequence or clip
m Item Settings: Uses the current settings for each item in a batch
m Existing presets can be accessed through the shortcut menu. Select any of these
presets as QuickTime settings and apply them to individual or multiple batches.
m Quality: Specifies the render quality level to be used for the items in this batch. This
applies only to sequences that are using current settings. Because clips may be exported
from several projects with different render quality names, the numbers 1–4 are used to
specify render qualities. Render quality 1 is used by default. Only applies if the output
format is Final Cut Pro Movie.
m Include: Specifies the media channels to be included in the exported media file. The
choices are, Audio and Video, Audio only, or Video only. These choices can be accessed
through the shortcut menu. For output types that contain only a single media format
(such as an audio clip or an image sequence), the correct media type is automatically
selected. Only applies if the output format is Final Cut Pro Movie.
m Recompress All Frames: Controls how existing QuickTime media is used in creating the
new file. When selected, all frames in the QuickTime movie are recompressed at the
designated quality. When not selected, samples are copied directly from the QuickTime
file unless they are incompatible with the main export setting. Only applies if the output
format is Final Cut Pro Movie.
Usually it’s best to copy the source media without recompression, since it is faster and
avoids any quality loss. You may want to recompress all frames when exporting to a
temporally compressed output format or to ensure a constant data rate.
Creating Final Output
265
m Format: Displays the current export type. All available export types can be accessed
through the shortcut menu. Select any of these presets as QuickTime settings and apply
them to individual or multiple batches.
m Use Item In/Out: Exports the sequence or clip using the current In and Out points. If this
option is not selected, all of the media in the clip or the entire sequence is exported.
m Naming Options: Columns that correspond to the options in the Naming Options dialog
box, described in the next section. All of these options apply to top-level batches. To
change any of these options, you can modify the column cell or select the batch and
choose Export Settings.
m Strip .ext: Corresponds to the Strip Existing Extension option
m Custom .ext: Corresponds to the Add Custom Extension option
m Type .ext: Corresponds to the Add File Type Extension option
Naming Options Dialog Box
File naming options are applied to the top-level batch in the batch export operation and
affect all files in the batch.
m Example File Name: Shows an example of how the file naming options will affect the
base filename
m Strip Existing Extension: Specifies whether the existing extension should be removed
from the base filename when the export filename is created
m Add Custom Extension: Specifies a custom extension to be applied to the filename.
m Add File Type Extension: Specifies whether the default extension for the specific export
output type should be appended to the filename
266
Chapter 14
C H A P T E R
15 Managing Complex Projects
15
Working with complex and large projects that contain hundreds or thousands of individual
clips can be complicated. Final Cut Pro provides a number of ways to manage these projects.
As a project demands the use of more tracks to create desired effects, you can simplify the
management of many tracks by nesting sequences inside one another. For projects with large
amounts of media, you can conserve disk space by creating rough cuts with low-resolution
clips that can be replaced with higher-resolution clips that have only the media you need to
finish the project. Final Cut Pro also enables you to move a project and its source media.
Placing Sequences Within Other Sequences
You can edit or nest one sequence into another sequence. By nesting sequences, you can
break down a complex project into smaller pieces that can be worked on separately, and then
combine them into a single sequence for output.
Nesting makes it possible to do the following:
m Apply the same effects uniformly to multiple clips: For example, if you want to animate a
series of still images along the same motion path at the same point in time, insert all of
the still images into a single sequence and nest that sequence into another sequence. You
can then apply the motion path to the single, nested sequence rather than creating
separate motion paths for each image.
m Reuse sequences: For example, if you animate a logo or create a standard introductory
sequence that you want to use again, you only need to create it once, then insert the
sequence into as many other sequences as desired.
m Update numerous projects by changing a single sequence: Unlike clips, nested
sequences are actually pointers or references to the original sequence, not copies. You
can nest a sequence into multiple projects, then change the original sequence and all the
projects in which that sequence is nested will be updated.
m Move clips together as a group.
267
Nesting Clips
You can nest several clips in a sequence into another sequence. This allows multiple identical
parts of a larger sequence to be standardized because the new sequence and all settings that
apply to it can be reused. You can also use the Nest Item(s) command to apply the attributes
of one clip to an entire sequence.
To nest clips in a sequence:
1
Select the clips you want to nest.
2
Choose Nest Item(s) from the Sequence menu.
3
Name the sequence and choose the new frame size.
All other sequence properties are copied from the current sequence.
4
If you’ve only selected one clip, leave “Keep Effects, Markers, and Audio Levels with Clip”
deselected if you want the clip’s current effects to be applied to the entire sequence.
The new sequence is placed into the same Browser bin as the current sequence.
Using the Sequence Trimmer
You can use the Sequence Trimmer to trim clips into an offline sequence, so that you can
recapture media at a higher resolution at the final output stage. This helps save disk space.
To trim clips into an offline sequence:
268
Chapter 15
1
Select the sequence in the Browser or Timeline and choose Trimmer from the Sequence
menu.
2
Enter a duration for handles for the offline clips. This adds extra footage at both the head and
tail of the trimmed clip, enabling you to fine-tune the sequence timing.
3
Enter a name for the new sequence and click OK.
Note: Selecting Extract Full Clip will not trim the clips, but will provide them in their full
media length in an offline sequence and a bin.
Relinking Offline Files
If you’ve moved the source media files used in a project or sequence, you can relink online
and offline clips to media on your disk using the Relink Media command.
To relink individual offline files:
1
Select the file or files to be relinked.
2
Open the File menu and choose Relink Media.
3
Locate the disk file for each clip in your sequence.
4
Click Select each time you locate the correct file.
Note: You can make it easier to locate the correct filename, especially if you’re looking
through a long list of similar names, by clicking the checkbox labeled “Show Only Files that
Match This Name.”
To relink all files in the same path:
m If all the files you’re looking for are in the same folder, you can check the “Relink All Files
In This Path” checkbox. When you click Select to link the first file you find, Final Cut Pro
looks at all files in the same path and automatically links them with any clips in the
sequence that are associated with files that match the selected filename.
Moving a Project and Its Media
Occasionally you may need to move the source media used in a project or copy a project and
its media to another disk. You can use the Media Mover to move a project and its source
media without breaking any links.
Managing Complex Projects
269
Note: Using the Save As command will make a copy of the project file, but not related
media. Use Media Mover to save a copy of your project along with copies of associated
render flies.
To use the Media Mover:
1
Click the project’s Browser tab, or select any item in the project.
2
Open the Sequence menu and choose Media Mover.
3
If you want to move rendered files as well as the source media, click the Include Render Files
checkbox.
4
Click OK.
5
Choose the location where you want to store the copy of the project.
6
Name the project, if necessary.
7
Click Save.
The project file and two new directories (Render Files and Clips) containing the related
media are copied to the new location.
Note: If you are using third-party plug-ins, you need to copy them to the new location also.
Managing Projects With Multiple Users
In situations where multiple users may be sharing the same system or working on the same
project, folders can be used to manage and organize multiple users’ media files.
To create a personal or project folder:
1
In the Finder, find and open your scratch disk.
2
Choose New Folder from the File menu.
3
Give the folder an appropriate name.
To select the folder as a storage directory for scratch files:
1
In Final Cut Pro, open the Edit menu and choose Preferences.
2
Click the Scratch Disks tab.
3
Select the type of media files to be stored in the folder and click the Set button to find and
choose the folder in the scratch disk.
When other users use the system, they can create their own folders and set the scratch disk
preferences to their folders.
270
Chapter 15
C H A P T E R
16 Building Effects With FXBuilder
16
FXBuilder gives you the ability to create, test, and modify custom video effects, such as
filters, text generators, or transitions. You don’t need in-depth programming knowledge to
create your own effects in FXScript. You use a process called scripting to create your effects.
You can build effects quickly and connect several effects together, so that they run in the
order you choose.
You can also save effects in a protected format that allows them to be run, but prevents
anyone from viewing their code. This means you can create and distribute effects that are
copyrighted without losing control of their content.
What Is Scripting?
Scripting is similar to programming. It is the process of putting together a series of video
processing instructions in a way that Final Cut Pro understands. A set of instructions that
performs a specific function is called a script.
Scripts have elements in common with written language as well as with programming. Scripts
have structural and syntactical rules, but the words you use are very similar to English.
Scripting is a way to put many smaller instructions together in a sequence, so that you can
perform complex tasks automatically. For example, if you want to add a color tint to a video
clip, Final Cut Pro does this by looking at the dots in each frame of the clip and then
changing some of them to the color of the tint you want. Doing this without a script would
be a tedious and error-prone task. With a script, all the instructions for creating the tint effect
can be applied to the clip with one simple step.
Scripting also guarantees that a particular effect will look and behave in the same way every
time it is used. It therefore makes a video effect consistent over multiple projects.
271
How Does FXBuilder Work?
You can do several things with effects scripts in FXBuilder:
m Open an existing script
m Make changes to a script
m Test a script to see how it looks in real time
m Create a new script
In addition, you can take existing effects from your project’s Browser and apply them to
video in your project’s Timeline or Canvas.
FXBuilder has three components:
m The FXBuilder window: You use this to create, test, and edit effects scripts. This contains
two tabs, one for script entry and one for the input controls that modify the behavior of
the script when it is run.
m The FXScript language: This is the scripting language you use. FXScript commands and
functions are listed in Appendix A, “FXScript Reference,” on page 285.
m The effects scripts provided with Final Cut Pro: You can apply these to your projects
unchanged or modify by changing the script code. The effects scripts are listed in
Appendix B, “List of Audio and Video Effects,” on page 325.
Opening FXBuilder
You work in the FXBuilder environment while you create and test effects scripts. You can
open an existing script in an FXBuilder window, or you can open a new FXBuilder window
and begin creating a script from scratch.
To open an empty FXBuilder window:
m Choose FXBuilder from the Tools menu.
You can open as many FXBuilder windows as you want.
The FXBuilder menu appears next to the Tools menu when an FXBuilder window is active.
You can use this menu to insert script words, run a script on a sample of video, or save your
script as a file that can’t be modified.
Opening and Applying Scripts
The sample scripts provided with Final Cut Pro are available in the Effects tab of the Browser.
Effects scripts are divided into several groups in the Browser:
m Filters: Modify the picture in a single clip
m Transitions: Perform effects to change the picture from one clip to another
m Generators: Create new video information, such as text
272
Chapter 16
To open a script so that you can view its code:
1
In the Browser’s Effects tab, locate and select the effect you want.
2
Choose Effect Editor from the View menu.
An FXBuilder window shows the script for the selected effect. This is the window you use
when working with scripts.
The FXBuilder Tabs
The FXBuilder window has two tabs.
m FX Builder Text Entry: Use this tab to review, enter, and edit script code.
Note: FXBuilder does not support multiple levels of undo.
Building Effects With FXBuilder
273
m FXBuilder Input Controls: Use this tab to test your script on some source video. Some
scripts require input from you in order to run. For example, if you’re testing a script that
adds a color tint, you need to specify which color you want the tint to be. You also need
to set the input controls for a script when you apply it to a clip in a sequence’s timeline.
Running a Script in FXBuilder
You can run scripts in real time, without rendering them first.
To run a script:
1
Open the effects script you want.
2
Click the Input Controls tab.
3
Drag a clip into one of the source spaces (transitions require two clips). You can drag clips
from the Browser, the Timeline, or a Viewer window.
Note: Controls will not appear in the FXBuilder Input Controls tab until you run your script
in the FXBuilder Text Entry tab.
4
Open the FXBuilder menu and choose Run.
The script runs in an FXBuilder window.
You can use the playhead in the Scrubber bar to step through the effect frame by frame, or
move rapidly through it.
5
Set the inputs as required.
6
You can do this while the script is running. If you click the Stop button or choose Stop from
the FXBuilder menu, the inputs revert to the default the next time you run the script.
Applying a Script in the Timeline
You can apply scripts to video in a sequence’s Timeline. To do this, drag the script from the
Browser’s Effects tab to the required location in the Timeline.
274
Chapter 16
You can place effects anywhere in the video you want to apply them to. You can also apply
multiple effects to the same video.
If you are placing transitions in the Timeline, you can place them between the end of the first
and the beginning of the second clip in the transition. You can also place effects at the end of
the second clip, or the beginning of the first.
When you place effects in the Timeline, you can adjust their inputs. If you do not set the
input controls, the defaults apply.
To adjust the input controls for a transition or generator effect in the Timeline:
m Double-click the effect’s icon that appears where you placed the transition or generator.
To adjust the input controls for any other type of effect in the Timeline:
m Double-click the clip.
m Click the Filters tab in the clip’s Viewer window.
Rendering
When you have applied scripts in the Timeline, you must render them before you can play
them. If you do not render video to which scripts have been applied, you will see a blue
display with the word “Unrendered” in the Canvas.
If you want to see what an effect will look like when used with project video in real time, you
can use FXBuilder to do this, as explained in “Running a Script in FXBuilder” on page 274.
For more information about Rendering, see Chapter 13, “Rendering,” on page 241.
Modifying Scripts
Final Cut Pro’s extensive library of effects can easily be modified to suit individual projects.
All scripts have the same simple structure, which makes it easy to understand and change
them.
How Is a Script Structured?
The script below applies a color tint to the video. It is one of the scripts supplied with Final
Cut Pro. You can open this script by selecting it in the Browser and choosing Effects Editor
from the View menu.
filter “Tint”;
group “Image Control”
input RGBtint, “Tint Color”, color, 0,0,0,0;
code
float offset0[ 3], offset128[ 3] ;
Building Effects With FXBuilder
275
yuvcolor yuvtint;
yuvtint = RGBtint;
yuvtint += 128;
offset128[ 1] = 128;
offset128[ 2] = 128;
colorTransform (Src1, Dest, RGBtoYUV, offset0, offset128);
channelFill(Dest, -1, -1, yuvtint.u, yuvtint.v);
ColorTransform (Dest, Dest,YUVtoRGB, offset128, offset0);
The first two lines state the script’s name and type, and assign it to a group in the Browser.
This script is named “Tint.” It is a filter script and has been assigned to the group Image
Control. This means it can be found in the Browser’s Image Control bin.
filter “Tint”;
group “Image Control”
The third line specifies the input control needed. In this case, all that is needed is a standard
color selection control. If more input controls were needed, they would appear in this part of
the script, on separate lines. This input control takes a number corresponding to the color
selected and places it in a variable called RGBtint.
All input controls place the result of the input into a variable, so that it can be used later on
in the script code.
input RGBtint, “Tint Color”, color, 0,0,0,0;
The next line shows where the actual script code begins. Every line that follows it is script
code:
code
The remaining lines are the code required to take the selected color and apply it to the video
by changing the colors in individual pixels of video. The final line, which begins with the
word channelFill, is the one that actually applies the selected color.
float offset0[ 3], offset128[ 3] ;
yuvcolor yuvtint;
yuvtint = RGBtint;
yuvtint += 128;
offset128[ 1] = 128;
offset128[ 2] = 128;
colorTransform (Src1, Dest, RGBtoYUV, offset0, offset128);
channelFill(Dest, -1, -1, yuvtint.u, yuvtint.v);
ColorTransform (Dest, Dest,YUVtoRGB, offset128, offset0);
276
Chapter 16
Script Lines
A script is divided into lines. Each line contains a statement, or a group of statements. You
can’t end a line in the middle of a statement. So, for example, in the Tint script, the statement
yuvtint = RGBtint must all appear on the same line. If you break the line in the middle
of this code, the script will not run.
The ; character denotes the end of a line. You can also use a carriage return (the Return key).
Use the ; character if you want to join two short lines together.
Customizing a Script
There are many ways to customize scripts.
For example, the Tint script can be changed by adding a brightness control that can be set by
the user.
First, set the input control for the brightness level. You can do this by entering the line below
under the Tint Color input command at the top of the script:
input brightness, “Brightness”, slider, 100, 0, 200 label “%”;
The input is then used to change the brightness of the clip. You use the channelMultiply
command to multiply the luminance channel by the input variable. The following line of code
does this, and should be placed below the channelFill line in the body of the script:
channelMultiply (dest, dest, 1, brightness/100, 1, 1);
The next time you run the script, you can change the brightness as well as the color tint.
Exporting Scripts
To export a script, make sure that the FXBuilder window for the script is active and choose
Export from the File menu.
Exporting Scripts as Text Files
If you export your script as a text file, it can be opened, viewed, and changed. Use this option
when you are working on a script, or if you are using scripts that are in the public domain.
To export a script as a text file:
1
Make sure that the FXBuilder window for the script is active.
2
Open the File menu and choose Text from the Export submenu.
3
Name your text file.
4
Export the file to the FXScripts folder within the Plug-Ins folder inside the Final Cut Pro
folder.
Building Effects With FXBuilder
277
Preventing Scripts From Being Modified or Viewed
m If you want a script to be saved so that it can be viewed only in Final Cut Pro: Choose
Create Plugin from the FXBuilder menu.
m If you want the script to be saved so that it can’t be viewed or changed: Choose Create
Encoded Plugin from the FXBuilder menu. This saves a copy of the script that can be run,
but can’t be viewed or changed.
Making a Favorite Effect From a Script
m Choose Make Favorite Effect from the Effects menu.
Installing Scripts
To install a script, drag the script file to the following location:
m Final Cut Pro : Plugins : FXScripts folder
If you know the type of the script you are installing, place it in the appropriate folder within
the FXScripts folder.
Final Cut Pro will load the new effects the next time you start the application.
Go to www.apple.com/finalcutpro/fxscripts to find additional scripts and instructions.
Building Scripts
There are four parts to the process of building a good, well-structured script.
m Planning: What do you want your script to do?
It’s important to have clear goals in mind before you start. It should be possible to
describe the function of a script in one or two sentences. You can write a script’s
description as a comment line in the script code.
m Structure: The purpose of your script determines its structure to a great extent.
Code that is broken up into structural “building blocks” is easier to test and modify than
code written without careful attention to structural detail.
FXScript allows you to break scripts up into subroutines that can be “called” from other
parts of the script. This means that you only need to write code once, regardless of how
many times it will be used. You should also group variable definitions together as much as
possible, and use comments to break up the script’s text and provide information about
what each part does.
278
Chapter 16
m Coding: Once you know your script’s purpose and have an idea of how it will be
structured, you can begin writing the code.
When you’re coding, remember that the exact format (“syntax”) of each
word or statement is important. Misspelled words, or words that are not accompanied by
all the necessary information, will cause errors in the script.
Important
It’s also a good idea to keep your script lines as short as possible. This makes the code
easier to read and interpret.
m Testing: Is it working, and if not, how do you fix it?
Testing is a crucial part of the scripting process. If you have written a simple script, you
may only need to run it once or twice to be satisfied that it works. More complex scripts
may need to be tested on different clips, and incorporated into Timelines to see how a
final product might look.
Some scripts will not run at all because they contain syntax errors. Syntax errors are like
spelling mistakes in the code. If you try to run a script that contains syntax errors,
FXBuilder stops the script and highlights the first line that contains an error. You can use
the reference information in Appendix A, “FXScript Reference,” on page 285, to check the
syntax of your script.
If your script contains input controls, be sure to test the script with a representative range
of input settings, so that you can be sure that all combinations of settings will work
together. If you find that certain combinations of settings give a result that is
unacceptable, you may need to modify the range of values accepted by one or more of
the input controls, to prevent those combinations from being chosen.
About the FXScript Commands
This section explains the functions of the different types of FXScript commands. For
complete reference information about the FXScript language, see Appendix A, “FXScript
Reference,” on page 285.
Statements
A statement is a command that accomplishes a single action. There are several types of
statements in FXScript.
The Definition Statement
The first statement in every script should be the definition statement. This tells Final Cut Pro
what the name of the script is, and what type of script it is (filter, transition, or generator).
Final Cut Pro uses this information to place the script in the Browser’s Effects tab.
If you don’t place a definition statement in your script, it will not run.
Building Effects With FXBuilder
279
Conditional Statements
A conditional statement says that something should happen if a certain condition is met.
Conditional statements always begin with if and end with end if.
This example comes from the Bevel filter script, which places a beveled border around the
picture.
if framewidth<frameheight
framemin=framewidth;
framemax=frameheight;
else
framemin=frameheight;
framemax=framewidth;
end if;
This statement is conditional upon the values of two variables, framewidth and frameheight.
It changes the values of two other variables, framemin and framemax, depending upon the
relative values of the variable pair mentioned in the conditional statement.
You can add more conditions by placing else if clauses into the conditional statement.
Each else if clause allows you to add one more condition to the statement.
The else clause means “in all other cases not covered by the previous condition or
conditions.” It is not essential to place else statements in scripts unless you want to specify
what should happen if none of the conditions are met.
Input Statements
Input statements are extremely powerful and versatile. They enable you to place user
controls into a script, so that an effect can be finely adjusted. The user controls appear in the
Input controls tab in the FXBuilder window, and also in the Viewer when a script is added to
the Timeline for a sequence.
There are several types of input control. You can choose the type of control that meets the
needs of the script most closely. You can have more than one input control in a script; some
have three or four.
Loops
A loop is a section of code that repeats, usually according to certain conditions specified by
the needs of the script. There are two basic types of loops in FXScript: the For/Next loop
and the Repeat/End Repeat loop, which has several specific forms.
280
Chapter 16
Subroutines
A subroutine is a section of the code that can be “called” from another part of the script.
When the subroutine is called, it runs and then returns the script flow to the place from
which it was called. Subroutines are a useful way to break code up, and they minimize the
amount of code in a script, because they can be reused.
You begin a subroutine in a script using the on command, like this:
on mysub (parameter 1, parameter 2...)
You end a subroutine with the word end on a line by itself.
All the code between the on and end commands is part of the subroutine.
“Mysub” is the subroutine’s name, and the “parameters” in brackets are information the
subroutine needs to do its job. Sometimes the parameters are taken from input controls in
the script.
The script can call the subroutine at any time just by using its name in a line of code. In a
sense, the subroutine has become a new scripting word, which you have created.
When the subroutine has been run, the script returns to the line immediately after it was
called.
Variables
A variable is a “container” for information that is unknown and that can change, such as the
result of an input control selection. You can treat variables as if they were numbers or
sequences of text; they’re like placeholders.
Any time you use a variable in a script, it must be introduced to the script in a declaration
statement. The exception to this rule is any predefined variable included in the FXScript
language.
There are three types of variables in FXScript:
m Predefined variables: These are part of the FXScript language. Examples are color
specifications, used by drawing routines, and the constants used by the numeric
formatter. Another example is the variable fps, which contains the number
corresponding to the current frame rate for the sequence.
m Global variables: These are variables you define in the code section of the script. They
reset to zero after each video frame on which the effect is applied, and can be referred to
in any part of the script following their declaration statement. The declaration statement
for a global variable must specify the data type of the variable being defined, as well as the
name.
m Static variables: These are declared before the code section of the script. They maintain
their values between frames of video, unless the script code changes them.
Building Effects With FXBuilder
281
Constants
A constant is a number that always has the same value. Several are available for use in your
scripts.
Data
Data is any type of information processed in a script. FXScript can handle several types of
data:
m Strings: A string is a sequence of characters. Strings are processed as characters only and
do not have mathematical or arithmetical meaning, even if they contain numbers.
m Numbers: FXScript allows you to work with several types of numbers. You can use
floating-point numbers, numeric coordinates, and numbers corresponding to colors.
m Images: These are buffers that can hold frames of video.
m Regions: These define an area of a video frame.
m Clips: These are buffers that can hold entire clips.
Arrays
An array is a grid of one or more dimensions. In a sense, a video picture is a two-dimensional
grid made up of colored dots. Arrays are often used in scripts that calculate which pixels or
regions of a frame need to be modified.
Operators and Expressions
An expression is a statement about the value of a number or numbers. It consists of numbers
themselves, or variables, combined with operators.
An operator is a symbol that defines a mathematical, logical, or arithmetical function such as
addition or subtraction, or a condition, such as the state of being greater than or less than
something else.
FXScript understands a wide variety of operators suited to different scripting purposes.
Functions
A function is a pre-defined calculation. Functions are very useful in graphical calculations,
such as the arctangent or cosine of a number. Some functions are used in color processing,
and others are used when processing digital video information on a pixel-by-pixel level.
Functions can be references in your scripts in the same way as variables.
282
Chapter 16
Comments
Any script line that begins with the characters // is a comment. You can place a comment line
anywhere in a script. It’s a good idea to include plenty of comments in scripts, especially if
you make changes to them, or if they are long or complex.
Comments are an essential part of a script. They give information about the script and what it
is doing. They can make a script much easier to understand, test, and change by including
useful explanatory detail about the script’s code and structure.
Building Effects With FXBuilder
283
A P P E N D I X
A
A
FXScript Reference
This appendix lists all the commands and functions in the FXScript language. These are
grouped by the FXBuilder submenu they appear in. Each command includes information
about its syntax, any parameters it requires, and any special information about its use.
When creating a script, you can place command templates into an FXBuilder Text Entry tab
by choosing them from the FXBuilder menu.
Scripting Parameters
Many FXScript commands require parameters for the calculations they perform. These have
names that indicate their uses. Any parameter required by FXScript functions and commands
can be replaced by a variable, as long as the variable is of the correct data type and has been
correctly declared elsewhere in the script. Some functions and commands can use numeric
parameters as well as variables.
Expressions in FXScript
Expressions are like phrases made up from scripting words, numbers, and operators,
together with parentheses. The operators determine what sort of calculation or evaluation
(also known as an operation) is done, and the parentheses determine the order in which
calculations are performed.
The rules are as follows:
m An expression is interpreted from left to right.
m Multiplication and division take precedence over addition and subtraction.
m Parts of the expression that are enclosed in parentheses are given priority over parts that
are outside the parentheses. If there are several layers of parentheses, the expression is
evaluated in order from the innermost parentheses to the outermost.
285
Operators
The following table lists all the operators that can be included in your scripts.
Operator
Meaning
+
Add (This operator can also be used to indicate a positive number.)
–
Subtract (This operator can also be used to indicate a negative number.)
*
Multiplication
/
Division
! or not
Logical NOT
~
Bitwise NOT
% or mod
Modulo
==
Equal
!=
Not equal
<
Less than
>
Greater than
<=
Less than or equal to
>=
Greater than or equal to
<<
Shift left
>>
Shift right
&
Bitwise AND
|
Bitwise OR
ˆ or xor
Bitwise XOR
&& or and
Logical AND
|| or or
Logical OR
? and :
<conditional> ? <value 1> : <value 2>
If the conditional is true, it will return value 1; if it is false, it will return value 2.
Note: Numbers are assumed to be floating-point unless preceded by “0x,” which denotes
hexadecimal.
286
Appendix A
Compound Operators
In an assignment statement, you can use the compound assignment operators. These are
+=, –=, *=, /=, %=, &=, |=, and ˆ=.
Operators and Regions
For regions, only a few operators can be used. These are +, –, &, |, and ˆ.
Operators and Strings
For strings, only the + operator can be used, for adding strings together.
Data Types
Data types allow you to declare variables and assign specific data types to them.
Data type statements are always followed by one or more variable names, separated by
commas.
You can create arrays by following a data type statement with up to 10 dimensions of the
array in brackets. The example creates a 3*4 array of points and names it “p”:
point p [3] [4]
Data Type
Syntax
Description
float
float variablename
Declares a floating-point
variable
point
point variablename
Declares a variable that contains
a two-dimensional point
coordinate
point3d
point3d variablename
Declares a variable that contains
a three-dimensional floatingpoint coordinate
image
image variablename
[width][height]
Declares a two-dimensional
buffer of pixels to be operated
on
region
region variablename
Declares a named region. A
region is an arbitrary shape.
string
string variablename
Declares a text string
FXScript Reference
287
Data Type
Syntax
Description
color
color variablename
Declares a variable with four
fields (one each for a, r, g, and
b) that contains an ARGB color
value
YUVcolor
YUVcolor variablename
Declares a variable with four
fields (one each for a, y, u, and
v) that contains a YUV color
value
clip
clip variablename
Declares a variable that holds a
video clip
value
value variablename
Declares a non-modifiable
parameter in a subroutine
Functions
Functions can be used with variables as well as with known numbers.
288
Appendix A
Function
Syntax
Description
Sin
Sin(angle)
The sine of the specified angle
(as a floating-point number in
degrees)
Cos
Cos(angle)
The cosine of the specified
angle (as a floating-point
number in degrees)
Tan
Tan(angle)
The tangent of the specified
angle (as a floating-point
number in degrees)
ASin
ASin(value)
The arcsine of the value in
degrees
ACos
ACos(value)
The arccosine of the value in
degrees
ATan
ATan(value)
The arctangent of the value in
degrees
Sqrt
Sqrt(value)
The square root of the value
Function
Syntax
Description
Abs
Abs(value)
The absolute integer value of
the value
Power
Power(value, exponent)
The value raised to the specified
exponent
Exp
Exp(value)
The mathematical constant e
raised to the power
corresponding to the specified
value
Log
Log(value)
The base e logarithm of the
value
Log10
Log10(value)
The base 10 logarithm of the
value
Integer
Integer(value)
Converts the value into an
integer number
Sign
Sign(value)
The sign of the value. This is –1
if the value is less than zero, 0 if
the value equals zero, and 1 if
the value is greater than zero.
Command
Syntax
Description
DistTo
DistTo(p1, p2)
The distance from P1 to P2. P1
and P2 are two-dimensional
point coordinates.
AngleTo
AngleTo(p1, p2)
Returns the angle from P1 to P2,
where P1 to P2 is a vector
Interpolate
Interpolate(p1, p2,
percent, result)
Interpolates between two
points. The result is a twodimensional point variable.
CenterOf
CenterOf(poly, point)
Places the center point of the
polygon represented by “poly”
into the variable represented by
“point”
Geometry
FXScript Reference
289
290
Appendix A
Command
Syntax
Description
BoundsOf
BoundsOf(image, result)
Fills in the polygon represented
by “result” with a four-sided
rectangle that is the bounds of
“image.” The result must be a
point [4] variable, set as a
rectangle.
DimensionsOf
DimensionsOf(image,
width, height)
Returns the width and height of
the specified image buffer
AspectOf
AspectOf(image)
Returns a floating-point value
that is the aspect ratio of the
pixels of the specified image
buffer. This buffer must have
been previously declared and
have the image data type.
Grid
Grid(srcPoly, destPoly)
This splits a rectangular
polygon, “srcPoly,” and divides
it into a grid of rectangles based
on the dimensions of “destPoly”
Mesh
Mesh(srcPoly, destPoly)
Makes a mesh out of a
rectangular polygon, “srcPoly,”
based on the dimensions of
“destPoly.”
Convert2dto3d
Convert2dto3d(point/
poly, point3d/
poly3d, zvalue)
Fills in the values of “point3d”
or “poly3d” with the
corresponding values from
“point” or “poly,” using the
number represented by “zvalue”
for the z-axis dimension of each
point
Convert3dto2d
Convert3dto2d(point3d/
poly3d, point/
poly, eye3d)
Fills in the values of “point” or
“poly” with the corresponding
values from “point3d” or
“poly3d.” Eye3d is the view
point for the conversion. If it is
zero, then parallel projection is
used for the conversion.
Shapes
Command
Syntax
Description
Line
Line(p1, p2, image,
color, width)
Draws a line in the buffer
corresponding to “image,” from
p1 to p2, with the specified
color (expressed as an RGB
value) and width (in pixels)
MakeRect
MakeRect(result, left,
top, width,
height)
Fills in a rectangular polygon,
“result,” with the dimensions
specified. Left and top are twodimensional points and width
and height are distances in
pixels.
MakeRegion
MakeRegion(poly, rgn)
Turns the specified polygon into
a region, stored in the region
named “rgn”
OvalRegion1
OvalRegion(poly, rgn)
Makes an oval from the upperleft and lower-right corners of
the specified polygon. This is
stored in the region named
“rgn” .
RegionIsEmpty
RegionIsEmpty(rgn)
Returns “true” if the region
specified contains no pixels.
“True” has a value of 1.
FrameRegion1
FrameRegion(rgn, image,
color, width)
Draws a line around the
specified region, rgn, with
specified color and width in the
image buffer
FillRegion1
FillRegion(rgn, image,
color)
Fills the specified region with
the specified color and stores
the result in the specified image
buffer
FXScript Reference
291
Command
Syntax
Description
FramePoly
FramePoly(poly, image,
color, width)
Draws a frame around the
bounds of the specified
polygon, with the specified
color (as an RGB value) and the
specified width (in pixels).
Stores the result in the specified
image buffer.
FillPoly
FillPoly(poly, image,
color)
Fills the specified polygon with
the specified color and stores
the result in the specified image
buffer
DrawSoftDot
DrawSoftDot(dest, point/
poly, shape,
size, softness,
subSteps,
color(s),
opacity(s),
aspect)
Draws one or more sub-pixelpositioned shapes in a buffer.
This command can be used to
draw circles, squares, and
diamonds in the specified color,
size, softness, positioning
accuracy, and opacity. The color
and opacity can be an array or a
single value.
FillOval
FillOval(poly, dest,
color)
Fills the specified oval with the
specified color and stores the
result in the specified image
buffer
FrameOval
FrameOval(poly, dest,
color, width)
Draws a frame around the
bounds of the oval specified
polygon, with the specified
color (as an RGB value) and the
specified width (in pixels).
Stores the result in the specified
image buffer.
1
292
Appendix A
The Region routine fills the alpha channel with black.
Transform
Command
Syntax
Description
Rotate
Rotate(point/poly,
center, angle,
aspect)
Rotates the specified point or
polygon through the specified
angle in degrees, around the
specified center
Rotate3d
Rotate3d(point3d/poly,
center3d,
xrotate, yrotate,
zrotate)
Rotates the specified threedimensional point or polygon
through the specified angle,
around the specified center.
Note that center3d has three
fields, corresponding to height,
width, and depth and separated
by commas.
Scale
Scale(point/poly,
center, hScale,
vScale)
Scales a point or polygon
around the specified center by
the amounts specified in hscale
and vscale
Scale3d
Scale3d(point3d/poly3d,
center3d, xscale,
yscale, zscale)
Scales a point or polygon
around the specified center by
the three scaling factors
Offset
Offset(point/poly,
hAmount, vAmount)
Moves a point or polygon by the
specified amount on each
dimension in the amount
specified
Offset3d
Offset3d(point3d/poly3d,
xoffset, yoffset,
zoffset)
Moves a three-dimensional
point or polygon by the
specified amount in each
dimension
Outset3d
Outset3d(poly3d,
center3d, amount)
Moves a four-sided polygon
towards or away from the
specified center point
FXScript Reference
293
Blit
294
Appendix A
Command
Syntax
Description
RegionCopy
RegionCopy(srcImage1,
srcImage2,
destImage, rgn,
softness)
Copies the two source images
into the destination image
buffer using the specified region
as a mask, softening the edges
of the mask according to the
value given for softness
Blit
Blit(sourceImage,
sourcePoly,
destImage,
destPoly,
opacity)
Copies the pixels inside
“sourcepoly” in “sourceimage”
into the “destpoly” in
“destimage,” applying the
“opacity” value
BlitRect
BlitRect(sourceImage,
sourcePoly,
destImage,
destPoly)
Copies the pixels inside
“sourcepoly” in “sourceimage”
into the “destpoly” in
“destimage.” The source and
destination polygons must be
four-sided and the alpha
channel of the source is treated
as opaque.
MeshBlit
MeshBlit(sourceImage,
sourcePoly,
destImage,
destPoly,
opacity)
Copies the pixels from
“sourceimage” into “destimage,”
using two point meshes as the
transformation and applying the
value specified for “opacity”
MeshBlit3D
MeshBlit3d(sourceImage,
sourcePoly,
destImage,
destPoly3d,
opacity,
center3D)
Copies the pixels from
“sourceimage” into “destimage,”
using two 3D point meshes as
the transformation and applying
the value specified for “opacity”
Command
Syntax
Description
MaskCopy
MaskCopy(sourceImage1,
sourceImage2,
maskImage,
destImage,softness,
amount)
Copies from the two source
images into the destination
image, using a gradient mask.
The value given for “softness”
defines the threshold amount
for the gradient, and “amount”
specifies the gradient
percentage. This command is
the same as RegionCopy, but
the mask is derived from an
image buffer.
PagePeel
PagePeel(srcImage1,
srcImage2,
destImage,
centerPoint,
radius, angle,
peel, aspect)
Performs a “page peel” effect,
using the srcImage1 and 2
buffers as the front and back of
the page. The result is placed in
the “destImage” buffer. The
center point and angle specify
the location and angle of the
“cut line” for the peel. “Radius”
is the radius of the curvature for
the peel. The value given for
“peel” determines the type of
peel that occurs: if it is zero, the
image is rolled up along one
side, like a scroll, and if it is any
value other than zero, the image
peels upward and away, starting
at one corner, from the image
below.
FXScript Reference
295
Process
296
Appendix A
Command
Syntax
Description
Blur
Blur(srcImage,
destImage,
radius, aspect)
Performs a blur operation on
the source image buffer and
places the result in the
destination image buffer.
“Radius” specifies the radius of
the blurred area.
BlurChannel
BlurChannel(srcImage,
destImage,
radius, doAlpha,
doRed, doGreen,
doBlue, aspect)
Performs a blur operation on
the specified channels of the
source image buffer and places
the result in the destination
image buffer. Any of the four
channels can be omitted.
“Radius” specifies the radius of
the blurred area. The
doChannel values are Boolean
numbers, either known
numbers or variables.
Diffuse
Diffuse(srcImage,
destImage,
repeatEdges,
hMin, hMax, vMin,
vMax)
Each pixel in the destination
image buffer is filled with a pixel
from the source image buffer,
which is offset spatially by a
random number. The range for
this random number is defined
by the values assigned to
“hmin” and “hmax” on the
horizontal axis, and “vmin” and
“vmax” on the vertical axis.
“RepeatEdges” is a Boolean
operation that determines
whether pixels that would be
beyond the bounds of the
source image are filled with
copies of the nearest edge pixel,
or with transparent black pixels.
Command
Syntax
Description
DiffuseOffset
DiffuseOffset(srcImage,
destImage,
repeatEdges,
hMin, hMax, vMin,
vMax,
hTable[width],
vTable[height])
This is similar to Diffuse, but the
horizontal and vertical offset for
each pixel is added to the
hTable and vTable, which
contain the horizontal and
vertical position for each pixel.
MotionBlur
MotionBlur(srcImage,
destImage, hDist,
vDist, steps)
Copies the source image buffer
into the destination image
buffer, adding a motion blur
with a magnitude specified by
“hdist” and “vdist.” “Steps”
determines how many
intermediate steps are added.
RadialBlur
RadialBlur(srcImage,
destImage,
centerPt, amount,
spin, steps,
aspect)
Copies the source image buffer
into the destination image
buffer, adding radial blur with a
magnitude specified by
“amount,” around the center
specified in “centerPt.” “Steps”
specifies how many
intermediate steps are added to
the blur effect. “Spin” can be
either true or false. If true,
“amount” is a rotation angle. If
false, “amount” is the distance
that the blur extends from the
center point.
Blend
Blend(srcImage1,
srcImage2,
destImage,
amount)
Blends the two source image
buffers and places the result in
the destination image buffer.
“Amount” specifies the blend
percentage.
FXScript Reference
297
298
Appendix A
Command
Syntax
Description
ColorTransform
ColorTransform(srcImage,
destImage,
matrix, float[3],
float[3])
Performs color transformation
from the source image buffer to
the destination image buffer,
based on the specified 3x3 float
matrix. The two float arrays
specify the offsets to be added
to the source and destination
buffers during the operation. If
the matrix is an RGB to RGB
transformation, the arrays
should be filled with zeros.
LevelMap
LevelMap(src, dest,
alphaMap[256],
redMap[256],
greenMap[256],
blueMap[256])
Maps the source image buffer
into the destination image
buffer, passing each component
of the source image through a
256-entry floating-point lookup
table. The tables are alpha, red,
green, and blue, in that order.
ChannelCopy
ChannelCopy(src, dest,
copyAlpha,
copyRed,
copyGreen,
copyBlue)
Copies a set of channels from
the source image buffer to the
destination image buffer. Each
channel is copied from the
channel specified by its
corresponding parameter. The
“copy” parameters are the
predefined variables kalpha,
kred, kgreen, and kblue.
Convolve
Convolve(srcImage,
destImage,
kernel, divisor,
offset)
Performs a 3x3 convolution
from the source image buffer to
the destination image buffer.
The sum of the contents of the
3x3 array specified as “kernel” is
divided by the specified divisor,
and “offset” is added in.
Command
Syntax
Description
ChannelFill
ChannelFill(destImage,
alphaValue,
redValue,
greenValue,
blueValue)
Fills the channels of the
destination image buffer with
the color values specified
ChannelMultiply
ChannelMultiply(srcImage,
destImage,
alphaValue,
redValue,
greenValue,
blueValue)
Copies the source image buffer
into the destination image
buffer, multiplying each channel
by the corresponding color
value. If any of these is set to
1.0, the channel is unchanged.
FXScript Reference
299
Distort
Distort is a group of routines that distort a clip.
300
Appendix A
Command
Syntax
Description
Cylinder
Cylinder(srcImage,
destImage,
center, radius,
amount, vertical)
Copies the source image buffer
into the destination image
buffer, distorting the pixels so
that they appear to have been
mapped onto the surface of a
cylinder. “Center” specifies the
three-dimensional center point
for the cylinder; “radius”
specifies the width of the
affected area. Vertical is a
Boolean number (true or false)
that specifies whether the
cylinder is horizontal or vertical.
Amount specifies the intensity
of the effect.
Fisheye
FishEye(srcImage,
destImage,
centerPt, radius,
amount, aspect)
Copies the source image buffer
into the destination image
buffer and distorts the image
outwards, creating a fisheye lens
effect. “Radius” specifies the
effect’s radius from the center
point in pixels. You can use a
negative number for “amount,”
which creates a reverse effect.
Whirlpool
Whirlpool(srcImage,
destImage,
repeatEdges,
centerPt, amount,
aspect)
Copies the source image buffer
into the destination image
buffer, distorting the image
outwards from the center point
by spinning the pixels around
by the “amount” specified. If
“RepeatEdges” is true, then the
edge pixels are repeated;
otherwise transparent black
pixels are introduced at the
edges.
Command
Syntax
Description
Ripple
Ripple(srcImage,
destImage,
repeatEdges,
centerPt,
amplitude,
wavelength,
aspect)
Copies the source image buffer
into the destination image
buffer, distorting the image by
applying waves from the edges.
“Amplitude” and “wavelength”
control the size and number of
waves in the ripple.
Wave
Wave(srcImage,
destImage,
repeatEdges,
centerPt,
amplitude,
wavelength,
vertical, aspect)
Copies the source image buffer
into the destination image
buffer, distorting the image
outwards from the center point
in such a way that the image
appears horizontally or vertically
rippled. The number and size of
the waves are controlled by
“amplitude” and “wavelength.”
The Boolean number (true or
false) represented by “vertical”
determines whether the waves
are arranged horizontally or
vertically. If “RepeatEdges” is
true, then the edge pixels are
repeated; otherwise transparent
black pixels are introduced at
the edges.
PondRipple
PondRipple(srcImage,
destImage,
centerPt,
radius[n],
thickness[n],
amplitude,
luminance,
aspect)
Copies the source image buffer
into the destination image
buffer, distorting the image
outward from the center point
in a pond ripple pattern. The
two parameters must be
floating-point arrays of the same
size. “n” ripples are created,
with radius and thickness
corresponding to “n.”
FXScript Reference
301
302
Appendix A
Command
Syntax
Description
Displace
Displace(srcImage,
destImage,
mapImage,
repeatEdges,
xScale, yScale,
lumaScale,
aspect)
Performs a pixel operation by
taking the red and green
channel values of a clip to offset
the source clip horizontally and
vertically, respectively
BumpMap
BumpMap(srcImage,
destImage,
mapImage,
repeatEdges,
angle, scale,
lumaScale,
aspect)
Performs a pixel operation by
taking the luminance value of a
clip to offset the source clip
OffsetPixels
OffsetPixels(srcImage,
destImage,
repeatEdges,
hDisplace[width],
vDisplace[height],
aspect)
Performs a row and column
operation by using two arrays to
offset the source clip
Composite
Command
Syntax
Description
Matte
Matte(overImage,
baseImage,
destImage,
amount, type)
Composites the image buffer
specified as “overImage” onto
the buffer specified as
“baseImage,” and places the
result in the destination image
buffer. “Type” can be one of the
predeclared variables kAlpha,
kWhite, or kBlack. These allow
alpha channel compositing or
black or white matte alpha
channel compositing. “Amount”
controls the opacity of the
image being overlaid.
Screen
Screen(srcImage1,
srcImage2,
destImage,
amount, type)
Mixes the white areas of source
image 1 into source image 2,
placing the result in the
destination image buffer.
“Amount” controls the
percentage of the blend.
Multiply
Multiply(srcImage1,
srcImage2,
destImage,
amount, type)
Mixes the black areas of source
image 1 into source image 2,
placing the result in the
destination image buffer.
“Amount” controls the
percentage of the blend.
Overlay
Overlay(srcImage1,
srcImage2,
destImage,
amount, type)
Mixes the white areas of source
image 1 into source image 2,
where the color values of pixels
in source image 1 are over 127,
and mixes the black areas of
source image 1 into source
image 2 elsewhere. The result is
placed in the destination image
buffer. “Amount” controls the
percentage of the blend.
FXScript Reference
303
304
Appendix A
Command
Syntax
Description
Lighten
Lighten(srcImage1,
srcImage2,
destImage,
percent, type)
For each pixel in the destination
image buffer, this function
chooses the corresponding
pixel in the source image that
has the lighter grayscale value.
Darken
Darken(srcImage1,
srcImage2,
destImage,
percent, type)
For each pixel in the destination
image buffer, this function
chooses the corresponding
pixel in the source image that
has the darker grayscale value.
Difference
Difference(srcImage1,
srcImage2,
destImage, type)
Each pixel in the destination
image buffer is filled with a
color value corresponding to
the absolute value of the
difference between each of the
channels in the two source
image buffers.
Add
Add(srcImage1,
srcImage2,
destImage,
percent, type)
Each pixel in the destination
image buffer is filled with a
color value corresponding to
the sum of the pixels in source
image 1 and the fraction of
source image 2 specified by
“percent.”
AddOffset
AddOffset(srcImage1,
srcImage2,
destImage,
offset)
Each pixel in the destination
image buffer is filled with a
color value corresponding to
the sum of the pixels in source
image 1 and source image 2.
The amount of offset is
specified by adding or
subtracting a value.
Command
Syntax
Description
Subtract
Subtract(srcImage1,
srcImage2,
destImage,
percent, type)
Each pixel in the destination
image buffer is filled with a
color value corresponding to
that for the same pixel in source
image 1 less the values of the
matching pixels in the portion
of source image 2 specified by
“percent.”
ImageAnd
ImageAnd(srcImage1,
srcImage2,
destImage)
Fills the destination image
buffer with a logical AND of all
the pixels in the two source
image buffers
ImageOr
ImageOr(srcImage1,
srcImage2,
destImage)
Fills the destination image
buffer with a logical OR of all
the pixels in the two source
image buffers
ImageXor
ImageXor(srcImage1,
srcImage2,
destImage)
Fills the destination image
buffer with a logical XOR of all
the pixels in the two source
image buffers
Invert
Invert(srcImage,
destImage)
Inverts the image
InvertChannel
InvertChannel(srcImage,
destImage,
doAlpha, doRed,
doGreen, doBlue)
Inverts one or more channels
selectively
UnMultiply
UnMultiply(srcImage,
srcImagetype)
Removes black or white
pre-multiplication
FXScript Reference
305
Key
306
Appendix A
Command
Syntax
Description
BlueScreen
BlueScreen(srcImage,
destImage, min,
max, fillRGB)
Creates a mask from the source
image buffer, extracting the blue
areas of the image. “min” and
“max” control the range of color
extraction. If “fillRGB” is 1, the
RGB channels are filled with a
grayscale mask. Otherwise only
the alpha channel is filled.
GreenScreen
GreenScreen(srcImage,
destImage, min,
max, fillRGB)
Creates a mask from the source
image buffer, extracting the
green areas of the image. “min”
and “max” control the range of
color extraction. If “fillRGB” is 1,
the RGB channels are filled with
a grayscale mask. Otherwise
only the alpha channel is filled.
BGDiff
BGDiff(srcImage,
destImage, min,
max, fillRGB)
Creates a mask from the source
image buffer, extracting the
areas of maximum difference
between the blue and green
channels. “min” and “max”
control the range of color
extraction. If “fillRGB” is 1, the
RGB channels are filled with a
grayscale mask. Otherwise only
the alpha channel is filled.
Command
Syntax
Description
RGBColorKey
RGBColorKey(srcImage,
destImage,
redTarget,
redPass,
greenTarget,
greenPass,
blueTarget,
bluePass,
softness,
fillRGB)
Fills either the alpha or RGB
channels of the destination
image buffer with a mask
created by comparing the values
of the pixels in the source
image to the “pass” values and
“target” numbers specified.
“Softness” specifies the softness
of the mask. “FillRGB” specifies
whether the alpha or RGB
channels are filled with the
results.
YUVColorKey
YUVColorKey(srcImage,
destImage,
yTarget, yPass,
uTarget, uPass,
vTarget, vPass,
softness,
fillRGB)
Fills either the alpha or RGB
channels of the destination
image buffer with a mask
created by comparing the YUV
values of the pixels in the
source image to the “pass”
values and “target” numbers
specified. “Softness” specifies
the softness of the mask.
“FillRGB” specifies whether the
alpha or RGB channels are filled
with the results.
FXScript Reference
307
External
308
Appendix A
Command
Syntax
Description
Filter
Filter("name", source,
dest, frame,
duration, fps,
["parmName",
parmValue, ...])
This calls another script, which
must be a filter. It passes one
source and one destination
image buffer, as well as values
corresponding to the frame
where the filter is to begin, the
frames per second for the video
where the frame is found, and
the duration of the filter effect.
You can also set the inputs for
the filter using the parameters
in square brackets. These
should correspond to the
variable names declared to hold
the inputs in the filter script
being called.
Command
Syntax
Description
Transition
Transition("name", src1,
src2, dest,
frame, duration,
fps, ["parmName",
parmValue, ...])
This calls another script, which
must be a transition. It passes
two source image buffers and
one destination image buffer, as
well as values corresponding to
the frame where the transition
is to begin, the frames per
second for the video where the
frame is found, and the duration
of the transition effect. You can
also set the inputs for the
transition using the parameters
in square brackets. These
should correspond to the
variable names declared to hold
the inputs in the transition
script being called.
Generator
Generator("name", dest,
frame, duration,
fps, ["parmName",
parmValue, ...])
This calls another script, which
must be a generator. It passes
one destination image buffer, as
well as values corresponding to
the frame where the generator
is to begin, the frames per
second for the video where the
frame is found, and the duration
of the generator effect. You can
also set the inputs for the
generator using the parameters
in square brackets. These
should correspond to the
variable names declared to hold
the inputs in the generator
script being called.
FXScript Reference
309
String
310
Appendix A
Command
Syntax
Description
NumToString
NumToString(number,
string, format)
Converts a number into a string
of text, using the format
specified. The format can be
any one of the constants used
to describe text formatting.
StringToNum
StringToNum(string)
Converts a string into a series of
numbers
Length
Length(string)
Returns a number
corresponding to the number of
characters in the specified string
CharsOf
CharsOf(sourceString,
first, last,
destString)
Places a subset corresponding
to the “first” through the “last”
characters of the source string
into the destination string
ASCIIOf
ASCIIOf(string, index)
Returns the ASCII value of the
character at the index in the
string
ASCIIToString
ASCIIToString(ASCIIValue,
destString)
Converts the “ASCIIvalue” into
the character it represents and
places this character in the
destination string specified
CountTextLines
CountTextLines(string)
Returns a number
corresponding to the number of
lines of text in the string
specified
FindString
FindString(sourceString,
startOffset,
findString)
Finds the characters in
“findstring” within
“sourcestring,” starting from
“startoffset”
Text
Command
Syntax
Description
DrawString
DrawString(string, h, v,
spacing, image,
color, aspect)
Draws the specified text string
in the specified image buffer,
starting in the position specified
by “h” and “v.” “Spacing”
determines the distance in
pixels between the characters
(auto-kerning), and “color”
specifies the color value for the
text. Can be used with doublebyte characters.
DrawStringPlain
DrawStringPlain(string,
poly, image,
color, aspect)
A faster string routine which
does not perform auto-kerning.
Can be used with double-byte
characters.
MeasureString
MeasureString(string,
spacing, width,
height, ascent,
descent, aspect)
Takes the specified string and
returns numbers based on its
dimensions. “Spacing”
determines the distance in
pixels between the characters
(auto-kerning). Can be used
with double-byte characters.
MeasureStringPlain
MeasureStringPlain(string,
width, height,
ascent, descent,
aspect)
Takes the specified string
without an auto-kerning
calculation and returns
numbers based on its
dimensions. Can be used with
double-byte characters.
SetTextFont
SetTextFont(string)
Chooses a font for the text from
the available system fonts
SetTextJustify
SetTextJustify
(justification)
Specifies right, left, or center
justification for a text string
SetTextStyle
SetTextStyle(style)
Sets plain, bold, italic, or bold
italic, for the text type used in a
text string
FXScript Reference
311
Command
Syntax
Description
SetTextSize
SetTextSize(size)
Sets the point size for a text
string
ResetText
ResetText
Resets the text to plain style,
black text color, 24-point size,
Times® font, and left-aligned
Command
Syntax
Description
GetVideo
GetVideo(srcClip,
timeOffset,
destImage)
Places the clip specified in
“srcClip” into the “destImage”
buffer, starting at the specified
time offset
GetTimeCode
GetTimeCode(srcClip,
timeCode,
frameRate,
dropFrame)
Gets the timecode for the
specified frame
GetReelName
GetReelName(srcClip,
string)
Places the reel name for the
source clip into the specified
string
GetLimits
GetLimits(srcClip,
duration, offset)
Places the time duration of the
specified clip into the variable
represented by “duration”
Command
Syntax
Description
SysTime
SysTime
Returns the computer’s current
clock setting
Random
Random(min, max)
Returns a random number no
less than “min” and no greater
than “max”
Clip
Utility
312
Appendix A
Command
Syntax
Description
RandomTable
RandomTable(array[n])
Fills the specified float array
with unique random values
between 0 and n-1
RandomSeed
RandomSeed(value)
Initializes the random number
generator. If “value” is zero,
random numbers generated will
be in a different sequence every
time.
MatrixConcat
MatrixConcat(srcMatrix1,
srcMatrix2,
destMatrix)
Concatenates two 3x3 matrices
and places the result into the
destination matrix
ColorOf
ColorOf(image, point,
color)
Places the color value of the
specified point in the specified
image buffer into the variable
specified for “color”
Truncate
Truncate(srcRect1,
srcRect2)
Takes the two source rectangles
specified and truncates them
into two equal-sized rectangles.
This is used right before Blit
commands to improve speed if
sub-pixel accuracy is not
needed.
PointTrack
PointTrack(fromImage,
srcPoint,
toImage,
guessPoint,
range,
deltaPoint)
Scans a rectangle of the size
specified in “range” around the
specified source point in the
“from” image buffer, looking for
a match in the “to” image buffer.
This assesses the difference in
position between the two image
buffers. The offset of the
matching image data in the “to”
image is placed in “deltapoint.”
FXScript Reference
313
Command
Syntax
Description
Highlight
Highlight(destImage,
centerPoint,
angle, width,
softness, dither,
gaussian,
foreColor,
backColor,
aspect)
Paints a specular highlight band
in the destination image buffer,
using the specified center point
and angle as the highlight line.
“Width” and “softness” define
the size of the highlight band,
and “color” specifies the color.
If the value for “dither” is true, a
random dither is applied to the
highlight gradient, making it
smoother over large areas. If
“gaussian” is true, the gradient
will have a Gaussian fall-off,
which looks more natural when
used for specular highlight, or
when two highlights are
screened together.
CircleLight
CircleLight(destImage,
centerPoint,
width, softness,
aspect, dither,
gaussian,
foreColor,
backColor)
Creates a circular highlight
outwards from “centerPoint”
RandomNoise
RandomNoise(destImage,
alphaMin,
alphaMax, redMin,
redMax, greenMin,
greenMax,
blueMin, blueMax,
makeColors)
Randomizes the color of all the
pixels in the destimage buffer,
according to the bounds set by
the min and max values for each
channel
Assert
Assert(value)
Stops the script with an error
Constants and Predeclared Variables
These are the predeclared variables included in FXScript. They can be used wherever
appropriate in your scripts and do not need to be declared in the script code. You can assign
values to them as necessary in your scripts.
314
Appendix A
General
Constant
Description
kUndefined
A value that static variables intially have
kAlpha
Used to define the alpha channel or straight alpha type
true
A Boolean variable
false
A Boolean variable
Color
Constant
Description
kBlack
Used to define black color or black pre-multiplied alpha type
kWhite
Used to define white color or white pre-multiplied alpha type
kGray
Used to define gray color
kRed
Used to define red color or the red channel
kGreen
Used to define green color or the green channel
kBlue
Used to define blue color or the blue channel
kCyan
Used to define cyan color
kYellow
Used to define yellow color
kMagenta
Used to define magenta color
Formatting
Constant
Description
kInteger
Used to define the integer numerical format
kFloat2
Used to define the real numerical format with two decimal places
kFloat4
Used to define the real numerical format with four decimal places
kFloat6
Used to define the real numerical format with six decimal places
kSize
Used to define the storage format (K, MB, GB, TB)
k24fps
Used to define the timecode format, 24 frames per second
FXScript Reference
315
Constant
Description
k25fps
Used to define the timecode format, 25 frames per second
k30fps
Used to define the timecode format, 30 frames per second, non-drop
frames
k30df
Used to define the timecode format, 30 frames per second, drop frames
k16mm
Used to define the timecode format 16 mm
k35mm
Used to define the timecode format 35 mm
Shapes
Constant
Description
kRound
Used to define an oval geometrical shape
kSquare
Used to define a rectangle geometrical shape
kDiamond
Used to define a diamond geometrical shape
Text
Constant
Description
kleftjustify
Used to define left text alignment
kcenterjustify
Used to define center text alignment
krightjustify
Used to define right text alignment
kplain
Used to define a plain text style
kbold
Used to define a bold text style
kitalic
Used to define an italic text style
kbolditalic
Used to define a bold, italic text style
Key
316
Appendix A
Constant
Description
kKeyNormal
Used to define the composite mode Normal
kKeyAdd
Used to define the composite mode Add
Constant
Description
kKeySubtract
Used to define the composite mode Subtract
kKeyDifference
Used to define the composite mode Difference
kKeyMultiply
Used to define the composite mode Multiply
kKeyScreen
Used to define the composite mode Screen
kKeyOverlay
Used to define the composite mode Overlay
kKeyHardLight
Used to define the composite mode HardLight
kKeySoftLight
Used to define the composite mode SoftLight
kKeyDarken
Used to define the composite mode Darken
kKeyLighten
Used to define the composite mode Lighten
Variables
Variable
Description
fps
Used to define the effects frame rate
frame
Used to define the current frame number
duration
Used to define the length of an effect
ratio
Used to define the ratio of current frame location relative to duration or
frame/duration
srcl
Used to define the current frame buffer from source clip in filters and
outgoing source clip in transitions
clip1
Used to define the source clip in filters and outgoing source clip in
transitions
srcType1
Used to define the source clip’s alpha type
src2
Used to define the current frame buffer from incoming source clip in
transitions
clip2
Used to define the incoming source clip in transitions
srcType2
Used to define the source clip’s alpha type
dest
Used to define the current buffer for video output
FXScript Reference
317
Variable
Description
exposedBackground
Used to define the background visibility
previewing
Used to define the rendering mode, frame render, or sequence render
renderRes
Used to define the sequence quality
RGBtoYUV
Used to define the matrix conversion from RGB to YUV color space
YUVtoRGB
Used to define the matrix conversion from YUV to RGB color space
Input
Input statements are used to specify the input controls that appear in the Input Controls tab
for your script. In each case, “UIName” signifies the label that appears next to the input in
the Input Controls tab.
318
Appendix A
Statement
Syntax
Description
CheckBox
input varName, "UIName",
CheckBox, value
Defines a checkbox. This can
have a value of either 0 (not
checked) or 1 (checked).
Slider
input varName, "UIName",
Slider, value,
min, max [ramp
value] [label
"Units"] [detent/
snap v1, v2, ...]
Creates a slider bar control. You
can specify an initial default
value, minimum and maximum
values, ramp value, “Units”
specified as the label, and
optional detent and snap values.
Angle
input varName, "UIName",
Angle, value,
min, max [label
"Units"] [detent/
snap v1, v2, ...]
Creates an angle control
Popup
input varName, "UIName",
Popup, value,
label1, label2,
..., labelN
Defines a pop-up menu with
the specified labels, set to the
default specified in “value”
Statement
Syntax
Description
RadioGroup
input varName, "UIName",
RadioGroup,
value, label1,
label2, ...,
labelN
Specifies a radio button or
group of radio buttons with the
specified label or labels
Color
input varName, "UIName",
Color, alpha,
red, green, blue
Defines a color selection tool.
The chosen color is placed in
the “color” variable. The default
color is specified by “alpha,”
“red,” “green,” and “blue.”
Clip
input varName, "UIName",
Clip
Defines an input control that
allows you to input a video clip
or a still image
Text
input varName, "UIName",
Text, "string"
[TextHeight h]
Creates a text box
Point
input varName, "UIName",
Point, x, y
Creates a point entry control
Label
input varName, "UIName",
Label, "string"
Defines the static text in the
Name column
FontList
input varName, "UIName",
FontList
[, "InitialFont",
“TextFieldName”]
Creates a pop-up list of fonts to
choose from. The
“TextFieldName” is the name of
the text box to be associated
with this font pop-up list. When
you change the font pop-up to
(for example) Geneva or Osaka,
the text in the text box
“TextFieldName” will be drawn
in Geneva or Osaka (whichever
font you choose).
FXScript Reference
319
Definition
These statements are used to define and set up the script. They must be included at the
beginning of the script, before any code.
320
Appendix A
Statement
Syntax
Description
Filter
Filter "name"
Defines the script as a filter with
the specified name, which
means that it appears in the
Filters bin in the Browser’s
Effects tab
Transition
Transition "name"
Defines the script as a transition
with the specified name, which
means that it appears in the
Transitions bin in the Browser’s
Effects tab
Generator
Generator "name"
Defines the script as a generator
with the specified name, which
means that it appears in the
Generators bin in the Browser’s
Effects tab
Group
Group "name"
Specifies the group the script
should be placed in. For
example, the Gaussian blur
sample script appears in the
Blur bin in the Filters bin in the
Browser’s Effects tab.
WipeCode
WipeCode(code, accuracy)
Defines the transition’s wipe
code
KeyType
KeyType(type)
Defines the transition’s key type
AlphaType
AlphaType(type)
Defines the alpha type. A
variable can be knone (none/
ignore), kalpha (straight),
kblack (black), or kwhite
(white).
Statement
Syntax
Description
QTEffect
QTEffect("name")
QTEffect defines the QT realtime effect name. If a QT realtime effect is installed on a
system with the same name, the
application uses the QT realtime effect instead.
ProducesAlpha
ProducesAlpha
Specifies that the effect will
produce an alpha channel
FullFrame
FullFrame
Is an input definition which
states that the filter only works
on a full frame. Final Cut Pro,
when processing fields, will only
pass the full frames. This flag is
only valid for filter scripts.
EffectID
EffectID ("name")
Reserved for future use.
Statement
Syntax
Description
Set
Set variable to value
Assigns a value to a variable.
The values that can be assigned
to a variable depend on its data
type.
Set Field
Set the field of
variable to value
Assigns a value to a specific field
within a variable
assign
variable = value
Assigns a value to a variable.
The values that can be assigned
to a variable depend on its data
type.
Assignment
FXScript Reference
321
Flow Control
Statement
Syntax
Description
If/Else
If (condition1)
If/Else statements run different
script code if the stated
conditions are met. Each If
statement isolates a single
condition and directs the flow
of the script to the statement
immediately following it only if
the condition is met.
Else/If statements isolate
successive conditions and direct
script flow to the code following
them, if the condition attached
to the statement is met. These
are optional.
Else statements provide for any
other circumstance. They
literally mean “in any other
event.” These are optional.
The end of an If statement is
always indicated by an End If
statement.
Else if (condition2)
Else
End If
Repeat While
Repeat While (condition)
End Repeat
Repeat With Counter
Repeat With Counter =
start to finish
[step amount]
End Repeat
322
Appendix A
A Repeat While statement is a
“loop.” The script lines between
Repeat While and End Repeat
are run repeatedly as long as
the condition in the Repeat
While statement is true. As soon
as the condition is no longer
true, the script moves out of the
loop and onto the next line.
This type of loop runs the script
lines between the Repeat and
End Repeat statements for the
number of times specified.
Repeat with counter=1 to 10
repeats the lines of script 10
times.
Statement
Syntax
Description
Repeat With list
Repeat With variable in
[x1, x2, x3, ...]
This repeats the script lines
between Repeat and End Repeat
once for each of the values
specified in the list. At the same
time, it assigns each value in
turn to the variable.
End Repeat
Exit Repeat
Exit Repeat
This command directs the script
flow to the lines immediately
following the End Repeat
statement. It can be structured
as the result of a condition
being met.
For/Next
For variable = start to
finish [step
amount]
This type of loop runs the script
lines between the For and Next
statements for the number of
times specified. Loop with
counter=1 to 10 loops the lines
of script 10 times.
Next
Exit For
Exit For
This command directs the script
flow in the For loop to the lines
immediately following the Next
statement. It can be structured
as the result of a condition
being met.
FXScript Reference
323
Statement
Syntax
Description
Subroutine
On subName(type parm1,
type parm2, ...)
A subroutine is a part of a script
that can be called by name from
anywhere else in the script.
Once the subroutine has been
run, the flow of the script
returns to the line immediately
after the subroutine call.
You can “pass parameters” to a
subroutine. This means that
information, such as numbers
or text strings, is put into the
subroutine from the part of the
script that calls it.
The subroutine runs the code
between the On statement and
the End statement.
End
Return
Return
Return(value)
324
Appendix A
A Return command directs
script flow back to the line
immediately after the
subroutine was called; it “jumps
out” of the subroutine and back
to the main script. A return
statement may be the result of a
particular condition being met.
Return (value) can be used to
return a numerical value.
A P P E N D I X
B
B
List of Audio and Video Effects
This appendix lists all the special effects provided with Final Cut Pro, which are available in
the Browser’s Effects tab. It also explains any settings you need to make when applying these
effects. You can apply these effects to clips individually or in combinations.
Audio Transitions
Transition
Description
Cross Fade (0 dB)
Fades the first clip out, while simultaneously fading the second clip in. This
effect applies a linear ramp to the volume level.
Cross Fade (+3 dB)
Performs the same operation as Cross Fade (0 dB), but applies an
equal-power ramp to the volume level
m Linear cross-fading introduces a volume dip in the middle of the cross
fade. Equal power cross-fading does not.
m Equal-power uses a quarter-cycle cosine fade-out curve and a
quarter-cycle sine fade-in curve, thus maintaining the output signal
power at a constant level.
325
Audio Filters
326
Appendix B
Filter
Description
3 Band Equalizer
Divides the audio spectrum into three frequency bands, corresponding to
treble, mid-range, and bass. You can set the center frequency for each band
and adjust the volume of each band relative to the others by changing the
Gain setting.
Band Pass Filter
Allows you to modify a single frequency band. By choosing its center
frequency, you can modify the boost or cut level. You can modify the Q
value to narrow or widen the frequency range that is heard and the level of
accentuation at the center of the band. A low Q value gives less
accentuation and wider audibility across the band. A high Q value focuses
more sharply on the center of the band, screening out more of the
frequencies above and below it.
Compressor/Limiter
Smoothes out inconsistencies in volume levels over time, on all
frequencies. Compression of volume reduces the dynamic volume range
so that it does not become too loud. The more a sound exceeds the
specified limit, the more it is decreased in volume, depending on the ratio
setting. After making settings, use the Preserve Volume option to keep the
overall level close to the original. The Threshold setting specifies the level
at which the effect will be triggered. The Attack and Release settings
specify how fast this effect should adjust the volume level in response to
the beginning and end of a change.
DC Notch
Compensates for a specific type of signal artifact caused by DC current
leakage by allowing you to remove the DC offset component potentially
introduced during recording
Echo
Adds a series of repeats to the selected audio. You can adjust the mix of the
original source signal with the repeating echo. You can also set the level
(amount) of the effect, brightness, feedback (duration of repeats), and
delay (time between repeats.) Use the Echo filter to provide a “slapback”
or “canyon” effect to the selected audio.
Expander/Noise Gate
Smoothes out inconsistencies in volume levels over time by increasing the
volume if it drops below a specified level. The lower a level is relative to
the highest level, the more it is increased to compensate, depending on
the Ratio setting. Noise Gate is used to silence all sound below the
specified volume threshold.
High Pass Filter
A Band Pass filter optimized for high frequencies
Filter
Description
High Shelf Filter
Similar to a Band Pass filter, but the upper end of the frequency range is
sharply cut off, while lower frequencies are allowed to pass. You can use
the Gain setting to boost or cut the relative volume at the upper end of the
frequency range.
Hum Remover
A notch filter that allows you to compensate for various types of hum
interference by screening out a specific frequency. You can also specify up
to five related harmonic frequencies to screen out.
Low Pass Filter
A Band Pass filter optimized for low frequencies
Low Shelf Filter
Similar to a Band Pass filter, but the lower end of the frequency range is
sharply cut off, while high frequencies are allowed to pass. You can use the
Gain setting to boost or cut the volume at the lower end of the frequency
range.
Notch Filter
Cuts out frequencies in a specific range. This works on a narrow range of
frequencies. This effect is the converse of a Band Pass filter.
Parametric Equalizer
Allows you to control various aspects of a single frequency band. It
combines the features of the Band Pass, Notch, and Shelf filters. You can
also set the Q value to narrow or widen the frequency range that is heard
and the level of accentuation at the center of the band. A low Q value gives
less accentuation and wider audibility across the band. A high Q value
focuses more sharply on the center of the band, screening out more of the
frequencies above and below it.
Reverberation
Allows you to simulate the natural ambience that occurs when sound is
conducted within a physical acoustic space such as a concert hall or
auditorium. You can adjust the mix of the dry signal and effected signal as
well as the level (amount) and brightness of the effect. This module also
provides you with a list of predefined environment types that can be
applied to your audio selection.
Vocal DeEsser
A special-purpose filter that controls and dampens sibilant (“s”) sounds.
Some vocal recordings show emphasis of these sounds.
Vocal DePopper
A special-purpose filter that controls and dampens plosive (“p”) sounds.
Some vocal recordings show emphasis of these sounds.
List of Audio and Video Effects
327
Video Transitions
3D Simulation
Transition
Description
Cross Zoom
Causes the video to zoom in on the first clip, switch to the second, and
zoom out. You can specify the center point, the amount of magnification in
the zoom, and the degree of blur applied during the zoom.
Cube Spin
Creates a three-dimensional cube from each clip and spins it in the
direction you choose. You can also view the cube from the inside or the
outside.
Spin3D
Spins the first clip around its center point, revealing the second clip. You
can choose the angle of the spin axis.
Spinback3D
Spins the first clip around its center point, until the clip is viewed from its
edge, and then switches to the second clip, which spins into view. You can
choose the angle of the spin axis.
Swing
Creates the effect of swinging the first clip in toward the viewer or out
toward the second clip, which is revealed as the swing widens. You can
choose the angle of the swing axis.
Zoom
Zooms the second clip in from a single center point to full-frame size, over
the top of the first clip. You can specify the center point (relative to the
first clip) where the zoom begins.
Dissolve
328
Appendix B
Transition
Description
Additive Dissolve
Adds the two clips so that the first clip fades out and the second fades in
Cross Dissolve
Blends the first clip into the second clip
Dip to Color
Blends the first clip into the plain color of your choice, and then blends the
plain color into the second clip. You can adjust the speed of the blend.
Dither Dissolve
Dissolves the first clip into the second by removing random pixels from the
first clip to reveal the second clip
Non-Additive
Dissolve
Compares the pixels in the two clips and displays the lighter of the two as
the first clip fades out and the second fades in
Transition
Description
Ripple Dissolve
Applies a pond ripple effect to the first clip, simultaneously blending it into
the second. You can choose the number of ripples, their center point on
the first clip, and their amplitude and acceleration. You can also apply a
circle highlight to the ripples.
Fade In, Fade Out
Fades in the incoming clip as the Outgoing clip fades out. Reveals the track
below the current track in a transition.
Iris
Transition
Description
Cross, Diamond,
Oval, Point,
Rectangle, and Star
These effects are similar. They differ in the shape of the transition. They
create the impression of an iris, which contains the first clip, opening to
reveal the second. In each iris effect, you can enter the center point
around which the opening is defined, and feather the edges, which blends
the edges of the clips together and gives a diffused iris.
Map
Transition
Description
Channel Map
Maps channels from the first and second clip, or fills the channel with
black. You can invert individual channels.
Luminance Map
Maps color using the luminance of a clip.
Page Peel
Transition
Description
Page Peel
Peels the first clip away to reveal the second clip. You can adjust the
appearance of the peel.
Slide
Transition
Description
Band Slide
Bands of the first clip slide in parallel to reveal the second clip. You can
adjust the number of bands and the slide direction.
Box Slide
Bands of the first clip slide one at a time in perpendicular directions to
reveal the second clip. You can adjust the number of bands and the slide
direction.
List of Audio and Video Effects
329
Transition
Description
Push Slide
The second clip pushes the first clip out of the view. You can adjust the
push direction.
Spin Slide
Boxes of the first clip spin and zoom out to reveal the second clip. You can
adjust the spin about the center of the box, and the number of boxes.
Multispin Slide
Boxes of the first clip spin and zoom out to reveal the second clip. You can
adjust the spin about the center of the first clip, and the spin about the
center of the box, as well as the number of boxes.
Split Slide
The first clip splits at specific points and slides to reveal the second clip.
You can adjust the orientation of the split.
Center Split Slide
Reveals the underlying clip by spliting the current clip down the center and
horizontally sliding the two halves away from each other.
Swap Slide
The first (top) and the second (bottom) clips slide in opposite directions,
swap places and slide back, revealing the second clip. You can adjust the
slide direction.
Stretch
Transition
Description
Cross Stretch
The first clip is squeezed as the second clip stretches from the specified
edge to the opposite edge.
Squeeze
The first clip is squeezed from the opposite edges toward the center to
reveal the second clip. You can specify the squeeze orientation.
Squeeze and Stretch
The first clip is squeezed from the opposite edges toward the center, and
stretches in a perpendicular direction to reveal the second clip. You can
adjust the squeeze orientation.
Stretch
The second clip stretches from the specified edge over the first clip.
Wipe
330
Appendix B
Transition
Description
Band Wipe
Wipes a band across the first clip to reveal the second. You can specify the
number of bands and the side orientation.
Center Wipe
A linear wipe from a specified point on the first clip reveals the second clip.
You can adjust the wipe direction.
Transition
Description
Checker Wipe
Checkered boxes appear on the first clip to reveal the second clip. You can
adjust the number of boxes and the wipe direction.
Checkerboard Wipe
Checkered boxes wipe individually on the first clip to reveal the second.
You can adjust the number of boxes and the wipe direction.
Clock Wipe
A rotational wipe over the first clip reveals the second. You can adjust the
start and direction of the wipe, and the center point of the rotation.
Edge Wipe
A linear wipe from the edge of the first clip reveals the second clip. You can
adjust the wipe direction.
Gradient Wipe
Uses a gradient wipe image to wipe across the first clip, revealing the
second clip. You can adjust the softness of the wipe and invert the gradient
wipe image. By default, the transition wipes horizontally from left to right.
You can override this by dragging an image onto the gradient clip well.
Inset Wipe
A rectangular wipe from the specified edge or corner of the first clip
reveals the second clip.
Jaws Wipe
A jagged-edged wipe from the center of the first clip reveals the second
clip. You can adjust the wipe direction and the shape of the jagged edge.
Random Edge Wipe
A linear wipe with a random edge from the edge of the first clip reveals the
second clip. You can adjust the direction of the wipe and the width of the
random edge.
V Wipe
A V-shaped wipe from the specified edge of the first clip reveals the second
clip.
Venetian Blind Wipe
Bands wipe across the first clip to reveal the second. You can adjust the
angle of bands and the number of bands.
Wrap Wipe
Bands wipe in the specified direction across the first clip to reveal the
second clip. You can specify the start and orientation of the wipe and the
number of bands.
Zigzag Wipe
Bands wipe in a zigzag pattern over the first clip to reveal the second clip.
You can specify the start and orientation of the wipe. You can also specify
the number of bands.
List of Audio and Video Effects
331
Video Filters
Blur
Filter
Description
Gaussian Blur
Blurs the clip. You can adjust which channel to blur.
Radial Blur
Blurs the clip. You can adjust the angle and steps of rotation. You can also
specify the center point of rotation.
Wind Blur
Directionally blurs the clip. You can adjust the direction, distance, and
steps.
Zoom Blur
Blurs the clip. You can adjust the type, amount, center point, and number
of steps for the zoom.
Border
Filter
Description
Basic Border
Draws a border around the edges of the clip. You can adjust the width and
color of the border.
Bevel
Draws a beveled border around the edges of the clip. You can adjust the
lighting and bevel.
Channel
332
Appendix B
Filter
Description
Arithmetic
Performs an arithmetic operation on the clip in a specific color channel.
You can adjust the operator and the channel.
Channel Blur
Blurs channels individually
Channel Offset
Offsets the channel position of the clip. You can specify the center offset
and the type of edge to be used.
Color Offset
Offsets the color of individual channels in the clip. You can adjust overflow
colors.
Compound
Arithmetic
Performs an arithmetic operation on the clip and a second specified clip.
You can adjust the operator and the channel.
Invert
Inverts the channel of the clip
Distort
Filter
Description
Bumpmap
Distorts the clip by offsetting pixels using the luminance of map image. You
can adjust the map image, luma scale, direction, outset, and repeat edges.
Direction and outset define the direction and amount of the offset. Luma
scale and repeat edges define the appearance of the offset.
Cylinder
Distorts the clip as if it were wrapped around a cylindrical object. You can
adjust the radius, center, and orientation of the cylinder.
Displace
Distorts the clip by offsetting pixels using the red and green channels. You
can adjust the horizontal offset using the red channel and the vertical
offset using the green channel. Horizontal and vertical scale define the
direction and amount of the offset. Luma scale and repeat edges define the
appearance of the offset.
Fisheye
Distorts the clip as if it were bulging outward. You can adjust the amount,
radius, and center of the bulge.
Pond Ripple
Distorts the clip as if it were mapped onto a pond ripple. You can adjust
the number and size of the ripples and the center point for the ripples.
Ripple
Distorts the clip in a wave pattern, both horizontally and vertically. You can
adjust the size and speed of the wave.
Wave
Distorts the clip in a zigzag pattern, horizontally or vertically. You can
adjust the size and speed of the wave.
Whirlpool
Distorts the clip in a whirlpool pattern. You can adjust the center and
rotation of the whirlpool.
Image Control
Filter
Description
Brightness and
Contrast
Changes the brightness and contrast of the clip by a specific amount
Color Balance
Changes the red, green, and blue levels of the clip. You can adjust the tone.
Desaturate
Removes the color from the clip by the specified amount
Gamma Correction
Changes the mid-tone brightness of the clip by the specified amount
Levels
Changes the channel brightness, contrast, and gamma of the clip by the
specified amount
List of Audio and Video Effects
333
Filter
Description
Proc Amp
Changes the clip’s color by the specified amount. You can adjust the setup,
video, chroma, and phase.
Sepia
Tints the clip with sepia color. You can adjust the amount and brightness of
tint.
Tint
Tints the clip with the specified color
Key
Filter
Description
Blue and Green
Screen
Keys the blue or green area of the clip and uses its color as a transparency
mask for compositing backgrounds into a scene. You can adjust the color
level and tolerance. You can also adjust the view mode and the edges.
Color Key
Keys out the area of the clip with the specified color. You can adjust the
key color level and tolerance. You can also adjust the view mode and the
edges.
Difference Matte
Compares two clips and keys out areas that are similar. You can adjust the
difference level and tolerance, as well as the view mode and the edges.
Luma Key
Keys out an area of the clip using the clip’s luminance. You can adjust the
type of key, luminance level, view mode, destination of the result, and
tolerance.
Spill Suppressor,
Blue
Removes blue around the edges of the clip
Spill Suppressor,
Green
Removes green around the edges of the clip
Using a Color Key
Use a color key when you want to make an area of a clip transparent based on a color value.
Final Cut Pro includes a Blue Screen Key that can be used for keying out blue, green, and
blue-green difference. It also includes a color key that can be used to key out any other color
value. Both keys let you control the tolerance value so that a range of colors can be made
transparent. They also have controls that let you create a smooth edge between the
transparent and opaque areas of the clip.
To use a color key:
1
334
Appendix B
Select the clip in the Timeline, or open a Viewer window for it.
2
Drag the Color Key effect from the Browser onto the clip, or choose Color Key from the
Effects menu.
3
Click the Filters tab for the clip and adjust the settings as desired.
Using a Luma Key
Use a luma key when you want to make an area of a clip transparent using the luminance of
the foreground clip. Keying out a luminance value works best when the clip has patches of
flat color.
To use a luma key:
1
Select the clip in the Timeline, or open a Viewer window for it.
2
Drag the Luma Key effect from the Browser onto the clip, or choose Luma Key from the
Effects menu.
3
Click the Filters tab for the clip and adjust the settings as desired.
Matte
Mattes let you make selected areas of the video opaque.
Filter
Description
8-Point Garbage
Matte
Generates an 8-point polygonal matte in the clip. You can adjust the view
mode, the points for the polygon, the smoothness around the corners, and
the edges.
Extract
Produces a luminous matte around the clip. You can adjust the luminance
level, tolerance, and view mode. Use the Copy Result pop-up menu to
copy the luminance result to the RGB or Alpha channel.
4-Point Garbage
Matte
Generates a four-point polygonal matte in the clip. You can adjust the view
mode, the points of the polygon, the smoothness around the corners, and
the edges.
Image Mask
Uses the alpha channel or luminance of a specified clip to create a matte
Mask Feather
Blurs the alpha channel of the clip by a specified amount
Mask Shape
Generates a mask shape on the clip. You can adjust the shape.
Matte Choker
Changes the edges of a matte on the clip
Soft Edges
Blurs the four edges of the clip individually by the specified amount
Wide Screen
Generates a wide-screen matte in the clip. You can adjust the type of the
wide screen and offset the clip vertically.
List of Audio and Video Effects
335
Perspective
336
Appendix B
Filter
Description
Basic 3D
Transforms the clip in three dimensions. You can adjust the rotation
around the x, y, and z axes. You can set the center and scale.
Curl
Curls the clip. You can adjust the amount, direction, radius, type, and back
side of the curl.
Flip
Flips the clip horizontally, vertically, or both
Mirror
Reflects a mirror image of the clip. You can adjust the position and angle of
the mirror.
Rotate
Rotates the clip by 90 degrees and scales the result to fit the frame size
Sharpen
Filter
Description
Sharpen
Increases the contrast between adjacent pixels
Unsharp Mask
Increases the contrast of adjacent pixels that are light or dark. You can
adjust the sharpness of the clip.
Stylize
Filter
Description
Anti-Alias
Blurs the high-contrast areas in the clip
Diffuse
Randomly offsets pixels in the clip. You can adjust the offset, direction, and
distance.
Emboss
Produces an illusion of raised edges where there is high contrast in the clip
Find Edges
Outlines the edges where there is high contrast in the clip
Posterize
Maps the colors in the clip to a specified number of colors
Replicate
Tiles the clip. You can adjust the number of tiles.
Solarize
Minimizes the midtones and maximizes the highlights and shadows in the
clip
Video
Filter
Description
Blink
Flashes clip on and off. You can adjust the frequency and opacity.
Image Stabilizer
Stabilizes motion in the clip. You can adjust the scan area and range.
De-Interlace
Averages adjacent horizontal lines of the clip
Stop Motion Blur
Blends frames in the clip. You can adjust the time, steps, opacity, and type
of blend.
Strobe
Freezes the specified frame of the clip for the specified amount of time
Timecode Print
Displays the clip’s timecode. You can adjust the timecode display.
View Finder
Displays view finder overlay, including mode and title/action safe. You can
adjust the text and color.
List of Audio and Video Effects
337
Video Generators
Filter
Description
Bars and Tone
Generates a video color bar and tone
Color Matte
Generates a specific color matte. You can adjust the opacity.
Custom Gradient
Generates a linear or radial gradient. You can adjust the gradient position,
direction, width, and colors.
Gradient
Generates a predefined gradient. You can adjust the gradient colors.
Highlight
Generates a specular highlight band using the specified center point and
angle as the highlight line. You can define the width, softness, and size of
the band as well as its foreground and background colors. You can also
apply a dither or highlight gradient, making it smoother over large areas.
Noise
Generates random pixel noise. You can adjust the colors.
Particulate Noise
Generates random particle noise. You can adjust the particle shape, color,
size, softness, and density.
Slug
Generates a slug. This is useful for a placeholder.
Text
338
Appendix B
Filter
Description
Lower 3rd
Generates two lines of text in the lower third of the frame. You can adjust
the text and background.
Text
Generates multiple lines of auto-kerned text. You can adjust tracking,
leading, aspect ratio, and subpixel positioning of the text. You can also
enable or disable auto-kerning and tracking.
A P P E N D I X
C Keyboard Shortcuts
C
This appendix lists keyboard shortcuts provided in Final Cut Pro.
General Controls
Function
Key command
New project
x
+E
New sequence
x
+N
New sequence with presets
x
+ option +
Open file
x
+O
Open selected item
Open in separate window
Open item editor
Open text generator
Close window
Close tab
N
return
+
shift
option
+
return
return
control + X
x
+W
control + W
339
Function
Key command
Help
x
+?
Quit
x
+Q
Save
x
+S
option
+S
Save all
Undo
x
+
Redo
x
+Y
Audio scrub on or off
Edit render quality
Looping on or off
Z
shift
+
shift
+Y
S
control + L
Snapping on or off
N
Application Windows
Function
340
Appendix C
Key command
Viewer
x
+1
Canvas
x
+
2
Timeline
x
+
3
Browser
x
+4
Function
Key command
Effects
x
+5
Favorites bin
x
+6
Trim Edit
x
+7
Log and Capture
x
+8
Item Properties
x
+9
Sequence Settings
x
+0
option
+Q
Preferences
Select, Cut, Copy, and Paste
Function
Key command
Copy
x
+C
Cut (lift to Clipboard)
x
+X
option
+D
option
+A
x
+V
option
+V
Duplicate
Make In/Out a selection
Paste (overwrite)
Paste attributes
Paste insert
shift
+V
Keyboard Shortcuts
341
Function
Key command
Select all
x
+
A
Deselect all
x
+
D
Navigation
Function
Key command
Forward one frame
Back one frame
Forward one second
Back one second
Play reverse1
Stop/Pause2
Play forward3
Match frame
Select an edit
Add edit
Next edit
Previous edit
342
Appendix C
shift
+
shift
+
J
or
shift
K
or
space
L
or
space
+
space
F
V
control + V
shift
option
+ E or '
+ E or ;
Function
Next gap
Previous gap
To beginning of media
To end of media
Key command
+G
shift
option
+G
home
or
end
+ home
shift
To next edit or In/Out
To previous edit or In/Out
To next edit, In/Out, or marker
To previous edit, In/Out, or
marker
To master clip
1
2
3
shift
+
shift
+
shift
+
F
Press key up to four times for accellerated reverse playback: once (1x), twice (2x), three (3x), and four (4x).
Hold key down while pressing J or L to step forward or backward one frame at a time.
Press key up to four times for accellerated forward playback: once (1x), twice (2x), three (3x), and four (4x).
Finding Items
Function
Key command
Find
x
+F
Find next (in Find results)
x
+G
Find previous (in Find results)
shift
+ F3
Keyboard Shortcuts
343
Scrolling
Function
Horizontal scroll left
Horizontal scroll right
Vertical scroll up
Vertical scroll down
Key command
shift
page
+ up
shift
page
+ down
page
up
page
down
Screen Layout and Display
Function
Custom layout 1
Custom layout 2
Standard layout
Key command
+U
shift
option
+U
control + U
Projects and Sequences
Function
344
Appendix C
Key command
Import file
x
+I
New project
x
+E
New sequence
x
+N
New sequence with presets
x
+ option +
N
Browser
Function
Change list (icon view)
Insert bin
Key command
+
shift
x
+B
option
+F
H
Open bins (list view)
Close bins (list view)
Make Favorite
Make Favorite Motion
Set logging (list view)
Set standard (list view)
control + F
option
+B
+
shift
B
Timeline
Function
Create or break link
Linked selection on or off
Create or break stereo pair
Change track size
Clip Keyframes on or off
Key command
x
+L
+
shift
option
shift
option
+
L
L
+T
+T
Keyboard Shortcuts
345
Function
Clip overlays on or off
Delete and leave gap
Ripple delete (no gap)
Fit sequence in window
Lock video track
Lock all video tracks
Lock audio track
Lock all audio tracks
Key command
option
+W
delete
shift
+
delete
shift
+
Z
F4
+ track number
+ F4
shift
F5
+ track number
+ F5
shift
Turn on waveforms
x
+ option + W
Logging and Capturing
Function
Log clip
Key command
F2
Batch capture
Capture now
346
Appendix C
x
shift
+H
+C
Playing Video
Function
Play reverse1
Stop/Pause2
Play forward3
Play around current
Play every frame
Play here to Out
Play In to Out
1
2
3
Key command
J
or
shift
K
or
space
L
or
space
+
space
\
option
+P
shift
+
P
shift
+
\
Press key up to four times for accellerated reverse playback: once (1x), twice (2x), three (3x), and four (4x).
Hold key down while pressing J or L to step forward or backward one frame at a time.
Press key up to four times for accellerated forward playback: once (1x), twice (2x), three (3x), and four (4x).
In and Out Points
Function1
Set In point
Set Out point
Set video In only
Set audio In only
Set video Out only
Key command
I
or
O
or *
/
control + I
x
+
option
+
l
control + O
Keyboard Shortcuts
347
Function1
Key command
Set audio Out only
x
+
option
+O
Audio level keyframe
x
+
option
+K
Clear In
Clear Out
Clear In and Out
Make selection an In or Out
Mark clip
To In point
To Out point
1
option
+I
option
+O
option
+X
+A
shift
X
shift
+
shift
+O
I
In and Out shortcuts follow a simple “set-go to-clear” scheme, using “I” or “O” for set, Shift+I or O to go to In or Out, and
Option+I or O to clear In or Out. For a navigation key matrix, see “Quick Navigation Keys and Modifiers” on page 353.
Markers
Function
Add marker
Add and name marker
Delete marker
Delete all markers
348
Appendix C
Key command
M
M
+M
x
+~
control +
`
Function
Extend marker
Reposition marker
Next marker
Previous marker
Key command
option
+~
shift
+~
shift
+M
option
+M
Editing
Function
Key command
Apply default video transition
x
+T
Apply default audio transition
x
+
Delete (lift)
Ripple delete
Extend edit
Insert edit
Insert with transition
Overwrite
Overwrite with transition
Replace
control + T
or
option
+T
delete
or
x
shift
+
delete
+
delete
or
x
E
F9
shift
+ F9
F10
shift
+ F10
F11
Keyboard Shortcuts
349
Function
Fit to fill
Superimpose
Key command
F12
Make subclip
Modify duration
Toggle Ripple/Roll type
Ripple cut to Clipboard
Slip edit
Split edit
Set target video
Set target video to None
Set target Audio 1
Set target Audio 1 to None
Set target Audio 2
Set target Audio 2 to None
Mixdown audio
Trim backward one frame
350
Appendix C
+ F11
shift
x
+U
control + D
or
U
+
shift
R
shift
+
shift
+click In or Out
option
F6
+ F6
+ track number
shift
F8
+click In or Out
+ track number
shift
F7
+ F7
+ track number
shift
+ F8
control + M
[
X
or ,
Function
Trim backward x frames1
Trim forward one frame
Trim forward x frames2
1
2
Key command
+
shift
[
or
shift
+,
]
or
shift
+.
or .
]
+
shift
Specify the number of frames in the Preview Pre and Post-Roll fields in the General tab of the Preferences window.
Specify the number of frames in the Preview Pre and Post-Roll fields in the General tab of the Preferences window.
Output
Function
Change render quality
Display frame
Print to video
Key command
Y
or
F15
x
+ F12
shift
+M
Compositing and Special Effects
Function
Nest item(s)
Add motion Keyframe
Next Keyframe
Previous Keyframe
Make still frame
Key command
option
+C
control + K
shift
option
shift
+
K
+K
+
N
Keyboard Shortcuts
351
Function
Key command
Render effect (FXBuilder)
x
+K
Render selection
x
+R
option
+R
Render sequence
Render single frame on or off
caps
lock
Speed
Change Image/Wireframe view
Change RGB/RGB+A/Alpha
Fit in window
Nudge position down
W
shift
+W
shift
+Z
+
option
+
option
+
option
+
Sub pixel down
x
+
Sub pixel left
x
+
Sub pixel right
x
+
Sub pixel up
x
+
Nudge position right
Nudge position up
Appendix C
+J
option
Nudge position left
352
x
Function
Key command
Zoom in
x
+=
Zoom out
x
+-
Quick Navigation Keys and Modifiers
Key
No Modifier
Shift + key
Option + key or
Control + Shift + key
I
Set In
Go To In
Clear In
O
Set Out
Go To Out
Clear Out
M
Set Marker
Next Marker
Previous Marker
E
Extend Edit
Next Edit
Previous Edit
G
Next Gap
Previous Gap
K
Next Keyframe
Previous Keyframe
Keyboard Shortcuts
353
Tools and Modifier Keys
Tool
354
Appendix C
Select
Tool + (x)
Command
Tool +
Shift
Tool +
Option
Arrow
A
Select
additional
Select range
Link on/off
Edit Selection
G
Select
additional
To Ripple
tool
Link on/off
Group Selection
G+G
Select
additional
Select
additional
Link on/off
Range Selection
G+G+G
Track Forward Select
T
All forward
Link on/off
Track Backward
Select
T+T
All backward
Link on/off
Track Selection
T+T+T
All Tracks Forward
Select
T+T+T+T
Track
forward
Link on/off
All Tracks Backward
Select
T+T+T+T+T
Track
backward
Link on/off
Roll Edit
R
Select
additional
To Ripple
tool
Link on/off
Ripple Edit
R+R
Select
additional
To Roll tool
Link on/off
Slip
S
Select
additional
Select clip
Link on/off
Slide
S+S
Select
additional
Select clip
Link on/off
Razor Blade
B
To Blade All
Link on/off
Razor Blade All
B+B
To Blade
Link on/off
Link on/off
Tool
Select
Tool + (x)
Command
Hand
H
Zoom in
Zoom In
Z
To Hand tool
Zoom in
maximum
Zoom out
Zoom Out
Z+Z
To Hand tool
Zoom out
maximum
Zoom in
Crop
C
All sides
Two sides
Distort
D
Pen
P
Pen Delete
P+P
Pen Smooth
P+P+P
Smooth
on/off
Tool +
Shift
Tool +
Option
Zoom out
Perspective
Resize
Adjust line
Pen delete
Pen
Keyboard Shortcuts
355
Index
If you can’t find
what you’re looking
for in this index,
look in the onscreen
help, available in
the Help menu on
your computer.
A
adding clips (Tutorial) 35
Add mode 240
After Effects third-party image filters 223–225
After Last Target Track option 184
After Last Track option 184
All Empty Tracks option 185
alpha channels 239, 245
Alpha Type property 160
Anchor Point property 226
Angle control 220
Apple FireWire 22
Apple FireWire Basic 22
Apple FireWire protocol 22, 100, 124
AppleTalk, capturing video and 103
appropriate device protocol 27
arrays 282, 287
Arrow tool 76
Aspect Ratio 102, 107
aspect ratio, non-square pixels 155
Assemble operation 253
assemble operation 253
Assemble Versus Insert Editing 253
assignments (FXScript) 321
audio
adjusting volume (Tutorial) 50
changing input gain level 116
changing level of 158–159
compressed formats 157
compression methods for 109
cross fade transitions 216
displaying waveforms for 157, 181
editing 91–92
editing (Tutorial) 48
exporting from clips or sequences 262, 263
exporting in an audio file format 263
exporting in movie file format 262
filters 326–327
formats for 116, 120, 122, 157
input channels 116, 120, 122
in sequences 164–165
maximum number of tracks 165
mixdown audio feature 165
mixing 97, 165
modifying audio transitions 216
QuickTime settings 109
real-time mixing 97
sample rate for 109
sample settings 105
simultaneous playthrough and capture 103
source settings 105
sub-frame slipping 159
synchronizing with video 97, 159
transitions 216, 325
working with 156–159
Audio Clip icon 137
audio clips
See also clips
adjusting volume of 145
color of in Timeline 180
audio effects. See special effects
Audio Filter icon 138
audio filters 164, 326–327
Audio Mapping option for EDL export 259
Audio not audible on computer’s speakers 28
357
If you can’t find
what you’re looking
for in this index,
look in the onscreen
help, available in
the Help menu on
your computer.
Audio not audible through camcorder
speakers 28
audio rendering 244
audio scrubbing 157
Audio settings 105
Audio tab 145, 219
audio tracks
See also tracks
displaying waveforms for 181
importing from audio CDs 132
in Timeline 181
labeling 110
mixing in real time 97
targeting (Tutorial) 37
Audio Transition icon 138
audio transitions 325
audio waveforms, displaying 110
auto editing VTR 22
autosaving projects 96, 134
B
backgrounds, viewing clips and 156
batch capture
logged clip settings 127
Batch Capture window 126–128
batch capturing clips 126–128
Batch Export command 263
Batch List command 260
batch lists 128–129, 260–261
beep sounds 245
Before Base Track option 184
Bezier handles 78, 237, 238
bins, organizing clips in 138–139
black and code 253, 257
Black option 250, 256
blits (FXScript) 294–295
blur filters 332
border filters 332
boundaries 155
breaking links 189
Browser 75
applying filters from 221–222
columns in 137–138
creating bin tabs for 138
customizing appearance of 134–136
358
Index
displaying items in 134–135
dragging multiple clips from Timeline to 174
making copies of items in 139
modifying clip properties in 139
opening clips in 147
organizing projects with 136–141
renaming items in 139
searching for items in 140–141
selecting items in 136
sorting items in 136
tabs in 84–86
Tutorial 32
viewing sequences in 168
C
cables 22
Cache Manager 247–248
calibration 101, 118–120
camcorder 21
camcorder. See video decks
camcorder or deck is not recognized 27
Canvas 74
changing position of clips in 227–228
controls in 85–86
editing in 171–175
making still images from frames in 199
previewing transition effects in 217
scaling clips in 228
tabs in 84–86
Tutorial 32
two-up display 175, 214
viewing transitions in 217
working with 163–164, 177–199
working with markers in 186
Canvas Edit Overlay 172
Capture hardware 19
Capture preferences 101–103, 117
capturing process 92, 113, 120–123
CDs, importing audio tracks from 132
Center property 226
channel filters 332
channels 92, 117, 145
clip
dragging to new position 190
Clipboard 191
Clip Collision message 210
Clip Control parameter 220
clip data 282
Clip icon 137
Clip Keyframes 179
clip markers 152, 186
Clip Name notes for EDL export 259
clip overlays 180
clips 92, 143
adding drop shadows to 231
adding markers to 125, 151
adding motion blur to 231–232
adding transition effects between 211–212
adjusting audio levels for 158–159
adjusting filters in 221
adjusting pan for 158–159
adjusting settings for 118–120
adjusting spread for 158–159
and transitions 239
appearance in Timeline 178
applying filters to 186, 221–222
applying motion effects to 147
audio formats for 157
automatically rendering before playing 248
backgrounds and 156
batch capturing 126–128
changing duplicate clip names 128
changing duration of 209–210
changing filter effects for 146
changing playback speed of 194–195
changing position of 227–228
changing source timecode of 129
choosing amount played 97
choosing logging bin for 121
color of in Timeline 180
controlling composite mode of 239–240
copying and pasting 192–193
correcting if out of sync 199
cropping 77, 230
customizing appearance in Timeline 181–182
cutting 77
deleting 191
distorting shape of 77, 229
dragging from Browser to Timeline 174
dragging to new position 190
editing in Canvas 171–175
editing in Timeline 174–175
exporting 261–266
extending edit in Timeline 210, 349
finding source video for 176
fitting in window 98, 154, 155
format of 160
FXScript 312
implications of making changes to 143
importing EDLs and 260
Linked Selection and 188
linking group of unrelated clips 189
locating different parts of 85–86
logging information for 162
logging offline clips 124–126
making visible and invisible 193
marking 123, 199
marking In or Out points for 149
modifying in sequences 193–195
modifying overlays in 98
modifying properties in Browser 139
moving into Timeline 189
moving playhead within 86
moving within sequences 190, 202
moving within Timeline 190
moving within Viewer or Canvas 227–228
naming 124–125
nesting in sequences 268
offline clips 93, 193
opening from View menu 153
opening in Browser 147
opening in other applications 154
opening in Timeline 147
opening in Viewer 147–148, 176
organizing in bins 138–139
pasting 192–193
playing 86, 148–149, 205
printing to video 249–250
property information about 160–162
redoing changes in 87
relinking online and offline clips 269
removing from projects 139
removing overscan edges 230
renaming 139
resizing in Timeline 202
Index
359
If you can’t find
what you’re looking
for in this index,
look in the onscreen
help, available in
the Help menu on
your computer.
360
Index
rotating 228–229
scaling in Viewer or Canvas 228
scrubber bar and 85, 143
scrubbing through thumbnails of 135
searching for in Browser 140–141
searching for in Timeline 197–198
selecting in Browser 136
selecting in Timeline 187, 188
setting number in Recent Clips list 96
setting opacity of 230–231
settings for 121
showing markers for 136
sliding 77, 209
slipping 77, 199, 202, 208–209
sorting in Browser 136
specifying scratch disk for 110
subclips 94, 150, 153
timing of 161
trimming into offline sequence 268–269
undoing changes in 87
using in sequences 143
Viewer window and 143
viewing 153–156
zooming in and out on 154
Clip Settings tab 116, 118–120, 121
Clip Visibility command 193
Close Gap command 198
codecs 108
color bars 119, 250, 256
color key 334
Color Selector parameter 220
columns
customizing in Browser 135–136
excluding from batch list 260
hiding 260
in Batch Export window 264–266
sorting in Browser 136
commands
See also keyboard shortcuts
Batch Export command 263
Batch List command 260
Clip Visibility command 193
Close Gap command 198
Cut command 191
Edit Render Qualities command 242–243
Edit to Tape command 249, 251–256
EDL command 258
Export Queue command 263
Find All command 197
Find command 197–198
FXScript commands 279–283
Gap command 198
Image Sequence command 262
Import command 260
Item Properties command 160, 246
Make Favorite Effect command 216
Make Still Frame command 199
Mark Clip command 176
Mark in Sync command 199
Mark Selection command 176
Match Frame command 176
Move into Sync command 199
Nest Item(s) command 268
Offline Clip command 194
Paste Attributes command 192
Print to Video command 249–250
Relink Media command 269
Render All command 246
Render Quality command 242
Render Selection command 217, 246
Ripple Delete command 191
Save All command 134
Save command 134
Save Project command 163
Sequence Editor command 167
Settings command 166
Slip into Sync command 199
Speed command 194
Still Image command 262
Text command 261
Track Gap command 198
Trimmer command 268
comments 152, 283
Comments notes for EDL export 259
composite mode 239–240
Tutorial 51
Composite Mode property 160
composites (FXScript) 303–305
compound operators 287
Compressed Audio 157
compression, video 104
compression settings 246
computer
changing audio level of 158
connecting video devices to 20
conditional statements 280
Connecting Video Devices 20
constants (FXScript) 282, 314–316
copying a project and render files 270
Countdown option 250, 256
cropping clips 77, 230
Crop property 226
Crop tool 77
cross fade transitions 216
Current Target Track option 185
current time indicator 178
Curves 237
curves, smoothing 78
customizing
See also preferences; presets
Browser display 134–136
clips in Timeline 181–182
screen layout 86
scripts 277
tracks in Timeline 181–182
Cut command 191
cut delete operation 191
cuts 211
D
Darken mode 240
data types (FXScript) 282, 287–288
decks. See tape decks; video decks
Deck search mechanism 100
definition statements (FXScript) 279, 320–321
De-Interlace property 160
Delete Tracks dialog box 185
deleting
clips 191
keyframes 78, 197, 235
markers 151
presets 107
render files 247–248
tracks from sequences 184
device control 20
capturing video with 121–123
capturing video without 120–121
choosing port for 100
Edit to Tape command and 251
enabling 99
Print to Video command and 249
device control cable 20, 28
Device Control preferences 99–101, 117
device control protocols 22
Device Control tab 99–101
Device Settings tab 254, 256
Difference mode 240
dissolve transitions 328
distort filters 333
distorting clips 77
Distort property 226
distort routines (FXScript) 300–302
Distort tool 77
Draft Render option 243
Drop Frame option for EDL export 259
drop frame timecode 89, 90, 109
dropped frames 27
dropped frames, Print to Video 250, 255
dropped frames, report option 98
Drop Shadow property 226
drop shadows, adding to clips 231
Dual-input speakers 24
duration
changing for clips 209–210
changing for transitions 215
modifying for audio transitions 216
of offline clip handles 268
of Print to Video options 249–250
Duration Calculator option 250, 256
Duration settings 161
DV 20
DV device with FireWire 21
DV Time option 100
E
ease-in/out 238
Edit Decision Lists (EDLs) 257–260
Editing
Tutorial 31
editing
Index
361
If you can’t find
what you’re looking
for in this index,
look in the onscreen
help, available in
the Help menu on
your computer.
362
Index
audio 91–92
audio (Tutorial) 48
extending edit 210
fit-to-fill editing 91, 173
in Canvas 171–175
insert editing 91, 172, 174
in Timeline 174–175
L-cut edits 175
markers 151–153
marking split edits 175–176
methods for performing 83–86
motion paths 237
motion properties 226–232
overwrite editing 91, 173, 174
render qualities 242–243
replace editing 91, 173
ripple editing 92, 203, 206–207, 215
roll editing 92, 203, 207–208, 215
sequence presets 107–109
sequences 167
setting up for 169–171
slide editing 92, 202
slip editing 92, 199, 202
superimpose editing 91, 173
target tracks 169
three-point editing 91, 164
to tape 251–256
track contents 186
transition editing 91
video 91–92
with Tool palette tools 92
Editing mode 252
Editing Timebase 107
edit points
defining 171
marking 171
moving split edit points 175–176
positioning playhead at 170
selecting 76, 203
setting to current selection 176
snapping 201
trimming and 201, 205
Edit Render Qualities command 242–243
edits
moving playhead to closest edit 183
selecting in Timeline 203
slipping in Trim Edit window 206
trimming 201–210
Edit Selection tool 76
edit to tape
capture 256
device 256
Edit to Tape, Playback Offset 101
Edit to Tape command 249, 251–256
Edit to Tape operations 252
Edit to Tape overlay 252, 255
Edit to Tape window 79, 251–257
EDL command 258
EDL Export Options dialog box 258–259
EDLs (Edit Decision Lists) 257–260
effects. See special effects
Effects tabs
Browser 325–338
Viewer 219
Enable Frame Blending option 243
error messages
during batch capture 128
during batch export 264
trimming operations and 210
exporting
audio in an audio file format 263
audio in movie file format 262
clips 261–266
EDLs 257–259
FXScripts 260
image sequence 262
QuickTime export settings 261
sequences 257, 260, 261
sequences (Tutorial) 71
still images 262
using predefined settings 261
Export Queue command 263
expressions 282, 285–287
Extend Edit command 210, 349
externals (FXScript) 308–309
F
fast-motion effects 194–195
favorite filters 223
favorites 92
Field Dominance 108
Field Dominance property 160
Field Rendering option 243
files
autosaved project files 134
changing duplicate filenames 128
Final Cut Pro Read Me file 22
graphic file formats 131
importing 130
offline files 269
project files 133
render files 98, 247–248
Filmstrip option 181
film support
EDL formats 258
filters 92
adjusting for clips 221
After Effects third-party image filters 223–225
applying from Browser 221–222
applying from Timeline 221–222
applying to clips 186, 221, 222
audio filters 326–327
blur filters 332
border filters 332
changing over time 222
changing rendering order of 223
changing settings for 146
channel filters 332
creating a favorite filter 223
distort filters 333
image control filters 333
key filters 334
matte filters 335
perspective filters 336
QuickTime Effects 224
saving settings for 223
scripts for 272
sharpen filters 337
stylize filters 337
turning off 222
video filters 220–221, 332–337
Filters notes for EDL export 259
Filters tab 146, 219, 223
Final Cut Pro
accessing functions of 83–86
Movie 261
optimizing performance of 26
preferences 80
reference information for 17
system requirements for 18
Web site 18, 22
working environment for 73–78
Final Cut Pro Read Me file 22
Final Cut Pro Web site 18, 22
Find All command 197
Find command 197–198
Find Results window 140
FireWire protocol 22, 100, 124
Flash file support 130
flow controls (FXScript) 322–324
Format option for EDL export 258
Format tab 160
Frame Blending option 194
Frame Rate option 243
frames
abort capture on dropped frames 102
finding in sequence 176
making still images from 199
moving playhead frame by frame 149
report on dropped frames 102
Frame size 102, 107
frames position 89
functions (FXScript) 282, 288–289
FXBuilder 271–283
FX Builder Input Controls tab 274
FX Builder Text Entry tab 273
FXBuilder window 272, 273–275
FXScript
See also scripting; scripts
command and function reference 285–324
exporting FXScripts as text 260
using FXBuilder with 271–283
G
Gap command 198
gaps 92
closing 198
covering 202
creating 191, 202
finding 198
Index
363
If you can’t find
what you’re looking
for in this index,
look in the onscreen
help, available in
the Help menu on
your computer.
gear down command 177, 232
General Preferences tab 96–98
General sequence settings 107
Generator icon 138
generators 92, 225
scripts for 272
video generators 338
geometry (FXScript) 289–290
global variables 281
Group Selection tool 76, 192, 202
H
Handle Size option 101
Hand tool 77, 154
Hard Light mode 240
help system 17
hiding
columns 135, 260
overlays 156
title and action safe boundaries 155
tracks 85, 183
High Quality Playback option 243
hours position 89
I
image control filters 333
image data 282
images
exporting 262
file formats for 131
filters for 223–225
importing 130–131, 239
moving with Hand tool 77
still images 130, 199, 262
zooming in and out on 77
Image Sequence command 262
Import command 260
importing 93
audio files from audio CDs 132
batch lists 128–129, 260
Edit Decision Lists (EDLs) 259
Flash files 130
images 130–131, 239
layered Photoshop files 131
364
Index
logs 128–129
media 130
QuickTime files 130
In and Out points
changing duration between 97, 148
changing simultaneously 206
moving simultaneously 171
selecting items between 189
setting (Tutorial) 36–38
In and Out points overlay 156
Include Filters option 243
In points 93
editing and 92
marking 125, 149
modifying in Viewer 171
moving playhead to 170
replace editing and 173
setting (Tutorial) 36
three-point editing and 164
timecodes and 87
In property 161
Input button 254
Input Controls tab 318
input statements 280, 318, 318–319
insert editing 91, 172, 174
insert operation 253
Insert Tracks dialog box 184
Insert Versus Assemble Editing 253
Insert with Transition editing 174
invisible clips 193
invisible tracks 85
iris transitions 329
Item Properties command 160, 246
Item Properties window 82
items
breaking links to 189
color of in Timeline window 180
correcting if out of sync 199
deleting in Timeline 191
deselecting on tracks 185
displaying as icons 134–135
displaying as list 134–135
making copies of 139
removing from tracks 186
repositioning in Timeline with timecode 190
searching for in Browser 140–141
searching for in Timeline 197–198
selecting individual items 76
selecting in Timeline 187–189
selecting multiple items 76
selecting on tracks 185
selecting range of 76
selecting without linked items 189
unable to select in Timeline 188
J
Jog control 85
jogging playhead 149
JVC RS-232 deck protocol 22
K
keyboard shortcuts 84, 90, 339–355
See also commands
key filters 334
keyframe markers 145
keyframe overlays 110, 195, 196
Keyframe Overlays button 196
Keyframes
corner point 237
keyframes 93
adding 77
adding Bezier handles to 78
adjusting level and spread with 159
changing effects over time with 232–235
corners and curves 237
deleting 78, 235
displaying in Timeline 195
editing in Timeline 196
editing in Viewer 234–235
motion path 237
moving in Timeline 196
overlay key frames 196
precision tuning 232
setting 234
snapping 196
types of 233
working with in Timeline 195–197
working with in Viewer 233–234
keys (FXScript) 306–307
L
layers, importing Photoshop files and 131
L-cut edits 175
Leader options 250, 255
Level notes for EDL export 259
Level slider 145
Levels of Undo 96
lift delete operation 191
Lighten mode 240
linked items
breaking links to 189
correcting if out of sync 199
Linked Selection feature 98, 188–189, 201
link indicators 179
locked tracks 84, 183, 188, 198
Lock Track control 179, 198
Log and Capture, Timecode Offset 101
Log and Capture window 78, 113–128
logging back-to-back clips 125
Logging Bin
specifying 114
logging bin 121
Logging Info tab 162
logging process 93, 113, 124–126, 162
Logging tab 114
logs, importing 128–129
looping playback 149
Loop option 250, 256
loops, in FXScript 280
LTC option 100
luma key 335
M
magnification, changing 154–155
Make Favorite Effect command 216
Make Still Frame command 199
map transition 329
Mark Clip command 176
Marker icon 137
marker overlays 156
markers 93
adding 125, 151–153
adding to sequences 187
deleting 151
Index
365
If you can’t find
what you’re looking
for in this index,
look in the onscreen
help, available in
the Help menu on
your computer.
366
Index
deleting sequence markers 187
editing 151–153
editing sequence markers 187
extending duration of 152–153
extending sequence markers 187
moving 152–153
moving playhead to 151
positioning playhead on 187
renaming 152
searching for text in 197
showing for clips 136
using as subclips 153
working with in Canvas 186
working with in Timeline 186
marking
clips 123, 199
edit points 171
In and Out points 125, 149
Mark in Sync command 199
Mark Selection command 176
Master, Audio Merged option for EDL export 258
master clips 150
mastering mode 252
mastering options 255
Mastering tab 255
Master option for EDL export 259
Match Frame (Tutorial) 42
Match Frame command 176
matte filters 335
media
importing 130
moving source media 269–270
Media Limit message 210
Media Mover 269–270
Media options 250, 256
memory 27
menus 83
minutes and seconds positions 89
mirror on desktop 250, 255
mirror video on the desktop 97
mixdown audio feature 165
mixing audio 97, 165, 244
modem port, connecting devices via 22
Mono Mix audio format 157
Mono option 109
Most 155
Motion Blur property 226, 243
motion effects, applying to clips 147
motion paths 235–238
motion properties 226–232
Motion tab 147, 219
Move into Sync command 199
moving clips into Timeline 189
multi-frame trim buttons 204
multi-frame trim size, setting 96
multiply mode 240
N
Name option 181
Name Plus Thumbnail option 181
naming clips 124–125
Naming Options dialog box 266
navigating with timecode values 88, 148
nested sequences 244, 267, 268
Nest Item(s) command 268
Next Edit button 86, 205
non-drop frame timecode 89
non-square pixels 155
Normal mode 240
NTSC format 100, 155, 254, 255
NTSC monitor 24, 130, 148, 155, 254, 255
video is not visible 27
number data 282
O
Offline Clip command 194
Offline Clip icon 137
offline clips 93, 124–126, 180, 193
offline files 269
offline sequences 268–269
Omit Transitions option for EDL export 259
opacity, setting for clips 230–231
Opacity property 226
operators (FXScript) 282, 286–287
optimizing performance 26
Other Protocols option 100
Out-of-Sync indicators 179
Out points 93
See also In and Out points; In points
editing and 91, 92
marking 125, 149
modifying in Viewer 171
moving playhead to 170
replace editing and 173
setting (Tutorial) 36
three-point editing and 164
timecodes and 87
Out property 161
Overlay mode 240
overlays 156
Canvas editing 172
clip overlays 180
Edit to Tape 252
In and Out points overlay 156
keyframe overlays 110, 195, 196
marker overlays 156
modifications of 98
title safe overlays 156
viewing or hiding 156
overscan 155
overscan edges 230
overwrite editing 91, 173, 174
Overwrite with Transition editing 174
P
page peel transition 329
Paired label style 181
PAL format
Capture Preferences Frame Size 102
Device Control 100
Preset Editor Compressor 108
Preset Editor Frame Size 107
QuickTime compressor setting 104
QuickTime video format setting 103
Sequence Presets 106
PAL monitor 24, 27, 130, 148, 155, 254, 255
video is not visible 27
pan, adjusting for clips 158–159
Panasonic deck protocols 22
parameters 285
Paste Attributes command 192
Paste Attributes dialog box 192
Pen Delete tool 78
Pen Smooth tool 78
Pen tool 77, 234, 236
performance 26, 224
perspective filters 336
Photoshop files 131
Pinnacle Systems Targa 20
Play Around Current button 86, 97, 205
playback
changing speed of clips 194–195
looping 149
moving to specific timecode 182
optimizing for QuickTime files 111
real-time playback 241
stopping 205
Playback offset value 101
Play Base Layer Only option 243, 245
Play button 86
playhead
appearance in Timeline 178
manipulating 149
moving backward or forward 170
moving to closest edit 183
moving to In point 170
moving to marker 151
moving to Out point 170
moving to sequence marker 187
moving within clips 86
moving with timecodes 88
positioning in sequence 182
positioning on edit point 170, 205
positioning on specific marker 187
sub-frame placement of 159
playing clips
automatically rendering before playing 248
choosing amount played 97
in Viewer 148–149
trimming and 205
zooming and 154
Play In to Out button 86, 205
Point Control parameter 220
Port option 100
ports, connecting video devices via 22
Post-roll interval 100, 101
predefined variables 281
preferences 20, 80, 95–111
accessing 95
Index
367
If you can’t find
what you’re looking
for in this index,
look in the onscreen
help, available in
the Help menu on
your computer.
368
Index
Capture preferences 101–103, 117
Device Control preferences 99–101, 117
General preferences 96–98
Real-time Audio Mixing preferences 165
Render Ahead preferences 248
Scratch Disk preferences 110–111, 117, 247
Preferences window 80
Pre-Read Edits option for EDL export 259
Pre-roll interval 100
Preset Editor 107
presets 166
accessing 95
definition of 93
deleting 107
installation and 20
Sequence Presets 106–109
previewing transitions 217
previewing video output 24
Preview operation 253
Previous Edit button 86, 205
printing to video 97, 249–250
Tutorial 71
Print to Video, options 250
Print to Video command 249–250
Print to Video dialog box 249–250
problems. See troubleshooting
processes (FXScript) 296–299
Project Properties window 81, 141
projects 93, 133
adding bins to 138
automatic saving 96
autosaving 134
changing properties of 141
closing 133
creating 133
managing complex 267–270
moving source media used in 269–270
opening 133
organizing with Browser 136–141
redoing changes in 87
removing items from 139
saving 134
searching for items in 140–141
undoing changes in 87
properties
changing project properties 141
clip information and 160–162
for sequences 166
modifying clip properties 139
motion properties 226–227
Protocol option 100
protocols 22
Q
Quality Name option 243
Quality option 261
QuickTime
exporting 261
QuickTime compression settings 108
QuickTime Effects 224
QuickTime files, importing 130
QuickTime movies, optimizing playback of 111
QuickTime settings 103–109
R
Range Selection tool 76
Razor Blade All tool 77
Razor Blade tool 77, 195
Read Me file 17, 22
real-time audio 244
Real-time Audio Mixing preference 165
real-time playback 241
Recent Clips list 96
record monitor. See Canvas
Redo feature 87
region data 282
relinking offline files 269
Relink Media command 269
renaming
clip markers 152
items in Browser 139
markers 152
Render Ahead preference 248
Render All command 246
render files 98, 110, 247–248
Render Files folder 247
rendering 93, 241–248
applied scripts and 275
audio effects and 164
audio rendering 244
automatically rendering before playing 248
backgrounds and 156
changing clip speed and 194
Disabling temporarily with Caps Lock
key 246
entire sequence 246
filter order 223
how to avoid 246
indicators for 245
nested sequences 244
procedure for 246
rendering ahead in sequences 97
section of sequence 246
sequences 241–248
transitions 217, 245
Tutorial 70
versus real-time playback 241
video rendering 244
render qualities 242–245
Render Quality command 242
Render Quality Editor 242–243
Render Selection command 217, 246
Render status bar 178
replace editing 91, 173
Resolution option 243
Reverse Alpha property 160
Ripple Delete command 191
ripple delete operation 191
ripple editing 92
edit points and 203
performing 206–207
performing on transitions in Viewer 215
Ripple tool 77, 202
roll editing 92
edit points and 203
performing 207–208
performing on transitions in Viewer 215
Roll tool 77, 202
rotating clips 228–229
Rotation control 220
Rotation property 226
ruler, Timeline 178
S
sample rate 109
Save All command 134
Save As command 270
Save command 134
Save Project command 163
saving projects 96, 134
Scale property 226
Scratch Disk preferences 110–111, 117, 247
Scratch Disks tab 111
screen layout, customizing 86
Screen mode 240
scripting 271, 285
See also FXScript
scripts 271
applying in Timeline 274–275
building 278–279
customizing 277
effects scripts 272
exporting 277
exporting FXScripts as text 260
installing 278
opening 273
running in FXBuilder 274
structure of 275–277, 278
testing 279
scroll bars 154, 178
Scrubber bar 85, 143
scrubbing
clips 85
playhead 149
thumbnails 135
turning off 157
SCSI ID number 25
searching
for items in Browser 140–141
for items in Timeline 197–198
Select All Tracks Backward tool 77
Select All Tracks Forward tool 77
Select Track Backward tool 76
Select Track Forward tool 76
separators 89
Sequence Editor 168
Sequence Editor command 167
Sequence icon 137
Index
369
If you can’t find
what you’re looking
for in this index,
look in the onscreen
help, available in
the Help menu on
your computer.
370
Index
sequence In and Out points 176
sequence markers 186
Sequence Presets 106–109
Sequence Presets tab 106–107
sequences 93, 163
adding markers to 151
adding tracks to 184
audio in 164–165
audio sequences 180
changing settings for 167–168
color of in Timeline 180
compositing tracks for 165
copying and pasting clips in 192–193
creating 166–168
creating new (Tutorial) 33
deleting tracks from 184
editing to tape 254
exporting 261–266
exporting as EDLs 257–259
exporting audio only from 262, 263
finding frames in 176
finding gaps in 198
fitting into window 154, 155
modifying in clips 193–195
moving clips in 190, 202
moving Timeline view of 167
nested sequences 244, 267, 268
opening for editing 167
placing within other sequences 267
positioning playhead in 182
presets and 106–110, 166
printing to video 249–250
properties for 166
redoing changes in 87
removing from projects 139
renaming 139
rendering 97, 241–248
saving changes made to 163
scaling view of in Timeline 182
searching for text in 197
searching for timecode in 197
selecting in Browser 136
setting render qualities for 242–245
setting up edits for 169–171
sorting in Browser 136
trimming clips into offline sequence 268–269
undoing changes in 87
using clips in 143
viewing 155, 168
Sequence Settings window 81, 107–110,
167–168
sequence tabs, Timeline 178
Sequence Trimmer 268–269
Sequential label style 181
serial port, connecting devices via 22
Setting In points for Edit to Tape 254
settings
See also individual settings
changing for clips 118–120
changing for filters 146
changing for sequences 167–168
changing for transitions 212–214
compression settings for source material 246
favorite transactions and 216
filter and motion bars 110
logging clips 127
saving for filters 223
thumbnail display 110
Settings command 166
Settings option 261
shapes (FXScript) 291–292
sharpen filters 337
shortcut menus 83
shortcuts, keyboard 84, 90, 339–355
See also commands
Show As Sq. Pixels 155
Show Filter & Motion Bars button 195
showing
columns 135
markers for clips 136
overlays 156
title and action safe boundaries 155
tracks 85
Shuttle control 85
shuttling playhead 149
Slate option 250, 256
Slate Source option 250, 256
slide editing 92, 202
Slider controls 220
Slide tool 77, 202
slide transitions 329
sliding clips 77, 209
slip editing 92, 199, 202
Tutorial 39
Slip into Sync command 199
slipping clips 171, 199, 208–209
slipping edits in Trim Edit window 206
Slip tool 77, 190, 202
slow-motion effects 194–195
snapping
in Timeline 190
keyframes and 196
trimming functions and 201
turning on 98
Soft Light mode 240
Sony deck protocols 22
Sorting option for EDL export 258
sound
See also audio
adjusting for clips 158–159
audio scrubbing and 157
beep sounds 245
turning off audio scrubbing 157
Sound Settings window 109
Source, Audio Merged option for EDL export 259
source media. See media
source monitor. See Viewer
special effects 92, 325–338
applying 219
audio effects 164
audio filters 326–327
audio transitions 325
building with FXBuilder 271–283
changing with keyframes 232–235
displaying keyframes for 195
exporting as text 260
fast-motion effects 194–195
locating 219
parameters for 220
slow-motion effects 194–195
text generators 338
Tutorial 51
video filters 332–337
video generators 338
video transitions 328–331
Speed command 194
Speed settings 161
split editing 175–176
spread, adjusting for clips 158–159
Spread slider 145
square pixels 155
start and end of edits overlay 156
start and end of media overlay 156
Start Time option for EDL export 259
statements 279
static variables 281
Stereo audio format 157
Stereo option 109
stereo pair indicators 179
stereo panning 145
Still Image command 262
Still Image Duration field 97
still images. See images
Stop button 205
storyboard, creating in Browser 174
stretch transitions 330
string data 282
strings (FXScript) 287, 310
stylize filters 337
Subclip icon 137
subclips 94
creating 150
finding master clip for 150
using markers as 153
sub-frame slipping 159
subroutines 281
subtract mode 240
superimpose editing 91, 173
switching between FireWire protocols 23
synchronizing audio and video 97, 159
System option 100
system requirements 18
T
tabbed windows 84–86, 144–147
tabs
creating for bins in Browser 138
dragging out of original windows 164
sequence tabs 177, 178
tape, editing to 251–256
Index
371
If you can’t find
what you’re looking
for in this index,
look in the onscreen
help, available in
the Help menu on
your computer.
372
Index
tape decks
See also device control; video decks
connecting to computer 20
protocols for 22, 100
Tape Deck status box 251
target track controls 84, 169, 179
target tracks 94, 169
Target Video Track Only option for EDL
export 259
testing scripts 279
text
custom titling 225
entry parameters 220
export FXScripts 261
FXScripts 311
generators 225, 338
slate 250, 256
superimposing 225
The 209
3D simulation transitions 328
three-point editing 91, 164
thumbnails 98, 135, 181
time
changing current time 88–89
modifying display in Timeline 182
timecode
calibrating 118
changing clip’s source timecode 129
choosing format for 100
displaying drop frame timecode 109
editing values 152–153
keyboard shortcuts 90
moving playback to 182
moving to a new time 88–89
navigation with 88, 148
repositioning items in Timeline with 190
searching for in Timeline 197
separators for 89
setting with “Black and Code” button 257
working with 87–90
Timecode Offset option 101
Timeline 74
applying filters from 221–222
applying scripts in 274–275
controls in 84–85
copying and pasting clips into 192
customizing clip appearance in 181–182
customizing track appearance in 181–182
deleting items in 191
dragging multiple clips to Browser from 174
editing clips in 174–175
items in 178–180
locking tracks in 183
modifying time display in 182
moving clips into 189
moving clips within 190
moving keyframes in 196
moving view of in sequences 167
moving with Hand tool 77
opening clips in 147
options for sequence presets 109
repositioning items in 190
resizing clips in 202
scaling view of 182
scrolling in 182
searching for items in 197–198
selecting clips in 187, 188
selecting contents of tracks in 185–186
selecting edit points in 203
selecting items in 187–189
snapping in 190
specifying render quality in 250
tabs in 84–86
target track controls in 169
trimming edits in 201, 206–210
viewing contents of 182
working with 163–164, 177–199
working with keyframes in 195–197
working with markers in 186
working with tracks in 183–186
zooming view of 77, 182
Timeline (Tutorial) 32
Timeline Options tab 109, 181–182
Timeline ruler 178, 245
Timeline window 177–180
Timer option 100
Time Source option 100
Timing tab 161
title and action safe boundaries 155
title safe overlays 156
titling, custom text 225
Tool palette 76–78
editing with 92
trimming edits and 201
ToolTips 98
Track Gap command 198
track gaps 198
track lock controls 84, 183
tracks
See also audio tracks; video tracks
adding overlay keyframes to 196
adding to sequences 184
compositing for final sequence 165
controls for 84–85
cost of 244
customizing appearance in Timeline 181–182
deleting from sequences 184
deselecting items on 185
editing contents of 186
hiding 85, 183
in Timeline 181
invisible tracks 85
locking 183, 198
maximum number of 165
modification of overlays 98
removing items from 186
selecting contents of 76–77, 185–186
selecting for recording 254
selecting items on 185
singling out for visibility 183
specifying target tracks for editing 169
target tracks 94
visibility controls 85, 179
visibility controls (Tutorial) 69
working with in Timeline 183–186
Tracks, default number of 109
Track Selection tool 76
Track Size control 179, 181
Track Size setting 110
track visibility controls 85, 179
Trailer option 250, 256
transforms (FXScript) 293
Transition Conflict message 210
transitions 92
adding (Tutorial) 44
adding transition effects 211–212
attached to clips 239
audio transitions 325
changing duration of 215
creating 211–217
dissolve transitions 328
editing 91
editing (Tutorial) 47
favorite transitions 216
iris transitions 329
map transition 329
modifying settings for 212–214
moving in Viewer 214–215
page peel transition 329
previewing 217
rendering 217
replacing (Tutorial) 46
scripts for 272
settings for 216
slide transitions 329
stretch transitions 330
trimming in Viewer 214–215
video transitions 328–331
viewing in Canvas 217
wipe transitions 330–331
Transition Viewer 212–214
transparent images 239
transport controls 86, 148–149, 205
Travel Matte mode 240
trim buttons 204
Trim Edit window 82, 201, 204–206
Trimmer command 268
trimming
clips into offline sequences 268–269
edits 201–210
in Trim Edit window 205
L-cut edits 175
multi-frame trim size and 96
transitions 214–215
Tutorial 41
troubleshooting
autosaved versions of projects and 134
beep sounds 245
malfunctions during editing process 251
video deck 123–124
Index
373
If you can’t find
what you’re looking
for in this index,
look in the onscreen
help, available in
the Help menu on
your computer.
Tutorial 29–71
Adding a Clip 35
adding transitions 44
audio, adjusting the volume 50
audio editing 48
Browser 32
Canvas and Timeline 32
compositing 51
creating a new sequence 33
editing 31
editing a transition 47
exporting sequences 71
Match-frame editing 42
printing to video 71
rendering 70
replacing a transition 46
setting In and Out points 36
Slip editing 39
special effects 51
Timeline 32
Trimming an Edit 41
Viewer 34
tutorial
media 29
U
Ultra Wide A/V hard disk drive 24
Ultra Wide SCSI hard disk drive 24
Undo feature 87, 96
utilities (FXScript) 312–314
V
variables 281, 314, 317
VCR mode 21, 27
vectorscope 119
vertical scroll bars 178
video
AppleTalk and 103
capturing with device control 121–123
capturing without device control 120–121
compression methods for 108
editing 91–92
external video options 97
filters 332–334
374
Index
finding source video for clips 176
generators 338
mirroring on desktop during playback 97
mirroring on desktop when printing 97
printing to 97, 249–250
QuickTime settings for 108
synchronizing with audio 159
transitions 328–331
video and audio cables 20
video clips. See clips
Video compression settings 104
video decks
See also device control; tape decks
connecting 20
protocols for 100
timecode formats for 100
troubleshooting 27–28, 123–124
video devices
connecting to computer 20
protocols for 22
Video does not play on screen 28
video effects. See special effects
Video Filter icon 138
video filters 220–221, 332–337
video frame size 19
video generators 338
video graphics 180
video rendering 244
Video settings 103
video source connection 19
Video source settings 103
Video tab 144
videotape, editing to 251–256
video tracks 181
See also tracks
Video Transition icon 138
video transitions 328–331
view
actual size 155
fit all 155
fit to window 154
shrink to fit 155
zoom in 154
zoom out 154
Viewer 73
changing position of clips in 227–228
changing transition duration in 215
clips and 143
controls in 84–86
editing keyframes in 234–235
Effects tabs in 219
modifying In and Out points in 171
moving transitions in 214–215
opening clips in 147–148, 176
playing clips in 86, 148–149
scaling clips in 228
tabs in 84–86
trimming edits in 201, 206–210
trimming transitions in 214–215
turning off audio scrubbing in 157
Tutorial 34
viewing clips with 153–156
working with 144–147
working with keyframes in 233–234
View menu 153
view playback from a video device 24
VITC option 100
volume, adjusting 145, 158–159
X,Y
X button, Audio tab 145
Z
Zoom control 180
Zoom feature 154, 182, 203
Zoom Slider 85, 180
Zoom tools, Timeline 77, 182
W
waveform monitor 118–120
waveforms, audio 157, 181
Web site, Final Cut Pro 18, 22
windows
See also individual windows
customizing screen layout of 86
fitting clips into 98, 154, 155
fitting sequences into 154, 155
performance 26
scaling 85
scrolling 85
shrinking to current clip size 155
tabbed windows 84–86
working with multiple 83, 174, 253
wipe transitions 330–331
wireframe mode 227
wireframes 94
Index
375