1
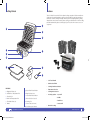
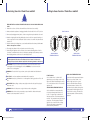
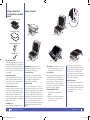
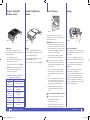
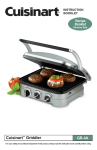
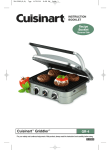
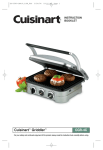
®
4-in-1 Panini Press and Grill
OWNER’S GUIDE
SM215 10
SM215_10_IB_ENG_100521.indd 1
10-05-21 4:28 PM
IMPORTANT SAFETY INSTRUCTIONS
For Household Use Only
WHEN USING ELECTRICAL
APPLIANCES, BASIC SAFETY
PRECAUTIONS SHOULD ALWAYS
BE FOLLOWED, INCLUDING THE
FOLLOWING:
1.
READ ALL INSTRUCTIONS
BEFORE USING YOUR 4-IN-1
PANINI PRESS AND GRILL.
3. The appliance should always be
set to ‘OFF’ before plugging into
or unplugging from the electrical
outlet. NEVER pull on the cord to
disconnect the appliance from the
outlet; instead, grasp the plug and
pull on the plug to disconnect the
appliance.
POLARIZED PLUG:
To reduce the risk of shock, this
appliance has a polarized plug (one
blade is wider than the other). As a
safety feature, this plug will fit into
a polarized outlet only one way. If
the plug does not fit fully into the
outlet, reverse the plug. If it still
does not fit, contact a qualified
electrician. DO NOT modify the
plug in any way.
Use the appliance only for its
intended use.
2. To protect against fire, electric
shock and injury to persons, DO
NOT immerse cord, plug or the
appliance in water or other liquids.
4. Let the appliance cool completely
before putting away or storing.
5. DO NOT touch hot surfaces; use
handles or knobs.
6. Close supervision is necessary
when any appliance is used by or
near children.
7.
Unplug from outlet when not in
use and before cleaning. Allow to
cool before putting on or taking
off parts, and before cleaning the
appliance.
8. DO NOT operate any appliance
with damaged cord or plug or
after the appliance malfunctions
or has been damaged in any
manner. Return the appliance to
EURO-PRO Operating LLC for
examination, repair or adjustment.
(See Warranty)
WARNING:
To reduce the risk of shock or
injury, do not use outdoors or on
wet surfaces.
9. The use of accessory attachments
not recommended by the
appliance manufacturer may result
in fire, electrical shock, or risk of
injury to persons.
11. DO NOT let power cord hang over
edge of table or counter, or touch
hot surfaces.
12. DO NOT place on or near a hot gas
or electric burner, or in a heated
oven.
13. Unplug the unit when finished
using.
14. Extreme caution must be
exercised when moving an
appliance containing hot oil or
other hot liquids.
15. To disconnect, set the function
switch to the ‘OFF’ setting, then
remove plug from wall outlet.
16. Always place the appliance on a
level, stable surface.
17. Never place the appliance close
to the edge of a counter or table.
Make sure that the power cord is
positioned safely so that nobody
trips or gets tangled.
18. When using this appliance, provide
6-8 inches of air space above,
behind and on both sides for air
circulation.
19. It is recommended that you use
an insulated hot pad underneath
the appliance to avoid any heat
damage to your counter or
furniture.
22. Never leave appliance unattended
during use.
23. Unit should never be used in the
half open position.
NOTE: This unit has a short power
supply cord to reduce the risk
resulting from becoming entangled
in or tripping over a long cord. An
extension cord may be used if you are
careful in its use:
1.
An extension cord may be used
if the electrical rating is equal to
or greater than the rating of the
appliance. Use only an extension
cord rated a minimum of 15
ampere, 14 gage cord. Cords
rated for less amperage may
overheat.
2. An extension cord with the power
cord must be arranged so that it
will not drape over the countertop
or tabletop where they can be
pulled on by children or tripped
over accidentally.
SAVE THESE
INSTRUCTIONS
20. Children should be supervised to
ensure that they do not play with
the appliance.
21. To avoid a circuit overload, DO
NOT operate this appliance on
the same circuit with another high
wattage appliance.
10. DO NOT use outdoors.
2
TOLL FREE: 1-800-798-7398
SM215_10_IB_ENG_100521.indd 2-3
www.euro-pro.com
3
10-05-21 4:28 PM
Contents
Thank you for
purchasing the
EURO-PRO®
4-in-1
Panini Press
and Grill.
Getting Started................................................................................................ 6
Features.............................................................................................................. 7
Before Using You 4-in-1 Panini Press and Grill..................................... 8
Getting to Know Your 4-in-1 Panini Press and Grill............................ 9
How to Assemble............................................................................................ 10
Operation........................................................................................................... 12
Using the ‘Panini Grill’ Function................................................................ 13
Using the ‘Griddle Press’ Function........................................................... 14
Care & Cleaning............................................................................................... 15
Storage................................................................................................................ 15
Troubleshooting............................................................................................... 16
Ordering Parts.................................................................................................. 16
Warranty............................................................................................................. 17
TECHNICAL SPECIFICATIONS
Voltage: 120V., 60Hz.
Power: 1500 Watts
4
TOLL FREE: 1-800-798-7398
SM215_10_IB_ENG_100521.indd 4-5
www.euro-pro.com
5
10-05-21 4:28 PM
Features
Getting Started
f
The 4-in-1 Panini Press and Grill is the optimal cooking companion. With removable nonstick plates, this versatile appliance can be used as a griddle for eggs in the morning, a
Panini press at lunch, and a grill at night. Whether you are using the griddle or grilling,
independent controls ensure accuracy when cooking your favorite meals. With a cooking
plate that automatically adjusts to the height of your food, the 4-in-1 ensures success in
every meal.
a
g
h
b
i
c
d
e
j
k
• Cool Touch Handle
• Stainless Steel Finish
• Cooking Plate Release Button
FEATURES
• Temperature Selection
a Ridged Grill Plate (x 2)
g Upper Plate Release Button
b Griddle Press Temperature Dial
h Hinge Release Lever
c Function Dial
i Lower Plate Release Button
d Panini Grill Temperature Dial
j Drain Collection Cup (x 2)
e Flat Griddle Plate (x 2)
f Handle
6
TOLL FREE: 1-800-798-7398
SM215_10_IB_ENG_100521.indd 6-7
• Cooking Mode Selection
• 4 Cooking Options - Open Grill
- Griddle
k Cleaning Tool
- Panini Press
l Power Cord (not shown)
- Contact Grill
m Cord Storage (not shown)
• Non-Stick Coating
www.euro-pro.com
7
10-05-21 4:28 PM
Before Using Your 4-in-1 Panini Press and Grill
Getting to Know Your 4-in-1 Panini Press and Grill
IMPORTANT
PERFORM THE FOLLOWING STEPS BEFORE USING YOUR 4-IN-1 PANINI PRESS AND
GRILL
1 Read all the sections of this booklet and follow all the instructions carefully.
2 Make sure that the appliance is unplugged and the function dial is in the ‘OFF’ position.
FUNCTION DIAL
3 Remove all packaging and any labels, stickers or tags that may be attached to the unit.
4 Wash the ridged grill plates, flat griddle plates, drain collection cups and cleaning tool
in hot, soapy water or in the dishwasher. (Refer to ‘How to Assemble’ for plate removal
instruction.)
5 Wipe the main unit, including base, cover, handle and dials with a damp cloth. Do not
immerse the appliance in water.
6 Thoroughly dry all parts of the unit and accessories before using.
7 When using the appliance for the fist time, we recommend heating with no food for
10 minutes on medium heat in order to eliminate any packing residue that may remain
after shipping and remove all traces of odor initially present.
GRIDDLE PRESS
TEMPERATURE DIAL
PANINI GRILL
TEMPERATURE DIAL
Note: Initial start-up operation may result in minimal smell and smoke. This is
normal and harmless and does not indicate a defect or hazard. It is due to the
burning off of a protective substance applied to the heating elements in the factory.
IMPORTANT: Only use wooden or plastic utensils on the non-stick surface of the
cooking plates to avoid damaging the surface. NEVER cut food on the non-stick
surface of the cooking plates.
WARNING: To avoid risk of injury or burns, touch only the handle and dials when in
use.
CAUTION: Do not leave appliance unattended while in operation.
CAUTION: Never place your hands in or on the appliance during operation or if it is still
hot.
IMPORTANT: When pulling out the power plug from the wall outlet, pull the plug not
the power cord.
WARNING: Never let the power cord get in between the cooking plates.
WARNING: Non-stick coatings can produce vapors harmful to birds when heated
without food at temperatures over 400°F.
8
TOLL FREE: 1-800-798-7398
SM215_10_IB_ENG_100521.indd 8-9
FUNCTION DIAL
Select ‘Griddle Press’ or ‘Panini Grill’
depending on your cooking needs. A red
light on the dial will indicate that the unit is
on. Set the function dial to ‘Off’ to turn the
appliance off.
GRIDDLE PRESS TEMPERATURE DIAL
Set the Griddle Press temperature dial
to the desired temperature from 200°F
to 450°F. A green light on the dial will
indicate when the selected temperature is
reached. The temperature may be adjusted
at any time. The temperature indicator
light will cycle on and off while cooking.
This indicates that the temperature is
thermostatically maintained.
PANINI GRILL TEMPERATURE DIAL
Set the Panini Grill temperature dial when
grilling to choose from ‘Warm’, ‘Low’,
‘Medium’, ‘High’ and ‘Sear’. A green
light on the dial will indicate when the
selected temperature is reached. The
temperature may be adjusted at any time.
The temperature indicator light will cycle
on and off while cooking. This indicates
that the temperature is thermostatically
maintained.
www.euro-pro.com
9
10-05-21 4:28 PM
Getting to Know Your
4-in-1 Panini Press and Grill
- cont’d
How to Assemble
RIDGED GRILL PLATES
FLAT GRIDDLE PLATES
Fig. 1
Fig. 3
DRAIN COLLECTION CUPS
CLEANING TOOL
RIDGED GRILL PLATES
Use the ridged grill plates when using the
appliance as a Panini press, contact grill or
open grill. The raised ridges allow grease
to drip down and out the drip spout on the
corner. They have a non-stick coating for
easy clean up.
FLAT GRIDDLE PLATES
Use the flat griddle plates when using as
a griddle. Grease will drip out the drip
spouts on the corners. They have a nonstick coating for easy clean up.
DRAIN COLLECTION CUPS
Arrange the drain collection cups so that
they catch the drippings from the drip
spouts on the corner of the plates. When
using the appliance as a Panini press or
contact grill, only one drain collection cup
is needed. When using as an open grill or
griddle, use both cups.
CLEANING TOOL
Use to clean the grill and griddle plates.
10
TOLL FREE: 1-800-798-7398
SM215_10_IB_ENG_100521.indd 10-11
Fig. 2
WARNING: Make sure the unit is
turned off, unplugged and cool before
disassembling or assembling.
CLOSED POSITION
When using as a contact grill or Panini
press, begin in this position when heating
up. The upper and lower plates are
touching each other. (Fig. 1)
OPEN POSITION
Once hot, lift the top part 100° so that it
rests open while you put your food on the
lower plate when using as a contact grill or
Panini press. (Fig. 2) The upper part will
stay in this upright position until you grasp
the handle and pull it down onto your food.
In order to return to the open position, first
close the upper part all the way with no
food inside so that the plates are touching
and then lift the upper part to the open
position.
Fig. 4
CAUTION: Do not use in this position to
cook on the bottom plate only. Open
the grill and use in the flat position.
FLAT POSITION
With your left hand, hold the top part open
by the handle part way, slide the hinge
release lever up with your right hand and
open the top cover all the way until the
handle touches the counter or tabletop.
Use in this position when using as an open
grill and as a griddle. (Fig. 3)
INSTALL DESIRED PLATES
1 Place appliance in the flat position.
(Fig. 3)
Fig. 5
3 Hold the upper or lower plate from
the outside edge and arrange the two
grooves on the inside edge to go under
the two hooks on inside edge of the
respective part. Then press the outside
edge of the plate down until it clicks and
locks into place. (Fig. 4)
REMOVE THE PLATES
1 Place the appliance in the flat position.
2 Press the upper plate release button to
remove the upper plate and lower plate
release button to remove the lower
plate. (Fig. 5)
2 Identify which is the upper plate and
lower plate by looking on the plate
where it is indicated.
www.euro-pro.com
11
10-05-21 4:28 PM
Operation
Using the ‘Panini Grill’ Function
WARNING: Make sure that the appliance
is turned off, unplugged and cool before
assembling the cooking plates.
1 Install the desired cooking plates.
2 Place appliance in desired cooking
position.
3 Place the drain collection cup(s) under
the drip spout(s) to catch any grease.
4 Plug the appliance into the electrical
outlet.
5 Set the function dial to ‘Panini Grill’ or
‘Griddle Press’ depending on what you
are cooking.
6 If using the appliance as a griddle, set
the Griddle Press temperature dial to
the desired temperature for cooking. If
you are using the appliance as a Panini
press or contact grill, set the Panini
Grill temperature dial to the desired
temperature setting.
7 Allow the grill to warm up while you
prepare your recipe.
8 When the temperature indicator light
turns green, place your food cooking
plate(s).
9 If using the appliance as a Panini press
or contact grill, close the upper part
so that both plates are in good contact
with the food. You can periodically
check on the cooking process by lifting
the top cover by the handle.
NOTE: If cooking more than one item,
make sure that the food that is placed
on the cooking surface is approximately
the same thickness so that the upper
plate will have even contact.
If using the appliance as an open grill or
griddle, check on your cooking process
periodically and flip your food half way
through cooking time as needed.
12
TOLL FREE: 1-800-798-7398
SM215_10_IB_ENG_100521.indd 12-13
10 When the food is finished cooking,
lift the upper part of the appliance by
the handle if using as a Panini press or
contact grill.
11 Remove the food using wooden or
plastic utensils so that you do not
damage the non-stick cooking surface.
12 When you are finished using the
appliance, set the function dial to the
‘Off’ position and unplug. Allow the unit
and the contents of the drain collection
cups to cool completely before moving
or cleaning.
13 Grease collected in the drain collection
cups should be disposed of carefully
once cooled.
CAUTION: Do not attempt to cook
food using the bottom plate only while
leaving the appliance in the open
position. The appliance should be in the
open position temporarily only, to put
food on or take food off the lower plate
when using as a Panini press or contact
grill.
WARNING: Do not touch any metal
parts of the appliance while in use and
still hot. Only touch the handle. Risk of
burns.
CAUTION: Do not move the appliance
while in use and while still hot. Do not
touch the upper part.
Fig. 6
PANINI PRESS
Make delicious sandwiches and then grill
them to perfection. Use fresh Italian style
breads for a better tasting Panini.
• Use the ridged grill plates.
• Place appliance in the closed position
to heat up and in the open position to
place your food on the lower plate.
• Use one drain collection cup. (Fig. 6)
• Light pressure can be applied to the
handle of the press to heat the sandwich
to your liking.
CONTACT GRILL
Use the grill as a contact grill to cook
burgers, boneless meat, thin meat cuts
and vegetables quickly because the food is
cooked from both sides at the same time.
• Use the ridged grill plates.
• Place appliance in the closed position
to heat up and in the open position to
place your food on the lower plate.
• Use one drain collection cup. (Fig. 6)
NOTE: The flat griddle plates may also
be used if you wish to have a sandwich
without grill marks.
www.euro-pro.com
13
10-05-21 4:28 PM
Using the ‘Panini Grill’
Function - cont’d
Using the ‘Griddle Press’
Function
Care & Cleaning
Storage
Fig. 9
Fig. 7
Fig. 8
OPEN GRILL
Use the grill as an open grill to cook
burgers, steaks, boneless poultry, seafood,
fish and vegetables.
• Use the ridged grill plates.
• Place appliance in the flat position to
heat up and also to cook.
• Use two drain collection cups. (Fig. 7)
NOTE: It is not recommended to cook
bone-in chicken as it will not cook
evenly on an open grill.
SUGGESTED GUIDE FOR USING THE
‘PANINI GRILL’ FUNCTION
TEMPERATURE
FUNCTION
Warm
(approx. 200°F)
Keep food warm
Low
(approx. 250°F)
Cook thin cuts of meat or
vegetables
Medium
(approx.
300°F to 350°F)
Normal grilling
(e.g. meat)
High
(approx. 400°F)
High temp. grilling
(Panini)
Sear
(approx. 450°F)
Very High temp. grilling
(e.g. meat)
14
GRIDDLE
You could cook breakfast meats on one
plate and pancakes and eggs on the other.
• Use the flat griddle plates.
• Place appliance in the flat position to
heat up and also to cook.
• Use two drain collection cups. (Fig. 8)
Clean the appliance soon after it has
completely cooled down. Clean after every
use and before first use.
WARNING: Unplug the unit. Allow the
unit and the contents of drain collection
cups to cool completely before cleaning.
1Use the cleaning tool to remove residue
from the plates. (Fig. 9) Clean the tool
by hand or in the dishwasher.
2Remove the plates when cooled and
wash by hand or in the dishwasher.
Do not use steel wool scouring pads,
metal utensils or abrasive cleansers on
the plates as this may damage the nonstick coating.
3If you cooked seafood, rub the plates
with lemon juice to prevent the taste
from transferring to the next food you
cook.
4Grease collected in the drain collection
cups should be disposed of carefully
once cooled. Clean the drain collection
cups by hand or in the dishwasher.
Fig. 10
HOW TO STORE SAFELY
1 Ensure that your 4-in-1 Panini Press and
Grill is turned off, unplugged, cooled
and clean.
2 One set of cooking plates can be left
attached to the appliance while storing.
3 Loosely wrap the cord around the cord
storage at the back of the appliance.
(Fig. 10)
Do not allow the power cord to get
between the cooking plates.
4 Store the appliance and all accessories
together in a cool dry area beyond
the reach of children and pets where
it won’t be damaged or hazardous to
anyone or anything, such as on a stable
shelf or in a cupboard.
5Wipe the main unit, including base,
cover, handle and dials with a damp
cloth.
Do not immerse the appliance in water.
Do not use abrasive pads or cleansers.
TOLL FREE: 1-800-798-7398
SM215_10_IB_ENG_100521.indd 14-15
6Let all parts and surfaces dry
thoroughly prior to use.
7Ensure that all parts and surfaces are
dry before plugging in the appliance.
www.euro-pro.com
15
10-05-21 4:28 PM
Model
SM215 10
Troubleshooting
PROBLEMS
ONE (1) YEAR LIMITED WARRANTY
POSSIBLE REASONS & SOLUTIONS
Unit not plugged in. Plug in unit.
Appliance Is Not
Working.
Make sure the electrical outlet is working. Check your
fuse box or circuit breaker box and replace the fuse or
reset the breaker as necessary.
Cooking Plates Do Not
Fit Into Place.
The cooking plates can only be mounted in their
respective positions. Check the markings on the plates
indicating which is the upper and lower plates.
Temperature Indicator
Light Keeps Going On
and Off.
This is normal. The temperature indicator light will
cycle on and off while cooking. This indicates that the
temperature is thermostatically maintained.
Hinge Release Lever
Cannot Be Moved.
The upper part is resting in the open position, this locks
the hinge release lever in place. Close the upper part
partially and then use the lever to release the hinge.
If your appliance still fails to operate or if problems persists, contact Customer Service at
1-800-798-7398, Monday to Friday between 8:30 A.M. - 5:00 P.M. Eastern Standard Time,
or visit our website at www.euro-pro.com.
Ordering Parts
2
3
This Limited Warranty as it applies to the non-stick finish on the ridged grill plates and
flat griddle plates covers de-lamination, peel off and wear off only. This Limited Warranty
DOES NOT cover scratches, stains, or discoloration caused by negligence misuse or abuse.
The liability of EURO-PRO Operating LLC is limited solely to the cost of the repair or
replacement of the unit at our option. This Limited Warranty does not cover normal
wear of parts and does not apply to any unit that has been tampered with or used for
commercial purposes. This Limited Warranty does not cover damage caused by misuse,
abuse, negligent handling or damage due to faulty packaging or mishandling in transit.
This Limited Warranty does not cover damage or defects caused by or resulting from
damages from shipping or repairs, service or alteration to the product or any of its parts,
which have been performed by a repair person not authorized by EURO-PRO Operating
LLC.
If your appliance fails to operate properly while in use under normal household conditions
within the Limited Warranty period, you may return the complete appliance and
accessories with proof of purchase and date, freight prepaid. For Customer Service
support, call 1-800-798-7398 or visit our website www.euro-pro.com.
If the appliance is found by EURO-PRO Operating LLC to be defective, in EURO-PRO
Operating LLC’s sole discretion, we will repair or replace it free of charge. Proof of
purchase date and a check made payable to EURO-PRO Operating LLC in the amount of
$23.95 to cover the cost of return shipping and handling must be included.*
This Limited Warranty is extended to the original purchaser of the unit and excludes all
other legal, implied and/or conventional warranties. The responsibility of EURO-PRO
Operating LLC if any, is limited to the specific obligations expressly assumed by it under
the terms of this Limited Warranty. In no event is EURO-PRO Operating LLC liable for
incidental or consequential damages to anyone of any nature whatsoever. Some states
do not permit the exclusion or limitation of incidental or consequential damages, so the
above may not apply to you.
To order additional parts and accessories, feel free to contact us at
www.euro-pro.com or call 1-800-798-7398.
1
EURO-PRO Operating LLC warrants this product to be free from material defects and
workmanship for a period of one (1) year from the date of purchase when utilized for
normal household use, subject to the following conditions, exclusions and exceptions.
4
This Limited Warranty gives you specific legal rights, and you may also have other rights
which vary from state to state or from province to province.
PART
PART NO.
1 Drain Collection Cup
100KKB
2 Cleaning Tool
101KKB
3 Set of Ridged Grill Plates
102KKB
4 Set of Flat Griddle Plates
103KKB
16
TOLL FREE: 1-800-798-7398
SM215_10_IB_ENG_100521.indd 16-17
*IMPORTANT: Carefully pack item to avoid damage in shipping. Be sure to include
proof of purchase date and to attach tag to item before packing with your name,
complete address and phone number with a note giving purchase information, model
number and what you believe is the problem with the item. We recommend you insure
the package (as damage in shipping is not covered by your Limited Warranty). Mark the
outside of your package “ATTENTION CUSTOMER SERVICE”. We are constantly striving
to improve our products, therefore the specifications contained herein are subject to
change without notice.
www.euro-pro.com
17
10-05-21 4:28 PM
U.S.:
CANADA:
EURO-PRO Operating LLC
Newton, MA 02459
English:
1-800-798-7398
www.euro-pro.com
EURO-PRO Operating LLC
4400 Bois Franc
Ville St. Laurent, Québec H4S 1A7
COPYRIGHT © EURO-PRO OPERATING LLC 2010
PRINTED IN CHINA
REV. 100521
Illustrations may differ from actual product.
SM215_10_IB_ENG_100521.indd 18
10-05-21 4:28 PM