1
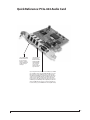
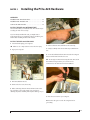
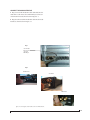
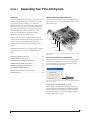
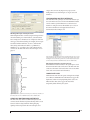
MOTU PCIe-424
™
User’s Guide for Windows
1280 Massachusetts Avenue
Cambridge, MA 02138
Business voice: (617) 576-2760
Business fax: (617) 576-3609
Technical support: (617) 576-3066
Tech support fax: (617) 354-3068
Tech support email: [email protected]
Web site: www.motu.com
SAFETY PRECAUTIONS AND ELECTRICAL REQUIREMENTS
WARNING: TO REDUCE THE RISK OF FIRE OR ELECTRICAL SHOCK, DO NOT EXPOSE THIS APPLIANCE TO RAIN OR OTHER MOISTURE.
CAUTION: TO REDUCE THE RISK OF ELECTRICAL SHOCK, DO NOT REMOVE COVER. NO USER-SERVICEABLE PARTS INSIDE. REFER SERVICING TO
QUALIFIED SERVICE PERSONNEL.
WARNING: DO NOT PERMIT FINGERS TO TOUCH THE TERMINALS OF PLUGS WHEN INSTALLING OR REMOVING THE PLUG TO OR FROM THE OUTLET.
WARNING: IF NOT PROPERLY GROUNDED YOUR MOTU AUDIO INTERFACE COULD CAUSE AN ELECTRICAL SHOCK.
Your MOTU audio interface is equipped with a three-conductor cord and grounding type plug which has a grounding prong, approved by Underwriters' Laboratories and the Canadian Standards Association.
This plug requires a mating three-conductor grounded type outlet as shown in Figure A below.
If the outlet you are planning to use for your MOTU audio interface is of the two prong type, DO NOT REMOVE OR ALTER THE GROUNDING PRONG IN ANY MANNER. Use an adapter as shown below
and always connect the grounding lug to a known ground. It is recommended that you have a qualified electrician replace the TWO prong outlet with a properly grounded THREE prong outlet. An adapter
as illustrated below in Figure B is available for connecting plugs to two-prong receptacles.
Figure A
Figure B
Grounding lug
Screw
3-prong plug
Make sure this is connected
to a known ground.
3-prong plug
Grounding prong
Two-prong receptacle
Properly grounded 3-prong outlet
Adapter
WARNING:THE GREEN GROUNDING LUG EXTENDING FROM THE ADAPTER MUST BE CONNECTED TO A PERMANENT GROUND SUCH AS TO A PROPERLY
GROUNDED OUTLET BOX. NOT ALL OUTLET BOXES ARE PROPERLY GROUNDED.
If you are not sure that your outlet box is properly grounded, have it checked by a qualified electrician. NOTE: The adapter illustrated is for use only if you already have a properly grounded two-prong
receptacle. Adapter is not allowed in Canada by the Canadian Electrical Code. Use only three wire extension cords which have three-prong grounding type plugs and three-prong receptacles which will
accept your MOTU audio interface’s plug.
IMPORTANT SAFEGUARDS
1.
2.
3.
4.
5.
6.
7.
8.
Read instructions - All the safety and operating instructions should be read before operating your MOTU audio interface.
Retain instructions - The safety instructions and owner's manual should be retained for future reference.
Heed Warnings - All warnings on your MOTU audio interface and in the owner's manual should be adhered to.
Follow Instructions - All operating and use instructions should be followed.
Cleaning - Unplug your MOTU audio interface from the computer before cleaning and use a damp cloth. Do not use liquid or aerosol cleaners.
Overloading - Do not overload wall outlets and extension cords as this can result in a risk of fire or electrical shock.
Power Sources - This MOTU interface should be operated only from the type of power source indicated on the marking label. If you are not sure of the type of power supply to your location, consult your local power company.
Power-Cord Protection - Power-supply cords should be routed so that they are not likely to be walked on or pinched by items placed upon or against them. Pay particular attention to cords and plugs, convenience receptacles, and the point
where they exit from your MOTU audio interface.
9. Lightning - For added protection for your MOTU audio interface during a lightning storm, unplug it from the wall outlet.This will prevent damage to your MOTU audio interface due to lightning and power line surges.
10. Servicing - Do not attempt to service this MOTU interface yourself as opening or removing covers will expose you to dangerous voltage and other hazards. Refer all servicing to qualified service personnel.
11. Damage Requiring Service - Unplug your MOTU audio interface from the computer and refer servicing to qualified service personnel under the following conditions.
a. When the power supply cord or plug is damaged.
b. If liquid has been spilled or objects have fallen into your MOTU audio interface.
c. If your MOTU audio interface has been exposed to rain or water.
d. If your MOTU audio interface does not operate normally by following the operating instructions in the owner's manual.
e. If your MOTU audio interface has been dropped or the cabinet has been damaged.
f. When your MOTU audio interface exhibits a distinct change in performance, this indicates a need for service.
12. Replacement Parts - When replacement parts are required, be sure the service technician has used replacement parts specified by the manufacturer or have the same characteristics as the original part. Unauthorized substitutions may
result in fire, electric shock or other hazards.
13. Safety Check - Upon completion of any service or repairs to this MOTU interface, ask the service technician to perform safety checks to determine that the product is in safe operating conditions.
ENVIRONMENT
Operating Temperature: 10°C to 40°C (50°F to 104°)
AVOID THE HAZARDS OF ELECTRICAL SHOCK AND FIRE
Do not handle the power cord with wet hands. Do not pull on the power cord when disconnecting it from an AC wall outlet. Grasp it by the plug.
INPUT
Line Voltage: 100 - 120 volts AC, RMS (US and Japan) or 220 - 250 volts AC, RMS (Europe). Frequency: 47 - 63 Hz single phase. Power: 7 watts maximum.
CAUTION: DANGER OF EXPLOSION IF BATTERY IS REPLACED. REPLACE ONLY WITH THE SAME OR EQUIVALENT TYPE RECOMMENDED BYMANUFACTURER. DISPOSE OF USED BATTERY ACCORDING TO MANUFACTURER’S INSTRUCTIONS.
Contents
5
6
10
Quick Reference: PCIe-424 Audio Card
About the PCIe-424 System
Packing List and PC System Requirements
11
Installing the PCIe-424 Hardware
13
Expanding Your PCIe-424 System
3
Mark of the Unicorn License Agreement and Limited
Warranty on Software
TO PERSONS WHO PURCHASE OR USE THIS PRODUCT: carefully read all
the terms and conditions of this agreement before using this software package.
Using this software package indicates your acceptance of the terms and conditions
of this license agreement.
Mark of the Unicorn, Inc. (“MOTU”) owns both this program and its documentation.
Both the program and the documentation are protected under applicable copyright
laws. Your right to use the program and the documentation are limited to the terms
and conditions described herein.
License
YOU MAY: (a) use the enclosed program on a single computer; (b) physically
transfer the program from one computer to another provided that the program is
used on only one computer at a time and that you remove any copies of the
program from the computer from which the program is being transferred; (c) make
copies of the program solely for backup purposes.You must reproduce and include
the copyright notice on a label on any backup copy.
YOU MAY NOT: (a) distribute copies of the program or the documentation to
others; (b) rent, lease or grant sublicenses or other rights to the program; (c)
provide use of the program in a computer service business, network, time-sharing,
multiple CPU or multiple user arrangement without the prior written consent of
MOTU; (d) translate or otherwise alter the program or related documentation
without the prior written consent of MOTU.
Term
Your license to use the program and documentation will automatically terminate if
you fail to comply with the terms of this Agreement. If this license is terminated you
agree to destroy all copies of the program and documentation.
Limited Warranty
MOTU warrants to the original licensee that the disk(s) on which the program is
recorded be free from defects in materials and workmanship under normal use for
a period of ninety (90) days from the date of purchase as evidenced by a copy of
your receipt. If failure of the disk has resulted from accident, abuse or misapplication of the product, then MOTU shall have no responsibility to replace the disk(s)
under this Limited Warranty.
THIS LIMITED WARRANTY AND RIGHT OF REPLACEMENT IS IN LIEU OF,
AND YOU HEREBY WAIVE, ANY AND ALL OTHER WARRANTIES, BOTH
EXPRESS AND IMPLIED, INCLUDING BUT NOT LIMITED TO WARRANTIES
OF MERCHANTABILITY AND FITNESS FOR A PARTICULAR PURPOSE. THE
LIABILITY OF MOTU PURSUANT TO THIS LIMITED WARRANTY SHALL BE
LIMITED TO THE REPLACEMENT OF THE DEFECTIVE DISK(S), AND IN NO
EVENT SHALL MOTU BE LIABLE FOR INCIDENTAL OR CONSEQUENTIAL
DAMAGES, INCLUDING BUT NOT LIMITED TO LOSS OF USE, LOSS OF
PROFITS, LOSS OF DATA OR DATA BEING RENDERED INACCURATE, OR
LOSSES SUSTAINED BY THIRD PARTIES EVEN IF MOTU HAS BEEN
ADVISED OF THE POSSIBILITY OF SUCH DAMAGES. THIS WARRANTY
GIVES YOU SPECIFIC LEGAL RIGHTS WHICH MAY VARY FROM STATE TO
STATE. SOME STATES DO NOT ALLOW THE LIMITATION OR EXCLUSION OF
LIABILITY FOR CONSEQUENTIAL DAMAGES, SO THE ABOVE LIMITATION
MAY NOT APPLY TO YOU.
Update Policy
In order to be eligible to obtain updates of the program, you must complete and
return the attached Mark of the Unicorn Purchaser Registration Card to MOTU.
General
This License Agreement shall be governed by the laws of the Commonwealth of
Massachusetts and shall inure to the benefit of MOTU, its successors, administrators, heirs and assigns.
Copyright Notice
Copyright © 2006, 2005, 2004, 2003, 2002 by Mark of the Unicorn, Inc. All rights
reserved. No part of this publication may be reproduced, transmitted, transcribed,
stored in a retrieval system, or translated into any human or computer language, in
any form or by any means whatsoever, without express written permission of Mark
of the Unicorn, Inc., 1280 Massachusetts Avenue, Cambridge, MA, 02138, U.S.A.
Limited Warranty on Hardware
Mark of the Unicorn, Inc. and S&S Research (“MOTU/S&S”) warrant this
equipment against defects in materials and workmanship for a period of NINETY
(90) DAYS from the date of original retail purchase. This warranty applies only to
hardware products; MOTU software is licensed and warranted pursuant to
separate written statements.
If you discover a defect, first write or call Mark of the Unicorn at (617) 576-2760 to
obtain a Return Merchandise Authorization Number. No service will be performed
on any product returned without prior authorization. MOTU will, at its option, repair
or replace the product at no charge to you, provided you return it during the
warranty period, with transportation charges prepaid, to Mark of the Unicorn, Inc.,
1280 Massachusetts Avenue, MA 02138. You must use the product’s original
packing material for in shipment, and insure the shipment for the value of the
product. Please include your name, address, telephone number, a description of
the problem, and the original, dated bill of sale with the returned unit and print the
Return Merchandise Authorization Number on the outside of the box below the
shipping address.
This warranty does not apply if the equipment has been damaged by accident,
abuse, misuse, or misapplication; has been modified without the written
permission of MOTU, or if the product serial number has been removed or defaced.
ALL IMPLIED WARRANTIES, INCLUDING IMPLIED WARRANTIES OF
MERCHANTABILITY AND FITNESS FOR A PARTICULAR PURPOSE, ARE
LIMITED IN DURATION TO NINETY (90) DAYS FROM THE DATE OF THE
ORIGINAL RETAIL PURCHASE OF THIS PRODUCT.
THE WARRANTY AND REMEDIES SET FORTH ABOVE ARE EXCLUSIVE AND
IN LIEU OF ALL OTHERS, ORAL OR WRITTEN, EXPRESS OR IMPLIED. No
MOTU/S&S dealer, agent, or employee is authorized to make any modification,
extension, or addition to this warranty.
MOTU/S&S ARE NOT RESPONSIBLE FOR SPECIAL, INCIDENTAL, OR
CONSEQUENTIAL DAMAGES RESULTING FROM ANY BREACH OF
WARRANTY, OR UNDER ANY LEGAL THEORY, INCLUDING LOST PROFITS,
DOWNTIME, GOODWILL, DAMAGE OR REPLACEMENT OF EQUIPMENT
AND PROPERTY AND COST OF RECOVERING REPROGRAMMING, OR
REPRODUCING ANY PROGRAM OR DATA STORED IN OR USED WITH
MOTU/S&S PRODUCTS.
Some states do not allow the exclusion or limitation of implied warranties or liability
for incidental or consequential damages, so the above limitation or exclusion may
not apply to you. This warranty gives you specific legal rights, and you may have
other rights which vary from state to state.
MOTU, AudioDesk and Mark of the Unicorn are trademarks of Mark of the Unicorn,
Inc.
This equipment has been type tested and found to comply with the limits for a class B digital device,
pursuant to Part 15 of the FCC Rules. These limits are designed to provide reasonable protection
against harmful interference in a residential installation. This equipment generates, uses, and can
radiate radio frequency energy and, if not installed and used in accordance with the instruction manual,
may cause harmful interference to radio communications. However, there is no guarantee that
interference will not occur in a particular installation. If this equipment does cause interference to radio
or television equipment reception, which can be determined by turning the equipment off and on, the
user is encouraged to try to correct the interference by any combination of the following measures:
• Relocate or reorient the receiving antenna
• Increase the separation between the equipment and the receiver
• Plug the equipment into an outlet on a circuit different from that to which the receiver is connected
If necessary, you can consult a dealer or experienced radio/television technician for additional
assistance.
PLEASE NOTE: only equipment certified to comply with Class B (computer input/output devices,
terminals, printers, etc.) should be attached to this equipment, and it must have shielded interface
cables in order to comply with the Class B FCC limits on RF emissions.
WARNING: changes or modifications to this unit not expressly approved by the party
responsible for compliance could void the user's authority to operate the equipment.
Quick Reference: PCIe-424 Audio Card
Connect additional MOTU
PCI audio interfaces here.
You can connect up to
four I/Os to a PCIe-424
card for a maximum of 96
possible active inputs
and outputs.
Connect the first (core
system) interface to
the PCIe-424 card here
using the Audio Wire
cable included with
your core system. If
you use a custom
cable, it should not be
longer than 50 feet.
If you are using the PCIe-424 system with one or more ADATs, or any other ADAT
Sync-compatible recorder, use this standard ADAT SYNC INPUT to connect the
PCIe-424 card to the end of your ADAT sync chain. For example, if you have
three ADATs, chain the ADATs in the usual fashion (SYNC OUT to SYNC IN, etc.),
and then connect the last ADAT’s SYNC OUT to this SYNC IN on the PCIe-424
card. This connection allows you to make sample-accurate audio transfers
between your host audio software (if it supports sample-accurate sync) and
the ADATs. If you have a MIDI Timepiece AV or a Digital Timepiece, make it the
master of the ADAT SYNC chain so that you can control everything from your
host audio software (or your other MIDI Machine Control compatible software).
5
CHAPTER 1
About the PCIe-424 System
OVERVIEW
The PCIe-424 core system is a computer-based hard disk
recording system for Mac OS and Windows that offers 24
simultaneous inputs and outputs per Audio Wire cable,
expandable to 96 inputs/outputs. A core system consists of a
PCI card connected to a standard 19-inch, single-space,
rack-mountable audio interface.
The system includes AudioDesk™, full-featured audio
workstation software for Mac OS that supports both 16-bit
and 24-bit recording at any standard sample rate up to 192
kHz.
For Windows, a WDM driver is included for compatibility
with audio applications that support standard multi-channel
WDM and Wave drivers.
Also included is an ASIO driver for multi-channel operation
with Steinberg Cubase and other ASIO-compatible software.
The PCIe-424 card . . . . . . . . . . . . . . . . . . . . . . . . . . . . . . . . . . 6
The 2408mk3 interface . . . . . . . . . . . . . . . . . . . . . . . . . . . . . . 7
The 24I/O interface . . . . . . . . . . . . . . . . . . . . . . . . . . . . . . . . . 8
The HD192 interface . . . . . . . . . . . . . . . . . . . . . . . . . . . . . . . . 8
16-bit and 24-bit recording. . . . . . . . . . . . . . . . . . . . . . . . . . . 9
AudioDesk . . . . . . . . . . . . . . . . . . . . . . . . . . . . . . . . . . . . . . . . . 9
Digital Performer . . . . . . . . . . . . . . . . . . . . . . . . . . . . . . . . . . . 9
Other Audio Software . . . . . . . . . . . . . . . . . . . . . . . . . . . . . . . 9
A computer-based system . . . . . . . . . . . . . . . . . . . . . . . . . . . . 9
THE PCIE-424 CARD
A PCIe-424 core system ships with a single PCI audio card
called the PCIe-424. The card features a custom processor, a
powerful DSP chip, four 6-pin Audio Wire connectors and
an ADAT SYNC IN connector.
High definition audio
The PCIe-424 system can operate at the following high
sample rates: 44.1, 48, 88.2, 96, 176.4 and 192 kHz. All
MOTU PCIe-424 audio interfaces support rates up to 96
kHz. In addition, the HD192 interface offers analog
recording and playback at 176.4 or 192 kHz.
Audio Wire expansion
The PCIe-424 card provides four Audio Wire jacks, which
are used to attach MOTU PCI audio interfaces to the card
installed in the computer. Each Audio Wire is capable of
transmitting 24 simultaneous channels of 96 kHz digital
audio input and output or 12 simultaneous channels of 192
kHz input and output.
Up to four MOTU PCI audio interfaces can be connected to
a single PCIe-424 card for a maximum of 96 possible input
and output connections. All MOTU PCI audio interfaces
(including the 2408mk3, 24I/O and HD192) can also be
“mixed and matched” on the PCIe-424 card, along with
legacy interfaces, such as the 2408, 2408mII, 1296, 1224, 24i
and 308.
Audio Wire carries a proprietary communication protocol
between the card and the external I/O to handle the
extremely low latencies required by the system. The heart of
the PCIe-424 card is a custom-programmed VLSI chip
capable of simultaneously processing all 96 inputs and
outputs (192 channels total) at samples rates up to 96 KHz.
At 176.4 or 192 kHz, this chip can process 48 simultaneous
channels of input and output.
The custom chip handles all of the system’s I/O processing,
freeing up the host computer’s processing bandwidth for
real-time DSP effects and hard disk I/O.
CueMIx DSP
The PCIe-424 card features CueMix DSP™, a flexible
DSP-driven mixing and monitoring matrix that provides the
same near-zero monitoring latency as today’s latest digital
mixers. CueMix DSP™ allows you to connect keyboards,
synth modules, drum machines, and even effects processors
and then monitor these live inputs with no audible delay and
no processor drain on the host computer’s CPU. The CueMix
DSP engine resides on the PCIe-424 card, so it works across
all interfaces connected to the card. The included CueMix
Console software provides an on-screen mixer that gives you
hands-on control of your monitor mix, regardless of what
audio software you prefer to use. Digital Performer users
have the additional option of controlling CueMix DSP
directly within Digital Performer’s mixing environment.
CueMix DSP completely eliminates the buffer latency
associated with monitoring on host-based recording
systems.
Sample-accurate synchronization
The PCIe-424 card’s standard 9-pin ADAT SYNC IN
connector provides sample-accurate synchronization with
all ADATs or other ADAT Sync-compatible devices
connected to the system. For example, if you digitally
6
ABOUT THE PCIE-424 SYSTEM
transfer a single track of material from the ADAT via light
pipe into the 2408mk3’s Macintosh workstation software,
and then transfer the track back to the ADAT, it will be
recorded exactly at its original location, down to the sample.
Analog bank
The analog inputs are equipped with 24-bit, 96 kHz 64x
oversampling A/D converters. The analog outputs have
24-bit, 96 kHz 128x oversampling D/A converters.
Video and SMPTE time code synchronization
The entire PCIe-424 system, including all connected
interfaces, can resolve directly to SMPTE time being received
on any analog input in the system. In addition, the 2408mk3
interface provides a BNC video input for resolving the entire
system directly to video.
The entire analog section of the circuit board inside the
2408mk3 is physically isolated from the rest of the board to
help ensure quiet analog performance.
THE 2408MK3 INTERFACE
Each of the 2408mk3’s eight analog stereo input pairs can be
switched between -10 dB and +4 dB operating levels to
support a wide variety of input sources, including synths,
samplers and other equipment.
Main Outs
For main stereo output, analog outputs 1 and 2 are
duplicated on the rear panel as a stereo pair of balanced,
+4dB quarter-inch TRS jacks. A dedicated knob on the front
panel gives you volume control of the main outs.
24 simultaneous inputs and outputs
The 2408mk3 I/O is a single-space, rack mountable chassis
with gold-plated analog and digital audio connectors on its
rear panel and status LEDs on the front. The rear panel has
seven banks of 8-channel I/O at 44.1 or 48 kHz in the
following formats:
■ One bank of 8 balanced (+4 dB) analog quarter-inch
(TRS) inputs and outputs.
■ Three Tascam DA-88 ‘TDIF’ 8-channel digital
I/O connectors.
■ Three Alesis ADAT optical ‘light pipe’ 8-channel digital
I/O connectors.
Three banks of 8-channel I/O at 44.1/48 kHz
Internally, the 2408mk3 has three 8-channel I/O busses (A, B
and C) for a total of 24 simultaneous inputs and outputs at
44.1 or 48 kHz. Using the included console software
(available for both Mac and PC), you can freely choose any
I/O format for each bank. For example, you can choose
analog for Bank A, ADAT optical for Bank B, and Tascam
TDIF for Bank C. Or you can choose ADAT optical for all
three banks.
Three banks of 4-channel digital I/O at 88.2/96
At 88.2 or 96 kHz, the 2408mk3 interface offers 4 channels of
I/O per bank for the ADAT optical and Tascam TDIF
formats, along with 8 channels of 96 kHz analog input and
output. Therefore, the 2408mk3 interface offers a maximum
of 16 channels of input and output at 96 kHz (2 banks of
4-channel digital I/O plus 8 channels of analog I/O). The
maximum number of digital inputs and outputs at 96 kHz is
12 (3 banks of 4-channel I/O).
SPDIF
The 2408mk3 rear panel has three SPDIF stereo pairs. The
SPDIF output on the right is dedicated to duplicating the
stereo main out so that you can, for example, conveniently
record a stereo mix to your DAT deck without swapping
cables with other SPDIF devices. The other two SPDIF
connectors serve as independent stereo inputs/outputs. They
can be used with any SPDIF compatible device, such as an
effects processor or other device.
Word Clock
BNC Word clock connectors (in and out) are provided for
synchronization with standard word clock devices. Via
software, the word output can be made to either double or
halve the 2408mk3’s system word rate. For example, if the
2408mk3 is running at 96 kHz, it can generate 48 kHz word
clock output.
Video sync
The BNC input connector can be switched via software to
become a dedicated video input, allow you to slave your
PCIe-424 system to NTSC or PAL/SECAM video (or
blackburst) without a dedicated synchronizer. The PCIe-424
card provides a DSP-driven phase-lock engine with
sophisticated filtering that provides fast lockup times and
sub-frame accuracy.
SMPTE time code
The RCA jacks for SPDIF input/output can be switched via
software to become a dedicated SMPTE time code (LTC)
input and output, allowing you to slave your PCIe-424
system to time code and/or generate time code. If you prefer
to use them for SPDIF digital I/O, you can use any analog
7
ABOUT THE PCIE-424 SYSTEM
input to receive SMPTE time code. Any active channel,
digital or analog, can be chosen as a SMPTE time code
output.
Level Meters
The front panel of the 2408mk3 I/O displays several banks of
status LEDs. On the left are three banks of eight LEDs (A, B
and C) that show audio signal on the 2408mk3’s three
ADAT/TDIF digital I/O buses. On the right are eight vertical,
five-segment LEDs that show input level from the eight
analog inputs measured from -40 dB to 0 dB. A similar bank
of dedicated five-segment LEDs is provided for the analog
outputs. These LEDs also provide status information, such as
the system clock sample rate and other settings.
Stand-alone Format Conversion
Finally, several additional LEDs, along with accompanying
set/select buttons, allow you to access the 2408mk3 I/O’s
stand-alone format conversion features. With these controls,
you can bounce any I/O format to any other format without
a computer.
Headphone output
The 2408mk3 front panel includes a quarter-inch stereo
headphone output jack and volume knob. The headphone
output matches the main stereo outs, which have their own
volume knob.
THE 24I/O INTERFACE
24 analog 24-bit/96 kHz inputs and outputs
The 24I/O is a single-space, rack mountable chassis with
gold-plated analog audio connectors on its rear panel and
level meters on the front. The rear panel has 24 gold-plated,
balanced +4dB TRS analog inputs and outputs with 24-bit
A/D converters. All inputs and outputs can be accessed
simultaneously. Internally, the 24I/O has a 24-bit data path to
and from the computer so that all audio data is carried
to/from the computer in 24 bits.
Converters
All analog-to-digital and digital-to-analog inputs on the
24I/O are equipped with 24-bit, 128x oversampling,
extremely high-quality, latest-generation converters.
Level Meters
The front panel of the 24I/O displays 48 level meters,
arranged in three banks of 8 channels. For each channel,
there is a five-segment meter that measures from -42 dB to 0
dB.
The clock section in the middle of the front panel indicates
the current sample rate.
THE HD192 INTERFACE
High definition audio recording
The HD192 provides the very best A/D and D/A conversion
available. It can operate at any standard sample rate from
44.1 kHz to 192 kHz.
12 analog inputs and 12 outputs
The HD192 I/O is a two-space, rack mountable chassis with
XLR audio connectors on its rear panel and level meters on
the front. The rear panel has four banks of I/O in the
following formats:
■
One bank of 12 XLR inputs
■
One bank of 12 XLR outputs
■
One pair of AES/EBU stereo digital I/O connectors
All analog inputs and outputs can be accessed simultaneously.
AES/EBU digital I/O
The HD192 rear panel includes an AES/EBU stereo digital
input and output. Both of these connectors are capable of
handling 24-bit digital audio at sample rates up to 96 kHz.
The AES/EBU input and output each has its own
independent sample rate converter for real-time conversion
between any two sample rates between 40 and 100 kHz.
System word clock in and out
BNC ‘System’ Word clock connectors (in and out) are
provided for synchronizing the HD192’s main system clock
with other standard word clock devices.
Word clock in and out
BNC Word clock connector can be programmed via software
for either input or output for synchronization with standard
word clock devices.
8
ABOUT THE PCIE-424 SYSTEM
AES word clock in
A BNC Word clock input connector is provided for
independently synchronizing the AES/EBU output of the
HD192 to a standard input clock.
Level Meters
The front panel of the HD192 I/O displays several banks of
status LEDs.
On the right are two banks of meters for the twelve analog
inputs and twelve analog outputs. For each channel, there is a
19-segment meter that measures from -42 dB to 0 dB, along
with two red ‘over’ lights. The top LED remains illuminated
after clipping occurs until it is cleared via software (either
manually or via a configurable time-out period). The red
LED below it only lights momentarily when clipping.
The Clock section on the left displays the current system
clock setting (44.1, 48, 88.2, 96, 176.4, 192 or no clock), as
well as the AES/EBU clock setting if sample rate conversion is
taking place independently of the system clock.
16-BIT AND 24-BIT RECORDING
The PCIe-424 system handles all data with a 24-bit signal
path, regardless of the I/O format. Using AudioDesk™, the
PCIe-424 system’s Macintosh workstation software
(included), you can record and play back 16-bit or 24-bit
audio files at 44.1, 48, 88.2 or 96 kHz via any of the system’s
analog or digital inputs and outputs. The HD192 also offers
recording at 176.4 or 192 kHz. On Windows, 24-bit audio
files can be recorded with any compatible host application
that supports 24-bit recording.
OTHER AUDIO SOFTWARE
The PCIe-424 system ships with a standard WDM driver that
allows you to record, edit, play back and mix your projects
using your favorite WDM- and Wave-compatible Windows
software.
The PCIe-424 system also ships with standard Mac OS audio
drivers.
The PCIe-424 also includes an ASIO driver for multi-channel
compatibility with Steinberg Cubase and other
ASIO-compatible software.
A COMPUTER-BASED SYSTEM
Regardless of what software you use with the PCIe-424
system, the host computer determines the number of tracks
the software can record and play simultaneously, as well as
the amount of real-time effects processing you can apply to
your mix. A faster computer with more RAM and faster hard
drives will allow more simultaneous tracks and real-time
effects than a slower computer with less RAM and slower
hard drives. Standard third-party system acceleration
products can also help you achieve higher track counts.
AUDIODESK
AudioDesk is a full-featured, 24-bit audio workstation
software package for Macintosh included with each
PCIe-424 core system. AudioDesk provides multi-channel
waveform editing, automated virtual mixing, graphic editing
of ramp automation, real-time effects plug-ins with 32-bit
floating point processing, crossfades, support for many
third-party audio plug-ins (in the MOTU Audio System
plug-in format), background processing of file-based
operations, sample-accurate editing and placement of audio,
and more.
DIGITAL PERFORMER
The PCIe-424 system is fully integrated with MOTU’s
award-winning Digital Performer audio sequencer software
package.
9
ABOUT THE PCIE-424 SYSTEM
CHAPTER 2
Packing List and PC System Requirements
PACKING LIST
PC SYSTEM REQUIREMENTS
A MOTU PCIe-424 core system ships with the items listed
below. If any of these items are not present in your core
system box when you first open it, please immediately
contact your dealer.
The PCIe-424 system requires the following PC system:
■ One rack-mountable audio interface (2408mk3, 24I/O or
HD192)
■ At least 128 MB (megabytes) of RAM (512 MB or more is
recommended)
■
A 800 MHz Pentium CPU or faster
■
A Pentium III or faster is recommended
■
One PCIe-424 audio card
■
One available PCIe (PCI Express) slot
■
One 15-foot “Audio Wire” cable
■
Windows XP
■
Power cord
PLEASE REGISTER TODAY!
■
One PCIe-424 Mac/Windows “flip book” manual
■
One AudioDesk Manual (for Mac OS only)
Please register your PCIe-424 system today. There are two
ways to register.
■
One cross-platform CD-ROM
■
Product registration card
■
Visit www.motu.com to register online
OR
■
Fill out and mail the included product registration card
As a registered user, you will be eligible to receive on-line
technical support email and announcements about product
enhancements as soon as they become available. Only
registered users receive these special update notices, so
please, complete and mail this registration card!
Thank you for taking the time to register your new MOTU
products!
10
PACKING LIST AND PC SYSTEM REQUIREMENTS
CHAPTER 3
Installing the PCIe-424 Hardware
OVERVIEW
Install the PCIe-424 software first! . . . . . . . . . . . . . . . . . . . 11
Install the PCIe-424 audio card . . . . . . . . . . . . . . . . . . . . . . 11
Connect the audio interface . . . . . . . . . . . . . . . . . . . . . . . . . 12
INSTALL THE PCIE-424 SOFTWARE FIRST!
We recommend that you install the PCIe-424 software before
installing the PCIe-424 card itself.
If you’ve already installed the card, you might want to
temporarily remove it to install the software, and then put it
back in after installing the PCIe-424 software.
INSTALL THE PCIE-424 AUDIO CARD
1 Switch off and unplug your computer.
☛
Failure to do so may result in serious shock or injury.
2 Open your computer.
6 Remove the PCIe-424 card from its anti-static bag.
7 Gently but firmly insert the card into any available PCIe
slot.
8 Secure the bulkhead of the PCIe-424 card to the computer
chassis with the bolt from the slot cover.
☛
We strongly recommend securing the PCIe-424 card in
this manner. Doing so allows you to ensure secure
connections to the card later on in the installation.
3 Find an available PCIe slot.
4 Remove the slot cover, if necessary.
5 Before removing the PCIe-424 card from it’s anti-static
bag, touch the power supply inside your computer to
discharge any static electricity that may have built up on you.
9 Place the cover back on your computer.
10 Reconnect the power cord to the computer before
proceeding.
11
INSTALLING THE PCIE-424 HARDWARE
CONNECT THE AUDIO INTERFACE
1 Plug one end of the Audio Wire cable (included) into the
Audio Wire socket next to the 9-Pin ADAT Sync connector
on the PCIe-424 card as shown below in Figure 3-1.
2 Plug the other end of the Audio Wire cable into the audio
interface as shown below in Figure 3-1.
Step 1
Connect the Audio
Wire to the socket
closest to the
ADAT SYNC port.
Step 2
2408mk3 interface
24I/O interface
HD192 interface
Figure 3-1: Connecting the audio interface to the PCIe-424 audio card.
12
INSTALLING THE PCIE-424 HARDWARE
CHAPTER 4
Expanding Your PCIe-424 System
OVERVIEW
CONNECTING EXPANSION INTERFACES
Up to four MOTU PCI audio interfaces can be connected to
a single PCIe-424 card for up to 96 simultaneously active
inputs and outputs. For example, if you connect four
2408mk3 interfaces, you get a total of 232 and 248 physical
input and output connections (respectively) and up to 96
input and output channels. You can freely “mix and match”
any MOTU PCI audio interfaces together on a single
PCIe-424 card, including the 24I/O, HD192, 2408,
2408mkII, 1296, 1224, 24i and 308 models.
Connect expansion interfaces to the three available Audio
Wire sockets on your core system’s PCIe-424 card as shown
below in Figure 4-1.
The PCIe-424 card, with its CueMix DSP engine, ties all
connected audio interfaces together, allowing them to act as
a massive audio routing matrix for mixing, merging,
splitting and routing to/from all connected inputs and
outputs.
Interface #4
Interface #3
Interface #2
MOTU PCI audio interfaces are sold separately as expanders
for any MOTU core system. See your MOTU dealer for
details.
Connecting expansion interfaces . . . . . . . . . . . . . . . . . . . . 13
Multiple interfaces in the Console. . . . . . . . . . . . . . . . . . . . 13
Enabling banks, or individual ins and outs . . . . . . . . . . . . 13
Working with input and output menus . . . . . . . . . . . . . . . 14
CueMix DSP routing among interfaces . . . . . . . . . . . . . . . 14
Core system interface (#1)
Figure 4-1: You can connect up to four MOTU PCI audio interfaces to a single
PCIe-424 card.
MULTIPLE INTERFACES IN THE CONSOLE
The MOTU PCI Audio Console window displays the settings
for one PCIe-424 interface at a time. To choose which I/O
you are looking at, choose it from the Configure Interface
menu as shown below in Figure 4-2.
Synchronizing multiple interfaces . . . . . . . . . . . . . . . . . . . 14
Word clock connections are not necessary . . . . . . . . . . . . 14
Sample rate issues . . . . . . . . . . . . . . . . . . . . . . . . . . . . . . . . . . 14
Figure 4-2: Choosing which audio interface you are working with in the MOTU PCI
Audio Console window.
Enabling banks, or individual ins and outs
Bank enabling, or enabling individual inputs and outputs,
works the same for each interface in the MOTU PCI Audio
Console window. Choose an interface from the Configure
Interface menu (Figure 4-2) and then configure the banks
(or individual outputs) as usual.
13
EXPANDING YOUR PCIE-424 SYSTEM
outputs. You can route any input to any output, create
multiple mix busses and mix inputs to outputs across all
interfaces.
SYNCHRONIZING MULTIPLE INTERFACES
The entire PCIe-424 system gets its clock from whatever you
choose from the Clock Source menu in the MOTU PCI Audio
Console window. Synchronization across all connected
interfaces is sample-accurate. All available sync sources on
all connected interfaces are displayed in the menu as
demonstrated below in Figure 4-4.
Working with input and output menus
With multiple interfaces connected, input and output menus
show all available ports on all interfaces, as demonstrated
below in Figure 4-3. If interfaces are configured to share the
same type of I/O format (analog, for example), their outputs
are labeled with the bank letter (A, B or C) and interface
name, along with numbered suffixes (e.g. 2408mk3-1,
2408mk3-2, etc.) according to the order in which they are
connected to the PCIe-424 card as shown in Figure 4-1 on
page 13.
2408mk3 #1
2408mk3 #2
Figure 4-4: The entire PCIe-424 system can be clocked from any sync source on any
connected interface. After you choose a source from this menu, the entire system,
including all connected interfaces, synchronizes to it with sample-accurate precision. This example shows three 2408mk3 interfaces and one 24I/O interface.
Word clock connections are not necessary
Each MOTU PCI audio interface in the system gets its clock
from the Audio Wire cable connection to the PCIe-424 card
(unless it is the master clock itself). There is no need to make
word clock connections between interfaces.
SAMPLE RATE ISSUES
2408mk3 #3
While the PCIe-424 card can operate at sample rates as high
as 192 kHz, not all MOTU PCI audio interfaces support the
higher rates. When choosing high sample rates (above 48
kHz) interfaces that do not support the rate will be
temporarily taken off line by the system.
24I/O (on
Audio Wire
port #4)
Figure 4-3: Input and output menus show the ports of all connected interfaces. In
this example, there are three 2408mk3 interfaces and one 24I/O interface.
CUEMIX DSP ROUTING AMONG INTERFACES
The PCIe-424 card, with its CueMix DSP engine, ties all
connected audio interfaces together, allowing them to act as
a massive audio routing matrix for mixing, merging,
splitting and routing to/from all connected inputs and
14
EXPANDING YOUR PCIE-424 SYSTEM