1
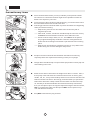
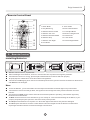
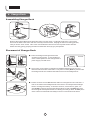
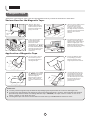
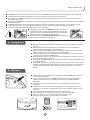
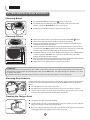
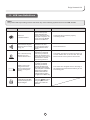
Robot Air Purifier
Mod
e
A320/A330
User
Guide
SD
Welcome and congratulations on your purchase of a Robot Air
Purifier.
We trust the purchase of your new product will help you to keep
your home clean and provide you more quality time to do other
things.
Before you go any further, we ask you to record your model
number, serial number and date of purchase below. We also
suggest you attach your Receipt to this page for safe keeping.
(Model and Serial numbers are located on the label on the
bottom of the Robot.)
MODEL # ________________
SERIAL # ________________
DATE OF PURCHASE ___ / ___ / ___
Should you have any problems in programming or getting your
product to function properly, we ask you to call us first before
contacting or returning the product to the place where you
purchased it.
Call 1-8 __-______ for assistance.
(Provide 1-8 __-______ phone number also provide address of
US business Office and WEB site for Service Stations.)
To find an authorized Service Center nearest you, please turn
to page ___.
For Warranty information, please turn to page ____.
Content
1. Safety Instructions
7. Magnetic Tape
User Guide ………………..............………………5
Various Uses for Magnetic Tape......……………20
Child Safety ………………….................………..5
Application of Magnetic Tape.……………….20,21
Precautionary Items ………….............……….6,7
8. Using Robot.................................................21
Power Supply for the Robot ……….......………...7
9.
Battery Charging, Replacement and Disposal....8
10. Maintenance
Recycling Packaging Material ………...…………8
SD Card.......................................................21
Cleaning Robot..............………………………...22
When the Product has Problems …………...……8
Cleaning Filters..................……………………..22
Correct Disposal of Product …………….........…8
Cleaning Drop Sensors.......……………………..22
2. Packed Contents and Product Specifications
Cleaning Charger Dock...............………………23
Packed Contents..…………........................…...9
11. LCD Icon Alarm Definitions..........................23
Product Specifications..…...................…………9
12. Common Failures........................................24
Part Name..……………............................……10
13. Common Questions with Answers...........25,26
Unpacking and Installing Filters.….......……….10
Remote Control Panel......................………….11
3. Remote Control
Installing Batteries.........................…………...11
Use....................................................……….11
4. Charger Dock
Assembling Charger Dock............……………..12
Placement of Charger Dock...........…………12,13
Charging Robot's Battery................………......13
5. Operation and Programming Robot
LCD Panel........................................….........14
Turning Robot ON.............................………...14
Pause Mode............................………………...15
Turning Robot OFF....................……………….15
Setting Air Schedule Cleaning Time..…………..15
Setting Clock Time..………..............…………...16
Setting Frequency of Scheduled Air Cleaning
Time.......................................................16
6. Mode Selection
Auto Mode........................………………………17
Search Mode..........................………………….18
Spot Mode.......................……………………….18
Back to Charge Mode.............…………………..19
Demo Mode......................……………………...19
Raise/Lower Mode............……………………...19
Music Mode..............……………………………..19
4
Enjoy Smarter Life!
1. SAFETY INSTRUCTIONS
Please follow these basic Safety Instructions to best assure you or the product is not harmed in the initial set-up
and use of the product. Should at anytime you have any questions, please call our 1-800 number for assistance.
User Guide
Get Machine
Body Wet
●
Be careful in unpacking the product so as not to loose or break anything.
●
Immediately dispose of all plastic bags before reading these Safety Instructions to
prevent children from playing with the bags.
●
Do NOT dispose of the rest of the packaging material until you check the Instruction
Book to make sure you have all the contents. Reference page 9 for list of contents.
●
Read the Instruction Book carefully and use your Robot according to the detailed
instructions. Store this Instruction Book in a convenient place for easy reference by all
users.
●
Do NOT use the top of the Robot as a place to rest items or a drink. If the Robot gets
WET, it may destroy the interior electrical components and require service.
●
Do NOT sit or stand on the Robot NOR use as a footrest.
●
Do NOT press HARD on the LCD as you may damage or break the glass. Please do NOT
touch the LCD if it is broken to avoid injury to yourself.
●
Improper operation of the Robot may cause injury to a person or may require your Robot
to be serviced by a Service Technician.
●
Not to be used to filter live cigarette smoke as a hot ash from the cigarette could ignite
the filter.
●
Use in the Outdoors, Business or in areas with combustible material is prohibited . It
will void your Warranty.
NO
Guardrail
The Magnetic Tape may NEVER be used to
confine an elevated area where the Robot
could fall down and hurt a person or cause
considerable damage to the room below when
the tape has lost its magnetism power.
Set up
Guardrail
●
In keeping with our name ECOVACS, we strongly urge you to recycle the packaging
materials.
●
Attempt to repair or alter the operation of this Robot will void the warranty and may allow
damage to be done to your property or yourself. All repair work must be done by a
qualified Service Technician.Call our 1-800 number for the nearest Service Station to
you.
●
The Robot is NOT a toy and children should NOT be allowed to play with it.
●
Children should NOT be allowed to be alone in the same room that the Robot
is operating.
●
Adult supervision is required at all times when the child is in the same room
the Robot is operating in.
Child Safety
5
Precautionar y Items
medium pile
carpet
●
We recommend the first time you use your Robot you be present to make
sure there are no obstructions which might cause a problem to either the
Robot or the objects in your home.
●
If Pets are part of the everyday household activity, you need to observe how
the Pet and the Robot inner act with each other.
●
Following precautions should be taken to prevent accidents from happening
while your Robot is working:
Ceramic tile
Wood Floor
─ ─ Objects easy to knock over should be removed from the path or
magnetic tape used.
Magnetic
Border
─ ─ Table cloth, curtains, and throws should be kept off of the floor so they
will NOT obstruct the Robot's freedom to move within the room.
─ ─ Power cords for lamps, radios, TV, etc., must NOT lie in the path as
they might be damaged by the Robot or become entangled with the
Robot and cause damage to the Robot or pull the item from its resting
place.
─ ─ O bjects such as magazines,newspapers,socks,etc.,may obstruct the
Robot during use or cause damage to the product.
Magnetic
Tape
1
.5
in
ch
●
People in the home should be informed when the Robot is functioning,
especially those who maybe hard of hearing or have poor eyesight.
●
Charger Dock should be kept in a space where people will not easily trip over
when walking in the room.
●
Robot cannot detect a staircase if the height is less than 1.5 inches. Also, if
the top step of the staircase has a reflective surface such as mirror, glass,
marble , tile, etc., it may cause the Drop Sensor not to function and cause the
Robot to fall down the stairs. We strongly recommend that you operate the
Robot at the Staircase or Step to make sure the Robot can detect the drop
off. Should you find that the Robot does not detect the Step or Staircase,
then you must place a piece of magnetic tape at the edge to the bare surface,
NOT on carpet and to make sure the tape will NOT cause a person to trip
over and fall down the steps.
●
Keep WET hands from the plug or Robot.
es
Wet
Hands
6
Enjoy Smarter Life!
Use a DRY soft cloth for daily and weekly cleaning of the
plug, cord, Charger Dock and Robot. A damp soft cloth
Cloth
cleaning
that has been rung dry of water could be used to wipe the
surfaces for better cleaning. A WET cloth may NOT be
used as water may get into the Robot or Charger Dock
and cause electrical problems resulting in a Service Call.
●
Do NOT grasp the upper portion of the product as doing so may cause
damage to the product.
●
Do NOT drop the Robot, should this happen, run the Robot to see that
everything is okay before letting it operate by itself without you being
present.
●
Keep the Robot away from hot sources such as
heater, fireplace, radiator, kitchen oven, direct
sunlight, etc., as the plastic could become
distorted and discolored.
Do not Drop
Ka
Power Supply for the Robot
Correct
●
The Robot's power supply is from a NI-MH rechargeable battery and only
accompanying E COVACS' Charger Dock may be used.
●
Do NOT use the Robot if the power supply cord to the Charger Dock becomes
damaged. Call our 1-800 number or visit our Web Site for the nearest Service
Center to send the Charger Dock for repair.
●
Do NOT remove the plug from the wall receptacle by pulling on the power supply
cord as it may damage the cord or internal wiring. Grasp the plug to remove from
the receptacle.
●
Do NOT move the Charger Dock by pulling on the power supply cord as you may
damage internal wiring.
●
Do NOT twist or pinch the power supply cord to avoid damage to the insulation.
●
Keep power supply cord away from warm/hot places or sharp edges to avoid
damage to the insulation.
●
Turn the Robot OFF and remove the Charger Dock plug from the receptacle when
you are not using the Robot for an extended period of time.
Draw out
the plug
7
Batter y Charging,Replacement and Disposal
●
Approved ECOVACS battery and Charger Dock must be used to prevent
potential danger and damage to the Robot, and to NOT VOID the Warranty.
●
Call our 1-800 number or visit our Web site to order replacement parts.
Model and serial number will be required when ordering.
●
ECOVACS, being an environmental friendly company, asks you to dispose of
used batteries in compliance with your local environmental legislation, as the
batteries hazardous substance will pollute the environment.
Recycling Packaging Material
When the Product
Has Problems
●
Please recycle the packaging material in accordance with your local
guidelines.
●
Should the power supply cord become damaged, do not attempt to repair by
yourself.
●
Should the Robot stop functioning, reference pages 24, 25 and 26 in this
Instruction Book or call our 1-800 number to talk to an experienced
Technician.
●
As with the power supply cord, should the Robot require service, please have
a certified Service Technician handle your repair. Otherwise, your Warranty
will be void and you could possibly cause yourself or your property damage
by attempting to do it yourself.
Cor rect Disposal of Product
●
This marking indicates the Robot and Charger Base should NOT be disposed with
other household wastes throughout the EU. To prevent possible harm to the
environment or human health from uncontrolled waste disposal, recycle responsibly
to promote the sustainable reuse of material resources. To return your used device,
please use the return and collection systems or contact the retailer where the
product was purchased. They can take this product for environmental safe
recycling.
●
In the U.S., please dispose of product at an acredited disposal site in compliance
with your local requirements.
8
Enjoy Smarter Life!
2.
Package Contents and Product Specifications
Packed Contents
SD
Charger Dock
Main Robot
Remote Control
Robot Air Purifier
Magnetic Recovery Tool
Magnetic Tape
Batteries for Remote Control
Mode
r
al Filter
Laye
aceri
Antib
Layer
yde Filter
Formaldeh
Efficient Filter Layer
A320/A330
User
Guide
SD
Charging Cable
Three Filters
User Guide
Product Specifications*
Functional Parameters
Model A330
220-240V~
220-240V~
Frequency
50Hz
50Hz
18.5
Rated Output Voltage
15VDC
15VDC
Approximately
two hours
Rated Output Current
1.6A
1.6A
Remote Control
Model A320
Model A330
Input Voltage
(Remote Control)
3VDC
3VDC
Remote Control Distance
≤ 16 Feet
≤ 16 Feet
Model A330
12VDC
12VDC
24W
24W
Continuous Working on One Charge
Approximately
two hours
Charging Time
Approximately
4-5 hours
Approximately
4-5 hours
≤60dB
Working Voltage
Rated Power
Maximum Lifting Height (INCHES)
Noise**
*
Model A320
Model A320
≤60dB
Charger Dock
Input Voltage
Our Company reserves the right to make technological and design changes as a result in pursuing Continuous Improvement. The right of interpretation
of the data belongs to ECOVACS Electrical Co., Ltd.
** The data is collected by our companies' laboratory based on noise test and in accordance with IEC 60704-1:1997. IEC 60704-2-1:2001 International
Standard. Noise is different based on environmental conditions existing at the time in your setting.
9
Par t Name
Universal Wheel
Air Quality Detector
LCD Display Screen
ON / OFF Switch
Air Quality Indicator Light
Key Panel
Surface Cover of Machine
Air Outlet Grid
Drop Sensor
Front Buffering Plate
SD Memory Card and
Button for Volume Control
SD
Driving Wheel
Optional Charging Slot of Main Robot
Charger Dock
Charger Base Signal Indicator
Remote Receiver
Lifting Collision Buffering Plate
Power Indicator
Charger Base Receiver
Upper Housing
Lifting System
Optional Charger Slot
of Charging Dock
Power Cord
Anti-slip Base
Charging Strips
Charging Strips
Unpacking Filters
nt
ie
ic
Eff
ter
Fil
r
ye
La
●
Open the top of the Robot and remove the filters. Install the filters in the
proper sequence.
Filters particles down to 0.6 Microns
1
SD
Filters VOC's from the air
2
Filters down to 0.3 Microns
3
r
r Laye
rial Filte
bace
Anti
ehyde Filter
Layer
Formald
Efficient Filter Layer
SD
10
Installation
Sequence
Enjoy Smarter Life!
Remote Control Panel
15
1
3
2
6
4
7
5
8
9
11
13
3.
10
12
14
1. Music Mode
9. “Auto” Mode
2. Play Next Song
10. Exact Search Mode
3. Machine Move Forward
11. Fixed Spot Mode
4. Machine Turn Left
12. Back to Charger Dock
5. Machine Move Backward
13. Raise Head
6. Machine Stop
14. Lower Head
7. Machine Turn Right
15. Remote Signal Beam
8. Auto Demo
Remote Control
Installing Batteries
●
●
●
●
●
Remote control uses two (7#) batteries.
When installing the two batteries, be sure to note the direction of positive and negative polarities.
If the batteries are low on energy, please replace both batteries so Remote will work properly.
Properly dispose of batteries in accordance with local legislation.
If the Remote is NOT going to be used for an extended period of time, please remove the batteries so the Remote
will NOT become damaged.
Use:
●
●
●
●
●
●
To use the Remote, you must be within 16 feet and point it towards the Indicator light on top of the Robot.
If the Robot is close to the Charger Dock, the signal from the Charger Dock may interfere with the use of the
Remote.
The Remote may NOT work in certain areas where a wireless product is operating. The wireless signal may
block the use of the Remote.
Do NOT use the Remote to force the Robot to go over a drop off. This will cause damage to the Robot, to your
property and perhaps injure a person in the close vicinity of the product.
Do NOT place the Remote in a hot place or in direct Sun light as the Remote may become damaged.
Do NOT expose the Remote to water or allow debris to become lodged around the buttons or inside when
replacing the batteries as this could cause damage to the Remote.
11
4. Charger Dock
Assembling Charger Dock
Transmitter Frame
Charger Base
Remove the Charger Base and Transmitter frame from the carton. Looking at the pictures, connect the
wire from the base to the frame and then carefully insert the frame, keeping the wires from being pinched,
until you hear a "click" sound. This "click" sound indicates the frame is securely latched into the base.
Please check by gently grasping the frame and the back and trying to pull upwards.
Placement of Charger Dock
● Place the Charger Dock against the wall
according to the picture. It must be placed
close to a Receptacle so the Charger Dock's
power supply cord will reach.
Correct
● Any excess power supply cord must be bundled and made secure so not to
interfere with the return of the Robot. The power cord may NOT be placed under
the Charger Dock as it will affect the Robot's return to the Charger Dock.
1 .5 fe e
1.5fee
t
t
5f
ee
t
● Please ensure there are NO obstacles within a rectangular box of 5 feet and 1.5
feet on each side of the Charger Dock so the Robot can easily find the Charger
Dock to recharge the battery. A reflective surface, such as mirror, glass, etc.
should NOT be directly opposite the Charger Dock so that it will NOT affect the
infrared signal and keep the Robot from finding the Charger Dock. Do NOT place
close to stairs as it will affect its ability to Dock or even fall down the stairs.
12
Enjoy Smarter Life!
Long and
Narrow
Room
Long and
Narrow
Room
??
● The Charger Dock
should be placed
in the room so the
Robot can find the
Charger Dock's
beam as quickly
as possible and
follow the beam to
the source.
?
*The room layout is too complicated;
therefore, the machine cannot quickly
find the Charger Dock.
● Depending on the room
size and the number of
pieces of furniture in
the room, it may take a
while for the Robot to
find the Charger Dock.
If you find this to be
happening, you may
want to relocate the
Charger Dock to a new
spot to see if the Robot
can find it easier.
Warning:
Do NOT place the Charger Dock near stairs or a drop off as it may affect the automatic return for charging
and may cause the Drop Sensor from properly functioning.
Do NOT place in a well traveled path by people of the household.
Charging Robot's Batter y
?
*The room layout is too complicated;
therefore, the machine cannot quickly
find the Charger Dock.
While Robot is charging the light will blink
When the battery is fully charged,
the light will stay on continuously.
●
Before using for the first time, charge the Robot for a minimum of 5 hours.
Run the Robot until it wants to seek the Charger Dock to recharge. Do this
for 2 or 3 times to achieve the best performance for the battery.
●
In normal use, the charging time is about 4-5 hours.
●
A warmer or cooler room may require a longer charging time.
●
When the Robot's battery gets low during use, it will quit cleaning the air and
seek out the Charger Dock for recharging its battery.
●
While the Robot is charging in the Charger Dock, the Battery Icon will blink.
Once the Robot's battery is fully charged, the Battery Icon will quit blinking
and stay on continuously.
●
So the Robot is ready to go out and clean the air at anytime, you may leave
the Robot in the Charger Dock. Once the battery is fully charged, the current
will decrease for charging the battery so that it will not hurt the battery.
●
When the Robot is placed in the Charger Dock, the Robot will automatically
turn itself ON and go in to the PAUSE mode where it will wait for the next
scheduled air cleaning.
●
If you have set the purification "on a schedule" in advance, the Robot will
automatically exit from the Charger Dock to work in the "Auto Mode" when
the scheduled time arrives.
● If Robot is NOT going to be used for 1 or 2 months, unplug the Charger Dock
and turn the Robot OFF with the switch on the bottom of Robot. When you
want to use the Robot again, we sugggest you recharge the battery as
mentioned above to regain best performance for the battery.
13
5. Operation and Programming Robot
LCD Panel
The detailed indication of display screen and control panel:
1
2 3
4 5 6
7
12 13
8
10
14
15
16
17
18
19
9
MODE
11
Time Setting Keys
1. Battery Charge Status
2. Prompt for Lack of Filter
Material
3. Prompt for Lifting System
Stuck
4. Prompt for Driving Wheel
Tangled
5. Prompt for Driving Wheel
Mode selection key
not resting on floor.
6. Prompt for whether the
Memory Card Is Installed
Or Not
7. 24 Hour Time Display
8. Prompt for Display of
Scheduling
9. Purification scheduled for
Start/Pause Key
current day
10. Purification Scheduled
Every Day
11. Purification Schedule on
HOLD
12. Indication of Working
Status
13. Pause Mode
Power On/Off Key
14. Auto Mode
15. Spot Mode
16. Automatic Demo Mode
17. Search Mode
18. Music Mode
19. Back to Charger Dock
Tur ning Robot ON
●
Turning the Robot over, turn the switch ON so the Robot will be able to
operate.
●
Pressing
key on the LCD on the top of the Robot will turn the Robot ON
and the Robot will be in stand by mode.
●
Pressing
key a second time will turn the Robot OFF.
MODE
14
Enjoy Smarter Life!
Pause Mode
MODE
●
Pressing the Pause
Mode, you will Pause the operation of the Robot.
●
During the Pause Mode, you can select one of the various operating Modes.
●
Pressing the
selected.
●
You may press any key on the LCD to cause the Robot to enter the
Pause Mode.
●
With the Robot in the Pause Mode, the Robot is consuming power from the
battery.
●
With the Robot running, pressing the
●
With the Robot turned OFF and NOT placed back in the Charger Dock, the
key again will start the Robot in the operating mode you
Tur ning Power OFF
key will turn the Robot OFF.
Robot will NOT go out at the next set Air Cleaning time.
MODE
●
If the Robot is NOT going to be used for a month or more, it is recommended
to turn the Robot OFF by depressing the
button on the bottom and
unplug the Charger Dock.
Setting Air Schedule Cleaning Time
NOTE: After you have set the Air Cleaning Time,
you will automatically be led into setting the Clock
time.
1. With the power
Button.
ON, press the Pause
2. Then press the
Clock Button and hold for
about 4 seconds until the 00 are flashing in the
LCD. This is the hour section of the clock. The
clock is a 24 hour clock.
MODE
MODE
3. Adjust the hour for the Air Cleaning Time by
depressing either
or . Pressing once each
time will move the number in the direction you
desire for the hour.
4. Press the
FOR EXAMPLE: if the scheduled
Clock Button to set the Hour.
5. The Minute 00 will flash. Set the minute by
pressing the
or
. Pressing once each time
will move the number in the direction you desire
for the minute.
Air Cleaning Time is to be 1:30 PM
then the display on the LCD
screen will be shown as13:30.
6. Press the
Clock Button to set the Minute.
The Clock indicator on the LCD will not be lit.
7. The LCD will automatically go to the Clock Set
Mode and the 00 will start flashing in the Hour
section.
15
Setting Clock Time
8. You are NOW in the Automatic Clock set mode,
you will see 00 flashing in the Hour section.
9. Set the hour – remember this is a 24 hour clock
- for the Clock by depressing either
or
Pressing once each time will move the number
in the direction you desire for the hour.
10.Press the
MODE
MODE
Clock Button to set the Hour.
11.The Minute 00 will flash. Set the minute by
pressing the
or
. Pressing once each
time will move the number in the direction you
desire for the minute.
FOR EXAMPLE: if the current
12.Press the
time is 3:30 PM, then the display
Clock Button to set the Minute.
The Clock indicator on the LCD will not be lit.
on the LCD screen will be shown
as 15:30
NOTE:
▶ If the Robot is turned OFF and NOT in the Charger Dock, the Robot will NOT go out to cleanse the air at the next
scheduled time.
▶ If the Robot while in the Charger Dock is NOT making a good electrical connection to the charger strips, the
battery will drain itself and will NOT have the battery power to go out on next scheduled time.
Setting Frequency of Scheduled Air Cleaning Time
●
Once you have scheduled the time of the day for the Robot to go out and clean the
Air, you may select from the following schedule:
▶ one day only
▶ every day
▶ place on HOLD
●
Adjust the frequency of scheduled purification by short press of
●
Looking at the LCD screen, you will see that the clock button is lit and the
is lit.
This means that the Robot will only do the scheduled Air cleaning once and then
NOT go out again until instructed. The Robot will return to the Charger Dock when
the battery runs low.
.
●
By pressing the
●
When this
is lit, then the Robot will go out every day on the scheduled time and
clean the Air, returning to the Charger Dock when the battery runs low.
●
By pressing the
●
When this
is lit, it means it will NOT do the scheduled cleaning and will remain
in the Charger Dock until you make one of the above selections telling it to do the
Air cleaning.
Clock Button and releasing, the next selection will be lit.
Each time pressing
,this product
will carry out icons according to the
following sequence:
Scheduled
Purification
once
Scheduled
Purification
Every Day
Scheduled
Purification
placed on
HOLD
Clock Button again and releasing, the next selection will be lit.
Notes:
▶ ONLY the Auto Mode can be selected to run in the Scheduled Air Cleaning Time setting. Reference page 17 for
instructions on how to select this mode.
▶ When the Robot starts the air cleaning process, the Robot will raise the top to better clean the air. If the Robot is under a
table or a piece of furniture, the top will rise until it meets resistance, where it will immediately stop and start to clean the
air. The top can rise to a height of 18.5 inches.
Caution: Because the Robot moves on its own and the top will raise and lower on its own, you must NEVER place
anything on the top of the Robot.
16
Enjoy Smarter Life!
6.
Mode Selection
By pressing the MODE
MODE
Key, you may select one of the six Modes of operation
that you want the Robot to do.
MODE
By pressing "Mode " key repeatedly, this
product will implement action according to the
They are: AUTO, SEARCH, SPOT , DEMO, BACK TO CHARGER and MUSIC .
Following is a description of the different modes.
Auto
Exact
Search
Fixed
Point
DEMO
Return
Auto Mode
Music
● This is the only Mode the Robot will run in for the Scheduled Air Cleaning Time.
● When Robot runs in this Mode, the Robot will travel in a straight line to find the Dirty Air. If there
is an obstacle in its way, the bumper, upon touching the obstacle, will change direction of the
Robot but will still continue to find the source.
Remote
LCD PANEL
● Once the Dirty Air is found, the Robot will stop, the light on top will change from Green to Red,
the top will extend upwards and the fan will begin to circulate the air through the filters thus
beginning to perform the air cleaning process.
● The Robot can operate for up to 2 hours in cleaning the air.
● When the air has been cleaned, the light on top will turn GREEN, the top of the Robot will retract
and the Robot will move to see if there is Dirty air elsewhere in the room.
● When the Robot detects that the battery is running low, it will stop cleaning the air and return to
the Charger Dock for recharging the battery.
Comment:
▶ This mode is not restricted by the room size, and will automatically search pollution and perform purification. It is
recommended to purify the home air often by using this mode.
17
Search Mode
● Use of this Mode is desired when known air pollution exists and you desire it to go to the
source to clean the air.
Remote
LCD PANEL
● When Robot runs in this Mode, the Robot will travel to find the source of polluted air. If there is
an obstacle in its way, the bumper will activate on touching the obstacle and the Robot will
change direction.
● Having found the source of the pollution, the Robot will stop, the light on top will turn from Green
to RED, the top will extend upwards and the fan will begin to circulate the air through the filters
thus beginning to perform the air cleaning process.
● The Robot can operate for up to 2 hours in cleaning the air.
● When the air has been cleaned, the light on top will turn GREEN, the top of the Robot will retract
and the Robot will move to see if there is Dirty air elsewhere in the room..
● When the Robot detects the battery is running low, it will stop cleaning the air and return to the
Charger Dock for recharging the battery.
Spot Mode
● This Mode
is used when you want to clean the air in a particular area because of
various reasons, such as: food preparation in the kitchen, people gathering in a room,
people smoking in a room, pet odors, and other strong or offensive odors. You use the
Remote to direct the Robot to the Spot desired.
Remote
SD
Power
Supply
Charging Slot
LCD PANEL
● Under normal conditions, the Robot will clean the air until the air is clean or the battery
runs low and the Robot needs to return to its Charger Dock to recharge the battery.
● If a longer duration is required to clean the air, the Charger Dock may be moved to the
room and with the provided Charging Cable, connect the Robot to the Charger Dock.
This will allow the Robot to run continuously till the air is clean.
● Do NOT place the Robot under a table or chair as it will decrease the Robot's ability to
cleanse the air.
Note:
For the unit to clean the air on the next scheduled time, the unit MUST be set back to the AUTO mode and placed back
into the Charger Dock.
18
Enjoy Smarter Life!
Back To
●
Charge Mode
When the Robot's battery runs low, the Battery symbol will start to blink; the Robot will
stop cleaning the air and will seek out the Charger Dock to recharge its battery.
● At anytime you want to send the Robot back to the Charger Dock, you should press the Pause
button and then press the Mode button until the symbol
appears. Then press the Pause
button so the Robot will seek out the Charger Dock.
Remote
LCD PANEL
Comments:
▶ During the process of charging, Battery icon flashes.
▶ After the completion of charging, Battery icon will stay lit.
Demo Mode
This Mode demonstrates the main functions of the Robot and helps you quickly learn by
interacting with the Robot by following the voice commands. Remove Robot from Charger
Dock and press
on the Remote to start the interaction.
CAUTION:During the DEMO Mode, the Drop Sensors are turned OFF. The Robot must NOT
be operated near steps or drop offs as the Robot will NOT be able to detect either of these
conditions.
Remote
Raise/
Lower Mode
(Only Limited to Model A330)
You may raise
the Remote.
LCD PANEL
or lower
the head of the Robot by pressing the appropriate key on
Remote
Music Mode
In this mode, you may select the music that you want played by using the Remote. The
Robot will play the music while it is in the Charger Dock or out cleaning the air.
● After selecting this Mode, the Robot will play music.
● You may select the piece of music by depressing the
19
button on the Remote.
7. Magnetic Tape
Application of the Magnetic Tape to the floor will establish the area you want the Air Purifier to work within.
Various Uses for the Magnetic Tape.
●
Magnetic Tape can be
affixed to ONLY hard floor
surfaces when you want to
keep the Air Purifier from
going in to an area.
●
If the door jam or obstacle is less
than 0.4 inch high, the Air
Purifier can move over the
obstacle. If this is not desired,
then Magnetic Tape needs to be
applied so the Air Purifier will not
attempt to move over the
obstacle.
●
Do not allow the Air Purifier to
operate in areas where there
might be water, open Fireplaces,
Heaters or fragile glass. The
Magnetic Tape can be used to
keep the Air Purifier from getting
into or close to these areas.
Door sill
Magnetic
Tape
Magnetic
Tape
●
Magnetic
Tape
1.
5
in
ch
es
In case you have stairs or a
drop off which the Air
Purifier cannot detect
because of certain
circumstances, you must use
the Magnetic Tape. NOTE:
Be certain that the Magnetic
Tape will not cause a person
to trip and fall and injure
themselves.
Water
2 inches
Magnetic
Tape
Application of Magnetic Tape
●
Use a dry cloth to wipe the
area clean of any dirt or
dust before application of
the Magnetic Tape.
●
Remove the Magnetic Tape
from packaging, unroll the
Magnetic Tape and cut the
length required for the location.
●
Being careful, remove ONLY
the WHITE backing off the
Magnetic Tape and not the
tape itself. Apply the
Magnetic Tape to the floor
surface, being careful to
make sure it adheres to the
floor.
●
Using the Magnetic Recovery
Tool, swipe the magnetic tape
several times to increase the
strength of the magnetic tape.
You will find that you have to do
this to keep the tape up to
sufficient strength over a
period of time.
Comments:
▶ You may use the magnetic tape included in the packaging to keep the Robot in a room for cleaning the air.
▶ If a step in the area where the Air Purifier is going to be used is less than 1.5 inches, then magnetic tape must be
placed to keep the Air Purifier from falling down the step. CAUTION, the tape must be secure so as not to
cause a person to trip down the step.
▶ The magnetic tape can also be used to define an area where you do NOT want the Robot to enter.
20
Enjoy Smarter Life!
● Do NOT apply to a carpeted surface as the adhesion will NOT be adequate to keep the magnetic tape in position.
● The Magnetic Tape must be applied to a clean dry hard floor surface for proper adhesion.
● After applying the Magnetic Tape, rub the Magnetic Tape with the Magnetism Recovery Tool. This increases the
magnetism of the tape.
● The tape should NOT be used within 5 feet of the Charger Dock as it will interfere with the Robot finding and entering
the Charger Dock.
● The Magnetism Recovery Tool should be used to restore the magnetism of the tape when it is found to be weak.
● There may be residue when you remove the Magnetic Tape. Usually a soapy cloth will clean the area.
● Remaining Magnetic Tape must be stored in a cool, dark place.
NO
Guardrail
● The Magnetic Tape should NEVER be used to confine an
elevated area where the Robot could fall down and hurt a
person or cause considerable damage to the room below
when the tape has lost its magnetism power.
● Instead, attach a permanent guard rail to block the unit
from reaching the edge of the drop off.
Set up
Guardrail
8. Using Robot
● With all programing having been completed, you are now ready to use the Air
Purifier.
● Having placed the Charger Dock in a room where you want the Robot to
operate, place the Robot in the Charger Dock.
● With the Robot turned ON, the Robot should automatically go to the Pause
Mode and wait for the next scheduled air cleaning time.
● Should no lights light up on the Robot, remove the Robot, turn the Robot over
and press the switch to the ON setting.
● Place the Robot back in the Charger Dock and the Robot is ready to go out on
the next scheduled air cleaning.
● Remember, the Auto mode is the only mode the Robot will automatically leave
the Charger Dock.
● Remember, we strongly recommend that you be present for the first run of the
Robot to make sure obstructions such as cords, magazines, etc. are removed
and the Robot will easily find its Charger Dock when it is time to charge its
battery.
9. SD Card
● Before removing the SD card, you must turn the Robot OFF by the switch on
the bottom of the Robot.
● The SD card will become very HO T to the touch if removed after using the
Robot, so be very careful in handling the SD card so you do not burn
yourself.
● Install the SD card to your computer or to an adapter connected to your
computer.
● Go to www.ecovacs.com and click on A330 for your language preference.
Follow the instructions for loading the music to the web site and then to your
SD card.
● Reinstall the SD card the proper way and close the cover.
● Turn the Robot over and press the switch to turn the Robot ON.
● With your Remote, you may select the desired song to play.
● Referring to the picture, you may adjust the volume.
Lock
2.0
GB
Open the Cover
Insert with Facing up
Lo ck
2.0
GB
21
Volume
Control
10. Maintenance of Robot Air Purifier
Cleaning Robot
● Turn the Robot OFF by pressing the
Button on the LCD.
● The Robot may be cleaned by using a soft damp cloth with a mild soap
solution. The cloth MUST NOT be wet, but wrung dry.
● Do NOT try to extend the Robot to wipe the tower panels.
Cleaning Filters
ic
Eff
● Remove the Robot from the Charger Dock and press the OFF
button.
● Remove the Top and remove the three filters from the Robot.
● The Top #1 and Bottom #3 filters can be gently tapped on the edge of your
wastebasket to remove any debris.
● You may use the hose attachment of your Vacuum cleaner to suck the fines
out of the filter. DO NOT place the end of the hose or tool directly on the filter
material. This could damage the filter and decrease its efficiency.
● The Middle filter #2, can be gently tapped on the edge of your wastebasket to
remove any debris. DO NOT use a vacuum on this filter as it may cause
damage and render the filter useless.
● After thorough cleaning, install the filters back into the Robot with #3 going in
first, #2 going in on top of #3 and #1 going in on top of #2.
● Replace the Cover making sure it is securely in position.
nt
ie
ter
Fil
r
ye
La
Efficient filter layer
Formaldehyde filter layer
Anti-bacterial filter layer
#3 Filters particles down to 0.6 Microns
#2 Filters VOC's from the air
#1 Filters down to 0.3 Microns
COMMENTS:
The #1 and #3 filter may change color after a while. This comes from use. You may check the filters to see if they are
still efficient by holding them up to a bright light and if you can NOT easily see light through the material, it is time
to replace the filters.
The #2 filter should be changed every 6 months or when found that odor filtration is not working well.
Cleaning Drop Sensors
Drop Sensors are located on the bottom of the Robot. Dirty lenses will not allow the
sensors to function properly and may cause the Robot NOT to detect a drop off or
stairs.
● Turn the Robot over onto a flat soft surface.
● You will see five (5) sensors which detect a drop off of more than 1.5 inches.
● These sensors need to be wiped every two weeks or oftener with a soft dry cloth
to remove any dust that has been attracted to the lenses.
Cleaning the Charger Dock
● Unplug the Charger Dock from the Wall.
● Using a damp soft cloth, one that has been wrung dry of water, you may wipe the
plug, power supply cord and the Charger Dock.
● Be sure to wipe the sensors with a soft dry cloth before placing back into position
and plugging the power supply cord in to the receptacle.
22
Enjoy Smarter Life!
11. LCD Icon Definitions
NOTE:
This product will stop working or fail to start when any of the following symbols are lit on the LCD screen.
ICON
CAUSE OF FAILURE
Filters not
installed in Robot
Drive wheel is tangled
with hair, piece of cloth,
string, etc.
One or both of Driving
Wheels are not in
contact with the floor.
SOLUTION
Remove the top and
check that filters are
properly installed and in
the proper sequence: #1
on Top, #2 in the Middle
and #3 on the Bottom.
Turn the Robot OFF.Turn
the Robot over and
remove the item that is
tangled with the Drive
Wheel.
By grasping the bottom of
the Robot on opposite
sides with your hands,
gently lift the Robot and
place back on the floor so
that both Drive wheels
are touching the floor.
Battery is low on its
charge and cannot
return to the Charger
Dock to recharge its
battery.
By grasping the bottom of
the Robot on opposite
sides with your hands,
gently lift the Robot and
carry back to the Charger
Dock and place in the Dock
making sure the Robot
makes contact with the
Charger Dock by having
the lights come ON on top
The Robot is not able
to raise the Top to the
proper height.
Remove the obstacle or
press the
OFF button
and gently remove the
Robot from under the
obstacle.
23
LOSS of FUNCTION
The Robot will not function properly
in cleaning the Air.
Robot will not drive
The Robot will stop its function because one
or both wheels are off of the floor and the
Robot can not move to perform its function.
The Robot has stopped before returning to
the Charger Dock because the battery do not
have energy left.
12. Common Failure
NO.
1
2
3
4
Problem
Solution
Does not work
1. Turn the power ON by pressing on the LCD panel. Check the Battery icon to
see amount of battery energy left in battery. If Battery icon does not light up
on the LCD panel, then the battery has no reserve energy.
2. Verify that the Charger Dock is plugged into a wall receptacle. The arm that
extends from the Charger Dock should light up with an orange cast. If the arm
is not lit, then try another receptacle. If the arm still does not light up, then the
Charger Dock should be sent to our Service Center.
3. With the Charger Dock arm lit, place the Robot in the Charger Dock so the
contacts rest against the Charger Dock contact. The LCD panel should light
up. If the Robot's LCD panel does not light up, then contact our Service
Center for further instructions.
4. Check that the switch on the bottom, underneath the Robot, has not been
turned OFF accidentally.
Machine is not
functioning
properly
The machine is susceptible to various things found in the average home. Some
of these things we might not find during the initial operation or may appear
occasionally in later use.
1. Cords from lights, TV or other items can become entangled in the Drive
Wheels which will cause the Robot to stop functioning until the entanglement
is removed.
2. Papers, magazines, clothes, comfort throws, etc. can cause a lifting action
with the bottom of the Robot so that the Drive Wheels cannot function.
3. The Robot has maneuvered itself into a tight area so that no matter how it
turns, its bumper will run into an obstacle and set it in motion to turn once
again.
Each of these instances will require personal attention to attend to the Robot
and set it in an area to start working again.
Machine fails to
detect a drop off
(Stairs)
Air cleaning
function is not
working or is
greatly reduced.
The Robot does not detect a drop off and goes over the edge.
1 . The Drop off could be less than 1.5 inches, or
2 . The top of the Drop off (stair) could be reflective, not allowing the sensors to
work.
The Magnetic Tape needs to be applied to the edge of the Drop Off. Be careful
to make sure a person will not trip over the magnetic tape and cause them to fall.
Reference page 20 for application of the Magnetic Strip.
3. The Drop Sensors on the bottom of the unit need to be wiped free of dust.
First listen to see if the fan is running, you may also place a piece of tissue at the
exhaust exit to verify that the fan is working. If the fan is NOT running, call our
Service Center for further instructions.
If the fan is running, turn the power OFF on the Robot by pressing Button
.
1.Remove the Top of the Robot and remove the filters.
2.Clean the filters by referencing page 22 and verify that they are not clogged.
3.Replace the filters by installing in the proper order.
4.Press the
Button and observe the cleaning function.
5.If still NOT working, call our Service Center for further instructions.
24
Enjoy Smarter Life!
13. Common Questions with Answers
1.
How long can the Robot function when fully
charged?
8.
Answer: The Robot will run for approximately two
(2) hours depending on the Mode the Robot is set
to clean the air in.
2.
Answer: The Robot has a sensor that slows it
down when it detects an obstacle in its path; by
slowing down, it will make a gentle bump with its
vinyl guard and then change its direction. There
are no sharp edges so the Robot will not cut a
child’s skin nor mar the furniture.
What keeps the Robot from falling down when
the drop off is greater than 1.5 inches?
Answer: The Robot has five (5) sensors installed
in the bottom of the Robot to detect a drop off.
The lenses must be wiped with a dry soft cloth
every two weeks or oftener to remove dust that
can obstruct its function.
3.
9.
Why does the Robot not operate for a decent
length of time in the selected Mode?
10.
b. the Robot has sensed the air in its Dirt Sensor
and has determined to be clean.
How does the Robot react when it meets an
obstacle?
11.
Answer: The Robot senses an object and will slow
down until the bumper touches the obstacle; this
will tell the Robot that it needs to change direction
for a new route.
Why does the Robot not perform its scheduled
air cleaning?
12.
How can I stop the Robot from going on its
scheduled air cleaning while I am away on a
trip?
Answer: You may cancel the function. Reference
page16 for instructions.
b.the Robot may have been in the Cancel mode,
or
13.
c. the battery may not have enough energy to do
the scheduled cleaning.
What is the correct way to move the Robot?
Answer: With both hands, grasp the Robot on
opposite sides under the Robot. Lift and
transport and place back on the floor gently.
Make sure when grasping the Robot that you do
not accidentally touch the ON – OFF switch that is
on the underneath either side of the Robot. You
can check that the Robot has power by touching
either the PAUSE or the OFF button on the panel
or use the Remote.
Why does the Remote Control fail to work?
Answer: a. you may be beyond the 16 foot
working range of the Remote.
b. there maybe other working wi-fi in the room
that interferes with the Remote signal,
c. the lenses on the Remote and the Robot may
be dirty and should be cleaned with a dry soft
cloth,or
14.
How do I clean the LCD panel?
Answer: Clean with a clean soft cloth and do not
press hard on the panel so as not to break the
glass. Cleaner used to clean glasses or a TV
screen can be lightly sprayed on the cloth to wipe
the stubborn spots. Follow by wiping with a dry
section of the cloth.
d. the batteries in the Remote may need to be
changed
7.
Is there any danger in touching the contacts
on the Charger Dock or the Robot?
Answer: The voltage is 24 volts DC and will not
cause a problem should a person or animal come
in contact with it
Answer: a. the unit may have been left in a mode
selection other than Auto mode,
6.
Does it matter if the product stays on the
Charger Dock even after it has been charged?
Answer: When the battery is fully charged, the
charger will switch to a low current mode and will
not deteriorate the battery. Should you not use
the Robot for an extended period of time, you
should unplug the Charger Dock and turn the
Robot off by pressing the Button and turning the
switch OFF on the underneath side of the Robot
a.The battery may be low on its charge and has to
return to the Charger Dock to charge its battery,
or
5.
How to prevent the Drive Wheels from getting
tangled in Power Cords?
Answer: Before operating the unit in a room,
check that all power cords have been lifted off the
floor or placed behind Magnetic Tape.
Answer:
4.
Is there any danger to furniture, children or
pets?
Why does the Robot slow down before
stopping?
Answer: The Robot has determined the spot
where it should stop and clean the air so the
Robot will slow down so that it does not pass the
spot.
25
15.
Why is there NO music in the MUSIC Mode?
21.
Answer:
Answer: Please refer to “Music Mode” in this
guide for the specific operation and www.
ecovacs.com.cn for downloading the music.
Reference page 21 .
1.Check to see that the SD card has been
installed in the Robot,
2. Check that the volume has been turned up so
you can hear the music, or
22.
3.if still no sound, then call our Service Center for
further instructions
16.
Why does the Robot fail to return to the
Charger Dock?
23.
2.Alarm State:When a function does not work, the
Icon will blink on the LCD panel until it is fixed.
3.The light on top will flash RED when the air
quality does not meet the Robots set standard;
the light will turn GREEN when the air meets the
Robots set standard.
3.Placement of the Charger Dock does not have a
clear view of the room for the infrared beam.
4.The lenses on the Charger Dock and the Robot
need to be cleaned with a soft dry cloth.
24.
Why does the Robot not clean the air in the
room?
How to use for longer time under fixed-point
mode?
Answer: In this case, you should move the
Charger dock to the room and plug the cable into
the Charger Dock and the Robot so the Robot will
continue to clean the air without using all of the
batteries energy. Reference Fixed Point Mode on
page18 for instructions.
25.
How to activate the battery when not used for
a period of time?
Answer: If the battery is dead, place the Robot in
the Charger Dock and fully charge the battery.
Run the Robot until the battery is low and then
place the Robot in the Charger Dock again till
fully charged. Repeat this cycle one more time
and the battery should function to its full capacity.
If the product is not going to be used for more
than three months, you should make a note to run
the Robot and then charge the battery.
Why does the Robot take longer in one place
than in another to clean the air?
Answer: The Robot has a built in sensor that has
a set standard to judge the air quality against.
When the air reaches the acceptable limit, the
Robot stops cleaning and will move to another
location where the air needs cleaning.
20.
What are the three status states of the Air
Purifier?
Answer: 1.Charging State: ① In Charging: The
power display icon on the display screen flashes.
② After Charging: The power display icon is
normally on. 2.Alarm State: The corresponding
alarm indicator icon on the display screen turns
red and flashes. 3.Air Quality Display State: ①
The light on Top turns Red when the air does not
meet internal standards. ②The light on Top turns
Green when the Air meets internal standards.
Answer: The pollution has permeated the air in
the room and it requires a longer period to clean
the air.
19.
There are three (3) reasons why lights will
flash/blink
Answer: 1.When the battery is low on Charge, the
Battery Icon will blink
2.There is an object that has a strong reflective
surface (mirror) within the infrared beam
projection from the Charger Dock that affects the
Robot from receiving the Charger Dock beam.
18.
How do you know when the level of air in your
room does not meet acceptable standards?
Answer: The light on top of the Robot will turn
RED when the air quality does not meet the
Robots standard.
Answer: 1.There are objects within 5 feet of the
Charger Dock which interferes with the infrared
beam
17.
How to download music?
Why does someone still feel stuffy in the room
while the machine keeps looking for air
pollution with the indicator light remaining
Green?
Answer: This is a normal phenomenon.
Sometimes people feel stuffy in a room because
lack of air movement. The Robot looks for air
pollution and cannot have any affect on the room
being stuffy.
26
Enjoy Smar ter Life!
A3S-000-IM201101