1
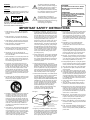
A-3780 3-piece speaker system Power output: 180 watts Acoustic balance subwoofer cabinet with pro excursion lab 8000 driver Illuminated wired remote control Remote control features: - on/off control - master volume control - bass volume control - headphone input jack Introduction Introduction Welcome to the Audio Authority A-3780 speaker system. Wir gratulieren Ihnen zum Kauf des "Audio Authority" A-3780 Lautsprechersystems. Bienvenue au système d'enceintes acoustiques Audio Authority A-3780. This 3-piece system is designed to deliver superior performance in devices such as computers, video game consoles, MP-3 players, DVD players, CD players and various other sources. High efficient, long excursion drivers combined with a low distortion, high power amplifier provide deep bass with clarify and greater dynamic range. Dieses 3-teilige Lautsprechersystem bietet eine hervorragende Leistungbeim Einsatz mit Computern, Videospielkonsolen, MP3-Spielern, DVD-Spielern, CD-Spielern und verschiedenen anderen Signalquellen. Hocheffiziente Lautsprecher mit breiter Abstrahlung und einem niedrigen Verzerrungskoeffizient mit hoher Leistung für die Wiedergabe von tiefen klaren, Bässen und einem großen, dynamischen Bereich. La conception de ce système à 3 enceintes assure une performance de haute qualité pour une utilisation avec les ordinateurs, consoles de jeux, lecteurs MP3, DVD et CD et divers autres appareils. Des haut-parleurs à hauts rendement et déplacement, associés à un amplificateur haute-puissance à faible distorsion, produisent des basses profondes avec une clarté et une dynamique accrues. The illuminated remote control allows easy access to all functions and allows you place the satellite speakers anywhere to provide optimum performance. Introduzione Die beleuchtete Fernbedienung ermöglicht den einfachen Zugriff auf alle Funktionen, und erlaubt die Aufstellung der Satellitenlautsprecher an den Orten, die eine optimale Wiedergabeleistung garantieren. Introducción La télécommande illuminée facilite l'accès à toutes les fonctions et permet le placement des enceintes à l'endroit où la performance est optimale. Introdução Benvenuti al sistema di altoparlanti Audio Authority A-3780. Bienvenido al sistema de altavoces Authority A-3780. Bem-vindo ao sistema Audio Authority A-3780 speaker. Questo sistema a 3 componenti è progettato per offrire una performance imbattibile in dispositivi quali computer, consolle per videogiochi, lettori MP3, lettori DVD, lettori CD e varie altri sorgenti. Grazie alla combinazione di driver ad alta efficienza e lunga escursione e ad un amplificatore ad alta potenza e bassa distorsione, potrete ottenere bassi profondi, una riproduzione più cristallina suono più nitido ed una maggiore gamma dinamica. Este sistema de 3 piezas se ha diseñado para ofrecerle una actuación superior en equipo como ordenadores, consolas de juegos de vídeo, equipo MP-3, DVD y CD y muchos otros. Con controladores de larga amplitud y gran eficiencia combinados con un amplificador de baja distorsión y alta potencia que le ofrece bajos profundos con límites claros y muy dinámicos. Este sistema de 3-peças foi projectado para oferecer um desempenho superior em dispositivos como computadores, jogo de consola vídeo, leitores MP3, leitores de DVD, leitores de CD e outras fontes várias. Software de excursão eficientes, longos altos combinaram com uma baixa distorção, amplificador de poder alto provê baixo fundo com clarifique e maior gama dinâmica. El control remoto iluminado permite el fácil acceso a todas las funciones y le permite colocar los altavoces satélite en cualquier lugar, lo que le ayuda a obtener una actuación óptima. O controle remoto iluminado permite acesso fácil a todas as funções e permite colocar os altifalantes de satélite em qualquer lugar que ofereça um desempenho óptimo. Il telecomando luminoso permette di accedere facilmente a tutte le funzioni e di posizionare gli altoparlanti satellitari ovunque, in modo da garantire prestazioni ottimali. Caution Do not plug the power supply in until all connections are made. Use only the power cord supplied with these speakers. Acoustic Authority will not be held responsible for damage caused by other power supply. Read the entire owners guide before making any connections. Keep your speakers away from extreme heat or humid and wet conditions. Use a dry cloth for cleaning. Do not expose any part of the system to cleaning liquids or solvents. The subwoofer is not magnetically shielded. It should not be placed near a computer hard drive, monitor, television, disks and game cartridges. 2 feet away from any device that may be affected by magnetics is a good rule. 1 Einführung Vorsicht Verbinden Sie den Netzstecker nicht mit der Stromversorgung bis alle Anschlüsse vollständig ausgeführt wurden. Verwenden Sie nur das mit diesem System mitgelieferte Netzkabel. "Audio Authority" übernimmt keinerlei Garantieleistungen, die durch den Einsatz des System mit einem anderen Netzkabel entstanden sind. Lesen Sie die Bedienungsanleitung vollständig durch, bevor Sie irgendw-elche Anschlüsse ausführen. Halten Sie Ihre Lautsprecher vom extremer Wärme oder Feuchtigkeit, und von nassen Orten fern. Verwenden Sie zur Reinigung nur ein trockenes Tuch. Achten Sie darauf, dass kein Teil des Systems mit Reinigungs-oder Lösungsmitteln in Berührung kommt. Der Basslautsprecher ist nicht magnetisch abgeschirmt. Sie sollten diesen nicht in der Nähe einer Computer-Festplatte, eines Monitors, TVGerätes, oder in der Nähe von Behältern mit Floppy-Disketten und Spielekartuschen aufstellen. Als goldene Regel sollten Sie das Gerät stets mindestens 60 cm von Geräten fernhalten, die durch Magnetfelder beeinflusst werden könnten. Avertissement Ne branchez pas le cordon d'alimentation avant d'avoir effectué toutes les connexions. Seul le cordon d'alimentation fourni avec ces enceintes doit être utilisé. Acoustic Authority ne pourra être tenu responsable des dommages provoqués par l'utilisation d'un autre matériel d'alimentation. Lisez le manuel d'utilisation avant d'effectuer les connexions. Tenez vos enceintes à l'écart des températures extrêmes et à l'abri de l'eau ou de l'humidité. Nettoyez à l'aide d'un chiffon sec. N'exposez aucune partie du système aux produits d'entretien ou aux solvants. Le subwoofer n'est pas muni d'écran magnétique. Il ne doit pas être placé à proximité des disques durs d'ordinateur, écrans, téléviseurs, disquettes et cartouches de jeu. En règle générale, éloignezle de 60 cm de tout appareil susceptible d'être affecté par le rayonnement magnétique. Precauzioni Non collegare lalimentazione finché non sono state effettuate tutte le connessioni Usare esclusivamente il cavo di alimentazione fornito con questi altoparlanti. Acoustic Authority non sarà ritenuta responsabile di alcun danno causato da altri alimentatori. Prima di effettuare qualsiasi connessione, leggere completamente la guida dellutente. Tenere gli altoparlanti lontano da estremità di calore e umidità e dal bagnato. Usare un panno asciutto per la pulizia. Non esporre alcuna parte del sistema a solventi o liquidi detergenti. Il subwoofer non è provvisto di schermatura magnetica. Non deve essere posizionato vicino a dischi fissi di computer, monitor, televisori, dischi e cartucce di videogiochi. È buona norma posizionarlo a 60 cm da qualsiasi altro dispositivo che possa essere condizionato da componenti magnetici. Preparing the speakers The subwoofer should be placed on the floor near a wall for optimum performance. Satellite speakers usually are placed on opposite ends of the listeners positions. As far apart as possible is usually best. An example would be to have the left satellite on the far left corner of a desktop and the right satellite on the far right corner of the desktop. On either side of a monitor or television is also very common. Preparazione degli altoparlanti Per ottenere le prestazioni ottimali, il subwoofer va posizionato sul pavimento, vicino a una parete. Gli altoparlanti satellitari vanno posti solitamente alle estremità opposte rispetto alla posizione dellascoltatore, preferibilmente distanziandoli il più possibile. Per esempio, si può posizionare il satellite sinistro nellangolo lontano sinistro della scrivania e il satellite destro nellangolo lontano destro della scrivania. È solito anche posizionare i satelliti ai lati di un monitor o di un televisore. Precaución No conecte a la fuente de corriente hasta que haya hecho todas las demás conexiones. Use sólo el cable de corriente que viene con los altavoces. Acoustic Authority no será responsable de los daños causados por otras fuentes de corriente. Lea el manual del usuario antes de hacer cualquier conexión. Mantenga los altavoces lejos del calor o humedad excesivos y de la lluvia. Use un paño seco para limpiarlos. No exponga parte alguna del sistema a líquidos o disolventes de limpieza. El subwoofer no está protegido magnéticamente. No se coloque cerca del controlador duro del ordenador, monitor, televisión, discos y cartuchos de juegos. Una regla a seguir es mantenerlo cuando menos a medio metro de cualquier equipo que pudiese ser afectado por el magnetismo. Vorbereitung der Lautsprecher Der Basslautsprecher sollte auf dem Boden in der Nähe einer Wand aufgestellt werden, um eine optimale Funktion zu gewährleisten. Stellen Sie die Satellitenlautsprecher an den gegenüberliegenden Seiten der Hörerposition auf. Die Lautsprecher sollten so weit wie möglich voneinander entfernt aufgestellt werden. Stellen Sie z.B. den linken Satellitenlautsprecher an der äußersten linken Ecke des Tisches auf, und den rechten Satellitenlautsprecher an der äußersten rechten Ecke des Tisches. Diese können aber auch rechts und links vom TV-Gerät aufgestellt werden. Preparación de los altavoces El subwoofer deberá colocarse en el suelo cerca de la pared para obtener una actuación óptima. Generalmente, los altavoces satélite se colocan en los extremos opuestos a la posición del escucha. Generalmente es mejor ponerlos tan separados como se pueda. Un ejemplo sería tener el satélite izquierdo en la esquina izquierda de un escritorio y el derecho en la esquina derecha del escritorio. También es muy común en los dos lados de un monitor o televisión. Precaução Não ligue o alimentador de corrente até todas as conexões terem sido feitas. Use apenas o cabo fornecido com os altifalantes. Acoustic Authority não será responsável por danos causado pela utilização de outro cabo. Leia o guia do utilizador antes de fazer qualquer conexão. Mantenha os altifalantes longe de calor extremo ou condições de humidade e água. Use um pano seco para limpar. Não exponha qualquer parte do sistema a líquidos de limpeza ou solventes. O subwoofer não está protegido magneticamente. Não deve ser colocado perto de um disco rígido de computador, monitor, televisão, discos e cartuchos de jogo. Deve ser colocado a 2 pés de distância de qualquer dispositivo que possa ser afectado através de campo magnético é uma boa regra. Installation des enceintes Le subwoofer doit être placé par terre, près d'un mur afin d'assurer une performance optimale. Les enceintes satellites sont souvent placées de chaque côté de l'utilisateur, éloignées au maximum l'une de l'autre. Par exemple, l'enceinte satellite gauche peut être placée sur le coin à l'extrême gauche du bureau et l'enceinte satellite droite sur le coin à l'extrême droite du bureau. Souvent, les enceintes sont placées de chaque côté d'un écran ou d'un téléviseur. Preparando os altifalantes O subwoofer deve ser colocado no chão perto de uma parede, para desempenho óptimo. Os altifalantes de satélite são colocados normalmente em campos opostos das posições de ouvintes. O mais afastados possível é normalmente a melhor solução. Um exemplo seria ter o altifalante esquerdo no canto esquerdo mais distante da escrivaninha e o altifanate direito no canto direito mais distante da escrivaninha. Colocálo em qualquer lateral de um monitor ou televisão também é muito comum. 2 Connecting the speakers There are a variety of devices these speakers can connect to. Please read these step by step instructions first and then consult the diagrams. Identify which diagram most closely matches your source. Sie können dieses Gerät an eine ganze Palette von Geräten anschließen. Bitte lesen Sie die detaillierten Hinweise zuerst durch, und beachten Sie anschließend die Abbildungen. Bestimmen Sie nun welche Abbildung Ihrer Signalquelle entspricht. Wired remote: Connect the Red Pin plug from the wired remote to the rear of the subwoofer. The jack for this plug is marked in red and it says To control box. Satellite speakers: Connect the right satellite speakers purple plug into the right jack on subwoofer. Connect the left satellite speakers grey plug into the left jack on subwoofer. Source cable: Connect the green source cable to the input jack on the subwoofer. Connect the opposite end of this cable to your audio source. Refer to diagrams for assistance. Connect the power cord into the AC source when you have completed all set up and are ready to play audio from your source. Kabelfernbedienung: Schließen Sie den roten Stecker der Fernbedienung an der Rückseite der Basslautsprecherbox an. Die Buchse für diesen Stecker ist rot mit den Worten "Zur Fernsteuerung" (To control box). Satellitenlautsprecher: Schließen Sie den violetten Stecker des rechten Satellitenlautsprechers an der mit "Rechts" (right) bezeichneten Buchse an der Basslautsprecherbox an. Schließen Sie den grauen Stecker des linken Satellitenlautsprecher an der mit "Links" (left) bezeichneten Buchse an der Basslautsprecherbox an. Signalquelle: Schließen Sie das grün markierte Kabel von der Signalquelle an der entsprechend markierten Buchse an der Basslautsprecherbox an. Schließen Sie nun das gegenüberliegende Ende des Kabels an der Buchse des Audiosystems an. Beachten Sie bitte die Anschlussdiagramme für detaillierte Hinweise. Nach dem Anschluss des AC-Netzkabels an die Netzdose ist das Gerät einsatzbereit, und Sie können nun die Signale von der Audioquelle hören. Collegamento degli altoparlanti 3 Anschließen der Lautsprecher Conexión de los altavoces Connexion des enceintes Les enceintes peuvent être connectées à divers appareils. Veuillez lire auparavant ces instructions, puis consulter les schémas. Identifiez les schémas se rapprochant le plus de votre installation. Télécommande à fil: Branchez la fiche rouge de la télécommande à l'arrière du subwoofer. La prise correspondante est marquée en rouge et comporte la légende To control box. Enceintes satellites: Branchez la fiche violette de l'enceinte droite à la prise du subwoofer marquée right. Branchez la fiche grise de l'enceinte gauche à la prise du subwoofer marquée left. Câble d'entrée: Branchez le câble d'entrée vert à la prise d'entrée du subwoofer. Branchez l'autre extrémité de ce câble à votre source audio. Consultez les schémas pour plus d'informations. Branchez le cordon d'alimentation à la prise murale AC lorsque toutes les connexions ont été effectuées et vous êtes prêts à écouter la source audio. Conectando os altifalantes Questi altoparlanti possono essere collegati a una molteplicità di dispostivi. Si invita innanzitutto a leggere queste istruzioni passo-passo e poi a consultare i diagrammi. Identificare il diagramma che riflette maggiormente la vostra sorgente audio. Estos altavoces pueden conectarse a un gran número de equipos. Sírvase leer cuidadosamente estas instrucciones antes de hacerlo y consulte los diagramas. Identifique el diagrama que se parece más a su fuente. Há uma variedade de dispositivos aos quais estes altifalantes se podem conectar. Por favor leia as instruções passo por passo primeiro e consulte os diagramas. Identifique o diagrama que esquematiza a sua aparelhagem. Telecomando cablato: Collegare la spina a Polo Rosso del telecomando cablato al retro del subwoofer. Il jack relativo a questa spina è contrassegnato in rosso e reca lindicazione To control box. Altoparlanti satellitari: Collegare la spina color porpora dellaltoparlante satellitare di destra al jack right (destro) del subwoofer. Collegare la spina grigia dellaltoparlante satellitare di sinistra al jack left (sinistro) del subwoofer. Cavo sorgente: Collegare il cavo sorgente verde al jack dingresso del subwoofer. Collegare lestremità opposta di questo cavo alla vostra orgente audio. Per maggiori dettagli, fare riferimento ai diagrammi. Una volta completate tutte le operazioni di approntamento e quando si è pronti alla riproduzione dellaudio dalla propria sorgente, collegare il cavo di alimentazione alla sorgente CA. Remoto cableado: Conecte la clavija roja del remoto cableado a la parte trasera del subwoofer. El enchufe para esta clavija está marcado en rojo y dice To control box (a la unidad de control). Altavoces satélite: Conectar el enchufe macho púrpura al altavoz satélite derecho al enchufe hembra derecho en el subwoofer. Conectar el enchufe macho gris en el altavoz satélite izquierdo al enchufe hembra izquierdo en el subwoofer. Cable de la fuente: Conectar el cable verde de la fuente al enchufe de entrada en el subwoofer. Conectar el extremo opuesto de este cable a su fuente de audio. Ayúdese con los diagramas. Conectar el cable de corriente a la fuente de CA cuando haya terminado todas las instrucciones y esté listo para escuchar audio de su fuente. Ligado ao controle remoto: Conecte a tomada de Vermelha do controle remoto à parte traseira do subwoofer. O jack para esta tomada é marcado em vermelho e diz To control box. Altifalantes de satélite: Conecte a tomada roxa dos altifalantes de satélite direitos no jack direito do subwoofer. Conecte tomada cinzenta dos altifalantes de satélite esquerdos no jack esquerda do subwoofer. Cabo de fonte: Conecte o cabo de fonte verde ao jack de entrada do subwoofer. Conecte o terminal oposto deste cabo à sua fonte sonora. Recorra aos diagramas para ajuda. Conecte o cabo na fonte de CA quando você completou todas as ligações e estiver pronto para ouvir da sua fonte sonora. Controls and features 1. Power: The on/off button is on the wired remote. Press in to turn on. The remote will illuminate when on. Press again to turn the system off. 2. Master volume control: This control is on the wired remote and is indicated by the words master volume. Rotate towards you to turn volume up or away from you to turn volume down. 3. Bass volume control: This control works similar to the master volume control. Rotate to increase or decrease bass as preferred. 4. Headphone: The remote has a headphone input jack. Connect your favorite headphones to this jack and they will mute the speaker system automatically. The remote can then be used to turn up and down the volume to your headphones. Comandi e funzioni Bedienung und Funktionen 1. Hauptschalter: die Ein/Aus-Taste befindet sich an der Fernbedienung mit Übertragungskabel. Betätigen Sie die Taste, um das Gerät einzuschalten. Die Fernbedienung leuchtet auf, wenn das Gerät eingeschaltet ist. Betätigen Sie die Taste nochmals, um das System wieder auszuschalten. 2. Master-Lautstärkeregler: Dieser Regler befindet sich ebenfalls an der Fernbedienung, und ist durch die Bezeichnung "Master Volume" gekennzeichnet. Schieben Sie den Regler an der Drehen Sie nach Ihnen zu oder Weg von Ihnen zu, um die Lautstärke wie gewünscht einzustellen. 3. Basslautstärke: Dieser Regler funktioniert ähnlich wie der Regler für die Gesamtlautstärke. Drehen Sie am Regler, um die Einstellung wie gewünscht vorzunehmen. 4. Kopfhörer: Die Fernbedienung verfügt über eine Kopfhöreranschlussbuchse. Schließen Sie Ihr Kopfhörerset an dieser Buchse an, und das Lautsprechersystem wird automatisch stumm geschaltet. Sie können nun die Lautstärke des Kopfhörers mittels der Fernbedienung einstellen. Control y características 1. Alimentazione: Il pulsante di accensione e spegnimento (on/off) si trova sul telecomando cablato. Premerlo per accendere lunità. Una volta acceso, il telecomando diventa luminoso. Per spegnere il sistema, premere nuovamente il detto pulsante. 2. Comando del volume principale: Questo comando si trova sul telecomando cablato ed è indicato dalla dicitura master volume. Retate verso lei a per aumentare il volume o lontano da lei per ridurlo. 3. Comando del volume dei toni bassi: Funziona in modo simile al comando del volume principale. Ruotarlo in un senso o nellaltro per aumentare i toni bassi o ridurli. 4. Cuffie: Lunità è provvista di una presa dingresso per cuffie. Collegando un paio di cuffie a questa presa jack, laudio degli altoparlanti si disattiva automaticamente (sordina). Si può quindi usare il telecomando per aumentare o ridurre il volume delle cuffie. 1. Corriente: El botón de encendido/apagado está en el remoto cableado. Presione para encenderlo. El remoto se iluminará cuando esté encendido. Presione nuevamente para apagar el sistema. 2. Control maestro de volumen: Este control está en el remoto cableado y está indicado por las palabras master volume (volumen maestro). Mover el Gire hacia usted a el volumen o lejos de usted a para bajarlo. 3. Control de volumen de bajos: Este control funciona de manera similar al control maestro de volumen. Haga girar para aumentar o disminuir los bajos según lo desee. 4. Auriculares: El remoto cuenta con un enchufe de entrada a los auriculares. Conecte sus auriculares favoritos a este enchufe y harán que el sistema de altavoces se silencie automáticamente. El remoto podrá entonces usarse para subir o bajar el volumen en los auriculares. Commandes et caractéristiques 1. Alimentation: Le commutateur Marche/Arrêt se trouve sur la télécommande à fil. Appuyez sur le commutateur pour mettre en marche. La télécommande s'illumine lorsqu'elle est sous tension. Appuyez de nouveau sur le commutateur pour éteindre le système. 2. Commande maître du volume: Cette commande située sur la télécommande à fil est marquée master volume. Tournez vers vous haut pour augmenter le volume ou eloigné de vous pour le diminuer. 3. Commande du volume des basses: Cette commande fonctionne de la même façon que la commande maître du volume. Tournez la commande pour augmenter ou diminuer le volume des basses fréquences. 4. Casque: La télécommande dispose d'une prise d'entrée casque. Connectez votre casque préféré à cette prise ; les enceintes seront automatiquement coupées. Vous pouvez ensuite régler le volume du casque à l'aide de la télécommande. Controle e características 1. Corrente: O botão de on/off está no controle remoto. Prima para ligar. O remoto iluminará quando ligado. Prima novamente para desligar o sistema. 2. Controle central de volume: Este controle está no controle remoto e é indicado pelas palavras master volume. Retate para você o volume ou afastado de você o volume. 3. Controle de volume do Baixo: Este controle trabalha de modo semelhante ao controle central de volume. Gire para aumentar ou diminuir, como preferir. 4. Auscultador: O contole remoto tem uma entrada de jack. Conecte o seu auscultador à entrada do jack e automaticamente o sistema de altifalantes emudecerá. O remoto pode ser usado para aumentar ou diminuir o volume do auscultador. Subwoofer bass volume control Master volume control Headphone input jack Power on / off 4 Troubleshooting tips Speaker system will not power on (Remote does not illuminate) Solution: Power is not turned on Wired remote is not connected to subwoofer Speaker does not produce sound Solution: Verify the system is getting power (see above steps) Volume setting is too low. Turn up the master volume control to 1/4 to 1/2 level Check all cable connections Check to see if your music source is properly functioning (see more on this below) Checking your sound source: Many times users believe the speakers are not working, when in fact they are having trouble from the sound source. The most common problem when connecting to a computer sound card is the connections are incorrect. Make sure you are connected to the audio output jack from your computer sound card. Many times it has a green color to it. Also, make sure your CD/DVD device is playing and the volume settings are turned up and not muted. If you still have problems disconnect the speaker source cable from your computer and connect to a Walkman or personal CD player or anything else with a mini headphone jack. If your speaker works on this other source, you know the speakers are OK and the problem lies within your computer or the connections. If you have questions or need assistance with your speakers, please call or consult our web site. Telephone (UK) 0121 625 2850 (outside UK) 0044 121 625 2850 Web site: www.acousticauthority.com U.S.A. 360-823-4100 Störungssuche Hinweise Das Lautsprechersystem schaltet nicht ein. (Fernbedienung nicht beleuchtet) Lösung: Strom ist nicht eingeschaltet. Das Kabel der Fernbedienung ist nicht am Basslautsprecher angeschlossen. Der Lautsprecher erzeugt keinen Ton Lösung: Überprüfen Sie, ob das System an die Stromversorgung angeschlossen ist (obige Hinweise beachten). Die Lautstärke ist zu niedrig eingestellt. Stellen Sie den Lautstärkeregler auf 1/4 bis 1/2 Lautstärke. Überprüfen Sie alle Kabelanschlüsse. Überprüfen Sie, ob die Signalquelle ordnungsgemäß funktioniert. (beachten Sie die weiteren Hinweise unten.) Überprüfen der Signalquelle: Oftmals nehmen die Benutzer dieses Systems an, dass Probleme vom System herrühren, obwohl diese tatsächlich durch Störungen der Signalquelle verursacht sind. Die häufigsten Probleme beim Anschluss an die Soundkarte eines Computers treten durch Anschlussfehler auf. Stellen Sie sicher, dass das System mit der Audio-Ausgangsbuchse Ihrer ComputerSoundkarte verbunden ist. Diese ist oft mit grüner Farbe markiert. Stellen Sie zudem sicher, dass der CD/DVD-Spieler funktioniert, dass die Lautstärke für das Ausgangssignal hoch genug eingestellt ist, und dass das Gerät nicht stummgeschaltet wurde. Falls eine Störung weiterhin besteht, dann trennen Sie das Lautsprechersystem von Ihrem Computer ab, und testen Sie dieses, indem Sie den Stecker an einem Walkman, CD-Spieler oder einem anderen Gerät mit Mini-Klinkensteckerbuchse anschließen. Wenn das Lautsprechersystem mit dieser anderen Signalquelle funktioniert, dann ist dieses "OK", und das Problem liegt beim Computer oder anderen Anschlüssen. Wenn Sie Fragen haben oder Unterstützung mit den Lautsprechern brauchen, rufen Sie uns bitte an oder besuchen Sie unsere Webseite. Telefon (Vereinigten Königreichs) 0121 625 2850 Webseite: www.acousticauthority.com (außerhalb des Vereinigten Königreichs) 0044 121 625 2850 Détection des pannes Le système d'enceintes ne se met pas sous tension (Télécommande ne s'illumine pas) Solution: Le commutateur marche/arrêt n'est pas sur la position Marche (On) La télécommande à fil n'est pas connectée au subwoofer Pas de son des enceintes Solution: Vérifiez l'alimentation (voir ci-dessus) Volume pas assez fort. Augmentez le volume au niveau ¼ ou ½ sur la commande Vérifiez les connexions des câbles Vérifiez le bon fonctionnement de votre source audio (voir ci-dessous) Vérification de la source audio: On croit souvent que les enceintes ne marchent pas alors que le problème provient de la source audio. Le problème le plus commun, lorsqu'il s'agit de a connexion sur une carte audio d'ordinateur, est une erreur de câblage. Vérifiez que le câble est bien connecté à la prise de sortie audio de la carte. Cette prise est souvent marquée en vert. Assurez-vous également que votre lecteur CD/DVD est en lecture et que la commande du volume est réglée à un niveau moyen et n'est pas en sourdine. Si le problème persiste, déconnectez le câble de votre ordinateur, puis connectez-le à un baladeur cassette ou CD ou tout autre appareil ayant une prise de sortie casque. Si les enceintes fonctionnent avec cet appareil, vous savez que le problème provient de l'ordinateur ou des connexions. Si vous avez des questions ou désirez de l'aide au sujet de vos enceintes, appelez-nous ou consultez notre site Web. Téléphone Site Web : 5 (Royaume Uni) 0121 625 2850 www.acousticauthority.com (Hors du Royaume Uni) 0044 121 625 2850 Consigli per la soluzione di problemi Gli altoparlanti non si accendono (il telecomando non si illumina) La soluzione: Lalimentazione non è inserita Il telecomando cablato non è collegato al subwoofer Non viene emesso alcun suono dagli altoparlanti La soluzione: Verificare che il sistema sia alimentato da corrente (vedi la procedura di cui sopra) Impostazione del volume troppo bassa. Regolare il comando del volume principale su un livello da 1/4 a 1/2 Controllare tutte le connessioni dei cavi Controllare che la sorgente musicale stia funzionando correttamente (vedere la sezione seguente per maggiori dettagli) Controllo della sorgente audio: Molte volte gli utenti credono che i loro altoparlanti non funzionino, quando infatti il problema riguarda la sorgente audio. Il problema più comune che sincontra quando si collega il sistema a una scheda audio di un computer è rappresentato dalla errata connessione dei cavi. Accertarsi che il jack di uscita audio sia collegato alla scheda audio del computer. Spesso questa connessione è indicata dal colore verde. Accertarsi inoltre che il dispositivo CD/DVD sia operativo e che il volume sia attivato e non in sordina. Se i problemi persistono, scollegare il cavo della sorgente audio dal computer e collegarlo a un Walkman o a un lettore CD portatile o a qualsiasi altra apparecchiatura con presa mini-jack per cuffia. Se laltoparlante funziona con queste sorgenti, significa che è operativo e che il problema riguarda il computer o le connessioni. Se avete domande o avete bisogno di assistenza per i vostri diffusori, chiamate la nostra assistenza o consultate il nostro sito web. Telefono Sito web: (Regno Unito) 0121 625 2850 www.acousticauthority.com (al di fuori del Regno Unito) 0044 121 625 2850 Sugerencias para resolver problemas El sistema de altavoces no se enciende (el remoto no se ilumina) La solución: No se ha encendido la corriente El remoto cableado no está conectado al subwoofer Los altavoces no suenan La solución: Verifique que el sistema está recibiendo corriente (siga los pasos dados abajo) La posición del volumen es muy baja. Suba el control maestro del volumen a un nivel de 1/4 o 1/2 Revise todas las conexiones de los cables Verifique que su fuente de música está funcionando correctamente (más información abajo) Para revisar su fuente de sonido: Muchas veces los usuarios piensan que los altavoces no funcionan, cuando de hecho están teniendo problemas con la fuente de sonido. El problema más común al conectarse a una tarjeta de sonido de ordenador es que las conexiones se han hecho mal. Asegúrese de que están conectadas al enchufe de salida de audio de la tarjeta de sonido del ordenador. Con frecuencia es de color verde. Además, asegúrese de que su equipo de CD/DVD está tocando y que el volumen se ha subido y no está silenciado. Si sigue teniendo problemas, desconecte el cable de la fuente del altavoz de su ordenador y conéctelo a un Walkman o CD personal o cualquier otro equipo que cuente con unamini conexión para auriculares. Si su altavoz funciona en la otra fuente, sabrá que lo altavoces no tienen problemas, y que el problema es con su ordenador o las conexiones. Si tiene preguntas o necesita asistencia con sus parlantes, por favor llame o consulte nuestro sitio web. Teléfono (Reino Unido) 0121 625 2850 Sitio web: www.acousticauthority.com (Fuera del Reino Unido) 0044 121 625 2850 Resolução de Problemas Sistema de altifalantes não liga (Remoto não ilumina) A solução: Corrente não está ligada O controle remoto não está conectado ao subwoofer Altifalante não produz som A solução: Verifique se o sistema está com corrente (veja passos acima) Volume é muito baixo. Vire para cima o controle geral de volume a nível 1/4 a 1/2 Confira todas as conexões dos cabos Confira para ver se sua fonte de música está funcionando correctamente (veja mais abaixo) Verificando sua fonte sonora: Algumas vezes as pessoas julgam que os altifalantes não estão trabalhando, quando na realidade eles eestão tendo dificuldade com a fonte sonora. O problema mais comum quando conectando a uma placa de som de computador é as conexões poderem estar erradas. Certifique-se que está conectado à saída audio da sua placa de som do computador. Muitas vezes tem uma cor verde. Também, tenha a certeza de que o seu dispositivo de CD/DVD está tocando e o volume está ligado e não emudecido. Se ainda tem problemas desconecte o cabo do altifalante do seu computador e ligue-o a um Walkman ou a um leitor de CD pessoal ou qualquer outra coisa com um entrada de míni jack. Se os altifalantes trabalham com outra fonte, você sabe que os altifalantes estão OK e o problema reside no seu computador ou nas conexões. Em caso de dúvida ou se necessitar de assistência em relação às suas colunas, por favor contacte-nos por telefone ou consulte o nosso site na Internet. Telefone Web site: (Reino Unido) 0121 625 2850 www.acousticauthority.com (Fora do Reino Unido) 0044 121 625 2850 6 Power Driven Performance Owners guide A-3780 To source Connecting to source Connecting to source To video RCA stereo plug cable not included WARNING: The lightning flash with arrowhead symbol, within an equilateral triangle, is intended to alert the user to presence of uninsulated dangerous voltage within the products enclosure that may be of sufficient magnitude to constitute a risk of electric shock to persons. To reduce the risk of fire or electric shock, do not expose this appliance to rain or moisture. CAUTION: Use of controls or adjustments or performance of procedures other than those specified may result in hazardous radiation exposure. The exclamation point within an equilateral triangle is intended to alert the user to the presence of important operating and maintenance (servicing) instructions in the literature accompanying the appliance. CAUTION - TO REDUCE THE RISK OF ELECTRIC SHOCK, DO NOT REMOVE COVER (OR BACK). NO USER-SERVICING TO QUALIFIED SERVICE PERSONNEL. CAUTION: TO PREVENT ELECTRIC SHOCK, MATCH WIDE BLADE OF PLUG TO WIDE SLOT, FULLY INSERT. ATTENTION: POUR ÉVITER LES CHOC ÉLECTRIQUES, INTRODUIRE LA LAME LA PLUS LARGE DE LA FICHE DANS LA BORNE CORRESPONDANTE DE LA PRISES ET POUSSER JUSQUAU FOND. IMPORTANT SAFETY INSTRUCTIONS 1. Read Instructions - All the safety and operating instruction should be read before the product is operated. 2. Retain Instructions - The safety and operating instruction should be retained for future reference. 3. Heed Warnings - All warning on the product and in the operating instructions should be adhered to. 4. Follow instructions - All operating and use instructions should be followed. 5. Cleaning - Unplug this product from the wall outlet before cleaning. Do not use liquid cleaners or aerosol cleaners. Use a damp cloth for cleaning. 6. Attachments - Do not use attachments not recommended by the product manufacturer as they may cause hazards. 7. Water and Moisture - Do not use this product near water - for example, near a bath tub, wash bowl, kitchen sink, or laundry tub; in a wet basement, or near a swimming pool, and the like. 8. Accessories - Do not place this product on an unstable cart, stand tripod, bracket, or table. The product may fall, causing serious injury to a child or adult, and serious damage to the product. Use only with a cart, stand, tripod, bracket, or table recommended by the manufacturer, or sold with the product. Any mounting of the product should follow the manufacturer? instructions, and should use a mounting accessory recommended by the manufacturer. 9. A product and cart combination should be moved with care. Quick stops, excessive force, and uneven surfaces may cause the appliance and cart combination to overturn. 10. Ventilation - Slots and openings in the cabinet are provided for ventilation and to ensure reliable operation of the product and to protect it from overheating, and these openings must not be blocked or covered. The openings should never be blocked by placing the product on a bed, sofa, rug, or other similar surface. This product should not be placed in a built-in installation such as a bookcase or rack unless proper ventilation is provided or the manufacturer? instruction have been adhered to. 12. Grounding or Polarization - This product may be equipped with a polarized alternating-current line plug (a plug having one blade wider than the other). This plug will fit into the power outlet only one way. This is a safety feature. If you are unable to insert the plug fully into the outlet, try reversing the plug. If the plug should still fail to fit, contact your electrician to replace your obsolete outlet. Do not defeat the safety purpose of the polarizes plug. Alternate Warnings - This product is equipped with a three-wire grounding-type plug, a plug having a third (grounding) pin. This plug will only fit into a grounding-type power outlet. This is a safety feature. If you are unable to insert the plug into the outlet, contact your electrician to replace your obsolete outlet. Do not defeat the safety purpose of the grounding-type plug. 13. Power-Cord Protection - Power supply cords should be routed so that they are not likely to be walked on or pinched by items placed upon or against them, paying particular attention to cords at plugs, convenience receptacles, and point where they exit from the product. 14. Protective Attachment Plug - The product is equipped with an attachment plug having overload protection. This is a safety feature. See Instruction Manual for replacement or resetting of protective device. If replacement of the plug is required, be sure the service technician has used a replacement plug specified by the manufacturer that has the same overload protection as the original plug. 15. Outdoor Antenna Grounding - If an outside antenna is connected to the receiver, be sure the antenna system is grounded so as to provide some protection against voltage surges and built-up static charges. Article 810 of the National Electrical Code, ANSI/NFPA 70, provides information with regard to proper grounding of the mast and supporting structure, grounding of the mast and supporting structure, grounding of the lead-in wire to an antenna-discharge unit, size of grounding conductors, location of antenna-discharge unit, connection to grounding electrodes, and requirements for the grounding electrode. See figure: ANTENNA LEAD IN WIRE GROUND CLAMP ELECTRIC SERVICE EQUIPMENT GROUND CONDUCTORS (NEC SECTION 810-21) GROUND CLAMPS NEC - NATIONAL ELECTRICAL CODE 11. Power Sources - This product should be operated only from the type of power source indicated on the marking label. If you are not sure of the type of power supply to your home, consult your product dealer or local power company. For products intended to operate from battery power, or other sources, refer to the operating instruction. ANTENNA DISCHARGE UNIT (NEC SECTION 810-20) POWER SERVICE GROUNDING ELECTRODE SYSTEM (NEC ART 250, PART H) 16. Lightning - For added protection for this product during a lightning storm, or when it is left unattended and unused for long periods of time, unplug it from the wall outlet and disconnect the antenna or cable system. This will prevent damage to the product due to lightning and power-line surges. 17. Power Lines - An outside antenna system should not be located in the vicinity of overhead power lines or other electric light or power circuits, or where it can fall into such power lines or circuits. When installing an outside antenna system, extreme care should be taken to keep from touching such power lines or circuits as contact with them might be fatal. 18. Overloading - Do not overload wall outlets, extension cords, or integral convenience receptacles as this can result in a risk of fire or electric shock. 19. Object and Liquid Entry - Never push objects of any kind into this product through openings as they may touch dangerous voltage points or short-out parts that could result in a fire or electric shock. Never spill liquid of any kind on the product. 20. Servicing - Do not attempt to service this product yourself as opening or removing covers may expose you to dangerous voltage or other hazards. Refer all servicing to qualified service personnel. 21. Damage Requiring Service - Unplug this product from the wall outlet and refer servicing to qualified service personnel under the following conditions: a) When the power-supply cord or plug is damaged, b) If liquid has been spilled, or objects have fallen into the product, c) If the product has been exposed to rain or water, d) If the product does not operate normally by following the operating instructions. Adjust only those controls that are covered by the operating instructions as an improper adjustment of other controls may result in damage and will often require extensive work by a qualified technician to restore the product to its normal operation. e) If the product has been dropped or damaged in any way, and f) When the product exhibits a distinct change in performance - this indicates a need for service. 22. Replacement Parts - When replacement parts are required, be sure the service technician has used replacement parts specified by the manufacturer or have the same characteristics as the original part. Unauthorized substitutions may result in fire, electric shock, or other hazards. 23. Safety Check - Upon completion of any service or repairs to this product, ask the service technician to perform safety checks to determine that the product is in proper operating condition. 24. Wall or Ceiling Mounting - The product should be mounted to a wall or ceiling only as recommended by the manufacturer. 25. Heat - The product should be situated away from heat sources such as radiators, heat registers, stoves, or other products (including amplifiers) that produce heat.