1
AR-M160/M205
Online Manual
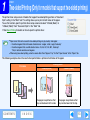
Start
Click this "Start" button.
Introduction
This manual describes the printer and scanner functions of the AR-M160/M205 digital multifunctional system.
●
Note
For information on the following topics, please refer to the Operation Manual for the digital multifunctional system.
• Basic machine procedures (adding paper and toner, removing misfeeds, using peripheral devices)
• Copier functions
• Scanning from the operation panel of the machine
• Resolving printer and scanner problems
• Specifications
● Where "AR-XXXX" appears in this manual, please substitute the name of your model for "XXXX". For the name of your model,
see "DIFFERENCES BETWEEN MODELS" in the Operation Manual.
● This manual refers to the Reversing single pass feeder as the "RSPF" and the Single pass feeder as the "SPF".
● The screen images and procedures that appear in this manual are mainly for Windows XP. With other versions of Windows, some
screen images may be different from those in this manual.
● For information on using your operating system, refer to your operating system's manual or online Help.
Trademark Acknowledgments
Microsoft® Windows® operating system is a trademark or copyright of Microsoft Corporation in the U.S.A. and other countries.
● Windows® 95, Windows® 98, Windows® Me, Windows NT® 4.0, Windows® 2000, and Windows® XP are trademarks or copyrights
of Microsoft Corporation in the U.S.A. and other countries.
● Acrobat® Reader Copyright© 1987- 2002 Adobe Systems Incorporated. All rights reserved. Adobe, the Adobe logo, Acrobat, and
the Acrobat logo are trademarks of Adobe Systems Incorporated.
● All other trademarks and copyrights are the property of their respective owners.
●
CONTENTS
I N D E X
2
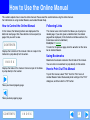
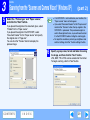
How to Use the Online Manual
This section explains how to view the online manual. Please read this section before using the online manual.
For information on using Acrobat Reader, see Acrobat Reader Help.
How to Control the Online Manual
Following Links
In this manual, the following buttons are displayed at the
bottom of each page. Click these buttons to move quickly to
pages that you wish to view.
This manual uses a link function that allows you to jump to a
related page. If you click green, underlined text, the related
page will be displayed. (In the Contents and Index sections, the
linked areas are not underlined.)
Example: ☞Contents
To return to the previous page, click the button on the menu
bar of Acrobat Reader.
CONTENTS
Displays the Contents of this manual. Click on a topic in the
Contents to jump directly to that section.
Using Bookmarks
Bookmarks have been created on the left side of this manual.
You can click on a bookmark to jump directly to that section.
I N D E X
Displays the Index of this manual. Click on a topic in the Index
to jump directly to that section.
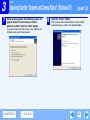
How to Print Out This Manual
To print this manual, select "Print" from the "File" menu of
Acrobat Reader. Select the desired printer settings in the "Print"
dialog box, and then click the "OK" button.
Takes you forward page by page.
Takes you back page by page.
CONTENTS
I N D E X
3
Contents
Introduction
How to Use the Online Manual
2
3
1 PRINT
Basic Printing
Opening the Printer Driver From the "Start" Button
Printer Driver Settings
Printing Multiple Pages on One Page
Fitting the Printed Image to the Paper
Rotating the Print Image 180 Degrees
Printing a Watermark
Two-sided Printing (Only for models that support two-sided printing)
Outline of the Print Status Window
5
7
8
9
10
11
12
13
14
3 SCAN
Scanning Overview
Scanning from a TWAIN-Compliant Application
Scanning from a WIA-Compliant Application (Windows XP)
Scanning from the "Scanner and Camera Wizard" (Windows XP)
Outline of Button Manager
Button Manager Settings
4 INDEX
2 PRINTER SHARING
Sharing the Printer Using Windows Networking
Shared Printer Settings
Client Settings
CONTENTS
I N D E X
15
16
17
4
20
21
26
28
31
32
1
PRINT
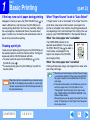
Basic Printing
(part 1)
The following example explains how to print a document on letter size paper from WordPad.
Before printing, make sure that the correct size of paper for your document has been loaded in the machine.
1
Make sure that the ON LINE indicator on the
operation panel is lit.
4
If the ON LINE indicator is not lit, press the [ON LINE]
key.
When the indicator is:
ON LINE
● Lit, the machine is online and
ready to print, or is printing.
● Blinking, the machine is
processing print data in memory
or printing has been paused.
● Off, the machine is off-line
and cannot print.
2
Start WordPad and open the document that you
wish to print.
3
Select "Print" from the application's "File"
menu.
The "Print" dialog box will appear.
Make sure that "SHARP AR-XXXX" is selected as
the printer. If you need to change any print
settings, click the "Preferences" button
("Properties" button in Windows 95/98/Me/NT 4.0)
to open the printer driver setup screen.
The printer driver setup screen will appear.
Windows 2000 does not have the "Preferences" button
in this dialog box. Select settings as needed on each of
the tabs in the setup screen.
☞Printer Driver Settings, Printing Multiple Pages on One Page,
Fitting the Printed Image to the Paper,
Rotating the Print Image 180 Degrees, Printing a Watermark,
Two-sided Printing (Only for models that support two-sided printing)
5
Click the "Print" button ("OK" button in
Windows 95/98/Me/NT 4.0).
Printing begins. When printing begins, the Print Status
Window automatically opens.
(☞Outline of the Print Status Window)
The print job is delivered to the output tray, with the position of
the paper offset slightly from the previous job (offset function).
CONTENTS
I N D E X
5
1
PRINT
Basic Printing
(part 2)
If the tray runs out of paper during printing
When "Paper Source" is set to "Auto Select"
Add paper to the tray or press the [TRAY SELECT] key ( ) to
select a different tray, and then press the [ON LINE] key to
resume printing. Note that if the "Auto tray switching" setting in
the user programs is enabled and there is the same size of
paper in another tray, the machine will automatically switch to
the other tray and continue printing.
If "Paper Source" is set to "Auto Select" in the "Paper" tab of the
printer driver setup screen and the correct size of paper for a
print job is not loaded in the machine, the printing procedure will
vary depending on the "Use Close Paper Size" setting in the user
programs (see "USER PROGRAMS" in the Operation Manual).
Pausing a print job
To pause a print job during printing, press the [ON LINE] key on
the operation panel to switch the machine off-line. Printing will
be paused and the ON LINE indicator will blink.
● To cancel a print job, press the [CLEAR] key (
) or the
[CLEAR ALL] key ( ).
● To resume printing, press the [ON LINE] key to switch the
machine online.
When "Use close paper size" is disabled
The PAPER SIZE indicator on the
operation panel will blink. You can press
the [TRAY SELECT] key ( ) to select a
tray manually, or load paper in the
bypass tray and press the [ON LINE]
key to begin printing.
ORIGINAL PAPER
SIZE
SIZE
11X17
8½X14
8½X11
8½X5½
8½X11
EXTRA
When "Use close paper size" is enabled
Printing will take place using a size of paper that is close to the
size of the print image.
●
Note
Caution
When the machine is connected to your computer using
the USB 2.0 (Hi-Speed) ports on each, be sure to read
"System requirements for USB 2.0 (Hi-Speed mode)" in
the Operation Manual.
CONTENTS
I N D E X
When the dual function board is installed, the print image
is automatically rotated to fit the paper in the event that
the paper is loaded in an orientation different from the
print image.
● If the dual function board is not installed, be sure to set
each tray's paper size in "Set Tray Status" in the
"Configuration" tab of the printer driver setup screen.
(See "CONFIGURING THE PRINTER DRIVER" in the
Software Setup Guide.)
When printing, be sure to specify a tray other than "Auto
Select" in "Paper Source" in the "Paper" tab of the printer
driver setup screen.
6
1
PRINT
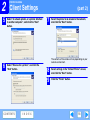
Opening the Printer Driver From the "Start" Button
You can open the printer driver and change the printer driver settings from the Windows "start" button. Settings adjusted in this way
will be the initial settings when you print from an application. (If you change the settings from the printer driver setup screen at the
time of printing, the settings will revert to the initial settings when you quit the application.)
Windows 2000/XP
1
Windows 95/98/Me/NT 4.0
Click the "start" button, and then click "Control
Panel".
1
Click the "Start" button, select "Settings" and
then click "Printers".
2
Click the "SHARP AR-XXXX" printer driver icon
and select "Properties" from the "File" menu.
In Windows 2000, click the "Start" button and select "Settings".
2
Click "Printers and Other Hardware", and then
click "Printers and Faxes".
In Windows 2000, click "Printers".
3
Click the "SHARP AR-XXXX" printer driver icon
and select "Properties" from the "File" menu.
Note
3
4
Click the "Printing Preferences" button in the
"General" tab.
The printer driver setup screen will appear.
☞Printer Driver Settings
CONTENTS
I N D E X
In Windows NT 4.0, select "Document Defaults" to open
the printer driver setup screen.
In Windows 95/98/Me, click the "Setup" tab.
The printer driver setup screen will appear.
☞Printer Driver Settings
7
1
PRINT
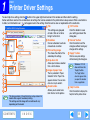
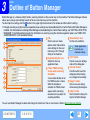
Printer Driver Settings
To view Help for a setting, click the
button in the upper right-hand corner of the window and then click the setting.
Some restrictions exist on the combinations of settings that can be selected in the printer driver setup screen. When a restriction is
in effect, an information icon (
) will appear next to the setting. Click the icon to view an explanation of the restriction.
1 Tab
7 "OK" button
The settings are grouped
Click this button to save
1
on tabs. Click on a tab to
your settings and exit the
bring it to the front.
dialog box.
2
2 Checkbox
8 "Cancel" button
Click on a checkbox to activate
Click this button to exit the
3
or deactivate a function.
dialog box without making any
changes to the settings.
3 Print setting image
9 "Apply" button
This shows the effect of the
selected print settings.
Click to save your settings
4
without closing the dialog box.
4 Drop-down list
Allows you to make a selection
Windows NT 4.0
5
Note
from a list of choices.
does not have the
5 Image of paper trays
"Apply" button.
The tray selected in "Paper
The "Apply" button
6
does not appear when
Selection" in the "Paper" tab
7
you open this window
appears in blue. You can also
from an application.
8
click on a tray to select it.
6 Check button
9
10 "Help" button
Allows
you
to
select
one
10
Click this button to display the
item from a list of options.
help file for the printer driver.
Note
The above screen is the printer driver setup screen for
models that support two-sided printing.
The settings and the image of the machine will vary
depending on the model.
CONTENTS
I N D E X
8
1
PRINT
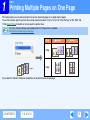
Printing Multiple Pages on One Page
This feature allows you to reduce and print two or four document pages on a single sheet of paper.
To use this function, open the printer driver setup screen and select "2-Up" or "4-Up" for "N-Up Printing" on the "Main" tab.
☞See Basic Printing for details on how to open the printer driver.
Note
The "N-Up Printing" setting is not available when "Fit To Paper Size" is selected.
☞Fitting the Printed Image to the Paper
N-Up
Border
Border
"2-Up"
"4-Up"
If you select the "Border" checkbox, borderlines will be printed around each page.
CONTENTS
I N D E X
9
PRINT
1
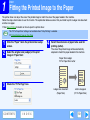
Fitting the Printed Image to the Paper
The printer driver can adjust the size of the printed image to match the size of the paper loaded in the machine.
Follow the steps shown below to use this function. The explanation below assumes that you intend to print a Ledger size document
on letter size paper.
☞See Basic Printing for details on how to open the printer driver.
Note
1
2
3
The "Fit To Paper Size" setting is not available when "N-Up Printing" is selected.
☞Printing Multiple Pages on One Page
Click the "Paper" tab in the printer driver setup
screen.
Select the original size (Ledger) of the print
image in "Paper Size".
4
Select the actual size of paper to be used for
printing (Letter).
The size of the printed image will be automatically
adjusted to match the paper loaded in the machine.
Paper Size: Ledger
Fit To Paper Size: Letter
Check the "Fit To Page" box.
Ledger size document
(Paper Size)
CONTENTS
I N D E X
Letter size paper
(Fit To Paper Size)
10
1
PRINT
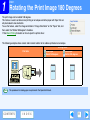
Rotating the Print Image 180 Degrees
The print image can be rotated 180 degrees.
This feature is used to enable correct printing on envelopes and other paper with flaps that can
only be loaded in one orientation.
To use the feature, select the image orientation in "Image Orientation" on the "Paper" tab, and
then select the "Rotate 180 degrees" checkbox.
☞See Basic Printing for details on how to open the printer driver.
The following example shows correct and incorrect rotation of an address printed on an envelope.
Printing result
Print data
Landscape
Rotate 180 degrees
Landscape
Rotate 180 degrees
ABCD
Note
ABCD
ABCD
The procedure for loading paper is explained in the Operation Manual.
CONTENTS
I N D E X
11
1
PRINT
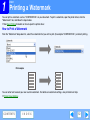
Printing a Watermark
You can print a watermark such as "CONFIDENTIAL" on your document. To print a watermark, open the printer driver, click the
"Watermarks" tab, and follow the steps below.
☞See Basic Printing for details on how to open the printer driver.
How to Print a Watermark
From the "Watermark" drop-down list, select the watermark that you wish to print (for example "CONFIDENTIAL"), and start printing.
Print sample
You can enter text to create your own custom watermark. For details on watermark settings, view printer driver Help.
☞Printer Driver Settings
CONTENTS
I N D E X
12
1
PRINT
Two-sided Printing (Only for models that support two-sided printing)
The printer driver setup screen of models that support two-sided printing contains a "Document
Style" setting in the "Main" tab. This setting allows you to print on both sides of the paper.
To use this function, open the printer driver setup screen and select "2-Sided (Book)" or
"2-Sided (Tablet)" from "Document Style" in the "Main" tab.
☞See Basic Printing for details on how to open the printer driver.
●
Note
Paper sizes that can be used for two-sided printing vary by country and region:
• Countries/regions that inch-based standard sizes: Ledger, Letter, Legal, Foolscap*
• Countries/regions that use AB standard sizes: A3, A4, A5*, B4, B5*, Foolscap*
*Only in certain countries and regions.
● When using two-sided printing, select a source other than "Bypass Tray" for the "Paper Source" in the "Paper" tab.
The following example shows the result when portrait data is printed on both sides of the paper.
Print data
Printing result
2-Sided (Book)
The pages are printed so that
they can be bound at the side.
CONTENTS
I N D E X
2-Sided (Tablet)
The pages are printed so that
they can be bound at the top.
13
1
PRINT
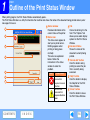
Outline of the Print Status Window
When printing begins, the Print Status Window automatically opens.
The Print Status Window is a utility that monitors the machine and shows the name of the document being printed and any error
messages that occur.
1 Status window
3 Tab
1
Click a tab to bring it to the
Provides information on the
front. The "Options" tab
current status of the printer.
2
allows you to select display
2 Status icon
options for the Print Status
The status icons appear to
Window.
alert you to printer errors.
3
4 Document Name
Nothing appears when
Shows the name of the
printing is taking place
document currently being
normally.
printed.
The icons are explained
4
below. Follow the
5 "Cancel Job" button
instructions in the status
Click this button during
window to solve the
printing to cancel the job
problem.
that is currently being
5
executed.
Icon
Print Status
6 "Help" button
An error has
6
Click this button to display
occurred that
7
requires immediate
the help file for the Print
attention.
Status Window.
An error has
7 "Close" button
occurred that
Click this button to close
requires attention
the Print Status Window.
soon.
CONTENTS
I N D E X
14
2
PRINTER SHARING
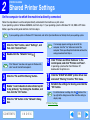
Sharing the Printer Using Windows Networking
The machine can be used as a shared printer in a Windows 95/98/Me/NT 4.0/2000/XP network environment.
Note that the Windows network environment must already be established.
Shared printer
Print server
Client
Client
Client
"Print server" as explained here is a computer that is directly connected to the machine, and a "Client" is any other computer that is
connected to the same network.
☞Shared Printer Settings
(On the print server)
CONTENTS
I N D E X
☞Client Settings
15
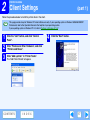
PRINTER SHARING
2
Shared Printer Settings
On the computer to which the machine is directly connected
Follow the steps below to use the computer directly connected to the machine as a print server.
If your operating system is Windows 95/98/Me, start from step 1. If your operating system is Windows NT 4.0, 2000 or XP Home
Edition, open the control panel and then start from step 6.
Note
If your operating system is Windows XP Professional, refer to the Operation Manual or the help file of your operating system.
1
Click the "Start" button, select "Settings", and
then click "Control Panel".
2
Double-click the "Network" icon (
Note
).
If the "Network" icon does not appear in Windows Me,
click "view all Control Panel options".
3
Click the "File and Print Sharing" button.
4
Enable "I want to be able to allow others to print
to my printer(s)." by clicking the checkbox, and
then click the "OK" button.
5
Click the "OK" button in the "Network" dialog
box.
CONTENTS
I N D E X
Note
6
If a message appears asking you to restart the
computer, click the "Yes" button and restart the
computer. Then, open the printer folder and continue the
setup procedures from Step 6.
Click "Printers and Other Hardware" in the
control panel, and click "Printers and Faxes".
In operating systems other than Windows XP,
double-click the printer icon.
7
8
Click the "SHARP AR-XXXX" printer driver icon
and select "Sharing" from the "File" menu.
Establish the settings for sharing, and click the
"OK" button.
Note
For information on a setting, click the
button at the
top-right of the dialog box and then click the setting to
display Help.
☞Client Settings
16
PRINTER SHARING
2
Client Settings
(part 1)
Follow the procedure below to install the printer driver in the client.
Note
This page provides steps for Windows XP Home Edition users only. If your operating system is Windows 95/98/Me/2000/XP
Professional, refer to the Operation Manual or the help file of your operating system.
If your operating system is Windows NT 4.0, refer to "Settings in Windows NT 4.0".
1
Click the "start" button, and click "Control
Panel".
2
Click "Printers and Other Hardware", and click
"Printers and Faxes".
3
Click "Add a printer" in "Printer Tasks".
4
Click the "Next" button.
The "Add Printer Wizard" will appear.
CONTENTS
I N D E X
17
2
5
PRINTER SHARING
Client Settings
Select "A network printer, or a printer attached
to another computer", and click the "Next"
button.
(part 2)
7
Select the printer to be shared in the network,
and click the "Next" button.
The contents of this window will vary depending on your
network environment.
6
Select "Browse for a printer", and click the
"Next" button.
CONTENTS
I N D E X
8
Select settings in the "Default Printer" screen,
and click the "Next" button.
9
Click the "Finish" button.
18
2
PRINTER SHARING
Client Settings
(part 3)
Settings in Windows NT 4.0
If your operating system is Windows NT 4.0, establish settings as follows in the printer properties after installing the printer driver.
For the procedure for installing the printer driver, see "INSTALLING THE SOFTWARE" in the Software Setup Guide.
1
Click the "Start" button, select "Settings", and
then click "Printers".
2
Click the "SHARP AR-XXXX" printer driver icon
and select "Properties" from the "File" menu.
4
Select "Local Port" in the "Available Printer
Ports" list, and click the "New Port" button.
The "Port Name" dialog box will appear.
5
Enter "\\(name of server connected to
machine)\(name of shared printer)", and click
the "OK" button.
The printer properties will appear.
3
Click the "Ports" tab, and click the "Add Port"
button.
The "Printer Ports" dialog box will appear.
name of shared printer
name of server connected to machine
6
CONTENTS
I N D E X
Click the "OK" button in the printer properties
window.
19
SCAN
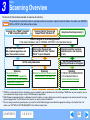
3
Scanning Overview
The flow chart shown below provides an overview of scanning.
Caution
The environment in which the machine's scanning function can be used is subject to certain limitations. For details, see "BEFORE
INSTALLATION" in the Software Setup Guide.
Scanning from a TWAIN*1-compliant
or WIA*2-compliant application
Scanning from the "Scanner and
Camera Wizard" (Windows XP)
Using the machine to begin scanning*3
Place the original in the scanning position
☞For more information, refer to "NORMAL COPYING" in the Operation Manual.
Start up a Twain-compliant or
WIA-compliant application, and
select the machine's scanner
Start up the "Scanner and
Camera Wizard" from "Control
Panel" in your computer.
Set the scan preferences
(only if the preferences are set to appear)
Set the scan preferences
Scanning
Scanning
☞Scanning from a
☞Scanning from the "Scanner and
TWAIN-Compliant Application,
Scanning from a WIA-Compliant
Application (Windows XP)
Change the machine to scanner
mode and press a scan menu key
(1 to 6).
Camera Wizard" (Windows XP)
Scanning
☞"USING THE SCANNER MODE"
in the Operation Manual,
Outline of Button Manager
*1 TWAIN is an international interface standard for scanners and other image acquisition devices. By installing a TWAIN driver on your computer, you can
scan and work with images using a variety of TWAIN-compliant applications.
*2 WIA (Windows Imaging Acquisition) is a Windows function that allows a scanner, digital camera or other imaging device to communicate with an image
processing application. The WIA driver for this machine can only be used in Windows XP.
*3 To scan using the machine's operation panel, you must first install Button Manager and establish the appropriate settings in the Control Panel. For
details, see "SETTING UP BUTTON MANAGER" in the Software Setup Guide.
CONTENTS
I N D E X
20
SCAN
3
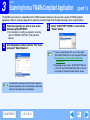
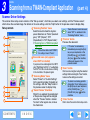
Scanning from a TWAIN-Compliant Application
(part 1)
The SHARP scanner driver is compatible with the TWAIN standard, allowing it to be used with a variety of TWAIN-compliant
applications. Below is a step-by-step guide for acquiring a scanned image to the Sharpdesk desktop screen using Sharpdesk.
1
Place the original(s) you wish to scan on the
document glass/SPF/RSPF.
☞For information on setting an original for scanning,
3
Select "SHARP MFP TWAIN A", and click the
"Select" button.
refer to "NORMAL COPYING" in the Operation
Manual.
2
Start Sharpdesk and then click the "File" menu
and select "Select Scanner".
●
Note
Note
If you are using Windows XP, you can also select
"WIA-SHARP AR-XXXX" to scan using the WIA driver.
☞Scanning from a WIA-Compliant Application
(Windows XP)
● Depending on your system, "SHARP MFP TWAIN A
1.0 (32-32)" and "WIA-SHARP AR-XXXX 1.0 (32-32)"
may appear in the above "Select Source" screen.
The method for accessing "Select Scanner" depends
upon the application. For more information, refer to the
manual or the help file of your application.
CONTENTS
I N D E X
21
SCAN
3
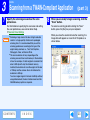
4
Scanning from a TWAIN-Compliant Application
Select "Acquire Image" from the "File" menu, or
click the "Acquire" button ( ).
The scanner driver setup screen will appear.
☞Scanner Driver Settings
5
In the "Scanning Position" menu, select the
location where you placed the original in Step 1.
If you placed a one-sided original in the SPF/RSPF,
select "SPF (Simplex)".
● If you placed a two-sided original in the RSPF, select
"SPF (Duplex-Book)" or "SPF (Duplex-Tablet)"
according to the binding position of the original.
●
Note
If you selected "SPF (Duplex-Book)" or "SPF
(Duplex-Tablet)" in the "Scanning Position" menu,
selected whether the orientation of the placed original is
"Right Edge Fed First" or "Leading Edge Fed First".
CONTENTS
I N D E X
6
(part 2)
Click the "Preview" button.
The preview image will appear.
●
Note
If the angle of the image is not correct, reset the
original, and click the "Preview" button again.
● If the preview image is not oriented correctly, click the
"Rotate" button in the preview screen. This rotates the
preview image 90 degrees clockwise, allowing you to
correct the orientation without resetting the original.
☞Preview screen
● If you set multiple pages in the SPF/RSPF, the
machine previews only the top page of the originals,
and then sends it to the original exit area. Return the
previewed original to the SPF/RSPF before starting the
scanning job.
22
3
7
SCAN
Scanning from a TWAIN-Compliant Application
Specify the scanning area and set the scan
preferences.
For information on specifying the scan area and setting
the scan preferences, see scanner driver Help.
☞Scanner Driver Settings
●
Scanning a large area in full color at high resolution
Caution
results in a large quantity of data and a prolonged
scanning time. It is recommended that you set the
scanning preferences according to the type of the
original being scanned, i.e., Text, Text/Graphics,
Photograph, Color, or Black & White.
● The scan resolution will vary depending on the
scanning area and how much memory in the machine
is free. For example, if a letter original is scanned in full
color at 300 dpi with only the standard memory
installed, the machine will scan the original in full color
at 150 dpi and the scanner driver will enhance the
resolution to 300 dpi.
To scan a ledger original in full color at 600 dpi without
using enhancement, the dual function board and the
256 MB memory option are required.
CONTENTS
I N D E X
8
(part 3)
When you are ready to begin scanning, click the
"Scan" button.
To cancel a scanning job after clicking the "Scan"
button, press the [Esc] key on your keyboard.
When you close the scanner driver after scanning, the
image data will appear as a new file in Sharpdesk, as
shown below.
23
3
SCAN
Scanning from a TWAIN-Compliant Application
(part 4)
Scanner Driver Settings
The scanner driver setup screen consists of the "Set-up screen", which lets you select scan settings, and the "Preview screen",
which shows the scanned image. For details on the scan settings, click the "Help" button in the preview screen to display Help.
1 "Scanning Position" menu
Set-up screen
"Zoom Preview" cannot be used
Note
Select the location where the original is
when "SPF" is selected in the
placed. Selections are "Platen" (document
"Scanning Position" menu.
glass),
"SPF
(Simplex)",
"SPF
1
5 "Preview" button
(Duplex-Book)" or "SPF (Duplex-Tablet)".
Previews the document.
☞Scanning from a TWAIN-Compliant
2
Application
If "Preview" is canceled by
3
Note
On machines without an SPF/RSPF,
this setting is fixed at "Platen".
Note
2 Scan side menu (only appears
when RSPF is installed)
If you placed a two-sided original in the RSPF,
select "Right Edge Fed First" or "Leading Edge
Fed First" from the scan side menu according
to the orientation of the placed original.
3 "Scanning Mode" menu
Select "Preset" or "Custom Settings"
for the scanning mode. For details on
the settings, click the "Help" button in
the preview screen to display Help.
4 "Zoom Preview" Checkbox
When this is selected, the selected part
of the preview image will be enlarged
when the "Preview" button is clicked.
To return to the regular view, remove
the checkmark.
4
5
6
7
CONTENTS
I N D E X
immediately pressing the [Esc]
key on your keyboard, or the
[CLEAR] key ( ) or [CLEAR
ALL] key ( ) on the machine,
nothing will appear in the
preview screen.
6 "Scan" button
Click to scan an original using the selected
settings. Before clicking the "Scan" button,
make sure the settings are correct.
Note
To cancel a scanning job after
clicking the "Scan" button, press
the [Esc] key on your keyboard,
or the [CLEAR] key ( ) or
[CLEAR ALL] key ( ) on the
machine.
7 "Close" button
Click to close the scanner driver setup screen.
24
SCAN
3
Scanning from a TWAIN-Compliant Application
(part 5)
Preview screen
2 "Rotate" button
Click to rotate the preview image 90 degrees clockwise. This
allows the orientation to be corrected without resetting the
original. Upon scanning, the image file is created in the
orientation shown in the preview window.
3 "Image Size" button
Click to open a dialog box that allows you to specify the
scanning area by entering numbers. Pixels, mm, or inches
can be selected for the units of the numbers. By initially
specifying a scanning area, numbers can be entered to
change that area relative to the top left corner as a fixed
origin.
4 "Auto Scan Area Adjustment" button
Click when the preview screen is displayed to automatically
set the scanning area to the entire preview image.
1
2
3
Click the "Auto Scan Area Adjustment" button
to automatically set the scanning area to the
entire preview image.
Preview image
Preview window
4
5
1 Preview window
Click the "Preview" button in the Set-up screen to display the
scanned image. You can specify the scanning area by
dragging the mouse inside the window. The inside of the
frame that is created when you drag the mouse will be the
scanning area. To cancel a specified scanning area and
clear the frame, click anywhere outside the frame.
CONTENTS
I N D E X
5 "Help" button
Click to display the help file for the scanner driver.
25
3
SCAN
Scanning from a WIA-Compliant Application (Windows XP)
(part 1)
If you are using Windows XP, you can use the WIA driver to scan from Sharpdesk, Paint and other WIA-compliant applications. The
procedure for scanning using Paint is explained in the following.
1
Place the original you wish to scan on the
document glass/SPF/RSPF.
☞For information on setting an original for scanning,
Note
If you have WIA drivers for other devices installed in your
computer, the "Select Device" screen will open. Select
"SHARP AR-XXXX" and click the "OK" button.
refer to "NORMAL COPYING" in the Operation
Manual.
2
Start Paint and then click the "File" menu and
select "From Scanner or Camera".
The scan screen of the WIA driver will appear.
CONTENTS
I N D E X
26
3
3
SCAN
Scanning from a WIA-Compliant Application (Windows XP)
Select the paper source and picture type, and
click the "Preview" button.
●
Note
The preview image will appear.
If you placed the original on the document glass, select
"Flatbed" for the "Paper source".
If you placed the original in the SPF/RSPF, select
"Document Feeder" for the "Paper source" and specify
the original size in "Page size".
4
CONTENTS
I N D E X
(part 2)
If an SPF/RSPF is not installed on your machine, the
"Paper source" menu will not appear.
● If you select "Document Feeder" for the "Paper source"
and click the "Preview" button, the top original in the
SPF/RSPF is previewed. The previewed original is
sent to the original exit area, so you will need to return
it to the SPF/RSPF before starting the scanning job.
● To view Help for a setting, click the
button in the
upper right-hand corner of the window and then click
the setting.
Click the "Scan" button.
Scanning begins and the image is acquired into Paint.
Use "Save" in your application to select a file name and
folder for the scanned image, and save the image.
To cancel a scanning job after clicking the "Scan"
button, click the "Cancel" button.
27
3
SCAN
Scanning from the "Scanner and Camera Wizard" (Windows XP)
(part 1)
The procedure for scanning with the "Scanner and Camera Wizard" in Windows XP is explained here. The "Scanner and Camera
Wizard" lets you scan an image without using a WIA-compliant application.
1
Place the original you wish to scan on the
document glass/SPF/RSPF.
4
Click the "Next" button.
☞For information on setting an original for scanning,
refer to "NORMAL COPYING" in the Operation
Manual.
2
Click the "start" button, click "Control Panel",
click "Printers and Other Hardware", and then
click "Scanners and Cameras".
3
Click the "SHARP AR-XXXX" icon and then
click "Get pictures" in "Imaging Tasks".
The "Scanner and Camera Wizard" will appear.
CONTENTS
I N D E X
28
3
5
SCAN
Scanning from the "Scanner and Camera Wizard" (Windows XP)
Select the "Picture type" and "Paper source",
and click the "Next" button.
●
Note
If you placed the original on the document glass, select
"Flatbed" for the "Paper source".
If you placed the original in the SPF/RSPF, select
"Document Feeder" for the "Paper source" and specify
the original size in "Page size".
You can click the "Preview" button to display the
preview image.
6
CONTENTS
I N D E X
(part 2)
If an SPF/RSPF is not installed on your machine, the
"Paper source" menu will not appear.
● If you select "Document Feeder" for the "Paper source"
and click the "Preview" button, the top original in the
SPF/RSPF is previewed. The previewed original is
sent to the original exit area, so you will need to return
it to the SPF/RSPF before starting the scanning job.
● To adjust the resolution, picture type, brightness and
contrast settings, click the "Custom settings" button.
Specify a group name, format and folder for saving
the image, and then click the "Next" button.
JPG, BMP, TIF or PNG can be selected for the format.
To begin scanning, click the "Next" button.
29
3
7
SCAN
Scanning from the "Scanner and Camera Wizard" (Windows XP)
When scanning ends, the following screen will
appear. Select the next task you wish to
perform, and then click the "Next" button.
8
(part 3)
Click the "Finish" button.
The "Scanner and Camera Wizard" closes and the
scanned image is saved in the specified folder.
If you are ready to end the session, click "Nothing. I'm
finished working with these pictures".
CONTENTS
I N D E X
30
3
SCAN
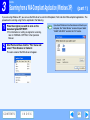
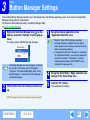
Outline of Button Manager
Button Manager is a software utility that links scanning functions to the scanner key on the machine. The Button Manager software
allows you to assign scan settings to each of the six scan menu keys on the machine.
To view Help for a setting, click the
button in the upper right-hand corner of the window and then click the setting.
☞To begin scanning using the machine's operation panel, settings must be established in the Control Panel after Button Manager is
installed. For information on installing Button Manager and establishing the Control Panel settings, see "SETTING UP BUTTON
MANAGER" in the Software Setup Guide. For information on scanning using the machine's operation panel, see "USING THE
SCANNER MODE" in the Operation Manual.
1 Tab
4 "Scan Setup" area
Click to set scan menu
Set the scan conditions.
1
options. Each tab contains
Some applications
2
Note
scan settings for the scan
may limit your
menu keys (SC1 through
choice of settings.
SC6) on the machine.
5 "OK" button
2 "Application Selection" area
3
Click to save your settings
Select the start-up
and exit the dialog box.
application here.
4
6 "Cancel" button
3 "Show TWAIN setting
Click this button to exit the
screen when scanning"
5
dialog box without making
Checkbox
any changes to the settings.
6
You can select whether or not
7 "Apply" button
the TWAIN screen is shown.
7
Click to save your settings
When the checkbox is
8
without closing the dialog box.
selected, the TWAIN screen
appears when scanning is
8 "Help" button
executed to let you adjust the
Click this button to display the
scanning conditions.
help file for Button Manager.
You can use Button Manager to select and change the functions of the six scan menus. Refer to Button Manager Settings.
CONTENTS
I N D E X
31
SCAN
3
Button Manager Settings
Once installed, Button Manager normally runs in the background in the Windows operating system. If you need to change Button
Manager settings, follow the steps below.
For details on Button Manager settings, see Button Manager Help.
☞Outline of Button Manager
1
Right-click the Button Manager icon ( ) on the
task bar, and select "Settings" from the pop-up
menu.
The setting screen of Button Manager will open.
Note
2
If the Button Manager icon does not appear on the task
bar, click the "start" button, select "All Programs"
("Programs" in Windows 98/Me/2000), select "Sharp
Button Manager A", and then click "Button Manager" to
start Button Manager.
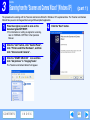
Click the tab of the scan menu you want to set
up.
CONTENTS
I N D E X
3
Set up the start-up application in the
"Application Selection" area.
●
Note
When the "Show TWAIN setting screen when
scanning" checkbox is selected, the scan setting
screen appears when scanning is executed to let you
adjust the scanning conditions.
● If an application other than "Sharpdesk" is selected in
the "Application Selection" area, only one original can
normally be scanned. If "Sharpdesk" is selected,
multiple originals loaded in the SPF/RSPF can be
scanned in a single operation.
4
Set up the "Color Mode", "Edge" and other scan
settings in the "Scan Setup" area.
5
Click the "OK" button.
This completes the settings.
32
4
INDEX
Index
For detailed information on the settings in the printer driver, Print Status Window, scanner driver, and Button Manager, see the help
files for each.
A
I
R
T
Application Selection...........31
"Auto Scan Area Adjustment" button....25
"Image Orientation" ............ 11
"Image Size" button ............ 25
Introduction........................... 2
"Rotate 180 degrees" ......... 11
"Rotate" button ................... 25
To cancel a print job ............. 6
To cancel a scanning job ....23
Troubleshooting .................... 2
TWAIN ................................ 20
Two-sided Printing .............. 13
B
Basic Printing ........................5
Border ...................................9
Button Manager ..................31
Button Manager Settings ....32
C
M
Main...................................... 8
N
N-up printing ......................... 9
"Close" button .....................24
O
D
Document Style...................13
ON LINE ............................... 5
Outline of Button Manager.... 31
Outline of the Print Status Window.... 14
F
P
Fit To Page .........................10
Pausing a print job................ 6
"Preview" button
Scanner and Camera Wizard .... 29
TWAIN driver ................... 24
WIA driver........................ 27
Preview Screen .................. 25
Print ...................................... 5
Print Status Window ........... 14
Printer Driver Settings .......... 8
Printer sharing .................... 15
Printing a Watermark.......... 12
H
Help
Button Manager ...............31
Print Status Window ........14
Printer driver ......................8
Scanner driver
TWAIN driver ................25
WIA driver .....................27
How to Use the Online Manual.....3
CONTENTS
S
Scan ................................... 20
"Scan" button
TWAIN driver .................. 24
WIA driver ....................... 27
Scan Setup......................... 31
Scanner and Camera Wizard.... 20
Scanning an Image
Scanner and Camera Wizard .... 28
TWAIN driver .................. 21
WIA driver ....................... 26
Scanning Mode .................. 24
Scanning Overview ............ 20
Scanning Position .............. 24
Select Device ..................... 26
Settings
Button Manager .............. 32
Printer driver ..................... 8
Scanner driver
Scanner and Camera Wizard.... 29
TWAIN driver ............... 24
WIA driver .................... 27
Set-up Screen .................... 24
Sharing............................... 15
Show TWAIN setting screen when scanning..... 31
W
Watermark .......................... 12
WIA ..................................... 20
Z
Zoom Preview.....................24
33