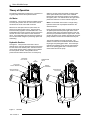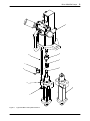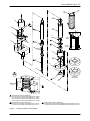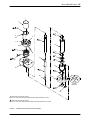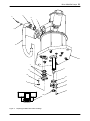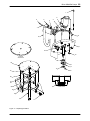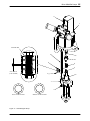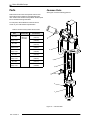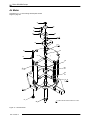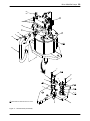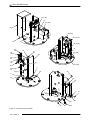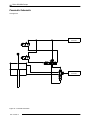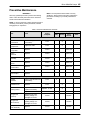
1
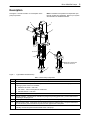
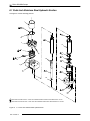
Rhinor SD2/XD2 Pumps Customer Product Manual Part 1073520-12 Issued 4/13 For parts and technical support, call the Nordson Industrial Coating Systems Customer Support Center at (800) 433−9319, or contact your local Nordson Representative. This document is subject to change without notice. Check http://emanuals.nordson.com/finishing for the latest version. NORDSON CORPORATION AMHERST, OHIO USA Table of Contents Safety . . . . . . . . . . . . . . . . . . . . . . . . . . . . . . . . . . . . . . . 1 Qualified Personnel . . . . . . . . . . . . . . . . . . . . . . . . . 1 Intended Use . . . . . . . . . . . . . . . . . . . . . . . . . . . . . . 1 Regulations and Approvals . . . . . . . . . . . . . . . . . . 1 Personal Safety . . . . . . . . . . . . . . . . . . . . . . . . . . . . 1 High-Pressure Fluids . . . . . . . . . . . . . . . . . . . . . 1 Fire Safety . . . . . . . . . . . . . . . . . . . . . . . . . . . . . . . . 2 Halogenated Hydrocarbon Solvent Hazards . 2 Action in the Event of a Malfunction . . . . . . . . . . . 2 Disposal . . . . . . . . . . . . . . . . . . . . . . . . . . . . . . . . . . 2 Description . . . . . . . . . . . . . . . . . . . . . . . . . . . . . . . . . . 3 Theory of Operation . . . . . . . . . . . . . . . . . . . . . . . . 4 Air Motor . . . . . . . . . . . . . . . . . . . . . . . . . . . . . . . 4 Hydraulic Section . . . . . . . . . . . . . . . . . . . . . . . . 4 Repair . . . . . . . . . . . . . . . . . . . . . . . . . . . . . . . . . . . . . . 7 Consumable Items . . . . . . . . . . . . . . . . . . . . . . . . . 7 Break Down the Pump . . . . . . . . . . . . . . . . . . . . . . 8 Repairs to the Hydraulic Section . . . . . . . . . . . 8 Repairs to the Air Motor . . . . . . . . . . . . . . . . . . . 8 Standard and Temperature Conditioned Hydraulic Sections . . . . . . . . . . . . . . . . . . . . . . . . . . . . . . . . . . 10 Disassemble the Hydraulic Section . . . . . . . . . 10 Assemble the Hydraulic Section . . . . . . . . . . . 10 Rebuild the Packing Gland . . . . . . . . . . . . . . . . . . 12 Stainless Steel Hydraulic Section . . . . . . . . . . . . . 14 Disassemble the Hydraulic Section . . . . . . . . . 14 Assemble the Hydraulic Section . . . . . . . . . . . 14 Air Motor . . . . . . . . . . . . . . . . . . . . . . . . . . . . . . . . . . 16 Replace the Trip-Rod U-Cup . . . . . . . . . . . . . . 16 Replace a Pilot Valve . . . . . . . . . . . . . . . . . . . . 18 Replace the Supply Tube Quad- and O-Rings . . . . . . . . . . . . . . . . . 20 Replace the Piston Rod Retainer U-Cup and O-Ring . . . . . . . . . . . . . . . 20 Replace the Piston Assembly . . . . . . . . . . . . . 22 Assemble the Pump . . . . . . . . . . . . . . . . . . . . . . . . 24 Parts . . . . . . . . . . . . . . . . . . . . . . . . . . . . . . . . . . . . . . . Common Parts . . . . . . . . . . . . . . . . . . . . . . . . . . . . . Air Motor . . . . . . . . . . . . . . . . . . . . . . . . . . . . . . . . . . 5.8 Cubic Inch Standard and Temperature Conditioned Hydraulic Sections . . . 8.1 Cubic Inch Standard and Temperature Conditioned Hydraulic Sections . . . 8.1 Cubic Inch Stainless Steel Hydraulic Section Tools . . . . . . . . . . . . . . . . . . . . . . . . . . . . . . . . . . . . . Kits . . . . . . . . . . . . . . . . . . . . . . . . . . . . . . . . . . . . . . . Mounting Hardware . . . . . . . . . . . . . . . . . . . . . . . . . 30/55-Gallon Drum Unloaders . . . . . . . . . . . . . 5-Gallon Pail Unloaders . . . . . . . . . . . . . . . . . . Specifications . . . . . . . . . . . . . . . . . . . . . . . . . . . . . . . Air Motor . . . . . . . . . . . . . . . . . . . . . . . . . . . . . . . . . . Hydraulic Section . . . . . . . . . . . . . . . . . . . . . . . . . . Air Requirements . . . . . . . . . . . . . . . . . . . . . . . . . . Pneumatic Schematic . . . . . . . . . . . . . . . . . . . . . . . Preventive Maintenance . . . . . . . . . . . . . . . . . . . . . . Contact Us Nordson Corporation welcomes requests for information, comments, and inquiries about its products. General information about Nordson can be found on the Internet using the following address: http://www.nordson.com. Address all correspondence to: Nordson Corporation Attn: Customer Service 555 Jackson Street Amherst, OH 44001 Notice This is a Nordson Corporation publication which is protected by copyright. Original copyright date 2006. No part of this document may be photocopied, reproduced, or translated to another language without the prior written consent of Nordson Corporation. The information contained in this publication is subject to change without notice. Part 1073520-12 26 26 28 34 36 38 39 40 41 41 41 42 42 42 43 44 45 Trademarks Nordson, the Nordson logo, and Rhino are registered trademarks of Nordson Corporation. All other trademarks are the property of their respective owners. E 2013 Nordson Corporation Change Record i Change Record Revision Date A09 6/09 Removed data on customer-specific pumps 1082087, 1082225, 1082478, 1082503, and 1084887. Refer to manual 1096339A for customer-specific pump data. A10 8/09 Add part number for new rod assembly design. A11 11/10 Add new Drive Train Kit part numbers. A12 4/13 Add XD2 Stainless Steel Packing Gland internal components kit 1603003. E 2013 Nordson Corporation Change Part 1073520-12 ii Change Record Part 1073520-12 E 2013 Nordson Corporation Rhino SD2/XD2 Pumps Safety Read and follow these safety instructions. Task- and equipment-specific warnings, cautions, and instructions are included in equipment documentation where appropriate. Make sure all equipment documentation, including these instructions, is accessible to persons operating or servicing equipment. Qualified Personnel Equipment owners are responsible for making sure that Nordson equipment is installed, operated, and serviced by qualified personnel. Qualified personnel are those employees or contractors who are trained to safely perform their assigned tasks. They are familiar with all relevant safety rules and regulations and are physically capable of performing their assigned tasks. Intended Use Use of Nordson equipment in ways other than those described in the documentation supplied with the equipment may result in injury to persons or damage to property. Some examples of unintended use of equipment include S S S S S S using incompatible materials making unauthorized modifications removing or bypassing safety guards or interlocks using incompatible or damaged parts using unapproved auxiliary equipment operating equipment in excess of maximum ratings Regulations and Approvals Make sure all equipment is rated and approved for the environment in which it is used. Any approvals obtained for Nordson equipment will be voided if instructions for installation, operation, and service are not followed. Personal Safety To prevent injury follow these instructions. S Do not operate or service equipment unless you are qualified. S Do not operate equipment unless safety guards, doors, or covers are intact and automatic interlocks are operating properly. Do not bypass or disarm any safety devices. E 2013 Nordson Corporation 1 S Keep clear of moving equipment. Before adjusting or servicing moving equipment, shut off the power supply and wait until the equipment comes to a complete stop. Lock out power and secure the equipment to prevent unexpected movement. S Relieve (bleed off) hydraulic and pneumatic pressure before adjusting or servicing pressurized systems or components. Disconnect, lock out, and tag switches before servicing electrical equipment. S While operating manual spray guns, make sure you are grounded. Wear electrically conductive gloves or a grounding strap connected to the gun handle or other true earth ground. Do not wear or carry metallic objects such as jewelry or tools. S If you receive even a slight electrical shock, shut down all electrical or electrostatic equipment immediately. Do not restart the equipment until the problem has been identified and corrected. S Obtain and read Material Safety Data Sheets (MSDS) for all materials used. Follow the manufacturer’s instructions for safe handling and use of materials, and use recommended personal protection devices. S S Make sure the spray area is adequately ventilated. To prevent injury, be aware of less-obvious dangers in the workplace that often cannot be completely eliminated, such as hot surfaces, sharp edges, energized electrical circuits, and moving parts that cannot be enclosed or otherwise guarded for practical reasons. High-Pressure Fluids High-pressure fluids, unless they are safely contained, are extremely hazardous. Always relieve fluid pressure before adjusting or servicing high pressure equipment. A jet of high-pressure fluid can cut like a knife and cause serious bodily injury, amputation, or death. Fluids penetrating the skin can also cause toxic poisoning. If you suffer a fluid injection injury, seek medical care immediately. If possible, provide a copy of the MSDS for the injected fluid to the health care provider. The National Spray Equipment Manufacturers Association has created a wallet card that you should carry when you are operating high-pressure spray equipment. These cards are supplied with your equipment. The following is the text of this card: Part 1073520-12 2 Rhino SD2/XD2 Pumps WARNING: Any injury caused by high pressure liquid can be serious. If you are injured or even suspect an injury: S S S S Go to an emergency room immediately. Tell the doctor that you suspect an injection injury. Show him this card Tell him what kind of material you were spraying MEDICAL ALERT—AIRLESS SPRAY WOUNDS: NOTE TO PHYSICIAN Injection in the skin is a serious traumatic injury. It is important to treat the injury surgically as soon as possible. Do not delay treatment to research toxicity. Toxicity is a concern with some exotic coatings injected directly into the bloodstream. Consultation with a plastic surgeon or a reconstructive hand surgeon may be advisable. The seriousness of the wound depends on where the injury is on the body, whether the substance hit something on its way in and deflected causing more damage, and many other variables including skin microflora residing in the paint or gun which are blasted into the wound. If the injected paint contains acrylic latex and titanium dioxide that damage the tissue’s resistance to infection, bacterial growth will flourish. The treatment that doctors recommend for an injection injury to the hand includes immediate decompression of the closed vascular compartments of the hand to release the underlying tissue distended by the injected paint, judicious wound debridement, and immediate antibiotic treatment. Fire Safety To avoid a fire or explosion, follow these instructions. S Ground all conductive equipment. Use only grounded air and fluid hoses. Check equipment and workpiece grounding devices regularly. Resistance to ground must not exceed one megohm. S Shut down all equipment immediately if you notice static sparking or arcing. Do not restart the equipment until the cause has been identified and corrected. S Do not smoke, weld, grind, or use open flames where flammable materials are being used or stored. S Do not heat materials to temperatures above those recommended by the manufacturer. Make sure heat monitoring and limiting devices are working properly. S Provide adequate ventilation to prevent dangerous concentrations of volatile particles or vapors. Refer to local codes or your material MSDS for guidance. S Do not disconnect live electrical circuits when working with flammable materials. Shut off power at a disconnect switch first to prevent sparking. Part 1073520-12 S Know where emergency stop buttons, shutoff valves, and fire extinguishers are located. If a fire starts in a spray booth, immediately shut off the spray system and exhaust fans. S Shut off electrostatic power and ground the charging system before adjusting, cleaning, or repairing electrostatic equipment. S Clean, maintain, test, and repair equipment according to the instructions in your equipment documentation. S Use only replacement parts that are designed for use with original equipment. Contact your Nordson representative for parts information and advice. Halogenated Hydrocarbon Solvent Hazards Do not use halogenated hydrocarbon solvents in a pressurized system that contains aluminum components. Under pressure, these solvents can react with aluminum and explode, causing injury, death, or property damage. Halogenated hydrocarbon solvents contain one or more of the following elements: Element Symbol Prefix Fluorine F “Fluoro-” Chlorine Cl “Chloro-” Bromine Br “Bromo-” Iodine I “Iodo-” Check your material MSDS or contact your material supplier for more information. If you must use halogenated hydrocarbon solvents, contact your Nordson representative for information about compatible Nordson components. Action in the Event of a Malfunction If a system or any equipment in a system malfunctions, shut off the system immediately and perform the following steps: S Disconnect and lock out system electrical power. Close hydraulic and pneumatic shutoff valves and relieve pressures. S Identify the reason for the malfunction and correct it before restarting the system. Disposal Dispose of equipment and materials used in operation and servicing according to local codes. E 2013 Nordson Corporation Rhino SD2/XD2 Pumps 3 Description See Figure 1 and refer to Table 1 for a description of the pump components. NOTE: Installation and operation are dependent upon the bulk unloader and application. Refer to your system documentation for detailed information. 6 7 1 2 5 4 TEMPERATURE CONDITIONED HYDRAULIC SECTION 3 Figure 1 Typical Rhino SD2/XD2 Pump Table 1 Rhino Pump Components Item Description 1 10-Inch Air Motor: Drives the hydraulic section. 2 Hydraulic Section: The hydraulic section pressurizes the material and forces it out of the pump. The following hydraulic section are available: S S S Standard 5.8- and 8.1- cubic inch 5.8- and 8.1- cubic inch temperature conditioned Stainless Steel 8.1-cubic inch 3 Shovel: Forces material into the hydraulic section. 4 Solvent Chamber: Contains fluid to lubricate the plunger and packing gland seals; prevents material from hardening on the plunger rod 5 Coupling: Connects the air motor coupling shaft to the hydraulic section plunger rod. 6 Main Air Control Valve: Controls the air motor shaft movement by shifting a spool. The spool exhausts air on one side of the piston and directs air pressure to the opposite side of the piston. 7 Pilot and Intermediate Valves: Controls the direction of the air motor shaft. Has manual overrides to manually override the upward and downward stroke of the pump. E 2013 Nordson Corporation Part 1073520-12 4 Rhino SD2/XD2 Pumps Theory of Operation The following paragraphs provide theory of operation for a typical pump air motor and hydraulic section. Air Motor See Figure 2. The air motor drives the hydraulic section. A five-way two-position main air control valve controls the direction of the air motor shaft movement. When the air motor piston moves up and down, the piston trip-bar trips the pilot valves. The pilot valves send momentary signals to an intermediate valve. The intermediate valve sends a positive continuous signal to the main air motor control valve for each direction of travel. The intermediate valve has manual overrides for air motor directional changes for performing repairs and assembling. Hydraulic Section See Figure 3. The hydraulic section has a shovel attached to the end of the hydraulic plunger that projects into the center of the follower plate. The shovel moves up and down with the plunger, helping to force material into the hydraulic section. The hydraulic section pressurizes the material and forces it out of the pump. UP STROKE PILOT VALVE AIR MOTOR PISTON TRIP-BAR MAIN AIR MOTOR CONTROL VALVE Figure 2 UP STROKE When the plunger strokes downward, the piston/upper check opens and the lower check closes. Material between the upper and lower checks is forced upward through the piston. The material above the upper check pressurizes and flows out of the material output port. NOTE: The stainless steel version is a single-acting hydraulic section that only displaces material on the downward stroke. During the upward pump stroke, the plunger and shovel are pulled upward and the piston/upper check closes. The lower check opens and allows material to pass into the lower pump chamber below the upper check. As the plunger and piston move upward, material from the upper pump chamber is forced out of the material outlet port. The solvent chamber surrounds the plunger. The chamber contains solvent chamber fluid that lubricates the plunger and packing gland seals. This fluid keeps material from hardening on the plunger and minimizes wear on the packing gland seals. The bleed valve is used to bleed air from the pump. INTERMEDIATE VALVE DOWN STROKE MANUAL OVERRIDE DOWN STROKE PILOT VALVE Air Motor Part 1073520-12 E 2013 Nordson Corporation Rhino SD2/XD2 Pumps 5 UP STROKE DOWN STROKE PLUNGER SOLVENT CHAMBER PACKING GLAND BLEED VALVE OUTPUT PORT OUTPUT PORT PISTON/UPPER CHECK LOWER CHECK SHOVEL FOLLOWER PLATE Figure 3 Standard and Temperature Conditioned Hydraulic Sections E 2013 Nordson Corporation Part 1073520-12 6 Rhino SD2/XD2 Pumps UP STROKE DOWN STROKE PLUNGER SOLVENT CHAMBER PACKING GLAND BLEED VALVE OUTPUT PORT OUTPUT PORT MATERIAL DOES NOT FLOW DURING THE UPSTROKE. MATERIAL FLOWS DURING THE DOWN STROKE. LOWER CHECK SHOVEL FOLLOWER PLATE Figure 4 Stainless Steel Single-Acting Hydraulic Section Part 1073520-12 E 2013 Nordson Corporation Rhino SD2/XD2 Pumps Repair Consumable Items This section only covers the procedures necessary to perform shop repairs. Refer to the Rhino SD2/XD2 Frames manual for procedures on removing the pump from the bulk unloader. WARNING: Allow only qualified personnel to perform the following tasks. Follow the safety instructions in this document and all other related documentation. Review the following: S S S 7 Keep the following on hand when repairing the pump. Item Never-Seez 900344 Threadlock Adhesive 900464 Pipe/Thread Sealant 900481 TFE Grease 1031834 (1-gal.) Relieve all pressure to the pump before performing repair procedures. Read and understand this entire section before repairing this equipment. Some repairs can be made without breaking down the pump. If necessary, contact a local Nordson representative with questions about these procedures. E 2013 Nordson Corporation Part Application Apply to threads of applicable parts. Lubricate air motor components. or 900349 (0.75 oz) O-Ring Lubricant 900223 Lubricate hydraulic section components. Mobil SHC 634 156289 Lubricate stainless steel hydraulic section components. Part 1073520-12 8 Rhino SD2/XD2 Pumps Break Down the Pump Repairs to the Air Motor See Figure 5 and perform the desired procedure. 1. Remove the screws (6) securing the coupling halves (7) to the floating coupling shaft (2) and plunger rod (3). Repairs to the Hydraulic Section 1. Remove the screws (6) securing the coupling halves (7) to the floating coupling shaft (2) and plunger rod (3). 2. Remove the nuts (4) securing the hydraulic section (5) to the connecting rods (8). 3. Remove the hydraulic section from the pump assembly. 4. Remove the cover (9) from the hydraulic section. TEMPERATURE CONDITIONED PUMPS: 5. Refer to the Hydraulic Section procedures to perform the desired repairs. Part 1073520-12 2. Remove the nuts (4) securing the hydraulic section (5) to the connecting rods (8). CAUTION: The air motor is heavy. Have an assistant help with removing the air motor from the hydraulic section. 3. Remove the air motor (1) from the hydraulic section (5). Remove the connecting rods (8) from the air motor (1). 4. Refer to the Air Motor procedures to perform the desired repairs. E 2013 Nordson Corporation Rhino SD2/XD2 Pumps 9 1 2 8 7 7 3 6 5 9 4 Figure 5 Typical Air Motor and Hydraulic Section E 2013 Nordson Corporation Part 1073520-12 10 Rhino SD2/XD2 Pumps Standard and Temperature Conditioned Hydraulic Sections The following paragraphs provide procedures for repairing a standard or temperature conditioned hydraulic section. Disassemble the Hydraulic Section 1. See Figure 6. Remove the solvent chamber (1) and the O-ring (2) from the packing gland (4). Discard the O-ring. NOTE: Packing glands have either 4 or 6 screws. 2. Perform the following: a. Remove the screws (3) from the packing gland (4). Insert two screws into the threaded holes (20) as shown. b. Alternate tightening the screws to remove the packing gland (4) from the upper pump body (5). 3. Remove the shovel adapter (18) from the rod assembly (10). NOTE: Hydraulic sections have either 4 or 6 screws that secure the cylinder assembly to the upper pump body. 4. Remove the screws (19) securing the cylinder assembly and follower plate housing (17) to the upper pump body (5). Remove the follower plate housing. 5. Remove the bottom housing (15), O-ring (16), lower check plate (14), and spacer (13). Discard the O-ring. 6. Remove the cylinder housing (12) from the upper pump body (5). Remove and discard the O-rings (11) from the cylinder housing. It is not necessary to remove the coil (25) unless it or the cylinder housing needs to be replaced. TEMPERATURE CONDITIONED SECTIONS: 7. Using either an arbor press or hydraulic press, push the plunger rod (6) out of the cylinder housing (12). 8. Remove the rod assembly from the plunger rod (6). Remove and discard the piston assembly (9). 9. Clean the parts with a compatible solvent. Refer to Table 4 in the Specifications section for wetted component materials. 10. Inspect parts for nicks, scratches, wear, and damage. Replace parts if necessary. 11. Rebuild the packing gland (4) if necessary. Refer to the Rebuild the Packing Gland procedure in this section for procedures. Part 1073520-12 Assemble the Hydraulic Section 1. See Figure 6. Apply O-ring lubricant (23) to the packing gland O-ring (2) and the packing gland I.D. (21). 2. Install the packing gland (4) into the upper pump body (5). 3. Apply Never Seez (22) to the threads of the screws (3). Install the screws into the packing gland (4) and tighten to 102−108 Nm (75−80 ft-lb). 4. Install the coil (25) onto the cylinder housing (12) if necessary. TEMPERATURE CONDITIONED SECTIONS: 5. Apply O-ring lubricant (23) to the O-rings (11) and I.D. of the cylinder housing (12). Install the O-rings onto the cylinder housing. Install the cylinder housing onto the upper pump body (5). 6. Assemble the plunger rod assembly: a. Install the piston assembly (9) onto the rod assembly (10). b. Apply Never Seez (22) to the upper threads and pilot of the rod assembly. Connect the rod assembly to the plunger rod (6) and tighten to 272−298 Nm (200−220 ft-lb). c. Apply a thin coat of O-ring lubricant (23) to the plunger rod, piston assembly, and the rod assembly. 7. Using either an arbor press or hydraulic press, install the plunger rod assembly through the cylinder housing (12) and packing gland (4). 8. Install the spacer (13) and lower check plate (14) onto the rod assembly. 9. Install the bottom housing (15) onto the cylinder housing (12). Apply O-ring lubricant (23) to the O-ring (16) and install it onto the bottom housing. 10. Install the follower plate housing (17) onto the bottom housing (15). NOTE: Hydraulic sections have either 4 or 6 screws that secure the cylinder assembly to the upper pump body. 11. Apply Never Seez (22) to the threads of the screws (19). Perform the following: a. Install the screws through the follower plate housing (17) and into the upper pump body (5). b. Hand-tighten two opposing screws at the same time until the follower plate housing, bottom housing, and cylinder housing (12) are secured to the upper pump body (5). Hand-tighten the remaining screws as shown. c. After performing step 10b, simultaneously tighten each screw 1/8 turn at a time in the sequence shown to 102−108 Nm (75−80 ft-lb). 12. Apply threadlock adhesive (24) to the lower threads of the rod assembly. Install the shovel adapter (18) to the rod assembly and tighten to 75−81 Nm (55−60 ft-lb). 13. Install the solvent chamber cup (1) onto the packing gland (4). E 2013 Nordson Corporation 11 Rhino SD2/XD2 Pumps 25 12 23 11 23 1 2 23 3 22 12 23 6 23 4 11 23 A 5 20 INLET PORT 13 9 23 14 OUTLET PORT 22 15 16 23 10 23 3 1 4 2 17 24 3 5 A 18 1 6 4 2 TORQUE SEQUENCES 19 22 21 23 PARTS ARE INCLUDED IN THESE KITS: SD2 5.8 CUBIC INCH DRIVE TRAIN SERVICE KIT 1105066 XD2 5.8 CUBIC INCH DRIVE TRAIN SERVICE KIT 1105065 SD2 8.1 CUBIC INCH DRIVE TRAIN SERVICE KIT 1105067 XD2 8.1 CUBIC INCH DRIVE TRAIN SERVICE KIT 1105068 PARTS ARE INCLUDED IN THESE KITS: 5.8 CUBIC INCH PACKING GLAND SERVICE KIT 1104726 8.1 CUBIC INCH PACKING GLAND SERVICE KIT 1104731 Figure 6 PARTS ARE INCLUDED IN THESE KITS: 5.8 CUBIC INCH PACKING GLAND INTERNAL PARTS SERVICE KIT 1081134 8.1 CUBIC INCH PACKING GLAND INTERNAL PARTS SERVICE KIT 1081135 Standard Hydraulic Section Repairs E 2013 Nordson Corporation Part 1073520-12 12 Rhino SD2/XD2 Pumps Rebuild the Packing Gland NOTE: This procedure requires the use of either a hydraulic or an arbor press to remove the internal parts of the packing gland. 3. Thoroughly clean the packing gland housing in a compatible solvent to remove all sealant material and O-ring debris. 1. See Figure 7. Place the packing gland housing (2) on a fixture (5) with the solvent cup end facing up. 4. Coat the bore (8) of the packing gland housing with O-ring lubricant (9). NOTE: During removal of the internal parts, the retainer groove will break the O-ring (4). 2. Insert the removal arbor (1) into the packing gland housing. Using the press, push out the internal parts (3). Part 1073520-12 5. Insert the scraper or retaining ring (7), sharp edge down, into the the packing gland (2). 6. Using the insertion tool (6) and press, insert the new internal parts into the packing gland housing (2). Make sure that the brass seal retainer or backup washer (10) is flush or slightly below the packing gland housing as shown. E 2013 Nordson Corporation Rhino SD2/XD2 Pumps 13 6 1 2 3 5 8 9 7 4 SCRAPER RING SHARP EDGE DOWN PACKING GLAND HOUSING BRASS SEAL RETAINER OR BACKUP WASHER SHOWN SLIGHTLY BELOW PACKING GLAND HOUSING 10 Figure 7 Typical Packing Gland Internal Parts Replacement E 2013 Nordson Corporation Part 1073520-12 14 Rhino SD2/XD2 Pumps Stainless Steel Hydraulic Section Assemble the Hydraulic Section The following paragraphs provide procedures for repairing the stainless steel hydraulic section. 1. See Figure 8. Apply threadlock adhesive (10) to the threads of the fittings (7). Install the fittings into the packing gland (5) and tighten securely. Disassemble the Hydraulic Section 2. Apply Mobil SHC 634 lubricant (22) to the packing gland O-ring (2) and the I.D. of the packing gland (5). 1. See Figure 8. Remove the solvent chamber (1) and the O-ring (2) from the packing gland (5). Discard the O-ring. 2. Remove the packing gland assembly: a. Remove the screws (3) from the collar (4). Insert two screws into the threaded holes (9) as shown. b. Alternate tightening the screws to remove the packing gland assembly from the upper pump body (8). c. Loosen the set screws (6) and remove the packing gland (5) from the collar (4). d. Remove the fittings (7) from the packing gland. 3. Install the upper collar (4) onto the packing gland (5). Tighten the set screws (6) until they make contact with the packing gland. Do not over tighten the set screws. 4. Install the packing gland assembly onto the body (8). 5. Apply Never Seeze (23) to the threads of the screws (3). Install the screws into the packing gland assembly and tighten to 102−108 Nm (75−80 ft-lb). 6. Apply Mobil SHC 634 lubricant (22) to the cylinder housing O-rings (14). Install the O-rings onto the cylinder housing (13). Install the cylinder housing onto the upper pump body (8). 7. Assemble the plunger rod assembly: a. Apply Never Seez (23) to the upper threads and pilot of the shovel rod (12). 3. Remove the shovel adapter (20) from the shovel rod (12). b. Connect the shovel rod to the plunger rod (11) and tighten to 272−298 Nm (200−220 ft-lb). 4. Remove the screws (21) securing the cylinder assembly and follower plate housing (19) to the upper pump body (8). Remove the follower plate housing. c. 5. Remove the bottom housing (17), O-ring (18), lower check plate (16), and spacer (15). Discard the O-ring. 6. Remove the cylinder housing (13) from the upper pump body (8). Remove and discard the O-rings (14) from the cylinder housing. Apply a thin coat of Mobil SHC 634 lubricant (22) to the plunger rod (11) and the shovel rod (12). 8. Using either an arbor press or hydraulic press, install the plunger rod assembly into the cylinder housing (13) and packing gland (5). 9. Install the spacer (15) and lower check plate (16) onto the rod assembly. 10. Install the bottom housing (17) onto the cylinder housing (13). Apply Mobil SHC 634 lubricant (22) to the O-ring (18) and install it onto the bottom housing. 7. Remove the shovel rod (12) from the plunger rod (11). 11. Install the follower plate housing (19) onto the bottom housing (17). 8. Clean the parts with a compatible solvent. Refer to Table 4 in the Specifications section for wetted component materials. 12. Apply Never Seez (23) to the threads of the screws (21). Perform the following: 9. Inspect parts for nicks, scratches, wear, and damage. Replace parts if necessary. a. Install the screws through the follower plate housing (19) and into the upper pump body (8). b. Hand-tighten two opposing screws at the same time until the follower plate housing, bottom housing (17), and cylinder housing (13) are secured to the upper pump body (8). Hand-tighten the remaining screws as shown. c. After performing step 12b, simultaneously tighten each screw 1/8 turn at a time in the sequence shown to 102−108 Nm (75−80 ft-lb). 13. Apply Never Seez (23) to the lower threads of the rod assembly. Install the shovel adapter (20) to the rod assembly and tighten to 75−81 Nm (55−60 ft-lb). 14. Install the solvent chamber cup (1) onto the packing gland assembly. Part 1073520-12 E 2013 Nordson Corporation 15 Rhino SD2/XD2 Pumps 1 2 22 3 23 14 22 9 11 22 4 13 9 5 14 22 6 15 23 7 10 16 17 8 12 22 23 18 22 3 19 5 1 6 4 2 TORQUE SEQUENCE 20 23 21 23 PARTS ARE INCLUDED IN THIS KIT: XD2 8.1 CUBIC INCH STAINLESS STEEL PACKING GLAND SERVICE KIT 1074331 PARTS ARE INCLUDED IN THIS KIT: XD2 8.1 CUBIC INCH ARW STAINLESS STEEL DRIVE TRAIN SERVICE KIT 1074332 Figure 8 Stainless Steel Hydraulic Section Repairs E 2013 Nordson Corporation Part 1073520-12 16 Rhino SD2/XD2 Pumps Air Motor Install the Trip-Rod U-Cup The following paragraphs provide repair procedures for the air motor section. 1. See Figure 9. Lubricate the new U-cup (14) with TFE grease (16). Insert the U-cup into the trip-rod retainer (12) as shown. Replace the Trip-Rod U-Cup 2. Install the seal retainer plate (11) onto the trip-rod retainer (12) using the screws (9) and washers (10). Tighten the screws to 22−25 ft-lb (30−33 Nm). The trip-rod U-cup can be replaced without removing the air motor from the pump. Remove the Trip-Rod U-Cup 1. See Figure 9. Remove the screws (2) securing the cover (1) to the trip-rod assembly (6). 2. Remove the screws (5) and washers (4) securing the trip-lever mounting pad (15) to the trip-rod assembly (6). 3. Swing the trip-lever mounting pad (15) away from the seal retainer plate (11). 4. Place a wrench on the flats of the piston rod (13). Remove the nut (7) securing the trip-bar (8) to the piston rod. 3. Place a wrench on the flats of the piston rod (13). Install the trip-bar (8) to the piston rod using the nut (7). Tighten the nut securely. 4. Perform the following: a. Make sure that the mounting pad pins (3) protrude through the trip-rod assembly (6) as shown. b. Secure the trip-lever mounting pad (15) to the trip-rod assembly using the screws (5) and washers (4). Tighten the screws to 22−25 ft-lb (30−33 Nm). 5. Install the cover (1) to the trip-rod assembly using the screws (2). Tighten the screws securely. 5. Remove the screws (9) and washers (10) securing the seal retainer plate (11) to the trip-rod retainer (12). ! CAUTION ! Use a small screwdriver or an O-ring pick in the next step to prevent damage to the U-cup bore and piston rod. 6. Remove the U-cup (14) from the trip-rod retainer (12). Discard the U-cup. Part 1073520-12 E 2013 Nordson Corporation Rhino SD2/XD2 Pumps 17 6 1 4 5 2 3 4 5 7 8 9 15 10 11 U-CUP ORIENTATION 14 16 13 12 Figure 9 Replacing the Trip-Rod U-Cup E 2013 Nordson Corporation Part 1073520-12 18 Rhino SD2/XD2 Pumps Replace a Pilot Valve The pilot valves can be replaced without removing the air motor from the pump. Remove and Install a New Pilot Valve 1. See Figure 10. Remove the screws (1) securing the cover (2) to the trip-rod assembly (3). 2. Disconnect the tubing (4, 5 or 6, 7) from the pilot valve (9 or 13). 3. Remove the screw (11) and washer (10) securing the pilot valve (9 or 13) to the mounting pad (8). 4. Install the pilot valve (9 or 13) to the mounting pad (8) using the washer (10) and screw (11). Thread the screw into the mounting pad. Do not tighten the screw at this time. Adjust the New Pilot Valve 1. Cycle the air motor: a. Upper Pilot Valve—Cycle the air motor until the trip-bar (12) is fully extended. b. Lower Pilot Valve—Cycle the air motor until the trip-bar (12) is fully retracted. 2. Set the gap between the roller lever on the pilot valve (9 or 13) and the trip-bar (12): a. Make sure that pilot valve moves freely and that the roller lever is bottomed out. b. Using the adjustment set screw, move the pilot valve in or out to obtain a gap of 0.040−0.070 in. (1.02−1.78 mm) between the roller lever on the pilot valve and the trip-bar. Tighten the hold-down screw securely. 3. Connect the tubing (4, 5 or 6, 7) to the pilot valve (9 or 13). See Figure 25 in the Specifications section for the proper tube routings. 4. Install the cover (1) to the trip-rod assembly using the screws (2). Tighten the screws securely. Part 1073520-12 E 2013 Nordson Corporation Rhino SD2/XD2 Pumps 19 4 3 8 2 9 10 5 11 12 1 13 7 6 0.040−0.070 IN. (1.02−1.78 MM) TRIP BAR ADJUSTMENT SET SCREW IN PILOT VALVE ROLLER LEVER BOTTOMED OUT Figure 10 OUT LOWER PILOT VALVE SHOWN Replacing a Pilot Valve E 2013 Nordson Corporation Part 1073520-12 20 Rhino SD2/XD2 Pumps Replace the Supply Tube Quad- and O-Rings Replace the Piston Rod Retainer U-Cup and O-Ring Use the following procedure to replace the supply tube quad- and O-rings. 1. See Figure 11. Remove the screws (13) and washers (14) securing the piston rod retainer (15) to the base plate (17). Remove the Supply Tube Quad- and O-Rings 2. Remove the O-ring (16) and U-cup (12) from the piston rod retainer (15). Discard the O-ring and U-cup. 1. See Figure 11. Remove the screws (4) and washers (5) securing the upper supply tube retainer (3) to the air manifold (1). 2. Remove the screws (11) and washers (10) securing the lower supply tube retainer (9) to the base plate (18). 3. Remove the supply tube (6) from the air manifold (1) and base plate (18). 3. Lubricate the new O-ring (16) and U-cup (12) with TFE grease. Insert the O-ring and U-cup into the piston rod retainer (15) as shown. 4. Install the piston rod retainer (15) onto the base plate (17) using the screws (13) and washers (14). Tighten the screws to 22−25 ft-lb (30−33 Nm). 4. Remove the upper and lower retainers (3, 9) from the supply tube and clean them in a compatible solvent if necessary. 5. Remove the O-ring (2) from the air manifold (1). Remove the Quad-rings (7) and O-ring (8) from the base plate (18). Discard the Quad- and O-rings. Install the Supply Tube Quad- and O-Rings 1. See Figure 11. Lubricate the Quad-rings (7) and O-rings (8) with TFE grease. Install the Quad-rings and O-ring into the base plate (18) as shown. 2. Install the lower retainer to the base plate (18) using the washers (10) and screws (11). Only finger tighten the screws at this time. 3. Lubricate the air manifold O-ring (2) with TFE grease and install it into the air manifold (1). 4. Install the upper retainer (3) onto the air supply tube (6). 5. Carefully insert the bottom portion of the air supply tube (6) through the lower retainer (9) and into the base plate (18). 6. Carefully insert the upper portion of the air supply tube (6) into the air manifold (1). 7. Secure the upper retainer (3) to the air manifold (1) using the screws (4) and washers (5). Tighten the screws to 10−12 ft-lb (13−16 Nm). 8. Tighten the lower retainer screws (11) to 10−12 ft-lb (13−16 Nm). Part 1073520-12 E 2013 Nordson Corporation Rhino SD2/XD2 Pumps 21 3 4 2 1 5 6 18 7 17 9 10 8 16 15 11 14 13 12 U-CUP ORIENTATION Figure 11 Replacing the Base Plate Seals and Rings E 2013 Nordson Corporation Part 1073520-12 22 Rhino SD2/XD2 Pumps Replace the Piston Assembly Install the Piston Assembly Use the following procedure to replace the piston assembly. 1. See Figure 13. Apply TFE grease to the following parts: Remove the Piston Assembly 1. See Figure 12. Remove the screws (1) securing the trip-rod assembly cover (2). 2. Place a wrench on the flats of the piston rod (5). 3. Remove the nut (3) securing the trip-bar (4) to the piston rod (5). S S S S inner surface of the air cylinder (20) piston (22) O-rings (4, 11, 19, 23) U-cup (12) 2. Install the O-ring (23) onto the piston rod (10). 4. See Figure 13. Remove the screws (6) and washers (7) securing the upper supply tube retainer (5) to the air manifold (2). 3. Apply Loctite 242 (24) to the upper threads of the piston rod (10). Install the piston (22) onto the piston rod. Install the nut onto the piston rod and tighten to 200−220 ft-lb (271−298 Nm). 5. Loosen the lower supply tube retainer screws (9). 4. Assemble the piston assembly and air cylinder (20): 6. Remove the supply tube (8) from the air manifold (2) and base plate (17). Remove and discard the O-ring (4) from the air manifold (2). 7. Remove the screws (13) and washers (14) securing the piston rod retainer (15) to the base plate (17). Remove the O-ring (11) and U-cup (12). Discard the O-ring and U-cup. 8. Remove the screws (1) and nuts (16) securing the air motor cap (18) to the base plate (17). Use a wrench on the flats of the two screws (3) below the air manifold (2) to remove the nuts. 9. Remove the air motor cap (18) and set it on a flat surface. Remove and discard the air motor cap O-ring (19). 10. Remove the air cylinder (20) and O-ring (19) from the base plate (17). Discard the O-ring. Remove the piston assembly from air cylinder. 11. Remove the nut (21) securing the piston (22) to the piston rod (10). Remove the O-ring (23) from the piston rod and discard. a. Insert the piston assembly into the air cylinder at a 20−30 degree angle to ensure that there is an equal amount of grease on each side of the piston. When the piston reaches the middle of the air cylinder, rotate it to the proper position. b. Apply TFE grease to the piston rod (10). 5. Install the O-rings (19) onto the base plate (17) and air motor cap (18). 6. Install the air cylinder/piston assembly onto the base plate (17). 7. Install the air motor cap (18) onto the air cylinder (20) using the screws (1, 3). Perform the following: a. Install the nuts (16) onto the screws. b. Hand-tighten two opposing screws at the same time until the air motor cap is secured to the base plate. c. After performing step 7b, secure the air motor cap to the base plate by tightening the screws in the sequence shown to 30−35 Nm (41−47 ft-lb). 8. Insert the O-ring (11) and U-cup (12) into the piston rod retainer (15) as shown. 9. Install the piston rod retainer (15) onto the base plate (17) using the screws (13) and washers (14). Tighten the screws to 22−25 ft-lb (30−33 Nm). 2 3 4 10. Carefully insert the bottom portion of the air supply tube (8) through the lower retainer (9) and into the base plate (17). 5 11. Carefully insert the upper portion of the air supply tube (8) into the air manifold (2). 12. Secure the upper retainer (5) to the air manifold (2) using the screws (6) and washers (7). Tighten the screws to 10−12 ft-lb (13−16 Nm). 13. Tighten the screws on the lower retainer (9) to 10−12 ft-lb (13−16 Nm). 1 Figure 12 Removing the Trip-Rod Cover Part 1073520-12 14. See figure 12. Install the trip-bar (4) to the piston rod (5) using the nut (3). Tighten the nut securely. 15. Install the cover (2) to the air motor using the screws (1). Tighten the screws securely. E 2013 Nordson Corporation Rhino SD2/XD2 Pumps 23 1 2 6 5 4 3 7 18 8 1 6 17 3 4 2 9 5 10 16 TORQUE SEQUENCE 11 18 15 14 12 13 19 20 21 24 22 12 U-CUP ORIENTATION 23 19 10 Figure 13 17 Replacing the Piston E 2013 Nordson Corporation Part 1073520-12 24 Rhino SD2/XD2 Pumps Assemble the Pump 1. See Figure 14. Apply threadlock adhesive to the male threads of the air motor shaft (2). Install the floating coupling shaft (3) onto the air motor shaft and tighten to 200−220 ft-lb (272−298 Nm). 2. Install the connecting rods (10) to the air motor (1) and tighten to 60−65 ft-lb (81.5−88 Nm). 3. Install the hydraulic section (7) onto the connecting rods (10) using the nuts (6). Tighten the nuts to 60−65 ft-lb (81.5−88 Nm). 4. Install the solvent chamber (5) onto the hydraulic section (7). NOTE: The split coupler halves are a matched set. Each half is stamped with the same serial number. Make sure that grooved end of each half is facing upward. 5. If necessary, use the manual overrides (11) to cycle the air motor (1) and position the floating coupling shaft (3) closer to the plunger rod (4). Part 1073520-12 6. Perform the following: a. Center the split coupler halves (9) between the hexagonal features of the two mating shafts. b. Make sure that there is a 0.030−0.100 in gap between the shaft ends as shown when the shaft threads and the split coupler threads mate. c. For fine adjustment of the gap, hold the split coupler in place and use a 15/16-in wrench to rotate the floating coupling shaft (3). NOTE: When performing the next step make sure that the gaps between the split coupler halves are equal. 7. Apply threadlock adhesive to the threads of the split coupler screws (8). Install the coupler screws and tighten to 14−16 ft.-lb (10−21 Nm). 8. Perform one of the following: Using Type-K solvent, fill the solvent chamber to 0.75 in. from the top. STANDARD HYDRAULIC SECTIONS: Using Mobil SHC 634, fill the solvent chamber to 0.75 in. from the top. STAINLESS STEEL HYDRAULIC SECTIONS: E 2013 Nordson Corporation Rhino SD2/XD2 Pumps 25 11 1 GROOVED END 10 2 3 9 9 4 0.030−0.100 IN. (0.762−2.54 MM) 8 5 7 6 EQUAL COUPLING GAPS Figure 14 UNEQUAL COUPLING GAPS Assembling the Pump E 2013 Nordson Corporation Part 1073520-12 26 Rhino SD2/XD2 Pumps Parts Common Parts See Figure 15 and the following parts list. Table 2 lists the air motor and hydraulic section sizes along with the part numbers for the applicable pump ratio. Refer to the Air Motor and Hydraulic Sections parts lists for detailed ordering information. To order parts, call the Nordson Customer Service Center or your local Nordson representative. Table 2 Air Motor and Hydraulic Section Sizes Pump Ratio Air Motor Size (Part Number) Hydraulic Section Size (Part Number) 48:1 SD2 10-Inch NPT Port (1077362) 8.1 cu. in. (1081133) 48:1 SD2 Temp. Cond. 8.1 cu. in. (1085369) 48:1 XD2 8.1 cu. in. (1081132) 48:1 XD2 Stainless Steel 8.1 cu. in. (1058351) 48:1 XD2 Temp. Cond. 8.1 cu. in. (1085368) 65:1 SD2 5.8 cu. in. (1081130) 65:1 SD2 Temp. Cond. 5.8 cu. in. (1085367) 65:1 XD2 5.8 cu. in. (1081131) 65:1 XD2 Temp. Cond. 5.8 cu. in. (1084888) 1 9 2 3 4 5 8 6 7 Figure 15 Part 1073520-12 Common Parts E 2013 Nordson Corporation Rhino SD2/XD2 Pumps Item — — — — Part 1073854 1073857 1085363 1085364 Description Pump, air motor assembly, 48:1, 8.1 cubic inch, SD2 Pump, air motor assembly, 48:1, 8.1 cubic inch, XD2 Pump, air motor assembly, 48:1, 8.1 cubic inch, SD2, T/C Pump, air motor assembly, 48:1, 8.1 cubic inch, XD2, T/C Pump, air motor assembly, — 1073855 48:1, 8.1 cubic inch, XD2, stainless steel ARW — 1073853 Pump, air motor assembly, 65:1, 5.8 cubic inch, SD2 — 1073856 Pump, air motor assembly, 65:1, 5.8 cubic inch, XD2 — 1085365 Pump, air motor assembly, 65:1, 5.8 cubic inch, SD2, T/C — 1085366 Pump, air motor assembly, 65:1, 5.8 cubic inch, XD2, T/C 1 249144 S Muffler, 1/4 NPT 2 -----S Air motor 3 1090926 S Rod, connecting 4 1024870 S Coupling shaft 5 1024875 S Coupler, split 6 984172 S Nut, hex, lock, 1/2-13 UNC-2B 7 -----S Hydraulic section 8 900464 S Adhesive, threadlocking 9 900481 S Adhesive, pipe sealant NS 900256 S Fluid, Type-K, pump chamber, 1 gallon NOTE A: Refer to the Air Motor parts list for detailed parts information. Qty 1 1 1 1 27 Note 1 1 1 1 1 2 1 4 1 1 4 1 AR AR AR A B B: Refer to the applicable Hydraulic Section parts list for detailed parts information. AR: As Required NS: Not Shown E 2013 Nordson Corporation Part 1073520-12 28 Rhino SD2/XD2 Pumps Air Motor See Figures 16, 17, and 18 along with the parts list that begins on page 28. 31 30 29 6 19 28 27 67 18 17 67 16 26 15 14 23 25 67 22 67 24 67 71 67 22 67 21 20 Figure 16 PARTS ARE INCLUDED IN SEAL KIT 1073577. Air Motor Parts Part 1073520-12 E 2013 Nordson Corporation Rhino SD2/XD2 Pumps 29 54 69 55 68 53 52 51 69 69 70 56 11 45 58 67 50 67 57 7 8 67 10 6 9 5 11 4 67 12 67 3 13 67 12 67 PARTS ARE INCLUDED IN SEAL KIT 1073577. Figure 17 2 1 Air Motor Parts (continued) E 2013 Nordson Corporation Part 1073520-12 30 Rhino SD2/XD2 Pumps 64 (7 IN.) 60 64 (7 IN.) 63 59 (8 IN.) 59 (7.5 IN.) 62 59 (12 IN.) 40 69 42 39 69 61 41 68 59 (4 IN.) 32 38 69 37 69 35 59 (12 IN.) 36 34 69 6 33 29 29 6 6 29 43 44 11 47 49 Figure 18 48 45 46 72 Air Motor Parts (continued) Part 1073520-12 E 2013 Nordson Corporation Rhino SD2/XD2 Pumps Item — 1 2 3 4 5 6 7 8 9 10 11 12 13 14 15 16 17 18 19 20 21 22 23 24 25 26 27 28 29 30 31 32 33 34 35 36 37 38 39 Part 1077362 1073852 1024803 1060470 -----1059595 983050 981485 -----1066321 345751 983410 ----------1073851 1062563 1060471 -----1062227 981344 1060402 345855 942730 1060359 1069505 1060403 345661 -----1062313 981340 1060242 1062562 1073832 1062719 972716 1062002 345758 1062584 1035504 1060278 Description Air Motor, 10-in., Rhino SD2/XD2 S Plate, base, air motor, 10-in. S Retaining ring, internal, 143, spiral, heavy S Bushing, 1.25 ID x 1.438 OD x 1.375, TFE-lined S O-ring, hot paint, 1.688 x 1.875 x 0.094 S Retainer, seal, piston rod S Washer, flat, E, 0.344 x 0.625 x 0.063 zinc S Screw, socket, 5/16−18 x 1.5 S U-cup, 1.250 ID x 1.75 OD x 0.250 S Retainer, bushing, supply tube, air motor S Screw, socket, 1/4−20 x 1 S Washer, flat, M, narrow, M6 S Quad ring, −322, 1.225 ID x 0.210, Buna S O-ring, −322, Buna-N, 1.225 ID, 0.210 w, 70 Duro S Cap, air motor, 10-in. S Retaining ring, internal, 75, spiral, heavy S Bushing, 0.625 ID x 0.75 OD x 1.125, TFE-lined S O-ring, hot paint, 1.000 x 1.188 x 0.094 S Retainer, seal, cycle rod S Screw, socket, 5/16−18 x 1 S Rod, piston and trip, air motor, 10-in. S Nut, lock, 1/2−13, nylon insert S O-ring, hot paint, 9.750 x 10 x 0.125 S Cylinder, air, 10-in. diameter x 8.108 S Piston, 10-in air motor S Retainer, piston/trip-rod, air motor S Screw, hex, head, 1/2−13 x 10 S U-cup, 0.625 ID x 1.125 OD, 0.25, 70 Duro S Plate, seal retainer, cycle rod S Screw, socket, 5/16−18 x 0.750 S Bar, trip, air motor, 10-in. S Nut, lock, 7/16−20, nylon insert S Plate, cover, trip-rod, air motor S Plug, finishing, 11/16 diameter, fits 0.016/0.125 S Connector, male, 1/4 tube x 1/8 NPT S Valve, air, 2-position, 5-port, manual-override S Screw, socket, 10-24 x 1.250 S Tee, run, 1/8 NPT male x 1/8 NPT female, 5/32 S Muffler, exhaust, 1/8-in. NPT male S Connector, male, elbow, 5/32 x 1/8 NPT Qty 1 1 1 1 1 1 11 4 1 1 3 9 2 1 1 1 1 1 1 4 1 6 2 1 1 1 6 1 1 7 1 1 1 1 2 1 2 1 2 2 31 Note Continued... E 2013 Nordson Corporation Part 1073520-12 32 Rhino SD2/XD2 Pumps Item Part — 1077362 40 972151 41 984121 42 345862 43 1077364 44 1077457 45 345750 46 1062570 47 1077363 48 983003 49 981944 51 972583 50 -----52 1063670 53 1061490 54 972119 55 303654 56 1063695 57 1063671 58 -----59 1073943 60 939110 61 1060290 62 1062560 63 1062215 64 1010810 65 -----66 981745 67 1031834 68 900464 69 900481 70 1069010 71 -----72 1077465 AR: As Required Part 1073520-12 Description Air Motor, 10-in., Rhino SD2/XD2 S Ell, male, 37, 7/16−20 x 1/8 S Nut, hex, machine, #10-24 S Washer, flat, Type-a, #10 narrow S Pad, mounting, pneumatic trip, air motor, 10-in. S Plate, alignment, pneumatic trip S Screw, socket, 1/4−20 x 0.750 S Screw, set, socket, flat, 1/4−20 x 3/8 S Lever, roller, pneumatic trip S Washer, flat, 0.156 x 0.312 x 0.032, 14456−CA S Screw, socket, 6-32 x 0.875 S Ell, male, 37, 11/16−12 x 3/4 S O-ring, hot paint, 2 x 2.25 x 0.125 S Manifold, 10-in. air motor S Valve, air pilot, 2-position, 5-port S Elbow, male, 1/4 tube x 1/8 NPT S Screw, socket, 5/16−18 x 2.5 S Retainer, supply tube, 10-in. air motor S Tube, air supply, 10-in. air motor S O-ring, hot paint, 1.250 x 1.438 x 0.094 S Tubing, 4 mm, Nylon, Series-N, flex, clear S Strap, cable, 0.875 diameter S Y-union, 5/32 S Screw, pan head, 10-32 x 0.375 S Cover, trip-rod, air motor S Tubing, 1/4 OD polyethylene, flame resistant S Plate, identification S Screw, drive, 0.187 S Lubricant, TFE grease, 5-lb, 1-gal S Adhesive, Loctite 242, blue, removable, 50 ml S Adhesive, pipe/thd/hyd sealant PST S Ell, pipe, 45, street, 11/4, brass S O-ring, Viton, 0.739 ID x 0.070 w, brown, 10418 S Connector, plug-in, elbow, male, 4 mm Qty 1 1 2 2 1 1 2 2 2 2 2 1 1 1 1 2 3 1 1 1 3 ft 2 1 6 1 1.6 ft 1 2 AR AR AR 2 1 3 Note E 2013 Nordson Corporation Rhino SD2/XD2 Pumps 33 Notes: E 2013 Nordson Corporation Part 1073520-12 34 Rhino SD2/XD2 Pumps 5.8 Cubic Inch Standard and Temperature Conditioned Hydraulic Sections See Figure 19 and the following parts list parts. 23 1 11 20 2 3 8 12 24 4 A 5 11 20 13 9 21 14 15 6 7 10 20 A 17 16 20 22 18 19 21 PARTS ARE INCLUDED IN THESE KITS: SD2 5.8 CUBIC INCH DRIVE TRAIN SERVICE KIT 1105066 XD2 5.8 CUBIC INCH DRIVE TRAIN SERVICE KIT 1105065 PARTS ARE INCLUDED IN THESE KITS: SD2/XD2 5.8 CUBIC INCH PACKING GLAND SERVICE KIT 1104726 PARTS ARE INCLUDED IN THESE KITS: SD2/XD2 5.8 CUBIC INCH PACKING GLAND INTERNAL PARTS SERVICE KIT 1081134 Figure 19 5.8 Cubic Inch Standard Hydraulic Section Parts Part 1073520-12 E 2013 Nordson Corporation Rhino SD2/XD2 Pumps Item — Part Part Part Part 1081130 — 1081131 — 1085367 — 1084888 1 1059749 1059749 1059749 1059749 2 941450 941450 941450 941450 3 4 5 6 7 1053264 -----1058797 ----------1015823 1053264 -----1058797 ----------- 1053264 -----1013172 ----------1015823 1053264 -----1013172 ----------- 8 1053015 1053015 9 10 11 1015667 1101793 1062623 1015667 1101793 1062623 1015667 1101793 1062623 1015667 1101793 1062623 12 1058798 1058798 1058798 1058798 13 14 15 16 17 18 19 -----1015648 1058799 1049516 1058800 1011361 1015990 -----1095969 1058799 1049516 1058800 1011361 1015990 -----1015648 1058799 1049516 1058800 1011361 1015990 -----1095969 1058799 1049516 1058800 1011361 1015990 20 900223 900223 900223 900223 21 900344 900344 900344 900344 22 900464 900464 900464 900464 1084904 1085225 1084904 1085225 23 24 E 2013 Nordson Corporation Description Pump, 1.375 diameter, 5.8 cubic inch, Rhino SD2 Pump, 1.375 diameter, 5.8 cubic inch, Rhino XD2 Pump, 1.375 diameter, 5.8 cubic inch, Rhino SD2 temperature conditioned Pump, 1.375 diameter, 5.8 cubic inch, Rhino XD2 temperature conditioned S Chamber, solvent S O ring, Viton, 2.563 x 2.750 x 0.094, 10545 S Screw, socket, 1/2-13 x 2 S Gland assembly tri-lip, 1.375 diameter S Body, pump, upper, 1.375 diameter S Screw, drive, 0.187 S Plate, identification S Rod, plunger, 1.375 diameter, chrome S Rod, plunger, 1.375 diameter, Rhino XD2 S Piston assembly, 1.375 diameter S Rod assembly, 1.375 diameter S O ring, −140 Viton S Cylinder, pump housing,1.375 diameter S Spacer, shaft support, 1.375 diameter S Plate, lower check, 1.375 diameter S Housing, bottom pump, 1.375 diameter S O ring, −144, Viton S Plate, housing, follower, 1.375 diameter S Plate, shovel, follower, 1.375 diameter S Screw, socket, 1/2−13 x 12 S Lubricant, O ring, parker, 4 oz, 30122−5 S Lubricant, Never Seez, 8−oz can S Adhesive, Loctite 242, blue, removable, 50 ml S Coil, temperature conditioned pump S Cover, temperature conditioned pump Qty 1 35 Note 1 1 1 1 1 4 1 1 2 1 1 1 1 1 2 1 1 1 1 1 1 1 4 1 1 1 1 1 Part 1073520-12 36 Rhino SD2/XD2 Pumps 8.1 Cubic Inch Standard and Temperature Conditioned Hydraulic Sections See Figure 20 and the following parts list. 23 1 11 20 2 12 8 24 3 21 A 4 11 20 13 9 14 21 5 15 6 7 16 20 10 20 17 22 A 18 19 21 PARTS ARE INCLUDED IN THESE KITS: SD2 8.1 CUBIC INCH DRIVE TRAIN SERVICE KIT 1105067 XD2 8.1 CUBIC INCH DRIVE TRAIN SERVICE KIT 1105068 PARTS ARE INCLUDED IN SD2/XD2 8.1 CUBIC INCH PACKING GLAND SERVICE KIT 1104731. PARTS ARE INCLUDED IN SD2/XD2 8.1 CUBIC INCH PACKING GLAND INTERNAL PARTS SERVICE KIT 1081135. Figure 20 8.1 Cubic Inch Standard and Temperature Conditioned Hydraulic Section Parts Part 1073520-12 E 2013 Nordson Corporation Rhino SD2/XD2 Pumps Item — Part Part Part Part 1081133 — 1085369 — 1081132 — 1085368 1 2 3 1011324 1015987 1053264 1011324 1015987 1053264 1011324 1015987 1053264 1011324 1015987 1053264 4 ------ ------ ------ ------ 5 6 7 1013172 ----------- 1013172 ----------- 1013172 ----------- 1013172 ----------- 1015822 1015822 8 1053014 1053014 9 10 11 12 1011340 1101794 1015989 1011346 1011340 1101794 1015989 1011346 1011340 1101794 1015989 1011346 1011340 1101794 1015989 1011346 13 1075048 1075048 1075048 1075048 1011349 1011349 14 1053043 1053043 15 1011347 1011347 1011347 1011347 16 17 1015986 1011360 1015986 1011360 1015986 1011360 1015986 1011360 18 1032764 1032764 1032764 1032764 19 1015990 1015990 1015990 1015990 20 900223 900223 900223 900223 21 900344 900344 900344 900344 22 900464 900464 900464 900464 23 1085380 1085380 24 1085225 1085225 E 2013 Nordson Corporation Description 1.625 diameter, 8.1 cubic inch, Rhino SD2 1.625 diameter, 8.1 cubic inch, Rhino SD2, temperature conditioned 1.625 diameter, 8.1 cubic inch, Rhino XD2 1.625 diameter, 8.1 cubic inch, Rhino XD2, temperature conditioned S Chamber, solvent S O ring, −149, Viton S Screw, socket, 1/2−13 x 2 S Gland assembly, tri-lip, 1.625 diameter, flange mount S Body, pump, upper, 1.625/1.375 S Screw, drive, 0.187 S Plate, identification S Rod, plunger, 1.625 diameter, chrome S Rod, plunger, 1.625 diameter, Score Guard S Piston assembly, 1.625 diameter S Rod assembly, 1.625 diameter S O ring, −144, Viton S Cylinder, pump housing, 1.625 S Spacer, shaft support, 1.625 diameter S Plate, lower check, 1.625 diameter S Plate, lower check, 1.625 diameter, Score Guard S Housing, bottom, pump, 1.625 diameter S O ring, −150, Viton S Plate, housing, follower, 1.625/1.375 S Plate, shovel, follower, 1.625 diameter S Screw, socket, 1/2−13 x 12 S Lubricant, O ring, Parker, 4 oz, 30122−5 S Lubricant, Never Seez, 8−oz can S Adhesive, Loctite 242, blue, removable, 50 ml S Coil, temperature conditioned pump S Cover, temperature conditioned pump Qty 37 Note 1 1 1 1 1 1 6 1 1 2 1 1 1 1 1 2 1 1 1 1 1 1 1 6 6 1 1 1 1 1 Part 1073520-12 38 Rhino SD2/XD2 Pumps 8.1 Cubic Inch Stainless Steel Hydraulic Section See Figure 21 and the following parts list. 1 2 22 14 22 3 23 11 22 4 13 5 14 22 6 15 7 24 23 16 8 17 9 10 12 22 23 18 22 19 20 23 21 23 PARTS ARE INCLUDED IN XD2 8.1 CUBIC INCH STAINLESS STEEL PACKING GLAND SERVICE KIT 1074331. PARTS ARE INCLUDED IN XD2 8.1 CUBIC INCH ARW STAINLESS STEEL DRIVE TRAIN SERVICE KIT 1074332. Figure 21 8.1 Cubic Inch Stainless Steel Hydraulic Parts Part 1073520-12 E 2013 Nordson Corporation Rhino SD2/XD2 Pumps Item — 1 2 3 4 5 6 7 8 9 10 11 12 13 14 15 16 17 18 19 20 21 22 23 24 Part 1058351 1011324 1015987 1029126 1058473 −−−−−− 981628 972889 1058323 −−−−−− −−−−−− 1058330 1600419 1058325 1015989 1058331 1058332 1058326 1015986 1058328 1058327 1053045 156289 900344 900481 Description Pump, Rhino XD2, 1.625 diameter, 8.1 cubic inch, stainless steel, ARW S Chamber, solvent S O ring, −149, Viton, S Screw, socket, 1/2−13 x 2.5 S Collar, ARW gland, rhino XD2, 1.625 diameter S Gland assembly, ARW, stainless steel S Screw, set, with Nylok, 3/8-16 x 1 S Elbow, male, ext, 1/4 T x 1/8 NPT S Body, pump, upper, stainless steel 1.625/1.375 S Plate, identification S Screw, drive, 0.187 S Rod, plunger, 1.625 diameter, stainless steel, Score Guard S Rod, lower check/shovel, 1.625 diameter, stainless steel S Cylinder, pump housing, 1.625, stainless steel S O ring, −144, Viton S Spacer, shaft support, 1.625 diameter, stainless steel S Plate, lower check, 1.625 diameter, Score Guard, stainless steel S Housing, bottom, pump, 1.625 diameter, stainless steel S O ring, −150, Viton, S Plate, housing, follower, 1.625/1.375, stainless steel S Plate, shovel, follower, 1.625 diameter S Screw, socket, 1/2−13 x 12 S Lubricant, Mobil SHC 634, 30122−8 S Lubricant, Never Seez, 8−oz can S Adhesive, pipe Qty 1 1 1 6 1 1 2 2 1 1 2 1 1 1 2 1 1 1 1 1 1 6 AR 1 1 39 Note Tools The following tools are available for the Rhino SD2/XD2 pumps. Item 5.8 Cubic Inch Hydraulic Sections 8.1 Cubic Inch Hydraulic Sections 8.1 Cubic Inch Stainless Steel Hydraulic Section E 2013 Nordson Corporation Kit Part Removal arbor, packing gland internal parts 1073580 Insertion tool, gland packing internal parts 1081096 Insertion tool, packing gland replacement 1073589 Removal arbor, packing gland internal parts 1073582 Insertion tool, gland packing internal parts 1081097 Insertion tool, packing gland replacement 1035823 Insertion tool, packing gland replacement 1035823 Part 1073520-12 40 Rhino SD2/XD2 Pumps Kits The following kits are available for the Rhino SD2/XD2 pumps. Item Air Motor 5.8 Cubic Inch Hydraulic Sections Kit Part Seals 1073577 SD2 Drive Train 1105066 SD2 CE Drive Train 1083820 XD2 Drive Train 1105065 XD2H Drive Train 1083817 SD2/XD2 Internal Packing Gland Parts 1081134 NOTE: This kit only includes the internal packing gland parts. SD2/XD2 CE Internal Packing Gland Parts 1083818 NOTE: This kit only includes the internal packing gland parts. SD2/XD2 Packing Gland Assembly 1104726 NOTE: This kit includes packing gland and the internal packing gland parts. NOTE: Refer to the Rhino SD2/XD2 Packing Gland Replacement operator’s card 1075674 for more data. SD2/XD2 CE Packing Gland Assembly 1083819 NOTE: This kit includes packing gland and the internal packing gland parts. NOTE: Refer to the Rhino SD2/XD2 Packing Gland Replacement operator’s card 1075674 for more data. XD2H Internal Packing Gland Parts 1083815 NOTE: This kit only includes the internal packing gland parts. XD2H Packing Gland Assembly 1083816 NOTE: This kit includes packing gland and the internal packing gland parts. NOTE: Refer to the Rhino SD2/XD2 Packing Gland Replacement operator’s card 1075674 for more data. 8.1 Cubic Inch Hydraulic Sections SD2 Drive Train 1105067 XD2 Drive Train 1105068 Internal Packing Gland Parts 1081135 NOTE: This kit only includes the internal packing gland parts. Packing Gland Assembly 1104731 NOTE: This kit includes the packing gland and internal packing gland parts. NOTE: Refer to the Rhino SD2/XD2 Packing Gland Replacement operator’s card 1075674 for more data. 8.1 Cubic Inch Stainless Steel Hydraulic Sections Drive Train, XD2 Stainless Steel 1074332 XD2 Stainless Steel Packing Gland Assembly 1074331 XD2 Stainless Steel Packing Gland Internal Components 1603003 NOTE: Refer to the Rhino XD2 Stainless Steel Packing Gland Replacement operator’s card 1081653 for more data. Part 1073520-12 E 2013 Nordson Corporation Rhino SD2/XD2 Pumps Mounting Hardware 5-Gallon Pail Unloaders The following Mounting Hardware is available for the pump. See Figure 23 and refer to the following parts list. 41 30/55-Gallon Drum Unloaders See Figure 22 and refer to the following parts list. 1 1 2 2 3 3 5 3 2 4 Figure 22 Item — 30/55-Gallon Drum Mounting Hardware Part 1069893 1 2 3 981664 983501 983254 4 5 345719 126751 E 2013 Nordson Corporation Description Pump, mounting to frame, 30/55-gallon S Screw, 7/8-14 x 4.5 S Washer, lock, 7/8 S Washer, flat, 0.938 x 1.75 x 0.134 S Screw, 7/8-14 x 3 S Rod, mounting Figure 23 Qty — 2 4 4 Item — 1 2 3 5-Gallon Pail Mounting Hardware Part 1070032 345719 983501 983254 Description Pump, mounting to frame, 5-gallon S Screw, 7/8-14 x 2.75 S Washer, lock, 7/8 S Washer, flat, 0.938 x 1.75 x 0.134 Qty — 2 2 2 2 2 Part 1073520-12 42 Rhino SD2/XD2 Pumps Specifications Following are the specifications for the pump. Air Motor Table 3 lists the hydraulic output ratios. See Figure 24 for air consumption data. Table 3 Output Ratios Hydraulic Section Air Motor 10-inch 5.8 cu-in. 8.1 cu-in. 8.1 cu-in. Stainless Steel 65:1 48:1 48:1 Hydraulic Section Table 4 lists the specifications for the hydraulic sections. Table 4 Hydraulic Section Specifications Item Maximum Output Maximum Stroke Rate Viscosity Range Wetted Component Materials Hydraulic Section 5.8 cu-in. 8.1 cu-in. 8.1 cu-in. Stainless Steel 174 cu-in./min. (2.85 liters/min.) 243 cu-in./min. (3.98 liters/min.) 121 cu-in./min. (1.98 liters/min.) Intermittent: 1 stroke per 2 sec (30 strokes/min.) Continuous: 1 stroke per 4 sec (15 strokes/min.) 30,000−3 million centipoise SD2 Standard Hydraulic Section: Carbon Steel, Stainless Steel, Brass, Aluminum, Proprietary Ceramic Coating, Chrome Plated Carbon Steel, Viton, UHMWPE XD2 Standard Hydraulic Section: Carbon Steel, Stainless Steel, Brass, Aluminum, Proprietary Ceramic Coating, Viton, UHMWPE XD2 Stainless Steel Hydraulic Section: Stainless Steel 400- and 300-Series, Proprietary Ceramic Coating, Viton, Polyester XD2H heated Hydraulic Section: Carbon Steel, Stainless Steel, Brass, Proprietary Ceramic Coating, Viton, Peek Part 1073520-12 E 2013 Nordson Corporation Rhino SD2/XD2 Pumps 43 Air Requirements See Figure 24. The minimum instantaneous flow rate must be at least 175 SCFM at 60 psi for rapid air motor direction changes. This flow rate minimizes material pressure loss during pump shifts. 10-Inch Air Motor Air Consumption SCFM Inlet Pressure PSIG 60 50 40 30 20 10 0 Figure 24 10 20 30 Strokes per Minute Air Consumption E 2013 Nordson Corporation Part 1073520-12 44 Rhino SD2/XD2 Pumps Pneumatic Schematic See Figure 25. NON−REGULATED AIR SUPPLY 13 14 13 1 14 3 5 B A 2 4 A REGULATED AIR SUPPLY B Figure 25 Pneumatic Schematic Part 1073520-12 E 2013 Nordson Corporation Rhino SD2/XD2 Pumps 45 Preventive Maintenance NOTE: The frequencies listed in Table 5 are only guidelines. Always perform preventive maintenance procedures according to your facility maintenance schedule. ! WARNING ! Allow only qualified personnel to perform the following tasks. Follow the safety instructions in this document and all other related documentation. NOTE: It may be necessary to adjust frequencies due to the facility enviornment, process parameters, material being applied, or experience. Table 5 Preventive Maintenance Schedule Item Task Time to Complete Frequency Daily Weekly Pump Strokes Other Air Motor Hose Connections Check and tighten if necessary 5 min. X Pressurized Components Inspect for leaks 5 min. X Trip Rod U-Cup Seal Replace 30 min. 2,000,000 Piston Rod Seal Replace 30 min. 2,000,000 Piston Assembly Replace 2 hours 4,000,000 Pilot Valves Replace 30 min. 8,000,000 Main Air Motor Control Valve Replace 30 min. 8,000,000 Intermediate Valve Replace 15 min. 8,000,000 Floating Joint Coupler Replace 45 min. 2,000,000 Hydraulic Pump Assembly Solvent Chamber Inspect and refill with fluid if necessary 5 min. Solvent Chamber Fluid Replace 5 min. X Inspect: 2 min. Replace: 30 min. X Packing Gland Inspect for leaks and replace if necessary X Replace 30 min. 100,000 Plunger Rod (Chrome) Replace every other packing change or, if damaged or scored 2 hours 200,000 Plunger Rod (Score Guard) Replace every other packing change or, if damaged or scored 2 hours 400,000 Complete Drive Train Assembly Replace 2 hours 400,000 E 2013 Nordson Corporation Part 1073520-12 46 Rhino SD2/XD2 Pumps Notes: Part 1073520-12 E 2013 Nordson Corporation