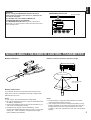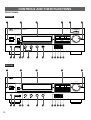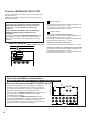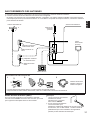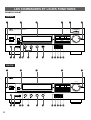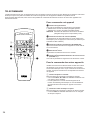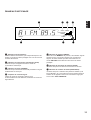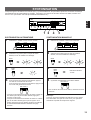
1
UCA
RX-496
RX-396
Natural Sound Stereo Receiver
Récepteur stéréo
Thank you for selecting this YAMAHA Stereo receiver.
Nous vous remercions d’avoir porté votre choix sur ce récepteur stéréo YAMAHA.
OWNER’S MANUAL
MODE D’EMPLOI
• Explanation of Graphical Symbols
CAUTION
RISK OF ELECTRIC SHOCK
DO NOT OPEN
CAUTION: TO REDUCE THE RISK OF
ELECTRIC SHOCK, DO NOT REMOVE
COVER (OR BACK). NO USER-SERVICEABLE
PARTS INSIDE. REFER SERVICING TO
QUALIFIED SERVICE PERSONNEL.
IMPORTANT
Please record the serial number of this unit in
the space below.
Model:
Serial No.:
The lightning flash with arrowhead
symbol, within an equilateral triangle,
is intended to alert you to the
presence of uninsulated “dangerous
voltage” within the product’s
enclosure that may be of sufficient
magnitude to constitute a risk of
electric shock to persons.
The exclamation point within an
equilateral triangle is intended to alert
you to the presence of important
operating and maintenance
(servicing) instructions in the
literature accompanying the
appliance.
WARNING
TO REDUCE THE RISK OF FIRE OR
ELECTRIC SHOCK, DO NOT EXPOSE THIS
UNIT TO RAIN OR MOISTURE.
The serial number is located on the rear of
the unit.
Retain this Owner’s Manual in a safe place
for future reference.
SAFETY INSTRUCTIONS
1
Read Instructions – All the safety and operating
instructions should be read before the unit is operated.
2
Retain Instructions – The safety and operating instructions
should be retained for future reference.
3
Heed Warnings – All warnings on the unit and in the
operating instructions should be adhered to.
4
Follow Instructions – All operating and other instructions
should be followed.
5
6
Water and Moisture – The unit should not be used near
water – for example, near a bathtub, washbowl, kitchen
sink, laundry tub, in a wet basement, or near a swimming
pool, etc.
Carts and Stands – The unit should be used only with a
cart or stand that is recommended by the manufacturer.
6A A unit and cart combination should be moved with care.
Quick stops, excessive force, and uneven surfaces may
cause the unit and
cart combination to overturn.
7
Wall or Ceiling Mounting – The unit
should be mounted to a wall or ceiling
only as recommended by the
manufacturer.
8
Ventilation – The unit should be situated so that its
location or position does not interfere with its proper
ventilation. For example, the unit should not be situated
on a bed, sofa, rug, or similar surface, that may block the
ventilation openings; or placed in a built-in installation,
such as a bookcase or cabinet that may impede the flow
of air through the ventilation openings.
9
Heat – The unit should be situated away from heat
sources such as radiators, stoves, or other appliances
that produce heat.
10 Power Sources – The unit should be connected to a
power supply only of the type described in the operating
instructions or as marked on the unit.
11 Power-Cord Protection – Power-supply cords should be
routed so that they are not likely to be walked on or
pinched by items placed upon or against them, paying
particular attention to cords at plugs, convenience
receptacles, and the point where they exit from the unit.
12 Cleaning – The unit should be cleaned only as
recommended by the manufacturer.
13 Nonuse Periods – The power cord of the unit should be
unplugged from the outlet when left unused for a long
period of time.
14 Object and Liquid Entry – Care should be taken so that
objects do not fall into and liquids are not spilled into the
inside of the unit.
15 Damage Requiring Service – The unit should be serviced
by qualified service personnel when:
A. The power-supply cord or the plug has been
damaged; or
B. Objects have fallen, or liquid has been spilled into the
unit; or
C. The unit has been exposed to rain; or
D. The unit does not appear to operate normally or
exhibits a marked change in performance; or
E. The unit has been dropped, or the cabinet damaged.
16 Servicing – The user should not attempt to service the unit
beyond those means described in the operating
instructions. All other servicing should be referred to
qualified service personnel.
17 Power Lines – An outdoor antenna should be located
away from power lines.
18 Grounding or Polarization – Precautions should be taken
so that the grounding or polarization is not defeated.
English
19 For US customers only:
Outdoor Antenna Grounding – If an outside antenna is
connected to this unit, be sure the antenna system is
grounded so as to provide some protection against
voltage surges and built-up static charges. Article 810 of
the National Electrical Code, ANSI/NFPA 70, provides
information with regard to proper grounding of the mast
and supporting structure, grounding of the lead-in wire to
an antenna discharge unit, size of grounding conductors,
location of antenna discharge unit, connection to
grounding electrodes, and requirements for the grounding
electrode.
Note to CATV system installer:
This reminder is provided to call the CATV system
installer’s attention to Article 820-40 of the NEC that
provides guidelines for proper grounding and, in
particular, specifies that the cable ground shall be
connected to the grounding system of the building, as
close to the point of cable entry as practical.
EXAMPLE OF ANTENNA GROUNDING
MAST
ANTENNA
LEAD IN
WIRE
GROUND
CLAMP
ANTENNA
DISCHARGE UNIT
(NEC SECTION 810–20)
ELECTRIC
SERVICE
EQUIPMENT
GROUNDING CONDUCTORS
(NEC SECTION 810–21)
GROUND CLAMPS
POWER SERVICE GROUNDING
ELECTRODE SYSTEM
(NEC ART 250. PART H)
NEC – NATIONAL ELECTRICAL CODE
SPECIAL NOTES FOR FCC COMPOSITE
DEVICE (for US customers only)
This device is a composite system. The digital device
component may not cause harmful interference.
FCC INFORMATION (for US customers only)
1. IMPORTANT NOTICE : DO NOT MODIFY THIS UNIT!
This product, when installed as indicated in the
instructions contained in this manual, meets FCC
requirements. Modifications not expressly approved by
Yamaha may void your authority, granted by the FCC, to
use the product.
2. IMPORTANT : When connecting this product to
accessories and/or another product use only high quality
shielded cables. Cable/s supplied with this product
MUST be used. Follow all installation instructions.
Failure to follow instructions could void your FCC
authorization to use this product in the USA.
3. NOTE : This product has been tested and found to
comply with the requirements listed in FCC Regulations,
Part 15 for Class “B” digital devices. Compliance with
these requirements provides a reasonable level of
assurance that your use of this product in a residential
environment will not result in harmful interference with
other electronic devices.
This equipment generates/uses radio frequencies and, if
not installed and used according to the instructions
found in the users manual, may cause interference
harmful to the operation of other electronic devices.
Compliance with FCC regulations does not guarantee that
interference will not occur in all installations. If this product
is found to be the source of interference, which can be
determined by turning the unit “OFF” and “ON”, please try
to eliminate the problem by using one of the following
measures:
Relocate either this product or the device that is being
affected by the interference.
Utilize power outlets that are on different branch (circuit
breaker or fuse) circuits or install AC line filter/s.
In the case of radio or TV interference, relocate/reorient the
antenna. If the antenna lead-in is 300 ohm ribbon lead,
change the lead-in to coaxial type cable.
If these corrective measures do not produce satisfactory
results, please contact the local retailer authorized to
distribute this type of product. If you can not locate the
appropriate retailer, please contact Yamaha Electronics
Corp., U.S.A. 6660 Orangethorpe Ave, Buena Park, CA
90620.
The above statements apply ONLY to those products
distributed by Yamaha Corporation of America or its
subsidiaries.
We Want You Listening For A Lifetime (for US customers only)
YAMAHA and the Electronic Industries Association’s
Consumer Electronics Group want you to get the most out of
your equipment by playing it at a safe level. One that lets the
sound come through loud and clear without annoying blaring
or distortion – and, most importantly, without affecting your
sensitive hearing.
Since hearing damage from loud sounds is often
undetectable until it is too late, YAMAHA and the
Electronic Industries Association’s Consumer
Electronics Group recommend you to avoid
prolonged exposure from excessive volume levels.
1
CONTENTS
SAFETY INSTRUCTIONS....Inside the Front Cover
CONTROLS AND THEIR FUNCTIONS ........10
FEATURES .....................................................2
BASIC OPERATIONS ...................................14
SUPPLIED ACCESSORIES ...........................3
TUNING OPERATIONS ................................17
CAUTION ........................................................4
PRESET TUNING .........................................18
NOTES ABOUT THE REMOTE CONTROL
TRANSMITTER ...............................................5
TROUBLESHOOTING ..................................21
SPECIFICATIONS .........................................22
CONNECTIONS ..............................................6
FEATURES
● Minimum RMS Output Power per Channel
RX-496
75W + 75W (8Ω) RMS Output
Power, 0.04% THD, 20–20,000 Hz
RX-396
50W + 50W (8Ω) RMS Output
Power, 0.04% THD, 20–20,000 Hz
● High Dynamic Power, Low Impedance
Drive Capability
● Continuously Variable LOUDNESS
Control
● 40-Station Random Access Preset Tuning
2
● Automatic Preset Tuning
● Preset Station Shifting Capability (Preset
Editing)
● IF Count Direct PLL Synthesizer Tuning
System
● SLEEP Timer
● Remote Control Capability
● RX-496 only
PURE DIRECT Switch to Reproduce the
Purest Source Sound
English
SUPPLIED ACCESSORIES
After unpacking, check that the following parts are included.
Indoor FM Antenna
Remote Control Transmitter
YAMAHA HiFi SYSTEM
REMOTE CONTROL TRANSMITTER
AM Loop Antenna
AUX
DIR A
DIR B REC/PAUSE
PLAY
A/B
–
PRESET
+
A/B/C/D/E
DISC
PLAY
TAPE 2
TAPE 1
TUNER
CD
PHONO
STANDBY/ON
SLEEP
VOLUME
Antenna adapter (U.S.A. and Canada models only)
Batteries (size AA, R6, UM-3)
3
CAUTION : READ THIS BEFORE OPERATING YOUR UNIT.
1. To assure the finest performance, please read this manual
carefully. Keep it in a safe place for future reference.
2. Install this unit in a cool, dry, clean place – away from
windows, heat sources, sources of excessive vibration,
dust, moisture and cold. Avoid sources of humming
(transformers, motors). To prevent fire or electrical shock,
do not expose the unit to rain or water.
3. Never open the cabinet. If something drops into the set,
contact your dealer.
4. Do not use force on switches, controls or connection wires.
When moving the unit, first disconnect the power plug and
the wires connected to other equipment. Never pull the
wires themselves.
5. The openings on the cabinet assure proper ventilation of
the unit. If these openings are obstructed, the temperature
inside the cabinet will rise rapidly. Therefore, avoid placing
objects against these openings, and install the unit in wellventilated condition. Be sure to allow a space of at least
20 cm behind, 20 cm on the both sides and 30 cm above
the top panel of the unit. Otherwise it may not only damage
the unit, but also cause fire.
6. Always set the VOLUME control to “– ∞” before starting
the audio source play. Increase the volume gradually to an
appropriate level after playback has been started.
7. Do not attempt to clean the unit with chemical solvents;
IMPORTANT
Please record the serial number of this unit in the space
below.
Model:
Serial No.:
The serial number is located on the rear of the unit.
Retain this Owner’s Manual in a safe place for future
reference.
WARNING
TO REDUCE THE RISK OF FIRE OR ELECTRIC SHOCK,
DO NOT EXPOSE THIS UNIT TO RAIN OR MOISTURE.
This unit is not disconnected from the AC power source as
long as it is connected to the wall outlet, even if this unit
itself is turned off. This state is called the standby mode.
In this state, this unit is designed to consume a very small
quantity of power.
FREQUENCY STEP switch (General Model only)
Because the interstation frequency spacing differs in
different areas, set the FREQUENCY STEP switch (located
at the rear) according to the frequency spacing in your area.
Before setting this switch, disconnect the AC power plug of
this unit from the AC outlet.
this might damage the finish. Use a clean, dry cloth.
8. Be sure to read the “TROUBLESHOOTING” section
regarding common operating errors before concluding that
the unit is faulty.
TO PREVENT ELECTRIC SHOCK, MATCH WIDE BLADE
OF PLUG TO WIDE SLOT AND FULLY INSERT.
9. When not planning to use this unit for long periods of time
THIS CLASS B DIGITAL APPARATUS MEETS ALL
REQUIREMENTS OF THE CANADIAN INTERFERENCECAUSING EQUIPMENT REGULATIONS.
(ie., vacation, etc.), disconnect the AC power plug from the
wall outlet.
10. To prevent lightning damage, disconnect the AC power
plug and antenna cable when there is an electrical storm.
11. Grounding or polarization – Precautions should be taken
so that the grounding or polarization of an appliance is not
defeated.
12. Do not connect audio equipment to the AC outlet on the
rear panel if the equipment requires more power than the
outlet is rated to provide.
13. Voltage Selector (General Model only)
The voltage selector on the rear panel of this unit must
be set for your local main voltage BEFORE plugging
into the AC main supply.
Voltages are 110/120/220/240 V AC, 50/60 Hz.
4
FOR CANADIAN CUSTOMERS
IF THIS UNIT FAILS TO TURN ON WHEN THE
STANDBY/ON SWITCH IS PRESSED;
The IMPEDANCE SELECTOR switch may not be set to
either end. If so, set the switch to either end when this unit is
in the standby mode.
English
WARNING
Do not change the IMPEDANCE SELECTOR switch
setting while the power to this unit is on, otherwise this
unit may be damaged.
IMPEDANCE SELECTOR
(U.S.A. model)
A OR B:4ΩMIN. /SPEAKER
A B:8ΩMIN. /SPEAKER
A OR B: 6ΩMIN. /SPEAKER
A B: I2ΩMIN. /SPEAKER
IMPEDANCE SELECTOR
SET BEFORE POWER ON
A
NOTES ABOUT THE REMOTE CONTROL TRANSMITTER
Battery installation
Remote control transmitter operation range
l6
20
l2
28
8
4
40
2
2
60
0
–dB
1
Remote control sensor
3
Within approximately
6 m (19.7 feet)
30°
30°
Battery replacement
If you find that the remote control transmitter must be used
closer to the main unit, the batteries are weak. Replace both
batteries with new ones.
Notes
● Use only AA, R6, UM-3 batteries for replacement.
● Be sure the polarities are correct. (See the illustration inside
the battery compartment.)
● Remove the batteries if the remote control transmitter is not
used for an extended period of time.
● If batteries leak, dispose of them immediately. Avoid
touching the leaked material or letting it come in contact with
clothing, etc. Clean the battery compartment thoroughly
before installing new batteries.
Notes
● There should be no large obstacles between the remote
control transmitter and the main unit.
● If the remote control sensor is directly illuminated by strong
lighting (especially an inverter type of fluorescent lamp etc.),
it might cause the remote control transmitter not to work
correctly. In this case, reposition the main unit to avoid direct
lighting.
5
CONNECTIONS
Never plug in this unit and other components until all connections are completed.
CONNECTIONS WITH OTHER COMPONENTS
When making connections between this unit and other components, be sure all connections are made correctly, that is to say L (left)
to L, R (right) to R, “+” to “+” and “–” to “–”. Also, refer to the owner’s manual for each component to be connected to this unit.
* If you have YAMAHA components numbered as 1, 3, 4, etc. on the rear panel, connections can be made easily by making sure
to connect the output (or input) terminals of each component to the same-numbered terminals of this unit.
Speakers A
Left
Right
Tape deck,
MD recorder, etc.
LINE OUT
LINE IN
GND
OUTPUT
Turntable
2
*
(U.S.A. model)
75Ω
UNBAL.
A OR B:4ΩMIN. /SPEAKER
A B:8ΩMIN. /SPEAKER
FM
ANT
GND
IN
1
A OR B :6ΩMIN. /SPEAKER
A B: I2ΩMIN. /SPEAKER
REMOTE CONTROL
*
IMPEDANCE SELECTOR
OUT
SET BEFORE POWER ON
GND
AM
ANT
A
PHONO
CD
AUX
TAPE 1
TAPE 2
PLAY /MD REC
PLAY
REC
B
1
3
4
CAUTION
3 or 5 4 or 6
I20V 60Hz
I00W MAX. TOTAL
SWITCHED
SEE INSTRUCTION MANUAL FOR CORRECT SETTING.
SPEAKERS
AUDIO SIGNAL
AC OUTLETS
CD player
Video cassette player,
LD player, etc.
LINE IN
LINE OUT
AUDIO OUT
OUTPUT
To AC outlet
Right
Left
Tape deck,
MD recorder, etc.
Speakers B
1
2
**
,
6
: See page 7.
2
AC OUTLETS (SWITCHED)
*
GND terminal (For turntable use)
*
(U.S.A., Canada, Europe and General models)
......................................................... 2 SWITCHED OUTLETS
(U.K. and Australia models) ................ 1 SWITCHED OUTLET
Connecting the ground wire of the turntable to the GND
terminal will normally minimize hum, but in some cases better
results may be obtained with the ground wire disconnected.
English
1
Use these to connect the power cords from your components
to this unit.
The power to the SWITCHED outlets is controlled by this unit’s
STANDBY/ON switch or the provided remote control
transmitter’s STANDBY/ON key. These outlets will supply
power to any component whenever this unit is turned on.
The maximum power (total power consumption of components)
that can be connected to the SWITCHED AC OUTLETS is 100
watts.
CONNECTING SPEAKERS
Connect the SPEAKERS terminals to your speakers with wire of the proper gauge (cut as short as possible). If the connections are
faulty, no sound will be heard from the speakers. Make sure that the polarity of the speaker wires is correct, that is the + and –
markings are observed. If these wires are reversed, the sound will be unnatural and lack bass.
Caution
Do not let the bare speaker wires touch each other or any metal part of this unit. This could damage this unit and/or
speakers.
How to Connect:
<U.S.A., Canada, Australia and General models only>
Banana Plug connections are also possible. Simply insert the
Banana Plug connector into the corresponding terminal.
Red: positive (+)
Black: negative (–)
2
1
3
➀ Unscrew the knob.
➁ Insert the bare wire.
[Remove approx. 5mm
(1/4”) insulation from
the speaker wires.]
➂ Tighten the knob and
secure the wire.
Use speakers with the specified impedance shown on the
rear of this unit.
Note
One or two speaker systems can be connected to this unit. If
you use only one speaker system, connect it to either the
SPEAKERS A or B terminals.
7
IMPEDANCE SELECTOR switch
Be sure to switch the position only when the power to this unit is
not on.
Select the position whose requirements your speaker system
meets.
WARNING
Do not change the IMPEDANCE SELECTOR switch
setting while the power to this unit is on, otherwise
this unit may be damaged.
IF THIS UNIT FAILS TO TURN ON WHEN THE
STANDBY/ON SWITCH IS PRESSED;
The IMPEDANCE SELECTOR switch may not be set to
either end. If so, set the switch to either end when this unit
is in the standby mode.
(Left position)
If you use one pair of speakers, the impedance of each
speaker must be 4Ω or higher.
If you use two pairs of speakers, the impedance of each
speaker must be 8Ω or higher.
(Right position)
<For U.S.A. model only>
IMPEDANCE SELECTOR
(U.S.A. model)
If you use one pair of speakers, the impedance of each
speaker must be 6Ω or higher.
If you use two pairs of speakers, the impedance of each
speaker must be 12Ω or higher.
<For Canada model only>
The impedance of each speaker must be 6Ω or higher.
A OR B:4ΩMIN. /SPEAKER
A B:8ΩMIN. /SPEAKER
<Except U.S.A. and Canada models>
A OR B: 6ΩMIN. /SPEAKER
A B: I2ΩMIN. /SPEAKER
IMPEDANCE SELECTOR
SET BEFORE POWER ON
A
If you use one pair of speakers, the impedance of each
speaker must be 8Ω or higher.
If you use two pairs of speakers, the impedance of each
speaker must be 16Ω or higher.
For Custom Installer
For U.S.A., Canada and Australia models only
REMOTE CONTROL (IN, OUT) terminals
These terminals are used for custom installation system.
When this unit is connected to the components for custom
installation system, you can operate this unit with the
system remote control.
Connect the REMOTE CONTROL IN terminal of this unit to
the output terminal of the central controller for custom
installation system.
By connecting the REMOTE CONTROL OUT terminal of
this unit to the REMOTE CONTROL IN terminal of the other
component, you can also operate the component with the
system remote control. In this way, up to 6 components can
be connected in series.
8
GND
REMOTE CONTROL
IN
PHONO
CD
AUX
TAPE 1
TAPE 2
PLAY /MD REC
1
3
OUT
4
AUDIO SIGNAL
PLAY
REC
3 or 5 4 or 6
English
ANTENNA CONNECTIONS
●
●
Each antenna should be connected to the designated terminal(s) correctly, referring to the following diagram.
Both AM and FM indoor antennas are supplied to this unit. In general, these antennas will provide sufficient signal strength.
Nevertheless, a properly installed outdoor antenna will give clearer reception than an indoor one. If you experience poor reception
quality, an outdoor antenna may result in improvement.
Outdoor FM antenna
Outdoor AM antenna
Indoor FM
antenna
(included)
75-ohm/300-ohm
antenna adapter
AM loop
antenna
(included)
75Ω
UNBAL.
FM
ANT
75-ohm coaxial cable
GND
AM
ANT
75-ohm/300-ohm
antenna adapter
300-ohm feeder
Ground
Connecting the AM loop antenna
1
2
➀
➂
➁
3
Orient so that the best
reception is obtained.
* The AM loop antenna should be placed apart from the main unit. The antenna may be hung on a wall.
* The AM loop antenna should be kept connected, even if an outdoor AM antenna is connected to this unit.
GND terminal
For maximum safety and minimum interference, connect the
GND terminal to a good earth ground, which is a metal stake
driven into moist earth.
Notes
● When connecting the indoor
FM antenna, insert its
connector into the FM ANT
terminal firmly.
● If you need an outdoor
FM antenna to improve
FM reception quality, either
300-ohm feeder or coaxial cable may be used. In locations
troubled by electrical interference, a coaxial cable is
preferable.
9
CONTROLS AND THEIR FUNCTIONS
FRONT PANEL
RX-496
1
2
3
4
5
6
PURE DIRECT
NATURAL SOUND STEREO RECEIVER
VOLUME
l6
TUNER
PHONO
20
CD
l2
28
8
STANDBY/ON
4
40
TAPE 2
MONITOR
AUX
A/B/C/D/E
1
2
3
4
5
6
7
2
60
TAPE 1/MD
8
0
–dB
PHONES
BASS
0
l
SPEAKERS
A
2
2
3
ON
2
3
4
OFF
3
4
5
2
2
3
4
5
90
BALANCE
0
l
l
2
3
4
5
7 8
TREBLE
0
l
l
l
B
3
4
5
4
L5
LOUDNESS
FLAT
l
–30dB
l0
9
3
DOWN TUNING UP
5R
MEMORY
EDIT
TUNING
MODE
8
4
5
B
A
FM/AM
2
6
7
MAN’L/AUTO FM
C
AUTO/MAN’L MONO
D EFGH
RX-396
1
2
3
4
6
NATURAL SOUND STEREO RECEIVER
VOLUME
l6
TUNER
PHONO
20
CD
l2
28
8
STANDBY/ON
4
40
TAPE 2
MONITOR
AUX
A/B/C/D/E
1
2
3
4
5
6
7
TAPE 1/MD
2
60
8
0
–dB
PHONES
BASS
0
l
SPEAKERS
A
B
2
3
ON
OFF
10
90
2
3
4
4
5
7 8
TREBLE
0
l
l
l
2
3
3
4
5
4
5
A
BALANCE
0
l
l
2
5
2
2
3
3
4
4
L5
5R
B
LOUDNESS
FLAT
l
–30dB
l0
FM/AM
DOWN TUNING UP
2
3
9
4
MEMORY
EDIT
TUNING
MODE
8
5
6
7
C
MAN’L/AUTO FM
AUTO/MAN’L MONO
D EFGH
Standby mode
In this state, this unit consumes a very small quantity of
power to receive infrared-signals from the remote control
transmitter.
2 Remote control sensor
Receives signals from the remote control transmitter.
3 Display panel
Shows various information. (For details, refer to page 13.)
0 Preset station number selector buttons
Select a preset station number (1 to 8).
A Tone controls
BASS
Used to increase or decrease the low frequency response.
The 0 position produces flat response.
TREBLE
Used to increase or decrease the high frequency response.
The 0 position produces flat response.
B BALANCE control
Adjusts the balance of the output volume to the left and right
speakers to compensate for sound imbalance caused by
speaker location or listening room conditions.
4 Input selector buttons
Select a program source to listen to. When a button is pressed,
the name of the selected source appears on the display.
C Continuously variable LOUDNESS control
5 PURE DIRECT switch and indicator
D FM/AM button
RX-496 only
English
1 STANDBY/ON switch
Press this switch to turn on the power to this unit. Press it
again to turn this unit into the standby mode.
Used to compensate for the human ears’ loss of sensitivity to
high and low-frequency ranges at low volume.
Press this button to switch the reception band to FM or AM.
Press this switch so that the indicator lights up to listen to a
source in the purest sound. (Refer to page 16 for details.)
6 VOLUME control
Used to raise or lower the volume level.
7 PHONES jack
When you listen with headphones, connect the headphones to
the PHONES jack.
When listening with headphones privately, set both the
SPEAKERS A and B switches to the OFF position.
PHONES
E MEMORY (MAN’L/AUTO FM) button
When this button is pressed, the “MEMO” indicator flashes for
about 5 seconds. While the indicator is flashing, select a
desired preset station number by pressing the corresponding
preset station number selector button to enter the displayed
station into the memory.
When this button is held down for more than 3 seconds, the
automatic preset tuning begins. (For details, refer to page 19.)
F EDIT button
This button is used to exchange the places of two preset
stations with each other.
G TUNING MODE (AUTO/MAN’L MONO) button
Press this button to switch the tuning mode to automatic or
manual. To select the automatic tuning mode, press this
button so that the “AUTO” indicator lights up on the display. To
select the manual tuning mode, press this button so that the
“AUTO” indicator goes off.
8 SPEAKERS switches
Set the switch A or B (or both A and B) for the speaker system
(connected to this unit) you will use to the ON position. Set the
switch for the speaker system you will not use to the OFF
position.
H TUNING DOWN/UP button
Used for tuning. Press the “UP” side to tune in to higher
frequencies, and press the “DOWN” side to tune in to lower
frequencies.
9 A/B/C/D/E button
Press this button to select a desired group (A–E) of preset
stations.
11
REMOTE CONTROL TRANSMITTER
The remote control transmitter provided with this unit is designed to control all the most commonly used functions of this unit. If the
CD player and tape deck connected to this unit are YAMAHA components designed for remote control compatibility, this remote
control transmitter will also control various functions of each component.
For Control of This Unit
1 Tuner keys
Control tuner.
+: Selects higher preset station number.
–: Selects lower preset station number.
A/B/C/D/E: Selects the group (A – E) of preset station
numbers.
YAMAHA HiFi SYSTEM
REMOTE CONTROL TRANSMITTER
2 SLEEP timer key
This unit is automatically turned into the standby mode one
hour after this key is pressed (so that “SLEEP” indicator lights
up).
AUX
DIR A
DIR B REC/PAUSE
1
1
PLAY
A/B
–
PRESET
+
A/B/C/D/E
DISC
PLAY
2
2
3
TAPE 2
TAPE 1
TUNER
4
CD
Turns the power to this unit on and turns this unit into the
standby mode alternately.
4 Input selector keys
PHONO
STANDBY/ON
SLEEP
3 STANDBY/ON key
Select input source.
VOLUME
5 VOLUME +/– keys
5
Turn the volume level up/down.
For Other Component Control
Identify the remote control transmitter keys with your
component’s keys. If these keys are identical, their functions
will be the same. On each key function, refer to the
corresponding instruction on your component’s manual.
1 Tape deck keys
Control tape deck.
* DIR A, B and A/B are applicable only to double
cassette tape deck.
* For a single cassette deck with automatic reverse
function, pressing DIR A will reverse the direction of
tape running.
2 CD player keys
Control compact disc player.
* DISC is applicable only to compact disc changer.
12
English
DISPLAY PANEL
1
2
3
4
AUTO STEREO
MHz
MEMO
5
1 Multi-information display
Displays various information, for example station frequency,
preset station number and name of selected input source.
2 AUTO indicator
Lights up when this unit is in the automatic tuning mode.
0 20
l00
TAPE MON
SLEEP
2
6
7
5 MEMO indicator
When the MEMORY button is pressed, this indicator flashes
for about 5 seconds. While this indicator is flashing, the
displayed station can be programmed to the memory by using
the A/B/C/D/E button and the preset station number selector
buttons.
3 STEREO indicator
Lights up when an FM stereo broadcast with sufficient signal
strength is received.
6 SLEEP indicator
4 Signal-level meter
Lights up when the tape deck (or MD recorder etc.) connected
to the TAPE 2 terminals on the rear of this unit is selected as
the input source by pressing the TAPE 2 MONITOR button.
Indicates the signal level of the received station.
If multipath interference is detected, the indication decreases.
Lights up while the built-in SLEEP timer is functioning.
7 TAPE MON 2 indicator
13
From page 14 to 20, this manual describes how to operate this unit mainly by using the front panel control parts.
To operate this unit on the remote control transmitter, use the corresponding keys on the remote control transmitter.
BASIC OPERATIONS
TO PLAY A SOURCE
2
3
7
PURE DIRECT
NATURAL SOUND STEREO RECEIVER
VOLUME
l6
TUNER
PHONO
20
CD
l2
28
8
STANDBY/ON
4
40
TAPE 2
MONITOR
AUX
A/B/C/D/E
1
2
3
4
5
6
7
TAPE 1/MD
2
60
8
0
–dB
PHONES
BASS
0
l
SPEAKERS
A
B
OFF
2
3
4
4
5
5
4
: RX-496 only
1
TREBLE
0
l
l
l
2
3
ON
2
BALANCE
0
l
l
2
3
3
4
2
2
3
4
5
3
4
5
4
L5
5R
LOUDNESS
FLAT
l
–30dB
l0
FM/AM
9
4
MEMORY
6
7
MAN’L/AUTO FM
5
l2
8
4
40
TUNING
MODE
AUTO/MAN’L MONO
1, 6
l6
28
EDIT
8
5
7
VOLUME
20
DOWN TUNING UP
2
3
Play the source. (For detailed information on the
tuning operation, refer to page 17.)
6
VOLUME
l6
20
28
2
60
l2
8
0
4
40
–dB
Set to the “∞” position.
2
60
0
–dB
2
Adjust to the desired output level.
Turn the power on.
STANDBY/ON
7
3
Select the desired input source by using the input
selector buttons.
TUNER
PHONO
CD
AUX
TAPE 2
MONITOR
TAPE 1/MD
* The name of the selected input source will appear on
the display.
4
Notes on using the input selector buttons
● Note that pressing each input selector button selects the
source which is connected to the corresponding input
terminals on the rear panel.
● The selection of TAPE 2 MONITOR cannot be canceled by
pressing another input selector button. To cancel it, press
TAPE 2 MONITOR again so that the “TAPE MON 2”
indicator disappears from the display.
When you select a button other than TAPE 2 MONITOR,
make sure that the “TAPE MON 2” indicator is not
illuminated on the display.
Select the speakers to be used.
SPEAKERS
A
ON
B
OFF
* If you use two speaker systems, press both the A and B
switches.
14
If desired, adjust the BASS, TREBLE, BALANCE and
LOUDNESS controls, or use the PURE DIRECT switch
(for RX-496 only). For details, refer to page 16.
When you finish using this unit
Press the STANDBY/ON switch on the front panel again or
the STANDBY/ON key on the remote control transmitter to
turn this unit into the standby mode.
English
TO RECORD (OR DUB) A SOURCE TO TAPE (OR MD)
1
2
NATURAL SOUND STEREO RECEIVER
VOLUME
l6
TUNER
PHONO
20
CD
l2
28
8
STANDBY/ON
4
40
TAPE 2
MONITOR
AUX
A/B/C/D/E
1
2
3
4
5
6
7
TAPE 1/MD
2
60
8
0
–dB
PHONES
BASS
0
l
SPEAKERS
A
B
OFF
TREBLE
0
l
l
l
2
2
3
ON
3
4
4
5
BALANCE
0
l
l
2
2
3
3
4
5
4
5
5
2
2
3
3
4
4
L5
5R
LOUDNESS
FLAT
l
–30dB
l0
FM/AM
DOWN TUNING UP
2
9
3
MEMORY
EDIT
TUNING
MODE
8
4
5
6
7
MAN’L/AUTO FM
AUTO/MAN’L MONO
4
1
3
Select the source to be recorded.
TUNER
PHONO
CD
TAPE 2
MONITOR
AUX
TAPE 1/MD
4
Begin recording on the tape deck (or MD recorder etc.)
connected to this unit.
If the tape deck (or MD recorder etc.) connected to the
TAPE 2 terminals on the rear of this unit is used for
recording, you can monitor the sounds being recorded
by pressing TAPE 2 MONITOR so that the “TAPE
MON 2” indicator lights up on the display.
TUNER
PHONO
CD
AUX
TAPE 2
MONITOR
TAPE 1/MD
* When you select TUNER, PHONO, CD, AUX or TAPE
1/MD, make sure that TAPE 2 MONITOR is not also
selected.
2
Play the source and then turn the VOLUME control up
to confirm the input source. (For detailed information
on the tuning operations, refer to the page 17.)
VOLUME
Note
VOLUME, BASS, TREBLE, BALANCE and LOUDNESS
controls have no effect on the material being recorded.
l6
20
l2
28
8
4
40
2
60
0
–dB
15
Selecting the SPEAKER system
Because one or two speaker systems can be connected to this
unit, the SPEAKERS switches allow you to select speaker
system A or B, or both at once.
SPEAKERS
A
Adjusting the continuously variable
LOUDNESS control
This control provides compensation for the human ears’ loss of
sensitivity to high and low-frequency ranges at low volume.
This control is adjustable to retain full tonal range at any
volume level.
1
B
LOUDNESS
FLAT
l
–30dB
2
l0
ON
OFF
9
3
5
Adjusting the BALANCE control
7
6
VOLUME
2
Adjust the balance of the output volume to the left and right
speakers to compensate for sound imbalance caused by
speaker location or listening room conditions.
Set to the “FLAT” position.
8
4
l6
20
l2
28
8
4
40
Set to the loudest listening level
that you would listen in.
2
60
0
–dB
BALANCE
0
l
l
2
2
3
3
4
3
4
L5
5R
LOUDNESS
FLAT
l
–30dB
2
l0
9
3
Adjusting the BASS and TREBLE
controls
BASS
0
l
TREBLE
0
l
l
l
2
2
3
3
4
4
5
BASS
5
2
2
3
3
4
8
4
5
6
7
Using the PURE DIRECT switch
RX-496 only
4
5
5
: Turn this clockwise to increase (or counterclockwise to decrease) the low frequency
response.
TREBLE : Turn this clockwise to increase (or counterclockwise to decrease) the high frequency
response.
16
Turn until the desired volume is
gained.
You can enjoy the purest possible sound from your audio
sources by pressing this switch so that the indicator lights up.
By doing so, the audio signal bypasses the BASS, TREBLE,
BALANCE and LOUDNESS controls, eliminating any
alteration to the audio signal.
To cancel this function, press it again so that the indicator goes
off.
Indicator
PURE DIRECT
English
TUNING OPERATIONS
Normally, if station signals are strong and there is no interference, quick automatic-search tuning (AUTOMATIC TUNING) is
possible. However, if signals of the station you want to select are weak, you must tune to it manually (MANUAL TUNING).
NATURAL SOUND STEREO RECEIVER
VOLUME
l6
TUNER
PHONO
20
CD
l2
28
8
STANDBY/ON
4
40
TAPE 2
MONITOR
AUX
A/B/C/D/E
1
2
3
4
5
6
7
TAPE 1/MD
2
60
8
0
–dB
PHONES
BASS
0
l
SPEAKERS
A
B
ON
OFF
TREBLE
0
l
l
l
2
2
3
3
4
4
5
5
2
BALANCE
0
l
l
2
3
3
4
4
5
5
2
2
3
3
4
4
L5
5R
LOUDNESS
FLAT
l
–30dB
l0
FM/AM
9
MEMORY
1
2
TUNING
MODE
5
6
7
MAN’L/AUTO FM
AUTO/MAN’L MONO
4
3
MANUAL TUNING
1
Select “TUNER” as the input source.
TUNER
EDIT
8
4
1 2
AUTOMATIC TUNING
DOWN TUNING UP
2
3
PHONO
Select “TUNER” as the input source.
CD
Select the reception band (FM or AM) confirming it on
the display.
TUNER
2
FM/AM
PHONO
CD
Select the reception band (FM or AM) confirming it on
the display.
FM/AM
or
3
3
TUNING
MODE
AUTO
AUTO/MAN’L MONO
4
or
To tune to a higher frequency, press the right side once.
To tune to a lower frequency, press the left side once.
TUNING
MODE
Turn the “AUTO”
indicator off.
AUTO/MAN’L MONO
4
Tune to a desired station manually.
DOWN TUNING UP
DOWN TUNING UP
* To continue tuning search, hold down the button.
* If the station where tuning search stops is not the desired
one, press again.
* If the tuning search does not stop at the desired station
(because the signals of the station are weak), change to
the MANUAL TUNING method.
Note
If you tune to an FM station manually, it is received in monaural
mode automatically to increase the signal quality.
17
PRESET TUNING
MANUAL PRESET TUNING
This unit can store station frequencies selected by tuning operation. With this function, you can recall any desired station only by
selecting the preset station number where it is stored. Up to 40 stations (8 stations x 5 groups) can be stored.
NATURAL SOUND STEREO RECEIVER
VOLUME
l6
TUNER
PHONO
20
CD
l2
28
8
STANDBY/ON
4
40
TAPE 2
MONITOR
AUX
A/B/C/D/E
1
2
3
4
5
6
7
TAPE 1/MD
2
60
8
0
–dB
PHONES
BASS
0
l
SPEAKERS
A
B
OFF
TREBLE
0
l
l
l
2
2
3
ON
3
4
2
BALANCE
0
l
l
2
3
4
5
3
4
5
2
2
3
4
5
3
4
5
4
L5
5R
LOUDNESS
FLAT
l
–30dB
l0
FM/AM
9
MEMORY
1
EDIT
TUNING
MODE
8
4
5
6
7
MAN’L/AUTO FM
2, 1 4, 2
To store stations
DOWN TUNING UP
2
3
AUTO/MAN’L MONO
3
To recall a preset station
1
Tune to a desired station.
(Refer to the previous page for tuning procedure.)
Select the group of preset stations.
A/B/C/D/E
2
Select a desired group (A – E) of preset stations
confirming it on the display.
2
A/B/C/D/E
Select the preset station number.
1
3
2
3
4
5
6
7
8
MEMORY
MEMO
AUTO
MAN’L/AUTO FM
MHz
0 20
l00
Flashes on and off
for about 5 seconds.
4
Select a preset station number where you want to
program the station before the “MEMO” indicator goes
off from the display.
1
2
3
4
5
6
AUTO
MHz
0 20
l00
7
8
Shows the
displayed station
has been
programmed to
A1.
* In the same way, program other stations to A2, A3 ... A8.
* You can program more stations to preset station numbers
of other groups in the same way by selecting other groups
in step 2.
18
Notes
• A new setting can be programmed in place of the former
one.
• For presets, the setting of the reception mode (stereo or
monaural) is stored along with the station frequency.
Memory back-up
The memory back-up circuit prevents the programmed data
from being lost even if this unit is turned into the standby mode
or the power plug is disconnected from the AC outlet or the
power is cut due to temporary power failure. If, however, the
power is cut for more than one week, the memory may be
erased. If so, it can be re-programmed by simply following the
PRESET TUNING steps.
You can make use of an automatic preset tuning function for FM stations. With this function, this unit performs automatic tuning and
stores FM stations with strong signals sequentially. Up to 40 stations are stored automatically in the same way as in the manual
preset tuning method on page 18.
English
AUTOMATIC PRESET TUNING
To store stations
NATURAL SOUND STEREO RECEIVER
VOLUME
l6
TUNER
PHONO
20
CD
l2
28
8
STANDBY/ON
4
40
TAPE 2
MONITOR
AUX
A/B/C/D/E
1
2
3
4
5
6
7
TAPE 1/MD
2
60
8
0
–dB
PHONES
BASS
0
l
SPEAKERS
A
B
OFF
TREBLE
0
l
l
l
2
2
3
ON
3
4
4
5
5
BALANCE
0
l
l
2
2
3
3
4
4
5
5
2
2
3
3
4
4
L5
5R
LOUDNESS
FLAT
l
–30dB
l0
9
DOWN TUNING UP
MEMORY
EDIT
TUNING
MODE
8
4
5
6
7
MAN’L/AUTO FM
1
2
AUTO/MAN’L MONO
3
If you want to store the first station received by the
automatic preset tuning to a desired preset station
number:
1
If, for example, you want to store the first received station to
C5, select “C5” by using the A/B/C/D/E button and the preset
station number selector buttons after pressing the MEMORY
button in step 2. Then press the TUNING button. The first
received station is stored to C5, and next stations to C6, C7 ...
sequentially.
If stations are stored up to E8, the automatic preset tuning
finishes automatically.
FM/AM
2
FM/AM
2
3
Press and hold for more than 3 seconds.
When the automatic preset tuning is finished;
The display shows the frequency of the last preset station.
Check the contents and the number of preset stations by
following the procedure of the section “To recall a preset
station” on page 18.
MEMORY
MAN’L/AUTO FM
To recall a preset station
AUTO
MEMO
Simply follow the procedure of the section “To recall a preset
station” on page 18.
* A recalled station is shown by the frequency on the display.
Flashes.
3
DOWN TUNING UP
To tune to higher frequencies, press right side once.
To tune to lower frequencies, press left side once.
* If the TUNING button is not pressed, in a while, the
automatic preset tuning begins automatically toward
higher frequencies.
Notes
● You can replace a preset station by another FM or AM
station manually by simply following the procedure of the
section “To store stations” on page 18.
● If the number of received stations is not enough to be stored
up to E8, the search is finished automatically after searching
all frequencies.
● With this function, only FM stations with sufficient signal
strength are stored automatically. If the station you want to
program is weak in signal strength, tune to it in monaural
manually and program it by following the procedure of the
section “To store stations” on page 18.
The automatic preset tuning begins from the frequency
currently displayed. Received stations are programmed to
A1, A2 ... A8 sequentially.
* If more than 8 stations are received, they are also
programmed to the preset station numbers of other
groups (B, C, D and E) in that order.
19
EXCHANGING PRESET STATIONS
You can exchange the places of two preset stations with each other as shown below.
NATURAL SOUND STEREO RECEIVER
VOLUME
l6
TUNER
PHONO
20
CD
l2
28
8
STANDBY/ON
4
40
TAPE 2
MONITOR
AUX
A/B/C/D/E
1
2
3
4
5
6
7
TAPE 1/MD
2
60
8
0
–dB
PHONES
BASS
0
l
SPEAKERS
A
B
OFF
TREBLE
0
l
l
l
2
2
3
ON
3
4
4
5
5
2
BALANCE
0
l
l
2
3
3
4
4
5
5
2
2
3
3
4
4
L5
5R
LOUDNESS
FLAT
l
–30dB
l0
FM/AM
DOWN TUNING UP
2
9
3
MEMORY
EDIT
TUNING
MODE
8
4
5
6
7
MAN’L/AUTO FM
AUTO/MAN’L MONO
2, 4
Example)
If you want to shift the preset station on E1 to A5, and vice
versa.
1
Recall the preset station on E1 (by following the
method of “To recall a preset station” on page 18).
4
EDIT
2
EDIT
Flashes.
MEMO
3
Recall the preset station on A5 by following the same
method as in step 1.
MEMO
Shows the exchange of stations is completed.
Flashes.
20
If the unit fails to operate normally, check the following points to determine whether the fault can be corrected by the simple
measures suggested. If it cannot be corrected, or if the fault is not listed in the SYMPTOM column, disconnect the power cord and
contact your authorized YAMAHA dealer or service center for help.
Amplifier
SYMPTOM
REMEDY
The unit fails to turn on when the
STANDBY/ON switch is pressed, or turns
into the standby mode suddenly soon
after the power is turned on.
Power cord is not plugged in or is not
completely inserted.
Firmly plug in the power cord.
The IMPEDANCE SELECTOR switch on the
rear panel is not set to either end.
Set the switch to either end when this unit is
in the standby mode.
It happens that this unit does not work
normally.
There is an influence of strong external noise
(lightning, excessive static electricity, etc.) or
a misoperation on this unit while using this
unit.
Turn this unit into the standby mode and
disconnect the AC power cord from the AC
outlet. After about 30 seconds pass, connect
the power and operate this unit again.
No sound.
Incorrect output cord connections.
Connect the cords properly. If the problem
persists, the cords may be defective.
Appropriate input source is not selected.
Select an appropriate input source with the
input selector buttons.
The SPEAKERS switches are not set
properly.
Set the SPEAKERS switch which
corresponds to the speakers to be used to
the ON position.
Speaker connections are not secure.
Secure the connections.
The protection circuit has been activated
because of short circuit etc.
Turn this unit into the standby mode, and
then turn on to reset the protection circuit.
The SLEEP timer has functioned.
Cancel the SLEEP timer function.
Incorrect setting of the BALANCE control.
Adjust it to the appropriate position.
Incorrect cord connections.
Connect the cords properly. If the problem
persists, the cords may be defective.
There is a lack of bass, and no ambience.
The + and – wires are connected in reverse
to this unit or speakers.
Connect the speaker wires in the correct
phase (+ and –).
Sound “hums”.
Incorrect cord connections.
Firmly connect the audio plugs. If the
problem persists, the cords may be defective.
No connection from the turntable to the GND
terminal.
Make the GND connection between the
turntable and this unit.
Sound level is low.
The LOUDNESS control is functioning.
Set the LOUDNESS control to the FLAT
position.
The volume level is low while playing a
record.
The record is being played on a turntable with
an MC cartridge.
The player should be connected to the unit
through the MC head amplifier.
The volume level cannot be increased, or
sound is distorted.
The component connected to the REC
terminals of this unit is turned off.
Turn the power to the component on.
FM stereo reception is noisy.
Because of the characteristics of FM stereo
broadcasts, this is limited to cases where the
transmitter is too far away or the antenna
input is poor.
Check the antenna connections.
Try using a high quality directional FM
antenna.
Set the TUNING MODE button to the manual
tuning mode.
There is distortion and clear reception
cannot be obtained even with a good FM
antenna.
There is multipath interference.
Adjust antenna placement to eliminate
multipath interference.
A desired station cannot be tuned in with
the automatic tuning method.
The station is too weak.
Use the manual tuning method.
Use a high quality directional FM antenna.
Previously preset stations can no longer
be tuned in.
This unit has been unplugged for a long
period.
Repeat the presetting procedure.
A desired station cannot be tuned in with
the automatic tuning method.
Weak signal or loose antenna connections.
Tighten the AM loop antenna connections
and rotate it for best reception.
There are continuous crackling and
hissing noises.
Noises result from ligtning, fluorescent lamps,
motors, thermostats and other electrical
equipment.
Use an outdoor antenna and a ground wire.
This will help somewhat but it is difficult to
eliminate all the noises.
There are buzzing and whining noises
(especially in the evening).
A television set is being used nearby.
Relocate this unit away from the TV.
The remote control transmitter does not
work.
Direct sunlight or lighting (of an inverter type
of fluorescent lamp etc.) is striking the
remote control sensor of the main unit.
Change the position of the main unit.
The batteries of this remote control
transmitter are too weak.
Replace the batteries with new ones.
This unit is in the standby mode.
Turn the power to this unit on.
The sound suddenly goes off.
Only one side speaker outputs the sound.
FM
CAUSE
English
TROUBLESHOOTING
Others
Remote control
transmitter
AM
Use the manual tuning method.
The sound is degraded when listening
with the headphones connected to the
compact disc player or cassette deck that
is connected with this unit.
21
SPECIFICATIONS
22
TABLES DES MATIERES
CARACTERISTIQUES...................................24
FONCTIONNEMENT DE BASE.....................36
ACCESSOIRES FOURNIS ............................25
SYNTONISATION ..........................................39
PRECAUTIONS D’USAGE ............................26
SYNTONISATION PREREGLEE ...................40
REMARQUES CONCERNANT LA
TELECOMMANDE.........................................27
EN CAS DE DIFFICULTE ..............................43
CARACTERISTIQUES TECHNIQUES ..........44
RACCORDEMENTS ......................................28
LES COMMANDES ET LEURS
FONCTIONS ..................................................32
CARACTERISTIQUES
● Puissance de sortie minimum RMS per
canal
RX-496
● Syntonisation préréglée automatique
Puissance de sortie RMS de 75W + 75W
(8 ohms), distorsion harmonique totale
de 0,04%, 20–20.000 Hz
● Fonction de permutation des stations
préréglées (Montage préréglé)
RX-396
● Système de syntonisation par
synthétiseur PLL direct en IF
Puissance de sortie RMS de 50W + 50W
(8 ohms), distorsion harmonique totale
de 0,04%, 20–20.000 Hz
● Grande puissance dynamique,
entraînement à impédance faible
● Commande de compensation
physiologique variable continuellement
(LOUDNESS)
24
● Préréglage de syntonisation aléatoire
pour 40 stations
● Minuterie de Sommeil
● Fonctionnement par télécommande
● RX-496 seulement
Commutateur PURE DIRECT pour la
reproduction la plus fidèle du son
d’origine
ACCESSOIRES FOURNIS
Après le déballage, vérifier que les pièces suivantes sont incluses.
Antenne FM intérieure
Télécommande
Cadre-antenna AM
Français
YAMAHA HiFi SYSTEM
REMOTE CONTROL TRANSMITTER
AUX
DIR A
DIR B REC/PAUSE
PLAY
A/B
–
PRESET
+
A/B/C/D/E
DISC
PLAY
TAPE 2
TAPE 1
TUNER
CD
PHONO
STANDBY/ON
SLEEP
VOLUME
Adaptateur d’antenne
(Modèles pour les Etats-Unis et le Canada seulement)
Piles (taille AA, R6, UM-3)
25
PRECAUTIONS D’USAGE: TENIR COMPTE DES PRECAUTIONS CI-DESSOUS
AVANT DE FAIRE FONCTIONNER L’APPAREIL.
1. Pour garantir les meilleures performances possible, lire ce
manuel avec attention. Le garder dans un endroit sûr pour
une utilisation future.
2. Installer votre appareil dans un endroit frais, sec et propre,
loin de fenêtres, sources de chaleur et d’endroits où les
vibrations, la poussière, l’humidité ou le froid sont
importants. Eviter les sources de bourdonnements
(transformateurs, moteurs). Pour éviter les incendies ou
chocs électriques, ne pas exposer l’appareil à la pluie ni à
l’humidité.
13. Sélecteur de tension (modèle général seulement)
Le sélecteur de tension sur le panneau arrière de cet
appareil doit être réglé sur la tension locale AVANT de
brancher l’appareil sur une prise de courant CA.
Les tensions sont de 110/120/220/240V CA 50/60 Hz.
IMPORTANT
Noter le numéro de série de votre appareil dans l’espace cidessous.
Modèle:
3. Ne jamais ouvrir le coffret. Si un objet pénètre dans
l’appareil, contacter votre revendeur.
4. Ne pas forcer les commutateurs, boutons ou câbles.
Lors du déplacement de l’appareil, d’abord débrancher la
prise d’alimentation et les câbles le raccordant à d’autres
appareils. Ne jamais tirer sur le cordon.
5. Les ouvertures pratiquées sur le coffret assurent une
ventilation adéquate de l’appareil. Si ces ouvertures sont
bouchées, la température va s’élever rapidement à
l’intérieur de l’appareil. Par conséquent, éviter de placer
des objets sur ces ouvertures, et installer l’appareil dans
un endroit suffisamment ventilé. Veiller à laisser un espace
d’au moins 20 cm derrière, 20 cm sur les deux côtés et
30 cm au-dessus du panneau supérieur de l’appareil.
Sinon, il peut y avoir un malfonctionnement de l’appareil et
un début d’incendie causé par une eventuelle surchauffe.
6. Toujours régler la commande de volume sur “–∞” avant de
commencer la lecture d’une source audio; augmenter petit
à petit le volume jusqu’à un niveau adéquat une fois que la
lecture a commencé.
7. Ne pas essayer de nettoyer l’appareil avec des diluants
chimiques, ceci endommagerait le fini. Utiliser un chiffon
propre et sec.
8. Bien lire la section “EN CAS DE DIFFICULTE” concernant
les erreurs de fonctionnement communes avant de
conclure que votre appareil est en panne.
N° de série:
Le numéro de série se trouve à l’arrière de l’appareil.
Garder le manuel d’instructions dans un endroit sûr pour
une utilisation future.
AVERTISSEMENT
Afin d’éviter tout risque d’incendie ou d’électrocution, ne pas
exposer l’appareil à la pluie ni à l’humidité.
Cet appareil n’est pas déconnecté de la source
d’alimentation CA tant qu’il est branché à la prise secteur,
même si l’appareil lui-même est mis hors tension. Cet état
est appelé mode veille.
Dans cet état, l’appareil consomme une très faible quantité
de courant.
Commutateur du pas de fréquences (FREQUENCY STEP)
(modèle général seulement)
Du fait que l’espacement interstations des fréquences diffère
selon les régions, régler le commutateur FREQUENCY STEP
situé sur le panneau arrière selon l’espacement des
fréquences de votre région.
Avant de régler ce commutateur, débrancher le cordon
d’alimentation CA de cet appareil de la prise de courant.
9. Lorsqu’on prévoit de ne pas utiliser cet appareil pendaut
une longue période (pendant les vacances, par exemple),
débrancher le cordon d’alimentation CA de la prise de
courant secteur.
10. Pour éviter des endommagements dus à l’orage,
débrancher la prise d’alimentation CA et débrancher le
câble d’antenne en cas d’orage.
11. Mise à la terre ou polarisation – Des précautions doivent
être prises de manière à ce que la mise à la terre ou la
polarisation d’un appareil ne soit pas annulée.
12. Ne pas raccorder d’appareil audio aux prises CA du
panneau arrière si cet appareil demande plus
d’alimentation que la valeur nominale fournie par les
prises.
26
POUR LES CONSOMMATEURS CANADIENS
POUR EVITER LES CHOCS ELECTRIQUES, INTRODUIRE
LA LAME LA PLUS LARGE DE LA FICHE DANS LA BORNE
CORRESPONDANTE DE LA PRISE ET POUSSER
JUSQU’AU FOND.
CET APPAREIL NUMERIQUE DE LA CLASSE B
RESPECTE TOUTES LES EXIGENCES DU REGLEMENT
SUR LE MATERIEL BROUILLEUR DU CANADA.
ATTENTION
Ne changez pas le réglage du sélecteur d’impédance
IMPEDANCE SELECTOR lorsque l’amplificateur est
sous tension, car cela risquerait d’endommager
l’appareil.
Français
SI CET APPAREIL NE SE MET PAS SOUS TENSION
QUAND L’INTERRUPTEUR STANDBY/ON EST
ACTIONNE;
Le sélecteur d’impédance IMPEDANCE SELECTOR n’est
pas réglé sur une position ou l’autre. Poussez-le à fond
dans un sens ou l’autre lorsque cet appareil est en mode
d’attente.
IMPEDANCE SELECTOR (Modèle pour les Etats-Unis)
A OR B:4ΩMIN. /SPEAKER
A B:8ΩMIN. /SPEAKER
A OR B: 6ΩMIN. /SPEAKER
A B: I2ΩMIN. /SPEAKER
IMPEDANCE SELECTOR
SET BEFORE POWER ON
A
REMARQUES CONCERNANT LA TELECOMMANDE
Mise en place des piles
Portée de fonctionnement de la télécommande
l6
20
l2
28
8
4
40
2
60
0
–dB
2
Capteur de signaux provenant
de la télécommande
1
3
Portée de 6 mètres
environ
30°
30°
Remplacement de piles
Si lorsque l’on utilise la télécommande il est nécessaire de la
rapprocher de l’appareil, les piles sont sans doute déchargées.
Dans ce cas, remplacer les deux piles par des neuves.
Remarques
● N’utiliser que des piles AA, R6, UM-3 pour le remplacement
des piles.
● Veiller à ce que les polarités soient respectées. (Voir
l’illustration se trouvant dans le compartiment des piles.)
● Lorsque l’on n’utilise pas la télécommande pendant un
certain temps, retirer les piles de la télécommande.
● Si les piles fuient, les jeter immédiatement. Ne pas toucher
l’électrolyte et veiller à ce qu’il n’entre pas en contact avec
des vêtements, etc. Nettoyer soigneusement le
compartiment des piles avant de mettre en place des piles
neuves.
Remarques
● En outre, veiller à ce qu’il n’y ait aucun obstacle entre la
télécommande et l’appareil.
● Si le détecteur de télécommande est exposé directement à
une forte lumière (provenant d’une lampe fluorescente de
type inverseur, etc.), il se peut que la télécommande ne
fonctionne pas correctement. Dans ce cas, changer la
position de l’appareil principal de façon à éviter une
exposition directe.
27
RACCORDEMENTS
Ne jamais brancher cet appareil et les autres composants avant d’avoir accompli tous les
raccordements.
RACCORDEMENTS A D’AUTRES APPAREILS
Lors du raccordement de cet appareil aux autres éléments veiller à ce que tous les branchements soient effectués correctement,
c’est-à-dire entre “L” (gauche) et “L”, entre “R” (droite) et “R”, entre “+” et “+” et entre “–” et “–”.
Voir aussi le mode d’emploi de chaque appareil branché à cet appareil.
* S’il y a des appareils YAMAHA numérotés 1, 3, 4, etc. sur le panneau arrière, il est possible d’effectuer facilement les
raccordements en raccordant les bornes de sortie (ou d’entrée) de chacun d’entre eux aux bornes portant les mêmes numéros sur
cet appareil.
Enceintes A
Gauche
Droite
Platine à cassette,
lecteur Minidisc, etc.
LINE OUT
LINE IN
GND
OUTPUT
Platine tourne-disque
2
*
(Modèle pour les Etats-Unis)
75Ω
UNBAL.
A OR B:4ΩMIN. /SPEAKER
A B:8ΩMIN. /SPEAKER
FM
ANT
GND
IN
1
A OR B :6ΩMIN. /SPEAKER
A B: I2ΩMIN. /SPEAKER
REMOTE CONTROL
*
IMPEDANCE SELECTOR
OUT
SET BEFORE POWER ON
GND
AM
ANT
A
PHONO
CD
AUX
TAPE 1
TAPE 2
PLAY /MD REC
PLAY
REC
B
1
3
4
CAUTION
3 or 5 4 or 6
I20V 60Hz
I00W MAX. TOTAL
SWITCHED
SEE INSTRUCTION MANUAL FOR CORRECT SETTING.
SPEAKERS
AUDIO SIGNAL
AC OUTLETS
Lecteur de disque
compact
Magnétoscope,
lecteur de Laser Disc, etc.
LINE IN
LINE OUT
AUDIO OUT
OUTPUT
Vers une
prise CA
Droite
Gauche
Platine à cassette,
lecteur Minidisc, etc.
Enceintes B
1
2
**
28
,
: Voir la page 29.
*
1
2
Prises CA [AC OUTLETS (SWITCHED)]
Brancher à ces prises les cordons d’alimentation des appareils
qui composent la chaîne Hi Fi.
L’alimentation aux prises commutées SWITCHED est
contrôlée par l’interrupteur STANDBY/ON de cet appareil ou la
touche STANDBY/ON de la télécommande fournie. En
d’autres termes, lorsque l’appareil est mis sous tension, tous
les appareils qui sont raccordés à ces prises seront aussi sous
tension.
La puissance totale maximum (puissance cumulée de tous les
appareils branchés) autorisée est de 100 watts aux prises
commutées SWITCHED.
Borne de mise à la terre (GND)
(Pour le tourne-disque)
En branchant le câble de mise à la terre d’un tourne-disque à
la borne de mise à la terre (GND), on obtient en général une
réduction du ronflement. Cependant, dans certains cas, les
résultats sont meilleurs si le câble de mise à la terre reste
débranché.
Français
(Modèles pour les Etats-Unis, le Canada, l’Europe et général)
............................................2 prises commutées (SWITCHED)
(Modèles pour le Royaume-Uni et l’Australie)
................................................1 prise commutée (SWITCHED)
*
RACCORDEMENT DES ENCEINTES
Raccorder les bornes SPEAKERS aux enceintes avec des câbles de section adéquate (aussi courts que possible). Si les
branchements sont mal faits, aucun son ne sera entendu aux enceintes. Respecter la polarité des câbles de raccord (repères + et
–). Si les polarités sont inversées, le son perçu manquera de naturel et de profondeur de basses.
Précaution
Veiller à ce que les portions dénudées des câbles ne se touchent pas et n’entrent pas en contact avec des pièces
métalliques de cet appareil. Ceci pourrait endommager l’appareil et/ou les enceintes.
Branchement:
<Modèles pour les Etats-Unis, le Canada, l’Australie et
général seulement>
Il est également possible d’utiliser des fiches banane. Il suffit
d’introduire la fiche banane dans la borne correspondante.
Rouge: positif (+)
Noir: négatif (–)
2
1
3
1 Dévisser le bouton.
2 Introduire le câble
dénudé.
(Enlever environ 5 mm
de gaîne pour dénuder
le câble.)
3 Revisser le bouton et
fixer le câble.
Utiliser des enceintes dont l’impédance correspond à la
valeur indiquée à l’arrière de l’appareil.
Remarque
Une ou deux paires d’enceintes peuvent être branchées à cet
appareil. Si I’on utilise une seule paire d’enceintes, choisir les
bornes d’enceintes (SPEAKERS) A ou B.
29
Sélecteur IMPEDANCE SELECTOR
N’effectuer le réglage de ce sélecteur que si cet appareil n’est
pas sous tension.
Sélectionner la position correspondant à la configuration des
d’enceintes utilisées.
(Position gauche)
ATTENTION
Ne changez pas le réglage du sélecteur d’impédance
IMPEDANCE SELECTOR lorsque l’amplificateur est
sous tension, car cela risquerait d’endommager
l’appareil.
SI CET APPAREIL NE SE MET PAS SOUS TENSION
QUAND L’INTERRUPTEUR STANDBY/ON EST
ACTIONNE;
Le sélecteur d’impédance IMPEDANCE SELECTOR n’est
pas réglé sur une position ou l’autre. Poussez-le à fond
dans un sens ou l’autre lorsque cet appareil est en mode
d’attente.
IMPEDANCE SELECTOR (Modèle pour les Etats-Unis)
Si l’on utilise une seule paire d’enceintes, l’impédance de
chaque enceinte doit être de 4 Ω ou plus.
Si l’on utilise une deux paires d’enceintes, l’impédance de
chaque enceinte doit être de 8 Ω ou plus.
(Position droite)
<Modèle pour les Etats-Unis seulement>
Si l’on utilise une seule paire d’enceintes, l’impédance de
chaque enceinte doit être de 6 Ω ou plus.
Si l’on utilise une deux paires d’enceintes, l’impédance de
chaque enceinte doit être de 12 Ω ou plus.
<Modèle pour le Canada seulement>
L’impédance de chaque enceinte doit être de 6 Ω ou plus.
<Excepté le modèles pour les Etats-Unis et le Canada>
Si l’on utilise une seule paire d’enceintes, l’impédance de
chaque enceinte doit être de 8 Ω ou plus.
Si l’on utilise une deux paires d’enceintes, l’impédance de
chaque enceinte doit être de 16 Ω ou plus.
A OR B:4ΩMIN. /SPEAKER
A B:8ΩMIN. /SPEAKER
A OR B: 6ΩMIN. /SPEAKER
A B: I2ΩMIN. /SPEAKER
IMPEDANCE SELECTOR
SET BEFORE POWER ON
A
Pour une installation personnalisée
Modèles pour les Etats-Unis, le Canada et l’Australie seulement
AL.
Bornes de télécommande REMOTE CONTROL (IN, OUT)
Ces bornes sont utilisées pour une installation en série das
appareils. Lorsque cet appareil est raccordé aux composants
du système de fonctionnement en série, il est possible de faire
fonctionner l’appareil au moyen de la télécommande.
Raccorder la borne REMOTE CONTROL IN de cet appareil à la
borne de sortie du contrôleur centrale pour le système
d’installation personnalisée.
En raccordant la borne REMOTE CONTROL OUT de cet
appareil à la borne REMOTE CONTROL IN de l’autre appareil,
il est aussi possible de faire fonctionner le composant au
moyen de la télécommande. De cette façon, il est possible de
raccorder en série 6 composants au maximum.
30
GND
REMOTE CONTROL
IN
PHONO
CD
AUX
TAPE 1
TAPE 2
PLAY /MD REC
1
3
OUT
4
AUDIO SIGNAL
PLAY
REC
3 or 5 4 or 6
RACCORDEMENTS DES ANTENNES
●
●
Antenne FM extérieure
Antenne AM extérieure
Antenne FM
intérieure
(incluse)
Adaptateur d’antenne
75 ohms/300 ohms
Français
Raccorder chaque antenne correctement à la (aux) borne(s) désignée(s), selon les schémas ci-dessous.
Les deux antennes AM et FM intérieures sont fournies avec cet appareil.
En général, ces antennes sont d’une sensibilité adéquate. Cependant, une antenne extérieure installée correctement donnera
une réception plus claire qu’une antenne intérieure. Si vous obtenez une qualité de réception médiocre, une antenne extérieure
pourra améliorer la situation.
Cadreantenne AM
(incluse)
75Ω
UNBAL.
FM
ANT
Câble coaxial de 75
ohms
GND
AM
ANT
Adaptateur d’antenne
75 ohms/300 ohms
Câble plat de 300
ohms
Mise à la terre
Raccordement du cadre-antenne AM
1
2
➀
3
Orienter l’antenne de
manière à obtenir la
meilleure réception.
➂
➁
* Le cadre-antenne AM doit être placé à un endroit séparé de l’appareil principal.
* Toujours laisser le cadre-antenne AM branché, même si on utilise aussi une antenne AM extérieure.
Borne de mise à la terre (GND)
Pour une sécurité maximale et une interférence minimale,
raccorder la borne GND à une bonne mise à la terre, qui se fait
par un piquet de métal planté dans une terre humide.
Remarques
● Lorsqu’on branche une antenne
intérieure FM, insérer
fermement son connecteur
dans la borne FM ANT.
● Si une antenne FM extérieure
s’avère nécessaire pour
améliorer la qualité de la réception FM, choisir soit un câble
de 300 ohms, soit un câble coaxial. Le câble coaxial est
préférable lorsque le lieu d’utilisation de l’appareil est
perturbé par des interférences électriques.
31
LES COMMANDES ET LEURS FONCTIONS
PANNEAU AVANT
RX-496
1
2
3
4
5
6
PURE DIRECT
NATURAL SOUND STEREO RECEIVER
VOLUME
l6
TUNER
PHONO
20
CD
l2
28
8
STANDBY/ON
4
40
TAPE 2
MONITOR
AUX
A/B/C/D/E
1
2
3
4
5
6
7
2
60
TAPE 1/MD
8
0
–dB
PHONES
BASS
0
l
SPEAKERS
A
2
2
3
ON
2
3
4
OFF
3
4
5
2
2
3
4
5
90
BALANCE
0
l
l
2
3
4
5
7 8
TREBLE
0
l
l
l
B
3
4
5
4
L5
LOUDNESS
FLAT
l
–30dB
l0
9
3
DOWN TUNING UP
5R
MEMORY
EDIT
TUNING
MODE
8
4
5
B
A
FM/AM
2
6
7
MAN’L/AUTO FM
C
AUTO/MAN’L MONO
D EFGH
RX-396
1
2
3
4
6
NATURAL SOUND STEREO RECEIVER
VOLUME
l6
TUNER
PHONO
20
CD
l2
28
8
STANDBY/ON
4
40
TAPE 2
MONITOR
AUX
A/B/C/D/E
1
2
3
4
5
6
7
TAPE 1/MD
2
60
8
0
–dB
PHONES
BASS
0
l
SPEAKERS
A
B
2
3
ON
OFF
32
90
2
3
4
4
5
7 8
TREBLE
0
l
l
l
2
3
3
4
5
4
5
A
BALANCE
0
l
l
2
5
2
2
3
3
4
4
L5
5R
B
LOUDNESS
FLAT
l
–30dB
l0
FM/AM
DOWN TUNING UP
2
3
9
4
MEMORY
EDIT
TUNING
MODE
8
5
6
7
C
MAN’L/AUTO FM
AUTO/MAN’L MONO
D EFGH
1 Interrupteur de veille/marche (STANDBY/ON)
Le presser pour mettre cet appareil en marche. Le presser à
nouveau pour mettre cet appareil en mode veille.
2 Capteur de télécommande
Il reçoit les signaux transmis par la télécommande.
Ils permettent de sélectionner un numéro de station préréglée
(1 à 8).
A Commandes de tonalité
Basses (BASS)
Elle permet d’augmenter ou de diminuer la réponse en basses
fréquences. La position 0 correspond à une réponse neutre.
Aigus (TREBLE)
Elle permet d’augmenter ou de diminuer la réponse en hautes
fréquences. La position 0 correspond à une réponse neutre.
Français
Mode veille
Dans cet état, cet appareil consomme une très faible
quantité de courant lui permettant de recevoir les signaux
infrarouge de la télécommande.
0 Sélecteurs de numéro de station préréglée
B Commande de l’équilibre sonore (BALANCE)
3 Panneau d’affichage
Indique diverses informations. (Pour plus de détails, voir la
page 35.)
4 Sélecteurs d’entrée
Ils permettent de sélectionner la source de programme que l’on
veut écouter. Lorsqu’on appuie sur un sélecteur, le nom de la
source sélectionnée apparaît sur l’affichage.
5 Interrupteur et indicateur de pureté sonore (PURE
DIRECT)
RX-496 seulement
Appuyer sur cet interrupteur de manière que l’indicateur
s’allume pour écouter une source avec le son le plus pur
possible. (Pour plus de détails, se reporter à la page 38.)
6 Commande du niveau de volume sonore (VOLUME)
Elle permet d’augmenter ou de diminuer le niveau du volume.
7 Prise de casque d’écoute (PHONES)
Pour effectuer une écoute au casque, brancher le casque
d’écoute à la prise pour casque (PHONES). Pour obtenir une
écoute au casque exclusivement, régler les deux interrupteurs
d’enceintes SPEAKERS A et B sur la position OFF.
PHONES
Régle l’équilibre des sons entre les enceintes gauche et droite
pour compenser tout déséquilibre provoqué par un
emplacement particulier des enceintes ou une disposition
particulière de la pièce d’écoute.
C Commande de compensation physiologique variable
continuellement (LOUDNESS)
Elle permet de compenser la perte de sensibilité de l’oreille
pour les fréquences basses et élevées lors d’une écoute à
faible volume.
D Touche FM/AM
Presser cette touche pour commuter la gamme de réception
sur FM ou AM.
E Touche de mémoire/FM auto/manuel
(MEMORY, MAN’L/AUTO FM)
Lorsqu’on appuie sur cette touche, l’indicateur “MEMO”
clignote pendant environ 5 secondes. Pendant que l’indicateur
clignote, choisir un numéro de station préréglée désiré en
appuyant sur le sélecteur de numéro de station préréglée
correspondant pour mémoriser la station affichée.
Lorsqu’on maintient cette touche enfoncée pendant plus de
3 secondes, la syntonisation préréglée automatique
commence. (Pour plus de détails, voir la page 41.)
F Touche Edition (EDIT)
Cette touche est utilisée pour permuter les positions de deux
stations préréglées.
G Touche de mode de syntonisation automatique/
8 Interrupteurs d’enceintes (SPEAKERS)
Mettre l’interrupteur A ou B (ou les deux interrupteurs A et B),
correspondant à l’enceinte ou aux enceintes (raccordées à cet
appareil) que l’on veut utiliser, sur la position “ON”. Mettre
l’interrupteur de l’enceinte que l’on ne veut pas utiliser sur la
position “OFF”.
9 Touche A/B/C/D/E
Appuyer sur cette touche pour sélectionner un groupe désiré
(A–E) de stations préréglées.
manuel mono (TUNING MODE, AUTO/MAN’L MONO)
Appuyer sur cette touche pour passer sur le mode de
syntonisation automatique ou manuel. Pour sélectionner le
mode de syntonisation automatique, appuyer sur cette touche
de manière que l’indicateur “AUTO” s’allume sur l’affichage.
Pour sélectionner le mode de syntonisation manuel, appuyer
sur cette touche de manière que l’indicateur “AUTO ” s’éteigne.
H Touche de syntonisation bas/haut (TUNING DOWN/UP)
Elle permet de syntoniser les stations. Appuyer sur le côté
“UP” pour syntoniser des fréquences plus hautes, et sur le côté
“DOWN” pour syntoniser des fréquences plus basses.
33
TELECOMMANDE
La télécommande fournie avec cet appareil permet de commander toutes les fonctions les plus utilisées de cet appareil. Si le lecteur
de disque compact et la platine à cassette raccordés à cet appareil sont des appareils YAMAHA compatibles avec le
fonctionnement télécommande, alors il sera aussi possible de commander les diverses fonctions de chacun des appareils avec
cette télécommande.
Pour commander cet appareil
1 Touches de syntonisateur
Ces touches permettent de commander le syntonisateur.
+: Sélectionne le numéro de station préréglée supérieur.
–: Sélectionne le numéro de station préréglée inférieur.
A/B/C/D/E: Permettent de sélectionner les numéros de stations
préréglées des groupes correspondants (A à E).
YAMAHA HiFi SYSTEM
REMOTE CONTROL TRANSMITTER
2 Touche de minuterie de sommeil (SLEEP)
Cet appareil est mis automatiquement en mode d’attente une
heure après qu’on ait appuyé sur cette touche (de manière que
l’indication SLEEP s’allume).
AUX
DIR A
DIR B REC/PAUSE
1
1
PLAY
A/B
–
PRESET
+
A/B/C/D/E
DISC
PLAY
2
2
3
TAPE 2
TAPE 1
TUNER
4
CD
Il permet de mettre alternativement l’appareil en mode veille et
en fonctionnement.
4 Sélecteurs d’entrée
PHONO
STANDBY/ON
SLEEP
3 Touche de mode de veille/marche (STANDBY/ON)
Ils permettent de sélectionner la source d’entrée.
VOLUME
5 Touches d’augmentation/diminution de volume sonore
5
(VOLUME +/–)
Ces touches permettent d’augmenter et de diminuer le volume.
Pour la commande des autres appareils
Identifier les touches de la télécommande à l’aide des touches
de l’appareil. Si ces touches sont identiques, leurs fonctions
seront aussi identiques. Pour ce qui concerne les fonctions des
touches, se reporter à l’instruction correspondante du manuel
de l’appareil.
1 Touches de platine à cassette
Elles permettent de commander une platine à cassette.
* Les touches DIR A, B et A/B sont utilisables seulement avec
une platine à deux cassettes.
* Pour les platines à une seule cassette équipées de la
fonction de rebobinage automatique, le sens de défilement
de la bande sera inversé lorsqu’on appuie sur la touche
DIR A.
2 Touche de lecteur de disque compact
Elles permettent de commander un lecteur de disque compact.
* La touche DISC est utilisable seulement avec un changeur
de disques compacts.
34
PANNEAU D’AFFICHAGE
2
3
4
Français
1
AUTO STEREO
MHz
MEMO
5
1 Affichage multi-informations
Il affiche diverses informations, par exemple la fréquence de
station, le numéro de station préréglée et le nom de la source
d’entrée sélectionnée.
2 Indicateur de syntonisation automatique (AUTO)
S’allume lorsque cet appareil est dans le mode de
syntonisation automatique.
3 Indicateur de stéréo (STEREO)
S’allume lorsqu’une émission stéréo FM possédant un signal
suffisamment fort est reçue.
4 Compteur de niveau de signal
Indique le niveau de signal de la station reçue.
Si des interférences sont détectées, l’indication du niveau du
signal diminue.
0 20
l00
TAPE MON
SLEEP
2
6
7
5 Indicateur de mémoire (MEMO)
Quand la touche MEMORY est pressée, cet indicateur clignote
pendant environ 5 secondes. Pendant que cet indicateur
clignote, la station affichée peut être mémorisée avec la
touche A/B/C/D/E et les sélecteurs de numéro de station
préréglée.
6 Indicateur de minuterie de sommeil (SLEEP)
Il s’allume lorsque la minuterie de sommeil est en fonction.
7 Indicateur de contrôle de bande (TAPE MON 2)
Il s’allume lorsqu’on a sélectionné la platine à cassette (ou le
lecteur Minidisc, etc.) raccordée aux bornes TAPE 2 situées à
l’arrière de cet appareil comme source d’entrée en appuyant
sur la touche TAPE 2 MONITOR.
35
De la page 36 à 42, ce mode d’emploi décrit principalement la manière de faire fonctionner cet appareil au moyen des commandes
du panneau avant. Pour faire fonctionner cet appareil au moyen de la télécommande, utiliser les touches de la télécommande
portant le même nom que celles du panneau avant.
FONCTIONNEMENT DE BASE
REPRODUCTION D’UNE SOURCE
2
3
7
PURE DIRECT
NATURAL SOUND STEREO RECEIVER
VOLUME
l6
TUNER
PHONO
20
CD
l2
28
8
STANDBY/ON
4
40
TAPE 2
MONITOR
AUX
A/B/C/D/E
1
2
3
4
5
6
7
TAPE 1/MD
2
60
8
0
–dB
PHONES
BASS
0
l
SPEAKERS
A
B
OFF
TREBLE
0
l
l
l
2
2
3
ON
3
4
4
5
2
4
: RX-496 seulement
1
3
4
5
BALANCE
0
l
l
2
3
4
5
2
3
4
5
4
L5
5R
LOUDNESS
FLAT
l
–30dB
l0
FM/AM
9
4
MEMORY
6
7
MAN’L/AUTO FM
TUNING
MODE
AUTO/MAN’L MONO
1, 6
l2
28
EDIT
8
5
5
l6
DOWN TUNING UP
2
3
7
VOLUME
20
2
3
Mettre en marche la source. (Pour les informations
détaillées concernant le syntonisateur, se reporter à la
page 39.)
8
4
40
6
VOLUME
l6
20
l2
2
60
28
8
0
–dB
2
4
40
Régler à la position “∞”.
2
60
0
–dB
Mettre l’appareil sous tension.
Régler le volume au niveau désiré.
STANDBY/ON
7
3
Sélectionner la source d’entrée désirée au moyen des
sélecteurs d’entrée.
TUNER
PHONO
CD
AUX
TAPE 2
MONITOR
TAPE 1/MD
* Le nom de la source d’entrée sélectionnée apparaît à
l’affichage.
4
Sélectionner les enceintes.
ON
B
OFF
* Lorsqu’on utilise deux paires d’enceintes, enfoncer les
interrupteurs A et B.
36
Remarques concernant l’utilisation des sélecteurs d’entrée
● Bien noter que le fait d’ appuyer sur chacun des sélecteurs
d’entrée a pour résultat de sélectionner la source qui est
raccordée aux bornes d’entrée correspondantes situées
sur le panneau arrière.
● La sélection de TAPE 2 MONITOR ne peut pas être
annulée en appuyant sur un autre sélecteur d’entrée. Pour
l’annuler, appuyer à nouveau sur la touche TAPE 2
MONITOR de manière que l’indicateur “TAPE MON 2”
disparaisse de l’affichage. Lorsqu’on sélectionne une
touche autre que TAPE 2 MONITOR, s’assurer que
l’indicateur “TAPE MON 2” n’est pas allumé sur l’affichage.
Après avoir utilisé cet appareil
SPEAKERS
A
Le cas échéant, régler les commandes BASS,
TREBLE, BALANCE et LOUDNESS, ou utiliser
l’interrupteur PURE DIRECT (pour les modèles
RX-496 seulement). Pour plus de détails, se reporter à
la page 38.
Appuyer à nouveau sur l’interrupteur STANDBY/ON du
panneau avant ou sur la touche STANDBY/ON de la
télécommande pour faire passer cet appareil au mode veille.
ENREGISTREMENT (OU DUPLICATION) D’UNE SOURCE SUR UNE BANDE MAGNÉTIQUE
(OU UN MINIDISQUE)
1
2
Français
NATURAL SOUND STEREO RECEIVER
VOLUME
l6
TUNER
PHONO
20
CD
l2
28
8
STANDBY/ON
4
40
TAPE 2
MONITOR
AUX
A/B/C/D/E
1
2
3
4
5
6
7
TAPE 1/MD
2
60
8
0
–dB
PHONES
BASS
0
l
SPEAKERS
A
B
OFF
TREBLE
0
l
l
l
2
2
3
ON
3
4
4
5
5
2
BALANCE
0
l
l
2
3
3
4
4
5
5
2
2
3
3
4
4
L5
5R
LOUDNESS
FLAT
l
–30dB
l0
FM/AM
DOWN TUNING UP
2
9
3
MEMORY
EDIT
TUNING
MODE
8
4
5
6
7
MAN’L/AUTO FM
AUTO/MAN’L MONO
4
1
Sélectionner la source que l’on veut enregistrer.
TUNER
PHONO
CD
TAPE 2
MONITOR
AUX
TAPE 1/MD
* Lorsqu’on choisit TUNER, PHONO, CD, AUX ou TAPE
1/MD, veiller à ne pas sélectionner en même temps TAPE
2 MONITOR.
2
Mettre en marche la source et tourner la commande
VOLUME afin de vérifier si la source choisie est bien la
bonne. (Pour les informations détaillées concernant le
syntonisateur, se reporter à la page 39.)
3
4
Enclencher l’enregistrement sur la platine à cassette
(ou lecteur Minidisc, etc.) raccordé à cet appareil.
Si la platine à cassette (ou un lecteur Minidisc, etc.)
raccordée aux bornes TAPE 2 situées à l’arrière de cet
appareil est utilisée pour l’enregistrement, il est
possible de contrôler les sons enregistrés en appuyant
sur la touche TAPE 2 MONITOR de manière que
l’indicateur “TAPE MON 2” s’allume sur l’affichage.
TUNER
PHONO
CD
AUX
TAPE 2
MONITOR
TAPE 1/MD
VOLUME
l6
20
l2
28
8
4
40
Remarque
Les commandes VOLUME, BASS, TREBLE, BALANCE et
LOUDNESS n’affectent pas l’enregistrement.
2
60
0
–dB
37
Sélection des enceintes acoustiques
Une ou deux paires d’enceintes peuvent être branchées à cet
appareil. Les interrupteurs SPEAKERS permettent de faire la
sélection de la paire A ou B choisie, ou des deux paires
simultanément.
SPEAKERS
A
B
ON
Réglage de la commande de
compensation physiologique variable
continuellement (LOUDNESS)
Lors d’une écoute à volume faible, cette commande compense
la perte de sensibilité de l’oreille humaine pour les fréquences
basses et élevées. Cette commande est réglable afin de
conserver une portée tonale étendue, quel que soit le niveau
de volume des sons.
OFF
1
LOUDNESS
FLAT
l
–30dB
2
l0
Régler à la position
“FLAT”.
9
3
8
4
5
7
6
Réglage de la commande d’équilibre
(BALANCE)
VOLUME
Régler l’équilibre des sons entre les enceintes gauche et droite
pour compenser tout déséquilibre provoqué par un
emplacement particulier des enceintes ou une disposition
particulière de la pièce d’écoute.
2
l6
20
l2
28
8
4
40
2
60
BALANCE
0
l
l
2
Régler à son niveau
d’écoute le plus fort.
0
–dB
2
3
3
4
4
L5
5R
3
Réglage des commandes des basses
(BASS) et des aigus (TREBLE)
BASS
0
l
2
3
3
4
4
5
5
9
3
Tourner jusqu’à ce que le
volume désiré soit obtenu.
8
4
5
6
7
TREBLE
0
l
l
l
2
LOUDNESS
FLAT
l
–30dB
l0
2
2
2
3
3
4
4
5
5
Basses (BASS) : Tourner la commande vers la droite pour
accentuer les sons de basse fréquence,
vers la gauche pour les diminuer.
Aigus (TREBLE) : Tourner la commande vers la droite pour
accentuer les sons de haute fréquence,
vers la gauche pour les diminuer.
Utilisation de l’interrupteur PURE DIRECT
RX-496 seulement
En enfonçant cet interrupteur de manière que l’indicateur
s’allume, il est possible d’obtenir le son le plus pur des sources
audio. En ce faisant, le signal audio contourne les commandes
BASS, TREBLE, BALANCE et LOUDNESS, ce qui permet
d’éliminer toute altération du signal audio.
Pour annuler cette fonction, appuyer à nouveau sur cet
interrupteur de manière que l’indicateur s’éteigne.
Indicateur
PURE DIRECT
38
SYNTONISATION
Lorsque les signaux des stations sont forts et qu’il n’y a pas d’interférences, la syntonisation rapide avec recherche automatique
(SYNTONISATION AUTOMATIQUE) est possible. Cependant, si les signaux de la station désirée sont faibles, il faudra avoir
recours à une syntonisation manuelle (SYNTONISATION MANUELLE).
NATURAL SOUND STEREO RECEIVER
VOLUME
Français
l6
TUNER
PHONO
20
CD
l2
28
8
STANDBY/ON
4
40
TAPE 2
MONITOR
AUX
A/B/C/D/E
1
2
3
4
5
6
7
TAPE 1/MD
2
60
8
0
–dB
PHONES
BASS
0
l
SPEAKERS
A
B
ON
OFF
TREBLE
0
l
l
l
2
2
3
3
4
4
5
5
2
BALANCE
0
l
l
2
3
3
4
4
5
2
2
3
3
4
5
4
L5
5R
LOUDNESS
FLAT
l
–30dB
l0
FM/AM
9
MEMORY
1
Sélectionner “TUNER” comme source d’entrée.
TUNER
2
PHONO
EDIT
TUNING
MODE
8
4
5
6
7
MAN’L/AUTO FM
1 2
SYNTONISATION AUTOMATIQUE
DOWN TUNING UP
2
3
AUTO/MAN’L MONO
4
SYNTONISATION MANUELLE
1
Sélectionner “TUNER” comme source d’entrée.
CD
Sélectionner la gamme (FM ou AM) de la station
désirée, tout en la vérifiant sur l’affichage.
3
TUNER
2
FM/AM
PHONO
Sélectionner la gamme (FM ou AM) de la station
désirée, tout en la vérifiant sur l’affichage.
FM/AM
ou
3
ou
3
TUNING
MODE
AUTO
AUTO/MAN’L MONO
4
CD
Pour syntoniser une fréquence plus élevée, appuyer
une fois sur le côté droit de la touche.
Pour syntoniser une fréquence plus basse, appuyer une
fois sur le côté gauche de la touche.
TUNING
MODE
Eteindre l’indicateur
“AUTO”.
AUTO/MAN’L MONO
4
Syntoniser manuellement sur la station désirée.
DOWN TUNING UP
DOWN TUNING UP
* Pour continuer la recherche de station, maintenir la touche
enfoncée.
* Lorsque le mécanisme de recherche de station s’arrête sur
une station qui n’est pas la station désirée, appuyer à
nouveau sur la touche.
* Lorsque le mécanisme de recherche de station ne s’arrête
pas sur la station désirée (parce que les signaux de la
station d’émission sont trop faibles), employer la méthode
de SYNTONISATION MANUELLE décrite à la page
suivante.
Remarque
Lorsqu’on syntonise l’appareil manuellement sur une station
FM, cette station est reçue en mode mono, pour permettre
d’améliorer la qualité de réception des signaux.
39
SYNTONISATION PREREGLEE
SYNTONISATION PREREGLEE MANUELLE
Cet appareil peut mémoriser la fréquence des stations d’émission sélectionnée par syntonisation. Grâce à cette fonction, il suffit de
sélectionner le numéro de station préréglée sur lequel elle est mémorisée pour rappeler la station correspondante. Il est possible de
mémoriser jusqu’à 40 stations (8 stations sur chacun des 5 groupes).
NATURAL SOUND STEREO RECEIVER
VOLUME
l6
TUNER
PHONO
20
CD
l2
28
8
STANDBY/ON
4
40
TAPE 2
MONITOR
AUX
A/B/C/D/E
1
2
3
4
5
6
7
TAPE 1/MD
2
60
8
0
–dB
PHONES
BASS
0
l
SPEAKERS
A
B
OFF
TREBLE
0
l
l
l
2
2
3
ON
3
4
2
5
BALANCE
0
l
l
2
3
4
3
4
5
4
5
5
2
2
3
3
4
4
L5
5R
LOUDNESS
FLAT
l
–30dB
l0
FM/AM
9
MEMORY
1
2
EDIT
TUNING
MODE
8
4
5
6
7
MAN’L/AUTO FM
2, 1 4, 2
Mémorisation des stations
DOWN TUNING UP
2
3
AUTO/MAN’L MONO
3
Pour rappeler une station préréglée
1
Syntoniser l’appareil sur la station désirée.
(Se reporter à la page précédente pour des
informations détaillées.)
Sélectionner le groupe de stations préréglées.
A/B/C/D/E
Sélectionner le groupe désiré (A – E) des stations
préréglées tout en le vérifiant sur l’affichage.
2
A/B/C/D/E
Appuyer sur le numéro correspondant à la station
préréglée.
1
3
2
3
4
5
6
7
8
MEMORY
MEMO
MAN’L/AUTO FM
AUTO
Clignote pendant
environ 5 secondes.
4
Sélectionner un numéro de station préréglée à l’endroit
où l’on vent programmer la station avant que
l’indicateur “MEMO” disparaisse de l’affichage.
1
2
3
4
5
6
AUTO
MHz
0 20
l00
7
8
Indique que la
station affichée a
été programmée
sur A1.
* Programmer de la même manière les stations désirées sur
A2, A3 ... A8.
* De la même manière, il est possible de programmer plus de
stations sur des numéros de préréglage de stations d’autres
groupes en sélectionnant d’autres groupes à l’opération 2.
40
MHz
0 20
l00
Remarques
• Toute nouvelle programmation de station sur une touche de
préréglage efface la programmation précédente.
• Le mode de réception (mono ou stéréo) est programmé en
même temps que la fréquence de la station.
Mémoire de maintien
Le circuit de mémoire de maintien évite que les informations
programmées ne soient perdues, si par exemple on met cet
appareil en mode d’attente, ou si la fiche d’alimentation est
retirée de la prise CA, ou encore si le courant est coupé à
cause d’une panne de courant.
Si l’alimentation est coupée pendant plus d’une semaine, la
mémoire peut être effacée. Dans ce cas, elle peut être
reprogrammée en suivant le processus de SYNTONISATION
PREREGLEE.
SYNTONISATION PREREGLEE AUTOMATIQUE
Il est possible d’utiliser la fonction de syntonisation préréglée automatique pour les stations FM. Grâce à cette fonction, l’appareil
peut effectuer la syntonisation automatique et la mémorisation ordonnée des stations FM émettant des signaux puissants. Jusqu’à
40 stations peuvent être mémorisées automatiquement sur les touches de préréglage de station en suivant une méthode similaire à
celle indiquée à la page 40 pour la syntonisation préréglée manuelle.
Français
Mémorisation des stations
NATURAL SOUND STEREO RECEIVER
VOLUME
l6
TUNER
PHONO
20
CD
l2
28
8
STANDBY/ON
4
40
TAPE 2
MONITOR
AUX
A/B/C/D/E
1
2
3
4
5
6
7
TAPE 1/MD
2
60
8
0
–dB
PHONES
BASS
0
l
SPEAKERS
A
B
OFF
TREBLE
0
l
l
l
2
2
3
ON
3
4
4
5
5
2
BALANCE
0
l
l
2
3
3
4
4
5
5
2
2
3
3
4
4
L5
5R
LOUDNESS
FLAT
l
–30dB
l0
9
5
6
7
MAN’L/AUTO FM
EDIT
TUNING
MODE
2
AUTO/MAN’L MONO
3
Pour programmer la première station reçue par
syntonisation préréglée automatique sur le numéro
de station préréglée voulu:
1
FM/AM
Appuyer sur la touche et la maintenir enfoncée
pendant plus de 3 secondes.
Si l’on veut par exemple programmer la première station reçue
sur C5, sélectionner “C5” au moyen des touches A/B/C/D/E et
des sélecteurs de numéro de stations préréglées après avoir
appuyé sur la touche MEMORY à l’étape 2. Appuyer ensuite
sur la touche TUNING. La première station reçue est
programmée sur C5, et les stations suivantes sont
programmées dans l’ordre sur C6, C7...
Lorsque la programmation des stations a été accomplie sur
tous les numéros jusqu’à E8, la syntonisation préréglée
automatique s’arrête automatiquement.
Lorsque la syntonisation préréglée automatique est
terminée;
MEMORY
MAN’L/AUTO FM
AUTO
MEMO
Clignote.
3
DOWN TUNING UP
MEMORY
8
4
1
2
FM/AM
2
3
L’affichage donne la fréquence de la dernière station
préréglée.
Vérifier la nature et le nombre de stations préréglées en
suivant la procédure décrite à la section “Pour rappeler une
station préréglée” à la page 40.
Pour rappeler une station préréglée
Il suffit de suivre la procédure décrite à la section “Pour
rappeler une station préréglée” à la page 40.
* Une station rappelée s’affiche par la fréquence.
DOWN TUNING UP
Pour syntoniser des fréquences plus hautes, appuyer une
fois sur le côté droit.
Pour syntoniser des fréquences plus basses, appuyer une
fois sur le côté gauche.
* Un instant après, si l’on n’appuie pas sur la touche
TUNING, la syntonisation préréglée automatique commence
automatiquement vers les fréquences plus hautes.
La syntonisation préréglée automatique commence à partir
de la fréquence actuellement affichée. Les stations reçues
sont programmées dans l’ordre sur A1, A2....A8.
* Si plus de 8 stations sont reçues, elles sont aussi
programmées sur les numéros de stations préréglées des
autres groupes (B, C, D et E) dans cet ordre.
Remarques
● Il est possible de remplacer manuellement une station
préréglée par une autre station FM ou AM en suivant
simplement la procédure décrite à la section “Mémorisation
des stations” à la page 40.
● Si le nombre de stations reçues ne suffit pas à remplir tous
les numéros de stations préréglées jusqu’à E8, la recherche
se terminera après avoir recherché toutes les fréquences de
stations.
● Avec cette fonction, seules les stations FM émettant un
signal suffisamment puissant peuvent être mémorisées
automatiquement. Si la station que l’on veut programmer
émet un signal faible, il faut la syntoniser manuellement en
mono et la programmer en suivant la procédure décrite à la
section “Mémorisation des stations” à la page 40.
41
PERMUTATION DE STATIONS PREREGLEES
Il est possible de permuter les touches de mémorisation de deux stations préréglées de la manière indiquée ci-dessous.
NATURAL SOUND STEREO RECEIVER
VOLUME
l6
TUNER
PHONO
20
CD
l2
28
8
STANDBY/ON
4
40
TAPE 2
MONITOR
AUX
A/B/C/D/E
1
2
3
4
5
6
7
TAPE 1/MD
2
60
8
0
–dB
PHONES
BASS
0
l
SPEAKERS
A
B
OFF
TREBLE
0
l
l
l
2
2
3
ON
3
4
4
5
2
3
4
5
BALANCE
0
l
l
2
3
4
5
2
2
3
3
4
5
4
L5
5R
LOUDNESS
FLAT
l
–30dB
l0
FM/AM
DOWN TUNING UP
2
9
3
MEMORY
EDIT
TUNING
MODE
8
4
5
6
7
MAN’L/AUTO FM
AUTO/MAN’L MONO
2, 4
Exemple:
Pour permuter la station préréglée de E1 à A5, et vice-versa.
1
2
Rappeler la station préréglée sur E1 (en suivant la
méthode décrite à la section “Pour rappeler une station
préréglée” à la page 40).
4
EDIT
EDIT
Clignote.
MEMO
3
Rappeler la station préréglée sur A5 en suivant la
même méthode qu’à l’étape 1.
MEMO
Indique que la permutation des stations est terminée.
Clignote.
42
EN CAS DE DIFFICULTE
Si l’appareil ne fonctionne pas correctement, avant de conclure qu’il est en panne, le vérifier selon la liste suivante de problèmes
possibles. Cette liste donne des détails sur les solutions que vous pouvez appliquer vous-même sans avoir à appeler un
spécialiste. Si vous avez quelque doute ou question, consulter votre revendeur officiel YAMAHA le plus proche.
FM
CAUSE
SOLUTION
Le cordon d’alimentation n’est pas branché ou ne
l’est pas complètement.
Bien brancher le cordon d’alimentation.
L’interrupteur IMPEDANCE SELECTOR situé sur le
panneau arrière n’est pas placé contre l’une ou
l’autre extrémité.
Placer l’interrupteur contre l’une ou l’autre extrémité
lorsque cet appareil est en mode d’attente.
Cet appareil ne fonctionne pas normalement.
Il y a interférence de bruits extérieurs puissants
(orage, électricité statique excessive, etc.) ou on a
effectué une opération erronée en utilisant cet
appareil.
Faire passer cet appareil au mode veille et
débrancher le cordon d’alimentation de la prise
secteur. Après environ trente secondes, rétablir
l’alimentation et utiliser à nouveau cet appareil.
Pas de son.
Mauvais raccordement des câbles de sortie.
Raccorder correctement les câbles. Si le problème
persiste, les câbles sont peut-être en mauvais état.
Sélection d’entrée incorrecte.
Sélectionner une source d’entrée correcte au
moyen des sélecteurs d’entrée.
Les interrupteurs SPEAKERS ne sont pas
correctement réglés.
Régler l’interrupteur SPEAKERS correspondant aux
enceintes que l’on utilise sur la position “ON”.
Les connexions des enceintes ne sont pas correctes.
Effectuer des connexions correctes.
Le circuit de protection s’est déclenché dû à un
court-circuit, etc.
Mettre l’appreil en mode veille puis le rallumer pour
remettre à zéro le circuit de protection.
Le son se coupe soudainement.
La minuterie SLEEP a été activée.
Désactiver la minuterie SLEEP.
Les sons ne sont émis aux enceintes que d’un
seul côté.
La commande BALANCE n’est pas correctement réglée.
Régler correctement la commande.
Mauvais raccordement des câbles.
Raccorder correctement les câbles. Si le probléme
persiste, les câbles sont peut-être en mauvais état.
Il y a une perte de basse et pas de son
d’ambiance.
Les cordons + et – ont été inversés au niveau de
l’appareil ou des enceintes.
Connecter les fils d’enceintes avec les phases
correctes (+ et –).
Le son “bourdonne”.
Mauvais raccordement des câbles.
Raccorder fermement les prises audio. Si le problème
persiste, le câble est peut-être en mauvais état.
Le tourne-disque n’est pas raccordé à une prise de
mise à la terre GND.
Faire le branchement de mise à la terre GND entre
le tourne-disque et cet appareil.
Le volume sonore est faible.
La fonction de compensation physiologique
(LOUDNESS) est activée.
Placer la commande LOUDNESS sur la position FLAT
(réponse plate).
Le niveau de volume est bas à la lecture d’un
disque.
Le disque est lu sur un tourne-disque avec cellule à
aimant mobile.
Raccorder le tourne-disque à l’appareil par le biais
de l’amplificateur à tête à aimant mobile.
Il est impossible d’augmenter le niveau de
volume, ou il y a une distorsion du son.
L’appareil branché aux bornes REC de cet appareil
est en mode d’attente.
Mettre l’appareil concerné sous tension.
La réception FM stéréo est parasitée.
A cause des caractéristiques des émissions FM
stéréo, ceci est limité aux cas où l’émetteur est
éloigné ou quand l’entrée d’antenne est faible.
Vérifier les raccordements de l’antenne.
Essayer d’utiliser une antenne FM à éléments
multiples.
Régler la touche TUNING MODE sur le mode de
syntonisation manuelle.
Il y a de la distorsion et une réception claire ne
peut pas être obtenue, même avec une bonne
antenne FM.
Il y a des interférences.
Ajuster l’emplacement de l’antenne pour éliminer les
interférences.
Une station voulue ne peut pas être syntonisée
avec la méthode de syntonisation automatique.
La station est trop faible.
Utiliser la méthode de syntonisation manuelle.
Utiliser une antenne FM directionnelle de bonne
qualité.
Les stations préréglées préalablement ne
peuvent plus être syntonisées.
Cet appareil a été débranché pendant longtemps.
Recommencer le préréglage.
Une station voulue ne peut pas être syntonisée
avec la méthode de syntonisation automatique.
Signal faible ou raccordements lâches de l’antenne.
Resserrer les raccordements du cadre-antenne AM
et le faire tourner de façon à obtenir la meilleure
réception possible.
Il y a des craquements continus et des bruits de
sifflement.
Ce sont des bruits provenant d’éclairages, de
lampes fluorescentes, de moteurs, de thermostats
et d’autres équipements électriques.
Utiliser une antenne extérieure et un câble de mise
à la terre. Ceci aidera mais il est difficile d’éliminer
tous les bruits.
Il y a des bruits de ronflements et d’ondes
(en particulier le soir).
Un téléviseur est utilisé près de l’appareil.
Eloigner cet appareil du téléviseur.
La télécommande ne fonctionne pas.
Le détecteur de télécommande de l’appareil principal
est exposé à la lumière directe du soleil (ou d’une
lampe fluorescente de type inverseur, etc.).
Changer la position de l’appareil principal.
Les piles de cette télécommande sont trop faibles.
Remplacer les piles.
Cet appareil est en mode veille.
Mettre cet appareil sous tension.
Français
Amplificateur
SYMPTOME
L’appareil ne se met pas sous tension lorsqu’on
appuie sur l’interrupteur STANDBY/ON, ou se
met soudain en mode veille après la mise sous
tension.
Autres
Télécommande
AM
Utiliser la méthode de syntonisation manuelle.
Les sons se dégradent lorsqu’on écoute avec un
casque relié à un lecteur de disque compact ou
à une platine à cassette raccordés à cet
appareil.
43
CARACTERISTIQUES TECHNIQUES
44
Français
45
YAMAHA
YAMAHA
YAMAHA
YAMAHA
YAMAHA
YAMAHA
YAMAHA
ELECTRONICS CORPORATION, USA 6660 ORANGETHORPE AVE., BUENA PARK, CALIF. 90620, U.S.A.
CANADA MUSIC LTD. 135 MILNER AVE., SCARBOROUGH, ONTARIO M1S 3R1, CANADA
ELECTRONIK EUROPA G.m.b.H. SIEMENSSTR. 22-34, 25462 RELLINGEN BEI HAMBURG, F.R. OF GERMANY
ELECTRONIQUE FRANCE S.A. RUE AMBROISE CROIZAT BP70 CROISSY-BEAUBOURG 77312 MARNE-LA-VALLEE CEDEX02, FRANCE
ELECTRONICS (UK) LTD. YAMAHA HOUSE, 200 RICKMANSWORTH ROAD WATFORD, HERTS WD1 7JS, ENGLAND
SCANDINAVIA A.B. J A WETTERGRENS GATA 1, BOX 30053, 400 43 VÄSTRA FRÖLUNDA, SWEDEN
MUSIC AUSTRALIA PTY, LTD. 17-33 MARKET ST., SOUTH MELBOURNE, 3205 VIC., AUSTRALIA
V205370
Printed in Malaysia