1
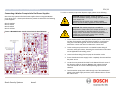
MIC-WKT and MIC-WKT-IR
Installation Manual
Bosch Security Systems
EN
Installation and Operation Manual
MIC-WKTI and MIC-WKT-IR Installation Manual
EN | 2
MIC-WKT and MIC-WKT-IR
Washer Pump Drive Card Kits for the MIC400
Camera Power Supply Units
Installation and Operation Manual
Chapters_______________________________________________
1. Introduction
2. Installation Instructions
3. Technical Specifications
Bosch Security Systems
Issue 1
MIC-WKTI and MIC-WKT-IR Installation Manual
EN | 3
Introduction............................................................. 1-7
Versions.............................................................................................
Features.............................................................................................
Unpacking..........................................................................................
Packaging Contents...........................................................................
1-7
1-7
1-8
1-8
Installation…………………………………… ……… 2-9
705-200 Washer Pump Drive Card Functionality…..…………………
Installation ……………………………………………….………………..
Connecting the washer pump to the IR power supply………………..
2-9
2-9
2-11
Technical Specifications......................................... 3-13
Technical Specifications ………………………………………………..
Bosch Security Systems
Issue 1
3-13
MIC-WKTI and MIC-WKT-IR Installation Manual
Safety Precautions
The following symbols are used throughout this manual please pay careful
attention to their meaning.
EN | 4
1.
2.
3.
4.
5.
The lightning flash with an arrowhead symbol within a
triangle is intended to alert the user to the presence of noninsulated “dangerous voltage” within the product’s
enclosure that may be of sufficient magnitude to constitute
a risk of electric shock to persons.
6.
The exclamation point within a triangle is intended to alert
the user to the presence of important safety, operating and
maintenance (servicing) instructions in the literature
accompanying the appliance.
10.
11.
Important Safety Instructions
CAUTION
TO REDUCE THE RISK OF ELECTRICAL SHOCK,
DISCONNECT POWER SUPPLY BEFORE OPENING THE
POWER SUPPLY UNIT.
POWER DISCONNECT: POWER SUPPLY UNITS HAVE
POWER SUPPLIED WHENEVER THE POWER CORD IS
INSERTED INTO THE POWER SOURCE
WARNING
INSTALLATION SHOULD BE CARRIED OUT BY
QUALIFIED PERSONNEL ONLY IN ACCORDANCE
WITH THE APPLICABLE LOCAL CODES.
BOSCH SECURITY SYSTEMS ACCEPTS NO LIABILITY
FOR ANY DAMAGES OR LOSSES CAUSED DUE TO
INCORRECT OR IMPROPER INSTALLATION
Bosch Security Systems
Issue 1
7.
8.
9.
12.
13.
14.
15.
Read all instructions prior to installation.
Keep this manual for future reference.
Heed all warnings.
Install according to manufacturer’s instructions.
Qualified persons only should install this product, if in doubt consult a qualified
installer.
Use correct electrostatic discharge handling procedures when handling printed
circuit boards to avoid damage to electro-sensitive components.
Do not install near any strong heat sources such as furnaces.
Never push objects or pour liquids into the product enclosure as this can cause a
fire or electrical shock hazard.
Only use electronic cleaning solvent in the unlikely event of the card requiring
cleaning.
Ensure that the product is correctly earthed.
Use only the power sources indicated in this user guide and ensure that the
current rating of the supply cable is adequate for the product.
Do not overload power supply sockets as this can be a fire or electrical shock
hazard.
In the event of failure do not attempt to service this product yourself, please
contact Bosch Security Systems for assistance.
Only use approved attachments or accessories specified by the manufacturer. Any
changes or modifications made to the equipment, not expressly approved in writing
by Bosch Security Systems, could prevent proper or safe operation of the product
and will invalidate the warranty.
Please dispose of disused electrical & electronic equipment at an environmentally
compatible recycling facility (contact Bosch Security Systems for further details).
MIC-WKTI and MIC-WKT-IR Installation Manual
EN | 5
This product complies with the following EC directives:-
Reference
EMC Directive (89/336/EC as amended)
Machinery Directive (98/37/EC)
LV Directive (73/23/EC)
Glossary of Terms
RoHS (Restriction of Hazardous substances) 2002/95/EC
WEEE (Waste Electrical & Electronic Equipment) 2002/96/EC
This equipment contains electrical or electronic components
that must be recycled properly to comply with Directive
2002/96/EC of the European Union regarding the disposal of
waste electrical and electronic equipment (WEEE). Contact
your local supplier for procedures for recycling this
equipment.
Bosch Security Systems
Issue 1
PTZ
PSU
IR
Camset
please
-
Pan/Tilt/Zoom
Power Supply Unit
Infra Red
Bosch Security Systems configuration & set up software,
MIC-WKTI and MIC-WKT-IR Installation Manual
EN | 6
CHAPTER 1
Introduction
The MIC-WKT and MIC-WKT-IR Washer Pump Drive Card Kits provide the
required fittings to enable third party washer kits to remotely clean the window of
the MIC400 camera.
Bosch Security Systems
Issue 1
MIC-WKTI and MIC-WKT-IR Installation Manual
EN | 7
Versions
This manual covers the installation and operation of Bosch Security Systems
MIC-WKT and MIC-WKT-IR Washer Pump Drive Card Kits for the MIC400 range
of PTZ Cameras.
The MIC-WKT kit consists of the 705-200 Washer Pump Drive Card, a 5mm single
jet washer nozzle and two (2) brackets to allow mounting of the washer nozzle on
to a MIC400 camera base or corner mount bracket (CMB) utilising the M8 x 20mm
fixing bolts holding the camera base or between wall and corner mount brackets.
The MIC-WKT-IR kit is identical to the MIC-WKT kit except for lacking the 705-200
Washer Pump Drive Card as this function is provided as standard on all MIC400 IR
Power Supplies.
The washer pump, reservoir bottle & 5mm tubing are not supplied by Bosch
Security Systems and will need to be purchased separately to suit the particular
installation.
This card is only required for MIC400 Power Supply Units which do not support
integrated washer or alarm operations, these are the following MIC400 Power
Supply Units:MIC-240PSU
MIC-12PSU
MIC-24PSU
MIC-115PSU
The following MIC400 Power Supply Units include 4 –Alarm inputs and a Washer
Pump Drive function as standard and details of setting up the washer drive are
included later in this manual, you may also refer to the MIC400 Power Supply
Units Installation and Operation Manual instead :MIC-IR-240PSU
MIC-IR-12PSU
MIC-IR-24PSU
MIC-IR-115PSU
The 705-200 is a Printed Circuit Board as shown below and plugs directly into Non
IR Power Supply Units for the MIC400 PTZ Camera.
Features
The MIC-WKT and MIC-WKT-IR Kits have the following features:
•
•
•
•
•
Bosch Security Systems
Issue 1
Washer Pump Drive Card (for MIC-WKT)
Easy installation into MIC400 non IR power supply units (for MIC-WKT)
Push to Test button
Choice of mounting brackets to suit most installations
Washer Nozzle
MIC-WKTI and MIC-WKT-IR Installation Manual
Unpacking
EN | 8
CHAPTER 2
WARNING: Use proper ESD handling precautions to avoid
electrostatic discharge. Wear a grounded wrist strap to
prevent damage when handling electro-sensitive printed
circuit boards.
Installation
705-200 Washer Pump Drive Card Functionality
The 705-200 Washer Pump Drive Card provides an output relay (SK1) rated at
240vAC up to 5 Amps, wiring for this supply must be provided by the installer and
it is strongly recommended that this supply is externally fused.
•
Check the exterior of the packaging for visible damage. If any items
appear to have been damaged in transit please inform the shipping
company.
A push to test button (SW1) is also provided to test the pump operation and expel
air to prime the pump ready for operation.
•
Unpack the unit carefully; although ruggedized this is electronic equipment
and should be handled with care.
The drive signal Washer Dr is a TTL signal generated by the MIC400 camera, this
TTL signal causes the relay drive transistor to switch on thus energizing the relay
and closing the relay contacts thereby activating the supply to the washer pump.
•
Do not use if any component appears to be damaged. Please contact
Bosch Security Systems in the event of damaged goods.
•
The shipping cartoon is the best way to transport the unit, save it & all
other packaging materials for future use. If the unit must be returned, use
the original packing materials.
Packaging Contents
Please check for the following contents for the MIC-WKT Washer Kit
•
•
•
•
MIC-WKT and MIC-WKT-IR Washer Kit Installation Manual (this Booklet)
705-200 Washer Pump Drive Card
Single Jet Washer Nozzle (5mm)
Two (2) Brackets for mounting the Washer Nozzle (200-007 & 200-008)
For the MIC-WKT-IR the following items should be included:•
•
•
MIC-WKT and MIC-WKT-IR Washer Kit Installation Manual (this Booklet)
Single Jet Washer Nozzle (5mm)
Two (2) Brackets for mounting the Washer Nozzle (200-007 & 200-008)
Bosch Security Systems
Issue 1
MIC-WKTI and MIC-WKT-IR Installation Manual
Installation of the 705-200 Washer Pump Drive Card
EN | 9
Figure 1:- MIC400 Non-IR Power Supply PCB Layout
CAUTION: Electrical Danger: Ensure all power is disconnected
before opening or working upon the MIC400 Power Supply Unit.
Installation must be carried out by suitably qualified persons &
all local safety regulations should be followed.
Installation of the 705-200 Washer Pump Drive Card is best performed prior to
installing the Power Supply in the field. To install the 705-200 Washer Pump
Drive Card, please do the following:1. The power supply unit must be switched off and unplugged prior to
carrying out any work.
2. Ensure that the four (4) card spacer supports fitted in the power supply are
positioned in the left and right most mounting holes on the power supply
printed circuit board, so that the MIC-WSH card is supported in each
corner.
3. Should you need to reposition the card spacers first remove the four (4)
screws holding the power supply PCB to the enclosure, turn the PCB over
and remove the two (2) card spacer supports, these spacers should be refixed at the correct positions shown as A and B on Figure 1 below.
4. Insert the 705-200 Washer Pump Drive Card so that the connector
labelled CN1 as shown on Figure 2 below plugs into the CN1 header on
the Power Supply labelled C on Figure 1. Then fix to the card spacer
supports using M3x6 screws.
5. The 705-200 Washer Pump Drive Card is now ready to accept third party
washer pump electrical connections. Please see Installation of the
Washer Pump for more details.
Bosch Security Systems
Issue 1
A. Right hand - Add on
card support spacers &
holes
B. Centre – Add on
card support spacers &
holes
C. Connection
Header CN1
Figure 2:- 705-200 Washer Pump Drive Card PCB Layout
MIC-WKTI and MIC-WKT-IR Installation Manual
Installation
CAUTION: Electrical Danger: Ensure all power is
disconnected before opening or working upon the MIC400
Power Supply Unit.
Installation must be carried out by suitably qualified persons
WARNING: The 705-200 may be connected via header SK1
to 240vAC or 24vAC pump systems. A correctly rated fuse
MUST be fitted for the expected current draw of the pump
system. Nominally this would be 2.5A for 240V and 5A for
24V pumps. In addition Bosch Security Systems
recommends that the external power supply feeding the
washer pump is protected with a suitably rated fuse.
Bosch Security Systems accepts no liability for damage or
injury caused by incorrect fuse installation.
To connect a third party washer pump, please do the following:1. Fit the washer nozzle to the appropriate bracket (wall or corner mount)
and then fix the washer nozzle bracket to the wall or corner bracket
using one of the M8 fixing bolts, ensure the washer nozzle points
towards the camera and does not obstruct the camera view see photo’s
on page 12 and 13 for installation of washer nozzle bracket.
2. Fit the washer pump and reservoir in a suitable location taking all
necessary safety precautions, observing the manufacturers instructions
and all applicable local building codes.
3. Connect the 5mm tubing from the pump to the washer nozzle.
4. Ensure the MIC400 Power Supply Unit is completely disconnected from
the power source.
Bosch Security Systems
Issue 1
EN | 10
5. Open the PSU lid and locate the washer pump drive header SK1 at the
upper left hand side of the 705-200 Washer Pump Drive Card (see
figure 2).
6. Feed the washer pump drive power cable through the one of the
weatherproof glands on the Power Supply Unit, leave sufficient slack to
connect to the SK1 terminal then tighten the gland. Bosch Security
Systemsstrongly recommends that the washer pump power cable
should be protected externally by a suitably rated fuse.
7. Connect the washer pump drive power cable to the 705-200 Washer
Pump Drive Card using the SK1 terminal, the connections required are
shown below:SK1
Pump Connections
1
2
3
4
Live
Neutral
Pump Neutral
Pump Live
8. Secure all external pipe work and cabling, fill the reservoir then plug in
the MIC400 Power Supply Unit.
9. Press the push to test button (SW1) to test the pump operation, hold
button SW1 down to expel the air from the tubing & prime the pump for
operation.
10. When the pump is primed, close the MIC400 Power Supply Unit.
11. Point the MIC400 at the wash nozzle and set the wash wipe position via
the control room interface or via a laptop using Camset.
MIC-WKTI and MIC-WKT-IR Installation Manual
Connecting a Washer Pump to Infra Red Power Supplies
Bosch Security Systems Infra Red Power supplies have an integrated Washer
Pump Drive and 4 – Alarm input built into the printed circuit board for the following
power supplies:MIC-IR-240PSU
MIC-IR-12PSU
MIC-IR-24PSU
MIC-IR-115PSU
Figure 3 MIC400IR Power Supply Printed Circuit Board Diagram
EN | 11
To connect a washer pump to the IR power supply, please do the following:CAUTION: Electrical Danger: Ensure all power is
disconnected before opening or working upon the MIC400
Power Supply Unit.
Installation must be carried out by suitably qualified
persons & all local safety regulations should be followed.
CAUTION: This washer pump drive is suitable for
230v/110v AC pumps ONLY (HD7 outputs at 230VAC or
110VAC depending on PSU link selection) if a lower
voltage pump is desired then an external transformer of a
suitable type must be used, please refer to suitably
qualified personnel in this instance.
1. Fit the washer nozzle to the appropriate bracket (wall or corner mount)
and then fix the washer nozzle bracket to the wall or corner bracket
using one of the M8 fixing bolts, ensure the washer nozzle points
towards the camera and does not obstruct the camera view.
2. Fit the washer pump and reservoir in a suitable location taking all
necessary safety precautions, observing the manufacturers instructions
and all applicable local building codes.
3. Connect the 5mm tubing from the pump to the washer nozzle.
4. Ensure the MIC400 Power Supply Unit is completely disconnected from
the power source.
5. Locate the 2 way terminal block HD7 in the bottom left hand corner of
the IR power supply as shown on Figure 3, this outputs electrical
current at 230VAC or 110VAC ONLY depending upon PSU link
selection.
6. Feed the washer pump power cable through one of the weatherproof
glands in the power supply enclosure, leave sufficient slack to connect
the cable to HD7.
Bosch Security Systems
Issue 1
MIC-WKTI and MIC-WKT-IR Installation Manual
Signal
Connection
Ident
Washer Pump Live
HD7 pin 1
L
Washer Pump Neutral
HD7 pin 2
N
7. Tighten the weatherproof gland then connect the pump power cable to
the appropriate terminals (Live or Neutral) taking care to observe the
correct polarity as shown below. Bosch strongly recommends that the
washer pump power cable should be protected externally by a suitably
rated fuse.
8. Secure all external pipe work and cabling, fill the washer reservoir then
plug in the MIC400 Power Supply Unit.
9. Press the push to test button (SW1) to test the pump operation, hold
button SW1 down to expel the air from the tubing and prime the pump
for operation.
10. When the pump is primed, close the MIC400 Power Supply Unit.
11. Point the MIC400 at the wash nozzle and set the wash wipe position via
the control room interface or via a laptop using Camset.
Bosch Security Systems
Issue 1
EN | 12
Photo showing installation of the washer pump bracket and nozzle installed
on the MIC 4” PCD foot
MIC-WKTI and MIC-WKT-IR Installation Manual
CHAPTER 3
Technical Specifications
705-200 Washer Pump Drive Card Dimensions
125mm (W) x 25 mm (H) x 60mm (D)
EN | 13
Contact
Americas
Bosch Security Systems Inc
850 Greenfield Road
Lancaster
Pennsylvania 17601
USA
Telephone
+1 888-289-0096
Fax
+1 585-223-9180
Email: [email protected]
www.boschsecurity.us
Europe, Middle East, Africa
Bosch Security Systems B.V
P.O Box 80002
5600 JB Eindhoven
The Netherlands
Phone
+31 40 2577 284
Fax
+31 40 2577 330
[email protected]
www.boschsecurity.com
Asia-Pacific
Bosch Security Systems Pte Ltd
38C Jalan Pemimpin
Singapore 577180
Phone
+65 6319 3450
Fax
+65 6319 3499
[email protected]
www.boschsecurity.com
© Bosch Security Systems B.V, 2011, Data subject to change without
Bosch Security Systems
Issue 2