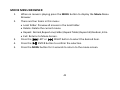
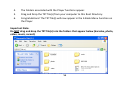
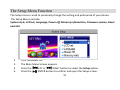
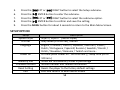
1
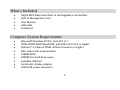
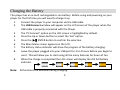
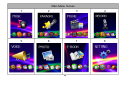
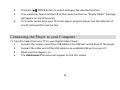
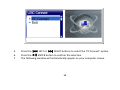
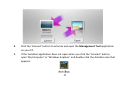
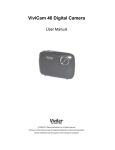
 59048
Digital Music Player
User Manual
© 2011 Sakar International, Inc. All rights reserved. Windows and the Windows logo are registered trademarks of Microsoft Corporation. All other trademarks are the property of their respective companies. Table of Contents
Introduction .................................................................................................................................... 3 What’s Included ............................................................................................................................... 4 Computer System Requirements ..................................................................................................... 4 Charging the Battery ........................................................................................................................ 5 A Quick Look at Your Digital Music Player ........................................................................................ 6 Button Functionality ........................................................................................................................ 7 Key Features .................................................................................................................................... 8 Powering on/Off Your Player .......................................................................................................... 10 The Main Menu ............................................................................................................................. 13 Connecting the Player to your Computer....................................................................................... 15 Transferring Files to your Player .................................................................................................... 18 Viewing and Editing Media Transferred to the Player .................................................................... 22 Controlling the Volume .................................................................................................................. 26 The Music Menu Function ............................................................................................................. 27 The Karaoke Menu Function .......................................................................................................... 33 The Movie Menu Function ............................................................................................................ 37 The Record Menu Function ........................................................................................................... 42 The Voice Menu Function .............................................................................................................. 45 The Photo Menu Function ............................................................................................................. 49 The E‐BOOK Menu Function .......................................................................................................... 53 The Setup Menu Function ............................................................................................................. 57 Sakar Warranty Card ...................................................................................................................... 59 Technical Support & Troubleshooting ............................................................................................ 60 Connecting and Transferring Files using A Mac…………………………………………………………………………….63 2 Introduction
Thank you for purchasing the 59048 Digital MP4 Player. This new generation USB digital portable versatile player allows you to upload and playback movies, view photos, listen to your favorite songs, karaoke sing along, read e‐books, record and playback voice messages and more… To transfer media from your computer to your Digital MP4 Player simply plug the player via the USB cable (included) to the USB slot at the base of the player. Plug the other end of the USB cable to an available USB port on your computer. •
Click ‘PC Connect’ and the inbuilt Management Tool will automatically open on your computer screen. •
No CD or external software applications need to be installed. •
Truly a portable player that can be plugged in and used on any compatible PC wherever you are. •
Easily transfer and remove movies, photos and songs to and from your player •
This player supports multiple music and photo formats 3 What’s Included
•
•
•
•
•
Digital MP4 Player with built‐in rechargeable Li‐ion battery Built‐in Management Tool User Manual USB cable Earphones Computer System Requirements
•
•
•
•
•
•
•
•
•
Microsoft Windows XP SP3, Vista SP1 or 7 INTEL PROCESSOR Based MAC with MAC OS X 10.5 or Higher Pentium® 4, Celeron®AMD, Athlon®processor or higher AGP video card recommended 128MB RAM 100MB free hard drive space Available USB Port 16‐bit color display adapter 1024x768 screen resolution 4 Charging the Battery
This player has an in‐built rechargeable Li‐ion battery. Before using and powering on your player for the first time you will need to charge it up. 1.
Connect the player to your computer via the USB cable. 2.
The USB Connect window will appear on the LCD screen of the player when the USB cable is properly connected with the Player. 3.
The ‘PC Connect’ option on the LCD screen is highlighted by default. 4.
Press the Up or Down button to select the ‘Exit’ option. 5.
Press the ENTER button to confirm the selection. 6.
The Main Menu screen appears on the LCD. 7.
The battery status indicator will show the progress of the battery charging. 8.
Leave the player plugged into your USB port for 3 to 4 hours before you begin to use it. This will allow you to start using all the many features for hours of fun. 9.
When the charge is completed the LCD screen will display the still full battery indicator. Note: All functions are available during charging. 5 A Quick Look at Your Digital Music Player
6 Button Functionality
Button POWER ON/OFF MENU/Up Back / Left Button Forward / Right Button Volume/ Down (VOL) Enter/Play/Pause Function Powers on and off the player Accesses menus and sub‐menus. Press for 3 seconds to enter Main Menu. Up Button. Back to previous option. Skips to next option. Adjusts the volume by pressing this button and then pressing the Previous or Next buttons to decrease or increase volume. Menu /Down Button Confirms selection/Play/Pause. Press for 3 seconds to Power Off / Wake up MP4 Player
7 Key Features
•
•
•
•
•
•
•
•
•
•
•
•
•
•
•
•
8 General Multimedia Features Music, Karaoke, Movie, Record, Voice, Photo, E‐book and Setup Full Color Animated menu Streamlined portable design USB disk with no driver required Internal memory of up to 2GB 7‐timbre Equalizer Display (EQ) ‐ natural, rock, pop, classic, soft, jazz, and DBB Music Playing Mode: normal, repeat, repeat one shuttle and more Equalizer Fade‐in and fade out volume control function Data Communication with computer ‐ Auto‐run and Mass Storage Power Saving Mode Battery Capacity Indicator Power On/Off animation display Firmware upgradeable Dynamic Label System Reserve multiple documents in .TXT format completely. 8 •
PC Management Tool application: ‐ Photo Input: Can adjust to suitable size ‐ Video Input: Automatically switch to supported size and format. ‐ Karaoke Input: Automatically switch to supported size and format. Main Function Description and File Format Compatibility Music Music Format Supported
MP2, MP3, ASF, WMA, OGG 7 EQ Music Mode Natural, Rock, Pop, Classic, Soft, Jazz, DBB
Lyric Display Yes
Karaoke Karaoke Format Supported
KOK, LRC+MP3
Karaoke Function Microphone, Echo, key Movie Movie Format Supported
AVI
Record Format Supported MSadpcm
Voice Format Supported MSadpcm
Feature Play the specific duration of the recorded voice files
Photo Photo Format Supported
JPG, GIF, BMP, PCX E‐Book File Format Supported
TXT
Setting System Style 2
Brightness Level 6
9 Powering on/Off Your Player
POWER ON Note: The player will not power on if the battery power is low. Please charge the battery before using the player. 1.
Slide the ON/OFF switch on the top of the player ON. 2.
The Opening ‘Welcome’ animation graphic will appear on the screen. 10 3.
4.
The Main Menu screen will appear a few seconds later. Your player is now ready to be used. POWER OFF To Power off the player manually: 1.
Slide the ON/OFF switch on the top of the player to OFF. 2.
The ‘Goodbye’ graphic will appear on the screen before the player powers off. 3.
Alternatively, while the player is set to ON, press the ENTER button for about three seconds to power off the player. Press the ENTER button again to turn the player back on. Note: The power will not turn off if the player is still processing – such as recording, transmitting data or updating firmware. AUTO POWER OFF The Player will also automatically power off in the following situations: 1. Sleep Mode 2. Power Saving Mode 3. Low Battery 11 (low battery screen) •
To save power, the Player has an ‘Auto Power Off’ setup feature that allows you to set the time for the player to automatically power off if it is not in use. •
Auto Power Off is set by default to power off after 30 minutes when the player is not active. •
The power will not turn off if the player is still processing – such as recording, transmitting data or updating firmware. 12 The Main Menu
There are 8 menu functions: Music, Karaoke, Movie, Record, Voice, Photo, E‐book and Setup All the functions can be accessed from the Main Menu screen that appears when powering on the player. 1.
Power on the player. 2.
The first menu option to appear on the screen is Music. LEFT or RIGHT buttons. 3.
To select the other functions press the 13 14 4.
5.
6.
Press the ENTER button to select and open the selected function. If no media has been transferred to that menu function an “Empty Folder” message will appear on the LCD screen. To transfer media form your PC to the player, plug the player into the USB port of you PC and read the next section. Connecting the Player to your Computer
To transfer media from your PC to your Digital Video Player: 1.
Connect the smaller end of the USB cable to the USB slot on the base of the player. 2.
Connect the other end of the USB cable to an available USB port on your PC. 3.
Make sure the player is on. 4.
The USB Connect file menu will appear on the LCD screen. 15 5.
6.
7.
Press the LEFT or RIGHT buttons to select the ‘PC Connect’ option. ENTER button to confirm the selection. Press the The following window will automatically appear on your computer screen. 16 8.
9.
Click the ‘Connect’ button to activate and open the Management Tool application on your PC. If this AutoRun application does not open when you click the ‘Connect’ button, open ‘My Computer’ or ‘Windows Explorer’ and double‐click the AutoRun icon that appears. 17 Transferring Files to your Player
Using the Management Tool you can transfer Photos, Music, Videos and Karaoke sound files on your PC directly to your Digital MP4 Player. The Management Tool is divided into 2 windows: ‘My Computer’ and ‘Digital Video Player’. 18 MY COMPUTER 1.
2.
3.
4.
5.
6.
7.
8.
The window on the left shows all the files and folders on your PC. In the left hand corner of the screen is a directory of files and folders on your computer. Select one of the media type tabs Photo, Music, Video or Karaoke at the top of the Directory Window. Find the picture files, music files, video files and karaoke files that you would like to upload and transfer to your player. The selected folder with thumbnail files will appear to the right of the directory window. Select the file thumbnail you wish to transfer to the Player. The file appears in the View Screen below the folder window. You can adjust the appearance of the Photos by clicking the following button option icons to the right of the View Screen: (Zoom in), (Zoom out), 19 (Rotate Left),
(Rotate Right), (Actual Size), (Reset Photo), (Crop Photo – the adjustable crop area is saved as a new photo to your player). 9.
10.
To transfer the file to the PC, press the Transfer File button. The selected file is automatically transferred to the Player. Note: All functions are disabled during PC connection. 20 DIGITAL VIDEO PLAYER 1.
2.
3.
4.
5.
To see the file that has been transferred to the player, click the relevant Photo, Music, Video or Karaoke tab on the right side of the main window. The media file that has been transferred will appear. All the files that appear in this right hand window when the player is connected to the PC are the files that have been successfully uploaded and transferred to your player. You can also delete media from the Player by selecting the file to delete and pressing the Delete button. The media on your player can also be transferred to any connected PC. Select the file you wish to save to the PC. Select the folder where you wish to save the file on the PC from the ‘My Computer’ list of folders on the left side of the screen. Press the ‘To PC transfer’ button to transfer the file to your computer. 21 Viewing and Editing Media Transferred to the Player
To enjoy the media that you have transferred to your player, remove the USB cable, turn on your player and select the relevant Menu function on your player. VIEW MEDIA To see all the media on the player in each of the menu function you can use the File Browser. 1.
Turn the Player on. 2.
Select the Menu Function Music, Karaoke, Movie, Record, Voice, Photo or E‐book from the Main Menu. ENTER button to confirm the selection. 3.
Press the 4.
The selected Function will open. 5.
Press the ENTER button to open the File Browser. ENTER to see all the files in that function 6.
Select the Local Folder option and press the folder. 7.
Press the LEFT or RIGHT buttons to select a file. ENTER button to confirm. 8.
Press the 9.
The selected media file will be displayed to play or view. 22 10.
Press the MENU button for 3 seconds to exit the Menu Function and return to the Main Menu screen. File Browser 23 DELETE MEDIA To delete a selected media file or delete all the media file in a function: 1.
Turn the Player on. 2.
Select the menu function Music, Karaoke, Movie, Record, Voice, Photo or E‐book from the Main Menu. 3.
Press the ENTER button to confirm the selection. 4.
The selected Function will open. 5.
Press the MENU button to open the File Browser. 6.
Press the LEFT or RIGHT buttons to scroll down the list: • Select the Delete option if you wish to delete the currently selected file in that function. • Select the Delete all option if you wish to delete all the media files in that function. • Select the Exit option to exit the File Browser and return to the current media file. ENTER button to confirm the selection. 7.
Press the 8.
If you selected to delete the current file, the selected media file will appear in a ‘Delete’ confirmation screen with ‘YES’ and ‘NO’ options: 24 9.
10.
• Press the LEFT or RIGHT buttons to select ‘YES’ or ‘NO’. ENTER button to confirm the selection. • Press the If ‘Yes’ is selected, the selected media file(s) will be deleted. Press the MENU button for 3 seconds to exit the Function Screen and return to the Main Menu. 25 Controlling the Volume
In the Music, Karaoke, Movie and Voice functions the volume can be adjusted and controlled. The volume range is 0 to 31. 1.
2.
3.
4.
Volume Control Press the VOL button to activate the Volume Control bar graphic. Press the LEFT button to DECREASE the volume. Press the or RIGHT button to INCREASE the volume. Press the ENTER button to save and exit the volume setting. 26 The Music Menu Function
PLAYING MUSIC 1.
2.
3.
4.
Turn the power on. The Main Menu Screen appears. Press the LEFT or RIGHT button to select the Music Function option. Press the ENTER button to confirm and open the Music screen. 27 5.
6.
7.
8.
9.
10.
In the Music Screen press the LEFT or RIGHT button to select a song to play. The Music file information (name, length, format, bit size, number of song, etc) will appear on the screen. Press the ENTER button to START PLAYING the song file. Press the ENTER button again to PAUSE the song. Press the LEFT or RIGHT button to play the previous or next song in the list. Press the MENU button for about 3 seconds to return to the Main Menu Screen. 28 Music Screen 29 LRC Function 30 MUSIC FUNCTION Music Menu: Music Function 1.
2.
While a music file is playing, press the MENU button. The Music function menu list will appear (sound effect, play mode.. etc.) 31 3.
4.
5.
6.
Press the LEFT or RIGHT button to select the desired Music functions menu. Press the ENTER button to enter the submenu. Press LEFT or RIGHT button to select the desired item. ENTER button to confirm the setting and return to the Music screen. Press the The 7 Music Menu Functions: Repeat, Equalizer, Replay, Replay gap, Microphone, Mic Volume and Return Music Functions Description Repeat Normal/ Repeat One/ Folder/ Repeat Folder/ Repeat all/ Random/ Intro Equalizer Natural/ Rock/ Pop/ Classic/ Soft/ Jazz/ DBB Replay Replays the selected music file Replay times 0 to 10 Replay gap 0 to 10 Microphone Active/ DeActive Microphone Vol. 1 to 6 Exit Returns to Music Screen 32 The Karaoke Menu Function
PLAYING KARAOKE 1.
2.
3.
4.
5.
6.
Turn the power on. The Main Menu Screen appears. LEFT or RIGHT button to select the Karaoke option. Press the ENTER button to display the Karaoke screen. Press the LEFT or RIGHT button to select a song you want to sing. Press the ENTER button to START PLAYING. Press the 33 7.
8.
9.
Press the ENTER button again to PAUSE. Press the LEFT or RIGHT button to play the previous or next song. Hold the MENU for three seconds to return to the Main Menu Screen. Karaoke Screen 34 KARAOKE DISPLAY Depending on the files types, Karaoke has 3 different displayed screens. KARAOKE FUNCTION WINDOW 1.
2.
Karaoke screen appears. ENTER button to play Karaoke. Press the 35 3.
4.
5.
6.
7.
8.
While Karaoke is playing, press the MENU button to display the Karaoke Menu Function window. Press the LEFT or RIGHT button to select the desired item. Press the ENTER button to enter the submenu. LEFT or RIGHT button to select the desired item. Press the Press the ENTER button to confirm and save the setting. Press the MENU button for about 3 seconds to return to the Main Menu Screen. Note: When playing LCR+MP3 music, Press the VOL MENU buttons to launch some shortcut functions: •
Press one time: Voice menu •
Press two times: Pitch menu •
Press three times: Microphone voice •
Press four times: Echo voice •
Press five times: Channel set 36 Karaoke Functions Volume Vocal Elim Microphone Echo Pitch Channel set Mute Description 0 ~ 32 0~06 0~06 0~06 -8 ~ 0 ~ +8 (LRC format only)
Left channel/ Right channel/ Left & Right (not for KOK format) The Movie Menu Function
Movie 37 PLAYING A MOVIE 1.
2.
3.
4.
5.
6.
7.
8.
9.
Turn the power on. The Main Menu Screen appears. Press the LEFT or RIGHT button to select the Movie Function option. Press the ENTER button to confirm and open the Movie screen. Press the LEFT or RIGHT button to select a movie. Press the ENTER button to START PLAYING the movie on the full LCD screen. Press the ENTER button again to PAUSE the movie. Press the LEFT or RIGHT button to playback the previous or next movie. Hold the MENU button for about three seconds to return to the Main Menu Screen. 38 Movie Screen MOVIE DISPLAY 39 In the center of the screen 40 MOVIE MENU BROWSER 1.
2.
3.
4.
5.
When no movie is playing press the MENU button to display the Movie Menu Browser. There are four items in this menu: • Local folder: Preview all movies in the local folder. • Delete: Delete the current movie. • Repeat: Normal,Repeat one,Folder,Repeat folder,Repeat all,Random,Intro. • Exit: Returns to Movie Screen. Press the LEFT or RIGHT button to select the desired item. Press the ENTER button to confirm the selection. Press the MENU button for 3 seconds to return to the movie screen. 41 The Record Menu Function
RECORDING 1.
2.
3.
4.
Turn the power on. The Main Menu Screen appears. Press the LEFT or RIGHT button to select the Record Function option. ENTER button to confirm and open the Record Screen. Press the 42 5.
6.
7.
When recording make sure that the Microphone on the top of the player is not covered. Press the ENTER button to START the RECORDING and again to PAUSE the recording. Press and ENTER button to save and STOP the recording. Press and hold the MENU button for 3 seconds to return to Main Menu Screen. Note: • The recorded file is stored in \RECORD\VOICE\ folder. • The recording file name is saved as REC# # #.WAV. “###” indicated the recording file number. • The maximum amount of recorded files is 999. 43 Record Screen RECORD MENU 1.
2.
The Record screen appears. Press the MENU button to display Record Menu Browser: • Local folder 44 3.
4.
5.
• REC Type: ‐ Fine REC (8KHz, 32Kbps, WAV format) ‐ Long REC (8KHz, 10Kbps, CLP format) • Exit Press the LEFT or RIGHT button to select the item. Press the ENTER to confirm and save the selection. Press the MENU button for about 3 seconds to return to the Main Menu Screen. The Voice Menu Function
45 LISTENING TO THE VOICE RECORDING 1.
2.
3.
4.
5.
6.
7.
Turn the power on. The Main Menu Screen appears. Press the LEFT or RIGHT button to select the Voice Function option. Press the ENTER button to confirm and open the Voice screen. Press the LEFT or RIGHT button to select the VOICE recording you want to playback. Press ENTER button to START/PAUSE the Voice Playback. Press the MENU button for about 3 seconds to return to the Main Menu Screen. Note: The Voice playback only supports WAV format 46 Voice Screen 47 VOICE MENU FUNCTION 1.
2.
3.
4.
5.
6.
7.
8.
Voice screen appears. ENTER button to Playback the recorded voice file. Press the While voice is playing, press the MENU button to display the Voice Menu Function Window. Press the LEFT or RIGHT button to select the desired item – Repeat, Replay or Exit. Press the ENTER button to enter the submenu. Press the LEFT or RIGHT button to select the desired item. Press the ENTER button to confirm the setting. Press the MENU button for about 3 seconds to return to the Main Menu Screen. Voice Functions Repeat Replay Exit Description Normal/ Repeat one/ Folder/ Repeat folder/ Repeat all /Random/ Intro Replays the selected voice file Returns to Voice Screen 48 The Photo Menu Function
VIEWING PHOTOS 1.
2.
3.
4.
5.
6.
Turn the power on. The Main Menu Screen appears. Press the LEFT or RIGHT button to select the Photo Function option. Press the ENTER button to confirm and open the Photo screen. LEFT or RIGHT button to select a photo to In the Photo Screen press the view. Press the ENTER button to view the selected photo on the full LCD screen. 49 7.
8.
Press the LEFT or RIGHT button to view the previous or next photo on the list. Press the MENU button for about 3 seconds to return to the Main Menu Screen. Note: The Player supports the following photo formats ‐ JPG, GIF, BMP and PCX. PHOTO DISPLAY 50 MAIN PHOTO BROWSER & PHOTO MENU 1.
2.
3.
4.
5.
6.
7.
8.
In the PHOTO mode, press the LEFT or RIGHT button to select the picture that you want to view on the full screen. Press the ENTER button to confirm and open the selected photo. Press the MENU button to display the Photo Browser menu: •
Local folder •
Play set •
Delete •
Delete All •
Exit LEFT or RIGHT button to select you desired item. Press the ENTER button to enter the submenu. Press the Press the LEFT or RIGHT button to select the desired item. Press the ENTER button to confirm the selection. Press the MENU button to exit. 51 Photo Menu Local folder Play set Delete Delete all Exit Description Displays Photo Browser Manual Play / Auto Play Plays back all the photos in the folder as a Slide Show, between 2~10sec. Deletes the current file Deletes all the photos in the Photo menu Returns to the Photo Screen 52 The E-BOOK Menu Function
1.
2.
3.
4.
5.
6.
7.
Turn the power on. The Main Menu Screen appears. Press the LEFT or RIGHT button to select the E‐book Function option. Press the ENTER button to confirm and open the E‐book TXT file browser screen. Press the LEFT or RIGHT button to select a file. Press the ENTER button to display the text. LEFT or RIGHT button to view the previous or next page. Press the 53 8.
When the text appears on the screen, press the Book Mark options: ENTER button to display the • Select • Add • Delete • Exit 9.
Press the LEFT or RIGHT button to select the desired item. 10. Press the ENTER button to confirm and open the selection. 11. Hold the MENU button for about three seconds to return to the TXT Browser. Note: The E‐Book feature only supports TXT formats. E‐BOOK Local folder Play set Delete Delete all Exit Description E‐Book text browser Manual Plays/ Auto Plays (1~10sec) Deletes the current text file Deletes all the text files Returns to E‐BOOK screen 54 TRANSFERRING TXT TO THE PLAYER The Management Tool application does not have an E‐BOOK upload feature. The TXT files that you wish to transfer to your player need to be uploaded manually. In order to transfer TXT files from your computer to the player, please follow these instructions: 1.
Connect the Player to your PC. 2.
Open the Management Tool as described in the “Connecting the Player to your Computer” and “Transferring Files to Your Player” sections of this manual. 3.
Open ‘My Computer’ and open the Removable Disk icon that appears when the Player is connected. 55 4.
5.
6.
The Folders associated with the Player functions appear. Drag and Drop the TXT file(s) from your computer to this Root Directory. Congratulations! The TXT file(s) will now appear in the E‐Book Menu Function on the Player. Important Note: Do NOT drag and drop the TXT file(s) into the folders that appear below (karaoke, photo, video, music, record). 56 The Setup Menu Function
The Setup menu is used to personally change the setting and preference of your device. The Setup Menus include: System style, LCD set, Language, Power off, Memory information, Firmware version, Reset and Exit 1.
2.
3.
4.
Turn the power on. The Main Menu Screen appears. Press the LEFT or RIGHT button to select the Setup option. Press the ENTER button to confirm and open the Setup screen. 57 5.
6.
7.
8.
9.
Press the LEFT or RIGHT button to select the Setup submenu. ENTER button to enter the submenu. Press the Press the LEFT or RIGHT button to select the submenu option. Press the ENTER button to confirm and save the setting. Press the MENU button for about 3 seconds to return to the Main Menu Screen. SETUP OPTION Setup System Style LCD Set Language Power off Memory info Firmware version Reset Setting Exit Description Style 1 / Style 2 (Menu Styles) Gray mode (0 to 30 sec) / Return English / Chinese / French / Japanese / German / Italian / Dutch / Portuguese / Spanish/ Russian / Swedish / Danish / Polish / Slovakian / Romania / Turkish and more… Off time (Auto Power off ‐ 00 to 60 min.) / Sleep time (00 to 120 min.) Status bar and Memory status in percentage Version number and related information Resets the player to the factory default settings Exits and returns to Main Menu Screen 58 Sakar Warranty Card
This warranty covers for the original consumer purchaser only and is not transferable. Products that fail to function properly UNDER NORMAL USAGE, due to defects in material or workmanship. Your product will be repaired at no charge for parts or labor for a period of one year. What Is Not Covered By Warranty: Damages or malfunctions not resulting from defects in material or workmanship and damages or malfunctions from other than normal use, including but limited to, repair by unauthorized parties, tampering, modification or accident. What To Do When Service Is Required: When returning your defective product (postage pre‐paid) for service, your package should include: 1.
Copy of original bill of sale 2.
A detailed written description of the problem. 3.
Your return address and telephone number (Daytime) 59 MAIL TO ADDRESS BELOW: Sakar US Sakar International Attention: Service Department 195 Carter Drive Edison, NJ 08817 Sakar UK/Europe Attention: Service Department 2D, Siskin Parkway East 4020 Middlemarch Business Park Coventry, CV3 4PE Sakar Australia Return faulty camera to the Refund Counter at the store where purchased Technical Support
For technical support issues please visit our website at www.sakar.com. You can find manuals, software and FAQ’s at the website. Can’t find what you are looking for? E‐mail us at [email protected] and one of our technical support team members will answer your questions. For phone support in the US please call 1‐877‐397‐8200, in the UK call 0800 917 4831. If you would like to call from anywhere else, please visit www.sakar.com for your local toll free number. Troubleshooting
60 No Power No sound is heard from earphone. Characters in LCD are corrupted Download of files fails. Check power switch has been power on. Check whether Volume is set to “0” and connect the headphone plugs firmly. Check whether the headphone plug is dirty. Make sure that the music files are not corrupted. Corrupted sound files may make a static noise and the sound may cut off. Check whether the right language has been selected. Check whether USB cable is damaged and is connected properly. Check whether the player’s memory is full. 61 This device complies with the part 15 of the FCC rules. Operation is subject to the following two conditions:(1) this device may not cause harmful interference, and (2) this device must accept any interference received, including interference that may cause undesired operation. Caution: changes or modifications not expressly approved by the party responsible for compliance could void the user's authority to operate the equipment. NOTE: This equipment has been tested and found to comply with the limits for a Class B digital device, pursuant to Part 15 of the FCC Rules. These limits are designed to provide reasonable protection against harmful interference in a residential installation. This equipment generates, uses and can radiate radio frequency energy and, if not installed and used in accordance with instructions may cause harmful interference to radio or television reception, which can be determined by turning the equipment off and on. The user is encouraged to try to correct the interference by one or more of the following measures: __ Reorient or relocate the receiving antenna. __ Increase the separation between the equipment and receiver. __ Connect the equipment into an outlet on a circuit different from that to which the receiver is connected. __ Consult the dealer or experienced radio/ TV technician for help. 59048EN‐260810v1‐TA FW1062_OSV02.22 62 Connecting and Transferring Files using A Mac
1.
2.
3.
Connect the USB cable included with your package to the USB port of the MAC. Open the "File finder” and you will see an external drive named “untitled”. Note that sometimes this drive is labeled with the model number or similar name of the player. Open itunes. Drag and drop compatible media files (please refer to page 9 regarding file format compatibility) from your Mac to the player. 63