1
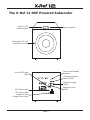
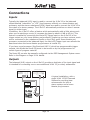
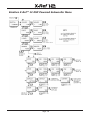
DSP Powered Subwoofer
User Manual
Important Safety Precautions and Explanation of Symbols
!
The exclamation point within an equilateral triangle is intended to alert the user to the
presence of important installation, operation, and service instructions in this manual.
The lightning flash with arrowhead symbol within an equilateral triangle is intended to
alert the user to the presence of uninsulated dangerous voltages within the enclosure
that may be of sufficient magnitude to constitute a risk of electrical shock to the user.
Please read this Installation and Operation Manual thoroughly before attempting to
install, configure, or operate the X-Ref subwoofer. After successful installation and
configuration of the X-Ref subwoofer, be sure to retain this manual in a safe place for
future reference.
Safety is a key component to a long lasting and trouble free installation. Please read
and follow all instructions and heed all warnings on the X-Ref subwoofer and in this
manual. The vast majority of the subsequent safety precautions are common sense. If
you are not comfortable with the installation of audio/video entertainment equipment,
you should seek the services of a qualified installation professional or call us for help.
!
WARNING: TO REDUCE THE RISK OF FIRE OR ELECTRIC SHOCK, DO NOT
USE THE X-REF SUBWOOFER NEAR WATER OR IN WET LOCATIONS, DO NOT
EXPOSE IT TO RAIN OR MOISTURE, DO NOT EXPOSE IT TO DRIPPING OR
SPLASHING FROM OTHER SOURCES, AND ENSURE THAT NO OBJECTS FILLED
WITH LIQUIDS (SUCH AS VASES) ARE PLACED ON IT. DOING SO MAY RESULT
IN DAMAGE TO THE X-REF SUBWOOFER AND THE RISK OF ELECTRIC SHOCK TO
THE USER, WHICH MAY RESULT IN BODILY INJURY OR DEATH.
CAUTION: TO REDUCE THE RISK OF ELECTRIC SHOCK, DO NOT REMOVE THE
COVER FROM THE X-REF SUBWOOFER. THERE ARE NO USER-SERVICEABLE
PARTS INSIDE THE X-REF SUBWOOFER. REFER ALL SERVICE TO QUALIFIED
SERVICE PERSONNEL.
Do not install the X-Ref subwoofer near or above any heat sources such as radiators,
heating vents, or other apparatus that produces heat. Do not block any ventilation
openings or heat sinks.
Always install your X-Ref subwoofer according to the manufacturer’s instructions and
only use with attachments or accessories specified by the manufacturer.
Do not install the X-Ref subwoofer on any stand, shelf, or other piece of furniture that
is unable to support its weight or withstand the vibrations produced by a subwoofer in
normal operation. If a cart is used to move the X-Ref subwoofer, use caution to avoid
injury from tip-over.
Connect the X-Ref subwoofer only to power sources of the correct voltage and
frequency (between 90 VAC and 250 VAC, 50 Hz or 60 Hz).
Protect the power cord from being pinched, walked on, or otherwise damaged. Be
especially careful where the power cable enters the power outlet and X-Ref subwoofer
unit.
Only connect the X-Ref subwoofer to an electrical outlet or extension cord of
appropriate type and rating.
The power cable for the X-Ref subwoofer should be unplugged from the outlet during
severe electrical storms, or when unused for a long period of time.
Only replace the fuse in the X-Ref subwoofer with a fuse of proper value and voltage
rating.
DO NOT defeat the safety purpose of a grounding or polarized plug by removing ground
pins or using unsafe adapters. A polarized plug has two blades - one wider than the
other. A grounding type plug has a third ground prong in addition to the two main
conductors. The wide blade or third grounding prong is provided for your safety. If the
provided plug does not fit your outlet, consult an electrician to replace your obsolete
outlet. If you replace the X-Ref subwoofer power cord, only use one of similar type and
equal or greater current rating.
!
You should seek service for your X-Ref subwoofer by qualified service personnel if any
of the following occur:
1.
2.
4.
5.
The
The
The
The
power-supply cord or the plug has been damaged
X-Ref subwoofer has been exposed to rain or had liquids spilled onto or into it
X-Ref subwoofer exhibits a marked change in performance
X-Ref subwoofer has been dropped, or its enclosure or chassis is damaged.
NOTE: TO COMPLETELY DISCONNECT THE X-REF SUBWOOFER FROM THE
AC POWER MAINS, DISCONNECT THE AC POWER CORD FROM THE AC
RECEPTACLE.
NOTE: THE X-REF SUBWOOFER’S AC POWER CORD MUST REMAIN READILY
ACCESSIBLE AT ALL TIMES.
The X-Ref subwoofer should only be cleaned as directed in the Operators Manual. Avoid
spraying or pouring liquids directly onto the X-Ref subwoofer.
CAUTION
CAUTION: TO REDUCE THE RISK
OF ELECTRICAL SHOCK, DO
NOT REMOVE COVER. NO USER
SERVICEABLE PARTS INSIDE.
REFER SERVICING TO QUALIFIED
SERVICE PERSONNEL.
FCC Interference Statement
Note: This equipment has been tested and found to comply with the limits for a Class B
digital device, pursuant to Part 15 of the FCC rules. These limits are designed to provide
reasonable protection against harmful interference in a residential installation. This
equipment generates, uses and can radiate radio frequency energy and, if not installed
and used in accordance with the instructions, may cause harmful interference to radio
communications. However, there is no guarantee that the interference will not occur in
a particular installation. If this equipment does cause harmful interference to radio or
television reception, which can be determined by turning the equipment off and on, the
user is encouraged to try to correct the interference by one or more of the following
measures:
Reorient or relocate the receiving antenna.
Increase the separation between the equipment and receiver.
Connect the equipment into an outlet on a circuit different from that of the receiver.
Consult the dealer or an experienced radio/TV technician for help.
For questions regarding service, please contact:
Emotiva Audio Corporation
135 Southeast Parkway Court
Franklin, Tennessee
37064
(615)-790-6754
www.emotiva.com
Contents
Important Safety Precautions and Explanation of Symbols
Introduction........................................................................ 2
About This Manual............................................................... 3
Features............................................................................. 4
Unpacking.......................................................................... 5
The X-Ref 12 DSP Powered Subwoofer.................................... 6
Quick Start......................................................................... 7
About Subwoofers............................................................... 8
Setting Up Your X-Ref 12...................................................... 9
Connections...................................................................... 10
Subwoofer Placement......................................................... 11
System Configuration......................................................... 14
Subwoofer Configuration and Adjustment............................. 17
Operation......................................................................... 19
Care and Maintenance........................................................ 20
Specifications.................................................................... 21
Troubleshooting................................................................. 22
Emotiva Audio Corporation Limited Warranty......................... 24
Contact Information........................................................... 25
Accessories....................................................................... 26
Notes............................................................................... 27
Page 1
Introduction
Thank you for purchasing Emotiva’s X-Ref 12 DSP Powered Subwoofer.
The X-Ref 12 DSP Powered Subwoofer was designed to deliver both the deep clean bass
and raw power you need for a truly impressive home theater experience along with the
speed, musicality, and accurate rendition of subtle detail necessary to fit seamlessly
into an audiophile music system.
The X-Ref 12’s powerful long-throw woofer, high-efficiency amplifier, and switchmode power supply give it the ability to deliver tremendous amounts of deep clean
bass without breaking a sweat; the strong sealed cabinet, with its extensive crossbracing and internal damping, completely eliminates spurious vibrations and noises;
and the attractive Studio Black satin lacquer finish and removable grill help the X-Ref
12 blend into the decor of your home theater or music room. However, the X-Ref
12 isn’t all muscle and good looks. The advanced DSP Management System, with
its convenient push-to-engage rotary encoder and easy to read backlit LCD display,
makes configuration simple and straightforward, and provides the flexibility and
finesse you need to configure this powerhouse to deliver perfect performance with
virtually any system or room. Of course we included everything you expect from a truly
advanced subwoofer, including both balanced (XLR) and unbalanced (RCA) inputs, our
sophisticated dynamics processing, and our elegant soft-limiting circuitry that protects
the X-Ref 12 without compromising the integrity of your music. And, finally, you get
Emotiva’s five year transferable warranty and 30 day no-hassle return policy.
The X-Ref 12 takes subwoofer performance, convenience, flexibility, and value to a new
level. We hope you enjoy listening to it as much as we enjoyed designing and building
it for you.
Happy listening!
The Emotiva Team
Page 2
About This Manual
This manual will provide you with all the information you need to get great
performance, accurate sound, and many years of reliable service from your
Emotiva X-Ref 12 DSP Powered Subwoofer.
Even if you’re familiar with subwoofers, we suggest that you read through the entire
manual; we kept things as short as possible and you might find some interesting and
helpful tips and information. If you’re new to the subject, then we encourage you to
take the suggestions we offer as a starting point, and experiment until you achieve just
the results that you want.
If you’re really in a hurry to get started, please read the Quick Start section
(on page 7) and the Safety Instructions; then read the remainder of the manual at
your leisure.
You may wish to record serial numbers or other purchase information on the Notes
page at the back of this manual.
Page 3
Features
The Emotiva X-Ref 12 DSP Powered Subwoofer, with its advanced DSP Management
System, was designed to deliver impressive performance and outstanding sound quality
in both home theater and audiophile stereo music systems. The X-Ref 12 delivers the
deep bass you need for earth-shaking home theater special effects, while maintaining
the quality, accuracy, and superb musical rendition necessary for true high-fidelity
music reproduction. Some of the more important features of the Emotiva X-Ref 12 DSP
Powered Subwoofer include:
• Great sound and amazing bass. The X-Ref 12 has both the raw power to deliver
awe-inspiring special effects and the finesse to play the bottom octaves of music
with amazing depth, detail, and subtlety.
• Power and efficiency. The X-Ref 12’s powerful, high-efficiency amplifier and high
current switch-mode power supply deliver all of the power necessary to rattle the
walls, or play the lowest registers of a pipe organ or bass guitar with amazing depth
and clarity, without running up your electric bill or heating up the room.
• Ease of use. The X-Ref 12’s convenient push-to-engage rotary encoder, and easy
to read back lit LCD display, make configuration simple and straightforward.
• Flexible, accurate, and repeatable configuration is provided by the X-Ref 12’s
advanced DSP Management System and fully configurable two-band parametric
equalizer.
• Advanced mechanical design, including a powerful 12” long-throw woofer with
a die-cast frame, massive motor assembly, woven tinsel leads, proprietary paraaramid blended fiber cone, and heavy-duty Butyl rubber half roll surround, and a
sealed cabinet with extensive cross bracing and internal damping, enables the
X-Ref 12 to produce prodigious amounts of smooth clean bass with no extra
vibrations, distortion, or unwanted distractions.
• Advanced electronic design, including Emotiva’s exclusive dynamics processing
and elegant soft limiting, delivers the clean power the X-Ref 12 needs to play all
types of source material with astonishing realism and no hint of strain or distortion
• Intelligent turn-on automatically switches the X-Ref 12 on when signal is present
and returns to standby mode when the music stops. The X-Ref 12’s Movie EQ
Trigger feature optionally activates a little extra punch for movie special effects
when instructed to do so.
• Application flexibility. Professional balanced (XLR) and unbalanced (RCA) input
connections allow you to connect the X-Ref 12 to both home theater and stereo
sources. A balanced feed through output lets you add additional subwoofers.
• Good looks and practicality. The X-Ref 12’s compact size, Studio Black satin
lacquer finish, and removable grill allow it to blend easily into any room decor. Both
aluminum spikes and non-marring rubber feet are included to allow you to use the
X-Ref 12 with any type of flooring, and the front-firing design helps simplify room
placement and minimize room interactions.
You can find more information about the X-Ref 12 DSP Powered Subwoofer on our Web
site at http://www.emotiva.com
Page 4
Unpacking
Your Emotiva X-Ref 12 DSP Powered Subwoofer was carefully packed and should reach
you in perfect condition. If you notice any shipping damage or other issues when you
unpack it, please contact Emotiva immediately.
Gently remove your X-Ref 12 from the packing carton and remove all wrappings and
shipping material. Use care when handling or lifting the X-Ref 12 since it is quite heavy.
Avoid pressing directly on the woofer cone or the surround, and avoid resting your
X-Ref 12 on its front, top, or back while unpacking it.
PLEASE NOTE: THE POWER CORD AND SPIKED FEET ARE INCLUDED IN THE
LOWER PACKAGING MATERIAL! DO NOT DISCARD PACKAGING MATERIAL
WITHOUT FULLY UNPACKING ALL PARTS!
It is important to save the box and all packing materials in case your X-Ref 12
subwoofer ever needs to be moved or shipped back to the factory for service.
Please keep your sales receipt in a safe place. It is the easiest way to verify your
purchase date for warranty purposes, and may also be required if you ever have to file
an insurance claim.
We truly value customer feedback and would like to hear from you.
Page 5
The X-Ref 12 DSP Powered Subwoofer
Back lit LCD
status display
Rotary encoder
High-power 12 inch
long-throw woofer
Power and Standby
indicator
Movie EQ Trigger
input
Unbalanced stereo
inputs (RCA)
UNBALANCED
STEREO INPUTS
Balanced output
(XLR)
MOVIE EQ TRIGGER
POWER
AC Power switch
IEC power cable
receptacle with
integral fuse holder
Page 6
Balanced input
(XLR)
Quick Start
To get the most from your Emotiva X-Ref 12 DSP Powered Subwoofer, we strongly urge
you to read the entire manual. If you just can’t wait to hear how great your X-Ref 12
subwoofer sounds, this section will cover the basics you need to get started.
• Find a secure location for your X-Ref 12 DSP Powered Subwoofer.
• Plug your X-Ref 12 DSP Powered Subwoofer into a grounded AC electrical outlet. If
you use a different power cord or extension cord, use only a three-prong grounded
type with sufficient current rating.
• Connect your X-Ref 12 to the “subwoofer” or “LFE” output on your source
equipment (preamp or home theater pre/processor).
• Configure the bass management on your source equipment according to the
manufacturer’s instructions.
• Turn on the Power switch on the rear panel of the X-Ref 12.
• Enjoy the music.
While you’re enjoying your X-Ref 12 DSP Powered Subwoofer, it would be a great time
to read the rest of the manual to learn more about it.
Page 7
About Subwoofers
The design of virtually all loudspeakers involves compromises; and producing large
amounts of undistorted low bass is often difficult (and expensive) to achieve in a fullrange speaker. Most full-range speakers, therefore, simply aren’t designed to produce
extended output at very low frequencies. This has historically been a limitation of highend stereo speakers, and is often considered to be “an acceptable compromise” in
many otherwise superb stereo systems; many audiophiles simply accepted that they
weren’t going to hear the lowest octaves of a pipe organ or feel the solid punch of a
drum with lifelike realism.
When home theater entered the scene, with its demand for the prodigious bass to
accurately reproduce sound effects that you could actually feel, this limitation was
addressed by including a separate speaker designed especially to produce only low
bass; the subwoofer. The addition of a subwoofer simplifies the job of designing the
other speakers, which no longer need to be totally full-range. It was also discovered
that low frequencies (typically below 100 Hz) are virtually non-directional to the human
ear, so a single subwoofer can provide the low frequencies for both channels in a stereo
system or all channels in a multi-channel system.
In principle, it should be simple to design a subwoofer that can do a great job of
producing the narrow range of frequencies required. Unfortunately many early
subwoofers, while they did a good job of producing window-rattling explosions,
dinosaur stomps, and subway crashes, didn’t sound very good with music. It turns out
that it’s a lot easier to design a subwoofer that can make lots of earth-skaking bass if
low distortion and smooth frequency response aren’t major concerns.
Now, however, as home theater listeners are coming to expect not only loud bass, but
high quality bass, and audiophiles are starting to look for the same impressive bass
performance from their stereo systems, but only if it sounds as good as the rest of
their system, there is a need for subwoofers that can both rattle the floor and deliver
extended low end with superb musicality.
Fortunately, advances in speaker technology, such as new cone and cabinet materials,
more powerful and efficient amplifiers, and advanced DSP management systems, have
made it possible to design a subwoofer that can deliver both thunderous special effects
and superb musical performance. One of the leaders of this new generation of “super
subs”, at home in both high-end home theater systems and audiophile stereo systems,
are the new Emotiva X-Ref DSP Powered Subwoofers.
Page 8
Setting Up Your X-Ref 12
Setting up your X-Ref 12 DSP Powered Subwoofer for optimal performance is really a
three-step process. The first part consists of deciding where to place your X-Ref 12
(or a pair of them). The second part consists of configuring your source equipment and
your X-Ref 12 to work perfectly together. The third and final part consists of using the
X-Ref 12’s advanced DSP Management System to configure it to perfectly match your
room and other equipment.
While none of this is terribly complicated (and the X-Ref’s advanced DSP Management
System makes it a lot easier and more precise), it still makes sense to plan what you
intend to do in advance.
The best configuration for your subwoofer (or subwoofers) depends, to a large degree,
on what type of system you have. The simplest and most effective way to configure
bass management and equalization is to allow your source component or components
to do the bass management, and use the controls on the subwoofer to fine-tune it to
your particular listening room and placement choices. The advanced DSP Management
System makes it simple to configure the X-Ref 12 to be a perfect match for virtually
any room. (While the DSP Management System also offers precise control of the
crossover point, it isn’t able to bass manage other components, so if your source
components have bass management, it’s best to set the X-Ref’s X-Over control to
Direct and allow your source components to handle the bass management).
The DSP Difference
Analog circuits, while simple to design and implement,
have several serious shortcomings. Not only is it difficult
to set a knob (or read where it’s set) accurately, but
individual variations in the analog circuitry itself may make
it difficult to accurately set certain parameters, or to return
to previous settings. There are also practical limitations
about what functions can be achieved with analog circuitry.
Properly designed DSP (digital) controls give you greater
flexibility, higher precision and repeatability, better
performance, and access to features simply not practical
with analog controls, and they do so at lower cost. In
addition, our convenient push-to-engage rotary encoder
is easier to use than a dial or knob, and the LCD display is
easy to read and simple to understand.
Page 9
Connections
Inputs
Typically the balanced (XLR) input is used to connect the X-Ref 12 to the balanced
output labelled “subwoofer” or “LFE” (low-frequency effects) on a home-theater pre/
processor, and the stereo unbalanced (RCA) inputs are used to connect the X-Ref 12 to
the output of a stereo preamp. The X-Ref 12 automatically switches on when it senses
signal on either input.
In addition, the X-Ref 12 offers a feature which automatically adds a little extra punch
when you’re watching a movie (it increases low bass by about +6 dB at 45 Hz). This
feature is enabled by connecting the Movie EQ Trigger input on the X-Ref 12 to the
trigger output on your home-theater pre/processor. (Assuming you have a stereo music
source connected to the unbalanced inputs on the X-Ref, and a home-theater pre/
processor connected to the balanced input, the Movie EQ Trigger input can activate the
bass boost when the home-theater pre/processor is turned on).
If you have a pre/processor (like Emotiva’s UMC-1) which has programmable trigger
outputs, this allows the Movie EQ boost to be turned on by the pre/processor for
certain types of program material.
The Movie EQ can also be manually configured via the DSP Management System menu.
Refer to the diagram on Page 19 for details.
Outputs
The balanced (XLR) output on the X-Ref 12 provides a duplicate of the input signal and
is intended for connecting one or more additional X-Ref 12 (or other) subwoofers.
STEREO PREAMP WITH SEPARATE HF & LF OUTPUTS
HOME THEATER PRE/PROCESSOR
L
LF
OUT
R
HF
OUT
L
R
LFE / SUB
OUT
TRIGGER
OUT
X-OVER
DIRECT
UNBALANCED
STEREO INPUTS
MOVIE EQ TRIGGER
Page 10
A typical installatiion, with a
single X-Ref 12 DSP Powered
Subwoofer providing bass
enhancement for both a
stereo system and a hometheater pre/processor
Subwoofer Placement
Deciding where to place a subwoofer (or a pair of them) is often a compromise
between practicality and acoustics. When selecting the ideal location for your X-Ref 12
DSP Managed Subwoofer, the goal is to choose a location that produces smooth, clean,
well defined bass (and not necessarily the location that produces the most bass). Even
though the sophisticated DSP Management System in the X-Ref 12 gives you very
precise control, you will still get the best overall results with the least amount of work if
you find a location where the subwoofer sounds clean and well defined before you start
adjusting it. Because low bass is non-directional, it is not necessary to choose a central
location for one subwoofer, nor to locate two subwoofers in symmetrical locations.
The locations that work best in a given room depend on the size, shape, and
construction of the room, as well as on room surface treatments (like carpeting)
and furniture. The most precise method for determining where to place one or more
subwoofers is to take careful measurements with a sound pressure level (SPL) meter,
analyze the results, and then test the likely locations that result. However, with a little
experimentation, you can achieve excellent results by ear alone.
Sub-woofer
Sub-woofer
Display
Center
Left Front
Right Front
Right Side
Surround
Left Side
Surround
Listener
Sub-woofer
Sub-woofer
Left Rear
Surround
Right Rear
Surround
Sub-woofer
Page 11
Several factors determine
which locations work best for
a subwoofer in a given room.
The easiest way to get great
results is to experiment with
different locations until you
find the right one. Here are
some locations you can try.
One method for choosing a location that produces very good results, although it’s a
bit undignified, is to place the subwoofer temporarily in your listening location, and
then sit on the floor in each potential subwoofer location and listen to the results. The
locations where the bass sounds powerful, yet clean and not boomy or muddy, are
probably good choices for where to place your subwoofer. Alternately, you can simply
try the subwoofer in different locations that are compatible with your room decor and
choose the location that sounds best.
You will also find that some audio components (especially turntables) are very sensitive
to low bass frequencies. Adding a subwoofer may expose this weakness in previously
well-behaved equipment, so you should be careful to isolate such components from
vibrations transmitted via the floor or through the air. Sensitive components should be
mounted on isolation feet or platforms, and a subwoofer should not be placed too close
to them (which may rule out certain potential locations).
Before starting, you should locate several pieces of music that you are familiar
with that contain substantial low frequency content. Look for music that contains
instruments or “interesting” sounds rather than single-tone electronic effects or
explosions. A recording of “pink noise” works well for some people, although test tones
intended for use with a meter are usually not very useful when doing things by ear.
Remember that the ideal location will be one where bass response is smooth, and no
specific tones are unduly emphasized or missing. (If you notice that a particular tone
seems to “drag on” long after it should have stopped, or that a particular frequency
or instrument sounds boomy or muddy, you are probably experiencing a resonance at
that frequency, and should avoid using the location where it occurs.)
You will also probably find that, while certain subwoofer locations produce the best
result for a single listening position (like your favorite chair), other locations may
produce better overall results for a larger area (the entire couch or group of chairs
where you and your family sit on Saturday evenings). Always remember that the best
location is simply the one that works best for you with your room and your equipment.
Finally, avoid locations that place your X-Ref 12 directly in front of a window or
heating vent, or in particularly damp or hazardous locations, and avoid locations that
encourage people to place foreign objects on top of your X-Ref 12. (Your X-Ref 12 is
a precision piece of audio gear and not a coffee table or plant stand. Placing objects
on top of your X-Ref 12 not only risks causing damage, but the vibration of the top in
normal use virtually ensures that they will fall off!)
Page 12
The following suggestions are intended as guidelines to help you decide which locations
to try for your X-Ref 12 DSP Powered Subwoofer(s):
• Corner placement usually produces the most bass, but sometimes produces
poorly defined or boomy bass. A corner location that produces a lot of clean
bass is fine; if, however, the bass is boomy or resonant then you should try another
location.
• Try various locations along side and rear walls. It’s often better to place a
subwoofer several feet away from the corner along one wall; any location anywhere
along a wall may be a good spot to locate your X-Ref 12.
• Avoid locations where your X-Ref 12 will be exposed to direct sunlight or
water (and don’t sit plants or other electronic equipment on top of it).
• A subwoofer should not be heard as a distinct source of sound. A properly
configured subwoofer should add a solid “foundation” to your music; it should
not, however, be discernible as a separate source of sound. Even though low
bass is non-directional, certain locations may cause the subwoofer to “stand out”
acoustically and should be avoided.
• Multiple subwoofers should sometimes be placed at different types of
locations. For example, if you are adding a second X-Ref 10 to an existing one
located in a corner, it’s may be a good idea to try locating the second one along
a wall. Certain locations sometimes accentuate certain frequencies; by varying
locations you average out the variations and get a smoother overall response.
At Emotiva we prefer symmetrical subwoofer placement in front locations if it’s
practical; we believe that your ears are sensitive to pressure differentials that,
although not audible, may nonetheless affect the integrity of the front sound stage.
• Avoid placing subwoofers within several feet of a turntable or other sensitive
audio device. Even if you use isolation feet or an isolation base, low frequency
vibrations travel directly through the air, and may be coupled to a turntable arm
or platter. You may also find that your turntable is more immune to vibration with
(or without) the dust cover in place. The result of acoustic feedback may be actual
howling noises or record skips or a more subtle muddying of the bass on some
musical passages. Since a lot of audio equipment is at least somewhat sensitive
to vibration, you may get better results by locating your subwoofer along a side or
back wall rather than by placing it directly behind or beside your equipment rack.
• Sound becomes less directional as the frequency gets lower. The sound
coming from a subwoofer configured to cross over at 80 Hz (the THX™ standard) is
almost totally non-localized, but localization increases at higher frequencies. If you
are noticing sound localization from a subwoofer configured to a frequency above
100 Hz, try choosing a lower crossover frequency.
Page 13
System Configuration
Configuring the X-Ref 12 for use with a
home theater system
Virtually all home theater pre/processors and receivers include bass management,
so it’s best to set the X-Ref 12 X-Over (crossover) setting to Direct and let the pre/
processor handle the bass management. Many high-end home theater pre/processors
include equalization controls of some sort. If your pre/processor includes automatic
equalization, then you should consider letting it handle the equalization. If your pre/
processor has simple graphic-equalizer type controls, then you will probably find that
the X-Ref’s advanced parametric equalizer controls make adjustment easier and do a
better job. While it is possible to use source component and subwoofer equalization
controls simultaneously, and doing so may actually prove useful in certain situations,
it’s usually easier to achieve better results if you use one and leave the other set to
flat.
Configuring the X-Ref 12 for use with a stereo system
Sophisticated high-end stereo preamplifiers often include bass management, in which
case it is best to set the X-Ref 12 X-Over setting to Direct and let the preamp handle
the bass management. If the bass management in your preamp also includes simple
shelving or graphic-equalizer type controls, then you should probably not use them,
since the X-Ref’s advanced parametric equalizer controls make adjustment easier
and do a better job. While it is possible to use source component and subwoofer
equalization controls simultaneously, and doing so may actually prove useful in certain
situations, it’s usually easier to achieve better results if you use one and leave the
other set to flat.
Configuring the X-Ref 12 for use with a stereo system
without bass management
In a system with bass management, very low frequencies are directed to the subwoofer
and away from the main or satellite speakers. The advanced DSP Management System
in the X-Ref 12 provides complete control of the frequencies handled by the X-Ref 12
but does not control the frequencies being handled by other speakers (which is what
bass management does).
If your preamp lacks bass management, you can still add an X-Ref 12 subwoofer to
augment the low bass frequencies produced by your main speakers, and the precise
X-Over (crossover) and Equalization settings on the X-Ref 12 can then be used to
configure a smooth transition between your subwoofer and main speakers. You must
remember, however, that the low frequencies will still be reaching your main speakers.
If your main speakers are full range, this will not be a problem. If, however, your main
speakers are “small” or “satellites”, then you should add an extra line level crossover or
high-pass filter to prevent low frequencies from reaching your satellites or small main
speakers (failure to do so may damage them).
Page 14
Configuring the X-Ref 12 for use with a combined stereo
and home theater system
There are several ways you can configure a combined stereo and home theater system
to work with your X-Ref 12.
Separate stereo preamp and home theater pre/processor
If you have entirely separate stereo and home theater systems, both with bass
management, and intend to share one X-Ref 12 (or one pair) between them, then the
best option is to simply connect the subwoofer outputs of each to one of the X-Ref’s
input connectors. (Connect one to the balanced input and one to the unbalanced input.
If one source component is physically closer, use the unbalanced cable for the shorter
cable run if possible.) Set the X-Over (crossover) to Direct on the X-Ref 12 to allow the
preamp and pre/processor to each handle their own bass management.
The X-Ref 12 also offers a feature which automatically adds a little extra punch when
you’re watching a movie (it increases low bass by about +6 dB at 45 Hz). This feature
is enabled by connecting the Movie EQ Trigger input on the X-Ref 12 to the trigger
output on your home-theater pre/processor. (Assuming you have a stereo music source
connected to one input on the X-Ref, and a home-theater pre/processor connected to
the other input, the Movie EQ Trigger input is typically configured to activate the bass
boost when the home-theater pre/processor is turned on).
If you have a pre/processor (like Emotiva’s UMC-1) which has programmable trigger
outputs, this allows the Movie EQ boost to be turned on by the pre/processor for just
certain types of program material.
This configuration should also work well if you have a separate preamp and pre/pro but
use “HT Bypass” or “Direct Mode” on either to allow both to share one power amp and
set of speakers for the front channels.
Stereo preamp (without bass management) and
home theater pre/processor
If you have a separate stereo preamp and home theater pre/processor, and your stereo
preamp does not have bass management (but you use your stereo preamp as a phono
preamp), the easiest solution is to connect the Tape Output of your stereo preamp to
one of the high-level inputs (Aux In) on your home theater pre/processor. This will
allow your pre/processor to control most aspects of playing music, including bass
management, yet allow you to play records via your stereo preamp.
Another option is to purchase an external line-level crossover to provide bass
management for your stereo preamp (passive or active) and then configure everything
as described above.
Page 15
Configuring your system to work with your
X-Ref 12 DSP Powered Subwoofer
No special configuration of your system is required for it to work perfectly with the
Emotiva X-Ref 12 DSP Powered Subwoofer. Most bass management systems will cross
over between the main or satellite speakers and the subwoofer at between 80 Hz and
120 Hz (80 Hz is the THX™ standard crossover point). The X-Ref 12 DSP Powered
Subwoofer is flat to above 200 Hz, and so will work perfectly with any crossover setting
your bass management system chooses to implement.
If you are configuring a preamplifier with bass management (like our Emotiva USP1) to work with satellite speakers, then choose the crossover point recommended by
the manufacturer of your speakers (this is often 80 Hz for “satellite” speakers). If you
are using full range speakers, then experiment with crossover points at or below 80
Hz until you achieve a pleasing result (the goal is to choose a point at or above the
frequency at which your main speakers sound strained or start to roll off in frequency
response).
If you are using a preamplifier without bass management, and you have full range
main speakers, then you will be using the X-Over (crossover) configuration on the
X-Ref 12 to configure the X-Ref to cut off at or about the frequency where your main
speakers stop producing sufficient bass, and the Volume configuration on the X-Ref to
match its level to that of your main speakers so the overall sound is continuous and
smooth - with no sudden jumps in output level. Simply try different frequencies until
you achieve a pleasing result.
Page 16
Subwoofer Configuration and Adjustment
The Emotiva X-Ref 12 includes an advanced DSP Management System, which is
accessed via a push-to-engage rotary encoder. The results are displayed on a back lit
LCD display, which remains lit while configuration is in progress, but switches off after
a short time when not in use; a press of the encoder button turns the display back on.
The diagram on Page 18 of this manual shows the complete Menu system of the X-Ref
12.
Configuring the Crossover settings
When the X-Ref 12 is connected to a preamp or pre/processor that includes bass
management, the X-Ref 12 X-Over (crossover) setting should be set to Direct. When
connected to a source that does not prevent high-frequencies from being sent to the
subwoofer, set the crossover frequency to obtain a smooth blend between the X-Ref 12
and your main speakers.
Adjusting the Volume setting
The Volume should be set so that the sound produced by the subwoofer blends with
your music rather than standing out from it. Your music should have deep, clean, solid
bass, and movie effects should have the impact and punch that you want, but you
shouldn’t actually hear the subwoofer as a source of sound.
Adjusting the Phase setting
The Phase setting is used to match the phase of the X-Ref 12 with your main speakers,
and any other subwoofers you have installed, to prevent cancellation effects in the
range of frequencies produced by both. Adjust the Phase setting to produce the most
overall output in the frequency range where the X-Ref 12 overlaps with other speakers.
Configuring the Preset setting
The Music (Flat) Preset on the X-Ref 12 offers flat frequency response (except as
modified by the EQ settings), while the Movie Preset adds about 6 dB of bass boost at
45 Hz. In a typical installation, the X-Ref 12 is configured with the Music Preset as the
default, and a trigger output from your pre/processor is attached to the X-Ref’s Movie
EQ Trigger input. Music is played using the Music (Flat) Preset, while the trigger from
your pre/processor switches the X-Ref 12 to the Movie preset for movies.
Adjusting the Equalization settings
The X-Ref 12 offers two separate bands of full parametric equalization to correct for
variations in room response and allow you to match the response of your X-Ref 12
perfectly to any main speakers. Each parametric equalizer section allows you to set
a center frequency (Frequency), and a filter bandwidth (Q), and then adjust the gain
of only that band of frequencies up or down. A higher value for Q corresponds to a
narrower range of affected frequencies. Each EQ can be used to boost or reduce a
specific band if required, for example to eliminate a troublesome room resonance.
Page 17
Emotiva X-Ref™ 12 DSP Powered Subwoofer Menu
Page 18
Operation
Once you have decided upon a location for your X-Ref 12 DSP Powered Subwoofer, and
connected and configured it and all associated equipment, operation is very simple.
• Plug your X-Ref 12 into a grounded electrical outlet of appropriate voltage.
(The X-Ref 12 will automatically switch between 110-120 VAC and 220-240 VAC.)
• Connect a signal source to either the unbalanced (RCA) or balanced (XLR) input on
the rear panel of the X-Ref 12.
• Place the Power switch on the rear panel of the X-Ref 12 in the On position.
• Immerse yourself in the music!
In general, once your X-Ref 12 is properly connected and configured, no explicit control
by the user is required.
Rotary encoder and back lit LCD display
The push-to-engage rotary encoder (located on the top panel of the X-Ref 10) is used
to enter or change configuration information; the encoder is active when the display
is lit. The encoder is made of a soft rubber material, and rotates when gentle pressure
is applied. In general, the encoder is rotated to change a displayed value, and pressed
like a button to accept a value or enter a command. You will probably find it easiest to
rotate the encoder using your thumb and one finger positioned on the top surface near
two opposite sides; you can press the center or the entire top surface. The display and
encoder will disengage and “sleep” if idle for a short time, but will remain active if you
pause while in the middle of a configuration sequence. A single press of the encoder
will activate the display and engage the encoder when it is off.
Status display
The X-Ref 12 includes a small status LED towards the top of the rear panel. When the
X-Ref 12 is powered on, but no signal is present, this LED will glow red to indicate that
the X-Ref 12 is in low-power Standby mode. When signal is present and the subwoofer
is operating, or when the LCD display is in use, this LED will glow green.
Automatic switching
When the Power switch is in the On position, the X-Ref 12 will wait in Standby mode
until a signal is present at either input, at which point it will turn on. After several
minutes with no signal, the X-Ref 12 will return to Standby mode.
Movie EQ Trigger
If the X-Ref 12’s Movie EQ trigger is connected to a pre/processor, a boost in low bass
of about +6 dB at 45 Hz will be activated whenever +12 V is present on the trigger
input.
Page 19
Care and Maintenance
Periodic maintenance
Your Emotiva X-Ref 12 DSP Powered Subwoofer is factory adjusted and requires no
periodic maintenance.
Cleaning the cabinet and baffle
• The cabinet of the X-Ref 12 should normally be cleaned with a rag dampened with
plain water. DO NOT spray water directly onto or into the woofer or cabinet and DO
NOT use abrasive or chemical cleaners. Gently dry the surface with a clean soft rag
after cleaning.
• If necessary, use a mild detergent, wipe the surface with a rag dampened with plain
water afterwards to rinse it, and then gently dry the surface with a clean soft rag.
• If something nasty does get on the sides or top of your X-Ref 12, use a rag
dampened with a weak solution of dish detergent or other mild cleaning liquid,
followed by a rag dampened with plain water, and then dry with a clean rag. Avoid
applying cleaning liquid to the front baffle.
Cleaning the grill
• If necessary, remove the grill and gently clean it with a vacuum cleaner.
Cleaning the woofer
• If something gets spattered on the cone or surround of the woofer driver, it may be
carefully cleaned with a dampened rag. Be careful to avoid excessive pressure.
Changing a fuse
• If the fuse blows, ALWAYS REPLACE IT WITH ONE OF THE SAME SIZE,
RATING, AND TYPE; NEVER USE A FUSE OF HIGHER RATING.
• If the fuse blows repeatedly, or you have any doubts, CONTACT EMOTIVA
TECHNICAL SUPPORT. (If there is any doubt, first verify that your AC power
source is the correct voltage.)
• BEFORE CHANGING THE FUSE, UNPLUG THE UNIT!
• To change the fuse, use a screwdriver to release the fuse holder. The fuse holder is
the little plate with the picture of a fuse on it (which is part of the IEC power cord
receptacle). First remove the power cord. Then pry up on the edge of the plate
nearest the power cord opening, and the fuse holder will slide out like a drawer.
Replace the fuse with one of the same size, rating, and type and carefully replace
the fuse holder (be sure to press firmly so it locks into place).
Page 20
Specifications
Driver complement:
(1) 12 inch long-throw woofer with die-cast frame, Butyl rubber surround, and
proprietary para-aramid blended fiber cone
Amplifier power:
600 watts RMS; 1000 watts peak
Typical in-room frequency response:
20 Hz to 200 Hz
Typical in-room maximum sound output level:
115 - 118 dB SPL
Inputs:
One pair (stereo) unbalanced (RCA)
One professional balanced (XLR)
One 1/8” trigger input (for Movie EQ)
Output:
One professional balanced (XLR)
Nominal input sensitivity:
Balanced input: 1 V
Unbalanced inputs: 0.5 V
Phase adjustment:
0 - 315 degrees (in 45 degree steps)
Low pass crossover (X-Over):
40 Hz - 150 Hz (in 1 Hz steps), Direct (flat)
Parametric equalizers: EQ1, EQ2 (independent)
Center frequency: 25 Hz - 150 Hz (in 1 Hz steps)
Gain: -12 dB - +6 dB (in 1 dB steps)
Q: 0.5 - 5.0 (in 0.1 steps)
Input voltage:
90 VAC - 250 VAC 50/60 Hz; auto detecting
IEC standard removable power cord
Dimensions:
Unboxed: 15.625” high x 14.625” wide x 15.5” deep (including 1” high feet)
Weight:
Unboxed: 44 lbs.
Page 21
Troubleshooting
Emotiva’s X-Ref 12 DSP Powered Subwoofers are carefully designed and manufactured
from high-quality precision components to ensure years of trouble free operation.
The troubleshooting section describes some common problems and how to eliminate
them. If this doesn’t solve your problem, please contact Emotiva Technical Support,
where a real person will be glad to help you get up and running.
Please remember to power down your X-Ref 12 and all connected equipment before
changing or disconnecting cables.
The following two procedures will address the vast majority of problems that you may
encounter:
Check the power connections:
Verify that your X-Ref 12 is turned on (the Power switch is on the back) and plugged
into an active AC outlet. If the X-Ref 12 is turned on, the Power LED on the back of
the unit should be lit (red indicates Standby; green indicates Active) and the blue
fluorescent display (on top of the X-Ref 12) should light if you briefly press the button
in the center of the rotary encoder (the black circle next to the display).
If not, verify that the Power switch is set to On, that the power cord is firmly inserted
into the back of the X-Ref 12 and an AC outlet, and that the AC outlet is alive. If so,
then verify that the fuse in the X-Ref 12 is not blown.
Check the signal source:
Verify that your signal source is sending output to the X-Ref 12. Some devices don’t
send output to one or more subwoofer outputs unless configured to do so. In addition,
some home theater pre/processors only send output to the subwoofer when certain
types of program material are playing and certain decoder options are chosen (for
example, some don’t send output to the LFE output when playing stereo material).
If your X-Ref 12 appears to “work” with some content and not other, check the
documentation that came with your source component.
If the rear panel indicator LED is red, this indicates that the X-Ref 12 is in Standby
mode (and that no input is being received).
Page 22
Problem: No output at all
• Verify that you really have no output, and that you should have output.
(Subwoofers reproduce only very low frequencies. If you happen to be playing
something without low frequency content, then nothing will come from the
subwoofer. In addition, since low frequency sound has very little localization
information, if your main speakers also produce low frequencies, it may be difficult
to notice the contribution from the subwoofer with some program material.)
• Verify that the subwoofer output on your source equipment is active and configured
correctly, and that the output is active in the particular mode you are using with
the content you are using. (Some combinations of content, processing mode, and
configuration, don’t use the subwoofer. For example, some decoders don’t use the
subwoofer at all when playing stereo content in some modes.) If the subwoofer
produces output in any mode with any source material, then the subwoofer and
connections are probably working correctly and the problem lies with your source
component configuration or program material
• Verify that you have power.
• If you have power and signal, but still have no output, then please contact
Emotiva Technical Support.
Problem: Excessive hum or noise
• Check your signal source.
• Verify that all cables are plugged fully in, that the connectors fit tightly, and that the
cables and connectors are in good condition.
• Try repositioning cables. If you have signal cables running near power cables, try
moving them further apart. (This is especially important with unbalanced cables.)
• If you are using unbalanced connections, try higher-quality cables with better
shielding. If that reduced but fails to eliminate the hum, consider trying balanced
cabling (especially for long runs or where runs next to power cables are
unavoidable).
• Some audio equipment (especially vacuum tube type) has a high output impedance,
which makes it inherently sensitive to picking up hum and noise, especially if
only unbalanced connections are provided. This is also true for some electronic
crossovers (especially passive models). It is essential that signal cables used with
such equipment be kept short, of good quality, and not run near power cables.
• Some difficult installations may require a balanced connection to completely
eliminate hum and noise.
Page 23
Emotiva Audio Corporation Limited
Warranty
Emotiva Audio Corporation guarantees its products to be free from defective materials
and/or workmanship and will replace defective parts and repair malfunctioning
products under this warranty when the defect occurs under normal operation and
use. For warranty service the unit must be returned to our headquarters via pre-paid
transportation with a copy of proof of purchase (i.e.: sales receipt). This warranty
provides that the examination of the return product must indicate, in our judgment,
a manufacturing defect. This warranty does not extend to any product which has
been subjected to misuse, neglect, accident, improper installation, or where the serial
number has been removed or defaced. Emotiva shall not be liable for incidental and/
or consequential damages. This warranty gives you specific legal rights. This limited
warranty is freely transferable during the term of the warranty period. The warranty on
Emotiva products is not valid if the original factory serial number has been removed,
defaced, or replaced in any way. Damage to, or loss of any software or data residing
on the product is not covered. When providing repair or replacement service, Emotiva,
where applicable, will use reasonable efforts to reinstall the product’s original software
configuration and subsequent update releases, but will not provide any recovery or
transfer of software or data contained on the serviced unit not originally included in the
product.
Customers may have additional rights, which vary from state to state or from country
to country. In the event that a provision of this limited warranty is void, prohibited or
superseded by local laws, the remaining provisions shall remain in effect. The Emotiva
Audio Corporation limited warranty is valid for a period of five (5) years from
date of purchase in all countries.
For any questions regarding the Emotiva Warranty, please contact
Emotiva Audio Corporation at:
Emotiva Audio Corporation
135 SE Parkway Court
Franklin, Tennessee
37064
(615) 790-6754
www.emotiva.com
Note: The Emotiva Shipping Department WILL NOT accept equipment for
service or repair without a valid Return Merchandise Authorization (RMA)
number.
Page 24
Contact Information
Emotiva Phone Numbers
615-790-6754 | 877-EMO-TECH (877-366-8324)
Monday through Friday 8am - 5pm (Central Standard Time)
Emotiva email addresses
Online sales, product information, and general questions:
[email protected]
Customer service related inquires:
[email protected]
Technical support or service issues:
[email protected]
Emotiva Web site
www.emotiva.com
Emotiva Shipping Address
Emotiva Audio Corporation
Attn: Customer Service
135 Southeast Parkway Court
Franklin, TN 37064
Note: To return items purchased through Emotiva for repair,
warranty work, or refund you MUST call us at 1-877-EMO-TECH to
obtain a Returned Merchandise Authorization (RMA) number.
Our Shipping Department will NOT accept packages unless they have a valid RMA
number clearly indicated on the outside of the package. ALL returns must be in original
packing materials (we’ll send you new ones if you’ve lost or discarded yours), and
should be addressed to “attn: Customer Service RMA xxxx” at the address above. You
will find more details about the return process on our Web site (www.emotivapro.com),
and our Technical Support department will be glad to help you.
Page 25
Accessories
Interconnect cables
Using high-quality interconnect cables will ensure that you get the best sound quality
and maximum reliability from your X-Ref 12 DSP Powered Subwoofer. It is especially
important to select good-quality well-shielded cables if you are using unbalanced
cables, or very long cables, or have an especially noisy environment. (We do not,
however, recommend or endorse fancy “boutique” audiophile cables.)
Emotiva Audio offers both balanced and unbalanced cables that combine solid
engineering, premium build quality, excellent performance, and reasonable cost.
If you choose to use third-party cables, avoid those that have excessively thin and
flexible insulation or that fail to provide full-coverage shielding. Cables with insufficient
mechanical integrity may fail prematurely, and cables with poor shielding will be more
subject to hum and noise.
Page 26
Notes
Page 27