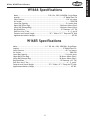
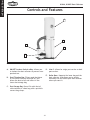
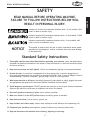
1
MODELS W1666, W1685
DUST COLLECTORS
INSTRUCTION MANUAL
Phone: 1-360-734-3482 • On-Line Technical Support: [email protected]
COPYRIGHT © 2000 BY WOODSTOCK INTERNATIONAL, INC. REVISED JANUARY 2006.
#6941CR
WARNING: NO PORTION OF THIS MANUAL MAY BE REPRODUCED IN ANY SHAPE OR FORM WITHOUT
THE WRITTEN APPROVAL OF WOODSTOCK INTERNATIONAL, INC.
Printed in China
WARNING
Some dust created by power sanding, sawing, grinding, drilling, and other construction activities contains chemicals known to the State of California to
cause cancer, birth defects or other reproductive
harm. Some examples of these chemicals are:
• Lead from lead-based paints.
• Crystalline silica from bricks, cement, and
other masonry products.
• Arsenic and chromium from chemically
treated lumber.
Your risk from these exposures varies, depending on
how often you do this type of work. To reduce your
exposure to these chemicals: work in a well ventilated area, and work with approved safety equipment, such as those dust masks that are specially
designed to filter out microscopic particles.
SAFETY
ELECTRICAL
SETUP
OPERATIONS
INTRODUCTION ..................................................................................................4
Woodstock Technical Support ............................................................................ 4
About Your New Dust Collector .......................................................................... 4
W1666 Specifications ...................................................................................... 5
W1685 Specifications ...................................................................................... 5
Controls and Features ..................................................................................... 6
SAFETY............................................................................................................7
Standard Safety Instructions ............................................................................. 7
Safety Instructions for Dust Collectors ................................................................. 9
Avoiding Potential Injuries ..............................................................................10
ELECTRICAL .................................................................................................... 11
110V Operation (W1685) .................................................................................11
220V Operation (W1666) .................................................................................11
Extension Cords ...........................................................................................11
Grounding ..................................................................................................11
SETUP ........................................................................................................... 12
Casters and Motor .........................................................................................13
Outlet, Gasket, and Separator Supports ..............................................................14
Separator and Transfer Hose ............................................................................15
Dust Bags and Inlet Y .....................................................................................16
System Grounding .........................................................................................17
Test Run ....................................................................................................18
OPERATIONS ................................................................................................... 19
General .....................................................................................................19
Operation ...................................................................................................19
MAINTENANCE ................................................................................................. 20
General .....................................................................................................20
Lubrication .................................................................................................20
Collector Bag Cleaning ...................................................................................20
Troubleshooting ...........................................................................................21
Wiring Diagram (W1666 and W1685) ...................................................................22
Parts Diagram (W1666 and W1685) ....................................................................23
Parts List (W1666 and W1685) ..........................................................................24
Accessories .................................................................................................25
Warranty ....................................................................................................26
INTRODUCTION
Contents
MAINTENANCE
SERVICE
USE THE QUICK GUIDE PAGE LABELS TO SEARCH OUT INFORMATION FAST!
INTRODUCTION
W1666, W1685 Dust Collectors
INTRODUCTION
Woodstock Technical Support
We stand behind our machines! In the event that a defect is found, parts are missing, or questions arise
about your machine, please contact Woodstock International Technical Support at (360)-734-3482 or
send e-mail to: [email protected]. Our knowledgeable staff will help you troubleshoot problems, send out parts, or arrange warranty returns.
If you need the latest edition of this manual, you can download it from http://www.shopfox.biz.
If you still have questions after reading the latest manual, or if you have comments please contact us at:
Woodstock International, Inc.
Attn: Technical Support Department
P.O. Box 2309
Bellingham, WA 98227
About Your New Dust Collector
Your new SHOP FOX® Dust collector has been specially designed to provide many years of trouble-free
service. Close attention to detail, ruggedly built parts and a rigid quality control program assure safe
and reliable operation. Depending on the design of the dust collection system, the W1666 will draw up
to 1550 CFM, and the W1685 will draw up to 1280 CFM.
Woodstock International, Inc. is committed to customer satisfaction in providing this manual. It is our
intent to make sure all the information necessary for safety, ease of assembly, practical use and durability of this product be included.
-4-
W1666 Specifications
Motor ................................................. 2 HP, 12A, 220V, 3450 RPM, Single-Phase
Impeller ........................................................................ 12" Radial Steel Fin
Static Pressure .....................................................................12.8" (of water)
Air Suction ................................................................................ 1550 CFM
Lower Bag Capacity ............................................................... 5.4 (cubic feet)
Upper Bag (Filter Bag) .................................................. 30 Micron Woven Fabric
Lower Bag (Storage Bag) ............................................... 30 Micron Woven Fabric
Bag Dimensions ........................................................... 19" Diameter x 33" Tall
Dust Port Inlet Y Size ................................................................ 4", 4", and 6"
Footprint and Overall Height ........................331/2" Wide x 211/2" Deep and 78" High
Approximate Machine Weight ............................................................. 107 lbs.
W1685 Specifications
Motor ..............................................11/2" HP, 16A, 110V, 3450 RPM, Single-Phase
Impeller ........................................................................ 12" Radial Steel Fin
Static Pressure ..................................................................... 10.1" (of water)
Air Suction ................................................................................ 1280 CFM
Lower Bag Capacity ............................................................... 5.4 (cubic feet)
Upper Bag (Filter Bag) .................................................. 30 Micron Woven Fabric
Lower Bag (Storage Bag) ............................................... 30 Micron Woven Fabric
Bag Dimensions ........................................................... 19" Diameter x 33" Tall
Dust Port Inlet Y Size ................................................................ 4", 4", and 6"
Footprint and Overall Height ........................ 331/2" Wide x 211/2" Deep and 78" High
Approximate Machine Weight ............................................................. 107 lbs.
-5-
INTRODUCTION
W1666, W1685 Dust Collectors
INTRODUCTION
W1666, W1685 Dust Collectors
Controls and Features
B
C
A
E
D
Dust collector controls and features.
A. ON/OFF Lockout Switch w/Key—Allows you
to lockout the dust collector to prevent unsupervised use.
B.
Dust Filtration Bag—Filters wood dust down
to 3 microns from the collected air, and
allows the dust to fall and collect in the
lower dust storage bag.
D. Inlet Y—Allows for single port suction or dual
port suction.
E.
C. Dust Storage Bag—Stores 5.4 cubic feet of
collected dust in a dust bag with a quick disconnect bag clamp.
-6-
Roller Base—Supports the lower bag and the
dust collector, and allows you to quickly
and easily roll and locate your dust collector
where you want it.
W1666, W1685 Dust Collectors
SAFETY
Indicates an imminently hazardous situation which, if not avoided, WILL
result in death or serious injury.
Indicates a potentially hazardous situation which, if not avoided, COULD
result in death or serious injury.
Indicates a potentially hazardous situation which, if not avoided, MAY
result in minor or moderate injury.
NOTICE
This symbol is used to alert the user to useful information about proper
operation of the equipment, and/or a situation that may cause damage
to the machinery.
Standard Safety Instructions
1. Thoroughly read the Instruction Manual before operating your machine. Learn the applications,
limitations and potential hazards of this machine. Keep the manual in a safe and convenient place
for future reference.
2. Keep work area clean and well lighted. Clutter and inadequate lighting invite potential hazards.
3. Ground all tools. If a machine is equipped with a three-prong plug, it must be plugged into a
three-hole grounded electrical receptacle or grounded extension cord. If using an adapter to aid in
accommodating a two-hole receptacle, ground using a screw to a known ground.
4. Wear eye protection at all times. Use safety glasses with side shields or safety goggles that meet
the appropriate standards of the American National Standards Institute (ANSI).
5. Avoid dangerous environments. DO NOT operate this machine in wet or open flame environments.
Airborne dust particles could cause an explosion and severe fire hazard.
6. Ensure all guards are securely in place and in working condition.
7. Make sure switch is in the OFF position before connecting power to machine.
8. Keep work area clean, free of clutter, grease, etc.
9. Keep children and visitors away. Visitors must be kept at a safe distance while operating unit.
10. Childproof your workshop with padlocks, master switches or by removing starter keys.
11. Stop and disconnect the machine when cleaning, adjusting or servicing.
-7-
SAFETY
READ MANUAL BEFORE OPERATING MACHINE.
FAILURE TO FOLLOW INSTRUCTIONS BELOW WILL
RESULT IN PERSONAL INJURY.
W1666, W1685 Dust Collectors
SAFETY
12. DO NOT force tool. The machine will do a safer and better job at the rate for which it was
designed.
13. Allergic reaction to wood dust. Be aware that certain woods may cause an allergic reaction in
people and animals, especially when exposed to fine dust. Make sure you know what type of wood
dust you will be exposed to and the possibility of an allergic reaction. Always wear an approved
respirator when operating this machine.
14. Use the correct tool. DO NOT force machine or attachment to do a job for which it was not
designed.
15. Wear proper apparel. DO NOT wear loose clothing, neck ties, gloves, jewelry, and secure long
hair away from moving parts.
16. Remove rags and tools. Before turning the machine on, make it a habit to remove all tools and
make sure the area is clean.
17. Avoid using an extension cord. If you use an extension cord with an undersized gauge or one
that is too long, excessive heat will be generated within the circuit, increasing the chance of a
fire, or damage to the circuit. Always examine the extension cord to ensure it is in good condition. Immediately replace a damaged extension cord. And always use an extension cord that uses a
ground pin and connected ground wire.
18. Keep proper footing and balance at all times.
19. DO NOT leave the machine running and unattended. Wait until it comes to a complete stop
before leaving the area.
20. Perform machine maintenance and care. Follow lubrication and accessory attachment instructions in the manual.
21. Keep machine away from open flame. Operating machines near pilot lights or open flames creates a high risk if dust is dispersed in the area. Dust particles and an ignition source may cause an
explosion. DO NOT operate the machine in high-risk areas, including but not limited to, those mentioned above.
22. If at any time you are experiencing difficulties performing the intended operation, stop using the
machine! Then contact Woodstock Technical Support or ask a qualified expert how the operation
should be performed.
22. Habits—good and bad—are hard to break. Develop good habits in your shop, and safety will
become second-nature to you.
24. Be aware that certain woods may cause an allergic reaction in people and animals, especially
when exposed to fine dust. Make sure you know what type of wood dust you will be exposed to
and the possibility of an allergic reaction.
-8-
W1666, W1685 Dust Collectors
Safety Instructions for Dust Collectors
USE this and other machinery with caution
and respect. Always consider safety first,
as it applies to your individual working
conditions. No list of safety guidelines can
be complete—every shop environment is
different. Failure to follow guidelines could
result in serious personal injury, damage
to equipment or poor work results.
1.
AVOIDING A PROJECTILE HAZARD: Never operate the dust collector without the dust bags and
ducting installed.
2.
SAFE SERVICING: Always turn off and unplug the dust collector, and allow the impeller to come to
a complete stop before emptying the dust bags, moving the dust collector, or removing ducting.
3.
KEEPING LIMBS CLEAR: Always keep hands and fingers and tools away from the dust collector suction port.
4.
PROTECTING BYSTANDERS: Never leave the dust collector running and unattended, or an uncontrolled machine could suffer damage or injure bystanders.
5.
USING DUST COLLECTOR SAFELY: Never use the dust collector to collect any other dust than
wood dust, and never allow steel, stones, or hard material to be drawn into the dust collector
and come in contact with the impeller, or the impeller can explode.
6.
KEEPING MACHINE SAFE: Do Not modify this dust collector for any purpose other than what it is
designed for or you may damage the machine, void warranty, and cause an unsafe condition.
7.
TROUBLESHOOTING: If you are experiencing difficulties with dust collector setup or use, contact
Woodstock Technical Support or ask a qualified expert for solutions.
8.
REDUCING FIRE HAZARDS: Make sure the dust collector ducting is grounded against static electricity buildup, and never use the dust collector in a wet or flammable environment.
9.
AVOIDING LUNG CONTAMINATION: Always wear an approved respirator during dust collector use,
the bag is not a safe substitute for a respirator.
10. SAFE WOODSHOP OPERATIONS: Habits – good and bad – are hard to break. Develop good habits in
your shop and safety will become second-nature to you.
-9-
SAFETY
READ and understand this
entire instruction manual
before using this machine.
Serious personal injury may
occur if safety and operational
information is not understood
and followed. DO NOT risk
your safety by not reading!
W1666, W1685 Dust Collectors
SAFETY
Avoiding Potential Injuries
Figure 1. Wear a respirator when dust collector is in use and when using your machines.
Figure 4. Never collect anything except wood
dust.
Figure 2. DO NOT remove impeller guard.
Figure 5. Keep hands and loose objects away.
Figure 3. Unplug machine when emptying bags.
Figure 6. Wear a respirator when emptying
bags.
-10-
W1666, W1685 Dust Collectors
ELECTRICAL
110V Operation (W1685)
The Model W1685 11/2 HP dust collector operates at 110
volts only, and draws up to 16 amps.
ELECTRICAL
Make sure that the power supply circuit this machine
is connected to meets local and federal electrical code
requirements. Seek assistance from a qualified electrician if you are unsure about electrical codes and wiring!
220V Operation (W1666)
The Model W1666 2 HP dust collector operates at 220V
only, and draws up to 12 amps. Connect a 220V 6-15
plug and outlet for your power connection (see Figure
7).
Make sure that the power supply circuit this machine
is connected to meets local and federal electrical code
requirements. Seek assistance from a qualified electrician if you are unsure about electrical codes and wiring!
DO NOT attempt to work on your electrical system if you are unsure about
electrical codes and wiring! Seek
assistance from a qualified electrician. Ignoring this warning can cause
electrocution!
Extension Cords
When it is necessary to use an extension cord, use the
following guidelines:
•
•
•
•
Use cords rated for standard service.
Use cords under 50 feet of length.
Use cords with 14 ga. wire or bigger.
Ensure cord has a ground wire and pin.
Grounding
This machine must be grounded! The plug attached to
the electrical cord supplied with this machine comes
with a grounding pin. Do not remove it. If your outlet
does not accommodate a ground pin, have it replaced
by a qualified electrician or have an appropriate adapter
installed.
This equipment must be grounded.
Under no circumstances should the
grounding pin from any three-pronged
plug be removed or electrocution may
occur.
Note: When using an adapter, the adapter must be
grounded.
6-15P
6-15R
Figure 7. A 220V 6-15 plug and outlet.
-11-
W1666, W1685 Dust Collectors
SETUP
Inventory
The following is a description of the main components
carefully packaged with your SHOP FOX® Model W1666
and W1685 Dust Collectors. See Figure 8 and refer to
the list below and inventory your shipment.
If any part is missing, examine the packaging carefully
to be sure parts are not among the packing materials. If
the part is not found, find the part number in the back
of this manual and contact Woodstock International, Inc.
at (360)-734-3482 or at [email protected].
Immediately discard all plastic bags
and packing materials to eliminate a
choking and suffocation hazard for
children and animals.
B
A
C
SETUP
G
F
D
H
E
N
K
L
J
O
P
M
I
Figure 8. Dust Collector Inventory.
A.
B.
C.
D.
E.
F.
G.
H.
I.
J.
K.
L.
M.
N.
O. Large Bolt Bag:
Transfer Hose
Impeller/Motor Assy • Hex Bolt M8-1.25 X 16mm (14)
• Flat Washer 8mm (14)
Separator
• Flat Washer 6mm (16)
Base Plate
• Hex Nut M6-1.0 (16)
Bag Hanger
• Phlp Hd Scr M6-1 X 12 (16)
Separator Supports
• Hex Wrench 4mm (1)
6" to 4" Inlet Y
Dust Collection Bags • Hex Wrench 5mm (1)
Gasket
P. Small Bolt Bag:
Casters
• Hex Bolt M8-1.25 X 16 (12)
Bag Clamps
• Hex Bolt M8-1.25 X 25 (4)
Hose Clamps
• Flat Washer 8mm (20)
Wrenches
• Hex Nut M8-1.25 (4)
Outlet
READ and understand this entire instruction manual before using this machine.
Serious personal injury may occur if
safety and operational information is not
understood and followed. DO NOT risk
your safety by not reading!
UNPLUG the power cord before you
do any assembly or adjustment tasks!
Otherwise electrocution may occur!
-12-
W1666, W1685 Dust Collectors
Casters and Motor
For quiet and vibration-free operation, assemble your
dust collector as outlined below. DO NOT modify this
dust collector for any other purpose than what it is
designed for.
To install the casters and motor/impeller assembly, do
these steps:
1.
MAKE SURE THE DUST COLLECTOR MOTOR IS
UNPLUGGED!
2.
Install the four swivel casters to the base plate
with the sixteen M6-1 X 12 Phillip head screws,
washers, and nuts (see Figure 9).
Round
and
Rectangle
Support
Mounting
Flanges
Figure 9. Caster installation.
SETUP
GET assistance when lifting machine parts. The
SHOP FOX® Model W1666 and W1685 dust collector
motor/impeller assembly is heavy, and ignoring this
warning can cause you a severe back injury.
3. Bolt the motor to the motor mount with the four
M8-1.25 X 25 hex bolts, washers, and nuts; and
with lifting assistance, position the motor/impeller
assembly on the base (see Figure 10).
4. Secure the motor/impeller assembly to the base
using six M8-1.25 X 16 hex bolts, washers, and nuts
(see Figure 11).
Figure 10. Motor/impeller assembly positioning.
Motor
Mount
Figure 11. Motor/impeller assembly
installation.
-13-
W1666, W1685 Dust Collectors
Outlet, Gasket, and
Separator Supports
The outlet directs the dust to the collector hat is supported by three separator support rods. Make sure that
you do not overtighten the bolts or the threaded holes
in the base can strip.
To install the outlet and the separator supports, do
these steps:
1.
MAKE SURE THE DUST COLLECTOR MOTOR IS
UNPLUGGED!
2. Place gasket on top of impeller housing body and
place the outlet on the gasket (see Figure 12).
SETUP
3. Secure the outlet with eight M8-1.25 X 16 hex bolts
and flat washers. DO NOT overtighten the bolts
or the gasket will squeeze out and the outlet will
crack.
Figure 12. Placing the outlet on the gasket.
4. Place a collector support over one of the sets of
holes indicated in Figure 13, and make sure the tail
at the top is oriented towards the inside as shown in
Figure 14.
5. Secure the three collector supports in place with six
M8-1.25 X 16 hex bolts and flat washers.
Figure 13. Separator support bolt locations.
-14-
Figure 14. Orientation of separator support tails.
W1666, W1685 Dust Collectors
Separator and Transfer
Hose
Never bypass the dust collector or and duct the transfer
hose outside without using dust collection bags, or move
the separator to a remote location and use a longer
transfer hose. Any modification can damage the dust
collector motor and create an unsafe condition.
To install the separator and transfer hose, do these
steps:
1. The separator has three tabs with threaded holes
along the bottom edge for mounting. Orient the separator so the holes align with supports and the inlet
is pointed toward the separator body. See Figure
15.
2. Secure the front and back supports using the hex
bolts and washers provided.
Figure 15. Separator in correct position.
SETUP
3. Secure the upper bag support rod and the last separator support to the separator as in Figure 16.
4. Slide a wire hose clamp onto the end of the transfer
hose.
5. Slide the transfer hose end over the inlet for the
collector making sure the end passes the ridge on
the inlet by 11⁄2".
6. Position hose clamp over the hose and the inlet
making sure the clamp is 3⁄4" from the end of the
hose and tighten the screw on the clamp (see Figure
17).
Figure 16. Installing upper bag support.
7. Slide the second hose clamp onto the free end of
the hose.
8. Slide the end of the transfer hose onto the outlet of
the impeller housing. The hose should go on as far
as possible.
9. Slide the hose clamp within 3⁄4" of the end of hose,
and tighten the screw on the clamp.
Figure 17. Securing transfer hose with clamp.
-15-
W1666, W1685 Dust Collectors
Dust Bags and Inlet Y
Two dust collection bags are included with your new
SHOP FOX® Dust Collector. There is a top and a bottom bag. The top is distinguished by a SHOP FOX® logo.
Both bags are secured with band clamps. For increased
filtration, optional 0.3 micron dust collector bags are
available through your dealer.
To install the dust bags and the inlet Y, do these
steps:
1. Find the opening in the rim of both bags and insert
the band clamps into the rim of the bags until they
come out of the other side (see Figure 18).
Figure 18. Latch clamp with toggle.
2. Hang the upper bag as shown in Figure 19.
NOTE: The upper bag has the SHOP FOX® logo on it
and the lower bag is plain.
SETUP
3. Position the rim of the upper bag onto the collector
and latch the band clamp closed.
4. Position the rim of the lower bag onto the collector
and latch the band clamp closed.
5. Position the inlet Y on the impeller housing inlet,
and fasten it in place with the Phillips head screw
(see Figure 20).
Figure 19. Fabric loop in upper support
hook.
Figure 20. Securing inlet with screw.
-16-
W1666, W1685 Dust Collectors
System Grounding
Under some circumstances, static electricity can be
generated in dust collection systems and can collect on
the plastic ducting surfaces. If this static electricity is
discharged through a spark, there is a potential for the
dust and oxygen in the ducting to ignite.
Therefore, your dust collection system must be grounded
one of three ways.
•
•
First, the ground is achieved by means of using
metal ducting throughout the system. All static
electricity buildup is carried through the continu
ous metal ducting and dissipated through the dust
collector impeller housing.
If the system has branches, place wires in the
same fashion and connect to the wires on the
main pipe/hose with wire nuts. If blast gates
are to be used, drill exit and entrance holes on
either side of the blast gate to allow wire to be
fed out of and into the system (see Figure 23).
•
SETUP
Second, for plastic pipe or hose ducting systems,
install an uncoated bare copper wire inside
the entire length of all ducting. An additional
wire must be spiral-wrapped on the outside of
all the ducting (see Figure 21). Both wires must
be connected to the dust collector impeller housing (see Figure 22) so all static electricity inside
and out of the ducting is carried through the
wires and dissipated through the dust collector
ground.
Figure 21. Typical dust collector with
ground wire installed inside and around
pipe.
Figure 22. Typical dust collector impeller
housing with ground wires secured to
the housing.
Third, if you use a combination of metal and
plastic ducting, make sure that you use a copper
grounding wire to ground all plastic connections
with the metal ducting so no part of the ducting
is insulated by the plastic.
Note: For more in-depth information on Dust Collection
System design, refer to refer to The Dust Collection
Handbook (ISBN 0-9635821-2-7), which is available for
purchase through any Woodstock/SHOP FOX® Dealer.
Figure 23. Ground wires bypassing a blast
gate.
-17-
W1666, W1685 Dust Collectors
Test Run
Once assembly is complete and adjustments are done to
your satisfaction, you are ready to test run the machine.
To test run the dust collector, do these steps:
1.
Make sure the paddle switch is pushed in the down
or OFF position.
2.
Make sure all the dust collection ducting and fasteners are tight, and that no parts or tools will get
sucked into the dust collection intake.
3.
Plug in the power cord.
4.
Flip the START paddle upward and keep your finger
poised over the paddle for a quick power kill, just
in case there is a problem.
DO NOT investigate problems or adjust
the dust collector while it is running.
Wait until the machine is turned off,
unplugged, and all working parts have
come to a complete stop before you
proceed!
SETUP
The dust collector should run smoothly, with little
or no vibration or rubbing noises.
• If you hear strange or unusual noises, or a loud
vibration exists, turn off the dust collector
and wait for all moving parts to stop. Unplug the
machine, refer to Troubleshooting on Page 25,
and investigate and correct the problem before
further operation.
• If the source of the problem is not an easy fix,
contact our Technical Support Department
for help at (360)-734-3482 or via [email protected].
-18-
Figure 24. Hand position for emergency
stop.
W1666, W1685 Dust Collectors
OPERATIONS
General
Many of these operations can be dangerous or deadly
if performed incorrectly. The instructions in this section are written with the understanding that the operator has the necessary knowledge and skills to operate
this machine. If at any time you are experiencing
difficulties performing any operation, stop using the
machine! If you are an inexperienced operator, we
strongly recommend that you read books, trade articles,
or seek training from an experienced dust collector
operator before performing any unfamiliar operations.
Above all, your safety should come first!
Operation
This dust collector is designed for collecting wood dust
from woodworking machines. The Model W1666 will draw
up to 1550 CFM, and the Model W1685 will draw up to
1280 CFM. The dust collectors are not designed to be
used as central whole-house vacuums. Central vacuum
systems and woodshop dust collection systems have
completely different vacuum pumps and are not interchangeable. For safe operation and the best dust collection results, please follow the rules below:
ALWAYS wear a NIOSH approved respirator to help
protect yourself from the respiratory dangers caused
by the inhalation of fine dust. Dust collectors do not
eliminate the fine, and most harmful, dust from the
workshop.
•
DO NOT collect metal pieces, glass, or liquid with
this dust collector. It is intended for collecting wood
dust only (Figure 25). Metal pieces may spark when
they contact the impeller and cause a fire.
•
USE a 4" dust collection hose that is as short as possible. Remember, the longer the hose, and the more
bends in the ducting, the less CFM your dust collector will draw.
•
LIMIT the use of 90˚ elbows or 45˚ elbows. These
fittings will decrease the overall efficiency of the
dust collector.
•
GROUND your dust collection hose to protect against
unpleasant static shock, and in the worst case, an
accidental fire.
-19-
OPERATIONS
•
Dust collectors do not eliminate the
fine, and most harmful, dust from
the workshop. Always wear a NIOSH
approved respirator to help protect
yourself from the respiratory dangers
caused by the inhalation of fine dust.
Figure 25. DO NOT collect metal pieces,
glass, or liquid with this dust collector.
W1666, W1685 Dust Collectors
MAINTENANCE
General
Make a habit of inspecting your dust collector each time
you use it to ensure optimum performance.
Check for the following conditions and repair or
replace when necessary:
•
•
•
•
Worn or damaged switch, switch-safety key, electrical cords and plugs.
Loose mounting bolts, loud rubbing, vibration or
tapping noises coming from motor or impeller housing.
Clogged, frayed, or leaking dust collection bags.
Any other condition that can cause an unsafe condition.
MAKE SURE that your machine is
unplugged during all maintenance procedures! If this warning is ignored, serious personal injury may occur.
Lubrication
All bearings are sealed and permanently lubricated, no
lubrication is required.
Emptying Collected Dust
The lower bag on the dust collector should be emptied
when it becomes 2⁄3 to 3⁄4 full.
1. ALWAYS WEAR A RESPIRATOR WHEN EMPTYING
DUST COLLECTION BAGS (see Figure 26).
2. Shake the upper bag and let the dust inside settle
for a few minutes.
Emptying the collector bag exposes
you to harmful dust. Always wear a
respirator and safety goggles when
emptying the collector bag!
MAINTENANCE
3. Loosen the latch clamp holding the bag.
4. Take the bag off of the collector body and close up
the opening.
5. Place a garbage bag over the opening of the collection bag. Invert both bags to empty.
6.
Clean or reinstall the bag on the dust collector.
Collector Bag Cleaning
The lower dust storage bag is intended to be cleaned by
simply emptying it. Once a year under heavy use, hand
wash in cold water with a mild soap, and hang dry only.
DO NOT wash bags in a laundry machine or tumble dry.
-20-
Figure 26. Wearing a respirator and safety goggles for personal dust protection.
W1666, W1685 Dust Collectors
Troubleshooting
This section covers the most common dust collector problems. DO NOT make any adjustments until the
dust collector is unplugged and moving parts have come to a complete stop.
SYMPTOM
Motor will not start, or it
growls on start up.
POSSIBLE CAUSE
CORRECTIVE ACTION
1. Power supply fuse or circuit
breaker has tripped.
2. Toggle switch is broken inside.
3. Start capacitor is at fault.
4. Motor fan cover is dented, stopping
the fan from being able to spin.
5. Motor is at fault.
Motor runs slower than
normal.
1. Poor electrical connection.
3. Motor is at fault.
1. Dust collector is not on a flat
surface and wobbles.
2. Impeller fan is damaged and
unbalanced.
3. The motor mounting is loose.
4. Impeller is loose on the motor
shaft.
5. Motor fan cover is dented, causing
the motor fan to hit the cover
while spinning.
Dust collector does not
adequately collect dust or
chips; poor performance.
5. Replace motor.
1. Inspect the power supply for loose, corroded, or
overheated electrical connections and repair.
2. Have the power source voltage checked; reduce
the length of extension cord.
3. Replace the motor.
2. Low power source voltage.
Loud, repetitious noise, or
excessive vibration coming
from dust collector.
1. Disconnect power, and inspect circuit for electrical
shorts and repair. Replace circuit breaker if it is
old or has tripped many times.
2. Disconnect power, and use an ohmmeter to check
switch terminals for continuity, and replace switch
if required.
3. Replace start capacitor.
4. Replace motor fan cover (and fan, if damaged).
1. Dust collection bags are full.
2. There is a restriction at the inlet
grate.
-21-
2. Unplug dust collector, and inspect the impeller for
dents, bends, loose fins. Replace impeller if any
damage is found.
3. Make sure all fasteners on the dust collector are
tight.
4. Replace the motor and impeller as a set if the
motor shaft and the impeller hub is damaged.
5. Replace motor fan cover.
1. Empty bags.
2. Remove dust line from dust collector inlet and
clean debris from the inlet grate (and wireconnector, if installed).
3. Relocate the dust collector closer to the point of
suction, and rework ducting without sharp bends.
Refer to the Dust Collection Basics handbook (ISBN
0-9635821-2-7) to help configure your dust system.
4. Process lumber with less than 20% moisture
content.
5. Rework the ducting as to eliminate all leaks, and
refer to the Dust Collection Basics handbook (ISBN
0-9635821-2-7) for more solutions.
6. Rework the ducting as to eliminate all restrictions,
and refer to the Dust Collection Basics handbook
(ISBN 0-9635821-2-7) for more solutions.
7. Ask your dealer for proper dust collection
accessories or the SHOP FOX® Dust Collection
Nozzle on Stand.
8. Install a larger dust collector to power your dust
collection system.
MAINTENANCE
3. The dust collector is too far away
from the point of suction, or there
are too many sharp bends in the
ducting.
4. The lumber is wet and the dust is
not flowing through the ducting
smoothly.
5. There is a leak in the ducting, or a
series of small leaks, or too many
open ports.
6. There is a restriction in the
ducting, or the ducting and ports
are incorrectly sized.
7. The dust collection ducting design
is inadequate, or machine is
undersized for the task.
8. The dust collector is too small for
the dust collection system.
1. Stabilize the dust collector.
W1666, W1685 Dust Collectors
Wiring Diagram (W1666 and W1685)
W1685
110V Motor
Connection
Ground
Hot
Neutral
110V
Power Supply
Toggle
Switch
Motor
Capacitor
MAINTENANCE
Hot
W1666
220V Motor
Connection
Ground
Hot
220V
Power Supply
Toggle
Switch
Motor
Capacitor
-22-
W1666, W1685 Dust Collectors
Parts Diagram (W1666 and W1685)
���������������������������
��������������������������
���������������������������
��
����
���
��
��
��
��
���
��
��
����
��
��
�
��
��
�������������������������������������������������
���
��
����
���
��
��
����
��
��
���
����
��
��
�
��
��
��
��
�
�
���
��
��
�
�
�
��
��
��
��
�
���
�
�
����
PARTS
�
���
�
��
��
��
��
��
����� �� ���
��
�� ��
��
��
���
��
��
��
�����
����
���
���
��
��
��
�
��
�
��
-23-
W1666, W1685 Dust Collectors
REF
PART #
1
2
3
4
5
6
7
8
8A
8A-1
8-1
8-2A
8-8
9
10
11
12
13
14
15
16
17
18
19
21
22
23
26
23
26
X1666001
XPN03M
X1666003
XPW01M
X1666005
XPB03M
REF
DESCRIPTION
24A
25A
28
29
29
30
30
31
32
33
34
35
36
38
38
39
40
41
42
43
48
56
57
58
59
60
61
62
63
CASTER
HEX NUT M6-1.0
BASE PLATE
FLAT WASHER 6
MOTOR BASE
HEX BOLT M8-1.25 X 16
XPWRCRD220L POWER CORD 220V, LONG
XPWRCRD220S POWER CORD 220V, SHORT
X1666008A
MOTOR 2 HP 220V
XPC200A
S. CAPACITOR 200MFD/250V
XPC600
S. CAPACITOR 600MFD/125V
X1666008-2A R. CAPACITOR 50MFD/350V
X1666008-8 CAPACITOR STRAP
X1666009
SWITCH
X1666010
SWITCH KEY
XPAW04M
HEX WRENCH 4MM
XPAW05M
HEX WRENCH 5MM
X1666013
UPPER BAG SUPPORT
X1666014A
COLLECTOR SUPPORT
XPB07M
HEX BOLT M8-1.25 X 25
XPW01M
FLAT WASHER 8MM
X1666017
KEY
X1666018
GASKET
XPN01M
HEX NUT M6-1.0
X1666021
HEX BOLT
IMPELLER
X1666022
PHLP HD SCR M6-1 X 12
XPS14M
X1666026
CAP SCREW M6-1.0 X 20 LH
PHLP HD SCR M6-1 X 12
XPS14M
X1666026
CAP SCREW M6-1.0 X 20 LH
PART #
X1666024A
X1666025A
X1666028
X1666029
X1685029A
X1666030
X1685030
X1666031
X1666032
X1666033
X1666034
X1666035
X1666036
X1666038
X1685038
X1666039
X1666040
X1666041
XPWR1214
XPWR1012
XPS09M
X1685008A
X1685008A-2
X1685008A-1
XPC200
X1684060
XPWRCRD110L
XPWRCRD110S
X1685022
DESCRIPTION
INLET
INLET COVER
SPECIAL WASHER
GASKET (W1666)
GASKET (W1685)
OUTLET (W1666)
OUTLET (W1685)
HOSE CLAMP
TRANSFER HOSE
SEPARATOR
HOSE CLAMP
FILTER BAG
COLLECTOR BAG
IMPELLER HOUSING (W1666)
IMPELLER HOUSING (W1685)
HAND WARNING LABEL
READ MANUAL LABEL
MACHINE ID/WARNING LABEL
12 X 14 WRENCH
10 X 12 WRENCH
PHLP HD SCR M5-0.8 x 10
MOTOR 1-1/2 HP 110V
MOTOR FAN COVER
MOTOR FAN
S. CAPACITOR 200MFD/125V
MACHINE ID/WARNING LABEL
POWER CORD 110V, LONG
POWER CORD 110V, SHORT
IMPELLER
PARTS
Parts List (W1666 and W1685)
-24-
W1666, W1685 Dust Collectors
Accessories
Below are some of the accessories that work well with this dust collector. If you do not have a dealer
in your area, these products are also available through online dealers. Please call or e-mail Woodstock
International Inc. Customer Service to get a current listing of dealers at: (800)-840-8420 or at
[email protected].
Quick Disconnect (Model W1038)
This is the perfect accessory for those who will use the
dust collector for multiple machines. The quick disconnect is designed to attach to a 4" hose and press-on to
any 4" diameter dust port. The quick disconnect works
with a friction fit to eliminate constant tightening/loosening hose clamps.
Universal Adapter (Model W1039)
Providing options for seven different sizes, this universal adapter allows you to connect your dust collector to
machines with dust ports smaller than 4". This is a "musthave" for miter saws or when connecting your dust collector to common vacuum hoses.
Remote Switch (Model D3038 110V or Model
D3346 220V)
Turn your dust collector ON or OFF from up to 75 feet
away. The Model D3038 remote switch controls 110V20A dust collectors up to 11/2 HP, and the Model D3346
remote switch controls 220V-20A dust collectors up to 3
HP.
Grounding Kit (Model W1053)
All dust collectors generate static electricity in the ducting system. If a series of conditions are in place, and the
dust collection ducting is not grounded, a spark from
static electricity buildup could ignite the fine wood dust
particles in the dust collector. To reduce this ignition hazard, install a grounding kit.
Deluxe Ceiling Mounted Air Cleaner (Model
W1690)
-25-
PARTS
Air cleaners are a great solution for removing airborne
dust particles. This air cleaner has three speeds (556,
702, and 1,044 CFM) and a primary and secondary filter
to remove dust particles as small as 2.5 Micron. Install
this air cleaner on a work bench, on a wall, or suspend it
from your shop ceiling.
W1666, W1685 Dust Collectors
PARTS
Notes
-26-
W1666, W1685 Dust Collectors
Notes
PARTS
-27-
W1666, W1685 Dust Collectors
Warranty
Woodstock International, Inc. warrants all SHOP FOX® machinery to be free of defects from workmanship and materials for a period of two years from the date of original purchase by the original
owner. This warranty does not apply to defects due directly or indirectly to misuse, abuse, negligence
or accidents, lack of maintenance, or reimbursement of third party expenses incurred.
Woodstock International, Inc. will repair or replace, at its expense and at its option, the SHOP FOX®
machine or machine part which in normal use has proven to be defective, provided that the original
owner returns the product prepaid to the SHOP FOX® factory service center or authorized repair
facility designated by our Bellingham, WA office, with proof of their purchase of the product within
two years, and provides Woodstock International, Inc. reasonable opportunity to verify the alleged
defect through inspection. If it is determined there is no defect, or that the defect resulted from
causes not within the scope of Woodstock International Inc.'s warranty, then the original owner must
bear the cost of storing and returning the product.
This is Woodstock International, Inc.'s sole written warranty and any and all warranties that may be
implied by law, including any merchantability or fitness, for any particular purpose, are hereby limited
to the duration of this written warranty. We do not warrant that SHOP FOX® machinery complies
with the provisions of any law or acts. In no event shall Woodstock International, Inc.'s liability under
this warranty exceed the purchase price paid for the product, and any legal actions brought against
Woodstock International, Inc. shall be tried in the State of Washington, County of Whatcom. We shall
in no event be liable for death, injuries to persons or property or for incidental, contingent, special or
consequential damages arising from the use of our products.
PARTS
Every effort has been made to ensure that all SHOP FOX® machinery meets high quality and durability standards. We reserve the right to change specifications at any time because of our commitment to
continuously improve the quality of our products.
-28-
Warranty Registration
Name ___________________________________________________________________________________
Street __________________________________________________________________________________
City _________________________ State ___________________________Zip ________________________
Phone # ______________________ Email __________________________Invoice # ___________________
Model #_________Serial #______________Dealer Name__________________Purchase Date___________
CUT ALONG DOTTED LINE
The following information is given on a voluntary basis. It will be used for marketing purposes to help us
develop better products and services. Of course, all information is strictly confidential.
1.
How did you learn about us?
_____ Advertisement
_____ Mail Order Catalog
2.
How long have you been a woodworker/metalworker?
_____ 0-2 Years
_____ 2-8 Years
____ 8-20 Years
_____ 20+ Years
3.
How many of your machines or tools are SHOP FOX®?
_____ 0-2
_____ 3-5
____ 6-9
_____ 10+
4.
Do you think your machine represents a good value?
5.
Would you recommend SHOP FOX® products to a friend? ____
6.
What is your age group?
_____ 20-29
_____ 50-59
7.
What is your annual household income?
_____ $20,000-$29,000
____ $30,000-$39,000
_____ $50,000-$59,000
____ $60,000-$69,000
8.
Which of the following magazines do you subscribe to?
____
____
____
____
____
____
____
____
____
____
9.
Cabinet Maker
Family Handyman
Hand Loader
Handy
Home Shop Machinist
Journal of Light Cont.
Live Steam
Model Airplane News
Modeltec
Old House Journal
____ Friend
____ Website
____ Local Store
____ Other:
_____ Yes
____ 30-39
____ 60-69
____
____
____
____
____
____
____
____
____
____
Popular Mechanics
Popular Science
Popular Woodworking
Practical Homeowner
Precision Shooter
Projects in Metal
RC Modeler
Rifle
Shop Notes
Shotgun News
____ No
Yes _
No
____ 40-49
____ 70+
____ $40,000-$49,000
____ $70,000+
____
____
____
____
____
____
____
____
____
Today’s Homeowner
Wood
Wooden Boat
Woodshop News
Woodsmith
Woodwork
Woodworker West
Woodworker’s Journal
Other:
Comments:__________________________________________________________________
_____________________________________________________________________________
_____________________________________________________________________________
_____________________________________________________________________________
_____________________________________________________________________________
FOLD ALONG DOTTED LINE
Place
Stamp
Here
WOODSTOCK INTERNATIONAL, INC.
P.O. BOX 2309
BELLINGHAM, WA 98227-2309
FOLD ALONG DOTTED LINE
TAPE ALONG EDGES--PLEASE DO NOT STAPLE