1
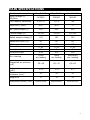
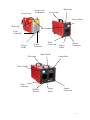
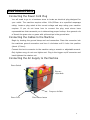
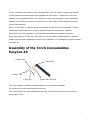
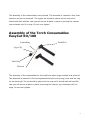
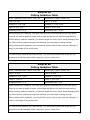
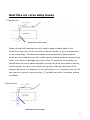
EasyCut
Cut-40/60/100
Plasma Cutters
Operation Manual
Hong Kong EasyWeld Limited
1
Introduction
The EasyCut series plasma cutter is a revolutionary new approach to plasma cutting
technology. Easyweld introduced a more efficient way to cut metal while keeping the
cost of operation lower. This was accomplished using several new approaches to
the mainstream technology. One of these methods is our proprietary plug-and-play
main circuit boards which allow ease of repair, reducing the downtime to only hours
rather than days, while also reducing repair costs averaging less than $15! The
cut4O uses special safety redundant circuitry with built in auto-protection and self
adjusting circuitry to keep your machine running in a safe threshold. This helps
protect your machine from over-voltage, power spikes, tip blowouts and shorting.
Warranty
The machine is insured against damage upon shipping. If you machine is damaged
in any way when you receive it, you must retain all shipping materials and packing.
Call our customer service department and report the damage immediately.
There is a 1 year warranty on all internal electronic parts. The torch, cables, power
cord, clamps, air regulator, hoses, case & paint and consumables are not covered
under warranty. You must use dry air via the air regulator and empty the reservoir
from the water separator frequently to insure proper protection from moisture.
This machine is designed to operate from 200~240VAC/380VAC at 50-60Hz Only.
Operating outside of limits will void warranty.
Warranty coverage covers repair or replacement of damaged machine or
damaged circuit board. Warranty does not cover shipping from the customer
but does cover return shipping within the Cont. United States. If you are going
to return a machine to us for repairs, it must be well packed and insured.
Customers who own machines that require warranty coverage should contact
our warranty department by email at [email protected] to obtain a return
authorization code.
Customers who own an out-of-warranty machine that require repairs should
contact us for an estimate.
2
Safety tips
●
With the machine in use, do not switch the machine off or it
will damage the internal circuitry.
●
Make sure your circuit breaker can handle the required
amperage draw of your machine.
●
Use a UL approved outlet/receptacle and plug with your
machine, do not hard wire the machine to main power.
●
Use safety goggles designed to darken the arc generated by
your machine.
Electric-shock
•Machine should be grounded via the power cord or ground on machine case.
•No touching electric parts with bare hands, wet hands or wet clothes.
•Do not operate machine with bare feet or on a wet floor.
•Make sure the work area is free of flammable and explosive chemicals.
Smoke—may be harmful to your health.
•Keep your head out of the smoke.
•When welding, make sure the air is flowing away to avoid breathing in the
smoke.
Arc-emission---may be harmful to your eyes and skin
•Wear suitable welding mask and clothes to protect your eyes and skin.
•Use suitable screen or curtain to keep the passers by from viewing the
emission.
•The arc spray and metal spray from machine use may cause nearby fires. Use
caution.
Noises—too much noise may be harmful to your hearing.
•Please wear something to protect your ears from the noises.
Break-down: ask the professional for help
•If you have any problems in setting up or operating, please first consult this
manual.
3
MAIN SPECIFICATIONS
EasyCut 40
EasyCut 60
EasyCut l00
AC220V
380VAC
380VAC
0.5/0.75
1/1.5
NA
Input KVA / AMPS
6/17
9/31
17
No—load voltage (V)
230
230
230
10~40
20~60
20~100
100
120
130
60
60
60
85
0. 93
B
IP23
85
0. 93
B
IP2l
85
0. 93
B
IP2l
Touch
arc-leading
Touch
arc-leading
Non-touch
arc—leading
55—65
65—70
65—80
2—4
3—5
5—7
12
23
30
8
19
33
390x163x290
480x205x355
560x361x360
Model
Input Voltage (V)
50/60Hz
Cut Capacity max/serve
Current range (A)
Rated output voltage (V)
Rated duty cycle (%)
Efficiency
Power factor case
Insulation class
Protection class
Arc—starting
Suggested air pressure
(psi)
Suggested air volume
(cfm)
Maximum cutting
thickness (mm)
Weight KG
Dimension(LxWxH) (mm)
4
Power Lamp
Compress Air
Gas Regulator
Pilot Lamp
Power Lamp
Power Switch
Pilot Lamp
Main Current
Torch
Connection
Ground
Connection
Trigger
Socket
Torch
Connection
Trigger
Socket
Ground
Connection
Main Current
Current Meter
Pilot Lamp
Power Switch
Torch
Connection
Pilot Arc
Terminal
Trigger
Socket
Ground
Connection
5
INSTALLATION
Connecting the Power Cord Plug
You will need to go to a hardware store to locate an electrical plug designed for
your outlet. The machine requires either 110v/220vac at a specified amperage
rating. Locate a plug rated at the correct voltage and amp rating your machine
requires. If you do not know how to connect the plug most stores have
representatives that can assist you in determining proper hookup. As a general rule
of thumb the green wire or green with yellow stripe is the ground wire.
Connecting the Cables to the Machine
Begin by locating the ground clamp and end connection. Place the connector into
the machines ground connection and turn it clockwise until it locks into position
(about 1/3 turn).
Connect the torch connector to the machine using a wrench or adjustable wrench.
Only tighten snug, do not over tighten nut. Plug in the trigger on/off connector and
hand tightens the retainer nut.
Connecting the Air Supply to the Machine
Power Switch
Pressure
adjust knob
Compress Air Inlet
Power Cord
Water release button
6
If your machine comes with an air regulator/filter you will need to secure the bracket
to the machine and then fasten the regulator to the bracket. Locate the in and out
labeled on the regulator body. Cut a section of hose long enough to bend around the
back of the machine as pictured and secure it to the outlet on the regulator and the
inlet to the machine.
Next you will need to connect an air compressor to the inlet to the regulator. The air
compressor should be set to a higher pressure than the compressor requires.
Set the knob on the regulator to the specified pressure your machine requires.
After long duration of use, you will need to push the water release button to release
water from the water separator section of the regulator. It is designed to remove water
from the air.
Assembly of the Torch Consumables
EasyCut 40
Ceramic Ring
Torch Head
Ceramic Cup
Copper Tip
Double Side Electrode
The torch handle is made of bakelite which is fire and heat resistant.
Do not drop or strike anything with the torch.
The on/off switch can be positioned on the top, side or bottom of the torch body to
allow ease of use.
7
The assembly of the consumables is as pictured. The electrode is inserted in first, then
seat the ring on the electrode. The copper tip should be placed on the ring and it
should seat well and flat. Last you will secure all parts in place by turning the ceramic
cup clockwise until it is snug. Do not over tighten.
Assembly of the Torch Consumables
EasyCut 6O/100
Ceramic Ring
Torch Head
Copper Tip
Shield Cup
Electrode
The assembly of the consumables for the cut60 and other larger models is as pictured.
The electrode is inserted in first and tightened with pliers very snug, then seat the ring
on the electrode. The tip should be placed on the ring and it should seat well and flat.
Last you will secure all parts in place by turning the ceramic cup clockwise until it is
snug. Do not over tighten.
8
OPERATION
1. Plug the machine to the electrical outlet, first making sure the machine on/off
switch is in the off position.
2. Connect the air compressor supply line to the input side of the air regulator/filter (if
applicable).
3. Turn the on/off switch of your cutter to the ON position. The cooling fan(s) should
come on and the ON indicator LED (if applicable) should come on.
4. At this point you should already have your cables connected to your machine, if
they are not then turn off your machine and do this now and start over.
5. Connect the ground clamp to your work piece to be cut. Make sure there is no rust
or paint creating an open circuit. You should clean the contact point on the work
piece to ensure a good electrical connection.
6. Make sure your protective clothing and eye protection is on before going any
further. Work in a well ventilated area to avoid smoke.
7. Bring the torch tip into direct contact with your work piece edge or over a predrilled
pilot hole if cutting very thick material. See Cutting Guideline table below for more
details about cutting. Depress the button on your torch to start the arc and begin
cutting.
8. After performing the desired cut you may need to clean off slag from the under part
of the cut. Do this with a grinder or chisel.
9
EasyCut 40
Cutting Guideline Table
Steel, Stainless Steel, MOLY, Iron, etc.
Aluminum, Copper, Brass, etc.
Thin = 0-1/8”
Thin = 0-1/16”
Medium = 1/8”-3/8”
Medium = 1/16”-3/16”
Thick = 3/8”-1/2”
Thick = 3/16”-3/8”
Severance cut = 3/4”
Severance cut = 9/16”
When cutting thin material, you may start directly perpendicular to the work piece,
there is no need to angle or start on the edge as the arc will pass through quickly.
When cutting medium material, you should angle the torch tip to avoid damaging the
tip. Once the arc passes through the material you may begin cutting normal.
When cutting thick material, you should drill a pilot hole to start your arc through or
start on the edge of the work piece.
Do not cut any material on a flat surface. The work piece should be raised off the
ground to avoid blow back which may burn you or cause fires.
EasyCut 60
Cutting Guideline Table
Steel, Stainless Steel, MOLY, Iron, etc.
Aluminum, Copper, Brass, etc.
Thin = 0-1/4”
Thin = 0-1/8”
Medium = 1/4”-7/16”
Medium = 1/8”-3/8”
Thick = 7/16”-1”
Thick = 3/8”-1/2”
Severance cut = 1.5”
Severance cut = 3/4”
When cutting thin material, you may start directly perpendicular to the work piece,
there is no need to angle or start on the edge as the arc will pass through quickly.
When cutting medium material, you should angle the torch tip to avoid damaging the
tip. Once the arc passes through the material you may begin cutting normal.
When cutting thick material, you should drill a pilot hole to start your arc through or
start on the edge of the work piece.
Do not cut any material on a flat surface. The work piece should be raised off the
ground to avoid blow back which may burn you or cause fires.
10
Real lime arc curve delay issues
Cutting Direction
Real time arc curve delay
When cutting thick materials you will need to keep a steady pace in the
direction of your cut. Do not move the torch too quickly or you will experience
an arc curve delay. This delay can cause your work piece to have sections
which are uncut and thus you will need to go over those sections a second time
which may distort or damage your work piece. To avoid arc curve delay you
should allow the arc to pass completely through the work piece before moving
too far ahead. Your arc curve should not lag more than the thickness of the
material being cut. For example, if your work piece is ½” thick then you will not
want your arc curve to lag more than ½” behind your torch. See below picture
for details.
Cutting Direction
Real time arc curve delay
11
MAINTENANCE
1. Clear dust that may accumulate in the machine at regular intervals with
clean and dry compressed air; if the working condition has heavy smoke
and pollution, the welding machine should be cleaned once a month.
2. Keep the machine exterior clean with mild soap and water.
3. Do not walk or store items on the cables or cords.
4. Do not jar, drop or stack items on top of your machine.
5. Always use a well grounded electrical outlet for your machine.
6. Always check the torch consumables before and after use and make sure it
is clear of obstructions and no parts are broken or cracked.
7. Replace any worn or damaged consumables before using machine to avoid
damage or harm.
8. For periods of prolonged non-use please remove cables and store in original
box in a cool dry place, free of bug infestation.
TROUBLE SHOOTING
Upon receipt of your machine, you should inspect the outer packaging for
damage. Note any damage with the delivery driver and contact us
immediately by phone or email to inform us of damage. Keep all packing
materials and box. We will start a claim with the shipping company which
will cover damage, loss or other issues regarding shipping. Claims generally
take 2-4 weeks to resolve completely. We are not responsible for any
damage or loss which may arise from improper handling, dropped boxes,
shipping damage or other damage. Do not refuse the package to us as we
will simply send it back. You must follow proper protocol.
Most problems can be resolved by the customer. Most problems arise due
to rough handling by the shipping company. Please call our service dept for
suggestions if your machine does not function upon receipt. There are
several steps which can be followed.
To alleviate the problem before a machine is sent back. The solution may be
simple so call or email us.
12
EasyCut 40 Problems and Solutions
Breakdown
The power switch is in
the ON position but fan
does not turn on and
machine doesn’t work.
The power switch is in
the ON position and the
fan works. When
pushing the cut button
on the torch the valve
opens and allows air to
pass but no arc starts
and the error LED come
on
The power switch is in
the ON position and the
fan works. When
pushing the cut button
on the torch the valve
opens and allows air to
pass but no arc starts
and the error LED does
not come on.
The arc doesn’t start
when I push the torch
button.
Solution
Over-voltage protection, turns off the machine
for a while, and then restarts it. Simply wait
3-10 minutes. Or the power cord is connected
incorrectly (you may have the wires improperly
connected to the plug)
1. K1170 on the top PCB is damaged.
2. The step-up transformer is damaged.
3. The control board is damaged.
4. Wires or connectors have come loose in the
machine.
1. The torch consumables are improperly
installed.
2. The primary coil of the arc-leading
transformer is shorted or not
well-connected.
3. The rectifier diode(s) is damaged.
4. The HF capacitor is leaking.
5. The relay(s) is damaged.
1. Low input voltage.
2. The air compressor pressure is too low or
too high.
13
EasyCut 60/100 Problems and Solutions
Breakdown
Solution
Power switch is turned on but no
1. The assistant transformer on
activity, no fan and no lights.
the control board is broken.
2. The power input wires are not
connected properly.
3. Wires or connectors have come
loose inside the machine.
Power switch is on, fan comes on
1. The rectifier diode is damaged
but when pressing the torch button 2. The high frequency capacitor
no arc starts and the error LED
1KV/102 is broken
comes on.
3. K1170 on the top board is
broken.
4. The step-up transformer on the
bottom board is broken
5. The control model is broken
The power switch is in the ON
1. The torch consumables are
position and the fan works. When
improperly installed.
pushing the cut button on the torch 2. The primary coil of the
the valve opens and allows air to
arc-leading transformer is
pass but no arc starts and the error
shorted or not well-connected.
LED does not come on.
3. The rectifier diode(s) is
damaged.
4. The HF capacitor is leaking.
5. The relay(s) is damaged.
The arc doesn’t start when I push
1. Low input voltage.
the torch button.
2. The air compressor pressure is
too low or too high.
14