1
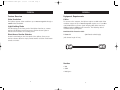
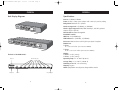
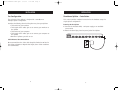
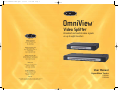
P74179-F1DV104-8-man.qxd
3/12/03
9:35 AM
Page 1
OmniView
™
Video Splitter
belkin.com
Broadcast and control video signals
on up to eight monitors
Belkin Corporation
501 West Walnut Street
Compton • CA • 90220 • USA
Tel: 310.898.1100
Fax: 310.898.1111
Belkin Components, Ltd.
Express Business Park
Shipton Way • Rushden • NN10 6GL
United Kingdom
Tel: +44 (0) 1933 35 2000
Fax: +44 (0) 1933 31 2000
Belkin Components B.V.
Starparc Building • Boeing Avenue 333
1119 PH Schiphol-Rijk • The Netherlands
Tel: +31 (0) 20 654 7300
Fax: +31 (0) 20 654 7349
Belkin, Ltd.
7 Bowen Crescent • West Gosford
NSW 2250 • Australia
Tel: +61 (0) 2 4372 8600
Fax: +61 (0) 2 4372 8603
Belkin Tech Support
US: 310.898.1100 ext. 2263
800.223.5546 ext. 2263
Europe: 00 800 223 55 460
Australia: 1800 666 040
P74179
© 2003 Belkin Corporation. All rights reserved. All trade names are
registered trademarks of respective manufacturers listed.
User Manual
ExpandView™ Series
F1DV104
F1DV108
P74179-F1DV104-8-man.qxd
3/12/03
9:35 AM
Page 3
TABLE OF CONTENTS
Overview
Introduction . . . . . . .
Package Contents . . . .
Feature Overview . . . .
Equipment Requirements
Unit Display Diagrams .
Specifications . . . . . .
....
....
....
...
....
....
.
.
.
.
.
.
.
.
.
.
.
.
.
.
.
.
.
.
.
.
.
.
.
.
.
.
.
.
.
.
.
.
.
.
.
.
.
.
.
.
.
.
.
.
.
.
.
.
.
.
.
.
.
.
.
.
.
.
.
.
INTRODUCTION
.
.
.
.
.
.
.
.
.
.
.
.
.
.
.
.
.
.
.
.
.
.
.
.
.
.
.
.
.
.
.
.
.
.
.
.
.
.
.
.
.
.
.
.
.
.
.
.
.
.
.
.
.
.
.
.
.
.
.
.
.
.
.
.
.
.
.
.
.
.
.
.
.
.
.
.
.
.
.
.
.
.
.
.
.
.
.
.
.
.
1
1
2
3
4
5
Installation
Pre-Configuration . . . . . . . . . . . . . . . . . . . . . . . . . . . . . . . . . 6
Standalone Splitter – Installation . . . . . . . . . . . . . . . . . . . . . . 7
Multiple Splitters – Installation . . . . . . . . . . . . . . . . . . . . . . . 9
Using your Splitter
Selecting a Monitor Using Direct-Access Monitor Selectors . . . . . 10
Resetting your Splitter . . . . . . . . . . . . . . . . . . . . . . . . . . . . 10
FAQs
. . . . . . . . . . . . . . . . . . . . . . . . . . . . . . . . . . . . . . . . . . 11
Troubleshooting . . . . . . . . . . . . . . . . . . . . . . . . . . . . . . . . . . . 12
Congratulations on your purchase of the Belkin OmniView ExpandView Series
Video Splitter (the Splitter). Our diverse line of market-leading KVM
solutions from Belkin exemplifies our commitment to delivering
high-quality, durable products at a competitive price. Engineered to give
you control over multiple monitors, the Belkin ExpandView Series comes
in 4- and 8-port versions, suitable for all configurations, large or small.
To ensure your satisfaction, these compact, affordable Splitters come with
a Belkin Five-Year Warranty and free technical support.
This manual will provide details about your new Splitter, from installation
and operation, to troubleshooting—in the unlikely event of a problem.
For easy installation, please refer to the Quick Installation Guide included
with your Splitter.
Thank you for purchasing the Belkin OmniView ExpandView Series Video
Splitter. We appreciate your business and have confidence that you will
soon see for yourself why over 1 million Belkin OmniView products are
being used worldwide.
Information . . . . . . . . . . . . . . . . . . . . . . . . . . . . . . . . . . . . . . 13
Package Contents:
•
•
•
•
•
OmniView ExpandView Series Video Splitter
User Manual
Quick Installation Guide
Registration Card
9V DC, 1.5A Power Supply
1
P74179-F1DV104-8-man.qxd
3/12/03
9:35 AM
Page 2
OVERVIEW
OVERVIEW
Feature Overview
Equipment Requirements
Video Resolution
Cables
The Splitter supports video resolutions up to 2048x1536@85Hz through a
400MHz video bandwidth.
To connect to the computer, the Splitter requires one VGA cable. Video
resolution support of up to 2048x1536@85Hz requires use of a 75-Ohm
coaxial VGA cable to preserve signal integrity. VGA cables must have
HDDB15 female-to-HDDB15 male connectors. The following cable is
recommended for your Splitter.
Light-Emitting Diode
The LED display on the front panel of the Splitter functions as a status
monitor. An LED above each direct-access monitor selector lights to
indicate which monitors are currently active.
OmniView Video Extension Cable
Direct-Access Monitor Selectors
F1D9003-XX
Located conveniently on the front panel of the Splitter, direct-access
monitor selectors allow for simple, manual monitor selection. Each button
controls a monitor.
(-XX denotes length in feet)
(VGA Female to Male Style)
Monitors
• VGA
• SVGA
• MultiSync®
2
3
P74179-F1DV104-8-man.qxd
3/12/03
9:35 AM
Page 4
OVERVIEW
OVERVIEW
Unit Display Diagrams
Specifications
F1DV104
F1DV108
The Back of the KVM Switch:
Video In
Monitor VGA ports
VIDEO IN
VIDEO OUT
Video Out
VGA IN
VGA 8
VGA 7
VGA 6
VGA 5
VGA 4
VGA 3
VGA 2
VGA 1
Part No.: F1DV104, F1DV108
Power: 9V DC, 1.5-Amp power adapter with center-pin postive polarity
Daisy-Chain: Maximum of 4 Splitters
Monitors Supported: 4 (F1DV104), 8 (F1DV108)
Monitor Types Supported: VGA, SVGA, MultiSync, and LCD (optional
adapter may be required)
Max Resolution: 2048x1536@85Hz
Bandwidth: 400MHz
VGA Port: 15-pin HDDB type
LED Indicators: 4 (F1DV104), 8 (F1DV108)
Enclosure: Metal enclosure with high-impact plastic faceplate
Dimensions:
F1DV104
11 x 1.75 x 6 inches (279 x 44.5 x 150mm)
F1DV108
17.25 x 1.75 x 7.5 inches (438 x 44.5 x 190mm)
Weight:
F1DV104 5.3 lbs. (2414g)
F1DV108 9.2 lbs. (4181g)
Operating Temp: 32° to 104°F (0~40º C)
Storage Temp: -4° to 140°F (-20~60º C)
Humidity: 0-80% RH, non-condensing
Warranty: 5 years
NOTE: Specifications are subject to change without notice.
DC power jack
VGA In
4
5
P74179-F1DV104-8-man.qxd
3/12/03
9:35 AM
Page 6
INSTALLATION
INSTALLATION
Pre-Configuration
Standalone Splitter – Installation
The enclosure of the Splitter is designed for a standalone or
multiple-splitter configuration.
This section provides complete instruction for the hardware setup of a
single splitter configuration.
Consider the following when deciding where to place your Splitter:
• The location of your monitors
• The lengths of the cables you use to connect your monitors to
the Splitter
• The location of your computer
• The lengths of the cables you use to connect your computer to
the Splitter
• Number of splitters you wish to use
Powering On the Splitter
1. Connect the included 9V DC, 1.5A power supply to an available
power outlet.
2. Attach the barrel plug into the power jack of the Splitter.
VIDEO IN
VIDEO OUT
VGA IN
VGA 8
VGA 7
VGA 6
VGA 5
Cable Distance Recommendations
We recommend that the video cable length be limited to 30 feet for
best video performance. Beyond that length, lower video resolutions
are recommended.
6
7
VGA 4
VGA 3
VGA 2
VGA 1
P74179-F1DV104-8-man.qxd
3/12/03
9:35 AM
Page 8
INSTALLATION
INSTALLATION
Connecting the Computer to the Splitter
1. Make sure your computer is powered off.
2. Using the OmniView Video Extension Cable (F1D9003-XX), connect the
HDDB15 male type connector to the video card on your computer.
VIDEO IN
VGA IN
VIDEO OUT
VGA 8
VGA 7
VGA 6
VGA 5
VGA 4
VGA 3
VGA 2
VGA 1
Multiple Splitters – Installation
You can daisy-chain up to four Splitters together, giving you the ability
to view a maximum of 32 monitors. When daisy-chained together, the
master Splitter will control all reset and power functions.
Note: A daisy-chain cable (F1D108-CBL) is required to daisy-chain each Splitter
and is available through your Belkin reseller or online at belkin.com.
Example of Daisy-Chain Configuration
VIDEO IN
VIDEO OUT
VGA IN
VGA 8
VGA 7
VGA 6
VGA 5
VGA 4
VGA 3
VGA 2
VGA 1
VGA IN
VGA 8
VGA 7
VGA 6
VGA 5
VGA 4
VGA 3
VGA 2
VGA 1
VGA IN
VGA 8
VGA 7
VGA 6
VGA 5
VGA 4
VGA 3
VGA 2
VGA 1
VGA IN
VGA 8
VGA 7
VGA 6
VGA 5
VGA 4
VGA 3
VGA 2
VGA 1
VIDEO IN
VIDEO OUT
VIDEO IN
VIDEO OUT
VIDEO IN
3. Connect the HDDB15 female type connector to the input port on
your Splitter.
4. Boot up your computer.
Connecting Monitors to the Splitter
1. Make sure your monitor is powered off.
2. Connect the HDDB15 male type connector of your monitor to the
HDDB15 female type connector output port on your Splitter.
3. Turn on your monitor.
Repeat steps 1-3 for each additional monitor you wish to connect.
VIDEO IN
VIDEO OUT
VGA IN
VGA 8
VGA 7
VGA 6
VGA 5
8
VGA 4
VGA 3
VGA 2
VGA 1
VIDEO OUT
Before you begin:
1. Make sure all monitors are powered off.
2. Place all primary and secondary splitters in the desired locations.
3. Connect the power supplies to the Splitters being used.
4. Connect the monitors to the Splitters as previously described for a
standalone configuration.
Connecting the Daisy-Chain Cable
5. Using the daisy-chain cable (F1D108-CBL), connect one end to the
“VIDEO OUT” port on the first Splitter.
6. Connect the other end of the daisy-chain cable to the “VIDEO IN” port
on the second Splitter.
**** Caution and Warning ****
Never connect “VIDEO IN” to “VIDEO IN” or “VIDEO OUT” to “VIDEO OUT”.
This may produce unpredictable results and may cause damage to
the Splitter.
9
P74179-F1DV104-8-man.qxd
3/12/03
9:35 AM
Page 10
USING YOUR SPLITTER
FAQs
Selecting a Monitor Using Direct-Access Monitor Selectors
Q: How many Splitters can I daisy chain?
Located conveniently on the front panel of the Splitter, direct-access
monitor selectors allow for simple, manual monitor selection. Each button
controls a monitor.
A: You can daisy chain up to four Splitters.
You can directly select which monitor you wish to access by pressing the
corresponding direct-access monitor selector next to the appropriate port.
The LED will be lit to indicate that the port is currently selected.
Q: How far can I connect my monitors from the Splitter?
A: You can connect your monitors 30 feet away from the Splitter without
experiencing any degradation. Lower video resolutions are
recommended for distances beyond 30 feet.
Q: Can I daisy-chain an F1DV104 with an F1DV108?
Resetting your Splitter
The reset button allows you to quickly and easily reset the Splitter.
Simply push the button and all of your monitors are reset and activated.
A: Yes, you can daisy-chain the F1DV104 with the F1DV108.
Note: Make sure the F1DV108 is the primary splitter when daisy-chaining.
Q: Does the Splitter support DVI adapters?
A: No, the Splitter does not support DVI-to-VGA adapters.
Q: Does it require a power supply?
A: Yes, the Splitter requires a 9V DC, 1.5A power supply.
10
11
P74179-F1DV104-8-man.qxd
3/12/03
9:35 AM
Page 12
TROUBLESHOOTING
VIDEO
I am getting a black screen on my monitor.
• Check that all video cables are inserted properly.
• Make sure the monitor is active on the Splitter.
• Make sure the monitor is powered on.
• Make sure the power supply is connected to the Splitter.
• Make sure the Splitter is powered on.
INFORMATION
FCC Statement
DECLARATION OF CONFORMITY WITH FCC RULES FOR
ELECTROMAGNETIC COMPATIBILITY
We, Belkin Corporation, of 501 West Walnut Street, Compton, CA 90220, declare under our
sole responsibility that the products:
F1DV104
F1DV108
to which this declaration relates:
Comply with Part 15 of the FCC Rules. Operation is subject to the following two
conditions: (1) this device may not cause harmful interference, and (2) this device must
accept any interference received, including interference that may cause undesired
operation.
• Make sure the resolution on your video card is supported by
your monitor.
CE Declaration of Conformity
• Connect the monitor directly to the computer to verify that your
monitor is functioning properly.
We, Belkin Corporation, declare under our sole responsibility that the products F1DV104 and F1DV108, to
which this declaration relates, are in conformity with Emissions Standard EN55022 and with Immunity
Standard EN55024, LVP EN61000-3-2, and EN61000-3-3.
ICES
I am getting ghosting, shadowing, or fuzzy images on my monitor.
• Check that all video cables are inserted properly.
• Check that the monitor you are using supports the resolution and
refresh-rate setting on your computer.
• Make sure you are using high-resolution cables.
• Use a different video card.
This Class B digital apparatus complies with Canadian ICES-003. Cet appareil numérique de la classe B
est conforme á la norme NMB-003 du Canada.
Belkin Corporation Limited Five-Year Product Warranty
Belkin Corporation warrants this product against defects in materials and workmanship for its warranty
period. If a defect is discovered, Belkin will, at its option, repair or replace the product at no charge
provided it is returned during the warranty period, with transportation charges prepaid, to the authorized
Belkin dealer from whom you purchased the product. Proof of purchase may be required.
This warranty does not apply if the product has been damaged by accident, abuse, misuse, or
misapplication; if the product has been modified without the written permission of Belkin; or if any
Belkin serial number has been removed or defaced.
THE WARRANTY AND REMEDIES SET FORTH ABOVE ARE EXCLUSIVE IN LIEU OF ALL OTHERS, WHETHER ORAL OR
WRITTEN, EXPRESSED OR IMPLIED. BELKIN SPECIFICALLY DISCLAIMS ANY AND ALL IMPLIED WARRANTIES,
INCLUDING, WITHOUT LIMITATION, WARRANTIES OF MERCHANTABILITY AND FITNESS FOR A PARTICULAR
PURPOSE.
No Belkin dealer, agent, or employee is authorized to make any modification, extension, or addition to
this warranty.
BELKIN IS NOT RESPONSIBLE FOR SPECIAL, INCIDENTAL, OR CONSEQUENTIAL DAMAGES RESULTING FROM
ANY BREACH OF WARRANTY, OR UNDER ANY OTHER LEGAL THEORY, INCLUDING BUT NOT LIMITED TO, LOST
PROFITS, DOWNTIME, GOODWILL, DAMAGE TO OR REPROGRAMMING, OR REPRODUCING ANY PROGRAM OR
DATA STORED IN OR USED WITH BELKIN PRODUCTS.
Some states do not allow the exclusion or limitation of incidental or consequential damages or
exclusions of implied warranties, so the above limitations of exclusions may not apply to you. This
warranty gives you specific legal rights, and you may also have other rights that vary from state
to state.
12
13