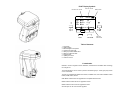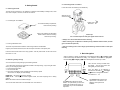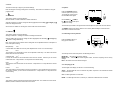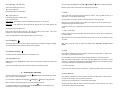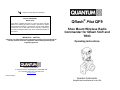
1
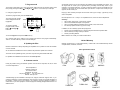
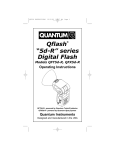
F
tested to comply with FCC standards
CANADA : 3707A-QFPILOT
FCC ID: CEXQFPILOT
Qflash PILOT
This device complies with Part 15 of the FCC Rules and with
RSS-210 of Industry & Science Canada. Operation is subject
to the following conditions: 1) this device may not cause harmful
interference, and 2) this device must accept any interference
received including that which may cause undesired operation of
the device
IMPORTANT – CAUTION
Changes or modifications to this equipment could void your authority to
use this product under the equipment authorization granted by the
regulating agencies
Qflash® Pilot QF9
Shoe Mount Wireless Radio
Commander for Qflash 5d-R and
TRIO
Operating Instructions
Quantum Instruments Inc.
10 Commerce Drive, Hauppauge NY 11788-3968 USA
Tel: 1-631-656-7400 Fax: 1-631-656-7410
www.qtm.com
P667web-English
Quantum Instruments
Designed and manufactured in the USA
PILOT Display Symbols
ISO from camera
F/number from camera
F5.6 7
-
R1 MAN
R2 AUTO
R3 AFILL
P1-P8
Battery status
ISO 200
1/8
7
F5.6
3
+1
SELECT
TEST
+
CH. 7
OPTIONS
Channel of
internal radio
Table of Contents
1.
2.
3.
4.
5.
6.
7.
8.
9.
Introduction
Getting started
Basic Navigation and Options
Choosing the right mode
Setting up a remote Qflash 5d-R
Setting up a Remote TRIO
Program mode
Updating the PILOT
Customer service
1. Introduction
Quantum’s “PILOT” integrates camera dedication, and Quantum’s FreeXWire radio technology
into a single unit.
The PILOT allows the user to control up to three remote flash groups. A flash group may contain
one or more flashes.
The Pilot is compatible with Qflash series TRIO, and Qflash 5d-R, 3d-R with FreeXWire models
FW7Q, FW8R, FW9T, FW10w.
Older Qflash models need to be upgraded to be compatible with the PILOT.
Qflash models T4d and T5d can be upgraded to T5d-R
Qflash models T2 and T2d can be upgraded to T3d-R.
See www.qtm.com for costs for these upgrades.
2.3 Connecting PILOT to a Camera
2. Getting Started
Loosen Shoe lock until metal “foot” protrudes fully.
2.1 Powering the PILOT
The Pilot can be powered by 4 “AA” batteries, or Quantum Turbo Battery including Turbo, Turbo
2x2, Turbo Compact, Turbo SC, Turbo AC and Turbo Z.
Slide PILOT into
camera hot shoe.
2.1.1 Inserting the “AA” batteries
Tighten shoe
lock wheel
To access the battery compartment,
unscrew the top housing.
Insert 4 “AA” batteries into the battery
holder located in the lower housing.
Close the top housing .
Very Important Tips
For consistent exposures with your digital camera and Trio.
● Always do a custom white balance before shooting
2.1.2 Using a Quantum Turbo.
The PILOT is powered from a Quantum Turbo using a CQ8 or a CCQ8 cable.
● When shooting TTL use Aperture or Shutter priority or Manual camera modes (P mode
gives inconsistent exposures)
● Set your metering area to center weight, partial metering instead of matrix or multi-spot
metering.
Plug the power cable into the Pilot, then into the output connection of the power pack.
Leave the PILOT on/off switch in the off (0) position. Use the power switch on the Turbo to turn
the PILOT on or off.
2.2 Restoring Factory settings
3. Basic Navigation
When a selection or setting is highlighted on the display the Left (-) Å and Right (+) Æ
buttons will change that selection or setting. For example if the F/number is highlighted
then the Left (-) Å and Right (+) Æ buttons will adjust the F/number up or down.
You can restore the factory settings by the following method:
1. Turn the PILOT off using the on/off switch located on the top housing, or by Turning the Turbo
OFF if you are using the power cable.
2. Press and hold any button
3. Turn the PILOT ON.
4. The PILOT will display a reset message and some soft key options
See section 7 for display of reset message.
RESET ALL - will restore all the factory settings.
KEEP P1 P8 - will keep your stored Program modes, but reset everything else to factory
settings.
EXIT – will exit the reset menu without changes
You can also reset the PILOT in the OPTIONS menu. See Section 7
-
+
There are four soft keys located under
the display. The soft keys select the
setting that you wish to adjust.
Once the setting to be adjusted is
selected use the Left (-) Å and Right
(+) Æ buttons to change that selection.
See sections 3.1 - 3.4.
TEST
OPTION
The TEST button will fire the remote
flashes. An option allows you to choose
whether the remotes fire all at once, or
sequentially so you can test individual
exposures.
The OPTION button will enter the
options menu. See section 7 for
details on which options are
available.
3.1 P1-P8
The Pilot can store up to eight of your favorite settings.
Enter the Program mode by pressing the P1-P8 soft key. See section 8 for details on using the
program mode.
3.2
SELECT
3.5 Options
Press the OPTIONS button to
enter the options set up menu.
To exit the set up menu press
the OPTIONS button again
DL
F
TS
-
+
RESET RESET
This soft key selects one of the following :
Mode of Remote 1 / Mode of Remote 2 / Mode of Remote 3
After the mode that you want to change has been highlighted, use the Left (-) Å and Right (+) Æ
buttons to change that mode.
See section 4 for details on choosing the correct mode of the remote flashes
Use the LEFT (-) Å or RIGHT
(+) Æ arrows to select the option
you want to change.
TEST
OPTIONS
The two soft keys located on the right side are used to adjust the option that has been elected.
The RESET soft keys are used to reset the Trio to factory default settings. Press both at the
same time to enter the reset mode.
3.3 SELECT
This soft key selects one of the following :
Settings for Remote 1 / Settings for Remote 2 / Settings for Remote 3
After the setting that you want to change has been highlighted, use the Left (-) Å and Right (+)
Æ buttons to change that setting.
3.5.1 Resetting to factory defaults
QFLASH
Press the RESET soft key to
bring up the reset menu
Each of the modes for the remotes have a setting that can be adjusted. Below is a description of
each mode plus it’s setting.
Man (Manual)
1/8 +
A remote flash set to Man can have it’s power adjusted from 1/32 to 1/1 in one third steps.
Auto
F8.03
The F/number of a remote flash in Auto can be adjusted in third steps. The ISO for all remote
flashes will come from the camera.
A.Fill (Auto Fill)
+1.07
In A.Fill, the F/number for the remote flash comes from the camera. However you can set the
remote flash from –3 stops below to +2 stops above the camera setting.
QTTL
-1.03
The exposure of the remote flash can be set from –3 stops below to +2 stops above the camera
setting.
Linked
+1.03
This mode uses the sensor located on the front of the PILOT. The F/number and ISO come from
the camera. However you can set the remote flash from –3 stops below to +2 stops above the
camera setting.
-
VER.
QF09xxxx
RESET KEEP
ALL
P1 P8
TEST
PILOT
+
EXIT
OPTIONS
The soft keys of the reset menu perform the following functions
RESET ALL - will restore all the factory settings.
KEEP P1 P8 - will keep your stored Program modes, but reset everything else to factory
settings.
EXIT – will exit the reset menu without changes
3.5.2 Display light DL
The back light of the display can be set to one of the following.
AUTO : The back light will come on whenever any button is pressed. This includes the shutter
button of the camera
ON : The back light will be on all the time.
3.4 CH.
This soft key is used to change the Channel of the internal radio. The channel set on the remote
Qflashes, needs to match the channel set on the PILOT.
DARK : The back light will come on, and stay on, whenever a darkened room is entered.
3.5.3 Sync type
F, R, HSS
Once the setting is highlighted use the Left (-) Å and Right (+) Æ buttons to change that setting.
Below is a list of modes, their uses and the setting used in that mode.
There are three settings for the sync.
F – Front curtain sync
Flash fires just after the shutter opens.
4.1 QTTL
R – Rear curtain sync
Flash fires just before the shutter closes.
QTTL mode uses the exposure system built into the camera. You may offset exposure by 2
stops above or 3 stops below camera setting.
HSS – high speed sync
Canon users – Select HSS if you want to enable High Speed Sync on your camera
Use this mode if you want the camera to control the exposure of the remote flash.
Nikon users – High Speed Sync will be automatically selected when your shutter speed is set
above 250
Notes about using High Speed Sync
HSS can be used when the remotes (R1 / R2 / R3) are in Man or QTTL modes. If any of the
remotes are in Auto or Auto Fill mode HSS will be disabled.
HSS is not supported when using a Qflash 5d-R as one of the remotes.
When two or more remote flashes are set to QTTL it is possible to set up TTL ratios using the
cameras built in exposure metering system.
Canon users please note : Not possible to ratio remote flash exposures unless R1 is set to QTTL
mode.
4.1.1 QTTL mode setting
In QTTL mode you can set the exposure of the remote flash from 3 stops below to 2 stops above
the camera setting.
When there are two or more remote flashes set to QTTL mode, you can use this setting to set up
TTL ratios.
3.5.4 Lock Buttons
Turning this option on will lock out the buttons and prevent any accidental changing of settings.
To unlock the Pilot Press the outer two soft keys when prompted.
Note: When using this mode, the remote may display either QTTLwR or Linked to Local
Qflash.
4.2 Auto
3.5.5 Audible Low Battery
Light output is controlled by the sensor located on the front of the remote flash. F number is set
by the user. ISO is sent from the camera.
The Pilot will sound an audible warning when the battery is low.
Use this mode if you want to set the F number and use the sensor to control the exposure.
3.5.6 Test Sequence TS
With this feature set to Sequence the remotes will fire one group at a time with each press of the
Fire button.
Note : Be mindful of flash location. Auto mode uses light reflected from the subject to control
exposure. If camera and remote flash are located different distances from the subject, exposure
at the position will differ from exposure at the flash position.
You can use this setting if you want to check the exposures of each of the groups.
4.2.1 Auto mode setting
In Auto mode you can set F number of the remote. The ISO information comes from the camera.
4. Choosing the right mode
4.3 A.Fill (Auto Fill)
To select a the mode of a remote flash, press the
flash you wish to change is highlighted.
SELECT button until the mode of the remote
Light output is controlled by the sensor located on the front of the flash. Both F number and ISO
are sent from the camera. User can set the amount of Fill.
Once the mode is highlighted use the Left (-) Å and Right (+) Æ buttons to change the mode.
The Fill can be set 2 stops above or 3 stops below camera setting.
Each mode has a unique setting that can be used to control the exposure.
To change the settings of a remote flash, press the SELECT
remote flash you wish to change is highlighted.
button until the setting of the
Use this mode is you want the sensor to control the exposure, and the exposure to be a fixed
amount above or below the camera setting.
Step 2
Set the channel on the Free X Wire to the channel you will be using on the Pilot.
4.3.1 A.Fill mode setting
In the Auto Fill (A.Fill) mode you can set the exposure of the remote flash from 3 stops below to 2
stops above the camera setting.
Turn all four zones on.
Note : The F number displayed on the remote flash will be the result of the Cameras F number
and the A.Fill setting. For example, if the camera is set to F8.0 and the A.Fill setting is –1, the
remote flash will display F5.6.
Step 3
Change the mode of the Qflash to Wireless Group 1 or Wireless Group 2. Note : Qflash 5d-R
does not support R3.
You may set up many flashes within a group. All flashes within a group will be set identically
from the Pilot.
4.4 Man (Manual)
There is no limit to the number of flashes for a group.
Light output is controlled by fixed power output of flash.
Use this mode if you want the most accurate and repeatable exposures possible.
Step 4
Once you are done setting up the remotes, turn on the Pilot.
4.4.1 Man mode setting
The Pilot will send mode and setting information to the remote flashes.
In Manual mode the power can be adjusted from 1/64 to 1/1 in third stop increments.
Note :
HSS is not supported when using a Qflash 5d-R as one of the remotes. Make sure that this
option is turned OFF.
4.5 LINK
Light output is controlled by the sensor located on the Pilot. The F number and ISO information
comes from the camera.
This mode provides the accuracy of the Auto setting while eliminating the need to worry about
flash placement. No matter where the flash is placed the sensor located on the Pilot will ensure
that the correct exposure reaches the camera.
6. Setting up a remote TRIO
Step 1
Connect the TRIO to a Turbo, Turbo SC, or Turbo 2x2 and turn the power on.
4.5.1 LINK mode setting
You can set the light output 3 stops below or 2 stops above the camera setting.
Note : There is only one LINK setting possible. If you have two or more remote flashes in LINK
mode they will share the same LINK setting.
Step 2
Set the channel on the Free X Wire to the channel you will be using on the Pilot.
Step 3
Change the mode of the Qflash to Remote Group 1, Remote Group 2, or Remote Group 3.
Note : If your TRIO does not support R3 visit www.qtm.com for the latest TRIO software.
4.6 OFF
Prevent the remote flash from firing.
You may set up many flashes within a group. All flashes within a group will be set identically
from the Pilot.
There is no limit to the number of flashes for a group.
5. Setting up a remote 5D-R
Qflash model 5d-R requires a Free X Wire receiver model FW7Q or FW8R.
Step 4
Once you are done setting up the remotes, turn on the Pilot.
If you are using an FW8R then you will also need an FW31 cable to connect the FW8R to the
Qflash.
The Pilot will send mode and setting information to the remote flashes.
HSS is automatically selected for remotes. There is no need to select the HSS option.
Step 1
After connecting the Free X Wire to the Qflash. Connect the Qflash to a Turbo, Turbo SC, or
Turbo 2x2 and turn the power on.
7. Program mode
The Program mode allows you to store your favorite settings and set-ups and then quickly recall
them just by pressing the Left (-) Å and Right (+) Æ buttons. You can store up to 8 set-ups.
8.1 Using the program mode.
An estimate of repair cost on out-of-warranty merchandise may be forwarded if you desire. This
will require that we contact you for approval before proceeding and will delay return of your
equipment. For fastest repair time, you may pre-approve repairs up to the limit of $85 with your
credit card. We will bill only for the actual costs up to the limit. If repair costs exceed your preapproval, we will contact you.
Paying by check will delay the repair until the check clears (up to 15 days). payment by money
order is acceptable.
To enter the program mode, press the P1-P8 button.
The current program number
will be displayed and will be
highlighted.
To change to another
Program number, use the
Left (-) Å and Right Æ
buttons.
P1
P1
F5.6
7
ISO
R1 MAN
R2 AUTO
R3 AFILL
EXIT
SELECT
FIRE
200
1/8
7
F5.6
3
+1
CH. 7
OPTION
To exit the Program mode press the EXIT soft key.
Normal repair time is 10 – 15 days. For expedited service, contact our Service Department.
Summary:
•
Ship via UPS, Parcel Post, or other carrier, insured.
•
Give a clear, detailed description of the problem.
•
Give your mailing address and daytime phone number, fax #, and/or email.
•
For warranty repairs include a copy of the receipt.
In addition, for out-of-warranty repairs with pre-approval:
•
Provide your Visa, MasterCharge, or American Express card # and expiration date.
•
Give us authority to charge costs up to $85.00.
•
Provide your billing address.
Note: Please do not e-mail your credit card information.
Any changes made to the settings of any program are saved to that program automatically.
There is no need to take any action to save the changes.
8. Updating the Pilot
Limited Warranty
Quantum products have a 1 year limited warranty. Please refer to the Limited Warranty card for
complete details, conditions, and terms.
Quantum Instruments is always expanding the capabilities of it’s products to meet the demands
of newer cameras.
Other Quantum Products
As new features are added to the PILOT, Quantum will post these updates on it’s website.
The PILOT can be updated right from your home computer using the included USB cable.
For updates and a detailed set of instructions visit. www.qtm.com
9. Customer service
Having any trouble I using your Quantum product? We are here to help. Mail, call, fax, or email
our Service Department:
TRIO
FREE X WIRE
QNEXUS
FW7Q
Service department
Quantum Instruments
10 Commerce Drive
Hauppauge, NY 11788
Tel: (631) 656-7400
Fax: (631) 656-7410
Website: www.qtm.com
Troubleshooting tips are available at www.qtm.com, Support, Customer Support, FAQ. If you
suspect a malfunction or require adjustment, return the unit to us with an accurate description of
the problem. please be sure your problem is not caused by improper operating procedure or
malfunctions in your other equipment. Send all equipment carefully packaged and insured to our
address above.
TURBO 2X2
TURBO SC
TURBO
COMPACT