1
ENGLISH
FAX-L380 Quick Reference Guide
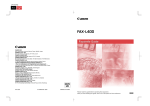
About the Manuals for the Machine
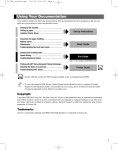
The manuals for this machine are divided as follows. Please refer to them for detailed information.
The manuals supplied with optional equipment are included in the list below.
Guides with this symbol are book manuals.
•
•
•
•
•
•
•
Setting up the Machine
Installing CARPS
Document and Paper Handling
Sending and Receiving Faxes
Speed Dialling
Making Copies
The Menu System
•
•
•
•
•
•
•
•
Setting up the Machine
Document and Paper Handling
Sending and Receiving Faxes
Speed Dialling
Making Copies
Maintenance
Troubleshooting
The Menu System
• Installing CARPS Software
• Printer Properties
• Troubleshooting Printer Driver Issues
CD-ROM
Guides with this symbol are PDF manuals included on the
accompanying CD-ROM.
Quick Reference Guide
(This Document)
User’s Guide
CD-ROM
Software Guide
CD-ROM
• To view the manual in PDF format, Adobe Reader/Adobe Acrobat Reader is required. If Adobe Reader/Adobe Acrobat Reader is not installed on your
system, please download it from the Adobe Systems Incorporated website.
Contents
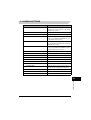
How to Use This Manual . . . . . . . . . . . . . . . . . . . . . . . . . . . . . . . . . . . . . . . . . . . . . . . . . . . . . . . . . . . . . v
Symbols Used in This Manual . . . . . . . . . . . . . . . . . . . . . . . . . . . . . . . . . . . . . . . . . . . . . . . . . . . . . . v
Button Used in This Manual. . . . . . . . . . . . . . . . . . . . . . . . . . . . . . . . . . . . . . . . . . . . . . . . . . . . . . . . v
Displays Used in This Manual . . . . . . . . . . . . . . . . . . . . . . . . . . . . . . . . . . . . . . . . . . . . . . . . . . . . . .vi
Abbreviations Used in This Manual . . . . . . . . . . . . . . . . . . . . . . . . . . . . . . . . . . . . . . . . . . . . . . . . . .vi
Legal Notices . . . . . . . . . . . . . . . . . . . . . . . . . . . . . . . . . . . . . . . . . . . . . . . . . . . . . . . . . . . . . . . . . . . . . vi
Trademarks . . . . . . . . . . . . . . . . . . . . . . . . . . . . . . . . . . . . . . . . . . . . . . . . . . . . . . . . . . . . . . . . . . . .vi
Copyright . . . . . . . . . . . . . . . . . . . . . . . . . . . . . . . . . . . . . . . . . . . . . . . . . . . . . . . . . . . . . . . . . . . . . .vi
Notice . . . . . . . . . . . . . . . . . . . . . . . . . . . . . . . . . . . . . . . . . . . . . . . . . . . . . . . . . . . . . . . . . . . . . . . vii
Chapter 1
Setting Up Your Machine
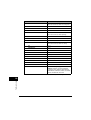
Unpacking Your Machine . . . . . . . . . . . . . . . . . . . . . . . . . . . . . . . . . . . . . . . . . . . . . . . . . . . . . . . . . . 1-1
Do You Have Everything? . . . . . . . . . . . . . . . . . . . . . . . . . . . . . . . . . . . . . . . . . . . . . . . . . . . . . . . 1-1
Removing Shipping Materials . . . . . . . . . . . . . . . . . . . . . . . . . . . . . . . . . . . . . . . . . . . . . . . . . . . . 1-3
Assembling the Machine . . . . . . . . . . . . . . . . . . . . . . . . . . . . . . . . . . . . . . . . . . . . . . . . . . . . . . . . . . .
Attaching Components . . . . . . . . . . . . . . . . . . . . . . . . . . . . . . . . . . . . . . . . . . . . . . . . . . . . . . . . .
Document Output Tray . . . . . . . . . . . . . . . . . . . . . . . . . . . . . . . . . . . . . . . . . . . . . . . . . . . . .
Output Tray . . . . . . . . . . . . . . . . . . . . . . . . . . . . . . . . . . . . . . . . . . . . . . . . . . . . . . . . . . . . . .
Installing the Paper Cassette. . . . . . . . . . . . . . . . . . . . . . . . . . . . . . . . . . . . . . . . . . . . . . . . . . . . .
1-4
1-4
1-4
1-4
1-5
Making Connections . . . . . . . . . . . . . . . . . . . . . . . . . . . . . . . . . . . . . . . . . . . . . . . . . . . . . . . . . . . . . .
Connecting the Machine to Your PC . . . . . . . . . . . . . . . . . . . . . . . . . . . . . . . . . . . . . . . . . . . . . . .
Connecting the Telephone Line. . . . . . . . . . . . . . . . . . . . . . . . . . . . . . . . . . . . . . . . . . . . . . . . . . .
Connecting the Power Cord. . . . . . . . . . . . . . . . . . . . . . . . . . . . . . . . . . . . . . . . . . . . . . . . . . . . . .
1-6
1-6
1-7
1-7
Setting the Display Language and Country* . . . . . . . . . . . . . . . . . . . . . . . . . . . . . . . . . . . . . . . . . . . 1-9
Getting Acquainted With Your Machine. . . . . . . . . . . . . . . . . . . . . . . . . . . . . . . . . . . . . . . . . . . . . .
Front View . . . . . . . . . . . . . . . . . . . . . . . . . . . . . . . . . . . . . . . . . . . . . . . . . . . . . . . . . . . . . . . . . .
Rear View . . . . . . . . . . . . . . . . . . . . . . . . . . . . . . . . . . . . . . . . . . . . . . . . . . . . . . . . . . . . . . . . . .
The Operation Panel . . . . . . . . . . . . . . . . . . . . . . . . . . . . . . . . . . . . . . . . . . . . . . . . . . . . . . . . . .
Special Function Buttons (One-Touch Speed Dial Panel Open) . . . . . . . . . . . . . . . . . . . . . . . . .
1-10
1-10
1-11
1-12
1-13
The Toner Cartridge. . . . . . . . . . . . . . . . . . . . . . . . . . . . . . . . . . . . . . . . . . . . . . . . . . . . . . . . . . . . . . 1-14
Handling and Storing Cartridges . . . . . . . . . . . . . . . . . . . . . . . . . . . . . . . . . . . . . . . . . . . . . . . . . 1-14
Installing/Replacing the Toner Cartridge . . . . . . . . . . . . . . . . . . . . . . . . . . . . . . . . . . . . . . . . . . . 1-15
Loading Recording Paper . . . . . . . . . . . . . . . . . . . . . . . . . . . . . . . . . . . . . . . . . . . . . . . . . . . . . . . . . 1-18
Loading Paper in the Cassette . . . . . . . . . . . . . . . . . . . . . . . . . . . . . . . . . . . . . . . . . . . . . . . . . . 1-19
Chapter 2
Registering Information in the Machine
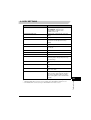
Guidelines for Entering Information. . . . . . . . . . . . . . . . . . . . . . . . . . . . . . . . . . . . . . . . . . . . . . . . . . 2-1
Entering Numbers, Letters, and Symbols . . . . . . . . . . . . . . . . . . . . . . . . . . . . . . . . . . . . . . . . . . . 2-1
Personalizing Your machine . . . . . . . . . . . . . . . . . . . . . . . . . . . . . . . . . . . . . . . . . . . . . . . . . . . . . . . .
Identifying Your Documents. . . . . . . . . . . . . . . . . . . . . . . . . . . . . . . . . . . . . . . . . . . . . . . . . . . . . .
Entering the Date and Time. . . . . . . . . . . . . . . . . . . . . . . . . . . . . . . . . . . . . . . . . . . . . . . . . . . . . .
Registering Your Fax Number and Name . . . . . . . . . . . . . . . . . . . . . . . . . . . . . . . . . . . . . . . . . . .
Setting the Telephone Line Type. . . . . . . . . . . . . . . . . . . . . . . . . . . . . . . . . . . . . . . . . . . . . . . . . .
2-3
2-3
2-3
2-4
2-5
User’s Data List . . . . . . . . . . . . . . . . . . . . . . . . . . . . . . . . . . . . . . . . . . . . . . . . . . . . . . . . . . . . . . . . . . 2-6
ii
Contents
Chapter 3
Installing the Printer Driver
System Requirements . . . . . . . . . . . . . . . . . . . . . . . . . . . . . . . . . . . . . . . . . . . . . . . . . . . . . . . . . . . . . 3-1
Installing CARPS on Your Computer . . . . . . . . . . . . . . . . . . . . . . . . . . . . . . . . . . . . . . . . . . . . . . . . . 3-3
Chapter 4
Document Handling
Document Requirements . . . . . . . . . . . . . . . . . . . . . . . . . . . . . . . . . . . . . . . . . . . . . . . . . . . . . . . . . . . 4-1
Scanning Area . . . . . . . . . . . . . . . . . . . . . . . . . . . . . . . . . . . . . . . . . . . . . . . . . . . . . . . . . . . . . . . . 4-2
Loading Documents in the ADF . . . . . . . . . . . . . . . . . . . . . . . . . . . . . . . . . . . . . . . . . . . . . . . . . . . 4-3
Chapter 5
Paper Handling
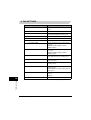
Print Media Requirements . . . . . . . . . . . . . . . . . . . . . . . . . . . . . . . . . . . . . . . . . . . . . . . . . . . . . . . . . . 5-1
Printing Areas . . . . . . . . . . . . . . . . . . . . . . . . . . . . . . . . . . . . . . . . . . . . . . . . . . . . . . . . . . . . . . . . . 5-2
Orientation of the Document and the Paper Loading . . . . . . . . . . . . . . . . . . . . . . . . . . . . . . . . . . . 5-3
Selecting the Paper Output Area . . . . . . . . . . . . . . . . . . . . . . . . . . . . . . . . . . . . . . . . . . . . . . . . . . . . . 5-4
Paper Type and Paper Output Area . . . . . . . . . . . . . . . . . . . . . . . . . . . . . . . . . . . . . . . . . . . . . . . . 5-5
Face Down Paper Output Area . . . . . . . . . . . . . . . . . . . . . . . . . . . . . . . . . . . . . . . . . . . . . . . . . . . 5-5
Face Up Paper Output Area . . . . . . . . . . . . . . . . . . . . . . . . . . . . . . . . . . . . . . . . . . . . . . . . . . . . . . 5-6
Chapter 6
Speed Dialing
Storing Numbers for One-Touch Speed Dialing . . . . . . . . . . . . . . . . . . . . . . . . . . . . . . . . . . . . . . . . 6-1
Storing Numbers for Coded Speed Dialing . . . . . . . . . . . . . . . . . . . . . . . . . . . . . . . . . . . . . . . . . . . . 6-3
Chapter 7
Sending Faxes
Preparing to Send a Fax . . . . . . . . . . . . . . . . . . . . . . . . . . . . . . . . . . . . . . . . . . . . . . . . . . . . . . . . . . . . 7-1
Adjusting the Image Quality (Resolution) . . . . . . . . . . . . . . . . . . . . . . . . . . . . . . . . . . . . . . . . . . . . 7-1
Adjusting the Exposure (Density) . . . . . . . . . . . . . . . . . . . . . . . . . . . . . . . . . . . . . . . . . . . . . . . . . . 7-2
Sending Methods . . . . . . . . . . . . . . . . . . . . . . . . . . . . . . . . . . . . . . . . . . . . . . . . . . . . . . . . . . . . . . 7-3
Manual Sending Via the Handset* . . . . . . . . . . . . . . . . . . . . . . . . . . . . . . . . . . . . . . . . . . . . . 7-3
Memory Sending . . . . . . . . . . . . . . . . . . . . . . . . . . . . . . . . . . . . . . . . . . . . . . . . . . . . . . . . . . 7-3
Dialing Methods . . . . . . . . . . . . . . . . . . . . . . . . . . . . . . . . . . . . . . . . . . . . . . . . . . . . . . . . . . . . . . . 7-4
Sending Documents . . . . . . . . . . . . . . . . . . . . . . . . . . . . . . . . . . . . . . . . . . . . . . . . . . . . . . . . . . . . . . . 7-5
Memory Sending . . . . . . . . . . . . . . . . . . . . . . . . . . . . . . . . . . . . . . . . . . . . . . . . . . . . . . . . . . . . . . 7-5
Manual Sending via the Handset* . . . . . . . . . . . . . . . . . . . . . . . . . . . . . . . . . . . . . . . . . . . . . . . . . 7-6
Chapter 8
Receiving Faxes
Different Ways to Receive a Fax . . . . . . . . . . . . . . . . . . . . . . . . . . . . . . . . . . . . . . . . . . . . . . . . . . . . . 8-1
Setting the Receive Mode . . . . . . . . . . . . . . . . . . . . . . . . . . . . . . . . . . . . . . . . . . . . . . . . . . . . . . . 8-2
Receiving Faxes and Phone Calls Automatically: FaxTel Mode . . . . . . . . . . . . . . . . . . . . . . . . . . 8-2
Setting the Options for FaxTel Mode . . . . . . . . . . . . . . . . . . . . . . . . . . . . . . . . . . . . . . . . . . . 8-2
What Happens When FaxTel Mode is Selected . . . . . . . . . . . . . . . . . . . . . . . . . . . . . . . . . . 8-4
Receiving Faxes Manually: Manual Mode . . . . . . . . . . . . . . . . . . . . . . . . . . . . . . . . . . . . . . . . . . . 8-6
Receiving Faxes Automatically: FaxOnly Mode . . . . . . . . . . . . . . . . . . . . . . . . . . . . . . . . . . . . . . . 8-7
Using an Answering Machine: AnsMode . . . . . . . . . . . . . . . . . . . . . . . . . . . . . . . . . . . . . . . . . . . . 8-7
Contents
iii
Chapter 9
Making Copies
Making Copies . . . . . . . . . . . . . . . . . . . . . . . . . . . . . . . . . . . . . . . . . . . . . . . . . . . . . . . . . . . . . . . . . . . 9-1
Specifying the Paper Size and Type (Common for Cassette and Multi-Purpose Feeder). . . . . . . 9-2
Specifying the Paper Size . . . . . . . . . . . . . . . . . . . . . . . . . . . . . . . . . . . . . . . . . . . . . . . . . . . . . . . 9-2
Specifying the Paper Type. . . . . . . . . . . . . . . . . . . . . . . . . . . . . . . . . . . . . . . . . . . . . . . . . . . . . . . 9-3
Chapter 10
The Menu System
Accessing the Menu . . . . . . . . . . . . . . . . . . . . . . . . . . . . . . . . . . . . . . . . . . . . . . . . . . . . . . . . . . . . . 10-1
Menu Descriptions . . . . . . . . . . . . . . . . . . . . . . . . . . . . . . . . . . . . . . . . . . . . . . . . . . . . . . . . . . . . . . . 10-2
1. PAPER SETTINGS . . . . . . . . . . . . . . . . . . . . . . . . . . . . . . . . . . . . . . . . . . . . . . . . . . . . . . . . . 10-2
2. COMMON SETTINGS . . . . . . . . . . . . . . . . . . . . . . . . . . . . . . . . . . . . . . . . . . . . . . . . . . . . . . . 10-3
3. COPY SETTINGS . . . . . . . . . . . . . . . . . . . . . . . . . . . . . . . . . . . . . . . . . . . . . . . . . . . . . . . . . . 10-5
4. FAX SETTINGS. . . . . . . . . . . . . . . . . . . . . . . . . . . . . . . . . . . . . . . . . . . . . . . . . . . . . . . . . . . . 10-6
5. ADD. REGISTRATION . . . . . . . . . . . . . . . . . . . . . . . . . . . . . . . . . . . . . . . . . . . . . . . . . . . . . 10-13
6. PRINTER SETTINGS . . . . . . . . . . . . . . . . . . . . . . . . . . . . . . . . . . . . . . . . . . . . . . . . . . . . . . 10-14
7. TIMER SETTINGS. . . . . . . . . . . . . . . . . . . . . . . . . . . . . . . . . . . . . . . . . . . . . . . . . . . . . . . . . 10-15
8. PRINT LISTS . . . . . . . . . . . . . . . . . . . . . . . . . . . . . . . . . . . . . . . . . . . . . . . . . . . . . . . . . . . . . 10-16
iv
Contents
Preface
Thank you for purchasing the Canon FAX-L380. Please read this manual thoroughly before operating the
product in order to familiarize yourself with its capabilities, and to make the most of its many functions. After
reading this manual, store it in a safe place for future reference. Before using the machine, make sure to read
“Safety Instructions” on p. 1-6 in the User’s Guide included in the CD-ROM.
How to Use This Manual
Symbols Used in This Manual
This manual uses the following symbols to indicate important safety precautions or useful information
about using the machine.
IMPORTANT
Indicates operational requirements and restrictions. Be sure to read these items to
avoid problems caused by incorrect operation.
NOTE
Indicates notes for operation or additional explanations. Reading these is highly
recommended.
See the User’s Guide
Refer to the User’s Guide for details on the topic of the previous sentence.
machine
The word “machine” refers to Canon FAX-L380.
default
A setting that remains in effect unless you change it.
Button Used in This Manual
A button or an item is referred to in [brackets] as follows in this manual.
• A button or an item on the screen ........ [OK]
• Name of window or dialog box.............. [Add Printer Wizard]
• A button on a toolbar ............................
(Help)
v
Displays Used in This Manual
Screen shots of computer operation screens used in this manual may differ from the ones you actually
see depending on the model or options that come with your machine.
Abbreviations Used in This Manual
In this manual, product names and model names are abbreviated as follows:
Microsoft® Windows® 98 operating system is referred to as Windows 98.
Microsoft Windows Millennium Edition operating system is referred to as Windows Me.
Microsoft Windows 2000 operating system is referred to as Windows 2000.
Microsoft Windows XP operating system is referred to as Windows XP.
Legal Notices
Trademarks
Canon and the Canon Logo are trademarks of Canon Inc.
Microsoft and Windows are either registered trademarks or trademarks of Microsoft Corporation in the
United States and/or in other countries.
Other brand and product names are trademarks or registered trademarks of their respective
companies.
In this manual, Microsoft and Microsoft Windows are referred to as Microsoft and Windows
respectively.
Copyright
Copyright© 2004 Canon Inc. All rights reserved.
No part of this publication may be reproduced, transmitted, transcribed, stored in a retrieval system, or
translated into any language or computer language, in any form or by any means, electronic,
mechanical, magnetic, optical, chemical, manual, or otherwise, without the prior written permission of
Canon Inc.
vi
Legal Notices
Notice
The information in this document is subject to change without notice.
CANON INC. MAKES NO WARRANTY OF ANY KIND WITH REGARD TO THIS MATERIAL, EITHER
EXPRESS OR IMPLIED, EXCEPT AS PROVIDED HEREIN, INCLUDING WITHOUT LIMITATION,
THEREOF, WARRANTIES AS TO MARKETABILITY, MERCHANTABILITY, FITNESS FOR A
PARTICULAR PURPOSE OF USE OR AGAINST INFRINGEMENT OF ANY PATENT. CANON INC.
SHALL NOT BE LIABLE FOR ANY DIRECT, INCIDENTAL, OR CONSEQUENTIAL DAMAGES OF
ANY NATURE, OR LOSSES OR EXPENSES RESULTING FROM THE USE OF THIS MATERIAL.
Legal Notices
vii
Setting Up Your Machine
1
CHAPTER
Unpacking Your Machine
Follow the directions below to unpack your machine properly, and to make sure you have all of its
components and documentation.
Do You Have Everything?
As you unpack the machine, save the carton and packing material in case you want to move or ship
the machine in the future.
Carefully remove all items from the box. You should have someone help you by holding the box while
you lift the machine and its protective packaging.
1-1
Unpacking Your Machine
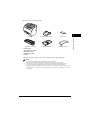
Make sure you have the following items:
•
•
•
•
•
DOCUMENT OUTPUT TRAY
OUTPUT TRAY
CARTRIDGE T STARTER
CASSETTE EXTENSION
EXTENSION COVER
Setting Up Your Machine
1
MAIN UNIT
POWER CORD
TELEPHONE LINE CORD
DOCUMENTATION
DESTINATION LABELS
CD-ROM
If any item is damaged or missing, notify your local authorized Canon dealer immediately.
NOTE
•
•
•
•
•
The actual items may differ in shape and quantity from the one shown above.
Note that the items included with your machine may vary depending on the country of purchase.
Important! Save your sales receipt for proof of purchase in case your machine requires warranty service.
If you have purchased the optional handset, see Appendix B of User’s Guide for the items included.
In addition to the items shipped with your machine, if you wish to use the machine as a printer, you will need a
USB cable, which you can purchase from your Canon dealer. For best results, use a cable that is no more than
5 meters long.
Unpacking Your Machine
1-2
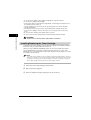
Removing Shipping Materials
In order to protect your machine during shipping, the machine has been packed with protective
material that you must remove before using. Follow these steps:
NOTE
The actual shipping materials may differ in shape, quantity, and position from the ones shown in the illustrations
below.
Setting Up Your Machine
1
1
Remove all pieces of shipping tape from the exterior of the machine.
2
Open the document feeder tray.
3
1-3
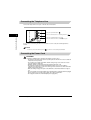
Open the operation panel by grasping it at the center and gently pulling it up.
Remove protective sheet from the Automatic Document Feeder (ADF), then gently close the operation
panel by pressing it down until it clicks.
4
Open the printer cover.
5
Remove all pieces of shipping tape from the inside of the machine.
Unpacking Your Machine
Assembling the Machine
Use the following instructions to assemble the main unit and its components. To see how the machine
will look fully assembled, see “Getting Acquainted With Your Machine,” on p. 1-10.
1
Setting Up Your Machine
Attaching Components
Document Output Tray
Insert the tabs into the corresponding slots on the back of the machine.
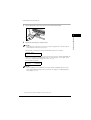
Output Tray
Insert the output tray into the corresponding slot.
Assembling the Machine
1-4
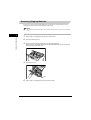
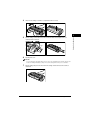
Installing the Paper Cassette
1
Pull out the paper cassette completely.
2
Attach the cassette extension to the cassette.
3
Attach the extension cover on the back of the machine.
4
Insert the paper cassette back into the machine.
Setting Up Your Machine
1
1-5
Assembling the Machine
Making Connections
NOTE
• The use of the jacks may differ in certain countries. See Appendix C, “Country-Specific Features,” of the User’s
Guide for details.
specifications.
• If you have connected an external device to your machine, be sure to set the correct receive mode.
See Chapter 8, “Receiving Faxes.”
• To connect an extension phone as well as an answering machine, connect the extension phone to the answering
machine, and then the answering machine to your machine.
• If you connect a data modem to your machine and you use it extensively, or others access your PC frequently
through the data modem, you may want a dedicated telephone line for your data modem.
Connecting the Machine to Your PC
Your machine has a USB port that allows you to connect it to a PC. To do this, you need to purchase a
USB cable from your dealer.
NOTE
For best results, use a cable that is 5 meters in length or shorter.
Connect the machine to your computer as follows:
1
2
Make sure the computer is turned off and the machine is unplugged.
Connect the USB cable to your machine and PC during software installation to ensure the proper
operation of the printer driver. (See the Software Guide.)
Making Connections
1-6
Setting Up Your Machine
1
• Be sure to connect any external device before using your machine.
• Canon cannot guarantee that all answering machines will be compatible with your machine, due to varying
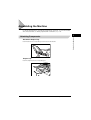
Connecting the Telephone Line
Connect the telephone line to the jack on the left side of the machine.
.
1
Connect an extension phone or answering machine to
Setting Up Your Machine
Connect the optional handset to
Connect the supplied telephone line to
.
Connect the other end of line to a wall telephone jack.
.
If you connect an answering machine to the machine, be sure to read your answering machine’s
manual.
NOTE
You can also connect the extension phone to
if you have not connected the optional handset.
Connecting the Power Cord
CAUTION
Follow these guidelines when connecting your machine to a power source:
- The machine is intended for domestic use only and requires 200-240 V AC. Do not use it outside the
country where it was purchased.
- Use only the power cord that came with the machine. Using a longer cord or extension cord can
cause the machine to malfunction.
- Unplug the machine only by pulling on the plug itself. Never pull on the cord.
- Do not plug the machine into an outlet shared with an appliance such as an air conditioner,
computer, electric typewriter, or copier. These devices generate electrical noise, which can interfere
with the operation of the machine.
- Make sure nothing is laying on the power cord, and that the cord cannot be walked on or tripped
over.
- Do not overload the electrical outlet. Make sure the total amperage used by all the machines plugged
into the outlet does not exceed the ampere rating of the outlet’s circuit breaker.
- Do not plug the machine into an uninterruptible power supply (UPS).
1-7
Making Connections
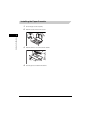
Connect the power cord as follows:
1
Plug the supplied power cord into the power connector on the back of the machine.
2
Setting Up Your Machine
1
Plug the other end of the power cord into the outlet.
NOTE
The machine has no power switch, so its power is on as long as it is plugged in. Once connected, though, the
machine still needs to warm up before you can use it.
While the machine is warming up, the message <PLEASE WAIT> appears in the LCD display:
PLEASE WAIT
When you connect the power cord to an AC outlet for the first time after purchase, <DISPLAY LANGUAGE> will
appear in the LCD display after <PLEASE WAIT>. In this case, set the language for the LCD display, and the
country*. (See “Setting the Display Language and Country*,” on p. 1-9.)
The Fax standby mode appears:
31/12/2003 WED 15:11
FaxOnly
STANDARD
NOTE
If the toner cartridge has not been installed yet, the message <INSTALL CARTRIDGE> appears in the LCD
display, and the Alarm indicator flashes. In this case, install the toner cartridge. (See “Installing/Replacing the
Toner Cartridge,” on p. 1-15.)
*
The country selection feature is available for certain countries only.
Making Connections
1-8
Setting the Display Language and Country*
When you connect the power cord to an AC outlet for the first time, you need to select the language for
the LCD display. For some countries, you also need to select the country where you are using the
machine. The machine automatically switches the selectable settings and the default settings in the
menus to suit the selected country.
1
Setting Up Your Machine
Follow these steps to set the display language and country.
After connecting the power cord, the display changes from <PLEASE WAIT> to the <DISPLAY
LANGUAGE> menu.
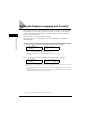
1
Use [
(-)] or [
(+)] to select the preferred language for the LCD display ➞ press [OK].
DISPLAY LANGUAGE
< ENGLISH
>
➞
COUNTRY SELECT
UK
If <COUNTRY SELECT> does not appear after <DATA ENTRY OK> is displayed:
Setting is completed and the machine enters the Fax standby mode.
If <COUNTRY SELECT> appears after <DATA ENTRY OK> is displayed:
Go to step 2.
2
Use [
(-)] or [
(+)] to select the country where you are using the machine ➞ press [OK].
COUNTRY SELECT
FRANCE
➞
31/12/2003 WED 15:11
FaxOnly
STANDARD
If your country name does not appear, select <OTHERS>.
Once you have selected the language and country, these setting menus will not appear next time you connect the
power cord.
• To check the settings made by the country selection, you can print the USER’S DATA LIST. (See “User’s Data
List,” on p. 2-6.)
• You can change the display language or country setting using the <SYSTEM SETTINGS> menu in the <FAX
SETTINGS> menu. (See Chapter 10, “The Menu System.”)
*
1-9
The country selection feature is available for certain countries only.
Setting the Display Language and Country*
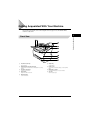
Getting Acquainted With Your Machine
Before using your machine, look over the diagrams on these pages to become familiar with the
machine’s components.
1
Setting Up Your Machine
Front View
a Document feeder tray
Place documents.
b ADF (Automatic Document Feeder)
Holds documents and feeds them automatically into the scanning
machine.
c Document output tray
Documents come out here.
d Slide guides
Adjust to the width of documents.
f Output tray
Outputs printouts.
g Printer cover
Open it when you install the cartridge, or remove jammed
paper.
h Multi-purpose feeder
Used when printing paper one by one manually.
i Cassette
Holds the paper supply.
e Operation panel
Controls the machine.
Getting Acquainted With Your Machine
1-10
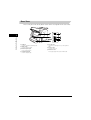
Rear View
The use of the jacks on the side may differ in certain countries. See Appendix D of the User’s Guide.
Setting Up Your Machine
1
a USB port
Connect the USB (Universal Serial Bus) cable.
b Handset jack
Connect the handset (optional).
c Extension phone jack
Connect an extension phone.
d Telephone line jack
Connect the telephone cable.
1-11
Getting Acquainted With Your Machine
e Face up cover
Open it when you output paper face up, or remove jammed
paper.
f Power socket
Connect the power cord.
g Extension cover
Protects paper supply in the cassette from dirt and dust.
The Operation Panel
FAX
02
03
1
04
GHI
05
06
07
08
09
10
11
12
14
15
16
17
18
19
20
2
JKL
4
P
13
DEF
ABC
Menu
01
PQRS
OK
5
TUV
7
3
MNO
6
1
WXYZ
8
9
0
T
a Menu button
h
Use this button to customize the operation of the machine.
b
In Use/Memory indicator
Lights when the telephone line is being used or a document has
been received in memory.
i Numeric buttons
Use these buttons to enter numbers and names when registering
information, and to dial fax/telephone numbers that are not
registered for automatic dialing.
c LCD display
The LCD display shows messages and prompts during operation,
and displays selections, text, numbers, and names when
registering information.
d
j Tone button
Use this button to use tone dialing temporarily when your
machine is set for pulse dialing.
COPY button
Use this button to switch standby display to Copy mode.
e
FAX button
k
Alarm indicator
This lamp flashes when an error occurs, or when the machine is
out of paper or toner.
g
System Monitor button
Use this button to check the status of copy, fax, print and report
jobs.
Enlarge/Reduce button
Use this button to set an enlargement or reduction ratio of the
copy.
Use this button to switch standby display to Fax mode.
f
Energy Saver button
Use this button to set or cancel the energy saver mode manually.
The button lights green when the energy saver mode is set, and
goes off when the mode is canceled.
l
Exposure button
Use this button to adjust the copy exposure.
m
Image Quality button
Use this button to select the resolution the machine will use for
the document you want to fax, or copy.
Getting Acquainted With Your Machine
1-12
Setting Up Your Machine
COPY
n
s
Stop/Reset button
Directory button
Use this button to cancel sending or receiving faxes and other
operations, and bring back the standby display in the LCD.
o
(-),
Use this button to search for fax/telephone numbers by the name
under which they are registered for speed dialing, and then use
the number for dialing.
(+) buttons
t
Use this button to scroll through the selections so you can see
other settings.
Coded Dial button
Use this button to dial a fax/telephone number that you have
registered for Coded Speed Dialing.
p OK button
u
Use this button to determine the contents you set or register. Also,
if the document being scanned stops in the ADF, pressing this
button makes the document come out automatically.
q
Start button
Setting Up Your Machine
r
Redial/Pause button
v One-Touch Speed Dial buttons
Use this button to begin faxing, or copying.
1
P
Use this button to redial the last number that was dialed using the
numeric buttons, or to enter pauses between digits when dialing
or registering fax numbers.
Use these buttons for One-Touch Speed Dialing.
Hook button
w One-Touch Speed Dial panel
Use this button to dial, even with the optional handset still in the
handset cradle.
Open this panel to access the registration buttons.
Special Function Buttons (One-Touch Speed Dial Panel
Open)
21
22
23
24
25
26
27
28
29
30
31
32
Receive
Mode
Report
R
Space
a Report button
Use this button to print activity reports.
b Receive Mode button
Use this button to select the receive mode for receiving faxes.
c R button
Use this button to dial an outside line access number when the
machine is connected through a switchboard (PBX).
d Space button
Use this button to enter a space between letters and numbers
when you are registering information.
1-13
Getting Acquainted With Your Machine
Delayed
Transmission
Polling
Delete
Clear
e Delayed Transmission button
Use this button to register a time for delayed sending.
f Polling button
Use this button to set a document for polling sending, and to poll
the other fax to receive a document.
g Clear button
Use this button to clear an entire entry during information
registration.
h Delete button
Use this button to delete characters one by one.
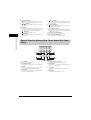
The Toner Cartridge
Handling and Storing Cartridges
• Do not stand the cartridge on end, and do not turn it upside down. If toner becomes caked in the
cartridge, it may prove impossible to free it even by shaking the cartridge.
• Keep the cartridge away from computer screens, disk drives, and floppy disks. The magnet inside
the cartridge may harm these items.
HDD
• Never touch the drum protective shutter. When holding the cartridge avoid touching the drum
protective shutter with your hands.
The Toner Cartridge
1
Setting Up Your Machine
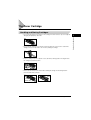
• Do not open the drum protective shutter on the cartridge. If the drum surface is exposed to light and
damaged, print quality may deteriorate.
1-14
• Do not expose the cartridge to direct sunlight or bright light for longer than 5 minutes.
• Do not store the cartridge in direct sunlight.
• Avoid locations subject to high temperature, high humidity, or rapid changes in temperature. Store
the cartridge between 0° and 35° C.
• Store the cartridge in its protective bag. Do not open the bag until you are ready to install the
cartridge in the machine.
• Save the protective bag. You may need to repack and transport the cartridge at a later date.
• Do not store the cartridge in salty air or where there are corrosive gases such as from aerosol
sprays.
• Do not remove the cartridge from the machine unless necessary.
• Be sure to remove the toner cartridge from the machine when disposing of the machine.
Setting Up Your Machine
1
CAUTION
DO NOT PLACE THE CARTRIDGE IN FIRE. TONER POWDER IS FLAMMABLE.
Installing/Replacing the Toner Cartridge
The machine uses a Canon Cartridge T. The procedure below explains how to install the cartridge for
the first time, and how to replace it when the toner runs out.
When the message <REPLACE CARTRIDGE> appears, the toner in the cartridge may simply be
unevenly distributed. Before replacing the cartridge, follow the instructions on p. 1-16 to evenly
distribute the toner. If after doing this the message remains displayed or the print quality is low, replace
the cartridge as described below.
NOTE
Canon makes numerous cartridges. However, the Cartridge T Starter and the regular Cartridge T is the only one
which Canon recommends you to use with your machine. The Cartridge T Starter that comes with your machine
can yield approx. 2,500 page of printouts, while the Cartridge T you purchase can yield approx. 3,500 page of
printouts. But the Cartridge T Starter is identical to the regular Cartridge T otherwise.
1-15
1
Remove any documents and/or printed pages from the machine.
2
Make sure the machine is plugged in.
3
Remove the cartridge from the bag. Keep the bag in a safe place for future use.
The Toner Cartridge
4
Gently rock the cartridge several times to evenly distribute the toner inside.
INSTRUCTIONS
DRUM PROTECTIVE SHUTTER
5
Setting Up Your Machine
1
Hold the cartridge on a flat stable surface with one hand, and break the tab and pull out the seal
completely with the other hand.
TAB
6
Open the printer cover.
NOTE
If you are replacing the old cartridge with the new one, remove the old cartridge from the machine. Then, discard
the old toner cartridge immediately according to the local laws and regulations for disposal of consumables.
7
Hold the cartridge and position the arrow mark on the cartridge towards the inside of the machine as
shown below.
The Toner Cartridge
1-16
8
Align the projections
on both sides of the cartridge to the guides
cartridge completely into the machine.
Setting Up Your Machine
1
9
1-17
Close the printer cover.
The Toner Cartridge
in the machine and slide the
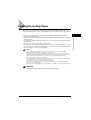
Loading Recording Paper
When the message <SUPPLY REC. PAPER> appears in the LCD display, you need to add paper to
the paper cassette. Here are a few tips you should follow when you load paper into the paper cassette.
NOTE
• Do not use damp, curled, wrinkled, or torn paper as these can cause paper jams or poor print quality.
• Highly textured, extremely smooth or shiny paper does not print well.
• The laser printing process uses high temperatures to fuse toner to the paper. Use paper that will not melt,
vaporize, discolor, or emit dangerous fumes at temperatures near 170ºC. For example, do not use vellum paper in
a laser printer. Make sure any letterhead or colored paper you use can withstand high temperatures.
Make sure the paper is free of dust, lint, and oil stains.
• To keep the paper from curling, do not open paper packs until you are ready to use the paper. Store unused paper
from opened packs in a cool, dry location in the original packaging.
• Your machine is factory-set to use A4-size paper in the paper cassette.
If you wish to use different sized paper, you must change the setting using the <PAPER SETTINGS> menu.
See Chapter 10, “The Menu System.”
• Refer to Chapter 5, “Paper Handling,” for more details on the types of media you can load in the paper cassette.
CAUTION
Do not load paper in the multi-purpose feeder when the machine is printing.
Loading Recording Paper
1-18
1
Setting Up Your Machine
• Be sure to load paper of the correct size, weight, and quantity recommended for your machine.
See Chapter 5, “Paper Handling.”
• Stack the paper so that the top and bottom edges and sides are straight and even before placing it in
the paper cassette.
• Do not print on both sides of the paper. Doing so may cause several sheets to feed into the machine
at the same time.
• Let the paper run out before you refill the paper cassette.
• Avoid mixing new stock with paper already loaded in the paper cassette. When adding new stock to
the cassette, be sure to remove the remaining paper on the cassette and reload it together with the
new stock. Failure to do so may cause paper jams.
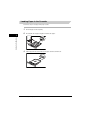
Loading Paper in the Cassette
Follow these steps to load paper in the paper cassette.
1
Pull out the paper cassette completely.
2
Pinch and slide the rear paper end guide to match the size of paper.
3
Load the paper into the cassette. Make sure the paper stack sits below the hooks.
Setting Up Your Machine
1
HOOKS
1-19
Loading Recording Paper
4
Pinch and slide the side paper end guides to match the size of paper.
5
Setting Up Your Machine
1
Even out the edges of the paper stack.
Make sure the height of the paper stack does not exceed the limit marks
.
HOOK
6
Insert the paper cassette back into the machine as far as it will go.
NOTE
If you do not completely insert the cassette into the machine, paper jams may occur.
Loading Recording Paper
1-20
Registering Information in the
Machine
2
CHAPTER
Guidelines for Entering Information
The following section explains how to enter user information into the machine.
NOTE
If you pause while entering information and do not make an entry for more than 60 seconds, the machine returns
to standby mode and loses all information you had entered up to that point. You will then have to start again.
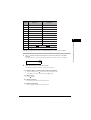
Entering Numbers, Letters, and Symbols
Each numeric button has a number and a group of uppercase and lowercase letters assigned to it. Use
the chart below to determine which numeric button to press for each character.
NOTE
The characters that appear when you press the numeric buttons differ depending on the display language you
select. For details on selecting the display language, see “Setting the Display Language and Country” on p. 1-9.
2-1
Guidelines for Entering Information
Uppercase
Lowercase
1
@.–_/
@.–_/
2
ABC
abc
3
DEF
def
4
GHI
ghi
5
JKL
jkl
6
MNO
mno
7
PQRS
pqrs
8
TUV
tuv
9
WXYZ
wxyz
2
Registering Information in the Machine
Button
0
Uppercase
#
–.
#!“,;:^
Lowercase
Number
_=/|’?$@%&+\ ()[]{}<>
Follow this procedure when you come to a step that requires you to enter a name or number.
1
Press [ ] to switch to the uppercase letter mode (:A), lowercase letter mode (:a), or the number
mode (:1).
You can see what mode you are in by the character indicated on the top right corner of the LCD display.
:A
_
2
Use the numeric buttons to enter the letter or number.
Press the button repeatedly until the letter or number you want appears.
● To enter two letters or symbols that are under the same button:
❑
Press the numeric button ➞ [
(+)] ➞ press the same numeric button again.
For example, to enter <DD> you would press [3] ➞ [
(+)] ➞ [3].
● To enter a space:
❑
Press [
(+)] twice.
● To delete a character:
❑
Press [Delete] under the One-Touch Speed Dial panel.
● To delete an entire entry:
❑
Press [Clear] under the One-Touch Speed Dial panel.
Guidelines for Entering Information
2-2
Personalizing Your machine
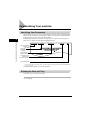
Identifying Your Documents
When sending documents, you can have your fax number, your name, and the current date and time
printed out by the receiving fax. This information is called your TTI (Transmit Terminal Identification)
and appears at the top of the faxed document in small type.
By identifying the documents you send, the receiving party can recognize your fax messages at a
glance. Here is a sample document with the identifying information:
Registering Information in the Machine
2
THE DATE AND TIME
YOU SENT THE
DOCUMENT
YOUR FAX/
TELEPHONE
NUMBER
YOUR NAME OR
COMPANY NAME
THE NAME OF THE
PARTY WHO IS
RECEIVING THE FAX*
THE PAGE NUMBER
*
If you send a fax using speed dialing, the top line also includes the name registered under the speed dialing button
or code you entered.
The following pages explain how to enter this information.
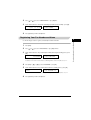
Entering the Date and Time
Follow these steps to enter the date and time.
1
2-3
Press [Menu].
Personalizing Your machine
2
Press [
3
Use the numeric buttons to enter the date (month/day/year) and time (in 24-hour format) ➞ press [OK].
(-)] or [
(+)] to select <7.TIMER SETTINGS> ➞ press [OK] twice.
DATE/TIME SETTING
TIMER SETTINGS
➞
31/12 ‘03 15:10
2.AUTO CLEAR
Enter only the last 2 digits of the year.
4
Press [Stop/Reset] to return to standby mode.
Registering Your Fax Number and Name
1
Press [Menu].
2
Press [
3
(-)] or [
(+)] to select <4.FAX SETTINGS> ➞ press [OK] four times.
Use the numeric buttons to enter your fax/telephone number (max. 20 digits, including spaces) ➞ press
[OK].
USER TEL NO.
TEL LINE SETTINGS
➞
123xxxxxxx
2.TEL LINE TYPE
To enter a plus sign (+) before the number, press [#] repeatedly until it appears.
For details on how to enter or delete numbers, see “Entering Numbers, Letters, and Symbols,” on p. 2-1.
4
Press [Menu] ➞ [
5
Use the numeric buttons to enter your name (max. 24 characters, including spaces) ➞ press [OK].
(-)] or [
(+)] to select <2.UNIT NAME> ➞ press [OK].
:a
Canon
➞
USER SETTINGS
3.TX TERMINAL ID
For details on how to enter or delete characters, see “Entering Numbers, Letters, and Symbols,” on p. 2-1.
6
Press [Stop/Reset] to return to standby mode.
Personalizing Your machine
2-4
Registering Information in the Machine
2
Use the following procedure to register your fax/telephone number and name.
Setting the Telephone Line Type
Use this procedure if you need to change the telephone line setting.
If you are unsure which setting to use, contact your local telephone company.
Follow this procedure to set the telephone line type:
Registering Information in the Machine
2
1
Press [Menu].
2
Press [
(-)] or [
(+)] to select <4.FAX SETTINGS> ➞ press [OK] three times.
3
Press [
(-)] or [
(+)] to select <2.TEL LINE TYPE> ➞ press [OK].
4
Press [
(-)] or [
(+)] to select the telephone line type ➞ press [OK].
TEL LINE TYPE
TEL LINE TYPE
➞
3.TX START SPEED
TOUCH TONE
You can select from the following:
- <TOUCH TONE> for tone dialing
- <ROTARY PULSE> for pulse dialing
5
2-5
Press [Stop/Reset] to return to standby mode.
Personalizing Your machine
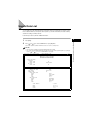
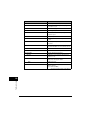
User’s Data List
You can print a list of the data registered in your machine. This list is useful when you want to review
the user data information you may have entered (such as your name and number, the date and time)
and all other settings currently selected.
Follow this procedure to print the USER’S DATA LIST.
Press [Menu].
2
Press [
2
(-)] or [
(+)] to select <8. PRINT LISTS> ➞ press [OK] twice.
The machine prints the USER’S DATA LIST and the LCD returns to standby mode.
NOTE
• The LCD returns to standby mode and the USER’S DATA LIST is printed.
• You can also print the USER'S DATA LIST using [Report]. Open One-Touch Speed Dial panel ➞ press [Report]
➞ press [
(-)] or [
(+)] to select <1.USER DATA> ➞ press [OK].
31/12 2003 13:36 FAX 8334423
WORLD ESTATE, INC.
001
✽✽✽✽✽✽✽✽✽✽✽✽✽✽✽✽✽✽✽✽✽✽
✽✽✽ USER’S DATA LIST ✽✽✽
✽✽✽✽✽✽✽✽✽✽✽✽✽✽✽✽✽✽✽✽✽✽
1.PAPER SETTINGS
CASSETTE
PAPER SIZE
PAPER TYPE
MP TRAY
PAPER SIZE
ENERGY SAVER
ENERGY SVR TIME
DATE SETUP
SUMMER TIME
BEGIN DATE/TIME
MONTH
WEEK
DAY
TIME
END DATE/TIME
MONTH
WEEK
DAY
TIME
TOTAL MEMORY
MAIN
MAIN2
ECONT
A4
PLAIN PAPER
A4
ON
5MIN.
DD/MM YYYY
ON
APRIL
FIRST WEEK
SUNDAY
02:00
SEPTEMBER
LAST WEEK
SATURDAY
02:00
4.080MB
DE-03-02
WLD-02-01
0027
User’s Data List
2-6
Registering Information in the Machine
1
Installing the Printer Driver
3
CHAPTER
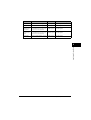
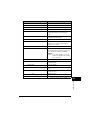
System Requirements
The printer driver for Windows 98/Me/2000/XP can be used in the following system environments.
■ Operating System
Windows 98, Windows Me, Windows 2000, or Windows XP (x86 architecture).
■ Computer
Any computer on which Windows 98, Windows Me, Windows 2000, or Windows XP runs properly.
■ Hardware Environment
Using the CARPS software requires following computer environment.
• IBM or IBM-compatible PC
• CD-ROM drive or network environment with the access to CD-ROM
• PC equipped with a USB port and the USB class driver installed
3-1
System Requirements
OS
RAM
Available free disk space
Windows 98
Intel Pentium 90 MHz or greater
16 MB or greater
100 MB or greater
Windows Me
Intel Pentium® 150 MHz or greater
32 MB or greater
100 MB or greater
Windows 2000*
Professional
Intel Pentium® 133 MHz or greater,
or compatible micro processors (up
to 2 processors are supported)
32 MB or greater
500 MB or greater
Windows 2000*
Server
Intel Pentium® 133 MHz or greater,
or compatible micro processors (up
to 4 processors are supported)
128 MB or greater
500 MB or greater
Windows XP*
Pentium Family® 233 MHz or greater
64 MB or greater
500 MB or greater
Logon as a user account with Administrator’s rights is recommended.
3
Installing the Printer Driver
*
CPU
®
System Requirements
3-2
Installing CARPS on Your Computer
Canon Advanced Raster Printing System (CARPS) is the software that extends the power of the
Windows operating system to a printer to speed up and simplify print jobs. CARPS provides more
printing control under Windows applications.
When installing the CARPS, you can use one of the following methods:
• User Software
• Plug and Play
• Add Printer Wizard
For details about the installation procedures, refer to the Software Guide.
Installing the Printer Driver
3
3-3
Installing CARPS on Your Computer
4
Document Handling
CHAPTER
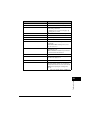
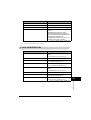
Document Requirements
The documents you load into the machine must meet the following requirements.
When loading a multi-page document:
Size:
Max.: 216 × 356 mm
(W × L)
Min.: 148 × 105 mm
Quantity:
Up to 50 A4-size, 50 letter-size, or 20 legal-size sheets
(1 sheet for sizes other than these)
Thickness:
0.07–0.13 mm
(For sheets thicker than this, load 1 sheet at a time)
All sheets should be of the same thickness.
Weight:
50–105 g/m2
All sheets should be of the same weight.
When loading a single-page document:
Size:
Max.: 216 mm × approx.1 m
(W × L)
Min.: 148 × 105 mm
Quantity
1 sheet
Thickness
0.06 – 0.23 mm
Weight:
50 – 240 g/m2
Document Requirements
4-1
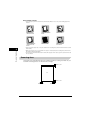
■ Problem Documents
• To prevent paper jams in the Automatic Document Feeder (ADF), do not use any of the following paper in the
machine:
WRINKLED OR
CREASED PAPER
CURLED OR ROLLED
PAPER
TORN PAPER
CARBON PAPER OR
CARBON-BACKED
PAPER
COATED PAPER
ONION SKON OR
THIN PAPER
• Remove all staples, paper clips, or any other fasteners before loading the document into the Automatic Document
Feeder (ADF).
• Make sure any glue, ink, or correction fluid on the paper is completely dry before loading the document into the
Automatic Document Feeder (ADF).
• If you have a document that will not feed into the machine properly, make a photocopy of the document, then load
the copy instead.
Document Handling
4
Scanning Area
The margins shown in the illustration below are outside the machine’s scanning area. Make sure your
document’s text and graphics do not extend into these margins.
MAX. 4.0 mm
A4
MAX. 4.0 mm
MAX. 3.0 mm
4-2
Document Requirements
MAX. 4.0 mm
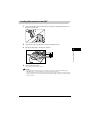
Loading Documents in the ADF
1
Fan the edges that will feed into the machine first, then tap the edges of multiple page documents on a
flat surface to even the stack.
2
Gently insert the stack into the Automatic Document Feeder (ADF) until it stops.
3
Adjust the document guides to the width of the document.
4
Load the documents in the ADF.
Document Handling
4
The documents are now ready for scanning.
NOTE
• For multiple page documents, the pages are fed one by one from the top of the stack (from the first page).
• Wait until all pages of your document have been scanned before starting a new job.
• 50 sheets of A4-size documents can be set in the ADF. If more than 50 sheets of A4-size documents are set in the
ADF, paper jams may occur. If you have trouble with page jams while feeding, see Chapter 13, “Troubleshooting,”
in the User’s Guide.
Document Requirements
4-3
Paper Handling
5
CHAPTER
This chapter describes how to select and prepare the print media for the different functions your machine can perform.
Print Media Requirements
For high-quality printing, we recommend using paper and transparencies recommended by Canon.
Some types of paper available at office supply stores may not be suitable for the machine. If you have
any questions about paper and transparencies, contact your local authorized Canon dealer or the
Canon help line.
■ Paper Storage
In order to prevent paper jams, do the following:
• To prevent moisture buildup, store remaining paper wrapped tightly in its original package. Store
paper in a dry location, out of direct sunlight.
• To prevent curling, store paper flat, not upright.
• If the paper is curled, uncurl it before loading it in the cassette or multi-purpose feeder. Failure to do
so will cause paper creases and a paper jam.
■ Unacceptable Paper
Do not print on the following types of paper stock. Doing so may result in paper jams.
• Severely curled or wrinkled paper
• Transparencies designed for full-color copiers or printers
• Paper which has already been copied using a digital full-color copier (Do not print on the reverse
side.)
• Paper which has been printed on using a thermal transfer printer (Do not print on the reverse side.)
IMPORTANT
Never attempt to print on full-color transparencies. Doing so may result in product malfunction.
5-1
Print Media Requirements
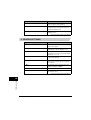
■ Acceptable Paper
Cassette/Multi-Purpose Feeder
*
Paper Size
A4, B5, A5, LTR, LGL (multi-purpose feeder),
EXECUTIVE
Envelope: COM10, MONARCH, DL, ISO-C5
Free Size (Multi-purpose feeder): 216 mm × 356 mm
[max.]/76 mm × 127 mm [min.]
Paper Weight
64 g/m2 to 128 g/m2
Paper Type
Plain paper, Recycled paper, Thin paper, Heavy paper,
Transparency, Label*, Envelope, Postcard.
A label that can be loaded in the cassette is a standard type (label standard card) only.
NOTE
• The printing speed may become slower than usual depending on the paper size, the paper type, and the number
of sheets you specify. This is because the machine's safety function works to prevent the failure due to heat.
• Some types of paper may not feed properly into the cassette or the multi-purpose feeder.
Printing Areas
Please note that the term “printing area” represents both the recommended area for optimum print
quality and the entire area where the machine can technically print from your computer.
Printing area (light shade): Canon recommends that you print within this area.
5
MAX. 5 mm
Paper Handling
■ Paper
MAX. 5 mm
MAX. 5 mm
Feeding
direction
MAX. 5 mm
■ Envelope
MAX. 5 mm
MAX. 5 mm
MAX. 5 mm
Feeding
direction
MAX. 5 mm
NOTE
Copying areas are a little larger than printing areas.
Print Media Requirements
5-2
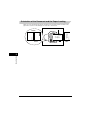
Orientation of the Document and the Paper Loading
When you load a document in the ADF, the orientation of the document and the orientation of the
paper in the cassette or in the multi-purpose feeder are as shown below.
DOCUMENT
PAPER
CASSETTE
MULTI-PURPOSE
FEEDER
Paper Handling
5
5-3
Print Media Requirements
COPY
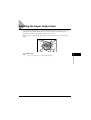
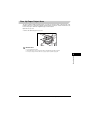
Selecting the Paper Output Area
Face down paper output delivers paper with the printed side down on the output tray. Face up paper
output delivers paper with the printed side up out of the face up paper output. Select the area
depending on your purpose by opening or closing the face up cover.
Open the face up cover for face up paper output, or close the face up cover for face down paper
output.
IMPORTANT
5
Paper Handling
Do not open or close the face up cover while copying and printing.
Selecting the Paper Output Area
5-4
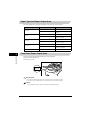
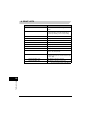
Paper Type and Paper Output Area
Select the suitable paper output area depending on the paper type and your purpose.
Paper Type
Paper Output Area
face up
1 sheet
face down
approx. 50 sheets
(64 g/m2)
face up
1 sheet
face down
approx. 50 sheets
(64 g/m2 to 90 g/m2)
face up
1 sheet
face down
approx. 30 sheets
(91 g/m2 to 105 g/m2)
face up
1 sheet
face down
approx. 30 sheets
(106 g/m2 to 128 g/m2)
face up
1 sheet
Plain Paper L
Plain Paper
Heavy Paper
Heavy Paper H
Transparencies
The Number of Output Sheets
Face Down Paper Output Area
5
Paper Handling
The paper is delivered with the printed side down on the output tray.
Paper is stacked in printed order.
Close the face up cover.
IMPORTANT
• Do not place the delivered paper back on the output tray. Doing so may result in paper jams.
• Do not place objects other than paper on the output tray. Doing so may result in paper jams.
NOTE
It is recommended to fold up the document feeder tray when printing many pages.
5-5
Selecting the Paper Output Area
Face Up Paper Output Area
The paper is delivered with the printed side up out of the face up paper output on the back side of the
machine. This way is convenient for printing on transparencies, envelopes, or labels which tend to curl,
because the paper is delivered straight through out of the machine.
Open the face up cover.
• Remove the delivered paper one by one.
IMPORTANT
• Do not pull the paper forcibly.
• The machine has no face up output tray. Remove the delivered paper with your hand.
• Do not place an object in front of the face up paper output to prevent a paper jam.
Paper Handling
5
Selecting the Paper Output Area
5-6
Speed Dialing
6
CHAPTER
Storing Numbers for One-Touch Speed
Dialing
Your machine can store up to 32 of your most frequently dialed numbers under One-Touch Speed Dial
buttons. Follow this procedure to store One-Touch Speed Dialing numbers and names.
1
Press [Menu].
2
Use [
3
6-1
(-)] or [
(+)] to select <5.ADD. REGISTRATION> ➞ press [OK] twice.
Press [ (-)] or [ (+)], or the One-Touch Speed Dial button to select a One-Touch Speed Dial button
under which you want to register a fax/telephone number between 01 and 32 ➞ press [OK] twice.
• If a number is already stored under the button you select, that number appears.
• If the button you select is registered for Group Dialing, <GROUP DIAL> appears.
Storing Numbers for One-Touch Speed Dialing
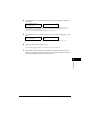
4
Use the numeric buttons to enter the telephone number (max. 120 digits, including spaces and pauses) ➞
press [OK] twice.
TEL NUMBER ENTRY
TEL=123xxxx_
➞
:A
_
• For details on how to enter or delete numbers, see “Entering Numbers, Letters, and Symbols,” on p. 2-1.
• Open the One-Touch Speed Dial panel ➞ press [Space] to enter spaces between numbers (spaces are
optional and are ignored during dialing).
• To enter a pause in the number, press [Redial/Pause] one or more times.
5
Use the numeric buttons to enter the name you want to store (max. 16 letters, including spaces) ➞ press
[OK].
:a
Canon Europa
➞
1-TOUCH SPD DIAL
05=
• For details on how to enter or delete letters, see “Entering Numbers, Letters, and Symbols,” on p. 2-1.
6
To continue registering numbers, repeat steps 3 to 5.
-orIf you have finished registering numbers, press [Stop/Reset] to return to standby mode.
After you register a number for One-Touch Speed Dialing, it is recommended to write the name of the
other party on a destination label and stick it on the One-Touch Speed Dial panel above the number of the
One-Touch Speed Dialing button where the number is registered.
6
Speed Dialing
7
Storing Numbers for One-Touch Speed Dialing
6-2
Storing Numbers for Coded Speed Dialing
You can store up to 100 numbers for Coded Speed Dialing. Follow this procedure to store Coded
Speed Dialing numbers and names.
1
Press [Menu].
2
Press [
(-)] or [
(+)] to select <5.ADD. REGISTRATION> ➞ press [OK].
3
Press [
(-)] or [
(+)] to select <2.CODED SPEED DIAL> ➞ press [OK].
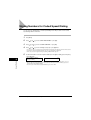
4
5
Press [ (-)] or [ (+)] to select a two-digit code (00-99) ➞ press [OK] twice.
• You can also select a code by pressing [Coded Dial] and entering the two-digit code with the numeric buttons.
• If a number is already registered under the code you select, that number is displayed.
• If the code you select is registered for group dialing, <GROUP DIAL> appears.
Use the numeric buttons to enter the telephone number (max. 120 digits, including spaces and pauses)
➞ press [OK] twice.
TEL NUMBER ENTRY
TEL=456xxxx_
6
➞
:A
_
Speed Dialing
• For details on how to enter or delete numbers, see “Entering Numbers, Letters, and Symbols,” on p. 2-1.
• Open the One-Touch Speed Dial panel ➞ press [Space] to enter spaces between numbers (spaces are
optional and are ignored during dialing).
• To enter a pause in the number, press [Redial/Pause] one or more times.
6-3
Storing Numbers for Coded Speed Dialing
6
Use the numeric buttons to enter the name you want to store (max. 16 letters, including spaces) ➞ press
[OK].
:A
Canon OPTICS
➞
CODED SPEED DIAL
03=
• For details on how to enter or delete letters, see “Entering Numbers, Letters, and Symbols,” on p. 2-1.
To continue registering numbers, repeat steps 4 to 6.
-orIf you have finished registering numbers, press [Stop/Reset] to return to standby mode.
6
Speed Dialing
7
Storing Numbers for Coded Speed Dialing
6-4
Sending Faxes
7
CHAPTER
Preparing to Send a Fax
Adjusting the Image Quality (Resolution)
Canon’s Ultra High Quality (UHQ™) imaging technology enables you to send faxes with a print quality
that is very close to that of the original document. The machine also lets you adjust the resolution it
uses in sending faxes to best suit your particular document.
The machine has 5 resolution settings:
• <STANDARD> is adequate for most text documents.
• <FINE> is suitable for documents with fine print.
• <PHOTO> is for documents that contain photographs. With this setting, areas of the document that
contain photos are automatically scanned with 256 levels of gray, rather than just two (black and
white). This gives a much better reproduction of the photos, though transmission time is longer.
• <SUPER FINE> is for documents that contain fine print and images, and its resolution is four times of
<FAX STANDARD>.
• <ULTRA FINE> is for documents that contain fine print and images, and its resolution is eight times
of <FAX STANDARD>.
7-1
Preparing to Send a Fax
Set the resolution as follows:
1
Press [FAX].
If you are already in the Fax standby mode, you can skip this step.
2
Press [Image Quality].
The LCD display shows the current resolution setting.
3
Press [Image Quality] repeatedly until the resolution you want is displayed ➞ press [OK].
31/12/2003 WED 10:00
FAX RESOLUTION
➞
FaxOnly
STANDARD
STANDARD
4
Continue with the operation you wish to complete.
If you do not proceed with any other operation, the LCD display returns to standby mode after about 5 seconds.
Adjusting the Exposure (Density)
You can adjust the lightness/darkness of the document pages before you scan for sending.
You can select the scanning density from the following:
• <LIGHT> for documents with dark text or color.
• <STANDARD> for normal printed or type written text.
• <DARK> for documents with light text or color.
1
Press [FAX].
7
2
Sending Faxes
If you are already in the Fax standby mode, you can skip this step.
Press [Exposure].
The LCD displays the current exposure setting.
3
Press [Exposure] repeatedly until the scanning density you want is displayed ➞ press [OK].
DENSITY CONTROL
31/12/2003 WED 10:00
➞
STANDARD
FaxOnly
STANDARD
4
Continue with the operation you wish to complete.
If you do not proceed with any other operation, the LCD display returns to standby mode after about 5 seconds.
Preparing to Send a Fax
7-2
NOTE
• You can set the scanning density so that the desired scanning density such as STANDARD is automatically
returned after the <AUTO CLEAR> function activates or documents are scanned. Since <SCAN DENSITY> of
<FAX DEFAULT> is set to 'OFF' in the factory default setting, the scanning density set using [Exposure] will
remain unchanged. (See Chapter 10, “The Menu System.”)
• You can set the level of each scanning density (LIGHT/STANDARD/DARK) in the <DENSITY CONTROL> of the
Menu. (See Chapter 10, “The Menu System.”)
Sending Methods
Manual Sending Via the Handset*
Use manual sending via the handset if you want to speak with the other party before sending a fax to
them. With manual sending via the handset, dial and converse normally, and when they are ready to
receive your fax, press [Start] to begin sending. For more details on manual sending via the handset,
see Chapter 6, “Sending Faxes,” in the User’s Guide.
For manual sending via the handset, you need to have the optional handset or a telephone connected
to your machine.
*
With optional handset or other telephone connected. This feature is available for certain countries only.
Memory Sending
Memory sending allows you to send a document easily and quickly. This method of sending scans the
document into memory, and as the first page of a multipage document is being scanned, the machine
already begins calling the other party and transmitting the information even as the remaining pages are
being scanned.
To use memory sending, you load the document, dial the fax number and press [Start]. See p. 7-5 for
more details on memory sending.
Since the machine is multitasking, you can even scan a document into the memory while sending a
document, receiving a document, or printing a report.
Sending Faxes
7
7-3
Preparing to Send a Fax
Dialing Methods
There are several ways of dialing the number of the party you want to send to:
■ Regular Dialing
Use the numeric buttons to dial the recipient’s fax number.
■ One-Touch Speed Dialing
Press the One-Touch Speed Dial button (1 to 32) under which you have registered the number you want to send to.
See Chapter 6 for details on registering One-Touch Speed Dialing.
■ Coded Speed Dialing
Press [Coded Dial] ➞ enter the two-digit code (00 to 99) under which you have registered the number you want to
send to. See Chapter 6 for details on registering Coded Speed Dialing.
■ Group Dialing
Send a document to a pre-defined group of fax numbers. (The numbers must already be stored as One-Touch
Speed Dialing numbers or Coded Speed Dialing numbers.) See User’s Guide for details on registering Group
Dialing.
■ Directory Dialing
Press [Directory] ➞ enter the first letter of the other party’s name and retrieve the number for dialing.
See Chapter 6, “Speed Dialing,” for details on how to use Directory Dialing.
Sending Faxes
7
Preparing to Send a Fax
7-4
Sending Documents
This section describes the different ways to send faxes with the machine.
Memory Sending
You should normally use memory sending to send documents efficiently. If <MEMORY FULL> is
displayed, the machine cannot scan the documents. In this case, wait for the machine to send any
faxes stored in the memory, then scan the documents.
NOTE
You can register a new fax job while the machine is waiting to redial the other party’s number automatically. For
details on how to set the machine to redial automatically, see the User’s Guide. You can store up to 5 fax jobs in
the memory.
Follow this procedure for memory sending:
1
Load the document in the ADF.
For details on the types of documents you can fax, their requirements, and how to load documents,
see “Document Requirements,” on p. 4-1, and “Loading Documents in the ADF,” on p. 4-3.
2
Press [FAX].
If you are already in the Fax standby mode, you can skip this step.
7
Sending Faxes
3
7-5
Adjust any necessary settings for your document.
• Press [Image Quality] to select the fax resolution. (See “Adjusting the Image Quality (Resolution),” on p. 7-1)
• Press [Exposure] to select the scan density. (See “Adjusting the Exposure (Density),” on p. 7-2)
Sending Documents
4
Dial the other party’s fax/telephone number.
For details on the different dialing methods, see “Dialing Methods,” on p. 7-4.
5
Press [Start].
NOTE
To cancel memory sending, press [Stop/Reset]. (See Chapter 11, “System Monitor,” in the User’s Guide.)
Manual Sending via the Handset*
Use manual sending when you want to talk to the other party before sending a document, or if the
other party does not have a fax machine that can receive automatically.
NOTE
You will need to connect a telephone to the machine if you want to talk to the other party before sending a
document.
*
With optional handset or other telephone connected. This feature is available for certain countries only.
Follow this procedure for manual sending:
1
Load the document in the ADF.
For details on the types of documents you can fax, their requirements, and how to load documents,
see “Document Requirements,” on p. 4-1, and “Loading Documents in the ADF,” on p. 4-3.
2
Press [FAX].
If you are already in the Fax standby mode, you can skip this step.
Adjust any necessary settings for your document.
• Press [Image Quality] to select the fax resolution. (See “Adjusting the Image Quality (Resolution),” on p. 7-1)
• Press [Exposure] to select the scan density. (See “Adjusting the Exposure (Density),” on p. 7-2)
Sending Documents
7-6
7
Sending Faxes
3
4
Pick up the handset.
5
Dial the other party’s fax/telephone number.
For details on the different dialing methods, see “Dialing Methods,” on p. 7-4.
6
Talk through the handset to the other party.
If you hear a high-pitched signal instead of the other party’s voice, go to step 8.
7
Ask the other party to set their fax machine to receive faxes.
8
When you hear a high-pitched signal, press [Start] ➞ hang up the handset.
NOTE
To cancel manual sending, press [Stop/Reset]. (See Chapter 11, “System Monitor”, in the User’s Guide.)
Sending Faxes
7
7-7
Sending Documents
8
Receiving Faxes
CHAPTER
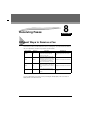
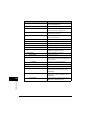
Different Ways to Receive a Fax
The machine provides you with 2 different modes for receiving faxes. To decide which mode will best
suit your requirements, consider how you want to use the machine:
Receive Mode
Operation
Requirements
Fax
Answers all calls as fax calls. It
receives faxes automatically and
disconnects voice calls.
Separate telephone line for fax use
only.
FaxTel
Fax/Tel
Automatically switches between fax
calls and voice calls. Receives faxes
automatically and rings for voice calls.
To set the details see “Setting the
Options for FaxTel Mode,” on p. 8-2.
Telephone connected to the machine.
Manual
Tel
Rings for every call, whether it is a fax
call or a voice call. For a fax call, you
have to manually activate reception of
the fax.
Telephone connected to the machine.
AnsMode
Fax/Tel
Receives faxes automatically and
routes voice calls to the answering
machine.
Answering machine connected to the
machine.
FaxOnly*
*
Main Use
Factory default setting
You can confirm which receive mode is set by checking the standby display. The receive mode is
displayed in the lower left of the LCD.
Different Ways to Receive a Fax
8-1
Setting the Receive Mode
Set the machine receive mode as follows:
1
Open One-Touch Speed Dial panel ➞ press [Receive Mode].
The LCD display shows the current receive mode setting.
2
If you want to change the receive mode, press [Receive Mode] repeatedly until the mode you want
appears ➞ press [OK].
Each time you press [Receive Mode], the receive mode changes in the following order:
FaxOnly ➞ Manual ➞ AnsMode ➞ FaxTel ➞ FaxOnly ➞ …
Receiving Faxes and Phone Calls Automatically: FaxTel
Mode
Set this mode if you want your machine to automatically switch between voice and fax calls.
You can control precisely how your machine handles incoming calls by adjusting the settings described
below.
Setting the Options for FaxTel Mode
When you select FaxTel Mode from the Menu, you can also set the following options.
■ RING START TIME
When a call comes in, the machine checks to see if it is a person wishing to speak to you or a fax machine trying to
send a document. If your machine does not have enough time to detect the fax tone, it assumes the call is from a
telephone. Use the <RING START TIME> setting to increase the time the machine takes to check whether a call is
from a fax machine or a telephone. You can select a time between 0 and 30 seconds; the default is 8 seconds.
■ F/T RING TIME
When your machine is set to receive both fax and telephone calls automatically, the telephone rings to alert you to
pick up the handset if the call is from a person. If you do not pick up the handset within a certain amount of time, the
telephone stops ringing. Use this option to change the number of times the machine rings, from 10 to 60 seconds.
The default is 22 seconds.
Receiving Faxes
8
8-2
Different Ways to Receive a Fax
■ F/T SWITCH ACTION
Not all fax machines are capable of sending a fax tone (the CNG tone that warns the receiving fax machine that a
fax is coming). For those cases the machine may think that the call coming in is a voice call and rings to alert you of
the call (the amount of time it is going to ring is determined by the <F/T RING TIME> setting above). If you do not
answer the call, one of two things can happen:
1. If you set the <F/T SWITCH ACTION> to ‘RECEIVE’, the machine will switch to fax receive mode automatically at
that point and start to receive the document. If no document comes in, it disconnects the call after
approx. 40 seconds. The factory default setting is ‘RECEIVE’.
2. If you set the <F/T SWITCH ACTION> to ‘DISCONNECT’, the machine will disconnect the phone call
immediately freeing up your phone line at this point.
Receiving Faxes
8
Different Ways to Receive a Fax
8-3
What Happens When FaxTel Mode is Selected
Type of call
Telephone
Telephone charges
begin for caller.
Fax
Fax
Sending document
manually
Sending document
automatically
The machine answers without ringing
The machine listens for fax tone
(For 8 sec.)
RING START TIME
(Factory default
setting = 8 sec.)
Fax tone
detected
Fax tone is not detected
The telephone starts ringing
F/T RING TIME
(Factory default
setting = 22 sec.)
Document received
automatically
(Fax tone is detected
and the FAX-L380
switches to receive
mode.)
Pick up the handset to
talk
If you don’t pick up the handset
(within 22 sec.)
F/T SWITCH ACTION
Choose between:
RECEIVE (factory default setting) and DISCONNECT
DISCONNECT
The machine
disconnects the call.
RECEIVE
(factory default setting)
Not all fax machines are capable of sending a fax tone. For
those cases if you set the <F/T SWITCH ACTION> to
RECEIVE, the machine switches to receive mode
automatically and starts receiving the document. If no
document comes in, it disconnects after
approx. 40 seconds.
Receiving Faxes
8
8-4
Different Ways to Receive a Fax
Set the Fax/Tel Mode options as follows:
1
Press [Menu].
2
Press [
(-)] or [
(+)] to select <4.FAX SETTINGS> ➞ press [OK].
3
Press [
(-)] or [
(+)] to select <4.RX SETTINGS> ➞ press [OK].
4
Press [
(-)] or [
(+)] to select <2.FAX/TEL OPT. SET> ➞ press [OK] twice.
RX SETTINGS
2.FAX/TEL OPT. SET
5
Press [ (-)] or [
[OK] twice.
➞
RING START TIME
08SEC
(+)] to set the time the machine waits before ringing when it receives a call ➞ press
RING START TIME
F/T RING TIME
➞
09SEC
022SEC
You can use the numeric buttons instead of using [
6
(+)] to set the time.
Press [ (-)] or [ (+)] to set the time the machine rings while waiting for someone to pick up the handset
➞ press [OK] twice.
F/T RING TIME
030SEC
➞
F/T SWITCH ACTION
RECEIVE
You can use the numeric buttons instead of using [
7
(-)] or [
Press [
(-)] or [
(-)] or [
(+)] to set the time.
(+)] to select <RECEIVE> or <DISCONNECT> ➞ press [OK].
F/T SWITCH ACTION
RX SETTINGS
➞
DISCONNECT
3.INCOMING RING
8
Press [Stop/Reset] to return to standby mode.
NOTE
The default settings and selectable settings vary depending on the current country selection.
Different Ways to Receive a Fax
8
Receiving Faxes
This setting tells the machine what to do if no one picks up the handset within the specified ring time set in step 6.
8-5
Receiving Faxes Manually: Manual Mode
To use this mode, you must have the optional handset or a telephone connected to the machine.
See “Connecting the Telephone Line,” on p. 1-7. In Manual Mode, the machine rings every time it
receives a call, whether the call is from a telephone or a fax machine.
NOTE
Make sure the <REMOTE RX> setting in the <RX SETTINGS> menu is enabled. See p. 10-11 for detail.
If you use your machine with Manual Mode, answer incoming calls as follows:
1
When the optional handset or the telephone rings, pick up the receiver.
● If you hear a person’s voice:
❑
Start your conversation. If the caller wants to send a document after talking to you, ask them to press the
start button on their fax machine. When you hear a beep, press [Start] to begin receiving the document, then
hang up.
● If you hear a slow beep or silence:
❑
A fax machine is trying to send you a document.
Press [Start] on the machine ➞ hang up.
-orEnter the two-digit ID code from the telephone, then hang up.
• The machine then begins receiving the document. (This is particularly convenient if your telephone is located
away from the machine.)
• If you do not hang up after pressing [Start] or the two-digit ID code, the machine beeps intermittently for a few
seconds after you receive the document. (You can turn the beeping off by disabling the <OFFHOOK ALARM>
in the <USER SETTINGS> menu. See p. 10-7.)
NOTE
If you have an answering machine connected to your machine that can carry out remote-control operations
(controlling your answering machine from a remote telephone), the security code for this function may be the
same as the two-digit ID code described above. If so, make sure you change the machine two-digit ID code to
make it distinct from the answering machine’s security code. See p. 10-11 for details on changing the code
(<REMOTE RX ID>) setting.
Receiving Faxes
8
8-6
Different Ways to Receive a Fax
Receiving Faxes Automatically: FaxOnly Mode
When the machine is set up for a dedicated line, set FaxOnly Mode to automatically receive
documents whenever a call comes over the fax line.
• The machine assumes all incoming calls are from fax machines sending documents. It receives the
documents automatically and disconnects all voice calls.
• In FaxOnly Mode, you can control whether or not the machine rings when it receives a fax call. To set
this option from the machine operation panel, see “3.INCOMING RING,” on p. 10-10 (<INCOMING
RING> setting).
Using an Answering Machine: AnsMode
Connecting an answering machine to the machine allows you to receive faxes and phone messages
while you are out of the office.
For instructions on connecting an answering machine to the machine, see “Connecting the Telephone
Line,” on p. 1-7.
NOTE
Canon does not recommend using an “answering service” (like those offered by local telephone companies that
provide voice mail) on the telephone line you are connecting to the machine. If you do subscribe to an answering
service, you may want to dedicate a separate line for fax communication only and connect that line to the
machine.
■ Using the Machine With an Answering Machine
Follow these guidelines when using the machine with an answering machine:
• Set the answering machine to answer on the first or second ring.
• If the machine runs out of paper or toner in Ans Mode, it receives all faxes into memory. The faxes then print
automatically when you add paper or replace the toner cartridge.
• When recording the outgoing message on the answering machine:
- The entire message must be no more than 15 seconds long.
- In the message, tell your callers how to send a fax. For example:
“Hello. I can’t answer the phone right now, but please leave a message after the beep. I’ll return your call as
soon as possible. If you would like to send a fax, press the start button on your fax machine after you leave your
message. Thank you.”
Receiving Faxes
8
Different Ways to Receive a Fax
8-7
Making Copies
9
CHAPTER
This chapter describes how to make copies with your machine.
Making Copies
One of the machine’s convenient features is its ability to make up to 99 high-quality copies of a
document. To make copies, do the following:
1
Load the document in the ADF.
For details on how to place or load documents, see “Loading Documents in the ADF,” on p. 4-3.
2
Press [COPY].
If you are already in the Copy standby mode, you can skip this step.
3
Use the numeric buttons to enter the number of copies.
You can set up to 99 copies.
4
5
Adjust any necessary settings for your document.
• Press [Image Quality] to select the scanning resolution. For details, see Chapter 10, “Making Copies,” in the
User’s Guide.
• Press [Exposure] to select the scanning exposure. For details, see Chapter 10, “Making Copies,” in the User’s
Guide.
Press [Start].
NOTE
To cancel copying, press [Stop/Reset].
9-1
Making Copies
Specifying the Paper Size and Type
(Common for Cassette and Multi-Purpose
Feeder)
NOTE
• When making copies on A4-size paper after having continuously copied on paper smaller than A4-size paper, the
copies may be dirty. To prevent copies from being dirty, wait about 1 minute before making copies.
• The paper in the multi-purpose feeder is fed prior to the paper in the cassette.
• The settings changed in the Menu do not return automatically to the settings you set previously. Change to the
previous settings again if necessary.
• When making copies of a small size or heavy paper*, etc., the copy speed may be slightly slower than usual.
* The paper type should be selected in the Menu.
• If you intend to make a copy and print with a thermal transfer printer using the same sheet of paper, make the
copy first. Failure to do so may make copies dirty or cause a paper jam.
• When copying onto transparencies, remove each transparency from the output tray as it is output.
Specifying the Paper Size
At the factory, the paper size has already been set to <A4>. Normally, you can make copies in this
setting. When making copies on other sizes of paper, you need to specify the paper size according to
the following.
1
Press [Menu].
2
Press [
(-)] or [
(+)] to select <1. PAPER SETTINGS> ➞ press [OK].
3
Press [
(-)] or [
(+)] to select <1. CASSETTE> or <2. MP TRAY> ➞ press [OK].
4
Press [
(-)] or [
(+)] to select <1. PAPER SIZE> ➞ press [OK].
Press [ (-)] or [ (+)] to select the appropriate paper size (A4, B5, A5, LTR, EXECUTIV or ENVELOPE for
the cassette, A4, B5, A5, LTR, LGL, EXECUTIV, ENVELOPE or FREESIZE for the multi-purpose feeder) ➞
press [OK].
● When <ENVELOPE> is selected:
❑
Press [ (-)] or [
press [OK].
(+)] to select the appropriate envelope type (DL, ISO-C5, COM10, or MONARCH) ➞
Specifying the Paper Size and Type (Common for Cassette and Multi-Purpose Feeder)
9
Making Copies
5
9-2
● When <FREE SIZE> is selected:
❑
Press [
❑
Use the numeric buttons, or press [
millimeters (mm).
(-)] or [
(+)] to select <VERTICAL SIZE> or <HORIZONTAL SIZE> ➞ press [OK].
(-)] or [
(+)] to specify vertical and horizontal sizes of the paper in
Available setting range in <VERTICAL SIZE>: 127 mm to 356 mm
Available setting range in <HORIZONTAL SIZE>: 76 mm to 216 mm
❑
Press [OK].
Repeat the steps above to specify both vertical and horizontal sizes of the paper.
6
Press [Stop/Reset] to return to standby mode.
Specifying the Paper Type
<PLAIN PAPER> is selected as the default paper type. When making copies on paper other than plain
paper, you can specify the paper type according to the following. Specifying the paper type can prevent
poor copy quality, or the printout not being printed correctly.
1
Press [Menu].
2
Press [
(-)] or [
(+)] to select <1. PAPER SETTINGS> ➞ press [OK].
3
Press [
(-)] or [
(+)] to select <1. CASSETTE> or <2. MP TRAY> ➞ press [OK].
4
Press [
(-)] or [
(+)] to select <2. PAPER TYPE> ➞ press [OK].
5
6
Press [ (-)] or [ (+)] to select the appropriate paper type (PLAIN PAPER, TRANSPARENCY,
PLAINPAPER L, HEAVY PAPER, or HEAVY PAPER H) ➞ press [OK].
Press [Stop/Reset] to return to standby mode.
Making Copies
9
9-3
Specifying the Paper Size and Type (Common for Cassette and Multi-Purpose Feeder)
10
The Menu System
CHAPTER
The menu allows you to specify or register various settings. This chapter explains the procedure to access the menus and
their contents.
Accessing the Menu
1
Press [Menu].
2
Press [
(-)] or [
(+)] to select the menu you want to change ➞ press [OK].
ADDITIONAL FUNCTIONS
COPY SETTINGS
➞
3.COPY SETTINGS
1.STD. IMAGEQUALITY
3
Press [
(-)] or [
(+)] to select the submenu you want to change ➞ press [OK].
COPY SETTINGS
STANDARD EXPOSURE
➞
2.STANDARD EXPOSURE
MANUAL
NOTE
•
•
•
•
•
For details on submenus, see “Menu Descriptions.”
After selecting the item or value with [
(-)] or [ (+)], press [OK] to enter the setting.
If you press [Stop/Reset] before [OK] is pressed, the item you have selected will not be registered.
Press [Stop/Reset] to exit from Menu.
If you press [Menu], the display returns to the previous screen.
Accessing the Menu
10-1
Menu Descriptions
1. PAPER SETTINGS
Name
Descriptions
1.CASSETTE
1.PAPER SIZE
Sets the paper size for the paper cassette.
A4, B5, A5, LTR, EXECUTIV, ENVELOPE (You
can select from COM10, MONARCH, DL, or
ISO-C5.)
2.PAPER TYPE
Sets the paper type to be used in the paper
cassette.
PLAIN PAPER, TRANSPARENCY, PLAIN
PAPER L, HEAVY PAPER, HEAVY PAPER H
2.MP TRAY
1.PAPER SIZE
Sets the paper size for the multi-purpose feeder.
A4, B5, A5, LTR, LGL, EXECUTIV, ENVELOPE
(You can select from DL, ISO-C5, COM10, or
MONARCH), FREESIZE (Horizontal and vertical
size can be specified in millimeters.)
2.PAPER TYPE
Sets the paper type to be used on the
multi-purpose feeder.
PLAIN PAPER, TRANSPARENCY, PLAIN
PAPER L, HEAVY PAPER, HEAVY PAPER H
(The factory default setting is in bold face.)
The Menu System
10
10-2
Menu Descriptions
2. COMMON SETTINGS
Name
1.DEFAULT SETTINGS
Descriptions
Selects which mode is displayed in the LCD
when the power cord is connected, or the AUTO
CLEAR function activates.
COPY
The Copy mode is selected.
FAX
The Fax mode is selected.
2.SW AFTER AUTO CLR
Selects whether the machine switches to the
mode you set in DEFAULT SETTINGS after the
AUTO CLEAR function activates.
DEFAULT MODE
The machine automatically switches to the mode
you set in DEFAULT SETTINGS after the AUTO
CLEAR function activates.
CURRENT MODE
The machine does not automatically switch to the
mode you set in DEFAULT SETTINGS even after
the AUTO CLEAR function activates.
3.VOLUME CONTROL
1.KEYPAD VOLUME
Adjusts the volume of the machine.
Adjusts the keypad volume.
ON
1 to 3
OFF
The volume is turned off.
2.ALARM VOLUME
Adjusts the alarm volume.
ON
1 to 3
OFF
The volume is turned off.
3.TX DONE TONE
ON
Adjusts the volume of the done tone sounded
when the machine has finished sending faxes.
1 to 3
ERROR ONLY
1 to 3
OFF
The volume is turned off.
(The factory default setting is in bold face.)
The Menu System
10
Menu Descriptions
10-3
Name
4.RX DONE TONE
Descriptions
Adjusts the volume of the done tone sounded
when the machine has finished receiving faxes.
ON
1 to 3
ERROR ONLY
1 to 3
OFF
The volume is turned off.
5.PRINTING END TONE
Adjusts the volume of the done tone sounded
when the machine has finished printing.
ON
1 to 3
ERROR ONLY
1 to 3
OFF
The volume is turned off.
6.SCANNING END TONE
Adjusts the volume of the done tone sounded
when the machine has finished scanning.
ON
1 to 3
ERROR ONLY
1 to 3
OFF
The volume is turned off.
7.LINE MONITOR VOL.
Adjusts the line monitor volume.
ON
1 to 3 (2)
OFF
The volume is turned off.
4.PRINT EXPOSURE
Adjusts the exposure to one of 5 levels. (center)
5.TONER SAVER MODE
Sets the toner saver mode.
ON
The toner saver mode is turned on.
OFF
The toner saver mode is turned off.
6.DISPLAY LANGUAGE
Select the message language.
ENGLISH, FRENCH, SPANISH, GERMAN,
ITALIAN, DUTCH, FINNISH, PORTUGUESE,
NORWEGIAN, SWEDISH, DANISH, SLOVENE,
CZECH, HUNGARIAN, RUSSIAN
(The factory default setting is in bold face.)
The Menu System
10
10-4
Menu Descriptions
3. COPY SETTINGS
Name
Descriptions
1.STD. IMAGEQUALITY
Select the document type.
TEXT ORIGINAL: Character mode
TEXT/PHOTO*1: Text/photo mode
PHOTO*1: Photo mode
2.STANDARD EXPOSURE
Select the auto or manual mode of exposure
setting.
AUTO*2
The exposure is adjusted automatically.
MANUAL
The exposure is adjusted manually.
The exposure can be adjusted in 9 steps.
(center)
3.STD ZOOM RATIO
Selects the copy ratio 050% to 200%. (100%)
4.STANDARD COPY QTY
Select the copy quantity.
01 to 99 (01)
5.AUTO SORT
Set the auto sort.
ON
The auto sort function is turned on.
OFF
The auto sort function is turned off.
6.PAPER SIZE GROUP
The paper size group can be selected. If the
paper size group is changed, the preset copy
ratios will change.
INCH
Preset copy ratios:50%, 64%, 78%, 100%, 129%,
200%
A
Preset copy ratios:50%, 70%, 100%, 141%,
200%
AB
Preset copy ratios:50%, 70%, 81%, 86%, 100%,
115%, 141%, 200%
7.SHARPNESS
Black and white of an image can be sharpened.
When you want to make characters and lines
clear, select a big number. When you make
copies of photographs, select a small number.
1 to 9 (5)
*1 STANDARD EXPOSURE automatically changes to MANUAL when TEXT/PHOTO or PHOTO is selected.
*2 STD. IMAGEQUALITY automatically changes to TEXT ORIGINAL when AUTO is selected.
Menu Descriptions
10
The Menu System
(The factory default setting is in bold face.)
10-5
4. FAX SETTINGS
Name
1.USER SETTINGS
1.TEL LINE SETTINGS
1.USER TEL NO.
2.TEL LINE TYPE
Specifies the basic operation settings in the Fax
mode.
Specifies the telephone line settings.
Your telephone and fax number can be
registered within 20 digits, including spaces.
Selects the telephone line type.
TOUCH TONE
The telephone line is set for touch tone dialing.
ROTARY PULSE
The telephone line is set for rotary pulse dialing.
3.TX START SPEED
Sets the transmission speed for all documents
you send.
33600bps/14400bps/9600bps/7200bps/
4800bps/2400bps
4.RX START SPEED
Sets the transmission speed for all documents
you receive.
33600bps/14400bps/9600bps/7200bps/
4800bps/2400bps
2.UNIT NAME
You can register your name or your company
name within 24 characters, including spaces.
3.TX TERMINAL ID
Prints your ID (Transmitting Terminal ID) on each
page you transmit.
ON
After you turn the terminal ID on, you can do the
following settings.
1.TTI POSITION
OUTSIDE IMAGE: Terminal ID is printed outside
the image border.
INSIDE IMAGE: Terminal ID is printed inside the
image border.
2.TEL NUMBER MARK
Selects the prefix for the identification header
number.
FAX, TEL
OFF
10
Descriptions
No terminal ID is printed on the pages you send.
The Menu System
(The factory default setting is in bold face.)
10-6
Menu Descriptions
Name
4.DENSITY CONTROL
Descriptions
Adjusts the scanning density.
1.LIGHT
Sets for dark documents. 3 to 9 (7)
2.STANDARD
Sets for standard documents. 2 to 8 (5)
3.DARK
Sets for light documents. 1 to 7 (3)
5.OFFHOOK ALARM
Enables/disables the offhook alarm that alerts
you when the handset is not in the handset
cradle.
ON
After reception, the offhook alarm sounds when
the handset is left off the hook.
OFF
No offhook alarm.
6.R-KEY SETTING
Sets how the fax connects to PBX. If your fax
machine is not connected through a PBX, you
can ignore these settings.
PSTN
The fax is connected to the outside line.
PBX
The fax is connected through a PBX. Select one
of the following settings, depending on the type of
PBX in service. Two settings are available:
HOOKING
PREFIX If you select PREFIX, you can set a
number up to 20 digits long, including
the “P” at the end.
2.REPORT SETTINGS
1.TX REPORT
Sets the report setting.
Enables/disables automatic printing of a
transmission report.
OUTPUT NO
No report is printed.
PRINT ERROR ONLY
Prints a report only when a transmission error
occurs.
REPORT WITH TX IMAGE
Enables/disables printing of the first page of the
fax under the report.
ON
Prints the first page.
OFF
No first page is printed.
10
The Menu System
(The factory default setting is in bold face.)
Menu Descriptions
10-7
Name
OUTPUT YES
REPORT WITH TX IMAGE
Descriptions
Prints a report every time you send a document.
Enables/disables printing of the first page of the
fax under the report.
ON
Prints the first page.
OFF
No first page is printed.
2.RX REPORT
Enables/disables automatic printing of a
reception report.
OUTPUT NO
No report is printed.
PRINT ERROR ONLY
Prints a report only when a reception error
occurs.
OUTPUT YES
Prints a report every time you receive a
document.
3.ACTIVITY REPORT
Enables/disables automatic printing of an
ACTIVITY REPORT after every 20 transactions.
ON
Prints the ACTIVITY REPORT.
OFF
No ACTIVITY REPORT is printed.
3.TX SETTINGS
1.ECM TX
Sets the transmission functions.
ECM (Error Correction Mode) transmission is
turned on or off.
ON
All transmissions are conducted with ECM if the
other party’s fax supports ECM.
OFF
ECM is turned off.
2.PAUSE TIME
Sets the length of the pause you insert into a
dialing sequence.
01 to 15SEC (04 SEC)
(The factory default setting is in bold face.)
The Menu System
10
10-8
Menu Descriptions
Name
3.AUTO REDIAL
ON
Descriptions
Sets whether to perform automatic redial when
the other line is busy or no answer.
Customizes the redial operation.
1.REDIAL TIMES
Sets the number of retries.
01 to 10TIMES (02 TIMES)
2.REDIAL INTERVAL
Sets period of time between redialings.
02 to 99MIN. (02 MIN.)
OFF
After the first attempt at dialing fails, redialing is
not attempted.
4.TIME OUT
Enables/disables automatic scanning of
documents after the fax number is entered by
using speed dialing.
ON
Scanning begins automatically in 5 or
10 seconds after you enter the phone number.
OFF
Press [Start] to scan document. Otherwise,
AUTO CLEAR function activates and the LCD
returns to standby mode after 2 minutes.
4.RX SETTINGS
1.ECM RX
Sets the reception functions.
ECM (Error Correction Mode) reception is turned
on or off.
ON
All receptions are conducted with ECM if the
other party’s fax supports ECM.
OFF
ECM is turned off.
1.RING START TIME
When FaxTel has been set, the optional settings
are available.
Sets the duration that the machine listens for a
fax tone before starting to ring.
00 to 30SEC (08 SEC)
(The factory default setting is in bold face.)
10
The Menu System
2.FAX/TEL OPT. SET
Menu Descriptions
10-9
Name
Descriptions
2.F/T RING TIME
Sets the length of time the machine rings to alert
you of an incoming call.
010 to 060SEC (022 SEC)
3.F/T SWITCH ACTION
Selects the action taken after the F/T RING TIME
expires.
RECEIVE
The machine switches to the fax receive mode
automatically at this point and starts to receive
the document.
DISCONNECT
The machine disconnects the call.
3.INCOMING RING
Sets whether the machine rings when it receives
a call when the machine is set to FaxOnly.
OFF
The machine does not ring when it receives a
fax. (In Energy Saver mode, the fax may ring one
or two times.)
ON
The machine rings when it receives a fax if a
telephone is connected.
RING COUNT
4.MAN/AUTO SWITCH
Sets the number of incoming rings before the
machine answers.
01 to 99TIMES (02TIMES)
Sets whether the machine switches to document
receive mode after ringing for a specified length
of time in the manual receive mode.
OFF
The machine keeps ringing until someone
answers the call manually with a connected
extension telephone.
ON
The machine switches to document receive
mode after ringing for a specified time.
F/T RING TIME
Sets the length of time to elapse before the
machine switches to the document receiving.
01 to 99SEC (15SEC)
(The factory default setting is in bold face.)
The Menu System
10
10-10
Menu Descriptions
Name
5.REMOTE RX
ON
Descriptions
Enables/disables remote receiving.
The machine enables remote receiving.
REMOTE RX ID
OFF
You can dial code on the remote extension to
start receiving a document.
A combination of two characters using [0] to [9],
[ ] and [#] (25) is possible.
The machine disables remote receiving.
5.PRINTER SETTINGS
1.RX REDUCTION
ON
Sets the print functions.
Receives images at a reduced size.
Image reduction is turned on.
1.RX REDUCTION
AUTO SELECTION: Reducing size is set
automatically.
FIXED REDUCTION: Reducing size is preset.
97%, 95%, 90%, 75%
2.SELECT REDUCE DIR
VERTICAL ONLY: Reduction is performed in the
vertical direction only.
HORIZ & VERTICAL: Reduction is performed in
the horizontal and vertical direction.
OFF
2.TONER SUPPLY LOW
Image reduction is turned off.
Allows you to set how the machine responds
when the toner supply is low.
RX TO MEMORY
The machine receives all documents in memory.
KEEP PRINTING
The keep printing function is turned on. With this
setting, the machine will not store documents in
memory if the toner has run out. Re-set to RX TO
MEMORY after replacing the cartridge with a
new one.
(The factory default setting is in bold face.)
The Menu System
10
Menu Descriptions
10-11
Name
6.POLLING BOX
1.SETUP FILE
Sets the functions of SETUP FILE, CHANGE
DATA and DELETE FILE.
Registers a polling box.
1.FILE NAME
Enters a name for polling box
(max. 24 characters, including spaces).
2.PASSWORD
Enters a password to protect the polling box
settings (max. 7 characters).
3.ERASE AFTER TX
Tells the machine how to handle a document
after it is polled and sent.
2.CHANGE DATA
Changes the settings of the polling box.
1.FILE NAME
Changes the file name.
2.PASSWORD
Changes the password.
3.ERASE AFTER TX
Changes the ERASE AFTER TX setting.
3.DELETE FILE
7.SYSTEM SETTINGS
1.FAX DEFAULT
1.RESOLUTION
10
Descriptions
Deletes the polling box and all of its settings.
Sets the functions of FAX DEFAULT, LOCK
PHONE and COUNTRY SELECT.
Sets the FAX DEFAULT functions.
Sets the fax resolution.
OFF
The setting of resolution set using [Image
Quality] remains even after the AUTO CLEAR
function activates.
STANDARD
Suitable for most text-only documents.
FINE
Suitable for fine-print documents.
PHOTO
Suitable for documents that contain photographs.
SUPER FINE
Suitable for documents that contain fine print and
images. (The resolution is four times that of
STANDARD)
ULTRA FINE
Suitable for documents that contain fine print and
images. (The resolution is eight times that of
STANDARD)
The Menu System
2.SCAN DENSITY
Sets the machine’s standard scanning density.
OFF, LIGHT, STANDARD, DARK
(The factory default setting is in bold face.)
10-12
Menu Descriptions
Name
2.LOCK PHONE
Descriptions
Sets the LOCK PHONE functions.
OFF
Outgoing voice call is operational.
ON
Outgoing voice call is not operational.
3.COUNTRY SELECT*
Selects the country where you are using your
machine.
UK/GERMANY/FRANCE/ITALY/SPAIN/
HOLLAND/DENMARK/NORWAY/SWEDEN/
FINLAND/AUSTRIA/BELGIUM/SWITZERLAND/
PORTUGAL/IRELAND/GREECE/
LUXEMBOURG/HUNGARY/CZECH/RUSSIA/
SLOVENIA/SOUTH AFRICA/OTHERS
(The factory default setting is in bold face.)
*
This setting is only available for some countries.
5. ADD. REGISTRATION
1.1-TOUCH SPD DIAL
1-TOUCH SPD DIAL
Descriptions
Registers the information on One-Touch Speed
Dialing.
Up to 32 destinations can be registered.
Selects a One-Touch Speed Dial button.
1.TEL NUMBER ENTRY
Registers the other party’s telephone number
(max. 120 digits, including spaces).
2.NAME
Registers the other party’s name
(max. 16 characters, including spaces).
2.CODED SPD DIAL
CODED SPD DIAL
Registers the information on Coded Speed
Dialing.
Up to 100 destinations can be registered.
Selects a Coded Speed Dialing code.
1.TEL NUMBER ENTRY
Registers the other party’s telephone number
(max. 120 digits, including spaces).
2.NAME
Registers the other party’s name
(max. 16 characters, including spaces).
10
(The factory default setting is in bold face.)
Menu Descriptions
10-13
The Menu System
Name
Name
3.GROUP DIAL
Descriptions
Registers the information on Group Dialing.
Up to 131 groups can be registered.
1.TEL NUMBER ENTRY
Registers the other party’s telephone numbers by
specifying the One-Touch Speed Dial buttons or
Coded Speed Dialing codes.
2.NAME
Registers the group’s name (max. 16 characters,
including spaces).
(The factory default setting is in bold face.)
6. PRINTER SETTINGS
Name
Descriptions
1.PRESET PRINT QTY
Sets the standard number of pages of the printer
function. 01 to 99 (01)
2.AUTO ERROR SKIP
Sets either printing with skipping an error
automatically, or without skipping an error.
ON
The auto error skip is on. The error is skipped
and shifted to the next job automatically without
indicating an error code.
OFF
The auto error skip is off. Skip the error and shift
to the next job manually.
3.ERROR TIME OUT
Sets the length of time before the machine
returns an error when no data is received from
the computer.
ON
The error time out is on. Sets time out period
005SEC to 300SEC. (015SEC)
OFF
The error time out is off.
4.PRINTER RESET
Cancels the job currently being received and the
job already received.
(The factory default setting is in bold face.)
The Menu System
10
10-14
Menu Descriptions
7. TIMER SETTINGS
Name
Descriptions
1.DATE/TIME SETTING
Enter the current date and time.
2.AUTO CLEAR
Sets the auto clear function. If the machine
remains idle for a certain period of time, the
display returns to the standby mode.
ON
The auto clear function is turned on.
1MIN. to 9MIN. (2MIN.)
OFF
The auto clear function is turned off.
3.ENERGY SAVER
Sets the energy saver mode.
ON
The energy saver mode is set.
03MIN. to 30MIN. (05MIN.)
OFF
The energy saver mode is turned off.
4.DATE SETUP
5.SUMMER TIME
Set the format for the DATE & TIME settings
menu and how the date is displayed in the LCD.
DD/MMYYYY, YYYY MM/DD, MM/DD/YYYY
Sets the summer time.
OFF
The summer time setting is disabled.
ON
The summer time setting is enabled.
1.BEGIN DATE/TIME
Sets the MONTH, WEEK, DAY and TIME when
the summer time starts.
2.END DATE/TIME
Sets the MONTH, WEEK, DAY and TIME when
the summer time ends.
(The factory default setting is in bold face.)
The Menu System
10
Menu Descriptions
10-15
8. PRINT LISTS
Name
Descriptions
1.USER DATA
Prints out a list of items set or registered in the
Menu.
2.SPEED DIAL LIST
Prints the list of the fax/telephone numbers
registered for One-Touch Speed Dial buttons,
Coded Speed Dialing codes or Group Dialing.
1.1-TOUCH LIST
Prints the One-touch List.
1.NO SORT
The printout of the list is not sorted.
2.SORT
The printout of the list is sorted.
2.CODED DIAL LIST
Prints the Coded Dial List.
1.NO SORT
The printout of the list is not sorted.
2.SORT
The printout of the list is sorted.
3.GROUP DIAL LIST
3.CANCEL REPORT
REPORT STATUS
Prints the Group Dial List.
Cancels printout of the report. Select report you
want to cancel the printout.
Displays the report status and allows you to
select the report job to be canceled. Select a job
➞ press [OK].
CANCEL REPORT? YES
The printout of the list is canceled.
CANCEL REPORT? NO
The printout of the list is not canceled.
(The factory default setting is in bold face.)
The Menu System
10
10-16
Menu Descriptions