1
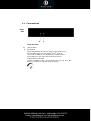
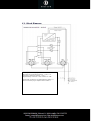
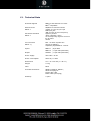
BOSSCOM Powerlink - Switch
Stereo Audio Switch | Two Jacks |
Automatic Switching | B&O®
Compatible
Installation Guide
Contents
Page
3..........BOSSCOM DENMARK
4..........Examples of Use
I.
Converting LF-Signals (stereo RCA) to standard-conforming
B&O® Powerlink signals
5..........Examples of Use
Feed-in of LF-Signals (stereo RCA) to B&O® Systems with
II.
automatic switching
6..........Examples of Use
Dolby Surround setup for LOEWE ® TV and B&O® Systems
with automatic switching (with trigger signal)
III.
8..........Safety Instructions
9.........Connections
·
Front
10.........Connections
·
Rear
·
Left
11..........Connections
·
Right side
12...........Block Diagram
13...........Technical Data
3.
BOSSCOM
BOSSCOM
The digital world of consumer electronics offers high-quality
devices, technologically sophisticated devices, devices with great
design and easy-to-use devices.
And there are a few devices that combine all these in one, to
cater to all needs of the customer - like BOSSCOM devices of
ip media systems GmbH.
This requires exploring new and unconventional ways
and being able to rely on years of experience.
BOSSCOM
Powerlink
Switch
Thank you for purchasing this automatic source-switch
with 8-pin DIN and RCA jacks. The BOSSCOM
Powerlink-Switch is to 100% compatible with B&O® devices.
This device provides you the solution to many problems
of audio installations, such as feed-in of any
audio sources to B&O® systems, connection of B&O® Speakers
to the audio devices of other manufacturers, etc.
The examples shown in this guide represent only a small
part of the many possible uses.
BOSSCOM
The BOSSCOM WirelessPowerlink System was especially
developed for your B&O® and is the way of signal transmission
from the system to the speakers, wherever a wired
connection is not possible or simply too expensive.
The transmitter of your B&O® TV and the receivers
of the rear speakers, for example, are constantly connected
- This means you can enjoy wireless surround sound in absolute
CD quality. The automatic frequency change always guarantees
the best possible transmission.
Wireless
Powerlink
BOSSCOM
Receiver
B&O®
compatible
A digital receiver of BOSSCOM can be controlled with a
Bang & Olufsen® remote control, such as the Beo4 ®.
This makes the use of multiple remote controls a thing of the
past. Our receivers can easily be integrated into the
time-controlled programming of a Bang & Olufsen® system.
The full integration into a Bang & Olufsen® link-system
is possible without any problems. Image and sound of the
receiver can thus be transported to other rooms, and the
simultaneous full operation of the receiver from there is
guaranteed.
BOSSCOM is not affiliated with
Bang & Olufsen® whatsoever.
All names, logos, etc. are registered trademarks of
manufacturers mentioned in this description.
The information in this manual is subject to change
without notice. All rights reserved.
4. Examples of Use
I.
Converting LF-Signals (Stereo RCA) to Standard-Conforming
®
B&O Powerlink Signals
®
®
B&O Speakers
®
e.g. BeoLab 8000
B&O Speakers
®
e.g. BeoLab 8000
any stereo source such as
BOSSCOM
Powerlink-Switch
®
SONOS
Zoneplayer
Connect any stereo source with an RCA cable to INPUT 1 of the
BOSSCOM Powerlink-Switch, via the adapter cable (included)
and use the device as a Powerlink converter.
Once a low-frequency signal is present, a standardconforming B&O® Powerlink signal (including switching
signal) is sent.
If the source does not send a signal (e.g. it's turned off, or
muted), an intelligent switch provides a delay of about 1 minute
- only then will the Powerlink signal be switched off and the
®
B&O speakers will go into standby mode.
This is necessary for longer pauses in audio books for example
and allows you sufficient time to select the next songs to be
played from your music library.
5. Examples of Use
II.
Feed-in of LF-Signals (Stereo RCA) to B&O® Systems with
Automatic Switching (without trigger signal)
®
®
B&O Speakers
®
e.g. BeoLab 6000
BOSSCOM
Powerlink-Switch
B&O Speakers
®
e.g. BeoLab 6000
Any stereo source, e.g.
SONOS® Zoneplayer
B&O® System
e.g. BeoSound 9000®
Interconnect the BOSSCOM Powerlink-Switch between your
B&O® system and your B&O® speakers. Connect any stereo
source with an RCA cable to INPUT 1 of the BOSSCOM
Powerlink-Switch, via the adapter cable (included).
Once a low-frequency signal is present at INPUT 1, it is
®
converted to a standard-conforming B&O
Powerlink signal
(including switching signal); otherwise INPUT 2 (Powerlink) is
passed through. CAUTION: If signals are present at both INPUT 1
and INPUT 2, INPUT 1 always has priority!
If the source does not send a signal to INPUT 1 (e.g. it's turned
off, or muted), an intelligent switch provides a delay of about 1
minute - only then will the Powerlink signal be switched off and
®
the B&O speakers will go to standby mode, or INPUT 2 will be
passed through (if a signal is present).
6. Examples of Use
III.
Dolby Surround Setup for LOEWE® TV and B&O® Systems with
Automatic Switching (with trigger signal)
Front Speakers
®
e.g. BeoLab 8000
Front Speakers
®
e.g. BeoLab 8000
TV with Dolby
Surround
decoder, like
®
LOEWE
®
Individual
®
B&O System e.g.
®
BeoSound 3200
2 x BOSSCOM
Powerlink-Switch
Rear Speakers
®
e.g. BeoLab 3
Rear Speakers
®
e.g. BeoLab 3
Use two BOSSCOM Powerlink switches and connect for example your
LOEWE ® TV to your B&O® system and your B&O® speakers. Connect
the two front channels of your TV to the front speakers, via INPUT 1 of
the first BOSSCOM Powerlink switch and the two rear channels to the
two rear speakers, via the second BOSSCOM Powerlink switch.
7. Examples of Use
III.
Your stereo source - in this example, a BeoSound 3200® - is
going to be connected to INPUT 2 of both BOSSCOM Powerlink
switches. You will need a Powerlink Y-cable.
You can also create a trigger level, by connecting the adapter
cable (included) to each INPUT 1 of the BOSSCOM Powerlink
switch, if the audio source provides such, like the LOEWE® TV in
the example shown. The voltage must be provided to both
BOSSCOM Powerlink switches with a Y-cable and the short circuit
plug must be connected to the RCA cable with the description
Trigger ON/OFF, of both adapter cables. The advantage of using
the trigger level on INPUT 1 is that is the automatic switch to
INPUT 2 is no longer initiated after a lag of about 1 minute
without audio signal, but immediately when the trigger level is
no longer present - this way you don't need to wait, to be able to
listen to the audio source of INPUT 2.
In the example shown, you can enjoy Dolby Surround Sound for
TV and Speaker-4 sound when listening to the audio system and all this completely automatically. You do not need to unlock
the source on the B&O system with the B&O remote control you simply turn on the TV and the B&O speakers are turned on
automatically.
The following applies: If both sources are active, INPUT 1 has
priority!
8.
Safety Instructions
Connect the device to the mains supply, via the supplied power
cord. Do not repair damaged cables.
The operating voltage must match the local mains voltage.
Protect the device from humidity and moisture. Do not operate
the device in the rain. The device may not be used near water,
bathtubs, washbasins, kitchen sinks, wet rooms, swimming
pools or damp rooms.
Do not place objects filled with liquids such as vases, jars,
bottles, etc. on the device.
Avoid direct sunlight and placement near radiators, heaters or
similar devices.
Condensation may form inside the device, if it is suddenly
moved from a cold to a warm place. Wait until the device
has reached room temperature, before turning it on.
The device should be unplugged, if it is unattended or not used
for prolonged periods and to protect it during lightning storms.
This will prevent damage to the device due to lightning and
power surges in the mains.
Improper use will void the warranty!
Disclaimer:
Ip media systems GmbH is not liable for damage to equipment
caused by negligence or improper use.
Ip media systems GmbH is particularly not liable for lost profits
or other economic loss of the buyer. This restriction also applies
to the personal liability of workers, representatives and agents.
9. Connections
Front
2
3
1
1
INPUT 1
8-pin DIN jack
Pin
Pin
Pin
Pin
1 - Trigger ON/OFF
2 - Ground
3 - Input right
4 - Input for trigger signal (5-15 V DC) to
enable INPUT 1
Pin 5 - Input left
2
INPUT 2 (Powerlink Input)
8-pin DIN jack
Pin
Pin
Pin
Pin
3
2
3
4
5
-
Ground
Input right
Powerlink mute circuit voltage (5 V DC)
Input left
OUTPUT (Powerlink Output)
8-pin DIN jack
Pin
Pin
Pin
Pin
2
3
4
5
-
Ground
Output right
Powerlink mute circuit voltage (5 V DC)
Output left
10. Connections
Rear
4
4
Mains Connection
Connect the Euro-mains socket to the socket, with the
included power cable. CAUTION: All other cables should
already be connected!
Left
side
5
5
POWER-LED
LED to indicate power supply
11. Connections
Right
side
6
7
Level Increase
6
right channel
7
left channel
Signal amplification for devices with a reduced line-level,
such as MP3 players like the Apple® iPod®, that are
connected to INPUT 1, for adjusting the volume to the
source INPUT 2. The right and left channel can be
independently controlled.
Counter-clockwise (left) turning raises the level up to 6 dB delivery condition is 0 dB (set fully clockwise).
12. Block Diagram
Schaltlogik = Switching Logic
NF-Erkennung (Ausschaltverzogerung – 1 Min) = LFRecognition (switching off delay – 1 min.)
Pegelanhebung 0 bis 5 dB = Level Increase 0 to 6 dB
Kurzschluss-Cinchstecker am Adapterkabel fur INPUT 1 =
Short circuit RCA-plug on adapter cable for INPUT 1
13. Technical Data
Powerlink Signals
INPUT 2 and OUTPUT are 100%
B&O® compatible
Remote Power
INPUT 1
ON/OFF via external contact
voltage (5-15 V DC) to 8-pin
DIN input jack
"ON" as soon as a low-frequency
signal is present
"OFF" (Standby), when
no low-frequency signal is received
for at least 1
minute
Automatic Activation
INPUT 1
Level Increase
INPUT 1]
Max. +6 DB to equalize the
Volume to INPUT 2,
separately adjustable for L and R
Inputs
INPUT 1 | 8-pin DIN
INPUT 2 | 8-pin DIN (Powerlink)
Output
OUTPUT | 8-pin DIN (Powerlink)
Power Supply
200-240V~ 50 Hz
Power Consumption
Stand by <1 Watt
Dimensions
171 x 72 x 34 mm (L x W x H)
Weight
0.3 kg
Color
black
Included Accessories
Adapter Cable for INPUT 1,
Short-RCA plug for
Trigger ON / OFF
Power cable (Euro plug)
Warranty
2 years