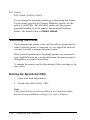
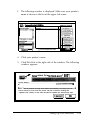
1
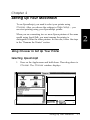
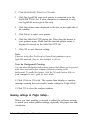
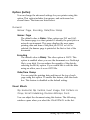
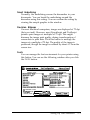
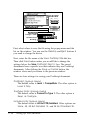
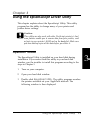
EPSON
English
4002619
CO1-00
EPSON
EpsonScript™ Cartridge RI
C83202*
Macintosh User’s Guide
All rights reserved. No part of this publication may be reproduced, stored in a retrieval
system, or transmitted in any form or by any means, mechanical, photocopying, recording,
or otherwise, without the prior written permission of Seiko Epson Corporation. No patent
liability is assumed with respect to the use of the information contained herein. Neither is
any liability assumed for damages resulting from the use of the information contained
herein.
Neither Seiko Epson Corporation nor its affiliates shall be liable to the purchaser of this
product or third parties for damages, losses, costs, or expenses incurred by purchaser or
third parties as a result of: accident, misuse, or abuse of this product or unauthorized
modifications, repairs, or alterations to this product, or (excluding the US) failure to strictly
comply with Seiko Epson Corporation’s operating and maintenance instructions.
Seiko Epson Corporation shall not be liable against any damages or problems arising from
the use of any options or any consumable products other than those designated as
Original Epson Products or Epson Approved Products by Seiko Epson Corporation.
The EpsonScript Level 2 Cartridge is a customized product based on PhoenixPage Level 2
developed by Phoenix Technologies Ltd.
Epson is a registered trademark of Seiko Epson Corporation.
TrueType, AppleTalk, Macintosh, and LaserWriter are registered trademarks of Apple
Computer, Inc.
ITC Avant Garde, ITC Bookman, ITC Zapf Chancery, ITC Zapf Dingbats are registered
trademarks of International Typeface Corporation.
Bookman and Century Schoolbook are registered trademarks of Kingsley-ATF Type
Corporation.
Times, Helvetica, Helvetica Narrow, and Palatino are registered trademarks and New
Century Schoolbook is a trademark of Linotype AG and/or its related companies.
Phoenix, PhoenixPage, and Phoenix MultiGray are registered trademarks of Phoenix
Technologies Ltd.
PostScript is a registered trademark of Adobe Systems, Inc.
General notice: Other product names used herein are for identification purposes only and
may be trademarks of their respective owners. Epson disclaims any and all rights in those
marks.
EpsonScript Driver, Copyright © 1992,1993
PhonixPage PS2 Driver, Copyright © 1992,1993
COMPUTER:applications,Inc., Copyright © 1988-1993
All Right Reserved
Copyright ©1993 by Seiko Epson Corporation
Nagano, Japan
Contents
Introduction
Features.. . . . . . . . . . . . . . . . . . . . . . . . . . . . . . . . .
Before using EpsonScript . . . . . . . . . . . . . . . . . . . . . . . .
Available interface . . . . . . . . . . . . . . . . . . . . . . . . .
Required memory . . . . . . . . . . . . . . . . . . . . . . . . .
Applications NOT supported . . . . . . . . . . . . . . . . . .
Chapter 1
1
2
2
2
3
Installing the Programs
Installing the printer driver . . . . . .
Before installing . . . . . . . . .
Easy and customize installation
Using Easy installation . . . . .
Customize installation . . . . .
.................
.................
.................
.................
.................
1-1
1-1
1-2
1-2
1-5
Chapter 2 Setting Up Your Macintosh
Using Chooser to Set Up Your Printer . . . . . . . . . . . . . . . . .
Selecting EpsonScript . . . . . . . . . . . . . . . . . . . . . . .
Making settings in Page Setup . . . . . . . . . . . . . . . . . . . .
Renaming the Printer . . . . . . . . . . . . . . . . . . . . . . . . . .
Running the EpsonScript Utility . . . . . . . . . . . . . . . . .
Print Dialog . . . . . . . . . . . . . . . . . . . . . . . . . . . . . . . .
Tips on Using TrueType Fonts . . . . . . . . . . . . . . . . . . . . .
Chapter 3
2-1
2-1
2-2
2-10
2-10
2-12
2-17
Using the EpsonScript Driver Utility
Operation outline . . . . . . . . . . . . . . . . . . . . . . . . . . 3-1
iii
Utility Functions . . . . . . . . . . . . . . . . . . . . . . . . . . . 3-3
PostScript Printers/ AppleTalk Zones . . . . . . . . . . . . . . 3-3
Printer is silent (box) . . . . . . . . . . . . . . . . . . . . . . . 3-3
Update Lists (Button) . . . . . . . . . . . . . . . . . . . . . . . 3-4
Information. . . . . . . . . . . . . . . . . . . . . . . . . . . . . 3-4
Print Requested Info (box) . . . . . . . . . . . . . . . . . . . . 3-4
Font Options . . . . . . . . . . . . . . . . . . . . . . . . . . . . 3-4
Printer Options. . . . . . . . . . . . . . . . . . . . . . . . . . . 3-4
About (button) . . . . . . . . . . . . . . . . . . . . . . . . . . . 3-5
Font Options . . . . . . . . . . . . . . . . . . . . . . . . . . . . . 3-5
List Fonts (button) . . . . . . . . . . . . . . . . . . . . . . . . . 3-5
Download (button) . . . . . . . . . . . . . . . . . . . . . . . . 3-5
Remove (button) . . . . . . . . . . . . . . . . . . . . . . . . . 3-10
Printer Options . . . . . . . . . . . . . . . . . . . . . . . . . . . . . . 3-11
Printer Info (button) . . . . . . . . . . . . . . . . . . . . . . . . 3-12
Send File (button) . . . . . . . . . . . . . . . . . . . . . . . . . 3-14
Rename (button) . . . . . . . . . . . . . . . . . . . . . . . . . . 3-15
General (button) . . . . . . . . . . . . . . . . . . . . . . . . . . 3-16
Features
The EpsonScript™ driver gives your Epson printer the capability
to print out documents formatted for PostScript™ Level 2 printers
(equivalent to the Apple® Personal Laser Writer-2g) with your
Macintosh® computer. This driver provides you with the
following high performance features, for use with today’s desktop
publishing:
Q Printing of documentations for PostScript printers. You can
easily print text, line art, graphics, and so on. With this
cartridge installed, your Epson printer works as if it is an
Apple Laser Writer 2g.
iJ
35 fonts in 11 font families: Fixed Pitch 810 Courier, Dutch 801
Roman, Swiss 721, Geometric ITC AvantGarde, Revival 711
ITC Bookman, Swiss 721 Narrow, Century 702 Century
Schlbook, Zapf Calligraphic 801, ITC Zapf Chancery Medium
Italic, ITC Zapf Dingbats, and Symbol.
Q Epson quality, reliability, and ease of operation.
This manual is a supplement to your printer manual. It gives you
the additional information necessary to use the EpsonScript
cartridge with your printer. Store these manuals together.
Introduction 1
Before using EpsonScript
Available interface
By connecting your Macintosh using Epson’s optional LocalTalk
interface C82312*, you can use EpsonScript with your Macintosh
computer. (If your printer has a built-in LocalTalk interface, you
can use it instead.)
Note:
0 Do not use the serial interface for this purpose, because the
Macintosh does not have a printer driver for the serial interface.
0
This cartridge cannot be used in the EPL4000/4100/4200,
EPL-7000, or EPL-8000/8100 printers. Also, this cartridge does not
work with any other printers even if the printer has a cartridge slot.
Please contact your dealer for details on whether you can use this
cartridge with later Epson printers than those listed in this manual.
0
This cartridge does not work if the optional Epson PostScript CARD
(C82609*) is installed in your printer.
Required memory
Before using this cartridge, make sure your printer has more than
1.5MB of memory. Because this cartridge generates printing data
using banding memory techniques, you should be able to print
out most documents without adding more memory.
If you connect your printer to more than one computer, you must
assign at least 1.5MB of printer memory to the channel using the
cartridge. (See your user’s guide for more details.)
However, it is recommended you increase your printer’s memory
if you print documents that require large amounts of data, such as
detailed graphics or complex layout formats.
2 Introduction
Note:
0 You cannot assign the PostScript mode to more than one channel,
even if your printer has more than 3.OMB of memory.
0
When memory is insufficient for your document, the printing
process is canceled. If this occurs, install extra memory in your
printer.
Applications NOT supported
Applications listed below are not supported:
LaserTalk™
SmartArt™
Introduction 3
Chapter 1
Installing the Programs
This chapter explains how to install the printer software on your
Macintosh computer.
Before installing this software, install the EpsonScript hardware in
your printer according to the instructions in your User’s Guide.
You can install this software using the installer programs included
in the disk packed with the EpsonScript package. This installer
copies the printer driver, utility, driver supplement files, and
screen fonts to your Macintosh computer.
Installing the printer driver
Before installing
To install the software, your Macintosh computer must have the
following:
~3 2MB of RAM
Q
(minimum; varies depending on the
minimum size required by your
system)
System 7.0 or later
0 Hard disk
Caution: Do not use the installerfor System 6.x or earlier.
use this installer for these old systems, your system will be
corrupted.
Installing the Programs
If
you
1-1
Easy and customize installation
The installer has two installation types; Easy Installation and
Customize Installation. The characteristics of each installation are
described below.
Easy installation
The installer copies all files which did not exist in your computer’s
hard disk drive. This choice is recommended for most of the all
users.
Customize installation
At the beginning of this installation, you can select the file(s) to be
installed to your computer so you can save the hard disk space.
However, we recommend you to start Easy Installation described
above, because the utility program and the screen fonts revise
your printing environment drastically better.
Using Easy installation
Follow the steps below to install the necessary files for using
EpsonScript with your computer:
1. Turn on your Macintosh computer.
Note:
If your Macintosh runs any applications automatically when the power is
turned on, quit the application before running the installer.
2. Insert Disk1 (Installation) into your computer. The Printing
Tools window opens automatically.
3. Double click the “Installer” icon in the “Printing Tools”
window. The following window appears on your display:
1-2
Installing the Programs
EPSON
Printing tools & Screen Fonts Installer
EpsonScript Printer Driver
PPD files for the EPSON printers.
EpsonScript Printer Utility
Screen Fonts
4.
Click OK. The installer then shows the menu below:
easy Install
Click Install to place the
l
EpsonScript Driver
l
EpsonScript Utility
l Screen Fonts for System 7.1
on the hard disk named
0 HD-SCSI 0
Note
This sample is based on your running the installer using System 7.1, and
your current hard disk being HD-SCSI 0. The hard disk name, the
System name, and the items below “Click Install to place the” vary
according to your system environment.
Installing the Programs
1-3
5. Make sure the name of the hard disk on you would like to install
the programs is shown below the message “on the hard disk
named” (where HD-SCSI 0 appears in the example).
If the hard disk name is correct, go to step 7.
6.
Click Switch Disk. Then one of other hard disk names is
displayed. Click again until you see the desired hard disk
name.
7.
Click Install to perform the easy installation. The installer starts
copying the necessary files automatically.
8.
Change the disk from Printing Tools (Disk1 ) to Screen Fonts
(Disk2) when the installer instructs you to do so. Installer
continues copying files automatically after you insert the next
disk.
Note:
You need to exchange the disks several times, as the messages
indicate.
9.
Make sure the following message shows on your display.
Installation on the active startup disk
“HD-SCSI 0” was successful. You must
now restart your Macintosh to use your
new software.
10. Click Restart. You are now finished copying files from the
disk 3.
1-4
Installing the Programs
Note :
If the screen fonts have already been installed, the following message
appears in step 9. Click Quit to leave the installer if this occurs.
Installation on “HD-SCSI 0” was
successful. If you are finished, click Quit
to leave the Installer. If you wish to do
additional installations, click Continue.
To enable the printer drivers, follow the instructions in the next
chapter, “Setting Up Your Macintosh.”
Customize installation
Note:
You can copy only the files you need from the disks using this
installation method. If you cannot print correctly after this installation,
perform the Easy Installation to copy the necessary files and modify
your system settings.
Steps 1 to 6 are the same as the steps in the Easy Installation.
Follow the steps in that section first. From step 7, follow the
procedures below:
7.
Click Customize to open the Customize Installation window.
The Customize Installation window is displayed.
Installing the Programs
1-5
Click the items you went to select;
Shift-click to select multiple items.
Note:
You can return to the Easy Installation by clicking Easy Install.
8.
Click the item(s) you would like to install. Selected items are
displayed in reverse, and the product information is shown.
For example, if you click EpsonScript Driver, the window
changes as follows:
Click the items you want to select;
Shift-click to select multiple items.
1-6
Installing the Programs
Note:
You can select multiple items by dragging the mouse or clicking the next
item while pressing the shift key. Product information is shown when
you select a single item only.
9.
After you select the items, click Install. The installer starts
copying the necessary files automatically.
10. If you install the screen fonts, eventually a message appears
requesting you to change the disk. Change the disk from
Printing Tools (Disk1) to Screen Fonts (Disk2) as instructed
by the installer messages. Installer continues copying files
automatically after you insert the required disk.
Note:
You will need to exchange the disks several times, as the messages
indicate.
The following steps are the same as the previous “Easy
Installation” section. Follow from step 9 on in that section to
complete installation.
Installing the Programs
1-7
Chapter 2
Setting Up Your Macintosh
To use EpsonScript, you need to select your printer using
Chooser. After you choose the settings in Page Setup..., you
can start printing using your EpsonScript printer.
When you are connecting two or more Epson printers of the same
model using AppleTalk, you must rename the printer to
distinguish it from the other printers. In this case, follow the steps
in the “Rename the Printer” section.
Using Chooser to Set Up Your Printer
Selecting EpsonScript
1.
Press on the Apple menu and hold down. Then drag down to
Chooser. The Chooser window displays.
APPleTelk Zones:
~~
App’eTa’k
@Active
0 Inact$ve
7 :
Setting Up Your Macintosh
2-1
2.
Click EpsonScript Driver in Chooser.
3.
Click the AppleTalk zone your printer is connected to in the
AppleTalk Zones list. If your computer is connected to only
one AppleTalk zone, ignore this step.
4.
Click the printer name displayed in the box on the right side of
the window.
5.
Click Setup to select your printer.
6. Click the Selected PPD popup list. Then drag the mouse to
your printers name. Make sure the selected printer name is
displayed correctly in the Selected PPD list.
7.
Click OK to save the new setting.
Note:
If you are using other PostScript or EpsonScript printers on your
AppleTalk network, they are also displayed in the list.
Note for Background Printing:
You can select the background printing feature that allows you to proceed
with other work while your computer performs printing in the
background. To enable this feature, click the On radio button. Refer to
your computer’s user’s guide for more details.
8. Click Close in Chooser. The system then displays a caution
message warning that you need to make settings in Page setup .
9. Click OK to close the caution window.
Making settings in Page Setup...
Before you start printing, you need to adjust the software settings
to match your actual printer settings, especially the paper size and
orientation.
2-2
Setting Up Your Macintosh
1.
Select Page Setup... in the File menu. The following window
is displayed.
EpsonScript Driuer ”
ActionLaser I ooo *
Paper: 1 letter
2.
%
n
[ C a n c e l ]
-1
Layout: Il-Up[
Reduce or
Enlarge:
S~by’D~Q
Orientation:
[Options]
[Help]
[About)
Make the settings for your printer and click OK. The meaning of
each option is described below. The current settings are
reflected in the paper image displayed at the left of the
window.
The following sections describe the settings available in Page
setup.
Paper (popup menu)
You can select a paper size using this option. You can choose any
paper size listed in the option. Make sure this setting matches the
paper loaded in your printer. You can select from among these
paper sizes:
A4, A5, B5, Letter, Legal, HalfLetter, Executive,
GovernmentLegal, GovernmentLetter, F4, Monarch,
Commercial-10, DL, C5
The default value varies, depending on your printer’s PPD file
setting. Usually A4 or Letter is selected.
Note:
The available paper sizes my depending on the PPD file prepared for
your printer.
Setting Up Your Macintosh
2-3
Orientation (icons)
You can select the direction of the document printed on the paper.
To change the orientation, click on the icon. The default value is
portrait (icon on the left.)
Reduce or Enlarge (box)
You can reduce or enlarge your document from 25% to 400%.
Enter the number of the percent you would like to reduce or
enlarge. The default value is l00(%.)
Layout (popup menu)
You can print two or more pages of your document onto one sheet
of paper. Each page is reduced and the selected number of pages is
printed on one sheet. For example, if you choose 4-UP, every four
pages of your document are printed on one sheet. You can select
l-up, 2-UP, 4-UP, 6-UP, 8-up, 9-up, 12-up, or 16-up. The default
value is l-up.
Cancel (button)
Click this button to cancel the setting changes and exit the current
window. All changes you made are canceled and the settings
return to their values before you entered this window.
About (button)
You can see the information about this driver by clicking this
button. To exit the About window, click anywhere on the window.
Help (button)
Click this button to view the help document for the driver. You
can use the help list at the left of the window. To exit the Help
window, click Done on the right of the window.
2-4
Setting Up Your Macintosh
Options (button)
You can change the advanced settings for your printer using this
option. This option includes four menus, and each menu has
several items. The items are listed below.
General
Banner Page, Encoding, Date/Time Stamp
Banner Page
The default value is None. Other options are First and Last.
The banner page is a sheet printed to identify the print job in a
network environment. This page displays the user name,
printing date and time of the print job. If First or Last is
selected, the banner page is printed at the first or last of the
document.
Encoding
The default value is Binary. The other option is ASCII. This
option is enabled when you save the document as a PostScript
file to your disk. You can reduce the quantity of the data by
selecting the Binary option. If you would like to edit the data
using an editor, save it as an ASCII file.
Date/Time Stamp
You can print the printing date and time at the top of each
page using this option. To enable this feature, click the check
box. This feature is disabled as the default setting.
Visual Effects
Flip Horizontal, Flip Vertical, Invert Image, Print Patterns As
Grays, Smart Underlining, Precision Bitmaps, Fonts
You can adjust the document using this feature. The following
window opens when you select the Visual Effects in the list:
Setting Up Your Macintosh
2-5
0ptk.n Groups:
0 Flip Horizontal
0 Flip Uertical
0 lnuert Image
q
Print Patterns Rs Grays
0 Smart Underlining
/yYQY
0 Precision Bitmlps
r-1 [fonllJ [ m
Flip Horizontal/Flip Vertical
These options allow you to flip the printed image on the page.
To enable these settings, click the appropriate check box.
Invert Image
When this check box is clicked, you can invert the black and
white (or color) of your document.
Print Patterns As Grays (/As Colors)
Bitmap graphic images can be black and white, color, or
simulated grayscale using black and white patterns to
represent shades of gray. The driver sends these patterns to
the printer as colors so that the printer can print them in its
own grayscale patterns.
But some patterns used in graphics may not be recognized by
the driver as representing color. These are sent to the printer
as patterns and therefore have a poorer quality. This option
tells the driver to send all patterns to the printer as colors so
the print quality of each pattern can be matched to the
printer’s capabilities.
This item depends on your printers PPD file. AS Gray appears
if the PPD is prepared for a black and white printer, and AS
Colors appears for a PPD that is prepared for a color printer.
2-6
Setting Up Your Macintosh
Smart Underlining
Normally, the underlining crosses the descenders in your
documents. You can break the underlining around the
decenders using this setting. You can confirm the setting by
viewing the sample graphic in the window.
Precision Bitmaps
On most Macintosh computers, images are displayed at 72 dpi
(dots per inch). However, most EpsonScript and PostScript
printers print images at multiples of 75 dpi. This might
decrease the image print quality during transformation of
screen data to print data. Click this button to multiply the
images at a multiple of 75 dpi. The quality of the image is
preserved, though the image is reduced by about 4% from the
screen size.
Fonts
You can manage the font environment for your printer using
this button. You can see the following window after you click
the Fonts button:
System Fonts
PPWlnstalled Fonts
[
(Remo.eJ
Bookmun~-Oeml
Bookmnn-ilemiltslic
(Help]
0 Substitute Fonts
TrueTgpe Fonts: 1 Convert to Tupe 1 ~1
Include Fonts: [ All But PPg/lnstalled ~1
[CanEsl]
[Saue]
Setting Up Your Macintosh
2-7
Note:
You should be familiar with font management on a Macintosh computer
before you attempt to changefont settings.
System Fonts (list)
Displays the list of available fonts to be added to the
PPD/lnstalled Fonts list.
PPD/lnstalled Fonts (list)
Displays the fonts found in the PPD file and those added from
the System Fonts list to be saved in the PPD file.
Substitute Fonts (check box)
Click this check box to substitute common screen fonts with
similar printer fonts. By not downloading the printer fonts
from your computer, you can print faster than when using
screen fonts. Note that if the substituted font design is very
different, your document can vary drastically from the screen.
TrueType Fonts: (popup menu)
The default value is Convert to Type 1. The other option is
Keep as TrueType.
Include Fonts: (popup menu)
The default value is All But PPD/lnstalled. Other options are
None, All, All But Standard 13, and All But Standard 35.
Add-> (button)
Click this button to add the fonts selected in the System Fonts
list to the PPD/lnstalled Fonts list.
Remove (button)
Click this button to remove the fonts selected in the
PPD/lnstalled Fonts list.
2-8
Setting Up Your Macintosh
Save (button)
Click this button to save the current fonts listed in the
PPD/lnstalled Fonts list to the PPD file. After saving the
data, the current window closes and you return to the
previous window.
Cancel (button)
Click this button to cancel the settings you changed and exit
the current window. All changes you made are canceled and
the settings return to their values before you entered this
window.
Help (button)
Click this button to view the help document for the driver.
You can use the help list at the left of the window. To exit the
Help window, click Done at the right of the window.
Resolution Improve
Resolution Improve (popup menu)
You can change your Epson printer’s RITech (Resolution
Improvement Technology) setting using this feature. The default
value is Printer’s default.
Printer’s default
RITech setting is used according to the printers setting.
Off/light/Medium/Heavy
RITech is set to Off/Light/Medium/Heavy.
Note:
The RITech feature is supported on certain Epson printers only. This
setting does not affect other brand printers that have a similar feature.
Setting Up Your Macintosh
2-9
Dot Screen
Dot Screen (popup menu)
You an change the grayscale technology setting using this feature.
If your printer supports the Phoenix MultiGray feature, set this
option to MultiGray. The Standard option sets the printer’s
grayscale handling to be the same as the standard PostScript
feature. The default value is Printer’s default.
Renaming the Printer
If your EpsonScript printer is the only EpsonScript printer and no
other PostScript printer is connected to your AppleTalk network,
you may not need to rename the printer name.
When several EpsonScript or PostScript printers are connected to
your AppleTalk network, you should rename the printer name to
distinguish your printer from others.
To rename the printer, use the EpsonScript Utility according to the
steps below.
Running the EpsonScript Utility
1. Open your hard disk window.
2. Double click EpsonScript Utility.
Note:
If you cannot find the EpsonScript Utility in your hard disk window,
perform the easy installation according to the steps in Chapter 1.
2-10
Setting Up Your Macintosh
3.
The following window is displayed. Make sure your printer’s
name is shown in the list at the upper left comer.
r IJDdate
Rbout
Lists 1
4.
Click your printer’s name.
5.
Click Rename at the right side of the window. The following
window appears:
Near name for “Actionlaser 1 IlOCI”:
Printer Status :
~ . . . . . . . . . . . . . . . . . . . . . . . . . . . . . . . . . . . . . . . . . . . . . . . . . . . . . . . . . . . . . . . . . . . . . . . . . . . . . . . . . . . . . . . . . . . . . . . . . . . . . . . . . . . . . .................................................
...........
:
t................._.......................................................................................................................................................
Note : Not all printers change their names immediately. You may, need to
wait a minute or even turn the printer off and on before clicking the
‘Update Lists’ button on the main window to update the zone/printer lists.
[Cancel]
:
[Ok]
Setting Up Your Macintosh
2-11
6. Enter a unique name for your EpsonScript Printer.
7.
Click OK.
8.
Click the Close box.
Note:
The features of the EpsonScript Utility are explained in Chapter 3.
Print Dialog
After you set up your computer, you can print using the
EpsonScript driver. When you select print in your software, the
following screen appears:
EpsonScritbtBrier
Copies:m
I
”
ActionLasrr I ooo ”
S+= 4 puipr@~
Pages: @I RII 0 From: 0 To: 0
Print As: 0 B/W
@ GraYscale
Print To: @I Printer
0 File
[Cancel]
Printer Prep: 1 Temporary -1
[Options]
paper from..
[ H e l p ]
[ A u t o m a t i c -1
:“““““““““‘““” _. . ,. _ .-.-.
7
0 Couer In: j fluttrrntrt~c
[lbout]
Print Pages: @I All 0 Odd Pages Only
0 Even Pages Only
Section Range: From: I
To: I
0 Print Selection Only
IJ Print Neut File
0 Print Back To Front
0 Print Hidden TeHt
This menu includes the following items:
Copies, Pages, Print As, Print To, Printer Prep, Paper from,
Cover In, Print, Cancel, Options, Help, About
2-12
Setting Up Your Macintosh
copies (box)
Enter a number from 1 to 999 to generate multiple copies of your
document. The default value is 1.
Pages
You can specify the pages of your document to print. The default
setting is All, displayed by the All button. You can enter the page
numbers in the boxes From: and TO:. The available range for the
boxes is from 1 to 9999.
Print As
You can select the printout method from B/W, Color (if available
on your printer), or Grayscale. The default setting is B/W.
B/W
Prints the image in black and white, even if the image on the
screen is color.
Grayscale
Prints the image using grayscale, which simulates shades of
gray even if the image on the screen is color. This option
appears if the printer’s PPD file supports the grayscale feature.
Color
Prints the image using color. This option appears if the
printer’s PPD file supports color printing.
Print To
You can select whether the computer prints to your printer or
saves the print data as a file on your disk. The default setting is
Printer.
If you select File, the Print button changes to Save. Clicking this
button saves your document as a file. The following window then
appears:
Setting Up Your Macintosh
2-13
=HD-SCSI
0
[ E j e c t ]
[DesLtop]
Save PostScriotB File As:
PostScript
PostScrIpt: 1 Level 1 Compatible -1
TrueType Fonts: 1 Convert to Type 1 -1
Include Fonts: [All But PPCVlnstalled -1
Encoding: [I
First, select where to save the file using the popup menu and the
list on the window. You can use the Desktop and Eject buttons if
you need to change the device.
Next, enter the file name at the Save PostScript File AS: box.
Then click Save button unless you would like to change the
settings below the Save PostScript Files To: box. The saved
documents have a specific icon that indicates they are PostScript
documents. After clicking the Save or Cancel button, the
window closes and you return to the previous window.
There are four settings for saving your PostScript document:
PostScript: (popup menu)
The default value is level 1 Compatible. The other option is
Level 2 Only.
TrueType Fonts: (popup menu)
The default value is Convert to Type 1. The other option is
Keep as TrueType.
Include Fonts: (popup menu)
The default value is All But PPD/lnstalled. Other options are
None, All, All But Standard 13, and All But Standard 35.
2-14
Setting Up Your Macintosh
Encoding: (popup menu)
The default value is Binary. The other option is ASCII.
Printer Prep (popup menu)
The default value is Temporary. Other options are None,
Permanent, and Interrogate. This menu determines how your
printer prepares for printing PostScript files.
Permanent
The printer saves the prepared settings so that the driver does
not perform the preparation again for the next printing.
Temporary
The printer does not save the prepared settings; the driver
needs to perform the preparation for every printing job.
Interrogate
The printer driver asks your printer whether the driver needs
to prepare or not. Preparation is performed again if the printer
answers it should be performed. The prepared settings are lost
after the printing.
None
The driver assumes that the printer is already prepared.
Note:
Q The best setting for the printer when you are using AppleTalk is to
set this option to Permanent for the first printing and to None
for all following print jobs.
CI If not all printer users are using the EpsonScript driver, set this
option to Permanentand do not select Interrogate.
Setting Up Your Macintosh
2-15
Paper from (popup menu)
The default value is Automatic. Other options are Custom, USE
SelecType’s PAGESIZE, Standard Bin, and Optional Lower
Cassette. You can choose the paper source of your printer using
this menu.The Automatic option uses the paper source that is
selected in the Page Setup window. The Custom option allows
you to sequentially take paper from different paper sources, such
as Sheet 1 from the upper, sheet 2 from lower.
Cover In (popup menu)
To enable this menu, first click the check box. The default value is
Automatic. Other options are USE SelecType’s PAGESIZE,
Standard Bin, and Optional Lower Cassette. YOU can select
the paper source for the cover sheet of your document. The pages
following the cover sheet are loaded from the paper source
selected in the Paper from menu.
Print (button)
Click this button to start printing.
Options (button)
This button operates the as same as the Option button in the
Page Setup window. See “Printer Setting” in this chapter.
Cancel (button)
Click this button to cancel the settings you changed and exit the
current window. All changes you made are canceled, and the
settings return to their values before you entered this window.
About (button)
You can see the information about this driver by clicking this
button. To exit the About window, click anywhere on the window.
2-26
Setting Up Your Macintosh
Help (button)
Click this button to view the help document for the driver. You
can use the help list at the left of the window. To exit the Help
window, click Done at the right of the window.
Tips on Using TrueType Fonts
When printing documents written for PostScript printers, the
printout from your printer and the PostScript printer might be
different. This difference occurs because this product uses fonts
that differ from PostScript standard fonts.
Setting Up Your Macintosh
2-17
Chapter 3
Using the EpsonScript Driver Utility
This chapter explains about the EpsonScript Utility. This utility
program has the ability to change many of your printer and
printer driver settings.
Caution:
This utility can also work with other PostScript printer(s). And,
some features enable you to remove data from your printer, such
as fonts in your printer’s RAM and on the hard disk. Make sure
you have backup copies of this data before you delete it.
Operation outline
The EpsonScript Utility is installed on your hard disk during
installation. If you cannot find this utility in your hard disk
window, run the installer to install this program according to the
steps in Chapter 1.
1.
Turn on your computer.
2.
Open your hard disk window.
3. Double click EpsonScript Utility. The utility program searches
the printers available on your AppleTalk network. The
following window is then displayed.
Using the EpsonScript Driver Utility
3-1
brmation :
Update Lists
4.
The Postscript Printers shows the EpsonScript and PostScript
printers connected through AppleTalk. Click the printer that
has settings you would like to change.
Note:
If your printer is connected to an AppleTalk network with multiple
AppleTalk zones, click the zone your printer is connected to in the
AppleTalk Zones list. Then printers connected to the selected
zone are then displayed in the PostScript Printers list.
3-2
5.
After you choose the printer, you can change the settings using
the buttons in the Font Options and Printer Options. Refer
to the sections after this section for details on the functions.
6.
To quit the utility, click the Close box of the window.
Using the EpsonScript Driver Utility
Utility Functions
This section describes all functions available in the utility. The
items displayed in the opening window are described at the
beginning of this explanation.
Note:
Detailed information on font Options and Printer Options are
described following this section.
PostScript Printers/AppleTalk Zones
When you change the settings of your printer using this utility,
first you should choose the printer name from the PostScipt
Printers list. Click the name of the printer that has settings you
would like to change.
This list displays the EpsonScript or PostScript printer names
connected to your AppleTalk network. If you cannot find your
printer, it may be connected to another AppleTalk zone.
Click the name of your printers zone listed in the AppleTalk
Zones. Then you should be able to find your printer’s name in the
PostScript Printers list.
Note:
If your AppleTalk network does not use the zone feature, NO zones
c *>. is displayed in the AppleTalk Zones list.
Printer is silent (box)
Click this box to disable the bidirectional communication between
your computer and printer. If this box is clicked, you cannot get
printer information or font lists. Also, any messages from your
printer are ignored.
Using the EpsonScript Driver Utility
3-3
Update lists (Button)
Click this button to update the PostScript Printers and
AppleTalk Zones. Use this button when you cannot find a printer
that might have been disconnected when you started the utility,
but may be connected now.
Information
When you click List Fonts or Printer Info, information is displayed
in this area.
Print Requested Info (box)
Click this button to print the information displayed in the
Information area. This feature takes effect for information
displayed after this button is clicked.
Font Options
Font Options has three buttons. They are List Fonts, Download,
and Remove. You can manage the fonts installed or to be
installed on the selected printer using these buttons.
Refer to the next section of this chapter, “Font Options”.
Printer Options
Printer Options has four buttons. They are Printer Info, Send
File, Rename, and General. You can get the printer information,
send files directly to your printer, rename your printer, and
perform several other functions.
3-4
Using the EpsonScript Driver Utility
Refer to the Printer Options section, next to the Font Options
section.
A bout (button)
You can view information about this utility by clicking this button.
To close the window, click any point on the window.
Font Options
This menu includes the following three buttons:
Displays the fonts available with the selected
List Fonts
printer
Downloads software fonts from your computer
Download
to the selected printer
Removes the fonts stored in the printer’s
Remove
erasable device (such as a SCSI hard disk)
List Fonts (button)
Click this button to display a list of the fonts available on the
selected printer. Both of the resident and current downloaded
fonts are displayed in the Information box.
Download (button)
Click this button to download software fonts from your computer
to the selected printer.
Using the EpsonScript Driver Utility
3-5
You will be able to reduce printing time using this feature if your
document includes download fonts, because usually the printer
driver downloads necessary fonts each time it prints and remove
them after printing finishes. The downloaded fonts using this
feature are handled as if they are resident fonts until you turned
off or reset the printer.
You can see the following window after you click the Download
button on the main window:
Font Downloading Options
[Memory -
o HD-SCSI 0 7
o HD-SCSI 0
[XI Convert TrueType to Type1
Operation outline
You can download software fonts from your computer to your
printer by following the steps below. Details on each item are
described following these steps.
3-6
1.
Select the printer using PostScript Printers and AppleTalk
Zones.
2.
Click Download. While getting the information from the
printer, a status window appears. Then the download window
shown in the previous section appears.
Using the EpsonScript Driver Utility
3.
Click the folder that contains the font in the list at the upper left
of the window (Folder List). If the font’s folder is not
displayed, choose the folder using Folder List, Popup Path
Menu, Desktop, and Open buttons.
4.
Click Open button (or click twice in the previous step) to
display the fonts in the folder in the File List, at the lower left
of the window.
5.
Select the font(s) in the File List you would like to download.
6.
Click Add. The selected font name or names then appear on the
Font List, at the right of the window.
7.
Click Send Fonts to start downloading.
8.
Click the Close box to exit the download window.
Details on each item are described in the following sections.
Folder List
The Folder List is the list in the upper left of this window that
shows the folder name(s) in the current directory. You can change
the current directory using POPUP Path Menu in the list and
Open button at the middle of the window.
File List
The File List is the list in the lower left of this window that shows
the PostScript font file name(s) in the current folder. If you have
chosen a font, you can change the current folder using Popup
Path Menu in the Folder List.
Font List
The Font List is the list in the right of the window that shows the
PostScript font name(s) selected in the File List to be downloaded
to the printer.
Using the EpsonScript Driver Utility
3-7
Popup Path Menu
The current directory is displayed in the Popup Path Menu in
the Folder List. You can change the current directory using this
menu by holding the mouse button on the menu and pulling
down the list that appears below. The list includes the following
items, in the following sequence:
Current directory
Directory that contains current directory
Directory that contains previous directory
Volume that contains the directories above
Desktop
Popup Device Menu
The Popup Device Menu shows the printer’s device to which
you can download fonts. Most printers can download fonts to the
memory only, so usually this menu displays Memory for the
device name. When the selected printer has another device (such
as hard disk), you can download fonts to by holding the mouse
button on the menu and pulling down the list that appears below.
You can select the download device to be Memory or other device
name(s).
Eject (button)
When a floppy disk is in your computeis drive, you can eject the
disk by clicking this button. If there is no disk in your drive, this
button is disabled.
Desktop (button)
Click this button to change the File List to display all available
volumes, files, and folders on the Desktop of your computer.
3-8
Using the EpsonScript Driver Utility
Open (button)
You can change the current directory to the folder in the Folder
List using this button.
To change the current directory, follow the steps below:
1.
Click the folder in the Folder List you want to select as the
current directory.
2.
Click the Open button. The current directory then changes to
that folder and Folder List and/or Font List is updated.
Note:
0 The Open button is disabled when any folder in the Folder List is
selected.
Q
You can also change the current directory to the folder in the
Folder List by double clicks on the folder.
Delete (button)
When you would like to remove the font(s) from the Font List to
cancel download, click this button after you select the fonts in the
Font List.
Note:
You should select the font(s) in the Font List before you click this button.
Add >>> (button)
This utility downloads the font(s) registered in the Font List. Click
this button to register the font(s) marked in the File List.
You can mark a font in the File List by clicking it.
Cancel (button)
Click this button to close the download window.
Using the EpsonScript Driver Utility
3-9
Convert True Type to Type 1 (box)
Click this button to send the selected TrueType font(s) to the
printer in PostScript Type 1 format.
Send Fonts (button)
Click this button to download the fonts in the Font List to the
printer. After the download procedure, the download window
closes automatically and you return to the main window.
Remove (button)
Caution: Make sure you have backup data before you erase the
resident fonts on the erasable device of the printer using this
feature. If you remove a font, you may need to reinstall it later
using the download feature.
Note:
You cannot erase fonts provided as built-in ROM fonts.
Fonts In The Printer (list) / Device (popup menu)
The list at the left of the window is the Fonts In The Printer list.
You can view the available EpsonScript or PostScript fonts for the
current device in the selected printer.
Fonts To Be Removed (list)
The list at the right of the window is the Fonts TO Be Removed
list. This list displays the fonts you selected to remove from the
selected printer.
Add >>> (button)
Click this button to copy the font names you selected in the Fonts
In The Printer list to the Fonts To Be Removed list.
3-10
Using the EpsonScript Driver Utility
Note:
The Add >>> button is disabled when a font name is selected in the
Fonts In The Printer fist.
Remove (button)
Click this button to remove the fonts in the Fonts TO Be
Removed list. Make sure that you have backup data for the fonts
you selected to remove; you may need to reinstall them later using
the download feature.
Note:
The Remove button is disabled when any font name is displayed in the
Fonts To Be Removed list.
Cancel (button)
You can cancel font removal and close the current window by
clicking this button. The window returns to main window without
removing any font.
Remove Fonts (button)
Click this button to remove the fonts displayed
Fonts to be added >>> (box)
This box shows the font you selected in the Font In The Printer
list. Also, you can type the font name you want to remove in this
box instead of selecting the font from the list.
Printer Options
You can get the various printer information, send files directly to
the printer, rename the printer, and perform other functions using
this feature.
Using the EpsonScript Driver Utility
3-11
Printer info (button)
To view information about the selected printer in the PostScript
Printers list, click this button. You can see the following features of
the printer.
Note:
The Printer Info button is disabled when any printer is selected in the
PostScript Printers list.
Product Name:
The name of the printer registered in the firmware of its
ROM is displayed. Note that this name might be different
from the name you can see in the PostScript Printers list.
Firmware Revision:
The version number of the printer’s software (and data) is
displayed.
Note:
If the number 0 is displayed your printer’s version number is
indecipherable.
PostScript Level:
This item displays the EpsonScript or PostScript level of
the printer.
Note:
If the number is 1 or Unknown, the EpsonScript or PostScript level
of your printer is 1.
PostScript Version:
This displays the EpsonScript or PostScript version of the
printer.
3-12
Using the EpsonScript Driver Utility
Max. memory available:
This is the amount of memory available for developing
the printout image and downloading fonts to the printer.
The unit is bytes.
Memory in use:
The amount of memory already used for download fonts
and other data stored in the printer.
‘Save’ nesting level:
This item displays ‘Save’ nesting level of the printer.
When starting a print job, the printer saves the current
settings and restores them after the job finished. This
feature is prepared to avoid a print job disturbing the
permanent settings of the printer. The nesting level is that
the number of ‘saves’ that can be done simultaneously
before a ‘restore’ must be performed.
Total pages printed:
This item displays the total number of pages printed by
the printer since it was manufactured.
Note:
If the printer’s counter reaches its limit, the counter returns to 0 and
it continues counting.
Startup Page Enabled:
This item displays the status of the startup page of the
printer. The startup page is a sheet prepared to printout
the printer’s status when the printer is turned on.
Enabled:
The Startup Page function is enabled.
The Startup Page function is disabled.
Disabled:
Unknown:
The Startup Page function does not exist
on the selected printer.
Using the EpsonScript Driver Utility
3-13
Note:
If your printer is connected by parallel converters or other such
devices, the status might be false or no information. This occurs
because they cannot communicate with parallel interface printers.
Send File (button)
You can send EpsonScript and PostScript files to the printer
directly using this feature without running any word processor or
DTP software.
When you click this button, the following window appears:
t=HD-SCSI 0 v 1
a HD-SCSI 0
m Applications
m documents
mMPW
To send a file, follow the steps below.
1.
Select the file using the Popup Path Menu at the top of the
window and the File List. Also, you can use the Eject and
Desktop buttons to change the storage device.
Note:
3-14
Using the EpsonScript Driver Utility
0
The files listed in the File List are TEXT attribute files. If you select
a file that is not formatted for EpsonScript or Postscript, it is not be
printed.
0
The Eject button is disabled if there is no floppy disk in your
computer's drive.
2.
Click Open to send the selected file to the printer.
3.
Click Cancel to exit the current window and return to main
window.
Rename (button)
If your EpsonScript or PostScript printer is the one printer and no
other EpsonScript or PostScript printer is connected to your
AppleTalk network, you may not need to rename the printer
name.
When several EpsonScript or PostScript printer(s) are connected to
your AppleTalk network, you should rename the printer name to
distinguish your printer from other printer(s).
To rename the printer, follow the steps below.
1.
Click Rename at the right side of the window. The following
window appears:
Using the EpsonScript Driver Utility
3-25
New name for *VIctianLaser 1 DOW’:
Printer Status :
~. . . . . . . . . . . . . . . . . . . . . . . . . . . . . . . . . . . . . . . . . . . . . . . . . . . . . . . . . . . . . . . . . . . . . . . . . . . . . . . . . . . . . . . . . . . . . . . . . . . . . . . . . . . . . . . . . . . . . . . . . . . . . . . . ............. ..... :
i . . . . . . . . . . . . . . . . . . . . . . . . . . . . . . . . . . . . . . . . . . . . . . . . . . . . . . . . . . . . . . . . . . . . . . . . . . . . . . . . . . . . . . . . . . . . . . . . . . . . . . . . . . . . . .................................................
...........
j
Note : Not all printers change their names immediately. You may need to
wait a minute or even turn the printer off and on before clicking the
‘Update Lists’ button on the main window to update the zone/printer lists.
[-ii-q [
2.
O
k
]
Enter a unique name for your EpsonScript or PostScript Printer.
3. Click OK.
4.
Click the Close box.
General (button)
You can send control commands to the printer, reset the printer,
set the Startup Page enable or disable, and edit control commands
using this feature. When you click the General button, the
following window appears:
3-16
Using the EpsonScript Driver Utility
You can reset the printer by clicking the Reset Printer button.
Enable or disable the startup page by clicking Enable or Disable.
To send printer control commands, follow the steps below:
1.
First, type in the command strings in the Enter text to send
box.
2.
Click the Add TO List button to copy the strings to the Select
command to send list.
3.
Click the command line in the Select command to send list.
4.
Click the Send Text button. Then the selected command line is
sent to the printer and the current status of the printer is
displayed in the status box.
Note:
You can send any command in ASCII characters using this feature.
Select command to send (list)
The command strings are saved in this list. You can add strings
using the Add TO List button and remove the strings using the
Delete From List button.
Using the EpsonScript Driver Utility
3-17
Enter text to send (list)
To send a command string, first enter the command string in this
box. You can edit the strings in this box then copy them to the
Select command to send list using the Add To List button.
You can also edit the command strings already saved in the
Select command to send list. To edit a saved string, first select
it in the Select command to send list. The string then appears
in the Enter text to send list.
Add To List (button)
Click this button to copy the command strings in the Enter text to
send box.
Note:
The Add TO List button is disabled if no strings are described in the
Enter text to send box.
Delete From List (button)
You can delete the registered command strings using this button.
To delete the strings, first select it on the Select command to
send list. The string then appears in the Enter text to send list.
Send Text (button)
Click the Send Text button to send the selected command strings
in the Select command to send list to the printer. Then the
current status of the printer is displayed in the status box.
Note:
You can send any command in ASCII characters using this feature.
3-18
Using the EpsonScript Driver Utility
Reset Printer (button)
Click this button to reset the printer. Note that this function is not
completely the same as the power-on reset. The EpsonScript or
PostScript interpreter is restarted by this function, but the
hardware mechanism is not re-initialized.
Startup Page
The startup page is a sheet that shows the printers status when
the printer is turned on. You can confirm the printer’s status using
this sheet.
Enable
Click the Enable button to enable startup page printing.
Disable
Click the Disable button to disable startup page printing.
Done (button)
Click the Done button to exit the current window and return to
the main window.
If you change the Select command to send list, the system
asks whether to “Save changes to text list?” and Yes, NO, and
Cancel buttons appear. Click Yes or NO to return to the main
window, or click cancel to continue jobs in the current window.
Using the EpsonScript Driver Utility
3-19
EPSON
Printed
in
Japan
93
10-1.5