1
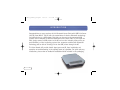
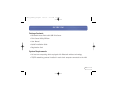
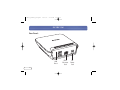
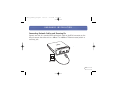
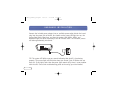
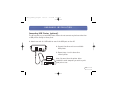
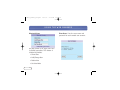
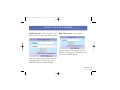
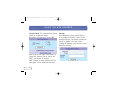
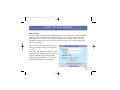
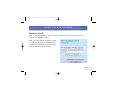
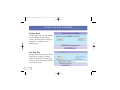
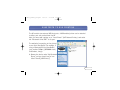
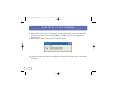
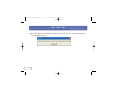
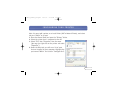
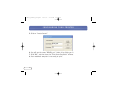
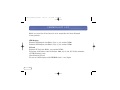
P74181_F8T030_man.qxd
1/10/03
5:33 PM
Page 1
™
Bluetooth Access Point
with USB Print Server
Access your network and USB
printers through Bluetooth devices
User Manual
F8T030
P74181_F8T030_man.qxd
1/10/03
5:33 PM
Page 1
TABLE OF CONTENTS
Introduction. . . . . . . . . . . . . . . . . . . . . . . . . . . . . . . . . . . . . . . . . . . . . . . . . . . . . . . . . . . . 2
Overview
Package Contents . . . . . . . . . . . . . . . . . . . . . . . . . . . . . . . . . . . . . . . . . . . . . . . . . . . . . . . 3
System Requirements . . . . . . . . . . . . . . . . . . . . . . . . . . . . . . . . . . . . . . . . . . . . . . . . . . . . . 3
Key Features and Benefits . . . . . . . . . . . . . . . . . . . . . . . . . . . . . . . . . . . . . . . . . . . . . . . . . . 4
Applications. . . . . . . . . . . . . . . . . . . . . . . . . . . . . . . . . . . . . . . . . . . . . . . . . . . . . . . . . . . 5
Product Specifications . . . . . . . . . . . . . . . . . . . . . . . . . . . . . . . . . . . . . . . . . . . . . . . . . . . . 6
Unit Display Diagrams . . . . . . . . . . . . . . . . . . . . . . . . . . . . . . . . . . . . . . . . . . . . . . . . . . . . 7
Hardware Installation . . . . . . . . . . . . . . . . . . . . . . . . . . . . . . . . . . . . . . . . . . . . . . . . . . . . . . 11
DHCP Setup . . . . . . . . . . . . . . . . . . . . . . . . . . . . . . . . . . . . . . . . . . . . . . . . . . . . . . . . . . . . 14
Operation and Status . . . . . . . . . . . . . . . . . . . . . . . . . . . . . . . . . . . . . . . . . . . . . . . . . . . . . . 16
Using the Web Manager. . . . . . . . . . . . . . . . . . . . . . . . . . . . . . . . . . . . . . . . . . . . . . . . . . . . . 25
Bluetooth to USB Printing . . . . . . . . . . . . . . . . . . . . . . . . . . . . . . . . . . . . . . . . . . . . . . . . . . . 41
LAN Printing. . . . . . . . . . . . . . . . . . . . . . . . . . . . . . . . . . . . . . . . . . . . . . . . . . . . . . . . . . . . 44
Configuring your Printer . . . . . . . . . . . . . . . . . . . . . . . . . . . . . . . . . . . . . . . . . . . . . . . . . . . . 47
Default Settings . . . . . . . . . . . . . . . . . . . . . . . . . . . . . . . . . . . . . . . . . . . . . . . . . . . . . . . . . 49
Troubleshooting. . . . . . . . . . . . . . . . . . . . . . . . . . . . . . . . . . . . . . . . . . . . . . . . . . . . . . . . . . 50
Compatibility List . . . . . . . . . . . . . . . . . . . . . . . . . . . . . . . . . . . . . . . . . . . . . . . . . . . . . . . . 54
Configuration Notes . . . . . . . . . . . . . . . . . . . . . . . . . . . . . . . . . . . . . . . . . . . . . . . . . . . . . . . 56
Information. . . . . . . . . . . . . . . . . . . . . . . . . . . . . . . . . . . . . . . . . . . . . . . . . . . . . . . . . . . . 57
1
P74181_F8T030_man.qxd
1/10/03
5:33 PM
Page 2
INTRODUCTION
Congratulations on your purchase of this Bluetooth Access Point with USB Print Server
(the AP) from Belkin. The AP adds the convenience of wireless Bluetooth technology
and LAN printing to a USB printer. Print jobs can be sent to the connected USB
printers from a computer or PDA via Bluetooth and the wired LAN. To print from the
LAN, simply connect a USB printer to the AP and run the included printer utility on
your Windows® or Mac® operating system. Your computers enabled with Bluetooth
technology will be able to directly print to the USB printer through the AP.
This User Manual will provide details about your new AP, from installation and
operation to troubleshooting in the unlikely event of a problem. For quick and easy
installation, please refer to the Quick Installation Guide included in the packaging.
2
P74181_F8T030_man.qxd
1/10/03
5:33 PM
Page 3
OVERVIEW
Package Contents
• Bluetooth Access Point with USB Print Server
• Print Server Utility CD-Rom
• User Manual
• Quick Installation Guide
• Registration Card
System Requirements
• At least one computing device equipped with Bluetooth wireless technology
• TCP/IP networking protocol installed in each wired computer connected to the LAN
3
P74181_F8T030_man.qxd
1/10/03
5:33 PM
Page 4
OVERVIEW
Key Features and Benefits
• Offers compatibility with any Bluetooth v1.1-compliant device
• Allows you to work at distances of up to 100 meters
• Features flash-upgrade support
• Offers built-in security using 128-bit encryption and authentication, allowing you
to securely access any Bluetooth device without wires
• Offers true Plug-and-Play convenience
• Supports up to 7 simultaneous users
• Provides easy management with built in web server
• Delivers manageability from a desktop or PDA
• Supports Microsoft® Windows® 98 SE, Me, 2000, and XP
*100m range is dependent upon environment, number of users, and other wireless
devices within immediate proximity.
4
P74181_F8T030_man.qxd
1/10/03
5:33 PM
Page 5
OVERVIEW
Applications
SOHO (Small Office/Home Office)
• SOHO users who need easy and quick setup
Wireless roaming with a PDA or laptop around the home or office
• Gain the freedom you need to access the Web, and e-mail around the home and
office without cables
Wireless printing with your PDA or laptop
• Print wirelessly to a USB printer from your PDA, notebook, or desktop computers
Frequently changing environments
• Take your personal area network with you when you change locations or rearrange
your workplace
Temporary LAN access
• Create a personal area network for your PDAs and computers at tradeshows, exhibitions,
conference rooms, and other sites that may require a network on a temporary basis
5
P74181_F8T030_man.qxd
1/10/03
5:34 PM
Page 6
OVERVIEW
Product Specifications
Bluetooth Compliance
Physical Interfaces
Operating Frequency
Output Power
Sensitivity
Data Rate
Operation Range
Network Topology
Packet Support
Frequency Stability
Antenna
Dimensions
6
Version 1.1
2 USB A Connectors,
RJ45 Connector
2.4 to 2.4835GHz
0 to 20 dBm, Class 1
< 0.1% BER at -70 dBm
723/56Kbps Asynchronous,
400/400Kbps Synchronous
100-meter (333 ft.)
radius indoors
Point-to-multipoint, up
to 7 slaves
1/3/5 slot packets
Integrated
4.7 (W) x 5 (L) x 1.75
(H) in.
Weight
Operating Temp
Storage Temp
Humidity
Supply Voltage
Nominal Current
Supported Profiles
Management
with SSI
Network
Wireless Security
USB Printing
Mounting
5.0oz.
0 to 50 degrees Celsius
10 to 70 degrees Celsius
5~90% non-condensing
5VDC
1 Amp
GAP, SDP, LAN Access,
Serial, PAN (Q1 2003)
Embedded web server
DHCP, NAT via Bluetooth
Firewall for wireless
devices
128-bit encryption
CHAP or PAP authentication
Line-printing protocol,
TCP/IP
Desktop or wall-mount
P74181_F8T030_man.qxd
1/10/03
5:34 PM
Page 7
OVERVIEW
Unit Display Diagrams:
USB 1 LED
(Amber)
USB LED 2
(Amber)
Bluetooth
LED (Blue)
Connected LED
(Green)
Power LED
(Green)
System LED
(Green)
LAN LED
(Green)
7
P74181_F8T030_man.qxd
1/10/03
5:34 PM
Page 8
OVERVIEW
Front Panel:
Power LED (Green)
On: Indicates that the AP is receiving power
System LED (Green)
Blinks once per second: AP has obtained a valid IP address or has a pre-configured
IP address
Blinks 3 times per second: AP has not obtained a valid IP Address
LAN LED (Green)
On: AP is connected to an Ethernet network
Off: No network connection (such as a cable connection to a hub, switch, or Ethernet)
Blinks: Traffic occurring on the wired LAN
8
P74181_F8T030_man.qxd
1/10/03
5:34 PM
Page 9
OVERVIEW
Connected LED (Green)
On: AP is connected to the Internet
Off: AP is not connected to the Internet (or has not been able to contact any of the
common Internet sites)
Bluetooth LED (Blue)
On: At least one Bluetooth device is connected to the AP
Off: No Bluetooth devices are connected to the AP
Blinking: Indicates Bluetooth radio activity
USB 1 LED (Amber)
Blinking: Indicates data traffic to the device connected to the first USB port
USB LED 2 (Amber)
Blinking: Indicates data traffic to the device connected to the second USB port
9
P74181_F8T030_man.qxd
1/10/03
5:34 PM
Page 10
OVERVIEW
Rear Panel:
USB
Port 1
10
RJ45
Ethernet
Jack
DC
Power
Jack
P74181_F8T030_man.qxd
1/10/03
5:34 PM
Page 11
HARDWARE INSTALLATION
Connecting Network Cables and Powering On
Connect one end of a standard CAT5 twisted-pair cable to the RJ45 connector on the
AP and connect the other end to a 10Base-T or 100Base-T Ethernet router/switch or
wall drop jack.
Wall Jack
11
P74181_F8T030_man.qxd
1/10/03
5:34 PM
Page 12
HARDWARE INSTALLATION
Connect the included power adapter into an available power outlet. Attach the barrel
plug into the power jack of the AP. You should see the power LED light turn on, the
system light blink a few times, and then the system, LAN, USB 1, USB 2, and
Bluetooth lights will blink repeatedly as the AP initiates itself. The initiation process
will take approximately 20 seconds.
TIP: The system LED blinks once per second indicating that the AP is functioning
properly. The system light will blink three times per second if the IP address has not
been set. If any lights other than the power light remain solid, there is some problem
with the unit. Consult the troubleshooting guide at the end of your User Manual.
12
P74181_F8T030_man.qxd
1/10/03
5:34 PM
Page 13
HARDWARE INSTALLATION
Connecting USB Printers (optional)
The AP supports up to two USB printers. Please do not connect any devices other than
a USB printer directly to these ports.
1. Attach one end of a USB cable to one of the USB ports on the AP.
2. Connect the other end to an available
USB printer.
3. Repeat steps 1 and 2 above for a
second printer.
Note: You must have the printer driver
installed in each computer you wish to print
from prior to use.
13
P74181_F8T030_man.qxd
1/10/03
5:34 PM
Page 14
DHCP SETUP
The IP address will automatically be set if your network has DHCP.
Once the AP is connected to the network, it will attempt to get an address from a
DHCP server upon power up.
Note: The AP will use the stored address and will not try DHCP if an IP address has
been manually stored via the web manager.
Once the AP obtains an address from DHCP, it will not be stored. The AP will use DHCP
each time it boots or the IP lease expires.
TIP: A quick way to tell if the AP has an IP address is to monitor the system LED.
After power up, the system LED will blink three times per second if the AP does not
yet have an IP address. Once an address is obtained, the system LED will blink once
per second.
To have an IP address permanently stored, you must use the web manager.
Generally, if you use DHCP, your IP address, netmask, and router will automatically be
set. In some cases, your DNS servers will also be set. Be sure to set these settings
manually if they are not provided by DHCP.
14
P74181_F8T030_man.qxd
1/10/03
5:34 PM
Page 15
DHCP SETUP
Connecting Is as Easy as 1.2.3.4
It’s easy to connect to the AP and manage it. You can connect to the AP using
Bluetooth technology, and a browser to connect to: http://1.2.3.4. This is the address
of every AP as seen from Bluetooth clients, making managing it as easy as 1-2-3-4.
Viewing Network Parameters
The current IP address used by the AP can be viewed on the main page of the web
manager from a PDA or computer. A key feature of the AP is its ability to be managed
by any Bluetooth client, even when not yet connected to an Ethernet LAN.
Once the IP address of the unit is known, you can also access the web manager by
browsing the units’ IP address via any network-connected computer. Browsing 1.2.3.4
can only be done from a locally connected Bluetooth client. The AP includes a built-in
NAT router on the Bluetooth interface.
15
P74181_F8T030_man.qxd
1/10/03
5:34 PM
Page 16
OPERATION AND STATUS
Bluetooth Client Connectivity
The current firmware release supports general AP functionality. From a Bluetooth client,
you can perform Device Discovery and Service Discovery on the AP, and attach to the
network via LAN access over PPP profile. The AP has a built-in NAT router that supplies
clients with internal IP addresses and routes Bluetooth clients over the LAN interface
to network resources and the Internet.
The AP will use its host name (name) when discovered by clients. The default name for
a unit is Belkin_XYZ, where XYZ is the last three bytes of the Ethernet (MAC) address
printed on the unit’s label. For example, if the unit’s address is 00:06:66:00:12:34,
then the Bluetooth name for the unit will be Belkin_1234.
You can change the host name via the web manager to any name you prefer, just
remember to use unique names for multiple units in proximity of each other on
your network.
The AP is shipped without any requirements for name and password for connecting
from a Bluetooth client (such as a PC). However, this can be changed such that the AP
will require a username and password. The only settings required by PPP are a login
16
P74181_F8T030_man.qxd
1/10/03
5:34 PM
Page 17
OPERATION AND STATUS
user name and password. When the client prompts for a PPP connection user name and
password, use user name “guest” and password “guest” (without the quotes).
Some clients also require link-key establishment before connecting. If a dialog box
appears asking for a Bluetooth Passkey, enter “belkin”.
For more information on Passkey, refer to the Security section of this manual.
Connecting to the AP
The AP can communicate to most clients enabled with Bluetooth technology, including
laptops/desktops with a PC card or USB adapter, a Palm™ handheld with SDIO card, or
a Microsoft® Pocket PC with a CF card or built-in.
Using the Bluetooth PC Card (part number F8T002) or USB Adapter (part number
F8T001 or F8T003) from Belkin (WIDCOMM stack):
1. Click on “My Bluetooth Places” on your Windows desktop.
2. Click on “View Devices Within Range”. The client will search for devices. You should
see “Belkin_xxx [y]” (y is the network address of the unit) as a Network AP.
3. Double-click on the device icon.
17
P74181_F8T030_man.qxd
1/10/03
5:34 PM
Page 18
OPERATION AND STATUS
4. You should see “discovering services”, and then three icons will appear. Double-click
on the “LAN access using PPP” icon.
5. You will see “connecting, status” and then a Bluetooth Null Connection box will
appear. Type in “guest” as the user name and “guest” as the password. Click on
“CONNECT”.
Your AP should now be connected. If in the future you do not want to see the dialog
box, you can edit the Bluetooth Null Connection icon found in your Network
Connections area under Windows. There should be a box under options checked stating
“prompt for name, password, etc.” if you uncheck the box then connection will occur
automatically the next time you double-click on the LAN access icon for the unit.
You may also add up to eight user accounts. For more information on user accounts,
refer to the Security section of this manual.
18
P74181_F8T030_man.qxd
1/10/03
5:34 PM
Page 19
OPERATION AND STATUS
Using a Bluetooth PDA Adapter Card (part number F8T020) or Pocket PC PDAs with
WIDCOMM stack such as HP/Compaq iPAQ:
1. Tap on the Bluetooth icon at the bottom right of the screen (icon is blue with two
opposing arrows).
2. Select “Bluetooth Manager”.
3. Tap “Search” in the bottom tool bar.
4. When the AP is found, select it in the check box and tap “Save”.
5. Tap “OK” to exit this screen.
6. Tap “OK” (top right) to exit the Search screen.
7. Tap the Belkin icon on the Bluetooth Manager screen to select it.
8. After it connects to the AP to discover the services, tap “Actions” and select
“Connect to LAN Access using…”
You are now connected to the network and may use the programs such as Microsoft
Internet Explorer for retrieving information.
19
P74181_F8T030_man.qxd
1/10/03
5:34 PM
Page 20
OPERATION AND STATUS
Using Pocket PC PDAs with Socket CF Cards
First go to the “Today” page of the Pocket PC. If the Socket software is properly
installed, and a working CF card exists in the slot, you should see a Bluetooth icon in
the lower right-hand corner.
1.
2.
3.
4.
5.
6.
Tap the icon.
Tap “Bluetooth LAN Access”.
Tap the “Find” button at the bottom.
Discovery will look and find all APs within range.
Tap the name of the AP you wish to connect to.
Tap the “Select” button, and tap the box marked “save selection for future use”.
You should then automatically be connected.
To auto-connect to this AP in the future, tap the Bluetooth icon, then “Advanced
Features”, “Bluetooth Devices”, “Tools”, “My Favorites”, “LAN Access”. Select the AP in
the “My Favorite LAP” box and check the button “Use the favorite selected above”. The
20
P74181_F8T030_man.qxd
1/10/03
5:34 PM
Page 21
OPERATION AND STATUS
Socket application will then always connect to this AP. In addition, certain applications,
such as Pocket Explorer, can be setup to automatically connect to the AP when pages
are requested.
Using Palm Handheld with SDIO Card
Find the Bluetooth icon and click on it. (You may need to have the “ALL” or “Unfiled”
category set.)
Under “Setup new connection”, click on “LAN” and follow the steps.
Step 1: Use “Bluetooth LAN” as the name or change it
Step 2: A search should come back with “Belkin_xxx”.
Step 3: Choose the AP you would like to connect to.
Step 4: Enter user name “guest” and password “guest”.
21
P74181_F8T030_man.qxd
1/10/03
5:34 PM
Page 22
OPERATION AND STATUS
To connect, simply run an application that uses LAN access, such as Eudora e-mail,
web browser, or a network. HotSync and the Palm will automatically connect to the AP.
Using PC Cards with Digianswer stacks (Toshiba, IBM, Motorola)
1.
2.
3.
4.
5.
6.
7.
8.
Set up virtual COM. ports on the laptop.
Setup direct cable connection on the laptop to use this COM port.
Run the program “Bluetooth Neighborhood” from the Digianswer Programs folder.
Discover all Bluetooth devices.
Double-click on the “Belkin” AP (to display services).
Double-click on “LAN Access using PPP”.
You may be prompted for a password, which is “roving”.
From the Start button, find the direct cable connection and run this program
(usually in “Accessories” or “Communications”).
9. Click on “Connect”.
This should establish a network connection using Bluetooth. For further information,
please refer to the Digianswer manual.
22
P74181_F8T030_man.qxd
1/10/03
5:34 PM
Page 23
OPERATION AND STATUS
Using 3Com PC Cards
Connecting to the AP using the 3COM client on a laptop involves first setting up the
client (please refer to the 3COM Bluetooth manual for this). The AP uses the “3COM
LAN Access Client”.
1. Run the “Bluetooth Connection Manager” from the 3COM Bluetooth folder.
2. Start the device discovery in this program. You should get a list of available
Bluetooth devices.
3. From the 3COM Bluetooth folder, select “3COM LAN Access Client”.
4. Use the user name “guest” and password “guest”.
5. Click on “Connect”.
6. Select the AP when you get a list of devices and click on “Connect”.
This should establish a connection with the AP and LAN connectivity to the laptop.
23
P74181_F8T030_man.qxd
1/10/03
5:34 PM
Page 24
“ M Y B OL PU E RT AO TOITOHN PALNA DC ESST”A TP UR SO G R A M
Ethernet LAN Connectivity
The AP appears as a typical IP node on the network, with support for ping, telnet, FTP
file service, and http file service.
To test the IP address setting, you can browse or ping the IP address.
To browse the AP, use the following URL: “http://x.x.x.x/” where “x.x.x.x” is the IP
address either set manually or assigned by the DHCP server.
24
P74181_F8T030_man.qxd
1/10/03
5:34 PM
Page 25
“ M Y BU LS UI NE GT OTOHTEH WP EL BA CME AS ”N APGREORG R A M
The AP can be easily managed using any web browser, including a Bluetooth connected
client browser. To access the web manager, simply browse the IP address of the unit,
or if connected via a Bluetooth client, you can alternately browse http://1.2.3.4/. The
main page appears as follows:
25
P74181_F8T030_man.qxd
1/10/03
5:34 PM
Page 26
U NUI SNISNTGA LTLHI EN GW TE HB E MSAONFATGWEARR E
On the main page you will see some useful information, such as
• Connected to: Name of the AP.
• Uptime: How long the unit has been operational since the last reboot.
• IP address: IP address of the AP that was obtained automatically via DHCP or
set manually.
• Ver: Version and date code.
The five main sections of the web manager are:
LAN: View/change network information, change and reset stored network LAN.
Bluetooth: View/change current Bluetooth settings.
USB: View USB port status, print test page.
Security: Administer Bluetooth users, set passkey, set web manager password.
Utilities: Upgrade, reboot, and restore factory settings, connectivity via ping.
26
P74181_F8T030_man.qxd
1/10/03
5:34 PM
Page 27
U NUI SNISNTGA LTLHI EN GW TE HB E MSAONFATGWEARR E
LAN
The Belkin AP allows you to automatically
obtain an IP address or set one manually.
From this page you can access TCP/IP settings
• Host Name
• IP Address
• Subnet Mask
• Router/Gateway
• DNS
• Domain
To change network settings, click or tap on the “CHANGE” button.
27
P74181_F8T030_man.qxd
1/10/03
5:34 PM
Page 28
USING THE WEB MANAGER
Use this page to view/change permanent stored settings of the unit. You can also
reset all settings to factory default values by clicking on the “RESET” button.
Reset will enable the AP to obtain an IP address automatically from the network.
IMPORTANT NOTE: Changes to these settings will
not take effect until a reboot has occurred.
28
P74181_F8T030_man.qxd
1/10/03
5:34 PM
Page 29
USING THE WEB MANAGER
Bluetooth
From this page you can view and change Bluetooth settings.
• Bluetooth Name
• Bluetooth Connections
• Data Activity
29
P74181_F8T030_man.qxd
1/10/03
5:34 PM
Page 30
USING THE WEB MANAGER
Bluetooth Status
Address: Indicates the Bluetooth device address of the
AP. Every Bluetooth device has a unique Bluetooth
Device Address (BDA).
Connections: Indicates the total number of Bluetooth
devices that are currently connected to the AP.
Link Status: Indicates the type of connection.
Packets IN: Indicates the total number of data
packets that have been received via Bluetooth.
Packets Out: Indicates the total number of data
packets that have been transmitted via Bluetooth.
Click or tap on the “SETTINGS” button to access the
Bluetooth Settings page.
30
P74181_F8T030_man.qxd
1/10/03
5:34 PM
Page 31
USING THE WEB MANAGER
Bluetooth Settings
Friendly Name: Here you may change the
Bluetooth name of your AP. The Bluetooth
name is what appears when a Bluetooth client
discovers the AP.
Max Clients: Here you may specify the
maximum number of Bluetooth clients that can
be connected to the AP at one time. The AP
supports up to seven simultaneous connections.
It is recommended that you leave two Bluetooth
connections open to allow Bluetooth printing to
an attached USB printer.
Click or tap the “CHANGE” button to apply changes.
NOTE: Changes to these settings will not take effect until a power cycle or reboot
has occurred.
31
P74181_F8T030_man.qxd
1/10/03
5:34 PM
Page 32
USING THE WEB MANAGER
USB
You can connect up to two USB printers and print to them via Bluetooth or the (wired)
LAN. If you have two USB printers connected to the AP, both may be accessed via
Bluetooth only. The wired LAN will only have access to the USB printer connected to
the lower USB port.
From this page you can view the current status of your USB port.
• Device Type
• Active State
Click or tap on printer test page to
print a test page from the connected
USB printer. You will be prompted to
select a printer type. Select the printer
type for your specific printer. Consult
your printer’s user manual if you do not
know the printer type.
32
P74181_F8T030_man.qxd
1/10/03
5:34 PM
Page 33
USING THE WEB MANAGER
Security
The AP can be configured as an open box, whereby all users have access with a common
user name and password. The default user name is “guest” and the default password is
“guest”. Stronger security can also be implemented where users and their unique passwords
are created. In addition, Bluetooth devices can utilize the passkey mechanism, which
is an additional password that must be used each time a connection is made. This
passkey defaults to “belkin” but can be changed as required.
From the security page you can manage
security settings for the following:
• Bluetooth Users
• Bluetooth Passkey
• Web Manager (Administrator) Password
33
P74181_F8T030_man.qxd
1/10/03
5:34 PM
Page 34
USING THE WEB MANAGER
Bluetooth Users
You may create up to eight users with
individual passwords. This feature is
disabled by default.
• Show Users
• Add/Change User
• Delete User
• Set User Mode
34
Show Users: Lists the users name and
password for each created user account.
P74181_F8T030_man.qxd
1/10/03
5:34 PM
Page 35
USING THE WEB MANAGER
Add/Change User: Use this to add a new
user or to edit a user name and password.
Delete User: Delete a user account.
Type the name of the user you wish to
delete in the user name text box. Click or
tap on the “DELETE” button.
Type the user name and password in the
provided text box. Click or tap on the
“UPDATE” button to submit changes.
35
P74181_F8T030_man.qxd
1/10/03
5:34 PM
Page 36
USING THE WEB MANAGER
Set User Mode: This feature allows you to
enable or disable user mode.
By default, this feature is set to “OFF”.
Click or tap on the “ON” radio button to
enable this feature. Click or tap on the
“OFF” radio button to disable.
NOTE: Changes to these settings will not
take effect until a reboot has occurred.
36
Passkey:
Some Bluetooth clients require the use
of a passkey to establish a bond to the
connected device. The default passkey for
the AP is “belkin”. You may use the
“Change BT Passkey” page to enter a new
Bluetooth passkey.
P74181_F8T030_man.qxd
1/10/03
5:34 PM
Page 37
USING THE WEB MANAGER
Web Manager
You may enable the web manager authentication to provide protection against unwanted
access to the web interface on the address http://1.2.3.4. When enabled, the user
attempting to access the web manager will be prompted to enter a user name and
password before you can access the web manager interface. Use the field provided to
specify a password.
Note: You are not required to enter a user
name. The default setting for this feature
is “OFF”.
Note: Once you change the password (and
enable the web manager security), you will
need to remember this password before
accessing the web manager in the future.
Please DO NOT FORGET this password.
37
P74181_F8T030_man.qxd
1/10/03
5:34 PM
Page 38
USING THE WEB MANAGER
Utilities
Upgrading The AP Firmware: Web Manager
The AP supports firmware update via http from any web server. Browse the IP address,
then select “Utilities”, then “Upgrade” pages. You should see a page showing the
current release in the unit and a URL pointing to www.belkin.com/support/F8T030.sw.
This location contains the most recent firmware. To upgrade, click on the “UPGRADE”
button. This may take a few minutes depending on the speed of your Internet/LAN
connection. When upgrade is finished, a screen will display status.
VERY IMPORTANT NOTE: Do not interrupt the
upgrade process or reboot the AP. Interruption may
cause irreparable damage to the AP. Wait until you
see a status page appear that confirms the
upgrade was successful.
Click on the “Special” button to choose an
upgrade file from a different location.
38
P74181_F8T030_man.qxd
1/10/03
5:34 PM
Page 39
USING THE WEB MANAGER
Rebooting the AP
After an upgrade completes, you will need to reboot the unit by cycling power or
clicking the “REBOOT” button.
NOTE: Once the REBOOT button is clicked,
you will lose all network and Bluetooth
connections, including the web manager.
Some clients may require a reset.
39
P74181_F8T030_man.qxd
1/10/03
5:34 PM
Page 40
USING THE WEB MANAGER
Factory Reset
Use this option to revert all settings
of your AP back to the factory
presets. See the “Default Settings”
section for a complete list of
default values.
Net Ping Test
You may check network connections
manually by “pinging” a known
server or IP address. You may ping
a host to verify network connections
and network speed.
40
P74181_F8T030_man.qxd
1/10/03
5:34 PM
Page 41
BLUETOOTH TO USB PRINTING
The AP contains two external USB host ports. A USB-enabled printer can be attached
to either port and serviced from the AP.
Note: You must add a printer, as a “Local Printer” (NOT Network Printer), and select
the “Bluetooth Serial PORT” as its port.
The method of connecting to the printer is
to use Serial Port Profile. For example, if
using a Bluetooth PC Card from Belkin
(part number F8T002) (WIDCOMM stack)
on Windows, simply:
1. Browse the device under “My Bluetooth
Places” and you should see an icon
titled “Virtual [USB Printer]”.
41
P74181_F8T030_man.qxd
1/10/03
5:34 PM
Page 42
BLUETOOTH TO USB PRINTING
2. Double-click on this icon. A connection via Serial Port Profile over the virtual COM
port will be created. This is usually “COM3” or “COM4” but can be configured to
another port.
3. Go to “Control Panel” and open the “Printers” folder.
4. Select the printer you have pre-installed that matches the printer that is connected
to the AP.
42
P74181_F8T030_man.qxd
1/10/03
5:34 PM
Page 43
BLUETOOTH TO USB PRINTING
5. Under the “Ports” section, attach the printer to the virtual COM port created.
6. You should now be ready to print to your
USB printer that is connected to the AP
via Bluetooth.
NOTE: Each time you would like to print via
the AP, you will have to double-click on the
“Virtual [USB Printer]” icon first to make a
connection, unless you set the printer you
created above to be your default printer. In
that case, the PC stack will automatically send
the print job via the virtual COM port.
43
P74181_F8T030_man.qxd
1/10/03
5:34 PM
Page 44
LAN PRINTING
Configuring your Network Settings
In order to connect to the Internet, your AP needs an IP address. Typically these are
provided to the AP by a DHCP server.
The AP is set to obtain an IP address from the Ethernet via DHCP. However, it is
possible for you to pre-configure a fixed IP address into the AP. This can be done
via the web manager using the Bluetooth interface (refer to the user manual for
more information).
Software Installation
Requirements:
• Windows 98 SE, Me, 2000, XP
• Computer must be connected to the same Local Area Network as the AP
• Computer must have the appropriate printer driver installed
44
P74181_F8T030_man.qxd
1/10/03
5:34 PM
Page 45
LAN PRINTING
Installing the Software
1. Insert the USB Print Server Utility CD-ROM in the computer you wish to print from.
2. Click on the “Setup.exe” file.
3. You should see the following appear on your screen. Click on the “Next” button to
begin the installation process.
45
P74181_F8T030_man.qxd
1/10/03
5:34 PM
Page 46
LAN PRINTING
4. Once the software installation is complete, you will receive a message confirming
the installation process.
46
P74181_F8T030_man.qxd
1/10/03
5:34 PM
Page 47
CONFIGURING YOUR PRINTER
Note: You must add a printer, as a Local Printer (NOT a Network Printer), and select
the port “Belkin” as its port.
1. Go to the Control Panel and open the “Printers” folder.
2. Select the printer that is connected to the AP.
3. Select “File” then “Properties” from the menu.
(You may also right-click on the printer and select
“Properties”).
4. Under the Ports tab, you will see a list of ports
that are installed on your computer. Highlight the
port named "Belkin" and click on "Configure Port".
47
P74181_F8T030_man.qxd
1/10/03
5:34 PM
Page 48
CONFIGURING YOUR PRINTER
5. Click on “Locate Servers”.
6. You will see the server "BELKIN_xxx". Select it by clicking on it.
7. Click “OK”, and then close the “Print Server Properties” window.
8. Your networked computer is now ready to print.
48
P74181_F8T030_man.qxd
1/10/03
5:34 PM
Page 49
D E FA U LT S E T T I N G S
The following are the default settings for the device:
• Bluetooth – Enabled
• USB – Enabled
• IP Address – Obtained via DHCP (not static)
• Bluetooth Passkey – Belkin
• Bluetooth first client address assigned: 192.168.222.222
• Number of PPP sessions: 5
• Serial Port Profile: Data sent to printer
• Admin Password – Belkin
• Guest Login for LAN Access over PPP – No security
• SNMP – Disabled
49
P74181_F8T030_man.qxd
1/10/03
5:34 PM
Page 50
TROUBLESHOOTING
I can connect to the AP but I cannot connect to external web pages.
Verify the following:
1. The Ethernet cable is properly connected to the AP unit. The LAN LED of the AP
should be on. If it is not on, then the device is not properly connected to the hub.
Please get a proper cable and plug it into a hub port.
2. Connect to the AP home page (http://1.2.3.4) and go to the status page where you
should see the following information:
a) IP address
b) Default Router/Gateway
c) DNS server
All these need to be something other than 0.0.0.0. Otherwise, you need to set these
either manually or using DHCP.
3. Check how fast the system LED is blinking. If it is blinking rapidly (three times per
second), then the AP unit has not acquired its IP address.
50
P74181_F8T030_man.qxd
1/10/03
5:34 PM
Page 51
TROUBLESHOOTING
If you have set the IP address manually:
• You may not have a set a default router (default gateway).
• You may not have set a DNS server.
Go back to the AP home page (http://1.2.3.4 if using Bluetooth client to configure)
and select the Configuration page. On this page, set the default router and the
DNS server(s).
If you have a DHCP server [such as a NAT box] on your network to give the AP an IP
address, then you may have one of these problems:
• The DHCP server is not responding to the AP’s requests.
• The DHCP server is not supplying the DNS server or the default router.
51
P74181_F8T030_man.qxd
1/10/03
5:34 PM
Page 52
TROUBLESHOOTING
What devices can I connect to the USB?
The currently supported devices are USB printers.
I get disconnected from the AP after a while.
Some clients such as PDAs and laptops disconnect automatically if the connection is
idle for a while. You will need to change the dial-up networking settings on your PDA
or laptop.
The system LED on the AP stopped flashing.
This is due to some internal errors in the AP. The AP is designed to clear many of
these errors and reset itself. However, it may need to be reset (by a power cycle).
When using Bluetooth, I cannot discover the AP from a client.
Sometimes you have to try discovery multiple times if the time period for the discovery
is too short. If you have a changeable device discovery time, try to use at least a
10-second discovery period.
52
52
P74181_F8T030_man.qxd
1/10/03
5:34 PM
Page 53
TROUBLESHOOTING
I can browse IP addresses (such as the built-in 1.2.3.4) but cannot access web
pages using “www” address names.
The DNS is probably not being set properly. Perhaps the DNS server address entered is
not valid, or one was not received if DHCP was used. One way to guarantee DNS will
work is to enter an address manually into the AP. For testing, use the Belkin DNS
server address, this server is generally available. The address is 207.217.126.81.
53
P74181_F8T030_man.qxd
1/10/03
5:34 PM
Page 54
C O M PAT I B I L I T Y L I ST
Belkin has tested the AP and found it to be compatible with these Bluetooth
clients/products:
USB Adapters
Bluetooth USB Adapter from Belkin, Class 1, part number F8T001
Bluetooth USB Adapter from Belkin, Class 2, part number F8T003
PC Cards
Bluetooth PC Card from Belkin, part number F8T002
Digianswer stack Release 1.09 on Windows 2000, 98, 95, Me, XP, Toshiba, Motorola,
and IBM Bluetooth cards
3Com Bluetooth PC card
PC cards and USB adapters with WIDCOMM stack 1.2 and higher
54
P74181_F8T030_man.qxd
1/10/03
5:34 PM
Page 55
C O M PAT I B I L I T Y L I ST
Pocket PC 2000 PDAs
Compaq iPAQ with Bluetooth PDA Adapter Card from Belkin (part number F8T020)
Compaq iPAQ with Socket CompactFlash Bluetooth card
Pocket PC 2002 PDA
Compaq iPAQ H3800 with built-in Bluetooth
HP Jornada with Socket CompactFlash Bluetooth card
Casio Pocket PC
Toshiba 570 with Socket CompactFlash Bluetooth card
Laptops with Integrated Bluetooth
Toshiba Protégé
Palm Devices
All Palm OS version 4.1 or greater with SDIO card
55
P74181_F8T030_man.qxd
1/10/03
5:34 PM
Page 56
CONFIGURATION NOTES
BDA Address
IP Address
Netmask
Router
DNS
Host Name
Passkey
56
P74181_F8T030_man.qxd
1/10/03
5:34 PM
Page 57
INFORMATION
DECLARATION OF CONFORMITY WITH FCC RULES FOR
ELECTROMAGNETIC COMPATIBILITY
We, Belkin Corporation, of 501 West Walnut Street, Compton, CA 90220, declare under our sole
responsibility that the product,
F8T030
to which this declaration relates, complies with Part 15 of the FCC Rules. Operation is subject to the
following two conditions: (1) this device may not cause harmful interference, and (2) this device must
accept any interference received, including interference that may cause undesired operation.
Caution: Exposure to Radio Frequency Radiation.
The radiated output power of this device is far below the FCC radio frequency exposure limits. Nevertheless, the
device shall be used in such manner that the potential for human contact normal operation is minimized.
When connecting an external antenna to the device, the antenna shall be placed in such a manner to minimize
the potential for human contact during normal operation. In order to avoid the possibility of exceeding the FCC
radio frequency exposure limits, human proximity to the antenna shall not be less than 20cm (8 inches) during
normal operation.
Federal Communications Commission Notice
This equipment has been tested and found to comply with the limits for a Class B digital device, pursuant to Part
15 of the FCC Rules. These limits are designed to provide reasonable protection against harmful interference in a
residential installation.
57
P74181_F8T030_man.qxd
1/10/03
5:34 PM
Page 58
INFORMATION
This equipment generates, uses, and can radiate radio frequency energy. If not installed and used in accordance with
the instructions, it may cause harmful interference to radio or television reception, which can be determined by
turning the equipment off and on, the user is encouraged to try and correct the interference by one or more of the
following measures:
• Reorient or relocate the receiving antenna.
• Increase the distance between the equipment and the receiver.
• Connect the equipment to an outlet on a circuit different from that to which the receiver is connected.
• Consult the dealer or an experienced radio/TV technician for help.
Modifications
The FCC requires the user to be notified that any changes or modifications to this device that are not expressly
approved by Belkin Corporation may void the users authority to operate the equipment.
Canada-Industry Canada (IC)
The wireless radio of this device complies with RSS 139 & RSS 210 Industry Canada. This Class B digital complies with
Canadian ICES-003.
Cet appareil numérique de la classe B conforme á la norme NMB-003 du Canada.
Europe-European Union Notice
Radio products with the CE 0560 or CE alert marking comply
with the R&TTE Directive (1995/5/EC) issued by the Commission
of the European Community.
58
0560
P74181_F8T030_man.qxd
1/10/03
5:34 PM
Page 59
INFORMATION
Compliance with this directive implies conformity to the following European Norms
(in brackets are the equivalent international standards).
• EN 60950 (IEC60950) – Product Safety
• EN 300 328 Technical requirement for radio equipment
• ETS 300 826 General EMC requirements for radio equipment.
To determine the type of transmitter, check the identification label on your Belkin product.
0560
Products with the CE marking comply with the EMC Directive (89/336/EEC) and the Low Voltage
Directive (72/23/EEC) issued by the Commission of the European Community. Compliance with
these directives implies conformity to the following European Norms (in brackets are the
equivalent international standards).
• EN 55022 (CISPR 22) – Electromagnetic Interference
• EN 55024 (IEC61000-4-2,3,4,5,6,8,11)- Electromagnetic Immunity
• EN 61000-3-2 (IEC610000-3-2) - Power Line Harmonics
• EN 61000-3-3 (IEC610000) – Power Line Flicker
• EN 60950 (IEC60950) – Product Safety
Products that contain the radio transmitter are labeled with CE 0560 or CE alert marking and may
also carry the CE logo.
59
P74181_F8T030_man.qxd
1/10/03
5:34 PM
Page 60
INFORMATION
Belkin Corporation Limited One-Year Product Warranty
Belkin Corporation warrants this product against defects in materials and workmanship for its warranty period. If a
defect is discovered, Belkin will, at its option, repair or replace the product at no charge provided it is returned
during the warranty period, with transportation charges prepaid, to the authorized Belkin dealer from whom you
purchased the product. Proof of purchase may be required.
This warranty does not apply if the product has been damaged by accident, abuse, misuse, or misapplication; if the
product has been modified without the written permission of Belkin; or if any Belkin serial number has been removed
or defaced.
THE WARRANTY AND REMEDIES SET FORTH ABOVE ARE EXCLUSIVE IN LIEU OF ALL OTHERS, WHETHER ORAL OR
WRITTEN, EXPRESSED OR IMPLIED. BELKIN SPECIFICALLY DISCLAIMS ANY AND ALL IMPLIED WARRANTIES, INCLUDING,
WITHOUT LIMITATION, WARRANTIES OF MERCHANTABILITY AND FITNESS FOR A PARTICULAR PURPOSE.
No Belkin dealer, agent, or employee is authorized to make any modification, extension, or addition to this warranty.
BELKIN IS NOT RESPONSIBLE FOR SPECIAL, INCIDENTAL, OR CONSEQUENTIAL DAMAGES RESULTING FROM ANY BREACH
OF WARRANTY, OR UNDER ANY OTHER LEGAL THEORY, INCLUDING BUT NOT LIMITED TO, LOST PROFITS, DOWNTIME,
GOODWILL, DAMAGE TO OR REPROGRAMMING, OR REPRODUCING ANY PROGRAM OR DATA STORED IN, OR USED WITH,
BELKIN PRODUCTS.
Some states do not allow the exclusion or limitation of incidental or consequential damages or exclusions of implied
warranties, so the above limitations of exclusions may not apply to you. This warranty gives you specific legal rights,
and you may also have other rights that vary from state to state.
60
P74181_F8T030_man.qxd
1/10/03
5:34 PM
Page 62
belkin.com
Belkin Corporation
501 West Walnut Street
Compton • CA • 90220 • USA
Tel: 310.898.1100
Fax: 310.898.1111
Belkin Components, Ltd.
Express Business Park
Shipton Way • Rushden • NN10 6GL
United Kingdom
Tel: +44 (0) 1933 35 2000
Fax: +44 (0) 1933 31 2000
Belkin, Ltd.
7 Bowen Crescent • West Gosford
NSW 2250 • Australia
Tel: +61 (0) 2 4372 8600
Fax: +61 (0) 2 4372 8603
Belkin Tech Support
US: 310.898.1100 ext. 2263
800.223.5546 ext. 2263
Europe: 00 800 223 55 460
Australia: 1800 666 040
P74181
© 2003 Belkin Corporation. All rights reserved. All trade names are registered trademarks of respective manufacturers listed.
The Bluetooth name and the Bluetooth trademarks are owned by Bluetooth SIG, Inc., and are used by Belkin Corporation under license.