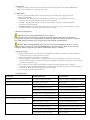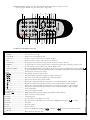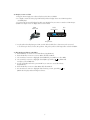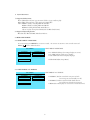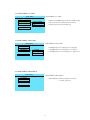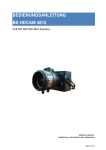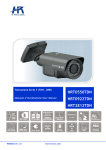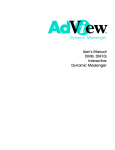
1
HDD PLAYER
User’s Manual
HDP1 Player
CONTENTS
1. Introductions ...................................................................................................................... 3
1.1 HDP1 Player ................................................................................................................... 3
2. Warnings and Suggestions ...................................................................................................
2.1 Safety Precautions ...........................................................................................................
2.2 Troubleshooting .............................................................................................................
2.3 Warranty .........................................................................................................................
3
3
3
4
3. System Requirements .......................................................................................................... 4
4. Operation Guide ..................................................................................................................
4.1 Ports and Buttons Overview ...........................................................................................
4.2 Remote Control .............................................................................................................
4.3 Remote Control Button Overview .................................................................................
4.4 Content Transfer ............................................................................................................
4.5 Display Content Via AV .................................................................................................
4.6 Display Content Via VGA ..............................................................................................
4.7 Background Music with JPEG's ......................................................................................
4
4
5
5
6
6
7
7
System Parameters ..............................................................................................................
5.1 Parameter Settings ...........................................................................................................
5.3.1 SETUP MENU— MAIN MENU ................................................................................
5.3.2 SETUP MENU—TV DISPLAY ..................................................................................
5.3.3 SETUP MENU—TV TYPE .......................................................................................
5.3.4 SETUP MENU—OSD LANG ...................................................................................
5.3.5 SETUP MENU—EXIT SETUP .................................................................................
8
8
8
8
9
9
9
5.
6. Specifications ....................................................................................................................... 10
Parts Inventory Check List
1.
2.
3.
4.
5.
HDP1 Player
Remote Control
DC5.0V/2.0A power supply
AV Cable (4.0ft)
USB 2.0 Cable
2
1. Introductions
This user’s manual covers operational instructions and technical specifications for Adview HDP1 Player.
Please read it carefully prior to turning on the unit.
1.1 HDP1 Player
This is no ordinary hard disk player. This unit has been custom designed for digital signage and
has these special features.
1. Auto start - The player will start automatically when powered up. It will display through either
VGA or Composite ports depending on which port was last used.
2. Content - The player will only play content in "Active" Folder. Content in other folders will be
ignored for automatic playback.
3. Automatic Looping - The player will continuously loop content in "Active" folder unless play is stopped
by using the remote control or by pressing stop button on player.
2. Warnings and Suggestions
Warning: Before disconnecting HDP1 player from computer.
Please properly remove unit from the computer before disconnecting the USB cable, to avoid data loss
or freezing the computer. Never simply pull out the USB cable, always disconnect properly from computer by
first double clicking on hardware icon in system tray and then clicking on STOP button.
Warning: Before unplugging HDP1 player from power supply press STOP button on player or remote
control, if unit is in play mode . Then press POWER button on remote control. Player can now be safely
unplugged. Failure to follow these procedures could result in damage to hard drive.
2.1 Safety precautions
1. Fragile handle unit with care. This unit has a hard disk that is delicate and needs to be treated with more
care than the average consumer electronics product.
2. Keep unit away from liquids, vapors or magnetism.
3. Adequate ventilation is essential for proper functioning of the hard disk player. Do not place unit in any
enclosure without air flow. The player generates heat and requires ventilation, damage can occur if excessive
heat builds up within the unit.
4. Do not place unit in areas with, direct sunlight, excessive heat, high humidity, shock or vibration.
5. Never disassemble or perform self-maintenance and repair. Have a qualified technician perform all product
maintenance. Warranty will be void if the unit is disassembled.
6. Use only approved power adapter with unit.
2.2 Troubleshooting
SYMPTOM
POSSIBLE REASON
RESOLUTION
No power
Power cable connection problem
Verify DC adapter is plugged in at both ends
Power on, but unit doesn't work properly
Player may need to be reset
Restart player
No picture
Player not connected to DC power adapter
Plug DC adapter into input jack on player
Display output setting is incorrect
On remote press VGA/TV button
Video cable not connected securely to unit
Connect video output cable securely to unit
Content format not supported by player
Use formats supported by player, see manual
No Volume
Audio cable not connected properly
Reconnect audio cable per manual
Pictures rolling up or poor quality
Player set to incorrect TV or display format
Access Setup Menu, select correct format
Media content of poor quality
Recreate or use different content
Battery is dead or low output
Install two new triple AAA batteries
Batteries not installed correctly
To great a distance or bad angle from unit
Reinstall batteries per imprint inside bay
Distance: Within 23 ft. Angle: +/- 30 o
Obstacle between remote and unit
Remove obstacle
Remote control doesn't work
3
2.3 Warranty
Our warranty does not cover the following:
1. Removed or altered serial number label
2. Damage as a result of natural disasters
Disasters such as floods, fires, winds, earthquakes or lightening
3. Misuse or abuse, any modification or alternation
Improper installation or maintenance
Used with an unauthorized accessory
3. System Requirements
1. Hard disk format - This unit is formatted under FAT32 and can have a maximum patition
size of 32 Giga bytes.
2. Supported operating systems - Windows XP, Windows 2000, Windows ME, etc.
3. Power supply - This unit requires 2 amps at 5.6 volts. Some USB devices may not have adequate
current and will result in the hard disk making a continuous ticking noise when connected to these
devices via USB. Under these conditions , plug in the power supply to the jack attached to the USB
cable supplied with this unit. If a USB hub is being used make sure to use one which has it own power.
4. Operation Guide
4.1 Port and Button Overview
Ports
1.
3.
2.
4.
1. AV Output
Audio/Video Signal Output Socket
2. VGA Output
VGA Output Socket
3. USB2.0 Input/Output USB Cable Connection Input/Output
4. DC Input
DC Power Supply Input Jack
Buttons
1.
2.
3.
4.
5.
1. Play/Enter
Playback/Pause
2. Stop
Stop Play
3. Volume +/-
Raise or Lower Volume
4. Skip --
Skip to Previous Media File
5. Skip +
Skip to Next Media File
4
4.2 Remote Control - Please insert two AAA batteries (included) before use. Remote control
o
operation range: Within 23 ft. from front panel , angle <=60 .
6.
3.
4.
2.
1.
16.
10.
9.
15.
11.
7.
5.
18.
17.
8.
22.
21.
13.
12.
14.
26. 30.
25. 29.
19. 23. 27.
20. 24. 28.
4.3 Remote Control Button Overview
HDP1 Player Function
KEY
1. POWER .................................. Turns the unit on or off
2. OSD/EDIT .............................. OSD (On Screen Display) On/Off
3. VGA/TV .................................. Output via either VGA or AV port on back of player
4. DIR ........................................... Not Functional, as "Active" target directory is already set
5. Number Keys ......................... Press appropriate number key to play that file, as listed in "Active" directory
6. REPEAT .................................. To play media once in Disc, Single, Folder, or repeat in Rep_Disc, Rep_Single, Rep_Folder modes
7. L/R ......................................... To output audio in Stereo, Mono Left or Mono Right modes
8. PHOTO/DIGEST ................... Press it while playing JPEG's to access Photo Digest, use arrow keys to highlight file, then press Play/
9. A-B ........................................... To repeat playback in movies (Normal Operation), Select MP3 for Background music (Signal Menu)
10. PSM .......................................... Change photo transitions, 12 options
11.
. ...................................... Play next file as listed in "Active" folder
12.
........................................ Fast forward music and movie playback up to 8X normal speed
13.
...................................... Fast reverse music and movie playback up to 8X normal speed
14.
...................................... Play previous file as listed in "Active" folder
15.
........................................... Rotate photo images (Normal operation) Press to move left (Setup Menu or Photo Digest)
16.
........................................... Flip photo images (Normal operation) Press to move up (Setup Menu or Photo Digest)
17. ............................................... Rotate photo images (Normal operation) Press to move right (Setup Menu or Photo Digest)
18.
............................................. Flip photo images (Normal Operation) Press to move down (Setup Menu or Photo Digest)
19. SETUP .................................... Access Setup Menu
20. CLEAR/EQ ............................ Turn audio equalizer On/Off
.............................. Playback (Normal Operation) or Enter (Setup Menu or Photo Digest)
21. PLAY /
22. GOTO .................................... Show movie title and elapsed time.
23. LANG .................................... Change language.
24. SLOW .................................... To slow motion movie playback up to 8X
25. STOP ..................................... Stop play and access file library, press arrow keys to highlight file and Play /
key to select
26. PAUSE ................................... Pause play
27. VOL - ..................................... Decrease volume
28. VOL + .................................. Increase volume
to increase or
to decrease zoom when turned on
29. ZOOM ................................. Turn Zoom (Enlarge) On/Off, use
30. MUTE ................................. Mute volume on files with audio
5
4.4 Content Transfer
1. DC Power supply must be unplugged from HDP1 player.
2. Connect USB 2.0 jack into USB Input/Output port on back of HDP1 player.
3. Connect other USB jack into USB port on computer, it may be located
in the front or back.
USB 2.0
Port
USB 2.0
Jack
USB
Port
DC Power
Supply Jack
USB Jack
4. Once player is connected to computer, double left click on My Computer icon and
drives will be listed. Player will appear as,
ADVIEW (G:), with drive letter
assignment determined by computer. Double left click on removable disk drive to see
ACTIVE folder. Double left click on
ACTIVE folder to open, content can now
be copy/pasted or dragged/dropped into folder. Content will play in numerical order
or alphabetical order, with numerical taking precedence, when both types are present.
5. Some USB devices may not have adequate current and will result in the hard disk
making a continuous ticking noise when connected to these devices via USB. Under
these conditions , plug in the DC power supply to the DC power supply jack attached to
the USB cable (Included) with this unit. If a USB hub is being used make sure to use
one which has it own power.
4.5 Display Content via AV
1. Plug DC Power Supply into outlet and jack into DC Port on HDP1.
2. To display content via A/V, using AV Cable (Included), plug 3.5 mm stereo jack into A/V
Onput Port in HDP1.
3. Plug video (Yellow) composite jack into Video In, on input device. Then plug audio (Red/White)
composite jacks into Audio In, on input device.
4. If content was previously displayed via VGA, press VGA/TV key on remote to switch to TV Output.
5. Make sure input source on input device is set to Video.
Audio
Jacks
AV Output
Port
3.5mm
Stereo Jack
Video
Jack
6
DC
Port
4.6 Display Content via VGA
1. Plug DC Power Supply into outlet and jack into DC Port on HDP1.
2. To display content via VGA, plug VGA Cable Jack from display device into VGA Output Port
on HDP1player.
3. If content was previously displayed via AV, press VGA/TV key on remote to switch to VGA Output.
4. Make sure input source on display device is set for VGA.
VGA
Cable Jack
VGA
Output Port
DC
Port
AV
Output Port
5. To play audio when displaying via VGA, use AV cable (included) or 3.5mm stereo jack connected
to an audio input device, such as, PC speakers. Plug stereo jack into AV Output Port on back of HDP1.
4.7 Play Background Music with JPEG's
1. Press STOP key on remote to access File Library (Signal Menu).
2. Press GOTO key on remote to turn on Music Slide Show Mode.
3. Use arrow keys on remote to highlight desired MP3 file, press A-B key to select MP3.
4. Use arrow keys on remote to highlight desired JPEG, press Play /
key, JPEG's will
now play to selected MP3 file.
5. To turn off background music, press STOP key on remote to access File Library
(Signal Menu).
6. Press GOTO key on remote to Exit Music Slide Show Mode.
7. Use arrow keys on remote to highlight desired starting content, press Play /
key,
JPEG's will now play without background music.
7
5. System Parameters
5.1 Supported File Formats
Photo: JPEG (file must have *.jpg extension. If left as *.jpeg it will not play)
Music: MP3 ( file must have *.mp3 extension); CD-DA files
Video: MPEG 1 (VCD), including MPG & DAT files
MPEG 2 (DVD), including MPG & VOB files
MPEG4 including DIVX, DVX & AVI files etc.
*(Does not play uncompressed AVI (Video for Windows) format)
5.2 Supported Operating Systems
Windows XP / Windows ME / Windows 2000 etc.
5.3 HDP1 SETUP MENU
5.3.1 SETUP MENU—MAIN PAGE
To access settings press SETUP key on remote control. On remote use arrows to move around screen and
button to make selections.
PLAY /
SETUP MENU—MAIN PAGE
SETUP MENU
TV DISPLAY
TV TYPE
OSD LANG
NORMAL/PS
NORMAL/LB
WIDE
• TV DISPLAY (Change how images display on screen)
• TY TYPE (Change signal sent to display)
• OSD LANG (On Screen Display Language)
EXIT SETUP
• EXIT SETUP (Exit Setup Menu)
5.3.2 SETUP MENU—TV DISPLAY
SETUP MENU
TV DISPLAY
TV TYPE
OSD LANG
SETUP MENU—TV DISPLAY
NORMAL/PS
NORMAL/LB
WIDE
• NORMAL /PS (On normal TV some parts of wide
screen image are automatically cut off)
• NORMAL /LB (On normal TV black bands show at
top and bottom of wide screen images)
• WIDE (Select when player is connected to a wide screen TV)
EXIT SETUP
8
5.3.3 SETUP MENU—TV TYPE
SETUP MENU—TV TYPE
SETUP MENU
TV DISPLAY
TV TYPE
OSD LANG
• MULTI. SYSTEM (Supports NTSC and PAL signals)
• NTSC (Dominant standard in United States)
• PAL (Dominant standard in Europe)
MULTI. SYSTEM
NTSC
PAL
EXIT SETUP
5.3.4 SETUP MENU—OSD LANG
SETUP MENU
TV DISPLAY
TV TYPE
OSDOSD
LANG
OSD LANG
EXIT SETUP
SETUP MENU—OSD LANG
• ENGLISH (On Screen Displays are in English)
• CHINESE (On Screen Displays are in Chinese)
• CHINESE F (On Screen Displays are in Chinese F)
ENGLISH
CHINESE
CHINESE F
5.3.5 SETUP MENU—EXIT SETUP
SETUP MENU
SETUP MENU—EXIT SETUP
TV DISPLAY
TV TYPE
OSD LANG
• EXIT SETUP (To Exit Setup Menu and return
to normal operation)
EXIT SETUP
9
7. Specifications
HDP1
Power Supply
DC 5.6V
Power Consumption
800MA
Video System
Auto/NTSC/PAL
Dimension
132X80X19mm
Weight
215g
Playable Program Formats
MPEG4, DVD, SVCD, VCD, JPEG, MP3, CD-DA
Video Output
1Vp-p +/-0.1 (75ohm)
Audio Output
2.0 Vrms +/-0.3V
Frequency Response
20Hz - 22kHz
S/N Ratio
>=90dB (1kHz 0dB)
Features of Audio Signal Output Dynamic Range
>=80dB (1kHz 0dB)
THD
0.04%
Audio Distortion
Lower than test level
Cross-talk
>=80dB (1kHz 0dB)
Hard Disk
2.5 inch, 20Gb, 40Gb, 80Gb
Remote Control System
Infrared Pulse, DC 3V, Button Battery
10