1
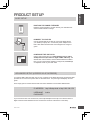
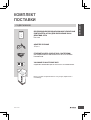
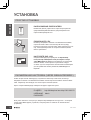
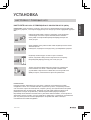
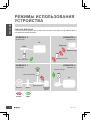
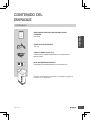
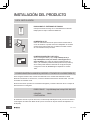
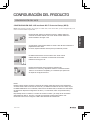
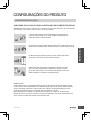
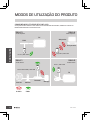
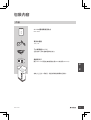
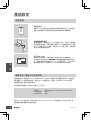
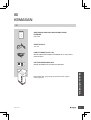
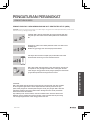
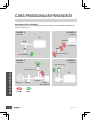
WIRELESS AC1200 DUAL BAND GIGABIT
RANGE EXTENDER
DAP-1650
QUICK
INSTALLATION
GUIDE
КРАТКОЕ РУКОВОДСТВО ПО УСТАНОВКЕ
GUÍA DE INSTALACIÓN RÁPIDA
GUIA DE INSTALAÇÃO RÁPIDA
快速安裝指南
PETUNJUK PEMASANGAN CEPAT
ENGLISH
CONTENTS OF
PACKAGING
CONTENTS
WIRELESS AC1200 DUAL BAND GIGABIT RANGE
EXTENDER
DAP-1650
POWER ADAPTER
12V / 2A
ETHERNET CABLE (CAT5 UTP)
CONNECT THE RANGE EXTENDER TO YOUR PC DURING
SETUP
Wi-Fi Configuration Note
WI-FI CONFIGURATION NOTE
CONTAINS THE DEFAULT WI-FI INFORMATION
If any of these items are missing from your packaging, contact
your reseller.
2
DAP-1650
ENGLISH
PRODUCT SETUP
EASY SETUP
POSITION THE RANGE EXTENDER
Place the range extender in an open area of your intended work
area for better wireless coverage.
CONNECT TO YOUR PC
Use the included Ethernet cable to connect the DAP-1650 to
your desktop or laptop PC. Connect the power adapter to the
DAP-1650. Wait until the Power LED changes from orange to
green.
CONFIGURE THE DAP-1650
Login
User Name xxxx
Password
Open a web browser and go to http://dlinkap.local (or http://
dlinkapxxxx.local (the last four digits of MAC address)). The
default User name is Admin, and the default Password is blank.
Now you can use the setup wizard to configure AP, MediaBridge
or Repeater mode on your DAP-1650.
ADVANCED SETUP (ACCESS VIA IP ADDRESS)
To configure DAP-1650 manually connect your computer to the DAP-1650 using the ethernet cable
provided. Then connect the power cable on the DAP-1650. The power light will display as solid
green.
Then simply open a browser window and enter the IP address in the browser address field:
IP ADDRESS:
http://dlinkap.local or http://192.168.0.50
USERNAME: Admin
PASSWORD:
If you have more than one Access Point, enter http://dlinkapxxxx.local (the xxxx are the last four
digits of the AP’s MAC address which is located on the bottom of the device in the label).
DAP-1650
3
ENGLISH
PRODUCT SETUP
WPS SETUP
SET UP DAP-1650 USING Wi-Fi PROTECTED SETUP (WPS)
NOTE: To extend the Wi-Fi network in your home using the DAP-1650 WPS feature
please make sure the source router or AP also features WPS.
Plug the DAP-1650 into a wall outlet and wait until the power LED is
solid green. Push the WPS button on the source wireless router or
AP.
Next, push the WPS button on the DAP-1650. The LED will start to
flash green.
Please allow up to two minutes for the process to finish.
The power LED will turn solid green when the DAP-1650 has
connected successfully to the source wireless router or AP.
The DAP-1650 is now ready to share the extended
Wi-Fi network with your PCs and mobile devices. Connect to the
DAP-1650 using the network name (SSID) and password printed
on your Wi-Fi Configuration Card.
NOTE:
The DAP-1650 can be further configured using the web GUI. After you have plugged
the DAP-1650 into a wall outlet and the power LED is solid green, go to the wireless
utility on your computer, select the DAP-1650 network, and enter the password (this
is on your Wi-Fi Configuration Card). Then open a web browser and type
http://dlinkap.local. By default, the username is Admin, and the password field
should be left blank. Please refer to the product manual for further information on
configuring the DAP-1650 using the web GUI.
4
DAP-1650
ENGLISH
PRODUCT USAGE MODES
HOW IT WORKS
You can select to use the 1650 in AP or BRIDGE or REPEATER mode by using the web interface.
ROOM 3
ROOM 4
Top Floor
Top Floor
TV
Adapter
DVR
Computer
DAP-1650/Repeater
DAP-1650/Bridge
ROOM 1
ROOM 2
Bottom Floor
Bottom Floor
DAP-1650/Bridge
DAP-1650/AP 5GHz
TV
Internet
Modem
2.4GHz
5GHz
DAP-1650
Router
Storage
5
ENGLISH
TROUBLESHOOTING
SETUP AND CONFIGURATION PROBLEMS
1. HOW DO I CONFIGURE MY DAP-1650 AP WITHOUT THE CD, OR CHECK MY WIRELESS
NETWORK NAME (SSID) AND WIRELESS ENCRYPTION KEY?
- Connect your PC to the range extender using an Ethernet cable.
- Open a web browser and enter the address http://dlinkap.local or http://192.168.0.50
- The default username is ‘Admin’. The default password is blank (leave the field blank).
- If you have changed the password and can not remember it, you will need to reset the AP to revert the password back to blank (leave the field blank).
2. HOW DO I RESET MY DAP-1650 AP TO FACTORY DEFAULT SETTINGS?
- Ensure the range extender is powered on.
- Press and hold the reset button on the rear of the device for 5 seconds.
Note: Resetting the range extender to factory default will erase the current configuration
settings. To re-configure your settings, log into the range extender as outlined in question 1, then
run the Setup Wizard.
3. HOW DO I ADD A NEW WIRELESS CLIENT OR PC IF I HAVE FORGOTTEN MY
WIRELESS NETWORK NAME (SSID) OR WIRELESS ENCRYPTION KEY?
- For every PC that needs to connect to the range extender wirelessly, you will need to ensure
you use the correct Wireless Network Name (SSID) and encryption key.
- Use the web based user interface (as described in question 1 above) to check or choose your
wireless settings.
- Make sure you write down these settings so that you can enter them into each wirelessly
connected client. You will find a dedicated area on the back of this document, this important
information for future use.
6
DAP-1650
You can find software updates and user documentation on the D-Link website.
Tech Support for customers in
Australia:
Tel: 1300-766-868
24/7 Technical Support
Web: http://www.dlink.com.au
E-mail: [email protected]
India:
Tel: +91-832-2856000
Toll Free 1800-233-0000
Web: www.dlink.co.in
E-Mail: [email protected]
Singapore, Thailand, Indonesia,
Malaysia, Philippines, Vietnam:
Singapore - www.dlink.com.sg
Thailand - www.dlink.co.th
Indonesia - www.dlink.co.id
Malaysia - www.dlink.com.my
Philippines - www.dlink.com.ph
Vietnam - www.dlink.com.vn
Korea:
Tel : +82-2-2028-1810
Monday to Friday 9:00am to 6:00pm
Web : http://d-link.co.kr
E-mail : [email protected]
New Zealand:
Tel: 0800-900-900
24/7 Technical Support
Web: http://www.dlink.co.nz
E-mail: [email protected]
South Africa and Sub Sahara
Region:
Tel: +27 12 661 2025
08600 DLINK (for South Africa only)
Monday to Friday 8:30am to 9:00pm South
Africa Time
Web: http://www.d-link.co.za
E-mail: [email protected]
Saudi Arabia (KSA):
Tel: +966 01 217 0008
Fax: +966 01 217 0009
Saturday to Wednesday 9.30AM to 6.30PM
Thursdays 9.30AM to 2.00 PM
E-mail: [email protected]
DAP-1650
D-Link Middle East - Dubai, U.A.E.
ENGLISH
TECHNICAL SUPPORT
Plot No. S31102,
Jebel Ali Free Zone South,
P.O.Box 18224, Dubai, U.A.E.
Tel: +971-4-8809022
Fax: +971-4-8809066 / 8809069
Technical Support: +971-4-8809033
General Inquiries: [email protected]
Tech Support: [email protected]
Egypt
1, Makram Ebeid Street - City Lights Building
Nasrcity - Cairo, Egypt
Floor 6, office C2
Tel.: +2 02 26718375 - +2 02 26717280
Technical Support: +2 02 26738470
General Inquiries: [email protected]
Tech Support: [email protected]
Kingdom of Saudi Arabia
Office # 84 ,
Al Khaleej Building ( Mujamathu Al-Khaleej)
Opp. King Fahd Road, Olaya
Riyadh - Saudi Arabia
Tel: +966 1 217 0008
Technical Support:
+966 1 2170009 / +966 2 6522951
General Inquiries: [email protected]
Tech Support: [email protected]
Pakistan
Islamabad Office:
61-A, Jinnah Avenue, Blue Area,
Suite # 11, EBC, Saudi Pak Tower,
Islamabad - Pakistan
Tel.: +92-51-2800397, 2800398
Fax: +92-51-2800399
Karachi Office:
D-147/1, KDA Scheme # 1,
Opposite Mudassir Park, Karsaz Road,
Karachi – Pakistan
Phone: +92-21-34548158, 34326649
Fax: +92-21-4375727
Technical Support: +92-21-34548310, 34305069
General Inquiries: [email protected]
Tech Support: [email protected]
7
ENGLISH
TECHNICAL SUPPORT
Iran
Unit 5, 5th Floor, No. 20, 17th Alley, Bokharest
St., Argentine Sq.,
Tehran IRAN
Postal Code : 1513833817
Tel: +98-21-88880918,19
+98-21-88706653,54
General Inquiries: [email protected]
Tech Support: [email protected]
073-796-2797
Morocco
M.I.T.C
Route de Nouaceur angle RS et CT 1029
Bureau N° 312 ET 337
Casablanca, Maroc
Phone: +212 663 72 73 24
Email: [email protected]
Lebanon RMA center
Dbayeh/Lebanon
PO Box:901589
Tel: +961 4 54 49 71 Ext:14
Fax: +961 4 54 49 71 Ext:12
Email: [email protected]
Bahrain
Technical Support: +973 1 3332904
Kuwait:
Technical Support: + 965 22453939 / +965
22453949
Türkiye Merkez İrtibat Ofisi
Ayazağa Maslak yolu
Erdebil Cevahir İş Merkezi No: 5/A Ayazağa /
Maslak İstanbul
Tel: +90 212 2895659
Ücretsiz Müşteri Destek Hattı: 0 800 211 00 65
Web:www.dlink.com.tr
Teknik Destek: [email protected]
8
DAP-1650
КОМПЛЕКТ
ПОСТАВКИ
БЕСПРОВОДНОЙ ДВУХДИАПАЗОННЫЙ ГИГАБИТНЫЙ
ПОВТОРИТЕЛЬ AC1200 ДЛЯ УВЕЛИЧЕНИЯ ЗОНЫ
ДЕЙСТВИЯ СЕТИ
PYCCКИЙ
СОДЕРЖИМОЕ
DAP-1650
АДАПТЕР ПИТАНИЯ
12 В, 2 А
ETHERNET-КАБЕЛЬ (ВИТАЯ ПАРА 5 КАТЕГОРИИ)
ДЛЯ ПОДКЛЮЧЕНИЯ ПОВТОРИТЕЛЯ К ПК И НАСТРОЙКИ
ПАРАМЕТРОВ
Wi-Fi Configuration Note
УКАЗАНИЕ ПО НАСТРОЙКЕ WI-FI
СОДЕРЖИТ ИНФОРМАЦИЮ О СЕТИ WI-FI ПО УМОЛЧАНИЮ
Если что-либо из перечисленного отсутствует, обратитесь к
поставщику.
DAP-1650
9
УСТАНОВКА
PYCCКИЙ
ПРОСТАЯ УСТАНОВКА
РАСПОЛОЖЕНИЕ ПОВТОРИТЕЛЯ
Разместите данное устройство на открытом пространстве
предполагаемой рабочей области для расширения зоны
покрытия беспроводной сети.
ПОДКЛЮЧИТЕ К ПК
Используя входящий в комплект поставки Ethernet-кабель,
подключите DAP-1650 к настольному ПК или ноутбуку.
Подключите адаптер питания к DAP-1650. Подождите до тех
пор, пока индикатор Power не загорится зеленым цветом
вместо оранжевого.
НАСТРОЙТЕ DAP-1650
Login
User Name
Passwor d
xxxx
Откройте Web-браузер и перейдите на http://dlinkap.
local (или http://dlinkapxxxx.local (последние четыре
знака MAC-адреса)). Именем пользователя по умолчанию
является Admin, а поле пароля по умолчанию следует
оставить пустым. Теперь можно воспользоваться Мастером
для настройки DAP-1650 в режиме AP, MediaBridge или
Repeater.
РАСШИРЕННАЯ НАСТРОЙКА (ЧЕРЕЗ WEB-ИНТЕРФЕЙС)
Чтобы настроить DAP-1650 вручную, подключите компьютер к DAP-1650, используя
входящий в комплект поставки Ethernet-кабель. Затем подключите кабель питания к DAP1650. Индикатор питания будет постоянно гореть зеленым цветом.
Просто откройте Web-браузер и введите IP-адрес в адресной строке:
IP-АДРЕС:
http://dlinkap.local или http://192.168.0.50
USERNAME: Admin
PASSWORD:
Если у Вас несколько точек доступа, введите http://dlinkapxxxx.local (где xxxx – последние
четыре знака MAC-адреса устройства, который указан на этикетке на нижней панели
устройства).
10
DAP-1650
УСТАНОВКА
НАСТРОЙКА С ПОМОЩЬЮ WPS
ПРИМЕЧАНИЕ: Чтобы расширить сеть Wi-Fi в доме, используя функцию WPS повторителя DAP-1650,
пожалуйста, убедитесь, что исходный маршрутизатор или точка доступа также поддерживает функцию
WPS.
Подключите DAP-1650 к розетке и дождитесь, когда индикатор
питания будет постоянно гореть зеленым цветом. Нажмите
кнопку WPS на исходном беспроводном маршрутизаторе или
точке доступа.
PYCCКИЙ
НАСТРОЙТЕ DAP-1650 С ПОМОЩЬЮ Wi-Fi PROTECTED SETUP (WPS)
Затем нажмите кнопку WPS на DAP-1650. Индикатор начнет мигать
зеленым цветом.
Пожалуйста, подождите около двух минут до завершения процесса.
Индикатор питания будет постоянно гореть зеленым
цветом, когда DAP-1650 успешно подключится к исходному
беспроводному маршрутизатору или точке доступа.
Теперь повторитель DAP-1650 подготовлен для совместного
использования сети Wi-Fi с компьютерами и мобильными
устройствами. Подключитесь к DAP-1650, используя имя сети
(SSID) и пароль, напечатанные в карте настройки Wi-Fi.
ПРИМЕЧАНИЕ:
Повторитель DAP-1650 может быть настроен с помощью пользовательского Webинтерфейса. После того как DAP-1650 был подключен к розетке, и индикатор питания
стал постоянно гореть зеленым цветом, откройте утилиту для подключения и настройки
беспроводной сети на компьютере, выберите сеть DAP-1650 и введите пароль (они
размещены на карте настройки Wi-Fi). Затем откройте Web-браузер и наберите
http://dlinkap.local. Именем пользователя по умолчанию является Admin, а поле пароля по
умолчанию следует оставить пустым. Пожалуйста, обратитесь к руководству пользователя
для получения дополнительной информации о настройке DAP-1650 с помощью
пользовательского Web-интерфейса.
DAP-1650
11
PYCCКИЙ
РЕЖИМЫ ИСПОЛЬЗОВАНИЯ
УСТРОЙСТВА
ПРИНЦИП ДЕЙСТВИЯ
С помощью Web-интерфейса можно выбрать режим работы DAP-1650: AP (ТД), BRIDGE (МОСТ)
или REPEATER (ПОВТОРИТЕЛЬ).
КОМНАТА 3
КОМНАТА 4
Верхний этаж
Верхний этаж
TV
Адаптер
DVR
Компьютер
DAP-1650/Repeater
DAP-1650/Bridge
КОМНАТА 1
КОМНАТА 2
Нижний этаж
Нижний этаж
DAP-1650/Bridge
DAP-1650/AP 5ГГц
TV
Маршрутизатор
12
Интернет
Модем
2.4GHz
5GHz
Устройство
хранения
данных
DAP-1650
ПОИСК И УСТРАНЕНИЕ
НЕИСПРАВНОСТЕЙ
1. КАК НАСТРОИТЬ DAP-1650 БЕЗ КОМПАКТ-ДИСКА ИЛИ ПРОВЕРИТЬ ИМЯ
БЕСПРОВОДНОЙ СЕТИ (SSID) И КЛЮЧ ШИФРОВАНИЯ БЕСПРОВОДНОЙ
СЕТИ?
- Подключите ПК к DAP-1650, используя Ethernet-кабель.
- Откройте Web-браузер и введите адрес http://dlinkap.local или http://192.168.0.50
- Именем пользователя по умолчанию является ‘Admin’. Пароль по умолчанию отсутствует
PYCCКИЙ
ПРОБЛЕМЫ УСТАНОВКИ И НАСТРОЙКИ
(оставьте это поле пустым).
- Если Вы изменили пароль и забыли его, то необходимо сбросить настройки устройства
для восстановления пароля в значение по умолчанию.
2. КАК СБРОСИТЬ DAP-1650 К ЗАВОДСКИМ НАСТРОЙКАМ?
- Убедитесь, что питание устройства включено.
- Нажмите и удерживайте кнопку сброса на задней панели устройства в течение 5 секунд.
Примечание: Сброс устройства к заводским настройкам удалит текущие параметры.
Для того чтобы повторно настроить параметры, войдите в Web-интерфейс DAP-1650, как
изложено в пункте 1, а затем запустите Мастер установки.
3. КАК ДОБАВИТЬ НОВОГО БЕСПРОВОДНОГО КЛИЕНТА ИЛИ ПК, ЕСЛИ
ЗАБЫТО ИМЯ БЕСПРОВОДНОЙ СЕТИ (SSID) ИЛИ КЛЮЧ ШИФРОВАНИЯ
БЕСПРОВОДНОЙ СЕТИ?
- Для каждого ПК, который требуется подключить к беспроводной сети повторителя DAP1650, необходимо убедиться, что используются правильные имя беспроводной сети (SSID)
и ключ шифрования.
- Используйте пользовательский Web-интерфейс (см. пункт 1), чтобы проверить или задать
настройки беспроводной сети.
- Запишите или запомните эти настройки для возможности дальнейшего их использования
каждым клиентом, подключающимся к беспроводной сети. На обратной стороне данного
руководства есть специальный раздел для сохранения указанной информации.
DAP-1650
13
PYCCКИЙ
ТЕХНИЧЕСКАЯ ПОДДЕРЖКА
Обновления программного обеспечения и документация доступны на Интернет-сайте D-Link.
D-Link предоставляет бесплатную поддержку для клиентов в течение гарантийного срока.
Клиенты могут обратиться в группу технической поддержки D-Link по телефону или через
Интернет.
Техническая поддержка D-Link:
8-800-700-5465
Техническая поддержка через Интернет:
http://www.dlink.ru
e-mail: [email protected]
ОФИСЫ
Россия
129626 г. Москва
Графский пер., 14
Тел.: +7 (495) 744-0099
Украина
04080 г. Киев , ул. Межигорская, 87-А, офис 18
Тел.: +38 (044) 545-64-40
E-mail: [email protected]
Беларусь
220114, г. Минск, проспект Независимости,
169 , БЦ "XXI Век"
Тел.: +375(17) 218-13-65
E-mail: [email protected]
Казахстан
050008, г. Алматы, ул. Курмангазы, 143
(уг. Муканова)
Tел./факс: +7 727 378-55-90
E-mail: [email protected]
Грузия
Тел./Факс: +995 (593) 98-3210
Lietuva
09120, Vilnius, Žirmūnų 139-303
Tel./faks. +370 (5) 236-3629
E-mail: [email protected]
Eesti
Mustamae 55-314
10621, Tallinn
Tel +372 613 9771
e-mail: [email protected]
Latvija
Mazā nometņu 45/53 (ieeja no Nāras ielas)
LV-1002, Rīga
Tel.:+371 7 618-703
Fax: +371 7 618-706
e-pasts: [email protected]
Армения
0038, г. Ереван, ул. Абеляна, 6/1, 4 этаж
Тел./Факс: + 374 (10) 398-667
E-mail: [email protected]
14
DAP-1650
CONTENIDO DEL
EMPAQUE
CONTENIDO
WIRELESS AC1200 DUAL BAND GIGABIT RANGE
EXTENDER
ADAPTADOR DE CORRIENTE
12V / 2A
ESPAÑOL
DAP-1650
CABLE ETHERNET (CAT5 UTP)
CONECTAR EL RANGE EXTENDER AL PC DURANTE LA
INSTALACIÓN
Wi-Fi Configuration Note
NOTA DE CONFIGURACIÓN WI-FI
CONTIENE LA INFORMACIÓN WI-FI POR DEFECTO
Si alguno de estos elementos falta en su empaque, póngase en
contacto con su distribuidor.
DAP-1650
15
INSTALACIÓN DEL PRODUCTO
FÁCIL INSTALACIÓN
POSICIONAR EL EXTENSOR DE RANGO
ESPAÑOL
Coloque el extensor de rango en un área abierta de su área de
trabajo para una mejor cobertura inalámbrica.
CONEXIÓN AL PC
Utilice el cable Ethernet incluido para conectar el DAP-1650 a
su PC de escritorio o portátil. Conecte el adaptador de corriente
al DAP-1650. Espere hasta que el LED de encendido cambie
de color desde el naranjo al verde.
CONFIGURACIÓN DEL DAP-1650
Login
User Name
Passwor d
xxxx
Abra un navegador Web y vaya a http://dlinkap.local (o
http://dlinkapxxxx.local (los últimos cuatro dígitos de la
dirección MAC)). El nombre de usuario predeterminado es
admin y la contraseña predeterminada queda vacía (en blanco).
Ahora usted puede utilizar el asistente de configuración para
configurar el modo AP, MediaBridge ó Repetidor en el DAP1650.
CONFIGURACIÓN AVANZADA (ACCESO A TRAVÉS DE LA DIRECCIÓN IP)
Para configurar el DAP-1650, conecte manualmente su PC al DAP-1650 utilizando el cable
Ethernet suministrado. A continuación, conecte el cable de alimentación del DAP-1650. La luz de
encendido se mostrará verde.
Entonces sólo tiene que abrir una ventana del navegador y escriba la dirección IP en el campo de
direcciones de su navegador:
DIRECCIÓN IP:
http://dlinkap.local o http://192.168.0.50
USUARIO:
Admin
CONTRASEÑA:
Si usted tiene más de un punto de acceso, introduzca http://dlinkapxxxx.local (xxxx son los últimos
cuatro dígitos de la dirección MAC del AP que se encuentra en la parte inferior del dispositivo en
la etiqueta).
16
DAP-1650
CONFIGURACIÓN DEL PRODUCTO
CONFIGURACIÓN DEL WPS
CONFIGURACIÓN DAP-1650 mediante Wi-Fi Protected Setup (WPS)
NOTA: Para extender la red Wi-Fi en su hogar con el DAP-1650, con la función WPS, por favor asegúrese de que el
router o AP fuente también soprota WPS.
A continuación, pulse el botón WPS en el DAP-1650. El LED comenzará a
parpadear de color verde.
Por favor, espere hasta dos minutos para que finalice el proceso.
ESPAÑOL
Enchufe el DAP-1650 a una toma de corriente y espere hasta que
el LED de encendido está de color verde. Pulse el botón WPS en el
router inalámbrico de origen o AP.
El LED de alimentación se enciende de color verde cuando
el DAP-1650 se ha conectado correctamente al enrutador
inalámbrico de origen o AP.
El DAP-1650 está listo para compartir la extensión de
Red Wi-Fi con sus PCs y dispositivos móviles. Conectarse al DAP1650 con el nombre de red (SSID) y la contraseña que aparece en
su tarjeta de configuración Wi-Fi.
IP)
NOTA:
El DAP-1650 se puede configurar a través de la interfaz gráfica del usuario web. Después de
conectar el DAP-1650 a una toma de corriente y el LED de encendido es de color verde, vaya a
la utilidad inalámbrica en su ordenador, seleccione la red DAP-1650, e introduzca la contraseña
(se trata de su tarjeta de configuración de Wi-Fi ). A continuación, abra un explorador Web y
escriba
http://dlinkap.local. Por defecto, el nombre de usuario es admin y el campo de la contraseña
debe dejarse en blanco. Por favor, consulte el manual del producto para obtener más
información sobre cómo configurar el DAP-1650 utilizando la interfaz Web.
DAP-1650
17
MODOS DE USO DEL PRODUCTO
COMO TRABAJA
Usted puede seleccionar para utilizar el DAP-1650 en modo repetidor AP o BRIDGE mediante la
interfaz web.
HABITACION 3
HABITACION 4
ESPAÑOL
Piso Superior
Piso Superior
TV
Adaptador
DVR
Computador
DAP-1650/Repeater
DAP-1650/Bridge
HABITACION 1
HABITACION 2
Piso inferior
Piso inferior
DAP-1650/Bridge
DAP-1650/AP 5GHz
TV
Router
18
Internet
Modem
2.4GHz
5GHz
Storage
DAP-1650
SOLUCIÓN DE PROBLEMAS
PROBLEMAS DE INSTALACIÓN Y CONFIGURACIÓN
1. ¿CÓMO CONFIGURO MI DAP-1650 SIN EL CD, O COMPRUEBO MI NOMBRE DE RED
WIRELESS (SSID) Y LA CLAVE WIRELESS ENCRIPTADA?
- Conecte su PC al extensor del rango DAP-1650 mediante un cable Ethernet.
- Abra el navegador web e introduzca la dirección http://dlinkap ó http://192.168.0.50
- El nombre de usuario predeterminado es admin. La contraseña predeterminada es en blanco
(deje este campo vacío).
- Si ha cambiado la contraseña y no la recuerda, tendrá que reiniciar el producto para restablecer
la contraseña por defecto.
2. ¿CÓMO PUEDO RESTABLECER DAP-1650 A LA CONFIGURACIÓN PREDETERMINADA
DE FÁBRICA?
- Asegúrese de que el extensor de rango esté encendido.
- Mantenga pulsado el botón de Reset ubicado en la parte posterior del dispositivo durante 5
segundos.
ESPAÑOL
Nota: Al restablecer el producto a los valores de fábrica, se borrará la configuración actual.
Para volver ajustar la configuración, inicie sesión en el extensor de rango como se indica en la
pregunta 1, a continuación, ejecute el Asistente de configuración.
3. ¿CÓMO PUEDO AÑADIR UN NUEVO CLIENTE O PC INALÁMBRICO SI HE OLVIDADO MI
NOMBRE DE RED WIRELESS (SSID) O LA CLAVE WIRELESS ENCRIPTADA?
- Por cada PC que necesita conectar al extensor de rango de forma inalámbrica, tendrá que
asegurarse de que usa el nombre de red Wireless (SSID) y la clave wireless correcta.
- Utilizar la interfaz de usuario basada en web (como se describe en la pregunta 1 arriba) para
comprobar o elegir la configuración inalámbrica.
- Asegúrese de anotar estos valores para que pueda ingresarlos en cada PC conectado de forma
inalámbrica. Usted encontrará una zona dedicada en la parte posterior de este documento para
anotar esta información importante para el uso futuro.
DAP-1650
19
SOPORTE TÉCNICO
Usted puede encontrar actualizaciones de softwares o firmwares y documentación para usuarios a
través de nuestro sitio www.dlinkla.com
SOPORTE TÉCNICO PARA USUARIOS EN LATINO AMERICA
ESPAÑOL
Soporte técnico a través de los siguientes teléfonos de D-Link
PAIS
NUMERO
Argentina
0800 - 12235465
Chile
800 260200
Colombia
01800 - 510070
Costa Rica
0800 - 0521478
Ecuador
1800 - 035465
El Salvador
800 - 6335
Guatemala
1800 - 8350255
México
01800 - 0626270
Panamá
011 008000525465
Perú
0800 - 00968
Venezuela
0800 - 1005767
Soporte Técnico de D-Link a través de Internet
Horario de atención Soporte Técnico en www.dlinkla.com
e-mail: [email protected] & [email protected]
20
DAP-1650
CONTEÚDOS DA
EMBALAGEM
CONTEÚDOS
EXTENSOR DE ALCANCE GIGABIT WIRELESS DUAL BAND
AC1200
DAP-1650
ADAPTADOR DE ENERGIA
12V / 0,5ª
CONECTE O EXTENSOR DE ALCANCE EM SEU COMPUTADOR
PARA REALIZAR AS CONFIGURAÇÕES
Wi-Fi Configuration Note
PORTUGUÊS
CABO DE REDE ETHERNET (UTP CAT.5)
CARTÃO DE CONFIGURAÇÃO WI-FI
CONTÉM AS INFORMAÇÕES DE CONEXÃO WI-FI FORNECIDAS
DE FÁBRICA
Se algum destes itens estiver ausente, contate seu revendedor.
DAP-1650
21
CONFIGURAÇÕES DO PRODUTO
FÁCIL DE INSTALAR
POSICIONE MELHOR O EXTENSOR DE ALCANCE
Instale fisicamente o Extensor de Alcance em um local adequado
que seja preferencialmente aberto para melhor abrangência de
cobertura.
PORTUGUÊS
CONECTE O SEU COMPUTADOR
Utilize o cabo de rede Ethernet para conectar o DAP-1650 em
seu computador ou notebook. Conecte o adaptador de energia
no ponto de acesso. Aguarde até que as luzes indicadoras de
funcionamento se acendam
CONFIGURE O DAP-1650
Login
User Name
Passwor d
xxxx
Abra um software de navegação e acesse http://dlinkap.
local (ou http://dlinkapxxxx.local (os últimos 4 dígitos do
endereço MAC)). O nome de usuário padrão é Admin, e por
definição de fábrica o produto não possui senha de acesso (é
recomendável criar uma). Agora você pode utilizar o utilitário de
configuração para configurar os modos de operação Ponto de
Acesso, Ponto-a-Ponto ou Repetidor em seu DAP-16500.
CONFIGURAÇÕES AVANÇADAS (ACESSO VIA ENDEREÇO IP)
Para configurar manualmente o DAP-1650 conecte seu computador ao DAP-1650 usando o cabo
de rede fornecido com o produto. Então conecte o cabo de energia no DAP-1650. A luz verde de
energia se acenderá.
Então simplesmente abra um software de navegação e digite o endereço IP na barra de
endereços:
Endereço IP:
http://dlinkap.local ou http://192.168.0.50
Nome de usuário:
Senha:
Admin
(deixe em branco)
Se você possui mais de um ponto de acesso, digite http://dlinkapxxxx.local (o xxxx são seus 4
dígitos do endereço MAC do ponto de acesso que está localizado na parte inferior do dispositivo).
22
DAP-1650
CONFIGURAÇÕES DO PRODUTO
CONFIGURAÇÕES DO WPS
CONFIGURE O DAP-1650 UTILIZADO O BOTÃO WPS (WI-FI PROTECTED SETUP)
OBSERVAÇÃO: Para estender a rede Wi-Fi de sua residência usando o DAP-1650 através do recurso WPS por
favor verifique se seu roteador wireless possui o mesmo recurso WPS.
Conecte o DAP-1650 em uma tomada elétrica e aguarde até que
o LED de Energia esteja na cor verde. Pressione primeiramente o
botão WPS de seu roteador wireless.
Em seguida, pressione o botão WPS do DAP-1650. O LED irá piscar na cor
verde. Por favor aguarde até 2 minutos para que o processo seja concluído.
PORTUGUÊS
O LED de Energia irá parar de piscar quando o DAP-1650 estiver
conectado com sucesso ao seu roteador wireless.
O DAP-1650 está pronto para compartilhar e estender sua rede
Wi-Fi com seus computadores e dispositivos móveis. Conectese ao DAP-1650 usando o nome de sua rede (SSID) e senha que
estão impressos no cartão de configuração Wi-Fi.
OBSERVAÇÃO:
O DAP-1650 pode ser configurado também através de sua interface Web. Depois de ter ligado
o DAP-1650 em uma tomada elétrica e o LED de Energia estiver verde, abra o utilitário wireless
de seu computador, selecione a rede do DAP-1650, e digite a senha (está impressa em seu
cartão de configuração Wi-Fi). Em seguida, abra um navegador e digite
http://dlinkap.local. Por padrão, o nome de usuário é Admin, e o campo de senha deve ser
deixado em branco. Por favor, consulte o manual do produto para obter mais informações sobre
como configurar o DAP-1650 usando a sua interface Web.
DAP-1650
23
MODOS DE UTILIZAÇÃO DO PRODUTO
COMO MELHOR UTILIZAR SEU DAP-1650
Você pode escolher utilizar o DAP-1650 nos modos PONTO DE ACESSO, PONTO-A-PONTO ou
REPETIDOR utilizando sua interface Web.
SALA 3
SALA 4
Andar Superior
Andar Superior
TV
Adaptador
DVR
PORTUGUÊS
Computador
Repetidor/DAP-1650
Ponto 2/DAP-1650
SALA 1
SALA 2
Andar Térreo
Andar Térreo
Ponto 1/DAP-1650
Ponto de Acesso 5GHz / DAP-1650
TV
Roteador
24
Internet
Modem
2.4GHz
5GHz
Storage
DAP-1650
SOLUÇÃO DE PROBLEMAS
PROBLEMAS DE INSTALAÇÃO E CONFIGURAÇÃO
1. COMO EU CONFIGURO O MEU PONTO DE ACESSO DAP-1650 SEM UTILIZAR O CD, OU
COMO VERIFICO O NOME DA REDE WIRELESS (SSID) E A SENHA DE ACESSO?
- Conecte seu computador diretamente ao DAP-1650, utilizando um cabo de rede Ethernet.
- Abra um navegador de acesso e digite o endereço http://dlinkap.local ou http://192.168.0.50
- O nome de usuário padrão é admin. O produto não tem senha definida de acesso às
configurações (deixar esta espaço em branco).
- Se você alterou a senha e não se lembra da mesma, você terá que redefinir as configurações
de fábrica do produto através de reset físico.
2. COMO REDEFINIR MEU PONTO DE ACESSO DAP-1650 PARA AS CONFIGURAÇÕES
PADRÕES DE FÁBRICA?
3. COMO FAÇO PARA CONECTAR UM NOVO CLIENTE WIRELESS OU COMPUTADOR
NO CASO DE TER ESQUECIDO O NOME DA REDE WIRELESS (SSID) OU A SENHA DE
ACESSO?
PORTUGUÊS
- Verifique se o produto está ligado.
- Pressione e segure o botão de reset na parte traseira do aparelho por 5 segundos.
Nota: A resturação do produto para os padrões de fábrica irá apagar todas as configurações
atuais. Para reconfigurar suas configurações, acesse novamente o DAP-1650 seguindo as
orientações expostas na pergunta 1, e em seguida execute o Assistente de Configuração do
produto.
- Para cada computador que necessitar se conectar ao DAP-1650 através da rede sem
fios, você precisará se certificar de estar acessando a sua rede Wireless e digitar a senha
corretamente.
- Utilize a interface web de usuário (como descrito acima na pergunta 1) para verificar ou
configurar as configurações da rede sem fios.
- Anote essas configurações para que você possa inseri-las em cada computador que precisar
ser conectado. Você encontrará uma área dedicada no verso deste documento para anotar
essas informações importantes para uso futuro.
DAP-1650
25
SUPORTE TÉCNICO
Caso tenha dúvidas na instalação do produto, entre em contato com o Suporte Técnico D-Link.
PORTUGUÊS
Acesse o site: www.dlink.com.br/suporte
26
DAP-1650
包裝內容
內容
AC1200雙頻無線基地台
DAP-1650
電源供應器
12V / 2A
乙太網路線(CAT.5)
在設定時可用來連接電腦和基地台
Wi-Fi Configuration Note
無線資料卡
中
顯示DAP-1650預設的無線網路名稱(SSID)和密碼(Password)
文
若缺少上述任一項物品,請儘快聯絡您購買的經銷商。
DAP-1650
27
產品設定
快速安裝
放置基地台
請將DAP-1650放置在您想使用區域內較無阻隔物的位置,並避開微
波爐、無線電話等干擾源來取得較佳的無線訊號和涵蓋範圍。
連接網路線和電源
請將網路線的一端連接至DAP-1650背面的LAN埠,並將另一端連接至
您的電腦的網路埠。若您的電腦是連接到一台交換器或路由器,請將
DAP-1650連接至同一台設備。之後將DAP-1650接上電源,並確認電
源指示燈由橘色變為綠色。
設定DAP-1650
Login
User Name
中
Passwor d
xxxx
請開啟網頁瀏覽器,在網址列輸入http://dlinkap.local或http://
dlinkapxxxx.local(xxxx代表設備MAC位址的末4碼)來開啟設定網
頁,請輸入預設使用者名稱為「Admin」無密碼來登入,之後可使用
設定精靈來設定AP、橋接(MediaBridge)和中繼(Repeater)模式。
文
進階設定 (透過IP位址來存取)
請將網路線的一端連接至DAP-1650背面的LAN埠,並將另一端連接至您的電腦的網路埠。若您的電
腦是連接到一台交換器或路由器,請將DAP-1650連接至同一台設備。之後將DAP-1650接上電源,
並確認電源指示燈由橘色變為綠色。
之後開啟網頁瀏覽器,並在網址列輸入以下IP位址:
IP位址:
USERNAME:
PASSWORD:
http://dlinkap.local 或 http://192.168.0.50
Admin
(無)
若您有一台以上的基地台,請輸入網址http://dlinkapxxxx.local(xxxx代表設備MAC位址的末4碼,請
查看設備底部的標籤)來開啟設定網頁。
28
DAP-1650
產品設定
WPS設定
使用WPS功能設定DAP-1650
備註: 使用此種方式設定前,請先確認您想連線的基地台或無線路由器上有WPS按鈕。
請將DAP-1650插入電源插座並等待電源指示燈呈現綠燈,之後按下
基地台或無線路由器上的WPS按鈕。
再按下DAP-1650上的WPS按鈕,此時指示燈會開始閃爍綠燈。
WPS連線程序大約需要2分鐘,請您耐心等待程序完成。
當DAP-1650的指示燈變為綠燈恆亮時,則表示DAP-1650已成功與
基地台或無線路由器連線。
中
文
DAP-1650現在已設定為中繼器功能,請用無線網路資料卡上的無線
名稱(SSID)和密碼來連線到DAP-1650。
備註:
DAP-1650可以使用網頁介面來執行進一步的設定,在DAP-1650插入電源插座且電源指示燈為綠
燈恆亮後,透過筆電的無線功能搜尋DAP-1650的名稱並輸入密碼連線(請查看無線網路資料卡),
之後開啟網頁瀏覽器,在網址列輸入http://dlinkap.local.,預設使用者名稱為Admin無密碼。請參考
產品使用手冊來取得更多資訊。
DAP-1650
29
無線模式
如何使用
您可以透過網頁介面來選擇和設定無線模式 - AP、橋接(BRIDGE)或中繼(REPEATER)。
房間 3
房間 4
頂樓
頂樓
TV
無線網卡
DVR
電腦
DAP-1650/Repeater(中繼)
DAP-1650/Bridge(橋接)
房間 1
房間 2
中
一樓
一樓
DAP-1650/Bridge(橋接)
文
DAP-1650/AP 5GHz
TV
路由器
30
網際網路
數據機
2.4GHz
5GHz
儲存裝置
DAP-1650
常見問題
設定和安裝的疑問
1. 我要如何手動設定DAP-1650(如需更改使用模式時)?
(1) 使用網路線連接電腦和DAP-1650。
(2) 請至電腦的「區域連線」內容,將TCP/IP(IPv4)設為指定IP,IP位址輸入192.168.0.x(除了50
外,1~254皆可)。
(3) 請開啟網頁瀏覽器,在網址列輸入「http://dlinkap.local」或「http://192.168.0.50」。
(4) 請以預設的使用者名稱(User Name)為「admin」,沒有密碼(Password)來登入設定網頁。(若您
已經更改過登入密碼但忘記此資料,請將設備reset回復原廠預設值來重新設定。)
2. 我要如何將DAP-1650回復出廠預設值(RESET)?
(1) 確認設備已連接電源並在待機中。
(2) 用迴紋針等細物插入DAP-1650背面的reset孔約8-10秒再放開,再稍候設備重新啟動。
請注意! 此動作會將DAP-1650的設定全部清除,請在設備開機完成後依上述說明重新設定。
3. 我要如何使用無線方式連線至DAP-1650? 若忘記無線網路名稱或密碼時該如何處理?
請先開啟無線裝置端的無線(Wi-Fi)功能並搜尋DAP-1650的無線網路名稱連線(預設為「dlink」無密
碼)。若您已忘記之前設定的無線名稱或密碼,您可以依照問題1的說明來開啟DAP-1650的設定網
頁,至「設定」(SETUP)>「無線設定」(Wireless Setup)頁面來查看或修改已設定的無線資料,之後
請記下這些資料以作為日後連線的參考。
DAP-1650
文
- 若DAP-1650上端直接連接數據機:
(1) Cable電視寬頻(DHCP)的使用者-請確認裝置內的「無線連線」IP位址設定為「自動取得IP位
址」。
(2) xDSL/ADSL的使用者-請確認在電腦上有執行寬頻連線(ADSL連線),且連線的使用者名稱和密碼
資料皆正確。若您使用的是行動裝置則無法適用於此種網路架構,請在DAP-1650上端加裝一台
路由器,若數據機有DHCP伺服器則請將該功能啟用。
(3) 固定IP的使用者-請確認裝置內的「無線連線」IP位址設定為「固定IP位址(使用下列IP位址」,
並輸入由網路業者提供的IP位址。
-若DAP-1650上端連接路由器: 請確認路由器已設定連通網際網路
中
4、DAP-1650在AP模式下,裝置的無線網路已顯示連線但無法連上網際網路時該如何檢
查?
31
D-Link 友訊科技 台灣分公司 技術支援資訊
如果您還有任何本使用手冊無法協助您解決的產品相關問題,台灣地區用戶可以透過我
們的網站、電子郵件或電話等方式與D-Link台灣地區技術支援工程師聯絡。
D-Link 免付費技術諮詢專線
0800-002-615
手機付費電話 (02)6600-0123#8715
服務時間:週一至週五,早上9:00到晚上9:00
(不含周六、日及國定假日)
網
站:http://www.dlink.com.tw
電子郵件:[email protected]
如果您是台灣地區以外的用戶,請參考D-Link網站,全球各地分公司
的聯絡資訊以取得相關支援服務。
產品保固期限、台灣區維修據點查詢,請參考以下網頁說明:
http://www.dlink.com.tw
產品維修:
使用者可直接送至全省聯強直營維修站或請洽您的原購買經銷商。
中
文
32
DAP-1650
ISI
KEMASAN
ISI
WIRELESS AC1200 DUAL BAND GIGABIT RANGE
EXTENDER
DAP-1650
ADAPTOR DAYA
12V / 2A
KABEL ETHERNET (CAT5 UTP)
MENGHUBUNGKAN RANGE EXTENDER KE PC PADA SAAT
PENGATURAN
Wi-Fi Configuration Note
CATATAN KONFIGURASI WI-FI
BERISI INFORMASI WI-FI BAWAAN PABRIKAN
DAP-1650
BAHASA INDONESIA
Bila terdapat item yang hilang dari kemasan Anda, segera
hubungi penjual.
33
PENGATURAN PERANGKAT
PENGATURAN MUDAH
POSISIKAN RANGE EXTENDER
Letakkan range extender di lokasi terbuka dimana Anda ingin
mendapatkan jangkauan wireless yang lebih baik.
MENGHUBUNGKAN KE PC ANDA
Gunakan kabel Ethernet bawaan untuk menghubungkan DAP1650 ke PC atau Laptop Anda. Hubungkan adaptor daya ke
DAP-1650. Tunggu hingga lampu LED Power berubah dari
warna oranye ke hijau.
KONFIGURASI DAP-1650
Login
User Name
BAHASA INDONESIA
Passwor d
xxxx
Buka browser dengan alamat http://dlinkap.local (atau http://
dlinkapxxxx.local (empat digit terakhir dari alamat MAC)).
User name default adalah Admin dan default Password kosong.
Sekarang Anda dapat menggunakan setup wizard untuk
mengkonfigurasi mode AP, MediaBridge atau Repeater pada
DAP-1650 Anda.
PENGATURAN TINGKAT LANJUT (AKSES MELALUI ALAMAT IP)
Untuk mengkonfigurasi DAP-1650 secara manual, hubungkan komputer dengan DAP-1650
dengan menggunakan kabel Ethernet bawaan. Kemudian hubungkan kabel daya ke DAP-1650.
Lampu Power akan menyala hijau.
Kemudian cukup buka browser dan masukkan alamat IP pada kolom halaman di browser:
ALAMAT IP :
http://dlinkap.local atau http://192.168.0.50
USERNAME: Admin
PASSWORD:
Jika Anda memiliki lebih dari satu Access Point, masukkan http://dlinkapxxxx.local (xxxx adalah
empat angka terakhir dari alamat MAC AP yang terletak di bagian bawah perangkat di label).
34
DAP-1650
PENGATURAN PERANGKAT
PENGATURAN WPS
PENGATURAN DAP-1650 MENGGUNAKAN Wi-Fi PROTECTED SETUP (WPS)
CATATAN: Untuk memperluas jaringan Wi-Fi rumah Anda dengan menggunakan fitur WPS pada DAP-1650, pastikan router
atau AP sumber juga dilengkapi dengan WPS.
Colokkan DAP-1650 ke stopkontak dan tunggu sampai LED daya
menyala hijau solid. Tekan tombol WPS pada router nirkabel atau
AP.
Selanjutnya, tekan tombol WPS pada DAP-1650. LED akan mulai
berkedip hijau.
Silakan tunggu hingga dua menit sampai proses selesai.
LED daya akan berubah menjadi hijau padat ketika DAP-1650
telah berhasil terhubung ke router nirkabel atau AP.
CATATAN:
DAP-1650 dapat dikonfigurasi lebih lanjut dengan menggunakan web GUI. Setelah
Anda menghubungkan DAP-1650 ke stopkontak dan LED daya berwarna hijau
pekat, buka pengaturan nirkabel pada komputer Anda, pilih jaringan DAP-1650 dan
masukkan password (tercantum dalam Kartu Konfigurasi Wi-Fi Anda). Kemudian
buka web browser dan ketikkan
http://dlinkap.local. Secara default, username adalah Admin dan kata sandi harus
dibiarkan kosong. Silakan lihat manual produk untuk informasi lebih lanjut tentang
cara mengkonfigurasi DAP-1650 menggunakan web GUI.
DAP-1650
BAHASA INDONESIA
DAP-1650 sudah siap digunakan untuk memperluas Jaringan WiFi kepada PC dan perangkat mobile Anda. Hubungkan ke DAP1650 dengan menggunakan nama jaringan (SSID) dan kata sandi
yang dicetak pada Kartu Konfigurasi Wi-Fi Anda.
35
CARA PENGGUNAAN PERANGKAT
BAGAIMANA CARA KERJANYA
Anda dapat memilih untuk menjadikan perangkat 1650 sebagai AP atau BRIDGE atau REPEATER
melalui konfigurasi web.
RUANG 3
RUANG 4
Lantai atas
Lantai atas
TV
Adaptor
DVR
Komputer
DAP-1650/Repeater
DAP-1650/Bridge
RUANG 1
RUANG 2
Lantai dasar
Lantai dasar
DAP-1650/Bridge
BAHASA INDONESIA
DAP-1650/AP 5GHz
36
TV
Router
Internet
Modem
2.4GHz
5GHz
Ruang
Penyimpanan
DAP-1650
PENANGANAN MASALAH
MASALAH PADA PENGATURAN DAN KONFIGURASI
1. BAGAIMANA CARA SAYA MENGATUR DAP-1650 AP TANPA CD, ATAU CARA
MEMERIKSA NAMA JARINGAN WIRELESS (SSID) DAN PASSWORD WIRELESS?
- Hubungkan PC Anda ke range extender dengan menggunakan kabel Ethernet.
- Buka web browser dan masukkan http://dlinkap.local atau http://192.168.0.50
- Default username adalah 'Admin'. Default password adalah kosong (tinggalkan kolom kosong).
- Jika Anda telah mengubah password dan tidak dapat mengingatnya, Anda akan perlu untuk mereset AP untuk mengembalikan password kembali kosong (tinggalkan kolom kosong).
2. BAGAIMANA CARA SAYA ME-RESET DAP-1650 AP KE BAWAAN PABRIK?
- Pastikan range extender dinyalakan.
- Tekan dan tahan tombol reset pada bagian belakang perangkat selama 5 detik.
Catatan: Mengatur ulang range extender ke pengaturan bawaan pabrik akan menghapus
pengaturan konfigurasi saat ini. Untuk mengkonfigurasi ulang pengaturan Anda, login ke range
extender seperti pada pertanyaan 1, kemudian jalankan Setup Wizard.
3. BAGAIMANA CARA MENAMBAH KLIEN NIRKABEL BARU ATAU PC JIKA SAYA TIDAK
INGAT NAMA JARINGAN WIRELESS (SSID) ATAU PASSWORD WIRELESS?
- Untuk setiap PC yang akan di hubungkan ke range extender, pastikan Anda menggunakan
Wireless Network Name (SSID) dan password yang benar.
- Gunakan antarmuka web (seperti yang dijelaskan dalam pertanyaan 1 di atas) untuk memeriksa
atau melakukan pengaturan nirkabel.
- Pastikan Anda menuliskan pengaturan ini sehingga Anda dapat memasukkan data tersebut ke
setiap klien yang akan terhubung secara nirkabel. Anda akan menemukan area khusus pada
bagian belakang dokumen ini, informasi ini penting untuk penggunaan masa depan.
BAHASA INDONESIA
DAP-1650
37
DUKUNGAN TEKNIS
Update perangkat lunak dan dokumentasi pengguna dapat diperoleh pada situs web D-Link.
Dukungan Teknis untuk pelanggan:
Dukungan Teknis D-Link melalui telepon:
Tel: +62-21-5731610
Dukungan Teknis D-Link melalui Internet:
BAHASA INDONESIA
Email : [email protected]
Website : http://support.dlink.co.id
38
DAP-1650
D-LINK GPL CODE
STATEMENT
This D-Link product includes software code developed by third parties, including software code
subject to the GNU General Public License (“GPL”) or GNU Lesser General Public License (“LGPL”).
As applicable, the terms of the GPL and LGPL, and information on obtaining access to the GPL code
and LGPL code used in this product, are available to you at:
http://tsd.dlink.com.tw/GPL.asp
The GPL code and LGPL code used in this product are distributed WITHOUT ANY WARRANTY and
is subject to the copyrights of one or more authors. For details, see the GPL code and the LGPL
code for this product and the terms of the GPL and LGPL.
WRITTEN OFFER FOR GPL
AND LGPL SOURCE CODE
Where such specific license terms entitle you to the source code of such software, D-Link will
provide upon written request via email and/or traditional paper mail the applicable GPL and LGPL
source code files via CD-ROM for a nominal cost to cover shipping and media charges as allowed
under the GPL and LGPL.
Technical Support: For product support, please visit http://support.dlink.com for further assistance.
General Public License (“GPL”) Inquiries: Please direct all GPL inquiries to the following email/
address. Note that technical support inquiries will not be supported at the below address.
Email:
[email protected]
Snail Mail:
Attn: GPLSOURCE REQUEST
D-Link Systems, Inc.
17595 Mt. Herrmann Street
Fountain Valley, CA 92708
GNU GENERAL PUBLIC LICENSE
Version 2, June 1991
Copyright (C) 1989, 1991 Free Software Foundation, Inc.
51 Franklin Street, Fifth Floor, Boston, MA 02110-1301, USA
Everyone is permitted to copy and distribute verbatim copies of this license document, but changing it is not allowed.
PREAMBLE
The licenses for most software are designed to take away your freedom to share and change it. By contrast, the GNU General
Public License is intended to guarantee your freedom to share and change free software--to make sure the software is free for
all its users. This General Public License applies to most of the Free Software Foundation's software and to any other program
whose authors commit to using it. (Some other Free Software Foundation software is covered by the GNU Library General
Public License instead.) You can apply it to your programs, too.
When we speak of free software, we are referring to freedom, not price. Our General Public Licenses are designed to make sure
that you have the freedom to distribute copies of free software (and charge for this service if you wish), that you receive source
code or can get it if you want it, that you can change the software or use pieces of it in new free programs; and that you know
you can do these things.
To protect your rights, we need to make restrictions that forbid anyone to deny you these rights or to ask you to surrender the
rights. These restrictions translate to certain responsibilities for you if you distribute copies of the software, or if you modify it.
For example, if you distribute copies of such a program, whether gratis or for a fee, you must give the recipients all the rights that
you have. You must make sure that they, too, receive or can get the source code. And you must show them these terms so they
know their rights.
We protect your rights with two steps: (1) copyright the software, and (2) offer you this license which gives you legal permission
to copy, distribute and/or modify the software.
Also, for each author's protection and ours, we want to make certain that everyone understands that there is no warranty for this
free software. If the software is modified by someone else and passed on, we want its recipients to know that what they have is
not the original, so that any problems introduced by others will not reflect on the original authors' reputations.
Finally, any free program is threatened constantly by software patents. We wish to avoid the danger that redistributors of a free
program will individually obtain patent licenses, in effect making the program proprietary. To prevent this, we have made it clear
that any patent must be licensed for everyone's free use or not licensed at all.
The precise terms and conditions for copying, distribution and modification follow.
GNU GENERAL PUBLIC LICENSE
TERMS AND CONDITIONS FOR COPYING, DISTRIBUTION AND MODIFICATION
0. This License applies to any program or other work which contains a notice placed by the copyright holder saying it may
be distributed under the terms of this General Public License. The "Program", below, refers to any such program or work,
and a "work based on the Program" means either the Program or any derivative work under copyright law: that is to say, a
work containing the Program or a portion of it, either verbatim or with modifications and/or translated into another language.
(Hereinafter, translation is included without limitation in the term "modification".) Each licensee is addressed as "you".
Activities other than copying, distribution and modification are not covered by this License; they are outside its scope. The act of
running the Program is not restricted, and the output from the Program is covered only if its contents constitute a work based on
the Program (independent of having been made by running the Program). Whether that is true depends on what the Program
does.
1. You may copy and distribute verbatim copies of the Program's source code as you receive it, in any medium, provided that you
conspicuously and appropriately publish on each copy an appropriate copyright notice and disclaimer of warranty; keep intact all
the notices that refer to this License and to the absence of any warranty; and give any other recipients of the Program a copy of
this License along with the Program.
You may charge a fee for the physical act of transferring a copy, and you may at your option offer warranty protection in
exchange for a fee.
2. You may modify your copy or copies of the Program or any portion of it, thus forming a work based on the Program, and copy
and distribute such modifications or work under the terms of Section 1 above, provided that you also meet all of these conditions:
a) You must cause the modified files to carry prominent notices stating that you changed the files and the date of any change.
b) You must cause any work that you distribute or publish, that in whole or in part contains or is derived from the Program or
any part thereof, to be licensed as a whole at no charge to all third parties under the terms of this License.
c) If the modified program normally reads commands interactively when run, you must cause it, when started running for
such interactive use in the most ordinary way, to print or display an announcement including an appropriate copyright
notice and a notice that there is no warranty (or else, saying that you provide a warranty) and that users may redistribute
the program under these conditions, and telling the user how to view a copy of this License. (Exception: if the Program
itself is interactive but does not normally print such an announcement, your work based on the Program is not required to
print an announcement.)
These requirements apply to the modified work as a whole. If identifiable sections of that work are not derived from the
Program, and can be reasonably considered independent and separate works in themselves, then this License, and its terms,
do not apply to those sections when you distribute them as separate works. But when you distribute the same sections as part
of a whole which is a work based on the Program, the distribution of the whole must be on the terms of this License, whose
permissions for other licensees extend to the entire whole, and thus to each and every part regardless of who wrote it.
Thus, it is not the intent of this section to claim rights or contest your rights to work written entirely by you; rather, the intent is to
exercise the right to control the distribution of derivative or collective works based on the Program.
In addition, mere aggregation of another work not based on the Program with the Program (or with a work based on the
Program) on a volume of a storage or distribution medium does not bring the other work under the scope of this License.
3.You may copy and distribute the Program (or a work based on it, under Section 2) in object code or executable form under the
terms of Sections 1 and 2 above provided that you also do one of the following:
a) Accompany it with the complete corresponding machine-readable source code, which must be distributed under the terms
of Sections 1 and 2 above on a medium customarily used for software interchange; or,
b) Accompany it with a written offer, valid for at least three years, to give any third party, for a charge no more than your cost
of physically performing source distribution, a complete machine-readable copy of the corresponding source code, to be
distributed under the terms of Sections 1 and 2 above on a medium customarily used for software interchange; or,
c) Accompany it with the information you received as to the offer to distribute corresponding source code. (This alternative
is allowed only for noncommercial distribution and only if you received the program in object code or executable form with
such an offer, in accord with Subsection b above.)
The source code for a work means the preferred form of the work for making modifications to it. For an executable work,
complete source code means all the source code for all modules it contains, plus any associated interface definition files, plus
the scripts used to control compilation and installation of the executable. However, as a special exception, the source code
distributed need not include anything that is normally distributed (in either source or binary form) with the major components
(compiler, kernel, and so on) of the operating system on which the executable runs, unless that component itself accompanies
the executable.
If distribution of executable or object code is made by offering access to copy from a designated place, then offering equivalent
access to copy the source code from the same place counts as distribution of the source code, even though third parties are not
compelled to copy the source along with the object code.
4.You may not copy, modify, sublicense, or distribute the Program except as expressly provided under this License. Any
attempt otherwise to copy, modify, sublicense or distribute the Program is void, and will automatically terminate your rights under
this License. However, parties who have received copies, or rights, from you under this License will not have their licenses
terminated so long as such parties remain in full compliance.
5.You are not required to accept this License, since you have not signed it. However, nothing else grants you permission to
modify or distribute the Program or its derivative works. These actions are prohibited by law if you do not accept this License.
Therefore, by modifying or distributing the Program (or any work based on the Program), you indicate your acceptance of this
License to do so, and all its terms and conditions for copying, distributing or modifying the Program or works based on it.
6. Each time you redistribute the Program (or any work based on the Program), the recipient automatically receives a license
from the original licensor to copy, distribute or modify the Program subject to these terms and conditions. You may not impose
any further restrictions on the recipients' exercise of the rights granted herein. You are not responsible for enforcing compliance
by third parties to this License.
7.If, as a consequence of a court judgment or allegation of patent infringement or for any other reason (not limited to patent
issues), conditions are imposed on you (whether by court order, agreement or otherwise) that contradict the conditions of this
License, they do not excuse you from the conditions of this License. If you cannot distribute so as to satisfy simultaneously your
obligations under this License and any other pertinent obligations, then as a consequence you may not distribute the Program
at all. For example, if a patent license would not permit royalty-free redistribution of the Program by all those who receive copies
directly or indirectly through you, then the only way you could satisfy both it and this License would be to refrain entirely from
distribution of the Program.
If any portion of this section is held invalid or unenforceable under any particular circumstance, the balance of the section is
intended to apply and the section as a whole is intended to apply in other circumstances.
It is not the purpose of this section to induce you to infringe any patents or other property right claims or to contest validity of
any such claims; this section has the sole purpose of protecting the integrity of the free software distribution system, which
is implemented by public license practices. Many people have made generous contributions to the wide range of software
distributed through that system in reliance on consistent application of that system; it is up to the author/donor to decide if he or
she is willing to distribute software through any other system and a licensee cannot impose that choice.
This section is intended to make thoroughly clear what is believed to be a consequence of the rest of this License.
8.If the distribution and/or use of the Program is restricted in certain countries either by patents or by copyrighted interfaces,
the original copyright holder who places the Program under this License may add an explicit geographical distribution limitation
excluding those countries, so that distribution is permitted only in or among countries not thus excluded. In such case, this
License incorporates the limitation as if written in the body of this License.
9.The Free Software Foundation may publish revised and/or new versions of the General Public License from time to time.
Such new versions will be similar in spirit to the present version, but may differ in detail to address new problems or concerns.
Each version is given a distinguishing version number. If the Program specifies a version number of this License which applies
to it and "any later version", you have the option of following the terms and conditions either of that version or of any later version
published by the Free Software Foundation. If the Program does not specify a version number of this License, you may choose
any version ever published by the Free Software Foundation.
10. If you wish to incorporate parts of the Program into other free programs whose distribution conditions are different, write to
the author to ask for permission. For software which is copyrighted by the Free Software Foundation, write to the Free Software
Foundation; we sometimes make exceptions for this. Our decision will be guided by the two goals of preserving the free status
of all derivatives of our free software and of promoting the sharing and reuse of software generally.
NO WARRANTY
11. BECAUSE THE PROGRAM IS LICENSED FREE OF CHARGE, THERE IS NO WARRANTY FOR THE PROGRAM, TO
THE EXTENT PERMITTED BY APPLICABLE LAW. EXCEPT WHEN OTHERWISE STATED IN WRITING THE COPYRIGHT
HOLDERS AND/OR OTHER PARTIES PROVIDE THE PROGRAM "AS IS" WITHOUT WARRANTY OF ANY KIND, EITHER
EXPRESSED OR IMPLIED, INCLUDING, BUT NOT LIMITED TO, THE IMPLIED WARRANTIES OF MERCHANTABILITY
AND FITNESS FOR A PARTICULAR PURPOSE. THE ENTIRE RISK AS TO THE QUALITY AND PERFORMANCE OF THE
PROGRAM IS WITH YOU. SHOULD THE PROGRAM PROVE DEFECTIVE, YOU ASSUME THE COST OF ALL NECESSARY
SERVICING, REPAIR OR CORRECTION.
12. IN NO EVENT UNLESS REQUIRED BY APPLICABLE LAW OR AGREED TO IN WRITING WILL ANY COPYRIGHT
HOLDER, OR ANY OTHER PARTY WHO MAY MODIFY AND/OR REDISTRIBUTE THE PROGRAM AS PERMITTED ABOVE,
BE LIABLE TO YOU FOR DAMAGES, INCLUDING ANY GENERAL, SPECIAL, INCIDENTAL OR CONSEQUENTIAL DAMAGES
ARISING OUT OF THE USE OR INABILITY TO USE THE PROGRAM (INCLUDING BUT NOT LIMITED TO LOSS OF DATA
OR DATA BEING RENDERED INACCURATE OR LOSSES SUSTAINED BY YOU OR THIRD PARTIES OR A FAILURE OF
THE PROGRAM TO OPERATE WITH ANY OTHER PROGRAMS), EVEN IF SUCH HOLDER OR OTHER PARTY HAS BEEN
ADVISED OF THE POSSIBILITY OF SUCH DAMAGES.
END OF TERMS AND CONDITIONS
HOW TO APPLY THESE TERMS TO YOUR NEW PROGRAMS
If you develop a new program, and you want it to be of the greatest possible use to the public, the best way to achieve this is to
make it free software which everyone can redistribute and change under these terms.
To do so, attach the following notices to the program. It is safest to attach them to the start of each source file to most effectively
convey the exclusion of warranty; and each file should have at least the "copyright" line and a pointer to where the full notice is
found.
<one line to give the program's name and a brief idea of what it does.>
Copyright (C) <year> <name of author>
This program is free software; you can redistribute it and/or modify it under the terms of the GNU General Public License as
published by the Free Software Foundation; either version 2 of the License, or (at your option) any later version.
This program is distributed in the hope that it will be useful, but WITHOUT ANY WARRANTY; without even the implied warranty
of MERCHANTABILITY or FITNESS FOR A PARTICULAR PURPOSE. See the GNU General Public License for more details.
You should have received a copy of the GNU General Public License along with this program; if not, write to the Free Software
Foundation, Inc., 51 Franklin Street, Fifth Floor, Boston, MA 02110-1301, USA.
Also add information on how to contact you by electronic and paper mail.
If the program is interactive, make it output a short notice like this when it starts in an interactive mode:
Gnomovision version 69, Copyright (C) year name of author Gnomovision comes with ABSOLUTELY NO WARRANTY; for
details type `show w'.
This is free software, and you are welcome to redistribute it under certain conditions; type `show c' for details.
The hypothetical commands `show w' and `show c' should show the appropriate parts of the General Public License. Of course,
the commands you use may be called something other than `show w' and `show c'; they could even be mouse-clicks or menu
items--whatever suits your program.
You should also get your employer (if you work as a programmer) or your school, if any, to sign a "copyright disclaimer" for the
program, if necessary. Here is a sample; alter the names:
Yoyodyne, Inc., hereby disclaims all copyright interest in the program `Gnomovision' (which makes passes at compilers) written
by James Hacker.
<signature of Ty Coon>, 1 April 1989
Ty Coon, President of Vice
This General Public License does not permit incorporating your program into proprietary programs. If your program is a
subroutine library, you may consider it more useful to permit linking proprietary applications with the library. If this is what you
want to do, use the GNU Library General Public License instead of this License.
以下警語適用台灣地區
經型式認證合格之低功率射頻電機,非經許可,公司、商號或使用者均不得擅自變更頻率、加大功率
或變更原設計之特性及功能。
低功率射頻電機之使用不得影響飛航安全及干擾合法通信;經發現有干擾現象時,應立即停用,並改
善至無干擾時方得繼續使用。前項合法通信,指依電信法規定作業之無線電通信。低功率射頻電機須
忍受合法通信或工業、科學及醫療用電波輻射性電機設備之干擾。
5.25 ~ 5.35GHz 限室內使用 (802.11a used)
Warning for Latin America
Please ensure that channels 36/40/44/48 on the 5 GHz band are unlicensed and unrestricted in your country of
residence before using them.
Any illegal usage of these channels is the responsibility of the user.
Por favor asegúrese de que los canales 36/40/44/48 en la banda de 5 GHz estén sin licencia y sin restricciones
de uso en su país de residencia antes de utilizarlos. Cualquier uso ilegal de estos canales es responsabilidad del
usuario.
NOTES
NOTES
NOTES
NOTES
WIRELESS NETWORK REMINDER
Wireless Network Name (SSID)
Wireless Network Password
Ver.1.01(DI) 2013/12/09
6AP1650QI.02G