1
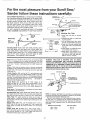
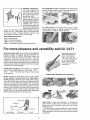
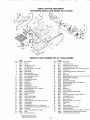
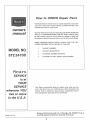
CAUTRON:
Read SAFETY
RULES and
INSTRUCTIONS
carefully
SEARS/CRAFTSMAN
MODEL NO.
572.24700
15 iNCH MOTORIZED
SCROLL SAW/SANDER
assembly
,,,ado
,nU_SoA. ,1/1/72
Par!
No. 405015
Searsl
Roebuck
and
Simpsons-Sears
and
o operating
o repair parts
Co., Chicago,
Ill.
Limited,
Toronto
60607
U.S.A.
L
FOR SAFE OPERATIO
1. Know your Power Tool. Read the owner's manual
carefully_ Learn its application
and limitations as
well as the specific potential hazards peculiar to
this tool.
9o Use right
13. Don't overreach. Keep your proper footing and
balance at all times,
14. Maintain
areas
and
should
tools in top condition.
15. Disconnect tools, before servicing and when
changing accessories such as blades, bits, cutters,
16. Avoid accidental starting.
is off before plugging in cord.
be
17. Use recommended
8. Don't force tool. It will do the job better and be
safer at the rate for which it was designed°
Make sure
accessories.
owner's manual. Use of improper
be hazardous.
available
at Sears retail or catalog
stores,
This Product
is Listed
by
UNDERWRITER'S
LABORATORIES, INC.
and Bear's the Mark:
Craftsman power tools (or welders) are unconditionalJyguaranteed for one year to give complete
satisfaction
or the tool will
be repaired
free of charge
This
guarantee
service
is
Stores
or Service
Centers
available
throughout
Canada
SEARS ROEBUCK
through
AND CO • SIMPSONS-SEARS
2
any
the United
of Sears
States
or
LIMITED
switch
Consult
accessories
The operation of any power tool can result in foreign
objects
being thrown
into the eyes, which can result in severe eye
damage,
Always
wear safety glasses
or eye shields
before
commencing
power tool operation.
We recommend
Wide Vision
Safety Mask for use over spectacles,
or standard safety glasses
....
Keep tools
sharp and clean for best and safest performance°
Follow instructions for lubricating and changing
accessories.
6. Avoid dangerous environment. Don't use power
tools in damp or wet locations° Keep work area
well illurninatedo
7. For safely and accuracy. All visitors
kept a safe distance from work area.
or
12. Secure work. Use clamps or a vise to hold work
when practical,
it's safer than using your hand,
frees both hands to operate tool.
order_
4. Remove adjusting keys and wrenches. Form
habit of checking to see that keys and adjusting
wrenches are removed from tool before turning on
tool.
Cluttered
for,,
1t. Use safety glasses. Also use face or dust mask
if cutting operation is dusty°
receptacle°
5. Keep work area clean.
benches invite accidents.
force tool or attachment
10. Wear proper apparel. No loose clothing
jewelry to get caught in moving parts.
2. If tool is equipped with three-prong
plug, it
should be plugged into a PROPERLY GROUNDED
3. Keep guards in place and in working
tool. Don't
to do a job it was not designed
the
may
For the most pmeasurefrom your Scrol! Saw/
Sander follow these instructions carefully:
The Craftsman Scroll Saw is a multi-purpose
workshop,
By connecting
different attachments
to the power takeoff, the unit is converted from the basic scroll saw to a
grinder, sander, buffing wheel, brush wheel, and a flexible shaft machine. Then you are able not only to saw,
but dri!l, grind, polish, rout, sharpen, sand, buff, carve,
engrave and perform many other hobby, home or shop
operations
Use with 2471 accessory pack.
DO NOT OPERATE MACHINE WITHOUT ATTACHING
TABLE, CAUTION: DISCONNECT PLUG FROM OUTLET,,
FORWARD
TO
TIGHTEN
(A)
BLADE
SAW
_
ARM
,.._.tt
_\\
|
_
......
//_..
[
T SPRING
....
SAW LIFT BLADE GUARD
...........................................................
FRLOMTHlS POStT_ON
|
WING
NUT
_
II
Attaching
Saw Table
1. Push lever (A) back to remove
blade.
] 2, Unscrew top wing nut--leave
in same position
WASHER
LOCATED
inserting Blade--Hold blade with teeth pointing downward and place into the small slot of both upper and
lower blade holder._ Apply tension by pulling lever on top
of blade holder toward you. For cutting material longer
than the 15" throat capacity, place the blade in either
side position The capacity is then unlimited
Motor--Runs
on 110-120 Volt, 60 cycle, AC, and produces 3450
R.P.M. It is equipped with two sealed bali bearings
No oiling
is needed Characteristically,
this shaded poleqype motor runs
a bit warm. However, overheating wilt not affect overall operation
GROUNDING
Cutting Capacity_Soft
wood up to 1%" and hardwood up to
_/2" in thickness can be cut. FEED WOOD SLOWLY DO NOT
FORCE When cutting wood over 1 V4", the blade guard must be
removed,. To remove guard, simply putl out ends of guard where
they enter the frame. When through sawing .... BE SURE TO
REPLACE THE FINGER GUARD
LEAD
ADAPTER
3-PRONG
MAKE SURE TH_S
tS CONNECTED
TO
A KNOWN
GROUND
PLUG
Sawing Metals_Saw
aluminum
to V4" thick, copper to 18
gauge, and steel to 1/16" thick When sawing metal, it is important to hold the work firmly on the table, use oil as a
lubricant,
and feed the work with a stow, steady pressure Do
not force it.
is considered
3. Lift up blade guard (from point
shown) and slide table into place,
4,, Pass bolt through
slotted
half
circle with hole at top positioned
over pin..
5. Place washer on outside of bracket and tighten with wing nut
& Blade guard must always be inserted with T shaped spring under
saw arm and both side pins outside of saw arm housing,
WARNING:
YOUR SAW IS EQUIPPED
WITH AN UNDERWRITERS'
LABORATORIES
AND CANADIAN
STANDARDS
ASSOCIATION APPROVED 3-PRONG PLUG WHICH MUST BE
CONNECTED
TO A GROUNDED
3-PRONG RECEPTACLE TO
GROUND YOUR SAW,, IF YOU DO NOT HAVE A GROUNDED
RECEPTACLE TO MATCH THIS PLUG YOU SHOULD HAVE A
QUALIFIED ELECTRICIAN INSTALL ONE.
Oiling_A
few drops of ordinary motor oil should occasionally
be placed on the connecting
link bearing through the hole on
the _eft side of the frame For oiling, tay unit on its side. Use
SA30 motor oil
Blade Guard_The
blade guard
It functions also as a hold-down
bolt
2-PRONG
RECEPTACLE
one of the safest
Increasing
Blade Life--When
blade teeth become dull in one
spot simpty loosen the lower wing nut located just beneath the
saw table, and raise the table to a section of new, unused teeth..
NOTE: The adapter illustrated is for use only if you already have
a properly grounded 2-prong receptacle Adapter is not allowed
in Canada by the Canadian Electrical Code,.
The use of any extension cord wilF cause some loss of power.
To keep this to a minimum
and to prevent overheating
and
motor burn-out, use the table beEow to determine the minimum
wire size (AW..G.} extension cord All cords should be 3-wire
grounded.
Tilting Table--For
angle sawing, the table can be tilted in
either direction
Loosen the top wing nut located just beneath
the saw table, and tilt to the desired angle following
the calibrated scale.
Making Inside Cuts--FirsL
use the flexible
shaft to drill a
5/32"
hole in the area to be sawed out Then, remove the
blade, thread it through the hole, and return it to the cutting
position.
Extension Cord Length
Iess
t00 ft or tess
50
Holding Scroll Saw In Place_On
a fairly smooth table or
bench, the rubber suction cups will keep it from sliding. Otherwise, set the machine on a _/2" thick rubber pad, such as a
household kneefing pad or typewriter cushion.
3
ftr=
or
Wire Size A.W,G_
No. 16
No 14
Attaching Accessories-The round extension on
the motor housing is the
power take-off for driving
the sander, buffing wheel,
and flexible shaft..
These are mounted
on
special adapters which fit
into the power take-off
BE SURE THE MOTOR IS
TURNED OFF. Line up
pin in the motor shaft with
.
,,i
the slot in the adapter and
press forward as far as it
will go,. Turn the wheel slowly until the adapter set screw
comes into view. Then tighten lightly, This screw does
not drive the shaft, it merely minimizes vibration
and
wheel drifting.. It does not have to be too tight.
Recommended
Accessories
#2471 =Accessory Kit..
#26877--Fine Tooth blades
#26878--Coarse
Tooth blades.
#2544--4" Assorted aluminum oxide Sanding
It's a scroll saw--Handles everything
from small scroll
work to full size furniture work. Cuts up to standard 2 x
4's, 18 ga. copper, 1/4" aluminum and steel
CUTLONG
BEVEL
CUT
It's a Disc Sander--For
shaping small pieces, sanding
rough edges, trueing up uneven surfaces,. Three disc
grits permit fine, medium, coarse sanding°
SAND
Discs.
LENGTHS
BEVELS
CONTOUR
Fer mere p easure and versatility add kit 2471
Attaching Flexible Shaft--Be sure MOTOR IS RUNNING
before the cable is engaged, DO NOT REMOVE OR
LOOSEN SCREW IN NYLON COUPLING
Insert the
black nylon coupling over the power take-off. Push the
coupling on as far as it will go, and hold in place by
turning the coupling counterclockwise,
To prevent the
cable from becoming disconnected
while the machine is
running, simply grasp the handpiece and twist the cable
one-half turn counterciockwise_
Flexible Shaft Handpiece--The
handpiece
is equipped
with a chuck accommodating
3 cottet sizes: !/8".
....
3/32"_ . . !/16",. This handpiece does not require oiling
or adjustments..
Chuck--Consists
of chuck tever, chuck cap and colleL
Do not attempt to operate chuck lever while shaft is
running, Depress chuck lever and rotate chuck cap by
hand until lock pin snaps into place, and stops the chuck
cap from running,. Place chuck wrench over chuck cap
and loosen as shown in the illustration. The chuck lever
must be kept depressed during this operation° Any accessory or drill should be inserted into the collet as far
as possible to prevent wobble during operation., Now
tighten chuck cap as shown keeping lever depressed..
Avoid excessive tightening of the chuck cap
Lightweight, ptastic handpiece handles easily as a
pencil Accommodates
1/32", 1/18", 3/32 '° and
I/8 '° collets Capacity 0135
to 1/8", Features oilLess
bronze bearing, quickaction chuck and neoprene
covered shaft
FLEXIBLE SHAFT PROVIDES
DRILLING
GRtNDI
CHUCK
WRENCH
TO
NG
SHARPENI
DEBURRING
NG
CARVENG
Finger Grip-A
finger grip attachment
is included
as
part of this kit. It easily slips onto the front of the handpiece and is used for precise control when doing close
tolerance work.,
For best results, use the flexible shaft with a delicate
touch. To prevent stalling
the motor, press the tool
lightly against the work, and never force the toot beyond
its capacity°
CHUCK CAP
CHUCK
ROUTING
LEVER
TO TIGHTEN
i
EXTRA VERSATILITY
LOOSEN
COLLET
4
PARTS LIST FOR CRAFTSMAN
MOTORIZED
SCROLL SAW MODEL NO. 572.24700
\
ORDER
Code
1
"2
3
* 4
5
6
8
9
10
11
12
13
14
15
16
17
"!8
19
19
2O
Part
Number
BY PART NUMBER
NOT BY CODE
Part
Number
NUMBER
Description
Code
4046
4035
15071
4033
15021
Guard
Hex Nuts No. 10-32
Left Side Frame
34
*35
"36
4023
3027
4064
Trim Screws No, 4 x _iB Type A
Frame Cover
"37
38
4072
15076
10-32 Square Nut No 10-32
Motor Mounting Screw No, 10/24
Feff Washer
15068
15O12
15011
15014
15010
15006
15077
Nylon Guide
Blade Lock Cam
39
40
15026
15091
Counter
Fan
41
*42
15085
4063
Fan Spacer
Bearing Bracket
Bow Complete
Connecting Link Half A
Bow Washer
Felt Disc
43
44
45
46
15078
15086
15029
4209
Baffle Keepers (2 required}
Fan Baffle
Bearing Seat
Link Bearing
Connecting Link Half B
Head Screw No. 6_20 x s/aType 25
Fine Tooth Blade
Coarse Tooth Blade
47
48
49
50
5t
52
15088
15079
15089
4230
t5005
15090
15076
15008
15025
15007
15036
8029
8030
2t
22
*23
*24
*25
26
27
28
=29
30
15018
15002
4005
4032
3032
4030
4004
4022
4031
15034
15020
"31
32
33
4060
4019
15087
Pair Upper Blade Holders
Pair Lower Blade Herders
Right Frame Side
Table
53
"54
4013
8038
Table Tilting Bracket
Wing Nut No, 10-24
Washer No,, 10
Tilt Bracket Screw No, 10424 x _8 Type 23
Table Bracket
*55
*56
57
"58
59
4067
4035
4001
4033
4016
Table Clamp
Car riage Bolt 3/t6-24
-_" (2 required)
Bow Pivot Screw (3 required} No,. 10-32 x i a/4
Trim Strip
Suction Cup Screw No. 10 Type A
Base
60
61
62
63
*64
A
4038
4068
4040
4208
4225
15084
Short Suction
Cup
*Standard Hardware )tern-May Be Purchased Locally
405015
5
Description
Long Suction Cup
Base Screw No,. 10-32 x _ia
Weight
x -Y8Type 23
(Compl, with Set Screw)
Screws
Field Bolt (2 required)
Bearing Bracket (CompL
Field Bolt Spacer
Rotor Spacer
Rotor
No, 10=24 x s/_Type 23
with Bearing)
Spiral Pin
Field Complete
Bearing Bracket (with Bearing)
Switch
Ground Screw No. 6--32 x :_ '° Type 23
Lockwasher
No 10
NuL Hex No, 10-32
Motor Housing
Switch Screw No 4 x _8 Type A
Strain Relief
Cord
Screw Keeper
Upper Motor Mounting Screw
Housing Extension
Housing Extension Screw No 6-32 x _8 Type 23
Complete Motor Assembly (Less Housing)
,
owners manual (not illustrated}
How
to ORDER
Repair
Parts
The Model Number wilt be found on a plate attached to your Saw
at the rear of the base, Always mention the Model Number when
requesting service or repair parts,
All parts listed herein may be ordered through SEARS, ROEBUCK
AND CO or SlMPSONS-SEARS
LIMITED, When ordering parts
by mail, selling prices will be furnished on request or parts will
be shipped at prevailing prices and you will be billed accordingly,,
WHEN ORDERING REPAIR PARTS, ALWAYS GIVE THE FOLLOWING INFORMATION AS SHOWN IN THIS LIST,,
MODEL NO.
572.24700
SER VICE
is at
YOUR
SERVICE
wherever YOU
live or move
in the U.S.A.
Made
in
UoSA,
.
The PART NUMBER
2
The PART DESCRIPTION
3,
The
4,
The NAME OF ITEM--SCROLL
MODEL
NUMBER
572,24700
SAW/SANDER
Your Sears merchandise takes on added value when you discover that Sears has over 2,000 Service Units throughout the
country Each is staffed by Sears-trained,
professional technicians using Sears approved parts and methods,
Sears,
Roebuck
and
Simpsons-Sears
6
and
Co., Chicago,
Ill.
Limited,
Toronto
60607
U.S.A.