1
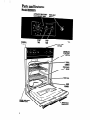
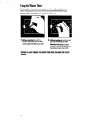
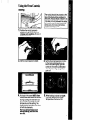
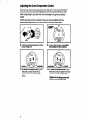
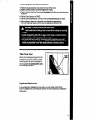
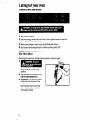
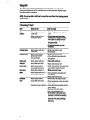
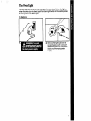
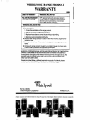
L
--
BUILT IN
OVENModel
Rl32OOOXV
I I’
~ Contents
Page
BEFOREYOU USEYOUR OVEN
IMPORTANT SAFETY
INSTRUCTIONS .
PARTS AND FEATURES
USING YOUR OVEN
Setting the Clock
Using the Minute Timer
Using the Oven Controls
Baking
. .
.
Broiling
.
Using the Automatic
MEALTIMER’ Clock
2
3
z
5
6
7
7
9
10
Oven Vent
Optional Rotisserie
CARING FOR YOUR OVEN..
Control Panel and Knobs
Oven Door
Oven Window
Standard Oven Cleaning
Cleaning
Chart
Oven Light
Page
11
11
12
12
12
13
13
14
15
IF YOU NEED SERVICE OR
ASSISTANCE
WHIRLPOOL OVEN WARRANTY
16
20
‘Tmk.
01988 Whirlpool
Corporation
Before you use your oven
Read and carefully
your oven.
follow the Installation
Instructions
packed
wlth
Read thls Use & Care Guide and the Cooking Guide carefully for important use
and safety information. Store this literature in a convenient
place for future use.
It Is your personal
l
l
l
l
l
l
See Cooklng
2
responslbllitY
and obllgaffon
to be sure your oven:
Has been installed where it is protected
from the elements.
Has been installed and leveled in a wall or cabinet that will hold the weight.
Has been properly connected
to electrical
supply and grounded.
(See Installation
Instructions.]
Is not used by anyone unable to operate it properly.
Is properly
maintained.
Is used only for jobs expected
of a home oven.
Gulde for Important
safety and use lnformatlon.
IMPORTANT
SAFETY INSTRUCTIONS
1. DO NOT allow
children to use or
play with any part of the oven, or
leave them unattended
near it.
They could be burned or injured.
2. DO NOT store things children
might want above the oven. Children could be burned or injured
while climbing on the door and
the door could be damaged.
3. KEEPchildren
l
Let steam and hot air escape
from the oven before removing
food to prevent burns.
4. DO NOT use the oven to heat a
room. Persons in the room could
be burned or injured, or a fire
could start.
5. DO NOT wear loose or hanging
aarments when usina the oven.
They could ignite if t6ey touch a
heating element and you could
be burned.
away from the
oven when it is on. The oven walls,
racks and door can get hot
enough to cause burns.
6. DO NOT heat unopened
con* Put oven racks where you
tainers, they could explode. The
want them before turning on
hot contents could burn you
the oven. Heated racks
and container particles could
could cause severe burns.
cause iniurv.
, .
l Do not touch
any part of the
7. When adding or removing food.
oven, especially
the heating
MAKE SUREto open the oven
elements, until you know they
door all the way to prevent burns.
are completely
cool. Dark elements can still be hot enough
to cause severe burns.
l FOR YOUR SAFETYl
DO NOT STORE OR USE GASOLINE OR OTHER FLAMMABLE VAPORS AND
LIQUIDS IN THE VICINITY OF THIS OR ANY OTHER APPLIANCE. THEY COULD
IGNITE CAUSING EXPLOSION AND/OR FIRE.
- SAW THESE INSTRUCTIONS
-
Thank you for buying a Whirlpool appliance. Please complete and mail
the Owner Registration Card provided with this product. Then complete
the form below. Have this information
a question.
l
l
Copy model and Serial numbers
from plate (behind the oven door
on the oven frame] and purchase
date from sales slip.
Keep this book and sales slip together in a handy place.
ready
if you need service
or call with
Model NUmber
Serial Number
Purchase
Date
Service Company
Phone Number
3
iI
Parts and features
Model RB2000XV
CONTROL
PANEL \
-.v.
TIME
TIME
‘Tmk.
/
OVEN VENT
AUTOMATIC
OVEN LIGHT
/
SWITCH
-
II I III
-
MODEL AND SERIA
NUMBER PLATE
OVEN RACK
BAKE
ELEMENT
OVEN
SELECTOR
OVENTEMPERATURE
CONTROL\
OVEN /
SIGNAL LIGHT
Using your oven
Setting the Clock
Push in and turn the Minute Timer Knob to set the Clock.
1. Push
in Minute Timer Knob and
turn clockwise until clock shows
the right time of day.
2. let the Minute Timer Knob pop
out. Turn clockwise
until Minute
Timer hand points to OFF. The
clock setting will change If you
push in the knob when turning.
Using the Minute Tiier
The Minute Timer does not start or stop the oven. It works like a kitchen timer.
Set it in minutes up to an hour. You will hear a buzzer when the set time is up.
DO NOT PUSH IN THE KNOB when setting the Minute Timer.
1. Without
pushing it in, turn the
Minute Timer Knob until the timer
hand passes the setting You want.
2. Wlthout pushing in, turn the knob
back
to the setting you want.
When the time is up, a buzzer
will sound. To stop the buzzer, turn
the Minute Timer hand to OFF.
PUSHING IN AND TURNING THE MINUTE TIMER KNOB CHANGES THE CLOCK
SETTING.
6
II
Using the Oven Controls
Baking
The rack(s) should be placed so the
top of the food will be centered in
the oven. Always leave at least lY2 to
2 inches (4-5 cm) between the sides
of the pan and the oven walls and
other pans. For more information,
see the Cooking Guide.
1. Position the rack(s) properly
before turning on the oven. To
change rack position, lift rack at
front and pull out.
2. Set the Oven Selector
to BAKE.
4. Put food in the oven. NOTE: Oven
racks, walls and door will be hot.
During baking, the elements will
turn on and off to keep the oven
temperature
at the setting. The
Oven Signal Light will turn on and
off with the elements.
The top element helps heat
during baking, but does not
turn red.
3. Set the Oven Temperature
Control
to the baking temperature
you
want. The Oven Signal Light will
come on. The oven is preheated
when the Oven Signal Light first
5. When baking is done, turn both
the Oven Selector and Oven
Temperature
Control to OFF.
Adjusting the Oven Temperature
Control
Does your oven seem hotter or colder than your old oven? The temperature
of
your old oven may have shifted gradually
without you noticing the change.
Your new oven is properly adjusted to provide accurate temperatures.
But
when comparing
to your old oven, the new design may give you difficult
results.
If after using the oven for a period of time, you are not satisfied with the
temperature
settings, they can be adjusted by following these steps:
LOCKING
1. Pull the
Oven Temperature
Knob straight off.
Control
OFF
screw. Note
the position of the notches.
2. Loosen the locking
OFF
i. To lower the temperature,
move
the tooth a notch closer to LO.
Each notch equals about 10°F
(SOC].
4.
To raise the temperature, move
the tooth a notch closer to HI. Each
notch equals about 10°F (WC].
Tighten fhe locking screw and
replace the control knob.
Broiling
1. Position
2. Put the broiler
the rack.
3. Close the door to the Broil Stop
position (open about 4 inches,
10.2 cm). The door will stay open
by itself.
4. Set the Oven Selector and Oven
Temperature
Control to BROIL.
the rack before turning
the oven on. See “Broil Chart” in
the Cooking Guide or a reliable
cookbook
for recommended
rack positions.
pan and food on
5. When broiling is done, turn both
the Oven Selector and Oven
Temperature
Control to OFF.
Custom Broil
l
If food is cooking
too fast, turn the Oven Temperature
Control counterclock-
wise until the Oven Signal Light goes off.
l
If you want the food to broil slower from the start, set the Oven Temperature
Control between 150” and 325°F (65.5” and 162.7”C). The lower the temperature, the slower the cooking.
The Oven Selector must be on BROIL for all broiling temperatures.
NOTE: The door must be partly open whenever the oven Is set to BROIL.
leaving the door open allows the oven to maintain proper temperatures.
Using the Automatic
MEALTIMER”
Clock
The automatic
MEALTIMER’ Clock is designed
to turn the oven on and off at times
you set, even when you are not around.
Automatic
baking is ideal for foods which do not require a preheated
oven,
such as meats and casseroles. Do not use the automatic cycle for cakes,
cookies, etc...undercooking
will result.
To start and stop baking automatically:
1. Position
2. Make sure the clock Is set to the
right time of day.
3. Push in and turn the Start Time
Knob clockwise to the time you
want baking to start.
4. Push in and turn the Stop Time
Knob clockwise to the time you
want the oven to shut off.
5. Set the Oven Selector
6.
the oven rack(s) properly
and place the food in the oven.
on TIMED.
Set the Oven Temperature
Control on the baking temperature
you want. The oven will now start
and stop automatically.
7. After baking is done or to stop
the oven before preset time, turn
10
both the Oven Selector and the
Oven Temperature
Control to OFF.
To start baking now and stop automatically:
1. Position rack(s) properly and place the food in the oven.
2. Make sure the clock Is set to the right time of day.
3. Push in and turn the Stop Time Knob clockwise to the time you want the oven
to shut off.
4. Set the Oven Selector on TIMED.
5. Set the Oven Temperature
Control on the baking
temperature
you want.
6. After baking is done or to stop the oven before the preset tlme,
turn both the Oven Selector
and Oven Temperature
Control to OFF
The Oven Vent
Hot air and moisture escape from the
oven through a vent on the top of the
control panel. The vent is needed for
air circulation.
Do not block the vent.
Poor baking can result.
Optional
Rotisserie
If you would like a rotisserie for your oven, you can order a kit (Part No.
RCK-79/261881) from your Whirlpool Dealer. The kit includes easy installation
instructions.
Caring for your oven
Control Panel and Knobs
1. Pull
knobs straight off.
2. Use warm soapy water and a soft cloth, or spray glass cleaner,
control panel. Rinse and wipe dry
3. Wash control
4. Push control
knobs in warm soapy
knobs straight
back
water. Rinse well and dry.
on. Make sure they point to OFF.
The Oven Door
Removing
the oven door will help make
1.
Open the door to the first stop
position.
2. Hold the door at both sides and lift
it at the same angle it is in.
3. To replace, fit the bottom corners
of the door over the ends of the
hinges.
Push the door down evenly. The
door will close only when it is on
the hinges correctly.
12
to wipe the
it easier to clean
the oven.
I
I I’
The Oven Window
Your oven has an oven window
for cleaning.
that the outer glass and frame can be removed
To remove the outer window:
2. Slightly tip the window and
frame out from the top.
With the door closed, remove the
screws from the top of the outer
window frame.
3. With both hands, lift up on both
sides of the frame.
To replace the outer window:
I
I
1
1. Fit the
bottom tabs of the frame
into the bottom of the window
opening.
3. Replace
the screws.
2. Push the top of the frame into
place while pushing down.
Standard Oven Cleaning
The Standard Oven has to be hand cleaned.
wool pads and a commercial
oven cleaner.
instructions.
Use warm soapy water and steel
See “Cleaning
Chart” for further
Do not allow commercial oven cleaner to contact the heatlng elements,
thermostat, oven seal or exterior surfaces of the oven. Damage will occur.
Using Foil
To catch sugar or starch spills from pies and casseroles, use a piece of
heavy-duty
aluminum foil or a shallow pan on the lower rack, slightly larger
than the cooking container.
NOTE: Do not use toll or foil liner to cover the oven floor. Poor baking results
could occurS
Cleaning Chart
HOW TO CLEAN
PART
WHAT TO USE
Oven
exterior
Warm soapy water and
a sotl cloth.
Plastic scrubbing pad
for stubborn spots.
Control knobs
Warm soapy water and
a soft cloth.
Control panel
Warm soapy water or
spray glass cleaner
and a soft cloth.
Broiler pan
and grid
Warm soapy water or a
soapy steel wool pad.
Oven racks
Warm soapy water or
soapy steel wool pads.
Oven door
glass
Spray glass cleaner or
warm soapy water and a
plastic scrubbing pad.
Wipe off regularly when oven is
cool.
9 Do not allow food oontalnlng
acids (such as vinegar, tomato,
lemon Juice or milk) to remaln
on surface. Aolds will remove
the glossy flnlsh.
l Do not use abrasive
or harsh
cleansers.
l
l
l
l
l
l
l
l
l
l
l
Standard
oven
Warm soapy water or
soapy steel wool pads.
l
Commercial
l
oven
CleCnerS.
l
l
l
l
14
Wash, rinse and dry well.
Do not soak.
Wash, rinse and dry well.
Follow directions provided
the cleaner.
with
Clean after each use.
Wash, rinse and dry well.
Wash, rinse and dry. Use soapy steel
wool pads for stubborn areas.
Make sure oven Is cool.
Follow dlrectlons provided
the cleaner.
Wash, rinse and drv well.
with
Remove door for easier access.
Place newspaper on floor to protect
floor surface.
Follow dlrections provided with the
oven cleaner.
Rinse well with clear water.
Use in well ventilated room.
Do not allow commerolal oven
cleaners to contact the heatlng
elements, oven seal or exterior
surfaces ot the oven. Damage
will occur.
The Oven Light
The oven light will come on when you open the oven door. To turn the light on
when the oven door is closed, push the Oven Light Switch on the control panel.
Push it again to turn off the light.
To Replace:
If you need service or assistance,
we suggest you follow these five steps:
1. Before calling for
2. If you need
assistance...
Performance
problems
often result
from little things you can find and fix
without tools of any kind.
If nothing operates:
l
l
Is the oven wired into a live circuit
with the proper voltage?
(See Installation Instructions.)
Have you checked
your home’s
main fuses or circuit breaker box?
If the oven will not operate:
l
l
Is the Oven Selector turned to a setting (BAKE or BROIL, but not TIMED)?
Is the Oven Temperature
Control
turned to a temperature
setting?
If cooking
expected:
l
l
l
l
l
l
results aren’t what you
Is the oven level?
Are you using pans recommended
in the Cooking Guide?
If baking, have you allowed 11/2 to 2
inches (4-5 cm] on all sides of the
pans for air circulation?
Have you preheated
the oven as the
recipe calls for?
Are the pans the size called for in the
recipe?
Are you following
a tested recipe
from a reliable source?
See the Cooking Guide for more information on cooking
problems
and
how to solve them.
16
assistance%.
Call Whirlpool COOL-LINE” service assistance telephone number.
Dial free from anywhere in the U.S.:
l-800-253-1301
and talk with one of our trained consultants The consultants
can instruct
you in how to obtain satisfactory operation from your appliance
or, if service is necessary,
recommend
a
qualified
service company
in your
area.
3.
If you need service*. . .
Whirlpool
has
nationwide
a
network of franchised
TECH] CARE@ Service
Companies.
&iwE
TECH-CARE servSERVICE
J
FRANCWSED
L-~~__
ice technicians
are trained to fulfill the product warranty and provide
after-warranty
service, anywhere
in the United States.
To locate TECH-CARE service in your
area, call our COOL-LINE service assistance telephone
number (see Step
2) or look in your telephone
directory
Yellow Pages under:
4.
If you have a
problem?..
Call our COOL-LINE service assistance
telephone
number (see Step 2) and
talk with one of our consultants, or if
you prefer, write to:
Mr. Donald Skinner
Director of Customer Relations
Whirlpool Corporation
2000 M-63
Benton Harbor, Ml 49022
5.
If you need FSP”
replacement parts%..
FSP is a registered
trademark
of
Whirlpool
Corporation
for quality
parts. Look for this symbol of quality
whenever
you need a replacement
part for your Whirlpool appliance.
FSP
replacement
parts will fit right and
work right, because they are made to
the same exacting
specifications
used to build every new Whirlpool
appliance.
To locate FSP replacement
parts in
your area, referto Step 3aboveorcall
the Whirlpool
COOL-LINE service assistance number in Step 2.
* If you must call or write, please provide: model number, serial number,
date of purchase, and a complete
description
of the problem. This information is needed
in order to better
respond
to your request for assistance.
II
Notes
18
Notes
19
WHIRLPOOL”
I
RANGE PRODUCT
W-TY
EROOl
LENGTH OF WARRANTY
WHIRLPOOL WILL PAY FOR
FULLONE-YEAR WARRANTY
From Date of Purchase
FSP@replacement parts and repair labor to
correct defects in materials orworkmanship.
Service must be provided by a franchised
TECH-CAREa service company.
WHIRLPOOL WILL NOT PAY FOR
A. Service calls to:
I. Correct the installation of the range product.
2. Instruct you how to use the range product.
3. Replace house fuses or correct house wirlng or plumbing.
4. Replace owner accessible light bulbs.
B. Repairs when range product is used in other than normal, single-family
household use.
C. Pick up and delivery. This product is designed to be repaired in the
home.
D. Damage to range product caused by accident, misuse, fire, flood, acts
of God or use of products not approved by Whirlpool.
WHIRLPOOLCORPORATION SHALL NOT BELIABLEFOR INCIDENTAL OR CONSEQUENTIAL
DAMAGES. Some states do not allow the exclusion or limitation of incidental or
consequential damages so this limitation or exclusion may not apply to you. This
warranty gives you specific legal rights, and you may also have other rights
which vary from state to state.
Outside the United States, a different warranty may apply. For details, please
contact your franchised Whirlpool distributor or military exchange.
Whirlpool
Part No. 3148314
01988 Whirlpool Corporation
Printed in U.S.A.