1
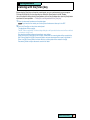
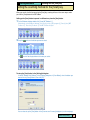
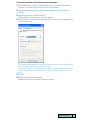
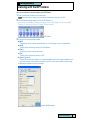
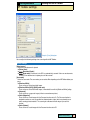
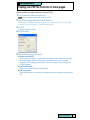
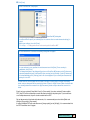
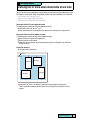
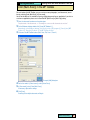
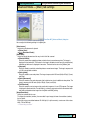
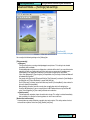
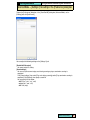
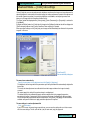
Return to
cover
Scanning with the [Scan] key ........................................................ 2
Setting the scanning method for the [Scan] key.......................... 3
Scanning with the MP Toolbox....................................................... 5
MP Toolbox settings .................................................................... 7
Scanning an image from an application ..................................... 10
Creating one PDF file from two or more pages .......................... 11
Scanning two or more small documents at one time ................ 13
[Color (Multi-Scan)] in the MP Toolbox...................................... 14
[Multi-Scan] in ScanGear MP (Simple Mode) ........................... 15
[Multi-Crop] in ScanGear MP (Advanced Mode)....................... 17
Setting preferences and scanning with ScanGear MP .............. 18
Using Simple Mode ................................................................... 19
Using Advanced Mode .............................................................. 20
Advanced Mode Toolbar............................................................ 21
Advanced Mode – Specifying the parameters of a scan........... 22
Advanced Mode — [Main] tab settings ..................................... 23
Advanced Mode — [Settings] tab settings ................................ 25
Advanced Mode — [Settings 1] tab settings
in the [Preferences] dialog box .................. 27
Advanced Mode — [Settings 2] tab settings
in the [Preferences] dialog box .................. 29
Advanced Mode — [Color] tab settings..................................... 30
Advanced Mode — [Color] tab — Brightness and contrast....... 32
Advanced Mode — [Color] tab — Gamma................................ 33
Advanced Mode — [Color] tab — Histogram ............................ 34
Advanced Mode — [Color] tab — Tone curve ........................... 35
3
Scanning
Troubleshooting
Scanning images
s Problems scanning
Advanced Mode — [Halftone] tab ............................................. 36
Determining resolution .............................................................. 37
Scanning with the WIA driver (Windows XP only) ..................... 38
Setting preferences in the WIA driver........................................ 39
Troubleshooting ............................................................................ 40
Problems scanning.................................................................... 41
Glossary (Scanning) ..................................................................... 45
Index (Scanning) ........................................................................... 47
MP Toolbox
MP730/MP700
Software Guide (Scanning)
1
3 Scanning documents
Scanning with the [Scan] key
By pressing the [Scan] key on the printer control panel, you can scan documents to your computer.
Pressing the [Scan] key has the same effect as clicking the [Save] button in the MP Toolbox.
You can change the settings for the [Save] button or you can set up a button other than the [Save] button
to perform the same operation. → “Setting the scanning method for the [Scan] key”
1
Place the document face-down on the platen glass.
Fax Model If you have the fax model, you can also place the document face-up in the ADF.
2
Press the [Scan] key on the printer control panel.
The document will be scanned.
The MP Toolbox and the MP Toolbox settings dialog box will open but the document will scan without
you having to click [Scan].
Your document will be processed according to your settings.
When you use the [Scan] key for the first time, a folder with the scanning date will be created in the
[My Pictures] folder in the [My Documents] folder, and your document will be saved in this folder. If
there is no [My Pictures] folder, the folder with the scanning date will be created in the [My
Documents] folder and your document saved in this folder.
MP730/MP700
Software Guide (Scanning)
2
3 Scanning documents
Scanning with the [Scan] key
Setting the scanning method for the [Scan] key
When you scan for the first time pressing the [Scan] key, scanning will occur in the same way as when
you click the [Save] button in the MP Toolbox.
Setting up the [Scan] button to operate in a different way from the [Save] button.
1
On the Windows desktop, double-click [Canon MP Toolbox 4.1].
Alternatively, on the Windows desktop, click [Start], point to [(All) programs], [Canon], then [MP
Toolbox 4.1]. Then click [Toolbox 4.1]. The MP Toolbox will open.
2
Drag the
The
mark over the button you want to select.
mark will be displayed above the button you select.
To set up the [Scan] button in the [Settings] dialog box
In the MP Toolbox, click [Settings]. In the [Settings] dialog box, in [Scan Button], select the button you
want to link the [Scan] button to, then click [OK].
You can also set up the [Scan] button in the [Scanners and Cameras] dialog box (see the next page).
MP730/MP700
Software Guide (Scanning)
3
To set up the [Scan] button in the [Scanners and Cameras] dialog box
1
On the Windows taskbar, click [Start], point to [Settings], then click [Control Panel] (Windows XP:
Click [Start], click [Control Panel], then click [Printers and Other Hardware]).
2
In the open window, double-click [Scanners and Cameras] (Windows XP: Click [Scanners and
Cameras]).
3
Right-click the printer icon, then click [Properties].
(Windows 98/2000: Click the printer icon, then click [Properties].)
4
On the [Events] tab, in [Send to next application] (Windows XP: [Actions]), select the operation for the
[Scan] key when pressed.
If you select an imaging application or an application such as Photoshop to open, ScanGear MP will
initially open when you press the [Scan] key on the printer.
If you set the MP Toolbox to open, if [Use the scanner driver to make advanced settings] is selected
in the MP Toolbox settings, ScanGear MP will initially open when you press the [Scan] key on the
printer.
5
6
Click [OK].
Windows 2000 only: Restart your computer.
Windows 2000/Me: Restart your computer to activate your setting.
MP730/MP700
Software Guide (Scanning)
4
3 Scanning documents
Scanning with the MP Toolbox
You can scan a document using the buttons on the MP Toolbox.
1
Place the document face-down on the platen glass.
Fax Model If you have the fax model, you can also place the document face-up in the ADF.
2
On the Windows desktop, double-click [Canon MP Toolbox 4.1].
Alternatively, on the Windows desktop, click [Start], point to [(All) programs], [Canon], then [MP
Toolbox 4.1]. Then click [Toolbox 4.1]. The MP Toolbox will open.
MP Toolbox
3
Click one of the scanning buttons below.
¡ [Mail]
The document will be scanned and attached to an e-mail message in your e-mail application.
¡ [OCR]
The text will be scanned and read by the OCR software.
¡ [Save]
The document will be scanned and saved.
¡ [File]
The text will be scanned and saved as a PDF.
¡ [Scan-1], [Scan-2]
The text will be scanned and appear in the registered application. You can change the button name
by directly entering a new name over the button name. The name can be up to 8 characters long.
A dialog box will appear for each of the buttons.
Example: [Mail] dialog box
MP730/MP700
Software Guide (Scanning)
5
4
Adjust the settings.
→ “MP Toolbox settings”
If you clicked a button other than [Save] or [File] and no application appears in [Link scanned image
to], select an application.
If you want to keep the same settings for future scans, click [Apply] before clicking [Scan].
5
Click [Scan].
When ScanGear MP is displayed
[ScanGear MP] dialog box
If you clicked [Use the scanner driver to make advanced settings] in Step 4, ScanGear MP will
appear.
Adjust the settings, then click [Scan].
For settings, → “Setting preferences and scanning with ScanGear MP.”
Scanning will begin.
If you clicked [Save] or [File] in step 3, a folder with the scanning date will be created in the [My
Pictures] folder in the [My Documents] folder, and your document will be saved in this folder. If there is
no [My Pictures] folder, the folder with the scanning date will be created in the [My Documents] folder
and your document saved in this folder.
If you clicked [Mail], [OCR], [File] or [Scan-1] in step 3, the scanned image will be displayed in the
application after scanning. Send the e-mail message or perform OCR conversion. (The scanned
image will not be displayed if you have not installed the applications on the MP730/700 Setup CDROM or if you have not set the [Link scanned images to] setting.)
When the applications in the MP730/700 Setup CD-ROM are installed, one part will be registered in
the MP Toolbox buttons.
[OCR] ScanSoft OmniPage
[File] Presto! PageManager
MP730/MP700
Software Guide (Scanning)
6
3 Scanning documents
Scanning with the MP Toolbox
MP Toolbox settings
Example: [Scan] dialog box
You can adjust the following settings when scanning with the MP Toolbox.
Scanner settings
[Select source]
Select where the document is placed.
¡ [Platen Glass]
¡ Fax Model [Document Feeder]
¡ Fax Model [Auto mode] Documents in the ADF are automatically scanned. If there are no documents
in the ADF, the document on the platen glass will be scanned.
[Scan mode]
Select the scan mode. The scan modes you can select differ depending on the MP Toolbox button you
press.
¡ [Black and White]
Scans an item as a black and white image.
¡ [Black and White (OCR)] ([OCR] button only)
Scans an item as a black and white image, in more detail than with the [Black and White] setting.
¡ [Grayscale]
Scans an item as a grayscale image (similar to a monochrome picture).
¡ [Color (Magazine)]
Scans an item as a color image with the Descreen function set to On. The Descreen function is
designed to reduce as much as possible the distorted pattern (moire) which occasionally occurs
when scanning printed materials. The scanning of a document will take longer if you use this
function.
¡ [Color (Photos)]
Scans an item as a color image with the Descreen function set to Off.
MP730/MP700
Software Guide (Scanning)
7
¡ [Color Multi-Scan)] (Only when [Platen Glass] is selected in [Select source])
For scanning in multiple images placed on the platen glass, and creating a separate image file for
each one.
For the [Mail] button, a new e-mail message with several images attached, or several new mail
messages with an image attached will open.
For the [Scan-1] and [Scan-2] buttons, separate files of each image will be created in the linked
application.
If you select [PDF] in [Save as type], and then click [Create multiple PDF] in the [PDF settings]
dialog box, multiple documents will be saved as one PDF.
¡ [Color (Auto crop)] (Only when [Platen Glass] is selected in [Select source])
For automatic detection of the document size and color scanning of the document. Even if there are
multiple documents on the platen glass, only one file will be created.
[Paper size]
Select the size of the document you will scan.
If you wish to specify the width and height with a value, select [Custom] to display the [Paper size
settings] dialog box. Select the [Unit], enter the [Width] and [Height], then click [OK].
You cannot select a document size when [Color (Multi-Scan)] or [Color (Auto crop)].
[Upper limit of attached file]
Select an approximate upper size limit (after compression) for the image you will send. (Depending on
the image, some file sizes after compression may be larger than the value set.)
For an ordinary mail message, a file size of [150KB] is recommended.
You cannot select set this item when [PDF] is selected in [Save as type].
[Image quality]
Select the scan quality (resolution). → “Determining resolution”
For the [Mail] button, the choices you can select will depend on your setting in [Upper limit of attached
file].
If [Color (Multi-Scan)] or [Color (Auto crop)] is selected in [Scan mode], you will only be able to select
75 dpi, 150 dpi or 300 dpi.
The maximum resolution when [PDF] is selected in [Save as type] is 400 dpi.
[Use the scanner driver to make advanced settings]
If you select this item and then click [Scan], the ScanGear MP dialog box will appear and you can make
advanced settings for scanning.
Enter [Scanner settings] such as [Scan mode] and [Paper size] in the ScanGear MP dialog box.
→ “Setting preferences and scanning with ScanGear MP”
If you clear this item, scanning will begin immediately with the settings displayed.
[Save scanned image to]
[File name]
Enter a file name for the scanned image.
If you try to save another file with the same name, four digits starting from 0001 will be attached after
the file name.
[Save as type]
¡ [BMP] Bitmap format
¡ [JPEG] JPEG format. Select for grayscale or color images only.
¡ [TIFF] TIFF format
¡ [PDF] PDF format. You can make advanced settings with the [PDF settings].
The type of file which can be saved with each button is shown below. → “Creating one PDF file from
two or more pages”
BMP JPEG TIFF PDF
[Mail]
–
K
–
K
[OCR]
K
–
K
–
[Save]
K
K
K
K
[File]
–
–
–
K
[Scan-1], [Scan-2]
K
K
K
–
MP730/MP700
Software Guide (Scanning)
8
If you select [PDF] in [Save as type], and select Color/A4-size/more than 600 dpi in ScanGear MP, a
warning message will appear and you will not be able to scan. Reduce the document size and lower
the resolution.
If you select [JPEG] in [Save as type] and then select [Newspaper] in ScanGear MP Simple Mode or
[Black and white] in ScanGear MP Advanced Mode, the document will still be saved in grayscale.
[Save to]
The place the scanned image will be saved is displayed.
To change the folder in which the saved image is to be saved, click [Browse], select a folder for saving
the image, then click [OK].
When you scan for the first time, a folder with the scanning date will be created in the [My Pictures]
folder in the [My Documents] folder, and your document will be saved in this folder. If there is no [My
Pictures] folder, the folder with the scanning date will be created in the [My Documents] folder and your
document saved in this folder.
[Put pictures in a subfolder using today’s date]
You can either directly save an image in the specified folder or create a folder inside the specified folder
with today’s date (e.g. 04/04/2003) and select to save in this folder.
[Link scanned images to]
The name of the application to be used by the scanned image will appear. If no name appears or you
wish to change the application, click [Set], select the application you wish to use, then click [Open].
If for the [Mail] button the name of the application you wish to use does not appear in the [Settings for
E-mail program] dialog box, select [None (Attach Manually)]. In this case, the application will not open
so you must open the image file in the application and attach the file.
The software is compatible with the e-mail software Outlook Express, Microsoft Outlook, EUDORA and
Netscape Messenger.
If you do not want to select an application, click [Link Deletion]. When asked to confirm, click [Yes].
MP730/MP700
Software Guide (Scanning)
9
3 Scanning documents
Scanning an image from an application
You scan an image from a TWAIN or WIA-compliant application and use the image in that application.
This procedure varies depending on the application. The following is only one example. For the correct
procedure, refer to the documentation of the application you are using.
1
Place the document face-down on the platen glass.
Fax Model You can also place the document face-up in the ADF.
2
3
In the application, click the command to scan a document ([Import], [Acquire image] etc.).
4
If necessary, in the scanner driver dialog box, preview the scan and make adjustments.
→ “Setting preferences and scanning with ScanGear MP”
→ “Scanning with the WIA driver (Windows XP only)”
5
Click [Scan].
When scanning is completed, the scanned image will appear in the application’s display area.
Select the scan driver.
With Windows XP you can use the ScanGear MP or the WIA driver as the scanner driver.
¡ To use ScanGear MP, select [Canon MP730] or [Canon MP700].
¡ To use the WIA driver, select [WIA CANON MP730] or [WIA CANON MP700].
MP730/MP700
Software Guide (Scanning)
10
3 Scanning documents
Creating one PDF file from two or more pages
You can scan two or more pages and make them into one PDF file.
1
Place the document face-down on the platen glass.
Fax Model You can also place the document face-up in the ADF.
2
On the Windows desktop, double-click [Canon MP Toolbox 4.1].
Alternatively, on the Windows desktop, click [Start], point to [(All) programs], [Canon], then [MP
Toolbox 4.1]. Then click [Toolbox 4.1]. The MP Toolbox will open.
3
Click [File].
If necessary, adjust any settings.
4
Click [PDF settings].
5
Adjust the following settings, then click [OK].
¡ [Create searchable PDF]
Click to convert the characters in the document to text data and make the document searchable
with simple keywords. However, all the characters in the document may not be accurately
recognized. In [Text language], select [English]. In [Scanner settings], in [Image quality], select
[300 dpi] or greater.
¡ [Create multiple PDF]
Click to create one PDF file from several documents.
¡ [PDF compression]
Select [High] for images such as photos or illustrations to be further compressed, reducing the file
size.
MP730/MP700
Software Guide (Scanning)
11
6
Click [Scan].
When ScanGear MP is displayed
[ScanGear MP] dialog box
ScanGear MP will open if you selected [Use the scanner driver to make advanced settings] in
step 3.
Adjust your settings, then click [Scan].
For settings, → “Setting preferences and scanning with ScanGear MP.”
As each document is scanned, the following dialog box will appear.
As you continue to scan, position the next document and click [Next]. Once scanning is
completed, click [Finish].
The above dialog box is not displayed if you have set ScanGear MP to open and in [Preferences],
selected [Automatically quit ScanGear MP after scanning] on the [Settings 1] tab in [Preferences]
in Advanced Mode on the [Settings] tab. It will also not appear if you scanned your document by
placing it in the ADF.
A folder with the scanning date will be created in the [My Pictures] folder in the [My Documents]
folder, and your document will be saved in this folder. If there is no [My Pictures] folder, the folder with
the scanning date will be created in the [My Documents] folder and your document saved in this
folder.
Even if you have selected [Color (Multi-Scan)] in [Scan mode], if you have selected [Create multiple
PDF], one PDF will be created from several documents placed on the platen glass. If you continue to
scan multiple documents, they will also be created into one PDF.
For text documents or black-and-white documents, it is recommended you select either [Black and
White] or [Grayscale] in [Scan mode].
If making a Multiple PDF with color documents ([Image quality] set to [300 dpi]), it is recommended that
the PDF have fewer than 20 pages.
MP730/MP700
Software Guide (Scanning)
12
3 Scanning documents
Scanning two or more small documents at one time
You can scan two or more photographs (small documents) at one time with the [Color (Multi-Scan)] in the
MP Toolbox, or with the [Multi-Scan] (Simple Mode) or [Multi-Crop] (Advanced Mode) in ScanGear MP.
→ “[Color (Multi-Scan)] in the MP Toolbox”
→ “[Multi-Scan] in ScanGear MP (Simple Mode)”
→ “[Multi-Crop] in ScanGear MP (Advanced Mode)”
Documents which will not be cropped accurately
The following types of documents will not be cropped accurately.
¡ Documents smaller than 9 64 inch2 (1cm2)
¡ Long, narrow documents, the proportion of the long and short sides of which is larger than 4:1
Documents which may not be cropped accurately
The following types of documents may not be cropped accurately.
¡ Photos that have an overall whitish appearance
¡ Photos that have a whitish border
¡ Documents other than photos (particularly documents printed on white paper, hand-written text,
business cards etc.)
Placing the document
You can place up to 10 documents.
(MP730)
(MP700)
Document
Document
Document
Document
Keep more than 3 8 inch (1cm) between the document and the edge of the platen glass.
There is automatic correction of documents that are not straight if they are off by less than 10
degrees.
MP730/MP700
Software Guide (Scanning)
13
3 Scanning documents
Scanning two or more small documents at one time
[Color (Multi-Scan)] in the MP Toolbox
For each button of the MP Toolbox, you can scan two or more photographs (small documents) at one
time by selecting [Color (Multi-Scan)] in [Scan mode].
You will not be able use this method for scanning multiple documents from an application. If you wish to
scan from an application, please use the ScanGear MP [Multi-Scan] or [Multi-Crop] setting.
1
Place the document face-down on the platen glass.
For placement of the documents, → “Scanning two or more small documents at one time.”
2
On the Windows desktop, double-click [Canon MP Toolbox 4.1].
Alternatively, on the Windows desktop, click [Start], point to [(All) programs], [Canon], then [MP
Toolbox 4.1]. Then click [Toolbox 4.1]. The MP Toolbox will open.
3
Click one of the MP Toolbox buttons (Mail, Save, File, Scan-1, Scan-2).
Example: [Mail] dialog box
4
5
For the fax model, in [Select source], select [Platen Glass].
6
Click [Scan].
Scanning of the multiple documents will begin.
In [Scan mode], select [Color (Multi-Scan)].
If necessary, adjust other settings.
MP730/MP700
Software Guide (Scanning)
14
3 Scanning documents
Scanning two or more small documents at one time
[Multi-Scan] in ScanGear MP (Simple Mode)
To scan two or more photographs without specifying the scanning area etc., use the [Multi-Scan] setting
in ScanGear MP (Simple Mode). Each photograph becomes one single image.
1
Place the document face-down on the platen glass.
For placement of the documents, → “Scanning two or more small documents at one time.”
2
Do one of the following.
¡ Use a button in the MP Toolbox
Click a button in the MP Toolbox, select [Use the scanner driver to make advanced settings], adjust
any other settings, then click [Scan].
¡ Scan in an application
With Windows XP, if the system is set up for the WIA driver, switch to ScanGear MP (→ “Scanning
an image from an application”) and select the command for scanning a document in the application
(e.g. [Import], [Acquire image]. See your application documentation).
The ScanGear MP dialog box will open.
3
4
5
If the [<< Simple Mode] is displayed, click [<< Simple Mode].
6
Click [Multi-Scan].
7
Select the color mode and resolution.
¡ [Color Mode]
Select from [Color], [Greyscale] and [Black and White].
¡ [Resolution]
Select from [75dpi], [150dpi] and [300dpi]. The higher the number, the more detail in your image;
the lower the number, the less detail.
→ “Determining resolution”
¡ [Magazine]
Suitable for scanning color magazines, with the Descreen function.
For the fax model, in [Select source], select [Platen Glass].
If you wish to see a preview, click [Preview].
The document will be provisionally scanned as a preview.
MP730/MP700
Software Guide (Scanning)
15
8
Click [Next].
Scanning of the multiple documents will begin.
If you selected [PDF] in [Save as type] in the MP Toolbox settings
As each document is scanned, the following dialog box will appear.
As you continue to scan, position the next document and click [Next]. Once scanning is
completed, click [Finish].
The above dialog box is not displayed if you have selected [Automatically quit ScanGear MP after
scanning] on the [Settings 1] tab, in [Preferences] in Advanced Mode on the [Settings] tab.
MP730/MP700
Software Guide (Scanning)
16
3 Scanning documents
Scanning two or more small documents at one time
[Multi-Crop] in ScanGear MP (Advanced Mode)
To specify in detail settings for scanning two or more photographs (small documents), use the [MultiCrop] in ScanGear MP (Advanced Mode).
Unlike the [Multi-Scan] in ScanGear (Simple Mode), you can set the scanning area etc.
1
Place the document face-down on the platen glass.
For placement of the documents, → “Scanning two or more small documents at one time.”
2
Do one of the following.
¡ Use a button in the MP Toolbox
Click a button in the MP Toolbox, select [Use the scanner driver to make advanced settings], adjust
any other settings, then click [Scan].
¡ Scan in an application
With Windows XP, if the system is set up for the WIA driver, switch to ScanGear MP (→ “Scanning
an image from an application”) and select the command for scanning a document in the application
(e.g. [Import], [Acquire image]. See your application documentation).
The ScanGear MP dialog box will open.
3
4
If the [Advanced Mode >>] is displayed, click [Advanced Mode >>].
5
If necessary, change the settings in [Color Mode] or [Output Resolution].
→ “Advanced Mode — [Main] tab settings”
→ “Advanced Mode — [Settings] tab settings”
6
In [Multi-Crop], click [Apply].
Each of the preview photos is surrounded by dotted lines. Each of the documents is separated by its
frame of dotted lines and is scanned as a separate document.
To delete all the dotted lines, click [Reset].
7
If you wish to adjust the frame of dotted lines drag the dotted lines.
If you wish to delete the frame, right-click the frame and then click [Delete].
8
Click [Scan].
Scanning of the multiple documents will begin.
Click [Preview].
The document will be provisionally scanned as a preview.
MP730/MP700
Software Guide (Scanning)
17
3 Scanning documents
Setting preferences and scanning with ScanGear MP
With ScanGear MP, you can review with the preview image (provisional scan) how the final image will be
scanned and make detailed adjustments for the size and color of the image. If the preview image is
satisfactory, you can then scan the document properly.
If you wish to make settings with ScanGear MP when scanning a document, you can either select [Use
the scanner driver to make advanced settings] in the MP Toolbox before scanning, or scan from an
application.
(If you are scanning from an application in Windows XP, select ScanGear MP in the application before
scanning. → “Scanning an image from an application”)
Switching between [Simple Mode] and [Advanced Mode]
ScanGear MP has two modes: [Simple Mode] and [Advanced Mode]. Use [Simple Mode] if you want to
scan without setting detailed preferences. With [Advanced Mode] you can set detailed preferences such
as resolution and contrast.
If the [<< Simple Mode] tab is showing in the upper right of the dialog box, you are in Simple Mode.
To switch to Advanced Mode, click [Advanced Mode >>] at the right.
If the [<< Simple Mode] is showing in the right of the dialog box, you are in Advanced Mode. If you
want to switch to Simple Mode, click the [<< Simple Mode].
Simple Mode dialog box
Advanced Mode dialog box
→ “Using Simple Mode”
→ “Using Advanced Mode”
MP730/MP700
Software Guide (Scanning)
18
3 Scanning documents
Setting preferences and scanning with ScanGear MP
Using Simple Mode
The Simple Mode dialog box is much simpler than the Advanced Mode dialog box.
The only settings you have to adjust are where the document is placed and what type of document it is.
[ScanGear MP] (Simple Mode) dialog box
1
Place the document face-down on the platen glass.
Fax Model You can also place the document face-up in the ADF.
2
In [Select source], select where the document was placed.
¡ [Platen Glass]
¡ Fax Model [Document Feeder]
3
In [Type of original], select the document type.
¡ [Photo] To Scan color photos (color, 300dpi)
¡ [Magazine] To Scan color magazines (color,150dpi, with the Descreen function)
¡ [Newspaper] To Scan text and line drawings (black and white, 300dpi)
¡ [Document] To scan color image or text in monochrome. Especially appropriate, for scanning
high-resolution monochrome image (grayscale, 300dpi)
If you select [Photo], [Magazine] or [Document], there will be automatic color correction. (To turn off
automatic color correction, in [Advanced Mode >>], on the [Settings] tab, click [Preferences]. On the
[Settings 1] tab, clear [Always perform the auto tone].)
4
To see a preview image (provisional scan), click [Preview].
A preview of the document will be scanned and appear at the left of the dialog box.
Fax Model If you placed your document in the ADF, reload it.
5
Click [Scan].
Scanning of the document will begin.
MP730/MP700
Software Guide (Scanning)
19
3 Scanning documents
Setting preferences and scanning with ScanGear MP
Using Advanced Mode
In Advanced Mode, you can adjust settings such as brightness and contrast to the preview.
[ScanGear MP] (Advanced Mode) dialog box
1
Place the document face-down on the platen glass.
Fax Model You can also place the document face-up in the ADF.
2
Select settings for [Select source], [Color Mode], [Output Resolution] and [Paper Size].
→ “Advanced Mode — [Main] tab settings”
3
4
Click [Preview].
5
If you want to print the document at a reduced or enlarged size specify the [Print Size].
→ “Advanced Mode — [Main] tab settings”
6
If necessary, rotate or flip the image, or apply settings such as [Descreen] and [Unsharp Mask].
→ “Advanced Mode Toolbar”
→ “Advanced Mode — [Settings] tab settings”
7
If necessary, in the [Color] tab, adjust the brightness and contrast.
→ “Advanced Mode — [Color] tab settings”
8
Click [Scan].
Scanning of the image will begin.
If you want to scan only part of the document, specify the parameters.
→ “Advanced Mode – Specifying the parameters of a scan”
MP730/MP700
Software Guide (Scanning)
20
3 Scanning documents
Setting preferences and scanning with ScanGear MP
Advanced Mode Toolbar
With the Advanced Mode Toolbar, you can make adjustments to the preview image and also select a part
of the image displayed.
To enlarge or reduce the preview image
1
2
On the Toolbar, click
(Zoom button).
To enlarge, left-click on the image.
To reduce, right-click on the image.
To move the image
If the enlarged image is too large to fit on the screen, on the Toolbar, click
(Move image button).
Then drag the image across the screen until the part you want to see is displayed.
You can move the image in the same way with the scroll bars.
To invert the color in the image
On the Toolbar, click
(Invert button).
To flip the image
On the Toolbar, click
(Mirror button).
To rotate the image
To rotate the image 90 degrees to the left, on the Toolbar, click
To rotate the image 90 degrees to the right, on the Toolbar, click
(Rotate Left button).
(Rotate Right button).
To show the ruler in the preview area
To display a ruler at the upper and left edges of the preview to make accurate measurements, on the
Toolbar, click
(Rulers button).
To delete the preview displayed
On the Toolbar, click
(Clear button). When asked to confirm, click [OK].
To detach and move the Toolbar
To detach the Toolbar from the ScanGear MP dialog box, click and hold on the edge of the Toolbar,
then drag the Toolbar. (It will return to its original position if you double-click on the title of the Toolbar.)
The Toolbar will adhere to a position if you drag it to the left or right of the preview area or the bottom
frame.
MP730/MP700
Software Guide (Scanning)
21
3 Scanning documents
Setting preferences and scanning with ScanGear MP
Advanced Mode – Specifying the parameters of a scan
You scan specify the parameters of a scan by selecting a part of the image. When you scan again, only
the part of the image you have specified is scanned.
You can specify the parameters of a scan with one of the following methods.
To select the parameters of a scan automatically
After previewing, on the Toolbar, click
(Auto crop button). Every time you click this button, the
parameters of the scan will gradually become smaller.
With the following operation, you can adjust the size and position of the specified area.
To specify the parameters of a scan
1
To maintain the current width and height proportions set for the image even after selecting the
parameters of the scan, on the Main tab, click
(keep proportions) button.
2
Do one of the following.
¡ Specify by dragging
Click
(Crop button). Then click and drag from the upper left corner of the parameter you wish to
specify to the lower right of the parameter. To adjust even further, drag the corner or border of the
selected parameters.
¡ Specify size
In [Width] and [Height], enter the parameters you want.
3
To move the crop border you have selected, place the mouse pointer inside the crop border, then
drag.
4
To preview the image, click [Preview].
To delete the settings, click on an area outside of the crop border.
MP730/MP700
Software Guide (Scanning)
22
3 Scanning documents
Setting preferences and scanning with ScanGear MP
Advanced Mode — [Main] tab settings
[ScanGear MP] (Advanced Mode) dialog box
You can adjust the following settings in the [Main] tab.
[Select source]
Select where the document is placed.
¡ [Platen Glass]
¡ Fax Model [Document Feeder]
[Color Mode]
Select the type of document and the way in which it will be scanned.
¡ [Black and White]
Select this mode when outputting photos and other items to monochrome printer. The image is
displayed in black and white. The contrast in the image is divided at certain levels (threshold values)
into black and white and is displayed in two colors. Threshold can be set on the [Halftone] tab.
¡ [Greyscale]
Select this mode to scan black and white photos or monochrome images. The image is expressed in
a 0–256 scale of black and white.
¡ [Color (photo)]
Select this mode to scan color photos. The image is expressed in 256 levels (8 bit) of R(ed), G(reen)
and B(lue).
¡ [Color (Documents)]
Select this mode to scan color documents that include text or charts in addition to color photos. The
image is expressed in 256 levels (8 bit) of R(ed), G(reen) and B(lue).
¡ [Text Enhanced]
Select this mode to scan text more crisply, particularly to process it in an OCR program. The image
is displayed in black and white. The document is scanned in grayscale and then converted to black
and white and therefore takes longer than the [Black and White] setting.
[Output Resolution]
Select the resolution for the scan.
The higher the resolution (number), the more detail in your image; the lower the resolution (number),
the less detail.
Either click or type a resolution between 25–2400 dpi (in 1 dpi increments), or enter one of the values
4800, 7200 or 9600 dpi.
→ “Determining resolution”
MP730/MP700
Software Guide (Scanning)
23
[Paper Size]
Select the size of the document to be scanned. When you select a size, the preview area size (heightto-width ratio) will change.
For setting up the printer not to scan beyond the parameters of the scan when previewing or if you are
scanning without specifying the parameters of the scan. If you do not know the size of the document,
your setting should be on the large side. You can specify the parameters after previewing. If you
change the setting in [Paper size] after previewing, the preview image will be deleted.
[Multi-Crop]
Click [Apply] to crop individually two or more documents placed on the platen glass. Click [Scan] and
the documents will be scanned as separate documents.
To remove the cropping (specified parameters) around an image, right-click the image, then select
[Delete]. To remove all the cropping, click [Reset].
→ “[Multi-Crop] in ScanGear MP (Advanced Mode)”
[Selection]
You can specify the width and height of the parameters of the scan by entering a value. After entering
the value, either click on another area or press the Enter key and the size of the cropping frame will
change. Click
(Keep proportions button) to change the icon to
(Locked icon) and maintain the
width and height proportions of the image.
Some applications have a limit to the amount of image data they can receive. If the parameters of a
scan contain more than 21,000 × 30,000 pixels, the image will not scan.
The values you can enter will be within the parameters of the document size you have selected.
Minimum parameters of an image with [Output Resolution] set to [600] dpi are 96 × 96 pixels.
[Print Size]
For setting the print size (output size) of the scanning parameters you have specified.
Specify by entering a value in either [Width], [Height] or [Scale], or click a [Scale] value. After adjusting
the settings, either click on another area or press the Enter key, and the other values linked to the input
values will change. Even if you change these settings, the size of the cropping frame and the setting for
[Output Resolution] will not change. The resolution when you actually scan will change in accordance
with the percentage (%) entered in [Scale].
The ratio of [Width] and [Height] is linked to the [Width] and [Height] in [Selection]. You can make
settings for [Scale] between 25 and 400 in increments of 1%. [Scale] is fixed to 100% if 4800, 7200 or
9600 dpi is entered in [Output Resolution].
MP730/MP700
Software Guide (Scanning)
24
3 Scanning documents
Setting preferences and scanning with ScanGear MP
Advanced Mode — [Settings] tab settings
[ScanGear MP]
(Advanced Mode) dialog box
You can adjust the following settings on the [Settings] tab.
[Filter processing]
¡ [Descreen]
Click [Descreen] when scanning printed photographs and pictures. This setting is not selected
immediately after installation.
Printed photographs and pictures are displayed as a collection of fine dots. If you scan without moire
reduction, the dots may interfere with each other and cause an unevenness of gradation and a
striped pattern in the image. Moire reduction is the function for reducing this moire effect.
If you select [Magazine] in [Type of original] in Simple Mode, the [Descreen] of Advanced Mode will
be automatically activated.
You cannot select [Descreen] if [Black and White] or [Text Enhanced] is selected in [Color Mode] on
the [Main] tab, or if [Output Resolution] is greater than [600] dpi.
Even if [Descreen] is selected, some moire effect may remain if [Unsharp Mask] is also selected. In
this case, disable [Unsharp Mask].
More reduction cannot be set when scanning from an application which will not display the
ScanGear MP dialog box. If you are scanning from the MP Toolbox without using ScanGear MP,
select [Color (Magazine)] in [Scan mode] to activate moire reduction.
¡ [Unsharp mask]
Click to emphasize and make sharper the outline of an image. This setting is selected immediately
after installation. It is effective for scanning photos etc. which have a soft focus.
[Reduce Dust and Scratches]
Scanned photo may contain white dots caused by dust and scratches. This setting reduces the dust
and scratches on photos. Select from [Soft], [Normal] and [Hard].
MP730/MP700
Software Guide (Scanning)
25
This setting is set to [None] (i.e. no reduction of dust and scratches) immediately after installation.
¡ [None]
For no reduction of dust and scratches.
¡ [Normal]
Normally this setting is recommended.
¡ [Soft]
For reducing small dust and scratch marks. With this setting, large dust or scratch marks may
remain.
¡ [Hard]
For reducing large dust and scratch marks but evidence of the reduction process may remain and
may also remove delicate parts of the image.
For scanning printed materials, the [None] setting is recommended.
If [Output Resolution] is set to less than [600] dpi and [Descreen] is selected, you cannot select
[Reduce Dust and Scratches]. (If you set [Output Resolution] to more than [601] dpi, the [Descreen]
setting will be automatically disabled and you can then set [Reduce Dust and Scratches].
This setting may not be effective for some types of photos.
[Color Settings]
Click one of the following. The default setting is [Recommended].
¡ [Recommended]
Vividly reproduces the tone of a document on the screen. It is recommended that you normally
select this setting.
¡ [Canon ColorGear Color matching]
Select to automatically match the scanner, monitor and color printer colors, thus reducing time and
trouble to manually match the monitor and printer colors.
This setting is available when [Color (photo)] or [Color (Documents)] is selected in [Color Mode].
If color matching is selected, the settings on the [Color] tab will not be available (the [Color] tab will
disappear).
[Calibration]
You cannot adjust calibration.
[Preferences]
Click to display the [Preferences] dialog box. You can adjust settings for scanning and previewing.
→ “Advanced Mode — [Settings 1] tab settings in the [Preferences] dialog box”
→ “Advanced Mode — [Settings 2] tab settings in the [Preferences] dialog box”
MP730/MP700
Software Guide (Scanning)
26
3 Scanning documents
Setting preferences and scanning with ScanGear MP
Advanced Mode — [Settings 1] tab settings in the [Preferences] dialog box
To open the [Preferences] dialog box, in the [ScanGear MP] dialog box (Advanced Mode), on the
[Settings] tab, click [Preferences].
You can adjust the following settings on the [Settings 1] tab.
[When application hides driver user interface]
Color mode cannot be changed in applications (UI off mode) such as OCR software which will not
display the ScanGear MP dialog box, and consequently the document will be scanned with the settings
in the application. To override the application settings and scan in a specific color mode, settings here.
¡ [Color (documents)]
The document is scanned in this mode irrespective of the settings in the application.
¡ [Text Enhanced]
The document is scanned in this mode irrespective of the settings in the application.
These settings will be invalid in UI mode (the mode in which the ScanGear MP dialog box is displayed).
Both are not selected immediately after installation.
[Preview at opening of ScanGear MP]
Select the preview operation when you open ScanGear MP.
¡ [Automatically execute preview]
The preview scan will start automatically when you open ScanGear MP.
¡ [Display saved preview image]
Displays the image last previewed.
Settings on the [Color] tab, and the Flip, Left and Right Rotate, Reverse Color and Ruler buttons in
the Toolbar will be reproduced.
¡ [None]
The preview image will not appear when you open ScanGear MP.
[Display saved preview image] is selected immediately after installation.
MP730/MP700
Software Guide (Scanning)
27
[Execute the auto cropping after preview]
If selected, the document will automatically be cropped to match the document size. This setting is
selected immediately after installation.
[Always perform the auto tone]
If selected, the image color will always be automatically corrected. The default setting is on.
[Remove the white borders]
Automatically removes the white borders of a document when scanning with multi-scan or multi-crop.
The default setting is on.
[Energy Saving Mode]
You cannot adjust this setting.
[Display thumbnails]
You cannot display thumbnails.
[Select folder where temporary files are saved]
Specify the folder in which a file will be saved temporarily. Click [Browse] and specify the folder to
which the file will be saved.
[Automatically quit ScanGear MP after scanning]
If selected, the ScanGear MP dialog box quits automatically after the image is scanned. This setting is
not selected immediately after installation.
Some applications will automatically quit ScanGear after scanning irrespective of this setting.
[Test Scanner]
You cannot perform this test.
MP730/MP700
Software Guide (Scanning)
28
3 Scanning documents
Setting preferences and scanning with ScanGear MP
Advanced Mode — [Settings 2] tab settings in the [Preferences] dialog box
To open the [Preferences] dialog box, in the [ScanGear MP] dialog box (Advanced Mode), on the
[Settings] tab, click [Preferences].
You can adjust the following settings on the [Settings 2] tab.
[Enable 48/16 bit output]
You cannot select this setting.
[Sound settings]
You can set up the scanner to play music during scanning or play a sound when scanning is
completed.
Click [Sound settings], then select [Play music during scanning] and/or [Play sound when scanning is
completed]. Click [Browse], then specify a sound file.
You can specify the files below.
¡MIDI files (*.mid, *.rmi, *.midi)
¡Audio files (*.wav, *.aiff)
¡MP3 file (mp3)
MP730/MP700
Software Guide (Scanning)
29
3 Scanning documents
Setting preferences and scanning with ScanGear MP
Advanced Mode — [Color] tab settings
On the [Color] tab, you can set preferences for brightness and tone of an image such as preferences for
adjusting brightness and contrast of the whole image, for making adjustments to match the brightness of
the monitor (gamma correction), for specifying highlights and shadows, and adjusting contrast and
balance in an image (with the histogram and tone curve).
The [Color] tab will be displayed when [Color (photo)], [Color (Documents)] or [Greyscale] is selected in
[Color Mode].
In [Black and White] mode, the [Color] tab will change to the [Halftone] tab but no tab will be displayed in
[Text Enhanced] mode or when [Canon ColorGear Color matching] is selected.
When you adjust settings on the [Color] tab, your changes will be immediately be reflected in the preview
image or in the scan.
[ScanGear MP]
(Advanced Mode) dialog box
To correct tone automatically
Specify the parameters of the adjustment and click [Apply] in [Auto tone].
The brightness of the image within the parameters you have specified will be automatically adjusted for
best results.
The results of color adjustment are reflected in the whole image and when the image is actually
scanned.
You cannot apply this setting if the preview image is not displayed.
The default setting is to automatically apply auto tone adjustment to the cropped image when
previewing the image. Consequently, when you preview the image, the [Apply] will not be available.
To view the preview image without auto tone adjustment, click [Reset]. The [Apply] will then become
available and you will be able to re-apply auto tone adjustment if required.
To save settings to a color adjustment file
Click
(Save button).
If you intend to scan the same image several times, you can save the settings for use in future scans
with the same settings. The file suffix will be (.adc) for color and (.adg) for grayscale.
MP730/MP700
Software Guide (Scanning)
30
To scan with the settings in the saved color adjustment file
Click
(Load button).
The image will be scanned with the saved settings. The file suffix will be (.adc) for color and (.adg) for
grayscale.
To revise the color adjustment settings currently on display or to return to default settings
Click [Reset].
To revise all color adjustment settings or to return to default settings
Click [Reset all].
[Master], [Red], [Green], [Blue] and all settings for contrast/brightness, gamma, histogram and tone
curve will be suspended and will return to default settings. Images which have undergone automatic
color correction will also return to their original state.
MP730/MP700
Software Guide (Scanning)
31
3 Scanning documents
Setting preferences and scanning with ScanGear MP
Advanced Mode — [Color] tab — Brightness and contrast
If the original image is too dark or too bright, or if the image quality is flat due to lack of contrast, you can
adjust the levels of brightness and contrast.
The gamma is active if [Color (Photo)] [Color (Documents)] or [Greyscale] is selected in [Color Mode].
You can set up the gamma without having to display a preview and the settings will be active when you
scan.
In ScanGear MP Advanced Mode, follow the steps below.
1
2
Click [Reset].
3
For a color image, in [Channel], select to only adjust either red, green or blue, or select [Master] to
adjust the three colors together.
4
Move the [Brightness] slide to the left to increase the darkness of the image, and to the right to
increase the brightness of the image.
Move the [Contrast] slide to the left to decrease the contrast of the image, and to the right to increase
the contrast of the image. You can also enter values (–127 to 127).
On the [Color] tab, click
(Brightness/contrast).
MP730/MP700
Software Guide (Scanning)
32
3 Scanning documents
Setting preferences and scanning with ScanGear MP
Advanced Mode — [Color] tab — Gamma
The gamma allows you to adjust the brightness of the image viewed on the computer monitor to the
brightness of the orignal document.
The monitor has characteristics (gamma values) for reproducing colors. The gamma value of an average
monitor is between 1.4 and 2.2, and reproduces colors in a somewhat darker way than the original
document. Consequently, to correct the difference between the color in the original image and the
reproduction of the color by the monitor, you may need to correct the gamma value.
The default setting for gamma is 2.2. You will have to change this value if you are using a monitor with a
different gamma value. For the monitor’s gamma value, refer to the documentation of your monitor, or
contact the manufacturer of your monitor.
When you set the monitor’s gamma value, the scanner’s gamma value will automatically be displayed in
the formula (reciprocal equation of the monitor gamma value) below.
1/ monitor gamma value = scanner gamma value
The gamma is active if [Color (Photo)] [Color (Documents)] or [Greyscale] is selected in [Color Mode].
You can set up the gamma without having to display a preview and the settings will be active when you
scan.
In ScanGear MP Advanced Mode, follow the steps below.
1
2
Click [Reset].
3
For a color image, in [Channel], select to only adjust either red, green or blue, or select [Master] to
adjust the three colors together.
4
Move the slider to the left to decrease or the right to increase the contrast displayed in the middle of
the tonal range (midtones) of the image. You can also enter values (-0.10 to 10.00).
On the [Color] tab, click
(Gamma).
MP730/MP700
Software Guide (Scanning)
33
3 Scanning documents
Setting preferences and scanning with ScanGear MP
Advanced Mode — [Color] tab — Histogram
A histogram allows you to see the data concentration at each brightness level of an image. You can
specify the darkest and brightest levels within an image, cut the levels and expand the middle of the tonal
range of the image.
The gamma is active if [Color (photo)], [Color (Documents)] or [Greyscale] is selected in [Color Mode].
You can set up the histogram without having to display a preview and the settings will be active when you
scan.
In ScanGear MP Advanced Mode, follow the steps below.
1
2
Click [Reset].
3
4
For a color image, in [Channel], select a color.
On the [Color] tab, click
(Histogram).
To change the black-point, mid-point or white-point, do one of the following.
¡ Click the [Black-point]
and select the darkest area in the preview image.
You can also enter a value (0 to 245).
Click the [Mid-point]
and select the area in the middle of the tonal range.
You can also enter a value (5 to 250).
Click the [White-point]
and select the lightest area.
You can also enter a value (10 to 255).
¡ Drag the triangles at the bottom of the histogram to an appropriate level.
Parts to the left of
(parts darker than the value specified in [Black-point]) will all turn black.
The parts in
(parts specified in [Mid-point]) will turn a color exactly between black-point and
white-point.
Parts to the right of
(parts lighter than the value specified in [White-point]) will all turn white.
MP730/MP700
Software Guide (Scanning)
34
3 Scanning documents
Setting preferences and scanning with ScanGear MP
Advanced Mode — [Color] tab — Tone curve
You can make subtle adjustments to the brightness of a specific area of an image by editing the shape of
the tone curve, a graph showing the balance of tone input and output.
The tone curve is active if [Color (photo)], [Color (Documents)] or [Greyscale] is selected in [Color Mode].
You can set up the tone curve without having to display a preview and the settings will be active when
you scan.
In ScanGear MP Advanced Mode, follow the steps below.
1
2
Click [Reset].
3
4
For a color image, in [Channel], select a color.
On the [Color] tab, click
(Tone curve).
In [Select Special Curve], select the tone curve.
MP730/MP700
Software Guide (Scanning)
35
3 Scanning documents
Setting preferences and scanning with ScanGear MP
Advanced Mode — [Halftone] tab
If [Black and white] is selected in [Color Mode], the [Color] tab will become the [Halftone] tab. On the
[Halftone] tab, you can set threshold.
You can set up the [Halftone] tab without having to display a preview and the settings will be active when
you scan.
The brightness of color and grayscale images is expressed as a value between 0 and 225 but brightness
of black and white images is expressed in terms of either black or white including the parts of an image
which are a color between the two. The boundary at which black and white is divided is called Threshold.
By adjusting the threshold, you can sharpen characters in a text document and reduce back-printing
such as in newspapers.
In ScanGear MP Advanced Mode, follow the step below.
1
Drag the slider to the right to increase the threshold value and thus reduce the white areas (black
areas will increase). Drag the slider to the left to decrease the threshold value and thus increase the
white areas (black areas will reduce). You can also enter a value (0 to 255).
MP730/MP700
Software Guide (Scanning)
36
3 Scanning documents
Setting preferences and scanning with ScanGear MP
Determining resolution
The data in the image you have scanned is a collection of dots carrying information about brightness and
color. The density of these dots is called “resolution”, and “dpi” (dots per inch) refers to the number of
dots in one inch. Resolution will determine the amount of detail your image contains. The higher the
resolution (number), the more detail in your image; the lower the resolution (number), the less detail.
As a general rule, you should select a scanning resolution that corresponds to your final output device
such as a monitor or printer.
You can specify a resolution in [Image quality] in the MP Toolbox settings dialog box, or in [Output
Resolution] in ScanGear MP.
Images for display on a monitor
Images for display on a monitor should in general be scanned at a resolution of 75 dpi.
Images for printing
Images to be printed should be scanned at a resolution which corresponds to the resolution of the
printer. For example, if you are using a 600 dpi black and white printer, you should scan your document
at [600] dpi.
With a color printer, the colors are expressed as a certain percentage of ink pigment so scanning your
document at half the resolution of the printer should be fine. For example, if you are using a 600 dpi
color printer, you should scan your document at [300] dpi.
Printing to scale
For example, if you want to print a document which is twice the size both vertically and horizontally, the
resolution of your document will be reduced by half. If the resolution of the original document is 300
dpi, the resolution of the enlarged document will be 150 dpi. If you print the document with a 600 dpi
color printer, the lack of detail in the image may be obvious. In such a case, if you scan at a resolution
of 600 dpi, resolution will be 300 dpi even if you double the size of the document and you can print the
document with sufficient quality. Conversely, if you want to print a document at a reduced size, it should
be sufficient to scan at half the resolution.
Resolution and data size
If you double the resolution, the image data will be four times greater. If the data is too large,
processing speed will slow down significantly, and you may experience malfunctions such as lack of
memory. Make sure the resolution corresponds to the purpose of use of the image and set at the
lowest level possible.
MP730/MP700
Software Guide (Scanning)
37
3 Scanning documents
Scanning with the WIA driver (Windows XP only)
With the WIA driver dialog box open, follow the steps below.
To display the WIA driver, → “Scanning an image from an application.”
Dialog box when [Flatbed] (platen glass) is selected
Dialog box when [Document Feeder] (ADF) is selected
1
In [Paper source] select either [Flatbed] (platen glass) or [Document Feeder] (ADF).
Depending on how you want to scan your document, click [Color picture], [Grayscale picture] or [Black
and white picture or text].
To adjust settings in detail, → “Setting preferences in the WIA driver.”
2
If you selected [Flatbed] in [Paper source]:
You can display a preview.
To display a preview, click [Preview]. The preview will be displayed on the right. You can drag
specify the area you want scanned.
If you selected [Document Feeder] in [Paper source]:
In [Page size], select the document size.
3
Fax Model
to
Click [Scan].
MP730/MP700
Software Guide (Scanning)
38
3 Scanning documents
Setting up the WIA driver (Windows XP only)
Setting preferences in the WIA driver
With the WIA driver dialog box open, follow the steps below.
→ “Scanning with the WIA driver (Windows XP only)”
1
Click [Adjust the quality of the scanned picture].
2
In the [Advanced Properties] dialog box, adjust the scan settings.
¡ In [Picture type], select the type of scan you want for your document.
¡ Use the slider to adjust the brightness. Move the slider to the left to make the image darker, or to
the right to make it brighter. You can also enter a value.
¡ For a color or grayscale image, use the slider to adjust the contrast. Move the slider to the left to
decrease the contrast, or to the right to increase it. You can also enter a value.
¡ Enter a resolution between 50 and 600 dpi.
→ “Determining resolution”
¡ To revert to the original settings, click [Reset].
3
Click [OK] to activate the scan settings you specified and to close the [Advanced Properties] dialog
box.
Click [Cancel] to cancel the scan settings you specified and close the [Advanced Properties] dialog
box.
→ “Scanning with the WIA driver (Windows XP only)”
MP730/MP700
Software Guide (Scanning)
39
Return to
cover
Troubleshooting
Problems scanning ....................................................................... 41
●Cannot scan a document. ......................................................... 41
●You tried to create a multipage PDF, but were not able to
scan several documents. .......................................................... 42
●Computer has hung up or frozen. ............................................. 42
●You installed the applications on the MP730/700 Setup
CD-ROM but they were not registered in the MP Toolbox........ 42
●When you click a button on the MP Toolbox, another
application opens. ..................................................................... 42
●You opened the [Preferences] dialog box from
the [Scanners and Cameras] icon and changed the settings,
but the settings were not activated (Windows 2000)................. 42
●You canceled a scan before completion and the document
became jammed in the ADF...................................................... 43
●The image you have scanned looks dirty.................................. 43
●White margins appear around the scanned image. .................. 43
●White lines appear on the left side of the image. ...................... 43
●Cannot scan correctly with multi-scan....................................... 43
●Scanned image is displayed at a large (small) size
on the computer screen. ........................................................... 44
Glossary (Scanning) ..................................................................... 45
Index (Scanning) ........................................................................... 47
MP730/MP700
Software Guide (Scanning)
40
Troubleshooting
Problems scanning
See below if you have problems scanning a document to your computer from the machine.
K Cannot scan a document.
1
Is there anything displayed in the LCD?
If nothing is displayed, see the User’s Guide.
2
Is the Alarm light blinking?
If it is blinking, see the User’s Guide.
3
Is the document loaded correctly?
Check that the document is loaded correctly on the platen glass or
Guide).
Fax Model
ADF (→ User’s
4
5
Restart the computer.
6
Are you using a USB 2.0-compatible USB hub?
If you are connecting a USB 2.0-equipeed computer and the printer using a USB 2.0-compatible
USB hub, you may not be able to scan. In this case, connect the USB cable directly to the
computer.
If you want to connect the printer and computer via a USB 2.0-compatible hub, follow the steps
below to modify the INI file. It is recommended that before opening the file in step 1 below, you
make a backup copy of the file in another folder before making any changes to it.
(1) Open the following file in Notepad or another text editor application.
Windows 98/Me:
windows\system\CNCMP50.ini
Windows 2000:
winnt\system32\CNCMP50.ini
Windows XP:
windows\system32\CNCMP50.ini
(2) Below the last line, add the following two lines, then save the file. Take care not to modify any
other parts.
[Scan]
ReadSize=16
7
If using a USB hub or repeater, try connecting the USB cable directly to the computer.
If you can scan documents successfully after connecting the USB cable directly to the computer,
the USB hub or repeater may be broken. Replace if necessary.
Is the [Select source] setting in the MP Toolbox, ScanGear MP, or WIA driver set correctly?
Choose between loading the document on the platen glass or ADF.
Fax Model
8
After installing the software, did you install a TWAIN-compatible application?
If this is the case, the TWAIN system file is replaced with something inappropriate and you will be
unable to scan images. If this happens, remove the software and reinstall (→ “Removing and
Reinstalling the software”).
9
Is the machine recognized in the [Scanners and Cameras] Window of [Control Panel]?
Follow this procedure to check if the machine icon is present in [Scanners and Cameras] of the
Control Panel:
1 On the Windows desktop, click [Start], point to [Settings], then click [Control Panel].
(Windows XP: On the desktop, click [Start], then [Control Panel].)
2 Double click [Scanners and Cameras]. (Windows XP: In the [Control Panel] window, click
[Printers and Other Hardware], then [Scanners and Cameras].)
MP730/MP700
Software Guide (Scanning)
41
Troubleshooting
3
In the [Scanners and Cameras] window, if [Canon MP730] or [Canon MP700] (Windows XP:
[WIA Canon MP730] or [WIA Canon MP700]) is present, the machine is recognized. If not,
remove the software and reinstall (→ “Removing and Reinstalling the software”).
K You tried to create a multipage PDF, but were not able to scan several documents.
Click a button on the MP Toolbox and in the settings dialog box, select [Use the scanner driver to
make advanced settings]. When ScanGear MP opens, if you scan with the [Automatically quit
ScanGear MP after scanning] setting selected in [Preferences] of Advanced Mode, only the
documents placed at one time on the platen glass will be scanned. If you want to scan additional
documents, clear the [Automatically quit ScanGear MP after scanning] setting before scanning.
K Computer has hung up or frozen.
1
Quit other open applications and try again.
Memory may be insufficient. Quit other open applications and try again.
2
Does the hard disk have enough available space?
Check that the hard disk has enough available space, in particular when scanning large
documents at a high resolution. For example, a letter-size document scanned at 600 dpi, full
color requires a minimum of 300 MB of space.
*If you do not have enough available space, scan the document at a lower resolution.
3
If an error occurs when scanning an image in Photoshop
Change the allocated memory. On the Edit menu, point to [References], then click [Memory &
Image Cache]. Change the Physical Memory Usage to between approximately 10% and 20%.
4
Remove the software and reinstall (→ “Removing and Reinstalling the software”).
K You installed the applications on the MP730/700 Setup CD-ROM but they were not
registered in the MP Toolbox.
If you install the applications with the MP Toolbox open, the applications will not be registered in the
MP Toolbox. Click [Defaults] to register them (→ “Scanning with the MP Toolbox”).
K When you click a button on the MP Toolbox, another application opens.
When you click a button on the MP Toolbox, you want another application to open.
Click a button on the MP Toolbox and select the application you want to open for that button. Repeat
for the other buttons (→ “MP Toolbox settings”).
K You opened the [Preferences] dialog box from the [Scanners and Cameras] icon and
changed the settings, but the settings were not activated (Windows 2000).
In Windows 2000, if you open [Scanners and Cameras] in [Control Panel] and change the settings in
[Events], the settings will not be activated unless you restart your computer. Once you have changed
your settings, restart your computer.
MP730/MP700
Software Guide (Scanning)
42
Troubleshooting
K
You canceled a scan before completion and the document became jammed in
the ADF.
Fax Model
Press [Resume] to eject the document from the ADF.
K The image you have scanned looks dirty.
1
2
If the image looks grainy, increase the scan resolution (→ “Determining resolution”).
3
There is moire when you scan printed material.
In ScanGear MP, click [Descreen] (→ “MP Toolbox settings”).
4
Set the monitor display colors to 16-bit or higher.
In [Display Properties], set the display colors to 16-bit color, 24-bit color or higher.
5
Clean the platen glass and document cover (→ User’s Guide).
Display the image at 100%.
Some applications do not display an image well at small sizes. Try displaying the image at 100%
magnification.
K White margins appear around the scanned image.
Specify the scan area.
In ScanGear MP, click [Multi-Scan] to automatically specify the scan area.
If there are white margins around documents such as photographs, or if you want to trim a
document (i.e. you want to scan only one part of a document), specify the area of the scan
manually (→ “Advanced Mode – Specifying the parameters of a scan”).
To display ScanGear MP when scanning, click a button on the MP Toolbox and select [Use the
scanner driver to make advanced settings]. Clear this setting if you do not want ScanGear MP to
display (→ “MP Toolbox settings”).
K White lines appear on the left side of the image.
Place the document approximately
1
8
inch (3 mm) from the edge of the platen glass.
K Cannot scan correctly with multi-scan
1
Does the position of the photographs and the way they are positioned fulfil the following
requirements?
• There should be a gap of at least 3 8 inch (1 cm) between the edge of the platen glass and
photographs.
• There should be a gap of at least 3 8 inch (1 cm) between the edges of the photographs.
• There should be no more than ten photographs.
• The photographs should be straight (any tilting should be kept within 10 degrees).
2
Some applications do not accept multiple scans of more than two images.
Check the application’s documentation or contact the application’s manufacturer.
3
4
Clean the platen glass and document cover (→ User’s Guide).
5
Is the document smaller than 9 64 inch2 (1 cm2)?
You cannot use multi-scan for documents smaller than
each document separately.
When scanning from the platen glass, thick or curled photographs may not be scanned properly.
Press lightly on the document cover when scanning.
3
8
inch ×
3
8
inch (1 cm × 1 cm). Scan
MP730/MP700
Software Guide (Scanning)
43
Troubleshooting
6
Is the ratio of the long and short sides of the document greater than 1:4?
You cannot use multi-scan if the long side of the document is 4 or more times longer than the
short side. Scan each document separately.
K Scanned image is displayed at a large (small) size on the computer screen.
1
Enlarge or reduce the image display in the application.
However, if you open the image in Paint or Imaging, it may display at a large size and you will not
be able to reduce it.
2
Change the resolution and scan again.
The image will be large if resolution is high. It will be small if resolution is low (→ “Determining
resolution”).
MP730/MP700
Software Guide (Scanning)
44
Glossary (Scanning)
C
D
G
M
O
P
Canon ColorGear color matching
Color management system for high-speed, high-precision color processing using
Canon’s own color management technology. Canon ColorGear is compatible with the
industry-standard format “ICC Profiles” and enables high-precision color management
using the properties of color devices specified in color profiles. The system is used in
many Canon products.
crop
Operation for selecting parts of an image within a rectangle. You can use the crop button
in the ScanGear MP Toolbox to select a part of a preview image, preview again the part
you have selected and scan.
dpi (dots per inch)
Number of dots per inch. Unit for measuring resolution of a monitor or printer.
gamma correction
Method for changing the brightness of an image. With gamma correction, the brightness
of parts of an image in the middle of the tonal range is changed without changing the
lightest or darkest areas of the image, which means you can change the brightness of
an image while maintaining contrast.
grayscale
A method of presenting a black-and-white image using medium tones.
multi-page PDF
Several scanned documents saved as one PDF. Each document will become one page of
the PDF.
OCR (Optical Character Reader)
Device for reading characters optically. System for extracting information in a text
format from information in the form of a graphic such as hand-written or printed
characters which have been scanned with a scanner. You cannot edit text scanned with
a scanner because it is in a graphic format, but with OCR software you can convert to a
text file and then edit the text with word-processing software.
PDF (Portable Document Format)
Document format of Adobe Systems. Using the Acrobat Reader viewing software, the
document always appears in the same way regardless of the viewer’s computer
environment.
The MP Toolbox can save a scanned document as a PDF document. The characters in a
document are recognized as text information and held in the PDF file so that you can
search a PDF with simple keywords.
preview
Provisional scanning and display of the document you are about to scan before you
actually scan it. If the preview scan looks different from what you want, you can change
the settings, display the preview again and confirm before scanning.
MP730/MP700
Software Guide (Scanning)
45
S
T
W
scanner driver
Software for controlling the scanner. The printer is provided with two drivers: The
ScanGear MP and the WIA driver (for use with Windows XP).
TWAIN (Technology without an interested name)
Industry-standard protocol for transferring information from devices such as scanners
and digital cameras to a computer.
Industry-standard protocol for an application programming interface (API) for input
devices such as scanners. If both the device and the application comply with the
standard, they will be compatible regardless of differences in manufacturer or model.
For example, with TWAIN-compatible image-processing software, you can start the
scanner’s TWAIN driver (ScanGear MP) from the software’s menu, scan the document
and return the scanned image to its original image-processing software.
WIA (Windows Image Acquisition)
Standard for downloading images from scanners or digital cameras. The printer
includes a TWAIN-compliant driver (ScanGear MP) and a WIA-compliant driver. The WIAdriver can only be used with Windows XP. With either driver, you can scan documents
with the printer in applications which support the TWAIN interface (Photoshop etc.).
MP730/MP700
Software Guide (Scanning)
46
Index (Scanning)
A
B
C
Advanced Mode 18
Toolbar 21
using 20
Always perform the auto tone 28
Application 10
Auto mode 7
Auto crop 8, 22
Automatically quit ScanGear MP after
scanning 28
Available space 42
Black and White 7, 23
(OCR) 7
BMP 8
Brightness 32
Calibration 26
Canon ColorGear Color
matching 26, 44
Clear 21
Color Mode 23
Color Settings 26
Color
(Auto crop) 8
(documents) 27
(Documents) 23
(Magazine) 7
(Multi-Scan) 8, 14
(Photo) 23
(Photos) 7
[Color] tab 30, 32, 33, 34, 35
Contrast 32
Correcting tone automatically 30
Create multiple PDF 11
Create searchable PDF 11
Crop 22, 44
D
Descreen 25
Display thumbnails 28
Document Feeder 38
dpi 37, 44
E
Enable 48/16 bit output 29
Energy Saving Mode 28
Executes the auto cropping after
preview 28
F
File 5
name 8
Filter processing 25
Flatbed 38
Flip 21
Flipping 21
G
Gamma 33, 46
Grayscale 7, 23, 44
H
[Halftone] tab 36
Hard disk 41
Histogram 34
I
Image quality 8, 37
J
JPEG 8
K
Keep proportions 22
L
Link scanned image to 9
Load button 31
M
Mail 5
[Main] tab 23
Moving 21
Moving image 21
MP Toolbox 5
settings 7
Multi-Crop 17, 24
Multi-page PDF 41, 44
Multi-Scan 8, 14, 15
O
OCR 5, 44
Output Resolution 24, 37
P
Paper size 8, 24
PDF 8
PDF compression 11
PDF file 11, 44
Preferences 26
[Preferences] dialog box 27
Preview 19, 20, 27, 44
Preview at opening of ScanGear MP 27
Print Size 24
Problems
scanning 41
Put picture in a subfolder using today’s
date 9
R
Reduce Dust and Scratches 26
Remove the white borders 28
Resolution 37
Reversing 21
Reversing color 21
MP730/MP700
Software Guide (Scanning)
47
Rotating 21
Rulers 21
S
Save 5
Save as type 8
Save to 9
Saving settings to a color adjustment
file 30
Scan button
setting 3
Scan
button 2
mode 7
Scan-1 5
Scan-2 5
[Scan] key. See Scan button
Scanner
driver 45
performing detailed settings in
driver 6, 8
settings 7
Scanners and Cameras 4
Scanning problems 41
Select folder where temporary files are
saved 28
Select source 19, 20, 23
Selection 24
[Settings 1] tab 27
[Settings 2] tab 29
[Settings] tab 25
Simple Mode 18
using 19
Sound settings 29
T
Test Scanner 28
Text (OCR) 23, 27
Threshold 36
TIFF 8
Tone curve 35
Toolbar 21
TWAIN 45
Type of original 19
U
Unsharp Mask 25
Upper limit of attached file 8
W
When application hides driver user
interface 27
White lines 43
WIA 45
WIA driver 38
settings 39
Z
Zoom 21
MP730/MP700
Software Guide (Scanning)
48