1
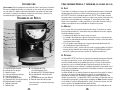
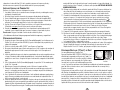
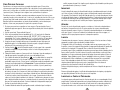
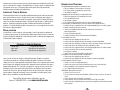
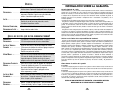
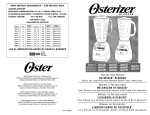
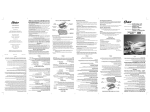
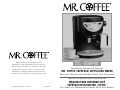
MODEL
MODELO
©2003 Sunbeam Products, Inc. All rights reserved.
MR. COFFEE® is a registered trademark of Sunbeam Products, Inc.
Distributed by Sunbeam Products, Inc., Boca Raton, Florida 33431.
©2003 Sunbeam Products, Inc. Todos los derechos reservados.
MR. COFFEE® es una marca registrada de Sunbeam Products, Inc.
Distribuido por Sunbeam Products, Inc., Boca Raton, Florida 33431.
ECMP40
Instruction Manual with Recipes
MR. COFFEE ESPRESSO/ CAPPUCCINO MAKER
®
READ ALL INSTRUCTIONS BEFORE USING THIS APPLIANCE
Manual de Instrucciones con Recetas
MÁQUINA PARA PREPARAR CAFÉ
EXPRESO/CAPUCHINO MR. COFFEE
®
Printed in China/Impreso en China
P.N. 113926
L EA T ODAS
LAS
I NSTRUCCIONES A NTES U SAR E STA U NIDAD
IMPORTANT SAFEGUARDS
When using electrical appliances, basic safety precautions should always be
followed to reduce the risk of fire, electric shock and/or injury to persons,
including the following:
1. READ ALL INSTRUCTIONS BEFORE USING THE MACHINE.
2. Do not touch hot surfaces. Use handles or knobs.
3. To protect against electric shock, do not put cord, plugs or machine in water
or any other liquids.
4. Close supervision is necessary when any appliance is used by or around children.
5. Unplug from outlet when Espresso Machine is not in use and before cleaning.
Allow to cool before putting on or taking off parts and before cleaning
the appliance.
6. The use of accessory attachments that are not MR. COFFEE® brand
may cause hazards or injuries.
7. Do not use outdoors.
SPECIAL CORD SET INSTRUCTIONS
1. A short power supply cord is provided to reduce the hazards resulting from becoming
entangled in or tripping over a longer cord.
2. An extension cord may be purchased and used if care is exercised in its use.
3. If an extension cord is used, the marked electrical rating of the extension cord must be
at least 15 amps and 120 volts. The resulting extended cord must be arranged so that
it will not drape over the countertop or tabletop where it can be pulled on by children
or tripped over accidentally.
This appliance has a polarized plug (one blade is wider than the other).
To reduce the risk of electric shock, this plug will fit in a polarized outlet only
one way. If the plug does not fit fully in the outlet, reverse the plug. If it still
does not fit, contact a qualified electrician. Do not modify the plug in any way.
I F S ERVICE I S R EQUIRED , D O N OT R ETURN A PPLIANCE
TO
S TORE
For Service, call 1-800 MR COFFEE (1-800-672-6333)
8. Do not let cord hang over edge of table or countertop or to touch hot surfaces.
9. Do not place this appliance on or near a hot gas or electric burner or in a heated
oven.
10. To disconnect, turn unit off, then remove plug from wall outlet.
TO ASSIST US IN SERVING YOU, PLEASE HAVE THE MODEL NUMBER
(ECMP40) AND DATE OF PURCHASE AVAILABLE.
11. Do not use appliance for other than its intended use.
12. Use on a hard, flat level surface only, to avoid interruption of air flow
underneath the appliance.
13. Do not operate any appliance with a damaged cord or plug or after the
appliance malfunctions or has been damaged in any manner. Return this
appliance only to the nearest Authorized Service Center for examination,
repair or adjustment.
14. WARNING: To reduce the risk of fire or electric shock,
do not remove any service covers. No user serviceable parts inside.
Repair should be done by authorized personnel only. Opening the
bottom service cover will void the warranty.
THIS UNIT IS
FOR
HOUSEHOLD USE ONLY
2
All repairs must be made by an Authorized MR. COFFEE® Service Center. Please call us for
assistance or for the location of the nearest Authorized MR. COFFEE® Service Center or go to
www.mrcoffee.com.
PLEASE DO NOT RETURN APPLIANCE TO STORE.
We welcome your questions, comments or suggestions.
Please contact us at
1-800 MR COFFEE (1-800-672-6333)
or
www.mrcoffee.com
S AVE T HESE I NSTRUCTIONS
3
I NTRODUCTION
H OW TO P REPARE Q UALITY E SPRESSO AND C APPUCCINO AT H OME
®
CONGRATULATIONS! You are the owner of a MR. COFFEE Espresso and Cappuccino
Maker. Please read all of the instructions in this manual carefully before you begin
to use this appliance. Proper care and maintenance will ensure the long life of this
appliance and its trouble-free operation. Save these instructions and refer to them often
for cleaning and care tips.
D IAGRAM OF PARTS
L
K
O
I
J
The coffee should be a freshly ground, dark, espresso roast variety. You may buy
whole coffee beans and grind them yourself at home using a MR. COFFEE Burr Mill
or a MR. COFFEE Bean Grinder. Store whole beans in an air-tight container, in a cool,
dark area. You do not need to store them in a refrigerator or freezer. If you buy pre-ground
coffee, plan to use the coffee within 7 to 8 days for best flavor. Store pre-ground coffee
in an air-tight container and keep in a cool, dark area.
®
®
THE GRIND
This is a vital step in the espresso making process. The coffee must be ground fine,
but not too fine. If you buy pre-ground coffee or have it ground, make sure you get an
espresso grind.
A
B
M
THE COFFEE
• The correct grind should look gritty, like salt or sand.
N
C
E
D
• If the grind is too fine, water will not flow through the coffee, even under pressure.
Coffee that is ground too fine looks like powder and feels like flour when rubbed
between your fingers.
• If the grind is too coarse, water flows through the coffee too fast, preventing a
full-flavored extraction.
G
F
H
• If using coffee pods, make sure they are standard size, single shot 7g/45mm coffee
pods manufactured for espresso machines. The ECMP40 DOES NOT accommodate
single shot 7g/55mm pods nor double shot 14g/55mm pods.
THE PROCESS
®
A.
B.
C.
D.
E.
F.
G.
H.
Removable Water Reservoir
Water Level Indicator
Steam Nozzle
Frothing Attachment
Brew Head
Filter Thumb Guard
Filter Holder (Filter Cup Inside)
Removable Drip Tray
I. Brew Button
J. Steam Button
K. On/Off Indicator Light (Red)
L. On/Off Switch
M. Brew Ready Indicator Light (Orange)
N. Steam Ready Indicator Light (Orange)
O. Steam / Froth Control Knob
Measuring Spoon and Tamping Tool (not shown)
4
Your New MR. COFFEE Espresso and Cappuccino Maker was designed to make brewing
fresh espresso and cappuccino at home easy. Several hints will help you make quality
espresso and frothed milk drinks time after time. First, always start with fresh, cold water
in the water reservoir. Be sure that all parts of your machine are cleaned from previous uses.
You can preheat the cups you brew espresso into by rinsing them with hot water.
This will help keep your espresso hot after it is brewed.
The quality, roast, freshness, grind and origin of the coffee beans you use will vary the
taste of your espresso. When you brew espresso, the grounds should be “tamped” in the
filter cup. Tamping is the process of slightly packing the espresso coffee grounds down in
the filter cup. Your MR. COFFEE Espresso/Cappuccino Machine comes with a pre-measured
coffee scoop tamping tool. NOTE: Do not overpack the grounds. If you are using coffee
pods, do not tamp, just insert the coffee pod in the pod adapter within the filter holder.
®
5
Use the bottom of the scoop to slightly press the grounds down after placing them in the
filter cup (G). This will help you brew hot, rich, delicious espresso with perfect crema
(the golden layer on top of fresh-brewed espresso).
BEFORE USING FOR THE FIRST TIME
Refer to Page 4 for the Diagram of Parts.
1. Wash all removable parts with hot water and a mild detergent and rinse thoroughly.
2. Remove the pink cap from the end of the hose inside the reservoir.
3. Fill the Water Reservoir with water. Do not exceed MAX fill line.
4. Follow the steps on Page 6 for brewing espresso to rinse the inside of the machine.
Use water only. Do not use coffee for the cleaning cycle.
5. Follow the Steps on Page 7 for steaming milk to clean the Frothing Arm.
You should use water instead of milk for this cleaning process.
6. After you have brewed one cycle and steamed for approximately 45 seconds,
empty the water reservoir, remove, rinse and dry all parts.
C AUTION : Allow unit to cool before removing parts.
YOUR ESPRESSO MAKER IS NOW READY TO BREW GREAT ESPRESSO AND CAPPUCCINO!
BREWING ESPRESSO
1. Make sure the On/Off switch (see Diagram on Page 4) is in the OFF position
and the brew and steam switches are off.
2. Plug in your new MR. COFFEE Espresso and Cappuccino Maker.
3. Remove the water reservoir and fill with fresh, cold water. Be sure to keep the water
reservoir filled above the “min” water level marking printed on the reservoir.
4. Replace the water reservoir into the machine, making sure that it slides completely into
place. When inserted properly, the end of the water reservoir will be even with the base.
Make sure the end of the hose is down in the water.
5. Turn the On/Off Switch to the “On” position so that the On Light is illuminated.
6. While the water is heating, insert filter in filter holder.
7. Put grounds into filter cup using 1 scoop for one 2-ounce serving and 2 scoops
for two 2-ounce servings, or place a standard 7g/45mm espresso coffee pod in the pod
adapter.
8. Use the bottom of the scoop to press the coffee grounds so that they are flattened down
and smoothed over. Gently remove any excess grounds from the rim of the filter holder.
If using a coffee pod, do not tamp it down.
9. Insert the filter holder into the machine. Make sure the thumb guard is flipped back and
not resting on top of the filter. Insert filter holder approximately 45 degrees to the left,
using the line on the Brew Head as a guide. When properly aligned, slide the filter
®
6
handle to the right until the handle is in the locked position. The handle will be
in the “Lock” area and should feel snug. YOU DO NOT NEED TO OVERTIGHTEN.
10. Place a cup underneath the filter holder spouts. Espresso will brew out of both filter
spouts, so use a cup that is wide enough to catch liquid from both spouts or brew
into two cups placed right next to each other.
11. When the Brew Ready Indicator Light comes on, you may begin brewing espresso.
(Your machine will only take a few minutes to heat up enough water for brewing).
Press brew button on
(brew position). Brew for approximately 25-30 seconds.
You may adjust brewing time to taste. A shorter brew time will yield a stronger cup of
espresso. The brew ready indicator light may go out while you are still brewing. This
just means that the machine is heating more water.
12. After 25-30 seconds, press brew button to turn off pump.
13. Remove cup from drip tray. Use caution when removing the filter holder as there can
still be hot water in the filter. Flip the thumb guard over the filter and knock out the
used grounds or spent coffee pod. Use caution as the filter and filter holder are very
hot. Rinse out the filter and filter holder and dry all parts.
14. You can brew multiple cups of espresso one right after the other! Just make sure the
water reservoir stays filled above the “min” level marking. Repeat Steps 5 – 13 above
to brew multiple cups of espresso.
USING ESPRESSO PODS
Your new MR. COFFEE® ECMP40 Espresso and
Cappuccino Maker has been designed to be podadaptable, that is, you may use versatile, pre-packed,
Pod Adapter
standard single shot 7g/45mm espresso coffee pods Pod
instead of regular espresso grounds coffee to brew your espresso. Pods contain a premeasured amount of espresso grounds packed in tear-resistant filter paper, with the added
convenience of no-fuss handling and mess-free disposal.
To prepare espresso using espresso pods, just replace the regular filter basket inside the
filter holder with the included pod adapter, then brew your espresso as explained in the
appropriate section of this instruction manual, except that instead of putting grounds in the
filter cup, you will place an espresso pod with your favorite espresso type or blend in the pod
adapter, then insert the filter holder into the machine. Make sure that the small tab on the pod
border remains inside the adapter before you insert the filter holder, for the best seal.
HOW TO MAKE CAPPUCCINO
Cappuccino is espresso topped with steamed and frothed milk. Frothing milk for cappuccino
takes practice. Do not be discouraged if it is not perfect the first time. The milk should be
half steamed (bottom of pitcher) and half frothed (top of the pitcher). It may take a few
7
times before you perfect this process.
IMPORTANT
For the best results, we recommend frothing milk in a separate pitcher and pouring the
milk into your coffee. The milk and pitcher should be cold. Do not use a pitcher which
has just been washed in warm water. Use skim or 2% milk.
We also recommend a stainless steel frothing pitcher and a specialty beverage thermometer,
if you own one, for preparing the best froth and steamed milk.
1. The first step in making cappuccino is to make espresso.Therefore, fill the water reservoir
with cold water. Never use warm or hot water to fill the water reservoir.
2. Follow steps in “Brewing Espresso”.
3. Fill a small stainless steel pitcher 1/3 to 1/2 way with cold milk. We recommend using a
MR. COFFEE® frothing pitcher (EFP1) or any other pitcher that holds about 10 - 12 ounces
and is around 5 inches tall. The pitcher should be cold. Do not use a pitcher that has just
been washed with warm water.
4. Make sure the Espresso Machine is turned on and that there is water in the water reservoir.
The brew ready indicator light will go off when the machine is ready to steam milk.
5. Press the Steam
Start/Stop Button. The steam ready light will come on when
the unit is ready to froth milk. The brew ready light will stay on.
6. Place the steaming tube in the pitcher with milk. Hold the pitcher so that the
steaming tube is submerged in milk and close to the bottom of the pitcher.
Clean the steam nozzle and frothing attachment immediately after each use. Fill a
pitcher halfway with water and run the steaming feature again for about 20 seconds.
This will clean out the inside of the steaming tube. Use a damp cloth to wipe off the
exterior of the steaming tube and frother attachment. You may want to rinse the frother
attachment with warm, soapy water. If the end of the steam tube becomes blocked with
dry milk, use a sewing needle or safety pin to clean out the small hole.
7. Turn the Steam/Froth Control Knob counterclockwise
to begin steaming.
The steam ready light will go off while you are steaming milk. This is normal
and you may continue steaming until you have completely steamed your milk.
USE CAUTION: Steam emitted from the frothing arm is very HOT. As the milk
heats up, the frothing pitcher will become very HOT!
8. The specially designed frothing attachment requires very little effort to produce thick
and frothy steamed milk. Steam the milk until the desired consistency is achieved
or until the frothed milk reaches the top of the pitcher. Slightly moving the pitcher
up and down while steaming (and keeping the frothing tube immersed in milk)
will help produce extra froth. When you are finished steaming, turn the Steam Control
Knob clockwise until it stops. Do not overtighten. Press the steam start / stop button
to complete the frothing process.
9. When the Steam Control Knob is closed, you will notice the machine releases
some steam. This is the machine releasing the pressure it has generated during
the steaming process and is normal.
ATTENTION
After using the steaming feature of your machine, the heating system is at its highest
temperature. If you wish to prepare more espresso immediately after steaming milk,
the heating system should be cooled down to keep from “burning” your espresso.
When the steam ready indicator light goes off, your machine is now ready to brew
espresso at the perfect temperature.
CLEANING
When you are finished brewing espresso and steaming milk, begin cleaning by turning
the unit off and unplugging the power cord.
The filter handle and filters should be cleaned each time you brew espresso. To clean,
remove filter handle by turning the handle approximately 45 degrees left of center.
The filter handle will release down from its locked position. Use caution as the filter or pod
adapter may still contain hot water floating on top of the coffee grounds or coffee pod.
Knock the used espresso grounds or pod out while holding the filter or pod adapter in
place by holding the thumb guard lock firmly against the filter cup or pod adapter. Use
caution as the filter cup or pod adapter and the filter holder will be very hot. Rinse the filter
cup or pod adapter and the filter holder out thoroughly with water. It is not recommended to
put the filter, pod adapter or filter holder in the dishwasher. If you are not going to use the
machine again for some time, do not reinsert the filter holder on the brew head; this will
lengthen the service life of the filter seal.
Remove the Water Reservoir and empty out any remaining water. Do not wash the
Water Reservoir in the dishwasher.
Remove the Drip Tray and Overflow Grid from the machine and rinse with warm,
soapy water. Do not wash these parts in the dishwasher.
CLEANING THE BREW HEAD
The Brew Head may need cleaning after prolonged use. You may wipe off the brew head
with a damp cloth to remove any old espresso grounds. If the brewing sieve (the underside
8
9
of the brew head) is particularly dirty, run a few cycles of plain water through the machine.
Operate the machine as if you were going to brew espresso, but do not put coffee grounds or
a coffee pod in the filter cup. Secure the filter handle in place and operate for 30 seconds
several times. This will run hot water through the brew head and clean out any old grounds.
CLEANING THE FROTHING TUBE
The Frothing Tube should be cleaned immediately after every use to prevent steamed milk
from drying on the tube. Fill a pitcher half way with water and run the steaming feature
again for about 20 seconds. This will clean out the inside of the steaming tube.
Use a damp cloth to wipe off the exterior of the steaming tube and frother attachment.
You may wish to rinse the frother attachment with warm, soapy water. If the end of
the steam tube becomes blocked with dry milk, use a sewing needle or safety pin
to clean out the small hole.
DE-LIMING
The service life of your Espresso Maker will be lengthened if you de-lime it regularly.
Your Espresso Maker may be de-limed using white household vinegar. The frequency
of de-liming depends upon the hardness of the water used. The following table gives
the suggested cleaning intervals.
SUGGESTED CLEANING INTERVAL
Type of Water
Cleaning Frequency
Soft Water
Every 80 Brew Cycles
Hard Water
Every 40 Brew Cycles
Fill about 18 ounces of vinegar into the Water Reservoir. Place a sufficiently large container
in the middle of the drip tray. Allow about one-third of the vinegar to run through the
system by operating the machine as if you were making espresso, but without putting
coffee grounds in the filter cups. Switch the machine off again and leave the vinegar to
work in for 10 to 15 minutes. Then run the rest of it through the system in one cycle.
It may be necessary to repeat the de-liming if the lime deposits are heavy. After the
last cycle, run two reservoirs of clear, fresh water through the system to clean all vinegar
from the machine. Once the cleaning cycle is complete, clean all removable parts in warm,
soapy water.
For additional espresso coffee pods, please call
1-800 MRCOFFEE or visit www.mrcoffee.com.
10
TROUBLESHOOTING
The espresso temperature is too low . . .
• Tamp (pack) the espresso ground coffee down a little more firmly.
• Pre-warm the cup by rinsing with hot water.
• De-lime the appliance.
The espresso brews too slowly . . .
• Do not tamp (pack) grounds so firmly.
• Use coarser espresso grounds.
• De-lime the appliance.
• Use correct type of coffee pod with appropriate espresso grind.
The espresso runs out of the side or top of the filter holder . . .
• Make sure that the filter holder is fitted into the holding ring properly.
• Tighten the filter handle down a little more firmly.
• Clean the espresso grounds off the edge of the filter cups before inserting into brew head.
• Clean the brew head.
• Seat coffee pod correctly within the pod adapter.
Espresso will not come out . . .
• Be sure that the Water Reservoir is full.
• Be sure that the Water Reservoir is properly fitted into position.
• Make sure the hose is down in the water and pink cap is removed.
• Be sure the grounds are not overpacked in the filter.
• Be sure that the filter holder is properly fitted into the holding ring.
• Clean the Filter Basket and Brew Head.
• De-lime the appliance.
The machine is very noisy when operating . . .
• Be sure that the Water Reservoir is full.
• Be sure that the Water Reservoir is properly fitted into position.
It is difficult to brew espresso with crema . . .
• Always use fresh espresso ground coffee.
• Be sure there is sufficient espresso ground coffee in the filter basket.
• Tamp (pack) the espresso ground coffee down slightly more.
• Use correct type of coffee pod.
Difficulty foaming milk . . .
• Always use fresh, cold milk.
• Use a stainless steel frothing pitcher. Insure the pitcher is cool before use.
• Clean the frothing tube by following the directions.
• Move the frothing pitcher slightly up and down while frothing.
• Make sure the frothing attachment is pushed up on the frothing arm as
far as it will go.
11
R ECIPES
ESPRESSO – . . . . . . . . Brew one or two cups at a time following the
directions. Optional: Add sugar to taste.
CAPPUCCINO – . . . . . . . Mix 1/3 espresso, 1/3 steamed milk and 1/3 frothed
milk. Top with ground nutmeg, cinnamon,
powdered chocolate or vanilla to taste.
LATTE – . . . . . . . . . . . Mix 1/3 espresso with 2/3 steamed milk.
Top with ground nutmeg, cinnamon,
powdered chocolate or vanilla to taste.
ICED ESPRESSO,
Mix beverages as described above,
CAPPUCCINO OR LATTE – then pour over ice.
R ECIPE I DEAS THAT YOU W ILL LOVE TO T RY !
CHOCOLATE
1/3 espresso, 1/3 steamed chocolate milk and
CAPPUCCINO –. . . . . . 1/3 froth from the chocolate milk.
FRENCH VANILLA
Pour 1/2 oz. vanilla syrup, 1/4 oz. hazelnut syrup
LATTE – . . . . . . . . . . into cup. Add espresso. Top with frothed milk.
Dust with vanilla powder.
VIENNA MOCHA – . . . . Pour 2/3 oz. chocolate syrup, 1/2 oz. almond syrup
into a glass. Add a shot of espresso. Fill with
steamed milk and top with frothed milk.
Dust with cinnamon.
BLACK FOREST
Pour 1 oz. chocolate syrup, 1 oz. bing cherry syrup,
CAPPUCCINO – . . . . . . 1/2 oz. orange syrup into a glass. Add 2 shots of
espresso. Fill with steamed milk and top with
frothed milk and cinnamon.
IRISH NUT
Pour 1 oz. Irish Cream syrup, 1 oz. hazelnut syrup,
LATTE – . . . . . . . . . . 1 shot espresso. Top with steamed and frothed milk.
CAPPUCCINO
Mix 1 shot espresso with 1 oz. Amaretto,
SUPREMO – . . . . . . . . 1 oz. brandy and steamed and frothed milk.
WARRANTY INFORMATION
1-YEAR LIMITED WARRANTY
Sunbeam Products, Inc, or if in Canada, Sunbeam Corporation (Canada) Limited (collectively “Sunbeam”)
warrants that for a period of one year from the date of purchase, this product will be free from defects in
material and workmanship. Sunbeam, at its option, will repair or replace this product or any component of
the product found to be defective during the warranty period. Replacement will be made with a new or
remanufactured product or component. If the product is no longer available, replacement may be made with
a similar product of equal or greater value. This is your exclusive warranty from Sunbeam.
This warranty is valid for the original retail purchaser from the date of initial retail purchase and is not
transferable. Keep the original sales receipt. Proof of purchase is required to obtain warranty performance.
Sunbeam dealers, service centers, or retail stores selling Sunbeam products do not have the right to alter,
modify or any way change the terms and conditions of this warranty.
This warranty does not cover normal wear of parts or damage resulting from any of the following: negligent
use or misuse of the product, use on improper voltage or current, use contrary to the operating instructions,
disassembly, repair or alteration by anyone other than Sunbeam or an authorized Sunbeam service center.
Further, the warranty does not cover: Acts of God, such as fire, flood, hurricanes and tornadoes.
What are the Limits on Sunbeam’s Liability?
Sunbeam shall not be liable for any incidental or consequential damages caused by the breach of any express,
implied or statutory warranty or condition.
Except to the extent prohibited by applicable law, any implied warranty or condition of merchantability or
fitness for a particular purpose is limited in duration to the duration of the above warranty.
Sunbeam disclaims all other warranties, or conditions or representations, express, implied, statutory or
otherwise.
Sunbeam shall not be liable for any damages of any kind resulting from the purchase, use or misuse of, or
inability to use the product including incidental, special, consequential or similar damages or loss of profits, or
for damages arising from any tort, including negligence or gross negligence, or fault committed by Sunbeam,
its agents or employees or for any breach of contract, fundamental or otherwise, or for any claim brought
against purchaser by any other party.
Some provinces, states or jurisdictions do not allow the exclusion or limitation of incidental or consequential
damages or limitations on how long an implied warranty lasts, so the above limitations or exclusions may not
apply to you.
This warranty gives you specific legal rights, and you may also have other rights that vary from province to
province, state to state or jurisdiction to jurisdiction.
How to Obtain Warranty Service
In the U.S.A.
If you have any question regarding this warranty or would like to obtain warranty service, please call 1-800672-6333 and a convenient service center address will be provided to you.
In Canada
If you have any question regarding this warranty or would like to obtain warranty service, please call 1-800667-8632 and a convenient service center address will be provided to you.
In the U.S.A., this warranty is offered by Sunbeam Products, Inc., located in Boca Raton, Florida 33431. In
Canada, this warranty is offered by Sunbeam Corporation (Canada) Limited, located at 5975 Falbourne Street,
Mississagua, Ontario L5R 3V8.
PLEASE DO NOT RETURN THIS PRODUCT TO ANY OF THESE ADDRESSES
OR TO THE PLACE OF PURCHASE
13
PRECAUCIONES IMPORTANTES
Cuando use alguna unidad eléctrica siempre deben de seguirse precauciones básicas
de seguridad incluyendo las siguientes para reducir el riesgo de incendio o descargas
eléctricas, y /o lesiones:
1. LEA TODAS LAS INSTRUCCIONES ANTES DE USAR LA UNIDAD.
2. No toque las superficies calientes. Use las asas o perillas.
3. Para protegerse contra una descarga eléctrica, no sumerja el cordón, el enchufe
o el aparato en agua o en otros líquidos.
4. Este producto no es recomendado para el uso por los niños.
5. Apague la cafetera y desconéctela del tomacorriente cuando ésta no esté en uso y antes
de limpiarla. Permita que se enfríe antes de poner o quitar partes y antes de limpiar la
unidad.
6. El uso de accesorios o aditamentos que no sean recomendados para usarse con
los productos de la marca MR. COFFEE® pueden causar lesiones o daños.
INSTRUCCIONES ESPECIALES
DEL
CORDÓN
1. Se proporciona un cordón corto para el suministro de corriente que reduce los riesgos
de los cordones largos que pueden enredarse o que hacen que la gente se tropiece.
2. Se puede comprar y usar una extensión si se tiene cuidado.
3. Si se usa una extensión, la clasificación eléctrica que viene marcada en el cordón debe ser
de por lo menos 10 Amperios y 120 Voltios. La extensión se debe arreglar de tal manera
que no cuelgue del fregadero ni de la mesa donde los niños puedan halarlo o la gente se
tropiece.
Esta unidad cuenta con un enchufe polarizado (uno de sus contactos es más
ancho que el otro). Para disminuir el riesgo de una descarga eléctrica, este
enchufe sólo podrá penetrar en un tomacorriente polarizado. Si el enchufe no
penetra completamente en el tomacorriente, inviértalo. Si aún no se puede
enchufar, comuníquese con un electricista autorizado. No modifique el enchufe
de manera alguna.
S I R EQUIERE S ERVICIO , N O
LA
D EVUELVA
A
S U T IENDA
Llame al 1-800-MR COFFEE (1-800-672-6333),
7. No use al aire libre o intemperie.
8. No permita que el cordón cuelgue sobre la orilla de la mesa o del mostrador o toque
superficies calientes.
9. No coloque esta unidad sobre o cerca de quemadores de estufas de gas o eléctricas,
ni dentro de un horno caliente.
PARA QUE NOS AYUDE A SERVIRLE, SÍRVASE TENER A MANO EL
NÚMERO DEL MODELO (ECMP40) Y LA FECHA DE COMPRA.
10. Para desconectar, remueva el enchufe del tomacorriente.
11. No use este aparato más que para lo que ha sido diseñado.
12. Coloque la cafetera sobre una superficie dura y nivelada para evitar la interrupción
del flujo de aire debajo la unidad.
13. No opere ninguna unidad con un cordón dañado o después de que la unidad ha
funcionado inadecuadamente o ha sido dañado en cualquier manera. Devuelva la
unidad a un centro de servicio autorizado para su revisión, reparación o ajuste.
14. A DVERTENCIA : Para reducir el riesgo de incendio o descarga eléctrica,
no quite ninguna cubierta para dar servicio a la unidad. En el interior de
la cafetera no se encuentra ninguna parte que pueda ser reemplazada.
Solamente el personal autorizado debe reparar la cafetera. Si usted
la cubierta inferior para dar servicio a la unidad, anulará la garantía.
E STA U NIDAD E S S ÓLO
PARA
14
U SO D OMÉSTICO
Todas las reparaciones deben ser hechas por MR. COFFEE® o en un Centro de
Servicio Autorizado MR. COFFEE®. Sírvase llamarnos para asistirle o para
informarle el lugar del Centro de Servicio Autorizado MR. COFFEE® más cercano o
vaya a www.mrcoffee.com.
P OR FAVOR N O D EVUELVA LA U NIDAD AL A LMACÉN .
Nos complace recibir sus preguntas, comentarios o sugerencias.
Comuníquese con nosotros en
1-800 MR COFFEE (1-800-672-6333)
o
www.mrcoffee.com
C ONSERVE E STAS I NSTRUCCIONES
15
I N T R O D U CC I Ó N
C ÓMO PREPARAR E XPRESO Y C APUCHINO DE C ALIDAD EN C ASA
®
¡FELICITACIONES! Usted el propietario de una cafetera Mr. Coffee para Expreso y Capuchino
Por favor lea cuidadosamente todas las instrucciones de este manual antes de comenzar a
usar esta unidad. El cuidado y mantenimiento apropiados le garantizarán la larga vida de
esta unidad y su operación sin problemas. Guarde estas instrucciones y refiérase a ellas
frecuentemente para la limpieza y consejos de cuidado.
D IAGRAMA DE L AS P ARTES
L
K
O
I
J
A
B
M
N
C
E
D
G
F
H
A.
B.
C.
D.
E.
F.
G.
H.
I.
J.
Depósito de agua removible
Indicador de nivel de agua
Boquilla de vapor
Accesorio productor de burbujas
Cabeza de preparación
Protector de pulgar del filtro
Soporte del filtro (Taza de filtro adentro)
Bandeja de goteo removible
Botón de preparación
Botón de vapor
K. Luz indicadora de On/Off
(Encendido/Apagado) (Roja)
L. Interruptor de On/Off (Encendido/Apagado)
M. Luz indicadora de listo para preparar
(Naranja)
N. Luz indicadora de vapor listo (Naranja)
O. Botón de control de burbujas/vapor
Cuchara de medir y herramienta de apisonar
(no se muestra)
16
E L C AFÉ
El café deberá ser molido fresco, oscuro, de la variedad tostada para expreso. Usted puede
comprar granos de café enteros y molerlos usted mismo en su casa usando la moledora
MR. COFFEE® Burr Mill o la moledora de granos MR. COFFEE® Bean Grinder. Almacene
los granos enteros en un recipiente al vacío, en un lugar fresco y oscuro. Usted no necesita
almacenarlos en la refrigeradora o en el congelador. Si usted compra café pre-molido,
planee usar el café dentro de 7 a 8 días para obtener el mejor sabor. Almacene el café premolido en un recipiente al vacío y manténgalo en un lugar fresco y oscuro.
L A M OL IDA
Este es un paso vital en el proceso de preparación de expreso. El café deberá ser molido
fino, pero no demasiado fino. Si usted compra café pre-molido o lo hace moler, asegúrese
de solicitar molido para expreso.
• El molido correcto deberá lucir arenoso, como sal o arena.
• Si el molido es demasiado fino, el agua no fluirá por entre el café, ni aún bajo presión.
El café que ha sido molido demasiado luce como polvo y al tacto se siente como harina
al pasarlo por entre los dedos.
• Si el café molido es demasiado grueso, el agua pasa demasiado rápido a través del
café, impidiendo una extracción total del café.
• Si utiliza pastillas (“pods”), asegúrese de que sean de un tamaño estándar, de 7g/45mm
para una sola taza, fabricadas para máquinas expreso. La ECMP40 NO puede utilizar
pastillas de 7g/55mm para una taza ni pastillas de 14g/55mm para dos tazas.
E L P ROCESO
Su cafetera MR. COFFEE® para Expreso y Capuchino fue diseñada para preparar fácilmente
café expreso y capuchino en su casa. Varias indicaciones le ayudarán a preparar café
expreso de calidad y bebidas de leche batida una y otra vez. Primero, siempre comience
con agua fría y fresca en el depósito de agua. Asegúrese de que todas las piezas de su
máquina estén limpias de usos anteriores. Usted puede precalentar las tazas donde servirá
el café expreso enjuagándolas con agua caliente. Esto ayudará a mantener su café expreso
caliente después de preparado.
La calidad, tostado, frescura, molida y origen de los granos de café que usted use varían el
sabor de su café expreso. Cuando usted prepara expreso, el café molido deberá ser
apisonado en la taza del filtro. Apisonado es el proceso de empacar ligeramente el café
molido en la taza del filtro. Su máquina MR. COFFEE® para Expreso y Capuchino viene con
una herramienta para apisonar y cuchara de pre-medida del café. NOTA: No sobre empaque
el café molido. Si usted está utilizando pastillas (“pods”) de café, no las apisone, tan solo
inserte la pastilla en el adaptador dentro del soporte del filtro.
Use la parte inferior de la cuchara para comprimir ligeramente el café molido después de
17
colocarlo en la taza del filtro (G) Esto le ayudará a preparar café expreso caliente y
delicioso con crema perfecta (la capa dorada sobre el expreso preparado).
ANTES DE USARLA POR PRIMERA VEZ
Refiérase a la Página 16 para ver el diagrama las partes.
1. Lave todas la piezas que se pueden remover con agua caliente y un detergente suave y
enjuáguelas completamente.
2. Remueva la tapa rosa del extremo de la manguera ubicada dentro del depósito.
3. Llene el depósito de agua con agua fría. No sobrepase la línea de llenado de MAX.
4. Siga los pasos en la Página 18 para preparar expreso para enjuagar el interior de la
máquina. Use únicamente agua. No use café en el ciclo de limpieza.
5. Siga los Pasos de la Página 19 para hervir leche y así limpiar el brazo de burbujas.
Usted debe usar agua en vez de leche para el proceso de limpieza.
6. Después de un ciclo de preparación y sacar vapor durante aproximadamente 45
segundos, vacíe el depósito de agua, remueva, enjuague y seque todas la piezas.
PRECAUCIÓN: Deje que la unidad se enfríe ante de remover las piezas.
¡Su cafetera está ahora lista para preparar fantástico expreso y capuchino!
PREPARACIÓN DE EXPRESO
1. Asegúrese de que el interruptor de On/Off (Encendido/Apagado) (ver el diagrama en la
Página 16), esté en la posición APAGADA y que los interruptores de preparación y de
vapor estén apagados.
2. Enchufe su nueva cafetera MR. COFFEE® para Expreso y Capuchino.
3. Remueva el depósito de agua y llénelo con agua fresca y fría. Asegúrese de mantener el
depósito de agua por encima de la marca de nivel de agua “min” estampada en el
depósito.
4. Instale el depósito de agua en la máquina asegurándose de que entre completamente en
su lugar. Cuando ha sido instalado apropiadamente, el extremo del depósito de agua
quedará a ras con la base. Asegúrese de que el extremo de la manguera esté dentro del
agua.
5. Gire el interruptor de On/Off (Encendido/Apagado) a la posición “On” de modo que la
luz de “On” se prenda.
6. Mientras que el agua está calentando, inserte el filtro en el soporte del filtro.
7. Coloque el café molido en la taza del filtro usando una cucharada para una taza de 2
onzas y 2 cucharadas para dos tazas de 2 onzas, o coloque una pastilla estándar para
café expreso de 7g/45mm en el adaptador.
8. Use el asiento de la cuchara para presionar el café molido de modo que quede plano y
parejo. Remueva cuidadosamente cualquier exceso del borde del soporte del filtro. Si
utiliza una pastilla de café, no la apisone.
9. Inserte el soporte del filtro en la máquina. Asegúrese de que el protector del pulgar sea
girado hacia atrás y que no quede descansando en la parte superior del filtro. Inserte el
soporte del filtro a aproximadamente 45 grados hacia la izquierda, usando la línea de la
Cabeza de Preparación como guía. Cuando quede alineado apropiadamente, deslice la
18
manija del filtro hacia la derecha hasta que la manija quede en la posición trabada. La
manija estará en el área “Trabada” y se deberá sentir apretada. USTED NO NECESITA
SOBRE APRETARLA.
10. Coloque una taza debajo de los caños del soporte del filtro. El expreso saldrá por los
dos caños del filtro, de modo que use una taza que sea suficientemente ancha para
colectar el café de los dos caños o en dos tazas colocadas una al lado de la otra.
11. Cuando la luz indicadora de listo para preparar se prenda, usted puede comenzar a
preparar el expreso. (Su máquina sólo tomará unos pocos minutos para calentar
suficientemente el agua para preparación). Oprima el botón de preparación
(posición de preparación). Cuele expreso durante aproximadamente 25-30 segundos.
Usted puede ajustar el tiempo de preparación al gusto. Un tiempo de preparación más
corto producirá una taza de expreso más fuerte. Puede que la luz de listo para
preparación se apague mientras que está aún preparando el café. Esto sólo significa
que la máquina está calentando más agua.
12. Luego de 25-30 segundos, oprima el botón de preparación para apagar la bomba.
13. Remueva la taza de la bandeja de goteo. Tenga precaución al remover el soporte del
filtro, ya que puede que aún haya agua caliente en el filtro. Gire el protector del pulgar
sobre el filtro y descarte el café molido usado o pastilla de café usada. Tenga
precaución ya que el filtro y el soporte del filtro están muy calientes. Enjuague el filtro
y el soporte del filtro y seque todas las piezas.
14. ¡Usted puede preparar múltiples tazas de expreso una detrás de la otra. Sólo asegúrese
de que el depósito de agua se mantenga lleno arriba de la marca de nivel de “min”.
Repita desde el Paso 5 al 13 arriba, para preparar múltiples tazas de expreso.
UTILIZANDO PASTILLAS (“PODS”) DE CAFÉ
Su nueva Máquina para Preparar Café
Expreso/Capuchino MR. COFFEE® ECMP40 ha sido
diseñada para acomodar pastillas de café (“pods”), o
sea que puede utilizar las versatiles pastillas estándar
Adaptador para
para café expreso, pre-empacadas, de 7g/45mm para Pastilla
Pastilla
una sola taza, en vez de café molido regular para colar
su café. Las pastillas contienen cierta cantidad pre-medida de café molido empacada en
papel de filtro resistente a roturas, con la conveniencia adicional de un manejo fácil y
limpieza sin embarres.
Para preparar café con pastillas de café, sólo reemplace la taza del filtro dentro del soporte
del filtro con el adaptador para pastillas incluido, entonces cuele su café según se explica
en la sección apropiada de este manual, salvo que en vez de colocar la harina de café en la
taza del filtro, colocará una pastilla de café con su variedad favorita de café en el adaptador
para pastillas, y luego insertará el soporte del filtro en la máquina. Asegúrese de que la
pequeña pestaña en el borde de la pastilla quede dentro del adaptador antes de insertar el
soporte del filtro, para conservar la eficiencia máxima de la bomba.
19
CÓMO PREPARAR CAPUCHINO
Capuchino es café expreso con leche espumada calentada al vapor. El hacer leche
espumosa para capuchino requiere práctica. No se desaliente si no le queda perfecta la
primera vez. La leche debe ser mitad al vapor (fondo del jarro) y mitad espumada (parte
superior del jarro). Pueda que le tome algunas veces perfeccionar este proceso.
Para obtener mejores resultados, nosotros recomendamos preparar la leche en un jarro
separado y luego servirla encima del café. La leche y el jarro deberán estar fríos. No use un
jarro que haya sido lavado recientemente en agua caliente. Use leche descremada o al 2%.
Nosotros también recomendamos un jarro de acero inoxidable y un termómetro para
bebidas, si tiene uno, para preparar la mejor leche espumosa al vapor.
emitirá un poco de vapor. Esto significa que la máquina está aliviando la presión que ha
generado durante el proceso y es normal.
IMPORTANTE
Limpie la boquilla de vapor y el dispositivo de burbujas inmediatamente después de cada
uso. Llene un jarro a la mitad con agua y opere el dispositivo de vapor de nuevo durante
20 segundos. Esto limpiará el interior del tubo de vapor. Use un trapo húmedo para limpiar
el exterior del tubo de vapor y el aditamento de burbujas. Pueda que usted quiera enjuagar
el aditamento de burbujas con agua tibia jabonosa. Si la punta del tubo de vapor se tapa
con leche, use una aguja de coser o alfiler para limpiar el agujero pequeño.
ATENCIÓN
1. El primer paso para hacer capuchino es hacer expreso. Por consiguiente, llene el
depósito de agua con agua fría. Nunca use agua tibia o caliente para llenar el depósito
de agua.
2. Siga los pasos bajo “Preparación de Expreso”
3. Llene un jarro pequeño de acero inoxidable de 1/3 a 1/2 con leche fría. Nosotros
recomendamos usar el jarro para burbujas MR. COFFEE® (EFP1) u otro jarro con
capacidad de 10 a 12 onzas, redondo y de 12,7 cm (5 pul.) de altura. El jarro deberá
estar frío. No use un jarro que haya sido lavado recientemente en agua caliente.
4. Asegúrese de que la máquina de expreso esté prendida y de que haya agua en el
depósito de agua. La luz indicadora de listo para preparar se apagará cuando la
máquina esté lista para burbujear la leche a vapor.
5. Oprima el botón
de Inicio/Parada de vapor. La luz de vapor listo se prenderá
cuando la unidad esté lista para burbujear leche. La luz de listo para preparar se
quedará prendida.
6. Coloque el tubo de vapor en el jarro con la leche. Sostenga el jarro de modo que el
tubo de vapor quede sumergido en la leche y cerca del fondo del jarro.
7. Gire el botón de control de Vapor/Burbujas
en el sentido contra las manecillas
del reloj para comenzar. La luz de vapor listo se apagará mientras que usted está
poniéndole vapor a la leche. Esto es normal y usted puede continuar poniéndole vapor
hasta que haya burbujeado la leche. PRECAUCIÓN: El vapor emitido por el brazo de
vapor está muy caliente. ¡A medida que la leche se calienta, el jarro se pondrá muy
CALIENTE!
8. El aditamento diseñado especialmente requiere muy poco esfuerzo para producir leche
de burbujas al vapor. Use el vapor en la leche hasta obtener la consistencia deseada o
hasta que la leche de burbujas a vapor llegue al borde del jarro. Moviendo ligeramente
el jarro hacia arriba y hacia abajo mientras sale el vapor (y manteniendo el tubo de
vapor en la leche) ayudará a producir más burbujas. Cuando termine de poner el vapor,
gire el botón de control de vapor en el sentido a favor de las manecillas del reloj hasta
que pare. No lo apriete demasiado. Oprima el botón de inicio/parada de vapor para
terminar el proceso de burbujas a vapor.
9. Cuando el botón de control de vapor queda cerrado, usted notará que la máquina
Después de usar el dispositivo de vapor de su máquina, el sistema de calentamiento se
encuentra a la temperatura más alta. Si quiere preparar más expreso inmediatamente
después de ponerle vapor a la leche, el sistema de calentamiento deberá ser enfriado para
evitar que “queme” su expreso. Cuando la luz indicadora de vapor listo se apague, su
máquina está lista para preparar expreso a la temperatura perfecta.
20
21
LIMPIEZA
Cuando termine de preparar el expreso y de ponerle vapor a la leche, comience a limpiar
apagando la máquina y desenchufando el cordón eléctrico.
El mango del filtro y el filtro deberán ser limpiados cada vez que prepara expreso. Para
limpiarlos, remueva el mango del filtro girando el mango aproximadamente 45 grados del
centro hacia la izquierda. El mango del filtro se soltará de la posición trabada. Sea
precavido ya que el filtro o adaptador aún pueden conservar agua caliente flotando sobre la
borra o sobre la pastilla. Descarte la borra o la pastilla usada mientras sostiene el filtro o
adaptador en su lugar sosteniendo el protector del pulgar firmemente contra el filtro o el
adaptador. Tenga cuidado ya que el filtro o el adaptador estarán muy calientes. Enjuague
completamente el filtro o adaptador y el soporte del filtro con agua. No se recomienda
lavar el filtro, adaptador o soporte del filtro en la lavaplatos. Si no piensa utilizar la
máquina durante algún tiempo, no reinserte el soporte del filtro en la cabeza de
preparación; esto aumentará la vida útil del sello del filtro.
Remueva el depósito de agua y vacíelo completamente. No lave el depósito de agua en el
lavaplatos.
Remueva la bandeja de goteo y la rejilla de desbordamiento de la máquina y enjuáguelos
con agua tibia jabonosa. No lave estas piezas en el lavaplatos.
LIMPIEZA DE LA CABEZA DE PREPARACIÓN
La cabeza de preparación podrá necesitar limpieza después de un uso prolongado. Usted
puede limpiar la cabeza de preparación con un trapo húmedo para remover cualquier café
molido usado. Si el cedazo de preparación (el lado inferior de la cabeza de preparación)
está particularmente sucio, cuele varios ciclos de sólo agua en la máquina. Opere la
máquina como si fuera a preparar expreso, pero no coloque café molido o una pastilla de
café en la taza del filtro. Asegure el mango del filtro en su lugar y opere la máquina durante
30 segundos varias veces. Esto pasará agua caliente por la cabeza de preparación y
limpiará cualquier residuo de café molido viejo.
LIMPIEZA DEL TUBO DE BURBUJAS
El tubo de burbujas deberá ser limpiado inmediatamente después de cada uso para evitar
que la leche hervida se seque en el tubo. Llene un jarro a la mitad con agua y opere el
dispositivo de vapor de nuevo durante 20 segundos. Esto limpiará el interior del tubo de
vapor. Use un trapo húmedo para limpiar el exterior del tubo de vapor y el aditamento de
burbujas. Pueda que usted quiera enjuagar el aditamento de burbujas con agua tibia
jabonosa. Si la punta del tubo de vapor se tapa con leche, use una aguja de coser o alfiler
para limpiar el agujero pequeño.
DESCALCIFICACIÓN
La vida útil de su cafetera expreso será aumentada si usted la descalcifica regularmente.
Su cafetera expreso puede ser descalcificada usando vinagre blanco común. La frecuencia
de la descalcificación depende de la dureza de agua usada. La siguiente tabla proporciona
el itinerario de limpieza sugerido.
INTERVALO DE LIMPIEZA SUGERIDO
Tipo de agua
Frecuencia de limpieza
Agua suave
Agua dura
Cada 80 ciclos de preparación
Cada 40 ciclos de preparación
Llene cerca de 18 onzas de vinagre en el depósito de agua. Coloque un recipiente
suficientemente grande en la mitad de la bandeja de goteo. Permita que un tercio del
vinagre pase por el sistema operando la máquina tal como si fuera a preparar café expreso,
pero sin poner café molido en la taza del filtro. Apague de nuevo la máquina y deje que el
vinagre trabaje durante 10 a 15 minutos. Luego pase el resto por el sistema en un ciclo.
Pueda que sea necesario repetir la descalcificación si los depósitos de cal son fuertes.
Después del último ciclo, pase dos depósitos llenos de agua a través del sistema para
remover todo el vinagre de la máquina. Una vez terminado el ciclo de limpieza, limpie
todas la piezas removibles con agua tibia jabonosa.
Para pastillas de café expreso adicionales, favor de
llamar al 1-800 MRCOFFEE o visite www.mrcoffee.com.
22
DIAGNÓSTICO DE PROBLEMAS
La temperatura para expreso es demasiado baja. . .
• Apisone (empaque) el café molido más firmemente.
• Pre-caliente la taza enjuagándola con agua caliente.
• Descalcifique el aparato.
La preparación del café expreso es demasiado lenta. . .
• No apisone (empaque) el café molido tan firmemente.
• Use café molido más grueso.
• Descalcifique el aparato.
• Use el tipo correcto de pastilla de café con el expreso molido apropiado.
El café expreso se desborda por el lado o por encima del soporte del filtro. . .
• Asegúrese de que el soporte del filtro esté encajado apropiadamente en el anillo de soporte.
• Apriete el mango del filtro más firmemente.
• Limpie el café molido del borde de la taza del filtro antes de insertarlo en la
cabeza de preparación.
• Limpie la cabeza de preparación.
• Coloque la pastilla de café correctamente dentro del adaptador.
El café expreso no sale. . .
• Asegúrese de que el depósito de agua esté lleno.
• Asegúrese de que el depósito de agua esté colocado en la posición apropiada.
• Asegúrese de que la manguera esté abajo en el agua y que la tapa rosa haya sido removida.
• Asegúrese de que el café molido no esté sobre empacado en el filtro.
• Asegúrese de que el soporte del filtro esté encajado apropiadamente en el anillo de soporte.
• Limpie la canasta del filtro y la cabeza de preparación.
• Descalcifique el aparato.
• Asegúrese de que no haya apisonado la pastilla de café.
La máquina es muy ruidosa cuando está operando. . .
• Asegúrese de que el depósito de agua esté lleno.
• Asegúrese de que el depósito de agua esté colocado en la posición apropiada.
Es difícil preparar café con crema. . .
• Siempre use café fresco molido para expreso.
• Asegúrese de que haya suficiente café molido para expreso en la canasta del filtro.
• Apisone (empaque) el café molido para expreso un poquito más.
• Use el tipo correcto de pastilla de café.
Dificultades para espumar la leche. . .
• Siempre use leche fresca y fría.
• Use un jarro para espumar de acero inoxidable. Asegúrese de que el jarro esté frío antes de
usarlo.
• Limpie el tubo de vapor siguiendo las instrucciones.
• Al hacer burbujas, mueva el jarro de hacer burbujas hacia arriba y hacia abajo.
• Asegúrese de que el aditamento de hacer espuma esté empujado en el brazo de espuma tanto
como se pueda.
23
R ECETAS
EXPRESO – . . . . . . . . . Prepare una o dos tazas a la vez siguiendo las
instrucciones. Opcional: Agréguele azúcar al gusto.
CAPUCHINO – . . . . . . . Mezcle 1/3 expreso, 1/3 leche al vapor y 1/3 leche
espumosa. Rocíelo al gusto con nuez moscada,
canela, chocolate en polvo o vainilla.
LATTE – . . . . . . . . . . . Mezcle 1/3 de expreso con 2/3 de leche al vapor.
Rocíelo al gusto con nuez moscada, canela,
chocolate en polvo o vainilla.
EXPRESO CONGELADO,
CAPUCHINO O LATTE –
Mezcle las bebidas tal como se describe arriba,
luego viértalas sobre hielo.
¡I DEAS DE RECETAS QUE USTED ADORARÍA PROBAR !
CHOCOLATE
1/3 expreso, 1/3 leche chocolatada al vapor y
CAPUCHINO – . . . . . . 1/3 leche espumosa de la leche chocolatada.
LATTE DE VAINILLA
Vierta en una taza 1/2 onza de almíbar de vainilla,
FRANCÉS – . . . . . . . . 1/4 de onza de almíbar de avellana. Agregue expreso.
Póngale encima leche espumosa.
Rocíelo con polvo de vainilla.
VIENA MOCA – . . . . . . Vierta en un vaso 2/3 de onza de almíbar de chocolate,
1/2 onza de almíbar de almendras. Adicione un
trago de expreso. Llénelo con leche al vapor y
póngale encima leche espumosa. Rocíelo con canela.
CAPUCHINO FLORESTA
Vierta en un vaso 1 onza de almíbar de chocolate,
NEGRA – . . . . . . . . . . 1 onza de almíbar de cereza, 1/2 onza de almíbar
de naranja. Adicione 2 tragos de expreso.
Llénelo con leche al vapor y póngale encima
leche espumosa y canela.
LATTE DE NUEZ
Vierta 1 onza de crema irlandesa, 1 onza de almíbar
IRLANDESA – . . . . . . . de avellana, 1 trago de expreso. Póngale encima
leche al vapor y leche espumosa.
CAPUCHINO
Mezcle 1 trago de expreso con 1 onza de Amaretto,
SUPREMO – . . . . . . . . 1 onza de brandy, leche al vapor y leche espumosa.
24
INFORMACIÓN SOBRE LA GARANTÍA
Garantía Limitada de 1 Año
Sunbeam Products Inc., o, en el Canadá, Sunbeam Corporation (Canada) Limited (“Sunbeam” colectivamente)
garantiza que, por un período de un año a partir de la fecha de compra, este producto estará libre de
defectos en el material y en la mano de obra. Sunbeam, a su criterio, reparará o reemplazará este producto
o cualquiera de los componentes del mismo que estén defectuosos durante el período de garantía. El
reemplazo será hecho con un producto o componente nuevo o reconstruido. Si el producto ya no se
encuentra disponible,
se reemplazará con un producto similar de igual o mayor valor. Esta es su garantía exclusiva.
Esta garantía es válida para el comprador original al detal a partir de la fecha inicial de compra al detal y no
es transferible. Conserve el recibo original de compra. La evidencia de compra es requerida para honrar la
garantía. Los concesionarios, centros de servicio de Sunbeam o tiendas al detal que vendan productos
Sunbeam, no tienen el derecho de alterar, modificar o cambiar de forma alguna los términos o condiciones
de esta garantía.
Esta garantía no cubre el desgaste por el uso normal de las piezas, o daños que resulten de cualesquiera de
las siguientes: uso negligente o incorrecto del producto, uso bajo un voltaje o corriente inadecuados, uso
contrario a las instrucciones de operación, desensamble, reparaciones o alteraciones que no sean hechas por
Sunbeam o por un centro de servicio autorizado Sunbeam. Además, la garantía no cubre: factores de fuerza
mayor tales como incendios, inundaciones, huracanes y tornados.
¿Cuáles son los límites de la responsabilidad de Sunbeam?
Sunbeam no será responsable de ningún daño incidental o consecuente causado por el incumplimiento de
cualquier garantía o condición expresa, implícita o estatutaria. Excepto hasta donde esté prohibido por el
derecho aplicable, cualquier garantía o condición implícita de comercialización o de aptitud para un
propósito en particular están limitadas en duración al período de la garantía antedicha. Sunbeam rechaza
cualesquiera otras garantías, condiciones o representaciones, expresas, implícitas, estatutarias o de otra
índole. Sunbeam no será responsable de cualesquiera daños de clase alguna que resulten de la adquisición,
uso o mal uso de, o incapacidad para utilizar el producto, incluyendo daños incidentales, especiales,
consecuentes o similares, o la pérdida de ganancias, o por cualquier incumplimiento de contrato, fundamental
o de otra índole, o por cualquier reclamación incoada contra el comprador por cualquier tercero. Algunas
provincias, estados o jurisdicciones no permiten la exclusión o limitación de daños incidentales o
consecuentes o limitar la duración de una garantía implícita, así que las limitaciones o exclusiones antedichas
pueden no ser aplicables a usted. Esta garantía le otorga derechos legales específicos, y usted puede también
tener otros derechos que varían de provincia en provincia, de estado en estado y de jurisdicción en
jurisdicción.
Cómo obtener el servicio de la garantía
En los EE.UU.
Si usted tiene cualquier pregunta con respecto a esta garantía o si desea obtener servicio, favor de llamar al
1-800-672-6333 y se le proveerá una dirección de un centro de servicio de acceso conveniente para usted.
En el Canadá
Si usted tiene cualquier pregunta con respecto a esta garantía o si desea obtener servicio, favor de llamar al
1-800-667-8623 y se le proveerá una dirección de un centro de servicio de acceso conveniente para usted.
En los EE.UU., esta garantía es ofrecida por Sunbeam Products, Inc., localizado en Boca Ratón, Florida 33431.
En el Canadá, esta garantía es ofrecida por Sunbeam Corporation (Canada) Limited, localizado en 5975
Falbourne Street, Mississauga, Ontario L5R 3V8.
FAVOR DE NO DEVOLVER ESTE PRODUCTO A CUALQUIERA DE ESTAS
DIRECCIONES O AL LUGAR DONDE LO ADQUIRIÓ.
25
NOTES
NOTAS
26
27