1
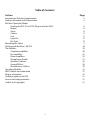
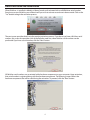
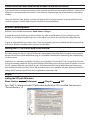
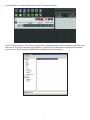
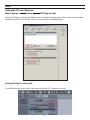
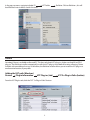
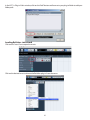
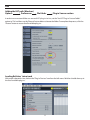
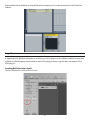
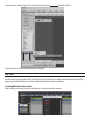
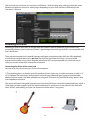
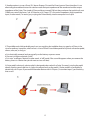
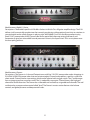
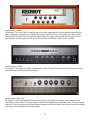
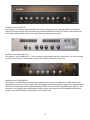
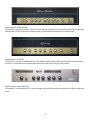
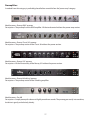
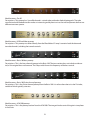
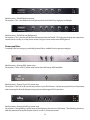
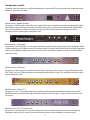
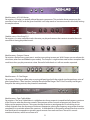
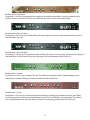
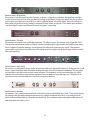
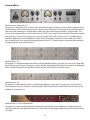
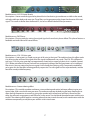
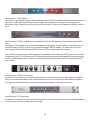
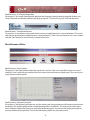
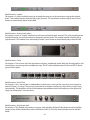
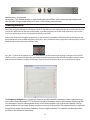
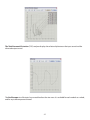
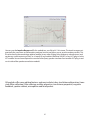
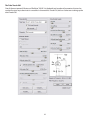
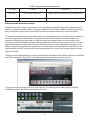
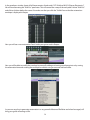
Table of Contents Section Page Introduction/Technical requirements 3 Product Activation and Authorization 4 ReValver Operating Modes Loading the VST, AU or RTAS Plug-in into the DAW 6 Reaper 6 Sonar 8 Cubase 9 Live 11 Logic Pro 12 Pro Tools 13 Recording the Guitar 3 Working with ReValver™ MK III.V 18 The Modules 10 Complete amplifiers 20 Pre-amplifiers 27 Power amplifiers 29 Stomp boxes/Pedals 31 Speakers/Cabinets 35 General Effects 36 Miscellaneous Utilities 39 Tweaking Modules 41 MIDI Control and automation 47 Plug in automation 47 Finding a good sound/FAQ 51 License and copy protection 51 Credits and Copyrights 51 2 Introduction Congratulations on your purchase of ReValver™ MK III.V! ReValver MKIII.V is a revolutionary 64-bit amplifier modeling software that captures the true characteristics of vacuum tubes while allowing users unprecedented control over their tonality and gain structures. ReValver includes 65 incredible linkable sub modules that model legendary amplifiers, stomp boxes and rack effects, making ReValver MKIII.V the most advanced virtual amplifier on the planet! This program works both as a standalone using miscellaneous sound card driver models, or as a VST/AU/RTAS plug-in on various hosts. The program is designed for minimal latency (input/output delay) which is only limited by the plug-in host. Technical requirements Mac Requirements: OS X 10.4 or later, 1 GHz CPU; 512 MB RAM; 1024x768 screen resolution; VST/AU/RTAS host or sound card The Live Host of ReValver MK III.V requires CoreAudio for playback, and MIDI for MIDI control. (MIDI optional.) AU plug-in requires AU host. VST plug-in requires VST host. RTAS plug-in requires RTAS host. PC Windows Requirements: 1 GHz CPU; 512 MB RAM; 1024x768 screen resolution; VST/RTAS host or ASIO/WDM sound card OS: Microsoft Windows 2000/XP or later The Live Host of ReValver MK III.V require either ASIO, MME, WDM or DirectSound for playback, and MIDI for MIDI control. (MIDI optional.) VST plug-in requires VST host. RTAS plug-in requires RTAS host. Compatibility issues While every measure has been made to resolve any compatibility issues with various VST/AU/RTAS hosts and sound cards, some issues may remain. If you believe you have found a new compatibility problem, please browse to www.peavey.com/products/revalver. There you will find product updates and user forums. 3 Product Activation and Authorization When ReValver™ is installed, it defaults to “demo” mode until activated with a valid ReValver serial number. Everytime you start ReValver you will be asked if you wish to activate or continue in demo mode. Click on the “Yes” button to begin the activation process. The next screen provides details into the product activation process. If you do not yet have a ReValver serial number, this screen also provides a link to the ReValver web site, where ReValver serial numbers can be purchased. If you have a serial number, click the “Next” button. All ReValver serial numbers are associated with a hardware component on your computer. Upon activation, that serial number is registered along with that hardware component. The following screen reflects the hardware component that will be used during the activation. To proceed, click the “Next” button. 4 On the following screen, enter your ReValver™ serial number. If you have an Internet connection, the activation process will register your copy of ReValver online. If you are ready to activate, click the “Next” button. During the online activation process, you will see the current status of the activation in the “Connection log” window at the bottom of the activation screen. Once the online activation is complete, you will see the following window stating that the activation was successful. To proceed, click the “OK” button. To finish the activation process, click the “Finish” button. 5 Product Activation and Authorization Without An Internet Connection If you do not have an Internet connection on the computer on which you are installing ReValver™, choose “This computer is not connected to the Internet” in the Internet Connection portion of the product authorization window. When you click the “Next” button, a window will pop up with instructions on how to activate ReValver from another computer. Carefully follow those instructions to activate ReValver. ReValver Operating Modes ReValver has two modes of operation: Stand-alone and Plug-in In stand-alone mode, ReValver runs alone without any other required software. If you are looking to use ReValver as a computer-based live rig or just want to play some guitar, this would be the mode to choose. In plug-in mode, ReValver runs within a host. If you are recording, your host would be the DAW of your choice. In this case, ReValver would be used as an insert or track effect. Loading the VST, AU or RTAS plug-in into the DAW On a Mac, a plug-in in the VST, AU or RTAS format is automatically located by the host and no action needs to be taken for the host to find the ReValver plug-in. It should be automatically listed among the available plugins after a rescan. In Windows, it is possible to install the VST plug-in at any location. To make the VST host aware of this location, it must be manually pointed to. During the installation of ReValver, you are given a choice of locations to install the VST (separate from the stand-alone version). We recommend that you install ReValver to a location you have already used with your host. Most DAWs provide a means to list available VST paths. Below are details for adding the VST path to various hosts and using ReValver within the DAW: Reaper Adding the VST path (Windows) Menu: Options Preferences Plug-ins VST Press “Add” (1) to browse to the VST path where the ReValver VST is installed. You then press “Rescan directory” (2). 6 To use ReValver™ on a track in Reaper, click on the “fx” button in the track. In the FX window, click on “VST” in the menu to the left and locate ReValver in the list of effects to the left. If you have a lot of VST plug-ins installed, typing “ReValver” in the Filter list at the bottom of the window will speed up your search. Once you have located ReValver, double click to load the plug-in. 7 Sonar Adding the VST path (Windows) Menu: Options Global VST Plug-ins (tab) From the VST Plug-ins tab, click the “Add” button (1) and browse to your plug-in folder. Once you have added the path, click the “Scan VST Folders” button (2) to rescan for all available plug-ins. Loading ReValver™ into a track To use ReValver on a track in Sonar, right mouse click in the “FX” window of the track. 8 In the pop-up menu, navigate to Audio FX load ReValver into an effects slot for the track. VST Folder ReValver. Click on ReValver™, this will Cubase Steinberg Cubase is available on Mac and PC. This host only loads VST plug-ins. It does not load AU or RTAS plug-ins. The ReValver installer automatically installs the VST plug-in in the default location, allowing Cubase to find it with no additional set-up. On Windows, the ReValver installer allows you to install the VST plug-in at an alternative location, if you prefer. Adding the VST path (Windows) Devices Plug-in Information VST Plug-ins (tab) From the VST PlugIns tab, click the “VST 2.x Plug-in Paths” button 9 VST 2.x Plug-in Paths (button) In the VST 2.x Plug-in Paths window, click on the “Add” button and browse to your plug-in folder to add your folder path. Loading ReValver™ into a track Click on the “Insert” bar to open the inserts. Click on the desired insert to choose the ReValver plug-in from the menu. 10 Live Adding the VST path (Windows) Options Preferences File Folder Plug-in Sources section In order to use a custom folder as a source of VST plug-ins in Live, set the “Use VST Plug-in Custom Folder” option to “On” and then use the “Browse” button below to locate the folder. To complete the process, click the “Rescan” button to rescan for all available plug-ins. Loading ReValver™ into a track With a track selected in Live, click on the “Plug-In Devices” icon from the left menu. ReValver should show up in the list of available plug-ins. 11 Either double click on ReValver™ or drag ReValver from the plug-ins list to the device chain in the Track View Selector. Logic Pro In Apple Logic Pro, ReValver will appear as an AU plug-in. All AU plug-ins are installed in a default location and will after installation appear automatically in the AU hosts plug-in menu. Logic Pro does not support VST or RTAS plug-ins. Loading ReValver into a track To insert ReValver on a track, click on “Inserts” 12 From the menu, under “Audio Units”, select Peavey Electronics ReValver™ MK III.V. Choose “Mono” or “Stereo” according to your situation. Pro Tools Avid Pro Tools only recognizes RTAS (and TDM) plug-ins. The ReValver installer automatically installs the RTAS plug-in at the default location. Pro Tools will automatically find it after installation. Loading ReValver into a track After creating a new track, you insert ReValver by switching to the Mix window. 13 Click on the Insert row where you want to insert ReValver™. Select the plug-in by selecting it from the menu. ReValver will appear as a mono or stereo plug-in depending on your track. ReValver will be found in the “Harmonic” sub menu. Recording the Guitar Recording a Guitar is not as easy as it might seem, but it doesn’t have to be difficult. If your Guitar is not powered by a battery (and very few are), then it is generating an electrical signal which is not compatible with most sound cards. There are common electrical standards between audio gear, and unfortunately the Guitar falls completely outside those standards because it is passive. The electrical signal from the Guitar is the result of the movement of metallic strings over a magnetic pickup, and this is rarely acceptable as an electrical source when you connect it directly to a computer sound card Connecting the Guitar to the sound card Here are three ways to connect your Guitar to the computer: 1) The simplest option is to hook it up to the sound card Line-In jack using a suitable connector, usually a 1/4” to 1/8” adapter. The advantage is that you don’t have to buy any additional gear (except maybe the cable adapter) but the sound is not ideal, probably not even good. The reason for the dull and boring sound is due to an impedance mismatch. The sound card input is designed to accept input from electrical devices which have adequate driving signal; a Guitar does not have enough signal. The input impedance of a sound card is in the order of a few thousand ohms (kOhm), while ideally, you want it to be around a million ohms (1 meg ohm). 14 2) Another option is to use a Direct (D.I.) box or Preamp. DI stands for Direct Input or Direct Interface. It is an electrically powered box that can be used to match the input impedance of the sound card and the output impedance of the Guitar. The simplest DI box could cost around $20, but there are boxes that could easily cost $200 if you want all the “extras,” too. A DI box has a Hi-Z input (“Z” is the unit of Impedance; High Impedance input, in other words). To record, you just plug the DI box directly into the computer Line-In jack. 3) The middle road, which probably won’t cost you anything, but could be almost as good as a DI box, is the use of an ordinary stomp box, which in fact is a sort of DI box. It could be a pedal of any kind: a distortion pedal, chorus, echo, etc., as long as: a) It is electrically powered, and you actually use the battery or power source b) You use it in bypassed mode, i.e “off” c) It is not a “true bypass” device (In other words, in “off” mode, if the sound disappears when you remove the battery, then it is a device that you do want to use as a DI box) A Guitar pedal is obviously a device which is designed to be used with a Guitar. To record, just plug the pedal directly into the sound card Line-In. Adjust the output levels on the pedal. A Guitar pedal is an example of a device with a Hi-Z input. If you could find another device with Hi-Z inputs (“Instrument input“) you should try that as well. 15 4) The best option is, of course, to purchase a good quality Digital Audio Interface, such as the Peavey Xport™ . Look for a device with ASIO (audio stream input/output) drivers, which is an industry standard and will work well with ReValver™ MKIII.V. After you install the device, the Audio Devices menu under the File menu will allow you to choose that device for input and output, then the Control Panel button will be activated, and serve as a link to your device. Since there are so many available options on the market, it is impossible for us to comment on the specifics of a particular product. Just keep in mind that most ASIO-driven audio interfaces operate in a similar fashion, and the control panel will enable you to make changes to the buffer size, changing the length of time the computer has to make calculations, and resulting in more or less latency. Generally, the smaller the buffer size, the lower the latency. However, you will have to experiment with buffer sizes to find the optimum settings for your computer, based on your processor speed and amount of memory. A word about latency Latency is a technical term that basically means the time lapse between playing a note and hearing it. When using ReValver as a stand alone program, you need to set the latency to as low a number as your computer will allow. If you are using your PC or Mac’s original factory sound card, you are almost guaranteed to have latency issues. It really does make sense to get a high-quality sound card, and there are many models available at various price levels. ReValver by itself does not control how much latency you will experience with the program, neither the stand-alone nor the plug-in. (In plug-in mode, the latency is controlled entirely by the DAW). To control the latency in stand-alone mode, you are advised to set the appropriate numbers in the sound card driver. ReValver provides a shortcut to the ASIO control panel of your card. (In the “Audio Devices” menu, select ASIO, your sound card, then press Control Panel). The latency is directly proportional to the “sample chunk size.” Short latency equals small chunk size. Recommended chunk size is 128-256 samples. If the sound is breaking up (choppy sound, stuttering), increase the buffer size. (Try these standard values: 64, 128, 256, 512, 1024, 2048). It is advisable to start with a smaller number and gradually increase until the sound is no longer choppy. 16 Recording the Guitar with or without effects? Should you use hardware compressors, distortion or other effects before you record the signal? It is your personal preference. If you can’t live without “that special sound,“ then you should probably record it that way. But when it comes to compression, EQ, reverb and other special effects that could be produced in software, then you should produce it in software and not in hardware. That way you can always change your mind afterward. To truly access all of the incredible tone shaping that ReValver™ allows, you should take advantage of a process called “re-amping.” In a nutshell, re-amping simply means to record the Guitar dry and then use the ReValver plug-in to change the tones. In this way, you will have unlimited access to all of the amazing tones ReValver can offer. Of course, as in the paragraph above, if you can’t live without a certain distortion tone, you can still use ReValver’s effects modules as a rack of effects. The sky is the limit and it’s all at your fingertips! There is one “effect” you generally should use before sampling the signal, namely “limiting.” It is a function which keeps the signal from clipping digitally in case you happen to use a too strong signal. Some audio interfaces have a soft limiter built in; however, when you are recording a dry Guitar the presence of distortion means you are sending too hot a signal to the computer. If you are recording a dry Guitar to re-amp, there should be no distortion whatsoever. Using 16 bit or 24 bit sampling? Many sound cards today offer 24-bit sampling at high sample rates. While the CD audio standard is only 16-bit and still sounds quite good, it makes perfect sense to use as many bits as possible during recording. In general, it is always good thinking to use more bits than you will need in the very end. 16-bit audio gives you about 96 dB of dynamic range. 24 bits gives you an additional 48 dB. A high gain preset in ReValver MK III.V amplifies the signal a lot, probably 40 - 80 dB, and with those levels you would start to hear the sound card “quantization noise” (bit noise). With more bits there is less digital noise. You will still hear electrical noise, but that is usually significantly less. Using 44.1/48kHz, 96kHz or higher? The higher the better, normally, but in ReValver MK III.V, all vital parts are oversampled to the double-sample rate to make sure there is a minimum of aliasing noise. Aliasing noise, simply put, is an unpleasent background noise that can occur with any modeling software or amplifier when the CPU is asked to do more than it can do. You should also consider that most good Guitar sounds are very bandwidth-limited and you probably don’t need the high frequency range that even 44.1kHz sample rate offers. 17 Working with ReValver™ MK III.V The title module At the top of the graphical interface of the program is a module containing general setup functionality, including the Input volume +-16dB adjustment (with pre and post LED indicators) and Output volume -32dB adjustment (with post LED indicator). The adjustment knobs can automatically adjust the input and output volume to 0dB by pressing the “Learn” buttons. Pressing the gearwheel icon brings up the Options window. The Title module also hosts the bank & preset management; see below. Presets and banks A preset of ReValver MK III.V is constructed from one or more sub-modules. The signal path moves down the path of modules from top to bottom. If the “signal splitter” has been inserted, the chain is split into two parallel chains until they are merged in the “signal merge module.” There is no restriction on how to combine modules, as they can be “chained” in any combination (although some combinations are undesirable). The idea is to imitate the behavior and application of real-life amps and effect units. Normally you would find combinations with this order: Stompbox (if any), Amp, Speaker and Effect (if any). An amp consists of a preamp and a power amp, and you may replace a module in the “Amp” category with a combination of a “Preamp” and “Power Amp.” Presets are organized in “banks.” To select a preset from a bank, that bank must first be selected from the title module at the top of the chain. A bank and preset can also be selected through MIDI command. To save a preset or bank in a new position, press “New” beside the drop-down menu. You will be asked to name it. When you have entered a name, press the “Done” button or the Enter key. To cancel, press the Escape key. After you rename a preset or a bank, ReValver automatically saves it. Pressing “Save” will save the current preset or bank into the currently selected position, overwriting the old. To import or export a preset or a whole bank, press the “Imp.” (import) or “Exp.” (export) buttons. 18 Quality modes By pressing the gearwheel icon on the title module you can select the Startup quality mode. The mix-down quality mode forces 64-bit processing at 4x oversampling. This mode fully exposes the qualities of the program, whereas the normal “real time” mode may be a little more noisy and is likely to contain some aliasing noise (especially in high gain amps). It is recommended to always use the “mix-down mode” when freezing/rendering or when mixing a track. Please be aware that the additional requirements of mix-down mode could make the multitracker stutter or drop out if run at real time. The CPU requirement is more than 5 times that of the real-time mode. To switch the mode, you must restart the VST/AU/RTAS host to allow all instances of ReValver to fully reload. Every new instance of ReValver™ will be started in the current startup mode. In some cases, the sound of ReValver can be different when switching modes. That is because not all features can be accurately expressed in real-time mode, but only in mix- down mode. Selecting modules To insert a module anywhere in the signal chain, right-click your mouse on “click for a new module here.” The module selector allows you to select modules from their categories, and will display a brief description about each module. Moving modules One of the coolest features in ReValver MK III.V is how easy it is to move modules around, totally reconfiguring the signal chain on the fly. To move a module, simply move the cursor to the right of the module over the rack screw until your cursor turns into a 4-pointed cross, then hold the mouse button down and move the module where you want it. Release the button and you’re done! Be mindful, however, that not all routing will sound good. For example, putting your amp directly into a Chorus pedal is not very pleasing to the ear! Toggling between mono and stereo Each module can be set individually to process the signal in either mono or stereo. It either merges the channels or expands them depending on how the previous module is set. Some modules, such as REVERB, VOLUME EFFECTS and DELAY, are set to STEREO by DEFAULT. If the host (VST, AU, DirectX) has patched ReValver MK III.V on a mono track, all processing will be converted to stereo. 19 The Modules Complete amps The modules in this category are integrated preamps and power amps; thus, no module from the “preamp” or “power amp” categories is needed along with an “amp” in a ReValver™ MK III.V preset. Module name = Peavey 6505® Description = Loud, mean and built for the road, the 6505 was named in celebration of Peavey’s first 40 years, 1965 to 2005. 6505 Series amps feature five 12AX7 preamp tubes and four 6L6GC power amp tubes, with presence and resonance controls and three-band EQ for taming their notorious tone. Module name = Peavey 6505®+ Description = Adding an extra preamp tube and even more gain to the 6505, the 6505+ represents the pinnacle of metal tone. The 6505 Series amps are the undisputed go-to Guitar amps for scores of rock, hardcore and metal bands due to their raw tone, relentless power and road-proven reliability. Module name = Peavey Classic® 30 Description = One of the most widely used and versatile amps in the music business, the Classic 30 has a dual-channel preamp, allowing quick variations of the tone from vintage blues to modern hard rock to grunge. The boost switch is particularly useful in obtaining the more traditional “cranked-amp” tones without the harshness generated by sending too much low end to the power amp. 20 Module name = Peavey 3120™ Description =The Ultimate tone machine. The 3120 rips, with four 12AX7 preamp tubes and four 6L6GC power amp tubes. The amp is controlled by a master volume pot and independent volume knobs for each of its three channels. The Ultra and Crunch channels have gain controls to further assist in taming this beast. Tone contour is accomplished through passive controls on the Clean channel, while the Ultra and Crunch channels utilize active controls. Module name = Peavey Sensation™ 20 Description = The Peavey Sensation is a boutique amp in every sense of the word. If your thing is tone, this is the amp for you. This single channel tone machine boasts three 12AX7 preamp tubes and two EL84 cathodebiased output tubes, along with pre-gain, treble, middle, bass, post controls and reverb. Drawing on over 45 years of Peavey amplifier know-how, the Sensation is a true player’s amplifier. Module name = Peavey Masterpiece™ 50 Description = The flagship of the Peavey custom shop amps, the Masterpiece is a two channel dream with three 12AX7 preamp tubes and two fixed-bias 6L6GC output tubes. The Clean channel features volume, treble, middle and bass controls with a bright switch. The Overdrive channel uses the Clean channel and adds two stages of gain to achieve a very smooth, musical overdrive that ranges from slightly overdriven to thick overdrive tones. Gain trim, gain and gain level controls and an all-tube reverb add even more tone shaping. 21 Module name = Peavey ValveKing® Description = A true tone monster in its own right, The ValveKing delivers a tone ranging from bluesy clean to crunchy and classic rock. The amp has a built-in spring reverb and separate tonestacks for the Clean and Lead channels. The amp’s preamp and power sections use 12AX7 and 6L6GC tubes, respectively. The ValveKing also features global resonance, presence and reverb controls. Module name = Peavey JSX® Description = Loaded with three independent channels and comprehensive tonal control, the Joe Satriani signature JSX puts the full spectrum of Guitar tones at your fingertips, starting with a pristine clean channel, the perfect foundation for layering outboard effects, and including the exclusive FAT switch that adds extra heft to the Ultra and Crunch channels. The amp also has presence control and the patented resonance adjustment for the ultimate in tone! Module name =Budda® SuperDrive Description = A rock masterpiece! The Budda SuperDrive is ready to go from punchy rhythm tones to creamy blues tones to full-on metal crunch. With three 12AX7 preamp tubes, one 5u4 rectifier and powered by 2 EL84 power tubes, the SuperDrive II runs the tonal gamut from rich and creamy to modern overdrive. The proprietary Budda Dual Class Hot Bias preamp circuit combines the best characteristics of class A and class AB to produce lively tones defined by massive dynamics and complex overtones in second and third harmonics, with plenty of separation to let your guitar sing. 22 Module name =Budda® V-Series Description = The Budda SuperDrive V-20 offers the best in British Class AB guitar amplifier design. The V-20 delivers rich, harmonically complex tone that rewards your playing with exceptional sensitivity to variations in your pick attack and to subtle changes in playing style. With Budda’s Dual Class Hot Bias preamp circuitry, three 12AX7 preamp tubes, 6V6GC power tubes and a special thick alternate voicing that boosts mid frequencies to give your tone added cut and presence in the mix, the SuperDrive V-20 is sure to please even the most picky guitarists. Module name =Demon Description = The Demon is a 3 channel Teutonic terror with five 12AX7AC preamp tubes and a whopping six EL34/5881/6550/KT88 power tubes that can be intermingled. Channel one produces a sparkly, crystal clear clean sound. Channel two has two voicings which can be selected with a toggle switch. The (-) mode ranges from a vintage type clean sound to crunch. The (+) mode offers more gain. Channel three is the high gain channel for brutal distortion. The Demon has a selectable mid cut feature, assignable to all channels. The mid cut feature has a compensation control called “level”. The Demon’s master section features dual volume controls, and global presence and deep control knobs. 23 Module name =Redhot Description = This Class A British amplifier sports two dual stage channels with completely separate signal paths, resulting in essentially two vintage amps in one. Channel One has a classic thick voice that screams when pushed. Channel Two has a tighter character with more upper mids and gain. Featuring four 12AX7 preamp tubes, four EL84 power tubes, and a GZ34 Rectifier, the Redhot is a classic rock standard. Module name = Flathill Description = This high-gain rectifier amplifier has 5 modes, Normal/Clean/Modern/Red/Vintage, each with individual frequency characteristics and gain. Module name = Basic 100 Description = With one channel for Guitar and one for bass, this “100 watt” amp has a lot of bottom and is favored for its clean tones. The Guitar and bass channels have different gain and tone stacks. The bass channel even has a “Deep” switch that shifts the frequency response of the Bass knob. On the Guitar channel, the Bright switch gives you a brighter sound on lower gain. 24 Module name = Fox ACS-45 Description = This amp has three channels, all running at the same time: a Normal, Brilliant and Tremolo channel. The Tone controls (Bass & Treble) only work on the Brilliant channel. The Tone Cut control removes some high treble (on all channels), and works like a reversed presence control. Module name = HomeBrew SE-1 Description = The HomeBrew SE-1 is a low-wattage, single ended amp with two channels. For a low-wattage circuit it has as many as 3 triode stages for gain. The amp has 2 channels, Clean/Dist. Module name = The MatchBox Description = The MatchBox is designed to provide clean to overdriven amplification with a minimum of clipping. It has as many as 4 gain stages with considerable attenuation between stages. It has a power amp in a push-pull configuration but no negative feedback (NFB). The sound is fitting for both Guitar and bass. This amp uses a very special tube configuration that gives you an extra bright sound. For additional distortion, please try any of the distortion stomp boxes in front of the amp. 25 Module name = ‘62 BluesMaker Description = Loosely based on a 1962 classic, this amp has 2 channels, normal and tremolo. The original amp did not have a “Drive” control, but we put one here to modulate the distortion in the power amp. Module name = ACM 900 Description = This amp is modeled after a “Rock & Roll” amp built with both valve and solid state components. It has only 1 channel but the two gain knobs control the gain at two stages in the preamp. Module name = HomeBrew PP-2 Description = The HomeBrew PP-2 is a low-wattage, push-pull amp with two channels and a British-style tone stack. 26 Preamplifiers A module from this category is preferably placed before a module from the “power amp” category. Module name = Peavey 6505® preamp Description = The preamp from the 6505 amplifier. All the tonal control without the power amp section. Module name = Peavey Classic 30® preamp Description = The preamp section of the Classic 30 without the power section. Module name = Peavey JSX® preamp Description = All the functionality of the Peavey JSX without the power section. Module name = Peavey ValveKing® preamp Description = The preamp section of the ValveKing amplifier. Module name = Pre-HB Description = Simple preamp for clean and slightly overdriven sounds. The preamp goes easily into overdrive, but distorts gently and relatively cleanly. 27 Module name = Pre-02 Description = This preamp has 2 parallel channels: a triode tube path and a diode clipping path. The tube sound mixed with diode distortion makes an interesting and dynamic mix as the two components deliver two different overtone spectra. Module name = ‘62 BluesMaker preamp Description = This preamp was taken directly from the BluesMaker ‘62 amp. It contains both the clean and tremolo channels, including the tremolo controls. Module name = Basic 100 bass preamp Description = This is the bass channel preamp in the Basic 100. The tone section does not include a mid control, as the original does not have one. The Deep switch lowers the frequency of the bass control. Module name = Basic 100 Guitar channel preamp Description = This is the Guitar channel preamp from the Basic 100. It is rather clean due to its dual 2 triodes, neither of which typically saturates. Module name = ACM 900 preamp Description = This is the preamp section from the ACM 900. The two gain knobs control the gain in two places in the chain. 28 Module name = Flathill Modern preamp Description = This is the Modern channel preamp from the Flathill. Very high gain and bright. Module name = Flathill Normal Red preamp Description = This is the Normal Red channel preamp from the Flathill. This high-gain preamp has a presence control, which usually sits in the power section, but gives extra control over the brightness. Power amplifiers A module from this category is preferably placed after a module from the preamp category. Module name = Peavey 6505® power amp Description = The 4 x 6L6GC power amp section from the Peavey 6505 amplifier. Module name = Peavey Classic 30® power amp Description = The Classic 30’s power amp section is pure EL84 heaven. By decreasing the drive on the preamp and increasing the level of the power amp, you can achieve great EL84 saturation. Module name = Peavey ValveKing® power amp Description = The ValveKing ‘s power amp section features the classic 4 x 6L6 lineup. The ValveKing, however, adds the patented Peavey Resonance control, as well as a Presence control. 29 Module name = M-998 Description = This simple power amp uses 2 triodes in series for extra gain, and also uses a pair of tonal character filters that can be tweaked in the Tweak GUI. Module name = Standard Power Amp #2 Description = This power amp has a standard push-pull end stage, but is not driven by the usual Long Tail Pair (LTP). It does have a “clean” switch for less drive and slightly different tonal character. Module name = ‘62 BluesMaker power amp Description = This power amp is taken directly out of the ‘62 BluesMaker. It has a drive and presence control, and has a standard Negative Feedback Loop (NFB) to which the presence control is attached. The NFB shapes the distortion character of the power stage. Module name = Basic power amp Description = This power amp is taken directly out of the Basic 100. Just like the original amp, the power section has only a master control. The Negative Feedback Loop (NFB) shapes the distortion character, and can be adjusted in the Tweak GUI. For an explanation of the Tweak GUI, see page 41. Module name = ACM 900 power section Description = This power amp is taken directly out of the ACM 900. Module name = Flathill power section Description = This power amp is taken directly out of the Flathill. 30 Stomp boxes / pedals A module from this category is usually placed before an amp module. They are designed to shape the sound before it is colored by the amp. Module name = Budda® Budwah™ Description = The Budwah is one of the most sought-after wah-wah pedals ever made, designed with tightly focused tone sweep and an outstanding vocal-like quality. At bass settings (heel rocked back), the Budwah tone is thick and honky without losing clarity of the note. When fully depressed, the highs roll off to a frequency that isn’t piercing like many other wahs. Module name = Gatekeeper Description = The Gatekeeper is a noise gate that relies on tubes for the actual gating, ensuring that the attack will be available at your slightest touch, even when closed. It has adjustable attenuation, threshold, speed and brilliance. For additional adjustment you can also use the “second learn mode” and strike a normal chord for automatic setup. Module name = OverDriver Description = This stomp box is wired somewhat like a Guitar amp, in that it uses 3 stages of diode distortion. The “Turbo” acts like a “Master,” adding some extra gain before the last stage. This stomp box could be used to drive a speaker by itself. Module name = Chorus CS-1 Description = This is a versatile stereo chorus with adjustable speed and modulation depth, stereo width, feedback, delay and 3 individually adjustable filter bands on the wet signal. A chorus can be used to enrich the sound. Module name = ACS-CS1 compressor Description = This compressor is used to even out the volume so that the lower levels do not completely disappear, making the soft sounds louder and the loud sounds softer and adding a certain sustain. 31 Module name = ACS-LM3 limiter Description = A limiter is a specially tailored dynamics compressor. This particular limiter compresses the sound by a factor of 50:1 over the given threshold. It will stop sounds or transients over this threshold, limiting the output volume. Module name = Slow Grow SG-1 Description = An auto swell effect tracks the notes you play and removes the transients to make the music sound like it’s being played backwards. Module name = Octapus Octaver Description = Behind every great tone is another tone waiting to come out. With Octapus you can release this sub octave, taken from and added to your melody. The Octapus is a tight and accurate octaver stomp box that works best when you play one note at a time. Be careful with chords or it will not sound as expected. Module name = FL-Duo flanger Description = This flanger effect mixes a varying, delayed signal with the original signal to produce a series of phase cancellations. These “notches” make up the sound of the flanger. The FL-Duo is actually two flangers. Except for the mixing controls, they share the same knobs. Module name = Texas Treble Maker Description = The Texas Treble Maker is a treble booster whose purpose is to equalize the frequency spectrum of the Guitar to make the distortion smooth. The overtones of most sounds are progressively fainter the higher up the spectrum they are. This means that the distortion a sound generates in a distortion circuit mainly originates from the overtones of the lowest frequencies, placing the frequency range of the distortion components in a particular place of the spectrum. A treble booster is designed to reshape the clean sound so that the distortion components originate in equal amounts from each overtone. The result is a much smoother distortion, and of course more of it! 32 Module name = The Sher’ff Description = The Sher’ff stomp pedal is a tough but versatile distortion effect. Loosely modeled after a 1980s-era cousin, it’s perfect for blues and rock either by itself or with a clean amp channel. Module name = Re-Lay 2 delay Description = The Re-Lay 2 is a double delay with a lot of options. You can set the volume of each tap, plus 2 individual filters per tap. Module name = Re-Lay 4 delay Description = The Re-Lay 4 is a quadruple delay with a lot of options. You can set the volume of each tap, plus 2 individual filters (in the Tweak GUI) per tap. See page 41 for an explanation of the Tweak GUI. Module name = Greener Description = A classic, yet so simple. This late ‘70s solid state stomp box utilizes a diode clipping circuit, shaped by pre and post filtering for optimal smooth overdrive/distortion. Module name = Driver Description = This is a very versatile stomp box that delivers anything from smooth overdrive (with “Blues” turned up) to a heavily distorted and overloaded sound (“Gain” and “Muffler” turned up high). The module uses a modified amp tone stack that allows for heavy mid scooping, great for blues and rock & roll. 33 Module name = MagnaVibe Description = Not to be confused with Tremolo, a vibrato is a frequency modulator that produces an effect similar to the sound you hear when you bend the string up and down, changing its pitch. This vibrato allows you to select a rate between 0 and 10 Hz, as well as a general depth. A knob for “delay” allows the vibrato to kick in after you pluck the string, making it more transparent when you play fast. Two modes are available, a “standard digital”, and an emulation of a certain “magnetic” stereo amp. Module name = Tremolo Description = A tremolo is an amplitude modulator. This effect “rotates” the volume at the range of 0-10 Hz. Two variants are included: the classic “digital” tremolo (multiplying the signal with a sine) and the even more classic “tube bias” tremolo (adding a sine to the bias of a tube, partly saturating the signal). The tube bias variant adds a natural overtone and clarity. The digital variant can adjust the up/down slope of the transition from soft to pulsing. Module name = Wow-Wah! Description = A Wah pedal is a low-, high-, or band-pass filter with adjustable frequency. At the point of cut off, there is a peak with adjustable resonance, making the Guitar sound “waaaoooowwwoooaaa”. The resonance has similarities with the human mouth, hence the name. The frequency can be controlled either by a MIDI pedal (or the main knob) or by automatic rotation. The resonance can range between any 2 frequencies of your choice. An extra knob adds overtones that enhance tonal clarity. Module name = BassBox Description = This is a distortion pedal with a harmonic spectrum tailored for bass Guitar. The even harmonics are stronger than the odd, making the distortion very smooth and borderline “clean.” A second gain knob allows ordinary diode clipping (somewhat asymmetrical). This module can be used to add small amounts of color and spice to the bass sound. 34 Speakers / cabinets A module from this category is usually placed after any amp module. Module name = Convolution speaker simulation Description = This module uses real-time convolution to mimic actual speaker and cabinet setups. Convolution can be very CPU-intensive so there are 2 optimization options, “Resample” and “Hi-Res.” Forcing downsampling of the signal reduces the CPU utilization to an amazing 25%, while still retaining virtually the same tonal quality. (This is possible because Guitar speakers generally do not have a frequency range of more than 5-6 kHz.) The available speakers and cabinets were sampled with several microphones placed at varying angles. One sampling (an “Impulse Response”) is a fixed moment in time and cannot be adjusted. The Load button allows you to import your own Impulse Responses in .wav format. Module name = Speaker Construction Set (SCS) Description = Select from any of the predefined speaker models and put them in a cabinet with a physical size of your choice. This simulated speaker cabinet is then miked by any of the 20 microphone configurations. (This technique is considerably less CPU-intensive than the RIR convolution module.) Remember, ReValver™MKIII.V is capable of building virtual speaker cabinets that really cannot exist in the physical world, and depending on which components and settings you change, you could end up with some very “unique” sounds. 35 General effects Module name = Peavey VC/L-2 Description = The Peavey VC/L-2 is an all-tube, dual channel Valve Compressor/Limiter, featuring the exclusive OptoDynamics system. With OptoDynamics, compression and limiting is much more natural and transparent than with solid-state designs, as there are no solid-state opto-isolators, opto-couplers, or opto-diodes. The “heart” of this design features an EL84 tube and two 12AX7s (four stages) for each channel. The output stage of each channel is a “power amp” design that uses a two-stage 12AT7 tube, which results in a +20 dBm output capability. Whether you need to produce smooth vocals, fix a lifeless snare drum, erase muddy lows from a bass, or add “punch” to an acoustic guitar performance, the VC/L-2 OptoDynamics system provides complete management over your audio dynamics. Module name = 8Q Description = An eight band parametric filter with adjustable frequency, gain and Q in seven types: high shelf, low shelf, high pass, low pass, band pass, notch and peak. Each band can be either a first order or second order IR filter. (Please note that first-order filters cannot represent EQ, band pass or notch curves.) Module name = 3Q Description = Triple parametric filters with adjustable frequency, gain and Q in seven types: high shelf, low shelf, high pass, low pass, band pass, notch and peak. (Please note that first-order filters cannot represent EQ, band pass or notch curves.) Module name = ACS R1 Stereo Reverb Description = Stereo reverb designed to be placed last in the chain to give ambience or width to the result, with adjustable echo, pre-delay and room size. Three filters can be programmed to shape the character of the wet signal. 36 Module name = ACS R2 Stereo Reverb Description = Stereo reverb designed to be placed last in the chain to give ambience or width to the sound, with adjustable pre-delay and room size. Three filters can be programmed to shape the character of the wet signal. This reverb is thicker than the Reverb R1; it also has different default filter parameters. Module name = Ph2 Phaser Description = Phasing works by mixing the original signal with one that is phase shifted. This phaser features a feedback and width control for stereo effects. Module name = SCH-1B Noise gate Description = A noise gate is a simple way to get rid of noise in the signal. The traditional way this effect works is by lowering the volume of the signal when the signal itself becomes very weak. The SCH-1B is different in two ways. First, this noise gate does not operate on a closed-only or open-only basis, but is variable. Second, SCH-1B does not affect the actual “volume” but continuously changes the filter parameters of an intelligent filter circuit. You may notice that the noise gate is half-closed when playing softly. Compared to traditional noise gates this has the effect of being perfectly responsive. The noise gate has four separate bands, and the fourth has an adjustable frequency. Module name = Stereo widening effect Description = This module combines ambience, stereo widening and exciter/enhancer effects to give your tone a wider, fuller sound with more presence. The enhancer operates by delaying the lower frequencies to allow the high frequencies to come first, giving the sound a touch of presence and clarity. Because of the delay, the enhancer may appear to add “distance” to the sound. You can blend the enhancement with the mix control. The widening effect applies a rotating phase distortion to each channel, and in combination with the ambience component you can place your audio in a rich virtual room. 37 Module name = Channel Delay Description = This module can delay the left and right channels 0-100 ms independently (each channel can be adjusted +-16dB). With the Ambiance option engaged, the module acts as if the time delay represents a distance in a room. The farther away from the source a channel is, the fewer high frequencies and less volume it has. Module name = VST host module (Only compatible with VST and AU operation, does not operate with RTAS hosts) Description = This module does not provide any effect or signal processing by itself, but simply allows you to load a third-party VST plug-in and run it as a regular ReValver™MK III.V module. This allows you to use your favorite plug-in inside of the ReValver MK III.V system. VST Plug-In Technology by Steinberg. Note: While Peavey makes every effort to ensure compatibility with a wide range of VST plug-ins, occasionally combining certain VSTs will require more CPU power than some computers are capable of providing and may result in unstable performance. Always save your preset before loading a third-party VST plugin into the VST host module. Module name = CS3 Tube Compressor Description = A compressor is used to even the volume so that the lower levels do not completely disappear. Many music professionals believe that a tube compressor sounds “warmer” than a solid-state variant due to the slight saturation of the tubes and because the transformer adds a subtle touch of “crunch.” Module name = CS2 Compressor Description = A compressor is used to even the loudness so that the lower levels do not completely disappear. It will make any distortion module distort for longer. 38 Module name = Gr8 Graphical equalizer Description = This simple 8 band graphic equalizer has frequency bands placed strategically for bass and Guitar. The bands can be adjusted manually by pressing the “T” button. Pressing “R” will reset the band. Module name = Convolution Reverb Description = A convolution type reverb which uses pre-sampled impulses as source templates. The sound and reaction of the original sampled reverb is what you hear in C-Verb. You can load your own *.wav samples with the “load” button, or select a factory sample from the list. Miscellaneous utilities Module name = Signal splitter Description = The signal splitter divides the signal into 2 streams. Each runs in parallel using its own set of modules. In the “signal merge” module, these two streams are mixed into one signal again. You can only use signal splitter once per preset. Module name = Frequency analyzer Description = The frequency analyzer can scan the audio in real time and present the frequency content on a live display. The update speed can be switched between 50 ms and 500 ms. The analyzer can create up to three snapshots and overlay them over each other. By hovering your mouse over the graph you can get an accurate readout of that position. The anti-aliased display yields a very accurate picture. 39 Module name = Leveler Description = A utility module that can be inserted wherever you wish to monitor or change the volume levels. The module monitors both the left & right channels. This module has a volume adjust and a “Learn” button to automatically adjust level to 0dB. Module name = Stereo Levels adjust Description = Same as “Leveler” module, but with a control knob for each channel. This utility module can be inserted wherever you wish to monitor or change the volume levels. The module monitors both the left & right channels. This module has a volume adjust and a “Learn” button to automatically adjust level to 0 dB. Module name = Tuner Description = Guitar tuner with two simultaneous displays, needle and strobe. With anti-aliased graphics, this tuner displays your tuning with incredible accuracy. The “A” is adjustable between 425 Hz and 455 Hz. Never go out of tune again! Module name = Simul-Tune Description = This is not one but six independent strobe tuners running at the same time, one assigned to each of a Guitar’s six strings. The tuning is presented in strobe form and you can adjust each string’s tuning chromatically. The brightness of the strobe indicates the confidence level of a frequency in that particular range (i.e. dark display = not even close). Module name = Single tonestack Description = This module only contains one tone stack with Bass, Mid and Treble knobs to adjust the filter aspects of any of the included tone stacks of ReValver™ MK III.V. (The Foxy tonestack does not use the Mid knob.) 40 Module name = Single triode Description = This module contains a single triode tube with no filters, with a level adjustment before and after the tube. Using a couple of these in a series is like building your own amp! Tweaking modules One of the most powerful features of ReValver™ MK III.V is the ability to tweak each parameter of a module other than the usual knobs and buttons on the front of the module. In an effort to explain the Tweak mode in ReValver, we’ve written some short explanations of each tweak option in the tube tweak GUI. It takes years to learn tube amplifier engineering, so the awesome “tweakability” of ReValver MKIII.V will keep even the most experienced valve amplifier engineer busy for hours. Users who don’t have any experience with tube amps can use ReValver to learn about how tube amplifiers work. Press the “+” button on the module, or select “Tweak Module” on the module menu to bring up the general Tweak GUI. The Tweak GUI is a general GUI that holds specialized tweakable components that differ from module to module. Some features include Frequency Analyzer, Oscilloscope, Total Harmonic Distortion analysis and save Impulse Response. The Frequency Analyzer runs a frequency response test of the module in question. It does so by inserting a short “pulse” and performing a FFT (Fast Fourier Transform) frequency analysis of the output. Please note that such techniques may not yield expected results in non-linear modules such as distortion modules. The Frequency Analyzer also accurately displays the phase response of the module. The analyzer window is displayed in logarithmic mode with the lower frequency shown in high resolution. This emphasis can be adjusted via the slider at the bottom of the window. 41 The Total Harmonic Distortion (THD) analyzer displays the relationship between the input sound and the distorted output sound. The Oscilloscope view illustrates how a module alters the sine wave. It is available for each module as a whole, and for any tube component thereof. 42 You can save the Impulse Response (IR) of a module to a .wav file in 44.1 kHz stereo. The impulse response is practically the same view as the frequency analyzer, but this tool allows you to save the response to disk. This IR can be used in the convolution speaker module (or any other IR plug-in by third party manufacturers) and can be very useful capturing a “filter” or a “sound” of any module in ReValver™ MK III.V, or any VST plug-in in the VST module. You can even capture the sound of a third party speaker simulator from another VST plug-in and run it inside of the speaker convolution module! All modules offer some editing features and may include: tubes (and tube configuration), tone stack (filter collection), filter coloring, rectifier properties, transformer properties, negative feedback, speaker cabinet, microphone and loudspeaker. 43 The Tube Tweak GUI One of the most powerful features of ReValver™ MK III.V is the detail and number of parameters that can be used to fine tune any tube circuit in a module. In the module’s Tweak GUI, click on a tube icon to bring up the tube Tweak GUI. 44 On the tube Tweak GUI, the editable parameters are divided into two groups, the Physical and the NonPhysical (which has no meaning in reality but can be used to enhance the sonic properties). Depending on which tube you wish to tweak, you can choose between triodes or pentodes. A power pentode is a tube type often used to drive the speakers, therefore you will usually find them as the last tube(s) in the chain of any amplifier. Triodes are voltage (V) amplifiers, whereas power pentodes (combined with a transformer) in ReValver™ MK III.V are treated as current (I) generators. You can replace any tube in the module with another tube of the same general type, from a stock of templates. The internal parameters of a tube consist of features like amplification, linearity and driving strength. These parameters cannot be changed and are not displayed on the GUI. If you check the option Only Load Internals, only these parameters will be loaded, otherwise the entire GUI will be reset. The Character parameter can be used to shape the frequencies of the distorted component. (On low input, the Character has minimal impact on the sound.) If you are editing a pentode you have the option of configuring it as a single-ended amplifier or as a pushpull amp. One push-pull tube is actually an even-number 2 or 4, but as the parameters are identical for all, only one tube icon is displayed on the Tweak GUI. A triode can only be configured as a plate follower (a cathodebiased voltage gain stage). VPP is the power supply voltage delivered to the tube stage from the power supply. Usually, the VPP is slightly lower if the stage is located early in the signal chain. In case the power supply is “sagging” (usually due to heavy load and high volumes), the VPP becomes temporarily lower, but the amount depends on internal values in each ReValver MK III.V amp module. Plate load (triode) and transformer impedance (pentode) are the parameters over which the signal is generated. The value of the load affects the signal output strength. Also, the transfer characteristics of the load changes the voltage on, and current through, the tube itself. Attenuation is not directly a part of the tube stage but can be thought of as a generic way of decreasing (attenuating) the signal after amplification. Cathode resistor (where applicable) is a resistor which is used to bias the tube, or in other words balance the symmetry of the waveform. It is commonly set near 1.5 kOhms for triodes, but the actual setting depends on the desired sound. The setting will also affect the overall gain in an “unbypassed” stage. (See definition of “unbypassed” below.) Cathode capacitor (where applicable) is connected in parallel with the cathode resistor. It has two main effects on sound: 1) The capacitor enables the stage to amplify the signal more; and 2) It will act as a low-shelf filter, effectively cutting out some low bass. The cutoff frequency is equal to 1/(6.28*RC), with C as the capacitor value and R as the value of the cathode resistor. This in turn affects the distortion spectrum. With a cathode capacitor, the stage is called bypassed, and without, unbypassed. 45 The coupling capacitor removes the high voltage DC offset from the output signal of the tube stage. This high-pass frequency is usually between 5-10 Hz, but if it is set higher, a user can change the tonal and dynamic properties of the stage. The grid resistor value is an all-in-one resistor used to calculate the effects of the stage’s bandpass limitation. Inside each tube there is an internal capacitance called “Miller capacitance.” The greater the resistor, the lower the bandwidth. The bandwidth can be calculated at 1/(6.28*RC) where R is the “grid resistor” and C is the Miller capacitance (usually around 150pF). In a normal triode stage with a 12AX7 tube, the bandwidth is around 15 kHz if the grid resistor is 68 kOhm. The slider for Class A/B is used for pentodes in push-pull configuration only. (The Bias voltage slider can be used as an alternative.) This sets the bias of the tube stage such that it corresponds more to a Class A or B stage. Some of the non-physical tweaks: Normally, a tube’s output swing is determined by the VPP, along with the various loads in the circuit. Setting Clip Limit to something higher than 1.0 gives the circuit a greater dynamic range. The output gets higher and the distortion on one side decreases. Clip softness is used to smooth out the sharp dynamic edge and gives the distortion a smooth sound. The default value of the Dynamic Bias offset amount is 1.0, and scaling this value changes the dynamics of the signal. The signal is usually not entirely free to move through the tube, and strong transients and high volumes affect the bias of the tube, moving up and down, as a function of volume. Cathode biased treble boost (where applicable) changes the “filter effect” that the cathode resistor & capacitor have on the frequency response. The Bias adjust slider simply adds or subtracts a certain voltage to or from the tube’s bias. Otherwise, this bias is defined by the tube and its surrounding components. Extra input headroom gives the stage more dynamic headroom, making the tube distort later if given a greater headroom. For a triode this means the signal is “attenuated” before the input and “amplified” after the output, thus restoring the signal strength to the following tube. The tube Tweak GUI features the following graphical displays: A “bode plot” (frequency& phase response) an oscilloscope (with input and output signal display overlaid), and a “transfer function” (a snapshot of the static input-to-output relationship). The whole tube component can be disabled via the Disable circuit checkbox. 46 MIDI control and automation In the stand-alone version, all knobs, faders and buttons can be controlled by MIDI. The VST and AU plug-in can be controlled using native automation, but not all parameters can be automated. MIDI To setup MIDI control in the standalone version, please select your MIDI interface from the menu (File -\> MIDI devices...). If you have added a new MIDI interface after starting the program, please restart to allow the program to find it. To assign a MIDI event to a GUI control, please right-click on the control (button/knob/ fader) and select “MIDI learn” from the menu. You will then be asked to activate the controller on the external MIDI controller. It is recommended that you assign a MIDI button to a GUI button, and a MIDI fader/knob to a similar GUI element. To remove the specific mapping from the GUI element, right-click and select “MIDI clear.” It is not possible to map the “Load module preset,”“Save module preset,”“Mono / stereo” or “Tweak” buttons to MIDI, but you can map the “Enable/disable” module. If you have assigned a GUI element in a module, you are free to move the module around anywhere in the preset, but if you delete the module the mapping will be cleared. MIDI mapping is stored inside the preset and will be restored when you reload the preset. Plug-in automation ReValver has an automation feature that allows you to make changes when you are mixing a song. This can be particulary important when recording a virtual wah-wah track, for example, where you need to be able to make those changes just like you would with the pedal. However, due to the modular structure of ReValver™ MK III.V it is not possible to map all GUI elements to plug-in automation events. For example, if you have two distortion pedals in the chain, only the first in the chain will receive the events, even if they were recorded from the second. To use automation, your VST/AU/RTAS host must be capable of reading and writing automation events from plug-ins. Table 1: Plug-in automation parameters VST name AU name Description Ped Gain Distpedal Gain Primary gain knob on a dist effect Ped Gain2 Distpedal Gain2 Secondary gain knob on a dist effect Ped Out Distpedal Output volume Distpedal Output volume 47 Table 1: Plug-in automation parameters VST name AU name Description Ped Bass Distpedal Bass Distpedal Bass control Ped Mid Distpedal Mid Distpedal Mid control Ped Treb Distpedal Treble Distpedal Treble control Ped Tone Distpedal Tone Distpedal Tone control Ped Mix Distpedal Mix Distpedal wet/dry mix Pre Gain Preamp Gain Preamp Gain Pre 1 Gain type 1 Preamp Gain 1 Pre 2 Gain type 2 Preamp Gain 2 Pre 3 Gain type 3 Preamp Gain 3 AmpBass Amp Bass (tone control) Ampmodule tonestack, bass control AmpMid Amp Mid (tone control) Ampmodule tonestack, mid control AmpTreb Amp Treble (tone control) Ampmodule tonestack, treble control AmpPres Amp Presence Ampmodule, presence control CleanDrt Clean Clean / dirty switch Drive Power amp drive Power amp master / drive Out Vol Output level Output level TremDpt Tremolo depth Tremolo depth TremSpd Tremolo speed Tremolo speed Type A Type A Type A Type B Type B Type B Type C Type C Type C Type D Type D Type D Type E Type E Type E RevrbMix Reverb amount Reverb amount RevrbLen Reverb length Reverb length Wah Pos Wow-Wah Amount/Position Wow-Wah Amount/Position Wah Mix Wow-Wah Mix Wow-Wah wet / dry mix 48 Table 1: Plug-in automation parameters VST name AU name Description Amp Out Power amp Output level Output adjust knob on amp or powerampmodule Pre Out Preamp Output level Output adjust knob on preamp module MIDI control and automation example To demonstrate native plug-in automation in a host, the following example will automate a parameter of a ReValver™ stompbox module in Reaper. Since many different hosts will have a different method of achieving plug-in automation, please refer to your DAWs manual for more information on its use of automation. It is important to note that there are a fixed number of automatable parameters in ReValver that are exposed to the host, regardless of whether the current preset has modules that make use of the parameters. For example, a stomp box ‘gain’ parameter is visible in the host even though there is no such module in your preset. Also, each automatable parameter can be mapped to a maximum of one (1) knob, and this is the first applicable knob found in the preset. This means that if you have two similar stompboxes, only the first will become automated. Furthermore, if automation is enabled and you move the knob of the SECOND of such a pair of modules, the FIRST module will recieve the automation. Don’t worry, your computer does not have a “ghost in the shell.” To begin, we have added ReValver to a guitar track in Reaper and added a “Wow-Wah!” module to our ReValver patch. The sweep of the “Wow-Wah!” is the parameter that we will automate in this exercise. On your guitar track in Reaper, click on the “env” button. This will bring up a window showing all of the available parameters that can be automated on this track. 49 In the envelopes window, locate all of the parameters listed under “VST: ReValver MK III.V (Peavey Electronics)”. We will be automating the “Wah Pos” parameter. This will control the sweep of the wah pedal. Locate “Wah Pos” and click on the box before the name. Also make sure that you click the “Visible” box so that the automation envelope is displayed in Reaper. Now you will see a new automation “lane” under your guitar track in Reaper. Now you will be able to modify the envelope by manually adding and moving envelope points or by arming the automation lane and creating the envelope in realtime using an external midi controller. As you can see, plug-in parameter automation is a very powerful feature of ReValver and when leveraged, will bring your guitar recordings to life. 50 Finding a great sound: FAQ Q. What can I do to improve the frequency response of a preset? A. Use an EQ or change the tonestack of an amp, but most of all, experiment with the speakers. A surprisingly large part of the sound comes from the speakers. Most amps have bass, mid and treble controls to adjust the tonestack’s filter parameters. You should assume the default values are actually the best for most users, for that amp. However, the power of Revalver™ is the ability to experiment with all aspects of an amp’s design. Remember one important thing: every EQ you use before an amp will affect the frequency range of the distortion harmonics. If you only wish to fine-tune the sound of a preset, primarily use the EQ the farthest down the chain as possible. Q. How much does the sound of the Guitar matter? A. It matters a lot! One must never think that the final sound is the same if you switch to another Guitar. The sound of a single -coiled pickup is very different from that of a humbucker pickup. Everybody has their favorite, and the sound and feeling differs as much as any two amps. Q. Do the tonestacks in ReValver MK III.V actually sound like the “originals”? A. Yes. The software version of the tonestacks are very similar to those on the original amps. All capacitors, resistors and pots have been accurately modeled. Q. What about the presence controls? A. The presence controls are usually not a part of the tonestack but are part of the power amp. Most amps use “negative feedback” to control distortion and output linearity of the power stage. By applying a filter in the feedback path, and controlling this filter with a knob, a very nice mid/high-mid presence can be achieved. Q. Are the amps in ReValver™MK III.V modeled after real amps? A. Most of them are. The program is able to model about 90-95% of the electronic components in any given real amp, including the tubes, diodes, filters, transformers, power supply and more. When modeling a real amp in ReValver MK III.V, the original or reissue schematics have been used. Sometimes a blend of schematics were used, and some amps have components that were tweaked by ear afterward and do not totally match the original. Q. I have some very cool Impulse Response (IR) files. Can I use them with ReValver MK III.V? A. Yes. The speaker convolution modeler (RIR) can load files in .wav format, provided they are reasonably short. RIR is using a real-time engine that requires no particular sample chunk size, so it can operate less efficiently with larger files. All input is therefore shortened considerably if needed. No reverb, echo or delay type of IRs can be used. Q. In ReValver MK III.V you can switch between push-pull and single-ended stages. What about the phase inverter? A. The phase splitter, “Long Tail Pair Phase Inverter“ has two outputs, each being essentially the same signal but with one being inverted 180 degrees. This is a common circuit to drive a push-pull stage that in fact requires two signals, one being 180 degrees apart. If you wish to drive a single ended stage you need only one signal, and there is little advantage in driving it with a phase inverter. In a module that in fact has a phase inverter, you can still switch the push-pull stage to a single- ended stage. What happens is simple: the inverted signal is ignored. Only the top half of the inverter signal is used. Licensing and copy protection ReValver™MK III.V utilizes a copy protection system that is entirely software based. There is no need to buy or purchase a driver to make the program work. A license for the program, or a sub feature of the program, is handled through license files in text format. These license files are locked to a particular hardware component on the computer in question. The actual component can be chosen from a number of types (but at the time of writing, only the “system drive” can be chosen). You may upgrade your hardware any number of times, requiring a new license file (which can be downloaded through the Peavey web site, or the accompanying Activation Tool). Credits and copyrights Copyrights ReValver MK III.V relies in part on the following technologies: PortAudio, copyright Ross Bencina and Phil Burk. PortMIDI, copyright Ross Bencina, Phil Burk and Roger B. Dannenberg. FFTReal, copyright Laurent de Soras. ASIO, VST PlugIn Interface Technology by Steinberg Media Technologies GmbH. Some speaker IR samples, copyright Chris Hurley, Dimitar Nalbantov, Murray McDowall. FamFamFam Silk icons (http://www.famfamfam.com/lab/icons/silk/) 51 Features and specifications subject to change without notice. © 2011 Peavey Electronics Corporation • 5022 Hartley Peavey Drive • Meridian, MS 39305 (601) 483-5365 • FAX (601) 486-1278 • www.peavey.com