1
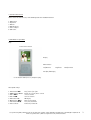
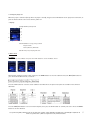
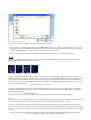
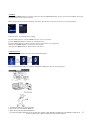
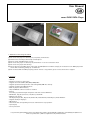
User Manual cocos-IDAHO MP4-Player 1. Read before first using this device (1) Do not use this player in extremely hot, cold, dusty environments. (2) Avoid contact and impact with sharp or hard objects. (3) Please charge this MP4-player on time. (4) Do not use this player in extremely dry environment in case of electrostatic shock. (5) Do not use the player while driving. (6) Please disconnect the MP4-player safely from the USB (‘Remove hardware safely’), do not disconnect the MP4-player from the PC while formatting, during up- or download. (7) Do not disassemble the MP4-player by yourself. If there is any problem, please contact the dealer or supplier. 2. Features - USB 2.0 - Earphone and line-in connections - Supports the formats MP1, MP2, MP4, WMA, MP3 - Supports picture browsing function and viewing JPEG, BMP files directly - Supports analyzing the MTV broadcast - Built-in polymer lithium battery - Only for WIN 98 a driver needs to be installed - Record Recording is possible through microphone and then saved as WAV-files. - EQ: Normal, Pop, Rock, Classical, Jazz, Bass, Custom EQ. - Multiple play modes: No Repeat, Repeat One, Repeat All, Random All, Folder Normal, Folder Repeat, Folder Random. - Supports multiple languages - FM function - Vivid menu with corresponding characters and words for easy operation. - Lyric Display - Screen protection cocos-promotions gmbh | talheimer straße 32-d | 74223 flein, germany | phone 0049 (0) 7131/649 38-0 | fax 0049 (0) 7131/649 38-19 www.cocos-promotions.de | www.cocos-promotions.com | www.usb-sticks.de 3. Standard Accessories Please check the content to see, if the following items are included in the box: 1. MP4-player 2. Earphones 3. Manual 4. MP4 CD driver 5. Power adapter 6. USB-cable 4. Introduction of product Keys: on top: Power-switch Display Menu-button Last/Rewind Play/Pause Next/Forward Vol+/Vol-/AB-Replay on the bottom: USB / Line-in / Earphone-plug Description of keys: 1. PLAY-button ▶┃┃: 2. MENU-button MENU: 3. VOL + ▶▶┃: 4. VOL + ┃◀◀: 5. VOL-button VOL: 6. NEXT-button ▶▶┃: 7. LAST-button ┃◀◀: 8. Power-switch: Play / Pause / On / Off Return to a menu / Enter a menu increase volume decrease volume AB-Replay Next / Fast forward Last / Fast backward Power On / Power Off cocos-promotions gmbh | talheimer straße 32-d | 74223 flein, germany | phone 0049 (0) 7131/649 38-0 | fax 0049 (0) 7131/649 38-19 www.cocos-promotions.de | www.cocos-promotions.com | www.usb-sticks.de 2 Operation of keys: Pressing a button includes: short press / long press / press / press constantly. (If not stated otherwise, short press will apply) Short press: Operation when pressing Long press: Pressing for 2 seconds, then operation starts. Press constantly: Operation all the time in certain frequency as long as button is pressed, operation stops when button is released. Press: Operation after button is released. Lock While the player is turned on, simultaneously press the PLAY-button and the MENU-button to activate the lock. Press them again to deactivate the lock. AB-Replay During playback, short press the VOL-button to enter the AB-Replay function. VOL+ / VOLIn any state, while the player is turned on, long press the VOL-button and the volume icon will become green. Press the LASTbutton to decrease the volume, and press the NEXT-button to increase the volume. Long press the VOL-button again or wait for a moment, and the volume icon will go back to the its regular colour. 5. Battery icon: Full icon (icon on top) indicates, that the power is at 3.7 V, meaning the battery is fully charged. While using the player, the remaining real power will be displayed. When the battery power is used up, the battery icon will be empty (icon below) to show that a recharge is needed. 6. First steps to use the player Connect the player to the USB-port of a PC. For users with the operation systems WIN 98 and WIN98 SE, a driver needs to be installed. Connection to a PC Please connect the player to the USB-port of a PC with the included USB-cable. The PC will recognize the player as a transportable floppy disk (Please confirm, whether you have installed the USB-driver). Charging the battery This player has a built-in, rechargeable battery. When first using the player, in order to enlarge the battery life, you have to fully empty the battery and then recharge it. 1. Connect the player to the USB-port of a PC via USB-cable to charge the battery. No operation when pressing any key of the player. 2. Connect the player to a power source via Power adapter to charge the battery. While the battery is charged, the red and green light of the power adapter will be turned on. If the battery is full, the green light will be turned off automatically. Important: 1. When charging, please do not pull out the adapter . 2. The battery life is related to the volume level. More battery power is needed for higher volume levels. cocos-promotions gmbh | talheimer straße 32-d | 74223 flein, germany | phone 0049 (0) 7131/649 38-0 | fax 0049 (0) 7131/649 38-19 www.cocos-promotions.de | www.cocos-promotions.com | www.usb-sticks.de 3 Uploading and Downloading files a. Open Windows Explorer and choose the newest removable medium, representing your player. b. You can create many folders in the removable disk, in order to sort and save your files in different folders. c. Copy the files directly from your PC (including music files) or move them to some folders in your removable disk. d. There is no need to create a new folder. You can copy/move the files directly to the root directory of the removable disk. e. You are able to delete/rename any file saved in the removable disk. ■ Formatting (can be done in two different ways) Method one: Open Windows Explorer and mouse right click on the icon of the removable disk (plate). Then mouse left click on formatting. Method two: In the MP4-player main menu select Setup , then Sys Tool and then Format. Press the PLAY-button to enter and then press the NEXT/LAST-button to choose Quick/complete. Press the PLAY-button again for confirmation, and the player will start the formatting process. Disconnection and connection with the PC Before disconnecting the player from a PC, please click (single click) on the green arrow icon on the right side of the bottom taskbar on your computer screen. When system announces that it is safe to remove the hardware, only then you can disconnect the player from the USB-port of the computer. If above steps are not completed, unplugging the player may cause malfunctions or loss of data. 7. Display and operation Power on Power off Main menu – music 1. Turning the player on First, make sure that the Power-switch is on the position ON. Then long press the PLAY-button to go to the main menu. In the main menu, short press the NEXT/LAST-button to go to the desired menu-item. Then press the PLAY-button to enter the chosen menu-item. Below is a list of all menu-items to choose from: To exit a menu, long press the MENU-button to return to the main menu. cocos-promotions gmbh | talheimer straße 32-d | 74223 flein, germany | phone 0049 (0) 7131/649 38-0 | fax 0049 (0) 7131/649 38-19 www.cocos-promotions.de | www.cocos-promotions.com | www.usb-sticks.de 4 2. Turning the player off When the player is turned on (except when the player is locked), long press the PLAY-button for the player to be turned off, or push the Power-switch to the left to turn the power off. 3. Display on top: Volume, battery level below: Number of songs, Song counter Repeat-mode Format, Bitrate, EQ-mode bottom: Play-icon, Playing time bar 8. Main menu 8.1 Music In main menu, select “Music” and press the PLAY-button to enter the Music-menu. Normal status Playback Pause During music playback or pause status, short press the MENU-button to enter the submenu. Press the NEXT/LAST-button to go to the desired submenu-item, see below: Press the PLAY-button to enter the chosen submenu-item. Below are all options listed, that are available in the different submenus: Press the NEXT/LAST-button to select the desired option, then press the PLAY-button to confirm your choice. Press the MENUbutton to exit the submenu. cocos-promotions gmbh | talheimer straße 32-d | 74223 flein, germany | phone 0049 (0) 7131/649 38-0 | fax 0049 (0) 7131/649 38-19 www.cocos-promotions.de | www.cocos-promotions.com | www.usb-sticks.de 5 ■ Lyric display 1. The player supports LRC format files. When the playback starts, it can display the corresponding lyrics. But this is only possible, if LRC file name and song file name are the same. 2. How to use lyric files? Lyric file name and song file name need to be saved under the same name, f.ex.: Song file name: yesterday once more .MP4 LRC file name: yesterday once more .lrc ■ AB-Replay During playback, press the VOL-button to choose the starting point ‘A’ of the AB-Replay. Press the VOL-button again to choose the ending point ’B’ of the AB-Replay. Only the segment between the starting point ‘A’ and the ending point ‘B’ will be played repeatedly. Press the VOL-button one more time to end the AB-Replay and to go back to the normal playback. ■ Slide show 1. Look for a folder called SLS.DIR in the player. 2. Double click the icon picture: Normal: Up: Down: Load image: Delete: Preview: Transform: , which is in the folder Slide show Maker_v1.8.0 on the CD and then you will see below Preview modes you can select: Normal, circle, shutter (left to right), shutter (top to bottom) The image you selected will move up. The image you selected will move down. Load the image from your computer. Delete the image file. Preview of the image. Transform the image. 3. Load the images from your computer (the image size is 160 X 128). You can move the image up/down or delete the image. 4. Select the preview mode and then click on ‘Preview’. 5. Click on ‘Transform’ and save the file in the SLS.DIR folder which you have set up in step 1. See picture below: cocos-promotions gmbh | talheimer straße 32-d | 74223 flein, germany | phone 0049 (0) 7131/649 38-0 | fax 0049 (0) 7131/649 38-19 www.cocos-promotions.de | www.cocos-promotions.com | www.usb-sticks.de 6 6. Remove the player safely (Remove Hardware Safely) from the computer. 7. Turn the player on. During playback, short press the MENU-button to enter the submenu. Select Slide Show and press the PLAY-button to enter this submenu-item. Now, you can select the slide show time, press the PLAY-button for confirmation and press the MENU-button to exit the submenu and to go back to the main menu. 8. When returning to the music playback, after the slide show time was entered, the slide show will be played. 8.2 FM Long press the MENU-button to enter the main menu. Press the NEXT/LAST-button to go to the menu-item ‘FM’. Press the PLAY-button to enter the menu-item (see picture 1). Picture 1 Picture 2 Picture 3 Picture 4 By pressing the PLAY-button again, you can adjust the FM-frequency manually with the NEXT/LAST-button. Short press the NEXT/LAST-button to increase/decrease the frequency step by step. Press the NEXT/LAST-button for about 2 seconds and then release it, the frequencies will be searched fast, the player will stop at the next station found; short press the NEXT/LASTbutton to stop the search. Press the MENU-button to enter the FM-submenu. With the NEXT/LAST-button, you can select one of the following submenu-items: Record, Auto Scan (see picture 2). If you select the submenu-item ‘Record’ and press the PLAY-button for confirmation, then the station will be saved (Presetstate). Press the PLAY-button again to see that the station was saved (see picture 3). Press the MENU-button in the Presetstate, and you can select: Delete or Auto Scan. If you select ‘Delete’ and then press the PLAY-button for confirmation, the respective station will be deleted. Note: For any station, that is saved in the player, you can change the state between Normal and Preset (picture 1 and picture 3), and only in the Preset-state, you can enter the submenu as shown in picture 4 (in order to ‘Delete’ a station). If you select the ‘Auto Scan’ and then press the PLAY-button for confirmation, you will enter the Normal state (as seen in picture 1) and the frequencies will be searched quickly. After the ‘Auto scan’ is completed, the scanned stations will be saved, and can also be deleted in the above described way. The automatic scanning stops, if a button is pushed (apart from the VOLbutton). cocos-promotions gmbh | talheimer straße 32-d | 74223 flein, germany | phone 0049 (0) 7131/649 38-0 | fax 0049 (0) 7131/649 38-19 www.cocos-promotions.de | www.cocos-promotions.com | www.usb-sticks.de 7 FM Record When you press the VOL-button, FM-recording will begin immediately. When you press the PLAY-button during recording, this will pause the recording. If you press the PLAY-button again, the recording will continue. Pressing the MENU-button will save the recording and you go back to the Normal state. Also see pictures below: Recording Pause rec. Save rec. Normal-state 8.3 Voice Long press the MENU-button to enter the main menu. Press the NEXT/LAST-button to go to the menu-item ‘Voice’. Then press the PLAY-button to enter this menu-item. If there is a recorded file in the player, press the PLAY-button to start the playback. When you press the PLAY-button during playback, this will pause the playback. If you press the PLAY-button again, the playback will continue. Press the NEXT/LAST-button to go to the next/previous title, if there is more than one recorded file. Press the MENU-button (during playback or in Pause/Stop-status) and you can enter the submenu. The Voice-submenu is the same as the Music-submenu. For details, please see the menu-item ‘Music’. Line-in When you want to transfer songs from another player to your MP4-player, you only need to use a Line-in cable (not included). ■ Recording (Line-in) In Voice Pause/Stop-status, press the VOL-button and the recording will start right away, see also pictures below: Stop-status Play-status Voice recording Press the MENU-button to save the recorded file in the LINE_REC folder and to return to the Voice-menu. 8.4 Photo Long press the MENU-button to enter the main menu. Press the NEXT/LAST-button to go to the menu-item ‘Photo’. Then press the PLAY-button to enter this menu-item. When entering this menu from the main menu, you will first see the file selection (as seen in picture 1). If there is no file, then the directory is empty. Press the PLAY-button to enter the picture browsing. Press the NEXT/LAST-button to choose the next/previous picture. Enter the picture browsing (as seen in picture 2): Picture 1 Picture 2 cocos-promotions gmbh | talheimer straße 32-d | 74223 flein, germany | phone 0049 (0) 7131/649 38-0 | fax 0049 (0) 7131/649 38-19 www.cocos-promotions.de | www.cocos-promotions.com | www.usb-sticks.de 8 ■ Press the NEXT/LAST-button, and choose the next/previous picture. ■ Short press the MENU-button to return to the file selection. ■ Long press the MENU-button to go back to the main menu. 8.5 Video Long press the MENU-button to enter the main menu. Press the NEXT/LAST-button to go to the menu-item ‘Video’. Then press the PLAY-button to enter this menu-item. When entering this menu from the main menu, you will first see the file selection (as seen in picture 1). If there is no file, the directory is empty. Press the PLAY-button to enter the video surface (as seen in picture 2). Press the PLAY-button again to start the playback (as seen in picture 3). In the Video state, short press the MENU-button to set up the Repeat options, which are the same as in the Music-submenu. Please see this item for details. ■ Press the NEXT/LAST-button to choose the next/previous file. ■ Short press the MENU-button to return to the file selection. ■ Long press the MENU-button to go back to the main menu. Picture 1 Picture 2 Picture 3 8.6 File Long press the MENU-button to enter the main menu. Press the NEXT/LAST-button to go to the menu-item ‘File’. Then press the PLAY-button to enter this menu-item. When entering this menu from the main menu, you will first see the folder selection. Press the NEXT/LAST-button to go to your desired folder. Press the PLAY-button to enter the chosen folder and all files of this folder will appear (as seen in picture 1). Press the NEXT/LAST-button to choose the desired file. Then press the PLAY-button and picture 2 will be displayed: Picture 1 Picture 2 Select ‘Yes’ or ‘No’ by pressing the NEXT/LAST-button. If you select ‘Yes’ and press the PLAY-button, the chosen file will be deleted. If you select ‘No’ and press the PLAY-button, you will go back to the file selection. Long press the MENU-button to go back to the main menu. cocos-promotions gmbh | talheimer straße 32-d | 74223 flein, germany | phone 0049 (0) 7131/649 38-0 | fax 0049 (0) 7131/649 38-19 www.cocos-promotions.de | www.cocos-promotions.com | www.usb-sticks.de 9 8.7 Game Long press the MENU-button to enter the main menu. Press the NEXT/LAST-button to go to the menu-item ‘Game’. Then press the PLAY-button to enter this menu-item. When entering this menu through the main menu, you will first see the selection of games. There are five games to choose from: Smart Tetris, Hungry Snake, Box Move, Tank, Gobang Select a game by pressing the NEXT/LAST-button. Press the PLAY-button to enter the submenu of the chosen game. There are four submenu-items to choose from: Start, Introduction, Level Set, History Start: You will start the game by pressing the PLAY-button. Instruction: Enter this submenu-item by pressing the PLAY-button. You will receive information on how to play the chosen game. Level Set: Enter this submenu-item by pressing the PLAY-button. You can now choose the desired game level. History: Enter this submenu-item by pressing the PLAY-button. Here, you can see the highest score. If you press the MENU-button, you will go back to the main menu. During playing a game: Long press the MENU-button and ‘continue’ and ‘exit’ will appear on the display. Choose one option by pressing the NEXT/LAST-button. IF you choose ‘continue’, you can continue with the game. If you choose ‘exit’, you will return to the submenu of the game. 8.8 Setup Long press the MENU-button to enter the main menu. Press the NEXT/LAST-button to go to the menu-item ‘Setup’. Then press the PLAY-button to enter this menu-item. The submenu-items of this menu are: Time, Power, Language, Display, Record, Sys Tools Go to the desired submenu-item by pressing the NEXT/LAST-button. Then press the PLAY-button to enter the chosen submenu-item. By short pressing the MENU-button, you can return to the list of submenus. By pressing the MENU-button long, you can go back to the main menu. 8.8.1 Time Press the NEXT/LAST-button to go to this submenu-item. Press the PLAY-button to enter this submenu-item. Options to choose from in this submenu: Adjust, Time Zone Press the NEXT/LAST-button to go to your desired option. Press the PLAY-button to enter the chosen option. Adjust the time or enter the correct time zone. Press the PLAY-button to confirm your choice and to exit this submenu-item. cocos-promotions gmbh | talheimer straße 32-d | 74223 flein, germany | phone 0049 (0) 7131/649 38-0 | fax 0049 (0) 7131/649 38-19 www.cocos-promotions.de | www.cocos-promotions.com | www.usb-sticks.de 10 8.8.2 Power Press the NEXT/LAST-button to go to this submenu-item. Press the PLAY-button to enter this submenu-item. Options to choose from in this submenu: Auto off, Always on Auto off: After setting a certain time, the player will be turned off automatically, when reaching the set time. If you enter this option, you can choose between: 15 Minutes, 30 Minutes, 60 minutes, 90 minutes, 120 Minutes, Close Press the NEXT/LAST-button to go to the desired setting. Press the PLAY-button to confirm your choice and to exit this submenu-item. Always On: If you enter this option, you can choose between: Yes and No If you choose ‘Yes’, the player will not be turned off automatically. Press the NEXT/LAST-button to go to the desired setting. Press the PLAY-button to confirm your choice and to exit this submenu-item. 8.8.3 Language Press the NEXT/LAST-button to go to this submenu-item. Press the PLAY-button to enter this submenu-item. In this submenu-item, you can choose your desired language. Choose between: CHI (Trad) ,CHI (Simp), English, German, French, Italian, Spanish, Portugues, Polish Press the NEXT/LAST-button to go to your desired language. Press the PLAY-button to confirm your choice and to exit this submenu-item. 8.8.4 Display Press the NEXT/LAST-button to go to this submenu-item. Press the PLAY-button to enter this submenu-item. In this submenu-item, you can find the following settings: Brightness, Backlight Brightness: Choose this option to adjust your desired screen brightness. Choose between: low, medium, high, maximum Press the NEXT/LAST-button to go to the desired screen brightness Press the PLAY-button to confirm your choice and to exit this submenu-item. Backlight: Choose this option to set up how long the backlight should stay on. Choose between: 15 Seconds, 30 seconds, 1 Minute, Close Press the NEXT/LAST-button to go to the desired screen brightness Press the PLAY-button to confirm your choice and to exit this submenu-item. 8.8.5 Record Press the NEXT/LAST-button to go to this submenu-item. Press the PLAY-button to enter this submenu-item. In this submenu-item, you can choose between the following settings: Source and Quality Source: Select between 'MIC 'and' Line In' by pressing the NEXT/LAST-button. Confirm your choice by pressing the PLAYbutton. Quality: Select between 'High Qty', 'Normal Qty.', and 'Long Time' by pressing the NEXT/LAST-button. Confirm your choice by pressing the PLAY-button. cocos-promotions gmbh | talheimer straße 32-d | 74223 flein, germany | phone 0049 (0) 7131/649 38-0 | fax 0049 (0) 7131/649 38-19 www.cocos-promotions.de | www.cocos-promotions.com | www.usb-sticks.de 11 8.8.6 Sys Tools Press the NEXT/LAST-button to go to this submenu-item. Press the PLAY-button to enter this submenu-item. In this submenu-item, you can choose between the following settings: Delete, Format, Reset ,Sys Info Delete: Go to this option by pressing the NEXT/LAST-button. Enter this option by pressing the PLAY-button. The list of folders can be seen. Choose your desired folder by pressing the NEXT/LAST-button. Enter this folder by pressing the PLAY-button. Listed are now all files in this folder. Go to the file you want to delete by pressing the NEXT/LAST-button. Press the PLAY-button and then choose between ‘Yes’ and ‘No’ by pressing the NEXT/LAST-button again. Press the PLAY-button to confirm your choice and to exit this option. Format: Go to this option by pressing the NEXT/LAST-button. Enter this option by pressing the PLAY-button. Choose between Quick and Complete. Go to your desired item by pressing the NEXT/LAST-button again. Enter the chosen item by pressing the PLAY-button. Quick: Choose between ‘No’ and ‘Yes’ by pressing the NEXT/LAST-button one more time. Press the PLAY-button to confirm your choice and to exit this option. Complete: Choose between ‘No’ and ‘Yes’ by pressing the NEXT/LAST-button one more time. Press the PLAY-button to confirm your choice and to exit this option. Reset: Go to this option by pressing the NEXT/LAST-button. Enter this option by pressing the PLAY-button. Choose between ‘No’ and ‘YES’ by pressing the NEXT/LAST-button again. Press the PLAY-button to confirm your choice and to exit this submenu-item. Note: If you select ‘YES’, the player will go back to the state it was in, when it left the factory. Sys Info: Go to this option by pressing the NEXT/LAST-button. Enter this option by pressing the PLAY-button. Here, you can see information on software-version and memory. Short press the MENU-button to return to the Setup-submenu. Long press the MENU-button to go back to the main menu. cocos-promotions gmbh | talheimer straße 32-d | 74223 flein, germany | phone 0049 (0) 7131/649 38-0 | fax 0049 (0) 7131/649 38-19 www.cocos-promotions.de | www.cocos-promotions.com | www.usb-sticks.de 12 8.9 EBook Long press the MENU-button to enter the main menu. Press the NEXT/LAST-button to go to the menu-item ‘EBook’. Then press the PLAY-button to enter this menu-item. When entering this menu-item through the main menu, you will first see the file selection, see the pictures below: Picture 1 Picture 2 If there is no file, then the directory is empty. Press the PLAY-button to enter the EBOOK selection, as seen in picture1. Press the NEXT/LAST-button to choose the next/previous file. Press the PLAY-button to be able to read the content of the file (as seen in picture 2). Short press the MENU-button to return to the file selection. Long press the MENU-button to go back to the main menu. 9. USB Connection Once the player is connected to a PC, it will show below pictures: You can download music (mp3 or wma) files through the USB-port of your PC onto your player. 1. Save digital audio files in your computer. 2. Transfer files to your Network Walkman. 3. Enjoy music with your Network Walkman. cocos-promotions gmbh | talheimer straße 32-d | 74223 flein, germany | phone 0049 (0) 7131/649 38-0 | fax 0049 (0) 7131/649 38-19 www.cocos-promotions.de | www.cocos-promotions.com | www.usb-sticks.de 13 10. Transforming tool Open the CD and double click on “Video Convert. Exe”. Below picture will appear: 11. DRM 10 Warning: Download of WMA music with DRM protection onto the MP4-player On Windows XPII, WMA music with DRM should be transferred by the Windows Media 10.0 version to the MP4-player. With other download methods, the MP4-player will probably not be able to read the WMA music with DRM file. Operation instruction: On Windows XPII, the user should upgrade the Windows Media Player to the 10.0 version. A) With the Windows Media Player 10.0 version : (Windows XPII) 1) Connect your MP4-player to a PC. Press the MENU-button, then the MP4-player will be in MTP MODE, exit out of the MTP MODE. 2) Open Windows Media Player 10.0. 3) Connect your MP4-player to PC. 4) Choose the desired WMA music with DRM. 5) Right click with mouse and choose “Add to Sync list”. cocos-promotions gmbh | talheimer straße 32-d | 74223 flein, germany | phone 0049 (0) 7131/649 38-0 | fax 0049 (0) 7131/649 38-19 www.cocos-promotions.de | www.cocos-promotions.com | www.usb-sticks.de 14 6) On the now open window, choose “Sync”. 7) On the “Sync” window, choose the desired WMA music with DRM. And choose “Removable Disk”. 8) Click on “start Sync” to transfer the WMA music with DRM to your MP4-player. 9) Safely remove your MP4-player from the PC (Remove hardware safely; icon on bottom task bar). cocos-promotions gmbh | talheimer straße 32-d | 74223 flein, germany | phone 0049 (0) 7131/649 38-0 | fax 0049 (0) 7131/649 38-19 www.cocos-promotions.de | www.cocos-promotions.com | www.usb-sticks.de 15 12. Technical Details Dimension Display Memory USB Power supply Playback time Record SNR Output earphone EQ Audio Format Video Format Temperature Language Picture Format Operating Systems Bit rate 90*40*7.7mm TFT (128*160) 512 mb – 8 gb USB 2.0 Polymer lithium battery 5 hours Format WAV Time 8 hours (128 mb Flash) 80dB max. 5mW*1(32ohm) Natural, Pop, Rock, Classical, Jazz, Bass, Custom EQ MP1, MP2, MP3, WMA *.Avi,*.wmv,*.asf,*.mpg,*.mov,*.qt,*.vob, *.rm,*.rmvb,*.3gp and so on translate into MTV format through the software tools 0 to 40°C CHI (Trad) ,CHI (Simp), English, German, French, Italian, Spanish, Portugues, Polish Jpg, Bmp Windows 98/SE/ME/2000/XP/2003, Linux 2.42 MP3: 8-320kbps Wma: 32-192kbps Disposal of Used Electrical & Electronic Equipment This symbol means, that this product and its accessories and packaging should not be treated as household waste. Please, discard this equipment according to the local regulations, regarding the disposal of electrical & electronic equipments. In the European Union and other European countries, there are different systems for disposing used electrical and electronic product. By ensuring the correct disposal of this product, you will help to prevent hazards to the environment and to human health, which could be caused by improper disposal of this product. Recycling of materials will help preserve the natural resources. Therefore, please do not put old electrical and electronic equipment into your household waste. For more detailed information on how to recycle this product, please contact your local authorities, your local recycling plant or the seller of this product. ALL INFORMATION IS SUBJECT TO CHANGE WITHOUT PRIOR NOTICE! cocos-promotions gmbh | talheimer straße 32-d | 74223 flein, germany | phone 0049 (0) 7131/649 38-0 | fax 0049 (0) 7131/649 38-19 www.cocos-promotions.de | www.cocos-promotions.com | www.usb-sticks.de 16