1
EPSON
SQ-2000 Printer
Operating Manual
FCC COMPLIANCE STATEMENT
FOR AMERICAN USERS
This equipment generates and uses radio frequency energy and if not
installed and used properly, that is, in strict accordance with the
manufacturer’s instructions, may cause interference to radio and
television reception. It has been type tested and found to comply with
the limits for a Class B computing device in accordance with the
specifications in Subpart J of part 15 of FCC Rules, which are designed
to provide reasonable protection against such interference in a
residential installation. However, there is no guarantee that interference will not occur in a particular installation. If this equipment does
cause interference to radio or television reception, which can be
determined by turning the equipment off and on, the user is
encouraged to try to correct the interference by one or more of the
following measures:
- Reorient the receiving antenna
- Relocate the computer with respect to the receiver
- Plug the computer into a different outlet so that the computer and
receiver are on different branch circuits.
If necessary, the user should consult the dealer or an experienced
radio/television technician for additional suggestions. The user may
find the following booklet prepared by the Federal Communications
Commission helpful:
“How to Identify and Resolve Radio-TV Interference Problems.”
This booklet is available from the U.S. Government Printing Office,
Washington, DC 20402. Stock No. 004-000-00345-4.
WARNING
The connection of a non-shielded printer interface cable to this printer
will invalidate the FCC certification of this device and may cause
interference which exceeds the limits established by the FCC for this
equipment. If this equipment has more than one interface connector,
do not leave cables connected to unused interfaces.
All rights reserved. No part of this publication may be reproduced,
stored in a retrieval system, or transmitted, in any form or by any
means, mechanical, photocopying, recording or otherwise, without the
prior written permission of Epson America, Inc. No patent liability is
assumed with respect to the use of the information contained herein.
While every precaution has been taken in the preparation of this book,
Epson America, Inc. assumes no responsibility for errors or omissions.
Neither is any liability assumed for damages resulting from the use of
the information contained herein.
Apple ® is a registered trademark of Apple Computer, Inc.
Compaq TM is a trademark of Compaq Computer Corporation.
CP/M ® is a registered trademark of Digital Research, Inc.
FX-80 TM, FX-lOO™, and RX-80” are trademarks of Epson America, Inc.
IBM-PC@ is a registered trademark of International Business Machines
Corporation.
LQ-1500™ is a trademark of Epson America, Inc.
Microsof™ is a trademark of Microsoft Corporation.
Q X - 1 0 ™ is a trademark of Epson America, Inc.
Softalk ® is a registered trademark of Softalk Publishing, Inc.
SQ-2000™ is a trademark of Epson America, Inc.
TRS-80® is a registered trademark of Radio Shack, a division of Tandy
Corporation.
80-Micro is published by Wayne Green Publishers.
Copyright © 1985 by Epson America, Inc.
Part No. 8492004
Torrance, California 90505
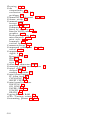
Contents
1
2
Introduction . . . . . . . . . . . . . . . . . . . . . . . . . . . . . .
1
Features . . . . . . . . . . . . . . . . . . . . . . . . . . . . . . . . . .
1
About This Manual . . . . . . . . . . . . . . . . . . . . . . . .
2
10 Steps to Printing . . . . . . . . . . . . . . . . . . . . . . . .
3
6
7
8
9
Selecting the Right Location . . . . . . . . . . . . . . . .
Unpacking the Printer . . . . . . . . . . . . . . . . . . . . . .
Putting on the Paper Feed Knob . . . . . . . . . . . .
Installing the Ink Cartridge . . . . . . . . . . . . . . . .
Setting Up the Single-Sheet Paper Guide . . . .
Installing the Interface Card . . . . . . . . . . . . . . . .
Connecting the Printer to Your Computer . . . .
Customizing the Printer . . . . . . . . . . . . . . . . . . . .
Loading Single-Sheet Paper . . . . . . . . . . . . . . . .
Self-Testing the Printer . . . . . . . . . . . . . . . . . . . .
A Word About Selecting Paper . . . . . . . . . . . . . .
Testing your paper . . . . . . . . . . . . . . . . . . . . . .
Printing Your First Document . . . . . . . . . . . . . .
Operation
................................
Power Switch . . . . . . . . . . . . . . . . . . . . . . . . . . . .
Control Panel Buttons . . . . . . . . . . . . . . . . . . . . . .
ON LINE button . . . . . . . . . . . . . . . . . . . . . . . .
FF (Form Feed) button . . . . . . . . . . . . . . . . . . . .
LF (Line Feed) button . . . . . . . . . . . . . . . . . . . .
CLEANING button . . . . . . . . . . . . . . . . . . . . . .
SHEET FEED button . . . . . . . . . . . . . . . . . . . .
Indicators . . . . . . . . . . . . . . . . . . . . . . . . . . . . . .
Meaning of blinking indicators . . . . . . . . . . . .
Paper-end detector . . . . . . . . . . . . . . . . . . . . . .
Inklow . . . . . . . . . . . . . . . . . . . . . . . . . . . . . . . .
Buzzer.. . . . . . . . . . . . . . . . . . . . . . . . . . . . . . . . .
Initialization . . . . . . . . . . . . . . . . . . . . . . . . . . . . . .
10
11
13
14
15
17
18
19
20
23
23
24
24
25
25
25
25
26
26
27
27
27
28
...
111
3
4
5
iv
Using the SQ-2000
........................
Using the SQ-2000 with Word Processors . . . .
Using the SQ-2000 with other application
programs . . . . . . . . . . . . . . . . . . . . . . . . . . . . . .
Programming with the SQ-2000 . . . . . . . . . . . .
Computer-to-printer communications . . . .
ASCII codes . . . . . . . . . . . . . . . . . . . . . . . . . . . .
Control codes . . . . . . . . . . . . . . . . . . . . . . . . . .
ESCape sequences . . . . . . . . . . . . . . . . . . . . . .
Translating the ASCII code . . . . . . . . . . . . . . . .
How to send control codes to printer . . . . . .
Using Master Select Command . . . . . . . . . . . . . .
29
29
30
30
31
31
32
32
33
33
35
Printer Care and Maintenance . . . . . . . . . . . . . .
43
43
44
45
45
46
46
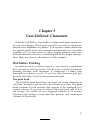
User-Defined Characters . . . . . . . . . . . . . . . . . . . .
51
51
51
52
53
55
58
58
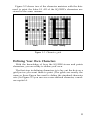
The Ink Jet Print Head . . . . . . . . . . . . . . . . . . . . . .
How Automatic Print Head Cleaning Works . .
For more extensive cleaning . . . . . . . . . . . . . .
Special cleaning . . . . . . . . . . . . . . . . . . . . . . . .
Summary of Cleaning Cycles . . . . . . . . . . . . . . . .
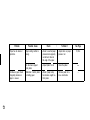
Troubleshooting Guide . . . . . . . . . . . . . . . . . . . .
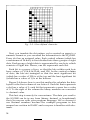
Dot-Matrix Printing . . . . . . . . . . . . . . . . . . . . . . . .
The print head . . . . . . . . . . . . . . . . . . . . . . . . . .
The print matrix . . . . . . . . . . . . . . . . . . . . . . . .
Defining Your Own Characters . . . . . . . . . . . . . .
Sending information to the SQ-2000 . . . . . .
Printing User-Defined Characters . . . . . . . . . . . .
Copying ROM to RAM
How Print Mode Affects User-Defined
Characters . . . . . . . . . . . . . . . . . . . . . . . . . . . . . .
Draft mode characters . . . . . . . . . . . . . . . . . . . .
Letter quality characters . . . . . . . . . . . . . . . . . .
Proportional mode characters . . . . . . . . . . . .
Mixing Print Styles . . . . . . . . . . . . . . . . . . . . . . . .
Other considerations . . . . . . . . . . . . . . . . . . . .
Defining Connecting Characters . . . . . . . . . . . .
Characters that connect vertically . . . . . . . . . .
59
60
60
61
61
62
62
65
6
DotGraphics.. . . . . . . . . . . . . . . . . . . . . . . . . . . . .
How the SQ-2000 Prints Dot Graphics . . . . . . . .
Syntax of the Graphics Command . . . . . . . . . . . .
Using Hand-Calculated Data to Print
Graphics.. . . . . . . . . . . . . . . . . . . . . . . . . . . . . . .
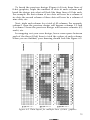
Printing Multiple Lines of 8-Dot Graphics . . . .
Using the 24-Dot Graphics Options . . . . . . . . . .
Using the SQ-2000 as a Plotter . . . . . . . . . . . . . .
Individual Graphics Options Commands . . . .
Assigning Graphics Options . . . . . . . . . . . . . . . .
7
Using the Hex Dump Feature
..............
8
Programming Hints . . . . . . . . . . . . . . . . . . . . .
High level language problems . . . . . . . . .
Apple Computers . . . . . . . . . . . . . . . . . . . . . . .
TRS-80 Computers . . . . . . . . . . . . . . . . . . . . .
IBM Personal Computers . . . . . . . . . . . . . . .
QX-10 Computers . . . . . . . . . . . . . . . . . . . . . . .
67
67
70
71
72
75
78
85
85
87
89
89
90
91
92
93
Appendixes
...
...
...
...
...
A-l
A-2
A-7
A-10
A-15
A-17
A-20
B
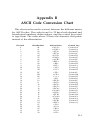
ASCII Code Conversion Chart . . . . . . . . . . . . . .
B-l
C
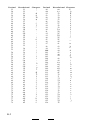
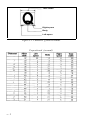
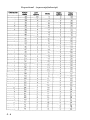
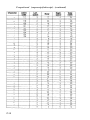
Widths of the Proportional Characters. . . . . . . .
C-l
D
Setting the DIP Switches
..................
D-l
D-l
D-3
D-3
D-4
D-4
D-5
D-5
D-5
D-5
D-6
D-6
D-8
D-8
D-8
D-8
D-8
E
Using the Optional Tractor Unit . . . . . . . . . . . .
E-l
E-l
E-2
E-3
E-4
............................
F-l
F-l
F-2
A
F
SQ-2000 Command Summary
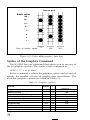
Location of Switches . . . . . . . . . . . . . . . . . . . . . .
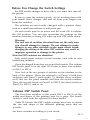
Before You Change the Switch Settings . . . . . .
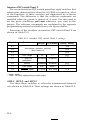
Column DIP Switch Panel . . . . . . . . . . . . . . . . . .
Interface DIP Switch Panels
Interface DIP switch Panel 1 ....................
SW1-1 . . . . . . . . . . . . . . . . . . . . . . . . . . . . . . . . . .
SWl-2 . . . . . . . . . . . . . . . . . . . . . . . . . . . . . . . . . .
SW1-3 . . . . . . . . . . . . . . . . . . . . . . . . . . . . . . . . . .
SW1-4 . . . . . . . . . . . . . . . . . . . . . . . . . . . . . . . . . .
Interface DIP switch Panel 2 . . . . . . . . . . . . . .
SW2-1, SW2-2, and SW2-3 . . . . . . . . . . . . . . . .
SW2-4 . . . . . . . . . . . . . . . . . . . . . . . . . . . . . . . . . .
SW2-5 . . . . . . . . . . . . . . . . . . . . . . . . . . . . . . . . . .
SW2-6 . . . . . . . . . . . . . . . . . . . . . . . . . . . . . . . . . .
SW2-7 . . . . . . . . . . . . . . . . . . . . . . . . . . . . . . . . . .
SW2-8 . . . . . . . . . . . . . . . . . . . . . . . . . . . . . . . . . .
Printer Location . . . . . . . . . . . . . . . . . . . . . . . . . .
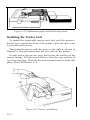
Installing the Tractor Unit . . . . . . . . . . . . . . . . . .
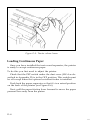
Installing the Paper Separator . . . . . . . . . . . . . .
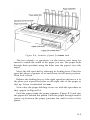
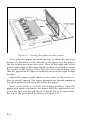
Loading Continuous Paper . . . . . . . . . . . . . . . .
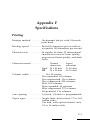
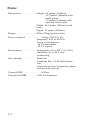
Specifications
Printing . . . . . . . . . . . . . . . . . . . . . . . . . . . . . . . . . .
Printer . . . . . . . . . . . . . . . . . . . . . . . . . . . . . . . . . . . .
Index
vi
.......... ...
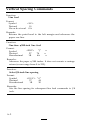
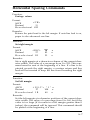
Vertical Spacing Commands . . . . . . . . . . . .
Horizontal Spacing Commands . . . . . . . . . .
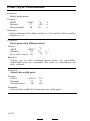
Print Style Commands . . . . . . . . . . . . . . . . . .
Character Set Commands . . . . . . . . . . . . . .
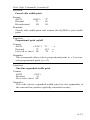
Graphics Commands . . . . . . . . . . . . . . . . . .
Miscellaneous Commands . . . . . . . . . . . . . .
Figures
1-1 Printer location . . . . . . . . . . . . . . . . . . . . . . . . . . . .
1-2 Printerparts . . . . . . . . . . . . . . . . . . . . . . . . . . . . . .
............
1-3 Interface card installed
............
...
.
1-4 Installing the paper feed knob’
.
.
.
.
.
.
.
.
.
.
.
.
.
.
.
...........
1-5 The ink cartridge
1-6 Installing the single-sheet paper guide . . . . . .
1-7 Removing the protective plate . . . . . . . . . . . . . .
1-8 Sliding in the interface card . . . . . . . . . . . . . . . .
1-9 Snapping the interface card into place . . . . . . . .
1-10 Connecting the printer and computer . . . . . . .
1-11 Locating the DIP switches . . . . . . . . . . . . . . . . .
1-12 Loading single-sheet paper . . . . . . . . . . . . . . .
1-13 Adjusting pressure bar rollers . . . . . . . . . . . . .
1-14 Self-test . . . . . . . . . . . . . . . . . . . . . . . . . . . . . . . . .
1-15 DIP switch setting for self-test . . . . . . . . . . . . .
1-16 Paper is too absorbent . . . . . . . . . . . . . . . . . . . . .
1-17 Paper is not absorbent enough . . . . . . . . . . . . .
1-18 Good print quality . . . . . . . . . . . . . . . . . . . . . . .
1-19 Sample document . . . . . . . . . . . . . . . . . . . . . . . . .
6
7
7
8
9
10
11
11
12
13
14
15
16
17
17
18
18
19
21
2-l Power switch and control panel . . . . . . . . . . . . . .
2-2 Control panel buttons . . . . . . . . . . . . . . . . . . . . . .
2-3 Control panel indicators . . . . . . . . . . . . . . . . . . . .
24
24
26
4-1 Buttons for cleaning during printing. . . . . . . . . .
45
The print head . . . . . . . . . . . . . . . . . . . . . . . . . . .
Charactergrids . . . . . . . . . . . . . . . . . . . . . . . . . . . .
User-defined character . . . . . . . . . . . . . . . . . . .
Data bytes for the first column of a new
capitalA . . . . . . . . . . . . . . . . . . . . . . . . . . . . . . . .
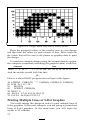
Character design grid for border characters . .
Three border designs . . . . . . . . . . . . . . . . . . . . .
Design grid for integral sign made of two
vertically connecting characters . . . . . . . . . .
Integral sign made of two vertically connecting
characters . . . . . . . . . . . . . _ . . . . . . . . . . . . . .
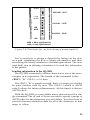
Graphics data byte and print head nozzles . . .
Values assigned to the print nozzles . . . . . . . . .
Value of the graphics data byte . . . . . . . . . . . . . .
Design sketch and sum of nozzle values . . . . . .
Data layout for multiple lines of g-dot
graphics . . . . . . . . .._.....................
52
53
54
5-1
5-2
5-3
5-4
5-5
5-6
5-7
5-8
6-l
6-2
6-3
6-4
6-5
55
64
64
66
66
68
69
70
72
73
vii
6-6 Map of 24-dot graphics . . . . . . . . . . . . . . . . . . . .
6-7 Data layout for 24-dot graphics . . . . . . . . . . . . . .
6-8 Eight-dot (top) and 24-dot (bottom) versions of
the density . . . . . . . . . . . . . . . . . . . . . . . . . . . . . .
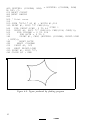
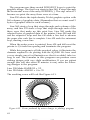
6-9 Figure produced by plotting program . . . . . . . .
6-10 Order of array elements . . . . . . . . . . . . . . . . . . . .
6-11 Curve produced by minor change in plotting
program . . . . . . . . . . . . . . . . . . . . . . . . . . . . . . . .
76
76
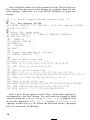
7-1 Hex dump feature . . . . . . . . . . . . . . . . . . . . . . . . . .
7-2 Hex dump printout of Chapter 6 graphics
program . . . . . . . . . . . . . . . . . . . . . . . . . . . . . . . .
87
C-l Character Q and its widths . . . . . . . . . . . . . . . . . .
c-2
D-l Location of column DIP switch panel . . . . . . . .
D-2 Location of interface DIP switch panels . . . . . .
D-2
D-2
E-l Continuous paper stacked below printer . . . .
E-2 Continuous paper stacked behind printer . . . .
E-3 Tractor installation . . . . . . . . . . . . . . . . . . . . . . . .
E-4 Paper separator being assembled and
installed . . . . . . . . . . . . . . . . . . . . . . . . . . . . . . . .
E-5 Tractor release levers . . . . . . . . . . . . . . . . . . . . . .
E-6 Location of parts for tractor unit . . . . . . . . . . . .
E-7 Feeding the paper into the printer . . . . . . . . . .
E-8 Top-of-page position . . . . . . . . . . . . . . . . . . . . . .
E-l
E-2
E-2
Viii
78
80
83
84
88
E-3
E-4
E-5
E-6
E-7
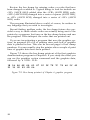
Tables
..........
26
Proportional print styles . . . . . . . . . . . . . . . . . . . .
Draft pica print styles . . . . . . . . . . . . . . . . . . . . . .
Draft elite print styles . . . . . . . . . . . . . . . . . . . . . .
Letter quality pica print styles . . . . . . . . . . . . . .
Letter quality elite print styles . . . . . . . . . . . . . .
37
38
39
40
41
5 - l User-defined character design grids . . . . . . . . . .
60
6-l Graphics options . . . . . . . . . . . . . . . . . . . . . . . . . .
6-2 Individual graphics options commands . . . . . .
70
85
D-l Column DIP switch setting for printing area . .
D-2 Interface DIP switch Panel 1 settings. . . . . . . . . .
D-3 Interface DIP switch Panel 2 settings. . . . . . . . . .
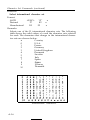
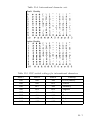
D-4 International character sets . . . . . . . . . . . . . . . . . .
D-5 DIP switch settings for international
characters . . . . . . . . . . . . . . . . . . . . . . . . . . . . . .
D-4
D-4
D-6
D-7
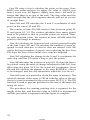
2-1 Messages of panel indicator lights
3-1
3-2
3-3
3-4
3-5
D-7
ix
Introduction
The Epson SQ-2000 Ink Jet Printer gives you the versatility,
speed, and graphics capability of a dot matrix printer, together
with print quality close to that of a daisy wheel printer. A major
advantage of the ink jet is its quiet operation, which sets it in a
class by itself.
Features
Like a conventional dot matrix printer, the SQ-2000 uses dots
to create each character. Instead of using a ribbon, it transfers the
characters onto the paper through 24 ink nozzles. The print head
cleans itself automatically, keeping the nozzles clear.
The SQ-2000 accepts a wide range of different types of paper;
you don’t need to buy specially manufactured stock. It’s designed
to work on smooth, ordinary bond paper.
The SQ-2000 offers dot graphic modes which let you create
custom characters, logos, and detailed graphic designs.
About the Manual
This manual contains all the information you need to operate
the SQ-2000. In the first section, you’ll find the necessary details
to get your SQ-2000 up and running. The second part of the
manual contains information on how to take full advantage of
some of the printer’s special features.
Chapter 1 shows you how to print your first document in ten
easy steps. Chapters 2 and 3 include a description of the control
panel, information on using your printer with word processing,
and some programming tutorials. Chapter 4 describes how the
printer maintains itself and contains some troubleshooting suggestions.
If you already know how to program a printer, you will find
useful information on graphics capabilities in chapters 5 and 6.
Chapters 7 and 8 contain additional programming information.
The Appendixes provide reference information for programming, instructions for installing an optional tractor feed unit, and
specifications.
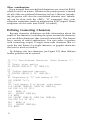
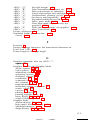
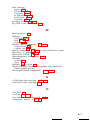
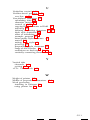
Chapter 1
10 steps to Printing
Setting up your SQ-2000 is simple and straightforward, even if
you’ve never used a printer before. In this chapter, you’ll learn
how to set up your printer and perform your first printing job in
10 easy steps, shown on the next two pages.
3
1
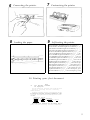
Unpacking the printer
3 Installing the ink cartridge
5
4
2 Putting on the paper feed knob
4 Setting up the paper guide
Installing the inferface card
6
8
Connecting the printer
Loading the paper
7
Customizing the printer
9
Self-testing the printer
ABCDEFGHIJKLMNOPQRSTUVWXYZ[\]
BCDEFGHIJKLMNOPQRSTUVWXYZ[\]^
CDEFGHIJKLMNOPQRSTUVWXYZ[\]^_
DEFGHIJKLMNOPQRSTUVWXYZ[\]^_'
EFGHIJKLMNOPQRSTUVWXYZ[\]^_'a
FGHIJKLMNOPQRSTUVWXYZ[\]^_'ab
GHIJKLMNOPQRSTUVWXYZ[\]^_'abc
HIJKLMNOPQRSTUVWXYZ[\]^_'abcd
IJKLMNOPQRSTUVWXYZ[\]^_'abcde
JKLMNOPQRSTUVWXYZ[\]^_'abcdef
KLMNOPQRSTUVWXYZ[\]^_'abcdefg
LMNOPQRSTUVWXYZ[\]^_'abcdefgh
MNOPQRSTUVWXYZ[\]^_'abcdefghi
NOPQRSTUVWXYZ[\]^_'abcdefghij
OPQRSTUVWXYZ[\]^_'abcdefghijk
PQRSTUVWXYZ[\]^_'abcdefghijkl
QRSTUVWXYZ[\]^_'abcdefghijklm
10 Printing your first document
MEMO
Don Donnison,
All employees
Text
President
As you all know, we
f i e l d i n s e n s i n g
rared sensors.
A smar
h n o l o g y
h standa
ions for
t infrared
i n t h e f o r
rd infrare
a sophist
have just entered an
d e v i c e i n d u s t r y ,
e
sensor incorporates microc
m o f a h i g h - s p e e d m i c r o p r
d sensing equipment. The
icated sensing device are
imited:
Industrial robots
Industrial quality assurance
Detecting electronic
Security systems
equipment
failure
Aviation
We believe the advances we are asking will br
p a n y
t o
t h e
s e n s i n g
d e v i c e
i n d u s t r y .
5
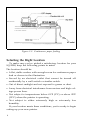
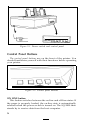
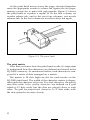
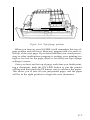
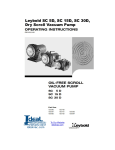
Figure 1-1. Continuous paper feeding
Selecting the Right Location
To make sure you’ve picked a satisfactory location for your
SQ-2000, keep the following points in mind.
The location should be:
l
l
l
l
l
l
A flat, stable surface with enough room for continuous paper
feed as shown in the illustration.
Served by an electrical outlet that cannot be turned off
accidentally by a wall switch or similar switch.
Out of direct sunlight and not exposed to grease or dust.
Away from electrical interference from motors and high voltage power lines.
Not subject to temperatures below 41°F (5°C) or above 95°F
(35°C) when the printer is operating.
Not subject to either extremely high or extremely low
humidity.
If your location meets these conditions, you’re ready to begin
setting up your new printer.
6
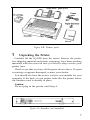
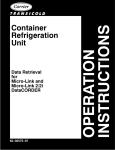
Single-sheet paper guide
Manual
Figure l-2. Printer parts
1
Unpacking the Printer
Carefully lift the SQ-2000 from the carton. Remove the protective shipping material and plastic wrapping. Save these packing
materials with the carton in case you need to ship or store your
printer later.
Check to see that you have all the parts shown above. If a part
is missing or appears damaged, contact your dealer.
You should also have the printer interface card suitable for your
computer. If the back of your printer looks like the picture below,
the interface card is already in place.
Caution:
Do not plug in the printer until Step 8.
Figure 1-3. Interface card installed
7
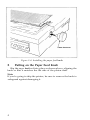
Figure 1-4. Installing the paper feed knob
2
Putting on the Paper Feed Knob
Slip the paper feed knob into place as shown above, aligning the
knob so that it matches the flat side of the platen shaft.
Note:
If you’re going to ship the printer, be sure to remove the knob to
safeguard against damaging it.
8
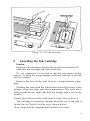
Figure 1-5. The ink cartridge
3
Installing the Ink Cartridge
Caution:
Under no circumstances should the power be switched ON
when the ink cartridge has been removed.
The ink compartment is located in the left rear corner of the
printer. To open the compartment, pull back and up on the lid
and set it aside.
Remove the ink cartridge tank from its vacuum-packed wrapping.
Holding the tank with the white label toward the front of the
printer, insert the tank into the compartment. The tank has a
raised guide on the right side that fits snugly into a slot in the
printer.
Gently press down on the tank until it stops. Do not force it.
The cartridge is completely inserted when the top of the tank is
below the two flexible hooking edges shown above.
Now, snap the ink compartment lid back into place.
9
Figure 1-6. Installing the single-sheet paperguide
4
Setting Up the Single-Sheet Paper Guide
You’ll use the single-sheet paper guide to feed individual sheets
of paper into the SQ-2000.
To install this guide, hold the guide in both hands, facing the
front of the printer.
With the guide tilted away from you, lower its two notched
feet into the two slots shown above.
At the back of each slot is a round horizontal bar. Place the
notches in the guide’s feet on these two bars.
Then tilt the guide toward you and press gently until it locks
into place with a click.
To remove the guide, press on the two locking levers and tilt
the guide away from you. Then lift it free of the printer.
10
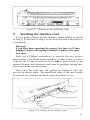
Figure 1-7. Removing the protective plate
5
Installing the Interface Card
If your printer already has the interface card installed, go ahead
to Step 6. (Look back to Step 1 to see how the card looks when it
is installed.)
Warning:
If you have been operating the printer, first turn it off, then
unplug it before attempting to install or remove the interface card.
First, use a Phillips screwdriver to remove the two screws
shown above. Set them aside carefully so they won’t get lost.
Take off the U-shaped protective metal plate to gain access to the
printer. Remove the interface card from its package, taking care
not to touch the electrical parts.
Now, ease the card into the printer by sliding it into the
grooves as shown below. The metal back plate of the card should
be toward you and the electrical parts should be on too.
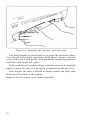
Figure Z-8. Sliding in the interface card
11
Figure l-9. Snapping the interface card into place
Use both thumbs as shown above to push the card into place.
You should feel a slight resistance when there’s about a quarter
of an inch to go. Press gently with gradually increasing pressure
until the card snaps into place.
If the card doesn’t seem to align correctly, remove it carefully
and try again. Be sure it is properly positioned in the grooves.
Now inspect the card. It should be firmly seated, the back plate
flush with the back of the printer.
Replace the two screws you removed earlier.
12
Figure l-10. Connecting the printer and computer
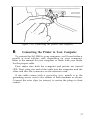
6
Connecting the Printer to Your Computer
To connect the SQ-2000 to your computer, you’ll need either a
parallel or serial interface cable, depending on your computer.
Refer to the manual for your computer or check with your dealer
for the proper cable.
First, make sure both the computer and printer are turned
OFF. Next, plug one end of the cable into the computer and the
other end into the connector on the interface card.
If the cable comes with a grounding wire, attach it to the
grounding screws next to the sockets of both machines as shown.
Connect the wire clips (or screws) to secure the plugs to their
sockets.
13
olumn DIP switch panel
Interface DIP switch panel
Figure l-21. Locating the DIP switches
7
Customizing the Printer
There are two DIP switch panels on the SQ-2000 that allow you
to customize the printer to your special needs. These are shown
in the picture.
The switches are preset at the factory, but they can be changed
to suit a variety of applications.
For information on the DIP switches and how to change them,
see Appendix D.
14
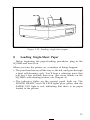
Figure l-12. Loading single-sheet paper
8
Loading Single-Sheet Paper
Before beginning the paper-loading procedure, plug in the
SQ-2000 and turn it on.
When you turn the printer on, a number of things happen:
l
l
The print head moves all the way to the left, and goes through
a brief self-cleaning cycle. You’ll hear a whirring noise that
will last a few seconds then stop. (For more details on the
SQ-2000’s self-cleaning feature, see Chapter 4.)
The indicator lights on the control panel light up. The
POWER, READY, and ON LINE lights glow green, and the
PAPER OUT light is red, indicating that there is no paper
loaded in the printer.
15
Now you’re ready to load paper.
1. Press the ON LINE button. The ON LINE and READY lights
go out, indicating that the printer is off-line-the power is on
but the printer won’t print.
2. Insert a sheet of paper into the paper guide and press the
SHEET FEED button. The paper automatically feeds into the
printer, and the red PAPER OUT light goes out.
3. With the paper loaded, lift the dust cover and adjust the rollers
on the pressure bar as shown below.
I’
I
I
Figure 1-13. Adjusting pressure bar rollers
16
I
ABCDEFGHIJKLMNOPQRSTUVWXYZ[\]^_'abcdefgh
BCDEFGHIJKLMNOPQRSTUVWXYZ[\]^_'abcdefghi
CDEFGHIJKLMNOPQRSTUVWXYZ[\]^_'abcdefghij
DEFGHIJKLMNOPQRSTUVWXYZ[\]^_'abcdefghijk
EFGHIJKLMNOPQRSTUVWXYZ[\]^_'abcdefghijkl
FGHIJKLMNOPQRSTUVWXYZ[\]^_'abcdefghijklm
GHIJKLMNOPQRSTUVWXYZ[\]^_'abcdefghijklmn
HIJKLMNOPQRSTUVWXYZ[\]^_'abcdefghijklmno
IJKLMNOPQRSTUVWXYZ[\]^_'abcdefghijklmnop
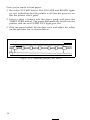
Figure l-14. Self-test
9
Self-Testing the Printer
To self-test the printer, follow these steps:
l
First, be sure that you have a sheet of paper at least 8½ inches
wide loaded into the printer.
l
Be sure the DIP switches under the dust cover are set to match
the setting below:
Figure l-15. DIP switch setting for self-test
l
Adjust the paper pressure bar as shown in Step 8.
l
Turn OFF the printer using its ON-OFF switch.
Now, turn ON the printer while holding down the LF button.
The printer will immediately begin printing out the self-test
characters shown above.
To stop the test, simply turn OFF the printer, or wait for it to
stop when it reaches the bottom of the page.
17
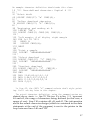
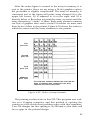
A Word About Selecting Paper
With an ink jet printer, paper absorbency is an important component for good print quality. Paper which is either too absorbent or not absorbent enough will give you less than optimum
print quality.
You can see in Figure 1-16 what happens when paper is used
which soaks up too much ink. The ink tends to bleed, causing
blurred or smeared characters.
Figure 1-17 shows what can happen when paper is not absorbent enough. The characters take too long to dry and are easily
smeared.
standard infrared sensing
for a sophisticated sens
ted:
Industrial robots
Industrial quality assuranc
Figure I-16. Paper is too absorbent
MEMO
Don Donnison, President
All employees
As
you all know,
field in the
red sensors.
we have j
dev
sensing
Figure l-77. Paper is not absorbent enough
Most dense-weave paper (of the quality used for business correspondence) can be used in the SQ-2000 without problems.
However, it’s a good practice to test the paper in your printer
before purchasing a large quantity. Of course, you should also
test labels and preprinted forms.
18
Testing your paper
To test a supply of paper, take the top sheet from the package
and load it in the printer. Have your printer perform its self-test
as shown in Step 9.
Now carefully look at each character in every line. If no ink
bleeds, the paper should be suitable for your SQ-2000.
Then take a new sheet from the package. This time, turn the
sheet over and run the self test on the reverse side of the paper.
Some types of paper give you consistently better printing results
on one side of the paper than on the other side.
Your printing should have the crisp appearance of the sample
in Figure l-18.
MEMO
Don
All
Donnison,
employees
President
we have ju
As you all know,
field in the sensing devi
red sensors.
A smart infrared sensor inco
ology in the form of a hig
standard infrared sensing
ns
for a sophisticated sens
ited:
Industrial
---------Industrial
robots
-----quality
assuranc
Figure l-18. Good print quality
Paper specially manufactured for use with ink jet printers can
also be ordered from your Epson dealer.
19
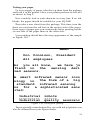
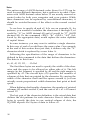
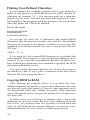
10
Printing Your First Document
Now you’re ready to print out your first document.
Simply follow the normal procedure for your word processor.
Additional information on printing documents can be found
in Chapter 3.
20
-MEMO
---From:
Don Donnison. President
All employees
To:
we have just entered an
AS
you all know,
industry,
device
new
the sensing
field in
infrared sensors.
A
exciting
“Smart”
smart
microcomputer
infrared sensor incorporates
microprocessor
high-speed
form of a
The
appliequipment.
with
infrared sensing
standard
are
almost
a sophisticated sensing device
cations
for
unlimited:
technology
in t h e
Industrial robots
_I n_ d_u_s _t r_i a
_ l_ q u a l i t y a s s u r a n c e
_Detecting
_
_ electronic equipment failurer
Security systems
_A_v_i _a _t i_o_ n_
We believe the advances we are making will bring our
company to the top of the sensing device industry.
Draft quality
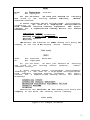
MEMO
- - -
-
From:
To:
Don
All
Donnison,
employees
President
As you all know,
we have just entered an
new field in the sensing device
industry,
infrared sensors.
exciting
"smart"
A smart infrared sensor incorporates microcomputer
technology i n the form of a high-speed microprocessor
with
The applistandard
infrared sensing equipment.
cations
for a sophisticated sensing device are almost
unlimited:
We believe the advances we are making will bring
top of the sensing device industry.
our
company to the
Letter quality
Figure l-19. Sample document
21
Chapter 2
Operation
This chapter covers the switches that control the operation of
the SQ-2000, the panel indicators, and initialization sequences.
Power Switch
The main power switch is a rocker switch on the left side of the
SQ-2000 towards the back. Press the front of the switch to turn
the power on and the back of the switch to turn it off.
Warning:
Never turn the power on or off by the switch at the main
outlet. Never turn the power on or off by inserting or removing the main cable at the outlet or the socket at the back
of the machine.
The SQ-2000 goes through a sequence of cleaning immediately
after being powered on and before powering off. You can damage the printer if this sequence is not carried out.
23
Figure 2-l. Power switch and control panel
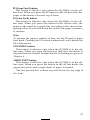
Control Panel Buttons
The control panel buttons are on the front of the printer. You
should familiarize yourself with their functions before operating
your printer.
Figure 2-2. Control panel buttons
ON LINE button
This button switches between the on-line and off-line states. If
the paper is properly loaded, the on-line state is automatically
selected when the power switch is turned on. The SQ-2000 then
stands by to receive data from the host computer.
24
FF (Form Feed) button
This button is effective only when the SQ-2000 is in the offline state. When you press the FF button in the off-line state, the
paper is advanced to the next top of form.
LF (Line Feed) button
This button is effective only when the SQ-2000 is in the offline state. When you press this button in the off-line state, the
paper is advanced by a single line according to the current line
spacing value. If you hold down the switch, the paper continues
to advance.
Note:
To advance the paper a number of lines, use the FF and/or paper
feed knob. Pressing the LF switch continuously will shorten the
life of the motor.
CLEANING button
This button is effective only when the SQ-2000 is in the offline state. When you press the button at that time, the inside of
the print head is cleaned. Further details of cleaning are given in
Chapter 4.
SHEET FEED button
This button is effective only when the SQ-2000 is in the offline state. When you press the button in the off-line mode, the
paper bail opens and a single sheet of paper is loaded.
The first printed line is about one inch below the top edge of
the form.
25
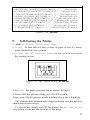
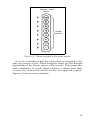
Indicators
The control panel has a number of lights that indicate the state
of the printer. The meanings of the indicators are as follows.
Figure 2-3. Control panel indicators
Table 2-l. Messages of panel indicator lights
Color
ON
OFF
POWER
Green
Power on
Power off
ON LINE
Green
On-line state
Off-line state
see below
READY
Green
Ready to
receive data
Not ready to
receive data
see below
INK LOW
Red
Ink supply low
Ink supply
adequate
PAPER OUT
Red
No more paper
Paper in platen
Indicator
Blinking
Meaning of blinking indicators
The ON LINE indicator will blink in the following cases:
Cause
Temperature of the print head
is below 59°F
At power-up during head cleaning
Rate
5 times a second
2 times a second
The READY light will blink during data transmission. This
flickering is normal.
26
Paper-end detector
The printer is equipped with a paper-end detector that warns
you when the printer runs out of paper. When the printer detects
that the paper has run out, printing stops, the PAPER OUT indicator goes on and the buzzer sounds.
The PAPER OUT light goes out when paper is loaded. However, printing does not restart until the ON LINE switch is pressed.
The SQ-2000 has an override which allows the paper to move
approximately one inch after the end of paper has been sensed.
For this reason, always remove paper using the LF or FF buttons.
If you manually remove the paper from the printer, you won’t
be sure the paper end has been detected. It is possible to later
place the printer in the on-line state and have data lost (and
printed onto the platen) if you don’t follow the correct procedure.
Ink low
When the ink cartridge is nearly empty, the INK LOW indicator lights and the buzzer sounds. Only 66 additional lines (approximately one page) can be printed in this state. If the ink is
low when the printer is switched on, the INK LOW indicator
lights up and the printer remains off-line until the ink cartridge is
replaced. To restart the printer, replace the cartridge, perform the
head cleaning operation (explained in Chapter 4), and then set
the printer on-line.
Buzzer
The buzzer is located on the control circuit board. It sounds for
about 0.25 second in the following cases:
l
When the BEL code (ASCII code <BEL>) is sent to the printer.
l
When the end of the paper is detected.
l
When the printer carriage malfunctions.
l
When the printer is out of ink.
Note:
The buzzer can be switched off when DIP switch SW2-6 is set to
ON (up). If a malfunction occurs the buzzer will sound even if
the switch is set to ON.
27
Initialization
The SQ-2000 is initialized (i.e., set to a fixed set of conditions) in
the following cases:
l
l
When you turn the power switch on.
(When you use a parallel interface) If the INIT signal is received from the host computer, causing pin 31 of the parallel
interface to become LOW.
When you give the <ESC>@ software command.
The initialization sequence proceeds as follows (except when
using the software command):
l
1. All interface signals are reset.
2. The input buffer is cleared.
3. The ON LINE indicator goes on and the SQ-2000 waits to
receive data.
4. Printer parameters are initialized to the default settings.
5. The default values of the DIP switches are set.
The <ESC> @ sequence only performs the last two operations. The DIP switch values are set to the current values even if
the power has not been switched off.
28
Chapter 3
Using the SQ-2000
This chapter tells you how to set up your word processor or
other applications software to work with the SQ-2000. If you are
interested in programming with the SQ-2000, the second part of
this chapter contains basic information on control codes and
ESCape sequences.
Using the SQ-2000 with Word Processors
Most word processing programs today support the SQ-2000
because it uses the same commands and control codes as many
Epson printers.
These programs usually have a setup or installation procedure
that prepares the program to work with a printer. This is often a
short question-and-answer session in which the program asks
two or three basic questions about your computer and printer. To
set up a program for use with the SQ-2000, you would give the
following answers:
Question
Answer
What type of computer Your computer’s type
are you using?
What type of printer
are you using?
Choose LQ-1500 if listed. If not listed,
choose FX-80 or FX-100. If specific models are not listed, choose “Epson printer.” (When new printers are released, it
takes time to update the lists, so by
choosing another Epson printer, you
will still be sending the correct codes.)
29
What type of interface
are you using?
Parallel or serial (this will depend on the
interface board in the SQ-2000, your
computer, and the type of cable you
have).
Programs that don’t specifically list the SQ-2000 may ask other
questions about your printer. The following questions are asked
most often (the answers follow in bold).
1. Does your printer (SQ-2000) do standard backspacing?
Yes
2. How many passes of the print head are adequate for boldfacing? Two
Some word processors let you redefine the printer instructions
(often called printer drivers). To do this, you must give your word
processor certain information so that it can take advantage of
your printer’s features. This is covered later on in this chapter,
and in Appendix A.
Using the SQ-2000 with other application programs
You can also use the SQ-2000 to print other documents, such as
spreadsheets, with various commercial software packages.
As with word processors, most of your printing will be
straightforward. If your program has a printer selection routine,
then follow the advice given above.
Programming with the SQ-2000
This section provides an overview of the ASCII code system. It
also gives basic instruction on how to send control codes and
ESCape sequences to the printer in order to take advantage of the
SQ-2000’s special features, such as italics, enlarged, or proportional typestyles.
If you already know how to program your printer, you can
skip to Appendix A, “SQ-2000 Commands,” and Appendix B,
“ASCII Code Conversion Chart.”
30
Computer-to-printer communications
A computer and printer communicate by means of numbered
codes. If you press the letter A on the keyboard, it is translated
into a numeric code, transmitted to a peripheral device (such as a
video screeen or a printer) then displayed as the letter A.
To cope with the many different kinds of computers and printers used today, a standard set of codes has been developed. This
set of codes is called the American Standard Code for Information
Interchange, or ASCII for short. Almost all computers use these
ASCII codes to communicate with printers.
There are ASCII codes for all of the letters in the alphabet, both
upper- and lowercase, and for the numbers from 0 to 9. The
ASCII code also includes most punctuation marks, and some
codes that control printer functions. If you refer to the ASCII chart
in Appendix B, you’ll find that all of these letters, numbers and
punctuation marks have been assigned code numbers from 33
through 255.
ASCII codes
Although these codes are standard from computer to computer, they can be expressed in a number of different ways. The
chart in Appendix B is a comparative table that lists each ASCII
code as a character (A, B, C, 1,2,3) and as a decimal or hexadecimal
number. For example, the letter A is represented as an A and as
the decimal number 65. If you wanted to print the letter A using
the BASIC language, you would use the decimal notation, written as CHR$(65).
The chart also shows the hexadecimal (or hex) value of each
character. The hexadecimal numbering system is based on units
of 16; our usual numbering system, decimal, is based on units of
10. In hex, the letter A is expressed as 41H (the H stands for
hexadecimal).
31
Control codes
Most of the time you don’t give this code system a thought. If
you press A on the keyboard, the computer sends the code to the
printer and the letter A is printed. However, some printer codes,
like the one for a line feed, do not have a key on the keyboard.
These are the ASCII codes with values of less than 33. These
codes are called control codes because they control the operation
of the printer. These characters are not displayed on your screen
and aren’t printed as a character by your printer.
The ASCII codes 0 through 32 have commonly used abbreviations for their names, such as <LF> for a line feed. These controls are listed in Appendix A.
ESCape Sequences
There are not enough control codes for all of the advanced
features of modem printers, so multiple-code control sequences
have been developed. All of these control sequences begin with
the control code ASCII 27, which is called Escape. (In this manual
it is abbreviated as <ESC>.) These sequences can have more
than one code following Escape, depending on the command.
The ESCape code changes the interpretation of the codes that
follow it - they are interpreted as part of a printer command. For
example, if the SQ-2000 receives the number 52, it prints the
numeral 4 because 52 is the ASCII code for that letter. However, if
the printer receives a 27 just before the 52, it turns on the italic
mode, because ESCape “4” is the SQ-2000’s code for italic printing, as shown in Appendix A.
This same command could also be written with “4” (including
the quotation marks) in place of the 52. Many ESCape sequences
are written with letters or numbers enclosed in quotation marks.
These letters or numbers can be used in place of the decimal or
hexadecimal values as long as they’re placed in quotes. There’s
no functional difference between the two systems, but you might
find the letters and numbers easier to remember.
32
Translating the ASCII code
You may also find that different manuals and programs use
different terms for the same characters or functions. For example,
your computer manual may say to send the decimal 10 for a line
feed, while your spreadsheet program recommends a <CR> or
CTRL-J for the same thing.
Appendix B contains a conversion chart for all the common
names of the ASCII codes, and shows the relationship between
the different forms of notation. In addition, Appendix A gives a
description of all the control codes and ESCape sequences used
on the SQ-2000.
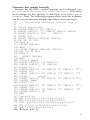
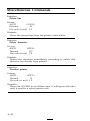
How to send control codes to printer
The short program that follows illustrates the concepts of control codes and ESCape sequences. It is written in Microsoft
BASIC, but it can be adapted to other forms of BASIC or other
programming languages. If you have specific questions about
how BASIC works, consult the program’s documentation. How
to overcome problems specific to your computer is covered in
Chapter 8.
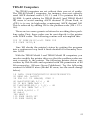
1. Make sure that you’re in BASIC; then type the following line
just as it appears here. (Don’t forget to include all semicolons,
even the ones at the end of the lines.)
10 LPRINT "NORMAL PRINTING" CHR$(lO) CHR$(13);
2. Now press RETURN, type RUN, and press RETURN again.
The SQ-2000 prints:
NORMAL PRINTING
This line begins with a line number, 10, then the command
LPRINT. Anything that is enclosed in quotation marks after the
LPRINT command is sent to the printer.
If you check the ASCII chart in Appendix B, you’ll find that
CHR$(lO) is the control code for a line feed, so when the printer
receives this, it moves the paper up one line.
CHR$(13), according to the ASCII chart, is the code for carriage
return, so the print head returns to the left margin and awaits the
next command.
33
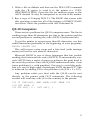
3. Next type:
20 LPRINT CHR$(27) "4" "ITALIC PRINTING";
4. Now press RETURN, type RUN, and press RETURN again.
The SQ-2000 prints:
NORMAL PRINTING
ITALIC PRINTING
This time the printer receives a CHR$(27) which is the code for
ESCape or <ESC>. This tells the printer that whatever comes
next should be interpreted as a printer command.
Next comes “4” -- if you look under the SQ-2000 commands in
Appendix A, you’ll find that <ESC> “4” is the command for
italic print. So the SQ-2000 prints “ITALIC PRINTING” in italic
type.
5. Next type:
30 LPRINT CHR$(27)
"5" CHR$(1O) CHR$(13);
6. Now press RETURN.
In this line the printer receives the ESCape code CHR$(27), so it
reads “5” as a printer code, in this case the code to turn off the
italic typestyle.
The next two codes, CHR$(1O) and CHR$(13), are for line feed
and carriage return respectively, as described in step 2.
7. Next type:
40 LPRINT CHR$(27) "p" CHR$(1) "PROPORTIONAL
PRINTING";
50 LPRINT CHR$(27) "p" CHR$(0) CHR$(1O) CHR$(13);
8. Now press RETURN, type RUN, and press RETURN again.
The SQ-2000 prints:
NORMAL PRINTING
ITALIC PRINTING
PROPORTIONAL PRINTING
EMPHASIZED PRINTING
34
The “p” 1 in line 40 turns on the proportional printing, and the
“p” 0 in line 50 turns it off.
9. Next type:
6 0 L P R I N T C H R $ ( 2 7 ) “ E ” “EMPHASIZED PRINTING” ;
70 LPRINT CHR$(27) “F”;
10. Now press RETURN, type RUN, and press RETURN again.
The SQ-2000 prints:
NORMAL PRINTING
ITALIC PRINTING
PROPORTIONAL PRINTING
EMPHASIZED PRINTING
The “E” in line 60 turns on the emphasized printing and the “F”
in line 70 turns it off.
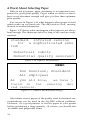
The program is now complete. To see it fully assembled on the
screen, type LIST and press RETURN. You will see:
10
20
30
40
LPRINT “NORMAL PRINTING” CHR$(10) CHR$(13);
LPRINT CHR$(27) “4” “ITALIC PRINTING”;
LPRINT CHR$(27) “5” CHR$(1O) CHR$(13);
LPRINT CHR$(27) “p” CHR$(1) “PROPORTIONAL
PRINTING”;
50 LPRINT CHR$(27) “p” CHR$(0) CHR$(10) CHR$(13);
60 LPRINT CHR$(27) “E” “EMPHASIZED PRINTING”;
70 LPRINT CHR$(27) “F”;
To send the entire program to the printer, type RUN, press
RETURN, and the SQ-2000 prints:
NORMAL PRINTING
ITALIC PRINTING
PROPORTIONAL PRINTING
EMPHASIZED PRINTING
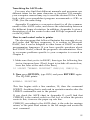
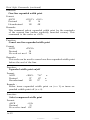
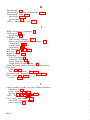
Using Master Select Command
The SQ-2000 can produce over 100 different combinations of
print styles. The Master Select command allows you to choose
any one of these styles. The Master Select command consists of
<ESC> “!" followed by a single ASCII code. The value of the
ASCII code determines the printing style that is selected. A typical master select command might look like this:
<ESC> “!” 66
35
This command would select italic proportional print. In
BASIC, the same command would look like this:
LPRINT CHR$(27) “!” CHR$(66);
You can make up your own combinations quite easily. This is
possible because each print style has its own value you can use
with the Master Select command. To create a “custom” Master
Select Code, add the values of the print styles you wish to combine. The values of the print styles are as follows:
Elite
Proportional
Compressed
Emphasized
Expanded
Italic
Underlined
1
2
4
8
32
64
128
For example, if you want to find the code for elite emphasized
italic print you would add these values:
Elite
Emphasized
Italic
1
8
64
73
The Master Select Command you would use would look like
this:
<ESC> “!” 73 (in BASIC: CHR$(27) “!” CHR$(73);)
Note:
Proportional overrides pica/elite. Compressed works only in
draft print.
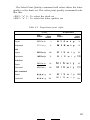
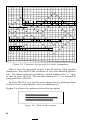
Some of the more popular styles the SQ-2000 can produce are
shown on the next four pages. The number following each example is the ASCII code (decimal) which will select that particular
print style.
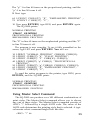
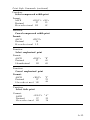
Proportional print styles are shown first. These styles are available in both the letter quality and draft sets. The next page shows
the printing styles that are available in the letter quality set. The
final two pages show the printing styles that are available in the
draft set.
36
The Select Print Quality command will select either the letter
quality or the draft set. The select print quality command looks
like this:
<ESC> “x” 0 - To select the draft set
<ESC> “x” 1 - To select the letter quality set
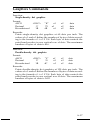
Table 3-1. Proportional print styles
Pica
Print
Sample
Expanded
Master
Select
Number
Print
Sample
Master
Select
Number
Regular
MISwiy
2
M I S w i y
34
Emphasized
MISwiy
10
M I S w i y
42
Regular
MISwiy
66
M I S w i y
98
Emphasized
MISwiy
74
M I S w i y 106
Regular
MISwiy
130
M I S w i y
162
Emphasized
MISwiy
138
M I S w i y
170
Regular
MISwiy
________
194
M I S w i y 226
Emphasized
MISwiy
202
M I S w i y
Italic
Underlined
Italic underlined
234
37
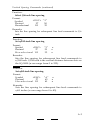
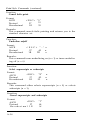
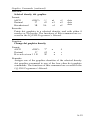
Table 3-2. Draft pica print styles
Pica
Print
Sample
Master
Select
Number
Regular
MISwiy
Emphasized
MISwiy
Italic
Regular
MISwiy
Emphasized
MISwiy
Underlined
Regular
MISwiy
Emphasized
M I S w i y
italic underlined
Regular
M I S w i y
Emphasized
MISwiy
P r i n t Master
Sample
Compressed
Expanded
Expanded
Compressed
Print
Sample
Select
Number
Master
Number
Sample
Master
Number
2
M I S w i y
3 6
M i S w i y 4
0
MISwiy
44
68
M l S w i y
6
MISwiy 100
MISwiy
76
M
MISwiy
132
M I S w i y
1
1 3 6
MISwiy
140
M I S w i y
1 6 8
MISwiy
1 9 2
MISwiy
196
M I S w i y
2 2 4
MISwiy 228
MISwiy
204
M
2
MISwiy
MISwiy
4
M
MISwiy
12
64
MISwiy
7 2
0
8
128
2 0 0
I
I
I
S
S
S
w
w
w
i
y
i
i
3
9
y 1
y
0
MISwiy
4
6
3
0 MISwiy
2
108
164
172
236
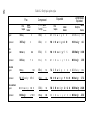
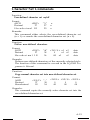
Table 3-3. Draft elite print styles
Elite
Print
Compressed
Master
Select
Sample Number
Master
Select
Sample Number
Print
Compressed
Expanded
Expanded
Print
Sample
Master
Select
Number
Print
Sample
Master
Select
Number
Regular
MISwiy
1
MISwiy
5
M I S w i y
3 3
MISwiy
37
Emphasized
MISwiy
9
MIswiy
13
M I S w i y
4 1
MISwiy
45
Regular
MISwiy
65
MISwiy
69
M I S w i y
9 7
MISwiy
101
Emphasized
MISwiy
73
MISwiy
71
M I S w i y
1 0 5
MISwiy
109
Regular
MISwiy
129
MISwiy
133
M I S w i y
1 6 1
MISwiy
165
Emphasized
MISwiy
137
MISwiy
141
M I S w i y
1 6 9
MISwiy
173
Regular
MISwiy
193
MISwiy
197
M I S w i y
2 2 5
MISwiy
229
Emphasized
MISwiy
201
MISwiy
205
M I S w i y
2 3 3
MISwiy
237
Italic
Underlined
Italic underlined
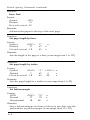
Table 3-4. Letter quality pica print styles
Pica
Print
Sample
Master
Print
Sample Select
Number
Master
Select
Number
Compressed
Expanded
Expanded
Compressed
Print
Sample
Master
Select
Number
Print
Sample
Master
Select
Number
Regular
MISwiy
0
MISwiy
4
M I S w i y
3 2
MISwiy
36
Emphasized
MISwiy
8
MISwiy
12
M I S w i y
4
0
MISwiy
44
Regular
MISwiy
64
MISwiy
68
M I S w i y
9
6
MISwiy 100
Emphasized
MISwiy
72
MISwiy
76
M I S w i y
1 0 4
MISwiy
108
Regular
MISwiy
128
MISwiy
132
M I S w i y
1 6 0
MISwiy
164
Emphasized
MISwiy
136
MISwiy
140
M I S w i y
1 6 8
MISwiy
172
Regular
MISwiy
192
196
M I S w i y
2 2 4
MISwiy 228
Emphasized
MISwiy
200
MISwiy
MISwiy
204
M I S w i y
2 3 2
MISwiy
Italic
Underlined
Italic underlined
236
Table 3-5. Letter quality elite print styles
Compressed
Elite
Compressed
Expanded
Expanded
Sample
Master
Select
Number
Regular
MISwiy
1
MISwiy 5
M I S w i y
3 3
Emphasized
MISwiy
9
MISwiy 13
M I S w i y
4 1
MISwiy
MISwiy
Regular
MISwiy
65
MISwiy 69
M I S w i y
9 7
MISwiy 101
Emphasized
MISwiy
73
MISwiy 77
M I S w i y
1 0 5
MISwiy 109
Regular
MISwiy
129
MISwiy
133
M I S w i y
161
MISwiy
165
Emphasized
MISwiy
137
Miswiy
141
M I S w i y
1 6 9
MISwiy
173
Regular
MISwiy
193
MISwiy 197
M I S w i y
2 2 5
MISwiy 229
Emphasized
MISwiy
201
MISwiy 205
M I S w i y
2 3 3
MISwiy 237
Master
Select
Sample Number
Print
Print
Sample
Master
Select
Number
Print
Sample
Master
Select
Number
37
45
Italic
Underlined
Italic underlined
Chapter3
Using the SQ-2000
This chapter tells you how to set up your word processor or
other applications software to work with the SQ-2000. If you are
interested in programming with the SQ-2000, the second part of
this chapter contains basic information on control codes and
ESCape sequences.
Using the SQ-2000 with Word Processors
Most word processing programs today support the SQ-2000
because it uses the same commands and control codes as many
Epson printers.
These programs usually have a setup or installation procedure
that prepares the program to work with a printer. This is often a
short question-and-answer session in which the program asks
two or three basic questions about your computer and printer. To
set up a program for use with the SQ-2000, you would give the
following answers:
Question
Answer
What type of computer Your computer’s type
are you using?
What type of printer
are you using?
Choose LQ-1500 if listed. If not listed,
choose FX-80 or FX-100. If specific models are not listed, choose “Epson printer.” (When new printers are released, it
takes time to update the lists, so by
choosing another Epson printer, you
will still be sending the correct codes.)
29
What type of interface
are you using?
Parallel or serial (this will depend on the
interface board in the SQ-2000, your
computer, and the type of cable you
have).
Programs that don’t specifically list the SQ-2000 may ask other
questions about your printer. The following questions are asked
most often (the answers follow in bold).
1. Does your printer (SQ-2000) do standard backspacing?
Yes
2. How many passes of the print head are adequate for boldfacing? Two
Some word processors let you redefine the printer instructions
(often called printer drivers). To do this, you must give your word
processor certain information so that it can take advantage of
your printer’s features. This is covered later on in this chapter,
and in Appendix A.
Using the SQ-2000 with other application programs
You can also use the SQ-2000 to print other documents, such as
spreadsheets, with various commercial software packages.
As with word processors, most of your printing will be
straightforward. If your program has a printer selection routine,
then follow the advice given above.
Programming with the SQ-2000
This section provides an overview of the ASCII code system. It
also gives basic instruction on how to send control codes and
ESCape sequences to the printer in order to take advantage of the
SQ-2000’s special features, such as italics, enlarged, or proportional typestyles.
If you already know how to program your printer, you can
skip to Appendix A, “SQ-2000 Commands,” and Appendix B,
“ASCII Code Conversion Chart.”
30
Computer-to-printer communications
A computer and printer communicate by means of numbered
codes. If you press the letter A on the keyboard, it is translated
into a numeric code, transmitted to a peripheral device (such as a
video screeen or a printer) then displayed as the letter A.
To cope with the many different kinds of computers and printers used today, a standard set of codes has been developed. This
set of codes is called the American Standard Code for Information
Interchange, or ASCII for short. Almost all computers use these
ASCII codes to communicate with printers.
There are ASCII codes for all of the letters in the alphabet, both
upper- and lowercase, and for the numbers from 0 to 9. The
ASCII code also includes most punctuation marks, and some
codes that control printer functions. If you refer to the ASCII chart
in Appendix B, you’ll find that all of these letters, numbers and
punctuation marks have been assigned code numbers from 33
through 255.
ASCII codes
Although these codes are standard from computer to computer, they can be expressed in a number of different ways. The
chart in Appendix B is a comparative table that lists each ASCII
code as a character (A, B, C, 1,2,3) and as a decimal or hexadecimal
number. For example, the letter A is represented as an A and as
the decimal number 65. If you wanted to print the letter A using
the BASIC language, you would use the decimal notation, written as CHR$(65).
The chart also shows the hexadecimal (or hex) value of each
character. The hexadecimal numbering system is based on units
of 16; our usual numbering system, decimal, is based on units of
10. In hex, the letter A is expressed as 41H (the H stands for
hexadecimal).
31
Control codes
Most of the time you don’t give this code system a thought. If
you press A on the keyboard, the computer sends the code to the
printer and the letter A is printed. However, some printer codes,
like the one for a line feed, do not have a key on the keyboard.
These are the ASCII codes with values of less than 33. These
codes are called control codes because they control the operation
of the printer. These characters are not displayed on your screen
and aren’t printed as a character by your printer.
The ASCII codes 0 through 32 have commonly used abbreviations for their names, such as <LF> for a line feed. These controls are listed in Appendix A.
ESCape Sequences
There are not enough control codes for all of the advanced
features of modern printers, so multiple-code control sequences
have been developed. All of these control sequences begin with
the control code ASCII 27, which is called Escape. (In this manual
it is abbreviated as <ESC>.) These sequences can have more
than one code following Escape, depending on the command.
The ESCape code changes the interpretation of the codes that
follow it -- they are interpreted as part of a printer command. For
example, if the SQ-2000 receives the number 52, it prints the
numeral 4 because 52 is the ASCII code for that letter. However, if
the printer receives a 27 just before the 52, it turns on the italic
mode, because ESCape “4” is the SQ-2000’s code for italic printing, as shown in Appendix A.
This same command could also be written with “4” (including
the quotation marks) in place of the 52. Many ESCape sequences
are written with letters or numbers enclosed in quotation marks.
These letters or numbers can be used in place of the decimal or
hexadecimal values as long as they’re placed in quotes. There’s
no functional difference between the two systems, but you might
find the letters and numbers easier to remember.
32
Translating the ASCII code
You may also find that different manuals and programs use
different terms for the same characters or functions. For example,
your computer manual may say to send the decimal 10 for a line
feed, while your spreadsheet program recommends a <CR> or
CTRL-J for the same thing.
Appendix B contains a conversion chart for all the common
names of the ASCII codes, and shows the relationship between
the different forms of notation. In addition, Appendix A gives a
description of all the control codes and ESCape sequences used
on the SQ-2000.
How to send control codes to printer
The short program that follows illustrates the concepts of control codes and ESCape sequences. It is written in Microsoft
BASIC, but it can be adapted to other forms of BASIC or other
programming languages. If you have specific questions about
how BASIC works, consult the program’s documentation. How
to overcome problems specific to your computer is covered in
Chapter 8.
1. Make sure that you’re in BASIC; then type the following line
just as it appears here. (Don’t forget to include all semicolons,
even the ones at the end of the lines.)
10 LPRINT "NORMAL PRINTING" CHR$(1O) CHR$(13);
2. Now press RETURN, type RUN, and press RETURN again.
The SQ-2000 prints:
NORMAL PRINTING
This line begins with a line number, 10, then the command
LPRINT. Anything that is enclosed in quotation marks after the
LPRINT command is sent to the printer.
If you check the ASCII chart in Appendix B, you’ll find that
CHR$(lO) is the control code for a line feed, so when the printer
receives this, it moves the paper up one line.
CHR$(13), according to the ASCII chart, is the code for carriage
return, so the print head returns to the left margin and awaits the
next command.
33
3. Next type:
20 LPRINT CHR$(27) "4" "ITALIC PRINTING";
4. Now press RETURN, type RUN, and press RETURN again.
The SQ-2000 prints:
NORMAL PRINTING
ITALIC PRINTING
This time the printer receives a CHR$(27) which is the code for
ESCape or <ESC>. This tells the printer that whatever comes
next should be interpreted as a printer command.
Next comes “4” -- if you look under the SQ-2000 commands in
Appendix A, you’ll find that <ESC> “4” is the command for
italic print. So the SQ-2000 prints “ITALIC PRINTING” in italic
type.
5. Next type:
30 LPRINT CHR$(27)
"5" CHR$(1O) CHR$(13);
6. Now press RETURN.
In this line the printer receives the ESCape code CHR$(27), so it
reads “5” as a printer code, in this case the code to turn off the
italic typestyle.
The next two codes, CHR$(lO) and CHR$(13), are for line feed
and carriage return respectively, as described in step 2.
7. Next type:
40 LPRINT CHR$(27) "p" CHR$(1) "PROPORTIONAL
PRINTING";
50 LPRINT CHR$(27) "p" CHR$(0) CHR$(10) CHR$(13);
8. Now press RETURN, type RUN, and press RETURN again.
The SQ-2000 prints:
NORMAL PRINTING
ITALIC PRINTING
PROPORTIONAL PRINTING
EMPHASIZED PRINTING
34
The “p” 1 in line 40 turns on the proportional printing, and the
“p” 0 in line 50 turns it off.
9. Next type:
6 0 L P R I N T C H R $ ( 2 7 ) “ E ” “EMPHASIZED PRINTING” ;
70 LPRINT CHR$(27) “F”;
10. Now press RETURN, type RUN, and press RETURN again.
The SQ-2000 prints:
NORMAL PRINTING
ITALIC PRINTING
PROPORTIONAL PRINTING
EMPHASIZED PRINTING
The “E” in line 60 turns on the emphasized printing and the “F”
in line 70 turns it off.
The program is now complete. To see it fully assembled on the
screen, type LIST and press RETURN. You will see:
10
20
30
40
LPRINT “NORMAL PRINTING” CHR$(10) CHR$(13);
LPRINT CHR$(27) “4” “ITALIC PRINTING”;
LPRINT CHR$(27) “5” CHR$(1O) CHR$(13);
LPRINT CHR$(27) “p” CHR$(1) “PROPORTIONAL
PRINTING”;
50 LPRINT CHR$(27) “p” CHR$(0) CHR$(10) CHR$(13);
60 LPRINT CHR$(27) “E” “EMPHASIZED PRINTING”;
70 LPRINT CHR$(27) “F”;
To send the entire program to the printer, type RUN, press
RETURN, and the SQ-2000 prints:
NORMAL PRINTING
ITALIC PRINTING
PROPORTIONAL PRINTING
EMPHASIZED PRINTING
Using Master Select Command
The SQ-2000 can produce over 100 different combinations of
print styles. The Master Select command allows you to choose
any one of these styles. The Master Select command consists of
<ESC> “!" followed by a single ASCII code. The value of the
ASCII code determines the printing style that is selected. A typical master select command might look like this:
<ESC> “!” 66
35
This command would select italic proportional print. In
BASIC, the same command would look like this:
LPRINT CHR$(27) “!” CHR$(66);
You can make up your own combinations quite easily. This is
possible because each print style has its own value you can use
with the Master Select command. To create a “custom” Master
Select Code, add the values of the print styles you wish to combine. The values of the print styles are as follows:
Elite
Proportional
Compressed
Emphasized
Expanded
Italic
Underlined
1
2
4
8
32
64
128
For example, if you want to find the code for elite emphasized
italic print you would add these values:
Elite
Emphasized
Italic
1
8
64
73
The Master Select Command you would use would look like
this:
<ESC> “!” 73 (in BASIC: CHR$(27) “!” CHR$(73);)
Note:
Proportional overrides pica/elite. Compressed works only in
draft print.
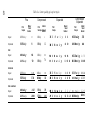
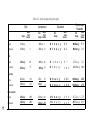
Some of the more popular styles the SQ-2000 can produce are
shown on the next four pages. The number following each example is the ASCII code (decimal) which will select that particular
print style.
Proportional print styles are shown first. These styles are available in both the letter quality and draft sets. The next page shows
the printing styles that are available in the letter quality set. The
final two pages show the printing styles that are available in the
draft set.
36
The Select Print Quality command will select either the letter
quality or the draft set. The select print quality command looks
like this:
<ESC> “x” 0 -- To select the draft set
<ESC> “x” 1 -- To select the letter quality set
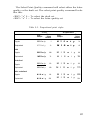
Table 3-1. Proportional print styles
Pica
Print
Sample
Expanded
Master
Select
Number
Print
Sample
Master
Select
Number
Regular
MISwiy
2
M I S w i y
34
Emphasized
MISwiy
10
M I S w i y
42
Regular
MISwiy
66
M I S w i y
98
Emphasized
MISwiy
74
M I S w i y
106
Regular
MISwiy
130
M I S w i y
162
Emphasized
MISwiy
138
M I S w i y
170
Regular
MISwiy
194
M I S w i y
226
Emphasized
MISwiy
202
M I S w i y
234
Italic
Underlined
Italic underlined
37
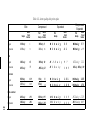
Table 3-2. Draft pica print styles
Pica
Print
Sample
Master
Select
Number
Regular
MISwiy
Emphasized
MISwiy
Italic
Regular
M I S w i y
Emphasized
MISwiy
Underlined
Regular
MISwiy
Emphasized
M I S w i y
italic underlined
Regular
MISwiy
Emphasized
MISwiy
Compressed
Expanded
Expanded
Compressed
Master
Print
Select
Sample Number
Print
Sample
Master
S e l e c t
Number
Select
Number
2
M I S w i y
3 6
M I S w i y 4
0
MISwiy
44
68
M l S w i y
6
MISwiy 100
MISwiy
76
M
MISwiy
132
M I S w i y
1
1 3 6
MISwiy
140
M I S w i y
1 6 8
MISwiy
192
MISwiy
196
M I S w i y
2 2 4
MISwiy 228
200
MISwiy
204
M
2
MISwiy
MISwiy
4
M
8
MISwiy
12
6 4
MISwiy
7 2
0
128
I
I
I
S
S
S
w
w
w
i
y
i
i
3
9
y 1
y
0
MISwiy
4
6
3
0 MISwiy
2
106
164
172
236
Table 3-3. Draft elite print styles
Elite
Print
Compressed
Master
Select
Sample Number
Master
Select
Sample Number
Print
Compressed
Expanded
Expanded
Print
Sample
Master
Select
Number
Print
Sample
Master
Select
Number
Regular
MISwiy
1
MISwiy
5
M I S w i y
3 3
MISwiy
37
Emphasized
MISwiy
9
MISwiy
13
M I S w i y
4 1
MISwiy
45
Regular
MISwiy
65
MISwiy
69
M I S w i y
9 7
MISwiy
101
Emphasized
MISwiy
73
MISwiy
77
M I S w i y
1 0 5
MISwiy
109
Regular
MISwiy
129
MISwiy
133
M I S w i y
1 6 1
MISwiy
165
Emphasized
MISwiy
137
MISwiy
141
M I S w i y
1 6 9
MISwiy
173
Regular
MISwiy
193
MISwiy
197
M I S w i y
2 2 5
MISwiy
229
Emphasized
MISwiy
201
MISwiy
205
M I S w i y
2 3 3
MISwiy
237
Italic
Underlined
Italic underlined
Table 3-4. Letter quality pica print styles
Pica
Print
Sample
Master
Print
Sample Select
Number
Master
Select
Number
Compressed
Expanded
Expanded
Compressed
Print
Sample
Master
Select
Number
Print
Sample
Master
Select
Number
Regular
MISwiy
0
MISwiy
4
M I S w i y
3 2
MISwiy
36
Emphasized
MISwiy
8
MISwiy
12
M I S w i y
4
0
MISwiy
44
Regular
MISwiy
64
MISwiy
68
M I S w i y
9
6
MISwiy 100
Emphasized
MISwiy
72
MISwiy
76
M I S w i y
1 0 4
MISwiy
108
Regular
MISwiy
128
MISwiy
132
M I S w i y
1 6 0
MISwiy
164
Emphasized
MISwiy
136
MISwiy
140
M I S w i y
1 6 8
MISwiy
172
Regular
MISwiy
192
MISwiy
196
M I S w i y
2 2 4
MISwiy 228
Emphasized
MISwiy
200
MISwiy
204
M I S w i y
2 3 2
M I S w i y 236
Italic
Underlined
Italic underlined
Table 3-5. Letter quality elite print styles
Compressed
Elite
Compressed
Expanded
Expanded
Sample
Master
Select
Number
Regular
MISwiy
1
MISwiy 5
M I S w i y
3 3
Emphasized
MISwiy
9
MISwiy 13
M I S w i y
4 1
MISwiy
MISwiy
Regular
MISwiy
65
MISwiy 69
M I S w i y
9 7
MISwiy 101
Emphasized
MISwiy
73
MISwiy II
M I S w i y
1 0 5
MISwiy MISwiy 109
Regular
MISwiy
129
MISwiy
133
M I S w i y
161
MISwiy
165
Emphasized
MISwiy
137
MISwiy
141
M I S w i y
1 6 9
MISwiy
173
Regular
MISwiy
193
MISwiy 197
M I S w i y
2 2 5
MISwiy 229
Emphasized
MISwiy
201
MISwiy 205
M I S w i y
2 3 3
MISwiy 237
Master
Select
Sample Number
Print
Print
Sample
Master
Select
Number
Print
Sample
Master
Select
Number
37
45
Italic
Underlined
Italic underlined
Chapter 4
Printer Care and Maintenance
In this chapter, you’ll learn about the self-cleaning feature and
other operating aspects of the printer. There’s also a troubleshooting chart you can use to quickly solve any little problems
that might arise.
As you’ll see, the SQ-2000 is not only easy to use -- it’s also
simple to maintain on a daily basis. Periodic attention by a service technician is necessary, however.
The Ink Jet Print Head
If you’re familiar with dot-matrix printers, you know that they
print characters made up of numerous tiny dots. The SQ-2000 is
similar in some ways, but significantly improves on earlier dotmatrix technology. Rapid-drying ink has replaced the ink ribbon.
Miniature nozzles release the dots directly onto the page.
The result is faster printing with almost no noise. Moreover,
because the SQ-2000’s print head releases the ink from 24 nozzles
arranged in two columns, each character is more sharply
defined.*
* In letter quality mode
43
How Automatic Print Head Cleaning Works
Each time you turn on the printer it goes through a brief
cleaning cycle in which cleaning solvent is sprayed through the
nozzles. When you turn the printer off, it cleans itself again.
Moreover, during printing the SQ-2000 periodically pauses for
a few moments to clean the print head’s lower nozzles, which
don’t get used as much and are more liable to become clogged.
A reservoir contained in the disposable ink cartridge supplies
the cleaning solvent. Used solvent flows back into the cartridge to
a separate location.
Ink is also kept from accidentally drying in the nozzles by
another automatic feature: Any time the printing stops for a
minute or more, the print head returns to its storage position and
the nozzles are automatically capped.
Caution:
Never unplug or otherwise turn off the printer without first
switching it off using the main power switch.
Turning off the printer from a remote source defeats the automatic cleaning operation and can permit ink to dry in the ink
nozzles. If this occurs, the print head may be damaged and have
to be replaced.
For this reason, avoid plugging the printer into an outlet
which is controlled by a wall switch or similar switch.
Cleaning the print head while printing
Occasionally you may want to give the print head an additional cleaning while engaged in printing.
First, make sure the printer is off-line. Clean the print head by
pressing the CLEANING button for a few moments, then releasing. This makes the printer go through its cleaning cycle for
about 15 seconds. (see Figure 4-l).
44
Figure 4-Z. Buttons for cleaning during printing
This time the print head did something different. It performed
the cleaning action, but first it stopped for several seconds in
front of the revolving rubber “brush” next to the storage station.
That gave it an additional scrubbing to remove dirt and other
deposits.
To resume printing, simply press the ON LINE button again
and the printing starts from the point of interruption.
For more extensive cleaning
At those times when the short cleaning cycle may not be
enough, or when the printer has not been used for some time,
you can put the SQ-2000 through a more thorough cleaning.
If you’ve been printing, first let the printing stop on its own so
no data will be lost. Turn off the printer. Then, turn it back on
while holding down the CLEANING button.
This cycle takes about two minutes, including a quiet period
in which the solvent is allowed to soak into the print head to
dissolve ink deposits.
Special cleaning
When you know you won’t use the printer for several weeks or
longer, if it’s to be moved long distances, or stored at temperatures over 95°F, you need to take an important precaution.
You must put the SQ-2000 through another cleaning cycle. But
when this one ends, air has replaced the ink in the print head
and tubes to keep ink from drying in them.
Turn off the printer while holding down the CLEANING but45
ton. This special cleaning also takes about two minutes.
Be careful not to unplug the printer too quickly. As with the
other extended cleaning cycle, there’s a quiet period during
which solvent is allowed to soak into the print head and other
parts.
Wait for the POWER light to go out. That’s your signal the
printer is ready to be stored or transported.
Summary of Cleaning Cycles
Here’s a brief summary of the cleaning cycles:
l
l
l
l
The printer automatically cleans itself when it is turned on
and periodically during operation.
If you notice a slight deterioration in print quality, push the
ON LINE button to make the printer go off-line. Then press
the CLEANING button for a few moments. To resume printing, press the ON LINE button again.
For a more extensive cleaning, wait for the printing to stop,
then turn the printer off. Turn it back on again while pressing
the CLEANING button.
When the printer won’t be used for an extended period, or is
to be stored or transported, clear the printing parts of ink by
turning the printer off while holding down the CLEANING
button. Let the POWER indicator go out before unplugging
the printer.
Troubleshooting Guide
The SQ-2000 is often able to tell when something goes wrong,
such as when paper has jammed or someone forgot to replace the
ink cartridge. It does that through special sensing devices.
When such a problem occurs, you may be alerted by a warning
light or buzzer. Or the printer just won’t operate.
The following troubleshooting guide provides some of the
more common problems that may arise during normal operation.
To save time (and perhaps some embarrassment), be sure to refer
to it before you call in service personnel.
46
Troubleshooting Guide
Problem
Printer will not operate at
all after being turned on.
Print head will not move
or printer stops printing.
Dots are missing
Check
Possible Cause
To Solve It
See Page
Printer is not on-line with
computer.
l
Check to see if ON
LINE indicator is
glowing.
l
Press ON LINE button
to make printer go online.
16, 24
Ink cartridge is not set in
place or pushed down far
enough.
l
Check if the ink cartridge is installed and
that it is not down past
the hooking edges.
l
Set ink cartridge,
pushing it down until
hooking edges show.
9
No ink in cartridge.
l
Check to see if INK
LOW indicator is
glowing.
l
Turn off printer. Replace ink cartridge.
Turn on printer and
press CLEANING
button.
Paper loaded incorrectly.
l
Check to see if paper is
properly inserted or
possibly jammed.
l
Printing has reached bottom of page.
l
Check to see whether
PAPER OUT indicator
is glowing.
Dirty print head due to
paper lint, ink deposits,
etc.
9, 27
Reload paper.
15
l
Remove printed page
with FF button and load
new sheet.
27
l
Do brief cleaning by
pressing CLEANING
button. Repeat.
44
Problem
Dots still missing after
normal cleaning cycle.
Print “bleeds” and has
blurred appearance.
Possible Cause
Check
Dirty print head.
To Solve It
See Page
l
Do extended cleaning.
45
Ink cartridge faulty.
l
Check ink cartridge for
effective use period.
l
Turn printer off. Replace with new ink cartridge with unexpired
effective period. Clean
after replacement.
9, 44
Paper is too coarse or
overly absorbent.
l
Do printer self-test and
inspect result.
l
Use other side of
paper.
Replace with paper
having denser weave.
18
Use other side of
paper.
Replace with paper that
meets absorbency requirements.
18
l
Do normal cleaning operation.
44
l
Print smudges, dries too
slowly.
Print appears distorted-dots either too coarse or
dense or appear wavy.
Print appears distorted
while using continuous
paper.
Paper not absorbent
enough.
l
Check several sheets
of paper stock with printer self-test.
Print head is dirty.
l
l
Interference by wind or air
from powerful fan.
l
Check if printer is exposed to strong wind or
fan.
l
Relocate printer out of
air current.
-
Tension not correct on
continuous paper.
l
Check if tractor sprockets are positioned correctly.
Check if paper guide
skids are evenly
spaced.
l
Move right sprocket so
paper is pulled taut.
Spread paper guide
skids evenly.
E-4
l
l
Problem
Paper has ink stains or
splotches.
Continuous paper feeds
irregularly: tension on
paper is uneven.
Possible Cause
Check
Check to see that paper
pressure bar is properly
set with end rollers at
the edge of the paper.
To Solve It
See Page
l
Adjust rollers on paper
pressure bar.
16, E-4
I
Paper setting method is
wrong.
l
Ink has been sprayed
onto platen.
l
Inspect platen for ink.
l
Clean the platen.
Obstruction behind platen
is binding paper.
l
Check if paper scrap
has become caught behind platen.
l
Remove platen to remove obstruction.
--
Chapter 5
User-Defined Characters
With the SQ-2000, it is possible to define and print characters
of your own design. This can be useful if you want to design an
entirely new alphabet or typeface. You can also create characters
for special applications (for example, mathematical or scientific
symbols). Or, you may want to create graphic patterns with userdefined characters to serve as building blocks for larger designs.
How these are done is the subject of this chapter.
Dot-Matrix Printing
In order to use user-defined characters, you need to understand
how dot-matrix printing works. The process is called dot-matrix
printing because each character is composed of small dots
arranged on a matrix, or grid. To see how that character grid gets
printed, let’s take a look at the print head itself.
The print head
The SQ-2000 print head does not print an entire character at
one time. Instead, it prints dots one column at a time. The print
head contains 24 ink nozzles that appear to be arranged in a
vertical column. If you were to remove the print head and look at
the nozzles, you would see two staggered columns of 12 nozzles.
However, the timing is such that they print as one continuous
column of 24 nozzles.
51
As the print head moves across the page, electrical impulses
cause the appropriate nozzles to release ink against the the paper,
causing a single dot to print with each impulse. Figure 5-1 shows
the print head as it prints a capital H. In the first column, six
nozzles release ink, and in the next four columns, one nozzle
releases ink. In the last column six nozzles release ink again.
Figure 5-1. The print head
The print matrix
Now that you know how the print head works, it’s important
to understand how the characters are defined and stored in the
SQ-2000’s memory. As mentioned earlier, each character is composed of a series of dots arranged on a matrix.
The matrix is 24 dots high-one dot for each nozzle on the
SQ-2000 print head. The width of the character matrix is dependent upon the character set in use. For draft characters, the grid is
nine dots wide. Letter quality characters are defined on a grid
which is 15 dots wide, but the dots are placed closer to each
other. The grid for proportional characters is 37 dots wide, with
the dots spaced even more closely.
52
Figure 5-2 shows two of the character matrixes with the dots
used to print the letter H. All of the SQ-2000’s characters are
stored in the same manner.
Draft
Letter Quality
Figure 5-2. Character grids
Defining Your Own Characters
With the knowledge of how the SQ-2000 stores and prints
characters, you are ready to define your own.
The first step in defining characters is to lay out the dots on a
grid just as you want them to print. (The grids are exactly the
same as those Epson has used to define the standard character
sets.) In Figure 5-3 you can see a user-defined character, a modem capital A.
53
Fig. 5-3. User-defined character
Next, you translate the dot pattern you’ve created on paper to a
numeric format so you can send the information to the SQ-2000.
Every dot has an assigned value. Each vertical column (which has
a maximum of 24 dots) is first divided into three groups of eight
dots. Each group of eight dots is represented by one byte, which
consists of eight bits. Hence, one bit represents each dot.
Each bit is a power of two, so that the bits within each byte
have values of 1,2,4,8,16,32,64, and 128. In the vertical column
of dots, the bits are arranged so that the most significant bit
(which has a value of 128) is at the top and the least significant bit
(which has a value of 1) is at the bottom.
Figure 5-4 shows how to use this method to calculate the data
bytes for the first column of our letter A. Each bit that represents
a dot has a value of 1; each bit that represents a space has a value
of 0. To the right of the column the binary numbers are converted
to decimal value.
This last step is merely for convenience. The data you send to
the SQ-2000 can be in any form (binary, decimal, or hexadecimal)
that you can use with your program language. We’ve chosen to
use decimal numbers because the example programs in this
manual are written in BASIC and everyone is familiar with decimals.
54
MSB
00011001 -25:D
LSB
MSB
01010101 - 85:D2
LSB
MSB
01010000 - 8O:D3
LSB
MSB = Most significant bit
LSB = Least significant bit
Figure 5-4. Data bytes for -he first column of a new capital A
You’ve seen how to design a character by laying out the dots
on a grid, translating the dots to binary information, and then
converting the binary numbers to decimal equivalents. The next
(and final) step in defining a character is to send this information
to the printer.
Sending information to the SQ-2000
The SQ-2000 command to define characters is one of the more
complex in its repertoire. The format of the command is this:
<ESC> “&” <NUL> nl n2 data
The <ESC> “&" is simple enough; that’s a format you should
be quite familiar with by now. The <NUL> (which is ASCII
code 0) allows for future enhancements. At this time it is always
ASCII code 0.
With the SQ-2000, you can define many characters with a single command. The n1 and n2 bytes are used to specify a range of
ASCII codes for the characters you will define. You then have to
provide character definition data for all of the characters in that
range to follow.
55
Note:
The entire range of ASCII decimal codes (from 0 to 127) can be
used for user-defined characters, but a caution is in order. Characters with ASCII decimal values below 32 are usually reserved as
control codes by both your computer and your printer. While
these characters can be replaced by user-defined characters, it
should be avoided because of the effect on the normal control
codes.
To see how to specify nl and n2, let’s use an example. If, for
instance, you wanted to redefine the characters A through Z, nl
would be “A” (or ASCII decimal 65) and n2 would be “Z” (ASCII
decimal 90). So the command <ESC> “&” <NUL> “AZ” (followed by the appropriate data) would replace the entire alphabet
of capital letters.
In some instances, you may want to redefine a single character.
In this case, nl and n2 would have the same value. Our example
at the end of this section does just that; it defines only the “A”
character which is replaced by a new letter A.
Following the specification of the range of characters to be
defined in this command is the data that defines the characters.
The data is in this form:
do, d1, d2, Dl, D2, . . . Dd1x3
The first three bytes are used to specify the width of the character and the space to be allowed on either side of it. The left
margin (in dot columns) is specified by d0 and the right margin is
specified by d2. The second byte (d1) specifies the number of
columns of dots that are printed by the character. By varying the
width of the character itself and the spaces around it, you can
actually create proportional width characters that print at draft
speed.
When defining draft quality characters, the number of printed
columns (dl) cannot exceed 9, and the sum of d0 + dl + d2 cannot
exceed 12.
The last part of the character definition is the actual data that
defines the dot patterns for each character. Since it takes three
bytes to specify the dots in one vertical column of dots, the
SQ-2000 expects d1x3 bytes of data to follow d2.
56
An example character definition should make this clear:
10 ‘*** User-defined character: Capital A ***
20 ’
30 ‘Select draft
40 LPRINT CHR$(27) “x’ CHR$(O);
50 ’
60 ‘Define download character
70 LPRINT CHR$(27) “&” CHR$(O);
80 ’
90 ‘beginning and ending at A
100 LPRINT “AA”;
110 LPRINT CHR$(2) CHR$(1O) CHR$(1);
120 ’
130 ‘left margin, # of digits, right margin
140 FOR I=1 TO 10*3
150
READ A
160
LPRINT CHR$(A);
170 NEXT
180 ’
190 ‘Print a sample
200 LPRINT “AAAAAAAAAAAAA”
210 ’
220 ‘Select download
230 LPRINT CHR$(27) “%” CHR$(1);
240 LPRINT “AAAAAAAAAAAAA”
250 ’
260 ‘Deselect download
270 LPRINT CHR$(27) “%" CHR$(0);
280 LPRINT “AAAAAAAAAAAAA”
290 END
300 DATA 25,85,80,4,0,0,1,1,0
310 DATA 0,64,0,0,17,0,0,4,0
320 DATA 0,1,0,0,0,64,0,0,16
330 DATA O,O,O,
In line 40, the <ESC> “x” command selects draft style printing. You’ll see why later in this chapter.
The actual character definition, using the command syntax explained above, starts in line 70. The two A’s in line 100 represent
n1 and n2, the range of characters being defined (in this case, a
range of one). Line 110 contains d0, dl, and d2. The information
about the actual character design (which is contained in the data
statements at the end of the program) is sent to the printer in the
loop between lines 140 and 170.
57
Printing User-Defined Characters
If you entered the example program above, you defined a
capital A and placed it in the RAM location for ASCII decimal 65
(replacing the standard “A” ). You can now print out a three-line
sample of your work. The first and third lines (printed by lines
200 and 280 of the program) print the normal A; the second line
(line 240) prints the A that you defined.
This is the result.
AAAAAAAAAAAAA
AAAAAAAAAAAAA
AAAAAAAAAAAAA
As you can see, both sets of characters (the original ROM
characters that the printer normally uses and the user-defined
character set) remain in the printer available for your use. The
command to switch between the two sets is used in lines 230 and
270. It is:
<ESC> “%” n
If n is equal to 0, the normal ROM character set is selected (this
is the default). If n is equal to 1, the user-defined character set is
selected. If you select the user-defined character set before you
have defined any characters, the command is ignored; the ROM
characters will still be in use.
You may switch between character sets at any time-even in
the middle of a line. To try it, place a semicolon at the end of lines
200 and 240 in the program above.
Copying ROM to RAM
After running the program above, if you select the userdefined character set and try to print other characters, the only
one that will print is the capital A. Since no other characters are in
the user-defined RAM area, nothing else prints. Other characters
sent to the printer don’t even print as spaces; it’s as if they were
not sent at all.
In many cases, you will want to redefine only a few of the
characters to suit your needs; the rest of the alphabet will work
fine as it is. As you have seen, it is possible to switch back and
forth at will between the normal character set and the userdefined character set. It is, however, rather inconvenient.
58
Therefore, the SQ-2000 has a command which allows you to
copy all of the standard characters from ROM to the user-defined
character set. The command format is:
<ESC> “:” <NUL> <NUL> <NUL>
Note:
This command will cancel any user-defined characters you have
created. You must send this command to the printer before you
define characters.
Using this command you can create a short sequence of codes
that will copy normal characters to the user-defined character set,
define your special characters, and select the user-defined character set. You can now print with the user-defined set as your
normal character set. You’ll never need to switch back and forth
between sets.
How Print Mode Affects User-Defined Characters
In the example program above, before you defined the new
capital A, you selected the SQ-2000’s draft print mode. By doing
this, you caused any user-defined characters to print as draft
characters because user-defined characters assume the mode that
is in effect at the time they are defined.
The modes that affect user-defined characters are draft, letter
quality, and proportional printing. The <ESC> “x" n command selects between draft (n=0) and letter quality (n=l). The
<ESC> “!” n (Master Select) or <ESC> “p”’ n (n=l) commands
are used to select proportional printing.
The commands for defining characters, selecting the userdefined character set, and copying ROM are exactly the same for
each of the user-defined print styles. The print mode in effect
when the characters are defined determines the mode of the
user-defined characters.
The print mode determines the size of the grid upon which the
characters are designed and the speed at which they print. Table
5-l shows the different character grid sizes for each of the print
modes.
59
Table 5-1. User-defined character design grids
dl
dO+d1+d2
(maximum)
(maximum)
Draft
9
12
Letter Quality
15
18
Proportional
37
Draft mode characters
As you have seen, draft characters are designed on a grid
which is 24 dots high by 9 dots wide (plus up to three columns of
dots for space between characters). User-defined draft characters
print at the same high speed as normal draft characters, even
though they may print with more dots and may even be designed for proportional spacing.
There is, however, one restriction on designing characters for
draft printing. Dots in the same row may not print in adjacent
columns. That is, there must be an empty dot position to the left
and to the right of each dot that prints (the space on either side of
the character counts as an empty dot position). Therefore, in a
character grid that is nine dots wide, a maximum of five dots will
print in any row.
For vertical spacing, there is no such restriction. You can print
a solid column of 24 dots if you wish.
Letter quality characters
If you select letter quality printing with the <ESC> “x” 1
command, you can design your user-defined characters on a grid
which is 24 dots high by 15 dots wide. Each character can be as
wide as 18 dots, including space on either side of the character.
The dot columns are spaced closer together horizontally than
draft style dot columns (the horizontal dot spacing is l/180-inch
when printing pica width-as opposed to l/120-inch for draft
characters).
60
Unlike draft characters, there are no restrictions on which dots
can print. You can print a solid box of 360 (15x24) dots if you
wish. This, coupled with the closer dot spacing, allows you to
design characters with higher resolution. The drawback is speed.
Normal letter quality characters print more slowly than draft
characters; the same is true of the user-defined character set.
Proportional mode characters
Selecting the proportional character mode yields user-defined
characters of the highest resolution. Characters can be designed
on a grid which is 24 dots high by 37 dots wide. Horizontal dot
spacing for proportional characters is l/360-inch-quite fine indeed! And, like letter quality characters, there are no limits on dot
placement. You can use all of the dot positions without restriction.
Mixing Print Styles
Each of the three user-defined character modes (draft, letter
quality, and proportional) can be used in combination with most
of the SQ-2000’s various print styles. For instance, italic, elite, and
emphasized styles all work with user-defined characters. The
characters you design will be altered to give each of these printing effects.
Mixing the three types of user-defined characters is not permitted. For example, you select the draft attribute and define
some characters. Then you select proportional printing and
define some more. In this case, the first character definitions will
be destroyed. Only one type of character definition may be
stored in RAM at any time.
If you define characters in one mode, then switch to another
mode and select the user-defined character set, the command will
be ignored and nothing will print. However, the user-defined
characters definitions remain unaffected. If you switch back to
the mode in which they were defined, you can then select and
print them.
61
Other considerations
Keep in mind that user-defined characters are stored in RAM,
which is volatile in nature. Whenever the printer power is turned
off, all of the user-defined characters are lost. Likewise, initializing the printer will clear the user-defined character area. Initializing can be done with the <ESC> “@” command. Also, your
computer sometimes sends an initialization (INIT) signal. (Some
computers do this each time BASIC is loaded.)
Defining Connecting Characters
Because character definitions include information about the
width of the character, including the space around the character,
you can define characters that connect horizontally. This feature
has a variety of useful applications. You can create: a typeface
with connecting scripts, a single extra-wide character that exceeds the size limits of a single character, or graphic characters
that can be used as borders.
By defining only two characters (see Figure 5-5), three different
border patterns can be created.
10 '*** User-Defined Character: Chain Borders ***
20 ’
30 ‘Select letter quality
40 LPRINT CHR$(27) “x" CHR$(1);
50 ’
60 ‘Define download character
70 LPRINT CHR$(27) “&” CHR$(0);
80 ’
90 ‘beginning at "=” and ending at ">”
100 LPRINT "=>“;
110 ’
120 ‘left margin, # of digits, right margin
130 LPRINT CHR$(O) CHR$(10) CHR$(0);
140 FOR I=1 TO 10*3
150
READ A
LPRINT CHR$(A);
160
170 NEXT
180 LPRINT CHR$(0) CHR$(14) CHR$(0);
190 FOR I=1 TO 14*3
200
READ A
LPRINT CHR$(A);
210
220 NEXT
62
230
240
250
260
270
280
290
300
310
320
330
340
350
351
352
353
360
370
380
390
400
410
420
430
440
450
460
470
480
,
'Select download
LPRINT CHR$(27) "%" CHR$(1);
'
'Print character 50 times
FOR I=1 TO 50
LPRINT "=";
NEXT:LPRINT
'
'Print character 50 times
FOR I=1 TO 50
LPRINT ">";
NEXT:LPRINT
FOR I=1 TO 25
LPRINT "=>";
NEXT
,
'Deselect download
LPRINT CHR$(27) "%" CHR$(0)
END
,
'Small chain
DATA 0,162,0,1,17,0,2,40,128,4,68,64,8,130,32
DATA 4,68,64,2,40,128,1,17,0,0,138,0,0,68,0
'
'Large chain
DATA 0,162,0,1,17,0,2,40,128,4,68,64,8,130,32
DATA 17,1,16,34,0,136,17,1,16,8,130,32,4,68,64
DATA 2,40,128,1,17,0,0,138,0,0,68,0
63
Figure 5-5. Character design grid for border characters
Here’s how the program works. Line 40 selects letter quality
characters; this will be the attribute of the user-defined characters. The data for the first character, which replaces the “=” sign,
is sent in lines 140-170. The second character (“>“) is defined in
program lines 190-220.
In lines 240-353, you test the new characters by printing them
in three lines (individually and in combination).
Figure 5-6 shows the printout from this program.
Figure 5-6. Three border designs
64
Characters that connect vertically
Because the SQ-2000’s vertical spacing can be changed, you
can also create characters that connect vertically. All you need to
do is change the line spacing so that there is no extra space
between lines. The following program shows how this technique
can be used to print an integral sign that is two lines high.
10 '*** User-defined Character; Integral Sign ***
20 '
30 'Select proportional
40 LPRINT CHR$(27) "p" CHR$(1);
50 LPRINT CHR$(27) ":" CHR$(O) CHR$(O) CHR$(O)
60 LPRINT CHR$(27); "&";
CHR$(O);
70 LPRINT "ef";
80 LPRINT CHR$(4) CHR$(28) CHR$(5);
90 FOR I=1 TO 28*3
100 READ A
110 LPRINT CHR$(A);
120 NEXT
130 LPRINT CHR$(4) CHR$(28) CHR$(5);
140 FOR I=1 TO 28*3
150 READ A
160
LPRINT CHR$(A);
170 NEXT
180 'Print a sample
190 LPRINT CHR$(27) "3" CHR$(12);
200 LPRINT CHR$(27) "%" CHR$(1);
210 LPRINT "e";
220 LPRINT CHR$(27) "S" CHR$(0) "1" CHR$(27) "T";
230 LPRINT "e";
240 LPRINT CHR$(27) "S" CHR$(0) "1" CHR$(27) "T"
250 LPRINT "
(aX+bY)";
260 LPRINT CHR$(27) "S" CHR$(0) "2" CHR$(27) "T";
270 LPRINT "dxdy"
280 LPRINT "f";
290 LPRINT CHR$(27) "S" CHR$(1) "0" CHR$(27) "T";
300 LPRINT "f";
310 LPRINT CHR$(27) "S" CHR$(l) "0" CHR$(27) "T"
320 LPRINT CHR$(27) "@"
330 END
340 'Top half (e)
350 DATA 0,0,0,0,0,0,0,0,0,0,0,0,0,0,0,0,0,0
360 DATA 0,0,0,0,0,0,0,0,0,0,0,0,0,0,0,0,0,0
370 DATA 0,63,255,0,0,0,3,255,255,0,0,0,4,0,0,0,0,0
380 DATA 8,0,0,0,0,0,24,0,0,0,0,0,60,0,0,0,0,0
390 DATA 2,4,0,0,0,0,0,0,0,0,0,0,0
400 ‘Bottom half (f)
65
410
420
430
440
450
DATA 0,0,0,0,0,0,0,0,24,0,0,0,0,0,60,0,0,0,0,0,24
DATA 0,0,0,0,0,16,0,0,0,0,0,32,0,0,0,255,255,192
DATA 0,0,0,255,252, 0, 0, 0, 0, 0, 0, 0, 0, 0, 0
DATA 0,0,0,0,0,0,0,0,0,0,0,0,0,0,0,0,0,0,0
DATA 0,0,0,0,0,0,0,0,0,0,0,0
The design grid is shown in Figure 5-7.
Figure 5-7. Design grid for integral sign made of two vertically
connecting characters
Figure 5-8 shows the printout from this program.
2
(aX+bY) dxdy
Figure 5-8. Integral sign made of two vertically connecting characters
66
Chapter 6
Dot Graphics
The SQ-2000 has all the dot graphics capabilities of the other
Epson printers as well as the ability to produce dot graphics
using all 24 of the nozzles in the print head. This gives the
SQ-2000 approximately three times the vertical resolution of the
other printers.
This chapter covers how the SQ-2000 produces dot graphics,
explains the commands used to produce the 10 different graphics
densities, and briefly describes several applications of dot
graphics.
If dot graphics is a new subject to you, you may want to study
the chapters on dot graphics in the User’s Manual for either the
Epson FX or RX series printers. These manuals, which are available at your Epson dealer, provide detailed tutorials on some of
the simpler applications of dot graphics. Because of the upward
compatibility between the Epson printers, the example programs
presented in those manuals will work equally well on the
SQ-2000 printer.
How the SQ-2000 Prints Dot Graphics
In the last chapter you learned how to address the individual
nozzles in the SQ-2000’s print head to create your own characters. Now you will learn how to address the individual nozzles in
the print head to print any graphics you want.
The method of addressing the nozzles in the print head for
graphics is very similar to the method used for creating userdefined characters. In fact, when you are using the 8-nozzle (also
called 8-dot) graphics options, the method of nozzle addressing is
much simpler.
67
When the SQ-2000 produces 8-dot graphics options, it prints
with every third nozzle.
Each byte of data received controls the nozzles for only one
vertical column of dots. This means you have to send the printer
more information when printing dot graphics, but it also means
that you have full control over what each print nozzle is doing.
A byte of data contains eight binary digits, or bits. Each bit
controls one of the eight nozzles used for 8-dot graphics. Figure
6-l shows how a graphics data byte controls eight print head
nozzles.
Graphics data byte
Most significant
bit
Least significant
bit
Print head
dot nozzles
Figure 6-Z. Graphics data byte and print head nozzles
Creating binary bit patterns like this may be easy for computers, but it’s difficult for humans. There is an easier way to create
graphics data bytes. If you assign each of the print head nozzles a
value, the value of a graphics data byte is the sum of the values of
the nozzles that you want to print (see Figure 6-2).
68
Assigned nozzle
values
Usable
nozzles
Figure 6-2. Values assigned to the print nozzles
It is not a coincidence that the values that are assigned to the
pins are powers of two. These assigned values are the decimal
equivalents of the binary values of the nozzles. This means that
each combination of nozzle values produces a unique sum; there
is never any doubt about which nozzles are supposed to print.
Figure 6-3 shows some examples.
69
Dots to print
Nozzle values
¡
64 - ¡
32 - ¡
16 - ¡
8-¡
4- ¡
2-¡
1-¡
128 -
Sum of nozzle values
73
255
226
Figure 6-3. Value of thegraphics data byte
Syntax of the Graphics Command
The SQ-2000 has one command that allows you to use any of
the 10 graphics options. The syntax of the command is:
<ESC> “*” s n1 n2 data
In this command, s selects the graphics option and n1 and n2
specify the number of bytes of graphic data that follows. The
available graphics options are listed in Table 6-1.
Table 6-l. Graphics options
Option
Nozzles
s
Single-density
8
Double-density
High-speed, double-density
8
1
8
8
8
2
3
4
8
2 4
2 4
24
2 4
6
32
33
38
39
Quadruple-density
QX-10 CRT screen
Other CRT screens
Single-density
Double-density
Other CRT screens
Triple-density
0
Horiz. density
(dots/in.)
6 0
120
120
240
80
90
6 0
120
9 0
180
The SQ-2000 uses the formula n1 + n2 X 256 to determine how
many bytes of graphics data to expect. To determine the values of
n1 and n2, given the number of dot columns of graphics data that
you want to send, use the following formulas (where X is the
number of columns of graphic data):
n1 = X mod 256
and
n2 = X\256 (where \ represents integer division)
For example, if you wish to send 1632 columns of graphic data,
n1 would be 96 and n2 would be 6 (1632 = 96 + 6 X 256).
When you are using the 24-dot graphics options you must
send three bytes of data for each dot column. Therefore, you refer
to dot columns instead of bytes of graphics data when calculating
nl and n2. (We will explain later how these three bytes are interpreted.)
The SQ-2000 will interpret the number of bytes determined by
n1 and n2 as graphics data, no matter what codes they are. This
means that you must be sure to supply enough bytes of graphic
data, or the SQ-2000 will stop and wait for more data, and will
seem to be locked up. If, on the other hand, you supply too much
graphics data, the excess will be interpreted and printed as regular text.
Using Hand-Calculated Data to Print Graphics
With what you know now, you can use the simplest application of graphics-using hand-calculated data to print graphic
images. While this method is the most tedious of those that we
will explore, it is useful for small graphic elements that are used
many times. Also, it helps you to develop your understanding of
dot graphics.
The first step is to figure out which dots you want to print.
Start by sketching your design on a piece of graph paper as
shown in Figure 6-4. The design in the illustration is only eight
dots high for simplicity, but it could also use multiple print lines.
71
Figure 6-4. Design sketch and sum of nozzle values
Write the assigned values of the nozzles next to your design
and then total the values for each column of dots. These totals are
the values that will be sent to the printer as graphics data to print
the design.
To print the example design using the normal density option,
the complete command (including the graphics data) would be:
Command
Data
<ESC> "*" 0 14 0
3 7 31 63 126 124 112 96 92 66 33 25 5 3
And the results would look like this:
Here is a short BASIC program that will print this figure:
10
20
30
40
50
60
70
LPRINT CHR$(27) “*” CHR$(0) CHR$(14) CHR$(0);
FOR X=1 TO 14
READ N
LPRINT CHR$(N);
NEXT X
DATA 3,7,31,63,126,124,112
DATA 96,92,66,33,25,5,3
Printing Multiple Lines of 8-Dot Graphics
You could enlarge this design in order to print multiple lines of
8-dot graphics. In the next example, you are going to print three
lines of 8-dot graphics. At the same time, you will triple the
width to 42 columns.
72
To break the previous design (Figure 6-4) into three lines of
8-dot graphics, triple the number of dots in each column and
break the design into what will look like three lines of 8 bits each.
For example: the first column of two dots will now be a column of
six dots; the second column of three dots will now be a column of
nine dots, etc.
Next, triple each column for a total of 42 columns. For example,
column 1 from the previous design will become columns 1,2, and
3; column 2 from the previous design will become columns 4,5,
and 6, etc.
In mapping out your new design, leave some space between
each of the three (8-bit) lines to total the values of each column.
When you are finished, your drawing should look like Figure 6-5.
Figure 6-5. Data layout for multiple lines of 8-dot graphics
73
Now total the values for each column of dots. These totals are
the values that are sent to the printer as graphics data for the
print design. And here is a new BASIC program to print the
design.
10 ‘*** Prints Graphics/Single-Density Mode ***
20 ’
30 ‘Set
line spacing 24/180
40 LPRINT CHR$(27) “3” CHR$(24); ‘Set line spacing 24/180
50 FOR I=1 TO 3
60 ’
70 ‘Select bit image mode
80 LPRINT CHR$(27) “*” CHR$(0) CHR$(42) CHR$(0);
90 FOR X=1 TO 42
100
READ N
110 LPRINT CHR$(N);
120 NEXT X
130
LPRINT
140 NEXT I
150 ’
160 ‘Reset line spacing to l/6-inch
170 LPRINT CHR$(27) “2”;
180 ’
190 ‘Data to print first line
200 DATA 0, 0, 0, 0, 0, 0, 0, 0, 0, 3, 3, 3, 31, 31
210 DATA 31,31,31,31,31,31,31,31,31,31,28,28,28,28
220 DATA 28,28,3,3,3,0,0,0,0,0,0,0,0,0
230 ’
240 ‘Data to print second line
250 DATA 0, 0, 0, 1, 1, 1, 127, 127, 127, 255, 255, 255, 255,
260 DATA 255,255,255,255,240,240,240,128,128,128,127,127~127,0
270 DATA 0,0,128,128,128,126,126,1,1,1,0,0,0
280 ’
290
300
310
320
‘Data
DATA
DATA
DATA
to print third line
63J63J63J255J255J255J255J255J255J255J255J255J248J248
248,192,192,192,O,0,0,O,O,O,192,192,192,56
56,56,7,7,7,7,7,7,199,199,199,63,63,63
Here’s how the program works. First, set the line spacing to
accommodate your new design. You will want the design to print
without leaving any spaces between each line of graphics. Line
40 uses the command <ESC> “3” n to select n/180-inch line
spacing. In this case, n = 24. When the line feed occurs, the paper
will be advanced 24/180-inch.
74
Lines 50 and 140 set a FOR-NEXT loop which will include
selecting the graphics option and printing the graphics data for
each of the three (8-bit) lines. Line 80 assigns the graphics option
each time one of the three lines is printed. ASCII 0 assigns S-dot,
single-density printing while ASCII decimal 42 tells the printer
the design will have 42 columns of data.
Lines 90-120 READ and LPRINT the 42 columns of data for
each line. The LPRINT statement in line 130 causes a line feed
and carriage return to occur after each line is printed. Line 170
resets the line spacing to l/6-inch (the power-on default setting).
The data in lines 200-220 correspond to the dot positions for
each of the 42 columns in the first printed line of the design.
Lines 250-270 are for the dot positions of the second printed line.
Lines 300-320 are for the third printed line.
Run the program. Your graphics design should now look like
this:
Did you have any trouble? If you did, check your commands
and be sure your data statements contain the values exactly as
they are shown in the program listing.
Using the 24-Dot Graphics Options
Up until now you have looked at the SQ-2000’s print head as
an B-dot graphics device. In reality, the SQ-2000 has 24 nozzles in
its print head, and they are all available to you when using the
24-dot graphics options.
The 24 nozzles are mapped as three 8-bit bytes stacked vertically (as shown in Figure 6-6). This means that for each nozzle
column of 24-dot graphics (as specified by n1 and n2) you must
send three bytes of graphics data.
75
Graphics data bytes
First byte
Second byte
Third byte
Print head
MSB = Most significant bit LSB = Least significant bit
Figure 6-6. Map of 24-dot graphics
Figure 6-7 shows the design used for B-dot graphics now
adapted for 24-dot graphics. In this adaptation, each dot printed
using the B-dot option will be printed as a square of nine dots
when using the 24-dot option.
Figure 6-7. Data layout for 24-dot graphics
76
Here is the BASIC program adapted for 24-dot graphics.
10 WIDTH "LPT1:",255
20 LPRINT CHR$(27) "*" CHR$(39) CHR$(42) CHR$(0);
30 FOR X=1 TO 126
40
READ N
50
LPRINT CHR$(N);
60 NEXT X
70 LPRINT
80 DATA 0,0,63,0,0,127,0,0,255,0,3,255,0,3,255,0,15,255,0,31,255
90 DATA 0,127,255,0,255,255,1,255,255,3,255,255,7,255,255,
15,255,255
100 DATA 31,255,254,31,255,252,31,255,248,31,255,240,31,2
55,224,31,255,192
110 DATA 31,255,0,31,252,0,31,240,0,31,224,0,31,1283,0,31,2
40,0
120 DATA 31,255,192,28,255,224,28,127,240,28,15,248,30,O,
252,31,0,126
130 DATA 15,128,15,7,192,7,3,24O,7,l,254,7,O,255,7,O,l27,l
35
140 DATA O,31,199,O,7,231,0,1,247,O,O,255,O,0,127,O,O,63
In this program, line 20 assigns the graphics option (24-dot
triple-density) with ASCII decimal 39. ASCII decimal 42 sets the
number of nozzle columns at 42. Lines SO-140 contain 126 bytes
of data (42 nozzle columnsX3 bytes for each nozzle column).
Lines 30-60 contain the subroutine to print the design.
The resulting design will be approximately the same size as
the original line design, but the dots will be printed much closer
together. And this is how the new design looks:
The shape is just about the same, but the density is much
greater. This design requires 126 bytes of graphics data instead of
the 14 bytes that were required using the B-dot graphics option.
Notice that the dots overlap quite a bit. This design was
printed using the triple-density 24-dot graphics option because
the density is the same (180 dots to the inch) in both directions.
Therefore, when you turned each dot of B-dot graphics into nine
dots of 24-dot graphics, the shape of the design remained
approximately the same.
77
Figure 6-8 shows the design modified to take advantage of the
higher resolution of 24-dot graphics. Notice that the curves are
smoother and the edges are less ragged. This illustrates the major
advantage of 24-dot graphics. The vertical resolution is approximately three times that of B-dot graphics which means you can
produce better-looking graphics.
Figure 6-8. Eight-dot (top) and 24-dot (bottom) versions of the density
Using the SQ-2000 as a Plotter
One of the best applications of the SQ-2000 graphics capabilities is to print graphics images. Graphics images can range from
business bar charts to computer-created art.
Since the SQ-2000 can’t move the paper in both directions, it
can’t plot a curve continuously like a pen plotter does. To print a
complete graphics image on the SQ-2000 the entire image must
be assembled in the computer’s memory and, when complete,
sent to the printer one line at a time. (Of course, if the image can
be created from the top down, it can be printed as it is created.)
In many cases, the part of the computer’s memory that stores
the image while it is being assembled is the same part of the
computer’s memory that produces the display on the screen. In
other words, the image is created on the screen of the computer
and then a screen dump is done to print the screen image on the
printer. This method is typical of many business graphics
program.
However, the SQ-2000 can print graphics with much higher
resolution than that of a computer screen. This means that using
the screen to create an image and then using the screen dump to
print it out actually limits the quality of your graphics.
Here is a short BASIC program that sets up a buffer in the
computer’s memory, creates a simple graphic image, and then
prints it on the SQ-2000 (see Figure 6-9).
78
100 ' *** SQ-2000 Plotter Program: 5-Point Star ***
110 '
120 ' Initialize
130 '
140 DIM BUFFER%(360,45)
A
150 FOR BIT = 0 TO 7 : DOT%(7 - BIT) = 2 BIT : NEXT
: Y.SCALE = 20
160 X.SCALE = 20
: Y.FACTOR = 360 /
170 X.FACTOR = 360 / X.SCALE
Y.SCALE
180 ESC$ = CHR$(27)
: LF$ = CHR$(lO)
190 '
200 ' Plot curve
210 '
220 RADIUS1 = 10
: RADIUS2 = 2
230 Xl = 20
: Yl = 10
240 DIFF = (RADIUS1 - RADIUS2)
250
FOR ANGLE = 0 TO 6.3 STEP .15
260 X2 = DIFF * COS(ANGLE) + RADIUS2 * COS(DIFF /
RADIUS2 * ANGLE) + 10
270 Y2 = DIFF X SIN(ANGL) - RADIUS2 * SIN(DIFF / R
ADIUS2 * ANGL) + 10
280 '
290 ' Draw a line from X1, Y1 to X2, Y2
300 '
310 X.LENGTH = X2 - X1
: Y.LENGTH = Y2 - Y1
320 X.STEPS = ABS(X.LENGTH * X.FACTOR)
330 Y.STEPS = ABS(Y.LENGTH * Y.FACTOR)
340 IF X.STEPS > Y.STEPS THEN STEPS = X.STEPS ELSE
STEPS = Y.STEPS
350 IF STEPS = 0 THEN 480
360 DELTA.X = X.LENGTH / STEPS
: DELTA-Y = Y.
LENGTH / STEPS
370
FOR COUNT = 0 TO STEPS
380
X1 = X1 + DELTA.X
* Y1 = Y1 + DELTA.Y
390 '
400 ' plot a point at Xl, Y1
410 '
420 X.POINT = X1 * X.FACTOR
: Y.POINT = Y1
* Y.FACTOR
430 COLUMN = INT(X.POINT)
440 ROW = INT(Y.POINT / 8)
450 BIT = INT(Y.POINT - ROW * 8)
79
460 BUFFER% (COLUMN, ROW) = BUFFER% (COLUMN, ROW)
OR DOT% (I)
470 NEXT COUNT
480 NEXT ANGLE
490 '
500 ' Print curve
510 '
520 OPEN "LPT:1" AS #1 : WIDTH #1,255
530 PRINT #1, ESC$ "3" CHR$(24);
540
FOR PRINT.LINE = 0 TO 44 STEP 3
550
PRINT #1, ESC$ "*" CHR$(39) CHR$(104) CHR$(1);
560
FOR COLUMN = 0 TO 359
FOR BYTE = 0 TO 2
570
580
PRINT #1, CHR$ (BUFFER% (COLUMN, PRINT.LINE
+ BYTE));
NEXT BYTE
590
600
NEXT COLUMN
610
PRINT #1, LF$
620
NEXT PRINT.LINE
630 PRINT #1, ESC$ "2";
640 CLOSE #1 : END
Figure 6-9. Figure produced by plotting program
80
The program explained here is an overly simplified plotting
program. It is not efficient in its use of memory, nor is it very fast.
In fact, the BASIC language itself is not very suitable for graphics
programs of a very large scale. BASIC is just not fast enough to
handle the massive amounts of data required for graphics. But
despite its drawbacks, this program contains all the elements
required, and BASIC does provide an almost universally understood format for communicating them.
First, this program allocates a section of memory to contain the
graphic image that will be created. In line 140 the DIM statement
defines the integer array BUFFER%( ). You will use each element
of this array to store one byte of graphics data. Each element of an
integer array can actually hold two bytes of graphics data, but
doing so would complicate the program. Therefore, we just have
to accept the inefficiency.
The figure that this program prints fits in an area two inches
square, and the BUFFER%( ) array uses about 32K of memory.
You can see that there is a lot of graphics data involved (even
considering the inefficiency).
Line 150 creates a vector array of the powers of two. These are
the values that are assigned to the nozzles in the print head. They
are used in creating the image in memory.
Line 160 sets the coordinate scale of the graphics image. Setting both scale factors to 20 creates a grid 20 units on a side. Line
170 calculates the relationship between the coordinate grid and
the actual dots to be printed. This program uses the 24-dot tripledensity option, so the two-inch square has 360 dots in each direction.
Line 180 assigns mnemonic variables for use in the printing
routine.
Lines 220-270 calculate the curve to be plotted. The curve that
the sample program plots is a hypocycloid. This is the shape
generated by the path of a point on a circle that is rolling around
the inside of another circle. Line 220 assigns the radii of the fixed
and rolling circles, respectively. Line 230 assigns the starting
point of the curve (you will see why this is necessary in a moment). Line 240 calculates a constant that is used in the calculations.
81
Line 250 starts a loop to calculate the points on the curve. Since
BASIC uses radian measure for angles, the value of ANGLE goes
from 0 to just over 360 degrees, slightly more than a full circle (to
ensure that there is no gap at the end). The step value must be
small enough that the curve appears smooth, and not as a series
of straight lines.
Lines 260 and 270 calculate the X and Y coordinates of each
point on the curve (X2 and Y2).
The routine in lines 310-380 creates a line between point Xl,
Yl and point X2, Y2. The routine calculates how many points
need to be plotted so that no possible points are missed. Then,
for each required point, the routine in lines 420-480 adds the
points to the image in memory.
Line 310 calculates the horizontal and vertical projected lengths
of the line. Lines 320 and 330 calculate the number of steps required in each direction so that no dots are missed. Line 340
selects the larger number of steps to use in plotting the line. Line
350 skips the rest of the routine if no steps are required.
Line 360 calculates the change in the X and Y coordinates for
each step, and line 370 starts a loop to plot the points.
Line 380 advances the position of point Xl, Yl along the line to
be plotted, using the rates of change calculated in line 360. Line
420 relates the point Xl, Yl to the actual dot coordinates. Lines
430 and 440 calculate the element in the array BUFFER%( ) that is
to be changed, and line 450 determines which bit is to be set.
Line 460 turns on a particular dot in the array in memory. The
selected element of the array is OR’ed with the value of the pin
that is to print (contained in the vector array DOT%( )). The OR
function is used to prevent problems in the case of the same dot
being set twice.
The procedure for creating printing dots is repeated for the
length of the line, and then the value of ANGLE is incremented
and the procedure is repeated until the figure is complete.
82
After the entire figure is created in the array in memory it is
sent to the printer. Since we are using a 24-dot graphics option
the procedure is slightly complicated. The array in memory is
structured just as the figure will print: array element 0,0 is the
upper left corner, 1,0 is adjacent to it on the right, and 0,l is
directly below it. But when we print the array, we must send the
array elements in “stacks” of three. Each array element contains
one byte of graphics data, and to control 24 nozzles we must send
three bytes of data to the printer. Figure 6-10 shows the order in
which we must send the array elements to the printer.
First
print line
Second
print line
Third
print line
Additional
print lines
The bold italic numbers indicate the order that the
bytes of graphics data, contained in the array
elements, are sent to the printer.
Figure 6-10. Order of array elements
The printing routine starts in line 520. This program was written on a Compaq computer, and this method of opening the
printer as a file avoids most problem codes with this computer.
Line 530 changes the line spacing to 24/180-inch so that there will
be no gaps in the printed design.
83
The program uses three nested FOR-NEXT loops to print the
graphics image. The first loop starts in line 540. It steps through
the horizontal rows of the array BUFFER%( ). The step value is 3
because we print the array three rows at a time.
Line 550 selects the triple-density 24-dot graphics option with
360 columns of graphics data. (Remember that we must send 3
bytes of graphics data for each column.)
Line 560 starts a loop that steps through each column of the
array, and line 570 starts a loop that steps through each of the
three rows that make up this print line. Line 580 sends the
selected bytes of graphics data to the printer. Lines 590 and 600
end the respective loops and line 610 sends a line feed to advance
the paper after each line is complete. Line 620 ends the outermost
loop, starting a new line.
When the entire curve is printed, lines 630 and 640 reset the
printer to l/6-inch line spacing and terminate the program.
While this program is of little practical value, it illustrates the
elements required to do plotting with the SQ-2000. We have used
a very simple curve for illustration so that it wouldn’t take too
long to run. The formulas in this program can produce some
striking designs with very slight modifications. If you are patient
enough (this will take about 20 minutes to run), make the following changes to the program:
Line 220-Make RADIUS2 = 2.2
Line 250-Make ANGLE = 0 to 70
The resulting curve will look like Figure 6-11.
Figure 6-11. Curve produced by minor change in plotting program
84
Individual Graphics Options Commands
As previously mentioned, Epson printers are upward compatible. Therefore the SQ-2000 responds to commands that are also
used with Epson FX and RX series printers. There are four individual graphics options commands that act very much the same
as the <ESC> “*” command, but each one works for only one
graphics option. Note that these commands contain one less variable than the <ESC> “*” command because they don’t need to
select a graphics option. They are shown in Table 6-2.
Table 6-2. Individual graphics options commands
Function
Command
<ESC> "*" Format
<ESC> "K"
Single-density
<ESC> "*" n1 n2 data
<ESC> "L"
Double-density
<ESC> "*" 1 n1 n2 data
<ESC> "Y"
High-speed,
double-density
<ESC> "*" 2 n1 n2 data
<ESC> "Z"
Quadruple-density
<ESC> "*" 3 n1 n2 data
Assigning Graphics Options
The SQ-2000 has a command that allows you to change the
graphics option assigned to any of the four individual graphics
options commands. The command looks like this:
<ESC> "?” s m
Where s is the letter that represents the command that you
wish to change the assignment for (i.e., K, L, Y, or Z) and m is the
number of the graphics option (from Table 5-1) that you want to
assign to it. For example, to change the <ESC> “K” command to
use the QX-10 CRT screen graphics option, the command would
look like this:
<ESC> “?" “K” 4
This is a quick way to change the aspect ratio of the design that
you are printing. Changing the graphics option will change the
width without changing the height. However, you should make
this change with caution.
If you change one of the 8-dot graphics options to a 24-dot
graphics option without changing the program that supplies the
graphics data, you will print garbage (if the program prints at all).
Remember, the 24-dot graphics options require three times as
much graphics data as the 8-dot graphics options. Moreover, the
data is arranged differently.
85
Chapter 7
Using the Hex Dump Feature
The SQ-2000 has the ability to print the hexadecimal number
of each code that it receives, instead of interpreting the codes as
characters and commands as it normally does. This is a great tool
for locating problems in programs that work with the printer.
The hex dump feature is turned on by holding down both the
LF and FF buttons while you turn the printer on. To turn it off
simply turn the printer off and back on again.
When debugging a system, a good place to start is to attempt
to print all the ASCII codes to see which ones don’t work correctly. If you are using BASIC the following program will do the
trick:
10 FOR X=0 TO 255
20 LPRINT CHR$( X);
30 NEXT X
A perfect printout using the hex dump feature will look like
Figure 7-l. Press the ON LINE button to print the last line, and
remember to put the printer back on-line before you print any
more.
Figure 7-1. Hex dump feature
87
Review the hex dump for missing codes or codes that have
been changed or added to. Typical things to look for include: an
<LF> (ASCII 0AH) added after the <CR> (ASCII 0DH) code,
<HT> (ASCII 09H) changed into a series of spaces (ASCII 20H),
or <FF> (ASCII 0CH) changed into a series of <LF> (ASCII
0AH) codes.
The program illustrated above could, of course, be written in
any language that you wish to investigate.
Beyond finding problem codes, the hex dump feature also provides a way to check which codes are actually being sent to the
printer by a program. Just turn on the hex dump feature and run
the program. Then interpret the codes that are printed out.
If you are investigating a program that uses the graphics options, be prepared for a lot of printing since each byte of graphics
data is printed in hex. This can be several pages of hex dump
numbers. You can usually stop the printer after a couple of print
lines of graphic data have been printed.
Figure 7-2 shows the hex dump printout of the first graphics
demonstration program in Chapter 6. If you study the codes you
can see the graphics option command and the graphics data,
followed by a <CR> <LF>
1B 2A 0 0 0E 0 0 0 3 0 7 1F 3F 7E 7C 7 0 6 0 5C 42
21 19 05 0 3 0D 0A
Figure 7-2. Hex dump printout of Chapter 6 graphics program
88
Chapter 8
Programming Hints
The SQ-2000 printer can be used with many different computers. However, almost all computers have some built-in quirks
that cause problems with the SQ-2000 (or any other printer, for
that matter).
We’re sure that the computer’s designers would describe these
quirks as features, because they typically solve one sort of problem-while creating another. For example, the MBASIC program, which is a widely used CP/M BASIC interpreter from
Microsoft, automatically converts the horizontal tab code
(ASCII 9) into a series of spaces to advance the print head to the
next tab position. This is handy if your printer doesn’t understand tabs, but it causes problems with a printer like the SQ-2000
that does understand tabs, and it makes it difficult to use ASCII 9
in graphics.
We will look at some of the problems that can occur on some
typical computer systems. While we can’t cover all the problems
for every computer system, we can point out some of the more
common problems and solutions. With these suggestions, and
your computer’s documentation, you can solve any problems you
have using your computer with the SQ-2000.
High level language problems
Most of the solutions that we will discuss are directed at
BASIC language interpreters. This is because high level languages tend to have more problems (or is that features?) built
into them. Lower level languages, like assembly language, usually give the programmer freedom to send any code to the printer
(but, of course, require more programming effort to do it).
89
Apple Computers
The Apple II computers present two problems when using
them with a printer like the SQ-2000. First, they can only send
seven bits of data to the printer, and second, they use the code
ASCII 9 for internal initialization of the printer routines.
The seven-bit limitation presents the largest problem, but we
have two solutions to offer. The easiest, but more expensive,
solution is to purchase a printer interface card that addresses all
eight bits. Your Epson dealer will help you with this.
The other solution is to POKE codes directly to the printer
output port on the Apple II. You can use the following routine to
do this on an Apple II Plus computer:
100 IF PEEK(49601)>127 THEN 100
110 POKE 49296,N
where N is the code that you want to send to the printer. Line
100 checks the printer’s status and line 110 sends the code to the
printer.
The Apple II used ASCII 9 to initialize the computer’s printer
routines. This code and the following character or characters are
intercepted by the printer interface card and used to change the
modes (in somewhat the same way the printer uses escape
codes). You can divert all output to the printer instead of to the
screen by sending the following lines to the printer interface
card:
PR#1
PRINT CHR$(9) "80N"
Then type anything, followed by ENTER.
The CHR$(9) “BON” directs all subsequent output to the printer, up to 80 characters per line. You can cancel this by typing:
PRINT CHR$(9) "I" or PR#0
To avoid the problem with ASCII 9 you can change the printer
initialization code to something else; this frees the ASCII 9 to go
on to the printer. This routine will change the printer initialization code to ASCII 1:
PR#1 PRINT
CHR$(9); CHR$(1)
90
TRS-80 Computers
The TRS-80 computers are not without their own set of quirks.
The TRS-80 Model I computer, for instance, does not correctly
send ASCII decimal codes 0, 10, 11, and 12 to printers like the
SQ-2000. A quick solution for TRS-80 Model I (and TRS-80 Model
III) users to avoid sending ASCII decimal 12 (Form Feed, or
<FF>) is to use its high-order counterpart ASCII decimal 140.
This is achieved by adding 128 to the problem code (128 + 12 =
140).
There are two more generic solutions for avoiding these problem codes. First, these codes can be sent directly to the printer
with POKE codes. The following routine will accomplish this:
100 IF PEEK(14312)<>63 THEN 100
110 POKE 14312,N
Line 100 checks the printer’s status by putting the program
into a continuous loop until it finds decimal 63 in memory location 14312.
With the TRS-80 Model I and TRS-80 Model III computers, you
can also modify the printer driver so that the problem codes are
sent correctly to the printer. The following printer driver was
written by Bob Boothe and reprinted with the permission of 80
Microcomputing (Wayne Green Publishers). Try the following
routine for Model I users (Model III users, see the small change
below).
10 DATA 21E837CB7E20FC211100397E32E837C9
20 READ B$: A=16571
30 FOR P-1 TO LEN(B$) STEP 2
40 B=ASC(MID$(B$,P,1)) - 48
50 IF B>9 THEN B=B - 7
60 T=ASC(MID$(B$,P + 1,1)) - 48
70 IF T>9 THEN T=T - 7
80 POKE A,B*1G + T
90 A=A+1
100 NEXT P
110 POKE 16422,187
120 POKE 16423,64
91
The program uses a machine language printer driver routine
(line 10), then tells the system where the new driver is located.
When you RUN the program, all codes (including those nasty
problem codes) are sent directly to the printer. This driver will
also work with the TRS-80 Model III with one change in line 10;
change 32E837 to D3FB.
IBM Personal Computers
There are three problems in using the IBM Personal Computer
BASIC (version 2.0) to drive a printer. First, the IBM-PC assumes
that your print line is 80 characters wide and inserts a line feed/
carriage return (<LF> <CR>) after each 80 characters you send
it. Second, it adds <LF> to each <CR> in an LPRINT statement.
And third, it will not send ASCII decimal 26 to the printer.
Here is the way to adjust the width when it is the only problem. Tell the computer that the print line is wider than 80 characters with this WIDTH statement:
WIDTH "LPT1:", 255
The extra line feed problem can be solved by using this in your
program:
OPEN "LPT1:" AS #1 : WIDTH #1, 255
The statement OPEN “LPT1:” AS #l opens the printer as a
random file and allows you to send any code. However, you must
now use PRINT #1 rather than LPRINT in your program. This
allows you to print anything, but it ignores any previous WIDTH
statements so WIDTH #l, 255 is included here.
Unfortunately, this solution won’t work with DOS 1.0 because
it can’t run a printer like a file. You may be able to get a free
update (DOS 1.05) from your dealer. Another problem with DOS
1.0 is that it doesn’t send ASCII 7 to the printer; it just sounds the
computer’s buzzer.
Sending an ASCII decimal 26 to the printer is more of a problem. We have three suggested solutions:
1. Use a machine language routine to drive the printer. The
September 1983 issue of Softalk for the IBM Personal Computer has an article describing a suitable routine.
92
2. Write a file on diskette and then use the DOS COPY command
with the /B option to send it to the printer (i.e. COPY
PRNTFILE/B PRN). Open the file for random access or the
ASCII decimal 26 may be interpreted as an end-of-file marker.
3. Buy a copy of Compaq DOS 2.1. The BASIC that comes with
this operating system has all of the features of IBM-PC BASIC,
but doesn’t have the problem with ASCII decimal 26.
QX-10 Computers
There are two problems for QX-10 computer users. The first is
sending more than 80 characters per line to the printer and the
second problem is sending the code ASCII 9 (horizontal tab).
To get the printer to accept more than 80 characters, use this
width statement (preferably at the beginning of your program):
WIDTH LPRINT 255
This will reserve extra room and a line feed (with carriage
return) will not be sent after 80 characters.
Microsoft BASIC is one of those languages that has trouble
sending the horizontal tab code (ASCII 9). It automatically converts ASCII 9 into a series of spaces to advance the print head to
the next tab position. Since the SQ-2000 understands tabs, it can
cause problems (i.e. with graphics). One way to avoid this problem is to use its high-order counterpart ASCII decimal 137. This
is achieved by adding 128 to the problem code (128 + 9 = 137).
Any problem codes you find with the QX-10 can be sent
directly to the printer with OUT statements. The following
routine will send any code (X in the routine) to the printer:
100 IF (INP(&H15) AND &HF8)<>200 THEN 100
110 OUT &H14, X
120 OUT &H17, 0 : OUT &H17, 1
93
There is another way of circumventing the ASCII 9. The OUT
command sends information directly to the printer without
going through the MBASIC operating system. A sample program
which performs this OUT routine is shown below. The program
is meant to be a subroutine that sends a 9 to the printer whenever
it is called.
500 IF INP(21) AND &H20 THEN 50 : REM check printer
status
510
520
530
540
94
OUT 20,9 : REM send a nine out printer port
OUT 23,0 : REM toggle strobe signal off
OUT 23,1 : REM toggle strobe signal on
RETURN
Appendix A
SQ-2000 Command Summary
This appendix gives a brief summary of the SQ-2000 commands (control codes). While this is a complete list of the commands, the descriptions are not complete in all cases. The complete descriptions of all the commands, including examples of
their use, can be found in the LQ-2500 Programmer’s Manual also
available from your Epson dealer.
In some cases the explanations given here describe the apparent function of the commands, rather than the actual mechanical
movements of the printer. For example, since the printer prints in
both directions, the line feed command may not actually return
the print head to the left margin if the next line prints from right
to left, but the final effect on the printed page is the same as if it
had.
The commands are organized into five logical groups: Vertical
Spacing Commands, Horizontal Spacing Commands, Character
Set Commands, Graphics Set Commands, and Miscellaneous
Commands. The function is what the printer will do when given
the proper command. The format is the correct syntax for the
ASCII code that the printer understands. This code may be expressed as a symbol, a decimal value, or a hexadecimal value
depending on the program you are using. Where n (or another
italic letter) is used as a variable, it stands for a numerical value.
A-l
Vertical Spacing Commands
Function:
Line feed
Format:
<LF>
Symbol
10
Decimal
Hexadecimal 0A
Remarks:
Returns the print head to the left margin and advances the
paper one line.
Function:
One-time n/180-inch line feed
Format:
Symbol
Decimal
Hexadecimal
<ESC>
27
1B
“J”
74
4A
n
n
n
Remarks:
Advances the paper n/180 inches. It does not execute a carriage
return (n can range from 0 to 255).
Function:
Select l/8-inch line spacing
Format:
Symbol
Decimal
Hexadecimal
<ESC> “0”
27
48
1B
30
Remarks:
Sets the line spacing for subsequent line feed commands to l/8
inch.
A-2
Vertical Spacing Commands (continued)
Function:
Select l/6-inch line spacing
Format:
Symbol
Decimal
Hexadecimal
<ESC> “2”
27
50
1B
32
Remarks:
Sets the line spacing for subsequent line feed commands to l/6
inch.
Function:
Set n/180-inch line spacing
Format:
<ESC>
Symbol
27
Decimal
Hexadecimal 1B
“3”
51
33
n
n
n
Remarks:
Sets the line spacing for subsequent line feed commands to
n/180 inch. l/180 inch is the vertical distance between dots on
the SQ-2000 (n can range from 0 to 255).
Function:
Set n/60-inch line spacing.
Format:
Symbol
<ESC>
Decimal
27
Hexadecimal 1B
“A”
65
41
n
n
n
Remarks:
Sets the line spacing for subsequent line feed commands to
n/60 inches (n can range from 0 to 85).
A-3
Vertical Spacing Commands (continued)
Function:
Form Feed
Format:
<FF>
Symbol
12
Decimal
Hexadecimal 0C
Remarks:
Advances the paper to the top of the next page.
Function:
Set page length by lines
Format:
<ESC>
Symbol
27
Decimal
Hexadecimal 1B
“C”
67
43
n
n
n
Remarks:
Sets the length of the page to n lines (n can range from 1 to 127).
Function:
Set page length by inches
Format:
Symbol
<ESC>
7
Decimal
Hexadecimal 1B
“C” <NUL> n
n
67
0
n
43
00
Remarks:
Sets the page length to n inches (n can range from 1 to 22).
Function:
Set bottom margin
Format:
ASCII
Decimal
Hexadecimal
<ESC>
27
1B
“N”
78
4E
n
n
n
Remarks:
Sets a bottom margin of n lines so that you can skip over the
perforations in pin-feed paper (n can range from 1 to 127).
A-4
Vertical Spacing Commands (continued)
Function:
Cancel bottom margin
Format:
ASCII
Decimal
Hexadecimal
<ESC>
27
1B
“0”
79
4F
Remarks:
Sets the bottom margin to 0 lines. The command uses the letter
“0”, not the number zero.
Function:
Vertical tab
Format:
ASCII
<VT>
Decimal
11
Hexadecimal 0B
Remarks:
Advances the paper to the next vertical tab position. If no
vertical tabs have been set, this code advances the paper one
line.
Function:
Set vertical tabs
Format:
ASCII
<ESC>
Decimal
27
Hexadecimal 1B
“B” n1 n2 n3 ... < N U L >
66 n1 n2 n3 ... 0
42 n1 n2 n3 ... 00
Remarks:
Sets the vertical tabs on lines n1, n2, n3, etc. You can set up to
16 vertical tab positions. The values of n1, n2, n3, etc. can range
from 1 to 254 and must be entered in ascending order.
A-5
Vertical Spacing Commands (continued)
Function:
Select a vertical tab channel
Format:
ASCII
<ESC>
Decimal
27
Hexadecimal 1B
“/”
47
2F
c
c
c
Remarks:
This command selects one of the vertical tab channels. Subsequent vertical tab codes will advance the paper to the next
vertical tab position in the selected channel (c can range from 0
to 7).
Function:
Set vertical tabs in tab channels
Format:
ASCII
<ESC>
Decimal
27
Hexadecimal 1B
“b” c n1 n2 ... < N U L >
98
c
n1
n2
...
0
62 c
n1
n2
...
00
Remarks:
Sets vertical tabs on lines n1, n2, n3, etc. of vertical tab channel
c. You can set up to 16 vertical tab positions. The values of n1,
n2, n3, etc. can range from 1 to 254 and must be entered in
ascending order (c can range from 0 to 7).
A-6
Horizontal Spacing Commands
Function:
Carriage return
Format:
<CR>
ASCII
Decimal
13
Hexadecimal OD
Remarks:
Returns the print head to the left margin. If auto-line feed is on,
paper is also advanced one line.
Function:
Set right margin
Format:
ASCII
<ESC>
Decimal
27
Hexadecimal 1B
“Q”
81
51
n
n
n
Remarks:
Sets a right margin at n character columns of the current character width. The value of n can range from 1 to 255. This command must be sent at the beginning of a line. If a line to be
printed exceeds the right margin, a carriage return and line
feed will be inserted to keep the line from exceeding the right
margin.
Function:
Set left margin
Format:
ASCII
< E S C > " 1 " n
Decimal
27
108
n
Hexadecimal 1B
49
n
Remarks:
Set the left margin at n character positions of the current character width. The value of n can range from 0 to 160, but if the
value is too large (if it results in a left margin greater than 8
inches), the command will be ignored. This command should
be placed at the beginning of a line.
A-7
Horizontal Spacing Commands (continued)
Function:
Horizontal tab
Format:
<HT>
ASCII
Decimal
9
Hexadecimal 09
Remarks:
This code advances the print head to the next horizontal tab
position. The default tab settings are every eight characters.
Function:
Set horizontal tabs
Format:
ASCII
Decimal
Hexadecimal
<ESC>
27
1B
“D” n1 n2 n3 ... < N U L >
68 n1 n2 n3 ... 0
44 n1 n2 n3 ... 00
Remarks:
Sets horizontal tabs at positions n1, n2, n3, etc. You can set up
to 32 horizontal tab positions. The values of n1, n2, n3, etc. can
range from 1 to 137 and must be entered in ascending order.
Function:
Set intercharacter space
Format:
ASCII
<ESC> <SP> n
Decimal
27
32
n
Hexadecimal 1B
20
n
Remarks:
Increases the space between characters by n dots (n can range
from 0 to 127).
A-8
Horizontal Spacing Commands (continued)
Function:
Absolute dot position
Format:
ASCII
Decimal
Hexadecimal
<ESC>
27
1B
“$”
36
24
n1
n1
n1
n2
n2
n2
Remarks:
Moves the print head to an absolute horizontal position.
The position, in inches, is determined by the formula
(n + n2 X 256)/60. The maximum position is 13.6 inches.
Function:
Move print head
Format:
ASCII
Decimal
Hexadecimal
<ESC>
27
1B
“\"
n1
92
n1
5C
n1
n2
n2
n2
Remarks:
Moves the print head a specified distance from the last charac-
ter printed. It can move the print head either left or right. The
distance, in inches, is determined by the following formulas:
(n1 + n2 x 256)/120
Draft:
(n1 + n2 x 256)/180
Letter Quality:
Proportional:
(n1 + n2 x 256)/360
To move to the left, add 64 to the calculated value for n2. The
maximum distance is 13.6 inches. The command will be
ignored if you try to move to a position outside of the current
margins.
A-9
Print Style Commands
Function:
Select print mode
Format:
ASCII
Decimal
Hexadecimal
<ESC>
27
1B
"x”
120
n
n
78
n
Remarks:
Selects between the draft mode (n = 0) and the letter quality
mode (n = 1).
Function:
Select print style (Master Select)
Format:
ASCII
<ESC>
27
Decimal
Hexadecimal 1B
"1"
33
21
n
n
n
Remarks:
Allows you to select multiple print styles (i.e., pica-italicunderlined) with one command. The value of n determines the
style selected.
Function:
Select elite width print
Format:
ASCII
Decimal
Hexadecimal
Remarks:
<ESC> “M”
27
1B
77
4D
Selects elite width (12 characters per inch) print.
A-10
Print Style Commands (continued)
Function:
Cancel elite width print
Format:
ASCII
Decimal
Hexadecimal
<ESC>
27
1B
“P”
80
50
Remarks:
Cancels elite width print and returns the SQ-2000 to pica width
print.
Function:
Proportional print on/off
Format:
<ESC> "P"
ASCII
112
Decimal
27
70
Hexadecimal 1B
n
n
n
Remarks:
This command either selects proportional print (n = 1) or cancels proportional print (n = 0).
Function:
One-line expanded width print
Format:
<SO>
ASCII
Decimal
14
Hexadecimal 0E
Remarks:
This code selects expanded width print for the remainder of
the current line (unless explicitly canceled sooner).
A-11
Print Style Commands (continued)
Function:
One-line expanded width print
Format:
ASCII
Decimal
Hexadecimal
<ESC> <SO>
27
14
1B
0E
Remarks:
This command selects expanded width print for the remainder
of the current line (unless explicitly canceled sooner). This
command is the same as <SO>.
Function:
Cancel one-line expanded width print
Format:
ASCII
<DC4>
20
Decimal
Hexadecimal 14
Remarks:
This code can be used to cancel one-line expanded width print
before the end of the line.
Function:
Expanded width print on/off
Format:
ASCII
Decimal
Hexadecimal
<ESC>
27
1B
“W”
87
57
n
n
n
Remarks :
Either turns expanded width print on (n = 1) or turns expanded width print off (n = 0).
Function:
Select compressed width print
Format:
<SI>
ASCII
15
Decimal
Hexadecimal OF
A-12
Print Style Commands (continued)
Function:
Select compressed width print
Format:
<ESC> <SI>
ASCII
15
27
Decimal
OF
Hexadecimal 1B
Function:
Cancel compressed width print
Format:
<DC2>
ASCII
18
Decimal
Hexadecimal 12
Function:
Select emphasized print
Format:
ASCII
Decimal
Hexadecimal
<ESC>
27
1B
“E”
69
45
Function:
Cancel emphasized print
Format:
ASCII
<ESC>
27
Decimal
Hexadecimal 1B
“F”
70
46
Function:
Select italic print
Format:
<ESC> “4”
ASCII
27
52
Decimal
34
Hexadecimal 1B
A-13
Print Style Commands (continued)
Function:
Cancel italic print
Format:
ASCII
Decimal
Hexadecimal
<ESC> “5”
53
27
1B
35
Remarks:
This command cancels italic printing and returns you to the
standard character set.
Function:
Underline on/off
Format:
ASCII
Decimal
Hexadecimal
<ESC> “-" n
45
n
27
1B
2D
n
Remarks:
This command turns underlining on (n = 1) or turns underlining off (n = 0).
Function:
Select superscripts or subscripts
Format:
ASCII
Decimal
Hexadecimal
<ESC>
27
1B
“S”
83
53
n
n
n
Remarks:
This command either selects superscripts (n = 0) or selects
subscripts (n = 1).
Function:
Cancel superscripts and subscripts
Format:
<ESC>
ASCII
27
Decimal
Hexadecimal 1B
A-14
“T”
84
54
Character Set Commands
Function:
User-defined character set on/off
Format:
<ESC>
ASCII
27
Decimal
Hexadecimal 1B
“%”
37
25
n
n
n
Remarks:
This command either selects the user-defined character set
(n = 1) or cancels the user-defined character set (n = 0).
Function:
Define user-defined characters
Format:
<ESC>
ASCII
27
Decimal
Hexadecimal 1B
“&”
38
26
< N U L > n1 n2
n1 n2
0
00 n1
n2
data
data
data
Remarks:
Defines user-defined characters of the currently selected style.
The function of this command is covered in the LQ-1500 Programmer’s Manual.
Function:
Copy normal character set into user-defined character set
Format:
ASCII
Decimal
Hexadecimal
<ESC> “:”
58
27
3A
1B
<NUL> <NUL> <NUL>
0
0
0
00
00
00
Remarks:
This command copies the currently active character set into the
user-defined character set.
A-15
Character Set Commands (continued)
Function:
Select international character set
Format:
ASCII
Decimal
Hexadecimal
<ESC>
27
1B
“R”
82
52
n
n
n
Remarks:
Selects one of the 11 international character sets. The following
table shows the valid values of n and the character sets selected
for each. The characters that change in the international character sets are shown below.
n
Country
U.S.A.
0
France
1
2
Germany
United Kingdom
3
Denmark
4
Sweden
5
Italy
6
7
Spain
8
Japan
9
Norway
Denmark
10
International characters
A-16
Graphics Commands
Function:
Single-density dot graphics
Format:
ASCII
Decimal
Hexadecimal
<ESC>
27
1B
“K”
75
4B
n1
n1
n1
n2
n2
n2
data
data
data
Remarks:
Prints single-density dot graphics at 60 dots per inch. The
values of n1 and n2 define the number of bytes of data according to the formula n1 + n2 X 256. Each byte of data controls the
print head nozzles in one vertical row of dots. The maximum
number of bytes of data is 816.
Function:
Double-density dot graphics
Format:
ASCII
Decimal
Hexadecimal
<ESC>
27
1B
“L”
76
4C
n1
n1
n1
n2
n2
n2
data
data
data
Remarks:
Prints double-density dot graphics at 120 dots per inch. The
values of n1 and n2 define the number of bytes of data according to the formula n1 + n2 X 256. Each byte of data controls the
print head nozzles in one vertical row of dots. The maximum
number of bytes of data is 1632.
A-17
Graphics Commands (continued)
Function:
High-speed, double-density dot graphics
Format:
<ESC>
ASCII
Decimal
27
Hexadecimal 1B
“Y"
89
59
n1
n1
n1
n2
n2
n2
data
data
data
Remarks:
Prints high-speed, double-density dot graphics at 120 dots per
inch. The values n1 and n2 define the number of bytes of data
according to the formula n1 + n2 x 256. Each byte of data controls the print head nozzles in one vertical row of dots. The
maximum number of bytes of data is 1632.
Function:
Quadruple-density dot graphics
Format:
ASCII
Decimal
Hexadecimal
<ESC>
27
1B
“Z”
90
5A
n1
n1
nl
n2
n2
n2
data
data
data
Remarks:
This function prints quadruple-density dot graphics at 240
dots per inch. The values of nl and n2 define the number of
bytes of data according to the formula nl + n2 x 256. Each byte
of data controls the print head nozzles in one vertical row of
dots. The maximum number of bytes of data is 3264.
A-18
Graphics Commands (continued)
Function:
Selected density dot graphics
Format:
ASCII
Decimal
Hexadecimal
<ESC>
27
1B
“*"
n1
42
2A
n1
n1
n2
n2
n2
data
data
data
Remarks:
Prints dot graphics in a selected density, and with either 8
nozzles or 24 nozzles. The functions of this command are covered in the LQ-1500 Programmer’s Manual.
Function:
Change dot graphics density
Format:
<ESC>
ASCII
27
Decimal
Hexadecimal 1B
"?”
63
3F
n
n
n
S
s
s
Remarks:
Assigns one of the graphics densities of the selected density
dot graphics command to any of the four other dot graphics
commands. The functions of this command are covered in the
LQ-1500 Programmer’s Manual.
A-19
Miscellaneous Commands
Function:
Delete line
Format:
<CAN>
ASCII
24
Decimal
Hexadecimal 18
Remarks:
Clears the current line from the printer’s data buffer.
Function:
Delete character
For-n-rat:
<DEL>
ASCII
127
Decimal
Hexadecimal 7F
Remarks:
Deletes the character immediately preceding it, unless that
character has already been printed.
Function:
Deselect printer
Format:
<DC3>
ASCII
19
Decimal
Hexadecimal 13
Remarks:
Places the SQ-2000 in an off-line state. It will ignore alI codes
until it receives a select printer code.
A-20
Miscellaneous Commands (continued)
Function:
Select printer
Format:
<DCl>
ASCII
17
Decimal
Hexadecimal 11
Remarks:
Returns the SQ-2000 to an on-line state. It enables the printer
to receive data again after it has been deactivated by a deselect
printer code. This code will not override the ON LINE button.
Function:
Set specified data to repeat printing
Format:
ASCII
<ESC> “V” n data <ESC> “V” <NUL>
27
86 n data
27
86
0
Decimal
56 n data
1B
56
00
Hexadecimal 1B
Remarks:
This command sequence will repeat data n times. This sequence can be nested up to five times, and the data string can
contain up to 2K characters. DIP switch l-l must be in the
down position to use this command sequence.
Function:
Set eighth-bit
Format:
ASCII
Decimal
Hexadecimal
<ESC>
27
1B
">”
62
3E
Remarks:
Sets the eighth data bit to 1.
A-21
Miscellaneous Commands (continued)
Function:
Clear eighth-bit
Format:
ASCII
Decimal
Hexadecimal
<ESC> " = "
27
61
1B
3D
Remarks:
Sets the eighth data bit to 0.
Function:
Cancel eighth-bit control
Format:
<ESC>
ASCII
27
Decimal
Hexadecimal 1B
"#"
35
23
Remarks:
Cancels control of the eighth data bit set by either the set
eighth-bit or clear eighth-bit commands.
Function:
Bell
Format:
ASCII
Decimal
Hexadecimal
<BEL>
7
7
Remarks:
Sounds the SQ-2000’s buzzer.
A-22
Miscellaneous Commands (continued)
Function:
Backspace
Format:
ASCII
Decimal
Hexadecimal
<BS>
8
8
Remarks:
Moves the print head one character to the left. This allows you
to overstrike characters. (Note that the print head doesn’t
actually move to the left, the SQ-2000 combines the two characters and prints them as one.)
Function:
Initialize printer
Format:
<ESC> “@”
ASCII
64
27
Decimal
40
Hexadecimal 1B
Remarks:
Resets the printer to the power-on state, including top of form.
Function:
Return print head to home position (one-line unidirectional
printing)
Format:
ASCII
Decimal
Hexadecimal
<ESC>
27
1B
"<"
60
3C
Remarks:
Returns the print head to the left side of the printer.
A-23
Miscellaneous Commands (continued)
Function:
Unidirectional printing on/off
Format:
<ESC>
ASCII
27
Decimal
Hexadecimal 1B
“U”
85
55
n
n
n
Remarks:
Selects unidirectional printing (n = 1) or returns the printer to
bidirectional printing (n = 0).
A-24
Appendix B
ASCII Code Conversion Chart
This chart can be used to convert between the different names
for ASCII codes. The codes from 0 to 32 have both decimal and
hexadecimal numbers, abbreviations, and the control keys used
to type them. The codes above 32 have the character that prints
instead of the abbreviation.
Decimal
0
1
2
3
4
5
6
7
8
9
10
11
12
13
14
15
16
17
18
19
20
21
22
23
24
25
26
27
28
29
30
31
32
Hexadecimal
00
01
02
03
04
05
06
07
08
09
0A
0B
0C
0D
0E
OF
10
11
12
13
14
15
16
17
18
19
1A
1B
1C
1D
1E
1F
20
Abbreviation
<NUL>
<SOH>
<STX>
<ETX>
<EOT>
<ENQ>
<ACK>
<BEL>
<BS>
<HT>
<LF>
<VT>
<FF>
<CR>
<so>
<SI>
<DLE>
<DCl>
<DC2>
<DC3>
<DC4>
<NAK>
<SYN>
<ETB>
<CAN>
<EM>
<SUB>
<ESC>
<FS>
<GS>
<RS>
<US>
<SP>
Control key
Control-@
Control-A
Control-B
Control-C
Control-D
Control-E
Control-F
Control-G
Control-H
Control-I
Control-J
Control-K
Control-L
Control-M
Control-N
Control-O
Control-P
Control-Q
Control-R
Control-S
Control-T
Control-U
Control-V
Control-W
Control-X
Control-Y
Control-Z
Control-[
B-l
Decimal
33
34
35
36
37
38
39
40
41
42
43
44
45
46
47
48
49
50
51
52
53
54
55
56
57
58
59
60
61
62
63
64
65
66
67
68
69
70
71
72
73
74
75
76
77
78
79
B-2
Hexadecimal
21
22
23
24
25
26
27
28
29
2A
2B
2C
2D
2E
2F
30
31
32
33
34
35
36
37
38
39
3A
3B
3C
3D
3E
3F
40
41
42
43
44
45
46
47
48
49
4A
4B
4C
4D
4E
4F
Character
!
"
#
$
%
&
,
(
)
*
+
'
.
/
0
1
2
3
4
5
6
7
8
9
:
;
<
=
>
?
@
A
B
C
D
E
F
G
H
I
J
K
L
M
N
O
Decimal
80
81
82
83
84
85
86
87
88
89
90
91
92
93
94
95
96
97
98
99
100
101
102
103
104
105
106
107
108
109
110
111
112
113
114
115
116
117
118
119
120
121
122
123
124
125
126
Hexadecimal Character
50
P
51
Q
52
R
53
S
54
T
55
U
56
V
57
W
58
X
59
Y
5A
Z
[
58
5C
\
5D
]
^
5E
__
5F
'
60
a
61
62
63
64
65
66
67
68
69
6A
68
6C
6D
6E
6F
70
71
72
73
74
75
76
77
78
b
c
d
e
f
79
7A
7B
7C
7D
7E
y
z
{
|
}
g
h
i
j
k
1
m
n
o
p
q
r
s
t
U
V
w
x
~
Decimal
127
128
129
130
131
132
133
134
135
136
137
138
139
140
141
142
143
Hexadecimal Character
<DEL>
7F
<NUL>
80
81
<SOH>
82
<STX>
<ETX>
83
84
<EOT>
85
<ENQ>
<ACK>
86
<BEL>
87
<BS>
88
<HT>
89
<LF>
8A
8B
<VT>
<FF>
8C
8D
<CR>
8E
<so>
<SI>
SF
Decimal
144
145
146
147
148
149
150
151
152
153
154
155
156
157
158
159
160
Hexadecimal Character
90
<DLE>
91
<DCl>
92
<DC2>
93
<DC3>
94
<DC4>
95
<NAK>
96
<SYN>
97
<ETB>
98
<CAN>
99
<EM>
100
<SUB>
101
<ESC>
102
<FS>
103
<GS>
104
<RS>
105
<US>
106
<SP>
Decimal
161
162
163
164
165
166
Hexadecimal
Al
A2
A3
A4
A5
A6
Character
,
Decimal
167
168
169
170
171
172
Hexadecimal Character
A7
A8
'
)
A9
*
AA
+
AB
AC
,
Decimal
173
174
175
176
177
178
179
180
181
182
183
184
185
186
187
188
189
190
191
192
Hexadecimal
AD
AE
AF
B0
Bl
B2
B3
B4
B5
B6
B7
B8
B9
BA
BB
BC
BD
BE
BF
C0
Character
Decimal
193
194
195
196
197
198
199
200
201
202
203
204
205
206
207
208
209
210
211
212
213
Hexadecimal
Cl
C2
C3
C4
C5
C6
C7
C8
C9
CA
CB
c c
CD
CE
CF
DO
Dl
D2
D3
D4
D5
"
#
$
%
&
.
/
0
1
2
3
4
5
6
7
8
9
:
;
<
=
>
?
@
Character
A
B
C
D
E
F
G
H
I
J
K
L
M
N
O
P
Q
R
S
T
U
B-3
Decimal
214
215
216
217
218
219
220
221
222
223
224
225
226
227
228
229
230
231
232
233
234
B-4
Hexadecimal
D6
D7
D8
D9
DA
DB
DC
DD
DE
DF
E0
El
E2
E3
E4
E5
E6
E7
E8
E9
EA
Character
V
W
x
Y
z
[
\
]
^
'
a
b
c
d
e
f
g
h
i
j
Decimal
235
236
237
238
239
240
241
242
243
244
245
246
247
248
249
250
251
252
253
254
255
Hexadecimal
EB
EC
ED
EE
EF
FO
Fl
F2
F3
F4
F5
F6
F7
F8
F9
FA
FB
FC
FD
FE
FF
Character
k
l
m
n
0
P
q
r
S
t
u
V
W
x
y
z
{
|
}
~
Appendix C
Widths of the
Proportional Characters
This table lists the widths of the SQ-2000’s proportional characters. The values given are in 360ths of an inch (for example: a
value of 36 is 36/360-inch). You may need to enter these widths
into a special table for your word processing program so that it
can calculate the number of proportional characters that will fit on
each line. The table shows: the character, its ASCII code (decimal)
and lists four widths. Figure C-l shows what each of the four
width values are for. The total width value is the only width that
you will probably need to know. The left-space, body and rightspace widths are all values that are internal to the SQ-2000.
C-l
Total width
Right-space
Body
Left-space
Figure C-l. Character Q and its widths
Proportional (normal)
c-2
Proportional (normal) (continued)
C-3
Proportional (normal) (continued)
C-4
Proportional (normal) (continued)
C-5
Proportional (superscript/subscript)
C-6
Proportional (superscript/subscript) (continued)
C-7
Proportional (superscript/subscript) (continued)
C-8
Appendix D
Setting the DIP Switches
The SQ-2000 is provided with two sets, or panels, of dual
in-line package (DIP) switches.
When these switches are preset, the printer assumes a certain
set of conditions each time it is turned on or reset.
For instance, if you usually print standard-sized business
documents, set the column DIP switches so that the printer always assumes the necessary printing area. But if you plan to do a
number of horizontal spreadsheets, the SQ-2000 allows you to
select a different page size.
Most users will find there’s little need to change the switches
from the factory settings (except in special instances).
Location of Switches
One set of DIP switches is located on the right beneath the
dust cover (see Figure D-l). These are used to change the width
of printing and allow the use of the optional cut sheet feeder.
They are referred to as the column DIP switch panel.
D-l
Figure D-1. Location of column DIP switch panel
The second set of switches, consisting of two or more groups,
is located on the interface card at the back of the printer (see
Figure D-2). The number of groups of switches depends on the
type of interface you have. Two groups are common to all interfaces and are used to select various features, such as the set of
international characters you’ll customarily use. We’ll refer to
these switches as the interface DIP switch panels.
Figure D-2. Location of interface DIP switch panels
D-2
Before You Change the Switch Settings
For DIP switch changes to have effect, you must first turn off
the printer.
Be sure to treat the switches gently. Avoid touching them with
your hands. Static charges, dirt and oil from your fingers can
harm the switches.
The switches are most easily changed with a pointed object
such as a small screwdriver or ball point pen.
On each switch panel is an arrow and the word ON to indicate
the ON position. You can also remember the settings on the
interface switches as being ON when up and OFF when down.
Warning:
The two sets of switches described here are the only ones
you should attempt to change. Do not attempt to make
changes to any other switches on the main circuit board;
changing the setting of the other DIP switches may result in
improper operation or damage to the printer.
How the DIP switches are identified
Each switch panel contains several switches, each with its own
identifying number.
Open the hinged front dust cover and look inside. The column
DIP switch panel is on the right. We’ll refer to these four switches
as SW-1 to SW-4.
Now look at the two groups of switches on the interface on the
back of the printer. These are referred to as Panel 1 (with four
switches) and Panel 2 (with eight). To identify these switches,
we’ll first use the panel number and then the switch number.
Thus, the second switch on Panel 1 is SWl-2, the third switch on
Panel 2 is SW2-3, and so on.
Column DIP Switch Panel
The first three switches of this panel (SW-l to SW-3) set the
width and shape of the printing area for a page. The fourth
switch is used with the optional cut sheet feeder.
Table D-l shows the DIP switch settings necessary to obtain
the size and shape of the different printing areas that are
possible.
Set these switches according to your needs.
D-3
Table D-l. Column DIP switch setting for printing area
Switch
Number of
SW-1 SW-2 SW-3 columns*
Width
(inch)
Paper shape and size
OFF
OFF
OFF
65
71/8
B5 vertical
OFF
OFF
ON
75
8¼
A4 horizontal
OFF
ON
OFF
78
8½
US. letter vertical
OFF
ON
ON
80
9½
ON
OFF
OFF
94
10¼
B4 vertical
ON
OFF
ON
102
11
US. letter horizontal
ON
ON
OFF
109
11¾
A3 vertical
ON
ON
ON
136
14%
B4 horizontal
SW-4
ON: When using the optional cut sheet feeder
OFF: When not using the optional cut sheet feeder
*In normal (pica) character size.
Interface DIP Switch Panels
These switches customize the printer for the type of computer
you have. As mentioned, up to four different switch panels may
be provided depending on your interface. Full details are given
in the manual that came with the interface. If you did not receive
the manual, consult your dealer. You may need it later, even if the
dealer installed the interface for you.
Here we’ll tell you how to set the two groups of switches that
are common to all interfaces.
Interface DIP switch Panel 1
The switches on Panel 1 of the interface have the functions and
settings shown in Table D-2.
Table D-2. Interface DIP switch Panel 1 settings
Switch
SWI-1
Function
2K-byte buffer
SW1 -2
Not used
SW1 -3
Automatic line
feed
SW1 -4
Control ROM
selection
D-4
ON (up)
Disabled
LF added
by printer
OFF (down)
Factory setting
Enabled
OFF
-
OFF
LF needed
from computer
OFF
See next page
OFF
SW1-1
Set this switch to OFF if you want to use the print buffer.
This switch controls the 2K-byte print buffer. When it is OFF
the buffer is used. This means information coming into the printer from the computer can be stored in the buffer until it is ready
to be processed, permitting the computer to operate more
efficiently.
When the switch is ON the buffer is disabled.
SW1-2
This switch is not used. It should always be OFF.
SW1-3
Set this switch to ON to add a line feed.
Some computers automatically cause the printer to advance
the paper one line each time a carriage return signal is received.
Others do not provide a line feed. Set this switch according to
which type of computer you have. If your computer provides the
automatic line feed, this switch should be OFF. If it does not
provide the line feed, the switch should be ON.
The user’s manual for your computer will tell you whether or
not this line feed is automatically performed. You’ll also know
when you start to print something out using your computer (but
not the printer self-test).
If you get double spacing when you want single spacing, this
means both the computer and the printer are providing a line
feed. Turn SW1-3 OFF.
If the second line overprints the first, neither the printer nor
the computer is supplying a line feed. Therefore, turn SWl-3 ON.
SW1-4
This switch is used with a special optional ROM (read only
memory) that attaches to the interface. The manual that comes
with this ROM explains how this switch should be set. If your
interface does not have the optional ROM, keep SW1-4 in the
OFF position.
D-5
Interface DIP switch Panel 2
The second interface DIP switch panel has eight switches that
select print characteristics when the SQ-2000 is turned on. Most
of the functions of these switches are duplicated by software
commands. The difference is that the software commands are
cancelled when the printer is turned off or reset. Use this panel to
set the print conditions you’ll want whenever you turn on the
printer. The software commands are explained in the separate
programming manual available from your Epson dealer.
Functions of the switches on interface DIP switch Panel 2 are
shown in Table D-3.
Table D-3. Interface DIP switch Panel 2 settings
Switch
Function
ON (up)
OFF (down)/
ON
2-l
2-2
Factory setting
International character selection
(See Table l-4)
ON
ON
2-3
2-4
Form length
12"
11"
OFF
2-5
1” skip-over
perforation
Enabled
Disabled
OFF
2-6
Buzzer
Disabled
Enabled
OFF
2-7
Print quality
LQ*
Draft**
OFF
2-8
SLCT IN signal
Fixed
Not fixed
ON
* Letter quality
** Draft: For more rapid printing in draft quality
SW2-1, SW2-2, and SW2-3
Use these three switches to select the international character
sets shown in Table D-4. Their settings are shown in Table D-5.
D-6
Table D-4. International character sets
Draft Quality
Letter Quality
Table D-5. DIP switch settings for international characters
County
SW2-1
SW2-2
SW2-3
ON
ON
ON
U.S.A (ASCII)
ON
ON
OFF
France
ON
OFF
ON
Germany
ON
OFF
OFF
England
OFF
ON
ON
Denmark
OFF
ON
OFF
Sweden
OFF
OFF
ON
Italy
OFF
OFF
OFF
Spain
D-7
SW2-4
Set the form length with this switch. ON is 12 inches; OFF is
11 inches.
When a form feed character is sent by the computer, the paper
moves to the next sheet if the optional cut sheet feeder is
attached, or to the top of the next form if the optional tractor unit
is being used. Set the switch according to the length of the sheets
or forms you are using. The form length can also be changed
temporarily under software control.
SW2-5
Set this switch to ON to automatically skip the perforations in
fanfold paper.
Set this switch to OFF when you want your printing (such as
program printouts) to be continuous and free from breaks caused
by the printer. This switch should also be set to OFF when the
word processing or other software program you are using requires complete control of the page length.
SW2-6
Set this switch to ON when you want to disable the printer
buzzer.
Set it to OFF when you want the buzzer to work.
SW2-7
When you want high-speed printing in draft quality, turn the
switch to OFF for a print speed of 176 characters per second.
Set this switch to ON for Letter Quality mode at 105 characters
per second.
SW2-8
Set this switch to ON to enable the printer upon power application.
The ON LINE light on the control panel will glow when the
printer and computer are on-line (in communication) when paper has been loaded. If this switch is not set to ON, some applications software may not operate properly.
Set this switch to OFF to allow the printer to be activated or
deactivated by the computer.
D-8
Appendix E
Using the Optional Tractor Unit
With the optional tractor unit, your printer can use continuous
paper with pin feed holes along the sides. The unit is adjustable
so that the continuous paper can be any width from 4 to 15
inches.
Printer Location
When you use the tractor and continuous paper, you must
locate your SQ-2000 so that the paper can flow freely in and out of
the printer.
Two possible arrangements are shown in Figures E-l and E-2.
Figure E-1. Continuous paper stacked below printer
E-l
Figure E-2. Continuous paper stacked behind printer
Installing the Tractor Unit
To install the removable tractor unit, first pull the printer’s
friction lever toward the front of the printer. Open the dust cover
to provide better access.
Then hold the tractor with the gears to the right as shown in
Figure E-3. Slip the tractor into the two slots on the printer.
In each tractor slot are two pegs that fit into the notches on the
tractor fittings. Tilt the tractor back so that the rear notches fit
over the rear pegs. Then tilt the unit forward until it clicks into
place. That’s all there is to it.
Figure E-3. Tractor installation
E-2
Installing the Paper Separator
Now assemble and install the paper separator as shown in
Figure E-4, inserting the separator into the slots on the back of
the printer. The separator keeps the paper that is coming out of
the printer from being pulled back in.
Figure E-4. Paper separator being assembled and installed
When you want to use single-sheet paper in your SQ-2000,
you can easily remove the tractor unit. Just push back the two
tractor release levers as shown in Figure E-5, tilt the unit up and
lift it off.
E-3
Figure E-S. Tractor release levers
Loading Continuous Paper
Once you have installed the tractor and separator, the printer
is ready to accept continuous paper.
To do this you first need to adjust the printer.
Check that the DIP switch under the dust cover (SW-4 as described in Appendix D) is in the OFF position. This switch must
be off except when the optional cut-sheet feeder is installed.
Push back the paper separator so that it’s in a raised position
on the back of the printer (see Figure E-6).
Next, pull the paper friction lever forward to move the paper
pressure bar away from the platen.
E-4
Figure E-6, Location of parts for tractor unit
The two wheels, or sprockets, on the tractor unit must be
moved to match the width of the paper you use. The paper feeds
through these sprockets using the holes near the paper’s two side
edges.
Move the left sprocket by releasing its locking lever. Place the
sprocket about a quarter of an inch from its left-most position.
Then lock it back.
Release the locking lever of the right sprocket and move it to
the place you expect the holes on the right side of the paper to
line up. Leave it unlocked for now.
Now raise the paper-holding covers on both the sprockets as
they appear in Figure E-6.
Feed the paper under the paper separator (Figure E-7) and into
the paper slot behind the platen. Push the paper through until it
comes up between the paper pressure bar and in front of the
platen.
E-5
Figure E-7. Feeding the paper into the printer
Next, pull the paper up until the top is above the pin-feed
holders. Fit the holes on the left side of the paper over the pins in
the left holder and close the cover. Now fit the right side of the
paper in the right holder, moving the holder as needed to match
the width of the paper. Close the second cover-making sure
that the paper has no dips or wrinkles-and lock the right holder
in place.
Adjust the paper guide skids on the back of the tractor so
they’re evenly spaced. The paper pressure bar should remain in
the open position and does not touch the paper.
Now you’re ready to set the top-of-page position. Turn the
paper-feed knob to advance the paper until the perforation between the first and second sheets is about l/8 of an inch below
the top of the print head as shown in Figure E-8.
E-6
Figure E-8. Top-of-page position
When you turn on your SQ-2000 it will remember this top-ofpage position and will use it when any program tells it to move to
the top of the next page. If you later find that your word processing or other applications program is putting your printing too
high or too low on the page, check to see that your top-of-page
setting is correct.
Once you have set the top of page, each time you finish printing a document, push the ON LINE button to put the printer
off-line and then push the FF button once to advance the paper.
This allows you to tear off your just-printed pages, and the paper
will be in the right position to begin the next document.
E-7
Appendix F
Specifications
Printing
Printing method . . . . . . . . . . . . . On-demand ink-jet, with 24-nozzle
print head
Printing speed ... . .............. Draft 176 characters per second Letter quality 105 characters per second
Character sets . . . . . . . . . . . . . . . . . 96 regular, 96 italic, 32 international
characters in each of: letter quality,
proportional letter quality, and draft
styles.
Character matrix . . . . . . . . . . . . .
Draft
LQ
Normal
characters
15 x 23 dots
29 x 23 dots
Super/
subscript
7x 14 dots
9x 14 dots
Column width . . . . . . . . . . . . . . . . Pica: 136 columns
Pica expanded: 68 columns
Pica emphasized: 136 columns
Pica compressed: 220 columns
Elite: 163 columns
Elite expanded: 81 columns
Elite compressed: 272 columns
Proportional: 116 columns
Line spacing . . . . . . . . . . . . . . . . . . . l/6-inch, l/S-inch or programmable
Paper types . . . . . . . . . . . . . . . . . ... Single sheet, friction feed, 7.2 to 14.3
inches wide.
Pin feed, with optional tractor unit,
5.5 to 16 inches wide.
F-l
Printer
Dimensions . . . . . . . . . . . . . . . . . . . . Height: 6.5 inches (165mm)
11.7 inches (296mm) with
sheet guide
7.5 inches (188mm) with
optional tractor unit
Width: 24.5 inches (595mm) with
knob
Depth: 15 inches (383mm)
Weight . . . . . . . . . . . . . . . . . . . . . . . . . . . . 40 lbs (18kg) (printer only)
Power required . . . . . . . . . . . . . . . Voltage: 120 VAC ± 10%
Frequency: 49.5 to 60.5 Hz
Power consumption:
60 VA maximum
40 VA typical
Environment . . . . . . . . . . . . . . . . . . . Temperature: 40 to 95F (5 to 35°C)
Humidity: 10 to 80% noncondensing
Ink cartridge . . . . . . . . . . . . . . . . . . . Black ink
Cartridge life: 3 X l06 draft characters
(depends on how frequently printer
is turned off and on)
Printer MTBF . . . . . . . . . . . . . . . . . . 5x 10⁶ lines
6
Print head MTBF . . . . . . . . . . . . . 100x 10 characters
F-2
INDEX
A
Apple II computers 90
eighth bit control 90, A-21
American Standard Code for Information Interchange (ASCII)
codes, conversion 31, B-l
Applications programs 30
ASCII codes 31, 33, B-l
Assigning graphics options 85
Automatic line feed D-4
B
Backspace 30
BASIC
common problems 89
language 33
programming hints 89
<BEL>. Sound buzzer A-22
Bidirectional printing. See Unidirectional printing.
Boldfacing 30
Border designs 64
Bottom margin A-4
<BS>. Backspace A-23
Buffer, input D-4
Buzzer 27, D-6
C
<CAN>. Delete line A-20
Care of printer 43
Carriage return
Channels. See Tabs, vertical
Character delete A-20
Character
grids 52,59,70
matrix 52, F-l
Character set 58
commands A-15
Character style selection 32, A-15
Characters
international A-16, D-6
space between 62, A-2, A-8, A-11
user-defined 53
defining 53
printing 58
widths of proportional characters C-l
G-l
Cleaning 44,46
Code
compatibility 31
conversion, ASCII B-l
problems 89
Column DIP switch panel D-l, D-3
Column width F-l
Command codes
format A-l
graphics 70, A-17
summary A-l
listed by function A-l
listed in ASCII order B - l
graphics A-17
horizontal spacing A-7
miscellaneous A-20
print style A-10
summary A-l
vertical spacing A-2
Communications 31
Compressed width print 38, A-12
cancel A-13
Computers
Apple II 90
Epson QX-10 93
IBM 92
TRS-80 91
type 29
Connecting characters 62,65
Connecting printer and computer 13
Control codes 32
defined 32
sending to printer 33
Control panel buttons
FF (form feed) 25
CLEANING 25
SHEET FEED 25
Control panel indicators
INKLOW 26
ON LINE 26
PAPER OUT 26
POWER 22
READY 26
Copying ROM to RAM 58
<CR>. Carriage return A-7
Customizing printer 14, D-l
G-2
D
<DCl>. Select printer A-21
<DC2>. Cancel compressed width A-13
<DC3>. Deselect printer A-20
<DC4>. Cancel one-line expanded print A-12
Debugging programs 87
Default values 28, A-23
Defining characters
connecting 62
explanation 53
program example 57
<DEL>. Delete character A-20
Delete line A-20
Deselect printer A-20
Design grid 64
Dimensions of printer F-2
DIP switches
handling care D-3
how identified D-3
location 14, D-l
position D-3
setting D-l
switch SW1 D-5
switch SW2 D-5
switch SW3 D-5
switch SW4 D-5, E-4
switch 2-l D-6
switch 2-2 D-6
switch 2-3 D-6
switch 2-4 25, D-6
switch 2-5 D-8
switch 2-6 27, D-8
switch 2-7 D-8
switch 2-8 D-8
warning D-3
Dirty print head 25,47
Dot graphics. See Graphics
Dot-matrix printing 51
Draft mode. See also Mode selection.
characters, 60
print matrix 52, F-l
setting 28,33,37, A-10, D-6
G-3
E
Eighth-bit control
cancel A-22
clear A-22
set A-21
Elite print style A-10
cancel 36, A-10
Emphasized print A-13
cancel A-13
Environment, specifications for F-2
Epson printers code compatibility 29
Epson QX-10 computers 93
<ESC> <SO>. *Select one-line expanded print A-12
Select compressed width print A-13
<ESC> <SI>.
Set intercharacter space A-8
<ESC> <SP>.
<ESC> “!“.
Master Select A-10
<ESC> “$“.
Absolute horizontal tab A-9
<ESC> “%“.
User-defined character set on/off A-15
Define user-defined characters A-15
<ESC> “&“.
Print graphics A-19
<ESC> “*“.
<ESC> "-“.
Underline on/off A-14
<ESC> “/”.
Select vertical tab channel A-6
Select l/8-inch line spacing A - l
<ESC> “0”.
Select l/6-inch line spacing A-3
<ESC> “2”.
<ESC> “3”.
Set n/180-inch line spacing A-3
Select italic print A-13
<ESC> “4”.
Cancel italic print A-14
<ESC> “5”.
Copy ROM characters to RAM A-15
<ESC> “:“.
<ESC> "<“.
Select one-line unidirectional printing A-23
<ESC> “=“.
Clear eighth bit A-22
Set eighth bit A-21
<ESC> “>“.
Cancel eighth-bit control A-22
<ESC> “#“.
<ESC> “?".
Change dot graphics density A-19
Initialize printer A-23
<ESC> “@“.
Set n/60-inch line spacing A-3
<ESC> “A”.
<ESC> “B”.
Set vertical tabs A-5
Set vertical tabs in channels A-6
<ESC> “b”.
<ESC> “C”.
Set page length A-4
Set horizontal tabs A-8
<ESC> “D”.
<ESC> “E”.
Select emphasized print A-13
Cancel emphasized print A-13
<ESC> “F”.
Set one-time n/180-inch line feed A-2
<ESC> “J”.
Print single-density dot graphics A-17
<ESC> “K”.
Print double-density dot graphics A-17
<ESC> “L”.
Set left margin A-7
<ESC> “1”.
Select elite width print A-10
<ESC> “M”.
Set skip-over-perforation A-4
<ESC> “N”.
Cancel skip-over-perforation A-5
<ES0 “0”.
Cancel elite width print A-10
<ESC> “P”.
Proportional printing on/off A-10
<ES0 “p”.
G-4
<ESC>
<ESC>
<ESC>
<ESC>
<ESC>
<ESC>
<ESC>
<ESC>
<ESC>
“Q”.
“R”.
“S”.
“T”.
“U”.
“V”.
“W”.
”x”.
“Y”.
Set right margin A-7
Select international character set A-16
Select superscripts or subscripts A-14
Cancel superscripts and subscripts A-14
Unidirectional printing on/off A-24
Set data to print repeatedly A-21
Expanded width print on/off A-12
Select print mode A-10
Print high-speed double-density dot
graphics A-18
<ESC> “Z”.
Print quadruple-density dot graphics A-18
<ESC> ”\,,.
Move print head A-9
Escape sequences 32
Expanded width print, one-line A-12
cancel A-12
F
Features 1
Foreign language characters. See International character set.
Form feed <FF> A-4
Forms, length of. See Page length
G
Graphics command. Also see <ESC> “*“.
syntax 70
Graphics, dot. See also Graphics Mode
24-dot options 75, 76
S-dot options 68, A-17
addressing nozzles 68
assigning options 70
changing options 85
commands 85
command syntax 70
dot columns 51, 71
hand-calculated data 71
individual option commands 85
nozzle values 69
options 70
printing method 67
printing multiple lines 72
using BASIC 35, 54, 89
using SQ-2000 as plotter 78
Graphics mode
double-density 75, A-17
high-speed double-density A-18
quadruple-density A-18
single-density 72, 74, A-17
G-5
H
Hexdump 87
Horizontal spacing commands A-17
Horizontal tabs A-8
absolute A-9
problems 93
<HT>. Horizontal tab A-8
I
IBM Personal Computer 92
Indicators 26
blinking 27
Initialize
DIP switch settings D-6
effect on user-defined characters 62
command A-23
conditions 28
sequence 28
Ink cartridge 9, 27, F-2
Ink low 27
Input buffer D-4
Installing
ink cartridge 9
interface card 11
paper feed knob 8
single-sheet paper guide 10
Intercharacter space setting. See Characters.
Interface
card 11, 30
DIP switch panels D-2, D-4
International character sets A-16, D-6
Italic print 34, A-13
cancel A-14
L
Letter quality mode. See also Mode selection.
characters 60
print matrix 52, F-l
setting 28, 33, 37, A-10, D-6
<LF>. Line feed A-2
Line feed, automatic D-4
one-time variable A-2
print matrix 52
G-6
Line spacing
types F-l
l/6-inch A-3
l/8-inch A-2
n/180-inch A-3
n/60-inch A-2
variable A-2
Loading paper 16, E-4
LQ-1500 User’s Manual A-l
M
Maintenance 43
Margin
bottom A-4
left A-7
right A-7
Master Select command 35, A-10
restrictions 36
values for 36
Matrix, character 52, F-l. See also Character, grids
Memory, of printer D-4
Microsoft BASIC 33
Miscellaneous commands A-20
Missing
codes 88
dots 47
Mixing print styles 61
Mode selection, draft/letter quality. See draft and
letter quality modes.
Move print head commands A-9, A-23
N
n/180-inch line spacing A-2, A-3
n/60-inch line spacing A-3
O
Off-line 24
On-line 24, D-8
One-time variable line feed A-2
Operation, theory of 30, 43
G-7
P
Page length
setting D-6
setting by inches A-4, D-6
setting by lines A-4
Paper
absorbency 18
feeding E-l
loading 15
position E-l
selection 18
separator E-3
test 18
types F-l
Paper-out detector 27
Parts 7
Perforation. See Skip-over-perforation.
Pica width print 38, 60
Power requirements 23, F-2
Power-on default values. See Default values.
Print buffer D-4
Print head
cleaning 44
design 43, 51
motion A-l
moving 52
MTBF F-2
Print matrix. See Character matrix.
Print mode
effect on user-defined characters 59
selection A-10
Print repeatedly A-21
Print style commands A-10
Print style
cancel emphasized 35, A-13
cancel italic 34, A-14
cancel sub/superscripts A-14
changing 35, 59
emphasized 35, A-13
italic 34, A-13
sub/superscripts A-14
Print width
cancel compressed A-13
cancel one-line expanded A-12
compressed A-13, 38
DIP switch setting D-l
elite A-10
expanded A-12
pica 60
proportional C-l
G-8
Printer
driver 30
interface card 7
location 6
MTBF F-2
parts 7
requirements 6
self-test 17
type 29
Printing
area D-3
continuous D-8
dot-matrix 51
line overflow A-24
method F-l
shape D-3
speed D-8, F-l
unidirectional A-24
Printing style selection
individual commands 33, A-10
Master Select command 35, A-10
on initialization D-6
Printing styles
draft 39, A-10
letter quality 40, A-10
proportional 34, 37, A-11, C-l
Printing user-defined characters 58
Problems
BASIC 89
printer 46
Problem codes
using the Hex dump to find 87
Programming
hints 89
introduction 30
Proportional mode
cancel A-11
characters 61
character width C-l
set A-11
values C-l
Proportional printing style 34, 36, 37,
QX-10 Computers 93
Q
G-9
R
Repeat printing A-21
Restrictions, draft style user-defined characters
Master Select 36
RAM 58, 61
ROM 58, D-4
S
Selecting
paper 18
printer location 6
Select printer A-21
Seven-bit systems, limitations 90
Self-test 17
<SI>. Compressed width print A-12
Single-sheet paper guide 10
Skip-over-perforation A-4
cancel A-5
SLCT IN signal D-6
<SO>. One-line expanded print A-11
Space, between characters. See Characters.
Special cleaning 45
Specifications. See Technical specifications.
Style selection, character. See Print style.
Sub/superscripts A-14
cancel A-14
T
Tabs
absolute horizontal A-9
channels A-6
horizontal A-8
vertical A-5
Technical specifications F-l
Temperature 6, 26, 45
Top of form A-4
Top-of-page position E-7
Tractor unit E-l
Troubleshooting 46
TRS-80 computers 91
Turning on printer 28
G-10
56, 60
U
Underline control A-14
Unidirectional printing A-24
one-line A-23
User-defined characters 53
calculating data 53
character matrix 54
control of A-15
copying ROM characters to RAM 58
defining 53
defining connecting characters 62, 65
draft style characters 60
effect of initializing 62
example program 57
letter quality style characters 60
matrix 54
mixing print styles 61
printing 58
proportional style characters 60
range of ASCII codes 56
restrictions on draft style 56, 60
vertically connecting characters 65
V
Vertical tabs
channels A-6
setting A-5
<VT>. Vertical tab A-5
w
Weight of printer F-2
Widths of proportional characters
Word processing
installing in software 29
using printer for 29
C-l
G-11
Master Select Codes
Using SQ-2000 Commands with BASIC
Most versions of BASIC use the LPRINT command and the CHR$(n) function
to send codes to the printer. In the CHR$(n) function the value n is the number of
the code that you want to send to the printer. For example, to set a right margin
at column 60, the SQ-2000 command is:
<ESC> “Q” 60
In BASIC it looks like this:
LPRINT CHR$(27) “Q” CHR$(60);
Control Codes by Function
Vertical Spacing Commands
produces a line feed.
<LF>
<ESC> ”J” n
Advances the paper n/180 inch
<ESC> “0”
Sets the line spacing to *1/8 inch.
<ESC> “2”
Sets the line spacing to l/6 inch.
<ESC> “3” n
Sets the line spacing to l/180 inch (0 n 255).
<ESC> “A” n
Sets the line spacing to n/60 inches (0 n 85).
<FF>
Produces a form feed.
<ESC> “C” n
Sets the length of the page to n lines
<ESC> “C” <NUL> n Sets the page length to n inches
<ESC> “N“ n
Sets a bottom margin of n lines
<ESC> “O”
Sets the bottom margin to 0 lines.
<VT>
Produces a vertical tab.
<ESC> “B” n1 n2 n3 ___ <NUL>
Sets up to 16 vertical tabs on lines n1, n2, n3, etc.
<ESC> “/” c
Selects a vertical tab channel
<ESC> “b” c n1 n2 n3 ... <NUL>
Sets up to 16 vertical tabs on lines n1, n2, n3, etc. of
vertical tab channel c
Horizontal Spacing Commands
<CR>
Produces a carriage return.
<ESC> “Q” n
Sets a right margin at n columns
<ESC> “1” n
Sets the left margin at n columns
<HT>
Produces a horizontal tab.
<ESC> “D”n1 n2 n3... <NUL>
Sets up to 32 horizontal tabs at character positions n1,
n2, n3, etc.
<ESC> <SP> n
Increases the space between characters by n dots
<ESC> “$” n1 n2
Moves the print head to an absolute horizontal position.
<ESC> “\” n1 n2
Moves the print head a specified distance from the last
character printed.
Print Style Commands
<ESC> “x” n
Selects between draft mode (n=0) and letter quality mode.
<ESC> “!” n
<ESC> “M”
<ESC> “P”
<ESC> “p” n
<so>
<ESC> <SO>
Selects multiple printing styles (Master Select command).
Selects elite pitch.
Cancels elite pitch.
Turns proportional printing ON (n=1) or proportional
printing OFF (n=0).
Selects one-line expanded width print.
Selects one-line expanded width print.
<DC4>
<ESC> “W” n
<SI>
<ESC> <SI>
<DC2>
<ESC> “E”
<ESC> “F”
<ESC> “4”
<ESC> “5”
<ESC> ”--” n
<ESC> “S” n
<ESC> “T”
Cancels one-line expanded print.
Turns expanded width print ON (n=1) or turns
expanded width print OFF (n=0).
Selects compressed width print.
Selects compressed width print.
Cancels compressed width print.
Selects emphasized print.
Cancels emphasized print.
Selects italic print.
Cancels italic print.
Turns underlining ON (n=1) or turns underlining
OFF (n=0).
Selects superscripts (n=0) or selects subscripts (n=l).
Cancels superscripts and subscripts.
Character Set Commands
<ESC> “%” n
Selects the user-defined character set (n=1) or cancels
the user-defined character set (n=0).
<ESC> “&” <NUL> n1 n2 data
Defines user-defined characters
<ESC> “.” <NUL> <NUL> <NUL>
Copies ROM character set to user-defined character set.
Selects international character set
<ESC> “R” n
Graphics Commands
<ESC> “K” n1 n2 data
<ESC> “L” n1 n2 data
<ESC> “Y” n1 n2 data
<ESC> “Z“ n1 n2 data
<ESC> “*” s n1 n2 data
<ESC> “?” s n
Prints single-density dot graphics.
Prints double-density dot graphics.
Prints high-speed double-density dot graphics.
Prints quadruple-density dot graphics.
prints selected-density dot graphics.
Assigns graphics densities.
Miscellaneous Commands
Cancels the current line.
<CAN>
Deletes the preceding character.
<DEL>
Turns printer to off-line state.
<DC3>
Turns printer to on-line state.
<DC1>
<ESC> “V” n data <ESC> “V” <NUL>
Repeats data, n times
<ESC> “>”
Sets the eighth data bit to 1.
<ESC> “=”
Sets the eighth data bit to 0.
<ESC> “#”
Cancels control of the eighth data bit.
Sounds the buzzer.
<BEL>
Produces a backspace.
<BS>
<ESC> “@”
Resets the printer.
Causes the next line to be printed left-to-right.
<ESC> “<”
Selects unidirectional printing (n=1) or bidirectional
<ESC> “U” n
printing (n=0).
Each print style is assigned a value to be used with the Master Select command. The Master Select command consists of <ESC> ’!” followed by a single
ASCII code. To create a Master Select code, add the values of the print styles you
want to combine.
The values of the print styles are as follows:
Elite
1
Proportional
2
4
Compressed
Emphasized
8
Expanded
32
Italic
64
Underlined
128
For example, if you want to find the code for elite emphasized italic print you
would add these values:
1
Elite
Emphasized
8
64
Italic
Master Select code
73
The Master Select Command you would use would look like this:
<ESC> “!” “I”
(I is ASCII 73)
DIP Switch Settings
Interface DIP switch Panel 1
Switch
Function
ON (up)
SW1-1 2K-byte buffer
SW1-2
Disabled
Not used
OFF
-
OFF
OFF
-
feed
Factory setting
Enabled
LF added
by printer
SW1-3 Automatic line
SW1-4
OFF (down)
LF needed
from computer
See Appendix D
Control ROM
selection
OFF
Interface DIP switch Panel 2
Switch
Function
ON (up) OFF (down)
ON
2-1
2-2
Factory setting
International character selection
ON
(See Table D-4)
2-3
ON
2-4
Form length
2-5
1" skip-over
perforation
12"
Enabled
11”
OFF
Disabled
OFF
I
2-6
Buzzer
Disabled
Enabled
OFF
2-7
Print quality
LQ*
Draft**
OFF
Fixed Not fixed
ON
2-8
* Letter quality
** Draft quality
SLCT IN signal
ASCII Code Conversion Chart
Decimal Hexadecimal Abbreviation Control key
<NUL>
Control-@
0
00
1
2
3
4
5
6
7
8
9
10
11
12
13
14
15
16
17
18
19
20
21
22
23
24
25
26
27
28
29
30
31
32
01
02
03
04
05
06
07
08
09
0A
0B
0C
0D
0E
0F
10
11
12
13
14
15
16
17
18
19
1A
18
1C
1D
1E
1F
20
<SOH>
<STX>
<ETX>
<EOT>
<ENQ>
<ACK>
<BEL>
<BS>
<HT>
<LF>
<VT>
<FF>
<CR>
<SO>
<SI>
<DLE>
<DCl>
<DC2>
<DC3>
<DC4>
<NAK>
<SYN>
<ETB>
<CAN>
<EM>
<SUB>
<ESC>
<FS>
<GS>
<RS>
<US>
<SP>
Control-A
Control-B
Control-C
Control-D
Control-E
Control-F
Control-G
Control-H
Control-I
Control-J
Control-K
Control-L
Control-M
Control-N
Control-O
Control-P
Control-Q
Control-R
Control-S
Control-T
Control-U
Control-V
Control-W
Control-X
Control-Y
Control-Z
Control-[
Dec Hex Chr
33 21 !
34 22 "
35
36
37
38
39
40
41
42
43
44
45
46
47
48
49
50
51
52
53
54
55
56
57
58
59
60
61
62
63
64
65
66
67
68
69
70
71
72
73
74
75
76
77
78
79
23
24
25
26
27
#
$
%
&
’
28
(
29 )
2A *
2B
2C
2D
2E
2F
30
31
32
33
34
35
36
37
38
39
3A
3B
3C
3D
3E
3F
40
41
42
43
44
45
46
47
48
49
4A
4B
4C
4D
4E
4F
+
,
.
/
0
1
2
3
4
5
6
7
8
9
:
;
<
=
>
?
@
A
B
C
D
E
F
G
H
I
J
K
L
M
N
O
Dec Hex Chr
80
81
82
83
84
85
86
87
88
89
90
91
92
93
94
95
96
97
98
99
100
101
102
103
104
105
106
107
108
109
110
111
112
113
114
115
116
117
118
119
120
121
122
123
124
125
126
50
51
52
53
54
55
56
57
58
59
5A
5B
5C
5D
5E
5F
60
61
62
63
64
65
66
67
68
69
6A
6B
6C
6D
6E
6F
70
71
72
73
74
75
76
77
78
79
7A
7B
7C
7D
7E
P
Q
R
S
T
U
v
W
X
Y
Z
[
\
]
^
’
a
b
c
d
e
f
g
h
i
j
k
l
m
n
0
p
q
r
s
t
u
v
w
x
y
z
(
:
)
~
Dec
127
128
129
130
131
132
133
134
135
136
137
138
139
140
141
142
143
144
145
146
147
148
149
150
151
152
153
154
155
156
157
158
159
160
Hex Chr
7F <DEL>
80 <NUL>
81 <SOH>
82
83
84
85
86
87
88
89
8A
8B
8C
8D
8E
8F
90
91
92
93
94
95
96
97
98
99
100
101
102
103
104
105
106
<STX>
<ETX>
<EOT>
<ENQ>
<ACK>
<BEL>
<BS>
<HT>
<LF>
<VT>
<FF>
<CR>
<SO>
<SI>
<DLE>
<DCl>
<DC2>
<DC3>
<DC4>
<NAK>
<SYN>
<ETB>
<CAN>
<EM>
<SUB>
<ESC>
<FS>
<GS>
<RS>
<US>
<SF>
Dec Hex
161
162
163
164
165
166
167
168
169
170
171
172
173
174
175
176
177
178
179
180
181
182
183
184
185
186
187
188
189
190
191
192
193
194
195
196
197
198
199
200
201
202
203
204
205
206
207
208
209
210
Al
A2
A3
A4
A5
A6
A7
A8
A9
AA
AB
AC
AD
AE
AF
B0
B1
B2
B3
B4
B5
B6
B7
B8
B9
BA
BB
BC
BD
BE
BF
C0
C1
C2
C3
C4
C5
C6
C7
C8
C9
CA
CB
CC
CD
CE
CF
D0
D1
D2
Chr
/
,,
#
$
%
&
'
(
)
*
+
,
-
.
/
0
1
2
3
4
5
6
7
8
9
:
;
<
=
>
?
@
A
B
C
D
E
F
G
H
I
J
K
L
M
N
O
P
Q
R
Dec
211
212
213
214
215
216
217
218
219
220
221
222
223
224
225
226
227
228
229
230
231
232
233
234
235
236
237
238
239
240
241
242
243
244
245
246
247
248
249
250
251
252
253
254
255
Hex
D3
D4
D5
D6
D7
D8
D9
DA
DB
DC
DD
DE
DF
E0
E1
E2
E3
E4
E5
E6
E7
E8
E9
EA
EB
EC
ED
EE
EF
F0
F1
F2
F3
F4
F5
F6
F7
F8
F9
FA
FB
FC
FD
FE
FF
chr
S
T
U
V
W
X
Y
Z
[
\
]
^
`
a
b
c
d
e
f
g
h
i
j
k
l
m
n
o
p
q
r
s
t
u
v
w
x
y
z
{
|
}
~
EPSON AMERICA, INC.
LIMITED WARRANTY
Epson America, Inc. hereby warrants that it will repair or replace, at its option, any
part of the Epson product with which this warranty is enclosed which proves defective
by reason of improper workmanship and/or material, without charge for parts or
labor, for a period of one (1) year. This warranty period commences on the date of
original purchase by the buyer other than for purposes of resale, and this warranty
applies only if such original purchase by the buyer was made in the United States.
To obtain service under this warranty you must return your Epson product, properly packaged in its original container or an equivalent, to the nearest authorized
Epson Service Center or the Dealer from whom the product was purchased. Any
postage, insurance and shipping costs incurred in presenting or sending your Epson
product for service are your responsibility.
The Dealer’s original bill of sale or other satisfactory proof of the date of the original buyer purchase of your Epson product must be made available to obtain service
under this warranty.
This warranty applies only if your Epson product fails to function properly under
normal use and within the manufacturer’s specifications. Batteries, as well as optional
software packages (ROMs) not contained in the original container of your Epson
product, are excluded from coverage under this warranty. This warranty does not
apply if the Epson label or logo, or the rating label or serial number, has been removed
from your Epson product, or if, in the sole opinion of Epson, your Epson product has
been damaged by faulty or leaking batteries not supplied by Epson, or by accident,
misuse, neglect, or improper packing, shipping, modification or servicing, by other
than Epson or an authorized Epson Service Center.
SOME EPSON PRODUCTS HAVE A COMPARTMENT CONTAINING
STATIC-SENSITIVE ELECTRONIC CIRCUITRY. THIS COMPARTMENT IS
CLEARLY LABELED. DO NOT OPEN IT! THIS WARRANTY WILL BECOME
VOID IF YOU ATTEMPT TO MODIFY OR ADJUST ANY ROM OR OTHER PART
OR DEVICE IN SUCH A COMPARTMENT, OR IF YOU A-I-TEMPT TO ADD OR
INSERT ANY ROM OR OTHER PART OR DEVICE. IF ANY OF THESE STEPS IS
REQUIRED, BRING YOUR EPSON PRODUCT TO AN AUTHORIZED EPSON
DEALER.
THE DURATION OF ANY IMPLIED WARRANTY OF MERCHANTABILITY,
FITNESS FOR A PARTICULAR PURPOSE, OR OTHERWISE, ON YOUR EPSON
PRODUCT SHALL BE LIMITED TO THE DURATION OF THE EXPRESS WARRAN-l-Y SET FORTH ABOVE. IN NO EVENT SHALL EPSON AMERICA, INC. OR
ITS AFFILIATES BE LIABLE FOR ANY LOSS, INCONVENIENCE OR DAMAGE
WHETHER DIRECT, INCIDENTAL, CONSEQUENTIAL OR OTHERWISE, OR
WHETHER CAUSED BY NEGLIGENCE OR OTHER FAULT RESULTING FROM
BREACH OF ANY EXPRESS OR IMPLIED WARRANTY OF MERCHANTABILITY, FITNESS FOR A PARTICULAR PURPOSE, OR OTHERWISE, WITH RESPECT TO YOUR EPSON PRODUCT EXCEPT AS SET FORTH HEREIN. SOME
STATES DO NOT ALLOW LIMITATIONS ON HOW LONG AN IMPLIED WARRANTY LASTS AND SOME STATES DO NOT ALLOW THE EXCLUSION OR
LIMITATION OF INCIDENTAL OR CONSEQUENTIAL DAMAGES, SO THE
ABOVE LIMITATIONS AND EXCLUSIONS MAY NOT APPLY TO YOU.
You may request information on how to obtain service under this warranty by
contacting the Dealer from whom your Epson product was purchased, or by contacting Epson America, Inc. at the address printed below:
Epson America, Inc.
Service Division
2780 Lomita Boulevard
Torrance, CA 90505
(213) 539-9174
This warranty gives you specific legal rights, and you may also have other rights
which vary from state to state.