1
Gigaset A180/A180 DUO / CHN / A31008-M2046-Y101-1-7619 / overview.fm / 08.01.2010
1
Gigaset A180/A180 DUO
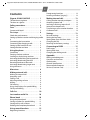
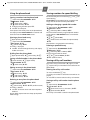
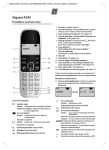
The handset at a glance
1 Display in idle mode
2 Back key
When editing text: backspace
In menu: go back to previous level
3 Internal communication key (
page 13)
4 Talk key / Redial list* (
page 10)
5 Control key
In idle mode: s open phone book, t open calls
list.
In menu, phone book and lists: Scrolling up/down
6 Star key / Ringer on/off *
7 Recall key
Consultation call (flash)
Insert pause*
8 OK key
9 Menu key (
page 7)
10 End call key / Power on/off *
11 Hash (#) key / Keypad lock on/off * (
page 7)
12 Call-by-call key * (
page 9)
13 Mute key (microphone off) (
page 9)
¢
Ò
Gigaset
1
U
1
2
8
3
9
4
10
5
¢
¢
¢
¢
¢
* To activate a function marked with an asterisk (*)
press and hold the corresponding key.
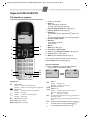
Display in idle mode
Press and hold the A key to toggle between
name/number and date/time display.
¤
11
12
13
6
7
Display icons
Ò
U
=
Radio signal
Steady:
Handset is linked with base
Flashing: Handset is out of range or not registered
Battery icon
Steady:
Full, more than1 hour talking time
Flashing: Charging
Steady:
Less than 1 hour talking time
¼
Ú Ringer is deactivated
Ø Keypad lock is activated
Flashing: Almost flat
Alarm clock is activated
Ò
Gigaset
ª
U
1
Ò
10/31
U
12-30
Talk icon
Steady:
Ongoing call
Flashing: Incoming call received
Phone book is opened
Y Calls list icon
{
Steady:
Already inspected calls in calls list
Flashing: New calls in calls list
Off:
No entry in calls list
In editing mode: Backspace. Press A to delete one
character at a time
In menu: Press A to go back to previous level or exit
menu.
| Confirm menu function or save entry with B.
In menu and lists: Scroll up/down with p.
V
In talk mode: Adjust volume with p.
W
Gigaset A180/A180 DUO / CHN / A31008-M2046-Y101-1-7619 / overview.fm / 08.01.2010
2
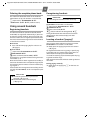
The base at a glance
¢
Registration/paging key:
Search for handsets: (press briefly, "Paging"
page 12)
Register handsets: (press and hold
page 12).
¢
Please note: Depending on the device variant the housing may vary
in colour.
Safety precautions
Disposal
All electrical and electronic products
should be disposed of separately from
the municipal waste stream via designated collection facilities appointed by
the government or the local authorities.
The correct disposal and separate collection of your old appliance will help prevent potential negative consequences for
the environment and human health. It is a
precondition for reuse and recycling of
used electrical and electronic equipment.
For more detailed information about disposal of your old appliance, please contact your local council refuse centre or the
original supplier of the product.
Read this user guide and the safety precautions carefully before use. Explain their contents and the
potential hazards associated with using the telephone to your children.
$
Only use the mains unit supplied.
¢
ƒ
Fit only the recommended, rechargeable
batteries (
page 16), i.e. never use a
conventional (non-rechargeable) battery
or other battery types as this could result
in significant health risks and personal
injury.
The operation of medical appliances may
be affected. Be aware of the technical
conditions in your particular environment, e.g. doctor's surgery.
Do not hold the rear of the handset to
your ear when it is ringing. Otherwise you
risk serious and permanent damage to
your hearing.
The handset may cause an unpleasant
humming noise in hearing aids.
Do not install the phone in a bathroom or
shower room. The handset and base station are not splashproof.
Do not use your phone in environments
with a potential explosion hazard, e.g.
paint shops.
If you give your Gigaset to someone else,
make sure you also give them the user
guide.
Please remove faulty base stations from
use or have them repaired by our service,
as they could interfere with other wireless
services.
Care
Wipe down the base station and handset with a
damp cloth (no solvents) or an antistatic cloth. Never
use a dry cloth. This can cause static.
Contact with liquid
!
If the handset should come into contact with liquid:
◆ Switch the handset off and remove the batteries
immediately.
◆ Allow the liquid to drain from the handset.
◆ Pat all parts dry, then with the battery compartment open and the keypad facing down place the
handset in a dry, warm place for at least 72 hours
(not in a microwave, oven etc.).
◆ Do not switch on the handset again until it is
completely dry.
When it has fully dried out, you will normally be able
to use it again.
Gigaset A180/A180 DUO / CHN / A31008-M2046-Y101-1-7619 / A180IVZ.fm / 08.01.2010
3
Contents
Deregistering handsets . . . . . . . . . . . . . . . . 12
Locating a handset ("paging") . . . . . . . . . . 12
Gigaset A180/A180 DUO . . . . . . . . . . 1
Making internal calls . . . . . . . . . . . . . 13
The handset at a glance . . . . . . . . . . . . . . . . . 1
The base at a glance . . . . . . . . . . . . . . . . . . . . 2
Contact with liquid . . . . . . . . . . . . . . . . . . . . . 2
Calling another internal participant . . . .
Accepting internal call . . . . . . . . . . . . . . . . .
Incoming call during internal call . . . . . . .
Internal consultation calls . . . . . . . . . . . . . .
Transferring a call to another handset . .
Conference call . . . . . . . . . . . . . . . . . . . . . . . .
First steps . . . . . . . . . . . . . . . . . . . . . . . . 4
Settings . . . . . . . . . . . . . . . . . . . . . . . . . 13
Check the pack contents . . . . . . . . . . . . . . . . 4
Setting up the base station and charging cradle
4
Connecting the base station . . . . . . . . . . . . 4
Connecting the charging cradle . . . . . . . . . 4
Setting up the handset for use . . . . . . . . . . 5
Setting the date and time . . . . . . . . . . . . . . . 6
Personal settings . . . . . . . . . . . . . . . . . . . . . .
Setting the key beep . . . . . . . . . . . . . . . . . . .
Setting date, time and alarm clock . . . . . .
Changing the PIN . . . . . . . . . . . . . . . . . . . . . .
Restoring to the factory settings . . . . . . .
Safety precautions . . . . . . . . . . . . . . . . 2
Care . . . . . . . . . . . . . . . . . . . . . . . . . . . . . . 2
Using the phone . . . . . . . . . . . . . . . . . . 7
Control key . . . . . . . . . . . . . . . . . . . . . . . . . . . . .
Entering numbers and text . . . . . . . . . . . . . .
Scrolling to display long numbers . . . . . . .
Activating/deactivating the keypad lock .
Activating/deactivating handset . . . . . . . .
Reverting handset to idle mode . . . . . . . . .
Activating/deactivating ringer tone . . . . .
Using the menu . . . . . . . . . . . . . . . . . . . . . . . . .
7
7
7
7
7
7
7
7
Menu tree . . . . . . . . . . . . . . . . . . . . . . . . 8
Making external calls . . . . . . . . . . . . . 9
Making an external call . . . . . . . . . . . . . . . . . .
Accepting a call . . . . . . . . . . . . . . . . . . . . . . . . .
Ending a call . . . . . . . . . . . . . . . . . . . . . . . . . . . .
Adjusting talking volume . . . . . . . . . . . . . . .
Muting . . . . . . . . . . . . . . . . . . . . . . . . . . . . . . . . .
Call waiting . . . . . . . . . . . . . . . . . . . . . . . . . . . . .
Using shortcut keys for speed dialling . . .
Call-by-call dialling . . . . . . . . . . . . . . . . . . . . . .
9
9
9
9
9
9
9
9
Calls list . . . . . . . . . . . . . . . . . . . . . . . . . 10
Last number redial list . . . . . . . . . . . 10
Phone book . . . . . . . . . . . . . . . . . . . . . 10
Using the phone book . . . . . . . . . . . . . . . . .
Storing numbers for speed dialling . . . . .
Storing call-by-call numbers . . . . . . . . . . . .
Deleting the complete phone book . . . .
11
11
11
12
Using several handsets . . . . . . . . . . . 12
Registering handsets . . . . . . . . . . . . . . . . . . . 12
13
13
13
13
13
13
13
14
14
14
14
Connecting to PABX . . . . . . . . . . . . . . 15
Prefix setup . . . . . . . . . . . . . . . . . . . . . . . . . . . . 15
Setting flash time . . . . . . . . . . . . . . . . . . . . . . 15
Changing the dialling mode . . . . . . . . . . . 15
Appendix . . . . . . . . . . . . . . . . . . . . . . . . 15
Writing and editing text . . . . . . . . . . . . . . . .
Questions and answers . . . . . . . . . . . . . . . .
Authorisation . . . . . . . . . . . . . . . . . . . . . . . . . .
General Specifications . . . . . . . . . . . . . . . . .
Recommended batteries . . . . . . . . . . . . . . .
Service (Customer Care) . . . . . . . . . . . . . . . .
15
15
15
16
16
16
Gigaset A180/A180 DUO / CHN / A31008-M2046-Y101-1-7619 / starting.fm / 08.01.2010
4
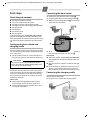
First steps
Check the pack contents
◆
◆
◆
◆
◆
◆
◆
◆
one Gigaset A180 base station
one mains adapter for base station
one Gigaset A18H handset (Gigaset A180)
two Gigaset A18H handsets (Gigaset A180 DUO)
one phone cord
two batteries
one battery cover
one user guide
If you have purchased a model with two handsets
(Gigaset A180 DUO), the package additionally contains two batteries, one battery cover and one charging cradle with power adapter for the second handset.
Connecting the base station
¤ Connect the plug from the power supply 1.
¤ Plug the power adapter into the plug socket 2.
¤ Then connect the telephone jack 3 and insert the
cables into the cable ducts.
2
1
4
1
1
Setting up the base station and
charging cradle
The base station and charging cradle are designed for
use in enclosed dry rooms with a temperature range
of +5 °C to +45 °C.
Set up the base station at a central location on a
flat, non-slip surface in your house or apartment.
¤
Please note
Pay attention to the range of the base station.
This is up to 300 m in unobstructed outdoor areas
and up to 50 m inside buildings.
The phone's feet do not usually leave any marks on
surfaces. However, due to the multitude of different
varnishes and polishes used on today's furnishings,
the occurrence of marks on the surfaces cannot be
completely ruled out.
Please note:
◆ Never expose the telephone to heat sources,
direct sunlight or other electrical appliances.
◆ Protect your Gigaset from moisture, dust, corrosive liquids and vapours.
3
1
¤ To mount the base to a wall, fix two screws on the
wall and insert the screws into the slots 4.
Please note:
◆ The mains adapter should always be connected,
as the phone will not operate without mains connection.
◆ Only use the mains adapter and phone cord supplied.
◆ Pin connections on telephone cables can vary. If
you buy a replacement phone cord, make sure
that the phone jack has the correct type of wiring.
Connecting the charging cradle
Only for Gigaset A180 DUO
Plug the mains adapter into the plug socket.
¤
Gigaset A180/A180 DUO / CHN / A31008-M2046-Y101-1-7619 / starting.fm / 08.01.2010
5
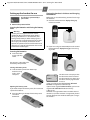
Setting up the handset for use
The display is protected by a
plastic film.
¤ Remove the protective film!
Placing the handset in the base and charging
the batteries
Before you can use the handset, you must first charge
the batteries.
Place the handset with the display facing up
in the base station.
¤
Inserting the batteries and closing the battery
cover
Warning
Use only the rechargeable batteries recommended by Gigaset Communications GmbH
(
page 16). Never use a conventional (nonrechargeable) battery or other battery types as
this could result in significant health risks and personal injury. For example, the batteries could
explode. The phone could also malfunction or be
damaged as a result of using batteries that are not
of the recommended type.
¢
Inserting the batteries
¤ If you have a Gigaset A180 DUO place the second
handset with the display facing up in the charging cradle.
¤ Insert the batteries the right way
round.
The polarity is indicated in/on
the battery compartment.
Closing the battery cover
¤ Slide the battery cover from bottom up
onto the casing
until it clicks
into place.
Opening the battery cover
If you need to open the battery cover, for instance to
replace the batteries:
¤ Press the ribbing at the top of the battery cover
and slide it
downward.
Ò
=
The idle screen is displayed. The
handset name and the internal
handset number are shown. The
Gigaset
1
handset is already registered to
the base.
In the case of Gigaset A180 DUO both delivered
handsets are registered automatically.
If you want to register further handsets, you have to
register each individual handset manually
(
page 12).
Handsets are assigned the lowest available internal
number (1-4). If four handsets are registered you will
have to deregister one handset before you can register another.
¢
Gigaset A180/A180 DUO / CHN / A31008-M2046-Y101-1-7619 / starting.fm / 08.01.2010
6
Initial charging and discharging of the
batteries
If the handset is activated, the flashing battery icon in
the top right of the display indicates that the batteries
are being charged. During handset operation, the
battery icon indicates the charge status of the batteries.
U Steady: Full, more than1 hour talking time
Flashing: Charging
= Steady: Less than 1 hour talking time
Flashing: Almost flat. Put the handset into the
charging cradle to recharge.
The correct charging level can only be displayed if the
batteries are first fully charged and discharged.
Place the handset in the charging cradle for fifteen hours.
Then remove the handset from the charging cradle and do not replace it until the batteries are
completely discharged.
¤
¤
Please note
◆ After the first battery charge and discharge
cycle you may replace your handset in the
charging cradle after every call.
◆ Always repeat the charging and discharging
procedure if you have removed the batteries
from the handset and re-insert them.
◆ The batteries may warm up during charging.
This is not dangerous.
◆ In a while, the charge capacity of the batteries
will decrease for technical reasons.
Warning
Please ensure that the handset is in the charging
cradle if you are absent for a long time (e.g. during
holidays) or remove the batteries from the handset. Else the batteries could be damaged.
Activating/deactivating the handset
¤ Press and hold the a key to activate or deacti-
vate the handset.
If you place a deactivated handset in the base station
or charging cradle, it will automatically activate.
Handset out of range
If the handset is out of range of the base station/
charger the antenna icon Ò will flash on the display.
If the signal becomes poor during a call the earpiece
will briefly intermit voice transmission by emitting an
out of range warning tone. In this case you should
reduce the distance to the base station. If the signal
becomes too low the line is disconnected.
Setting the date and time
Set the date and time so that the correct date and
time can be assigned to incoming calls and the alarm
can be used.
f ¢CLOCK/ALARM ¢|
¢ DATE&TIME¢|
¢~ (enter date: MM/DD) ¢|
¢~ (enter time: HH:MM, 24hrs format) ¢|
¤ Use { as backspace.
Your phone is now ready for use.
If you have any questions about using your phone,
please read the tips on troubleshooting ("Writing and
editing text"
page 15) or contact our Customer
Care team
page 16.
¢
¢
Gigaset A180/A180 DUO / CHN / A31008-M2046-Y101-1-7619 / using.fm / 08.01.2010
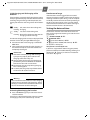
7
Using the phone
Activating/deactivating handset
Control key
Precondition: handset is in idle mode.
Press and hold a for at least 5 seconds to power
off the handset.
Press and hold a again to reactivate the handset.
In idle mode
t Open the calls list.
s Open the phone book.
In menu and lists
p Scroll up/down line by line.
In input fields
t Move to previous character.
s Move to next character.
During a call
p Adjust the earpiece volume.
Entering numbers and text
¤ Enter digits or letters using the keypad ~.
You will find information on multiple line input in the
appendix to this user guide, ¢ page 15.
When entering the time and date etc.:
Overwrite the highlighted (flashing) character.
¤
Correcting incorrect entries
In editing mode the display shows { in the lower
left corner.
To correct incorrect characters when editing:
Press the { key A to delete the character to
the left of the cursor.
Insert new characters at the cursor position.
¤
¤
Reverting handset to idle mode
To revert the handset to idle mode during menu
operation or in lists:
Press a.
Changes that you have not confirmed or saved will be
lost.
If no key is pressed for more than 60 seconds the
handset will automatically return to idle mode.
¤
Activating/deactivating ringer tone
To switch the ringer off:
Press and hold * to turn off the ringer tone.
The Ú icon appears in the display when the
ringer is deactivated.
Press and hold * once again to reactivate the
ringer.
You can adjust the ringer volume (
page 13).
¤
¤
¤
¤
Using the menu
Scrolling to display long numbers
¤
¤
The display indicates a phone number which is longer
than 12 digits by displaying  and à left and right to
the number.
To display the additional digits press B.
¤
Activating/deactivating the keypad
lock
¤ Press and hold # to activate the keypad lock.
The Ø icon appears in the display when the keypad lock is activated.
Press and hold # again to reactivate the keypad.
The keypad lock is deactivated automatically if someone calls you or if paging is activated. It is reactivated
when the call is finished.
¤
¢
Your phone has an extensive range of features. These
are offered in the form of menus. The menu tree is
available via the handset.
Precondition: handset is in idle mode.
To open the menu, press the f key.
Use the p key to scroll to the function you require
During menu operation the display shows { on the
lower left corner and | on the right corner indicating that the corresponding keys are activated.
|: Press B to confirm your selection.
{: Press A to go back to the previous level or to
exit the menu.
To return to idle mode: press the a key.
¤
Gigaset A180/A180 DUO / CHN / A31008-M2046-Y101-1-7619 / menuetree.fm / 08.01.2010
8
Menu tree
PHONEBOOK
NEW ENTRY
LIST ENTRY
EDIT ENTRY
DELETE ENTRY
DELETE ALL
CALL BY CALL
SPEED DIAL
PERSONAL SET
HANDSET NAME
HANDSET TONE
AUTO ANSWER
CLOCK/ALARM
ADVANCED SET
DATE&TIME
¢ page 11
¢ page 11
¢ page 11
¢ page 11
¢ page 12
¢ page 11
KEY 1
KEY 2
¢ page 13
RING VOLUME
RINGER OFF
LEVEL 1
...
LEVEL 4
RING TONES
MELODY 1
...
MELODY 10
KEY BEEP
ON
OFF
ON
OFF
¢ page 14
ALARM
OFF
ON ONCE
ON DAILY
ALARM TONE
MELODY 1
MELODY 2
MELODY 3
CHANGE PIN
REGISTRATION
UNREGISTER
¢ page 11
¢ page 14
¢ page 12
¢ page 12
RESET
HANDSET
BASE
AUTO PREFIX
ON
OFF
FLASH TIME
SHORT
MEDIUM
LONG
DIAL MODE
TONE
PULSE
¢ page 14
¢ page 14
¢ page 14
¢ page 14
¢ page 14
¢ page 15
¢ page 15
¢ page 15
¢ page 13
¢ page 13
¢ page 14
Gigaset A180/A180 DUO / CHN / A31008-M2046-Y101-1-7619 / main.fm / 08.01.2010
9
Making external calls
Call waiting
Making an external call
A second incoming call arriving during another call is
indicated by an acoustic signal. CLI information is displayed if available. The call is stored in the calls list,
page 10.
External calls are calls using the public telephone network.
~ (enter number in idle mode) c
or
c (activate talk mode) ~ (enter number)
The phone number is dialled.
To cancel the dialling press a.
The call duration is shown on the display in seconds.
¢
¤
¢
Please note
Dialling using phone book (
page 10), redial
list (
page 10), calls list (
page 10) or speed
dialling (
page 9) saves you from having to reenter numbers and network provider prefixes.
¢
¢
¢
¢
¢
Answering a waiting call
(provider dependent)
This function is only available if supported by your
provider.
Press Z
to release the active call and to
answer the waiting call. The waiting call becomes
the active call.
Press Z2 to put the first active call on hold
and answer the waiting call.
Press Z2 again, to toggle between the 2 callers.
¤
¤
¤
Ignoring the waiting call
Accepting a call
The waiting call is automatically refused after 40 seconds.
An incoming call is indicated by ringing and by flashing of the ª and the Y icon on the display.
To accept an incoming call press c.
If the handset is in the charging cradle and the AUTO
ANSWER function is activated (
page 14), the
handset will take a call automatically when you lift it
from the cradle.
You can adjust the ringer volume, (
page 13) or
completely deactivate the ringer (
page 7).
Call duration is shown on the display in the format:
HH--MM--SS.
Using shortcut keys for speed dialling
¤
¢
¢
¢
Ending a call
¤ Press a or replace the handset into the charging
cradle.
The call duration is shown on the display in the
format: HH--MM--SS.
Adjusting talking volume
There are 3 levels of earpiece volume (default: LEVEL
2). You can adjust the earpiece volume during a call.
Press p to increase/decrease the volume.
The current setting is shown on the display.
¤
Muting
You can mute your phone when making external
calls. The microphone is deactivated so that your conversational partner can no longer hear you.
To deactivate the microphone press C.
MUTE ON appears on the display when the microphone is deactivated.
¤
You can use key and 2 as shortcut keys.
Precondition: The keys must be set up for speed dialling,
page 11.
Press and hold key or key 2.
The number stored on the related key for speed dialling is dialled immediately.
¤
¢
Call-by-call dialling
You can use a call-by-call number stored in the phone
book to economically make international calls.
Precondition: The call-by-call number is stored in the
phone book,
page 11.
¢
In idle mode:
~ (enter IDD (International Direct Dial) number)
press and hold Q.
Your Gigaset A180/A180 DUO will automatically pick
the line and add the call-by-call number stored in the
phone book as a prefix to the IDD phone number.
¢
In talk mode:
c (activate talk mode) press and hold Q
The service provider is called. You will hear an
announcement of your the provider.
~ Enter the IDD number.
You can also use the Q key for dialling the call-bycall number from phone book, calls list, or redial list.
The prefix function (
page 15) is disabled when
using IP dialling.
¢
¢
¢
Gigaset A180/A180 DUO / CHN / A31008-M2046-Y101-1-7619 / main.fm / 08.01.2010
10
Calls list
Last number redial list
The calls list stores incoming calls: name, number,
time stamp (max. 20 calls).
Precondition: CLI is available.
The Y icon appears on the display when there
are any entries in the calls list. The Y icon blinks if
there is a new entry.
The last number redial list contains the ten numbers
last dialled. Maximum: 24 digits, including Pause (P), *
and #.
Calling Line Identification (CLI)
CLI is a telephone service that transmits a caller's
number and possibly an associated name to the
called party's telephone equipment.
Precondition:
1 You network provider enables to display the caller's number (CLIP) or name (CNIP).
2 The caller has asked the network provider for his
number to be identified.
When you get a call, the
Ò Y U caller's number will be displayed. The caller's name will
PETER
be displayed if it is stored in
the phone book or if CNIP
(Calling Name Identification
Presentation) has been requested. An incoming call
without CLI is indicated as UNKNOWN.
Viewing the calls list
t (open calls list)
¢p (scroll through calls list entries, select entry)
¢| (view details: number)
¢| (view details: date/time)
¤ Press { to return to idle mode.
Dialling with the calls list
t (open calls list) ¢p (select entry) ¢c
Storing a calls list entry into the phone book
t (open calls list) ¢p (select entry)
¢f ¢SAVE NUMBER ¢|
¢~ (enter name) ¢|
Deleting an entry from the calls list
t (open calls list) ¢p (select entry)
¢f ¢DELETE ¢press and hold |
Deleting the calls list
t (enter calls list) ¢f ¢DELETE ALL
¢|¢| (confirm action)
Viewing the redial list
¤ Press and hold c.
¢p (scroll through redial list)
The display shows the last stored number in redial list.
If the entry matches an entry in the phone book, the
name is shown.
To display the hidden digits of a long entry press
|.
¤
Dialling from the redial list
p (scroll to the desired redial list entry)¢ c
Storing the redial number into the phone
book
p (scroll to the desired redial list entry)
¢f ¢SAVE NUMBER¢|
~ (enter name) ¢|
Delete a number from the redial list
p (scroll to the desired redial list entry)
¢f¢DELETE ENTRY ¢|
¢| (confirm action)
Deleting the redial list
Press and hold c
¢f
¢DELETE ALL¢|¢|
Phone book
In the handset’s phone book you can store up to 50
phone numbers and corresponding names. Maximum: 24 digits, 12 characters.
To access the phone book use the menu.
¤
f ¢ PHONEBOOK
NEW ENTRY
Save new phone number.
LIST ENTRY
List all stored numbers.
EDIT ENTRY
Edit selected entry.
DELETE ENTRY Delete selected entry.
DELETE ALL
Delete all entries in phone book.
CALL BY CALL
Enter call-by-call number
SPEED DIAL
For shortcuts, assign the current
entry to a key.
Gigaset A180/A180 DUO / CHN / A31008-M2046-Y101-1-7619 / main.fm / 08.01.2010
11
Using the phone book
Storing a number into the phone book
f (open menu)¢PHONEBOOK ¢|
¢NEW ENTRY ¢|
¢~ (enter name) ¢|
¢~ (enter number) ¢|
¤ To display long numbers press |.
¤ Use { as backspace.
If the input name already exists in the phone book,
the display shows DOUBLE NAME for 2 seconds and
then returns to the ENTER NAME screen.
Viewing a phone book entry
s (open phone book) or
f (open menu)¢PHONEBOOK
¢LIST ENTRY ¢|
¢p (select entry)¢|
The entry is displayed.
Use | to scroll through the entry and display
hidden characters.
¤
Dialling from the phone book
s (open phone book) ¢p (select entry) ¢c
Saving a dialled number in the phone book
~ (enter number) ¢f (open menu)
¢SAVE NUMBER ¢|
¢~ (enter name)¢|
Editing an entry in the phone book
f (open menu)¢PHONEBOOK ¢|
¢EDIT ENTRY ¢|
¢p (select entry) ¢|
¢~ (edit name) ¢|
¢~ (edit number) ¢|
Deleting an entry from the phone book
f (open menu)¢PHONEBOOK ¢|
¢DELETE ENTRY ¢|
¢p (select entry) ¢|¢| (confirm action)
The entry is deleted.
Use { to discard action and return to phone
book list.
Please delete expired entries to keep up the phone
book storage.
¤
Storing numbers for speed dialling
On the handset you can use the keys and 2 for
speed dialling.
Precondition: the number(s) to be assigned to the
key(s) must be contained in the phone book.
Adding or changing a speed dial number
f (open menu) ¢PHONEBOOK ¢|
¢SPEED DIAL ¢|
¢p (select key: KEY 1 or KEY 2)¢|
The name of the currently assigned phone number
will be shown or NO NUMBER if there is no number
assigned.
f p (select ADD)
p (choose name or number from phone book)
¢ ¢
¢
¢|
The number is assigned to the selected key.
Deleting a speed dial entry
f (open menu)¢PHONEBOOK ¢|
¢SPEED DIAL ¢|
¢p (select key: KEY 1 or KEY 2)¢|
The current name will be shown.
f p (select DELETE) |
| (confirm action)
¢ ¢
¢
¢
Storing call-by-call numbers
¢
To use the call-by-call function (
page 9) via the
Q key the call-by-call number must be stored in the
phone book.
Viewing the call-by-call number
¤ Press and hold the Q key.
If a call-by-call number is stored the name will be displayed.
Press | to view or edit the call-by-call number.
¤
Storing a call-by-call number into the phone
book
f (open menu)¢PHONEBOOK ¢|
¢CALL BY CALL ¢|
¢~ (enter name: max. 12 characters) ¢|
¢~ (enter number)¢|
The call-by-call number is stored in the phone book.
Gigaset A180/A180 DUO / CHN / A31008-M2046-Y101-1-7619 / main.fm / 08.01.2010
12
Deleting the complete phone book
This action will delete the entries in the handset’s
phone book. call-by-call numbers are not deleted.
f (open menu) PHONEBOOK |
DELETE ALL
| | (confirm action)
¢
¢ ¢
¢
¢
Using several handsets
Registering handsets
The delivered handsets (one for A180 and two for
A180 DUO) are registered automatically. If you want
to connect a further handset, you must register it to
the base station. You can register up to four handsets.
You must initiate handset registration on the handset
and on the base station.
On the base
Press and hold the paging key for at least 5 sec
(
page 2).
¤
¢
On the handset
f (open menu)
¢ADVANCED SET ¢|
¢REGISTRATION¢|
~ (enter current PIN, default: 0000) ¢|
The handset is assigned the lowest unassigned internal number (1–4).
Once the handset has been registered successfully, it
returns to idle mode. The name (default: Gigaset) and
the handset’s internal number is shown in the display,
e.g. Gigaset 1.
If the handset was not registered successfully, the display will show PLS REG H/S. In this case repeat the procedure.
Please note
◆ The default system PIN may have been
changed, (
¢ page 14).
◆ The handset name can be changed,
(
¢ page 13).
Deregistering handsets
Please note
Do not deregister handsets unless necessary!
Precondition: the handset is in idle mode.
f (open menu) ADVANCED SET |
¢
¢
¢UNREGISTER¢|
~ (enter current PIN)¢|
¢p (select handset to be deregistered) ¢f
A long confirmation tone indicates the successful
deregistration. The handset display will show
PLS REG H/S.
Locating a handset ("paging")
You can locate the handsets using the base station.
Precondition: base station is in idle mode.
Briefly press the paging key on the base station
(
page 2).
All registered handsets will ring using a specific paging melody. This also applies if the ringer tones are
deactivated. The displays will show BASE 0.
In case of an incoming call, the handset quits the paging mode and then rings.
After 30 seconds handset and base station go back to
idle mode.
¤
¢
Ending paging manually
Briefly press the paging key Ë on the base station again.
¤
Gigaset A180/A180 DUO / CHN / A31008-M2046-Y101-1-7619 / main.fm / 08.01.2010
13
Making internal calls
Internal calls are free calls to other handsets that are
registered to the same base station or to the base station itself.
Calling another internal participant
k¢~ (enter internal number of participant)
1-4 = handset number, * = all
Accepting internal call
¤ To answer the call press c.
¤ To end the call, press a.
If an internal participant presses the end call key a,
the other handset remains connected to the external
participant.
Settings
Your handset is preconfigured, but you can change
the settings to suit your individual requirements.
Personal settings
¤ To change the handset settings use the menu.
f ¢ PERSONAL SET
HANDSET NAME
Change handset name.
Incoming call during internal call
HANDSET TONE
Change ringer volume, ringer
melody and key beep.
An incoming call is indicated by an acoustic signal.
c (answer external call, end internal call) or
k (hold internal call, accept external call)
k(start conference)
AUTO ANSWER
Activate/deactivate auto answer.
¢
Internal consultation calls
When you are speaking to an external participant,
you can call an internal participant at the same time
for consultation.
Press and hold k (put external call on hold)
k ~ (enter internal number of participant)
You are connected with the internal participant.
k (toggle between internal and external participant)
¢
Transferring a call to another handset
You can transfer an external call to another handset.
k (put external call on hold)
k ~ (enter internal number of participant)
You are connected with the internal participant.
a (transfer external call to internal participant)
¢
Conference call
When you are speaking to an external participant, an
internal caller can listen in on this call and take part in
a conference call.
Starting a conference call
k (put external call on hold)
k¢~ (enter internal number of participant)
You are connected with the internal participant.
Press and hold k (start conference)
Ending a conference call
¤ Press the end call key a.
Changing the handset name
You can change the default name of the handset
(default: Gigaset). Maximum characters: 10.
f ¢PERSONAL SET ¢|
¢HANDSET NAME¢|
The current name is shown, last character flashing.
Use { as backspace.
~ (enter name) |
You will find information on editing text in the appendix to this user guide,
page 15.
¤
¢
¢
Changing the ringer volume
You can choose between 5 sound levels for the ringer
volume; LEVEL 1 – LEVEL 4 and RINGER OFF
(default: LEVEL 2).
f ¢PERSONAL SET ¢|
¢HANDSET TONE¢|
¢RING VOLUME¢|
The currently set ringer melody is played with current
volume.
p (select volume level) |
If the ringer is deactivated, the Ú icon appears in
the display. The handset will ring at LEVEL 2 when its
base is paging it.
You can also deactivate the ringer completely using
the * key.
¢
¢
Changing the ringer melody
You can choose between 10 ringer melodies
(default: MELODY 1).
f ¢PERSONAL SET ¢|
¢HANDSET TONE¢|
¢RING TONES¢|
¢p (select melody)
The selected melody is played.
To confirm a selected melody
¤
¢|
Gigaset A180/A180 DUO / CHN / A31008-M2046-Y101-1-7619 / main.fm / 08.01.2010
14
Setting the key beep
Setting the alarm melody
Your telephone will beep whenever a key on the
handset is pressed. You can deactivate this acoustical
signal (default: ON).
f ¢PERSONAL SET ¢|¢HANDSET
TONE¢|
¢KEY BEEP¢|
¢p (select ON or OFF) ¢|
Activating/deactivating auto answer
If you activate this function, when you receive a call
you can simply lift the handset out of the charging
cradle without having to press the talk key c.
f ¢PERSONAL SET ¢|¢AUTO
ANSWER¢|
¢p (select ON or OFF) ¢|
Setting date, time and alarm clock
f ¢ CLOCK/ALARM
DATE&TIME
Set date and time.
ALARM
Set an alarm clock.
ALARM TONE
Set a melody for the alarm clock.
Setting date and time
f ¢CLOCK/ALARM ¢|
¢ DATE&TIME¢|
¢~ (enter date: MM/DD) ¢|
¢~ (enter time: HH:MM, 24hrs format) ¢|
¤ Use { as backspace.
Setting the alarm clock
You can set an alarm clock on the handset.
Precondition: The date and time have already been
set, see above.
An alarm will sound for 1 minute at the set time once
or daily.
f ¢CLOCK/ALARM ¢|¢ALARM¢|
¢p (select ON ONCE or ON DAILY or OFF) ¢|
If you select ON ONCE or ON DAILY
~ (enter time: HH-MM, 24hr format) |
Use { as backspace.
If the alarm is activated, the ¼ icon appears in the
display. During the alarm --ALARM-- is flashing on the
display.
To cut off the alarm press any key on the keypad.
¤
¤
¢
You can choose from 3 alarm melodies (default:
MELODY 1).
f ¢CLOCK/ALARM ¢|¢ALARM
¢|
¢p (select melody)
TONE
The selected melody is played.
To confirm a selected melody
¤
¢|
Changing the PIN
The base station is protected via PIN against unauthorised handset registration. You can change the
preset PIN via menu.
f ¢ADVANCED SET ¢|¢CHANGE
PIN¢|
¢~ (enter current PIN, default: 0000) ¢|
¢~ (enter new PIN: 0 to 9 digits) ¢|
¤ Use { as backspace.
Please note
¤ If you have forgotten the PIN reset the base
unit to the factory settings to reset the PIN to
default setting 0000, ¢ page 14.
Restoring to the factory settings
You can reset any individual settings and changes
that you have made.
Phone book and calls list entries are not affected.
After restoring the base, handsets are not affected.
Precondition: handset and base are in idle mode.
Restoring the base
f ¢ADVANCED SET ¢| ¢RESET¢|
¢p (select BASE) ¢|¢|
Restoring the handset
f ¢ADVANCED SET ¢|¢RESET¢|
¢p (select HANDSET) ¢|¢|
Precondition: the handset is in idle mode.
Gigaset A180/A180 DUO / CHN / A31008-M2046-Y101-1-7619 / main.fm / 08.01.2010
15
Connecting to PABX
Appendix
Your phone is preset at the factory for operation on
the main connection. For operation on a PABX, you
may have to change the following values. Please refer
to the user guide for your PABX.
To change the handset settings use the menu.
Writing and editing text
AUTO PREFIX
Set a prefix for dialling outside line.
FLASH TIME
Change the flash time.
The following rules apply when writing text:
◆ Control the cursor with p.
◆ Characters are inserted on the left of the cursor.
◆ The first letter of the name of phone book entries
is automatically capitalised.
Press the relevant key several times to enter letters/
characters.
DIAL MODE
Change the dial mode.
Standard characters on the handset
¤
f ¢ ADVANCED SET
Prefix setup
You can set a prefix which is automatically added to a
phone number with at least 5 digits. This prefix can be
used to dial into the outside line when operating the
device on a PABX.
Precondition: The number must be dialled in idle
mode, i.e. first ~ then ª.
f ¢ADVANCED SET ¢|
¢AUTO PREFIX¢|
¢p (select ON or OFF) ¢|
~ (enter prefix, max. 5 digits) ¢|
¤ To enter a pause in the prefix press and hold Z.
The pause may be needed to obtain the outside line
before proceeding dialling. Pause duration is one second by default.
Example: Prefix is ON and set to 65
You dial
Really dialled number
1234
12345
#12345
1234
65P12345
65P#12345
Setting flash time
Flash time is the time used to identify a signal of the
flash key (S). On your device it is set to 100 ms and
may be different on your PABX.
You can set the flash time to 100 (SHORT), 300
(MEDIUM) or 600 (LONG) ms. (Default: SHORT)
¢f ¢ADVANCED SET ¢|
¢FLASH TIME ¢|
¢p (select SHORT, MEDIUM or LONG) ¢|
Changing the dialling mode
There are two dialling modes: TONE (Touch tone dialling - DTMF) and PULSE (dial pulsing - DP)
(Default: TONE)
It may be different on your PABX and can be changed:
f ¢ADVANCED SET ¢|
¢DIAL MODE ¢|
¢p (select PULSE or TONE) ¢|
2
3
4
5
L
M
N
O
Q
*
#
1x
2x
1
3x
_
4x
<
5x
>
6x
A
B
C
2
A
B
D
E
F
3
D
E
G
H
I
4
G
H
J
K
L
5
J
K
M
N
O
6
M
N
P
Q
R
S
7
P
T
U
V
8
?
T
W
X
Y
Z
9
W
0
--
/
\
#
+
2)
*
*
*
*
*
*
2)
#
#
#
#
#
#
1)
1)
1)Space
2)without effect when entering names
Questions and answers
If you have any questions about using your phone,
visit us at
www.gigaset.com/customercare at any time.
Authorisation
This device is intended for connection to analogue
networks outside the EEA (with the exception of Switzerland) depending on national type approval.
Country-specific requirements have been taken into
consideration.
We, Gigaset Communications GmbH, declare that this
device meets the essential requirements and other
relevant regulations laid down in Directive 1999/5/
CE.
A copy of the 1999/5/EC Declaration of Conformity is
available at this Internet address:
http://www.gigaset.com/docs.
Gigaset A180/A180 DUO / CHN / A31008-M2046-Y101-1-7619 / main.fm / 08.01.2010
16
General Specifications
Technical Data
WDCT standard
supported
Number of channels
80 cuplex cahnnels
Radio frequency range 2400-2483.5 MHz
Duplex method
Time multiplex, 10 ms frame length
Bit rate
576 kbit/s
Modulation
GFSK
Range
up to 300 m outdoors, up to 50 m
indoors
Base station power
supply
100 ~ 240 V, 50 Hz
Environmental conditions in operation
+5 °C to +45 °C;
20 % to 75 % humidity
Dialling mode
DTMF/DP
Handset size
approx. 150 x 48 x 30 mm
(Hight x Width x Depth)
Recommended batteries
Technology:
Size:
Voltage:
Capacity:
Nickel-metal-hydride (NiMH)
AAA (Micro, HR03)
1.2 V
550 - 800 mAh
We recommend the following battery types, because
these are the only ones that guarantee the specified
operating times, full functionality and long service
life:
◆ Sanyo NiMH 800
◆ Panasonic 700 mAh
◆ GP 700 mAh
◆ Yuasa AAA 700/800mAh
◆ Corun AAA 550/650mAh
◆ SHP 550/650 mAh
The device is supplied with two recommended batteries.
Service (Customer Care)
Hotline: 4006 706 007
Gigaset A180/A180 DUO / CHN / A31008-M2046-Y101-1-7619 / cover_back_zweiseitig.fm / 08.01.2010
Gigaset A180/A180 DUO / CHN / A31008-M2046-Y101-1-7619 / cover_back_zweiseitig.fm / 08.01.2010
Issued by
Gigaset Communications GmbH
Frankenstr. 2a
D-46395 Bocholt
Manufactured by Gigaset Communications GmbH under trademark license of Siemens AG.
As of 1 Oct. 2011 Gigaset products bearing the trademark "Siemens" will exclusively use the trademark "Gigaset".
© Gigaset Communications GmbH 2010
All rights reserved. Subject to availability.
Rights of modification reserved.
www.gigaset.com
A31008-M2046-Y101-1-7619