1
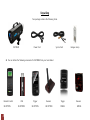
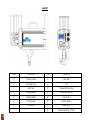
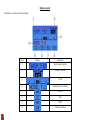
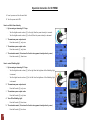
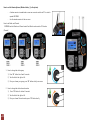
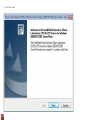
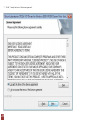
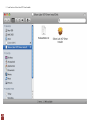
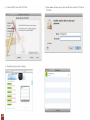
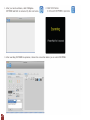
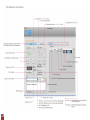
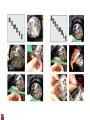
USER GUIDE XB PRIME 3 / 5 / 7 / 12 Please read this manual before operating XB PRIME, and keep it for future reference. Referez-vous au mode d’emploi avant d’utilizer la XB PRIME. 1 Index 2 Introduction P03 Intellectual Property P03 Safety Introduction P04 Unpacking P05 Layout P06 LCD Layout P07 Specification P08 Operation Instruction for XB PRIME P09 How to set Remote Control P13 How to install software for XB PRIME P14 Operation Instruction for SWING P23 Operation Instruction for XB OPTION P24 Check list when troubling P33 Replacing lamp and flash tube P34 Accessories P36 Warranty P37 INTRODUCTION Thank you for your choice for XB PRIME. XB PRIME is designed for professional photographers. It gives quicker and easier operation and great satisfaction for professional photographers. XB PRIME is made of superior electric components in the world. ( Capacitor : Rubicon Company [only made in Japan], Flash Tube : Perkin Elmer Company [ Only made in Singapore]) Rime Lite telecommunications Web: www.rimelite.com Facebook: rimelites Twitter: @rimelites Mail : [email protected] Headquarters: Hyundae Photonics B/D, 118-16, Chimsan-Dong, Buk-Gu, Daegu, South Korea. Tel: 82–53–359–1445 / Fax: 82–53–359-0333 INTELLECTUAL PROPERTY All intellectual property, owned by or which is otherwise the property of Rime Lite or its respective suppliers relating to XB PRIME, including but not limited to, accessories, parts, or software, is proprietary to Rime Lite. No title to or ownership in the intellectual property is transferred to you. All applicable rights of the intellectual Property shall remain with Rime Lite and its suppliers. 3 Safety Instructions Please read and understand all the instructions to avoid injury to yourself and/or damage to XB PRIME - Do not expose to extream temperatuers ( above 140℉ or below -4℉, or above 60℃ or below -20℃). - Do not expose to moisture. Do not use XB PRIME near water. - Do not let any foreign matter spill into XB PRIME - Do not expose to chemicals such as benzene and thinners. Do not use liquid or aerosol cleaners. Clean with a soft damp cloth only. - Do not expose to direct sunlight or heat sources for a prolonged period. - Do not try to disassemble and/or repair XB PRIME yourself. - Do not subject XB PRIME to severe impact, - Do not place heavy objects on XB PRIME. - Do not jubject XB PRIME to excessive pressure. - Do not touch XB PRIME with wet hands - Do not store in dusty areas. Please be aware that Rime Lite claims no responsibility for damage from data loss due to breakdwon, repair, or other causes. 4 Unpacking Your package contains the following items. XB PRIME Power Cord Syncro Cord Halogen Lamp You can obtain the following accessories for XB PRIME from your local dealer: Remote Control XB OPTION 5 USB Trigger Receiver Trigger Receiver XB OPTION XB OPTION XB OPTION SWING SWING Layout 6 Cursor Description Cursor Description ① Protecting Glass ⑧ Main Inlet ② Modeling Lamp ⑨ LCD ③ Flash Tube ⑩ Wireless Module Holder ④ Modeling Base ⑪ Modeling Lamp Fuse ⑤ Umbrella Holder ⑫ Sync Socket ⑥ Locking Holder ⑬ Function Buttons ⑦ Photocell ⑭ Power Switch ⑮ Power Intensity Up / Down Display Layout The display is comprised of below images. Cursor 7 Display Description ① Flash power Intensity ② Group / Channel ③ F-STEP ④ Modeling power intensity ⑤ SOUND ⑥ CELL ⑦ PROP ⑧ Continuous Mode SPECIFICATION 8 Operation Instruction for XB PRIME A. Insert a power cord into the main Inlet. B. Turn the power switch ON How to set Flash Power Intensity 1. 2. By increasing or decreasing 0.1 F-stop. - Turn the digital encoder volume (①) to the right, then the power intensity is increased. - Turn the digital encoder volume (①) to the left, then the power intensity is decreased. The maximum power output mode. - 3. The minimum power output mode. - 4. Press the encoder (①) only once. Press the encoder (①) only twice. The restoration mode. (It is restored to the last set-up power intensity value by a user) - Press the encoder (①) three times. How to control Modeling light 1. By increasing or decreasing 0.1 F-stop - Turn the digital encoder volume (②) to the right then the brightness of the Modeling Light is increased. - Turn the digital encoder volume (②) to the left then the brightness of the Modeling Light is decreased. 2. The maximum power output mode. 3. Press the Encoder (②) only once. The minimum power output mode. - Press the Encoder (②) only twice. 4. Turn off the Modeling Light - Press the Encoder (②) three times. 5. The restoration mode. (It is restored to the last set-up power intensity value by a user) - 9 Press the Encoder (②) four times. How to set ACS (Aperture Control System) Once you firstly complete setting up the exposure value on XB PRIME, the exposure value can be controlled anytime whenever users want to increase or decrease it. You can also check the exact exposure value among a subject, a camera and XB PRIME on LCD display window if the distance of them is not changed. How to check the ACS - 1. You can check the ACS on the LCD display to see whether it is standby mode or not. How to reset the ACS 1) Press the “XB” button for at least 3 seconds. And then you will see the below image. 2) Press the “XB” button one more time shortly. And then you will see the image has changed into the below image. 3) Turn the dial (③) to the right or left, you can reset the exposure value with exact data. ( If you want to use this function, you have to firstly check the correct exposure value with an exposure meter) 4) Once you set the exact exposure value on XB PRIME, you don’t need to use the exposure meter anymore if the distance and position among a subject, a camera and XB PRIME are not changed. You should input the correct exposure value on XB PRIME when its power intensity (F-stop) is F 1.1 1) Choose the exposure value by turning the dial to the right or left. 2) After you press the ‘XB’ button , the exposure value will be stored on XB PRIME 10 Another Function 1. Photo Cell On/Off (② in the picture) - Press “CELL” button once. The “CELL” icon on the LCD display window will be changed into black color, which means that Photo Cell function is ready to work. If users don’t want to use it, press the “CELL” button once more. 2. Sound On/Off - Press “SOUND” button once. The “SOUND” icon on the LCD display window will be changed into black color, which means it is ready to work the sound function. If users don’t want to use it, press the “SOUND” button once more. 3. PROP (Modeling Light) - 4. Continuous On/Off - 5. Press “PROP” button for 2 seconds. You can check green color on “PROP” button TEST Button - 11 Press “PROP” button once. You can check red color on “PROP” button .The performance is same as below You can check whether the flash tube is discharged or not. How to set the Remote Systems (Wireless holder, ① in the picture) - A wireless receiver is needed when a user uses a remote control and PC in order to operate XB PRIME. - Join the wireless receiver to the rare cover. How to set Studio and Channel. XB PRIME has both Studio and Channel mode. Each Studio mode consist of 10 strobes (Channel) 1. How to change the strobe group 1) Press “XB” button for at least 3 seconds. 2) Turn the dial to the right or left 3) Once you choose your group, press “XB” button shortly once more. 2. How to change the strobe channel number 1) Press “XB” button for at least 3 seconds. 2) Turn the dial to the right or left 3) Once you choose Channel number, press “XB” button shortly. 12 How to set Remote Control A. Most operating way is same with the XB Prime’s Operating Instruction. B. The differences are only a few. 1. “POWER” button Turn on the power of Remote Control. 2. “XB” button This button is for the start of all performances of each strobe/channel. Press this button when you need to perform any functions of each strobe. Press “POWER” button and select the studio group (A to E) and then select the strobe/channel (1 to 10) and then press the “XB” button. And now you can control all functions of selected strobe. When pressing “XB” button for 3 seconds, it starts ACS mode can be set the exposure value by F1.1 (1.1 f-step). 3. “CELL” button Photocell On / Off 4. “SOUND” button Sound On / Off 5. “PROP” button Press it shortly: proportionally power on / free modeling lamp. Press it for 2 or 3 seconds: modeling lamp continuously turns on / off. 6. “TEST” button By pressing this button, test flash can be released. 7. “STROBE OFF” button Pressing this button can turn on / off the selected strobe’s power. You should select the strobe you want to turn on / off before pressing this button. 8. “SCAN” button You can check the current connected strobes with this function. 13 How to install the software for XB PRIME 14 1. You can download the software on Rime Lite website : http://www.rimelite.com/2662 2. Download 3. You will see the icon on your computer 4. Click below icon 5. You will see the icon in your screen, then double-click this icon. 6. 15 Click “Next” button. 7. 16 Tick off “ I accept the terms of the license agreement” 8. 17 Select any folder you want to install this program in your computer. And click “Next” button. 9. 18 Click “ Install” button. 10. Tick off “Launch the CP210x VCP Driver Installer, and click “Finish” button. 19 11. If downloading is successful, you should check whether “ Silicon Labs CP210 x USB to UART Bridge(COM3)” is installed in Device Manager in your computer. ( MY COMPUTER – CONTROL PANEL - DEVICE MANAGER – Click “ PORTS(COM&LPT) 20 12. Execute the program (Name: Lights Extended) – Click the icon – you should match the Com Port number in below pop-up window as same as below 21 13. Click “ Scan Button”, Then, this program will automatically find out the activated Strobes. You can control each strobe. 22 How to install the software for XB PRIME (MAC) 1. 23 You can download the software on Rime Lite website : http://www.rimelite.com/2662 and down load softwares. 2. 24 Install and run Silicon Labs VCP Driver Installer 25 26 27 28 29 Operation Instruction for SWING Before you use SWING with XB PRIME, please power off strobes. You will experience the great performance of both strobe and SWING. Transmitter - Join the transmitter to a digital camera Receiver - Join the receiver to a strobe. Notice) when a user set the channel of SWING, the user should adjust the same number of both transmitter and receiver. It can set the maximum 6 strobes per a transmitter under the same channel If a user uses over 6 strobes under the same channel, the effective distance from both a transmitter and a receiver can be shorter. TEST Button The LED lamp is flickered when a user presses “TEST” button. 30 Check list when troubling 1. Cannot turn on the power. 1) Please check the power switch on. 2) Please check the power cable inserted correctly. 2. Unit does not flash. 1) Please check the flash tube inserted correctly. 2) Please check the trigger coil contacted with the flash tube legs. 3) Please change the flash tube. 3. Unit does not recharge. 1) Please check the power cable inserted correctly. 2) Please check the units voltage supply it correct. 3) Please change the fuse. 4. Ready “beep” does not sound. 1) Please check the “SOUND” button pressed. 2) Please make sure the unit fully recharging. 5. Unit does not fire from sync connection or transmitter or remote control. 1) Check the sync cord or receiver is inserted correctly. 2) Try another sync cord or wireless system. 6. Unit sounds long “beep” sound. 1) It has been started in “overheat” mode and it turns off automatically. After a break for cooling down (from 5 min. to 10 min.), you can turn it on again. 33 Replacing lamp and flash tube You must switch off and disconnect the power cord before changing lamp or flash tube!! 34 35 Accessories 36 XB PRIME is free of defects in material and workmanship for a period of twenty four (24) months from the original date of purchase by the consumer. If during the period of warranty this product proves defective under normal use and service, you should return the product to the retailer from whom it was originally purchased, or to any Rime Lite authorized dealer or authorized service center, if outside the time limit for returns imposed by the retailer. - Warranty Conditions 1. The warranty is only valid presentation of the proof purchase consisting of original invoice or sales slip confirmation, indicating the date of purchase, retailer’s name, model and serial number. Rime Lite reserve the right to refuse warranty service if this information has been removed or changed after the original purchased of the product from the retailer. 2. Rime Lite’s sole obligations are to the repair of the defective part, or at its discretion, replacement of the product (service exchange unit) 3. Warranty repair must be carried out by an authorized Rime Lite dealer/ service center. No reimbursement will be made for repairs carried out by non-Rime Lite, and warranty coverage will not be valid for any repairs or damage caused by such repairs. 4. Repair or replacement under the term of this warranty does not give right to extension to or a new starting of the period of warranty. Repair or direct replacement under the terms of this warranty may be fulfilled with functionally equivalent service exchange units. 5. The warranty is not applicable in cases other than defects in material and workmanship. The warranty does not cover the following: A. Periodic checks, maintenance, repair, and replacement of parts due to normal wear and tear. B. Abuse or misuse, including but not solely limited to the failure to use this product for its normal purpose in accordance with Rime Lite’s instructions for usage and maintenance. C. Failure of or damage to the product arising from incorrect installation or use inconsistent with technical or safety standards, or failure to comply with product manual instructions. 37