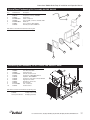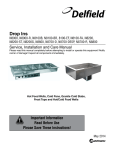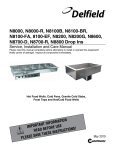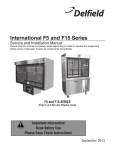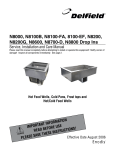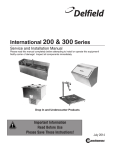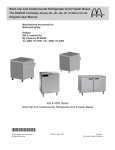
1
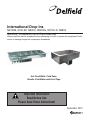
International Drop Ins N8100B, 8100-EF, N8200, N8200G, N8700-D, N8800 Service, Installation and Care Manual Please read this manual completely before attempting to install or operate this equipment! Notify carrier of damage! Inspect all components immediately. Hot Food Wells, Cold Pans, Granite Cold Slabs and Frost Tops CAUTION Important Information Read Before Use Please Save These Instructions! September 2013 International N8000 Series Drop-In Installation and Operation Manual Important Warning And Safety Information WARNING Read This Manual Thoroughly Before Operating, Installing, Or Performing Maintenance On The Equipment. WARNING Failure To Follow Instructions In This Manual Can Cause Property Damage, Injury Or Death. WARNING Do Not Store Or Use Gasoline Or Other Flammable Vapors Or Liquids In The Vicinity Of This Or Any Other Appliance. WARNING Unless All Cover And Access Panels Are In Place And Properly Secured, Do Not Operate This Equipment. WARNING This Appliance Is Not Intended For Use By Persons Who Lack Experience Or Knowledge, Unless They Have Been Given Supervision Or Instruction Concerning Use Of The Appliance By A Person Responsible For Their Safety. WARNING This Appliance Is Not To Be Played With. Warning Do Not Clean With Water Jet. WARNING Do Not Use Electrical Appliances Inside The Food Storage Compartment Of This Appliance. CAUTION Observe the following: 2 • Minimum clearances must be maintained from all walls and combustible materials. • Keep the equipment area free and clear of combustible material. • Allow adequate clearance for air openings. • Operate equipment only on the type of electricity indicated on the specification plate. • Unplug the unit before making any repairs. • Retain this manual for future reference. For customer service, call (800) 733-8829, (800) 733-8821, Fax (989) 773-3210, www.delfield.com International N8000 Series Drop-In Installation and Operation Manual Contents Receiving And Inspecting Unit................................................. 3 Serial Number Location........................................................... 4 Warranty Information............................................................... 4 Regulatory Certifications......................................................... 4 Specifications....................................................................... 5-7 Installation............................................................................ 8-9 Operation.......................................................................... 10-12 Maintenance.......................................................................... 13 Wiring Diagram................................................................. 14-15 Replacement Parts........................................................... 16-18 Standard Labor Guidelines.................................................... 19 Receiving And Inspecting The Equipment Even though most equipment is shipped crated, care should be taken during unloading so the equipment is not damaged while being moved into the building. 1. Visually inspect the exterior of the package and skid or container. Any damage should be noted and reported to the delivering carrier immediately. 2. If damaged, open and inspect the contents with the carrier. 3. In the event that the exterior is not damaged, yet upon opening, there is concealed damage to the equipment notify the carrier. Notification should be made verbally as well as in written form. 4. Request an inspection by the shipping company of the damaged equipment. This should be done within 10 days from receipt of the equipment. 5. Also open the compressor compartment housing and visually inspect the refrigeration package. Be sure lines are secure and base is still intact. 6. Freight carriers can supply the necessary damage forms upon request. 7. Retain all crating material until an inspection has been made or waived. Uncrating The Equipment First cut and remove the banding from around the crate. Remove the front of the crate material, use of some tools will be required. For customer service, call (800) 733-8829, (800) 733-8821, Fax (989) 773-3210, www.delfield.com 3 International N8000 Series Drop-In Installation and Operation Manual Serial Number Location The serial number on self-contained refrigerated units is on the electrical specifications tag located near the condensing unit. The serial number on remote refrigerated units is on the outside bottom of the food well. On hot food pans and hot/cold combination pans, the serial number tag is located on the back of the control raceway or remote panel. The serial number tag also lists the refrigerant used and the amount of charge. Always have the serial number of your unit available when calling for parts or service. This manual covers only standard 8000 series units. If you have a custom designed unit, you should contact our parts/service department at (800) 733-8829 for questions. ©2013 The Delfield Company. All rights reserved. Reproduction without written permission is prohibited. “Delfield” is a registered trademark of The Delfield Company. Warranty Information Visit http://www.delfield.com/minisite/service/warranty_info to: • Register your product for warranty. • Verify warranty information. • View and download a copy of your warranty. Regulatory Certifications Models are certified by: National Sanitation Foundation (NSF) Technical Inspection Association European Conformity 4 For customer service, call (800) 733-8829, (800) 733-8821, Fax (989) 773-3210, www.delfield.com International N8000 Series Drop-In Installation and Operation Manual Export Specifications Export N8100B Series Self-Contained Mechanically Cooled Pans - R404A Model L D H Counter Cutout Dimensions V/Hz/Ph Amps H.P. BTU Evap BTU/ TD/TEMP Sys Cap Ship Weight Refrig. Charge 12”x20” Pans Temp Class N8118B-E 18” (45.7cm) 26” (66cm) 21.87” (55.5cm) 17” X 25” (43.2cm x 63.5cm) 230-240/ 50/1 1.5 1/5 204 19/38º/-3º 708 100lbs (45kg) 454g 1 N N8130B-E 30.75” (78.1cm) 26” (66cm) 21.87” (55.5cm) 29.75” x 25” (75.6cm x 63.5cm) 230-240/ 50/1 1.5 1/5 379 26/31º/4° 812 140lbs (64kg) 454g 2 N N8143B-E 43.5” (110.5cm) 26” (66cm) 21.87” (55.5cm) 42.50” X 25” (108.6cm x 63.5cm) 230-240/ 50/1 1.5 1/5 569 35/26º/9º 889 173lbs (78kg) 454g 3 N Export N8100B Series Self-Contained Mechanically Cooled Pans - R134A Model N8156B-E N8169B-E L 56.25” (142.9cm) D H Counter Cutout Dimensions V/Hz/Ph Amps H.P. BTU Evap BTU/ TD/TEMP Sys Cap Ship Weight Refrig. Charge 12”x20” Pans Temp Class 26” (66cm) 21.87” (55.5cm) 55.25” x 25” (140.3cm x 63.5cm) 230-240/ 50/1 2.5 1/4 758 43/32º/3º 1373 205lbs (93kg) 454g 4 N 69” (175.3cm) 26” (66cm) 21.87” (55.5cm) 68” X 25” (172.7cm x 63.5cm) 230-240/ 50/1 2.5 1/4 948 51/29º/6º 1469 225lbs (102kg) 454g 5 N Export N8100NB Series Self-Contained Mechanically Cooled Pans Narrow Style - R404A N8146NB-E 46.75” (118.7cm) 18” (45.7cm) 21.81” (55.4cm) 45.75” x 17” (113.7cm x 43.2cm) 230240/50/1 1.5 1/5 454 17/40º/-5º 680 175lbs (80kg) 454g 2 N N8168NB-E 67.5” (171.5cm) 18” (45.7cm) 21.81” (55.4cm) 66.5” x 17” (168.9cm x 43.2cm) 230240/50/1 1.5 1/5 676 26/31º/4º 804 240lbs (109kg) 454g 3 N Export 8100-EF Series LiquiTec® Eutetic Fluid Refrigerated Cold Pans - R404A Model L D H Counter Cutout Dimensions V/Hz/Ph Amps H.P. BTU Load Evap BTU/ TD/TEMP Sys Cap Ship Weight Refrig. Charge 12x20 Pans Temp Class 8118-EF-E 18.20” (46.2cm) 26” (66cm) 23.25” (59.1cm) 17” x 25” (43.2cm x 63.5cm) 230-240/ 50/1 2.5 1/4 204 19/50º/15° 928 169lbs (77kg) 454g 1 N 8132-EF-E 31.76” (80.7cm) 26” (66cm) 23.25” (59.1cm) 30.75” x 25” (78.1cm x 63.5cm) 230-240/ 50/1 2.5 1/4 379 26/42º/-7° 1112 215lbs (98kg) 454g 2 N 8145-EF-E 45.32” (115.1cm) 26” (66cm) 23.25” (59.1cm) 44.25” x 25” (112.4cm x 63.5cm) 230-240/ 50/1 2.5 1/4 569 35/36º/-1° 1259 265lbs (120kg) 454g 3 N 8159-EF-E 58.88” (149.6cm) 26” (66cm) 23.25” (59.1cm) 57.87” x 25” (147cm x 63.5cm) 230-240/ 50/1 2.5 1/4 758 43/32º/3° 1373 285lbs (130kg) 454g 4 N 8172-EF-E 72.44” (184cm) 26” (66cm) 23.25” (59.1cm) 71.5” x 25” (181.6cm x 63.5cm) 230-240/ 50/1 2.5 1/4 948 51/29º/6° 1469 295lbs (134kg) 454g 5 N 8186-EF-E 86” (218.4cm) 26” (66cm) 23.25” (59.1cm) 85” x 25” (215.9cm x 63.5cm) 230-240/ 50/1 2.5 1/4 1138 59/26º/9° 1529 394lbs (179kg) 454g 6 N Export 8100-EFN Series LiquiTec® Slim Line Eutetic Fluid Refrigerated Cold Pans - R404A 8148-EFN-E 47.66” (121.1cm) 18” (45.7cm) 23.25” (59.1cm) 46.88” x 17.25” (119.1cm x 43.8cm) 230-240/ 50/1 2.5 1/4 379 26/42º/-7° 1112 235lbs (107kg) 454g 2 N 8169-EFN-E 69.22” (175.8cm) 18” (45.7cm) 23.25” (59.1cm) 68.5” x 17.25” (174cm x 43.8cm) 230-240/ 50/1 2.5 1/4 569 35/36º/-1° 1259 285lbs (130kg) 454g 3 N 8191-EFN-E 90.78” (230.6cm) 18” (45.7cm) 23.25” (59.1cm) 90” x 17.25” (228.6cm x 43.8cm) 230-240/ 50/1 2.5 1/4 758 43/32º/13° 1373 295lbs (134kg) 454g 4 N For customer service, call (800) 733-8829, (800) 733-8821, Fax (989) 773-3210, www.delfield.com 5 International N8000 Series Drop-In Installation and Operation Manual Export Specifications Export N8200 Series Self-Contained Frost Tops - R404A Model L D H Counter Cutout Dimensions V/Hz/Ph Amps H.P. BTU Evap BTU/ TD/TEMP Sys Cap Refrig. Charge Temp Class N8231-E 31.75" (80.6cm) 26” (66cm) 15.75” (40cm) 30.75” x 25" (78.1cm x 63.5cm) 230-240/ 50/1 1.5 1/5 379 26/42º/-7° 1112 142lbs (64kg) 454g N N8245-E 45.63” (115.9cm) 26” (66cm) 15.75” (40cm) 44.63” x 25” (113.3cm x 63.5cm) 230-240/ 50/1 1.5 1/5 569 35/36º/-1° 1259 168lbs (76kg) 454g N N8259-E 59.5” (151.1cm) 26” (66cm) 15.75” (40cm) 58.50” x 25” (148.6cm x 63.5cm) 230-240/ 50/1 2.5 1/4 758 43/32º/3° 1373 193lbs (88kg) 454g N N8273-E 73.38" (186.4cm) 26” (66cm) 15.75” (40cm) 72.38” x 25” (183.8cm x 63.5cm) 230-240/ 50/1 2.5 1/4 948 51/29º/6° 1469 209lbs (95kg) 454g N N8287-E 87.25" (221.6cm) 26” (66cm) 15.75” (40cm) 86.25" x 25" (219.1cm x 63.5cm) 230-240/ 50/1 2.8 1/3 1138 59/30º/5° 1787 239lbs (108kg) 454g N Ship Weight Export N8200G Series Self-Contained Granite Cold Slabs - R404A Model L D H Counter Cutout Dimensions V/Hz/Ph Amps H.P. BTU Evap BTU/ TD/TEMP Sys Cap Ship Weight Refrig. Charge Temp Class N8231G-E 31.75” (80.6cm) 25.87” (65.7cm) 19” (48.3cm) 30.75” X 25” (78.1cm x 63.5cm) 230-240/ 50/1 1.5 1/5 379 26/42º/-7° 1112 219lbs (99kg) 454g N N8245G-E 45.63” (115.9cm) 25.87” (65.7cm) 19” (48.3cm) 44.63” x 25” (113.4cm x 63.5cm) 230-240/ 50/1 1.5 1/5 569 35/36º/-1° 1259 284lbs (129kg) 454g N N8259G-E 59.5” (151.1cm) 25.87” (65.7cm) 19” (48.3cm) 58.5” x 25” (148.6cm x 63.5cm) 230-240/ 50/1 2.8 1/3 758 43/37º/-2° 1572 338lbs (153kg) 454g N 6 For customer service, call (800) 733-8829, (800) 733-8821, Fax (989) 773-3210, www.delfield.com International N8000 Series Drop-In Installation and Operation Manual Export Specifications Export N8700D Series Individually Controlled Heated Food Wells Counter Cutout Dimensions Ship Weight 12”x20” Pans Temp Class 1450 41lbs (19kg) 1 N 240/50/1 2900 99lbs (45kg) 2 N 14.5” x 4.62” x 7.00” (36.8cm x 11.7cm x 17.8cm) 240/50/1 4350 134lbs (61kg) 3 N 58.5” x 25” (148.6cm x 63.5cm) 18.69” x 4.62” x 7.00” (47.5cm x 11.7cm x 17.8cm) 240/50/1 5800 166lbs (75kg) 4 N 9.5” (24cm)* 72.37” x 25” (183.8cm x 63.5cm) 22.88” x 4.62” x 7.00” (58.1cm x 11.7cm x 17.8cm) 240/50/1 7250 186lbs (84kg) 5 N 9.5” (24cm)* 86.25” x 25” (219.1cm x 63.5cm) 27” x 4.62” x 7.00” (68.6cm x 11.7cm x 17.8cm) 240/50/1 8700 236lbs (107kg) 6 N V/Hz/Ph Watts L 17.88” (45.4cm) D 26” (66cm) H 9.5” (24cm)* 16.88” X 25” (42.8cm x 63.5cm) Control Panel Cutout Dimensions 7.00” x 4.62” x 7.00” (17.8cm x 11.7cm x 17.8cm) N8731-D-E 31.75” (80.6cm) 26” (66cm) 9.5” (24cm)* 30.75” x 25” (78.1cm x 63.5cm) N8745-D-E 45.63” (115.9cm) 26” (66cm) 9.5” (24cm)* N8759-D-E 59.5” (151.1cm) 26” (66cm) N8773-D-E 73.38” (186.4cm) N8787-D-E 87.25” (221.4cm) Model N8717-D-E V/Hz/Ph Watts 240/50/1 10.31” x 4.62” x 7.00” (26.2cm x 11.7cm x 17.8cm) 44.62” x 25” (113.3cm x 63.5cm) 9.5” (24cm)* 26” (66cm) 26” (66cm) *14” Overall height including drain connection Export N8800 Series Single Tank Electric Hot Food Wells Model L D H Counter Cutout Dimensions Control Panel Cutout Dimensions Ship Weight 12”x20” Pans Temp Class N8831-E 31.75” (80.6cm) 26” (66cm) 11” (27.9cm) 30.75” X 25” (78.1cm x 63.5cm) 12.25” x 4.25” x 7.00” (31.1cm x 10.8cm x 17.8cm) 240/50/1 2900 100lbs (45kg) 2 N N8845-E 45.63” (115.9cm) 26” (66cm) 11” (27.9cm) 44.63” x 25” (113.4cm x 63.5cm) 12.25” x 4.25” x 7.00” (31.1cm x 10.8cm x 17.8cm) 240/50/1 4350 136lbs (62kg) 3 N N8859-E 59.5” (151.1cm) 26” (66cm) 11” (27.9cm) 58.5” x 25” (148.6cm x 63.5cm) 12.25” x 4.25” x 7.00” (31.1cm x 10.8cm x 17.8cm) 240/50/1 5800 158lbs (72kg) 4 N N8873-E 73.38” (186.4cm) 26” (66cm) 11” (27.9cm) 72.38” x 25” (183.8cm x 63.5cm) 12.25” x 4.25” x 7.00” (31.1cm x 10.8cm x 17.8cm) 240/50/1 7250 195lbs (88kg) 5 N N8887-E 87.25” (221.6cm) 26” (66cm) 11” (27.9cm) 86.25” x 25” (219.1cm x 63.5cm) 12.25” x 4.25” x 7.00” (31.1cm x 10.8cm x 17.8cm) 240/50/1 8700 224lbs (102kg) 6 N For customer service, call (800) 733-8829, (800) 733-8821, Fax (989) 773-3210, www.delfield.com 7 International N8000 Series Drop-In Installation and Operation Manual Installation N8100 & N8200 Series These units are intended for indoor use only. A room temperature of no more than 86°F (30°C) is recommended. Be sure the location chosen has a counter strong enough to support the total weight of the unit and contents. A fully loaded model may weigh as much as 600 pounds! Reinforce the counter as necessary to provide maximum loading. DANGER Unit requires that the sides and bottom are not any closer than 3” (7.6cm) to any combustible material. The counter cut-out sizes and power requirements are shown on the specification pages. A gasket is installed in the flange of each unit. The weight of the unit on the gasket forms a seal preventing liquids from seeping into the cut-out opening. Louvers Airflow is required to the compressor. A 13” x 25” (33 cm x 63.5 cm) louver is provided by Delfield and must be installed in the counter in front of the condenser. The louver cutout dimension is 11” x 22” (27.9 cm x 55.9 cm). The rear must have an opening to permit removal of heated air. The opening must be at least 8” x 11”, a total of 88 square inches (20.3 cm x 27.9 cm, a total of 566 square centimeters). Plumbing The units drain must have an outlet to an appropriate drainage area or container. A drain trap must be installed. N8200 series have 1/2” drain and N8200G series have 3/4” drain located on end/center. The 1” diameter drain on N8100B, N8100NB, N8100-BR, N8100-FA and 8100-EF Series units is shipped loose and must be connected during installation. 8 CAUTION Moisture collecting from improper drainage can create a slippery surface on the floor and a hazard to employees. It is the owner’s responsibility to provide a container or outlet for drainage. Some N8100B & N8100NB may have polyethylene insulation in the drain hole. This can easily be cut out without any contact or damage to the units interior insulation or refrigeration lines. Electrical connection Refer to the amperage data on the specification pages, the serial tag or your local code to be sure the unit is connected to the proper power source. A protected circuit of the correct voltage and amperage must be run for connection of the line cord. Some units have an ON/OFF switch located behind the louvered panel in the machine compartment. Simply turn the switch to ON to begin operation. Some units have an OFF position on the thermostat dial which is located behind the louvered panel in the machine compartment. Simply turn the dial to begin operation. The unit must be disconnected from the power source whenever performing service or maintenance functions. Never operate the unit without the louvered panel in place! For customer service, call (800) 733-8829, (800) 733-8821, Fax (989) 773-3210, www.delfield.com International N8000 Series Drop-In Installation and Operation Manual Installation N8700 & N8800 Series These units are intended for indoor use only. Be sure the location chosen has a counter strong enough to support the total weight of the unit and contents. A fully loaded model may weigh as much as 600 pounds! Reinforce the counter as necessary to provide maximum loading. DANGER Unit requires that the sides and bottom are not any closer than 3” (7.6cm) to any combustible material. The counter cut-out sizes and power requirements are shown on the specification pages. A gasket is installed in the flange of each unit. The weight of the unit on the gasket forms a seal preventing liquids from seeping into the cut-out opening. N8700 Series pans should be installed with the drains at the back, away from the operator’s sides. Plumbing N8700-D Plumbing: Unit is equipped with 1/2” (1.3cm) drains, (one per well located in right rear corner 1/2” (1.3cm) female N.P.T.) manifold and 1/2” (1.3cm) gate valve. N8800 Plumbing: Well is sloped to a 1.00” (2.5cm) male N.P.T. stainless steel drain. CAUTION Moisture collecting from improper drainage can create a slippery surface on the floor and a hazard to employees. It is the owner’s responsibility to provide a container or outlet for drainage. Electrical connection Refer to the amperage data on the specification pages, the serial tag or your local code to be sure the unit is connected to the proper power source. The unit must be disconnected from the power source whenever performing service or maintenance functions. The controls are mounted in a control panel, designed to be installed at a “remote” location. The control panel should be installed so that the indicator light for each control is to the right of the control. N8700D series units have 48” (121.9cm) of conduit and N8800 Series units have 24” (61.0cm) of conduit between the pans and the remote control panel to facilitate this installation. Control Panel Installation, N8700-D Series Infinite control shown, directions also apply to digital control The control panel is designed to be installed on the side opposite the drains. If you choose to install the control panel on the same side as the drains the control panel will either be upside down or the knobs will control the opposite wells. Control panel installed opposite drains Drains For customer service, call (800) 733-8829, (800) 733-8821, Fax (989) 773-3210, www.delfield.com 9 International N8000 Series Drop-In Installation and Operation Manual Operation N8100B & N8100NB & N8100 Series mechanically cooled cold pans are adjusted at the factory to provide proper operation without any further adjustments. However, if it is necessary to adjust the temperature, the control is located in the machine compartment. Turn the knob clockwise as indicated on the control. Settings are from 1 thru 7 (7 being the coldest). Adjustments should be made gradually. Several small adjustments will be more effective than one large adjustment. It may take an hour or longer to realize the temperature change depending on the application and location of the unit. These units are not designed to cool warm food products. Items should be placed in the unit pre-cooled at least to the desired holding temperature, if not slightly colder. In some applications, a gradual warming of product may occur, particularly at the exposed top of the product. Stirring or rotation of the product may be necessary to maintain overall temperature. Warming of food product can occur very quickly outside of the unit. When loading or rotating product, avoid leaving food items in a non-refrigerated location for any length of time to prevent warming or spoilage. The temperature control is used to turn the unit on and off as well as control the temperature of the cold pan. The settings range from 1 through 7 (7 being the coldest). To turn the cold pan off, turn the knob to the off position. If the cold pan is to be used with ice, it is recommended that the optional perforated bottoms be used. These will allow ice to melt properly. The unit must be turned off when not in use or overnight for defrosting and cleaning. Operation 8100-EF Series There is a switch on the compressor housing front to turn the 8100-EF units on and off. 8100-EF Series LiquiTec® Eutetic fluid cold pans are adjusted at the factory to provide proper operation without any further adjustments. However, if it is necessary to adjust the temperature, the control is located in the machine compartment. Turn the knob clockwise as indicated on the control to adjust it colder. Adjustments should be made gradually. Several small adjustments will be more effective than one large adjustment. It may take an hour or longer to realize the temperature change depending on the application and location of the unit. The unit must be turned off when not in use or overnight for defrosting and cleaning. Temperature Control Settings: 17°F (8ºC) differential 25°F (-4ºC) cut-in 8°F (-13ºC)cut-out These units are not designed to cool warm food products. Items should be placed in the unit pre-cooled at least to the desired holding temperature, if not slightly colder. In some applications, a gradual warming of product may occur, particularly at the exposed top of the product. Stirring or rotation of the product may be necessary to maintain overall temperature. Warming of food product can occur very quickly outside of the unit. When loading or rotating the product, avoid leaving food items in a non-refrigerated location for any length of time to prevent warming or spoilage. The cold pan is not intended to be used with ice. 10 For customer service, call (800) 733-8829, (800) 733-8821, Fax (989) 773-3210, www.delfield.com International N8000 Series Drop-In Installation and Operation Manual Operation N8200 N8200 Series frost tops are designed to maintain an even layer of frost to pleasantly display product. Once turned on, the compressor will run continuously. The unit should be turned off overnight or when not in use. There is no temperature control on the N8200 series. The ON/OFF switch is the only means available to cycle the unit. Since it takes time for the frost to accumulate initially, the unit should be turned on approximately one hour before it is actually required. Product should not be placed on the frost top prior to turning the unit on, because it may freeze to the surface of the unit. The unit must be turned off when not in use or overnight for defrosting and cleaning. Operation N8200G N8200G Series granite cold slabs are designed to maintain a low temperature surface for quick turn products such as ice cream. Frost patterns will vary depending on room conditions such as temperature, humidity and airflow. The “work zone” of the granite surface is considered to be inside a 2” (5.1cm) perimeter. Temperatures in the perimeter zone may be higher and again the frost patterns in this area will vary based on room conditions. Unit is controlled by an on/off switch. Once turned on, the unit will run continuously. There is no temperature control in this unit. Turn the unit on approximately two hours prior to use to allow for ample cool down time. The unit must be turned off when not in use or overnight for defrosting and cleaning. For customer service, call (800) 733-8829, (800) 733-8821, Fax (989) 773-3210, www.delfield.com 11 International N8000 Series Drop-In Installation and Operation Manual Operation N8700-D & N8800 Series These units are designed to hold warm food product between 140F to 160F (60C to 71C). N8700-D series individually heated hot food units may be operated “wet” (with water in the wells) or “dry”. However, “wet” operation is recommended for better performance. N8800 Series single tank hot food units are designed to be operated “wet” (with water in the tank) only. Wet Operation Fill the food well with a minimum of 2” (5.1cm) of water and cover with lid or empty pan. To preheat water, set temperature control at “HI”. With pans in place, wells will boil water. Food temperature will vary depending on type and amount of product. To minimize steam and water usage, set control at lowest setting that will maintain proper food temperature. To reduce preheating time, use hot water to fill the well. Proper water level (approximately 2” [5.1cm]) must be maintained to prevent damage to the tank on the N8800 Series units. When operating these units “wet,” never use anything other than plain water in the wells or tank. Failure to observe this warning may result in personal injury or damage to the unit. After the unit is hard wired to the electrical system, select desired temperature by rotating temperature control. A knob and indicator light are provided for each individual heated food well. When operated at the highest temperature setting, the top of the unit will become very hot. Staff and customers using the equipment should be informed about this. DANGER First Time Use Before the unit is used the first time for serving, turn the temperature knob to “HI” and heat the well for 20 to 30 minutes. Any residue or dust that adhered to the heater element(s) will be burned off during this initial preheat period. DANGER Steam can cause serious burns. Always use some type of protective covering on your hands and arms when removing lids from the unit. Lift the lid in a way that will direct escaping steam away from your face and body. When serving thick sauces always use the hot food well in “wet” operation. This provides more uniform temperature for the sauce. Dry Operation N8700 Series only Wet operation is usually much more efficient and is preferred. However, these units may be operated without water with no damage to the unit. Never place food directly in well. Always use pans. When operated dry, the bottom of the well will discolor. To clean, use a stainless steel cleaner or mild abrasive. The dry well should never be preheated longer than 15 minutes. For most efficient operation, keep covered inserts in each well during preheating or when empty. Always place covers on pans when not serving to prevent food from drying out. DANGER 12 When operated dry, the well bottoms become very hot. Do not allow unprotected skin to contact any well surface. For customer service, call (800) 733-8829, (800) 733-8821, Fax (989) 773-3210, www.delfield.com International N8000 Series Drop-In Installation and Operation Manual Maintenance Drain Maintenance Each unit has a drain located inside the unit that removes the condensation from the evaporator coil and routes it to an external condensate evaporator pan. Each drain can become loose or disconnected during normal use. If you notice water accumulation on the inside of the unit be sure the drain tube is connected to the evaporator drain pan. If water is collecting underneath the unit make sure the end of the drain tube is in the condensate evaporator in the machine compartment. The leveling of the unit is important as the units are designed to drain properly when level. Be sure all drain lines are free of obstructions. The power switch must be turned to OFF and the unit disconnected from the power source whenever performing service, maintenance functions or cleaning the refrigerated area. Stainless Steel Care and Cleaning To prevent discoloration or rust on stainless steel several important steps need to be taken. First, we need to understand the properties of stainless steel. Stainless steel contains 70- 80% iron, which will rust. It also contains 12-30% chromium, which forms an invisible passive film over the steel’s surface, which acts as a shield against corrosion. As long as the protective layer is intact, the metal is still stainless. If the film is broken or contaminated, outside elements can begin to breakdown the steel and begin to form discoloration or rust. Proper cleaning of stainless steel requires soft cloths or plastic scouring pads. Cleaning the Condenser Coil In order to maintain proper refrigeration performance, the condenser fins must be cleaned of dust, dirt and grease regularly. It is recommended that this be done at least every three months. If conditions are such that the condenser is totally blocked in three months, the frequency of cleaning should be increased. Clean the condenser with a vacuum cleaner or stiff brush. If extremely dirty, a commercially available condenser cleaner may be required. Failure to maintain a clean condenser coil can initially cause high temperatures and excessive run times. Continuous operation with a dirty or clogged condenser coil can result in compressor failure. Neglecting the condenser coil cleaning procedures will void any warranties associated with the compressor and cost to replace the compressor. CAUTION Never use a high-pressure water wash for this cleaning procedure as water can damage the electrical components located near or at the condenser coil. NEVER USE STEEL PADS, WIRE BRUSHES OR SCRAPERS! Cleaning solutions need to be alkaline based or non-chloride cleaners. Any cleaner containing chlorides will damage the protective film of the stainless steel. Chlorides are also commonly found in hard water, salts, and household and industrial cleaners. If cleaners containing chlorides are used be sure to rinse repeatedly and dry thoroughly. Routine cleaning of stainless steel can be done with soap and water. Extreme stains or grease should be cleaned with a non-abrasive cleaner and plastic scrub pad. Always rub with the grain of the steel. There are stainless steel cleaners available which can restore and preserve the finish of the steels protective layer. Early signs of stainless steel breakdown are small pits and cracks. If this has begun, clean thoroughly and start to apply stainless steel cleaners in attempt to restore the passivity of the steel. CAUTION Never use an acid based cleaning solution! Many food products have an acidic content, which can deteriorate the finish. Be sure to clean the stainless steel surfaces of ALL food products. Common items include, tomatoes, peppers and other vegetables. For customer service, call (800) 733-8829, (800) 733-8821, Fax (989) 773-3210, www.delfield.com 13 International N8000 Series Drop-In Installation and Operation Manual Wiring Diagram N8100B & N8100NB CONDENSER FAN S C ON/OFF SWITCH L1 COOLING T'STAT R COMPRESSOR 115V N G Wiring Diagram 8100-EF, 8100-EFN CONDENSER FAN S C ON/OFF SWITCH L1 COOLING T'STAT R COMPRESSOR 120V N G Wiring Diagram N8200 & N8200G ON/OFF SWITCH L1 CONDENSER FAN S C R COMPRESSOR 115V N G 14 For customer service, call (800) 733-8829, (800) 733-8821, Fax (989) 773-3210, www.delfield.com International N8000 Series Drop-In Installation and Operation Manual Wiring Diagram N8700-D PILOT LIGHT (FURNISHED) L1 H1 G N 1450 W 240 V HEATING ELEMENT P L1 L2 H2 HA–1 LINE WIRES HA–2 TO ADDITIONAL FOOD WARMERS INFINITE CONTROL WITH “OFF” POSITION Amperes In Line Wires # Of 240V, Warmers 1 Phase 1 6.0 2 12.1 3 18.1 4 24.2 5 30.2 6 36.3 HA–3 HA–4 HA–5 HA–6 HA = HEATER ASSEMBLY Single Phase Wiring Diagram N8800 LI THERMOSTAT G L2 DOUBLE POLE THERMOSTAT ON MODELS N8873 & N8887 ONLY For customer service, call (800) 733-8829, (800) 733-8821, Fax (989) 773-3210, www.delfield.com 15 International N8000 Series Drop-In Installation and Operation Manual Narrow Base Condensing Unit Assembly 1/5 H.P. R404A, Low N8118B, N8130B, N8143B, N8146NB, N8168NB Key 1 2 3 4 5 6 7 8 Delfield Part # 000-BN5-003I 2160029 2160030 026-C58-0037 3526994 3516451 3516452 3516322 039-231-0030 3516454 Description Assembly, 1/5 Condensing Unit Fan, Axial, 5.5.", 230V Guard, Fan, 6.0" Shroud, Condenser Coil Compressor, 1/5HP, 220/50, TL4CL Start Capacitor Comp, Relay, Danfoss Filter Dryer Condensate Pan Condenser Coil 2 3 4 1 5 6 Miscellaneous Parts Not Included in Condensing Unit - 2194400 15 Amp switch, 220V 7 8 Condensing Unit 1/4 H.P. R404a Low 8100-EF Series, 8100-EFN Series, N8231, N8231G, N8245, N8245G, N8259, N8273 Key - 1 2 3 4 5 5 6 7 8 Delfield Part # 000-BN5-003J 2160029 2160030 026-C58-0037 3527013 2194787 3516444 3516322 075-231-0030 3516454 Description Condensing Unit Assembly, 220V/50Hz Fan, Axial, 5.5”, 230V Fan Guard, 6.0” Shroud, Condenser Coil Compressor 220/50Hz, Danfoss Capacitor, Start 280MFD Compressor relay and overload, NF5.5CLX Filter-dryer, (2) inlet .25” Pan, condensate Condenser Coil 2 3 4 1 5 Miscellaneous Parts Not Included in Condensing Unit - 2194400 15 Amp switch, 220V - Varies per destination Cord/plug assembly - MCP00140 Expansion valve - 3516596 Clip, sensing bulb 6 7 8 16 For customer service, call (800) 733-8829, (800) 733-8821, Fax (989) 773-3210, www.delfield.com International N8000 Series Drop-In Installation and Operation Manual Narrow Base Condensing Unit Assembly N8156B, N8169B Key 1 2 3 4 5 6 7 - Delfield Part # 2183300 3526719 3516047 024-ADB-0041 2162689 026-ANM-0033 3516067 3516230 Description Harness, wire, power cord Compressor, 1/4 h.p., 220v/50hz Cold control Stand, compressor Fan assembly, condenser, 8” blade, 220V Baffle, fan Coil, condenser, 9x10, R134A Filter dryer, double 1/4”OD inlet 1 2 3 Miscellaneous Parts Not Included in Condensing Unit - 2194400 15 Amp switch, 220V 4 5 6 7 Condensing Unit Assembly 1/3 H.P. R404a, Low, N8259G, N8287 Key - 1 2 3 4 5 5 6 7 8 9 10 Delfield Part # Description 000-BN5-003M Condensing Unit Assembly, 220V/50Hz 2160029 Fan, Axial, 5.5”, 230V 2160030 Guard, Fan, 6.0” 026-C58-0037 Shroud, Condenser Coil 3527012 Compressor, 220V/50Hz Danfoss 2194788 Capacitor, Start 320MFD 3516438 Compressor relay and overload, NF7CLX 3516324 High pressure switch 3516322 Filter-dryer, (2) inlet .25” 3516458 Receiver tank 075-231-0030 Pan, condensate 3516454Condenser Coil 2 3 4 5 1 6 Miscellaneous Parts Not Included in Condensing Unit - MCP00140 Expansion valve - 2194400 15 Amp switch, 220V - Varies per destination Cord/plug assembly 8 7 9 10 For customer service, call (800) 733-8829, (800) 733-8821, Fax (989) 773-3210, www.delfield.com 17 International N8000 Series Drop-In Installation and Operation Manual Food Well Assembly With Infinite Control N8700 For models N8700D Key 1 2 3 4 5 6 7 7 - - 3 Delfield Part # 3434703 2194335 026-103-0002 3434663 026-061-0001 2194007 000-BQ9-Z0000 000-BQ9-Z0001 3234557 2194110 Description Insulation, fiberglass, 9” x 48” Thermostat, non-adjustable, 480˚F Bottom cover Insulation, blanket, 24” wide Plate, deflector, DFW, with or without drain Element, heating, 208/230v, 1000/1222w Well, hot food, with drain Well, hot food, without drain Knob, infinite control Control, infinite, 240v, 14a 4 5 1 2 1 6 7 Food Well Assembly With Thermostat Control N8800 For models N8831, N8859, N8873, N8887 Key 1 2 2 3 4 - - Delfield Part # 3234556 2193984 2194012 2194007 026-061-0001 3434704 3434664 Description Knob, thermostat control Thermostat 30A, N8873. N8887 Thermostat, 25A, N8831, N8845, N8859 Element, heating, 208/230v, 1000/1222w Plate, deflector, DFW, with drain Insulation, fiberglass, 1” thick Insulation, fiberfrax, 1” thick 4 1 2 3 Miscellaneous Parts Delfield Part # 265-AXE-0000 243-ALS-0032 243-AB0-0001 2195301 2195068 3234242 1701273 Cap Tube Chart - R134A Refrigerant Description Divider bar, 2.00” x 20.93” Divider bar, 13.00” x .90” Divider bar, 21.00” x .90” Line Filter, Cold Units Line Filter, Heated Units Plastic drain Trim gasket (sold by foot) Louver part #359-411-0003 Model Number N8118B N8130B N8143B N8146NB N8156B N8168NB N8169B N8181B 25” Cutout dimension is 11” x 22” (27.9 cm x 55.9 cm). 13” 18 For customer service, call (800) 733-8829, (800) 733-8821, Fax (989) 773-3210, www.delfield.com Cap Tube Size/Length .036ID x 72” .036ID x 72” .036ID x 72” .042ID x 120” .042ID x 120” .042ID x 120” .042ID x 120” .054ID x 110” International N8000 Series Drop-In Installation and Operation Manual Standard Labor Guidelines To Repair Or Replace Parts On Delfield Equipment Advice and recommendations given by Delfield Service Technicians do not constitute or guarantee any special coverage. • A maximum of 1-hour is allowed to diagnose a defective component. • A maximum travel distance of 100 miles round trip and 2-hours will be reimbursed. Actual travel to be charged. • Overtime, installation/start-up, normal control adjustments, general maintenance, glass breakage, freight damage, and/or correcting and end-user installation error will not be reimbursed under warranty unless pre-approved with a Service Work Authorization from Delfield. You must submit the number with the service claim. • Actual repair time will be paid at or below guidline. • Parts on the critcal stock list must be air freighted at the expense of the service agent. Labor Up To 1-Hour Is Allowed To Replace • Infinite Switch • Contactor/Relay • Door Jamb Switch • Transformer • Solenoid Coil • Evaporator/Condenser Fan Motor and Blade • Hi-limit/Thermal Protector Switch • Circulating Fan Motor and Blade • Fan Delay/Defrost Termination Switch • Digital Control • Compressor Start Components and Overload Protector • Water Level Sensor/Probe • Defrost Timer • Door Hinges, Locks, and Gaskets • Thermostat • Condensate Element • Thermometer • Springs/Lowerator • Gear Motor Labor Up To 2 Hours To Replace • Drawer Tracks/Cartridges • Defrost Element • Pressure Control • Heating Element • Solenoid Valve • Locate/Repair Leak Labor Up To3 Hours To Replace • EPR or CPR Valve • Condenser or Evaporator Coil • Expansion Valve • Cap Tube Labor Up To 4 Hours To Replace • Compressor -- This includes recovery of refrigerant and leak check. -- $55.00 maximum reimbursement for refrigerant recovery (includes recovery machine, pump, torch, oil, flux, minor fittings, solder, brazing rod, nitrogen, or similar fees). Refrigerants • R22 A maximum of $4.00/lb. or 25¢/oz. will be reimbursed. • R134A A maximum of $7.00/lb. or 44¢/oz. will be reimbursed. • R404A A maximum of $16.00/lb. or $1.00/oz. will be reimbursed. For customer service, call (800) 733-8829, (800) 733-8821, Fax (989) 773-3210, www.delfield.com 19 Covington, TN Mt. Pleasant, MI Thank you for choosing Delfield! Help is a phone call away. Help our team of professional, courteous customer service reps by having your model number and serial number available at the time of your call (800) 733-8829. Model:_____________________ S/N: ____________________ Installation Date:_____________ For a list of Delfield’s authorized parts depots, visit our website at www.delfield.com Register your Delfield warranty online. Go to www.delfield.com under the service tab to complete. 980 S. Isabella Rd., Mt. Pleasant, MI 48858, U.S.A. • (989) 773-7981 or (800) 733-8829 • Fax (989) 773-3210 • www.delfield.com Delfield reserves the right to make changes in design or specifications without prior notice. ©2013 The Delfield Company. All rights reserved. Printed in the U.S.A. DM8000 09/13 XXXXXXX