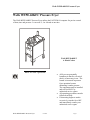
1
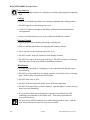
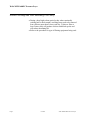
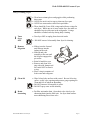
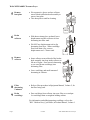
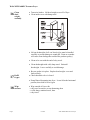
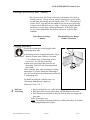
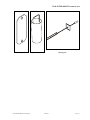
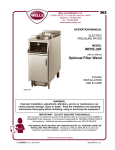
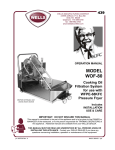
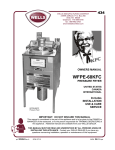
Wells WFPE-68KFC Pressure Fryer
Wells WFPE-68KFC Pressure Fryer
The Wells WFPE-68KFC Pressure Fryer utilizes the FAST EM-99 computer for precise control
of heat, time and pressure. It can cook 2, 4 or 6 heads at one time.
Wells WFPE-68KFC
6–Head Cooker
Rules for Safe Operation
•
•
•
Wells WFPE-68KFC Pressure Fryer
01/26/04
All fryers are potentially
hazardous in that fire, electrical
shock, or burns may occur. The
hazard is increased in pressure
fryer operation because
shortening is under pressure.
The equipment must be installed
and serviced ONLY by
authorized service agents.
All operating procedures must be
followed carefully
If shortening begins to smoke
excessively, turn the fryer OFF
and immediately contact your
authorized service agent.
Page 1
Wells WFPE-68KFC Pressure Fryer
Fryer Start Up
• Make sure heating elements are completely covered by shortening before applying
heat.
Cooking
• Follow all established procedures for operating equipment and cooking products.
• DO NOT open drain valve during cook cycle.
• Cook ONLY authorized products and follow established minimum/maximum
cook quantities.
• Always use basket hook to lower, raise or otherwise handle fryer basket.
Filtering/Cleaning
• Turn fryer OFF before draining shortening to filtering unit.
• Follow established procedures for emptying and cleaning collector.
• Never use steel wool to clean any part of the fryer.
• DO NOT use the "burn-off" method to clean heating elements.
• DO NOT use soap to clean any part of the fryer. DO NOT use water to clean any
part of the fryer except as specified in established procedures.
Miscellaneous
• Use care when operating or cleaning fryer to prevent burns from hot metal parts
and shortening.
• DO NOT use a fryer that does not operate properly or has faulty, loose, or missing
parts. Replace only with authorized Wells parts.
• DO NOT heat water in fryer.
• DO NOT spill any liquid (soft drinks, water, milk) into shortening.
• DO NOT let foreign objects (closed containers, cigarette lighters, aerosol cans) get
near fryer or hot shortening.
• If any electrical shock occurs during fryer operation, immediately turn OFF
controlling circuit breaker or disconnect fryer. Then contact an authorized
electrician for service.
• For your safety, NEVER stand on fryers while cleaning hood or filters! Pull the
fryer from under the hood and use a step stool or ladder.
Page 2
01/26/04
Wells WFPE-68KFC Pressure Fryer
Wells WFPE-68KFC Pressure Fryer
Start Up
1
Perform
safety
checks
• Check that drain valve is closed.
• Shortening level must be at OIL LEVEL line.
• Check level of fryer by looking at shortening level in frypot.
Shortening level in frypot should be equal distance from top of all
3 heater brackets. Adjust legs as necessary to level fryer.
2
Turn fryer ON, • Turn fryer ON. Make sure power lamp is ON.
heat
• If in COOL MODE, press EXIT COOL, select product button.
shortening
HEAT ON light will cycle on and off until shortening temperature
reaches 185°F, then heat will stay on. Display will begin indicating
temperature at 255°F
3
Melt
shortening
in collector
• Push stirring tool through solid shortening to
bottom of collector. Stir and swirl shortening
until completely melted.
4
Check
collector
• Carefully feel exterior of collector bottom with hand to see if it’s
hot. If not hot, continue to stir until it is hot to the touch.
5
Install
heat plate
• Use heat resistant gloves and install heat plate using the collector
removal hook on the basket hook assembly.
6
Heat
shortening
to DROP
temperature
• After droP is displayed, or HEAT ON light goes OFF, check
shortening level. If needed, add small amounts of shortening.
• Fill to OIL LEVEL line inside rear of frypot.
• If overfilled, dip out excess shortening using a saucepan and use
later as add back.
• Ready to cook first round.
Wells WFPE-68KFC Pressure Fryer
01/26/04
Page 3
Wells WFPE-68KFC Pressure Fryer
Discard Cracklings and Filter Shortening Twice Daily
• During a busy/high volume period or day when continually
cooking back to back rounds, cracklings may need to be removed
from collector more than 2 times each day. Failure to filter at
least 2 times daily will produce chicken with black specks and
will reduce shortening life.
• Refer to the procedure for type of filtering equipment being used.
Page 4
01/26/04
Wells WFPE-68KFC Pressure Fryer
Wells WFPE-68KFC Pressure Fryer
Daily Cleaning Fryer
• Wear heat resistant gloves and goggles while performing
these steps.
• NEVER use steel wool or soap to clean any fryer part.
• NEVER use water unless called for in procedure.
• There should be 2 sets of lid o-rings and collector o-rings for
each fryer. While one set is in use on the fryer, the other set
should be kept in cold water in the refrigerator. O-rings
should be switched each day during daily cleaning.
Turn
fryer
OFF
• Turn fryer OFF or unplug from electrical outlet.
2
Remove
lid gasket
• Slide pivot tube forward
until it drops into the
indents in the rods.
• Slide lid and yoke
assembly to the rear until
the lid pivot engages the
pivot tube.
• Raise lid and tilt to rear.
• Remove and clean lid oring with cold, damp towel.
Be careful NOT to stretch
o-ring.
• Place o-ring in container of
fresh water and refrigerate.
3
Clean lid
• Wipe lid and yoke surfaces with a towel. Be sure lid o-ring
groove, safety valve opening and pressure gauge opening are
clean and free of baked-on shortening.
• DO NOT immerse lid assembly in water.
• DO NOT spray water on lid assembly
4
Drain
shortening
• Put filter unit under drain. Open drain valve slowly to let
shortening drain into the filter unit. Let fryer drain until no
more shortening flows from valve.
1
Wells WFPE-68KFC Pressure Fryer
• DO NOT remove lid assembly from fryer for cleaning.
01/26/04
Page 5
Wells WFPE-68KFC Pressure Fryer
5
Remove
heat plate
• Wear protective gloves and use collector
removal hook on basket hook assembly to
remove heat plate.
• Take heat plate to sink for cleaning.
6
Drain
collector
• With heat resistant glove on hand, lower
displacement tool into collector to force
shortening into filter tank.
• DO NOT use displacement tool to dip
shortening from fryer. When cracklings
flow from drain valve, remove
displacement tool. Clean at sink.
7
Remove
collector
• Insert collector removal hook of the basket
hook assembly into loop inside collector to
lift out of frypot. Pour as much shortening
as you can (but not cracklings) into
shortening filter.
• Leave cracklings and small amount of
shortening in collector.
8
Filter
shortening
5 minutes
• Refer to filter procedure in Equipment Manual, Volume 2, for
the filter being used.
9
Drain
cracklings
• Pour cracklings from collector into cone filter over stockpot.
Let cracklings drain overnight in holding cabinet.
For information on holding/preparing cracklings, refer to the
"KFC Chicken Gravy" procedure, in Product Manual, Volume 1.
Page 6
01/26/04
Wells WFPE-68KFC Pressure Fryer
Wells WFPE-68KFC Pressure Fryer
10 Refrigerate
collector
gasket in
water
11 Clean
frypot
• Remove o-ring from collector and clean with cold, damp
towel. Place o-ring in fresh water in refrigerator.
• Clean collector at sink with HOT water ONLY.
• Place large stockpot under frypot
• Scrape crackling ring from frypot and discard.
• Rinse frypot with hot water.
• Scrub frypot behind heating element coils and
heater brackets with the teflon brush and hot
water, then rinse.
• Wipe frypot with damp towel, then with dry
towel.
• Remove stockpot.
coils
12 Dry
and
brackets
13 Replace
lid and
collector
o-rings
• Wrap dry towel around bristle end of brush and dry heating
element coils and brackets.
• Remove spare lid and collector o-rings from refrigerator.
• Dry o-rings thoroughly, then lubricate with liquid shortening.
• Install lid o-ring on lid and collector o-ring on collector.
(The collector o-ring must be in place to prevent shortening
from leaking.)
14 Install
collector
• Install collector in frypot. Press to seat against bottom of fryer.
• Leave heat plate on top of fryer overnight.
15 Remove
and clean
condensate
tray
• Slide condensate tray out of fryer. Use both handles to carry.
• Pour contents into a container to let shortening solidify. Skim
off shortening and discard. Pour ONLY WATER down floor
drain.
• Clean condensate tray. Spray at sink with hot water ONLY.
• Dry condensate tray with a towel, then reinstall in fryer.
Wells WFPE-68KFC Pressure Fryer
01/26/04
Page 7
Wells WFPE-68KFC Pressure Fryer
16 Clean
dead
weight
assembly
• Turn twist latches. Lift dead weight cover off of fryer.
• Clean inside cover with damp towel.
• Lift out deadweight. (ball-end deadweights must be handled
carefully to prevent damage to round end. Dents or scratches
will cause steam leakage that could affect product quality.)
• Clean valve seat with the end of a dry towel.
• Clean deadweight with cold, damp towel. Reinstall
deadweight. Lower carefully to avoid damage.
17 Refill
frypot
• Be sure gasket is in place. Replace dead weight cover and
latch securely.
• Check that drain valve is closed.
• Pump filtered shortening into fryer. Lower lid to the horizontal
position, then slide lid over frypot.
18 Wipe
surfaces
Page 8
• Wipe outside of fryer with:
– a dry towel to remove excess shortening, then
– a cold, damp, sanitized towel, then
– a dry towel.
01/26/04
Wells WFPE-68KFC Pressure Fryer
Wells WFPE-68KFC Pressure Fryer
Checking Fryer Recovery Rate – Monthly
• The fryer recovery rate check is necessary to determine if the fryer is
heating correctly. During start up, using a stopwatch or a watch with a
second hand, start timing once the display reads 275°F. When the fryer
reaches 300°F, stop and note the length of time for the fryer to heat up.
Compare this to the ideal recovery range. If the time is higher than the
maximum recovery range, contact maintenance. If the fryers don't
recover in the allotted time, the product will not be cooked to KFC
standards.
Ideal Recovery Range
1 minute
Maximum Recovery Range
1 minute 30 seconds
Changing Shortening
Wear heat resistant gloves and goggles while
performing these steps.
• Shortening must be changed and inside of fryer
must be cleaned when visibility is less than
3" on visibility tester, if shortening smokes
excessively, or if off-flavors develop.
• Make sure grease barrel has room for old
shortening. DO NOT pour shortening down
floor drain.
Check visibility daily when shortening is at drop
temperature. You must change the shortening if
you can’t see the plate when shortening touches the
3” mark on the rod.
For details on using the visibility tester, see
"Shortening Management" chapter in
Standards Library Vol. 1.
1
Melt new
shortening
Wells WFPE-68KFC Pressure Fryer
• Slowly, melt 68 lbs. new, solid shortening pieces in stockpots on stove.
• Slide pivot tube forward until it drops into the indents in the rods.
• Slide lid and yoke assembly to the rear until the lid pivot engages the
pivot tube.
Raise lid and tilt to rear.
Note: For melting shortening in the fryer, follow procedures in Volume 1,
"Shortening Management" page 6.
01/26/04
Page 9
Wells WFPE-68KFC Pressure Fryer
2
Remove
old
shortening
• Turn fryer and circuit breaker OFF or unplug from electrical outlet. Let
shortening cool.
• With shortening shuttle:
-Drain shortening from fryer drain into shortening shuttle.
-Discard in grease barrel.
-Refer to the "Shortening Shuttle" or "Fat Boy Shortening
Handler" procedure in the Equipment Manual, Volume 2.
• Without shuttle:
-Drain shortening from fryer drain into a stockpot. Discard in
grease barrel.
-Use collector removal tool to remove collector.
3
Collect
Cracklings
• Pour cracklings into cone filter over stockpot. Let cracklings drain in
upright holding cabinet. Discard shortening.
4
Clean
collector
• Remove o-ring from collector and clean with cold, damp, sanitized
towel. Place in fresh water in refrigerator. Take collector to sink and
spray with hot water, then dry. Place an empty stockpot under frypot.
5
Clean
lid
• Wipe lid with a dry towel. Clean o-ring with cold, damp, sanitized towel
and place in refrigerator in a container of clean water.
6
Scrub
frypot
• Scrub the inside, including heating elements, brackets, and drain port,
with brush and hot water.
7
Install
Collector
• Wipe heating elements and inside frypot with dry towel.
8
Add new
shortening
• Install collector with a spare collector o-ring that has been submerged,
then close drain valve.
Note: For melting shortening in the fryer, follow procedures in Volume 1,
"Shortening Management" page 6.
If melting shortening on stove:
• Pour melted shortening into frypot to cover heater elements.
• Lubricate clean lid o-ring with shortening, then install on lid.
• Lower lid to the horizontal position.
Page 10
01/26/04
Wells WFPE-68KFC Pressure Fryer
Wells WFPE-68KFC Pressure Fryer
Wells WFPE-68KFC Pressure Fryer
01/26/04
Page 11
Wells WFPE-68KFC Pressure Fryer
Parts Description – Wells WFPE-68KFC Pressure Fryer
accessories
Part
Function
Fryer basket
Used to rack and to cook chicken.
Collector removal hook
Used to remove and to install heat plate and collector in frypot. Part of
basket hook assembly.
Basket hook assembly
Used to lower and remove 6-head fryer basket from frypot.
Heat plate
Sets in collector and transfers heat from frypot to keep shortening melted in
the collector.
Displacement tool
Used to force shortening from collector through drain valve.
Stirring tool
Used to break up solidified shortening in the collector and to stir shortening.
Fryer basket
(6-tier with cover rack)
Page 12
Basket hook assembly with collector
removal hook
01/26/04
Wells WFPE-68KFC Pressure Fryer
Wells WFPE-68KFC Pressure Fryer
Heat plate
Displacement tool
Wells WFPE-68KFC Pressure Fryer
Stirring tool
01/26/04
Page 13
Wells WFPE-68KFC Pressure Fryer
Problem–Solving –– Wells WFPE-68KFC Pressure Fryer
Problem
No heat
Hi-Limit trips
Possible Cause
•
•
•
•
•
•
•
•
Fryer will not
build pressure
Page 14
Solution
•
•
•
•
•
•
•
Turn circuit breaker ON.
Turn POWER switch ON.
Connect power cord.
Contact maintenance.
Contact maintenance.
Clean hi-limit thermobulb.
Clean temp sensor.
• Cover loose.
• Gasket damaged, missing or dirty.
• Turn fryer OFF, contact
maintenance.
• Turn fryer OFF, contact
maintenance.
• Clean or replace.
• Clean groove.
• Contact maintenance.
• Replace lid gasket.
• Clean lid gasket.
• Contact maintenance.
• Discard chicken – give basket
slight twist when lowering into
"pot" to make sure it seats.
• Tighten cover twist-latches.
• Replace or clean gasket.
• Muffler drain plugged.
• Contact maintenance.
• Frypot overfilled.
• Shortening in collector stirred after
start-up.
• Collector overfilled with cracklings.
• Fill to correct line in rear of frypot
when temperature is at droP.
• DO NOT stir collector after
cooking first round.
• Fryer parts not dried during
cleaning.
• Too much chicken/chicken weight
too high.
• Empty cracklings at least 2 times a
day, more often if cooking back to
back rounds continuously.
• Replace o-ring
• Clean deadweight and seat
• Turn fryer OFF, contact
maintenance.
Fryer heats too
•
slowly
Shortening leaks •
from base of fryer •
•
Steam leaking
•
around lid
•
•
•
Steam leaking
from pressure
relief assembly
Shortening leaks
from back of fryer
Shortening
boils over
Circuit breaker OFF.
ON/OFF switch OFF.
Fryer unplugged.
Hi-Limit tripped
Defective computer or component.
Thermobulb contaminated with crumbs.
Temp sensor contaminated with
crumbs.
Hi-limit thermostat or internal
component damaged.
One or two heating elements not
working.
Collector gasket damaged or dirty.
Collector gasket groove dirty.
Drain valve leaking.
Defective lid gasket.
Dirty lid gasket.
Lid damaged.
Basket of chicken not fully seated in
frypot; lid not fully lowered.
• Lid o-ring damaged or missing
• Deadweight or seat dirty
• Damaged internal component
01/26/04
Wells WFPE-68KFC Pressure Fryer
Wells WFPE-68KFC Pressure Fryer
Problem–Solving –– Wells WFPE-68KFC Pressure Fryer (continued)
Problem
Cannot lower lid
into frypot
Cannot raise lid
from frypot
Basket cannot be
lowered into
frypot
Possible Cause
• Pivot tube engaged.
•
• Damaged component.
•
• Pressure not bled off.
•
• Proper procedure not used.
•
• Frypot full of cracklings.
• Drain shortening, clean out
cracklings.
• Turn fryer OFF, contact
maintenance.
• Contact maintenance
• Damaged internal components.
Indicator lamps
• Bulbs burned out.
not working
Hi-limit
• High heat thermostat or other
“SERVICE” light
component defective.
stays ON
Display reads HI • Computer or component
with steady alarm
malfunction.
Display reads
PROB
Solution
Disengage pivot tube from lid
pivot bracket.
Turn fryer OFF, contact
maintenance
Wait until pressure gauge reads
zero.
Turn control handle fully
counterclockwise to disengage
cam pawl, then clockwise to
raise.
• Turn fryer OFF, contact
maintenance.
• Turn fryer OFF, contact
maintenance.
• Indicated temperature probe failure. • Turn fryer OFF, contact
maintenance.
Wells WFPE-68KFC Pressure Fryer
01/26/04
Page 15
Wells WFPE-68KFC Pressure Fryer
434 WFPE-68KFC Standard Library Operating Instruction
Page 16
01/26/04
p/n 305875 Rev. A ECN-12626
Wells WFPE-68KFC Pressure Fryer