1
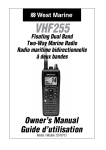
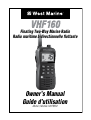
VHF155
Floating Two-Way
Marine Radio
Radio
Two-WayMarine
Radio maritime bidirectionnelle flottante
Owner’s Manual
Guide d’utilisation
Model / Modèle 14078562
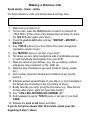
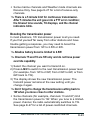
Making a Distress Call
Speak slowly - clearly - calmly.
For future reference, write your boat’s name & call sign here:
1. Make sure your radio is on.
2. On the radio, press the 16/9-Tri button to switch to Channel 16
(156.8 MHz). (If the corner of the display does not show 16, press
the 16/9-Tri button again until it does.)
3. Press the push to talk button and say: “MAYDAY -- MAYDAY -MAYDAY.”
4. Say “THIS IS {name of your boat (three times) and call sign/boat
registration number (once)}.”
5. Say “MAYDAY {name or call sign of your boat}.”
6. Tell where you are: (what navigational aids or landmarks are near,
or read the latitude and longitude from your GPS).
7. State the nature of your distress, (e.g. are you sinking, medical
emergency, man overboard, on fire, adrift, etc.
8. State the type of assistance you need (medical, towing, pumps,
etc.).
9. Give number of persons aboard and conditions of any injured
persons.
10. Estimate present seaworthiness of your ship (e.g. how immediate is
the danger due to flooding or fire or proximity to shore).
11. Briefly describe your ship, giving the ship name (e.g. “Blue Duck is
32 foot cabin cruiser, white hull, blue deck house”).
12. Say: “I WILL BE LISTENING ON CHANNEL 16.”
13. End message by saying “THIS IS {name or call sign of your boat},
OVER.”
14. Release the push to talk button and listen.
If you do not get an answer after 30 seconds, repeat your call,
beginning at step 3, above.
Faire un appel de détresse
Faire un appel de détresse vocal
Parlez lentement – clairement – calmement.
Pour toute référence ultérieure, transcrivez ci-dessous le nom et l’indicatif
d’appel de votre bateau :
1. Vérifiez si votre radio est en marche.
2. Appuyez sur la touche 16/9-Tri de la radio afin de commuter au canal 16 (156,8
MHz). (Si le canal 16 n’apparaît pas à l’affichage, appuyez de nouveau sur la
touche 16/9-Tri jusqu’à ce qu’il soit affiché.)
3. Appuyez sur le bouton de microphone push to talk et dites :“MAYDAY - MAYDAY
– MAYDAY”.
4. Donnez l’identité de votre navire en disant : “ICI {nom de votre bateau (trois fois) ou
indicatif d’appel et le numéro d’identification de votre bateau (une fois)}”.
5. Dites “MAYDAY {nom ou indicatif d’appel de votre bateau} une fois”.
6. Donnez votre position : (quels sont les points de repère ou aides à la navigation
près de vous ou lisez les coordonnées de longitude et de latitude apparaissant sur
votre dispositif GPS).
7. Révélez la nature de votre détresse (par exemple, nous sommes en train de couler,
urgence médicale, un homme à la mer, un incendie, nous sommes à la dérive, etc.
8. Révélez la nature de l’assistance désirée (médicale, remorquage, essence, etc.)
9. Donnez le nombre de personnes à bord et les conditions des blessés, s’il y en a.
10. Donnez la condition de navigabilité actuelle de votre navire, tel que le degré de
l’urgence par rapport à l’inondation, à l’incendie ou à votre proximité de la côte.
11. Donnez une brève description de votre navire en donnant le nom du bateau (par
exemple, “Blue Duck est un yacht de croisière de 32 pieds, avec une coque blanche
et un rouffle bleu.”).
12. Dites : “JE VAIS ÉCOUTER SUR LE CANAL 16”.
13. Terminez le message en disant “ICI {nom ou indicatif d’appel de votre bateau}, À
VOUS”.
14. Relâchez le bouton push to talk du microphone et écoutez.
Si vous n’obtenez pas de réponse après 30 secondes, répétez l’appel
encommençant à l’étape 3 ci-dessus.
Table of Contents
Making a Distress
Call............. (inside front cover)
Introduction............................. E-1
Features................................... E-1
Getting Started........................ E-4
What’s Included........................ E-4
Parts of the VHF160................. E-5
Front view........................... E-5
Back view............................ E-5
Charger............................... E-7
Reading the Display................. E-7
Display icons and what
they mean...................... E-8
How It Works........................... E-9
Normal Mode Operation......... E-10
Normal mode with
Weather Alert Watch.... E-10
Normal mode with Triple
Watch or Dual Watch... E-11
Scan Mode Operation............. E-11
Using the radio in Scan
mode .......................... E-12
Scan mode with Weather
Alert Watch.................. E-12
Scan mode with Triple
Watch or Dual Watch... E-13
Both Weather Alert and
Triple/Dual Watch in
Scan mode.................. E-14
Weather Mode........................ E-14
Using the radio in weather
mode........................... E-15
Weather mode with
Weather Alert Watch.... E-15
Weather mode with Triple
Watch or Dual Watch... E-15
Setting Up the Hardware...... E-16
Attaching the Antenna............ E-16
Installing the Battery............... E-16
Using the Alkaline Battery
Tray.................................... E-16
Mounting the Charger............. E-18
Charging the Battery............... E-18
Important notes on
charging the battery..... E-19
Attaching the Belt Clip............ E-19
Using Your Radio.................. E-20
Turning It On . ........................ E-20
Setting It Up............................ E-20
Changing the volume ....... E-20
Setting the Squelch level.. E-20
Reading volume and
squelch level
on battery icon............. E-21
Setting the UIC channel
mode (USA/CAN/INT). E-22
Using the WX Mode................ E-22
Making a Transmission........... E-22
Selecting a channel........... E-22
Making a transmission...... E-22
Boosting the
transmission power..... E-23
Saving Channels to Memory.. E-24
Special Features..................... E-24
Using the Strobe SOS
Light/Flashlight............ E-24
Turning the key beep on
and off.......................... E-25
Setting Key Lock............... E-25
Using the external
speaker/Mic jack.......... E-25
Using the Battery Save
feature......................... E-25
Maintenance and
Troubleshooting................. E-27
Common Questions................ E-27
Channels and Frequencies
(MHz)................................... E-31
US Channel Frequencies and
Names................................ E-31
Canadian Channel
Frequencies and Names.... E-32
International Channel
Frequencies and Names.... E-35
Weather Channel Frequencies
and Names......................... E-37
Regulations and Safety
Warnings............................ E-38
Maritime Radio Services
Operation............................ E-38
Basic Radio Guidelines.......... E-38
Introduction
Features
Your radio provides the following key features:
Submersible design. Complies with floating JIS8/IPX8
water-resistant standards, which means the radio can
be submerged in 1.5 meters of water for 1 hour without
damage.
##Notes:
The radio will only meet this rating if fully assembled
and all rubber seals and sealing plugs are well
maintained and correctly fitted. This means that the
speaker microphone is attached or the sealing plug is
fitted, and the battery pack (or tray) and antenna are
attached and securely fastened.
After your radio is submerged in water, you might
notice that the sound is distorted. This is because
West Marine VHF160 Radio Owner’s Manual
E-1
there is still water remaining in and around the
speaker and microphone. Just shake the radio to
clear excess water, and the sound will return to
normal.
If your radio is exposed to salt water, clean it
thoroughly with fresh water and dry it before turning
it on.
The charger is not waterproof.
Memory Scan mode. Lets you save channels to memory
and monitor them in quick succession.
Transmitter power level select/Boost. Lets you boost
the transmitter power from 1W to 2.5W or 6W for added
transmission distance.
Battery level display and low battery alert.
Dual and Triple Watch operation. These different Watch
modes let you monitor up to one Coast Guard Distress/
Hailing channel and one weather channel along with one
regular marine channel.
All marine VHF channels for the U.S., Canada, and
international waters.
Battery Save. The Battery Save feature automatically
turns off RX power at regular intervals to save battery
power.
National Oceanic and Atmospheric Administration
(NOAA) Weather Channel watch. Sounds a warning
tone when a hazard alert is issued.
SOS Strobe/Flashlight. A high intensity strobe LED can
be set to blink an SOS pattern or to be steady on.
Emergency 16/9 Channel monitoring. Set unit to scan
one or both of these emergency channels regularly within
normal scanning cycles.
E-2
West Marine VHF160 Radio Owner’s Manual
Key Lock. Locks keys to prevent accidentally changing
channels or entering data.
Nine weather channels.
Selectable Volume (0 - 9) and Squelch (0 - 3) levels.
West Marine VHF160 Radio Owner’s Manual
E-3
Getting Started
What’s Included
Antenna
Charging Cradle
Lithium Ion Poly
Battery
Alkaline Battery Tray
(batteries not included)
VHF160 Radio
DC Charging
Adapter
AC-DC Charging
Adapter
Screws for Charging
Cradle
Wrist Strap
Belt Clip
If any pieces are missing or damaged, contact West Marine
(see back cover for contact information).
E-4
West Marine VHF160 Radio Owner’s Manual
Parts of the VHF160
Front view
Antenna
External speaker and
microphone
LCD display
Wrist strap
anchor
Channel up
button
Power button
Push to talk
button
Boost
button
16/9-Tri
(16/9- triple
watch) button
Mem (memory)
SOS button
WX-Alert
(weather-alert)
button
Strobe
SOS light
L/M/H button
LOCK/UIC
button
Channel down
button
Volume/
Squelch
button
Scan/Dual
(scan-dual
watch) button
Microphone
Speaker
Back view
Battery
latch
Battery charging
contacts
Battery
Belt clip
West Marine VHF160 Radio Owner’s Manual
E-5
Button
Power
Press to...
NA
PTT (Push
NA
to Talk)
Boost
16/9/TRI
MEM/SOS
WX/
ALERT
Channel
Up
L/M/H
LOCK/UIC
Channel
Down
E-6
Press and hold to...
Turn the radio on or off.
Talk/transmit on a
channel.
NA
Transmit with a higher
power level.
1st press: Go to channel 16.
2nd press: Go to channel 9.
3rd press: Go back to the
starting channel.
Turn Triple Watch on
and off.
Turn on the SOS signal.
Save a channel into memory Press and hold again to
turn on flashlight.
or delete a channel from
memory.
Press and hold again to
turn off the LED light.
Places radio into Weather
Turn Weather Alert Watch
mode so you can listen to
on and off.
the weather channels.
Move up one channel or
Move quickly up the
channels/ squelch/volume
squelch/volume step at a
time.
steps.
Change the transmit power
NA
(see page E-9).
Switch from US to
Lock the keys; press and
Canadian or International
hold again to unlock.
channels.
Move down one channel
Move quickly down the
or squelch/volume step at
channels/squelch/volume
a time.
steps.
West Marine VHF160 Radio Owner’s Manual
Button
SCAN/
DUAL
Press to...
Start scanning channels
saved in memory.
Press and hold to...
Turn Dual Watch on and
off.
VOL/SQ
Increase or decrease the
volume.
Increase or decrease the
squelch level.
Charging
contacts
Power jack
[cigarette (DC) or
wall (AC) plug]
Charger
Charging
latches
Screw holes
for mounting
CHARGE LED
Reading the Display
The LCD display shows different information depending on
what you are doing. This sample screen shows some of this
information. The following table shows all the possible icons
and what they mean.
Transmit
power level
The radio is
transmitting
Current
channel
number
Battery
status icon
UIC channel
mode
Key lock
is on
Weather
Alert Watch
is on.
Watch
mode The radio is in
scan mode
This channel is
stored in memory.
West Marine VHF160 Radio Owner’s Manual
E-7
Display icons and what they mean
Icon
What it means
You are currently transmitting.
LO, MID, HI
The transmitter power is set to L (Low - 1W), M
(Mid - 2.5W), or H (HIGH - 6W).
The keys are locked.
LOCK
US, CAN, or INT
TRI or DUAL
Indicates if the radio is set for US channels,
CANadian channels, or INTernational channels.
TRIple Watch or DUAL Watch is turned on.
MEM
The current channel is saved in memory.
SCAN
The radio is in Scan mode.
WX
The radio is in Weather mode
Weather Alert Watch is turned on.
The battery is fully charged, mostly charged, half
charged, mostly empty, or completely empty.
88A
E-8
Current channel number
West Marine VHF160 Radio Owner’s Manual
How It Works
Your radio has three main operation modes: Normal, Scan,
and Weather.
Mode
What it does
Use it when you
want to...
Monitors a single marine
Monitor a channel or
channel and lets you talk
talk to another radio.
on that channel.
Check a small group
Monitors all the channels
Scan
of regularly-used
you save into memory.
channels for traffic.
Monitors the selected
Hear the current or
Weather
NOAA weather channel. forecasted weather.
Normal
To turn it
on/off
(default
mode)
Press
SCAN/
DUAL.
Press WX/
ALERT.
In addition to the three operation modes, your radio provides
three different watch modes which you can activate during
any operation mode. In the watch modes, the radio briefly
checks for activity on a specific channel, then returns to its
previous operation.
Watch mode
What it does
Checks the last-used weather
Weather Alert
channel for hazard alerts
Watch
every 7 seconds.
Checks channel 16 for activity
Dual Watch
every 2 seconds.
Checks channels 16 and 9 for
Triple Watch
activity every 2 seconds.
To turn it on/off
Press and hold WX/
ALERT for 2 seconds.
Press and hold SCAN/
DUAL for 2 seconds.
Press and hold 16/9/TRI
for 2 seconds.
##Private boats must monitor channel 16 whenever they are
underway. Water-going vessels should have either Triple
Watch or Dual Watch on at all times.
West Marine VHF160 Radio Owner’s Manual
E-9
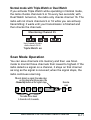
Normal Mode Operation
To transmit, remove the radio from the charger, then press
and hold Push to Talk. Release the button when you are
finished talking.
For the best sound quality, hold the microphone about two
inches from your mouth while you’re talking.
Press Channel up to move up one channel at a time. Press
and hold the button to scroll quickly up the channels.
Press Channel down to move down one channel at a time.
Press and hold the button to scroll quickly down the
channels.
To change the transmit power, press L/M/H. The transmit
power switches to the next transmit power each time you
press this button.
Normal mode with Weather Alert Watch
If you activate
Monitoring Channel 25
Weather Alert
Watch while
Every few seconds,
operating in
the radio checks
Normal mode,
the last-used
the radio checks the most recently
weather channel.
used weather channel every few
wx
seconds. If it detects a weather or
other hazard alert, it will switch to that
weather channel. (If you are actively
WX Alert
transmitting, the radio waits until you
Watch on
finish your transmission before
checking the weather channel.)
E-10
West Marine VHF160 Radio Owner’s Manual
Normal mode with Triple Watch or Dual Watch
If you activate Triple Watch while operating in Normal mode,
the radio checks channels 9 or 16 every two seconds; with
Dual Watch turned on, the radio only checks channel 16. The
radio will not check channels 9 or 16 while you are actively
transmitting; it waits until your transmission is finished and
then checks the channels.
Monitoring Channel 25
09 16
09 16
Every 2 seconds, the radio
checks channels 9 & 16.
09 16
Triple Watch on
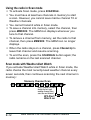
Scan Mode Operation
You can save channels into memory and then use Scan
mode to monitor those channels from lowest to highest. If the
radio detects a signal on a channel, it stays on that channel
as long as the signal is received; when the signal stops, the
radio continues scanning.
When it detects a signal, the radio stays
on the channel until you press the
Channel Up button or the signal stops.
08
10
11
12
13
Resume
scan
14
15
17
The radio scans about
5 channels in 0.5 seconds.
West Marine VHF160 Radio Owner’s Manual
E-11
Using the radio in Scan mode
To activate Scan mode, press SCAN/DUAL.
You must have at least two channels in memory to start
a scan. However, you cannot save marine channel 70 or
Weather channels.
You cannot transmit while in Scan mode.
To save a channel into memory, select the channel, then
press MEM/SOS. The MEM icon displays whenever you
tune to that channel.
To remove a channel from memory, set the radio to that
channel, then press MEM/SOS. The MEM icon no longer
displays.
When the radio stays on a channel, press Channel Up to
leave that channel and resume scanning.
To end the scan, press the SCAN/DUAL button again; the
radio remains on the last scanned channel.
Scan mode with Weather Alert Watch
If you activate Weather Alert Watch while in Scan mode, the
radio checks the most recently/used weather channel every
seven seconds, then continues scanning the next channel in
memory:
Memory Channel Scan
08
10
11
12
13
14 15 17 20 24 25
Every 7 seconds, the radio
checks the last-used
weather channel, then
scans the next channel.
wx
WX Alert
Watch on
E-12
West Marine VHF160 Radio Owner’s Manual
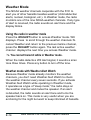
Scan mode with Triple Watch or Dual Watch
If you activate Triple Watch while operating in Scan mode,
the radio checks channels 9 or 16 every two seconds, then
goes on to scan the next channel; with Dual Watch turned
on, the radio only checks channel 16:
Memory Channel Scan
08 10 11 12 13 14
Every 2 seconds, the
radio checks channels
9 & 16, then scans
the next channel.
09 16
Triple
15
17
20
24
25
Watch on
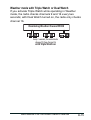
Both Weather Alert and Triple/Dual Watch in Scan mode
You can activate Weather Alert Watch and Triple/Dual Watch
at the same time. The radio performs both checks at their
scheduled time:
Memory Channel Scan
08 10 11 12 13 14 15 17 20 24 25
Every 2 seconds, the
Every 7 seconds, the radio
radio checks channels
checks the last-used
9 & 16, then scans
weather channel, then
the next channel.
scans the next channel.
09 16
Triple
WX Alert wx
Watch on
Watch on
West Marine VHF160 Radio Owner’s Manual
E-13
Weather Mode
The NOAA weather channels cooperate with the FCC to
alert you of other hazards besides weather (child abduction
alerts, nuclear, biological, etc.). In Weather mode, the radio
monitors one of the nine NOAA weather channels. If any type
of alert is received, the radio sounds an alert tone and the
display blinks.
Using the radio in weather mode
Press the WX/ALERT button to access Weather mode. WX
displays. Press to scroll through the weather channels.To
cancel Weather and return to the previous marine channel,
press the WX/ALERT button again. The last active weather
channel displays the next time you access Weather mode.
##You cannot transmit while in Weather mode.
When the radio detects a WX Alert signal, it sounds a siren
tone three times. Press any button to turn off the tone.
Weather mode with Weather Alert Watch
Because Weather mode already monitors the weather
channels, you don’t need Weather Alert Watch to check
the weather channel every seven seconds. If you activate
Weather Alert Watch while operating in Weather mode,
it operates as a type of “sleep mode;” the radio stays on
the weather channel and mutes the speaker. If an alert
is detected, the radio sounds an alert tone and turns the
speaker back on. This mode is very useful when you are
anchoring for the night but want to keep informed of hazards.
E-14
West Marine VHF160 Radio Owner’s Manual
Weather mode with Triple Watch or Dual Watch
If you activate Triple Watch while operating in Weather
mode, the radio checks channels 9 and 16 every two
seconds; with Dual Watch turned on, the radio only checks
channel 16.
Monitoring Weather Channel WX08
09 16
09 16
09 16
Every 2 seconds, the radio checks
channel 9, then channel 16
with Triple Watch on
West Marine VHF160 Radio Owner’s Manual
E-15
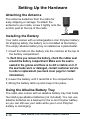
Setting Up the Hardware
Attaching the Antenna
The antenna detaches from the radio for
easy shipping or storage. To attach the
antenna to your radio, screw it tightly onto the
anchor post at the top of the radio.
Installing the Battery
Your radio comes with a rechargeable Li-Ion Polymer battery;
for shipping safety, the battery is not installed at the factory.
The empty alkaline battery tray is installed as a placeholder.
1)Insert the tabs on the battery into the notches at the top of
the battery compartment.
##Each time you remove the battery, check the rubber seal
around the battery compartment. Make sure the seal is
seated in the groove and there is no dirt or debris on it. If
the seal looks worn or damaged, contact customer service
to order a replacement (see back cover page for contact
information).
2)Lower the battery until it rests flat in the compartment.
3)Bring the battery latch up and snap it into place.
Using the Alkaline Battery Tray
The radio also comes with an alkaline battery tray that holds
four AAA-type alkaline batteries (not included). You can use
alkaline batteries as a backup for the Li-Ion Polymer battery
so you can still use your radio while your Li-Ion Polymer
battery is recharging.
E-16
West Marine VHF160 Radio Owner’s Manual
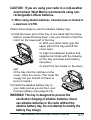
CAUTION: If you are using your radio in a cold-weather
environment, West Marine recommends using nonrechargeable Lithium batteries.
##When using alkaline batteries, transmit power is limited to
a maximum of 2.5W.
Follow these steps to use the alkaline battery tray:
1)Hold the lower part of the tray in one hand with the three
battery contacts facing down. Use your thumb to hold the
notch on the lower part of the tray.
2) With your other hand, grip the
upper part of the tray and lift the
cover open.
3) Align the batteries’ positive and
negative terminals with the drawing
on the tray and snap each battery
into place.
4) Insert the two hooks on the lower
part
of the tray into the notches on the
cover; close the cover. (The cover fits
snugly but you should not have to
force it closed.)
5)Install the alkaline battery tray in
your radio just as you do the Li-Ion
Polymer battery (see page E-15).
WARNING! The tray is designed to prevent the
accidental charging of alkaline batteries. Never
use alkaline batteries in the radio without the
alkaline battery tray. Do not attempt to modify the
battery tray design.
West Marine VHF160 Radio Owner’s Manual
E-17
Mounting the Charger
You can mount the charger on any flat surface.
1)Use the two holes at the base of the
charger as a template to mark the drill
holes.
2)Using a 1/8-inch (or 3 mm) drill bit, drill
two holes 1/2 inch (13mm) deep.
3)Use the provided screws to attach the
charger to the surface.
Charging the Battery
Your radio includes a charger and a
rechargeable battery pack. Place your radio in
the charger with the display facing forward.
Make sure that the CHARGE LED on the
charger turns orange.
Cautions:
Use only the battery and charger supplied with this radio.
Using a different charger or battery can damage the radio
and create a risk of fire or shock.
The charger is not waterproof. If the charger falls into the
water, unplug it before attempting to remove it from the
water. After you remove the charger from the water, please
contact West Marine directly (see back cover for contact
information).
Wipe off dirt or shake water from your radio before placing
in the charger if your radio gets dirty or wet.
E-18
West Marine VHF160 Radio Owner’s Manual
Important notes on charging the battery
Charge the battery fully before using the radio. When the
battery is completely charged, the CHARGE LED turns
green.
Don’t use the charger when the ambient temperature is
below 0° C (32° F) or above 45° C (113° F).
If the radio is powered down, the battery can charge in
about seven hours. (If the radio is powered on, the battery
takes longer to charge.)
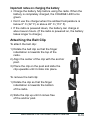
Attaching the Belt Clip
To attach the belt clip:
1)Rotate the belt clip so that the finger
indentation is towards the top of the
radio.
2)Align the center of the clip with the anchor
post.
3)Place the clip on the post and slide the
clip upwards until it clicks into place.
To remove the belt clip:
1)Rotate the clip so that the finger
indentation is towards the bottom
of the radio.
2)Slide the clip up until it comes free
of the anchor post.
West Marine VHF160 Radio Owner’s Manual
E-19
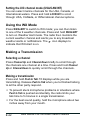
Using Your Radio
Turning It On
Press and hold POWER for at least two seconds to turn the
radio on. Press and hold POWER again to turn the unit off.
Setting It Up
Even though you can change your radio’s settings at any
time, you will probably want to establish initial settings after
you have turned it on for the first time. You will adjust some
of these settings on an as-needed basis, but some settings
might only need to be set once.
Changing the volume
To change the speaker volume, press VOL/SQ to enter
Volume Setting mode. O (for volume level 0 - 9) displays.
Press CHANNEL UP or CHANNEL DOWN to increase or
decrease the volume levels. Press VOL/SQ to save.
Setting the Squelch level
The VHF160 recognizes signals as transmissions if they
exceed a signal strength threshold.
Strong signals
Weak signals
Noise
No
Squelch
E-20
Medium
Squelch
High
Squelch
West Marine VHF160 Radio Owner’s Manual
Adjusting the squelch sets this threshold level. Increasing
squelch requires a signal to be stronger to be seen as a
transmission. If you set the squelch too high, you will risk not
receiving transmissions that are lower than that threshold.
Reducing the squelch allows weaker signals to be accepted.
However, if you lower the squelch too much, you will hear
white noise all the time
While listening to a channel, press and hold VOL/SQ to enter
Squelch Setting mode.The SQUELCH Level (S0)number
displays on the LCD. Press CHANNEL UP or CHANNEL DOWN to
increase or decrease the squelch levels (0 - 3). Press VOL/SQ
to save the setting.
##Note: Setting the squelch level too high may prevent
you from hearing weaker transmissions. If you are having
difficulty hearing a transmission, try setting the squelch
level lower.
Reading volume and squelch level on battery icon
When you adjust the volume or squelch levels, the 4 bars on
the battery icon display according to the volume and squelch
levels. For example, two bars display for VOL levels 3 and 4,
and Squelch level 2.
SQ Level
(0 - 3)
7-9
VOL
5-6
Level
3-4
(0 - 9)
1-2
3
2
1
0
No bars
Squelch
.
West Marine VHF160 Radio Owner’s Manual
E-21
Setting the UIC channel mode (USA/CAN/INT)
You can select marine channels for the USA, Canada, or
International waters. Press and hold LOCK/UIC to scroll
through USA, CANada, or INTernational channel options.
Using the WX Mode
Press WX/ALERT to switch to WX mode; you can then listen
to one of the 9 weather channels. Press and hold WX/ALERT
to turn on Weather Alert mode. The radio then monitors the
current weather channel and alerts you to any broadcast
icon displays to
weather alerts or notifications. The
indicate that WX Alert is on.
Making a Transmission
Selecting a channel
Press Channel Up and Channel Down briefly to scroll through
the channels one channel at a time. Press and hold Channel
Up or Channel Down to quickly scroll through the channels.
Making a transmission
Press and hold Push to Talk.TX displays while you are
transmitting. Release Push to Talk when you’re finished talking
to let the other party respond.
To prevent stuck microphone problems or situations where
Push to Talk is pushed accidentally, the radio limits your
talk time to 5 minutes in a single transmission.
For the best sound quality, hold the microphone about two
inches away from your mouth.
E-22
West Marine VHF160 Radio Owner’s Manual
Some marine channels and Weather mode channels are
Receive Only. See page E-27 for a list of receive-only
channels.
##There is a 5 minute limit for continuous transmission.
After 5 minutes the unit goes into a PTT error condition;
the timeout tone sounds, TX displays, and the channel
indicators blink.
Boosting the transmission power
In most situations, 1W transmission power is all you need.
If you find yourself far away from other stations and have
trouble getting a response, you may need to boost the
transmission power from 1W to 2.5W or 6W.
##Alkaline battery boost is limited to 2.5W
##Channels 75 and 76 are 1W only and do not have power
override capability.
1)Select the channel you want to transmit on.
2)Press L/M/H to switch to the next transmission power level
(for example, from 1W to 2.5W; from 2.5W to 6W, or from
6W back to 1W).
3)The display shows the new transmission power. The
transmit power remains at the new setting until you
change it again.
##Don’t forget to change the transmission setting back to
1W when you move close to other stations.
Some channels (for example, channels 13 and 67) limit
the transmission power to 1W. When you tune to a limitedpower channel, the radio automatically switches to 1W.
See page E-27 for a list of power-restricted channels.
West Marine VHF160 Radio Owner’s Manual
E-23
Saving Channels to Memory
If you find a channel you like and want to listen to it again,
save it to memory. Press MEM/SOS; the active channel is
stored in memory and MEM displays. Press SCAN DUAL to
scan the channels in memory.
##You must have at least 2 channels in memory in order to
use Scan mode. Channel 70 and WX channels cannot be
stored into memory.
Press SCAN/DUAL again to remove the channel from memory.
Special Features
Using the Strobe SOS Light/Flashlight
You can use this radio in an emergency. If you turn on the
strobe SOS high-intensity LED light on your radio, your radio
will blink “S O S” in international Morse Code. This will make
it easier for rescuers to find you faster.
##Your radio operates normally when the SOS LED strobe is
activated.
With the SOS LED
in this state -
Do This -
For this -
OFF
Press and hold Mem/
SOS for 2 seconds.
SOS LED signals SOS
in Morse code.
SOS
Press and hold Mem/
SOS for 2 seconds.
SOS LED remains
on continuously.
(Flashlight mode)
Continuous
Press and hold Mem/
SOS for 2 seconds.
SOS LED turns off.
E-24
West Marine VHF160 Radio Owner’s Manual
Turning the key beep on and off
Key beep is the tone that sounds when you press a key or a
button. You cannot change the key beep volume.
To turn key beep on or off, press and hold Channel up or
Channel down while turning on the radio. You may need to turn
off the radio first.
Setting Key Lock
You can lock and unlock the keypad by pressing LOCK/UIC.
If Key Lock is on, only PTT, Boost, and power on/off will
operate. Key Lock remains in memory when the radio is
turned off.
Key Lock will automatically turn off if a WX Alert signal is
received.
Using the external speaker/Mic jack
You can connect an optional external speaker-mic to this
watertight jack. Unscrew the cap, which is held by the rubber
cap-keeper to prevent loss. Insert the special gasketed
plug and screw down the shell, which prevents water from
entering the jack.
For details, consult your dealer or contact West Marine
directly (see back cover for contact information).
Using the Battery Save feature
The Battery Save feature automatically turns off receive
power at regular intervals to save battery power. Battery
Save turns of when receiving transmissions or transmitting
a response. It reactivates after 3 seconds of no activity
(transmit or receive).
West Marine VHF160 Radio Owner’s Manual
E-25
##Battery Save does not work while in Scan mode or in
Triple/Dual watch, and while WX alert is active.
E-26
West Marine VHF160 Radio Owner’s Manual
Maintenance and Troubleshooting
Due to its rugged design, your radio requires very little
maintenance. However, it is a precision electronic instrument,
so you should follow a few precautions:
If the antenna has been damaged, do not transmit except
in an emergency situation. Transmitting with a defective
antenna may cause further radio damage.
You are responsible for continued FCC technical
compliance of your radio.
Common Questions
Problem
The radio won’t turn
on.
The power LED on
the charger doesn’t
turn on.
The radio won’t
transmit.
Things to Try
Charge the radio.
– Don’t use the charger when the ambient
temperature is below 0° C (32° F) or above
45° C (113° F).
– Make sure the charging contacts on the
radio and charger are clean.
– Replace the battery.
Make sure you are not in Weather or Scan
mode.
Make sure you are not trying to transmit on a
receive-only channel or transmit at the wrong
power level for this channel (see the channel
lists starting on page E-27).
Check the battery power level; if it’s low, charge
the battery before trying to transmit.
Make sure the duration of each transmission is
less than 5 minutes.
West Marine VHF160 Radio Owner’s Manual
E-27
Problem
I can’t hear anything
from the speaker.
The sound is muffled
or the volume is low.
Noise comes out of the
speaker all the time.
I can transmit, but no
one can hear me.
I’m not getting hazard
alerts.
Things to Try
Adjust the squelch level; it is probably too high.
Clear water from the speaker grill.
Adjust the squelch level; it is probably too low.
Check your UIC channel settings: does the area
you are in use different channel assignments?
Make sure Weather Alert Watch is turned on.
The channel number on the display will flash if
the radio is in a Watch mode or in Scan mode.
Try turning off scanning, Weather Alert Watch,
Triple Watch, or Dual Watch (see page E-8).
Where can I find my
The serial number is on a plate inside the battery
radio’s serial number? compartment.
The display flashes,
and I don’t know why.
E-28
West Marine VHF160 Radio Owner’s Manual
Specifications
Weight
General
All US/International/Canada marine
channels
9 Weather channels
PLL
Transmit: 0.5 PPM (at 25°C) nominal
Receive: 0.5 PPM (at 25°C) nominal
-4°F (-20°C) to +122°F(+50°C)
Flexible Whip
Built-in Electret type
Liquid Crystal Display
8Ω 1.0 Watt
Rechargeable Lithium Ion Battery
7.4V 1160 mAh
5.95 (H) x 2.40 (W) x 1.69 (D) inch
142 (H) x 61 (W) x 43 (D) mm
9.9 oz (281g) (w/battery and antenna)
Frequency Range
Frequency Stability
Power Output
Spurious Emissions
Current Drain
Transmitter
156~158 MHz
±3 PPM (nominal)
1.0 W & 2.5W & 6W
70 dBm
1400 mA (6W) nominal
Channels
Freq. Control
Freq. Tol.
Oper. Temp.
Antenna
Microphone
Display
Speaker
Power Source
Size (without antenna)
Type
Frequency Range
Sensitivity
Receiver
Double Conversion Super Heterodyne
Phase Locked Loop system for Local
Oscillator
156~164 MHz
0.22 μV for 12dB SINAD (nominal)
West Marine VHF160 Radio Owner’s Manual
E-29
Squelch Sensitivity
Threshold 0.18 μV (nominal)
+5.0 dB @ 500 Hz; -6 dB @ 2000Hz
Audio Frequency Response
(nominal)
Adjacent Channel Selectivity 80 dB @ ±25 kHz (nominal)
Audio Output Power
1.0 W @10% THD (nominal)
Squelched: 38 mA; Max. Audio: 230 mA
Current Drain
(nominal)
E-30
West Marine VHF160 Radio Owner’s Manual
Channels and Frequencies (MHz)
US Channel Frequencies and Names
Ch
1A
5A
6
7A
8
9
10
11
12
13
14
15
16
17
18A
19A
20
20A
21A
22A
23A
24
25
26
27
28
63A
RX Freq
156.050
156.250
156.300
156.350
156.400
156.450
156.500
156.550
156.600
156.650
156.700
156.750
156.800
156.850
156.900
156.950
161.600
157.000
157.050
157.100
157.150
161.800
161.850
161.900
161.950
162.000
156.175
US Marine Channels
TX Freq
Status
Name
156.050
Simplex Vessel traffic system/commercial
156.250
Simplex Vessel traffic system/commercial
156.300
Simplex Inter-ship safety
156.350
Simplex Commercial
156.400
Simplex Commercial
156.450
Simplex Non commercial
156.500
Simplex Commercial
156.550
Simplex Vessel traffic system
156.600
Simplex Vessel traffic system
156.650 Simplex, 1W Bridge to bridge
156.700
Simplex Vessel traffic system
Inhibit Receive only Environmental
156.800
Simplex Distress, safety, and calling
156.850 Simplex, 1W Govt maritime control
156.900
Simplex Commercial
156.950
Simplex Commercial
157.000
Duplex Port operation
157.000
Simplex Port operation
157.050
Simplex Coast guard only
157.100
Simplex Coast guard
157.150
Simplex Coast guard only
157.200
Duplex Marine operator
157.250
Duplex Marine operator
157.300
Duplex Marine operator
157.350
Duplex Marine operator
157.400
Duplex Marine operator
156.175
Simplex Vessel traffic system
West Marine VHF160 Radio Owner’s Manual
E-31
Ch
65A
66A
67
68
69
70
71
72
73
74
75
76
77
78A
79A
80A
81A
82A
83A
84
85
86
87
88
RX Freq
156.275
156.325
156.375
156.425
156.475
156.525
156.575
156.625
156.675
156.725
156.775
156.825
156.875
156.925
156.975
157.025
157.075
157.125
157.175
161.825
161.875
161.925
157.375
157.425
TX Freq
156.275
156.325
156.375
156.425
156.475
Inhibit
156.575
156.625
156.675
156.725
156.775
156.825
156.875
156.925
156.975
157.025
157.075
157.125
157.175
157.225
157.275
157.325
157.375
157.425
US Marine Channels
Status
Name
Simplex Port operation
Simplex Port operation
Simplex, 1W Bridge To Bridge
Simplex Non Commercial
Simplex Non Commercial
Receive only Digital Selective Calling
Simplex Non Commercial
Simplex Non Commercial (Ship-Ship)
Simplex Port Operation
Simplex Port Operation
Simplex, 1W Port Operation
Simplex, 1W Port Operation
Simplex, 1W Port Operation (Ship-Ship)
Simplex Non Commercial
Simplex Commercial
Simplex Commercial
Simplex Coast Guard
Simplex Coast Guard
Simplex Government
Duplex Marine Operator
Duplex Marine Operator
Duplex Marine Operator
Simplex Marine Operator
Simplex Commercial (Ship-Ship)
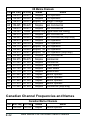
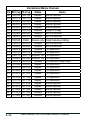
Canadian Channel Frequencies and Names
Canadian Marine Channels
Ch RX Freq TX Freq Status
Name
1 160.650 156.050
Duplex Marine Operator
E-32
West Marine VHF160 Radio Owner’s Manual
Ch
2
3
4A
5A
6
7A
8
9
10
11
12
13
14
15
16
17
18A
19A
20
21A
22A
23
24
25
26
27
28
60
61A
62A
63A
RX Freq
160.700
160.750
156.200
156.250
156.300
156.350
156.400
156.450
156.500
156.550
156.600
156.650
156.700
156.750
156.800
156.850
156.900
156.950
161.600
157.050
157.100
161.750
161.800
161.850
161.900
161.950
162.000
160.625
156.075
156.125
156.175
Canadian Marine Channels
TX Freq Status
Name
156.100
Duplex Marine Operator
156.150
Duplex Marine Operator
156.200 Simplex Canadian Coast Guard
156.250 Simplex Vessel Traffic System
156.300 Simplex Inter-Ship Safety
156.350 Simplex Commercial
156.400 Simplex Commercial
156.450 Simplex Boater Calling Channel
156.500 Simplex Commercial
156.550 Simplex Vessel Traffic System
156.600 Simplex Vessel Traffic System
156.650 Simplex, 1W Bridge To Bridge
156.700 Simplex Vessel Traffic System
156.750 Simplex, 1W Environmental
156.800 Simplex Distress, safety, calling
156.850 Simplex, 1W State Control
156.900 Simplex Commercial
156.950 Simplex Canadian Coast Guard
157.000 Duplex, 1W Port Operation
157.050 Simplex Canadian Coast Guard
157.100 Simplex Canadian Coast Guard
157.150
Duplex Canadian Coast Guard
157.200
Duplex Marine Operator
157.250
Duplex Marine Operator
157.300
Duplex Marine Operator
157.350
Duplex Marine Operator
157.400
Duplex Marine Operator
156.025
Duplex Marine Operator
156.075 Simplex Canadian Coast Guard
156.125 Simplex Canadian Coast Guard
156.175 Simplex Port Operation
West Marine VHF160 Radio Owner’s Manual
E-33
Ch
64
64A
65A
66A
67
68
69
70
71
72
73
74
75
76
77
78A
79A
80A
81A
82A
83
83A
84
85
86
87
88
E-34
RX Freq
160.825
156.225
156.275
156.325
156.375
156.425
156.475
156.525
156.575
156.625
156.675
156.725
156.775
156.825
156.875
156.925
156.975
157.025
157.075
157.125
161.775
157.175
161.825
161.875
161.925
157.375
157.425
Canadian Marine Channels
TX Freq Status
Name
156.225
Duplex Marine Operator
156.225 Simplex Port Operation
156.275 Simplex Port Operation
156.325 Simplex, 1W Port Operation
156.375 Simplex Bridge To Bridge
156.425 Simplex Non Commercial
156.475 Simplex Non Commercial
Inhibit Receive only Digital Selective Calling
156.575 Simplex Non Commercial
156.625 Simplex Non Commercial
156.675 Simplex Port Operation
156.725 Simplex Port Operation
156.775 Simplex, 1W Port Operation
156.825 Simplex, 1W Port Operation
156.875 Simplex, 1W Port Operation
156.925 Simplex Inter Ship
156.975 Simplex Inter Ship
157.025 Simplex Inter Ship
157.075 Simplex Canadian Coast Guard
157.125 Simplex Canadian Coast Guard
157.175
Duplex Canadian Coast Guard
157.175 Simplex Canadian Coast Guard
157.225
Duplex Marine Operator
157.275
Duplex Marine Operator
157.325
Duplex Marine Operator
157.375 Simplex Port Operation
157.425 Simplex Port Operation
West Marine VHF160 Radio Owner’s Manual
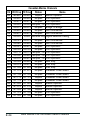
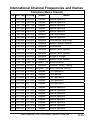
International Channel Frequencies and Names
Ch
1
2
3
4
5
6
7
8
9
10
11
12
13
14
15
16
17
18
19
20
21
22
23
24
25
26
27
28
60
61
RX Freq
160.650
160.700
160.750
160.800
160.850
156.300
160.950
156.400
156.450
156.500
156.550
156.600
156.650
156.700
156.750
156.800
156.850
161.500
161.550
161.600
161.650
161.700
161.750
161.800
161.850
161.900
161.950
162.000
160.625
160.675
International Marine Channels
TX Freq
Status
Name
156.050
Duplex Marine operator
156.100
Duplex Marine operator
156.150
Duplex Marine operator
156.200
Duplex Marine operator
156.250
Duplex Marine operator
156.300 Simplex Inter-ship safety
156.350
Duplex Marine operator
156.400 Simplex Commercial (ship-ship)
156.450 Simplex Boater calling channel
156.500 Simplex Commercial
156.550 Simplex Vessel traffic system
156.600 Simplex Vessel traffic system
156.650 Simplex Bridge to bridge
156.700 Simplex Vessel traffic system
156.750 Simplex, 1W Environmental
156.800 Simplex Distress, safety, calling
156.850 Simplex, 1W Govt maritime control
156.900
Duplex Port operation
156.950
Duplex Commercial
157.000
Duplex Port operation
157.050
Duplex Port operation
157.100
Duplex Port operation
157.150
Duplex Marine operator
157.200
Duplex Marine operator
157.250
Duplex Marine operator
157.300
Duplex Marine operator
157.350
Duplex Marine operator
157.400
Duplex Marine operator
156.025
Duplex Marine operator
156.075
Duplex Marine operator
West Marine VHF160 Radio Owner’s Manual
E-35
Ch
62
63
64
65
66
67
68
69
70
71
72
73
74
75
76
77
78
79
80
81
82
83
84
85
86
87
88
E-36
RX Freq
160.725
160.775
160.825
160.875
160.925
156.375
156.425
156.475
156.525
156.575
156.625
156.675
156.725
156.775
156.825
156.875
161.525
161.575
161.625
161.675
161.725
161.775
161.825
161.875
161.925
157.375
157.425
International Marine Channels
TX Freq
Status
Name
156.125
Duplex Marine operator
156.175
Duplex Marine operator
156.225
Duplex Marine operator
156.275
Duplex Marine operator
156.325
Duplex Marine operator
156.375 Simplex Bridge to bridge
156.425 Simplex Non commercial
156.475 Simplex Non commercial
Inhibit Receive only Digital Selective Calling
156.575 Simplex Non commercial
156.625 Simplex Non commercial
156.675 Simplex Port operation
156.725 Simplex Port operation
156.775 Simplex, 1W Port operation
156.825 Simplex, 1W Port operation
156.875 Simplex Port operation (ship-ship)
156.925
Duplex Port operation
156.975
Duplex Port operation
157.025
Duplex Port operation
157.075
Duplex Port operation
157.125
Duplex Port operation
157.175
Duplex Port operation
157.225
Duplex Marine operator
157.275
Duplex Marine operator
157.325
Duplex Marine operator
157.375 Simplex Marine operator
157.425 Simplex Marine operator
West Marine VHF160 Radio Owner’s Manual
Weather Channel Frequencies and Names
Channel
WX01
WX02
WX03
WX04
WX05
RX
162.5500
162.4000
162.4750
162.4250
162.4500
Channel
WX06
WX07
WX08
WX09
RX
162.5000
162.5250
161.6500
161.7750
West Marine VHF160 Radio Owner’s Manual
E-37
Regulations and Safety Warnings
WARNING! Read this information before
using the radio.
Maritime Radio Services Operation
Warning! This transmitter will operate on channels/frequencies that have
restricted use in the United States. The channel assignments include
frequencies assigned for exclusive use of the U.S. Coast Guard, use in
Canada, and use in international waters. Operation on these frequencies
without proper authorization is strictly forbidden. See page E-31 for tables of
the available channels and their uses. If you are still not certain which
channels to use, see the FCC maritime radio page at the FCC website
(http://wireless.fcc.gov/marine/) or contact the FCC Call Center at
1-888-CALL-FCC. For individuals requiring a license, such as commercial
users, you should obtain a license application from your nearest FCC field
office (for US users) or Industry Canada (for Canadian users).
Basic Radio Guidelines
You should familiarize yourself with the rules on marine radios and be
aware of which rules apply to your boat. Complete guidelines for all ship
and marine radio types can be found at the US Coast Guard website
under the topic Radio Info for Boaters (the direct link is
http://www.navcen.uscg.gov/marcomms/boater.htm). Here are a few
guidelines that affect nearly all boaters.
If you have a VHF radio on your boat, you must maintain a watch on
channel 16 (156.800 MHz) whenever the radio is not being used to
communicate. Starting in 2004, if a radio is carried, it must be on and set
to channel 16. Whenever your boat is underway.
If you hear a distress call, wait a few minutes to let a shore station or
Coast Guard vessel respond. If no other station has responded after 5
minutes, you must respond to the distress call.
E-38
West Marine VHF160 Radio Owner’s Manual
Do not make false mayday or distress calls as a prank or to test your
radio. (This is essentially like making a false 9-1-1 call; you may be subject
to fines.)
FCC/Industry Canada Information
Certification: FCC Part 80 or RSS-182
Output Power: 6W
Emission: 16K0F3E
Transmitter Frequency Range: 156.025-157.425 MHz
This device complies with Part 15 of the FCC Rules. Operation is subject
to the condition that this device does not cause harmful interference.
Unauthorized changes or modifications to this equipment may void
compliance with the FCC Rules. Any change or modification must be
approved in writing by Uniden. Changes or modifications not approved by
Uniden could void the user’s authority to operate the equipment.
FCC RF Exposure Information
In August 1996 the Federal Communications Commission (FCC) of the
United States with its action in Report and Order FCC 96-326 adopted
an updated safety standard for human exposure to radio frequency
electromagnetic energy emitted by FCC regulated transmitters. Those
guidelines are consistent with the safety standard previously set by both
U.S. and international standards bodies. The design of the radio complies
with the FCC guidelines and these international standards.
Never allow children to operate the radio without adult supervision and the
knowledge of the following guidelines.
WARNING! It is up to the user to properly operate this radio transmitter to
insure safe operation. Please adhere to the following:
Use only the supplied or an approved antenna. Unauthorized antennas,
modifications, or attachments could impair call quality, damage the radio,
or violate FCC regulations.Do not use the radio with a damaged antenna.
If a damaged antenna comes into contact with the skin, a minor burn may
result. Please contact your local dealer for a replacement antenna.
West Marine VHF160 Radio Owner’s Manual
E-39
Body-Worn Operation
This device was tested for typical body-worn operations using the supplied
belt-clip. To maintain compliance with FCC RF exposure requirements,
body-worn operations are restricted to the supplied belt-clip. For handheld operation, the radio should be held 1 inch from the user’s face. The
use of accessories that do not satisfy these requirements may not comply
with FCC RF exposure requirements and should be avoided. For more
information about RF exposure, please visit the FCC website at www.fcc.
gov.
Lithium-Ion Polymer Battery Warning
This equipment contains a rechargeable Lithium-Ion Polymer battery. The
rechargeable Lithium-Ion Polymer battery contained in this equipment may
explode if disposed of in a fire.
Do not short-circuit the battery.
Do not charge the rechargeable battery used in this equipment in any
charger other than the one specified in the owner’s manual. Using another
charger may damage the battery or cause the battery to explode.
NOTE: Li-Ion Polymer batteries must be recycled or disposed of
properly.
Avoid exposing the battery (whether attached to the radio or not) to direct
sunlight, heated cars, or temperatures below -4°F (-20°C) or above
+140°F (+60°C). Exposing the chemical contained within the battery pack
to temperatures above +140°F (+60°C) may cause the battery to rupture,
fail, or reduce performance.
In case of exposure to the cell contents, wash the affected area
thoroughly, and seek medical attention.
E-40
West Marine VHF160 Radio Owner’s Manual
RBRC Information
As part of our commitment to protect the environment
and conserve natural resources, Uniden voluntarily
participates in an RBRC® industry program to collect
and recycle used Li-Ion Polymer batteries within the US.
Please call 1-800-8-BATTERY for information on Li-Ion
Polymer battery recycling in your area.
(RBRC® is a registered trademark of the Rechargeable Battery
Recycling Corporation.)
West Marine Limited Warranty
What Does This Limited Warranty Cover?
West Marine warrants to the original retail purchaser of the West Marine
product, where the purchase is made in the United States, that the product
will be free from defects in materials and craftsmanship with only the
limitations or exclusions set out below.
How Long Does This Limited Warranty Last?
This limited warranty is valid for 36 months from the date of the original
retail purchase from West Marine within the United States (the “Limited
Warranty Term”).
The warranty period is not extended if we repair or replace a warranted
product or any parts. West Marine reserves the right to change the
availability of limited warranties, at its discretion, but any changes will not
be retroactive and will only apply to subsequent purchases.
What Does This Limited Warranty Not Cover?
This limited warranty does not cover:
xx Software.
xx Commercial or industrial use or operation.
xx Normal maintenance items or normal wear and tear.
xx Problems resulting from fire or submergence in water
or other liquids [DELETE IF PRODUCT OF WATER
PROOF].
xx If the product was damaged, modified or altered by you.
xx If the product was used as part of any conversion kits,
subassemblies, or any configurations not appropriate or
contemplated for this product or its use.
xx If damage or loss occurring during return shipment of
the product to West Marine or its authorized service
representative.
xx If the product was subject to improper service, repair,
installation, storage, maintenance, alteration or
application.
xx Problems that result from accident, neglect, abuse,
misuse or issues with electrical power.
xx Problems caused by accessories, parts or components
added to the product that are not appropriate for this
product or its use.
THIS LIMITED WARRANTY GIVES YOU SPECIFIC LEGAL RIGHTS,
AND YOU MAY ALSO HAVE OTHER RIGHTS WHICH VARY FROM
STATE TO STATE (OR JURISDICTION TO JURISDICTION). WEST
MARINE’S RESPONSIBILITY FOR MALFUNCTIONS AND DEFECTS
IN HARDWARE IS LIMITED TO REPAIR OR REPLACEMENT AS
SET FORTH IN THIS WARRANTY STATEMENT. ALL EXPRESS AND
IMPLIED WARRANTIES FOR THE PRODUCT INCLUDING, BUT NOT
LIMITED TO, ANY IMPLIED WARRANTIES AND CONDITIONS OF
MERCHANTABILITY AND FITNESS FOR A PARTICULAR PURPOSE,
ARE LIMITED IN TIME TO THE LIMITED WARRANTY TERM (AS
SPECIFIED ABOVE). NO WARRANTIES, WHETHER EXPRESS OR
IMPLIED, WILL APPLY AFTER THE LIMITED WARRANTY TERM HAS
EXPIRED. SOME STATES DO NOT ALLOW LIMITATIONS ON HOW
LONG AN IMPLIED WARRANTY LASTS, SO THE ABOVE LIMITATIONS
MAY NOT APPLY TO YOU.
WE DO NOT ACCEPT LIABILITY BEYOND THE REMEDIES PROVIDED
FOR IN THIS LIMITED WARRANTY OR FOR CONSEQUENTIAL OR
INCIDENTAL DAMAGES INCLUDING, WITHOUT LIMITATION, ANY
LIABILITY FOR THIRD-PARTY CLAIMS AGAINST YOU FOR DAMAGES,
FOR PRODUCTS NOT BEING AVAILABLE FOR USE, FOR PERSONAL
INJURY AND/OR FOR LOST PROPERTY, DATA OR SOFTWARE.
OUR LIABILITY AND THE MAXIMUM AMOUNT FOR WHICH WE
ARE RESPONSIBLE WILL BE NO MORE THAN THE AMOUNT YOU
PAID FOR THE PRODUCT THAT IS THE SUBJECT OF A CLAIM.
SOME STATES DO NOT ALLOW THE EXCLUSION OR LIMITATION
OF INCIDENTAL OR CONSEQUENTIAL DAMAGES, SO THE ABOVE
LIMITATION OR EXCLUSION MAY NOT APPLY TO YOU.
What Must I Do To Keep the Warranty in Effect?
xx You must keep your receipt or other appropriate
documentation as proof of the date of sale and purchase.
xx You must keep your serial number or order number for
the product. This is found on the product itself or on your
receipt.
xx You must not do any of the things that will make
the warranty invalid as provided for in this warranty
statement.
xx You must use, install, maintain and operate the product in
accordance with published specifications and the user’s
manual.
What Do I Do If I Need Warranty Service?
xx Before the warranty expires, please call us at
1-800-BOATING. Please also have your West Marine
serial number or order number available.
xx When you contact us, we will issue a Return Material
Authorization Number for you to include with your return.
We will also provide you the address of where to ship the
product.
xx You must return the product to us in its original or
equivalent packaging, prepay shipping charges, and
insure the shipment or accept the risk if the product is lost
or damaged in shipment.
What Will West Marine Do?
During the Limited Warranty Term, if the product you return to us proves
to be defective in materials or workmanship and not for the reasons which
would otherwise disqualify it (as explained above), we will:
xx Repair the product or, if we are unable to repair it, replace
it with a comparable product that is new or refurbished;
xx Or, as an alternative, at West Marine’s option, we will
refund you the original purchase price;
xx If we repair or replace the product, we will return the
repaired or replacement product to you; and
xx Pay to ship the repaired or replacement product to you
if you use an address in the United States (excluding
Puerto Rico and U.S. possessions and territories).
Otherwise, we will ship the product to you freight collect.
If we determine that the problem is not covered under this warranty, we
will notify you of this when we return your product to you to the address
you provide us in the United States (excluding Puerto Rico and U.S.
possessions and territories).
We use new and refurbished parts made by various manufacturers
in performing warranty repairs and in building replacement parts and
systems. Refurbished parts and systems are parts or systems that have
been returned to West Marine, some of which were never used by a
customer. Replacement parts and systems are covered for the remaining
time left in the Limited Warranty Term for the product you bought. West
Marine owns all parts removed from repaired products.
Maintenance is the Owner’s Responsibility
Cleaning, polishing, lubricating, replacing filters, tuning, replacing worn
parts, using your purchased product according to the user’s manual, and
regularly maintaining your purchased product is your responsibility.
What if I purchased a Plus Protection Plan?
Service will be provided to you under the terms of the Plus Protection Plan
contract. Please refer to that contract for details on how to obtain service.
How State Law Relates to the Warranty.
This warranty gives you specific legal rights, and you may also have other
rights which vary from state to state.
www.westmarine.com
1-800-BOATING
Printed in Vietnam
Imprimé au Vietnam
U01UT644ZZZ(0)