1
Open Cloud Rhino SLEE 1.4.3
Administration Manual
Version 1.1
November 2, 2006
Open Cloud Limited
54-56 Cambridge Terrace
Wellington 6149
New Zealand
http://www.opencloud.com
LEGAL NOTICE
Unless otherwise indicated by Open Cloud, any and all product manuals, software and other materials available on the Open
Cloud website are the sole property of Open Cloud, and Open Cloud retains any and all copyright and other intellectual property
and ownership rights therein. Moreover, the downloading and use of such product manuals, software and other materials available on the Open Cloud website are subject to applicable license terms and conditions, are for Open Cloud licensees’ internal
use only, and may not otherwise be copied, sublicensed, distributed, used, or displayed without the prior written consent of
Open Cloud.
TO THE FULLEST EXTENT PERMISSIBLE UNDER APPLICABLE LAW AND APPLICABLE OPEN CLOUD SOFTWARE LICENSE TERMS AND CONDITIONS, ALL PRODUCT MANUALS, SOFTWARE AND OTHER MATERIALS
AVAILABLE ON THE OPEN CLOUD WEBSITE ARE PROVIDED “AS IS” AND OPEN CLOUD HEREBY DISCLAIMS
ANY AND ALL EXPRESS OR IMPLIED CONDITIONS, REPRESENTATIONS AND WARRANTIES, INCLUDING ANY
IMPLIED WARRANTIES OF MERCHANTABILITY, FITNESS FOR A PARTICULAR PURPOSE OR USE, OR NONINFRINGEMENT.
Copyright 2006 Open Cloud Limited. All rights reserved.
Open Cloud is a trademark of Open Cloud.
JAIN, J2EE, Java and “Write Once, Run Anywhere” are trademarks or registered trademarks of Sun Microsystems.
November 2, 2006 (1838)
Open Cloud Rhino 1.4.3 Administration Manual v1.1
2
Contents
1 Introduction
1.1 Intended Audience . . . . . . . . . . . . . . . . . . . . . . . . . . . . . . . . . . . . . . . . . . . . . . . . .
1.2 Chapter Overview . . . . . . . . . . . . . . . . . . . . . . . . . . . . . . . . . . . . . . . . . . . . . . . . . .
1
1
1
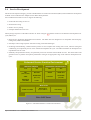
2 The Rhino SLEE Platform
2.1 Introduction . . . . . . . . . . . . . .
2.2 Service Logic Execution Environment
2.3 Integration . . . . . . . . . . . . . . .
2.4 Service Development . . . . . . . . .
2.5 Functional Testing . . . . . . . . . .
2.6 Performance Testing . . . . . . . . .
2.7 Software Development Kit . . . . . .
.
.
.
.
.
.
.
.
.
.
.
.
.
.
.
.
.
.
.
.
.
.
.
.
.
.
.
.
.
.
.
.
.
.
.
.
.
.
.
.
.
.
.
.
.
.
.
.
.
.
.
.
.
.
.
.
.
.
.
.
.
.
.
.
.
.
.
.
.
.
.
.
.
.
.
.
.
.
.
.
.
.
.
.
.
.
.
.
.
.
.
.
.
.
.
.
.
.
.
.
.
.
.
.
.
.
.
.
.
.
.
.
.
.
.
.
.
.
.
.
.
.
.
.
.
.
.
.
.
.
.
.
.
.
.
.
.
.
.
.
.
.
.
.
.
.
.
.
.
.
.
.
.
.
.
.
.
.
.
.
.
.
.
.
.
.
.
.
.
.
.
.
.
.
.
.
.
.
.
.
.
.
.
.
.
.
.
.
.
.
.
.
.
.
.
.
.
.
.
.
.
.
.
.
.
.
.
.
.
.
.
.
.
.
.
.
.
.
.
.
.
.
.
.
.
.
.
.
.
.
.
.
.
.
.
.
.
.
.
.
.
.
.
.
.
.
.
.
.
.
.
.
.
.
.
.
.
.
.
.
.
.
.
.
.
.
.
.
.
.
.
.
.
3
3
4
4
5
6
6
7
3 JAIN SLEE Overview
3.1 Introduction . . . . . . . . . . . .
3.2 Events and Event Types . . . . . .
3.3 Event Driven Applications . . . .
3.4 Components . . . . . . . . . . . .
3.5 Provisioned Data . . . . . . . . .
3.6 Facilities . . . . . . . . . . . . . .
3.7 Activities . . . . . . . . . . . . .
3.8 Resources and Resource Adaptors
.
.
.
.
.
.
.
.
.
.
.
.
.
.
.
.
.
.
.
.
.
.
.
.
.
.
.
.
.
.
.
.
.
.
.
.
.
.
.
.
.
.
.
.
.
.
.
.
.
.
.
.
.
.
.
.
.
.
.
.
.
.
.
.
.
.
.
.
.
.
.
.
.
.
.
.
.
.
.
.
.
.
.
.
.
.
.
.
.
.
.
.
.
.
.
.
.
.
.
.
.
.
.
.
.
.
.
.
.
.
.
.
.
.
.
.
.
.
.
.
.
.
.
.
.
.
.
.
.
.
.
.
.
.
.
.
.
.
.
.
.
.
.
.
.
.
.
.
.
.
.
.
.
.
.
.
.
.
.
.
.
.
.
.
.
.
.
.
.
.
.
.
.
.
.
.
.
.
.
.
.
.
.
.
.
.
.
.
.
.
.
.
.
.
.
.
.
.
.
.
.
.
.
.
.
.
.
.
.
.
.
.
.
.
.
.
.
.
.
.
.
.
.
.
.
.
.
.
.
.
.
.
.
.
.
.
.
.
.
.
.
.
.
.
.
.
.
.
.
.
.
.
.
.
.
.
.
.
.
.
.
.
.
.
.
.
.
.
.
.
.
.
.
.
.
.
.
.
.
.
.
.
.
.
.
.
.
.
.
.
.
.
.
.
.
.
.
.
.
.
.
.
.
.
.
.
.
.
.
.
.
.
8
8
8
9
9
9
9
10
10
4 Getting Started
4.1 Introduction . . . . . . . . . . . . . . . . .
4.2 Installation on Linux / Solaris . . . . . . . .
4.2.1 Checking Prerequisites . . . . . . .
4.2.2 PostgreSQL database configuration
4.2.3 Firewalls . . . . . . . . . . . . . .
4.2.4 Unpacking . . . . . . . . . . . . .
4.2.5 Installation . . . . . . . . . . . . .
4.2.6 Unattended Installation . . . . . . .
4.2.7 Configuring a Cluster . . . . . . . .
4.2.8 Distributing Cluster Configuration .
4.2.9 Configuring the Cluster . . . . . . .
4.2.10 Initialising the Database . . . . . .
4.3 Cluster Lifecycle . . . . . . . . . . . . . .
4.3.1 Creating the Primary Component .
4.3.2 Starting a Node . . . . . . . . . . .
4.3.3 Starting a Quorum Node . . . . . .
4.3.4 Automatic Node Restart . . . . . .
4.3.5 Starting the SLEE . . . . . . . . .
4.3.6 Stopping a Node . . . . . . . . . .
4.3.7 Stopping the Cluster . . . . . . . .
4.4 Management Interface . . . . . . . . . . .
4.5 Setting the system clock . . . . . . . . . .
4.5.1 Configurating ntpd . . . . . . . . .
.
.
.
.
.
.
.
.
.
.
.
.
.
.
.
.
.
.
.
.
.
.
.
.
.
.
.
.
.
.
.
.
.
.
.
.
.
.
.
.
.
.
.
.
.
.
.
.
.
.
.
.
.
.
.
.
.
.
.
.
.
.
.
.
.
.
.
.
.
.
.
.
.
.
.
.
.
.
.
.
.
.
.
.
.
.
.
.
.
.
.
.
.
.
.
.
.
.
.
.
.
.
.
.
.
.
.
.
.
.
.
.
.
.
.
.
.
.
.
.
.
.
.
.
.
.
.
.
.
.
.
.
.
.
.
.
.
.
.
.
.
.
.
.
.
.
.
.
.
.
.
.
.
.
.
.
.
.
.
.
.
.
.
.
.
.
.
.
.
.
.
.
.
.
.
.
.
.
.
.
.
.
.
.
.
.
.
.
.
.
.
.
.
.
.
.
.
.
.
.
.
.
.
.
.
.
.
.
.
.
.
.
.
.
.
.
.
.
.
.
.
.
.
.
.
.
.
.
.
.
.
.
.
.
.
.
.
.
.
.
.
.
.
.
.
.
.
.
.
.
.
.
.
.
.
.
.
.
.
.
.
.
.
.
.
.
.
.
.
.
.
.
.
.
.
.
.
.
.
.
.
.
.
.
.
.
.
.
.
.
.
.
.
.
.
.
.
.
.
.
.
.
.
.
.
.
.
.
.
.
.
.
.
.
.
.
.
.
.
.
.
.
.
.
.
.
.
.
.
.
.
.
.
.
.
.
.
.
.
.
.
.
.
.
.
.
.
.
.
.
.
.
.
.
.
.
.
.
.
.
.
.
.
.
.
.
.
.
.
.
.
.
.
.
.
.
.
.
.
.
.
.
.
.
.
.
.
.
.
.
.
.
.
.
.
.
.
.
.
.
.
.
.
.
.
.
.
.
.
.
.
.
.
.
.
.
.
.
.
.
.
.
.
.
.
.
.
.
.
.
.
.
.
.
.
.
.
.
.
.
.
.
.
.
.
.
.
.
.
.
.
.
.
.
.
.
.
.
.
.
.
.
.
.
.
.
.
.
.
.
.
.
.
.
.
.
.
.
.
.
.
.
.
.
.
.
.
.
.
.
.
.
.
.
.
.
.
.
.
.
.
.
.
.
.
.
.
.
.
.
.
.
.
.
.
.
.
.
.
.
.
.
.
.
.
.
.
.
.
.
.
.
.
.
.
.
.
.
.
.
.
.
.
.
.
.
.
.
.
.
.
.
.
.
.
.
.
.
.
.
.
.
.
.
.
.
.
.
.
.
.
.
.
.
.
.
.
.
.
.
.
.
.
.
.
.
.
.
.
.
.
.
.
.
.
.
.
.
.
.
.
.
.
.
.
.
.
.
.
.
.
.
.
.
.
.
.
.
.
.
.
.
.
.
.
.
.
.
.
.
.
.
.
.
.
.
.
.
.
.
.
.
.
.
.
.
.
.
.
.
.
.
.
.
.
.
.
.
.
.
.
.
.
.
.
.
.
.
.
.
.
.
.
.
.
.
.
.
.
.
.
.
.
.
.
.
.
.
.
.
.
.
.
.
.
.
.
.
.
.
.
.
.
.
.
.
.
.
.
.
.
.
.
.
.
.
.
.
.
.
.
.
.
.
.
.
.
.
.
.
.
.
.
.
.
.
.
.
.
.
.
.
.
.
.
.
.
.
.
.
.
.
.
.
.
.
.
.
.
.
.
.
.
.
.
.
.
.
.
.
.
.
.
.
.
.
.
.
.
.
.
.
.
.
.
.
.
.
.
.
.
.
.
.
.
.
.
.
.
.
.
.
.
.
.
.
.
.
.
.
.
.
.
.
.
.
.
.
.
.
.
.
.
.
.
.
.
.
11
11
11
11
13
13
13
13
14
14
16
16
17
17
17
18
18
18
18
19
19
19
20
20
.
.
.
.
.
.
.
.
.
.
.
.
.
.
.
.
i
4.6
.
.
.
.
.
.
.
.
.
.
.
.
.
.
.
.
.
.
.
.
.
.
.
.
.
.
.
.
.
.
.
.
.
.
.
.
.
.
.
.
.
.
.
.
.
.
.
.
.
.
.
.
.
.
.
.
.
.
.
.
.
.
.
.
.
.
.
.
.
.
.
.
.
.
.
.
.
.
.
.
.
.
.
.
.
.
.
.
.
.
.
.
.
.
.
.
.
.
.
.
.
.
.
.
.
.
.
.
.
.
.
.
.
.
.
.
.
.
.
.
.
.
.
.
.
.
.
.
.
.
.
.
.
.
.
.
.
.
.
.
.
.
.
.
.
.
.
.
.
.
.
.
.
.
.
.
.
.
.
.
.
.
.
.
.
.
.
.
.
.
.
.
.
.
.
.
.
.
.
.
.
.
.
.
.
.
.
.
.
.
.
.
.
.
.
.
.
.
.
.
.
.
.
.
.
.
.
.
.
.
.
.
.
.
.
.
.
.
.
.
.
.
.
.
.
.
.
.
.
.
.
.
.
.
.
.
.
.
.
.
.
.
.
.
.
.
.
.
.
.
.
.
21
21
21
21
21
22
23
23
24
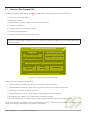
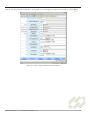
5 Management
5.1 Introduction . . . . . . . . . . . . . . . . . . . . . . . . . .
5.1.1 Web Console Interface . . . . . . . . . . . . . . . .
5.1.2 Command Console Interface . . . . . . . . . . . . .
5.1.3 Ant Tasks . . . . . . . . . . . . . . . . . . . . . . .
5.1.4 Client API . . . . . . . . . . . . . . . . . . . . . .
5.2 Management Tutorials . . . . . . . . . . . . . . . . . . . .
5.3 Building the Examples . . . . . . . . . . . . . . . . . . . .
5.4 Installing a Resource Adaptor . . . . . . . . . . . . . . . .
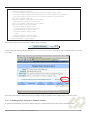
5.4.1 Installing an RA using the Web Console . . . . . . .
5.4.2 Installing an RA using the Command Console . . . .
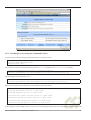
5.5 Installing a Service . . . . . . . . . . . . . . . . . . . . . .
5.5.1 Installing a Service using the Web Console . . . . .
5.5.2 Installing a service using the Command Console . .
5.6 Uninstalling a Service . . . . . . . . . . . . . . . . . . . . .
5.6.1 Uninstalling a Service using the Web Console . . . .
5.6.2 Uninstalling a Service using the Command Console .
5.7 Uninstalling a Resource Adaptor . . . . . . . . . . . . . . .
5.7.1 Uninstalling an RA using the Web Console . . . . .
5.7.2 Uninstalling an RA using the Command Console . .
5.8 Creating a Profile . . . . . . . . . . . . . . . . . . . . . . .
5.8.1 Creating a Profile using the Web Console . . . . . .
5.8.2 Creating a Profile using the Command Console . . .
5.9 SLEE Lifecycle . . . . . . . . . . . . . . . . . . . . . . . .
5.9.1 The Stopped State . . . . . . . . . . . . . . . . . .
5.9.2 The Starting State . . . . . . . . . . . . . . . . . . .
5.9.3 The Running State . . . . . . . . . . . . . . . . . .
5.9.4 The Stopping State . . . . . . . . . . . . . . . . . .
.
.
.
.
.
.
.
.
.
.
.
.
.
.
.
.
.
.
.
.
.
.
.
.
.
.
.
.
.
.
.
.
.
.
.
.
.
.
.
.
.
.
.
.
.
.
.
.
.
.
.
.
.
.
.
.
.
.
.
.
.
.
.
.
.
.
.
.
.
.
.
.
.
.
.
.
.
.
.
.
.
.
.
.
.
.
.
.
.
.
.
.
.
.
.
.
.
.
.
.
.
.
.
.
.
.
.
.
.
.
.
.
.
.
.
.
.
.
.
.
.
.
.
.
.
.
.
.
.
.
.
.
.
.
.
.
.
.
.
.
.
.
.
.
.
.
.
.
.
.
.
.
.
.
.
.
.
.
.
.
.
.
.
.
.
.
.
.
.
.
.
.
.
.
.
.
.
.
.
.
.
.
.
.
.
.
.
.
.
.
.
.
.
.
.
.
.
.
.
.
.
.
.
.
.
.
.
.
.
.
.
.
.
.
.
.
.
.
.
.
.
.
.
.
.
.
.
.
.
.
.
.
.
.
.
.
.
.
.
.
.
.
.
.
.
.
.
.
.
.
.
.
.
.
.
.
.
.
.
.
.
.
.
.
.
.
.
.
.
.
.
.
.
.
.
.
.
.
.
.
.
.
.
.
.
.
.
.
.
.
.
.
.
.
.
.
.
.
.
.
.
.
.
.
.
.
.
.
.
.
.
.
.
.
.
.
.
.
.
.
.
.
.
.
.
.
.
.
.
.
.
.
.
.
.
.
.
.
.
.
.
.
.
.
.
.
.
.
.
.
.
.
.
.
.
.
.
.
.
.
.
.
.
.
.
.
.
.
.
.
.
.
.
.
.
.
.
.
.
.
.
.
.
.
.
.
.
.
.
.
.
.
.
.
.
.
.
.
.
.
.
.
.
.
.
.
.
.
.
.
.
.
.
.
.
.
.
.
.
.
.
.
.
.
.
.
.
.
.
.
.
.
.
.
.
.
.
.
.
.
.
.
.
.
.
.
.
.
.
.
.
.
.
.
.
.
.
.
.
.
.
.
.
.
.
.
.
.
.
.
.
.
.
.
.
.
.
.
.
.
.
.
.
.
.
.
.
.
.
.
.
.
.
.
.
.
.
.
.
.
.
.
.
.
.
.
.
.
.
.
.
.
.
.
.
.
.
.
.
.
.
.
.
.
.
.
.
.
.
.
.
.
.
.
.
.
.
.
.
.
.
.
.
.
.
.
.
.
.
.
.
.
.
.
.
.
.
.
.
.
.
.
.
.
.
.
.
.
.
.
.
.
.
.
.
.
.
.
.
.
.
.
.
.
.
.
.
.
.
.
.
.
.
.
.
.
.
.
.
.
.
.
.
.
.
.
.
.
.
.
.
.
.
.
.
.
.
.
.
.
.
.
.
.
.
.
.
.
.
.
.
.
.
.
.
.
.
.
.
.
.
.
.
.
.
.
.
.
.
.
.
.
.
.
.
.
.
.
.
.
.
.
.
.
.
.
.
.
.
.
.
.
.
.
.
.
.
.
.
.
.
.
.
.
.
.
.
.
.
.
.
.
.
.
.
.
.
.
.
.
.
.
.
.
.
.
.
.
.
.
.
.
.
.
.
.
.
.
.
.
.
.
.
.
.
.
.
.
.
26
26
26
27
27
27
27
28
28
29
30
31
31
33
34
34
35
35
36
36
37
37
40
41
41
42
42
42
6 Administrative Maintenance
6.1 Introduction . . . . . . . . . . . . . . . .
6.2 Runtime Diagnostics and Maintenance . .
6.2.1 Inspecting Activities . . . . . . .
6.2.2 Removing Activities . . . . . . .
6.2.3 Inspecting SBBs . . . . . . . . .
6.2.4 Removing SBB Entities . . . . .
6.2.5 Removing All . . . . . . . . . . .
6.3 Upgrading a Cluster . . . . . . . . . . . .
6.3.1 Exporting State . . . . . . . . . .
6.3.2 Installing a new cluster . . . . . .
6.3.3 Deploying State . . . . . . . . . .
6.3.4 Activating the new Cluster . . . .
6.3.5 Deactivating the old Cluster . . .
6.4 Backup and Restore . . . . . . . . . . . .
6.4.1 Making PostgresSQL Backups . .
6.4.2 Restoring a PostgresSQL Backup
.
.
.
.
.
.
.
.
.
.
.
.
.
.
.
.
.
.
.
.
.
.
.
.
.
.
.
.
.
.
.
.
.
.
.
.
.
.
.
.
.
.
.
.
.
.
.
.
.
.
.
.
.
.
.
.
.
.
.
.
.
.
.
.
.
.
.
.
.
.
.
.
.
.
.
.
.
.
.
.
.
.
.
.
.
.
.
.
.
.
.
.
.
.
.
.
.
.
.
.
.
.
.
.
.
.
.
.
.
.
.
.
.
.
.
.
.
.
.
.
.
.
.
.
.
.
.
.
.
.
.
.
.
.
.
.
.
.
.
.
.
.
.
.
.
.
.
.
.
.
.
.
.
.
.
.
.
.
.
.
.
.
.
.
.
.
.
.
.
.
.
.
.
.
.
.
.
.
.
.
.
.
.
.
.
.
.
.
.
.
.
.
.
.
.
.
.
.
.
.
.
.
.
.
.
.
.
.
.
.
.
.
.
.
.
.
.
.
.
.
.
.
.
.
.
.
.
.
.
.
.
.
.
.
.
.
.
.
.
.
.
.
.
.
.
.
.
.
.
.
.
.
.
.
.
.
.
.
.
.
.
.
.
.
.
.
.
.
.
.
.
.
.
.
.
.
.
.
.
.
.
.
.
.
.
.
.
.
.
.
.
.
.
.
.
.
.
.
.
.
.
.
.
.
.
.
.
.
.
.
.
.
.
.
.
.
.
.
.
.
.
.
.
.
.
.
.
.
.
.
.
.
.
.
.
.
.
.
.
.
.
.
.
.
.
.
.
.
.
.
.
.
.
.
.
.
.
.
.
.
.
.
.
.
.
.
.
.
.
.
.
.
.
.
.
.
.
.
.
.
.
.
.
.
.
.
.
.
.
.
.
.
.
.
.
.
.
.
.
.
.
.
.
.
.
.
.
.
.
.
.
.
.
.
.
.
.
.
.
.
.
.
.
.
.
.
.
.
.
.
.
.
43
43
43
43
45
46
47
47
48
48
48
49
49
49
50
50
50
4.7
4.8
Optional Configuration . . . . . .
4.6.1 Introduction . . . . . . . .
4.6.2 Ports . . . . . . . . . . .
4.6.3 Usernames and Passwords
4.6.4 Separate the Web Console
Installed Files . . . . . . . . . . .
Runtime Files . . . . . . . . . . .
4.8.1 Node Directory . . . . . .
4.8.2 Logging output . . . . . .
.
.
.
.
.
.
.
.
.
.
.
.
.
.
.
.
.
.
.
.
.
.
.
.
.
.
.
.
.
.
.
.
.
.
.
.
.
.
.
.
.
.
.
.
.
.
.
.
.
.
.
.
.
.
.
.
.
.
.
.
.
Open Cloud Rhino 1.4.3 Administration Manual v1.1
.
.
.
.
.
.
.
.
.
.
.
.
.
.
.
.
.
.
.
.
.
.
.
.
.
.
.
.
.
.
.
.
.
.
.
.
.
.
.
.
.
.
.
.
.
.
.
.
.
.
.
.
.
.
.
.
.
.
.
.
.
.
.
.
.
.
.
.
.
.
.
.
.
.
.
.
.
.
.
.
.
.
.
.
.
.
.
.
.
.
.
.
.
.
.
.
.
.
.
.
.
.
.
.
.
.
.
.
.
.
.
.
.
.
.
.
.
.
.
.
.
.
.
.
.
.
.
.
.
.
.
.
.
.
.
.
.
.
.
.
.
.
.
.
.
.
.
.
.
.
.
.
.
.
.
.
.
.
.
.
.
.
.
.
.
.
.
.
.
.
.
.
.
.
.
.
.
.
.
.
.
.
.
.
.
.
.
.
.
.
.
.
.
.
.
.
.
.
.
.
.
.
.
.
.
.
.
.
.
.
.
.
.
.
.
.
ii
7 Export and Import
7.1 Introduction . .
7.2 Exporting State
7.3 Importing State
7.4 Partial Imports
.
.
.
.
.
.
.
.
.
.
.
.
.
.
.
.
.
.
.
.
.
.
.
.
.
.
.
.
.
.
.
.
.
.
.
.
.
.
.
.
.
.
.
.
.
.
.
.
.
.
.
.
.
.
.
.
.
.
.
.
.
.
.
.
.
.
.
.
.
.
.
.
.
.
.
.
.
.
.
.
.
.
.
.
.
.
.
.
.
.
.
.
.
.
.
.
.
.
.
.
.
.
.
.
.
.
.
.
.
.
.
.
.
.
.
.
.
.
.
.
.
.
.
.
.
.
.
.
.
.
.
.
.
.
.
.
.
.
.
.
.
.
.
.
.
.
.
.
.
.
.
.
.
.
.
.
.
.
.
.
.
.
.
.
51
51
52
53
54
8 Statistics and Monitoring
8.1 Introduction . . . . . . . . . . . . .
8.2 Performance Implications . . . . . .
8.2.1 Direct Connections . . . . .
8.3 Console Mode . . . . . . . . . . . .
8.3.1 Useful output options . . . .
8.4 Graphical Mode . . . . . . . . . . .
8.4.1 Saved Graph Configurations
.
.
.
.
.
.
.
.
.
.
.
.
.
.
.
.
.
.
.
.
.
.
.
.
.
.
.
.
.
.
.
.
.
.
.
.
.
.
.
.
.
.
.
.
.
.
.
.
.
.
.
.
.
.
.
.
.
.
.
.
.
.
.
.
.
.
.
.
.
.
.
.
.
.
.
.
.
.
.
.
.
.
.
.
.
.
.
.
.
.
.
.
.
.
.
.
.
.
.
.
.
.
.
.
.
.
.
.
.
.
.
.
.
.
.
.
.
.
.
.
.
.
.
.
.
.
.
.
.
.
.
.
.
.
.
.
.
.
.
.
.
.
.
.
.
.
.
.
.
.
.
.
.
.
.
.
.
.
.
.
.
.
.
.
.
.
.
.
.
.
.
.
.
.
.
.
.
.
.
.
.
.
.
.
.
.
.
.
.
.
.
.
.
.
.
.
.
.
.
.
.
.
.
.
.
.
.
.
.
.
.
.
.
.
.
.
.
.
.
.
.
.
.
.
.
.
.
.
.
.
.
.
.
.
.
.
.
.
.
.
.
.
.
.
.
.
.
.
.
.
.
.
.
.
.
.
.
.
.
.
.
.
.
.
.
.
.
.
.
.
.
.
.
.
.
.
.
.
.
.
56
56
57
57
57
58
59
61
9 Web Console
9.1 Introduction . . . . . . . . . . . . . . . . . . .
9.2 Operation . . . . . . . . . . . . . . . . . . . .
9.2.1 Connecting and Login . . . . . . . . .
9.2.2 Managed Objects . . . . . . . . . . . .
9.2.3 Navigation Shortcuts . . . . . . . . . .
9.2.4 Interacting with Managed Objects . . .
9.3 Deployment Architecture . . . . . . . . . . . .
9.3.1 Embedded Web Console . . . . . . . .
9.3.2 Standalone Web Console . . . . . . . .
9.4 Configuration . . . . . . . . . . . . . . . . . .
9.4.1 Changing Usernames and Passwords . .
9.4.2 Changing the Web Console Ports . . .
9.4.3 Disabling the HTTP listener . . . . . .
9.5 Security . . . . . . . . . . . . . . . . . . . . .
9.5.1 Secure Socket Layer (SSL) Connections
9.5.2 Declarative Security . . . . . . . . . .
9.5.3 JAAS . . . . . . . . . . . . . . . . . .
.
.
.
.
.
.
.
.
.
.
.
.
.
.
.
.
.
.
.
.
.
.
.
.
.
.
.
.
.
.
.
.
.
.
.
.
.
.
.
.
.
.
.
.
.
.
.
.
.
.
.
.
.
.
.
.
.
.
.
.
.
.
.
.
.
.
.
.
.
.
.
.
.
.
.
.
.
.
.
.
.
.
.
.
.
.
.
.
.
.
.
.
.
.
.
.
.
.
.
.
.
.
.
.
.
.
.
.
.
.
.
.
.
.
.
.
.
.
.
.
.
.
.
.
.
.
.
.
.
.
.
.
.
.
.
.
.
.
.
.
.
.
.
.
.
.
.
.
.
.
.
.
.
.
.
.
.
.
.
.
.
.
.
.
.
.
.
.
.
.
.
.
.
.
.
.
.
.
.
.
.
.
.
.
.
.
.
.
.
.
.
.
.
.
.
.
.
.
.
.
.
.
.
.
.
.
.
.
.
.
.
.
.
.
.
.
.
.
.
.
.
.
.
.
.
.
.
.
.
.
.
.
.
.
.
.
.
.
.
.
.
.
.
.
.
.
.
.
.
.
.
.
.
.
.
.
.
.
.
.
.
.
.
.
.
.
.
.
.
.
.
.
.
.
.
.
.
.
.
.
.
.
.
.
.
.
.
.
.
.
.
.
.
.
.
.
.
.
.
.
.
.
.
.
.
.
.
.
.
.
.
.
.
.
.
.
.
.
.
.
.
.
.
.
.
.
.
.
.
.
.
.
.
.
.
.
.
.
.
.
.
.
.
.
.
.
.
.
.
.
.
.
.
.
.
.
.
.
.
.
.
.
.
.
.
.
.
.
.
.
.
.
.
.
.
.
.
.
.
.
.
.
.
.
.
.
.
.
.
.
.
.
.
.
.
.
.
.
.
.
.
.
.
.
.
.
.
.
.
.
.
.
.
.
.
.
.
.
.
.
.
.
.
.
.
.
.
.
.
.
.
.
.
.
.
.
.
.
.
.
.
.
.
.
.
.
.
.
.
.
.
.
.
.
.
.
.
.
.
.
.
.
.
.
.
.
.
.
.
.
.
.
.
.
.
.
.
.
.
.
.
.
.
.
.
.
.
.
.
.
.
.
.
.
.
.
.
.
.
.
.
.
.
.
.
.
.
.
.
.
.
.
.
.
.
.
.
.
.
.
.
.
.
.
.
.
.
.
.
.
.
.
.
.
.
.
.
.
.
.
.
.
.
.
.
.
.
.
.
.
.
.
.
.
.
.
.
.
.
.
.
.
.
.
.
.
.
.
.
.
.
.
.
.
.
.
.
.
64
64
64
64
65
65
66
66
66
67
68
68
68
68
68
69
69
69
10 Log System Configuration
10.1 Introduction . . . . . . . . . . . . . . . . . . . . . . . .
10.1.1 Log Keys . . . . . . . . . . . . . . . . . . . . .
10.1.2 Log Levels . . . . . . . . . . . . . . . . . . . .
10.2 Appender Types . . . . . . . . . . . . . . . . . . . . . .
10.3 Logging Configuration . . . . . . . . . . . . . . . . . .
10.3.1 Log Configuration using the Command Console
10.3.2 Web Console Logging . . . . . . . . . . . . . .
.
.
.
.
.
.
.
.
.
.
.
.
.
.
.
.
.
.
.
.
.
.
.
.
.
.
.
.
.
.
.
.
.
.
.
.
.
.
.
.
.
.
.
.
.
.
.
.
.
.
.
.
.
.
.
.
.
.
.
.
.
.
.
.
.
.
.
.
.
.
.
.
.
.
.
.
.
.
.
.
.
.
.
.
.
.
.
.
.
.
.
.
.
.
.
.
.
.
.
.
.
.
.
.
.
.
.
.
.
.
.
.
.
.
.
.
.
.
.
.
.
.
.
.
.
.
.
.
.
.
.
.
.
.
.
.
.
.
.
.
.
.
.
.
.
.
.
.
.
.
.
.
.
.
.
.
.
.
.
.
.
.
.
.
.
.
.
.
.
.
.
.
.
.
.
.
.
.
.
.
.
.
.
.
.
.
.
.
.
.
.
.
.
.
.
.
.
.
.
.
.
.
.
70
70
70
70
70
71
71
72
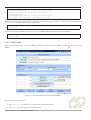
11 Alarms
11.1 Alarm Format . . . . . . .
11.2 Management Interface . .
11.2.1 Command Console
11.2.2 Web Console . . .
.
.
.
.
.
.
.
.
.
.
.
.
.
.
.
.
.
.
.
.
.
.
.
.
.
.
.
.
.
.
.
.
.
.
.
.
.
.
.
.
.
.
.
.
.
.
.
.
.
.
.
.
.
.
.
.
.
.
.
.
.
.
.
.
.
.
.
.
.
.
.
.
.
.
.
.
.
.
.
.
.
.
.
.
.
.
.
.
.
.
.
.
.
.
.
.
.
.
.
.
.
.
.
.
.
.
.
.
.
.
.
.
.
.
.
.
.
.
.
.
.
.
.
.
.
.
.
.
.
.
.
.
.
.
.
.
.
.
.
.
.
.
.
.
.
.
.
.
.
.
.
.
.
.
.
.
.
.
.
.
.
.
.
.
.
.
.
.
.
.
.
.
.
.
.
.
.
.
.
.
.
.
.
.
.
.
.
.
.
.
.
.
.
.
.
.
.
.
.
.
.
.
.
.
.
.
.
.
.
.
.
.
.
.
.
.
75
75
75
75
76
12 Threshold Alarms
12.1 Introduction . . . . . . . . . .
12.2 Threshold Rules . . . . . . . .
12.3 Parameter Sets . . . . . . . .
12.4 Evaluation of Threshold Rules
12.5 Types of Rule Conditions . . .
12.5.1 Simple Conditions . .
12.5.2 Relative Conditions . .
12.6 Creating Rules . . . . . . . .
12.6.1 Web Console . . . . .
.
.
.
.
.
.
.
.
.
.
.
.
.
.
.
.
.
.
.
.
.
.
.
.
.
.
.
.
.
.
.
.
.
.
.
.
.
.
.
.
.
.
.
.
.
.
.
.
.
.
.
.
.
.
.
.
.
.
.
.
.
.
.
.
.
.
.
.
.
.
.
.
.
.
.
.
.
.
.
.
.
.
.
.
.
.
.
.
.
.
.
.
.
.
.
.
.
.
.
.
.
.
.
.
.
.
.
.
.
.
.
.
.
.
.
.
.
.
.
.
.
.
.
.
.
.
.
.
.
.
.
.
.
.
.
.
.
.
.
.
.
.
.
.
.
.
.
.
.
.
.
.
.
.
.
.
.
.
.
.
.
.
.
.
.
.
.
.
.
.
.
.
.
.
.
.
.
.
.
.
.
.
.
.
.
.
.
.
.
.
.
.
.
.
.
.
.
.
.
.
.
.
.
.
.
.
.
.
.
.
.
.
.
.
.
.
.
.
.
.
.
.
.
.
.
.
.
.
.
.
.
.
.
.
.
.
.
.
.
.
.
.
.
.
.
.
.
.
.
.
.
.
.
.
.
.
.
.
.
.
.
.
.
.
.
.
.
.
.
.
.
.
.
.
.
.
.
.
.
.
.
.
.
.
.
.
.
.
.
.
.
.
.
.
.
.
.
.
.
.
.
.
.
.
.
.
.
.
.
.
.
.
.
.
.
.
.
.
.
.
.
.
.
.
.
.
.
.
.
.
.
.
.
.
.
.
.
.
.
.
.
.
.
.
.
.
.
.
.
.
.
.
.
.
.
.
.
.
.
.
.
.
.
.
.
.
.
.
.
.
.
.
.
.
.
.
.
.
.
.
.
.
.
.
.
.
.
78
78
78
78
79
79
79
79
80
80
.
.
.
.
Open Cloud Rhino 1.4.3 Administration Manual v1.1
iii
12.6.2 Command Console . . . . . . . . . . . . . . . . . . . . . . . . . . . . . . . . . . . . . . . . . . . . .
81
13 Notification System Configuration
13.1 Introduction . . . . . . . . . .
13.2 The SLEE Notification system
13.2.1 Trace Notifications . .
13.3 Notification Recorder M-Let .
13.3.1 Configuration . . . . .
.
.
.
.
.
.
.
.
.
.
.
.
.
.
.
.
.
.
.
.
.
.
.
.
.
.
.
.
.
.
.
.
.
.
.
.
.
.
.
.
.
.
.
.
.
.
.
.
.
.
.
.
.
.
.
.
.
.
.
.
.
.
.
.
.
.
.
.
.
.
.
.
.
.
.
.
.
.
.
.
.
.
.
.
.
.
.
.
.
.
.
.
.
.
.
.
.
.
.
.
.
.
.
.
.
.
.
.
.
.
.
.
.
.
.
.
.
.
.
.
.
.
.
.
.
.
.
.
.
.
.
.
.
.
.
.
.
.
.
.
.
.
.
.
.
.
.
.
.
.
.
.
.
.
.
.
.
.
.
.
.
.
.
.
.
.
.
.
.
.
.
.
.
.
.
.
.
.
.
.
.
.
.
.
.
.
.
.
.
.
.
.
.
.
.
.
.
.
.
.
.
.
.
.
.
.
.
.
.
.
.
.
.
.
.
83
83
83
83
84
84
14 Licensing
14.1 Introduction . . . . . . . . . .
14.2 Alarms . . . . . . . . . . . . .
14.2.1 License Validity . . .
14.2.2 Limit Enforcement . .
14.2.3 Statistics . . . . . . .
14.2.4 Management Interface
14.2.5 Audit Logs . . . . . .
.
.
.
.
.
.
.
.
.
.
.
.
.
.
.
.
.
.
.
.
.
.
.
.
.
.
.
.
.
.
.
.
.
.
.
.
.
.
.
.
.
.
.
.
.
.
.
.
.
.
.
.
.
.
.
.
.
.
.
.
.
.
.
.
.
.
.
.
.
.
.
.
.
.
.
.
.
.
.
.
.
.
.
.
.
.
.
.
.
.
.
.
.
.
.
.
.
.
.
.
.
.
.
.
.
.
.
.
.
.
.
.
.
.
.
.
.
.
.
.
.
.
.
.
.
.
.
.
.
.
.
.
.
.
.
.
.
.
.
.
.
.
.
.
.
.
.
.
.
.
.
.
.
.
.
.
.
.
.
.
.
.
.
.
.
.
.
.
.
.
.
.
.
.
.
.
.
.
.
.
.
.
.
.
.
.
.
.
.
.
.
.
.
.
.
.
.
.
.
.
.
.
.
.
.
.
.
.
.
.
.
.
.
.
.
.
.
.
.
.
.
.
.
.
.
.
.
.
.
.
.
.
.
.
.
.
.
.
.
.
.
.
.
.
.
.
.
.
.
.
.
.
.
.
.
.
.
.
.
.
.
.
.
.
.
.
.
.
.
.
.
.
.
.
.
.
.
.
.
.
.
.
.
.
.
.
.
.
.
.
.
.
.
.
.
.
.
.
.
.
.
85
85
86
86
86
86
87
87
15 Security Configuration
15.1 Introduction . . . . . . .
15.2 Security Policy . . . . .
15.3 Network Connections . .
15.4 Signing Deployable Units
15.5 Key Stores . . . . . . . .
15.6 Transport Layer Security
15.7 JAAS Configuration . . .
.
.
.
.
.
.
.
.
.
.
.
.
.
.
.
.
.
.
.
.
.
.
.
.
.
.
.
.
.
.
.
.
.
.
.
.
.
.
.
.
.
.
.
.
.
.
.
.
.
.
.
.
.
.
.
.
.
.
.
.
.
.
.
.
.
.
.
.
.
.
.
.
.
.
.
.
.
.
.
.
.
.
.
.
.
.
.
.
.
.
.
.
.
.
.
.
.
.
.
.
.
.
.
.
.
.
.
.
.
.
.
.
.
.
.
.
.
.
.
.
.
.
.
.
.
.
.
.
.
.
.
.
.
.
.
.
.
.
.
.
.
.
.
.
.
.
.
.
.
.
.
.
.
.
.
.
.
.
.
.
.
.
.
.
.
.
.
.
.
.
.
.
.
.
.
.
.
.
.
.
.
.
.
.
.
.
.
.
.
.
.
.
.
.
.
.
.
.
.
.
.
.
.
.
.
.
.
.
.
.
.
.
.
.
.
.
.
.
.
.
.
.
.
.
.
.
.
.
.
.
.
.
.
.
.
.
.
.
.
.
.
.
.
.
.
.
.
.
.
.
.
.
.
.
.
.
.
.
.
.
.
.
.
.
.
.
.
.
.
.
.
.
.
.
.
.
.
.
.
.
.
.
.
.
.
.
.
.
.
.
.
.
.
.
.
.
.
.
.
.
.
88
88
88
89
90
91
91
92
16 Performance Tuning
16.1 Introduction . . . . . . . . . . . . . . . . . .
16.2 Staging Configuration . . . . . . . . . . . . .
16.2.1 Configuration . . . . . . . . . . . . .
16.2.2 Stage Tuning . . . . . . . . . . . . .
16.2.3 Tuning Recommendations . . . . . .
16.3 Object Pool Configuration . . . . . . . . . .
16.3.1 Initial Pool Population . . . . . . . .
16.3.2 Configuring the Object Pools . . . . .
16.4 Fault Tolerance . . . . . . . . . . . . . . . .
16.4.1 Introduction . . . . . . . . . . . . . .
16.4.2 Fault Tolerant Services . . . . . . . .
16.4.3 Fault Tolerant Resource Adaptors . .
16.4.4 Fault Tolerance and High Availability
.
.
.
.
.
.
.
.
.
.
.
.
.
.
.
.
.
.
.
.
.
.
.
.
.
.
.
.
.
.
.
.
.
.
.
.
.
.
.
.
.
.
.
.
.
.
.
.
.
.
.
.
.
.
.
.
.
.
.
.
.
.
.
.
.
.
.
.
.
.
.
.
.
.
.
.
.
.
.
.
.
.
.
.
.
.
.
.
.
.
.
.
.
.
.
.
.
.
.
.
.
.
.
.
.
.
.
.
.
.
.
.
.
.
.
.
.
.
.
.
.
.
.
.
.
.
.
.
.
.
.
.
.
.
.
.
.
.
.
.
.
.
.
.
.
.
.
.
.
.
.
.
.
.
.
.
.
.
.
.
.
.
.
.
.
.
.
.
.
.
.
.
.
.
.
.
.
.
.
.
.
.
.
.
.
.
.
.
.
.
.
.
.
.
.
.
.
.
.
.
.
.
.
.
.
.
.
.
.
.
.
.
.
.
.
.
.
.
.
.
.
.
.
.
.
.
.
.
.
.
.
.
.
.
.
.
.
.
.
.
.
.
.
.
.
.
.
.
.
.
.
.
.
.
.
.
.
.
.
.
.
.
.
.
.
.
.
.
.
.
.
.
.
.
.
.
.
.
.
.
.
.
.
.
.
.
.
.
.
.
.
.
.
.
.
.
.
.
.
.
.
.
.
.
.
.
.
.
.
.
.
.
.
.
.
.
.
.
.
.
.
.
.
.
.
.
.
.
.
.
.
.
.
.
.
.
.
.
.
.
.
.
.
.
.
.
.
.
.
.
.
.
.
.
.
.
.
.
.
.
.
.
.
.
.
.
.
.
.
.
.
.
.
.
.
.
.
.
.
.
.
.
.
.
.
.
.
.
.
.
.
.
.
.
.
.
.
.
.
.
.
.
.
.
.
.
.
.
.
.
.
.
.
.
.
.
.
.
.
.
.
.
.
.
.
.
.
.
.
.
.
.
.
.
.
.
.
.
.
.
.
.
.
.
.
.
.
.
.
.
.
.
.
.
.
94
94
94
95
95
95
96
96
96
97
97
98
99
99
17 Clustering
17.1 Introduction . . . . . . . . . .
17.2 Concepts and terms . . . . . .
17.2.1 Cluster Node . . . . .
17.2.2 Quorum Node . . . . .
17.2.3 Cluster . . . . . . . .
17.2.4 Cluster Membership .
17.2.5 Typical Installation . .
17.2.6 Primary Component .
17.2.7 Tie Breaking . . . . .
17.2.8 Shutdown and Restart
17.3 Scenarios . . . . . . . . . . .
17.3.1 Node Failure . . . . .
17.3.2 Node Restart . . . . .
17.3.3 Network Failure . . .
17.4 Configuration Parameters . . .
.
.
.
.
.
.
.
.
.
.
.
.
.
.
.
.
.
.
.
.
.
.
.
.
.
.
.
.
.
.
.
.
.
.
.
.
.
.
.
.
.
.
.
.
.
.
.
.
.
.
.
.
.
.
.
.
.
.
.
.
.
.
.
.
.
.
.
.
.
.
.
.
.
.
.
.
.
.
.
.
.
.
.
.
.
.
.
.
.
.
.
.
.
.
.
.
.
.
.
.
.
.
.
.
.
.
.
.
.
.
.
.
.
.
.
.
.
.
.
.
.
.
.
.
.
.
.
.
.
.
.
.
.
.
.
.
.
.
.
.
.
.
.
.
.
.
.
.
.
.
.
.
.
.
.
.
.
.
.
.
.
.
.
.
.
.
.
.
.
.
.
.
.
.
.
.
.
.
.
.
.
.
.
.
.
.
.
.
.
.
.
.
.
.
.
.
.
.
.
.
.
.
.
.
.
.
.
.
.
.
.
.
.
.
.
.
.
.
.
.
.
.
.
.
.
.
.
.
.
.
.
.
.
.
.
.
.
.
.
.
.
.
.
.
.
.
.
.
.
.
.
.
.
.
.
.
.
.
.
.
.
.
.
.
.
.
.
.
.
.
.
.
.
.
.
.
.
.
.
.
.
.
.
.
.
.
.
.
.
.
.
.
.
.
.
.
.
.
.
.
.
.
.
.
.
.
.
.
.
.
.
.
.
.
.
.
.
.
.
.
.
.
.
.
.
.
.
.
.
.
.
.
.
.
.
.
.
.
.
.
.
.
.
.
.
.
.
.
.
.
.
.
.
.
.
.
.
.
.
.
.
.
.
.
.
.
.
.
.
.
.
.
.
.
.
.
.
.
.
.
.
.
.
.
.
.
.
.
.
.
.
.
.
.
.
.
.
.
.
.
.
.
.
.
.
.
.
.
.
.
.
.
.
.
.
.
.
.
.
.
.
.
.
.
.
.
.
.
.
.
.
.
.
.
.
.
.
.
.
.
.
.
.
.
.
.
.
.
.
.
.
.
.
.
.
.
.
.
.
.
.
.
.
.
.
.
.
.
.
.
.
.
.
.
.
.
.
.
.
.
.
.
.
.
.
.
.
.
.
.
.
.
.
.
.
.
.
.
.
.
.
.
.
.
.
.
.
.
.
.
.
.
.
.
.
.
.
.
.
.
.
.
.
.
.
100
100
100
100
100
100
100
101
101
101
101
101
102
102
102
102
.
.
.
.
.
.
.
.
.
.
.
.
.
.
.
.
.
.
.
.
.
.
.
.
.
.
.
.
.
.
.
.
.
.
.
.
.
.
.
.
.
.
.
.
.
.
.
.
.
.
.
.
.
.
.
.
.
.
.
.
.
.
.
.
.
.
.
.
.
.
.
.
.
.
.
.
.
.
.
.
.
.
.
.
.
.
.
.
.
.
.
.
.
.
.
.
.
.
.
.
.
.
.
.
.
.
.
.
.
.
.
.
.
.
.
.
.
.
.
.
.
.
.
.
.
.
Open Cloud Rhino 1.4.3 Administration Manual v1.1
.
.
.
.
.
.
.
.
.
.
.
.
.
.
.
iv
18 Application Environment
18.1 Introduction . . . . . . . . . . . . . . . . . . . . . .
18.2 Main Working Memory . . . . . . . . . . . . . . . .
18.2.1 Replication Models . . . . . . . . . . . . . .
18.2.2 Concurrency Control . . . . . . . . . . . . .
18.2.3 Multiple Transactions . . . . . . . . . . . .
18.3 Application Configuration . . . . . . . . . . . . . .
18.3.1 Replication . . . . . . . . . . . . . . . . . .
18.3.2 Concurrency Control . . . . . . . . . . . . .
18.4 Multiple Resource Managers . . . . . . . . . . . . .
18.5 Extension Deployment Descriptors . . . . . . . . . .
18.5.1 Service Extension Deployment Descriptor . .
18.5.2 SBB Extension Deployment Descriptor . . .
18.5.3 Packaging Extension Deployment Descriptors
18.5.4 Example . . . . . . . . . . . . . . . . . . .
18.6 Application Fail-Over . . . . . . . . . . . . . . . . .
18.6.1 Programming Model . . . . . . . . . . . . .
18.6.2 Management Interface . . . . . . . . . . . .
.
.
.
.
.
.
.
.
.
.
.
.
.
.
.
.
.
.
.
.
.
.
.
.
.
.
.
.
.
.
.
.
.
.
.
.
.
.
.
.
.
.
.
.
.
.
.
.
.
.
.
.
.
.
.
.
.
.
.
.
.
.
.
.
.
.
.
.
.
.
.
.
.
.
.
.
.
.
.
.
.
.
.
.
.
.
.
.
.
.
.
.
.
.
.
.
.
.
.
.
.
.
.
.
.
.
.
.
.
.
.
.
.
.
.
.
.
.
.
.
.
.
.
.
.
.
.
.
.
.
.
.
.
.
.
.
.
.
.
.
.
.
.
.
.
.
.
.
.
.
.
.
.
.
.
.
.
.
.
.
.
.
.
.
.
.
.
.
.
.
.
.
.
.
.
.
.
.
.
.
.
.
.
.
.
.
.
.
.
.
.
.
.
.
.
.
.
.
.
.
.
.
.
.
.
.
.
.
.
.
.
.
.
.
.
.
.
.
.
.
.
.
.
.
.
.
.
.
.
.
.
.
.
.
.
.
.
.
.
.
.
.
.
.
.
.
.
.
.
.
.
.
.
.
.
.
.
.
.
.
.
.
.
.
.
.
.
.
.
.
.
.
.
.
.
.
.
.
.
.
.
.
.
.
.
.
.
.
.
.
.
.
.
.
.
.
.
.
.
.
.
.
.
.
.
.
.
.
.
.
.
.
.
.
.
.
.
.
.
.
.
.
.
.
.
.
.
.
.
.
.
.
.
.
.
.
.
.
.
.
.
.
.
.
.
.
.
.
.
.
.
.
.
.
.
.
.
.
.
.
.
.
.
.
.
.
.
.
.
.
.
.
.
.
.
.
.
.
.
.
.
.
.
.
.
.
.
.
.
.
.
.
.
.
.
.
.
.
.
.
.
.
.
.
.
.
.
.
.
.
.
.
.
.
.
.
.
.
.
.
.
.
.
.
.
.
.
.
.
.
.
.
.
.
.
.
.
.
.
.
.
.
.
.
.
.
.
.
.
.
.
.
.
.
.
.
.
.
.
.
.
.
.
.
.
.
.
.
.
.
.
.
.
.
.
.
.
.
.
.
.
.
.
.
.
.
.
.
.
.
.
.
.
.
.
.
.
.
.
.
.
.
.
.
.
.
.
.
.
.
.
.
.
.
.
.
.
.
.
.
.
.
.
.
.
.
.
104
104
104
104
105
106
106
106
106
106
106
107
107
110
110
111
111
112
19 Database Connectivity
19.1 Introduction . . . . . . . . .
19.2 Configuration . . . . . . . .
19.2.1 Connection Pooling .
19.3 Configuration Example . . .
19.4 SBB use of JDBC . . . . . .
19.4.1 SQL Programming .
.
.
.
.
.
.
.
.
.
.
.
.
.
.
.
.
.
.
.
.
.
.
.
.
.
.
.
.
.
.
.
.
.
.
.
.
.
.
.
.
.
.
.
.
.
.
.
.
.
.
.
.
.
.
.
.
.
.
.
.
.
.
.
.
.
.
.
.
.
.
.
.
.
.
.
.
.
.
.
.
.
.
.
.
.
.
.
.
.
.
.
.
.
.
.
.
.
.
.
.
.
.
.
.
.
.
.
.
.
.
.
.
.
.
.
.
.
.
.
.
.
.
.
.
.
.
.
.
.
.
.
.
.
.
.
.
.
.
.
.
.
.
.
.
.
.
.
.
.
.
.
.
.
.
.
.
.
.
.
.
.
.
.
.
.
.
.
.
.
.
.
.
.
.
.
.
.
.
.
.
.
.
.
.
.
.
113
113
113
114
114
115
116
.
.
.
.
.
.
.
.
.
.
.
.
.
.
.
.
.
.
.
.
.
.
.
.
.
.
.
.
.
.
.
.
.
.
.
.
.
.
.
.
.
.
.
.
.
.
.
.
.
.
.
.
.
.
.
.
.
.
.
.
.
.
.
.
.
.
.
.
.
.
.
.
.
.
.
.
.
.
20 J2EE SLEE Integration
118
20.1 Introduction . . . . . . . . . . . . . . . . . . . . . . . . . . . . . . . . . . . . . . . . . . . . . . . . . . . . . 118
20.2 Invoking EJBs from an SBB . . . . . . . . . . . . . . . . . . . . . . . . . . . . . . . . . . . . . . . . . . . . 118
20.3 Sending SLEE Events from an EJB . . . . . . . . . . . . . . . . . . . . . . . . . . . . . . . . . . . . . . . . . 120
21 PostgreSQL Configuration
21.1 Introduction . . . . . . . . . .
21.2 Installing PostgreSQL . . . . .
21.3 Creating Users . . . . . . . .
21.4 TCP/IP Connections . . . . .
21.5 Access Control . . . . . . . .
21.6 Multiple PostgreSQL Support
21.6.1 Configuration . . . . .
.
.
.
.
.
.
.
.
.
.
.
.
.
.
.
.
.
.
.
.
.
.
.
.
.
.
.
.
.
.
.
.
.
.
.
22 SIP Example Applications
22.1 Introduction . . . . . . . . . . . . . . .
22.1.1 Intended Audience . . . . . . .
22.2 System Requirements . . . . . . . . . .
22.2.1 Required Software . . . . . . .
22.3 Directory Contents . . . . . . . . . . .
22.4 Quick Start . . . . . . . . . . . . . . .
22.4.1 Environment . . . . . . . . . .
22.4.2 Building and Deploying . . . .
22.4.3 Configuring the Services . . . .
22.4.4 Installing the Services . . . . .
22.5 Manual Installation . . . . . . . . . . .
22.5.1 Resource Adaptor Installation .
22.5.2 Deploying the Resource Adaptor
22.5.3 Specifying a Location Service .
22.5.4 Installing the Registrar Service .
22.5.5 Removing the Registrar Service
22.5.6 Installing the Proxy Service . .
.
.
.
.
.
.
.
.
.
.
.
.
.
.
.
.
.
.
.
.
.
.
.
.
.
.
.
.
.
.
.
.
.
.
.
.
.
.
.
.
.
.
.
.
.
.
.
.
.
.
.
.
.
.
.
.
.
.
.
.
.
.
.
.
.
.
.
.
.
.
.
.
.
.
.
.
.
.
.
.
.
.
.
.
.
.
.
.
.
.
.
.
.
.
.
.
.
.
.
.
.
.
.
.
.
.
.
.
.
.
.
.
.
.
.
.
.
.
.
.
.
.
.
.
.
.
.
.
.
.
.
.
.
.
.
.
.
.
.
.
.
.
.
.
.
.
.
.
.
.
.
.
.
.
.
.
.
.
.
.
.
.
.
.
.
.
.
.
.
.
.
.
.
.
.
.
.
.
.
.
.
.
.
.
.
.
.
.
.
.
.
.
.
.
.
.
.
.
.
.
.
.
.
.
.
.
.
.
.
.
.
.
.
.
.
.
.
.
.
.
.
.
.
.
.
.
.
.
.
.
.
.
.
.
.
.
.
.
.
.
.
.
.
.
.
.
.
.
.
.
.
.
.
.
.
.
.
.
.
.
.
.
.
.
.
.
122
122
122
122
123
123
123
123
.
.
.
.
.
.
.
.
.
.
.
.
.
.
.
.
.
.
.
.
.
.
.
.
.
.
.
.
.
.
.
.
.
.
.
.
.
.
.
.
.
.
.
.
.
.
.
.
.
.
.
.
.
.
.
.
.
.
.
.
.
.
.
.
.
.
.
.
.
.
.
.
.
.
.
.
.
.
.
.
.
.
.
.
.
.
.
.
.
.
.
.
.
.
.
.
.
.
.
.
.
.
.
.
.
.
.
.
.
.
.
.
.
.
.
.
.
.
.
.
.
.
.
.
.
.
.
.
.
.
.
.
.
.
.
.
.
.
.
.
.
.
.
.
.
.
.
.
.
.
.
.
.
.
.
.
.
.
.
.
.
.
.
.
.
.
.
.
.
.
.
.
.
.
.
.
.
.
.
.
.
.
.
.
.
.
.
.
.
.
.
.
.
.
.
.
.
.
.
.
.
.
.
.
.
.
.
.
.
.
.
.
.
.
.
.
.
.
.
.
.
.
.
.
.
.
.
.
.
.
.
.
.
.
.
.
.
.
.
.
.
.
.
.
.
.
.
.
.
.
.
.
.
.
.
.
.
.
.
.
.
.
.
.
.
.
.
.
.
.
.
.
.
.
.
.
.
.
.
.
.
.
.
.
.
.
.
.
.
.
.
.
.
.
.
.
.
.
.
.
.
.
.
.
.
.
.
.
.
.
.
.
.
.
.
.
.
.
.
.
.
.
.
.
.
.
.
.
.
.
.
.
.
.
.
.
.
.
.
.
.
.
.
.
.
.
.
.
.
.
.
.
.
.
.
.
.
.
.
.
.
.
.
.
.
.
.
.
.
.
.
.
.
.
.
.
.
.
.
.
.
.
.
.
.
.
.
.
.
.
.
.
.
.
.
.
.
.
.
.
.
.
.
.
.
.
.
.
.
.
.
.
.
.
.
.
.
.
.
.
.
.
.
.
.
.
.
.
.
.
.
.
.
.
.
.
.
.
.
.
.
.
.
.
.
.
.
.
.
.
.
.
.
.
.
.
.
.
.
.
.
.
.
.
.
.
.
.
.
.
.
.
.
.
.
.
.
.
.
.
.
.
.
.
.
.
.
.
.
.
.
.
.
.
.
.
.
.
.
.
.
.
.
.
.
.
.
.
.
.
.
.
.
.
.
.
.
.
.
.
.
.
.
.
.
.
.
.
.
.
.
.
.
.
.
.
.
.
.
.
.
.
.
.
.
.
.
.
.
.
.
.
.
.
.
.
.
.
.
.
.
.
.
.
.
.
.
.
.
.
.
.
.
.
.
.
.
.
.
.
.
.
.
.
.
.
.
.
.
.
.
.
.
.
.
.
.
.
.
.
.
.
.
.
.
.
.
.
.
.
.
.
.
.
.
.
.
.
.
.
.
.
.
.
.
.
.
.
.
.
.
.
.
.
.
.
.
.
.
.
.
129
129
129
130
130
130
130
130
131
134
134
135
135
136
137
138
140
140
.
.
.
.
Open Cloud Rhino 1.4.3 Administration Manual v1.1
v
22.5.7 Removing the Proxy Service . .
22.5.8 Modifying Service Source Code
22.6 Using the Services . . . . . . . . . . .
22.6.1 Configuring Linphone . . . . .
22.6.2 Using the Registrar Service . .
22.6.3 Using the Proxy Service . . . .
22.6.4 Enabling Debug Output . . . .
.
.
.
.
.
.
.
.
.
.
.
.
.
.
.
.
.
.
.
.
.
.
.
.
.
.
.
.
.
.
.
.
.
.
.
.
.
.
.
.
.
.
.
.
.
.
.
.
.
.
.
.
.
.
.
.
.
.
.
.
.
.
.
.
.
.
.
.
.
.
.
.
.
.
.
.
.
.
.
.
.
.
.
.
.
.
.
.
.
.
.
.
.
.
.
.
.
.
.
.
.
.
.
.
.
.
.
.
.
.
.
.
.
.
.
.
.
.
.
.
.
.
.
.
.
.
.
.
.
.
.
.
.
.
.
.
.
.
.
.
.
.
.
.
.
.
.
.
.
.
.
.
.
.
.
.
.
.
.
.
.
.
.
.
.
.
.
.
.
.
.
.
.
.
.
.
.
.
.
.
.
.
.
.
.
.
.
.
.
.
.
.
.
.
.
.
.
.
.
.
.
.
.
.
.
.
.
.
.
.
.
.
.
.
.
.
.
.
.
.
.
.
.
.
.
.
.
.
.
.
.
.
.
.
.
.
.
.
.
.
.
.
.
.
.
.
.
.
.
.
.
.
.
.
.
.
.
.
.
.
.
.
.
.
.
.
142
143
143
143
144
145
147
23 JCC Example Application
23.1 Introduction . . . . . . . . . . . . . . . . . . . .
23.1.1 Intended Audience . . . . . . . . . . . .
23.1.2 System Requirements for JCC example .
23.2 Basic Concepts . . . . . . . . . . . . . . . . . .
23.2.1 Resource Adaptor . . . . . . . . . . . . .
23.2.2 Call Forwarding Service . . . . . . . . .
23.2.3 Service Logic . . . . . . . . . . . . . . .
23.3 Directory Contents . . . . . . . . . . . . . . . .
23.4 Installation . . . . . . . . . . . . . . . . . . . .
23.4.1 JCC Reference Implementation . . . . .
23.4.2 Deploying the Resource Adaptor . . . . .
23.5 The Call Forwarding Service . . . . . . . . . . .
23.5.1 Installing and Configuring . . . . . . . .
23.5.2 Examining using the Command Console .
23.5.3 Editing the Call Forwarding Profile . . .
23.6 JCC Call Forwarding Service . . . . . . . . . . .
23.6.1 Trace Components . . . . . . . . . . . .
23.6.2 Creating Trace Components . . . . . . .
23.6.3 Creating a Call . . . . . . . . . . . . . .
23.6.4 Testing Call Forwarding . . . . . . . . .
23.7 Call Duration Service . . . . . . . . . . . . . . .
23.7.1 Call Duration Service - Architecture . . .
23.7.2 Call Duration Service - Execution . . . .
23.7.3 Service Logic: Call Duration SBB . . .
.
.
.
.
.
.
.
.
.
.
.
.
.
.
.
.
.
.
.
.
.
.
.
.
.
.
.
.
.
.
.
.
.
.
.
.
.
.
.
.
.
.
.
.
.
.
.
.
.
.
.
.
.
.
.
.
.
.
.
.
.
.
.
.
.
.
.
.
.
.
.
.
.
.
.
.
.
.
.
.
.
.
.
.
.
.
.
.
.
.
.
.
.
.
.
.
.
.
.
.
.
.
.
.
.
.
.
.
.
.
.
.
.
.
.
.
.
.
.
.
.
.
.
.
.
.
.
.
.
.
.
.
.
.
.
.
.
.
.
.
.
.
.
.
.
.
.
.
.
.
.
.
.
.
.
.
.
.
.
.
.
.
.
.
.
.
.
.
.
.
.
.
.
.
.
.
.
.
.
.
.
.
.
.
.
.
.
.
.
.
.
.
.
.
.
.
.
.
.
.
.
.
.
.
.
.
.
.
.
.
.
.
.
.
.
.
.
.
.
.
.
.
.
.
.
.
.
.
.
.
.
.
.
.
.
.
.
.
.
.
.
.
.
.
.
.
.
.
.
.
.
.
.
.
.
.
.
.
.
.
.
.
.
.
.
.
.
.
.
.
.
.
.
.
.
.
.
.
.
.
.
.
.
.
.
.
.
.
.
.
.
.
.
.
.
.
.
.
.
.
.
.
.
.
.
.
.
.
.
.
.
.
.
.
.
.
.
.
.
.
.
.
.
.
.
.
.
.
.
.
.
.
.
.
.
.
.
.
.
.
.
.
.
.
.
.
.
.
.
.
.
.
.
.
.
.
.
.
.
.
.
.
.
.
.
.
.
.
.
.
.
.
.
.
.
.
.
.
.
.
.
.
.
.
.
.
.
.
.
.
.
.
.
.
.
.
.
.
.
.
.
.
.
.
.
.
.
.
.
.
.
.
.
.
.
.
.
.
.
.
.
.
.
.
.
.
.
.
.
.
.
.
.
.
.
.
.
.
.
.
.
.
.
.
.
.
.
.
.
.
.
.
.
.
.
.
.
.
.
.
.
.
.
.
.
.
.
.
.
.
.
.
.
.
.
.
.
.
.
.
.
.
.
.
.
.
.
.
.
.
.
.
.
.
.
.
.
.
.
.
.
.
.
.
.
.
.
.
.
.
.
.
.
.
.
.
.
.
.
.
.
.
.
.
.
.
.
.
.
.
.
.
.
.
.
.
.
.
.
.
.
.
.
.
.
.
.
.
.
.
.
.
.
.
.
.
.
.
.
.
.
.
.
.
.
.
.
.
.
.
.
.
.
.
.
.
.
.
.
.
.
.
.
.
.
.
.
.
.
.
.
.
.
.
.
.
.
.
.
.
.
.
.
.
.
.
.
.
.
.
.
.
.
.
.
.
.
.
.
.
.
.
.
.
.
.
.
.
.
.
.
.
.
.
.
.
.
.
.
.
.
.
.
.
.
.
.
.
.
.
.
.
.
.
.
.
.
.
.
.
.
.
.
.
.
.
.
.
.
.
.
.
.
.
.
.
.
.
.
.
.
.
.
.
.
.
.
.
.
.
.
.
.
.
.
.
.
.
.
.
.
.
.
.
.
.
.
.
.
.
.
.
.
.
.
.
.
.
.
.
.
.
.
.
.
.
.
.
.
.
.
.
.
.
.
.
.
.
.
.
.
.
.
.
.
.
.
.
.
.
.
.
.
.
.
.
.
.
.
.
.
.
.
.
.
.
.
.
.
.
.
.
.
.
.
.
.
.
.
.
.
.
.
.
.
.
.
.
.
.
.
.
148
148
148
148
148
149
149
151
154
154
154
155
156
156
158
159
161
161
161
162
162
163
164
164
165
24 Customising the SIP Registrar
24.1 Introduction . . . . . . . . . .
24.2 Background . . . . . . . . . .
24.3 Performing the Customisation
24.4 Extending with Profiles . . . .
.
.
.
.
.
.
.
.
.
.
.
.
.
.
.
.
.
.
.
.
.
.
.
.
.
.
.
.
.
.
.
.
.
.
.
.
.
.
.
.
.
.
.
.
.
.
.
.
.
.
.
.
.
.
.
.
.
.
.
.
.
.
.
.
.
.
.
.
.
.
.
.
.
.
.
.
.
.
.
.
.
.
.
.
.
.
.
.
.
.
.
.
.
.
.
.
.
.
.
.
.
.
.
.
.
.
.
.
.
.
.
.
.
.
.
.
.
.
.
.
.
.
.
.
.
.
.
.
.
.
.
.
.
.
.
.
.
.
.
.
.
.
.
.
.
.
.
.
169
169
169
170
172
A Hardware and Systems Support
A.1 Supported Hardware/OS platforms . . . . .
A.2 Recommended Hardware . . . . . . . . . .
A.2.1 Introduction . . . . . . . . . . . . .
A.2.2 Development System Requirements
A.2.3 Production System Requirements .
A.2.4 Application Example . . . . . . . .
.
.
.
.
.
.
.
.
.
.
.
.
.
.
.
.
.
.
.
.
.
.
.
.
.
.
.
.
.
.
.
.
.
.
.
.
.
.
.
.
.
.
.
.
.
.
.
.
.
.
.
.
.
.
.
.
.
.
.
.
.
.
.
.
.
.
.
.
.
.
.
.
.
.
.
.
.
.
.
.
.
.
.
.
.
.
.
.
.
.
.
.
.
.
.
.
.
.
.
.
.
.
.
.
.
.
.
.
.
.
.
.
.
.
.
.
.
.
.
.
.
.
.
.
.
.
.
.
.
.
.
.
.
.
.
.
.
.
.
.
.
.
.
.
.
.
.
.
.
.
.
.
.
.
.
.
.
.
.
.
.
.
.
.
.
.
.
.
.
.
.
.
.
.
.
.
.
.
.
.
.
.
.
.
.
.
.
.
.
.
.
.
.
.
.
.
.
.
.
.
.
.
.
.
.
.
.
.
.
.
.
.
.
.
.
.
173
173
173
173
173
174
175
B Redundant Networking
B.1 Redundant Networking in Solaris . . . . .
B.1.1 Prerequisites . . . . . . . . . . .
B.1.2 Create interface group . . . . . .
B.1.3 Tune failure detection time . . . .
B.1.4 Configure probe addresses . . . .
B.1.5 Editing the Routing Table . . . .
B.1.6 Make the Configuration Persistent
.
.
.
.
.
.
.
.
.
.
.
.
.
.
.
.
.
.
.
.
.
.
.
.
.
.
.
.
.
.
.
.
.
.
.
.
.
.
.
.
.
.
.
.
.
.
.
.
.
.
.
.
.
.
.
.
.
.
.
.
.
.
.
.
.
.
.
.
.
.
.
.
.
.
.
.
.
.
.
.
.
.
.
.
.
.
.
.
.
.
.
.
.
.
.
.
.
.
.
.
.
.
.
.
.
.
.
.
.
.
.
.
.
.
.
.
.
.
.
.
.
.
.
.
.
.
.
.
.
.
.
.
.
.
.
.
.
.
.
.
.
.
.
.
.
.
.
.
.
.
.
.
.
.
.
.
.
.
.
.
.
.
.
.
.
.
.
.
.
.
.
.
.
.
.
.
.
.
.
.
.
.
.
.
.
.
.
.
.
.
.
.
.
.
.
.
.
.
.
.
.
.
.
.
.
.
.
.
.
.
.
.
.
.
.
.
.
.
.
.
.
.
.
.
.
.
.
.
.
.
.
.
.
.
.
.
.
.
.
.
.
.
.
.
.
.
.
.
.
.
.
.
177
177
177
177
179
179
180
180
.
.
.
.
.
.
.
.
.
.
.
.
.
.
.
.
.
.
.
.
.
.
.
.
.
.
.
.
.
.
.
Open Cloud Rhino 1.4.3 Administration Manual v1.1
vi
C Resource Adaptors and Resource Adaptor Entities
C.1 Introduction . . . . . . . . . . . . . . . . . . .
C.2 Entity Lifecycle . . . . . . . . . . . . . . . . .
C.2.1 Inactive State . . . . . . . . . . . . . .
C.2.2 Activated State . . . . . . . . . . . . .
C.2.3 Deactivating State . . . . . . . . . . .
C.3 Configuration Properties . . . . . . . . . . . .
C.4 Entity Binding . . . . . . . . . . . . . . . . . .
.
.
.
.
.
.
.
.
.
.
.
.
.
.
.
.
.
.
.
.
.
.
.
.
.
.
.
.
.
.
.
.
.
.
.
.
.
.
.
.
.
.
.
.
.
.
.
.
.
.
.
.
.
.
.
.
.
.
.
.
.
.
.
.
.
.
.
.
.
.
.
.
.
.
.
.
.
.
.
.
.
.
.
.
.
.
.
.
.
.
.
.
.
.
.
.
.
.
.
.
.
.
.
.
.
.
.
.
.
.
.
.
.
.
.
.
.
.
.
.
.
.
.
.
.
.
.
.
.
.
.
.
.
.
.
.
.
.
.
.
.
.
.
.
.
.
.
.
.
.
.
.
.
.
.
.
.
.
.
.
.
.
.
.
.
.
.
.
.
.
.
.
.
.
.
.
.
.
.
.
.
.
.
.
.
.
.
.
.
.
.
.
.
.
.
.
.
.
.
.
.
.
.
.
.
.
.
.
.
.
.
.
.
.
.
.
.
.
.
.
.
.
.
.
.
.
.
.
.
.
.
.
.
.
.
.
.
.
182
182
182
183
183
183
183
184
D Transactions
D.1 Introduction . . . . . . . . . . . . . . . . . . .
D.2 ACID Properties . . . . . . . . . . . . . . . .
D.3 Concurrency Control Models . . . . . . . . . .
D.3.1 Pessimistic Concurrency Control . . . .
D.3.2 Optimistic Concurrency Control . . . .
D.3.3 Summary . . . . . . . . . . . . . . . .
D.4 Processing Components and Commit Protocols
D.4.1 Transaction Processing Components . .
D.4.2 Multiple Resource Managers . . . . . .
D.4.3 Commit Protocols . . . . . . . . . . .
.
.
.
.
.
.
.
.
.
.
.
.
.
.
.
.
.
.
.
.
.
.
.
.
.
.
.
.
.
.
.
.
.
.
.
.
.
.
.
.
.
.
.
.
.
.
.
.
.
.
.
.
.
.
.
.
.
.
.
.
.
.
.
.
.
.
.
.
.
.
.
.
.
.
.
.
.
.
.
.
.
.
.
.
.
.
.
.
.
.
.
.
.
.
.
.
.
.
.
.
.
.
.
.
.
.
.
.
.
.
.
.
.
.
.
.
.
.
.
.
.
.
.
.
.
.
.
.
.
.
.
.
.
.
.
.
.
.
.
.
.
.
.
.
.
.
.
.
.
.
.
.
.
.
.
.
.
.
.
.
.
.
.
.
.
.
.
.
.
.
.
.
.
.
.
.
.
.
.
.
.
.
.
.
.
.
.
.
.
.
.
.
.
.
.
.
.
.
.
.
.
.
.
.
.
.
.
.
.
.
.
.
.
.
.
.
.
.
.
.
.
.
.
.
.
.
.
.
.
.
.
.
.
.
.
.
.
.
.
.
.
.
.
.
.
.
.
.
.
.
.
.
.
.
.
.
.
.
.
.
.
.
.
.
.
.
.
.
.
.
.
.
.
.
.
.
.
.
.
.
.
.
.
.
.
.
.
.
.
.
.
.
.
.
.
.
.
.
.
.
.
.
.
.
.
.
.
.
.
.
.
.
.
.
.
.
.
.
.
.
.
.
.
.
.
.
.
.
.
.
.
.
.
.
.
.
.
.
.
.
185
185
185
185
185
186
186
186
186
186
187
E Audit Logs
188
E.1 File Format . . . . . . . . . . . . . . . . . . . . . . . . . . . . . . . . . . . . . . . . . . . . . . . . . . . . . 188
E.1.1 Data Types . . . . . . . . . . . . . . . . . . . . . . . . . . . . . . . . . . . . . . . . . . . . . . . . . 188
E.2 Example Audit Logfile . . . . . . . . . . . . . . . . . . . . . . . . . . . . . . . . . . . . . . . . . . . . . . . 190
F Glossary
Open Cloud Rhino 1.4.3 Administration Manual v1.1
191
vii
Chapter 1
Introduction
Welcome to the Open Cloud Rhino SLEE Administration Manual for Systems Administrators and Software Developers. This
guide is intended for use with the Open Cloud Rhino, a JAIN SLEE 1.0 compliant SLEE implementation.
This document contains instructions for installing, running, and configuring the Rhino SLEE, as well as tutorials for the included
examples. It also serves as a starting point for the development of new services for deployment into the Rhino SLEE.
A list of frequent problems and solutions can be can be found in the Troubleshooting Guide1 . It is recommended that this guide
is reviewed before Open Cloud is contacted for support. Further information and contact details are available from the Open
Cloud website at http://www.opencloud.com .
1.1 Intended Audience
Not all chapters of this document will be relevant to all users of the Rhino SLEE. You may wish to skip ahead to the chapters
recommended below:
• If you are a Service Developer interested in building and deploying application components, then you should refer to
Chapters 3 (SLEE Overview), 4 (Getting Started), 22 (SIP Examples) and 23 (JCC Examples).
• If you are a Systems Administrator who is interested in deploying, tuning and maintaining the Rhino SLEE, see Chapters
3 (SLEE Overview) and 4 (Getting Started).
1.2 Chapter Overview
Chapter 1 introduces the Open Cloud Rhino SLEE, a carrier-grade implementation of the JAIN SLEE 1.0 specification, JSR 22.
This chapter also outlines the solution domain and integration capabilities of the Open Cloud Rhino SLEE.
Chapter 2 gives an overview of the Rhino SLEE platform.
Chapter 3 contains an introduction to the JAIN SLEE 1.0 specification, the reference for the Open Cloud Rhino SLEE. Further
background material is available from http://www.jainslee.org .
Chapter 4 gives detailed instructions on how to install the Rhino SLEE.
Chapter 5 provides a guide to the tools used to to manage the Rhino SLEE and contains several examples using the packaged
demonstration applications.
Chapter 6 describes techniques which are performed by administrators to operate the Rhino SLEE reliably over extended periods
of time and how to respond to services which malfunction or pollute the SLEE.
Chapter 7 describes the process for exporting and importing the state of the Rhino SLEE. The export and import mechanism
are used to perform online upgrades of a cluster.
Chapter 8 details the metrics and instrumentation used to monitor Rhino SLEE and SLEE application performance.
1 The
Troubleshooting Guide is a separate document available from Open Cloud
1
Chapter 9 describes installation details and configuration issues of the Web Console used for Open Cloud Rhino SLEE management operations.
Chapter 10 details the online and offline configuration of the Rhino SLEE logging system. The logging system is used by Rhino
SLEE and application component developers to record output.
Chapter 11 describes how to manage the alarms that may occur from time to time.
Chapter 12 is an introduction to threshold alarms.
Chapter 13 details the notification system, and how it can be configured. This is of particular use when integrating into an
existing network.
Chapter 14 explains the capacity licensing restrictions of the Open Cloud Rhino SLEE.
Chapter 15 provides information on security policies, and in particular discusses the security policy file, granting permissions
to various components.
Chapter 16 describes production and staging issues such as clustering, object pool configuration and fault tolerance within
Rhino SLEE.
Chapter 17 describes how distributed nodes can provide fault tolerance for the Rhino SLEE.
Chapter 18 details topics on the implementation of the JAIN SLEE 1.0 specification, and reviews configuration options that are
available in a Rhino SLEE deployment.
Chapter 19 describes how to use an external SQL database from within a Rhino SLEE component application and discusses
systems-level topics such as connection pooling and transaction management.
Chapter 20 discusses how Rhino SLEE is integrated with J2EE 1.3 compliant products. This chapter describes how SBBs can
invoke EJB components running in a J2EE server, and how J2EE components can send events in to a Rhino SLEE.
Chapter 21 describes installation details and configuration issues of the PostgreSQL database used for Open Cloud Rhino SLEE
non-volatile memory.
Chapters 22 and 23 provide demonstration SLEE applications using SIP and JCC. The SIP demonstration includes a registrar
and proxy service. The JCC demonstration includes a call forwarding example. These demonstrations validate the stability of
the installation and provide a tutorial for administration and programming.
Chapter 24 takes the programmer further into the development of Rhino SLEE SBBs, by customising the SIP Registrar Service
Appendix A specifies known supported hardware platforms and recommended configurations for the Open Cloud Rhino SLEE
platform and its integral components. It additionally identifies operating-system specific dependencies and system level information.
Appendix C outlines the concepts of Resource Adaptor and Resource Adaptor Entity in the JAIN SLEE 1.1 specification, JSR
240, and defines life-cycles and configuration properties for Resource Adaptor Entities, a topic which is not described in the
JAIN SLEE 1.0 specification
Appendix D provides background material on transaction processing methods utilised by the Open Cloud Rhino SLEE. This
appendix provides an important reference for administrators and programmers.
Appendix E provides details on the format of the logs output by Rhino for the purpose of license auditing.
Open Cloud Rhino 1.4.3 Administration Manual v1.1
2
Chapter 2
The Rhino SLEE Platform
2.1 Introduction
The Open Cloud Rhino SLEE is a suite of servers, resource adaptors, tools, and examples that collectively support the development and deployment of carrier-grade services in Java. At the core of the platform is the Rhino SLEE, a fault-tolerant, carrier
grade implementation of the JAIN SLEE 1.0 specification.
It supports rapid integration with external systems and protocol stacks and may be tuned to meet the most demanding performance and fault tolerant requirements.
In addition, a production installation of Rhino has a carrier-grade fault-tolerant infrastructure that provides continuous availability, service logic execution and on-line management even during network outages, hardware failure, software failure and
maintenance operations.
Elements of the platform can be organised into the following categories as shown in Figure 2.1:
• Service Logic Execution Environment (SLEE).
• Integration.
• Service Development.
3
Rhino Platform
Integration
Service Development
Resource Adaptor Toolkit
Ex ample Services
Ent erprise Int egration
Service Editing
Prebuilt Resource Adapt ors
Funct ional Test ing
Load Testing
Service Logic Execution Environment
Resource Adaptor
Architecture
Service
Ex ecut ion
Management
Car r i er Gr ad e Enab l i ng Inf r ast r uct ur e
Figure 2.1: The Rhino Platform
2.2 Service Logic Execution Environment
The Service Logic Execution Environment (SLEE) category includes:
• The Rhino SLEE server. The Rhino SLEE is compliant with the JAIN SLEE 1.0 specification, which includes the JAIN
SLEE component model, management interfaces, and integration framework.
• SLEE Management tools. These are applications which perform management operations of the running Rhino SLEE.
Their are two main management tools used by system administrators and developers to deploy and manage services,
profiles and resource adaptors: the Web Console and the Command Console.
• The Resource Adaptor Architecture. Resource Adaptors are adaptors to externally available system resources, such
as network protocol stacks. The Resource Adaptor Architecture allows services to be portable across many network
protocols.
2.3 Integration
The Integration category includes:
• Pre-built Resource Adaptors for integration with common external systems, for example SIP and JCC.
• Tools to rapidly build new Resource Adaptors and Services.
• Integration with enterprise RDBMS SQL database servers.
• Security integration with LDAP directory systems and J2EE web servers.
• Duplex communications with J2EE application servers.
Open Cloud also has Resource Adaptor offerings for SS7 and IP signalling protocols and other messaging protocols, these are
are available on demand. Please contact Open Cloud for more information.
Open Cloud Rhino 1.4.3 Administration Manual v1.1
4
2.4 Service Development
The Service Development category provides a Federated Service Creation Environment (FSCE) which enables the development
of SLEE services and Resource Adaptors for the Rhino SLEE platform.
Also included in the FSCE are tools to support the following:
• Functional unit testing of services.
• Performance testing.
• Failure recovery testing.
• Example demonstration services.
The key design objectives of the FSCE initiative as shown in Figure 2.2 and their relation to the Software Development Lifecycle (SDLC) are:
• Rapid service application development environment. The FSCE has been designed to be compatible with third party
testing tools, build tools and IDEs.
• Developers can leverage expertise with their existing tools and technologies.
• Producing and maintaining a SLEE software product is more complex than writing source code, software testing and
conditioning is an important process of the software development life-cycle. The FSCE facilitates the development of
reproducible unit test cases.
• Durability and performance latency are potentially critical for network-oriented SLEE services. The FSCE offers load
generation tools to perform and operate performance testing at the appropriate stage of the software development lifecycle.
Federated Service Creation Environment
Resource Adaptors
Simulators/Load Generators
JCC
SIP
MM7
SIP
SS7
BILLING
SMPP
SMSC Sim
J2EE
DIAMETER
HLR Sim
SwitchSim
Messaging
HTTP
(INAP, CAP, MAP)
(SMPP, MM7)
(Base, CCA)
(CAP, INAP)
Build Tools
IDE Plugins
SLEE Ant Tasks
(Eclipse, NetBeans)
Unit testing
Rhino SLEE Server
Figure 2.2: The Federated Service Creation Environment
Open Cloud Rhino 1.4.3 Administration Manual v1.1
5
The Federated Service Creation Environment allows a SLEE component or application to be fully tested under scenarios similar
to the actual deployment environment. The same service or resource adaptors binaries can be tested from pre-production staging
all the way through to final production deployment.
The process of integrating services and resource adaptors with the network critical physical infrastructure can be executed with
a high level of confidence allowing effort to be concentrated on other relevant aspects of the production integration exercise.
2.5 Functional Testing
Once source code starts being produced, having a set of repeatable functional unit tests provides a massive benefit to the software
development life-cycle.
Functional unit tests reflect a sequence of inputs that validate whether or not the service is producing appropriate output.
The Rhino SLEE platform includes several tools that are able to be used when building functional tests. These are:
• CAP V2 Switch Simulator.
• ETSI INAP CS-1 Switch Simulator.
• SMSC simulator that generates SMPP messages.
• MM7 R/S simulator that generates MM7 messages.
• HLR simulator that responds to SCP queries via MAP v3.
These tools allow various scenarios to be simulated. The switch simulators are capable of producing either originating or terminating BCSMs (Basic Call State Machines). The switch simulators can test calls that are answered at either end, abandoned,
invalid and so forth.
Developers at Open Cloud make use of the JUnit unit testing framework (http://www.junit.org) to run batches of tests.
2.6 Performance Testing
Running repeatable performance tests during key stages of the SDLC can provide valuable information regarding the effectiveness of a component, service, or resource adaptor. Performance tests run several sequences of inputs repeatedly and collect
various performance metrics and statistics over the duration of the tests.
Performance testing using the Rhino platform is supported by the load generation component. The load generation component
has the following capabilities:
• Dynamically configurable load
• Statistics reporting
• Real-time latency graphs
• A plug-in architecture, including plug-ins for:
– CAP v2 Switch Simulator
– ETSI INAP CS-1 Switch Simulator
– SMSC simulator
– MM7 simulator
Open Cloud Rhino 1.4.3 Administration Manual v1.1
6
2.7 Software Development Kit
The Open Cloud Rhino SLEE SDK (Figure 2.3) is a JAIN SLEE service development solution and includes:
• All software in the SLEE category.
• SIP Resource Adaptors.
• SIP Demonstration services: Registrar, Proxy, Find-me-follow-me.
• JCC Resource Adaptors.
• JCC Demonstration services: call forwarding.
• Enterprise Integration features.
• Example demonstration SIP and JCC applications.
The evaluation license distributed with the Rhino SLEE limits the maximum throughput of events per second. Sometimes
a call may involve more than a single event. For more information regarding extended licenses for the Rhino SLEE please
contact Open Cloud
Rhino Software Development Kit
Integration
Service Development
Enterprise Integration
Example SIP + JCC Services
SIP + JCC Resource Adaptors
Single Node Service Logic Execution Environment
Resource Adaptor
Architecture
Service
Execution
Management
Figure 2.3: The Open Cloud Rhino SLEE SDK
Some key features of the Rhino SLEE SDK are:
• It provides a high performance, low latency service logic execution environment.
• The Rhino SLEE SDK runs as a single node server, which is easier to work with for development.
• JAIN SLEE 1.0 specification, JSR 22 compliance.
• Example demonstration services are provided to enable rapid application development.
• Pre-built Resource Adaptors are provided to decrease lead time to market.
• The Federated Service Creation Environment enable developers to build services using existing tool sets.
The Rhino SLEE SDK is intended to support the development of services and functional testing but is not suitable for load
testing, failure testing or deployment into a production environment.
Open Cloud Rhino 1.4.3 Administration Manual v1.1
7
Chapter 3
JAIN SLEE Overview
3.1 Introduction
This chapter discusses key principles of the JAIN SLEE 1.0 specification architecture.
The SLEE architecture defines the component model for structuring application logic for communications applications as a
collection of reusable object-oriented components, and for assembling these components into high-level sophisticated services.
The SLEE architecture also defines the contract between these components and the SLEE container that will host these components at run-time.
The SLEE specification supports the development of highly available and scalable distributed SLEE specification-compliant
application servers, yet does not mandate any particular implementation strategy. More importantly, applications may be
written once, and then deployed on any application server that implements the SLEE specification.
In addition to the application component model, the SLEE specification also defines the management interfaces used to administer the application server and the application components executing within the application server. It also defines a set of
standard facilities such as the Timer Facility, Alarm Facility, Trace Facility and Usage Facility.
The SLEE specification defines:
• The SLEE component model and how it supports event driven applications.
• How SLEE components can be composed and invoked.
• How provisioned data can be specified, externally managed and accessed by SLEE components.
• SLEE facilities.
• How external resources fit into the SLEE architecture and how SLEE applications interact with these resources.
• How events are routed to application components.
• The management interfaces of a SLEE.
• How applications are packaged for deployment into a SLEE.
The following sections discuss the central abstractions of the SLEE specification. For more detail about the concepts introduced
in this chapter please refer to the SLEE specification, available at http://jcp.org/en/jsr/detail?id=22 .
3.2 Events and Event Types
An event typically represents an occurrence that requires application processing. It carries information that describes the
occurrence, such as the source of the event. An event may originate from a number of sources:
• An external resource such as a communications protocol stack.
8
• Within the SLEE. For example:
– The SLEE emits events to communicate changes in the SLEE that may be of interest to applications running in the
SLEE.
– The Timer Facility emits an event when a timer expires.
– The SLEE emits an event when an administrator modifies the provisioned data for an application.
• An application running in the SLEE – applications may use events to signal or invoke other applications in the SLEE.
Every event in the SLEE has an event type. The event type of an event determines how the event is routed to different application
components.
3.3 Event Driven Applications
An event driven application typically does not have an active thread of execution. Instead, event handler sub-routines are
invoked by an ‘event routing’ component in response to receipt of events. These event handler sub-routines define application
code that inspect the event and perform appropriate processing to handle the event.
The SLEE component model models the external interface of an event driven application as the set of events that the application
may receive from the SLEE and external resources. Each event type is handled by an event handler method of one of the
software components in the application. This enforces a well-defined event interface. A SLEE application may interact with
the resource that emitted the event (or other resources), fire new events or update the application state.
A SLEE implementation provides the event routing behaviour (as defined by the SLEE specification) that invokes the event
handler methods of application software components.
3.4 Components
The SLEE architecture defines how an application can be composed of components. These components are known as Service
Building Block (SBB) components. An example of an SBB is a call forwarding service.
Each SBB component identifies the event types accepted by the component and defines event handler methods that contain
application code for processing events of these event types. An SBB component may additionally define an interface for
synchronous method invocations.
At run-time, the SLEE creates instances of these components to process events.
3.5 Provisioned Data
The SLEE specification defines management interfaces and specifies how applications running in the SLEE access provisioned
data. Typical provisioned data includes configuration data or per-subscriber data. The SLEE specification uses objects called
“Profiles” to store provisioned data.
3.6 Facilities
The SLEE specification defines a number of Facilities that may be used by SBB components.
These Facilities are:
• Timer Facility.
• Trace Facility.
• Usage Facility.
• Alarm Facility.
Open Cloud Rhino 1.4.3 Administration Manual v1.1
9
3.7 Activities
An Activity represents a related stream of events. These events represent occurrences of significance that have occurred on the
entity represented by the Activity. From the perspective of a resource, an Activity represents an entity within the resource that
emits events on state changes within the entity or resource.
For example, a phone call may be an Activity.
3.8 Resources and Resource Adaptors
A resource represents a system that is external to a SLEE. Examples include network devices, protocol stacks, and databases.
These resources may or may not have Java APIs. Resources with Java APIs include call agents supporting the Java Call Control
API, Parlay/OSA services supporting the JAIN Service Provider APIs (JAIN User Location Status, JAIN User Interaction).
These Java APIs define Java classes or interfaces to represent the events emitted by the resource. For example, the Java Call
Control API defines JccCallEvent and JccConnectionEvent to represent call and connection events. A JccConnectionEvent
signals call events such as connection alerting and connection connecting.
The SLEE architecture defines how applications running within the SLEE interact with resources through the use of resource
adaptors. Resource adaptors are so named because they adapt resources so that they can be used by services in the SLEE.
The SLEE architecture defines the following concepts related to Resource Adaptors:
• Resource adaptor type: A resource adaptor type specifies the common definitions for a set of resource adaptors. It
defines the Java interfaces implemented by the resource adaptors of the same resource adaptor type. Typically, a resource
adaptor type is defined by an organisation of collaborating SLEE or resource vendors, such as the SLEE expert group.
• Resource adaptor: A resource adaptor is an implementation of particular resource adaptor type. Typically, a resource
adaptor is provided either by a resource vendor or a SLEE vendor to adapt a particular resource implementation to a
SLEE. An example of a Resource Adaptor is Open Cloud’s implementation of a SIP stack.
• Resource adaptor entity: A resource adaptor entity is an instance of a resource adaptor which is instantiated at runtime.
Multiple resource adaptor entities may be instantiated from a single resource adaptor. Typically, an administrator instantiates a resource adaptor entity from resource adaptor installed in the SLEE by providing the parameters required by the
resource adaptor to bind to particular resource.
Open Cloud Rhino 1.4.3 Administration Manual v1.1
10
Chapter 4
Getting Started
4.1 Introduction
This chapter describes the processes required to install, configure and verify an installation of the Rhino SLEE.
It is expected that the user has a good working knowledge of the Linux and Solaris command shells.
The following steps explain how to install and start using the Rhino SLEE 1.4.3:
1. Checking prerequisites.
2. Unpacking the distribution.
3. Installation.
• Configuring a cluster.
• Transferring cluster configuration.
• Configuring the nodes.
4. Initialising the main working memory.
5. Starting a Rhino SLEE node.
6. Starting the Rhino SLEE cluster.
7. Connecting to the Web Console and Command Console.
4.2 Installation on Linux / Solaris
4.2.1
Checking Prerequisites
Before installing Rhino SLEE, ensure that the system meets the requirements below. For more information about supported
systems configuration please see Appendix A.
• Supported hardware/OS platforms
The Rhino SLEE is supported on the following hardware:
– Intel i686
– AMD
– UltraSPARC III
The Rhino SLEE is supported on the following OS platforms:
11
– Linux 2.4
– Solaris 9
– Red Hat Linux 9
The Rhino SLEE is supported on the following Java platforms.
– Sun 1.4.2_12 or later for Sparc/Solaris and Linux/Intel
• A suitable hardware configuration.
• A suitable network configuration.
Ensure the system is configured with an IP address and is visible on the network. Also ensure that the system can resolve
localhost to the loopback interface.
• A PostgreSQL installation. For more information in installing PostgreSQL, refer to Chapter 21.
• The Java J2SE SDK 1.4.2_12 or greater, or the Java JDK 1.5.0_07 or greater. It is strongly recommended that the most
recent 1.5-series Java JDK is used. Java can be downloaded and installed from http://www.sun.com.
The variable JAVA_HOME needs to be set to the root directory of the Java SDK.
To make sure that Java is correctly installed, do the following:
$ which java
/usr/local/java/bin/java
$ java -version
java version "1.5.0_07"
Java(TM) 2 Runtime Environment, Standard Edition (build 1.5.0_07)
Java HotSpot(TM) Client VM (build 1.5.0_07, mixed mode, sharing)
$ export JAVA_HOME=/usr/local/java
$ PATH=$JAVA_HOME/bin:$PATH
• Apache Ant 1.6.2 or greater. Ant can be downloaded from http://ant.apache.org/.
The ANT_HOME variable will need to be set to the root directory of Apache Ant. To verify that Ant is installed, try the
following:
$ which ant
/usr/local/ant/bin/ant
$ ant -version
Apache Ant version 1.6.2 compiled on July 16 2004
$ export ANT_HOME=/usr/local/ant
$ PATH=$ANT_HOME/bin:$PATH
Several other commands are required to run the Rhino SLEE. These commmands should be available on standard installations of Solaris or Linux.
• The “unzip” command utility.
$ which unzip
/usr/bin/unzip
• The “tar” command utility.
$ which tar
/bin/tar
Open Cloud Rhino 1.4.3 Administration Manual v1.1
12
• The “awk” command utility.
$ which awk
/bin/awk
• The “sed” command utility.
$ which sed
/bin/sed
4.2.2
PostgreSQL database configuration
The Rhino SLEE depends on the PostgreSQL RDBMS to persist its main working memory. This working memory is where
Rhino SLEE stores it’s current configuration and run-time state.
The Rhino SLEE has been tested on PostgreSQL versions 7.4.12 and 8.0.7. Running the Rhino SLEE using these versions of
PostgreSQL is supported by Open Cloud.
For further information about the installation of PostgreSQL please refer to Chapter 21.
A single PostgreSQL server installation will support all of the nodes in the cluster. For further information about running
multiple PostgreSQL servers to support a cluster please refer to Section 21.6.
Before a PostgreSQL database can be used with Rhino, it must be initialised. For more information, see Section 4.2.10.
4.2.3
Firewalls
If the local system has a firewall installed, the firewall rules will need to be modified to allow multicast UDP traffic.
Multicast addresses are, by definition, in the range 224.0.0.0/4* (224.0.0.0-239.255.255.255).
This range is separate from the unicast address range that machines use for their host addresses.
Rhino SLEE uses multicast UDP to distribute main working memory between cluster members. During the install it asks for a
range of multicast addresses to use. By default the port numbers which are required are: 45601,45602,46700-46800.
All nodes in the cluster must use the same multicast addresses – this is how they see each other.
Ensure that the firewall is configured to allow multicast messages through on the multicast ranges/ports that are configured
during installation.
4.2.4
Unpacking
The Rhino SLEE is delivered as an uncompressed tar file named Rhino-1.4.3.tar.
This will need to be unpacked using the tar command, for example:
$ tar xvf Rhino-1.4.3.tar
$ cd rhino-install
This will create the distribution directory rhino-install in the directory where the binary distribution was unpacked.
4.2.5
Installation
From within the distribution directory rhino-install execute the script rhino-install.sh to begin the installation process.
If the installer detects a previous installation, it will ask if it should first delete it.
Open Cloud Rhino 1.4.3 Administration Manual v1.1
13
>./rhino-install.sh -h
Usage: ./rhino-install.sh [options]
Command line options:
-h, --help
- Print this usage message.
-a
- Perform an automated install. This will perform a
non-interactive install using the installation defaults.
-r <file>
- Reads in the properties from <file> before starting the
install. This will set the installation defaults
to the values contained in the properties file.
-d <file>
- Outputs a properties file containing the selections
made during install (suitable for use with -r).
4.2.6
Unattended Installation
When installation needs to be automated or repeated the installer can perform a non-interactive installation based on an answer
file that has been specified.
The -r switch reads the file and the -a runs the installer in non interactive mode.
>./rhino-install.sh -r answer.config -a
The -d switch will create the answer file based on the answer that has been given interactively during the installation.
>./rhino-install.sh -d answer.config
4.2.7
Configuring a Cluster
The Rhino SLEE distribution must be installed or transferred onto each machine which will host a cluster node. For more
information on transferring cluster configuration to remote hosts please refer to Subsection 4.2.8.
For further information on clustering please refer to Chapter 17.
To install the Rhino SLEE, run the rhino-install.sh script and answer the questions presented. The default values are
normally satisfactory for a working installation.
$ ./rhino-install.sh
Open Cloud Rhino SLEE Installation
The Rhino SLEE install requires access to a PostgreSQL database server,
for storing persistent configuration and deployment information. The database
settings you enter here are required for the Rhino SLEE config files. The
install script can optionally configure the database for you, you will be
prompted for this later in the install process.
Postgres
Postgres
Postgres
Postgres
Postgres
host [localhost]:
port [5432]:
user [user]:
password:
password (again):
The database name you specify below will be created in your Postgres server and
configured with the default tables for Rhino SLEE support.
Database name [rhino]:
Enter the directory where you want to install Rhino.
These two ports are used for accessing the Management MBeans from a Java RMI
(Remote Method Invocation) client, such as the Rhino SLEE command-line
utilities.
Management Interface RMI Registry Port [1199]:
Management Interface RMI Object Port [1200]:
This port is used for accessing the JMX Remote server. The Rhino Web Console
uses this for remote management.
Open Cloud Rhino 1.4.3 Administration Manual v1.1
14
Management Interface JMX Remote Service Port [1202]:
This port is used for the Web Console (Jetty) server and provides
remote management user interface. This is a secure port (TLS).
Secure Web Console HTTPS Port [8443]:
Enter the location of your Java J2SE/JDK installation.
This must be at least version 1.4.2.
JAVA_HOME directory [/usr/local/java]:
Found Java version 1.4.2_04.
The Java heap size is an argument passed to the JVM to specify the amount of
main memory (in megabytes) which should be allocated for running the
Rhino SLEE. To prevent extensive disk swapping, this should be set to less
than the total memory available at runtime.
Java heap size [512]:
*** Cluster Configuration ***
You must enter cluster configuration parameters here, even if you are only
using a single Rhino node. The cluster configuration must be the same on each
host that is part of the cluster.
The Cluster ID is an integer ID that uniquely identifies this cluster.
Cluster ID [100]:
The Address Pool is a pool of multicast addresses that will be used for group
communication by Rhino services.
Address Pool Start [224.0.24.1]:
Address Pool End [224.0.24.8]:
*** Network Configuration ***
The Rhino SLEE install will now attempt to determine local network
settings. The hostname detected here is used by the web console. The IP
addresses detected here are used in generating the default security
policy for the management interfaces.
The following network settings were detected. These can be modified after
installation by editing /home/user/rhino/{NODEID}/config/config_variables.
Canonical hostname:
Local IP Addresses:
cyclone
192.168.62.2 127.0.0.1 192.168.0.22
The Rhino SLEE installation needs to use the PostgreSQL interactive
client, psql. Enter the full path to your local psql client here. If you do
not have a psql client installed (e.g. if postgres is running on a remote host
and not installed on this one), then enter ’-’ here to skip this question.
You will still need to initialise the database on the remote host using
’init-management-db.sh’.
Location of psql client [/usr/bin/psql]:
*** Confirm Settings ***
Installation directory:
Postgres
Postgres
Postgres
Database
host:
port:
user:
name:
/home/user/rhino
localhost
5432
user
rhino
JAVA_HOME directory:
/usr/local/java
Management Interface RMI/JMX Ports:
Web Console Interface HTTPS Port:
Savanna Cluster ID:
Savanna Address Pool Start:
Savanna Address Pool End:
1199,1200,1202
8443
100
224.0.24.1
224.0.24.8
Are these settings correct (y/n)? y
If the settings specified are considered correct, press Y.
Open Cloud Rhino 1.4.3 Administration Manual v1.1
15
Creating installation directory.
Writing configuration to /home/user/rhino/etc/defaults/config/config_variables.
I will now generate the keystores used for secure transport authentication,
Remote management and connections must be verified using paired keys.
/home/user/rhino/rhino-public.keystore
with a storepass of changeit and a shared keypass of changeit
/home/user/rhino/rhino-private.keystore
with a storepass of changeit and a shared keypass of changeit
The behaviour of the Rhino SLEE paired key SSL can be configured by editing:
/home/user/rhino/config/rmissl.{service_name}.properties
Creating key pairs for common services
Exporting the certificates into the public keystore for service distribution
Certificate was added to keystore
Certificate was added to keystore
Certificate was added to keystore
Certificate was added to keystore
Copying the public keystore to the client distribution directory
The Open Cloud Rhino SLEE is now installed in /home/user/rhino.
Next Steps:
- Create nodes using "/home/user/rhino/create-node.sh".
- Run /home/user/rhino/{NODEID}/init-management-db.sh to initialise the PostgreSQL database.
- Start Rhino nodes using /home/user/rhino/{NODEID}/start-rhino.sh (see the user guide for arguments)
- Access the Rhino management console at https://cyclone:8443/
- Login with username admin and password password
Open Cloud Rhino SLEE installation complete.
4.2.8
Distributing Cluster Configuration
Each host in the cluster must use the same configuration settings. The Rhino SLEE can be installed onto each host using an
unattended installation or the cluster configuration can be copied onto each machine.
On the local host issue the following commands:
>cd /tmp
>tar cvf rhino-cluster.tar $RHINO_HOME
Then copy the file to the target host. On the target host issue the following commands:
>cd /tmp
>tar xvf rhino-cluster.tar $RHINO_HOME
Once the cluster configuration has been transferred to the target hosts, each node can be created and configured.
4.2.9
Configuring the Cluster
Creating new nodes is done by executing the $RHINO_HOME/create-node.sh shell script. A typical and basic “safe-default”
configuration for a the Rhino SLEE cluster is to use three machines, each hosting one node.
Once a node has been created, its configuration can not be transferred to another machine. They must be created on the host on
which they will run.
In the following example nodes 101, 102, and 103 are all created on and intended to run on one host. Below is a capture of the
creation of three nodes.
Open Cloud Rhino 1.4.3 Administration Manual v1.1
16
$ /home/user/rhino/create-node.sh
Chose a Node ID (integer 1..255)
Node ID [101]: 101
Creating new node /home/user/rhino/node-101
Deferring database creation. This should be performed before starting Rhino for the first time.
Run the "/home/user/rhino/node-101/init-management-db.sh" script to create the database.
Created Rhino node in /home/user/rhino/node-101.
$ /home/user/rhino/create-node.sh 102
Creating new node /home/user/rhino/node-102
Deferring database creation. This should be performed before starting Rhino for the first time.
Run the "/home/user/rhino/node-102/init-management-db.sh" script to create the database.
Created Rhino node in /home/user/rhino/node-102.
$ /home/user/rhino/create-node.sh 103
Creating new node /home/user/rhino/node-103
Deferring database creation. This should be performed before starting Rhino for the first time.
Run the "/home/user/rhino/node-103/init-management-db.sh" script to create the database.
Created Rhino node in /home/user/rhino/node-103.
4.2.10
Initialising the Database
Rhino SLEE uses a PostgreSQL database to keep a back-up of the current state of the SLEE. This database must first be
initialised before Rhino SLEE can be used. The database can be created and initialised by executing the
$RHINO_NODE_HOME/init-management-db.sh shell script. This script can also be used when the SLEE administrator wants
to wipe all state held within the SLEE.
The init-management-db.sh script will produce the following console output.
$ ./init-management-db.sh
CREATE DATABASE
You are now connected to database "rhino".
NOTICE: CREATE TABLE / PRIMARY KEY will create
CREATE TABLE
COMMENT
NOTICE: CREATE TABLE / PRIMARY KEY will create
CREATE TABLE
COMMENT
NOTICE: CREATE TABLE / PRIMARY KEY will create
CREATE TABLE
COMMENT
NOTICE: CREATE TABLE / PRIMARY KEY will create
CREATE TABLE
COMMENT
implicit index "versioning_pkey" for table "versioning"
implicit index "keyspaces_pkey" for table "keyspaces"
implicit index "timestamps_pkey" for table "timestamps"
implicit index "registrations_pkey" for table "registrations"
4.3 Cluster Lifecycle
4.3.1
Creating the Primary Component
The primary component is the set of nodes which know the authoritative state of the cluster. A node will not accept management
commands or perform work until it is in the primary component and a node which is no longer in the primary component will
shut itself down.
At least one node in the cluster must be told to create the primary component, typically only once the first time the cluster is
started. The primary component is created when a node is started with the -p switch.
When a node is restarted it will remember whether it was part of the primary component without the need to specify the -p
switch. It does this by looking at configuration written to the work directory. If the primary component already exists then the
-p switch is ignored.
The following command will start a node and create the primary component. This will start Rhino SLEE in the STOPPED
state, ready to receive management commands.
Open Cloud Rhino 1.4.3 Administration Manual v1.1
17
>cd node-101
>./start-rhino.sh -p
4.3.2
Starting a Node
Subsequent nodes can be started by executing the $RHINO_NODE_HOME/start-rhino.sh shell script.
During node startup, the following events occur:
• A Java Virtual Machine process is launched by the host.
• The node generates and reads its configuration.
• The node checks to see if it should become part of the primary component. If it was previously part of the primary
component, or the -p switch was specified on startup, it tries to join the primary component.
• The node waits to enter the primary component of the the cluster.
• The node connects to PostgreSQL and synchronises state with the rest of the cluster.
• The node starts per-machine MLets (Management Agents).
• The node becomes ready to receive management commands.
For more information regarding lifecycle management please refer to Section 5.9 in Chapter 5.
4.3.3
Starting a Quorum Node
A quorum node can be created by specifying the -q option to the start-rhino.sh shell script. Quorum nodes are lightweight
nodes which do not perform any event processing, nor do they participate in management level operations. They are intended
to be used strictly for determining which parts of the cluster remain in the primary component in the event of node failures.
>cd node-101
>./start-rhino.sh -q
For more information regarding clustering behaviour please refer to Chapter 17.
4.3.4
Automatic Node Restart
The -k flag can be used with ./start-rhino.sh to automatically restart a node in the event of failure (such as a JVM crash).
This flag works by restarting the node 30 seconds after it exits unexpectedly. If the node was originally started with the -p or
-s flags, it will be restarted without them to avoid changing the cluster state.
The -k flag works by checking for the existance of the RHINO_HOME/work/halt_file file, only restarting if it does not exist.
This file is written by Rhino if a node is manually shutdown or is killed with the ./stop-rhino.sh script. It will also be
written if a node fails to start because it has been incorrectly configured.
4.3.5
Starting the SLEE
Once the primary component is created, the Rhino SLEE cluster is ready to enter the RUNNING state and begin to process work
(i.e. activities and events).
• Either connect using the Web Console or the Command Console and perform the start operation.
>cd $RHINO_HOME
>./client/bin/rhino-console start
Open Cloud Rhino 1.4.3 Administration Manual v1.1
18
• Or start a node with the -s switch by issuing the following command.
>cd node-101
>./start-rhino.sh -s
Typically, to start the cluster for the first time and create the primary component, the system administrator starts the first node
with the -p switch and the last node with the -s switch.
>cd node-101
>./start-rhino.sh -p
>cd ../node-102
>./start-rhino.sh
>cd ../node-103
>./start-rhino.sh -s
4.3.6
Stopping a Node
A node can be stopped by executing the $RHINO_NODE_HOME/stop-rhino.sh shell script.
>cd node-101
>./stop-rhino.sh --help
Usage: stop-rhino.sh (--node|--kill|--cluster)
Terminates either the current node, or the entire Rhino cluster.
Options:
--node
--kill
--cluster
- Cleanly removes this node from the cluster.
- Terminates this node’s JVM.
- Performs a cluster wide shutdown.
This will terminate the node process, while leaving the remainder of the cluster running.
>cd node-101
>./stop-rhino.sh --node
Shutting down node 101.
Shutdown complete.
4.3.7
Stopping the Cluster
This will stop and shutdown the cluster. The Rhino SLEE will transition to the STOPPED state and then transition to the
SHUTDOWN state.
>cd node-101
>./stop-rhino.sh --cluster
Shutting down cluster.
Stopping SLEE.
Waiting for SLEE to enter STOPPED state.
Shutting down SLEE.
Shutdown complete.
4.4 Management Interface
A running SLEE can be managed and configured by using either the Command Console or the Web Console.
Open Cloud Rhino 1.4.3 Administration Manual v1.1
19
• The Command Console can be started by running the following:
$ cd $RHINO_HOME
$ ./client/bin/rhino-console
Interactive Management Shell
[Rhino (cmd (args)* | help (command)* | bye) #1] State
SLEE is in the Running state
• The Web Console can be accessed by directing a web browser to https://<hostname>:8443. The default user-name is
“admin” and the default password is “password”.
The default port number to connect to can be changed during installation from the default "8443". The relevant install
question refers to the “Management Interface HTTPS port number”.
Figure 4.1: Web Console Login
4.5 Setting the system clock
As with most system services, it is a bad idea to make sudden changes to the system clock. The Rhino SLEE assumes that time
will only ever go forwards, and that time increments are less than a few seconds. If the system clock is suddenly set to a time
in the past, the Rhino SLEE may show unpredicable behaviour.
If the system clock is set to a value more than 8 seconds forward from the current time, nodes in the cluster will assume that
they are no longer part of the quorum of nodes and will leave the cluster. Because of this, it is vitally important that system time
is only ever gradually slewed when it is being set to the correct time. It is recommended that the NTP (network time protocol)
service is set up to gradually slew the system clock to the correct time.
Use extreme care when manually setting the time on any node.
When using a cluster of nodes, it is useful to use ntpd to keep the system clocks on all nodes synchronised and to have all
nodes configured to use the same timezone. This helps, for example, for keeping timestamps in logging output from all nodes
synchronised.
The reader is referred to the tzselect or tzconfig commands on Solaris or Linux for instructions on how to configure the
timezone.
4.5.1
Configurating ntpd
The actual configuration of ntpd is beyond the scope of this document and the reader is referred to the documentation provided
with the ntpd package or on the Internet.
Open Cloud Rhino 1.4.3 Administration Manual v1.1
20
One important configuration element is to make sure that ntpd is configured to slew the time rather than step time. This can be
achieved using the -x flag when running ntpd. Refer to the man page for ntpd.
4.6 Optional Configuration
4.6.1
Introduction
The following suggestions can be followed to further configure the Rhino SLEE.
4.6.2
Ports
The ports that were chosen during installation time can be changed at a later stage by editing the file
$RHINO_HOME/etc/defaults/config/config_variables.
4.6.3
Usernames and Passwords
The default user names and passwords used for remote JMX access can be changed by editing the file
$RHINO_HOME/etc/defaults/config/rhino.passwd.
@RHINO_USERNAME@:@RHINO_PASSWORD@:admin
#the web console users for the web-console realm
#rhino:rhino:admin,view,invoke
#invoke:invoke:invoke,view
#view:view:view
#the jmx delegate for the jmxr-adaptor realm
jmx-remote-username:jmx-remote-password:jmx-remote
More information regarding changing usernames and passwords can be found in Section 15.7.
4.6.4
Separate the Web Console
The Rhino SLEE has two ways of running the Web Console: embedded and external. The embedded web console is enabled
by default to allow simpler administration of the Rhino SLEE. In a CPU-sensitive environment such as a production cluster, it
is recommended that the embedded Web Console be disabled and an external Web Console is run on another host.
To stop the embedded Web Console, edit the file
$RHINO_HOME/etc/defaults/config/permachine-mlet.conf and set enabled=”false”:
<mlet enabled="false">
<classpath>
<jar-url>@FILE_URL@@RHINO_BASE@/client/lib/web-console-jmx.jar</jar-url>
<jar-url>@FILE_URL@@RHINO_BASE@/client/lib/web-console.war</jar-url>
<jar-url>@FILE_URL@@RHINO_BASE@/client/lib/javax.servlet.jar</jar-ur
...
</classpath>
...
<class>com.opencloud.slee.mlet.web.WebConsole</class>
...
</mlet>
To start up an external Web Console on another host, execute $RHINO_HOME/client/bin/web-console start on that remote
host. A web browser can then be directed to https://remotehost:8443.
Open Cloud Rhino 1.4.3 Administration Manual v1.1
21
4.7 Installed Files
A listing of the files in a typical Rhino installation and their descriptions is listed below.
CHANGELOG
client/
bin/
generate-client-configuration
rhino-console
rhino-export
rhino-stats
web-console
etc/
client.policy
client.properties
common.xml
jetty-file-auth.xml
jetty-jmx-auth.xml
jetty.policy
rhino-common
rmissl.client.properties
templates/
client.properties
jetty-file-auth.xml
jetty-jmx-auth.xml
web-console.passwd
web-console.properties
web-console-log4j.properties
web-console.jaas
web-console.passwd
web-console.properties
lib/
activation.jar
endorsed/
org.mortbay.jaas.jar
org.mortbay.jetty.jar
org.mortbay.jetty.plus.jar
javamail-api.jar
javax.servlet.jar
jline.jar
jmxremote.jar
jmxri-1.2.1.jar
log4j.jar
rhino-ant.jar
rhino-client.jar
rhino-exporter.jar
slee-ant-tasks.jar
slee-ext.jar
slee.jar
statsclient.jar
web-console-jmx.jar
web-console.war
log/
rhino-client.keystore
web-console.keystore
work/
create-node.sh
etc/
defaults/
README.postgres
config/
config_variables
defaults.xml
hotspot_compiler_fix
jetty.xml
log.properties
notifications.xml
permachine-mlet.conf
pernode-mlet.conf
rhino-config.xml
rhino.jaas
rhino.passwd
rhino.policy
rmissl.rmi-adaptor.propertie
savanna/
NODEID/
savanna.conf
backbone.xml
node.xml
settings-cluster.xml
settings-group.xml
settings.xml
wellknowngroups.xml
dumpthreads.sh
export.sh
-
Release notes.
Directory containing remote Rhino management clients.
Directory containing all remote management client scripts.
Script for generating a web console configuration for standalone deployment.
Script for starting the command line client.
Script for exporting Rhino configuration to file.
Script for starting the Rhino statistics and monitoring client.
Script for starting the web console as a standalone management client.
Directory containing configuration for remote management clients.
Security policy for Rhino management clients.
Configuration settings common to all Rhino management clients.
Ant task definitions used for remote deployments using Ant.
Jetty configuration for the standalone Rhino web console, using file-based authentication.
Jetty configuration for the standalone Rhino web console, using jmx-remote authentication.
Security policy for the standalone Rhino web console.
Contains script functions common to multiple scripts.
Secure RMI configuration.
Templates used by generate-client-configuration to populate the client/etc/ directory.
-
Log4j properties for the web console.
Configuration for web console login contexts.
Usernames, passwords, and roles for file based login context.
Configuration settings specific to the web console.
Java libraries used by the remote management clients.
-
Directory used for logj4 output from the remote management clients.
Keystore used to secure connections.
Keystore used to secure connections.
Temporary working directory.
Script for generating new rhino node directories from the templates stored in etc/defaults/
Directory containing configuration defaults used by create-node.sh.
-
Postgres database setup information.
Directory containing Rhino configuration.
Contains configuration of various Rhino settings.
Default Rhino configuration used when starting Rhino for the first time.
JVM workaround file for Sun’s 1.4.2 JVM on Linux.
Jetty configuration for the embedded web console.
Log4j configuration.
Notification configuration
Mlet configuration.
Mlet configuration.
Configuration file for settings not covered elsewhere.
Configuration for web console login contexts.
Usernames, passwords, and roles for file based login context.
Rhino security policy.
Secure RMI configuration.
Internal clustering configuration.
- Script for sending a SIGQUIT to Rhino to cause a threaddump.
- Script for conveniently exporting Rhino configuration. Deprecated.
Open Cloud Rhino 1.4.3 Administration Manual v1.1
22
generate-configuration
generate-system-report.sh
init-management-db.sh
manage.sh
read-config-variables
rhino-common
run-compiler.sh
run-jar.sh
start-rhino.sh
stop-rhino.sh
examples/
j2ee/
jcc/
sip/
lib/
Rhino.jar
javax-slee-standard-types.jar
jcc-1.1.jar
jmxr-adaptor.jar
jmxtools.jar
linux/
libocio3.so
log4j.jar
notification-recorder.jar
postgresql.jar
solaris/
libocio3.so
solaris_i386/
libocio3.so
licenses/
JAIN_SIP.LICENSE
JCC_API.LICENSE
JLINE.LICENSE
POSTGRESQL.LICENSE
SERVICES.LICENSE
node-XXX/
work/
log/
config.log
rhino.log
audit.log
encrypted.audit.log
ra-signers.keystore
rhino-common
rhino-private.keystore
rhino-public.keystore
rhino.license
web-console.keystore
-
Script used internally to populate a Node’s working directory with templated configuration files.
Script used to produce an archive containing useful debugging information.
Script for reinitializing the Rhino postgres database.
Script for invoking the command line management client (client/bin/rhino-console). Deprecated.
Script used internally for performing templating operations.
Contains script functions common to multiple scripts.
Script used by Rhino to compile dynamically generated code.
Script used by Rhino to run the external ’jar’ application.
Script used to start Rhino.
Script used to stop Rhino.
Example services.
J2EE Connector example.
Example JCC service.
Example SIP services.
Libraries used by Rhino.
- Third party software licenses.
-
Instantiated Rhino node.
Rhino working directory.
Default destination for Rhino logging.
Log containing useful configuration information, written on startup.
Log containing all Rhino logs.
Log containing licensing auditing.
Encrypted version of audit.log
JKS keystore for signed resource adaptors.
Contains script functions common to multiple scripts.
JKS keystore used for secure connections from management clients.
JKS keystore used for secure connections from management clients.
Default Rhino license. Used when other licenses are unavailable.
JKS keystore used to sign the web console application.
4.8 Runtime Files
4.8.1
Node Directory
Creating a new Rhino node (by running the create-node.sh script) involves making a directory for that node. This directory
contains several files that that nodes uses to store state, including configuration, logs and temporary files.
Open Cloud Rhino 1.4.3 Administration Manual v1.1
23
node-XXX/
config/
savanna/
work/
rhino.pid
start-rhino.sh/
config/
log/
rhino.log
audit.log
encrypted.audit.log
config.log
deployments/
tmp/
lib/
state/
-
Instantiated Rhino node.
Directory containing configuration files.
Savanna configuration files.
Rhino working directory.
File containing the current process
ID of Rhino.
- Temporary directory.
-
Default destination for Rhino logging.
Log containing all Rhino logs.
Log containing licensing auditing.
Encrypted audit log
Log containing useful configuration
information, written on startup.
- Used for storing source code for compiling
SBBs etc.
- Temporary directory.
-
The config/ directory contains a set configurations files that Rhino uses at start-up. These are only used when a node is
(re)started. Once the node has joined the cluster, it stores and retrieves settings from the in-memory database (“MemDB”).
Some files are overwritten in the config/ directory by the Rhino SLEE. Specifically, the logging.xml file is updated by the
Rhino SLEE at run-time when the administrator changes the SLEE’s logging configuration using management tools. Logging
configuration is stored in each node’s logging.xml file because this configuration is needed before the rest of the cluster’s
configuration can be loaded from the database and the node joins the cluster.
The tmp/, deployments/ and start-rhino.sh/ directories are temporary directories. The deployments/ directory stores
files that Rhino uses to compile SLEE services. The start-rhino.sh directory is used when starting the Rhino SLEE – the
files in the config directory are copied here, and then all variable substitutions are made. The process of variable substitutions
means that occurrences of @variables@ in the configuration files are replaced with their values from the config_variables
file.
The log/ directory contains a set of log files which are constantly written and rotated as the Rhino SLEE outputs logging
information. The total size of this directory is automatically managed to not become excessive.
4.8.2
Logging output
The Rhino SLEE uses the Log4J libraries for logging. In the default configuration, logging output is sent to both the standard
error stream (i.e. the user’s console) and also to log files in the work/log directory.
There are three logging files: rhino.log, config.log and audit.log. rhino.log contains all logs that Rhino has outputted. config.log contains changes to Rhino’s configuration, and audit.log contains auditing information. There is also an
encrypted version of the audit log for use by Open Cloud support staff.
This output is the result of how the Rhino SLEE’s logging system has been set up. Chapter 10 explains more about this logging
system and how to configure it.
Log File Format
Each statement in the log file has a certain structure. Here is an example:
2005-12-13 17:02:33.019 INFO
[rhino.alarm.manager]
<Thread-4>
Alarm 56875825090732034 (Node 101, 13-Dec-05 13:31:54.373): Major
[rhino.license] License with serial ’107baa31c0e’ has expired.
This line starts with the current date: “2005-12-13 17:02:33.019” – the 13th of December, 2005 at 5:02pm, 33 seconds and
19 milliseconds. The milliseconds value is often useful for determining if log messages are related; if they occur within a few
Open Cloud Rhino 1.4.3 Administration Manual v1.1
24
milliseconds of each other then they probably have a causal relationship. Also, if there is a time-out in the software somewhere,
that time-out may often be found by looking at this timestamp.
Next is the log level. In this case, it is “INFO”, which is standard. It can also be “WARN” for more serious happenings in the
SLEE, or “DEBUG” if debug messages are enabled. Section 10.1.2 in Chapter 10 has much more information about the log
levels available and how to set them.
Next is the logger key – in this case, [rhino.alarm.manager]. Every log message has a key, and this shows what part of Rhino
this log message came from. Verbosity of each logger key can be controlled, as discussed in Section 10.1.1 of Chapter 10.
Then, the thread which outputted this message is displayed – in this case, <Thread-4>.
Finally, the rest of the message is the actual log message. In this case, it is an Alarm message which is being outputted.
Open Cloud Rhino 1.4.3 Administration Manual v1.1
25
Chapter 5
Management
5.1 Introduction
Administration of the Rhino SLEE is done by using the Java Management Extensions (JMX). An administrator can use either
the Web Console or the Command Console, which act as front-ends for JMX. The JAIN SLEE 1.0 specification defines JMX
MBean interfaces that provide the following management functions:
• Management of Deployable Units.
• Management of SLEE Services.
• Management of SLEE component trace level settings.
• Management of usage information generated by SLEE Services.
• Provisioning of Profile Tables.
• Provisioning of Profiles.
• Broadcast of JMX notifications carrying trace, alarm, usage, or SLEE state change information.
The Rhino SLEE also exposes additional management functions. These include:
• Management of Resource Adaptors.
• Log configuration.
• JDBC Resource Management.
• Object Pool configuration.
• Statistics monitoring.
• On-line housekeeping.
5.1.1
Web Console Interface
The Web Console provides an HTML user interface for managing the SLEE. It uses JAAS to provide security and allow
authorised users access to the management functions.
The MBeans used in these tutorials are the Deployment MBean, the Service Management MBean and the Resource Management
MBean.
For detailed information on the configuration and deployment of the Web Console see Chapter 9
26
5.1.2
Command Console Interface
The Command Console is a command line shell which supports both interactive and batch file commands to manage and
configure the Rhino SLEE.
Usage:
rhino-console <options> <command> <parameters>
Valid options:
-?
-h
-p
-u
-w
or --help
<host>
<port>
<username>
<password>
-
Display this message
Rhino host
Rhino port
Username
Password, or "-" to prompt
If no command is specified, client will start in interactive mode.
The help command can be run without connecting to Rhino.
The Command Console can also be run in a non-interactive mode by giving the script a command argument. For example,
./rhino-console install <filename> is the equivalent of entering install <filename> in the interactive command shell.
The Command Console features command-line completion. The tab key is used to activate this feature. Pressing the tab key
will cause the Command Console to attempt to complete the current command or command argument based on the command
line already input.
The Command Console also records the history of the commands that have been entered during interactive mode sessions. The
up and down arrow keys will cycle through the history, and the history command will print a list of the recent commands.
5.1.3
Ant Tasks
Ant is a build system for Java. Rhino SLEE provides several Ant tasks which provide a subset of the management commands
using the JMX interfaces.
For more information regarding Rhino SLEE Ant tasks please refer to Chapters 22 and 23.
5.1.4
Client API
The Client API is a Java API which exposes SLEE management functions programmatically.
This API can be used by developers to access the SLEE management functions from an external application. For example, a
J2EE application could use this API to create profiles in the SLEE, or to analyse usage information from an SBB. The Command
Console provided with the Rhino SLEE is implemented using this API.
The Client API is described in detail in the Rhino SLEE Programmer’s Reference and the Client API Javadoc, available from
Open Cloud on request.
5.2 Management Tutorials
The Rhino SLEE can be managed either by using the Web Console or the Command Console.
The following sections provide a number of tutorials that illustrates various management scenarios. For each scenario, the steps
that need to be taken to achieve the desired goal of that scenario are described using both the Web Console and the Command
Console. The tutorials included in this section describe:
1. Installing a Resource Adaptor.
Open Cloud Rhino 1.4.3 Administration Manual v1.1
27
2. Installing a Service.
3. Uninstalling a Service.
4. Uninstalling a Resource Adaptor.
5. Creating a Profile.
The tutorial sections 1, 2, 3 and 4 provides examples of how to deploy, activate, deactivate, and undeploy (respectively) the SIP
resource adaptor and the demonstration SIP applications.
Tutorial 5 provides an example of configuring a profile for the JCC Call Forwarding service.
Management operations may have ordered dependencies on the state of other components in the SLEE.
For example:
• A resource adaptor may not be uninstalled when entities are in use, or when a service is installed that uses the
resource adaptor.
• A service can not be deployed before the resource adaptor is deployed.
• A component can only be deployed once and from only one deployable unit. Attempting to redeploy the same
component from a different deployable unit will fail; the component will need to be first undeployed.
• A profile table cannot be created until the ProfileSpecification is deployed.
In the management examples shown here, the deployable units are on the local file system, so the parameter for the install
command’s URL uses the file protocol (file://).
The jars and example applications are in the following place in the Rhino SLEE installation:
$RHINO_HOME/examples/
5.3 Building the Examples
Before the examples can be deployed using either the Web Console or the Command Console, the example JAR files need to
be built. Perform the following command (with the path modified for your local environment):
$ ant -f /home/user/rhino/examples/sip/build.xml build
...
buildexamples:
BUILD SUCCESSFUL
Total time: 6 seconds
5.4 Installing a Resource Adaptor
The operations used in this example for configuration of the Resource Adaptor are:
1. Installing the Resource Adaptor.
2. Creating a resource adaptor entity.
3. Binding a link name.
4. Activating the entity.
5. Viewing the installed resource adaptor state.
Open Cloud Rhino 1.4.3 Administration Manual v1.1
28
5.4.1
Installing an RA using the Web Console
To install a resource adaptor using the Web Console, first open a web browser and direct it to https://localhost:8443.
First, the deployable unit is deployed using the Deployment MBean which can be navigated to from the main page:
To install the resource adaptor, type in its file name or use the “Browse. . . ” button to locate the file:
After installation of the resource adaptor, any number of resource adaptor entities (“RA entities”) can be created to allow that
resource to be accessed by services.
The Resource Management MBean is used.
To create the resource adaptor entity, fill in a name and click “createResourceAdaptorEntity”.
So that applications can locate an RA entity using JNDI, that RA Entity is bound to a link name as follows:
The chosen link name must match the link name in the SIP Registrar SBB META-INF/sbb-jar.xml deployment descriptor.
Open Cloud Rhino 1.4.3 Administration Manual v1.1
29
<resource-adaptor-type-binding>
<resource-adaptor-type-ref>
<resource-adaptor-type-name>OCSIP</resource-adaptor-type-name>
<resource-adaptor-type-vendor>Open Cloud</resource-adaptor-type-vendor>
<resource-adaptor-type-version>1.2</resource-adaptor-type-version>
</resource-adaptor-type-ref>
<activity-context-interface-factory-name>
slee/resources/ocsip/1.2/acifactory
</activity-context-interface-factory-name>
<resource-adaptor-entity-binding>
<resource-adaptor-object-name>
slee/resources/ocsip/1.2/provider
</resource-adaptor-object-name>
<resource-adaptor-entity-link>
OCSIP
</resource-adaptor-entity-link>
</resource-adaptor-entity-binding>
</resource-adaptor-type-binding>
Once the link name is bound, the resource adaptor entity is activated.
To show the result of the operations, query the Resource Management MBean to see if any resource adaptor entities are in the
active state.
The result of this operation shows that the resource adaptor entity for the SIP resource adaptor that is in the active state.
5.4.2
Installing an RA using the Command Console
To perform the installation of a resource adaptor using the Command Console, first start up the Command Console:
Open Cloud Rhino 1.4.3 Administration Manual v1.1
30
$ ./client/bin/rhino-console
Interactive Rhino Management Shell
[Rhino@localhost (#0)]
Use the install command to install the deployable unit. Alternatively, the installlocaldu command can be used.
> install file:examples/sip/lib/ocjainsip-1.2-ra.jar
installed: DeployableUnit[url=file:examples/sip/lib/ocjainsip-1.2-ra.jar]
The resource adaptor entity is created using the createraentity command:
> listResourceAdaptors
ResourceAdaptor[OCSIP 1.2, Open Cloud]
> createRAEntity "OCSIP 1.2, Open Cloud" "sipra"
Created resource adaptor entity sipra
SBBs use a link name to refer to resource adaptor entities. To ensure that the link name exists, it should be defined using the
bindralinkname command:
> listRAEntities
sipra
> bindRALinkName sipra OCSIP
Bound sipra to link name OCSIP
The resource adaptor entity needs to be activated. When activated, it will connect to remote resources and start firing and
receiving events.
> activateRAEntity sipra
Activated resource adaptor entity sipra
The state of the RA Entity can be seen by doing:
> getRAEntityState sipra
RA entity sipra state is Resource Adaptor Active
At this state, the resource adaptor is deployed and configured appropriately.
In the next section, the registrar service is deployed and activated.
5.5 Installing a Service
The operations used in this example for setup of the registrar application are:
• Installing the Location Service.
• Installing the Registrar Service.
• Activating the Registrar Service.
• Viewing the service state.
5.5.1
Installing a Service using the Web Console
The Deployment MBean is used to deploy a service.
Open Cloud Rhino 1.4.3 Administration Manual v1.1
31
Install the Location Service using the install operation.
Install the Registrar Service using the install operation.
View the Registrar Service has been successfully deployed.
Using the Service Management MBean which can be navigated to from the main page, activate the Location and Registrar
services:
In order to view the services’ state, use the Service Management MBean to find the active services.
The results of the operation are shown:
Open Cloud Rhino 1.4.3 Administration Manual v1.1
32
5.5.2
Installing a service using the Command Console
To perform the installation using the Command Console in interactive mode;
$ ./client/bin/rhino-console
Interactive Rhino Management Shell
[Rhino@localhost (#0)]
The location service DU can be installed using either the install command or the installlocaldu command.
> install file:examples/sip/jars/sip-ac-location-service.jar
installed: DeployableUnit[url=file:examples/sip/jars/sip-ac-location-service.jar]
The same applies for the registrar service:
> install file:examples/sip/jars/sip-registrar-service.jar
installed: DeployableUnit[url=file:examples/sip/jars/sip-registrar-service.jar]
Both services need to be active before they will commence processing events:
> listServices
Service[SIP AC Location Service 1.5, Open Cloud]
Service[SIP Registrar Service 1.5, Open Cloud]
> activateService "SIP AC Location Service 1.5, Open Cloud"
Activated Service[SIP AC Location Service 1.5, Open Cloud]
> activateService "SIP Registrar Service 1.5, Open Cloud"
Activated Service[SIP Registrar Service 1.5, Open Cloud]
At this stage, the resource adaptor and services have been installed appropriately. For more information on the operation of the
Open Cloud Rhino 1.4.3 Administration Manual v1.1
33
service please see the Open Cloud SIP Users Guide.
5.6 Uninstalling a Service
The operations used in this example for uninstalling the registrar application are:
1. Deactivating the registrar service.
2. Uninstalling the location and registrar services.
5.6.1
Uninstalling a Service using the Web Console
The Service Management MBean is used to deactivate the service.
Before removing the service and resource adaptor, deactivate the service so that no new entity trees of the service will be
instantiated on initial events:
Wait until the service has reached the inactive state, so that there are no more instances of the service left.
Once the service has transitioned to the inactive state, the service can be uninstalled using the Deployment MBean.
Open Cloud Rhino 1.4.3 Administration Manual v1.1
34
Remove the Registrar and Location Service deployable units.
5.6.2
Uninstalling a Service using the Command Console
The following steps show how to uninstall a service using the Command Console.
Firstly, the services need to be deactivated.
> deactivateService "OCSIP Registrar Service 1.5, Open Cloud"
Deactivated Service[OCSIP Registrar Service 1.5, Open Cloud]
> deactivateService "OCSIP AC Location Service 1.5, Open Cloud"
Deactivated Service[OCSIP Location Service 1.5, Open Cloud]
To see which deployable units need to be removed, the listdeployableunits command can be used. The entry
javax-slee-standard-types.jar is required by the SLEE and should not be removed.
> listDeployableUnits
DeployableUnit[url=jar:file:/home/user/rhino/lib/RhinoSDK.jar!/javax-slee-standard-types.jar]
DeployableUnit[url=file:examples/sip/lib/ocjainsip-1.2-ra.jar]
DeployableUnit[url=file:examples/sip/jars/sip-ac-location-service.jar]
DeployableUnit[url=file:examples/sip/jars/sip-registrar-service.jar]
Once deactivated, the registrar service can be uninstalled.
> uninstall file:examples/sip/jars/ocsip-registrar-service.jar
uninstalled: DeployableUnit[url=file:examples/sip/jars/ocsip-registrar-service.jar]
The services have now been deactivated and uninstalled. The next step is to perform operations to remove the resource adaptor.
5.7 Uninstalling a Resource Adaptor
The operations used in this example for the removal of the resource adaptor are:
• Deactivating the entity.
• Removing the link name.
• Removing the entity.
• Uninstalling the resource adaptor.
Open Cloud Rhino 1.4.3 Administration Manual v1.1
35
5.7.1
Uninstalling an RA using the Web Console
The activities are done using the Resource Management MBean.
We deactivate the resource adaptor entity using the Resource Management MBean, so that the resource adaptor cannot create
new activities.
Removed any named links bound to the resource adaptor:
Deactivate the resource adaptor entity:
The resource adaptor entity can now be removed.
Finally the resource adaptor is uninstalled using the Deployment MBean.
5.7.2
Uninstalling an RA using the Command Console
Before the resource adaptor can be removed, any RA Entities of that resource adaptor need to be deactivated:
> deactivateRAEntity sipra
Deactivated resource adaptor entity sipra
Any link names associated with that RA Entity need to be unbound:
> unbindRALinkName OCSIP
Unbound link name OCSIP
The resource adaptor can then be removed.
> removeRAEntity sipra
Removed resource adaptor entity sipra
Once removed, the deployable unit for that resource adaptor can be uninstalled.
> uninstall file:examples/sip/lib/ocjainsip-1.2-ra.jar
uninstalled: DeployableUnit[url=file:examples/sip/lib/ocjainsip-1.2-ra.jar]
Open Cloud Rhino 1.4.3 Administration Manual v1.1
36
5.8 Creating a Profile
This example explains how to create a Call Forwarding Profile which is used by the Call Forwarding Service.
Before creating the profile the JCC Call Forwarding example must be deployed, i.e. the CallForwardingProfile
ProfileSpecification must be available to the Rhino SLEE.
To deploy the JCC Call Forwarding service please refer to Chapter 23 or perform the operation below.
$ ant -f /home/user/rhino/examples/jcc/build.xml deployjcccallfwd
5.8.1
Creating a Profile using the Web Console
Profiles are managed with the Profile Provisioning MBean.
A Profile is an instance of a Profile Table. A Profile Table is a schema, which is defined in a profile specification from a
deployable unit.
Create the Profile Table if it does not already exist:
Now the Profile can be created:
The profile editing page is shown below.
Open Cloud Rhino 1.4.3 Administration Manual v1.1
37
The Profile MBean can be in two modes: viewing or editing. The operations available on the profile give some hint as to which
mode that profile is in. If you leave the Web Console without committing your changes, the profile will remain in “editing”
mode and you will see a long-running transaction in the Rhino logs.
Profiles which are still in the “editing” mode can be returned to by navigating from the main page to the “Profile MBeans” link
under the “SLEE Profiles” category.
To change the value of an attribute, first make the profile writable. A new profile will be created in the writable and dirty
state and placed in the editProfile mode, either commitProfile or restoreProfile before finally closeProfile.
Change the value of one or more attributes by editing their value fields. The web interface will correctly parse values for Java
primitive types and Strings, and arrays of primitive types and Strings.
Open Cloud Rhino 1.4.3 Administration Manual v1.1
38
After editing the values, click applyAttributeChanges (this will parse and check the attribute values). Then click commitProfile
to commit the changes.
If you get an error, you will need to navigate back to the uncommitted profile from the main page again as described above.
Once the profile has been committed, the buttons on the form will change and the fields will no longer be editable:
Open Cloud Rhino 1.4.3 Administration Manual v1.1
39
Changes made to the profile via the management interfaces are dynamic. The SBBs that implement the example Call Forwarding
services will retrieve the profile every time they are invoked, so they will always retrieve the most recently saved properties.
Note that Profiles are persistent across cluster re-starts.
The configuration of this new profile can be tested by using the CallForwarding service.
5.8.2
Creating a Profile using the Command Console
To perform the installation using the Command Console in interactive mode;
$ ./client/bin/rhino-console
Interactive Rhino Management Shell
[Rhino@localhost (#0)]
Create the Profile Table.
>listProfileSpecs
ProfileSpecification[AddressProfileSpec 1.0, javax.slee]
ProfileSpecification[CallForwardingProfile 1.0, Open Cloud]
ProfileSpecification[ResourceInfoProfileSpec 1.0, javax.slee]
>createProfileTable "CallForwardingProfile 1.0, Open Cloud" CallForwarding
Created profile table CallForwarding
Create the Profile.
Open Cloud Rhino 1.4.3 Administration Manual v1.1
40
[Rhino (cmd (args)* | help (command)* | bye) #1] createProfile CallForwarding ForwardingProfile
Created profile CallForwarding/ForwardingProfile
Configure the Profile Attributes
>setProfileAttributes CallForwarding ForwardingProfile
ForwardingEnabled true ForwardingAddress ’E.164 88888888’ Addresses ’[E.164 00000000]’
Set attributes in profile CallForwarding/ForwardingProfile
>listProfileAttributes CallForwarding ForwardingProfile
ForwardingEnabled=false
ForwardingAddress=E.164 88888888
Addresses=[E.164 00000000]
ProfileDirty=false
ProfileWriteable=false
5.9 SLEE Lifecycle
The SLEE specification defines the operational lifecycle of a SLEE. The operational lifecycle of the Rhino SLEE conforms
with the specified lifecycle as illustrated in Figure 5.1.
Rhino SLEE initialised
start()
shutdown()
Stopped
Starting
*
*
*
Stopping
Running
stop()
Figure 5.1: Rhino SLEE lifecycle
When the first node of a cluster is booted, it performs a number of initialisation tasks then enters the Stopped state. The
operational state is changed by invoking the start() and stop() methods on the Slee Management MBean. Additional nodes that
enter the Rhino SLEE cluster assume the operational state of the existing cluster members once initialised, so that all nodes in
the cluster always share the same operational state.
Management operations can only be invoked on a cluster node once that node has completed initialisation and has entered a
valid state.
Each state in the Rhino SLEE lifecycle state machine is discussed below, as are the transitions between these states.
5.9.1
The Stopped State
The Rhino SLEE is configured and initialised, ready to be started. This means that active resource adaptor entities are loaded
and initialised, and SBBs corresponding to active services are loaded and ready to be instantiated. However the entire eventdriven subsystem is idle. Resource adaptor entities and the SLEE are not actively producing events, and the event router is not
processing work. SBB entities are not created in this state.
Open Cloud Rhino 1.4.3 Administration Manual v1.1
41
• Stopped to Starting: The Rhino SLEE has no operations to execute.
• Stopped to Does Not Exist: The Rhino SLEE processes shutdown and terminate gracefully.
5.9.2
The Starting State
Resource adaptor entities that are recorded in the management database as being in the activated state are activated. SBB entities
are not created in this state. The Rhino SLEE transitions from this state when either all startup tasks are complete, which causes
a transition to the Running state, or when some startup task fails, which causes a transition to the Stopping state.
• Starting to Running: The Rhino SLEE event router is started.
• Starting to Stopping: The Rhino SLEE has no operations to execute.
5.9.3
The Running State
Activated resource adaptor entities are able to fire events. The Rhino SLEE event router is instantiating SBB entities and
delivering events to them as required.
• Running to Stopping: The Rhino SLEE has no operations to execute.
5.9.4
The Stopping State
This state is identical to the Running state except new Activity objects are not accepted from resource adaptor entities or created
by the SLEE. Existing Activity objects are allowed to end (according to the resource adaptor specification). The Rhino SLEE
transitions out of this state when all Activity objects have ended. If this state is reached from the Starting state, there will be no
existing Activity objects and transition to the Stopped state occurs effectively immediately.
• Stopping to Stopped: Any resource adaptor entities that were active are deactivated so they do not produce any further
events. The database state for the resource adaptor entity is not modified. If the Rhino SLEE event router had been
started, it is stopped.
Open Cloud Rhino 1.4.3 Administration Manual v1.1
42
Chapter 6
Administrative Maintenance
6.1 Introduction
A system administrator must ensure that the Rhino SLEE maintains peak operational performance. The administrator can
maximise the processing throughput and perform regular precautionary measures to ensure that, in the event of a failure, a
recovery can occur effectively.
6.2 Runtime Diagnostics and Maintenance
During normal Rhino SLEE operation SBB entities are removed by the SLEE when they are no longer needed. This usually
happens when all activities attached to the SBB have ended. In certain cases, however, the normal SBB life-cycle is interrupted
and SBB entities are not removed at the appropriate time. This could occur, for instance, if the SBB is attached to an activity
that hasn’t ended correctly due to a problem in the Resource Adaptor that created it. It is also possible for normal SBB removal
to fail if the SBB sbbRemove method throws an exception.
Rhino SLEE provides an administration interface to safeguard against the type of resource leak that unexpected problems
caused by deployed Resource Adaptors or Services may cause. The Housekeeping MBean allows interrogation of SBB state
and provides facilities for removing SBBs which have not been removed in the normal manner. There are also mechanisms for
finding and removing stale or problematic Activities, SBB entities, Activity Context Naming bindings, and Timers.
6.2.1
Inspecting Activities
The activity inspection commands allow the administrator to search for activities within the SLEE and to examine activity
details.
The findActivities command is used to search for activities corresponding to certain search parameters. When executed
with no arguments will return all activities in the system, limited only by the maximum results argument. Other arguments
available are:
Argument
-max <num>
-node <node-id>
-cb <time>
-ca <time>
-ra <ra entity name>
Description
The maximum number of activities returned.(100 by default)
Limit the search to activities whose processing node is the specified node.
Limit the search to activities created before <time> specified as a number of days, hours,
minutes and seconds before now.
Limit the search to activities created after <time>.
Limit the search to activities created by a particular RA entity.
Table 6.1: Command-line arguments for findActivities
The max parameter is used to limit the load placed on Rhino SLEE when processing the request. If too many rows are returned
43
the administrator should narrow their search results by applying -node, -cb, -ca, and -ra parameters. In the following example
the administrator searches for activities belonging to the resource adaptor entity TestRA.
[Rhino@localhost (#1)] findactivities
pkey
handle
ra-entity
replicated
------------------------- ---------------------------------------- --------------- ----------65.0.4E8BF.1.2A567636 ServiceActivity[HA PingService 1.0, Open Cloud] Rhino internal
true
65.2.4E8BF.0.2EA48
SAH[switchID=8756,connectionID=4,address=1]
TestRA
false
66.2.4E98A.0.2EA49
SAH[switchID=8756,connectionID=5,address=1]
TestRA
false
66.0.4E98A.0.2EA45
SAH[switchID=8756,connectionID=1,address=1]
TestRA
false
66.DE.4E98A.0.2EC08
SAH[switchID=8756,connectionID=452,address=1]
TestRA
false
66.F8.4E98A.0.2EC39
SAH[switchID=8756,connectionID=501,address=1]
TestRA
false
65.F5.4E8BF.0.2EC26
SAH[switchID=8756,connectionID=482,address=1]
TestRA
false
65.F3.4E8BF.0.2EC24
SAH[switchID=8756,connectionID=480,address=1]
TestRA
false
65.F8.4E8BF.0.2EC2E
SAH[switchID=8756,connectionID=490,address=1]
TestRA
false
66.1.4E98A.0.2EA47
SAH[switchID=8756,connectionID=3,address=1]
TestRA
false
65.F0.4E8BF.0.2EC1C
SAH[switchID=8756,connectionID=472,address=1]
TestRA
false
65.F6.4E8BF.0.2EC2B
SAH[switchID=8756,connectionID=487,address=1]
TestRA
false
65.ED.4E8BF.0.2EC16
SAH[switchID=8756,connectionID=466,address=1]
TestRA
false
66.EF.4E98A.0.2EC29
SAH[switchID=8756,connectionID=485,address=1]
TestRA
false
65.FD.4E8BF.0.2EC3A
SAH[switchID=8756,connectionID=502,address=1]
TestRA
false
65.E3.4E8BF.0.2EC05
SAH[switchID=8756,connectionID=449,address=1]
TestRA
false
66.ED.4E98A.0.2EC27
SAH[switchID=8756,connectionID=483,address=1]
TestRA
false
....
100 rows
submission-time
----------------20050418 10:52:54
20050418 10:59:53
20050418 10:59:55
20050418 10:59:47
20050418 11:11:48
20050418 11:12:37
20050418 11:12:17
20050418 11:12:15
20050418 11:12:26
20050418 10:59:51
20050418 11:12:08
20050418 11:12:23
20050418 11:12:01
20050418 11:12:21
20050418 11:12:38
20050418 11:11:45
20050418 11:12:18
update-time
-----------------20050418 10:52:54
20050418 11:01:50
20050418 11:02:12
20050418 11:02:12
20050418 11:12:25
20050418 11:12:37
20050418 11:12:17
20050418 11:12:15
20050418 11:12:26
20050418 11:02:12
20050418 11:12:08
20050418 11:12:23
20050418 11:12:25
20050418 11:12:21
20050418 11:12:38
20050418 11:12:20
20050418 11:12:18
The 100 rows returned represents only some of the available activities. In order to find activities of interest, the search must
narrowed with more specific arguments.
A common use of this facility would be to find activities which have become stale. The Rhino SLEE performs a periodic liveness
scan. This means that all active activities are scanned and any detected stale activities are ended. However, it is possible that
due to a failure in the network or inside a Resource Adaptor, the liveness scans may not detect and end all stale activities. In
these cases, an administrator must locate and end stale activities manually.
To narrow the search to activities belonging to node 101 (i.e. any activities whose processing node is 101 and are replicated and
non-replicated activities) that are more than 1 hour old, add the parameters -node 101 and -cb 1H:
[Rhino@localhost (#1)] findactivities -ra TestRA -node 101 -cb 1H
pkey
handle
------------------------- ---------------------------------------65.1.2E8BF.0.2EA46
SAH[switchID=8756,connectionID=2,address=1]
65.2.2E8BF.0.2EA48
SAH[switchID=8756,connectionID=4,address=1]
ra-entity
---------TestRA
TestRA
replicated
----------false
false
submission-time
-----------------20050418 10:59:49
20050418 10:59:53
update-time
-----------------20050418 11:01:50
20050418 11:01:50
2 rows
Two activities are returned from the search. The administrator may decide to interrogate Rhino for additional information about
one of these activities. This is achieved using the getActivityInfo command. This command takes a single parameter – the
Activity’s primary key (from the pkey column in the findActivities result set). To get additional information about the first of
the returned activities:
[Rhino@localhost (#1)] getactivityinfo 65.1.2E8BF.0.2EA46
pkey
: 65.1.2E8BF.0.2EA46
ending
: false
events-processed : 1
handle
: SAH[switchID=8756,connectionID=2,address=1]
processing-node : 101
queue-size
: 0
ra-entity
: TestRA
eeference-count : 1
replicated
: false
sbbs-invoked
: 1
submission-time : 20050418 10:59:49
submitting-node : 101
update-time
: 20050418 11:01:50
attached-sbbs
:
> pkey
replicated
sbb-component-id
> -------------------- ----------- -------------------------> 101:8372508:0
false
HA PingSbb^Open Cloud1.0
service-component-id
-----------------------------HA PingService^Open Cloud1.0
> 1 rows
events
no rows
:
The information returned by the getActivityInfo command is a snapshot of the Activity’s state at the time the command is
executed. Some values (fields pkey, ra-entity, replicated, submission-time, submitting-node, and handle) are fixed for the
lifetime of the activity. Others will change as events are processed on the activity.
Open Cloud Rhino 1.4.3 Administration Manual v1.1
44
Table 6.2 contains a summary of the fields returned by getActivityInfo:
Field
pkey
ending
events-processed
handle
processing-node
queue-size
ra-entity
reference-count
replicated
sbbs-invoked
submission-time
submission-node
update-time
attached-sbbs
events
Description
The Activity’s primary key – uniquely identifies this activity within
the Rhino SLEE.
The ending flag will be set if the activity is determined to be in the ending state
(usually if an end event has been submitted)
Counts the number of events processed on this activity.
The Activity Handle assigned by the activities Resource
Adaptor, in string form. The exact content is resource adaptor dependent and
may or may not contain useful human readable information
The cluster node currently responsible for
processing events on this activity. This value would only ever change for
replicated activities after a node fail-over
The number of events currently in the activities queue
including those awaiting processing, and the head event which may be being
processed.
The Resource Adaptor entity that created this activity.
the count of references to this activity
within the SLEE. Includes number of references via SBB attachment, Activity
Context Naming bindings, and Timer Facility timers.
True if the activity is a replicated activity.
The number of SBBs that have been invoked by events submitted
on this activity
The time at which the activity was created. Does not change.
The cluster node which first submitted the activity. If this value differs from
the processing node, the activity must be a replicated activity and the submitting node
left the cluster at some point, causing the activity to be failed over.
The time the last event was processed on this
activity. This is useful in some situations for evaluating whether an activity is
still live
A list of SBB entities attached to this activity.
Each SBB entity is represented by the service component id, SBB component id,
and a primary key. These 3 fields are required to uniquely identify SBBs
within the SLEE
A list of events currently in the activities queue,
including the head event which may be currently being processed.
Table 6.2: Fields returned by getActivityInfo
6.2.2
Removing Activities
Once the administrator determines that the activity they are examining is stale or in an unwanted state they can use the housekeeping commands to remove it.
The JAIN SLEE 1.0 specification provides detailed rules concerning how an activity should be ended when it is no longer
required. Even though Rhino SLEE performs the query liveness scan, it is still possible due to failures in the Resource Adaptor
or in an external resource, some state needs to be removed manually. In the case of activities the removeActivity command
is provided for this purpose:
[Rhino@localhost (#1)] removeactivity 65.1.2E8BF.0.2EA46
[Rhino@localhost (#1)] findactivities -ra TestRA -node 101 -cb 1H
pkey
handle
----------------------------------------------65.2.2E8BF.0.2EA48
SAH[switchID=8756,connectionID=4,address=1]
Open Cloud Rhino 1.4.3 Administration Manual v1.1
ra-entity
---------TestRA
replicated
----------false
submission-time
-----------------20050418 10:59:53
update-time
-----------------20050418 11:01:50
45
6.2.3
Inspecting SBBs
Administrators may also search for and query for information about SBB entities. The SBB inspection commands work in the
same way as the activity inspection commands with one main difference: when searching for SBBs, there is no SLEE-wide
command that will find all SBBs. Instead, searches must be performed within a service by specifying the service’s component
ID, or within an SBB component type within a service by specifying both the service’s component ID and the SBB’s component
ID.
For example, to find all SBBs belonging to a service called “HA Ping Service” which is currently deployed.
[Rhino@localhost (#1)] findsbbs -node 101 -service HA\ PingService\ 1.0,\ Open\ Cloud
pkey
creation-time
parent-pkey replicated
sbb-component-id
service-component-id
--------------- ------------------ -------------- ---------------------- -----------------------------101:8372512:25
20050418 12:30:51
false
HA PingSbb^Open Cloud1.0
HA PingService^Open Cloud1.0
101:8372512:14
20050418 12:30:29
false
HA PingSbb^Open Cloud1.0
HA PingService^Open Cloud1.0
101:8372512:27
20050418 12:30:55
false
HA PingSbb^Open Cloud1.0
HA PingService^Open Cloud1.0
101:8372512:28
20050418 12:30:57
false
HA PingSbb^Open Cloud1.0
HA PingService^Open Cloud1.0
101:8372512:24
20050418 12:30:49
false
HA PingSbb^Open Cloud1.0
HA PingService^Open Cloud1.0
101:8372512:26
20050418 12:30:53
false
HA PingSbb^Open Cloud1.0
HA PingService^Open Cloud1.0
101:8372512:29
20050418 12:30:59
false
HA PingSbb^Open Cloud1.0
HA PingService^Open Cloud1.0
101:8372512:23
20050418 12:30:47
false
HA PingSbb^Open Cloud1.0
HA PingService^Open Cloud1.0
101:8372512:16
20050418 12:30:33
false
HA PingSbb^Open Cloud1.0
HA PingService^Open Cloud1.0
101:8372512:22
20050418 12:30:45
false
HA PingSbb^Open Cloud1.0
HA PingService^Open Cloud1.0
101:8372508:1
20050418 10:59:53
false
HA PingSbb^Open Cloud1.0
HA PingService^Open Cloud1.0
101:8372512:15
20050418 12:30:31
false
HA PingSbb^Open Cloud1.0
HA PingService^Open Cloud1.0
101:8372512:17
20050418 12:30:35
false
HA PingSbb^Open Cloud1.0
HA PingService^Open Cloud1.0
101:8372512:20
20050418 12:30:41
false
HA PingSbb^Open Cloud1.0
HA PingService^Open Cloud1.0
101:8372512:21
20050418 12:30:43
false
HA PingSbb^Open Cloud1.0
HA PingService^Open Cloud1.0
101:8372512:19
20050418 12:30:39
false
HA PingSbb^Open Cloud1.0
HA PingService^Open Cloud1.0
101:8372512:18
20050418 12:30:37
false
HA PingSbb^Open Cloud1.0
HA PingService^Open Cloud1.0
....
100 rows.
The number of rows returned is the maximum soft limit, which indicates that the search results should be narrowed using
additional parameters to find SBBs of interest. Once again the administrator is concerned with SBB entities greater than 1 hour
old and belonging to any cluster node.
[Rhino@localhost (#1)] findsbbs -service HA\ PingService\ 1.0,\ Open\ Cloud
-created-before 1H
pkey
creation-time
parent-pkey replicated
sbb-component-id
service-component-id
-------------- ------------------------------- -------------------------- -----------------------------102:8578700:2
20050418 10:59:55
false
HA PingSbb^Open Cloud1.0
HA PingService^Open Cloud1.0
102:8578700:0
20050418 10:59:47
false
HA PingSbb^Open Cloud1.0
HA PingService^Open Cloud1.0
101:8372508:1
20050418 10:59:53
false
HA PingSbb^Open Cloud1.0
HA PingService^Open Cloud1.0
102:8578700:1
20050418 10:59:51
false
HA PingSbb^Open Cloud1.0
HA PingService^Open Cloud1.0
4 rows
The administrator may use the getSBBInfo command to retrieve additional information about a particular SBB entity. In this
case, the administrator would like additional information about the third SBB in the result set. The getSBBInfo command
requires 3 parameters – the service component id, and SBB component ID and the SBB’s primary key. All 3 are included in the
findSBBs command result set. Without all 3 parameters the SBB cannot be uniquely identified within the SLEE.
[Rhino@localhost (#1)] getsbbinfo HA\ PingService\ 1.0,\ Open\ Cloud HA\ PingSbb\ 1.0,\ Open\ Cloud 101:8372508:1
parent-pkey
:
pkey
: 101:8372508:1
convergence-name
: nodeID=101,seq=2,vmStart=8367:::::-1
creating-node-id
: 101
creation-time
: 20050418 10:59:53
priority
: 10
replicated
: false
sbb-component-id
: HA PingSbb^Open Cloud1.0
service-component-id : HA PingService^Open Cloud1.0
attached-activities :
> pkey
handle
ra-entity
replicated
> ---------------- -------------------------------------------------- ---------- ----------> 65.2.2E8BF.0.2EA48
SAH[switchID=8756,connectionID=4,address=1]
TestRA
false
> 1 rows
Explanation of the fields returned by getSBBInfo:
Open Cloud Rhino 1.4.3 Administration Manual v1.1
46
Field
pkey
parent-pkey
convergence-name
creating-node-id
creation-time
priority
replicated
sbb-component-id
service-component-id
attached-activities
Description
The SBB entity’s primary key. This identifies the SBB within
its service and SBB component type
The pkey of the SBBs parent SBB
(only applies to child SBBs)
The convergence name generated by the SLEE when
the SBB entity was created. Examining this field is often useful for
debugging applications that use custom convergence name methods
The cluster node that created this SBB. This
field only has meaning for non-replicated SBBs - for non-replicated SBBs
only the creating node can access the SBB.
Replicated SBBs can be accessed by any node in the cluster
The time at which the SBB entity was created.
Event delivery priority of the SBB.
Replicated flag. This flag will be true only for SBBs
belonging to replicated services.
The component ID of the SBBs SBB component.
The component ID of the SBBs encapsulating
service component.
A list of all activities to which the SBB is attached.
Table 6.3: Fields returned by getSBBInfo
6.2.4
Removing SBB Entities
The administrator may decide to remove an SBB using the removeSBB command. Like the getSBBInfo command the
removeSBB command takes the service component id, the SBB component ID and the SBB entity ID as arguments:
[Rhino@localhost (#1)] removeSbb HA\ PingService\ 1.0,\ Open\ Cloud HA\ PingSbb\ 1.0,\ Open\ Cloud 101:8372508:1
[Rhino@localhost (#1)] findsbbs -service HA\ PingService\ 1.0,\ Open\ Cloud
-creates-before 1H
pkey
creation-time
parent-pkey
replicated
sbb-component-id
service-component-id
-------------- ------------------ ------------ ----------- -------------------------- -----------------------------102:8578700:2
20050418 10:59:55
false
HA PingSbb^Open Cloud1.0
HA PingService^Open Cloud1.0
102:8578700:0
20050418 10:59:47
false
HA PingSbb^Open Cloud1.0
HA PingService^Open Cloud1.0
102:8578700:1
20050418 10:59:51
false
HA PingSbb^Open Cloud1.0
HA PingService^Open Cloud1.0
3 rows
6.2.5
Removing All
Occasionally it is necessary to remove all Activities belonging to a Resource Adaptor or all SBBs in a particular Service. Typically, an administrator would do this so that a Resource Adaptor or Service can be deactivated for upgrading or reconfiguration.
Under normal conditions these actions would be performed automatically by allowing existing activities and SBBs to drain over
time. Rhino SLEE provides housekeeping commands to forcibly speed up the draining process, although these are to be used
with extreme care on production systems because they will interrupt service for any existing network activities belonging to the
Resource Adaptor or Services.
Activities
The removeAllActivities command will remove all activities belonging to a particular Resource Adaptor entity. The activities are not removed immediately in order to prevent a possible overload being caused by processing a large number of activity
end events all at once, instead the targeted activities are marked as ending and will be ended by the next pass of the query
liveness scan. Typically with default settings, the query liveness scan would rescan within 3 - 5 minutes.
Open Cloud Rhino 1.4.3 Administration Manual v1.1
47
SBB Entities
The removeAllSBBs command accepts a service component ID and will immediately and forcibly remove all SBB entities
belonging to that service. As an additional safeguard, it is required that the service be in the deactivating state before executing
this command.
6.3 Upgrading a Cluster
Sometimes it will be necessary to upgrade a cluster. This would happen, for instance, when the Rhino SLEE is to be replaced
with a newer version, or if some part of the system needs to be modified that cannot be done using the standard management
commands.
Using the Rhino SLEE, it is possible to upgrade an existing cluster without causing any service disruptions. This does depend,
however, on the structure of the resource adaptors and network devices used.
The general sequence for upgrading a cluster is as follows:
1. Export the state of the existing cluster to a directory.
2. Install a new Rhino SLEE, using a new cluster ID .
3. Deploy that saved state into the new cluster.
4. Activate the new cluster.
5. Deactivate the old cluster.
Upgrading a cluster can cause high CPU usage and disk access, so it is best to perform this operation when the cluster is at its
lowest load to prevent dropped calls.
6.3.1
Exporting State
To export state from an old cluster, simply use the rhino-export command:
$ client/bin/rhino-export export
Connecting to rhinomachine:1199
7 deployable units found to export
Establishing dependencies between deployable units...
Exporting file:rhino/units/ss7-common-types-du.jar...
Exporting file:rhino/units/capv2-ra-type.jar...
Exporting file:rhino/units/capv2-conductor-ra.jar...
... etc ...
After this command has completed, the state of the cluster should be stored in the export directory.
The export command is discussed in more detail in Chapter 7.
6.3.2
Installing a new cluster
Installing a new cluster follows more or less the same steps as described in Chapter 4. However, there are a few differences.
Likely, the new cluster will be installed on the same machines as the old cluster. Because of this, several system resources
will be occupied by the old cluster when the new cluster is brought into action. Typically, these would be TCP/IP ports which
can only be opened for listening by one application, but could also be other system resources used by other deployed resource
adaptors.
During installation, it is necessary to use new values for the following:
Open Cloud Rhino 1.4.3 Administration Manual v1.1
48
• A new database name will be needed; otherwise the existing database will be overwritten by the new cluster. The existing
PostgreSQL installation can be used.
• The SLEE will need to be installed in a new directory.
• The Management Interface RMI Registry Port (default of 1199) needs to be a free port.
• The Management Interface RMI Object Port (default of 1200) needs to be a free port.
• The Management Interface JMX Remote Service Port (default of 1202) needs to be a free port.
• The Standard Web Console HTTP Port (default of 8066) needs to be a free port.
• The Secure Web Console HTTPS Port (default of 8443) needs to be a free port.
• Most importantly, a new Cluster ID will be needed.
Note that the RMI Registry Port, RMI Object Port and the JMX Remote Service Port are consecutive numbers, so a whole new
range of ports for these services will be needed to be found.
The same UDP multicast address range can be used for both clusters – the cluster ID is sent in the UDP multicast packets, and
clusters will ignore traffic that is not their own.
Next, create nodes and initialise the database (as described in Chapter 4) and try to start up the nodes.
6.3.3
Deploying State
Deploying state on the new cluster is simply a case of running the ant utility in the exported directory. To do this, first edit the
import.properties file in the export/ directory to point to the client directory of the new cluster.
Then, with the new cluster active but in the stopped state, run ant in that directory. This should deploy the old cluster’s state
on the new cluster.
6.3.4
Activating the new Cluster
To activate the new cluster, use the start command on the Command Console, or use the Web Console to put the cluster into
the running state. If all has gone to plan, the new cluster should start receiving and processing tasks.
Ensure that the new cluster is performing as expected. Make use of the statistics client and watch the output to Rhino’s logs to
ensure the new cluster is performing as expected.
6.3.5
Deactivating the old Cluster
The old cluster should now be able to be deactivated. To do this cleanly, put the old cluster into the stopped state using the
stop command on the Command Console. The old cluster will take some time to drain out activities depending on the nature
of those activities.
The waitonstate stopped command can be used to wait until the cluster has processed all activities and returned to the
stopped state.
If activities linger around for several hours longer than they are meant to, it could be possible that a glitch in the system has
prevented them from being cleaned up. The findActivities and getActivityInfo commands can be useful for diagnosing
hanging activities. To remove these activities, use the removeActivity command.
Finally, the cluster can be shut down. This can be done using the shutdown command, or by using the stop-rhino.sh with
the --cluster argument.
As a final resort, the kill command or its alternatives can be used from the system shell to kill errand nodes or processes. Use
these commands with care; it would not be good to kill the new cluster accidentally.
Open Cloud Rhino 1.4.3 Administration Manual v1.1
49
6.4 Backup and Restore
During normal operation, all SLEE management and profile data in its own in-memory distributed database. The memory
database is fault tolerant and can survive the failure of a node. However, for management and profile data to survive a total
restart of the cluster, it must be persisted to a permanent, disk-based data store. Open Cloud Rhino SLEE uses the PostgreSQL
database for this purpose.
For scheduled backups it is possible to use PostgreSQL’s pg_dump utility to backup the main working memory and working
configuration. It is important to note that database backups made this way can only be restored successfully if the same Rhino
SLEE version is used with the restored database. For making backups that may reliably be used with a different version of the
Rhino SLEE, an export image of the SLEE should be created using the Exporter script (see Chapter 7).
6.4.1
Making PostgresSQL Backups
The PostgreSQL pg_dump utility can be used to backup the PostgreSQL database. For example, to backup a main working
memory database named “rhino_mgmt”:
pg_dump ---format=t rhino_mgmt > backup.tar
For more information on the options available to pg_dump, please refer to the PostgreSQL documentation.
6.4.2
Restoring a PostgresSQL Backup
Backups made using pg_dump can be imported using the pg_restore utility, for example:
pg_restore ---format=t --d rhino_mgmt backup.tar
If the database being restored already exists but contains existing data that conflicts with the data being imported, add the -c
parameter to clean the target database before importing, e.g.:
pg_restore --c ---format=t --d rhino_mgmt backup.tar
Open Cloud Rhino 1.4.3 Administration Manual v1.1
50
Chapter 7
Export and Import
7.1 Introduction
The Rhino SLEE provides administrators and programmers with the ability to export the current deployment and configuration
state to a set of human-readable text files, and to later import that export image into either the same or another Rhino SLEE
instance. This is useful for:
• Backing up the state of the SLEE.
• Migrating the state of one Rhino SLEE to another Rhino SLEE instance.
• Migrating SLEE state between different versions of the Rhino SLEE.
An export image records the following state from the SLEE:
• All deployable units.
• All Profile tables.
• All Profiles.
• All Resource adaptor entities.
• Configured trace level for all components.
• Current state of all services and resource adaptor entities.
• Runtime configuration.
– Logging
– Rate limiter
– Licenses
– Staging queue dimensions
– Object pool dimensions
– Threshold alarms
51
7.2 Exporting State
In order to use the exporter, the Rhino SLEE must be available and ready to accept management commands. The exporter is
invoked using the $RHINO_HOME/client/bin/rhino-export shell script. The script requires at least one argument, which
is the name of the directory in which the export image will be written to. In addition, a number of optional command-line
arguments may be specified:
$ client/bin/rhino-export
Valid command line options are:
-h <host>
- The hostname to connect to.
-p <port>
- The port to connect to.
-u <username>
- The user to authenticate as.
-w <password>
- The password used for authentication.
-f
- Removes the output directory if it exists.
<output-directory>
- The destination directory for the export.
Usually, only the <output-directory> argument must be specified.
All other arguments will be read from ’client.properties’.
An example of using the exporter to output the current state of the SLEE to the rhino_export directory is shown below:
user@host:~/rhino/client/bin$ ./rhino-export ../../rhino_export
4 deployable units found to export
Establishing dependencies between deployable units...
Exporting file:lib/ocjainsip-1.2-ra.jar...
Exporting file:jars/sip-ac-location-service.jar...
Exporting file:jars/sip-registrar-service.jar...
Exporting file:jars/sip-proxy-service.jar...
Export complete
The exporter will create a new sub-directory specified as an argument, e.g. rhino_export and create all the files which are
deployed in the SLEE, and an Ant script called build.xml which can be used later to initiate the import process.
user@host:~/rhino$ cd rhino_export/
user@host:~/rhino/rhino_export$ ls -l
total 28
-rw------1 user
group
-rw------1 user
group
drwx-----2 user
group
-rw------1 user
group
drwx-----2 user
group
4534
504
4096
5667
4096
Open Cloud Rhino 1.4.3 Administration Manual v1.1
Apr
Apr
Apr
Apr
Apr
5
5
5
5
5
14:24
14:24
14:24
14:24
14:24
build.xml
import.properties
profiles
rhino-ant-management.dtd
units
52
7.3 Importing State
To import the state into a Rhino SLEE, execute the ant script in the directory created by the exporter.
user@host:~/rhino/rhino_export$ ant
Buildfile: build.xml
management-init:
login:
[slee-management] establishing new connection to : localhost:1199/admin
install-ocjainsip-1.2-ra-du:
[slee-management] Install deployable unit file:lib/ocjainsip-1.2-ra.jar
install-sip-ac-location-service-du:
[slee-management] Install deployable unit file:jars/sip-ac-location-service.jar
create-ra-entity-sipra:
[slee-management] Create resource adaptor entity sipra from ComponentID[name=OCSIP,
vendor=Open Cloud,version=1.2]
[slee-management] Bind link name OCSIP to sipra
install-sip-registrar-service-du:
[slee-management] Install deployable unit file:jars/sip-registrar-service.jar
install-sip-proxy-service-du:
[slee-management] Install deployable unit file:jars/sip-proxy-service.jar
install-all-dus:
create-all-ra-entities:
set-trace-levels:
[slee-management] Set trace level of ComponentID[(SBB) name=ACLocationSbb,vendor=Open Cloud,
version=1.5] to Info
[slee-management] Set trace level of ComponentID[(SBB) name=RegistrarSbb,vendor=Open Cloud,
version=1.5] to Info
[slee-management] Set trace level of ComponentID[(SBB) name=ProxySbb,vendor=Open Cloud,
version=1.5] to Info
activate-ra-entities:
[slee-management] Activate RA entity sipra
activate-services:
[slee-management] Activate service ComponentID[name=SIP AC Location Service,vendor=Open Cloud,
version=1.5]
[slee-management] Activate service ComponentID[name=SIP Registrar Service,vendor=Open Cloud,
version=1.5]
[slee-management] Activate service ComponentID[name=SIP Proxy Service,vendor=Open Cloud,
version=1.5]
all:
BUILD SUCCESSFUL
Total time: 31 seconds
Open Cloud Rhino 1.4.3 Administration Manual v1.1
53
7.4 Partial Imports
A partial import is where only some of the import management operations are executed.
This is useful when only deployable units are needed to be deployed or only the resource adaptor entities are required and they
do not need to be activated.
To list the available targets in the build file execute the following command:
user@host:~/rhino/rhino_export$ ant -p
Buildfile: build.xml
Main targets:
Other targets:
activate-ra-entities
activate-services
all
create-all-ra-entities
create-ra-entity-sipra
install-all-dus
install-ocjainsip-1.2-ra-du
install-sip-ac-location-service-du
install-sip-proxy-service-du
install-sip-registrar-service-du
login
management-init
set-trace-levels
Default target: all
Then specify a target which ant is to execute or specify no target and the default target all will be executed.
>ant create-all-ra-entities
Buildfile: build.xml
management-init:
login:
[slee-management] establishing new connection to : localhost:1199/admin
install-ocjainsip-1.2-ra-du:
[slee-management] Install deployable unit file:lib/ocjainsip-1.2-ra.jar
create-ra-entity-sipra:
[slee-management] Create resource adaptor entity sipra from ComponentID[name=OCSIP,
vendor=Open Cloud,version=1.2]
[slee-management] Bind link name OCSIP to sipra
create-all-ra-entities:
BUILD SUCCESSFUL
Total time: 7 seconds
This example activates the previously created resource adaptor entities.
Note how some operations fail but do not halt the build process. This is because failonerror is set to false.
Open Cloud Rhino 1.4.3 Administration Manual v1.1
54
Note: The import script will ignore any existing components. It is recommended that the import be run against a Rhino
SLEE which has no components deployed.
The $RHINO_NODE_HOME/init-management-db.sh script will re-initialise the run-time state and working configuration persisted in the main working memory.
Open Cloud Rhino 1.4.3 Administration Manual v1.1
55
Chapter 8
Statistics and Monitoring
8.1 Introduction
The Rhino SLEE provides monitoring facilities for capturing statistical performance data about the cluster using the client side
application rhino-stats.
To launch the client and connect to the Rhino SLEE, execute the following command:
>cd $RHINO_HOME
>client/bin/rhino-stats
One (and only one) of -g (Start GUI), -m (Monitor Parameter Set), -l (List Available Parameter Sets) required.
Available command line format:
-d
: display actual value in addition to deltas for counter stats
-R
: display raw timestamps (console mode only)
-w <argument> : password
-h <argument> : hostname
-H <argument> : bind address for direct statistics download
-C
: use comma separated output format (console mode only)
-p <argument> : port
-P <argument> : port for direct statistics download
-g
: gui mode
-l <argument> : query available statistics parameter sets
-q
: quiet mode - suppresses informational messages
-i <argument> : internal polling period in milliseconds
-m <argument> : monitor a statistics parameter set on the console
-u <argument> : username
-f <argument> : full path name of a saved graph configuration .xml file to redisplay
-t <argument> : runtime in seconds (console mode only)
-T
: disable display of timestamps (console mode only)
-j
: use JMX remote option for statistics download in place of direct statistics download
-n <argument> : name a tab for display of subsequent graph configuration files
-s <argument> : sample period in milliseconds
The rhino-stats application connects to the Rhino SLEE via JMX and samples requested statistics in real-time. Extracted
statistics can be displayed in tabular text form on the console or graphed on a GUI using various graphing modes.
A set of related statistics is defined as a parameter set. Many of the available parameter sets are organised in an hierarchical
fashion. Child parameter sets representing related statistics from a particular source contribute to parent parameter sets that
summarise statistics from a group of sources.
One example is the Events parameter set which summarises event statistics from each Resource Adaptor entity. In turn each
Resource Adaptor entity parameter set summarises statistics from each event type it produces. This allows the user examining
the performance of an application to drill down and analyse statistics on a per event basis.
Much of the statistical information gathered is useful to both service developers and administrators. Service developers can use
performance data such as event processing time statistics to evaluate the impact of SBB code changes on overall performance.
For the administrator, statistics are valuable when evaluating settings for tunable performance parameters. The following types
of statistics are helpful in determining appropriate configuration parameters:
Three types of statistic are collected:
• Counters count the number of occurrences of a particular event or occurrence such as a lock wait or a rejected event.
56
Parameter Set Type
Object Pools
Staging Threads
Memory Database Sizing
System Memory Usage
Lock Manager
Tunable Parameters
Object Pool Sizing
Staging Configuration
Memory Database Size limits
JVM Heap Size
Lock Strategy
Table 8.1: Useful statistics for tuning Rhino performance
• Gauges show the quantity of a particular object or item such as the amount of free memory, or the number of active
activities.
• Sample type statistics collect sample values every time a particular event or action occurs. Examples of sample type
statistics are event processing time, or lock manager wait time.
Counter and gauge type statistics are read as absolute values while sample type statistics are collected into a frequency distribution and then read.
8.2 Performance Implications
The statistics subsystem is designed to minimise the performance impact of gathering statistics. Generally, gathering counter
or gauge type statistics is very cheap and should not result in more than 1% impact on either overall CPU usage or latency even
when several parameter sets are monitored. Gathering sample type statistics is more costly and will usually result in a 1-2%
impact on CPU usage when several parameter sets are monitored.
It is not recommended that the client be executed on production cluster node. Rather, run the statistics client on a local
workstation. The statistics client’s GUI can result in CPU usage that may cause a cluster to drop calls.
The exact performance impact depends on the number of distinct parameter sets being monitored, the number of simultaneous
users, and the sample frequency.
8.2.1
Direct Connections
For collecting statistics from a Rhino cluster, the rhino-stats client asks each node to create a connection back to the statistics
client for the express purpose of sending the client statistics data. This requires each Rhino node to be able to create outgoing
connections to the host that the rhino-stats client is running on, so an intermediary firewalls will need to be configured to
allow this.
Previous versions of the statistics client retrieved statistics by creating a single outgoing JMX connection to one of the cluster
nodes. This statistics retrieval method is now disabled by default, as it had a greater performance impact than when using direct
connections. It is still available through the use of the -j option.
8.3 Console Mode
In console mode the rhino-stats client has two main modes of execution. When run with the -l parameter rhino-stats
will list the available types of statistics the Rhino SLEE is capable of supplying.
The following examples show usage of rhino-stats to query available parameter set types, and to query the available parameter sets within the parameter set type Events
[user@host rhino]$ ./client/bin/rhino-stats -l
The following parameter set types are available for instrumentation:
Activities, Events, Lock Managers, MemDB-Local, MemDB-Replicated, Object Pools,
Services, Staging Threads, System Info, Transactions
For parameter set type descriptions and a list of available parameter sets use -l <type name> option
Open Cloud Rhino 1.4.3 Administration Manual v1.1
57
$ /home/user/rhino/client/bin/rhino-stats -l Events
Parameter Set Type: Events
Description: Event stats
Counter type statistics:
Name:
Label:
accepted
n/a
failed
n/a
rejected
n/a
successful
n/a
Description:
Accepted events
Events that failed in event processing
Events rejected due to overload
Event processed successfully
Sample type statistics:
Name:
Label:
eventProcessin EPT
eventRouterSet ERT
numSbbsInvoked #sbbs
sbbProcessingT SBBT
Description:
Total event processing time
Event router setup time
Number of sbbs invoked per event
SBB processing time
Found 9 parameter sets of type ’Events’ available for monitoring:
-> "Events"
-> "Events.Rhino internal"
-> "Events.Rhino internal.[javax.slee.ActivityEndEvent javax.slee, 1.0]"
-> "Events.Rhino internal.[javax.slee.serviceactivity.ServiceStartedEvent javax.slee, 1.0]"
-> "Events.TestRA"
-> "Events.TestRA.[com.opencloud.slee.resources.simple.End Open Cloud Ltd., 1.0]"
-> "Events.TestRA.[com.opencloud.slee.resources.simple.Mid Open Cloud Ltd., 1.0]"
-> "Events.TestRA.[com.opencloud.slee.resources.simple.Start Open Cloud Ltd., 1.0]"
-> "Events.cdr"
From the above output, it can be seen that there are many different parameter sets of the type Events available. This allows the
user to select the level of granularity at which they want statistics reported. To monitor a parameter set in real-time using the
console interface use the -m command line argument followed by the parameter set name.
[user@host
2005-04-18
2005-04-18
2005-04-18
2005-04-18
2005-04-18
2005-04-18
2005-04-18
2005-04-18
2005-04-18
2005-04-18
2005-04-18
2005-04-18
2005-04-18
2005-04-18
...
rhino]$ ./client/bin/rhino-stats -m Transactions
20:44:52.070 INFO
[rhinostat] Cluster has members [101]
20:44:52.175 INFO
[rs] Cluster membership => members=[101] left=[] joined=[101]
20:44:52.225 INFO
[rs]
20:44:52.226 INFO
[rs]
active
committed
rolledBack
started
20:44:52.226 INFO
[rs]
--------------------------------20:44:52.226 INFO
[rs] node-101
3 |
- |
- |
20:44:53.242 INFO
[rs] node-101
5 |
42 |
0 |
44
20:44:54.257 INFO
[rs] node-101
6 |
68 |
0 |
69
20:44:55.275 INFO
[rs] node-101
8 |
44 |
0 |
46
20:44:56.298 INFO
[rs] node-101
5 |
54 |
0 |
51
20:44:57.312 INFO
[rs] node-101
8 |
52 |
0 |
55
20:44:58.344 INFO
[rs] node-101
7 |
66 |
0 |
65
20:44:59.362 INFO
[rs] node-101
5 |
57 |
0 |
55
20:45:00.382 INFO
[rs] node-101
2 |
40 |
0 |
37
Once started rhino-stats will continue to extract and print the latest statistics every 1 second. This period can be changed
using the -s switch.
8.3.1
Useful output options
The default console output is not particularly useful when you want to do automated processing of the logged statistics. To
make post-processing of the statistics easier, rhino-stats supports a number of command line arguments which modify the
Open Cloud Rhino 1.4.3 Administration Manual v1.1
58
format of statistics output:
• -R will output raw (single number) timestamps.
• -C will output comma seperated statistics.
• -q will suppress printing of non-statistics information.
For example, to output a command seperated log of event statistics, you could use:
[user@host rhino]$ ./client/bin/rhino-stats -m Events -R -C -q
8.4 Graphical Mode
When run in graphical mode using the -g switch the rhino-stats client offers a range of options for interactively extracting
and graphically displaying statistics gathered from Rhino SLEE. The following types of graph are available:
• Counter/gauge plots. These display the values of gauges, or the change in values of counters over time. It is possible
to display multiple counters or gauges using different colours. The client application stores 1 hours worth of statistics
history for review.
• Sample distribution plots. These display the 5th, 25th, 50th, 75th, and 95th percentiles of a sample distribution as they
change over time, either as a bar and whisker type graph or as a series of line plots.
• Sample distribution histogram. This displays a constantly updating histogram of a sample distribution in both logarithmic
and linear scales.
To create a graph start the rhino-stats client with the -g option:
[user@host rhino]$ ./client/bin/rhino-stats -g
After a short delay the application will be ready to use. A browser panel on the left side shows the available parameter sets
hierarchy in a tree form.
From the browser it is possible to quickly create a simple graph of a given statistic by right clicking on the parameter set in the
browser.
More complex graphs comprising multiple statistics can be created using the graph creation wizard. In the following example
screenshots, a plot is created that displays event processing counter statistics from the resource adaptor entity “TestRA”.
To create a new graph, choose “New” from the Graph menu. This will display the graph creation wizard.
The wizard has the following options:
• Create a plot of one or more counters or gauges. This will allow the user to select multiple statistics and combine them
in a single line plot type graph.
• Create a plot of a sample distribution. This will allow the user to select a single sample type statistic and plot its percentile
values on a line plot.
• Create a histogram of a sample distribution. This will allow the user to select a single sample type statistic and display a
histogram of the frequency distribution.
– A rolling distribution gives a frequency distribution which is influenced by the last X generations of samples.
– A resetting distribution gives a frequency distribution which is influenced by all samples since the client last
sampled statistics.
– A permanent distribution gives a frequency distribution which is influenced by all samples since monitoring
started.
Open Cloud Rhino 1.4.3 Administration Manual v1.1
59
Figure 8.1: Creating a Quick Graph
Figure 8.2: Creating a Graph with the Wizard
Open Cloud Rhino 1.4.3 Administration Manual v1.1
60
Figure 8.3: Selecting Parameter Sets with the Wizard
• Load an existing graph configuration from a file. This allows the user to select a previously saved graph configuration
file and create a new graph using that configuration.
Selecting the first option, “Line graph for a counter or a gauge”, and clicking “Next” displays the graph components screen.
This screen contains a table listing the statistics currently selected for display on the line plot. Initially, this is empty. To add
some statistics click the “Add” button which will display the Select Parameter Set dialog. This dialog allows the user to select
one or more statistics from a parameter set. Using the panel on the left, navigate to the Events.TestRA parameter set (Figure
8.3).
Using shift-click, select the counter type statistics “accepted”, “rejected”, “failed” and “successful”. If the intention is to extract
statistics from the multi-node Rhino cluster then this screen can be used to select an individual node to extract the statistics from.
In this case, opt to use combined statistics from the whole cluster. Click OK to add these counters to the graph components screen
(Figure 8.4).
On this screen, the colour assigned to each statistic can be changed using the colour drop down in the graph components table.
Clicking Next displays the final screen in the graph creation wizard. On this screen, assign a name to the graph and select a
display tab to display the graph in (Figure 8.5).
By default all graphs are created in a tab of the same name as the graph title but there is also the option of adding several related
graphs to the same tab for easy visual comparison. For this exam ple, the graph has been named “TestRA Events from Cluster”
and displayed in a new tab of the same name. There is no need to fill out the tab name field to use the same name for the tab
name.
Clicking Finish will create the graph and begin populating it with statistics extracted from Rhino (Figure 8.6).
The rhino-stats client will continue collecting stats periodically from Rhino and adding them to the graph. By default the
graph will only display the last one minute of information - this can be changed via the graphs context menu (accessible via
right-click) which allows the x axis scale to be narrowed to 30 seconds, or widened up to 10 minutes. Each line graph will store
approximately one hour of data (using the default sample frequency of 1 second). Stored data that is not currently visible can
be reviewed by clicking and dragging the graph, or clicking on the position indicator at the bottom of the graph.
8.4.1
Saved Graph Configurations
Because it can be quite time consuming to create graphs with multiple statistics the rhino-stats client allows saving of graph
configurations to an XML file. To save the configuration of a graph right click on the graph to display it’s context menu and
select “Save Graph Configuration”.
There are two ways to load and display saved graph configuration;
1. By using the -f command line parameter when starting the rhino-stats client.
Open Cloud Rhino 1.4.3 Administration Manual v1.1
61
Figure 8.4: Adding Counters with the Wizard
Figure 8.5: Naming a Graph with the Wizard
Open Cloud Rhino 1.4.3 Administration Manual v1.1
62
Figure 8.6: A Graph created with the Wizard
2. Or if the client application is already running, by selecting option 4 in the graph creation wizard – “Load an existing
graph configuration from a file”.
Note that these saved graph configurations can also be used with with the rhino-stats console when used in conjunction with
the -f option. This allows arbitrary statistics sets to be monitored from the command line.
Open Cloud Rhino 1.4.3 Administration Manual v1.1
63
Chapter 9
Web Console
9.1 Introduction
The Rhino SLEE Web Console is a web application that provides access to management operations of the Rhino SLEE. Using
the Web Console, the SLEE administrator can deploy applications, provision profiles, view usage parameters, configure resource
adaptors, etc. The Web Console enables the administrator to interact directly with the management objects (known as MBeans)
within the SLEE.
9.2 Operation
9.2.1
Connecting and Login
To connect to the Web Console, use the URL that was displayed at the end of the installation process. This will normally be
https://hostname:8443/ (where hostname is the name of the host where the Rhino SLEE is running). The following login
screen will be presented:
The default username is admin, and the password is password. (In a production environment, this should obviously be changed
to something more secure – see the configuration section below for information.)
Once the username and password have been verified, the Web Console will retrieve the management beans (MBeans) from the
MBean Server, and display the main page of the Web Console.
64
9.2.2
Managed Objects
The main page of the Web Console (see Figure 9.1) groups the management beans into several categories:
Figure 9.1: Web Console Main Page
• The SLEE Subsystem category is an enumeration of the "SLEE" JMX domain and provides access to the management
operations mandated by the JAIN SLEE specification.
• The Container Configuration category contains MBeans which provide runtime configuration of license, logging,
object pools, rate limiting, the staging queue and threshold alarms.
• The Instrumentation Subsystem category contains an MBean which provides access to the instrumentation feature,
allowing an administrator to view and manage active SBBs, activities and timers.
• The MLet Extensions category is an enumeration of the "Adaptors" JMX domain, and provides access to the management operations provided by each m-let (management applet).
• The Usage Parameters category contains two MBeans that provide access to usage MBeans created by the SLEE.
Usage MBeans will be visible here if they have been created via the MBeans in the SLEE Subsystem category.
• The SLEE Profiles category contains an MBean that provides access to ProfileMBeans created by the SLEE. Profile MBeans will be visible here if they have been created by invoking the createProfile or getProfile operation on the
ProfileProvisioning MBean.
9.2.3
Navigation Shortcuts
At the top of every page is a bar showing the location of the current page in the page hierarchy. The links here can be used to
quickly navigate back to other pages:
At the bottom of every page is a set of quick links to commonly used management functions:
Open Cloud Rhino 1.4.3 Administration Manual v1.1
65
Clicking on the "Logout" link will end the current session and redisplay the login screen.
9.2.4
Interacting with Managed Objects
This section describes how the Web Console maps the MBean operations to the web interface.
The first screen that the user will see when clicking on a link to an MBean object will display the following information about
the MBean:
• MBean Name
• Java class name
• Brief description
• MBean attributes
• MBean operations
Managed Attributes
Descriptions of each of the attributes can be viewed by clicking on the name of the attribute. If the value of the attribute is a
simple type, it will be displayed in the value column. If the value is more complex, it can be viewed by clicking on the link in
this column. Note that in some cases, attributes may need to be accessed via their get and set operations.
Some MBean attributes can be modified directly, these will have "RW" (read-write) in the Access column. If an attribute has
read-write access, the value can be changed simply by entering the new value and pressing the "apply attribute changes" button.
Managed Operations
Information about each of the operations can be seen by clicking either on the “i” link (if the operation is available), or the name
of the operation itself (if the operation is unavailable). Operations are invoked by filling in the fields next to the operation and
clicking the button with the name of the operation.
When an operation is invoked, a page containing the outcome of the operation is displayed. To return to the MBean details
screen, the user can either press the browser’s "back" button or use the navigation links at the top of the screen. Note that in
some cases the page may need to be refreshed to reflect the results of the operation.
9.3 Deployment Architecture
This section briefly describes the architecture of the Web Console and discusses different deployment scenarios.
9.3.1
Embedded Web Console
When the Rhino SLEE is first installed, the Web Console is configured to run in the Jetty servlet container, and is launched by
an m-let in the same virtual machine as Rhino (this is the "embedded" Jetty scenario).
The classes required to run the Web Console are packaged in a number of different libraries, the full set of which can be
seen in the classpath section of the m-let entry in $RHINO_HOME/etc/defaults/config/permachine-mlet.conf. Here is a
summary:
• The Web Console JMX loader (web-console-jmx.jar) contains the management bean for the Web Console, and a few
extensions to the Jetty servlet container to integrate logging, security, etc.
Open Cloud Rhino 1.4.3 Administration Manual v1.1
66
• The Web Console web application archive (web-console.war) contains the J2EE web application itself, consisting of
servlets, static resources (images, stylesheets and scripts) and configuration files.
• Third-party library dependencies in $RHINO_HOME/client/lib, such as Jetty itself, the servlet API, etc.
9.3.2
Standalone Web Console
In a production environment, it is strongly recommended that the embedded web console is disabled, and a standalone web
console is installed on a dedicated management host.
Disabling the Embedded Web Console
To disable the embedded Web Console, edit the $RHINO_HOME/etc/defaults/config/permachine-mlet.conf file. Find
the m-let for the Web Console and change the enabled attribute to false:
<mlet enabled="false">
<classpath>
<jar-url>@FILE_URL@@RHINO_BASE@/client/lib/web-console.war</jar-url>
<jar-url>@FILE_URL@@RHINO_BASE@/client/lib/web-console-jmx.jar</jar-url>
...
</classpath>
<class>com.opencloud.slee.mlet.web.WebConsole</class>
...
</mlet>
The embedded Web Console can be shutdown in a running system by using the WebConsole MBean in the MLet Extensions
category of the Web Console.
Starting the Standalone Web Console
To start the standalone Web Console on a remote host, follow these steps:
1. Copy the $RHINO_HOME/client directory to the remote host. (This directory will hereafter be referred to as $CLIENT_HOME.)
2. Edit the $RHINO_HOME/etc/defaults/config/permachine-mlet.conf file to give the remote host permission to connect to the JMX Remote adaptor.
3. Edit $CLIENT_HOME/etc/web-console.properties to specify the default host and port to connect to (this can be
overridden from the login screen).
4. Run $CLIENT_HOME/bin/web-console start
Standalone Web Console Authentication
There are two alternatives for authenticating users when the Web Console is running standalone:
• Use the JMX Remote connection to authenticate against JMX Remote adaptor running in Rhino (the jetty-jmx-auth.xml
Jetty configuration).
• Authenticate locally using a password file accessible to the web server (the jetty-file-auth.xml Jetty configuration).
Open Cloud Rhino 1.4.3 Administration Manual v1.1
67
9.4 Configuration
9.4.1
Changing Usernames and Passwords
To edit or add usernames and passwords for accessing Rhino with the Web Console, edit either
$RHINO_HOME/etc/defaults/config/rhino.passwd (if embedded or using JMX Remote authentication) or
$CLIENT_HOME/etc/web-console.passwd (if using local file authentication in a standalone Web Console). The Rhino node
(or standalone Web Console) will need to be restarted for changes to this file to take effect.
The format of this file is:
username:password:role1,role2,role3
The role names must match roles defined in the $RHINO_HOME/etc/defaults/config/rhino.policy file, as described in the
security section of this chapter. The security configuration chapter (Chapter 15) also has information on configuring security
policies.
9.4.2
Changing the Web Console Ports
To change the Web Console ports, edit the file $RHINO_HOME/etc/defaults/config/config_variables and set the variables to the desired port numbers as follows:
WEB_CONSOLE_HTTP_PORT=8066
WEB_CONSOLE_HTTPS_PORT=8443
Standalone Web Console Ports
When the Web Console is running in standalone mode, the Jetty configuration files need to be updated by hand, or regenerated
from the config_variables file. The $CLIENT_HOME/bin/generate-client-configuration script will regenerate the
client configuration files. Copy config_variables to the host running the web console, then run the script with that file as
a parameter. Warning: any custom changes to these files (e.g., enabling or disabling listeners) will be overwritten – in this
situation the file should be updated by hand.
9.4.3
Disabling the HTTP listener
For a production environment, it is recommended that the standard (unencrypted) HTTP listener be disabled. To do this, edit
either the $RHINO_HOME/etc/defaults/config/jetty.xml file (embedded Jetty) or one of the $CLIENT_HOME/etc/
jetty-*-auth.xml files (standalone Jetty), and comment out or remove the following element:
<Call name="addListener">
<Arg>
<New class="org.mortbay.http.SocketListener">
<Set name="Port">8066</Set>
...
</New>
</Arg>
</Call>
9.5 Security
The Web Console relies on the HTTP server and servlet container to provide secure socket layer (SSL) connections, declarative
security, and session management.
Open Cloud Rhino 1.4.3 Administration Manual v1.1
68
9.5.1
Secure Socket Layer (SSL) Connections
The HTTP server creates encrypted SSL connections using a certificate in the web-console.keystore file. This means sensitive
data such as the administrator password is not sent in cleartext when connecting to the Web Console from a remote host. This
certificate is generated at installation time using the hostname returned by the operating system.
9.5.2
Declarative Security
Declarative container based security is specified for all URLs used by the Web Console. These constraints are defined in the
web.xml file inside the web application archive, and provide coarse-grained access control to the Web Console.
However, it is the MBean Server that has ultimate responsibility for checking if a user has sufficient permission to access an
MBean.
An authenticated user has permissions granted based on the roles assigned in the password file.
The permissions for each role are defined in the $RHINO_HOME/etc/defaults/config/rhino.policy file. By default, Rhino
defines the following roles, which can be used as the basis for more specific roles:
View — this role has permission to view MBean attributes and invoke any read-only operations (determined by the method
signature). There is a view user that has this role.
Rhino — this role has the complete set of permissions to view and set any attribute, and invoke any operation, all individually
specified. There is a rhino user that has this role.
Admin — this role has a single global MBean permission that grants full access to every MBean. The admin user is assigned
this role.
JMX security and the MBeanPermission format is described in detail in Chapter 12 of the JMX 1.2 specification.
9.5.3
JAAS
The Web Console (as well as the Rhino SLEE itself) uses the Java Authentication and Authorization Service (JAAS) interfaces
to provide a standard mechanism for extending the security implementation. For example, a custom JAAS LoginModule
could be written to authenticate against an external user repository. The JAAS configuration file for the Web Console is
$CLIENT_HOME/etc/web-console.jaas.
Open Cloud Rhino 1.4.3 Administration Manual v1.1
69
Chapter 10
Log System Configuration
10.1 Introduction
The Rhino SLEE uses the Apache Log4J logging architecture (http://logging.apache.org/) to provide logging facilities to
the internet SLEE components and deployed services. This chapter explains how to set up the Log4J environment and examine
debugging messages.
SLEE application components can use the Trace facility provided by the SLEE for logging facilities. The Trace facility is
defined in the SLEE 1.0 specification, and Trace messages are converted to Log4J messages using the NotificationRecorder
MBean.
10.1.1
Log Keys
Subsystems within the Rhino SLEE send logger messages to various appropriate logger keys. An example logger key is
"rhino.facility.alarm", which periodically receives messages about which alarms are currently active within the Rhino SLEE.
Logger keys are hierarchical. Parent keys receive all messages that are sent to child keys. For example, the key "rhino.facility"
is a parent of "rhino.facility.alarms" and so it receives all messages destined to the "rhino.facility.alarms" key.
The root logger key is aptly called "root". To get a list of all logger keys, one could use the "listLogKeys" command in the
Command Console.
10.1.2
Log Levels
Log Levels determine how much information is sent to the logs from within the Rhino SLEE. A log level can be set for each
logger key.
If a logger does not have a log level assigned to it, then it inherits its log level from its parent. By default, the root logger is
configured to the INFO log level. In this way, all keys will output log messages at the INFO log level or above unless explicitly
configured otherwise.
Note that a lot of useful or crucial information is output at the INFO log level. Because of this, setting logger levels to WARN,
ERROR or FATAL is not recommended.
Table 10.1 lists the logger levels that control logger cut-off filtering.
10.2 Appender Types
After being filtered by logger keys, logger messages are sent to Appenders. Appenders will append log messages to whatever
they’re configured to append to, such as files, sockets or the Unix syslogd daemon. Typically, an administrator is interested in
file appenders which output log messages to a set of rolling files.
The actual messages that each appender receives is determined by the loggers AppenderRefs.
70
Log Level
FATAL
ERROR
WARN
INFO
DEBUG
Description
Only error messages for unrecoverable errors are produced (not recommended).
Only error messages are produced (not recommended).
Error and warning messages are produced.
The default. Errors and warnings are produced, as well as some informational
messages, especially during node startup or deployment of new resource adaptors
or services.
Will produce a large number of log messages. As the name suggests this log
level is intended for debugging by Open Cloud Rhino SLEE developers.
Table 10.1: Level Cut-off Filters
By default, the Rhino SLEE comes configured with the following appenders, visible using the "listAppenders" command from
the Command Console:
[Rhino@localhost (#14)] listAppenders
ConfigLog
STDERR
RhinoLog
The RhinoLog appender is the main appender. This appender sends all its output to work/log/rhino.log. The AppenderRef
which causes this appender to receive all log messages is linked from the root logger key.
The STDERR appender outputs all log messages to the standard error stream so that they appear on the console where a Rhino
node is running. This also has an AppenderRef linked to the root logger key.
The ConfigLog appender outputs all log messages to the work/log/config.log file, and has an AppenderRef attached to the
rhino.config logger key.
Rolling file appenders can be set up so that when a log file reaches a configured size, it is automatically renamed as a numbered
backup file and a new file created. When a certain number of archived log files have been made, old ones are deleted. In this
way, log messages are archived and disk usage is kept at a manageable level.
10.3 Logging Configuration
Rhino SLEE also allows changes to logging configuration at run-time, useful for capturing log information to diagnose a problem without requiring a SLEE restart. Log configuration is accomplished using the Logging Configuration MBean, accessible
via the Web Console or the Command Console.
The Logging Configuration MBean provides methods for querying the current state of log configuration, and for changing the
current configuration. Configuration changes take effect immediately for most subsystems1 .
10.3.1
Log Configuration using the Command Console
The Command Console has several commands to modify the logging configuration at run-time. A quick example of some of
these commands is given below.
The first example here is the creation of a file appender. A file appender appends logging requests to a file in the work/log
directory in each node’s directory.
1
Log level changes in some subsystems will only be effective after a node restart. This restriction is imposed for performance reasons.
Open Cloud Rhino 1.4.3 Administration Manual v1.1
71
>cd $RHINO_HOME
>./client/bin/rhino-console
[Rhino@localhost (#1)] help createfileappender
createFileAppender <appender-name> <filename>
Create a file appender
[Rhino@localhost (#2)] createFileAppender FBFILE foobar.log
Done.
Once the file appender has been created, log keys can be configured to output their loggers messages to that appender. This is
done using the "addAppenderRef" command:
[Rhino@localhost (#3)] help addappenderref
addAppenderRef <log-key> <appender-name>
Attach an appender to a logger
[Rhino@localhost (#4)] addAppenderRef rhino.foo FBFILE
Done.
The additivity of each logger determines whether the output from that key is sent to each appender. Additivity can be set to
"true" or "false":
[Rhino@localhost (#5)] setAdditivity rhino.foo false
Done.
Each logger key can have any of the levels in Table 10.1 above.
Set the logger key to DEBUG to enable debugging logging requests.
[Rhino@localhost (#6)] setLogLevel rhino.foo DEBUG
Done.
Log File Rollover
The Rhino SLEE file appenders support automated rollover of log files. The default behaviour is to automatically rollover
log files when they reach 1GB in size, or when requested by an administrator. An administrator can request rollover of log
files using the rolloverAllLogFiles method of the Log Configuration MBean. This method can also be accessed using the
Command Console.
>cd $RHINO_HOME
>./client/bin/rhino-console rolloverAllLogFiles
The default maximum file size before a log file is rolled over and the maximum number of backup files to keep can be overridden
when creating a file appender using the Log Configuration MBeans createFileAppender method.
10.3.2
Web Console Logging
The MBean used for configuring the Logging system from the Web Console is in the "Container Configuration" category. The
same exercise is repeated as for the Command Console above. First, create a file appender by filling in the details and clicking
on the "createFileAppender" button as in Figure 10.1.
Open Cloud Rhino 1.4.3 Administration Manual v1.1
72
Figure 10.1: Creating a file appender
To add an AppenderRef so that logging requests for the "savanna.stack" logger key are forwarded to the FBFILE file appender,
we choose appropriate fields and click the "addAppenderRef" button as in Figure 10.2.
Figure 10.2: Adding an AppenderRef
Open Cloud Rhino 1.4.3 Administration Manual v1.1
73
There are also Web Console commands for setting additivity for each logger key and for setting levels as in Figure 10.3.
Figure 10.3: Other Logging Administration Commands
Open Cloud Rhino 1.4.3 Administration Manual v1.1
74
Chapter 11
Alarms
Alarms are described in the JAIN SLEE 1.0 Specification and are faithfully implemented in the Rhino SLEE. Alarms can be
raised by various components inside Rhino, including other vendor’s components which have been deployed in the SLEE.
In most cases, it is the responsibility of the system administrator to clear Alarms, although in some cases an alarm may be
cleared automatically as the cause of that alarm has been resolved.
Alarms make their presence known through log messages. It is also possible for applications to interact with the Alarm MBean
directly to retrieve a list of current alarms. Clients can also register a notification listener with the Alarm MBean to receive
notifications of alarm changes as they occur.
This chapter covers using the Command Console and the Web Console to interact with Alarms.
11.1 Alarm Format
When an Alarm is printed out, either by using the Command Console or the Web Console, it will look something like the
following:
Alarm 56875565751424514 (Node 101, 07-Dec-05 16:44:05.435): Major
[resources.cap-conductor.capra.noconnection] Lost connection to
backend localhost:10222
The structure of this alarm is as follows:
1. After the word “Alarm” is that alarm’s ID. This is used to refer to this alarm to clear it.
2. Then comes the node where that alarm originated (“Node 101”), followed by the current date and time (“07-Dec-05
16:44:05.435”).
3. After this is the alarm’s severity (“Major”) and the part of the system it came from (“resources.cap-conductor.capra.noconnection”).
4. Following this is the alarm’s message – in this case, a backend cannot be connected to.
11.2 Management Interface
11.2.1
Command Console
To get a list of all of the active alarms, the command listActiveAlarms can be used:
75
[Rhino@localhost (#28)] listactivealarms
Alarm 56875565751424514 (Node 101, 07-Dec-05 16:44:05.435): Major
[resources.cap-conductor.capra.noconnection] Lost connection to
backend localhost:10222
Alarm 56875565751424513 (Node 101, 07-Dec-05 16:41:04.326): Major
[rhino.license] License with serial ’107baa31c0e’ has expired.
Clearing alarms can be done individually for each alarm, or for an entire group of Alarms. To clear one alarm individually, use
the clearAlarm command with the alarm’s ID as follows:
[Rhino@localhost (#29)] clearalarm 56875565751424514
Alarm cleared.
To clear a whole group of alarms, use the clearAlarms command with the alarm category as the parameter:
[Rhino@localhost (#30)] clearalarms rhino.license
Alarms cleared.
11.2.2
Web Console
When using the Web Console, the Alarm MBean is situated at the top of the list of MBeans. Figure 11.1 shows the Alarm
MBean.
Figure 11.1: The Web Console showing the Alarms MBean
Here, several things are apparent:
• The AllActiveAlarms attribute is a list of all of the current active alarms.
• The clearAlarm button will clear the selected alarm.
Open Cloud Rhino 1.4.3 Administration Manual v1.1
76
• The clearAlarms button will clear all alarms in that category.
• The exportAlarmTableAsNotifications button will export all alarms as JMX notifications. The results of this operation will be visible on the logs as notifications.
• The logAllActiveAlarms button will write all alarms to the Rhino SLEE’s log.
Open Cloud Rhino 1.4.3 Administration Manual v1.1
77
Chapter 12
Threshold Alarms
12.1 Introduction
To supplement the standard alarms raised by Rhino, an administrator may configure additional alarms to be raised or cleared
automatically based on the evaluation of a set of conditions using input from Rhino’s statistics facility. These alarms are known
as Threshold Alarms and are configured using the Threshold Rules MBean.
This chapter describes the types of conditions available for use with threshold alarms and provides an example demonstrating
configuration of a threshold alarm.
12.2 Threshold Rules
Each threshold rule consists of the following elements:
• A unique name identifying the rule.
• A set of trigger conditions containing at least one condition.
• An alarm level, type and message text.
• Optionally, a set of reset conditions.
• Optionally, a time period in milliseconds for which the trigger conditions must remain before an alarm will be raised.
• Optionally, a time period in milliseconds for which the reset conditions must remain before an alarm will be cleared.
Condition sets may be combined using either an AND or an OR operator. When AND is used all conditions in the set must be
satisfied; when OR is used any one of the conditions may cause the alarm to be raised or cleared.
12.3 Parameter Sets
The parameter sets used by threshold rules are the same as used by the statistics client. The parameter sets can be discovered
either by using the statistics client graphically, or by using its command-line version from a sh or bash shell as follows:
$ client/bin/rhino-stats -l
2006-01-10 17:33:42.242 INFO
[rhinostat] Connecting to localhost:1199
The following parameter set types are available for instrumentation:
Activities, ActivityHandler, CPU-usage, ETSI-INAP-CS1Conductor,
Events, License Accounting, Lock Managers, MemDB-Local,
MemDB-Replicated, Object Pools, Savanna-Protocol, Services, Staging
Threads, System Info, Transactions
78
For parameter set type descriptions and a list of available parameter sets use -l <type name> option
$ client/bin/rhino-stats -l "System Info"
2006-01-10 17:34:04.195 INFO
[rhinostat]
Parameter Set Type: System Info
Description: JVM System Info
Counter type statistics:
Name:
Label:
freeMemory
n/a
totalMemory
n/a
Connecting to localhost:1199
Description:
Free memory
Total memory
Sample type statistics: (none defined)
Found 1 parameter sets of type ’System Info’ available for monitoring:
-> "System Info"
12.4 Evaluation of Threshold Rules
For each rule configured, Rhino evaluates the conditions it contains. When a rule’s trigger conditions evaluate to true, the alarm
corresponding to that rule is raised. If the rule has reset conditions, Rhino will begin evaluating those, clearing the alarm when
they evaluate to true. If the rule does not have reset conditions the alarm must be cleared manually by an administrator.
The frequency of evaluation of threshold rules is configurable via the Threshold Rule Configuration MBean. This MBean
allows the administrator to specify a polling frequency in milliseconds, or 0 to disable rule evaluation. The default value for
a Rhino installation is zero and must be changed to enable evaluation of threshold rules. The ideal polling frequency to use is
highly dependent on the nature of the alarms configured.
12.5 Types of Rule Conditions
Conditions in a threshold rule may be either simple conditions which evaluate a single Rhino statistic, or relative conditions
which compare two statistics. For more information on Rhino statistics and how to view available statistics refer to Chapter 8.
The two types of condition are described in more detail below.
12.5.1
Simple Conditions
A simple condition compares the value of a counter type Rhino statistic against a constant value. The available operators for
comparison are >, >=, <, <=, == and !=. For simple conditions the constant value to compare against must be a whole number.
The condition can either compare against the absolute value of the statistic (suitable for gauge type statistics) or against the
observed difference between successive samples (suitable for pure counter type statistics).
An example of a simple threshold condition would be a condition that evaluated to true when the number of transactions rolled
back is > 100. This condition would select the statistic rolledBack from the Transactions parameter set.
12.5.2
Relative Conditions
A relative threshold compares the ratio between two monitoring statistics against a constant value. As with simple conditions
the available operators for comparison are >, >=, <, <=, == and !=. For relative thresholds, the constant value to compare against
is not limited to being a whole number and can be any floating point number (represented as a java.lang.Double in Java).
An example of a relative threshold condition would be a condition that evaluated to true when free heap space was less than 20%
of total heap space. This condition would select the statistics freeMemory and totalMemory from the System Info parameter
set. Using the < operator and a constant value of 0.2 the condition would evaluate to true when the value of freeMemory /
totalMemory was less than 0.2.
Open Cloud Rhino 1.4.3 Administration Manual v1.1
79
12.6 Creating Rules
Rules may be created using either the Web Console or using the Command Console with XML files. The following sections
demonstrate how to manage threshold rules using both methods.
12.6.1
Web Console
The following example shows creation of a low memory alarm using the Web Console. This rule will raise an alarm on any
node if the amount of free memory becomes less than 20% of the total memory.
In Figure 9.1, from the main page of the web console select the “Threshold Rules” MBean in the “Container Configuration”
section.
The Threshold Rules MBean allows new rules to be created and existing rules to be retrieved for editing or removed. The first
step is to create a new rule called “Low Memory”. Enter “Low Memory” in the text field next to createRule and then click
createRule:
The Rule Configuration MBean is displayed. This MBean allows the new rule to be edited.
In addition to viewing the rule, it can be activated or deactivated, conditions can be added or removed or reset, the evaluation
period for the rule trigger can be altered, and the alarm type and text can be modified.
The rule is currently inactive and cannot be activated until it has alarm text and at least one trigger condition. For a low memory
rule a trigger condition is required that uses heap statistics available from the “System Info” parameter set. The statistics
available are freeMemory and totalMemory. One option is to configure a simple threshold that compares free memory to a
suitable low water mark representing 20% of the total.
If the intention is to raise an alarm if less than 20% (for example) of free memory is available, a relative threshold could be used
that compares the ration between free memory and total memory. The advantage of the this approach is that it is dynamic – the
rule will not need to be reconfigured if the amount of memory allocated to the Rhino node changes.
Open Cloud Rhino 1.4.3 Administration Manual v1.1
80
The alarm type and message is set with the setAlarm operation.
Finally, the rule is activated using the activateRule operation. Once the rule is active it will begin to be evaluated.
12.6.2
Command Console
A less resource-intensive manner of viewing, exporting and importing rules is by using the Command Console. Using the
command console, rules cannot be edited directly but must be first exported to a file, edited and then imported again. In this
way, any aspect of a rule can be modified using a text editor and rules can be saved for later use.
The exported files containing the threshold rules data is formatted using XML.
To view the deployed rules use the listconfigkeys command, supplying threshold-rules as the configuration type argument:
[Rhino@localhost (#0)] listconfigkeys threshold-rules
rule/low_memory
To view the content of a rule use the getconfig command:
Open Cloud Rhino 1.4.3 Administration Manual v1.1
81
[Rhino@localhost (#1)] getconfig threshold-rules rule/low_memory
<?xml version="1.0" encoding="UTF-8"?>
<!DOCTYPE rhino-threshold-rule PUBLIC "-//Open Cloud Ltd.//DTD Rhino Threshold Rule 1.0//EN"
"http://www.opencloud.com/dtd/rhino-threshold-rule.dtd">
<rhino-threshold-rule config-version="1.0" rhino-version="Rhino-SDK
(version=’1.4.3’, release=’00’, build=’200610301220’, revision=’1798’)"
timestamp="1162172349575">
<!-- Generated Rhino configuration file: 2006-10-30 14:39:09.575 -->
<threshold-rules active="false" name="low memory">
<trigger-conditions name="Trigger conditions" operator="OR" period="0">
<relative-threshold operator="<=" value="0.2">
<first-statistic calculate-delta="false"
parameter-set="System Info" statistic="freeMemory"/>
<second-statistic calculate-delta="false"
parameter-set="System Info" statistic="totalMemory"/>
</relative-threshold>
</trigger-conditions>
<reset-conditions name="Reset conditions" operator="OR" period="0"/>
<trigger-actions>
<raise-alarm-action level="Major" message="Low on memory" type="memory"/>
</trigger-actions>
<reset-actions>
<clear-raised-alarm-action/>
</reset-actions>
</threshold-rules>
</rhino-threshold-rule>
The rule is displayed in XML format on the console. It can be exported to a file using the exportConfig command:
[Rhino@localhost (#2)] exportconfig threshold-rules rule/low_memory rule.xml
Export threshold-rules (rule/low_memory) to rule.xml
Wrote rule.xml
A rule can be modified using a text editor and then reinstalled. In the following example, a reset condition is added to the rule so
that the alarm raised will be automatically cleared when free memory becomes greater than 30%. Currently, the reset-conditions
element in the rule contains no conditions. To add a condition, edit the reset-conditions element as follows:
<reset-conditions name="Reset conditions" operator="OR" period="0">
<relative-threshold operator=">" value="0.3">
<first-statistic calculate-delta="false" parameter-set="System Info"
statistic="freeMemory"/>
<second-statistic calculate-delta="false"
parameter-set="System Info"
statistic="totalMemory"/>
</relative-threshold>
</reset-conditions>
The rule can be imported using the importconfig command:
[Rhino@localhost (#1)] importconfig threshold-rules rule_low_memory.xml -replace
The first argument, threshold-rules, is interpreted as the type of data to read from the file in the second argument (the XML
file). The third argument, -replace, is necessary to reinstall the “low memory” rule because there is already an existing rule
of that name.
Note that when an active existing rule is replaced, the rule is always reverted to its untriggered state first. If the rule being
replaced has triggered an alarm then that alarm will be cleared.
Open Cloud Rhino 1.4.3 Administration Manual v1.1
82
Chapter 13
Notification System Configuration
13.1 Introduction
The Rhino SLEE supports notifications as a mechanism for external management clients to be notified of particular events within
the SLEE. The Java Management Extensions (JMX) defines the APIs and usage of notification broadcasters and listeners.
For more information on JMX, refer to http://java.sun.com/products/jmx/overview.html . The manner in which
notifications are implemented and how JMX is used is described in the JAIN SLEE 1.0 specification.
Notifications are created by SBBs running within the SLEE, or by the SLEE itself, and consumed by external management
clients.
13.2 The SLEE Notification system
Notifications come from many sources: Alarms, Traces, SBB Usage notifications or SLEE state change notifications.
Alarm notifications are broadcast when an alarm is raised within the SLEE. Potential sources of alarms include the Rhino SLEE
itself and the SBBs that use the Alarm Facility to create alarms. Alarms are used to alert a system administrator to conditions
in the SLEE that require manual intervention.
Trace notifications are the main method for recording debugging information from an SBB. Trace notifications should be used
instead of printing messages to stdout or using Log4J directly for recording debugging information. Trace notifications are
created using the Trace Facility from within SBBs.
SLEE state change notifications are broadcast when the SLEE changes it’s state to one of SleeState.STOPPED,
SleeState.STARTING, SleeState.RUNNING or SleeState.STOPPING. These states are defined in the package
javax.slee.management.
Usage parameter notifications are notifications that are broadcast when usage parameters (such as counters or sampled statistics)
are updated by SBBs.
In order to receive these notifications, a management client or m-let will need to create an object which implements the
NotificationListener interface and add hte listener to the appropriate MBean. This is described in more detail in the Open
Cloud Rhino API Programmer’s Reference Manual, available on request from Open Cloud.
One such listener is provided with Rhino: The Notification Recorder, which forwards any notifications it receives to Rhino’s
logging system. This is described below in Section 13.3.
13.2.1
Trace Notifications
The following example code creates a trace notification from within an SBB. Firstly, the Trace Facility needs to be looked up:
83
public void setSbbContext( SbbContext context ) {
this.context =
try {
final Context c = (Context)new InitialContext().lookup("java:comp/env/slee");
traceFacility = (TraceFacility)c.lookup("facilities/trace");
} catch( NamingException e ) { }
}
Then, in the SBB, the trace facility is used to create the trace message:
...
traceFacility.createTrace( context.getSbb(), Level.WARNING,
"sbb.com.opencloud.mysbb", "this is a trace message",
System.currentTimeMillis() );
...
Service developers may find it useful to create a utility method to make trace method calls more concise.
More details about the trace facility, including the trace facility API, is available in the JAIN SLEE specification version 1.0.
13.3 Notification Recorder M-Let
The Rhino SLEE includes an m-let which listens for notifications from the SLEE and from the Alarm and Trace facilities and
records them to the Rhino SLEE logging subsystem on the notificationrecorder log key. The m-let is installed by default
with the following entry in $RHINO_NODE_HOME/config/pernode-mlet.conf.
<mlet>
<classpath>
<jar>
<url>file:@RHINO_HOME@/lib/notificationrecordermbean.jar</url>
</jar>
</classpath>
<class>com.opencloud.slee.mlet.notificationrecorder.NotificationRecorder</class>
</mlet>
13.3.1
Configuration
By default, the notification recorder is configured to write all notifications it receives to the Log4J log key “notificationrecorder”.
These log messages will then be processed by Rhino’s logging system.
To separate the notification recorder’s output from the rest of the Rhino logs, the logging system can be configured to send all
log messages for the key “notificationrecorder” to a particular logging appender. Detailed information on the configuration of
Rhino’s logging system is available in Chapter 10.
To create a new logging appender (in this case, a file appender), do the following:
[Rhino@localhost (#1)] createfileappender myFileAppender myfileappender.log
This appender, named “myFileAppender”, will write all output to the file “myfileappender.log” in the rhino/work/log directory.
For the sake of example, only trace messages will be sent to the log. To achieve this, all log messages from the log key
“notificationrecorder.trace” will be sent to the logging appender that has just been created:
[Rhino@localhost (#2)] addappenderref notificationrecorder.trace myFileAppender
Now when an SBB calls the trace method of the Trace Facility, the created messages will appear in the above file.
Open Cloud Rhino 1.4.3 Administration Manual v1.1
84
Chapter 14
Licensing
14.1 Introduction
This chapter explains how to use licenses and the effects licenses have on the running of the Rhino SLEE.
In order to activate services and resource adaptors, a valid license must be loaded into Rhino. At a minimum there should be
a valid license for the core functions (“default”) installed at all times. Further licenses that give access to additional resource
adaptors and services can also be installed.
Each license has the following properties;
• A unique serial identifier.
• A start date – the license is not valid until this date.
• An end date – the license is not valid after this date.
• A set of licenses that are superseded by this license.
• The licensed product functions.
• The licensed product versions.
• The licensed product capacities.
A license is considered valid if:
• The current date is after the license start date, but before the license end date.
• The list of license functions in that license contains the required function.
• The list of product versions contains the required version.
• The license is not superseded by another.
If multiple valid licenses for the same function are found then the largest licensed capacity is used.
When a service is activated, the Rhino SLEE checks the list of functions that this service requires against the list of installed
valid licenses. If all required functions are licensed then this service will activate. If one or more functions is unlicensed then
this service will not activate. The same behaviour occurs for resource adaptors.
85
The current functions that are used by the Rhino family of products are:
“Rhino” – The function used by the production Rhino build for its core functions.
“RhinoSDK” – The function used by the SDK Rhino build for its core functions.
“default” – This is synonymous with “Rhino” on the production build and “RhinoSDK” on the SDK build. This is intended
to be used for services that disable accounting on the core function where those services must work on both the SDK and
production builds without recompilation or repackaging.
14.2 Alarms
Licensing alarms will typically be raised in the following situations:
• A license has expired.
• A license is due to expire in the next 7 days.
• License units are being processed for a currently unlicensed function.
• A license function is currently processing more accounted units than it is licensed for.
Once an alarm has been raised it is up to the system administrator to verify that it is still pertinent and to cancel it. Particular
note should be paid to the time the alarm was generated and in the case of an over capacity alarm it may be necessary to view
the audit logs to determine exactly when and how long the system was over capacity. Alarms may be cancelled through the
management console. Please note that a cancelled capacity alarm will be re-generated if a licensed function continues to run
over capacity.
14.2.1
License Validity
Services and resource adaptors will fail to activate if they require unlicensed functions. This applies to explicit activation (i.e.
via a management client) and implicit activation (i.e. on SLEE restart). There is one exception: if a node joins an existing
cluster that has an active service for which there is no valid license, the service will become active on that node.
In the production version of Rhino, services and resource adaptors that are already active will continue to successfully process
events for functions that are no longer licensed, such as when a license has expired.
For the SDK version of Rhino, services and resource adaptors that are already active will stop processing events for the core
“RhinoSDK” function if it becomes unlicensed, typically after a license has expired.
14.2.2
Limit Enforcement
For the production version of Rhino, the “hard limit” on a license is never enforced by the SLEE. Alarms will be generated
if event processing rate goes above the licensed limit and an audit of the audit log will show the amount of time spent over
licensed limit for each over-limit function.
For the SDK version of Rhino, the “hard limit” on the core “RhinoSDK” function will be enforced. That is, events bound for a
service that uses this function over the licensed limit will be dropped. If more than one service is interested in the same event
and one of those services is over limit then none of the services will receive the event. Alarms will be generated when events
are dropped. An audit of the audit log will show that events equal to (or just less than) the licensed limit were processed.
14.2.3
Statistics
Statistics are available through the standard Rhino SLEE statistics interfaces. ‘License Accounting’ is the name of the root
statistic, and statistics are available per function, with each function showing an “accountedInitialEvents” and “unaccountedInitialEvents” value. Only “accountedInitialEvents” count towards licensed limits, “unaccountedInitialEvents” are recorded for
services and resource adaptors where accounted=”false” is configured for a licensed function.
Open Cloud Rhino 1.4.3 Administration Manual v1.1
86
14.2.4
Management Interface
These are performed via the Web Console and the Command Console. A description of managing a license using the Command
Console is given here.
Installed Licenses
An overall view of which licenses are currently installed in Rhino can be displayed by using the listLicenses command:
[Rhino@localhost (#7)] listLicenses
Installed licenses:
[LicenseInfo serial=107baa31c0e,validFrom=Wed Nov 23 14:00:50 NZDT 2005,
validUntil=Fri Dec 02 14:00:50 NZDT 2005,capacity=400,hardLimited=false,
valid=false,functions=[Rhino],versions=[Development],supersedes=[]]
[LicenseInfo serial=10749de74b0,validFrom=Tue Nov 01 16:28:34 NZDT 2005,
validUntil=Mon Jan 30 16:28:34 NZDT 2006,capacity=450,hardLimited=false,
valid=true,functions=[Rhino,Rhino-IN-SIS],versions=[Development,Development],
supersedes=[]]
Total: 2
Here, there are two licenses installed: 107baa31c0e and 10749de74b0. The former enables one function: [Rhino], and the
second enables two functions: [Rhino,Rhino-IN-SIS]. Both of these licenses are development licenses.
The command getLicensedCapacity can be used to determine how much throughput the Rhino cluster has:
[Rhino@localhost (#9)] getlicensedcapacity Rhino Development
Licensed capacity for function ’Rhino’ and version ’Development’: 450
Installing Licenses
To install a license, use the installLicense command. This command takes a URL as an argument. License files must be on
the local filesystem of the host where the node is running:
[Rhino@localhost (#12)] installLicense file:/home/user/rhino/rhino.license
Installing license from file:/home/user/rhino/rhino.license
Uninstalling Licenses
In the same way, licenses can be removed by using the uninstallLicense command:
[Rhino@localhost (#15)] uninstalllicense 105563b8895
Uninstalling license with serial ID: 105563b8895
14.2.5
Audit Logs
Rhino SLEE generates two copies of the same audit log. One is unencrypted and can be used by the Rhino SLEE system
administrator to perform a self-audit. The encrypted log contains an exact duplicate of the information in the unencrypted log.
The encrypted log may be requested by Open Cloud in order to perform a license audit. Audit logs are subject to “rollover” just
like any other rolling log appender log. Therefore it may be necessary to concatenate a number of logs in order to get the full
audit log for a particular period. Older logs are named audit.log.0, audit.log.1, etc.
The audit log format can be found in Appendix E.
Open Cloud Rhino 1.4.3 Administration Manual v1.1
87
Chapter 15
Security Configuration
15.1 Introduction
Security in the JAIN SLEE is an essential component of the Rhino SLEE architecture. It provides access control for
1. MLet extensions.
2. Resource Adaptors.
3. Node administration.
4. Cluster management.
The operational capabilities of Rhino SLEE allow a deployment to operate securely and reliably. A vendor can;
1. Relax or strengthen the security of the SLEE using Java policy based security.
2. Sign deployable units (jars) and grant permissions to signed code (SBBs, resource adaptors, services).
3. Contextualise security for user authentication and authorisation.
4. Integrate context security with enterprise systems, identity servers and databases.
The installation configures the standard Rhino SLEE security,
1. Creates default user-names and passwords.
2. Creates public and private key stores.
3. Generates basic key pairs and certificate chains.
4. Imports certificates into the public key stores.
5. Enables the Java Security Manager.
15.2 Security Policy
The security model is based on the standard Java security and the Java Authentication and Authorisation Service (JAAS) models.
The security subsystem provides a rigid level of systems integration and granular code level security which prevents untrusted
Resource Adaptors, MLets, SBBs or human users from performing restricted functions in the container environment.
A Rhino library code-base is protected in the file located at $RHINO_HOME/etc/defaults/config/rhino.policy. MLets
security are declared by protection domain grants issued in the security-spec section of the $RHINO_NODE_HOME/config/
⁀permachine-mlet.conf file.
88
Nb. This configuration file is subject to the variable substitution applied to configuration files (replacement of
@RHINO_HOME@, etc).
The configuration file is a standard Java security policy file.
For more information regarding Sun Java security policy documentation at please visit
http://java.sun.com/j2se/1.4.1/docs/guide/security/PolicyFiles.html .
In some cases, it may be convenient to completely disable the security policy instead of granting the necessary permissions
individually. There are two alternative methods:
1. Insert a rule into the policy file granting AllPermission to all code:
grant {
permission java.security.AllPermission;
};
2. Disable the use of a security manager by editing $RHINO_NODE_HOME/read-config-variables and commenting out the
line:
#OPTIONS="$OPTIONS -Djava.security.manager"
Note that making either of these changes will greatly reduce the security of the container environment. This should only be
done on systems that run in a trusted network environment (for example, behind a firewall), and only trusted code should be
installed and used.
The SecurityManager can be configured to produce trace logs by editing $RHINO_NODE_HOME/read-config-variables and
adding the line:
OPTIONS="$OPTIONS -Djava.security.debug=access;failure"
Note: This OPTION will produce a lot of console output. It is recommended to start-rhino.sh > out 2>&1 to
capture output.
15.3 Network Connections
Network connections to and from remote machines are also protected by the standard Java Security Manager.
To enable unrestricted access to networking resources such as the hosts file add the line(s) below to the
$RHINO_HOME//etc/defauls/config/rhino.policy file.
grant {
java.net.SocketPermission "*","connect,accept,resolve";
java.io.FilePermission "*","read,write,delete";
};
To allow remote host to connect to the JMX Remote Adaptor and the Web Console locate the $RHINO_HOME/etc/defaults/
config/mlet.conf file.
Open Cloud Rhino 1.4.3 Administration Manual v1.1
89
<mlet enabled="true">
<classpath>
<jar-url>@FILE_URL@@RHINO_BASE@/lib/jmxr-adaptor.jar</jar-url>
<jar-url>@FILE_URL@@RHINO_BASE@/lib/ext/jmxremote.jar</jar-url>
<jar-url>@FILE_URL@@RHINO_BASE@/lib/ext/jmxri.jar</jar-url>
<security-permission-spec>
grant{
...
permission java.net.SocketPermission "<REMOTE_HOST>","accept";
...
</mlet>
...
<mlet>
<classpath>
<jar-url>@FILE_URL@@RHINO_BASE@/lib/web-console.war</jar-url>
<jar-url>@FILE_URL@@RHINO_BASE@/lib/web-console-jmx.jar</jar-url>
<jar-url>@FILE_URL@@RHINO_BASE@/lib/ext/javax.servlet.jar</jar-url>
...
<security-permission-spec>
...
grant{
...
permission java.net.SocketPermission "<REMOTE_HOST>","accept";
...
</mlet>
15.4 Signing Deployable Units
When a deployable unit is installed, the contained component jars are extracted to a temporary location determined by the
SLEE. This means that individual component jars cannot be identified via a ‘codeBase’ rule in the security policy file.
However security permission can still be applied to the component jar, using the ‘signedBy’ rule. For example:
Open Cloud Rhino 1.4.3 Administration Manual v1.1
90
# Build componentJarOne.jar
# ...
# Generate a new signing key.
keytool -genkey -keystore my.keystore -alias componentSignerOne
# Sign the component jar.
jarsigner -keystore my.keystore componentJarOne.jar componentSignerOne
# Build a deployable unit
# ...
For further details on the use of keytool and jarsigner, see Sun’s tool documentation at
http://java.sun.com/j2se/1.4.1/docs/tooldocs/tools.html .
When deployed, the extracted component will reside somewhere in $RHINO_WORK_DIR/deployments. Grant permissions in
the Rhino security policy based on this codeBase and a signedBy rule that refers to the signer for the component jar:
keystore "my.keystore";
grant codeBase "@RHINO_WORK_DIR@/deployments/-"
signedBy "componentSignerOne"
{
permission ..... ;
};
15.5 Key Stores
The Resource Adaptor deployable units installed with Rhino contain component jars which have already been signed. The
public keys of the signers are provided in a keystore located at
$RHINO_HOME/rhino-public.keystore, $RHINO_HOME/rhino-private.keystore; the keystore and the keys have a default
passphrase of “changeit”. The default rhino.policy file grants necessary permissions to the resource adaptors for basic
operation.
To export the public key certificate out from the rhino-private.keystore execute the following command:
keytool -export -storepass insecurity \\
-keystore rhino-private.keystore \\
-alias componentOneSigner \\
| keytool -import \\
-storepass changeit \\
-keystore rhino-public.keystore \\
-alias componentOneSigner \\
-noprompt
It may be necessary to grant additional security permissions to the resource adaptors, depending on the environment they are
deployed in. The most likely additional permission needed will be ‘java.net.SocketPermission’, to connect and accept
connections from hosts other than localhost.
Table 15.1 shows the signer aliases used to sign each resource adaptor:
15.6 Transport Layer Security
Network components communicate securely using a secure socket factory.
Open Cloud Rhino 1.4.3 Administration Manual v1.1
91
Resource Adaptor
J2EE Connector Resource Adaptor
JAIN SIP Resource Adaptor
JCC Resource Adaptor
Web Console
Signer
RhinoJ2EEConnectorRA
RhinoSIPRA
RhinoJCCRA
web-console-lib
Table 15.1: Signer aliases used to sign Resource Adaptors
The server must export its public key to the client and when client authentication is required, the client must also export its
public key to the server.
1. The Java client is started with an environment variable -Drmissl.securesocket=ssl.properties which points to the
ssl.properties file which configures the client and server key stores and trust key stores.
2. The client connects to the server and downloads the client socket connection factory
3. The secure client socket is created and the servers public key is sent to the client
4. The client checks the server public key against the client trust store configured in the properties file
5. Secure communications ensue
15.7 JAAS Configuration
This section describes how to achieve integration with enterprise systems, identity servers, databases and password files
Note: Transport-layer security and the general security of the remote host and server are important considerations when
communicating with third-party servers. Any length of security planning can be foiled by an incumbent with a key.
Authentication is provided by the modules specified in the rhino.jaas file and the LoginContext file is specified as the system
property java.security.auth.login.config. See Java Authentication and Authorization Service (JAAS) Reference Guide
for more information.
-Djava.security.auth.login.config=$RHINO_HOME/etc/defaults/config/rhino.jaas
Rhino contains three JAAS login modules:
1. FileLoginModule
The login credentials and roles are stored in a file.
jaas-context {
com.opencloud.rhino.security.auth.FileLoginModule REQUIRED
file="/home/rhino/config/passwd"
hash="none";
};
By default, passwords are stored in cleartext in the password file. For increased security, a secure one-way hash of the
password can be stored instead. Use the client/bin/rhino-passwd utility to generate hashed passwords which can be copied
into the password file. The file login module needs to be configured by changing the hash="none" option to hash="md5".
2. LDAPLoginModule
The login credentials and roles are stored in an LDAP directory.
jaas-context {
com.opencloud.rhino.security.auth.LdapLoginModule REQUIRED
properties="/home/rhino/config/ldapauth.properties";
};
Open Cloud Rhino 1.4.3 Administration Manual v1.1
92
The file config/ldapauth.properties contains configuration for the LDAP connection, please see the Rhino Javadoc for
com.opencloud.rhino.security.auth.LDAPLoginModule. Here is a sample configuration.
rhino.security.auth.ldap.host=host.domain
rhino.security.auth.ldap.port=389
rhino.security.auth.ldap.binddn=
rhino.security.auth.ldap.bindpw=
rhino.security.auth.ldap.basedn=O=OpenCloud,OU=Research Development
rhino.security.auth.ldap.usetls=true
3. ProfileLoginModule
The login credentials and roles are stored in a SLEE profile table.
jaas-context {
com.opencloud.rhino.security.auth.ProfileLoginModule REQUIRED
profiletable="Users" hash="md5";
};
The ProfileLoginModule works by looking up a profile with a name matching the supplied username in a specified table.
It then compares the supplied password with the password stored in the profile. If the authentication succeeds, it retrieves
the roles for that user from the profile.
The ProfileLoginModule supports the following options:
(a) profiletable - the name of the profile table to use (defaults to "UserLoginProfileTable")
(b) passwordattribute - the profile attribute to compare the password against, attribute type must be java.lang.String
(defaults to "HashedPassword")
(c) rolesattribute - the profile attribute to load the roles from, attribute type must be array of java.lang.String (defaults
to "Roles")
(d) hash - the hashing algorithm to use for the password, may be "none" or "md5" (defaults to "md5")
A profile specification is provided with Rhino that can used to create a profile table for the profile login module. A
profile table named "UserLoginProfileTable" created using the provided profile specification will work with all the default
configuration values listed above.
It is recommended that a file login module be configured as a fallback mechanism in case the profile table is accidentally
deleted/renamed or the the admin user profile is deleted/changed. (It would not be possible to fix the problem with
the profile table since no user would be able to login using a management client.) This can be achieved by giving the
ProfileLoginModule a "SUFFICIENT" flag and the FileLoginModule a "REQUIRED" flag. (See the JAAS Javadoc for
more details about these flags.)
jaas-context {
com.opencloud.rhino.security.auth.ProfileLoginModule SUFFICIENT
profiletable="Users" hash="md5";
com.opencloud.rhino.security.auth.FileLoginModule REQUIRED
file="/home/rhino/config/passwd" hash="none";
};
Open Cloud Rhino 1.4.3 Administration Manual v1.1
93
Chapter 16
Performance Tuning
16.1 Introduction
The Rhino SLEE will excel to production performance and stability requirements when it is configured, monitored and tuned
correctly. The following sections demonstrate administration strategies and configurations of Rhino SLEE which will provide
fault tolerance and high availability behaviour.
For documentation of the statistics features of Rhino SLEE please refer to Chapter 8.
16.2 Staging Configuration
Staging refers to the micro management of work within the Rhino SLEE. The work is divided up into “Items” and executed by
"Workers".
Each worker is represented by a system level thread. The number of threads available to process the items on the stage can be
configured to minimise the latency, and henceforth increase the performance capacity of the Rhino SLEE.
Rhino performs event delivery on a pool of threads called “Staging Threads”. The staging thread system operates a queue for
units of work to be performed by Rhino, called "stage items". Typically, these units of work involve the delivery of SLEE events
to SBBs. When a “stage item” enters staging it is placed in a processing queue and removed by the first available staging thread
which will then perform the work associated with that “stage item”.
The amount of time an event processing stage item spends in the staging queue before being processed by a stage worker
contributes to the overall latency in handling the event. Because of this, it is important to make sure that the staging threads
are being used optimally. There are a number of tunable parameters in the staging system that can be altered to improve
performance:
Parameter
maximum-size
thread-count
maximum-age
local-enabled
local-maximum-size
Description
The maximum size of the staging queue.
The number of staging threads in the thread pool.
The maximum age of a staging item, in milliseconds.
Stage items that stay in the staging queue for longer than maximum-age are
automatically failed by the staging thread.
Enable thread local staging (see below).
Maximum size for staging threads local stage queues.
Table 16.1: Staging system tunable parameters
94
16.2.1
Configuration
Configure the following parameters for staging configuration using the Web Console, or by editing and updating the staging
configuration XML using the Command Console.
1. local-enabled
2. local-maximum-size
3. maximum-age
4. maximum-size
5. threadcount
16.2.2
Stage Tuning
You can observe the effects of the configuration changes in the Statistics Client by simulating heavy concurrency using a load
simulator.
For more information regarding statistics please refer to Chapter 8
16.2.3
Tuning Recommendations
The maximum size of the staging queue determines how many stage items may be queued awaiting processing. When the
queues maximum size is reached the oldest item in the queue is automatically failed and removed to accommodate new items.
The default value of 3000 is suitable for most scenarios. It is recommended to set the maximum size to be high enough that the
SLEE can ride out short bursts of peak traffic, but not so large that under extreme overload stage items are allowed to wait in
the queue for too long before being properly failed.
The thread-count parameter determines the number of staging threads that will service the staging queue. This parameter
has the greatest impact on overall latency of all the staging parameters and careful attention should be given to tuning the
thread-count in order to achieve optimal performance. Again, is has been found the default value of 30 to be useful for many
applications on a wide range of hardware, however for some applications, or when using hardware with 4 or more CPU’s it may
be beneficial to increase the number of staging threads.
In particular when the SLEE is running services that perform high latency blocking requests to an external system it will often
be necessary to increase the number of staging threads.
Consider for example a credit check application that will only allow a call setup to continue after performing a synchronous call
to an external system. If a credit check takes on average 150ms this means the staging thread processing the call setup event will
be blocked and unable to process other events for 150ms. With the default configuration of 30 staging threads such a system
would be able to handle an input rate of approximately 200 events/second. Above this rate the stage worker threads will not
be able to service event processing stage items fast enough and stage items will begin to backup in staging queues, eventually
causing some calls to be dropped. In this example the problem is easily solved by configuring additional staging threads.
In real world applications it is seldom a matter of applying a simple formula to work out the optimal number of staging threads,
it is recommended to use performance monitoring tools to examine the behaviour of staging alongside such metrics as event
processing time and system CPU usage to find a suitable value for this parameter.
The maximum-age setting determines the maximum time an item of work can remain in the staging queue and still be considered valid for processing upon removal. Tuning of this parameter (along with maximum-size) is useful for determining your
application’s behaviour under overload conditions.
The local-enabled, local-initial-size and local-maximum-size parameters are useful for reducing latency and, to a
lesser extent, CPU usage in some applications by controlling thread affinity for related items of work. These parameters become
useful when an event processing stage item is submitted to staging by a staging thread. This would happen for example if SBB
event handler code being executed on a particular staging thread fires an event using an SBB fireXXEvent() method and the
transaction commits.
With local staging queues disabled the stage item for the fired event will enter the staging queue just like any other event.
Open Cloud Rhino 1.4.3 Administration Manual v1.1
95
With local staging queues enabled the new stage item will be processed immediately by the thread that created it upon termination of the transaction that fired the event.
This reduces context switching which will often result in reduced latency. The local-enabled settings should be considered
advanced settings and should only be used after other performance related parameters have been tried. Many applications will
not benefit at all from enabling this option.
16.3 Object Pool Configuration
The Rhino SLEE uses groups of object pools to sequence access to SBBs and Profile Tables, throughout the life-cycle of an
object it may move from one pool to another.
Although the defaults are suitable for the majority of cases the size/depth of these pools can be configured by the administrator
to increase the performance of the Service.
Note: Object pool configuration is territory for an expert level administrator. It is assumed that the administrator knows the pool
types available to the SLEE and how these relate to the life-cycle of an SBB. For more information about the SBB Life-cycle
please refer to the JAIN SLEE 1.0 specification, JSR 22.
16.3.1
Initial Pool Population
Initial pool population is only used by SBB object pools. The Profile Table object pools can be configured with an initial pool
population however it will have no noticeable impact on performance.
When an event is processed an SBB object is required to process it. This SBB object is taken from a pool of objects in the
correct state. If this pool is empty a new SBB object needs to be created and initialised. The initialisation of the SBB object
may take some time, particularly if the setSbbContext() method on the object performs a lengthy initialisation (such as parsing
large XML files or similar). This results in the event taking an unusual amount of time to process, perhaps to the extent that it
is dropped altogether. Normally this only is an issue on receiving the first cluster of events after service activation.
To reduce the impact of SBB object initialisation it is possible to pre-populate the pool with initialised SBB objects. This
pre-population is done at service activation or SLEE startup time. By default Rhino SLEE pre-populates each service’s pool
with 50 initialised SBB objects. This value can be adjusted using the management interface as described in 16.3.2.
16.3.2
Configuring the Object Pools
With the exception of the initial pooled pool size attribute these values should not be altered by the system administrator,
except to tune for a specific issue or under the instruction of a Open Cloud engineer.
There are five types of object pool configuration MBean:
• Application Pool Config MBean: Configures the pool sizes for the Rhino SLEE application.
• Default Profile Table Pool Config MBean: The default values for newly created profile tables.
• Default Service Pool Config MBean: The default values for newly created services.
• Custom Profile Table Pool Config MBean: The values for a specific profile table application.
• Custom Service Pool Config MBean: The values for a specific service and its SBBs.
There are six attributes that may be present on an object pool configuration MBean:
• pooled pool size: The maximum number of objects to hold in the pooled pool.
• initial pooled pool size: The initial number of objects to place in the pooled pool.
• state pool size: The maximum number of objects to hold in the state pool.
• ready pool size: The maximum number of objects to hold in the ready pool.
Open Cloud Rhino 1.4.3 Administration Manual v1.1
96
• stale pool size: The maximum number of objects to hold in the stale pool.
• use defaults: For custom pool config MBeans only; use values from default pool config MBean of the appropriate
type or to use the values in this MBean.
The object pool configuration can be accessed from the Container Configuration section of the Rhino web console under
View ObjectPool MBean in Figure 9.1.
Figure 16.1: Object Pool Configuration
The custom service pool configuration for a particular service can be accessed by selecting the correct service from the drop
down box to the right of the getServicePoolConfigMBean operation and clicking on getServicePoolConfigMBean.
Figure 16.2: Service Object Pool Configuration for the Sip Registrar Service
16.4 Fault Tolerance
16.4.1
Introduction
As Rhino is a carrier grade application server it provides several options for enabling Fault Tolerance and High Availability.
Two types of fault tolerance are supported, and can be combined to work together, or used separately: Service-based fault
tolerance and Resource Adaptor-based fault tolerance (also called activity fault tolerance because it applies to activities created
Open Cloud Rhino 1.4.3 Administration Manual v1.1
97
by fault tolerant Resource Adaptors). Because of the clustering infrastructure and the single management image, this allows
even applications configured without fault tolerance to offer high availability.
Fault Tolerance means that in the event of a failure.
1. The SLEE is continuously available for management operations.
2. Each deployed service is continuously available.
3. Each services’ session is continuously available
4. A proportion (>95%) of sessions residing on a failed cluster member will be failed-over to another cluster member.
For example "phone calls" being processed by that cluster member will be able to be processed on another cluster member.
With fault tolerant Services, SBB entities and their state are replicated across all nodes in the cluster using a replicated version
of the main working memory. If a cluster node fails or a network segmentation occurs, the replicated SBB state is still visible
to other nodes. With fault tolerant Resource Adaptors, all activities created by a fault tolerant RA are replicated to other
nodes in the cluster. If the activity creating node fails another cluster member will be able to ‘adopt’ the activity and assume
responsibility for processing events it produces.
High Availability means that in the event of a failure:
1. The SLEE is continuously available for management operations.
2. Each deployed services is continuously available.
3. Each services’ session is not continuously available.
4. Any session being executed on a cluster member which fails will be destroyed.
For example “phone calls” being processed by that cluster member will fail.
With “high availability”, state is not replicated across cluster nodes, so if a node failure or network segmentation occurs some
activities will be lost, however the application will continue running and still be available on other nodes.
16.4.2
Fault Tolerant Services
In Rhino the persistent state of applications managed by the container is stored in the main working memory. This state includes
SBB entity state, activity context naming bindings and SLEE timers. With a fault tolerant service, Rhino uses a replicating
version of the main working memory (called MemDB). The primary difference between a fault tolerant and a non-fault tolerant
service is replication of state - when a non-fault tolerant service is deployed a non-replicating version of the main working
memory is used (called MemDB-Local). With replicating main working memory, committed changes to an applications state
are visible to other nodes in the cluster, allowing the application to continue operating after a cluster member fails.
When a service is deployed Rhino examines the (optional) oc-service.xml deployment descriptor for extended service properties. One of the supported service properties, replicated is a flag which determines whether that services state should be
replicated. If no value is specified Rhino assumes the default value of False. The example oc-service.xml below shows a
configuration for a fault tolerant service.
<?xml version="1.0"?>
<!DOCTYPE oc-service-xml PUBLIC
"-//Open Cloud Ltd.//DTD JAIN SLEE Service Extension 1.0//EN"
"http://www.opencloud.com/dtd/oc-service-xml_1_0.dtd">
<oc-service-xml>
<service id="pingservice">
<service-properties replicated="True"/>
</service>
</oc-service-xml>
The default for services in Rhino is if a service is deployed without the replicated flag set to true then its state will not be
replicated and it will not be fault tolerant.
Open Cloud Rhino 1.4.3 Administration Manual v1.1
98
16.4.3
Fault Tolerant Resource Adaptors
When a fault tolerant Resource Adaptor is activated in Rhino, all activities it creates and their associated state are replicated to
all cluster members. This means that if a cluster node fails, the surviving nodes are able to reassign the activities that the failed
node was responsible for. To configure replication of activities for a Resource Adaptor, the replicate-activities attribute
should be set in the Resource Adaptor’s oc-resource-adaptor-jar.xml deployment descriptor:
<?xml version="1.0" encoding="ISO-8859-1"?>
<!DOCTYPE oc-resource-adaptor-jar PUBLIC
"-//Open Cloud Ltd.//DTD JAIN SLEE Resource Adaptor Extension 1.0//EN"
"http://www.opencloud.com/dtd/oc-resource-adaptor-jar_1_0.dtd">
<oc-resource-adaptor-jar>
<resource-adaptor id="SimpleRA">
<resource-adaptor-classes>
<resource-adaptor-class>
<resource-adaptor-class-name>
com.opencloud.slee.resources.simple.SimpleResourceAdapter
</resource-adaptor-class-name>
</resource-adaptor-class>
</resource-adaptor-classes>
<ra-properties replicate-activities="True"/>
</resource-adaptor>
</oc-resource-adaptor-jar>
16.4.4
Fault Tolerance and High Availability
Replication of SBB state via a replicated MemDB and replication of activity state both carry some performance penalties along
with the benefits of fault tolerance. Because the decision to use activity replication is application dependent, Rhino allows
this to be configured on a per service and per resource adaptor level. It is also permissible to have a mix of replicated (Fault
Tolerant) and non-replicated (Highly Available) resource adaptors and services.
For more information on configuring application using extension deployment descriptors please refer to Section18.5 in Chapter
18.
Open Cloud Rhino 1.4.3 Administration Manual v1.1
99
Chapter 17
Clustering
17.1 Introduction
This chapter defines the terms and concepts used when clustering Rhino SLEE and describes several typical configurations.
Various scenarios within the cluster such as bootstrap, failure and recovery are explained within the context of the typical
clustered installation.
The Rhino SLEE is a distributed system in that it runs across multiple computers connected via an IP network. A Rhino SLEE
cluster is managed as a single system image and is an N-way active cluster architecture as opposed to an active-standby design.
17.2 Concepts and terms
Rhino SLEE uses a number of terms and concepts to describe its clustering features. Each of the terms is described and the
relationship between the terms is shown within the context of a typical installation.
17.2.1
Cluster Node
Each cluster node is a separate process with a unique identifier termed the node ID. There may be several nodes on the same
machine. It is typical in a Network Critical Physical Infrastructure model that each node is installed on a single host computer.
Each node is able to execute management commands, execute SBBs, and host Resource Adaptors and Profiles.
17.2.2
Quorum Node
A quorum node is a lightweight cluster node which only exists for determining cluster membership in the event of network
segmentation or node failures. It does not perform any event processing, cannot host resource adaptors, and cannot be the target
of management operations. In effect, it cannot perform any work.
17.2.3
Cluster
A cluster is a collection of nodes. Each cluster has a unique identifier termed the cluster ID. Each node can be a member of
one cluster only. The set of nodes in a cluster are discovered at runtime and does not need to be configured a priori. The set of
nodes can expand and contract over time without taking the cluster offline.
17.2.4
Cluster Membership
Cluster membership is defined as the set of nodes that the cluster membership algorithm decides are reachable within a timeout
period.
100
17.2.5
Typical Installation
The typical installation for Rhino SLEE is a 3 machine cluster, with one node running on each machine. This configuration is
show in figure 17.1. Open Cloud Rhino SLEE clustering concepts are explained within the context of this typical configuration.
Clust er [1,2,3]
Machine A
Machine B
Machine C
Rhino node 1
Rhino node 2
Rhino node 3
Figure 17.1: A typical configuration, nodes 1 2 and 3 are cluster members.
17.2.6
Primary Component
The Rhino SLEE defines the term primary component as the set of nodes that are aware of the authoritative membership of
the cluster. As nodes fail, or become disconnected from the rest of the cluster, they will leave the primary component. Nodes
leaving the primary component self-terminate and require restarting before they can rejoin the cluster.
The primary component is a superset of the nodes capable of performing work, but also contains quorum nodes, and nodes
which are currently synchronizing state with already running members of the cluster.
Figure 17.1 shows nodes 1, 2 and 3 as members of the primary component.
17.2.7
Tie Breaking
In a cluster with an even number of nodes, it is possible that a network segmentation could result in two evenly sized clusters
forming (e.g. a four node cluster splitting into two fragments of two). In this scenario, the cluster half which contains the lowest
node ID is used to determine which of the cluster halves continues to be the primary component.
This means that in a two node cluster, if the lowest ID node fails, then both cluster members will become non-primary (and
terminate as a result).
17.2.8
Shutdown and Restart
In the event of a complete cluster failure (e.g. powercut), a mechanism is needed to determine which nodes should form the
primary component when restarting. This is accomplished by writing out the cluster state during normal operation, and using
this information on restart to determine the primary component.
When the nodes of a shutdown cluster are restarting, they will form a non-primary component. Once this non-primary component contains enough members that it should have been primary in the pre-shutdown cluster configuration, the non-primary
component will become primary.
17.3 Scenarios
Many different clustered installations of Rhino SLEE are possible. Common scenarios are described in this section.
Open Cloud Rhino 1.4.3 Administration Manual v1.1
101
17.3.1
Node Failure
Node failure is defined as a node exiting the process, or the machine that the process runs on dying (possibly due to power
failure etc). The following steps are performed after a node failure:
• The cluster detects that the node has not been active1 and votes for new cluster membership.
• The new membership is decided and the new primary component is formed.
• Any FT activities being processed on that node are failed over to another node.
Figure 17.2 shows the cluster configuration after the failure of node 1. The primary component has a membership of nodes 2
and 3.
Clust er [2,3]
Machine A
Machine B
Machine C
Rhino node 1
Rhino node 2
Rhino node 3
Figure 17.2: Node one has failed
17.3.2
Node Restart
A node booting and joining a cluster is the same as a failed node restarting. Figure 17.3 shows a two stage process for a node
re-starting. Initially the node boots and forms a non-primary cluster component with membership of itself.
The node becomes a member of the primary component and synchronizes working memory with the primary component. The
node can only perform work once it is a member of the primary component and has synchronized state with the rest of the
cluster.
17.3.3
Network Failure
In a distributed system, the connection between different computers can fail. Two possible examples of this include (but are not
limited to) the physical network cable being cut or the network interface card failing. Figure 17.4 shows two stages that occur
in a network failure.
The first stage is shown in the top portion of the diagram and shows that two different components are formed one is a nonprimary component that has a membership of node 1 the other is the primary component that has membership of nodes 2 and
3.
Once a node has transitioned from a primary component to a non-primary it logs an error message, ensures that outstanding
transactions will not commit, and finally terminates.
17.4 Configuration Parameters
Rhino SLEE clustering software can be configured for various purposes. The default configuration should be suitable for the
majority of environments.
1 The
cluster detects the node has aborted by properties defined in the file $RHINO_NODE_HOME/config/savanna/settings-cluster.xml.
Open Cloud Rhino 1.4.3 Administration Manual v1.1
102
Clust er [1]
Clust er [2,3]
Machine A
Machine B
Machine C
Rhino node 1
Rhino node 2
Rhino node 3
Clust er [1,2,3]
Machine A
Machine B
Machine C
Rhino node 1
Rhino node 2
Rhino node 3
Figure 17.3: Node one starting or rejoining a cluster. This is a two stage process.
Clust er [1]
Clust er [2,3]
Machine A
Machine B
Machine C
Rhino node 1
Rhino node 2
Rhino node 3
Clust er [2,3]
Machine A
Machine B
Machine C
Rhino node 2
Rhino node 3
Figure 17.4: The network has segmented causing two network components.
Open Cloud Rhino 1.4.3 Administration Manual v1.1
103
Chapter 18
Application Environment
18.1 Introduction
In this chapter we;
• Describe the function and configuration of MemDB the Rhino SLEE volatile memory database.
• Define optimisation hints, configured to manage the state of application components.
• Discuss features which support very durable and long-life applications.
The JAIN SLEE 1.0 specification defines that SBB components execute within a transaction for all event handling work. Such
a transacted programming model enables application components to be reasonably simple, whilst allowing JAIN SLEE servers
to provide features such as high availability, multi-threading, load sharing and so forth. Transactions can be supported by a
JAIN SLEE implementation through the use of a number of techniques.
For more information to the transaction processing concepts relevant in this chapter please refer to Appendix D.
18.2 Main Working Memory
MemDB is the volatile memory database used to hold the Rhino SLEE main working memory which consists of the run-time
state and the working configuration.
MemDB is designed for high performance and low latency, and is integrated with the Rhino SLEE platform carrier grade
architecture. MemDB supports several replication and concurrency control techniques. This section discusses the replication
and concurrency techniques.
MemDB provides an N-way active clustering architecture and is able to survive multiple point failures, including network
segmentation.
For more information on availability clustering please refer to Chapter 17
18.2.1
Replication Models
MemDB supports several replication models. Each model is intended to meet different application requirements. There is
specific terminology used when describing the Rhino SLEE support for replication. These are as follows:
• Synchronous Replication: before a transaction commits the results of the operations of the transaction are saved into a
durable form.
• Asynchronous Replication: some time after a transaction commits the results of the operations of the transaction are
saved into a durable form.
• Re-synchronization: the process of updating a new cluster member with the state of the cluster.
104
Synchronous Memory-to-Memory Replication
When MemDB operates in this mode all replicas are consistent for every transaction.
As part of the transaction commit process all replicas (including the originating node) apply the commit. When a transaction
rolls back, none of the replicas apply the commit. The advantage of this approach is that there is never a window of time where
different replicas are out of sync. This mode allows Rhino to run an N-way active clustering architecture.
When MemDB operates in this mode re-synchronization is started when a new node enters the cluster. The new node will
receive a copy of the MemDB state, and once the copy process has completed it will participate in subsequent transactions.
The state of a MemDB running in this mode will survive the failure of N nodes provided that the cluster remains in the primary
component. The MemDB state is only lost if the cluster transitions from the primary component to the non-primary component,
or if the entire cluster fails (for example the power supply to the cluster fails).
Asynchronous SQL Replication
When MemDB operates in this mode all replicas are consistent for every transaction, and a disk based SQL database is kept
in-sync with the state of MemDB by asynchronous replication.
As part of the transaction commit process all replicas (including the originating node) apply the commit, and an update of
the SQL database is scheduled. When a transaction rolls back, none of the replicas apply the commit. The advantage of this
approach is that there is never a window of time where different replicas are out of sync, and that if all memory copies are lost
(for example the entire cluster loses power) a disk-based copy of the state is available. This mode allows Rhino to run an N-way
active clustering architecture.
There are two re-synchronization approaches used with this mode. The first applies when other cluster members are members
of the primary components. The first approach is as follows: re-synchronization is started when a new node enters the Rhino
cluster. The new node will receive a copy of the MemDB state, and once the copy process has completed it will participate in
subsequent transactions.
When there are no cluster members that have an up-to-date copy of the MemDB state (for example the cluster is restarted after
a complete power failure) and a node boots it will read the state stored in the SQL database and synchronise the MemDB state
with the SQL database state.
The state of a MemDB running in this mode will survive the failure of N nodes regardless of whether or not the cluster remains
in the primary component. The MemDB state is lost if the on-disk copy is lost (for example the disks fail) and either the cluster
transitions non-primary or all cluster nodes fail (for example due to cluster power failure).
No Replication
MemDB supports a mode of operation that does not perform any replication. This mode has the highest performance of the
MemDB modes as it does not need to perform replication. In this mode each Rhino node has a separate view of the state in the
MemDB. The failure of a node means that the state stored in that MemDB is lost.
This mode is appropriate for applications or application components that do not require replication. Applications that fall into
this category typically do not require a particular activity to be continued on other nodes after a failure.
18.2.2
Concurrency Control
All MemDB replication models support both the optimistic and pessimistic concurrency control.
When using pessimistic access and a replicated MemDB, MemDB will acquire a distributed lock the first time an addressable
element of state is accessed in a transaction. Addressable units of state include an SBB entity, an Activity Context attribute, or
a Profile Table Entry.
In a MemDB using a replicated mode, optimistic concurrency control exhibits slightly lower latency than pessimistic concurrency control due to the fact it does not have to acquire distributed locks.
MemDB includes deadlock detection so that deadlocked transactions are detected and rolled-back.
A single MemDB supports both optimistic and pessimistic components in a single transaction. In such a case if optimistic
concurrency control conflicts are detected in the prepare phase the transaction is rolled-back. Transactions will also roll-back if
Open Cloud Rhino 1.4.3 Administration Manual v1.1
105
a deadlock is detected during lock acquisition.
18.2.3
Multiple Transactions
Multiple MemDB instances can be used in a single transaction, as MemDB supports a two-phase commit protocol. A common
scenario exists in the default Rhino SLEE configuration where an SBB receives an event and queries a Profile. In this example
the SBB is stored in one MemDB, and the Profile is stored in another.
18.3 Application Configuration
18.3.1
Replication
The default configuration of Rhino has two MemDBs. The first MemDB uses Synchronous Memory-to-Memory replication
and is used by SBBs, and Activity Context attributes. The second MemDB uses Synchronous Memory-to-Memory replication
with Asynchronous SQL replication and is used by Profiles.
18.3.2
Concurrency Control
As seen in Section 18.2 there are several possible combinations for configuring concurrency control within MemDB. SBBs are
able to be configured to use different concurrency control techniques.
The default concurrency configuration for SBB entities uses an entity-tree lock, and sets every SBB to optimistic. Before any
transaction delivers an event to an SBB in the SBB entity tree, it acquires the entity-tree lock. This model forces serial access to
the SBB entity tree, which means that deadlocks within an entity-tree are not possible. It also has a fixed lock acquisition cost
per event delivery.
Different SBB entity-trees are able to run concurrently as there is one lock per tree.
A concurrency configuration other than the default can be specified using Rhino’s extension deployment descriptors which are
discussed in Section 18.5. If a developer configures concurrency options other than the default it is expected that the developer
understands when various code paths in the SBB entity tree execute and has understood Rhino’s concurrency controls.
Profiles use optimistic concurrency control, and their concurrency control is not configurable. Profiles are read-only from SBBs
and therefore concurrency control conflicts are unlikely.
18.4 Multiple Resource Managers
Rhino SLEE supports the use of multiple Resource Managers the same transaction. For example consider the case that an SBB
is deployed that has its state in MemDB, and executes an SQL statement against a third party database. The third party database
and MemDB are now participants in the same transaction.
External Resource Managers are treated as though they do not support two-phase commit. In order to allow this (common) case
to proceed, Rhino uses the well-known Last Resource Commit optimisation to manage the transaction across the two-phase
Resource (MemDB) and the external Resource Manager. For more information on this approach please see Section D.4.3 in
Appendix D.
This means that the external database will be told to commit a transaction only after the successful preparation of all two-phase
resources. If the third party database fails to commit the transaction, it will rollback MemDB. If the third party database commit
succeeds the main working memory will commit.
18.5 Extension Deployment Descriptors
SBB developers and SLEE administrators can configure the deployment of SBBs in addition to JAIN SLEE 1.0 specification
by supplying an Open Cloud Rhino SLEE deployment descriptor in the SBB deployable unit. This extra deployment descriptor
is called an extension deployment descriptor.
Open Cloud Rhino 1.4.3 Administration Manual v1.1
106
The extension deployment descriptor mechanism allows a number of run-time properties of the SBB to be configured. It is
important to note that it does not include additional API requirements or constraints; therefore an SBB that uses the extension
deployment descriptor is still portable across compliant SLEE implementations.
18.5.1
Service Extension Deployment Descriptor
The Service Extension Deployment Descriptor allows changes from the default locking strategy. The default concurrency
control is described in Section 18.3.2. The DTD for the Extension Deployment Descriptor for Services is shown below.
<?xml version="1.0" encoding="ISO-8859-1"?>
<!-Use doc-type:
<!DOCTYPE oc-service-xml PUBLIC
"-//Open Cloud Ltd.//DTD JAIN SLEE Service Extension 1.0//EN"
"http://www.opencloud.com/dtd/oc-service-xml_1_0.dtd">
The file META-INF/oc-service.xml must be included in the deployable unit jar
file if defined. Note that since only one of these extension deployment
descriptors can be included in the deployable unit, only one service XML
file should also be included, otherwise deployment errors will result when
Rhino attempts to merge the deployment descriptors using the service ID tags.
-->
<!ELEMENT oc-service-xml (description?, service*)>
<!ELEMENT description (#PCDATA)>
<!ELEMENT service (description?, service-properties?)>
<!ELEMENT service-properties EMPTY>
<!ATTLIST service id ID #REQUIRED>
<!ATTLIST service-properties entity-tree-lock-disabled (True|False) "False">
18.5.2
SBB Extension Deployment Descriptor
The Extension Deployment Descriptor for SBBs allows the default locking strategy for SBBs to be changed. This default is
described in Section 18.3.2. The DTD for the Extension Deployment Descriptor for SBBs is shown below.
<?xml version="1.0" encoding="ISO-8859-1"?>
<!-Use doc-type:
<!DOCTYPE oc-sbb-jar PUBLIC
"-//Open Cloud Ltd.//DTD JAIN SLEE SBB Extension 1.0//EN"
"http://www.opencloud.com/dtd/oc-sbb-jar_1_0.dtd">
-->
<!ELEMENT oc-sbb-jar (description?, sbb*, security-permission*)>
Open Cloud Rhino 1.4.3 Administration Manual v1.1
107
<!ELEMENT description (#PCDATA)>
<!ELEMENT sbb (description?, lock-strategy?, attachment-lock-strategy?,
resource-ref*)>
<!-The lock-strategy element specifies the locking strategy for the SBB EJB.
It specifies either pessimistic or optimistic. If not specified, it defaults
to optimistic.
Example:
<lock-strategy>pessimistic</lock-strategy>
-->
<!ELEMENT lock-strategy (#PCDATA)>
<!-The attachment-lock-strategy element specifies the locking strategy for the EJBs
used to represent an SBB’s attachment to activity contexts. It specifies either
pessimistic or optimistic.
If not specified, it defaults to the locking
strategy of the SBB EJB as specified by the lock-strategy element.
Example:
<attachment-lock-strategy>pessimistic</lock-strategy>
-->
<!ELEMENT attachment-lock-strategy (#PCDATA)>
<!--
Taken from http://java.sun.com/dtd/ejb-jar_2_0.dtd
The resource-ref element contains a declaration of an enterprise bean’s
reference to an external resource. It consists of an optional
description, the resource manager connection factory reference name,
the indication of the resource manager connection factory type
expected by the enterprise bean code, the type of authentication
(Application or Container), and an optional specification of the
shareability of connections obtained from the resource (Shareable or
Unshareable).
Example:
<resource-ref>
<res-ref-name>jdbc/EmployeeAppDB</res-ref-name>
<res-type>javax.sql.DataSource</res-type>
<res-auth>Container</res-auth>
<res-sharing-scope>Shareable</res-sharing-scope>
</resource-ref>
-->
<!ELEMENT resource-ref (description?, res-ref-name, res-type, res-auth, res-sharing-scope?, res-jndi
-name)>
<!-The res-ref-name element specifies the name of a resource manager
connection factory reference. The name is a JNDI name relative to the
java:comp/env context. The name must be unique within an enterprise bean.
Used in: resource-ref
-->
<!ELEMENT res-ref-name (#PCDATA)>
Open Cloud Rhino 1.4.3 Administration Manual v1.1
108
<!-The res-type element specifies the type of the data source. The type
is specified by the fully qualified Java language class or interface
expected to be implemented by the data source.
Used in: resource-ref
-->
<!ELEMENT res-type (#PCDATA)>
<!-The res-auth element specifies whether the enterprise bean code signs
on programmatically to the resource manager, or whether the Container
will sign on to the resource manager on behalf of the enterprise bean. In the
latter case, the Container uses information that is supplied by the
Deployer.
The value of this element must be one of the two following:
<res-auth>Application</res-auth>
<res-auth>Container</res-auth>
Used in: resource-ref
-->
<!ELEMENT res-auth (#PCDATA)>
<!-The res-sharing-scope element specifies whether connections obtained
through the given resource manager connection factory reference can be
shared. The value of this element, if specified, must be one of the
two following:
<res-sharing-scope>Shareable</res-sharing-scope>
<res-sharing-scope>Unshareable</res-sharing-scope>
The default value is Shareable.
Used in: resource-ref
-->
<!ELEMENT res-sharing-scope (#PCDATA)>
<!-The res-jndi-name element specifies the location in JNDI where the resource has
been bound by the container. This is relative to "java:resource/".
-->
<!ELEMENT res-jndi-name (#PCDATA)>
<!ELEMENT security-permission (description?, security-permission-spec)>
<!-The security-permission element specifies a security permission based
on the security policy file syntax. Refer to the following URL for
definition of Sun’s security policy file syntax:
http://java.sun.com/j2se/1.3/docs/guide/security/PolicyFiles.html#FileSyntax
Used in: security-permission
The security permissions specified here are granted to classes loaded from
Open Cloud Rhino 1.4.3 Administration Manual v1.1
109
the resource adaptor component jar file only. They are not granted to classes
loaded from any other dependent jars required by resource adaptors defined in
the resource adaptor component jar’s deployment descriptor, nor to any
dependent library jars used by the same.
Example:
<security-permission-spec>
grant {
permission java.lang.RuntimePermission "modifyThreadGroup";
};
</security-permission-spec>
-->
<!ELEMENT security-permission-spec (#PCDATA)>
<!ATTLIST sbb id ID #REQUIRED>
18.5.3
Packaging Extension Deployment Descriptors
Services
The Extension Deployment Descriptor for Services must be placed in the META-INF directory of the deployable unit jar.
The id attribute is used to link the Service with the Extension Deployment descriptor. An example of the Service Deployment
Descriptor and Extension Deployment Descriptor is shown in Section 18.5.4.
SBBs
The extension Deployment Descriptor for SBBs must be placed in the META-INF directory contained within the SBB jar file.
The filename must be oc-sbb-jar.xml.
The id attribute is used to link the SBB with the Extension Deployment descriptor. An example of the SBB Deployment
Descriptor and Extension Deployment Descriptor is shown in Section 18.5.4.
18.5.4
Example
Service
Assume a Service Deployment Descriptor has declared a service with an id attribute set to my_service. The Service Extension
Deployment descriptor to turn off the default entity-tree-lock behaviour is as follows.
<!DOCTYPE oc-service-xml PUBLIC
"-//Open Cloud Ltd.//DTD JAIN SLEE Service Extension 1.0//EN"
"http://www.opencloud.com/dtd/oc-service-xml_1_0.dtd">
<oc-service-xml>
<service id="my_service">
<description>
Disable entity tree lock for my_service
</description>
<service-properties entity-tree-lock-disabled="True" />
</service>
</oc-service-xml>
Open Cloud Rhino 1.4.3 Administration Manual v1.1
110
SBB
This example shows fragments of the JAIN SLEE 1.0 specification defined SBB deployment descriptor, and a corresponding
extension DD that informs Rhino that the SBB should use optimistic concurrency control.
SBB deployment descriptor fragment:
<sbb-jar>
<sbb id="TestSBB">
<description>Test SBB to show use of extension DD mechanism</description>
...
</sbb>
</sbb-jar>
SBB Extension deployment descriptor fragment:
<oc-sbb-jar>
<sbb id="TestSBB">
<lock-strategy>optimistic</lock-strategy>
...
</sbb>
</oc-sbb-jar>
18.6 Application Fail-Over
The JAIN SLEE programming model and the Rhino implementation of JAIN SLEE include some important robustness features
that should be considered by a developer when writing applications that will be in deployment for a long period of time.
One of the most important resources to manage when programming long running applications is memory. The JAIN SLEE
programming model alleviates a lot of the burden of memory management from the application developer by requiring the
SLEE implementation to manage the lifecycles of SBB entities and their state.
18.6.1
Programming Model
The JAIN SLEE programming model understands the relationship between an event producer and an event consumer. For
example consider that an SBB entity is an event consumer and an Activity is the event producer. If the SBB entity is not
attached to any ActivityContext then it will be deleted. Likewise if the ActivityContext ends then the SBB entities that are
attached to it are detached, in which case some SBB entities will not attached to any ActivityContext.
This model causes the following types of questions to be asked: What happens if the system is overloaded and cannot process
the activity as being ended? What happens if a Rhino node fails and the state of the SBB entity is replicated – will this leak
MemDB state?
The reason why Rhino SLEE will not run out of memory resource in either of these cases is that each Activity Rhino knows
of is periodically queried after it has been idle for a period of time. The RA is asked if the Activity has finished. The RA
understands the meaning of an activity and can end the activity if it has finished. This will cause the above deletion process to
occur thereby ensuring that resource is not leaked.
This process is explained using the following example for the SIP protocol.
Example
A developer writes an SBB that is interested in certain events (e.g. SIP events such as an INVITE and a BYE message). Assume
that the call progresses and a BYE is not received (either it was not sent by the SIP client, or the network between the SIP client
and Rhino was cut, or there could have been a 4xx message or a CANCEL message). If the SBB entity was not deleted by the
SLEE, then there would be a resource leak.
In the case of SIP all SIP messages are delivered on a SIP transaction activity. The SIP RA understands the SIP protocol and
Open Cloud Rhino 1.4.3 Administration Manual v1.1
111
therefore knows that SIP transactions time out after a certain period of time. When Rhino queries the RA it will tell Rhino to
end the activity corresponding to the outstanding SIP transaction. Rhino will then end the activity according to the JAIN SLEE
specification which will detach the SBB and delete it. It should be noted that this approach means that if Rhino discards the
event due to lack of CPU resource to process the event that eventually the RA will be queried again.
It is also possible to use the JAIN SLEE timer facility to set timers that will delete the SBB when they fire. Please note that the
use of such defensive timers is very rare and likely the application can be designed such that it will not need to set defensive
timers.
18.6.2
Management Interface
If for some reason SBB entities or ActivityContext objects which are allocated are not being reclaimed the cause is likely to be
bug in the deployed application (e.g. inside a Service or Resource Adaptor).
It is possible to manually delete them using the management interface. For details of this interface please refer to Section 6.1 in
Chapter 6.
Open Cloud Rhino 1.4.3 Administration Manual v1.1
112
Chapter 19
Database Connectivity
19.1 Introduction
This chapter discusses Rhino SLEE configuration, and recommendations for programming applications which connect to an
external SQL database.
Rhino SLEE can connect to any external database which has support for JDBC 2.0 and JDBC 2.0’s standard extensions1 .
Application components such as Resource Adaptors and Service Building Blocks may execute SQL statements against the
external database.
A systems administrator can configure new JDBC datasources for use by the SBBs or resource adaptors. The Rhino SLEE must
be offline mode when configuring an external Database source.
Note: The PostgreSQL database which is used to persist the main working memory is separately configured than applications which use an external database as an application resource. For more information regarding main working memory
please refer to Section 4.2.10 in Chapter 4.
For more information regarding installing PostgreSQL please refer to Chapter 21.
19.2 Configuration
External database sources are added to the database manager by configuring the file $RHINO_HOME/etc/defaults/config/
rhino-config.xml.
The <ejb-resources> element must have at least one<jdbc> elements present.
Each <jdbc> element contains a mandatory <jndi-name> element. The <jndi-name> element identifies the JNDI name
that the database will be bound into the JNDI tree. for example the location java:resource/jdbc/<jndi-name>
The JNDI location is not accessible to SBBs directly. Each SBB is link to this JNDI name in the SBB deployment
descriptor. For more information on SBB deployment descriptor entries please see Section 19.4.
Each <jdbc> element contains mandatory <datasource-class> elements. This element specifies the name of the Java
class file that implements the javax.sql.DataSource interface or the javax.sql.ConnectionPoolDataSource interface.
For more information on the distinction between these interfaces and their implications for connection pooling in Rhino please
refer to Section 19.2.1.
The JDBC specification defines that each DataSource has a number of JavaBean properties. To configure the JavaBean properties for each DataSource, add <parameter> elements to the <jdbc> element.
It is expected that a minimum parameter element will be specified that informs the JDBC driver where to connect to the
database server.
1 see
http://java.sun.com/products/jdbc
113
Each <parameter> element contains a mandatory <param-name>, <param-type> and <param-value> element. These
three elements identify the name of the JavaBean property, the Java type for the property, and the value to set the JavaBean
property to respectively.
Rhino requires that there must be one <jdbc> element that has a <jndi-name> element of ManagementResource. This is
the database that is used by Rhino to store state related to the management of the Rhino installation2 .
Rhino SLEE treats distinct <jdbc> elements as different database managers. Therefore even if two <jdbc> elements
correspond to the same database manager and are used in the same transaction, they will be treated as multiple resource
managers.
19.2.1
Connection Pooling
JDBC 2.0 with standard extensions provides two mechanisms for obtaining connections to the database.
• The javax.sql.DataSource interface that provides unmanaged physical connections.
• The javax.sql.ConnectionPoolDataSource interface that provides managed physical connections.
To connect to a connection pooling data source a managed ConnectionPoolDataSource connection is required.
Each <jdbc> element may optionally contain a <connection-pool> element. If a <connection-pool> element is specified, and the class file corresponding to the <datasource-class> element is an implementation of javax.sql.DataSource
Rhino will automatically use an internal implementation of ConnectionPoolDataSource to create managed connections. If
a <connection-pool> element is specified, and the class file corresponding to the <datasource-class> element is an
implementation of the javax.sql.ConnectionPoolDataSource interface Rhino will use the managed connections obtained
from the ConnectionPoolDataSource provided by the <datasource-class>.
The <connection-pool> element contains the mandatory elements.
• <max-connections> The <max-connections> element specifies the maximum number of active connections in use
by a Rhino process at any particular point in time. the connection pool.
• <max-pool-size> The <max-pool-size> element specifies the maximum number of active and inactive connections
that are included in
• <max-idle-time>
• <idle-check-interval> The <idle-check-interval> element specifies the time in seconds that it takes for an active connection to be considered inactive after being returned to the pool, that is how long after an application component
has finished using the connection before Rhino considers the connection inactive.
19.3 Configuration Example
The following XML fragment contains an example <jdbc> element. It can be seen that this example defines a JNDI name, a
datasource-class,parameters and a connection pool.
2
The PostgreSQL database must be used as the ManagementResource for the Rhino SLEE
Open Cloud Rhino 1.4.3 Administration Manual v1.1
114
<jdbc>
<jndi-name>ExternalDataSource</jndi-name>
<datasource-class>org.postgresql.jdbc2.optional.SimpleDataSource</datasource-class>
<parameter>
<param-name>serverName</param-name>
<param-type>java.lang.String</param-type>
<param-value>dbhost</param-value>
</parameter>
<parameter>
<param-name>databaseName</param-name>
<param-type>java.lang.String</param-type>
<param-value>db1</param-value>
</parameter>
<parameter>
<param-name>user</param-name>
<param-type>java.lang.String</param-type>
<param-value>slee</param-value>
</parameter>
<parameter>
<param-name>password</param-name>
<param-type>java.lang.String</param-type>
<param-value>changeme</param-value>
</parameter>
<connection-pool>
<max-connections>15</max-connections>
<idle-check-interval>0.0</idle-check-interval>
</connection-pool>
</jdbc>
19.4 SBB use of JDBC
A SBB is able to use JDBC to execute SQL statements. The SBB must declare its intent to use JDBC in an extension deployment
descriptor.
For more information regarding extension deployment descriptors please refer to Chapter 18.
This deployment descriptor is the oc-sbb-jar.xml file that is contained in the META-INF directory in the SBB jar file. The
JDBC DataSource is defined in the <resource-ref> element of the oc-sbb-jar.xml file. This <resource-ref> element
is as follows:
<resource-ref>
<!-- Name of resource under sbb s java:comp/env tree -->
<res-ref-name>foo/datasource</res-ref-name>
<!-- Resource type - must be javax.sql.DataSource -->
<res-type>javax.sql.DataSource</res-type>
<!-- Only Container auth supported -->
<res-auth>Container</res-auth>
<!-- Only Shareable scope supported -->
<res-sharing-scope>Shareable</res-sharing-scope>
<!-- Location of resource in Rhino’s java:resource tree.
res-ref-name is linked to this location -->
<res-jndi-name>jdbc/ExternalDataSource</res-jndi-name>
</resource-ref>
The <resource-ref> element must be placed inside the <sbb> element of the oc-sbb-jar.xml file. Please note in the
above example that the <res-jndi-name> element has the value jdbc/ExternalDataSource and that this value maps to the
earlier database configuration example.
Open Cloud Rhino 1.4.3 Administration Manual v1.1
115
For further information regarding extension deployment descriptors refer to Section 18.5 in Chapter 18.
The SBB is then able to obtain a reference to an object implementing the DataSource interface via a JNDI lookup as follows:
import javax.slee.*;
import javax.sql.DataSource;
import java.sql.Connection;
import java.sql.SQLException;
...
public class SimpleSbb implements Sbb {
private DataSource ds;
...
public void setSbbContext(SbbContext context) {
try {
Context myEnv = (Context) new InitialContext().lookup("java:comp/env");
ds = (DataSource) myEnv.lookup("jdbc/ExternalDataSource");
} catch (NamingException xNE) {
//Could not set SBB context
}
}
...
public void onSimpleEvent(SimpleEvent event, ActivityContextInterface context,
Address address){
...
try{
Connection conn = ds.getConnection();
} catch(SQLException xSQL) {
//Could not get database connection
}
...
}
...
}
19.4.1
SQL Programming
When a SBB is executing in a transaction and invokes SQL statements, the transaction management of the JDBC connection
is controlled by the Rhino SLEE. This enables Rhino SLEE to perform the last-resource-commit optimisation as discussed in
section D.4 of Appendix D.
Invoking JDBC methods which affect transaction management have no effect or undefined semantics when called from an
application component isolated by a SLEE transaction.
The methods (including any overridden form) that affect transaction management on the java.sql.Connection interface are
as follows:
• close
• commit
• rollback
• setAutoCommit
• setIsolationLevel
• setSavePoint
• releaseSavePoint
Open Cloud Rhino 1.4.3 Administration Manual v1.1
116
It is recommended that these methods are not invoked by a SLEE components.
Open Cloud Rhino 1.4.3 Administration Manual v1.1
117
Chapter 20
J2EE SLEE Integration
20.1 Introduction
The Rhino SLEE can inter-operate with a J2EE 1.3-compliant server in two ways:
1. SBBs can obtain references to the home interface of beans hosted on an external J2EE server, and invoke those beans via
J2EE’s standard RMI-IIOP mechanisms.
2. EJBs residing in an external J2EE server can send events to the Rhino SLEE via the standardised mechanism described
in the JAIN SLEE 1.0 Final Release specification, Appendix F.
The following sections describe how to configure Rhino and a J2EE server to enable SLEE-J2EE interoperability. The examples
discussed have been tested with SUN Microsystems Java Application Server 8.0, BEA WebLogic Server 7.0 and Jboss.org’s
Jboss. The examples should work with any J2EE 1.3-compliant application server.
Please note that the Appendix F of the JAIN SLEE 1.0 Final Release specification includes source code fragments for both
SBBs invoking EJBs and EJBs sending events to a JAIN SLEE product.
20.2 Invoking EJBs from an SBB
The current version of the Rhino SLEE requires that each EJB type to be accessed by an SBB be explicitly configured prior to
SLEE startup. This is done by editing $RHINO_HOME/etc/defaults/config/rhino-config.xml.
An example configuration is shown below.
118
<?xml version="1.0"?>
<!DOCTYPE rhino-config PUBLIC
"-//Open Cloud Ltd.//DTD Rhino Config 0.5//EN"
"http://www.opencloud.com/dtd/rhino-config_0_5.dtd">
<rhino-config>
<!-- Other elements not shown here -->
<ejb-resources>
<!-- Other elements not shown here -->
<remote-ejb>
<!-The <ejb-name> element specifies the logical name of this EJB as known to Rhino. It should
correspond to the logical name used by SBBs in their deployment descriptors to reference
the EJB.
-->
<ejb-name>external:AccountHome</ejb-name>
<!-The <home> element identifies the Java type of the home interface of the referenced EJB
-->
<home>test.rhino.testapps.integration.callejb.ejb.AccountHome</home>
<!-The <remote-url> element is the URL to use to obtain the remote EJB home interface from
the J2EE server. It should generally be of the form:
"iiop://serverhost:serverport/internal-server-path".
The "internal-server-path" part of the URL should correspond to the name the J2EE server
uses to identify the EJB in its CosNaming implementation.
For example, BEA Weblogic Server uses the "jndi-name" of the deployed EJB component as the
CosNaming path
-->
<remote-url>iiop://server.example.com:7001/AccountHome</remote-url>
</remote-ejb>
</ejb-resources>
</rhino-config>
When Rhino is configured in this way, the remote EJB home interface is automatically available to all SBBs under the name
specified in <ejb-name> tag. To obtain the interface, SBBs should declare a dependency on a EJB via the <ejb-ref> tags
in their deployment descriptor (sbb-jar.xml), using the configured EJB name as the <ejb-link> value.
For example, if Rhino is configured as above, an SBB could obtain and use the interface by declaring an EJB dependency in
sbb-jar.xml:
Open Cloud Rhino 1.4.3 Administration Manual v1.1
119
<!-- other elements omitted -->
<ejb-ref>
<description> Access to remote EJB stored on a J2EE server. </description>
<!-The <ejb-ref-name> element identifies the JNDI path, relative to java:comp/env,
to bind the EJB to.
-->
<ejb-ref-name>ejb/MyEJBReference</ejb-ref-name>
<!-- The <ejb-ref-type> element identifies the expected bean type of the bean being bound. -->
<ejb-ref-type>Entity</ejb-ref-type>
<!-- The <home> element identifies the expected Java type of the bean’s home interface. -->
<home>com.example.EJBHomeInterface</home>
<!-- The <remote> element identifies the expected Java type of the bean’s remote interface. -->
<remote>com.example.EJBRemoteInterface</remote>
<!-The <ejb-link> element identifies the EJB this name should refer to. It should correspond
to the <ejb-name> specified in rhino-config.xml for an external EJB.
-->
<ejb-link>external:EJBNumberOne</ejb-link>
</ejb-ref>
In the SBB implementation, the reference can then be obtained from JNDI:
//look up the EJB remote home interface
javax.naming.Context initialContext = new javax.naming.InitialContext();
Object boundObject = initialContext.lookup("java:comp/env/ejb/MyEJBReference");
com.example.EJBHomeInterface homeInterface =
(com.example.EJBHomeInterface) javax.rmi.PortableRemoteObject.narrow(
boundObject, com.example.EJBHomeInterface.class);
// The variable homeInterface is now a reference to the EJB’s remote home interface.
20.3 Sending SLEE Events from an EJB
To support sending SLEE events from EJBs hosted in a J2EE server to the Rhino SLEE, two optional components that are not
enabled by default must be installed.
The Rhino SLEE includes a J2EE Resource Adaptor that accepts connections from the J2EE server for event delivery. The
Resource Adaptor is packaged as a SLEE deployable unit located at
$RHINO_HOME/examples/j2ee/prebuilt-jars/rhino-j2ee-connector-ra.jar.
Use the management interface (command-line or HTML) to deploy, instantiate, and activate this resource adaptor. See Chapter
5 for instructions on deploying resource adaptors.
The J2EE Resource Adaptor has a single configuration parameter: the port to listen on. To change the port number, edit
the “port” config-property element in the J2EE Resource Adaptor’s oc-resource-adaptor-jar.xml deployment descriptor.
The default port number is 1299. If the Rhino SLEE is using a security manager, please ensure that the resource adaptor has
sufficient permissions to listen on this port and accept connections from the J2EE server.
The Rhino SLEE includes a J2EE 1.3 Connector packaged $RHINO_HOME/examples/j2ee/prebuilt-jars/rhino-j2ee
-connector.rar.
The Open Cloud Rhino SLEE J2EE Connector should be configured and deployed in the J2EE server. Consult the J2EE server’s
documentation for instructions on deploying connectors.
Open Cloud Rhino 1.4.3 Administration Manual v1.1
120
During this configuration, the Open Cloud Rhino SLEE J2EE Connector will be configured with a list of endpoints. This list is
a space- or comma- separated list of host:port pairs that identify the nodes of the Rhino SLEE that the connector should contact
to deliver events; in the case of a Rhino SLEE install, there is only one possible node. The port number should correspond to
the port that the J2EE Resource Adaptor has been configured to use.
Once the Connector is successfully installed, EJBs may use it to contact the SLEE and send events via the standard
javax.slee.connection.SleeConnection interface, as documented in Appendix F of the JAIN SLEE 1.0 Final Release
specification.
Open Cloud Rhino 1.4.3 Administration Manual v1.1
121
Chapter 21
PostgreSQL Configuration
21.1 Introduction
The Rhino SLEE requires a PostgreSQL RDBMS database for persisting the main working memory to non-volatile memory.
The main working memory in Rhino contains the runtime state, deployments, profiles, entities and the entities’ bindings.
Before installing a production Rhino cluster, PostgreSQL must be installed. For further information on downloading and
installing PostgreSQL platform refer to http://www.postgresql.org .
The PostgreSQL database can be installed on any network reachable host, although it is typically installed on the same local
host as Rhino SLEE.
Only a single PostgreSQL database is required for the entire Rhino SLEE cluster. The Rhino SLEE can replicate the main working memory across multiple PostgreSQL servers. For more information about using Rhino with multiple database backends,
please refer to Section 21.6.
The Rhino SLEE remains available whether or not the PostgreSQL database is available. The database does not affect or limit
how Rhino SLEE applications are written or operate. The PostgreSQL database provides a back-up of the working memory
only to restore a cluster if that cluster has entirely failed and needs to be restarted.
For Solaris/Sparc users, Open Cloud provides a pre-built PostgreSQL server package for Solaris. To install this package use the
Solaris pkgadd utility.
PostgreSQL is usually also available as a package on the various Linux distributions.
21.2 Installing PostgreSQL
PostgreSQL is usually packaged as part of your Linux distribution. Solaris users can make use of a pre-packaged PostgreSQL
package available at http://www.blastwave.org.
21.3 Creating Users
Once PostgreSQL has been installed, the next step is to create or assign a database user for the Rhino SLEE. This user will need
permissions to create databases, but does not need permissions to create users.
To create a new user for the database, use the “createuser” script supplied with PostgreSQL:
[postgres]$ createuser
Enter name of user to add: postgres
Shall the new user be allowed to create databases? (y/n) y
Shall the new user be allowed to create more new users? (y/n) n
CREATE USER
122
21.4 TCP/IP Connections
The PostgreSQL server needs to be configured to accept TCP/IP connections so that it can be used with the Rhino SLEE.
As of version 8.0 of PostgreSQL this parameter is no longer required, and the database will accept TCP/IP socket connects by
default.
Prior to version 8.0 of PostgreSQL, it was necessary to manually enable TCP/IP support. To do this, edit the tcpip_socket
parameter in the $PGDATA/postgresql.conf file:
tcpip_socket = 1
21.5 Access Control
The default installation of PostgreSQL trusts connections from the local host. If the Rhino SLEE and PostgreSQL are installed
on the same host the access control for the default configuration is sufficient. An example access control configuration is shown
below, from the file $PGDATA/pg_hba.conf:
#TYPE
local
host
DATABASE
all
all
USER
all
all
IP-ADDRESS
IP-MASK
127.0.0.1
255.255.255.255
METHOD
trust
trust
When the Rhino SLEE and PostgreSQL are required to be installed on separate hosts, or when a stricter security policy is
needed, then the access control rules in $PGDATA/pg_hba.conf will need to be tailored to allow connections from Rhino to the
database manager. For example, to allow connections from a Rhino instance on another host:
#TYPE
local
host
host
DATABASE
all
all
rhino
USER
all
all
postgres
IP-ADDRESS
IP-MASK
127.0.0.1
192.168.0.5
255.255.255.255
255.255.255.0
METHOD
trust
trust
password
Once these changes have been made, it is necessary to completely restart the PostgreSQL server. Telling the server to reload
the configuration file does not cause it to enable TCP/IP networking as this is initialised when the database is initialised.
To restart PostgreSQL, either use the command supplied by the package (for example, “/etc/init.d/postgresql restart”),
or use the “pg_ctl restart” command provided with PostgreSQL.
21.6 Multiple PostgreSQL Support
The Rhino SLEE supports communications with multiple PostgreSQL database servers. This adds an extra level of fault
tolerance for the main working memory, the runtime configuration and the working state of the Rhino SLEE.
The main working memory is constantly synchronized in each database server, in the instance of PostgreSQL failure or no
longer being network reachable the most integral PostgreSQL host is automatically selected as the definitive main working
memory for the cluster.
21.6.1
Configuration
Every node in the cluster must be configured to use each PostgreSQL database server. Illustrated by figure 21.1.
Open Cloud Rhino 1.4.3 Administration Manual v1.1
123
Figure 21.1: Cluster with mulitple database servers
The main working memory consists of several memory databases on each node.
• The ManagementDatabase which holds the working configuration and run-time state of the logging system, services,
resource adaptor entities.
• The ProfileDatabase which holds the profile tables, profiles and profile indexes.
Generally both of these memory databases must be configured for fail-over using multiple PostgreSQL database servers.
Before connecting Rhino SLEE to the remote database server, the database must be prepared by executing
$RHINO_NODE_HOME/init-management-db.sh on that database server:
init-management-db.sh --help
Initialise the Rhino SLEE main working memory database schema.
-h hostname : The host running postgres.
Default is MANAGEMENT_DATABASE_HOST
-p port
: The port running postgres.
Default is MANAGEMENT_DATABASE_PORT
-u username : The user to connect to template1.
Default is MANAGEMENT_DATABASE_USER
-d database : The name of the database to create.
Default is MANAGEMENT_DATABASE_NAME
Optional switches override local configuration options
found in $RHINO_NODE_HOME/config/config_variables
You will be prompted for a password on the command line
Once the databases are initialized on each database server, configure rhino for use with multiple PostgreSQL servers by editing
the configuration file
$RHINO_NODE_HOME/config/rhino-config.xml. This configuration must be applied to each node in the cluster.
Multiple <persistence-instance> elements will need to be added to the <persistence> element for the memdb element
with the jndi-name of ManagementDatabase and ProfileDatabase as shown below.
Each <persistence-instance> element needs to be completed with the attributes of the PostgreSQL server (hostname, database
Open Cloud Rhino 1.4.3 Administration Manual v1.1
124
name, user name, password, login timeout). Variable substitution using @variable-name@ syntax substitutes variables from
the $RHINO_NODE_HOME/config/config_variables.
Example Configuration
For a two database host configuration, first initialize the main working memory on each database server.
user@host> init-management-db.sh -h host1
user@host> init-management-db.sh -h host2
Then alter the configuration for each node in the cluster. Here is a sample configuration file.
<?xml version="1.0"?>
<!DOCTYPE rhino-config PUBLIC "-//Open Cloud Ltd.//DTD Rhino Config 0.5//EN"
"http://www.opencloud.com/dtd/rhino-config_0_5.dtd">
<memdb>
<jndi-name>ManagementDatabase</jndi-name>
<message-id>10003</message-id>
<group-name>rhino-db</group-name>
<committed-size>50M</committed-size>
<persistence>
<persistence-instance>
<datasource-class>org.postgresql.jdbc3.Jdbc3SimpleDataSource</datasource-class>
<dbid>rhino_sdk_management</dbid>
<parameter>
<param-name>serverName</param-name>
<param-type>java.lang.String</param-type>
<param-value>@MANAGEMENT_DATABASE_HOST@</param-value>
</parameter>
<parameter>
<param-name>portNumber</param-name>
<param-type>java.lang.Integer</param-type>
<param-value>@MANAGEMENT_DATABASE_PORT@</param-value>
</parameter>
<parameter>
<param-name>databaseName</param-name>
<param-type>java.lang.String</param-type>
<param-value>@MANAGEMENT_DATABASE_NAME@</param-value>
</parameter>
<parameter>
<param-name>user</param-name>
<param-type>java.lang.String</param-type>
<param-value>@MANAGEMENT_DATABASE_USER@</param-value>
</parameter>
<parameter>
<param-name>password</param-name>
<param-type>java.lang.String</param-type>
<param-value>@MANAGEMENT_DATABASE_PASSWORD@</param-value>
</parameter>
<parameter>
<param-name>loginTimeout</param-name>
<param-type>java.lang.Integer</param-type>
<param-value>30</param-value>
</parameter>
</persistence-instance>
<persistence-instance>
Open Cloud Rhino 1.4.3 Administration Manual v1.1
125
<datasource-class>org.postgresql.jdbc3.Jdbc3SimpleDataSource</datasource-class>
<dbid>rhino_sdk_management</dbid>
<parameter>
<param-name>serverName</param-name>
<param-type>java.lang.String</param-type>
<param-value>@MANAGEMENT_DATABASE_HOST2@</param-value>
</parameter>
<parameter>
<param-name>portNumber</param-name>
<param-type>java.lang.Integer</param-type>
<param-value>@MANAGEMENT_DATABASE_PORT@</param-value>
</parameter>
<parameter>
<param-name>databaseName</param-name>
<param-type>java.lang.String</param-type>
<param-value>@MANAGEMENT_DATABASE_NAME@</param-value>
</parameter>
<parameter>
<param-name>user</param-name>
<param-type>java.lang.String</param-type>
<param-value>@MANAGEMENT_DATABASE_USER2@</param-value>
</parameter>
<parameter>
<param-name>password</param-name>
<param-type>java.lang.String</param-type>
<param-value>@MANAGEMENT_DATABASE_PASSWORD2@</param-value>
</parameter>
<parameter>
<param-name>loginTimeout</param-name>
<param-type>java.lang.Integer</param-type>
<param-value>30</param-value>
</parameter>
</persistence-instance>
</persistence>
</memdb>
<memdb>
<jndi-name>ProfileDatabase</jndi-name>
<message-id>10004</message-id>
<group-name>rhino-db</group-name>
<committed-size>50M</committed-size>
<persistence>
<persistence-instance>
<datasource-class>org.postgresql.jdbc3.Jdbc3SimpleDataSource</datasource-class>
<dbid>rhino_sdk_profiles</dbid>
<parameter>
<param-name>serverName</param-name>
<param-type>java.lang.String</param-type>
<param-value>@MANAGEMENT_DATABASE_HOST@</param-value>
</parameter>
<parameter>
<param-name>portNumber</param-name>
<param-type>java.lang.Integer</param-type>
<param-value>@MANAGEMENT_DATABASE_PORT@</param-value>
</parameter>
<parameter>
<param-name>databaseName</param-name>
<param-type>java.lang.String</param-type>
Open Cloud Rhino 1.4.3 Administration Manual v1.1
126
<param-value>@MANAGEMENT_DATABASE_NAME@</param-value>
</parameter>
<parameter>
<param-name>user</param-name>
<param-type>java.lang.String</param-type>
<param-value>@MANAGEMENT_DATABASE_USER@</param-value>
</parameter>
<parameter>
<param-name>password</param-name>
<param-type>java.lang.String</param-type>
<param-value>@MANAGEMENT_DATABASE_PASSWORD@</param-value>
</parameter>
<parameter>
<param-name>loginTimeout</param-name>
<param-type>java.lang.Integer</param-type>
<param-value>30</param-value>
</parameter>
</persistence-instance>
<persistence-instance>
<datasource-class>org.postgresql.jdbc3.Jdbc3SimpleDataSource</datasource-class>
<dbid>rhino_sdk_profiles</dbid>
<parameter>
<param-name>serverName</param-name>
<param-type>java.lang.String</param-type>
<param-value>@MANAGEMENT_DATABASE_HOST2@</param-value>
</parameter>
<parameter>
<param-name>portNumber</param-name>
<param-type>java.lang.Integer</param-type>
<param-value>@MANAGEMENT_DATABASE_PORT@</param-value>
</parameter>
<parameter>
<param-name>databaseName</param-name>
<param-type>java.lang.String</param-type>
<param-value>@MANAGEMENT_DATABASE_NAME@</param-value>
</parameter>
<parameter>
<param-name>user</param-name>
<param-type>java.lang.String</param-type>
<param-value>@MANAGEMENT_DATABASE_USER2@</param-value>
</parameter>
<parameter>
<param-name>password</param-name>
<param-type>java.lang.String</param-type>
<param-value>@MANAGEMENT_DATABASE_PASSWORD2@</param-value>
</parameter>
<parameter>
<param-name>loginTimeout</param-name>
<param-type>java.lang.Integer</param-type>
<param-value>30</param-value>
</parameter>
</persistence-instance>
</persistence>
</memdb>
This configuration must be made to each node in order to synchronise state accurately and correctly. Once this is done, each
Open Cloud Rhino 1.4.3 Administration Manual v1.1
127
node is configured to update multiple databases.
Open Cloud Rhino 1.4.3 Administration Manual v1.1
128
Chapter 22
SIP Example Applications
22.1 Introduction
The Rhino SLEE includes a demonstration resource adaptor and example applications which use SIP (Session Initiation Protocol
- RFC 3261). This chapter explains how to build, deploy and demonstrate the examples. The examples illustrate how some
typical SIP services can be implemented using a SLEE. They are not intended for production use.
The example SIP services and components that are included with the Open Cloud Rhino SLEE are:
• SIP Resource Adaptor The SIP Resource Adaptor (SIP RA) provides the interface between a SIP stack and the SLEE.
The SIP stack is responsible for sending and receiving SIP messages over the network (typically UDP/IP). The SIP RA
processes messages from the stack and maps them to activities and events, as required by the SLEE programming model.
The SIP RA must be installed in the SLEE before the other SIP applications can be used.
• SIP Registrar Service This is an implementation of a SIP Registrar as defined in RFC3261, Section 10. This service
handles SIP REGISTER requests, which are sent by SIP user agents to register a binding from a user’s public address to
the physical network address of their user agent. The Registrar Service updates records in a Location Service that is used
by other SIP applications. The Registrar service is implemented using a single SBB (Service Building Block) component
in the SLEE, and uses a Location Service child SBB to query and update Location Service records.
• SIP Stateful Proxy Service This service implements a stateful proxy as described in RFC3261, Section 16. This proxy
is responsible for routing requests to their correct destination, given by contact addresses that have been registered with
the Location Service. The Proxy service is implemented using a single SBB, and uses a Location Service child SBB to
query Location Service records.
• SIP Find Me Follow Me Service This service provides an intelligent SIP proxy service, which allows a user profile to
specify alternative SIP addresses to be contacted in the event that their primary contact address is not available.
• SIP Back-to-Back User Agent Service This service is an example of a Back-to-Back User Agent (B2BUA). This behaves
like the Proxy Service but maintains SIP dialog state (call state) using dialog activities.
• UAS & UAC Dialog SBBs These SBBs are child SBBs, used by the B2BUA SBB for managing the UAS and UAC (User
Agent Server/Client) sides of the SIP session.
• AC Naming & JDBC Location Service SBBs These SBBs provide alternate implementations of a SIP Location Service,
which is used by the Proxy and Registrar services. By default the AC Naming Location Service is deployed, which uses
ActivityContext Naming facility of the SLEE to store location information. Alternatively the JDBC Location Service can
be used, to store the location information in an external database.
22.1.1
Intended Audience
The intended audiences are SLEE developers and administrators who want to quickly get demonstration applications running
in Rhino SLEE, and become familiar with SBB programming and deployment practices. Some basic familiarity with the SIP
protocol and concepts is assumed.
129
22.2 System Requirements
The SIP examples run on all supported Rhino SLEE platforms. Please see Appendix A for details.
22.2.1
Required Software
• SIP user agent software, such as Linphone or Kphone.
– http://www.linphone.org
– http://www.wirlab.net/kphone
– http://www.sipcenter.com/sip.nsf/html/User+Agent+Download
22.3 Directory Contents
The base directory for the SIP Examples is $RHINO_HOME/examples/sip. The contents of the SIP Examples directories are
summarised in Table 22.1.
File/directory name
build.xml
build.properties
sip.properties
README
src/
lib/
classes/
jars/
javadoc/
Description
Ant build script for SIP example applications. Manages building and deployment of the
examples.
Properties for the Ant build script.
Properties for the SIP services, these will be substituted into deployment descriptors when
the applications are built.
Text file containing quick start instructions.
Contains source code for example SIP services.
Contains pre-built jars of the SIP resource adaptor and resource adaptor type.
Compiled classes are written to this directory.
Jar files are written here, ready for deployment.
Java doc files for developers.
Table 22.1: Contents of the $RHINO_HOME/examples/sip directory
22.4 Quick Start
To get the SIP examples up and running straight away, follow the quick start instructions here. For more detailed information
on building, installing and configuring the examples, see Section 22.5, SIP Examples Installation.
22.4.1
Environment
The Rhino SLEE must be installed and running. Before the deployable units are built, the Proxy
application must be configured with a hostname and the domains that it will serve. The file
$RHINO_HOME/examples/sip/sip.properties contains these properties.
The two properties that need to be changed are shown below:
# Proxy SBB configuration
# Add names that the proxy host is known by. The first name in the list
# will be treated as the Proxy’s canonical hostname and will be used in
# Via and Record-Route headers inserted by the proxy.
PROXY_HOSTNAMES=siptest1,localhost,127.0.0.1
# Add domains that the proxy is authoritative for
PROXY_DOMAINS=siptest1,opencloud.com,opencloud.co.nz
Open Cloud Rhino 1.4.3 Administration Manual v1.1
130
After changing the PROXY_HOSTNAMES and PROXY_DOMAINS properties so that they are correct for the environment, save the
sip.properties file.
22.4.2
Building and Deploying
To create the deployable units for the Registrar, Proxy and Location services run Ant with the build target as follows:
user@host:~/rhino/examples/sip$ ant build
Buildfile: build.xml
init:
[mkdir] Created dir: /home/user/rhino/examples/sip/jars/sip/jars
[mkdir] Created dir: /home/user/rhino/examples/sip/jars/sip/classes
compile-sip-examples:
[mkdir] Created dir: /home/user/rhino/examples/sip/jars/sip/classes/sip-examples
[javac] Compiling 37 source files to /home/user/rhino/examples/sip/jars/sip/classes/sip-ex
amples
sip-ac-location:
[sbbjar] Building sbb-jar: /home/user/rhino/examples/sip/jars/sip/jars/ac-location-sbb.jar
[deployablejar] Building deployable-unit-jar: /home/user/rhino/examples/sip/jars/sip/jars/sipac-location-service.jar
[delete] Deleting: /home/user/rhino/examples/sip/jars/sip/jars/ac-location-sbb.jar
sip-jdbc-location:
[sbbjar] Building sbb-jar: /home/user/rhino/examples/sip/jars/sip/jars/jdbc-location-sbb.ja
r
[deployablejar] Building deployable-unit-jar: /home/user/rhino/examples/sip/jars/sip/jars/sipjdbc-location-service.jar
[delete] Deleting: /home/user/rhino/examples/sip/jars/sip/jars/jdbc-location-sbb.jar
sip-registrar:
[copy] Copying 2 files to /home/user/rhino/examples/sip/jars/sip/classes/sip-examples/reg
istrar-META-INF
[sbbjar] Building sbb-jar: /home/user/rhino/examples/sip/jars/sip/jars/registrar-sbb.jar
[deployablejar] Building deployable-unit-jar: /home/user/rhino/examples/sip/jars/sip/jars/sipregistrar-service.jar
[delete] Deleting: /home/user/rhino/examples/sip/jars/sip/jars/registrar-sbb.jar
sip-proxy:
[copy] Copying 3 files to /home/user/rhino/examples/sip/jars/sip/classes/sip-examples/pro
xy-META-INF
[sbbjar] Building sbb-jar: /home/user/rhino/examples/sip/jars/sip/jars/proxy-sbb.jar
[deployablejar] Building deployable-unit-jar: /home/user/rhino/examples/sip/jars/sip/jars/sipproxy-service.jar
[delete] Deleting: /home/user/rhino/examples/sip/jars/sip/jars/proxy-sbb.jar
Open Cloud Rhino 1.4.3 Administration Manual v1.1
131
sip-fmfm:
[copy] Copying 4 files to /home/user/rhino/examples/sip/jars/sip/classes/sip-examples/fmf
m-META-INF
[profilespecjar] Building profile-spec-jar: /home/user/rhino/examples/sip/jars/sip/jars/fmfm-p
rofile.jar
[sbbjar] Building sbb-jar: /home/user/rhino/examples/sip/jars/sip/jars/fmfm-sbb.jar
[deployablejar] Building deployable-unit-jar: /home/user/rhino/examples/sip/jars/sip/jars/sipfmfm-service.jar
[delete] Deleting: /home/user/rhino/examples/sip/jars/sip/jars/fmfm-profile.jar
[delete] Deleting: /home/user/rhino/examples/sip/jars/sip/jars/fmfm-sbb.jar
sip-b2bua:
[copy] Copying 3 files to /home/user/rhino/examples/sip/jars/sip/classes/sip-examples/b2b
ua-META-INF
[sbbjar] Building sbb-jar: /home/user/rhino/examples/sip/jars/sip/jars/b2bua-sbb.jar
[deployablejar] Building deployable-unit-jar: /home/user/rhino/examples/sip/jars/sip/jars/sipb2bua-service.jar
[delete] Deleting: /home/user/rhino/examples/sip/jars/sip/jars/b2bua-sbb.jar
build:
BUILD SUCCESSFUL
Total time: 25 seconds
Open Cloud Rhino 1.4.3 Administration Manual v1.1
132
By default, the build script will deploy the Registrar and Proxy example services, and any components these depend on,
including the SIP Resource Adaptor and Location Service. To deploy these examples, run Ant with the deployexamples target
as follows:
user@host:~/rhino/examples/sip$ ant deployexamples
Buildfile: build.xml
init:
build:
management-init:
[echo] OpenCloud Rhino SLEE Management tasks defined
login:
[slee-management] establishing new connection to : 127.0.0.1:1199/admin
deploysipra:
[slee-management]
[slee-management]
[slee-management]
[slee-management]
Install deployable unit file:lib/ocjainsip-1.2-ra.jar
Create resource adaptor entity sipra from OCSIP 1.2, Open Cloud
Bind link name OCSIP to sipra
Activate RA entity sipra
deploy-jdbc-locationservice:
deploy-ac-locationservice:
[slee-management] Install deployable unit file:jars/sip-ac-location-service.jar
[slee-management] Activate service SIP AC Location Service 1.5, Open Cloud
[slee-management] Set trace level of ACLocationSbb 1.5, Open Cloud to Info
deploylocationservice:
deployregistrar:
[slee-management] Install deployable unit file:jars/sip-registrar-service.jar
[slee-management] Activate service SIP Registrar Service 1.5, Open Cloud
[slee-management] Set trace level of RegistrarSbb 1.5, Open Cloud to Info
undeployfmfm:
[slee-management]
[slee-management]
[slee-management]
[slee-management]
[slee-management]
[slee-management]
[slee-management]
[slee-management]
Remove profile table FMFMSubscribers
[Failed] Profile table FMFMSubscribers does not exist
Deactivate service SIP FMFM Service 1.5, Open Cloud
[Failed] Could not find a service matching SIP FMFM Service 1.5, Open Cloud
Wait for service SIP FMFM Service 1.5, Open Cloud to deactivate
[Failed] Could not find a service matching SIP FMFM Service 1.5, Open Cloud
Uninstall deployable unit file:jars/sip-fmfm-service.jar
[Failed] Deployable unit file:jars/sip-fmfm-service.jar not installed
deployproxy:
[slee-management] Install deployable unit file:jars/sip-proxy-service.jar
[slee-management] Activate service SIP Proxy Service 1.5, Open Cloud
[slee-management] Set trace level of ProxySbb 1.5, Open Cloud to Info
deployexamples:
BUILD SUCCESSFUL
Total time: 1 minute 36 seconds
Ensure that the Rhino SLEE is in the RUNNING state after the deployment:
Open Cloud Rhino 1.4.3 Administration Manual v1.1
133
user@host:~/rhino$ ./client/bin/rhino-console
Interactive Rhino Management Shell
Rhino management console, enter ’help’ for a list of commands
[Rhino@localhost (#0)] state
SLEE is in the Running state
The Registrar and Proxy services are now deployed and ready to use. See Section 22.6 for details on using SIP user agents to
test the example services.
22.4.3
Configuring the Services
Configuring the services is done by editing the sip.properties file.
These properties are substituted into the deployment descriptors of the example services when they are built. The main properties in this file are shown in Table 22.4.3.
Name
PROXY_HOSTNAMES
PROXY_DOMAINS
PROXY_SIP_PORT
PROXY_SIPS_PORT
PROXY_LOOP_DETECTION
Description
Comma-separated list of hostnames that the proxy is known by.
The first name is used as the proxy’s canonical hostname, and will be
used in Via and Record-Route headers inserted by the proxy.
Comma-separated list of domains that the proxy is authoritative for.
If the proxy receives a request addressed to a user in one of these domains,
then the proxy will attempt to find that user in the Location Service.
This means that the user must have previously registered with the Registrar service.
Requests addressed to users in other domains will be forwarded according
to normal SIP routing rules.
This port number will be included in Via and Record-Route headers
inserted by the proxy.
This port number will be included in Via and Record-Route headers
inserted by the proxy, when sending to secure (sips:) addresses.
If enabled, the proxy will be able to detect routing loops, as described
in RFC 3261 section 16. It is recommended that loop detection is enabled,
which is the default setting.
Table 22.2: The sip.properties file
22.4.4
Installing the Services
Restrictions
Not all of the example SIP services should be installed at the same time. The restrictions on which services can be deployed are
as follows:
• Registrar Service: This service can be installed independently of other services.
• Proxy, FMFM and B2BUA Services: Only one of these services may be installed at a time. It is possible to customise the
SBB initial event selection code so that they can all be deployed, however this is not done by default.
JDBC Location Datasource
If the JDBC Location Service is being used without using the default PostgreSQL database for persistence, then the JDBC
Location SBB extension deployment descriptor oc-sbb-jar.xml must be edited to refer to the correct JDBC data source. By
default this will point to the PostgreSQL database installed with the Rhino SLEE.
Open Cloud Rhino 1.4.3 Administration Manual v1.1
134
The deployment descriptors for the JDBC Location SBB are located in the src/com/opencloud/slee/services/sip/
location/jdbc/META-INF directory. The default data source in the oc-sbb-jar.xml extension deployment descriptor is as
follows:
<resource-ref>
<res-ref-name>jdbc/SipRegistry</res-ref-name>
<res-type>javax.sql.DataSource</res-type>
<res-auth>Container</res-auth>
<res-sharing-scope>Shareable</res-sharing-scope>
<res-jndi-name>jdbc/JDBCResource</res-jndi-name>
</resource-ref>
The data source must be configured in the Rhino SLEE rhino-config.xml file. To use an alternative database, edit the
resource-ref entry in the SBB extension deployment descriptor so that res-jndi-name refers to the appropriate data source
configured in rhino-config.xml.
For more information about extension deployment descriptors please refer to Chapter 18 section 18.5.
For more information on configuring data sources, see Chapter 19.
Once the deployment descriptors are correct for the current environment, the example services can be installed.
22.5 Manual Installation
The steps for manually installing and configuring the example SIP services are shown below. These are covered in detail in the
following sections.
• Install the SIP Resource Adaptor, Section 22.5.1.
• Optionally configure a JDBC location service, Section 22.5.3.
• Install the example SIP services, Section 22.4.4.
• Use the example SIP services with SIP user agents, Section 22.6.
22.5.1
Resource Adaptor Installation
Configuring the Resource Adaptor
The SIP Resource Adaptor has been pre-configured to work correctly in most environments. However, it may need configuring for the current environment, such as changing the default port used for SIP messages (which is, by default, port 5060).
Instructions for doing so are included below.
These default properties can be overridden at deployment time by passing additional arguments when creating the SIP RA
entity.
The available configurable properties for the SIP RA are summarised below:
Open Cloud Rhino 1.4.3 Administration Manual v1.1
135
Name
ListeningPoints
Type
java.lang.String
Default
0.0.0.0:5060/[udp|tcp]
ExtensionMethods
java.lang.String
OutboundProxy
java.lang.String
UDPThreads
TCPThreads
RetransmissionFilter
java.lang.Integer
java.lang.Integer
java.lang.Boolean
1
1
False
AutomaticDialogSupport
java.lang.Boolean
False
Keystore
KeystoreType
KeystorePassword
Truststore
TruststoreType
TruststorePassword
CRLURL
CRLRefreshTimeout
CRLLoadFailureRetryTimeout
CRLNoCRLLoadFailureRetryTimeout
ClientAuthentication
java.lang.String
java.lang.String
java.lang.String
java.lang.String
java.lang.String
java.lang.String
java.lang.String
java.lang.Integer
java.lang.Integer
java.lang.Integer
java.lang.String
sip-ra-ssl.keystore
jks
sip-ra-ssl.truststore
jks
86400
900
60
NEED
Description
List of endpoints that the SIP stack will listen on. Must be specified as a
list of host:port/transport triples, separated by semicolons.
SIP methods that can initiate dialogs, in addition to the standard INVITE
and SUBSCRIBE methods.
Default proxy for the stack to use if it cannot route a request
(JAIN SIP javax.sip.OUTBOUND_PROXY property).
The number of UDP Threads to use.
The number of TCP Threads to use.
Controls whether the stack automatically retransmits 200 OK and ACK
messages during INVITE transactions
(JAIN SIP javax.sip.RETRANSMISSION_FILTER property).
If true, SIP dialogs are created automatically by the stack. Otherwise
the application must request that a dialog be created.
The keystore used to store the public certificates.
The encryption type of the keystore.
The keystore password.
The keystore containing a private certificate.
The encryption type of the keystore.
The trust keystore password.
The certificate revocation list location.
The certificate revocation list refresh timeout.
The certificate revocation list load failure timeout.
The certificate revocation list load failure retry timeout.
Indicate that clients need to be authenticated against certificates in the
keystore.
Readers familiar with JAIN SIP 1.1 may note that some of these properties are equivalent to the JAIN SIP stack properties of
the same name.
The default values for these RA properties are defined in the the “oc-resource-adaptor-jar.xml” deployment descriptor, in the RA
jar file. Rather than editing the oc-resource-adaptor-jar.xml file directly, and reassembling the RA jar file, it is easier to override
the RA properties at deploy time. This can be done by passing additional arguments to the createRAEntity management
interface. Below is an excerpt from the $RHINO_HOME/examples/sip/build.xml file showing how this can be done in an Ant
script:
...
<slee-management>
<createraentity
resourceadaptorid="${sip.ra.name}"
entityname="${sip.ra.entity}"
properties="${sip.ra.properties}" />
<bindralinkname entityname="${sip.ra.entity}" linkname="${SIP_LINKNAME}" />
<activateraentity entityname="${sip.ra.entity}"/>
</slee-management>
...
Where sip.ra.properties is defined in build.properties
sip.ra.properties=ListeningPoints=0.0.0.0:5060/udp;0.0.0.0:5060/tcp
Config-properties are passed to the createRAEntity task using a comma-separated list of name=value pairs. In the above
example the ListeningPoints property has been customised. When the RA is deployed using the Ant script (as shown below)
the RA will be created with these properties.
22.5.2
Deploying the Resource Adaptor
After setting these properties correctly for the system, the SIP Resource Adaptor can be deployed into the SLEE. The Ant build
script $RHINO_HOME/examples/sip/build.xml contains build targets for deploying and undeploying the SIP RA.
To deploy the SIP RA, first ensure the SLEE is running. Go to the SIP examples directory, and then execute the Ant target
deploysipra as shown:
Open Cloud Rhino 1.4.3 Administration Manual v1.1
136
user@host:~/rhino/examples/sip$ ant deploysipra
Buildfile: build.xml
management-init:
[echo] OpenCloud Rhino SLEE Management tasks defined
login:
[slee-management] establishing new connection to : 127.0.0.1:1199/admin
deploysipra:
[slee-management]
[slee-management]
[slee-management]
[slee-management]
Install deployable unit file:lib/ocjainsip-1.2-ra.jar
Create resource adaptor entity sipra from OCSIP 1.2, Open Cloud
Bind link name OCSIP to sipra
Activate RA entity sipra
BUILD SUCCESSFUL
Total time: 22 seconds
This compiles the SIP resource adaptor, assembles the RA jar file, deploys it into the SLEE, creates an instance of the SIP
Resource Adaptor and finally activates it.
The SIP RA can similarly be uninstalled using the Ant target undeploysipra, as shown below:
user@host:~/rhino/examples/sip$ ant undeploysipra
Buildfile: build.xml
management-init:
[echo] OpenCloud Rhino SLEE Management tasks defined
login:
[slee-management] establishing new connection to : 127.0.0.1:1199/admin
undeploysipra:
[slee-management]
[slee-management]
[slee-management]
[slee-management]
Deactivated resource adaptor entity sipra
Unbound link name OCSIP
Removed resource adaptor entity sipra
uninstalled: DeployableUnit[url=file:lib/ocjainsip-1.2-ra.jar]
BUILD SUCCESSFUL
Total time: 11 seconds
Note the slee-management task in the Ant output above is a custom Ant task that wraps around the Rhino SLEE management
interface . For more information on using the management interfaces please refer to chapter 5.
22.5.3
Specifying a Location Service
The example SIP Registrar and Proxy services require a SIP Location Service. The Location Service stores SIP registrations,
mapping a user’s public SIP address to actual contact addresses.
In the SIP examples, the Location Service functionality is implemented using an SBB with a Local Interface. A Local interface
defines a set of operations which may be invoked directly by other SBBs. Two implementations of this interface are provided
with the examples. The default implementation uses the SLEE ActivityContext Naming Facility to store the mapping between
public and contact addresses. This is deployed by default, and no further configuration is necessary. There is also a JDBC
Location Service, which stores the mappings in an external database. Other implementations are possible, for example LDAP.
The Registrar and Proxy SBBs do not need to know the details of the Location Service implementation, since they just use a
standard interface.
The JDBC Location Service can be enabled by setting a property in build.properties:
Open Cloud Rhino 1.4.3 Administration Manual v1.1
137
# Select location service implementation.
# If "usejdbclocation" property is true, JDBC location service will be deployed.
# Default is to use Activity Context Naming implementation.
usejdbclocation=true
The PostgreSQL database that was configured during the SLEE installation is already setup to act as the repository for a JDBC
Location Service.
Note. The table is removed and recreated every time the $RHINO_NODE_HOME/init-management-db.sh script is executed.
This table stores a record for each contact address that the user currently has registered. To use another database for the location
service, configure the database with a simple schema. A single table by the name of “registrations” is required. The SQL
fragment below shows how to create the table:
create table registrations (
sipaddress varchar(80) not null,
contactaddress varchar(80) not null,
expiry bigint,
qvalue integer,
cseq integer,
callid varchar(80),
primary key (sipaddress, contactaddress)
);
COMMENT ON TABLE registrations IS ’SIP Location Service registrations’;
The JDBC Location Service will automatically update the registrations table when the SIP Registrar Service receives a successful REGISTER request. No further database administration is required.
The PostgreSQL database that was configured for the Rhino SLEE installation already contains this table.
22.5.4
Installing the Registrar Service
To install the SIP Registrar Service, first ensure the SLEE is running. Then go to the SIP examples directory and execute the
Ant target deployregistrar:
user@host:~/rhino/examples/sip$ ant deployregistrar
Buildfile: build.xml
init:
compile-sip-examples:
sip-ac-location:
[sbbjar] Building sbb-jar: /home/users/rhino/examples/sip/jars/ac-location-sbb.jar
[deployablejar] Building deployable-unit-jar: /home/users/rhino/examples/sip/jars/sip-ac-locat
ion-service.jar
[delete] Deleting: /home/users/rhino/examples/sip/jars/ac-location-sbb.jar
sip-jdbc-location:
[sbbjar] Building sbb-jar: /home/users/rhino/examples/sip/jars/jdbc-location-sbb.jar
[deployablejar] Building deployable-unit-jar: /home/users/rhino/examples/sip/jars/sip-jdbc-loc
ation-service.jar
[delete] Deleting: /home/users/rhino/examples/sip/jars/jdbc-location-sbb.jar
Open Cloud Rhino 1.4.3 Administration Manual v1.1
138
sip-registrar:
[copy] Copying 2 files to /home/users/rhino/examples/sip/classes/sip-examples/registrar-M
ETA-INF
[sbbjar] Building sbb-jar: /home/users/rhino/examples/sip/jars/registrar-sbb.jar
[deployablejar] Building deployable-unit-jar: /home/users/rhino/examples/sip/jars/sip-registra
r-service.jar
[delete] Deleting: /home/users/rhino/examples/sip/jars/registrar-sbb.jar
sip-proxy:
[copy] Copying 3 files to /home/users/rhino/examples/sip/classes/sip-examples/proxy-METAINF
[sbbjar] Building sbb-jar: /home/users/rhino/examples/sip/jars/proxy-sbb.jar
[deployablejar] Building deployable-unit-jar: /home/users/rhino/examples/sip/jars/sip-proxy-se
rvice.jar
[delete] Deleting: /home/users/rhino/examples/sip/jars/proxy-sbb.jar
sip-fmfm:
[copy] Copying 4 files to /home/users/rhino/examples/sip/classes/sip-examples/fmfm-META-I
NF
[profilespecjar] Building profile-spec-jar: /home/users/rhino/examples/sip/jars/fmfm-profile.j
ar
[sbbjar] Building sbb-jar: /home/users/rhino/examples/sip/jars/fmfm-sbb.jar
[deployablejar] Building deployable-unit-jar: /home/users/rhino/examples/sip/jars/sip-fmfm-ser
vice.jar
[delete] Deleting: /home/users/rhino/examples/sip/jars/fmfm-profile.jar
[delete] Deleting: /home/users/rhino/examples/sip/jars/fmfm-sbb.jar
sip-b2bua:
[copy] Copying 3 files to /home/users/rhino/examples/sip/classes/sip-examples/b2bua-METAINF
[sbbjar] Building sbb-jar: /home/users/rhino/examples/sip/jars/b2bua-sbb.jar
[deployablejar] Building deployable-unit-jar: /home/users/rhino/examples/sip/jars/sip-b2bua-se
rvice.jar
[delete] Deleting: /home/users/rhino/examples/sip/jars/b2bua-sbb.jar
build:
management-init:
[echo] OpenCloud Rhino SLEE Management tasks defined
login:
[slee-management] establishing new connection to : 127.0.0.1:1199/admin
deploysipra:
[slee-management]
[slee-management]
[slee-management]
[slee-management]
[slee-management]
[slee-management]
[slee-management]
[slee-management]
Install deployable unit file:lib/ocjainsip-1.2-ra.jar
[Failed] Deployable unit file:lib/ocjainsip-1.2-ra.jar already installed
Create resource adaptor entity sipra from OCSIP 1.2, Open Cloud
[Failed] Resource adaptor entity sipra already exists
Bind link name OCSIP to sipra
[Failed] Link name OCSIP already bound
Activate RA entity sipra
[Failed] Resource adaptor entity sipra is already active
deploy-jdbc-locationservice:
deploy-ac-locationservice:
[slee-management] Install deployable unit file:jars/sip-ac-location-service.jar
[slee-management] Activate service SIP AC Location Service 1.5, Open Cloud
[slee-management] Set trace level of ACLocationSbb 1.5, Open Cloud to Info
Open Cloud Rhino 1.4.3 Administration Manual v1.1
139
deploylocationservice:
deployregistrar:
[slee-management] Install deployable unit file:jars/sip-registrar-service.jar
[slee-management] Activate service SIP Registrar Service 1.5, Open Cloud
[slee-management] Set trace level of RegistrarSbb 1.5, Open Cloud to Info
BUILD SUCCESSFUL
Total time: 48 seconds
This will compile the necessary classes, assemble the jar file, deploy the service into the SLEE and activate it.
22.5.5
Removing the Registrar Service
The SIP Registrar Service can be deactivated and removed using the Ant undeployregistrar target.
user@host:~/rhino/examples/sip$ ant undeployregistrar
Buildfile: build.xml
management-init:
[echo] OpenCloud Rhino SLEE Management tasks defined
login:
[slee-management] establishing new connection to : 127.0.0.1:1199/admin
undeployregistrar:
[slee-management] Deactivate service SIP Registrar Service 1.5, Open Cloud
[slee-management] Wait for service SIP Registrar Service 1.5, Open Cloud to deactivate
[slee-management] Service SIP Registrar Service 1.5, Open Cloud is now inactive
[slee-management] Uninstall deployable unit file:jars/sip-registrar-service.jar
BUILD SUCCESSFUL
Total time: 2 minutes 12 seconds
22.5.6
Installing the Proxy Service
To install the SIP Proxy Service, first ensure the SLEE is running, then go to the SIP examples directory and execute the Ant
target deployproxy:
user@host:~/rhino/examples/sip$ ant deployproxy
Buildfile: build.xml
init:
[mkdir] Created dir: /home/user/rhino/examples/sip/jars
[mkdir] Created dir: /home/user/rhino/examples/sip/classes
compile-sip-examples:
[mkdir] Created dir: /home/user/rhino/examples/sip/classes/sip-examples
[javac] Compiling 37 source files to /home/user/rhino/examples/sip/classes/sip-examples
sip-ac-location:
[sbbjar] Building sbb-jar: /home/user/rhino/examples/sip/jars/ac-location-sbb.jar
[deployablejar] Building deployable-unit-jar: /home/user/rhino/examples/sip/jars/sip-ac-locati
on-service.jar
[delete] Deleting: /home/user/rhino/examples/sip/jars/ac-location-sbb.jar
Open Cloud Rhino 1.4.3 Administration Manual v1.1
140
sip-jdbc-location:
[sbbjar] Building sbb-jar: /home/user/rhino/examples/sip/jars/jdbc-location-sbb.jar
[deployablejar] Building deployable-unit-jar: /home/user/rhino/examples/sip/jars/sip-jdbc-loca
tion-service.jar
[delete] Deleting: /home/user/rhino/examples/sip/jars/jdbc-location-sbb.jar
sip-registrar:
[copy] Copying 2 files to /home/user/rhino/examples/sip/classes/sip-examples/registrar-ME
TA-INF
[sbbjar] Building sbb-jar: /home/user/rhino/examples/sip/jars/registrar-sbb.jar
[deployablejar] Building deployable-unit-jar: /home/user/rhino/examples/sip/jars/sip-registrar
-service.jar
[delete] Deleting: /home/user/rhino/examples/sip/jars/registrar-sbb.jar
sip-proxy:
[copy] Copying 3 files to /home/user/rhino/examples/sip/classes/sip-examples/proxy-META-I
NF
[sbbjar] Building sbb-jar: /home/user/rhino/examples/sip/jars/proxy-sbb.jar
[deployablejar] Building deployable-unit-jar: /home/user/rhino/examples/sip/jars/sip-proxy-ser
vice.jar
[delete] Deleting: /home/user/rhino/examples/sip/jars/proxy-sbb.jar
sip-fmfm:
[copy] Copying 4 files to /home/user/rhino/examples/sip/classes/sip-examples/fmfm-META-IN
F
[profilespecjar] Building profile-spec-jar: /home/user/rhino/examples/sip/jars/fmfm-profile.ja
r
[sbbjar] Building sbb-jar: /home/user/rhino/examples/sip/jars/fmfm-sbb.jar
[deployablejar] Building deployable-unit-jar: /home/user/rhino/examples/sip/jars/sip-fmfm-serv
ice.jar
[delete] Deleting: /home/user/rhino/examples/sip/jars/fmfm-profile.jar
[delete] Deleting: /home/user/rhino/examples/sip/jars/fmfm-sbb.jar
sip-b2bua:
[copy] Copying 3 files to /home/user/rhino/examples/sip/classes/sip-examples/b2bua-META-I
NF
[sbbjar] Building sbb-jar: /home/user/rhino/examples/sip/jars/b2bua-sbb.jar
[deployablejar] Building deployable-unit-jar: /home/user/rhino/examples/sip/jars/sip-b2bua-ser
vice.jar
[delete] Deleting: /home/user/rhino/examples/sip/jars/b2bua-sbb.jar
build:
management-init:
[echo] OpenCloud Rhino SLEE Management tasks defined
login:
[slee-management] establishing new connection to : localhost:1199/admin
deploysipra:
[slee-management]
[slee-management]
[slee-management]
[slee-management]
Install deployable unit file:lib/ocjainsip-1.2-ra.jar
Create resource adaptor entity sipra from OCSIP 1.2, Open Cloud
Bind link name OCSIP to sipra
Activate RA entity sipra
deploy-jdbc-locationservice:
Open Cloud Rhino 1.4.3 Administration Manual v1.1
141
deploy-ac-locationservice:
[slee-management] Install deployable unit file:jars/sip-ac-location-service.jar
[slee-management] Activate service SIP AC Location Service 1.5, Open Cloud
[slee-management] Set trace level of ACLocationSbb 1.5, Open Cloud to Info
deploylocationservice:
deployregistrar:
[slee-management] Install deployable unit file:jars/sip-registrar-service.jar
[slee-management] Activate service SIP Registrar Service 1.5, Open Cloud
[slee-management] Set trace level of RegistrarSbb 1.5, Open Cloud to Info
undeployfmfm:
[slee-management]
[slee-management]
[slee-management]
[slee-management]
[slee-management]
[slee-management]
[slee-management]
[slee-management]
Remove profile table FMFMSubscribers
[Failed] Profile table FMFMSubscribers does not exist
Deactivate service SIP FMFM Service 1.5, Open Cloud
[Failed] Could not find a service matching SIP FMFM Service 1.5, Open Cloud
Wait for service SIP FMFM Service 1.5, Open Cloud to deactivate
[Failed] Could not find a service matching SIP FMFM Service 1.5, Open Cloud
Uninstall deployable unit file:jars/sip-fmfm-service.jar
[Failed] Deployable unit file:jars/sip-fmfm-service.jar not installed
deployproxy:
[slee-management] Install deployable unit file:jars/sip-proxy-service.jar
[slee-management] Activate service SIP Proxy Service 1.5, Open Cloud
[slee-management] Set trace level of ProxySbb 1.5, Open Cloud to Info
BUILD SUCCESSFUL
Total time: 39 seconds
This will compile the necessary classes, assemble the jar file, deploy the service into the SLEE and activate it.
22.5.7
Removing the Proxy Service
The SIP Proxy Service can be deactivated and removed using the Ant target undeployproxy:
user@host:~/rhino/examples/sip$ ant undeployproxy
Buildfile: build.xml
management-init:
[echo] OpenCloud Rhino SLEE Management tasks defined
login:
[slee-management] establishing new connection to : 127.0.0.1:1199/admin
undeployproxy:
[slee-management]
[slee-management]
[slee-management]
[slee-management]
Deactivate service SIP Proxy Service 1.5, Open Cloud
Wait for service SIP Proxy Service 1.5, Open Cloud to deactivate
Service SIP Proxy Service 1.5, Open Cloud is now inactive
Uninstall deployable unit file:jars/sip-proxy-service.jar
BUILD SUCCESSFUL
Total time: 10 seconds
Open Cloud Rhino 1.4.3 Administration Manual v1.1
142
22.5.8
Modifying Service Source Code
If modifications are made to the source code of any of the SIP services, the altered services can be recompiled and deployed
easily using the Ant targets in $RHINO_HOME/examples/sip/build.xml. If the service is already installed, remove it using
the relevant undeploy Ant target, and then rebuild and redeploy using the relevant deploy target (use “ant -p” to list the possible
targets).
22.6 Using the Services
This section demonstrates how the example SIP services can be used with a SIP user agent. The SIP user agent shown here is
Linphone 0.9.1 (http://www.linphone.org), a Gnome/GTK+ application for Linux. Other user agents that support RFC2543 or
RFC3261 should work as well.
Installation of Linphone or other user agents is not covered here; refer to the product documentation for specific installation
instructions.
Note. Regardless of the SIP proxy specified, some versions of Linphone may try to detect a valid SIP proxy for the
address of record using DNS.
If DNS is not configured to resolve SIP lookup requests to the SIP Proxy Service, then a 404 error from Linphone
may be received when requesting an INVITE of the form user@domain. Specify an address of record in the form
[email protected] to work around this issue. For more information regarding Locating SIP Servers, please refer to
IETF RFC3263.
There is an alternative to the graphical version of Linphone, which is useful for testing purposes over a network. The commandline version of linphone is called “linphonec”.
22.6.1
Configuring Linphone
The SIP configuration screen for Linphone is accessed from the Connection -> Parameters menu item on the Linphone
main window. This may differ in appearance depending on the version of Linphone installed, but should look similar to Figure
22.1.
Figure 22.1: The configuration screen for Linphone
Once the settings above have been applied, Linphone can be used with the example SIP services. This is discussed in the follow
sections.
Open Cloud Rhino 1.4.3 Administration Manual v1.1
143
Linphone Setting
SIP port
Identity
Use sip registrar
Server address:
Your password
Address of record
Use this registrar server. . .
Description
Default is 5060. Ensure this is different to the SIP RA’s port if
running the SLEE and Linphone on the same system.
The local SIP identity on this host, the contact address used in a SIP registration.
Ensure this is selected, so that Linphone will automatically send a REGISTER request when it starts.
The SIP address of the SLEE server, e.g. sip:hostname.domain:port
Leave this blank, the example services do not use authentication.
The public or well-known SIP address, e.g. sip:[email protected]. This address will
be registered with the SIP Registrar Service and bound to the local SIP identity above.
Check this box.
Table 22.3: Linphone settings
22.6.2
Using the Registrar Service
Linphone will automatically attempt to register with the SIP Registrar Service when it starts up. Ensure the SLEE is running
and the SIP Registrar Service has been deployed. When started from a terminal window with the --verbose flag, Linphone
will display all the requests and responses that it receives. Output similar to the following for a successful REGISTER request
should be seen:
| INFO1 | <udp.c: 292> Sending message:
REGISTER sip:siptest1.opencloud.com SIP/2.0
Via: SIP/2.0/UDP 192.168.0.9:5060;branch=z9hG4bK4101313487
From: <sip:[email protected]>;tag=1555020692
To: <sip:[email protected]>;tag=1555020692
Call-ID: [email protected]
CSeq: 0 REGISTER
Contact: <sip:[email protected]>
max-forwards: 10
expires: 900
user-agent: oSIP/Linphone-0.12.0
Content-Length: 0
| INFO1 | <udp.c: 206> info: RECEIVING UDP MESSAGE:
SIP/2.0 200 OK
Via: SIP/2.0/UDP 192.168.0.9:5060;branch=z9hG4bK4101313487
From: <sip:[email protected]>;tag=1555020692
To: <sip:[email protected]>;tag=1555020692
Call-ID: [email protected]
CSeq: 0 REGISTER
Max-Forwards: 10
Contact: <sip:[email protected]>;expires=900;q=0.0
Date: Sun, 18 Apr 2004 10:55:23 GMT
Content-Length: 0
A Registration Successful message should be show in the status bar of the Linphone main window.
To see the SIP network messages being passed between the SIP client (in these examples, Linphone) and Rhino SLEE, enable
debug-level log messages for sip.transport.manager in the Rhino SLEE. This can be done in the Command Console by
typing “setloglevel sip.transport.manager debug”.
The SLEE terminal window should show log messages similar to the following:
Open Cloud Rhino 1.4.3 Administration Manual v1.1
144
address-of-record = sip:[email protected]
Updating bindings
Updating binding: sip:[email protected] -> sip:[email protected]
Contact: <sip:[email protected]>
setRegistrationTimer(sip:[email protected], sip:[email protected], 900, 2400921797@192.
168.0 9, 0)
set new timer for registration: sip:[email protected] -> sip:[email protected], expires
in 900s
Adding 1 headers
Sending Response:
SIP/2.0 200 OK
Via: SIP/2.0/UDP 192.168.0.9:5060;branch=z9hG4bK4101313487
From: <sip:[email protected]>;tag=1555020692
To: <sip:[email protected]>;tag=1555020692
Call-ID: [email protected]
CSeq: 0 REGISTER
Max-Forwards: 10
Contact: <sip:[email protected]>;expires=900;q=0.0
Date: Sun, 18 Apr 2004 10:55:23 GMT
Content-Length: 0
Note that the first REGISTER request processed by the SLEE after it starts up may take slightly longer than normal. This is
due to one-time initialisation of some SIP stack and SLEE classes. Subsequent requests will be much quicker.
22.6.3
Using the Proxy Service
The SIP Proxy Service can be used to setup a call between two Linphone user agents on the same network. The Proxy Service
does not support advanced features like authentication or request forking, and can only be used within a single domain.
It is necessary to run the Linphone user agents on separate hosts. This is so that the RTP ports used by Linphone for audio data
do not conflict. Assume the two hosts in our example are called siptest1 and siptest2.
Rhino SLEE may run on one of these hosts (assume siptest1) as long as the SIP RA UDP port (default 5060) does not conflict
with the Linphone SIP port on that host.
On each host, setup the Linphone user agent to use siptest1 as the SIP server. Configure the user agent on siptest1 to use the
address-of-record sip:[email protected] and the siptest2 user agent to use the address-of-record sip:[email protected].
Start both user agents. Both should register automatically with the Registrar service (the Registrar service is installed with the
Proxy service as a “Child SBB”).
Once both agents have registered, it is then possible to make a call to a user’s public SIP address via the Proxy service.
The Proxy service will retrieve the callee’s contact address from the Location Service and route the call (a SIP INVITE request)
to the destination user agent.
On siptest1 (Joe’s host), enter the SIP address sip:[email protected], and press Call or Answer. This will send a SIP
INVITE request to Fred, via the Proxy Service.
The status bars on the user agents should show the call in progress. A ringing tone will be heard if sound is enabled. On siptest2,
hit Call or Answer to accept the call. This will complete the INVITE-200 OK-ACK SIP handshake and setup the call. Both
user agents should now show Connected in the status bar.
If the local systems have microphone inputs enabled then it should be possible to speak to the other party. The audio data is
transferred directly between the user agents over a separate RTP connection. This connection is not managed by the SIP proxy
service.
Either user can then hangup the call by hitting Release or Refuse. This will send a SIP BYE request to the other user agent.
Hitting Release or Refuse on the caller while the INVITE is in progress will send a CANCEL request. If the callee hits
Release or Refuse, this will cause a 603 Decline response to be returned to the caller.
Open Cloud Rhino 1.4.3 Administration Manual v1.1
145
siptest1
siptest2
siptest1
siptest2
siptest1
siptest2
Open Cloud Rhino 1.4.3 Administration Manual v1.1
146
22.6.4
Enabling Debug Output
The SIP services can write tracing information to the Rhino SLEE logging system via the SLEE Trace Facility.
To enable tracing logging output, login to the Web ConsoleFrom the main page, select SLEE Subsystems, then View Trace
MBean.
On the Trace page are setTraceLevel and getTraceLevel buttons. On the drop-down list next to setTraceLevel, select the
component to debug, for example the SIP Proxy SBB. Select a trace level; Finest is the most detailed.
Hit the setTraceLevel button. The Proxy SBB will now output more detailed logging information, such as the contents of
SIP messages that it sends and receives.
The Proxy SBB trace level can also be quickly changed on the command line, using rhino-console. For example:
$RHINO_HOME/client/bin/rhino-console setTraceLevel sbb "ProxySbb 1.5, Open Cloud" Finest
Open Cloud Rhino 1.4.3 Administration Manual v1.1
147
Chapter 23
JCC Example Application
23.1 Introduction
The Rhino SLEE includes a sample application that makes use of Java Call Control version 1.1 (JCC 1.1). This section explains
how to build, deploy and use this example. JCC is a framework that provides applications with a consistent mechanism for
interfacing underlying divergent networks. It provides a layer of abstraction over network protocols and presents a high-level
API to applications. JCC includes facilities for observing, initiating, answering, processing and manipulating calls.
The example code demonstrates how a simple JCC application can be implemented using the SLEE. This application is not
intended for production use.
23.1.1
Intended Audience
The intended audiences are SLEE developers and administrators who want to become familiar with SBB and JCC programming
and deployment practices. Some understanding of Java Call Control is assumed.
23.1.2
System Requirements for JCC example
The JCC examples run on all supported Rhino SLEE platforms. Please see Appendix A for details.
Required software:
• Java Call Control Reference Implementation http://www.argreenhouse.com/JAINRefCode
In order for the JCC Resource Adaptor and JCC Call Forwarding Service to function, the Reference Implementation of JCC 1.1
must be downloaded, see section 23.4.1 for installation instructions.
23.2 Basic Concepts
The JCC API defines four objects which model the key call processing functionality: “Provider”, “Call”, “Connection” and
“Address”. Some of these objects contain finite state machines that model the state of a call. These provide facilities for
allowing applications to register and be invoked, on a per-user basis, when relevant points in call processing are reached. These
four objects are:
• Provider: represents the “window” through which an application views the call processing.
• Call: represents a call and is a dynamic “collection of physical and logical entities” that bring two or more endpoints
together.
• Address: represents a logical endpoint (e.g., directory number or IP address).
148
Provider
Call
Connection
Connection
Address
Address
Figure 23.1: Object model of a two-party call
• Connection: represents the dynamic relationship between a Call and an Address.
The purpose of a Connection object is to describe the relationship between a Call object and an Address object. A
Connection object exists if the Address is a part of the telephone call. Connection objects are immutable in terms of
their Call and Address references. In other words, the Call and Address object references do not change throughout the
lifetime of the Connection object instance. The same Connection object may not be used in another telephone call.
23.2.1
Resource Adaptor
The JCC Resource Adaptor provides the interface between a JCC implementation and the Rhino SLEE. The JCC RA receives
events from the JCC implementation and maps these events to activities and events as required by the SLEE programming
model. This adaptation follows the JCC resource adaptor recommendations in the JAIN SLEE specification.
The JCC RA also includes a graphical interface that may be used to create and terminate calls in order to drive the JCC
applications. Note that the graphical user interface is run from within the SLEE; running graphical utilities from inside the
SLEE is an implementation strategy for this example only and is not recommended in a production system.
23.2.2
Call Forwarding Service
The Call Forwarding Service is a service that forwards numbers made to a particular terminating party to another terminating
party. The Call Forwarding Service reads information from the SLEE Profile Facility to determine whether or not to forward a
given call, and if it is to forward a call what address the call should be forwarded to.
The service is implemented as the JCC Call Forwarding SBB, which contains the service logic. The SBB stores its state using
JAIN SLEE Profiles.
The SBB reacts to events using the ‘onCallDelivery’ event handler. It accesses the stored state using the profile CMP method
‘getCallForwardingProfile’.
The service works as follows:
1. The Call ForwardingService is listening for either the Authorize Call Attempt event or the JCC Call Delivery event,
implemented as a JccConnectionEvent.CONNECTION_AUTHORIZE_CALL_ATTEMPT or JccConnectionEvent
.CONNECTION_CALL_DELIVERY
Open Cloud Rhino 1.4.3 Administration Manual v1.1
149
Figure 23.2: Diagrammatic representation of the Call Forwarding Service
2. It determines whether the called party has call forwarding enabled, and to which number.
3. If so, the call is routed: Call.routeCall(...);
4. The service completes: Connection.continueProcessing();
The Call Forwarding Profile contains the following user subscription information:
• Address: address of the terminating party.
• Forwarding address: address where the call will be forwarded.
• Forwarding enable: Boolean value which indicates if service is enabled for a determined user.
Event Handling
Calls made between two parties, such as from user A (1111) and user B (2222), cause new JCC events to be released into the
SLEE. This service is executed for the terminating party (user B), so the JCC event which arrives to the JCC Resource Adaptor
is the Connection Authorize Call Attempt event.
This is the deployment descriptor (stored in sbb-jar.xml) for the service:
<event event-direction="Receive" initial-event="True" mask-on-attach="False">
<event-name>CallDelivery</event-name>
<event-type-ref>
<event-type-name>
javax.csapi.cc.jcc.JccConnectionEvent.CONNECTION_AUTHORIZE_CALL_ATTEMPT
</event-type-name>
<event-type-vendor>javax.csapi.cc.jcc</event-type-vendor>
<event-type-version>1.1</event-type-version>
</event-type-ref>
<initial-event-select variable="AddressProfile"/>
<event-resource-option>block</event-resource-option>
</event>
The service has an initial event, the Connection Authorize Call Attempt event. The initial event is selected using the
“initial-event="True"” line. The variable selected to determine if a root SBB must be created is AddressProfile
Open Cloud Rhino 1.4.3 Administration Manual v1.1
150
Figure 23.3: Call Attempt
(initial-event-select variable="AddressProfile"). So when a “Connection Authorize Call Attempt” event arrives at
the JCC Resource Adaptor, a new root SBB will be created for that service if the Address (user B address) is present in the
Address Profile Table of the Service.
The JCC Resource Adaptor creates an activity for the initial event. The Activity object associated with this activity is the
JccConnection object. The JCC Resource Adaptor enqueues the event to the SLEE Endpoint.
23.2.3
Service Logic
After verification, a new Call Forwarding SBB entity is created to execute the service logic for this call. The SBB receives a
Connection Authorize Call Attempt event and executes the onCallDelivery method.
As can be seen in the deployment descriptor above, the SBB must defines an event (<event-name> CallDelivery </event-name>)
which matches with an event type (<event-type-name> javax.csapi.cc.jcc.JccConnectionEvent.
CONNECTION_AUTHORIZE_CALL_ATTEMPT </event-type-name>). The SBB will execute the method onEventName
every time it receives that event.
public void onCallDelivery (JccConnection connection, ActivityContextInterface aci) {
// Source code
}
If the service (Call Forwarding SBB) wants to receive more JCC events for this Activity, it will need to attach to the Activity
Context Interface associated with this activity (not in this example).
OnCallDelivery Method
The OnCallDelivery method determines the logic of Call Forwarding service.
The SBB must find out if the call must be redirected. It needs to access to user subscription information data in Call Forwarding
Profile. The SBB requests the Profile data indexed by the address of user B, included in JCC message. At this part, it is certain
that user B exists in service Profile, because the SBB has been created based on initial event select variable = Address Profile.
Open Cloud Rhino 1.4.3 Administration Manual v1.1
151
Figure 23.4: Call Forwarding SBB creation
// get profile for service instance’s current subscriber
CallForwardingAddressProfileCMP profile;
try {
// get profile table name from environment
String profileTableName = (String)new InitialContext().lookup(
"java:comp/env/ProfileTableName");
// lookup profile
ProfileFacility profileFacility = (ProfileFacility)new InitialContext().lookup(
"java:comp/env/slee/facilities/profile");
ProfileID profileID = profileFacility.getProfileByIndexedAttribute(profileTableName,
"addresses", new Address(AddressPlan.E164, current));
if (profileID == null) {
trace(Level.FINE, "Not subscribed: " + current);
return;
}
profile = getCallForwardingProfile(profileID);
} catch (UnrecognizedProfileTableNameException upte) {
trace(Level.WARNING, "ERROR: profile table doesn’t exist: CallForwardingProfiles");
return;
} catch (Exception e) {
trace(Level.WARNING, "ERROR: exception caught looking up profile", e);
return;
}
If forwarding parameter in Profile is enabled, the SBB changes the destination number for the call, and routes the call to the
Forwarding Address of that user.
// check subscriber profile to see if service is enabled
if (!profile.getForwardingEnabled()) {
Open Cloud Rhino 1.4.3 Administration Manual v1.1
152
Figure 23.5: OnCallDelivery method execution
trace(Level.FINE, "Forwarding not enabled - ignoring event");
return;
}
// get forwarding address
String routedAddress = profile.getForwardingAddress().getAddressString();
Finally, the SBB executes the Continue Processing method in the JCC connection, and the connection is unblocked.
Service Garbage Collection
After receiving the Route Call or Continue notification which unblocks the call, the JCC Resource Adaptor sends the JCC
message to the network in order to establish the communication between user A (1111) and user B, located in the redirected
number (3333).
The SBB entity is not attached to any Activity Context Interface, so it will not receive more events. Because of that, after a
while, SLEE container will remove that SBB entity. The activity, which is not attached to any SBB will be removed too.
If there is a need to receive a notification about call finalization then attach the SBB to the activity. When a Release Call JCC
event would be received (an end activity event), the Activity Context Interface would be detached from the SBB and the SBB
and Activity would be removed.
Open Cloud Rhino 1.4.3 Administration Manual v1.1
153
Figure 23.6: Service finalization. SBB and activity has been removed
23.3 Directory Contents
The base directory for the JCC Examples is $RHINO_HOME/examples/jcc. When referring to file locations in the following
sections, this directory is abbreviated to $EXAMPLES. The contents of the examples directory are summarised below.
File/directory name
build.xml
build.properties
README
createjcctrace.sh
src/
lib/
classes/
jars/
ra/
Description
Ant build script for JCC example applications. Manages building and deployment
of the examples.
Properties for the Ant build script.
Text file containing quick start instructions.
Shell script to create JCC trace components, used to test the JCC applications.
Contains source code for example JCC services.
Contains pre-built jars of the JCC resource adaptor and resource adaptor type.
Compiled classes are written to this directory.
Jar files are written here, ready for deployment.
Contains deployment descriptors for assembling the JCC RA deployable unit.
23.4 Installation
23.4.1
JCC Reference Implementation
Before attempting to deploy the JCC examples, the JCC Reference Implementation must be downloaded. Due to licensing
restrictions this cannot be included with the Rhino SLEE.
The JCC RI is available from http://www.argreenhouse.com/JAINRefCode . After downloading, the JCC RI jar file
(jcc-ri-1.1.jar) should be copied to the $RHINO_HOME/examples/jcc/lib directory. Proceed with installing the examples
below after this is done.
Open Cloud Rhino 1.4.3 Administration Manual v1.1
154
23.4.2
Deploying the Resource Adaptor
The Ant build script $EXAMPLES/build.xml contains build targets for deploying and undeploying the JCC RA.
To deploy the JCC RA, first ensure that the SLEE is running. Go to the JCC examples directory, and then execute the Ant target
deployjccra as shown:
user@host:~/rhino/examples/jcc$ ant deployjccra
Buildfile: build.xml
management-init:
[echo] OpenCloud Rhino SLEE Management tasks defined
login:
[slee-management] establishing new connection to : 127.0.0.1:1199/admin
buildjccra:
[mkdir]
[copy]
[jar]
[delete]
Created dir: /home/user/rhino/examples/jcc/library
Copying 2 files to /home/user/rhino/examples/jcc/library
Building jar: /home/user/rhino/examples/jcc/jars/jcc-1.1-local-ra.jar
Deleting directory /home/user/rhino/examples/jcc/library
deployjccra:
[slee-management] Install deployable unit file:/home/user/rhino/examples/jcc/lib/jcc-1.1-ra-ty
pe.jar
[slee-management] Install deployable unit file:/home/user/rhino/examples/jcc/jars/jcc-1.1-loca
l-ra.jar
[slee-management] Create resource adaptor entity jccra from JCC 1.1-Local 1.0, Open Cloud Ltd.
[slee-management] Activate RA entity jccra
BUILD SUCCESSFUL
Total time: 18 seconds
This compiles the JCC resource adaptor, assembles the RA jar file, deploys it into the SLEE, creates an instance of the JCC
Resource Adaptor and finally activates it.
Please ensure Rhino SLEE is in the RUNNING state before the deployment.
user@host:~/rhino$ ./client/bin/rhino-console
Interactive Rhino Management Shell
Rhino management console, enter ’help’ for a list of commands
[Rhino@localhost (#0)] state
SLEE is in the Running state
The JCC RA can similarly be uninstalled using the Ant target undeployjccra, as shown below:
Open Cloud Rhino 1.4.3 Administration Manual v1.1
155
user@host:~/rhino/examples/jcc$ ant undeployjccra
Buildfile: build.xml
management-init:
[echo] OpenCloud Rhino SLEE Management tasks defined
login:
[slee-management] establishing new connection to : 127.0.0.1:1199/admin
undeployjccra:
[slee-management]
[slee-management]
[slee-management]
[slee-management]
[slee-management]
local-ra.jar
[slee-management]
a-type.jar
Deactivate RA entity jccra
Wait for RA entity jccra to deactivate
RA entity jccra is now inactive
Remove RA entity jccra
Uninstall deployable unit file:///home/user/rhino/examples/jcc/jars/jcc-1.1Uninstall deployable unit file:///home/user/rhino/examples/jcc/lib/jcc-1.1-r
BUILD SUCCESSFUL
Total time: 7 seconds
23.5 The Call Forwarding Service
23.5.1
Installing and Configuring
Installing the Call Forwarding Service involves deploying the Call Forwarding Service and configuring the Call Forwarding
Profile so that calls are forwarded to the appropriate destinations.
The Call Forwarding Service and Profile Specification components are deployed together in the same deployable unit jar file.
Use the Ant target deployjcccallfwd to compile and deploy these components into the SLEE:
Open Cloud Rhino 1.4.3 Administration Manual v1.1
156
user@host:~/rhino/examples/jcc$ ant deployjcccallfwd
Buildfile: build.xml
management-init:
[echo] OpenCloud Rhino SLEE Management tasks defined
login:
[slee-management] establishing new connection to : 127.0.0.1:1199/admin
buildjccra:
[mkdir]
[copy]
[jar]
[delete]
Created dir: /home/user/rhino/examples/jcc/library
Copying 2 files to /home/user/rhino/examples/jcc/library
Building jar: /home/user/rhino/examples/jcc/jars/jcc-1.1-local-ra.jar
Deleting directory /home/user/rhino/examples/jcc/library
deployjccra:
[slee-management] Install deployable unit file:/home/user/rhino/examples/jcc/lib/jcc-1.1-ra-ty
pe.jar
[slee-management] Install deployable unit file:/home/user/rhino/examples/jcc/jars/jcc-1.1-loca
l-ra.jar
[slee-management] Create resource adaptor entity jccra from JCC 1.1-Local 1.0, Open Cloud Ltd.
[slee-management] Activate RA entity jccra
buildjcccallfwd:
[mkdir] Created dir: /home/user/rhino/examples/jcc/classes/jcc-callforwarding
[javac] Compiling 3 source files to /home/user/rhino/examples/jcc/classes/jcc-callforwardi
ng
[profilespecjar] Building profile-spec-jar: /home/user/rhino/examples/jcc/jars/profile.jar
[sbbjar] Building sbb-jar: /home/user/rhino/examples/jcc/jars/sbb.jar
[deployablejar] Building deployable-unit-jar: /home/user/rhino/examples/jcc/jars/call-forwardi
ng.jar
[delete] Deleting: /home/user/rhino/examples/jcc/jars/profile.jar
[delete] Deleting: /home/user/rhino/examples/jcc/jars/sbb.jar
deployjcccallfwd:
[slee-management]
rding.jar
[slee-management]
gProfile
1.0, Open Cloud
[slee-management]
[slee-management]
[slee-management]
[slee-management]
[slee-management]
Install deployable unit file:///home/user/rhino/examples/jcc/jars/call-forwa
Create profile table CallForwardingProfiles from specification CallForwardin
Create profile foo in table CallForwardingProfiles
Set attribute Addresses in profile foo to [E.164:1111]
Set attribute ForwardingAddress in profile foo to E.164:2222
Set attribute ForwardingEnabled in profile foo to true
Activate service JCC Call Forwarding 1.0, Open Cloud
BUILD SUCCESSFUL
Total time: 42 seconds
The build process automatically creates a Call Forwarding Profile Table with some example data in it so that the examples can
be run straight away. The example profile specifies that any calls to the E.164 address 1111 be forwarded to 2222.
The service can be uninstalled using the undeployjcccallfwd build target:
Open Cloud Rhino 1.4.3 Administration Manual v1.1
157
user@host:~/rhino/examples/jcc$ ant undeployjcccallfwd
Buildfile: build.xml
management-init:
[echo] OpenCloud Rhino SLEE Management tasks defined
login:
[slee-management] establishing new connection to : 127.0.0.1:1199/admin
undeployjcccallfwd:
[slee-management] Deactivate service JCC Call Forwarding 1.0, Open Cloud
[slee-management] Wait for service JCC Call Forwarding 1.0, Open Cloud to deactivate
[slee-management] Service JCC Call Forwarding 1.0, Open Cloud is now inactive
[slee-management] Remove profile foo from table CallForwardingProfiles
[slee-management] Remove profile table CallForwardingProfiles
[slee-management] Uninstall deployable unit file:///home/user/rhino/examples/jcc/jars/call-for
warding.jar
BUILD SUCCESSFUL
Total time: 10 seconds
23.5.2
Examining using the Command Console
Now that the service is deployed, the Rhino console can be used to examine the results.
• The deployable units: with regard to this application there are installed the call forwarding service (with the SBB and the
Call Forwarding Profile), and the JCC Resource Adaptor and Resource Adaptor Type.
[Rhino@localhost (#1)] listdeployableunits
DeployableUnit[url=file:///home/user/rhino/examples/jcc/jars/call-forwarding.jar]
DeployableUnit[url=file:///home/user/rhino/examples/jcc/jars/jcc-1.1-local-ra.jar]
DeployableUnit[url=file:///home/user/rhino/examples/jcc/lib/jcc-1.1-ra-type.jar]
DeployableUnit[url=jar:file:/home/user/rhino/lib/RhinoSDK.jar!/javax-slee-standard-types.jar]
• The Resource Adaptor:
[Rhino@localhost (#2)] listresourceadaptors
ResourceAdaptor[JCC 1.1-Local 1.0, Open Cloud Ltd.]
• The Resource Adaptor Entities: there are deployed an entity of the resource adaptor.
[Rhino@localhost (#3)] listraentities
jccra
• The Service:
[Rhino@localhost (#4)] listservices
Service[JCC Call Forwarding 1.0, Open Cloud]
• The SBB:
[Rhino@localhost (#5)] listsbbs
Sbb[JCC Call Forwarding SBB 1.0, Open Cloud]
• The Profile Specifications: there are three profiles specification, the Call Forwarding Profile of our application plus two
Rhino internal profiles (AddressProfileSpec and ResourceInfoProfileSpec).
Open Cloud Rhino 1.4.3 Administration Manual v1.1
158
[Rhino@localhost (#6)] listprofilespecs
ProfileSpecification[AddressProfileSpec 1.0, javax.slee]
ProfileSpecification[CallForwardingProfile 1.0, Open Cloud]
ProfileSpecification[ResourceInfoProfileSpec 1.0, javax.slee]
• The Profile Tables:
[Rhino@localhost (#7)] listprofiletables
CallForwardingProfiles
• The Profiles inside the CallForwardingProfiles Table:
[Rhino@localhost (#8)] listprofiles CallForwardingProfiles
foo
• The Profiles Attributes inside the foo profile:
[Rhino@localhost (#9)] listprofileattributes CallForwardingProfiles foo
Addresses=
[0] E.164: 1111
ForwardingAddress=E.164: 2222
ForwardingEnabled=true
• The activities: there are two Rhino internal activities, one for the CallForwardingProfiles profile table and another for the
JCC Call Forwarding Service.
[Rhino@localhost (#10)] findactivities
pkey
handle
------------------------- ------------------------------------------------------------65.4.4366CB83.3.519CA2DB
ProfileTableActivity[CallForwardingProfiles]
65.5.4366CB83.3.E769D57
ServiceActivity[JCC Call Forwarding 1.0, Open Cloud]
ra-entity
--------------Rhino internal
Rhino internal
replicated
----------true
true
submission-time
-----------------20051101 02:58:56
20051101 02:58:57
update-time
-----------------20051101 02:58:56
20051101 02:58:57
2 rows
23.5.3
Editing the Call Forwarding Profile
To enable call forwarding for more addresses, more Call Forwarding Profiles must be added in the SLEE, or existing ones can
be modified. This can be done from the Web Console or the Command Console.
Web Console Interface
This example will demonstrate how to create a Call Forwarding Profile that forwards calls destined for the E.164 address
5551212 to 5553434.
Login to the Web Console, from the main page, hit the Profile Provisioning link.
We need to create a new profile in the CallForwardingProfiles Profile Table. This new profile can have any name, such as
profile1.
In the createProfile field, enter CallForwardingProfiles and profile1 as shown, and hit the createProfile button.
Open Cloud Rhino 1.4.3 Administration Manual v1.1
159
The profile is presented in edit mode.
To change profiles, the web interface must be in the “edit” mode. The web interface is left in “edit” mode after a profile is
created. If not, hit the editProfile button, then on the results page hit the profile1 link to go back to the profile.
Change the value of one or more attributes by editing their value fields. The web interface will correctly parse values for Java
primitive types and Strings, arrays of primitive types or Strings, and also javax.slee.Address objects.
In the Addresses field, enter [E.164:5551212]. This notation represents a javax.slee.Address object of type E.164 and
value 5551212. The square brackets are used because this attribute is an array of addresses. For example, a number of addresses
can be forwarded using [E.164:1111, E.164:2222, E.164:3333] and so on.
The ForwardingAddress attribute is a single address to which the above address(es) will be forwarded. Enter E.164:5553434
for the ForwardingAddress attribute.
Finally, select the value true for the ForwardingEnabled attribute.
Once the values have been edited, hit applyAttributeChanges button (this will parse and check the attribute values) and the
commitProfile button to commit the changes.
The profile is now active. Test that forwarding works using the JCC trace components described below.
Command Console Interface
As above, this example demonstrates how to create a Call Forwarding Profile that forwards calls to E.164 address 5551212 to
5553434. This can be done using the Command Console.
First ensure that the Call Forwarding Service has been deployed, and then follow the steps below to create more profiles.
1. Create a new profile in CallForwardingProfiles Profile Table.
user@host:~/rhino$ ./client/bin/rhino-console
Interactive Rhino Management Shell
Rhino management console, enter ’help’ for a list of commands
[Rhino@localhost (#0)] createprofile CallForwardingProfiles profile1
Created profile CallForwardingProfiles/profile1
2. Set the Addresses, ForwardingAddress and ForwardingEnabled attributes.
Open Cloud Rhino 1.4.3 Administration Manual v1.1
160
Note that the Addresses attribute is an array of addresses, hence the enclosing brackets.
[Rhino@localhost (#1)] setprofileattributes CallForwardingProfiles profile1 \
Addresses "[E.164:5551212]" \
ForwardingAddress "E.164:5553434" \
ForwardingEnabled "true"
Set attributes in profile CallForwardingProfiles/profile1
3. View the profile.
[Rhino@localhost (#2)] listprofileattributes CallForwardingProfiles profile1
RW javax.slee.Address[] Addresses=[E.164: 5551212]
RW boolean ForwardingEnabled=true
RW javax.slee.Address ForwardingAddress=E.164: 5553434
Forwarding from 5551212 to 5553434 is now enabled.
23.6 JCC Call Forwarding Service
23.6.1
Trace Components
In order for users to test the JCC resource adaptor, a graphical JCC trace component is included as part of the JCC resource
adaptor. This trace component allows the user to create and terminate calls. Each trace component has an associated E.164
address and listens for events destined to that address. The trace component does not function as a terminal device, i.e. it is
never ‘busy’ and multiple components can share the same address.
23.6.2
Creating Trace Components
Trace components are created by use of the createjcctrace.sh shell script that is located in the JCC examples directory. The
parameter to the shell script is the E.164 address that the trace component will listen to events on. For example, the commands:
$ ./createjcctrace.sh 1111
$ ./createjcctrace.sh 2222
$ ./createjcctrace.sh 3333
will launch 3 JCC trace components, similar to those shown below.
Open Cloud Rhino 1.4.3 Administration Manual v1.1
161
The component executes in the same JVM as the SLEE therefore the trace components can only be used if the SLEE process
can access a windowing system.
23.6.3
Creating a Call
Using the trace components ‘dial’ facility creates a new call. The destination number is entered and the ‘dial’ button selected.
The trace component at the destination address should show an incoming call alert, which can be answered or disconnected as
desired.
23.6.4
Testing Call Forwarding
The Call Forwarding Service can be tested simply by dialling a number from one trace component, and observing how the call
gets redirected to the appropriate forwarding address.
Open Cloud Rhino 1.4.3 Administration Manual v1.1
162
For example, the default Call Forwarding Profile enables forwarding from address 1111 to 2222. To test this, launch 3 trace
components using addresses 1111, 2222 and 3333 respectively. On the 3333 component, dial 1111. The call will be forwarded
to 2222, which can then answer or hangup the call. The screen shot below shows this in action.
23.7 Call Duration Service
This service measures the duration of a call, and writes a trace with the result.
Figure 23.7: General funcationality of the Call Duration Service
The general functionality of the service can be described in the following steps:
Open Cloud Rhino 1.4.3 Administration Manual v1.1
163
1. It starts when receives a JCC event:
• CONNECTION_CONNECTED
2. It stores the start time in a CMP field.
3. The service receives one of the following JCC events:
• CONNECTION_DISCONNECTED
• CONNECTION_FAILED
4. It calculates the call duration, reading the CMP field, and detaches from activity.
5. The service finishes.
23.7.1
Call Duration Service - Architecture
The JCC components included are:
JCC Resource Adaptor: this is the same resource adaptor as used in the above examples.
JCC Events: the duration service listens for several JCC Events:
• JccConnectionEvent.CONNECTION_CONNECTED
• JccConnectionEvent.CONNECTION_DISCONNECTED
• JccConnectionEvent.CONNECTION_FAILED
JCC Call Duration SBB: this contains the service logic, comprising of:
• Event handler method onCallConnected to store the call start time.
• Event handler methods onCallDisconnected and onCallFailed to calculate call duration.
23.7.2
Call Duration Service - Execution
JCC event: Call Connected
When user A makes a call to user B, B answers the call and a new JCC event arrives at the JAIN SLEE. The deployment
descripter below shows how these events are declared:
<event event-direction="Receive" initial-event="True">
<event-name>CallConnected</event-name>
<event-type-ref>
<event-type-name>
javax.csapi.cc.jcc.JccConnectionEvent.CONNECTION_CONNECTED
</event-type-name>
<event-type-vendor>javax.csapi.cc.jcc</event-type-vendor>
<event-type-version>1.1</event-type-version>
</event-type-ref>
<initial-event-select variable="ActivityContext"/>
<initial-event-selector-method-name>determineIsOriginating</initial-event-selector-method-name>
<event-resource-option>block</event-resource-option>
</event>
This service has an initial event (initial-event="True"), which is the “Connection Connected event”. The variable selected
to determine if a root SBB must be created is “Activity Context” (initial-event-select variable="ActivityContext").
So when a “Connection Connected” event arrives at the JCC Resource Adaptor, a new root SBB will be created for that service
if there is not already an Activity handling this call.
The JCC Resource Adaptor creates an activity for the initial event. The Activity Object associated with this activity is the
JccConnection object. The JCC Resource Adaptor enqueues the event to the SLEE Endpoint.
Open Cloud Rhino 1.4.3 Administration Manual v1.1
164
Figure 23.8: Initial Event in Call Duration Service
This service is executed only in the originating party (user A) because we use an initial event selector method that determines
that, as we can see in the source code below.
public InitialEventSelector determineIsOriginating(InitialEventSelector ies) {
// Get the Activity from the InitialEventSelector
JccConnection connection = (JccConnection) ies.getActivity();
// Determines if the message correspond to an initial event
boolean isInitialEvent = connection.getAddress(). getName().equals(connection.getOriginatingAddress().getName());
if (isInitialEvent)
trace(Level.FINE, "Event (" + ies.getEventName() + ") on " + connection + " may be an initial event");
// Set if it is InitialEvent in InitialEventSelector
ies.setInitialEvent(isInitialEvent);
return ies;
}
23.7.3
Service Logic: Call Duration SBB
OnCallConnected method
After verification, a new Call Duration SBB entity is created to execute the service logic for this call. The SBB receives a
CallConnected event and executes the onCallConnected method.
As you can see in the Initial Event Selector method, the SBB must defines an event (<event-name> CallConnected </eventname>) which matches with an event type (<event-type-name> javax.csapi.cc.jcc.JccConnectionEvent.CONNECTION_CONNECTED
</event-type-name>). Then, the onCallConnected(...) method (shown below) will be called every time this SBB receives
that event.
Open Cloud Rhino 1.4.3 Administration Manual v1.1
165
Figure 23.9: Call Duration SBB creation
public void onCallConnected(JccConnectionEvent event,
ActivityContextInterface aci) {
JccConnection connection = event.getConnection();
long startTime = System.currentTimeMillis();
trace(Level.FINE, "Call from " + connection.getAddress().getName());
this.setStartTime(startTime);
try {
if (connection.isBlocked())
connection.continueProcessing();
} catch (Exception e) {
trace(Level.WARNING, "ERROR: exception caught in continueProcessing()", e);
}
}
The SBB stores the current time in a CMP field in order to calculate the call duration at a later stage. Finally, the SBB executes
the continueProcessing() method in the JCC connection, and the connection is unblocked.
Using the findsbbs command of the Command Console, it can be seen that there is an SBB handling each established call.
[Rhino@localhost (#2)] findsbbs -service JCC\ Call\ Duration\ 1.0,\ Open\ Cloud
pkey creation-time parent-pkey replicated sbb-component-id service-component-id
---- -------------- ------------ ----------- ---------------- -------101:31421066918:0 20051102 12:58:14 false JCC Call Duration SBB^Open Cloud^1.0 JCC Call Duration^Open Cloud^1.0
1 rows
OnCallDisconnected and onCallFailed method – Service Garbage Collection
The SBB is listening to Call Disconnected and Call Failed events, as we can see in the deployment descriptor file for this
service:
Open Cloud Rhino 1.4.3 Administration Manual v1.1
166
<event event-direction="Receive">
<event-name>CallDisconnected</event-name>
<event-type-ref>
<event-type-name> javax.csapi.cc.jcc.JccConnectionEvent.CONNECTION_DISCONNECTED
</event-type-name>
<event-type-vendor>javax.csapi.cc.jcc</event-type-vendor>
<event-type-version>1.1</event-type-version>
</event-type-ref>
</event>
<event event-direction="Receive">
<event-name>CallFailed</event-name>
<event-type-ref>
<event-type-name> javax.csapi.cc.jcc.JccConnectionEvent.CONNECTION_FAILED
</event-type-name>
<event-type-vendor>javax.csapi.cc.jcc</event-type-vendor>
<event-type-version>1.1</event-type-version>
</event-type-ref>
</event>
When the SBB receives any of them it calls to a private method called calculateCallDuration to handle the events and
detach from activity.
private void calculateCallDuration(String cause, JccConnectionEvent event, ActivityContextInterface aci) {
JccConnection connection = event.getConnection();
trace(Level.INFO, "Received " + cause + " event on call from " + connection.getAddress().getName());
long startTime = getStartTime();
long endTime = System.currentTimeMillis();
long duration = endTime - startTime;
int seconds = (int) (duration / 1000);
int millis = (int) (duration % 1000);
String smillis = "00" + String.valueOf(millis);
smillis = smillis.substring(smillis.length() - 3);
trace(Level.INFO, "call duration=" + seconds + "." + smillis + "s");
// detach from activity
aci.detach(context.getSbbLocalObject());
}
This method calculates the call duration subtracting the start call time to the current time, that is stored in a CMP field. The
SBB writes a trace with the call duration.
Open Cloud Rhino 1.4.3 Administration Manual v1.1
167
Figure 23.10: Call Disconnected or Call Failed events
After this, the SBB is not interested in any more events, so it detaches from the activity, and, after a while, the SLEE container
will remove that SBB entity. The activity, which is not attached to any SBB will be removed too.
Figure 23.11: Call Duration Service finalization. SBB is detached from activity
The Command Console can be used to show that the SBB has been removed:
[Rhino@localhost (#2)] findsbbs -service JCC\ Call\ Duration\ 1.0,\ Open\ Cloud
no rows
Open Cloud Rhino 1.4.3 Administration Manual v1.1
168
Chapter 24
Customising the SIP Registrar
24.1 Introduction
This section provides a mini-tutorial which shows developers how to use various features of the Rhino SLEE and of JAIN
SLEE. The mechanism employed to achieve this objective is writing a small extension to a pre-written example application the SIP Registrar. A brief background on SIP Registration is provided in Section 24.2 for developers who are not familiar with
the SIP Protocol.
By following the steps in the mini-tutorial, a developer will touch upon the following JAIN SLEE concepts:
1. The Service Building Block (SBB)
2. The SBB’s deployment descriptor
3. The SBB’s JNDI environment
4. Using the JAIN SLEE Trace Facility from an administrative and development perspective
Additionally the developer will use a small part of the JAIN SIP 1.1 API.
Once this activity is completed a suggestion for a valid larger extension to the SIP Registrar application is described, and some
hints for pieces of the existing examples which developers should look at for inspiration are provided.
24.2 Background
When a SIP device boots it performs an action know as "registration" in order for the device to be able to receive incoming
session requests (for example if the SIP device is a phone handset, it can receive incoming calls via the SIP protocol). The
registration process involves two entities, the SIP device itself and a SIP Registrar. A SIP Registrar is a system running on a
network which stores the registration of SIP devices, and uses that information to provide the location of the SIP device on an
IP network.
The sample Registrar application allows all users to successfully perform a registration action. However typically there is
some requirement for administrative control over which users are allowed to successfully register and which are not allowed to
register. A very simple way to provide some selective functionality is to use the Domain Name of the user’s SIP address and
only allow users who are from the same domain as the SIP Registrar to successfully register. Therefore registration requests
from users in other domains are rejected.
Very simply the SIP registration protocol is initiated by a client device sending a SIP REGISTER message. The REGISTER
message has three headers which are of interest to the sample Registrar application, they are the TO, the FROM and the CONTACT headers. The TO and FROM headers contain the user’s public SIP address (for example sip:[email protected]).
The CONTACT header contains the IP address and port which the device will accept session request on (for example
sip:192.168.0.7:5060).
If the SIP Registrar accepts the registration request it will send back a 200-OK response, and on receipt of that response the
device will know that it has registered successfully. If the SIP Registrar refuses the registration request then it will send back a
SIP error response. For this example, a 403-Forbidden response is used.
169
24.3 Performing the Customisation
The following steps should be carried out in order to provide the additional function.
1. Backup the existing SIP Registrar source example which is located in the $RHINO_HOME/examples/sip/src/com/
opencloud/slee/services/sip/registrar.
2. Install the SIP Registrar (if it is not already installed). From the examples/sip directory under the Rhino SLEE directory,
run the following command:
ant deployregistrar
3. To see what the Registrar SBB is doing when it processes requests, set the trace level of the Registrar SBB to "Finest".
This can be done using the Command Console command in the client/bin directory under the $RHINO_HOME directory:
rhino-console setTraceLevel sbb "RegistrarSbb 1.5, Open Cloud" Finest
Alternatively, the property sbb.tracelevel can be set to Finest in the build.properties file. This sets the trace level for
all the example SBBs when they are next deployed.
4. Test the registrar and view the trace output to see the SIP messages and debug logging from the Registrar SBB. How to
perform this action is described in Chapter 22.
5. Undeploy the existing Registrar using the following command.
ant undeployregistrar
6. Modify the Registrar SBB so that it rejects requests from domains that it does not know about.
First, add an env-entry to the Registrar SBBs deployment descriptor. Env-entries (environment entries) are used for
specifying static configuration information for the SBB. The env-entry will specify the domain that the Registrar SBB
will accept requests from.
The Registrar SBBs deployment descriptor file is $RHINO_HOME/examples/sip/src/com/opencloud/slee/services/
sip/registrar/META-INF/sbb-jar.xml. Edit this file and add the following element at line 64 under the other enventry elements:
<env-entry>
<env-entry-name>myDomain</env-entry-name>
<env-entry-type>java.lang.String</env-entry-type>
<env-entry-value>opencloud.com</env-entry-value>
</env-entry>
The opencloud.com domain is just an example. Any other domain could be used.
Now, edit the source code of the Registrar SBB so that it checks the domain name in the request.
Insert the code below (commented as NEW CODE) at line 54, in the method "onRegisterEvent" in file $RHINO_HOME/
examples/sip/src/com/opencloud/slee/services/sip/registrar/RegistrarSbb.java:
Open Cloud Rhino 1.4.3 Administration Manual v1.1
170
// --- EXISTING CODE --...
URI uri =
((ToHeader)request.getHeader(ToHeader.NAME)).getAddress().getURI();
String sipAddressOfRecord = getCanonicalAddress(uri);
// --- NEW CODE STARTS HERE --// Get myDomain env-entry from JNDI
String myDomain = (String) new
javax.naming.InitialContext().lookup("java:comp/env/myDomain");
String requestDomain = ((SipURI)uri).getHost();
// Check if domain in request matches myDomain
if (requestDomain.equalsIgnoreCase(myDomain)) {
if (isTraceable(Level.FINE))
fine("request domain " + requestDomain + " is OK, accepting request");
}
else {
if (isTraceable(Level.FINE))
fine("request domain " + requestDomain + " is forbidden, rejecting request");
sendFinalResponse(st, Response.FORBIDDEN, null, false);
return;
}
// --- END OF NEW CODE --The new code that has just been added gets the myDomain env-entry from JNDI and compares it with the domain in the
To header of the received request. If the domain does not match myDomain, then a FORBIDDEN response is sent and this
code returns. Some trace messages are also included so that it can be seen whether the request was accepted or rejected.
7. To rebuild the service code and its deployable unit jar, run the command:
ant build
This rebuilds all the example SIP services, including the registrar.
To deploy the registrar service again, run:
ant deployregistrar
Note that the "deployregistrar" target will automatically run the "build" target if any source files have changed, so rebuild
and redeploy the service in one step if it is preferred.
8. As before, set the trace level of the Registrar SBB to Finest, to see that the SBB accepts or rejects the request using the
new code.
rhino-console setTraceLevel sbb "RegistrarSbb 1.5, Open Cloud" Finest
9. Configure the SIP client to use the correct Domain Name and then register. The following output should appear: Rhino
SLEE.
Sbb[RegistrarSbb 1.5, Open Cloud] request domain opencloud.com is OK, accepting request
10. Re-configure the SIP client to use a different Domain Name than the one configured for the SIP Registrar. Try to register.
The output should be similar to the following:
Sbb[RegistrarSbb 1.5, Open Cloud] request domain other.com is forbidden, rejecting request
11. To undeploy the registrar service, run:
ant undeployregistrar
Open Cloud Rhino 1.4.3 Administration Manual v1.1
171
To undeploy all the SIP example applications, including the SIP resource adaptor, run:
ant undeployexamples
At this point, the Ant system has been successfully used. An example SBB implementing a SIP Registrar has been
modified and that SBB’s deployment descriptor has had a new environment entry added to it. The JAIN SIP API has
been demonstrated, and the logging system’s management has been used to enable or disable the application’s debugging
messages.
24.4 Extending with Profiles
The example in Section 24.3 introduced a feature whereby the SIP Registrar would only accept Registration requests from users
within its own domain. A more challenging exercise for the developer is to use the JAIN SLEE Profiles concept to provide more
fine grained access control whereby only users who are part of an “allow list” are able to register. Two examples provided with
this distribution use Profiles and these illustrate the use of Profiles.
Briefly, the “Find Me Follow Me” service uses Profiles to represent a list of SIP addresses which will be tried if the user is
unavailable at their primary address. The code and deployment descriptors for the Find Me Follow Me Service are found in
$RHINO_HOME/examples/sip/src/com/opencloud/ slee/services/sip/fmfm.
Additionally, the JCC Call Forwarding example uses a custom Address Profile to store the forwarding address of the user. The
source code for this service is in $RHINO_HOME/examples/jcc/src/com/opencloud/ slee/services/callforwarding.
The developer can refer to the JAIN SLEE 1.0 API and 1.0 specification document to review the revelant documentation on
Profiles.
Open Cloud Rhino 1.4.3 Administration Manual v1.1
172
Appendix A
Hardware and Systems Support
A.1 Supported Hardware/OS platforms
Table A.1 references platforms that Rhino SLEE supports.
A.2 Recommended Hardware
A.2.1 Introduction
This subsection outlines minimum and recommended hardware configurations for different uses of Rhino SLEE. Please refer
to Open Cloud Rhino SLEE 1.4.3 support for information related to supported platforms for Rhino products.
Here is some general background regarding performance on the Rhino SLEE:
• Rhino has been tested on 2 - 8 CPU UltraSPARC III Sun machines. Rhino has been validated as scaling well to 8 CPUs.
• Rhino is CPU bound rather than I/O bound. The faster the CPU, the faster Rhino runs.
• Main Memory requirement is in linear relationship with the number of activities and profiles that are used in Rhino.
A.2.2 Development System Requirements
A Rhino development system is used for purposes of software development and functional testing. Software development is
the process of developing a new application, or resource adaptor for the Rhino platform. Functional testing is the process of
validating whether the new application or resource adaptor complies with its specification (i.e. whether it is functionally correct
or not).
The Rhino Software Development Kit (SDK) is intended for use in Software development and functional testing.
Minimum and recommended software development and functional testing hardware:
• RAM - Minimum of 512MB RAM for the Rhino SDK process (for both UltraSPARC III and Intel X86 CPUs). Recommended 512MB RAM.
• CPU - UltraSPARC III CPU 750MHz minimum, UltraSPARC III 750MHz or greater recommended. X86 CPU Pentium
III 1GHz minimum.
• Hard Disk space – Minimum 2GB hard disk space. The PostgreSQL database server will run on the same machine as the
Rhino SDK.
• Functional testing hardware – The same machine or separate machine(s) can be used to run functional tests. If a separate
machine is used please have a minimum of 512 MB ram, 1 GB disk, and UltraSPARC III 750MHz or X86 Pentium III
1GHz.
173
Required
3rd
Party Software
PostgreSQL
database(supplied
with Rhino)
PRODUCT
Hardware
OS
JVM
Open Cloud Rhino
Intel
x86
(Xeon), AMD64
(Opteron), UltraSPARC III or IV
CPU
Intel
x86
(Xeon), AMD64
(Opteron), UltraSPARC III or IV
CPU
Linux 2.4 or
2.6,Solaris 9 or 10
Sun
1.4.2_03,
1.5.0_05 or later
Linux 2.4 or 2.6,
Solaris 9 or 10
N/A
Ulticom
ware v9
Intel
x86
(Xeon), AMD64
(Opteron), UltraSPARC III or IV
CPU
Same
requirements for Open
Cloud Rhino
Linux 2.4 or
2.6,Solaris 9 or 10
Sun
1.4.2_03,
1.5.0_05 or later
N/A
Intel
x86
(Xeon), AMD64
(Opteron), UltraSPARC III or IV
CPU
Linux 2.4 or
2.6,Solaris 9 or 10
Sun
1.4.2_03,
1.5.0_05 or later
Ulticom Signalware v9
For CAP v2,
INAP CS-1, and
HLR
simulators and load
generators
Intel x86 (Xeon)
AMD64
(Opteron)
UltraSPARC III
or IV
Linux 2.4 or
2.6,Solaris 9 or 10
Red Hat Linux 9
Sun
1.4.2_03,
1.5.0_05 or later
for Sparc/Solaris
and Linux/Intel
PostgreSQL
database(supplied
with Rhino SDK).
Open Cloud Rhino SS7 Resource adaptors
JCC CAP-V2
JCC INAP-CS1
MAP
Open Cloud Rhino SLEE Internet Protocol Resource Adaptors
OC SIP
MM7
SMPP
Open Cloud Rhino SLEE Enterprise
Integration
J2EE Adaptor
JDBC Connectivity
LDAP Connectivity
OC Toolset
CAP v2 Switch Simulator
INAP CS-1 Switch Simulator
HLR Simulator
Load generator for CAP v2 Switch Simulator
Load generator for INAP CS-1 Switch
Simulator
Load generator for HLR Simulator
MMS Relay/Server Simulator
SMSC Simulator
Load generator for MMS R/S Simulator
Load generator for SMSC Simulator
Functional testing toolkit
Performance measurement toolset
Open Cloud Rhino SLEE
Non HA, Non FT JAIN SLEE
Non HA, Non FT SIP
Development JCC
SIP example applications
JCC example applications
Signal-
N/A
Table A.1: Supported Hardware Platforms
• Functional testing software – Functional testing can be quickly implemented by extending the Open Cloud Toolkit.
Note: if running a modern IDE on the same hardware as the Rhino SDK, then the hardware should be increased in line with
the requirements of the IDE.
A.2.3 Production System Requirements
A Rhino production system is used for performance testing, failure testing and ultimately live deployment. Performance testing
is the process of validating whether or not the combination of Rhino, Resource Adaptors and Application exceeds performance
Open Cloud Rhino 1.4.3 Administration Manual v1.1
174
requirements. Failure testing is the process of validating whether or not the combination of Rhino, Resource Adaptors and
Application displays appropriate characteristics in failure conditions.
Open Cloud Rhino is intended for use in performance and failure testing. There are many different performance measurements
that may be of interest, and different performance targets that are required. These are typically dictated by the requirements of
the application.
We provide recommendations for minimum and basic performance and failure testing hardware in a general sense, as well as
providing an example for a particular application.
Recommended Requirements
Here are the Open Cloud Rhino SLEE 1.4.3 minimum and recommended hardware requirements.
Note that the general hardware requirements do not include load generation hardware or SS7 connectivity. Please refer to the
specific application example for an SS7 capable Rhino configuration.
• Number of Sun machines in the Rhino cluster – Minimum 3, Recommended 3.
• Number of UltraSPARC III CPUs in each Sun machine – Minimum 2, Recommended 4.
• Speed of each UltraSPARC III CPU – Minimum 750MHz, Recommended 1GHz+.
• RAM requirements of each Sun machine – Minimum 1 GB, Recommended 2GB+.
• Hard disk requirements of each Sun machine – Minimum 2GB, Recommended 9GB+.
• Network interface requirements of each Sun machine – Minimum 100MB, Recommended 100MB or 1GB Switched
Ethernet.
A.2.4 Application Example
The example of VPN or Mobile Centrex is used to illustrate a possible hardware configuration. This configuration is capable
of running a VPN or Mobile Centrex application at 300+ Call Setups per second, with 3-way redundancy and low latency. In
this configuration each Rhino machine is running at approximately 60% CPU utilisation, and the SS7 signalling links are the
bottleneck for latency and throughput. The application is doing 1500+ ACID transactions per second (i.e. 1500+ JAIN SLEE
events per second).
Rhino cluster hardware
• 3 Sun Machines with identical hardware configuration.
• 4 UltraSPARC III 1GHz CPUs.
• 4GB RAM.
• 9GB Hard disk.
• Single 100MB Switched Ethernet interface.
Ulticom Signalware SS7 cluster
• 2 Sun machines with identical hardware configuration.
• 2 UltraSPARC III 900MHz CPUs.
• 4GB RAM.
• 9GB Hard disk.
• Single 100MB Switched Ethernet interface.
• Ulticom Signalware 9.
• T1/E1 interface.
Open Cloud Rhino 1.4.3 Administration Manual v1.1
175
Load generation and network element simulation hardware
• Single Ulticom Signalware machine with identical RAM, CPU, Hard Disk configuration to Ulticom Signalware SS7
cluster machines
• Two T1/E1 interfaces.
• Three 2x900MHz UltraSPARC III machines running several instances of the switch simulator and HLR simulator.
Open Cloud Rhino 1.4.3 Administration Manual v1.1
176
Appendix B
Redundant Networking
This topic describes how to setup redundant networks for the Rhino SLEE so that cluster members can still communicate in the
event of link or switch failures.
B.1 Redundant Networking in Solaris
Solaris 8 and up includes a feature called IP Multipathing (IPMP). This allows multiple ethernet interfaces to be combined into
a group with automatic IP address failover within the group if a link failure is detected.
The authoritative Solaris IPMP documentation is available at http://docs.sun.com/.
This section briefly describes how to get an IPMP configuration running with 2 network interfaces in active/standby mode.
B.1.1 Prerequisites
There must be at least two available ethernet interfaces on each host. The network interfaces could be used for other traffic, but
for this example we will assume that they will be dedicated to Rhino SLEE traffic.
By default, Solaris/SPARC server will use the same MAC address for all ethernet interfaces on the host. When using IPMP
we will have multiple interfaces plugged into the same switch and if they all have the same MAC address the switch will get
confused, so this behaviour needs to be changed.
To check if the server is using a single MAC address or not, run the command:
# eeprom local-mac-address?
local-mac-address?=false
The default value is false, and this means the server is using a single MAC address. To change this so that each interface uses
its own local MAC address, run:
# eeprom local-mac-address?=true
Now reboot the machine so that this takes effect.
B.1.2 Create interface group
For this example we will use the two hosts rhinohost1 and rhinohost2. The ethernet interfaces bge0 and bge1 are available
on each host. These interfaces will be placed into a highy-available interface group called savanna.
The interface bge0 will be the active interface and bge1 will be the standby. Each will have its own static private IP address
(called a test address in the Sun documentation) which is not used by applications. Each host will have a third, virtual IP address
that can move between the two physical interfaces during failover or failback. So 6 addresses are needed in total – these must
all be on the same subnet. For this example, the subnet 192.168.1.0/24 will be used:
177
/etc/hosts:
...
192.168.1.1
192.168.1.2
192.168.1.101
192.168.1.102
192.168.1.103
192.168.1.104
rhinohost1-public
rhinohost2-public
rhinohost1-bge0
rhinohost1-bge1
rhinohost2-bge0
rhinohost2-bge1
#
#
#
#
#
#
Externally visible IP address for rhinohost1
Externally visible IP address for rhinohost2
Private test address for interface bge0 on rhinohost1
Private test address for interface bge1 on rhinohost1
Private test address for interface bge0 on rhinohost2
Private test address for interface bge1 on rhinohost2
If the interfaces have not been used before (they do not appear in ifconfig -a), then they need to be “plumbed”, i.e. the device
drivers need to be initialised:
# ifconfig bge0 plumb
# ifconfig bge1 plumb
On each host, configure the active interface as follows:
rhinohost1:
# ifconfig bge0 rhinohost1-bge0 netmask + broadcast + group savanna deprecated \
-failover up
# ifconfig bge0 addif rhinohost1-public netmask + broadcast + failover up
rhinohost2:
# ifconfig bge0 rhinohost2-bge0 netmask + broadcast + group savanna deprecated \
-failover up
# ifconfig bge0 addif rhinohost2-public netmask + broadcast + failover up
The first ifconfig sets the IP address of the interface to the test address, and adds this interface to the “savanna” group. The
deprecated flag means that applications cannot bind to this address – it will only be used by IPMP’s in.mpathd daemon to
monitor the links. The -failover flag means this test address will not failover to other interfaces; it is fixed on this interface.
The second ifconfig adds a virtual interface on bge0, with the public, virtual address. The failover flag means that this address
can failover to other physical interfaces in the group.
Now configure the standby interface:
rhinohost1:
# ifconfig bge1 rhinohost1-bge1 netmask + broadcast + group savanna deprecated \
-failover standby up
rhinohost2:
# ifconfig bge1 rhinohost2-bge1 netmask + broadcast + group savanna deprecated\
-failover standby up
This command sets the IP address of the interface to the test address, and adds it to the “savanna” group. Again, the deprecated
and -failover flags mean that applications cannot use the test address, and it will not be failed over. The standby flag means
that the interface will not be used for any traffic until it is needed, that is when the active interface goes down.
The “savanna” interface group is now ready. If you run ifconfig -a, you should see output similar to the following:
Open Cloud Rhino 1.4.3 Administration Manual v1.1
178
rhinohost1:
# ifconfig -a
...
bge0: flags=9040843<UP,BROADCAST,RUNNING,MULTICAST,DEPRECATED,IPv4,NOFAILOVER> mtu 1500 index 3
inet 192.168.1.101 netmask ffffff00 broadcast 192.168.1.255
groupname savanna
ether 0:3:ba:3c:9c:d3
bge0:1: flags=1000843<UP,BROADCAST,RUNNING,MULTICAST,IPv4> mtu 1500 index 3
inet 192.168.1.1 netmask ffffff00 broadcast 192.168.1.255
bge1: flags=69040843<UP,BROADCAST,RUNNING,MULTICAST,DEPRECATED,IPv4,NOFAILOVER,STANDBY,INACTIVE> mtu 1500 index 4
inet 192.168.1.102 netmask ffffff00 broadcast 192.168.1.255
groupname savanna
ether 0:3:ba:3c:9c:d4
Note that the virtual interface bge0:1. This has the public, highly-available address. If there is a link failure on bge0 (for
example, when the network cable is pulled out), then the failure will be detected by the in.mpathd daemon and it will create
the virtual interface bge1:1 and move the IP address across.
We now have a basic active/standby group. Next we need to tune some settings to make it suitable for use in a Rhino cluster.
B.1.3 Tune failure detection time
The default time for IPMP to detect a link failure and perform a failover is 10 seconds. This is higher than Rhino SLEE’s default
8 second timeout, so it is possible that we could get unnecessary node failures while IPMP is busy failing over.
To reduce the IPMP failure detection time, edit /etc/default/mpathd and change the line:
FAILURE_DETECTION_TIME=10000
to:
FAILURE_DETECTION_TIME=1000
1000ms usually works well for failing over.
After editing the file, make the in.mpathd daemon reload its configuration:
# pkill -HUP in.mpathd
B.1.4 Configure probe addresses
IPMP will dynamically select some remote IP addresses to use as probe addresses. These will be other hosts on the same
network, and IPMP frequently pings these addresses to help determine if any link failures have occured. If you snoop the
interfaces you will see many pings emanating from the test addresses on the two interfaces.
In this configuration with just two hosts on the network, it is likely that IPMP will pick the other host’s public address as a
probe address. This seems to work except in the case where both active interfaces fail at the same time. Because each host will
temporarily be unable to ping the other’s public address, IPMP will decide that all the interfaces have gone down and not permit
any traffic on either interface.
To get around this problem, IPMP needs to be forced to use specific IP addresses as probe addresses. There should be more
than one probe address, and these should be on separate hosts. For example, in a Rhino cluster, each node could use the test
addresses of one or more other nodes (or a quorum node or management server etc) as probe addresses.
To specify probe addresses, add static host routes to the routing table:
rhinohost1:
# route add rhinohost2-bge0 rhinohost2-bge0 -static
# route add rhinohost2-bge1 rhinohost2-bge1 -static
IPMP will automatically start using these addresses as probe addresses. Now if both active interfaces fail, the standby interfaces
will still be able to ping some of their probe addresses, so IPMP will still be able to failover to the standby interface.
Open Cloud Rhino 1.4.3 Administration Manual v1.1
179
B.1.5 Editing the Routing Table
Finally we need to add a multicast route so that the traffic is directed to our interface group.
Rather than directing all multicast traffic over the group, it is best just to create a route for the address range that Rhino SLEE
is using. Other services such as routing or time daemons may depend on multicast traffic on a separate interface on a public
network.
For example, if the cluster is using the address range 224.0.55.1 - 224.0.55.8, we can add routes as follows:
rhinohost1:
# route add -interface 224.0.55.0/24 rhinohost1-public
rhinohost2:
# route add -interface 224.0.55.0/24 rhinohost2-public
When Rhino sends multicast traffic to the cluster, it will be using the interface group. When IPMP failover occurs, the routing
table is automatically updated so that the standby interface is used for multicast.
At this stage, the cluster should be able to survive losing several network cables. Occasional warnings from the Rhino SLEE
may appear during the failover, but these will be transient and the cluster should recover.
B.1.6 Make the Configuration Persistent
Solaris’ interface configuration files need to be edited so that the savanna group is automatically created when Solaris boots.
The files should look something like these:
rhinohost1:/etc/hostname.bge0:
rhinohost1-bge0 netmask + broadcast + group savanna deprecated -failover up \
addif rhinohost1-public netmask + broadcast + failover up
rhinohost1:/etc/hostname.bge1:
rhinohost1-bge1 netmask + broadcast + group savanna deprecated -failover standby up
rhinohost2:/etc/hostname.bge0:
rhinohost2-bge0 netmask + broadcast + group savanna deprecated -failover up \
addif rhinohost2-public netmask + broadcast + failover up
rhinohost2:/etc/hostname.bge1:
rhinohost2-bge1 netmask + broadcast + group savanna deprecated -failover standby up
Create a startup script, for example /etc/rc2.d/S99static_routes, which runs all the necessary route commands:
Open Cloud Rhino 1.4.3 Administration Manual v1.1
180
rhinohost1:/etc/rc2.d/S99static_routes:
#!/bin/sh
# Probe addresses
/usr/sbin/route add rhinohost2-bge0 rhinohost2-bge0 -static
/usr/sbin/route add rhinohost2-bge1 rhinohost2-bge1 -static
# Savanna multicast traffic
route add -interface 224.0.55.0/24 rhinohost1-public
rhinohost2:/etc/rc2.d/S99static_routes:
#!/bin/sh
# Probe addresses
/usr/sbin/route add rhinohost1-bge0 rhinohost1-bge0 -static
/usr/sbin/route add rhinohost1-bge1 rhinohost1-bge1 -static
# Savanna multicast traffic
route add -interface 224.0.55.0/24 rhinohost2-public
Open Cloud Rhino 1.4.3 Administration Manual v1.1
181
Appendix C
Resource Adaptors and Resource Adaptor
Entities
C.1 Introduction
The SLEE architecture defines the following resource adaptor concepts:
• Resource adaptor type: A resource adaptor type specifies the common definitions for a set of resource adaptors. It
defines the Java interfaces implemented by the resource adaptors of the same resource adaptor type. Typically, a resource
adaptor type is defined by an organisation of collaborating SLEE or resource vendors, such as the SLEE expert group.
An administrator installs resource adaptor types in the SLEE.
• Resource adaptor: A resource adaptor is an implementation of particular resource adaptor type. Typically, a resource
adaptor is provided either by a resource vendor or a SLEE vendor to adapt a particular resource implementation to a
SLEE, such as particular vendor s implementation of a SIP stack. An administrator installs resource adaptors in the
SLEE.
• Resource adaptor entity: A resource adaptor entity is an instance of a resource adaptor. Multiple resource adaptor
entities may be instantiated from a single resource adaptor. Typically, an administrator instantiates a resource adaptor
entity from resource adaptor installed in the SLEE by providing the parameters required by the resource adaptor to bind
to a particular resource. In Rhino, a single resource adaptor entity may have many Java object instances, for example
when running more than one Java Virtual Machine in a Rhino cluster, each event processing node will contain a Java
object instance that represents the resource adaptor entity in the Virtual Machine address space.
The lifecycle and APIs for resource adaptors are out of scope of the SLEE specification. Rhino defines its own Resource
Adaptor framework. This chapter describes the lifecycle of resource adaptor entities in Rhino.
C.2 Entity Lifecycle
The administrator controls the lifecycle of the resource adaptor entity. This section discusses the resource adaptor entity lifecycle
state machine as shown in figure C.1.
182
RA entity created
Inactive
activateEntity()
Activated
deactivateEntity()
Deactivating
Figure C.1: Resource Adaptor Entity lifecycle state machine
Each state in the lifecycle state machine is discussed below, as are the transitions between these states.
C.2.1 Inactive State
When the resource adaptor entity is created (through use of the Resource Management MBean) it is in the Inactive state.
When a resource adaptor entity is in the Inactive state it may not attempt to provide Rhino with events for processing. If it does
so Rhino will discard the events and inform the resource adaptor entity that the events have been discarded. A resource adaptor
entity may be removed when in the Inactive state.
• Inactive to Activated transition: This transition occurs when the activateEntity method is invoked on the Resource
Management MBean.
C.2.2 Activated State
When in the activated state Java object instances representing the resource adaptor entity may create activities, submit events
and end activities.
• Activated to Deactivating transition: This transition occurs when the deactivateEntity method is invoked on the
Resource Management MBean.
C.2.3 Deactivating State
This state is entered from the Activated state. When the resource adaptor entity is in this state it is not able to create new
Activities. Activities that exist in Rhino before the resource adaptor entity transitions to this state may continue to have events
submitted on them, and are able to be ended by the resource adaptor. The resource adaptor will remain in this state until all
Activities created by the resource adaptor entity have ended.
• Deactivating to Inactive transition: This transition occurs when Rhino recognises that all Activity objects submitted by the
resource adaptor entity have ended. The resource adaptor entity will remain in the deactivating state until this condition
occurs.
C.3 Configuration Properties
Each resource adaptor entity may include configuration properties, such as address information of network end points, URLs
to external systems etc. Such configuration properties are passed to the resource adaptor entity via the Resource Management
MBean createEntity, and updateConfigurationProperties methods.
The configuration properties are a Java language String. This String has a mandatory format of comma delimited pairs of the
form ’property-name=value’.
Open Cloud Rhino 1.4.3 Administration Manual v1.1
183
A property name must be one of the configuration properties defined by the resource adaptor. The configuration properties
defined by a resource adaptor can be retrieved via the Resource Management MBean getConfigurationProperties method.
Configuration properties that have no default value defined by the resource adaptor must be specified in the properties parameter
when creating an RA entity. A configuration property can be specified at most once. If a property value is required to include a
comma, the value may be quoted using double quotes (’"’). Alternatively a backslash (‘\’) can be used to escape the character
following it (relieving that following character of any special meaning). An equals sign appearing as part of the value will
simply be treated as part of the value.
Property string examples include:
• host=localhost,port=5000
• settings="1,5,7,8,9",colour=blue
• settings=1\,5\,7\,8\,9,colour=blue
C.4 Entity Binding
SBBs use JNDI to lookup a reference to a Java object instance that represents a resource adaptor entity. Section 6.13.2.12 of the
JAIN SLEE 1.0 technical specification (“Declaration of resource adaptor entity bindings in the SBB deployment descriptor”)
specifies that an SBB deployment descriptor contains two elements to achieve this. The first element is the resource-adaptor-object-name; this element should match some name that the SBB will use in its JNDI lookup calls to get a reference to
the resource adaptor provided object. The second is the resource-adaptor-entity-link element; this element contains
a string value that defines a link name which is associated with the resource adaptor entity that will be bound in the SBBs
JNDI namespace at the resource-adaptor-object-name location. Link names resource-adaptor-entity-link can be
associated with a resource adaptor entity and removed using the Resource Management MBean.
Open Cloud Rhino 1.4.3 Administration Manual v1.1
184
Appendix D
Transactions
D.1 Introduction
This appendix provides a brief overview of transactions and transaction processing systems including the ACID properties of
Transactions, various Concurrency Control Models, components of a transaction processing system and commit protocols.
Transactions are a part of the JAIN SLEE event and programming models, therefore it is important that these concepts are
understood. Rhino provides a sophisticated transaction processing system, and is able to trade durability with performance in a
number of ways.
D.2 ACID Properties
The ACID properties of transactions greatly simplify both the normal runtime logic of an application (in terms of concurrency
control, and updates to state), and the failure-recovery logic of applications. Very briefly these properties are:
• Atomicity - A transaction either completes successfully, and the effects of all of its operations are recorded, or it has no
effect at all.
• Consistency - A transaction takes the state of the system from one consistent state to another consistent state.
• Isolation - Each transaction is performed without interference from other transactions; in other words, the intermediate
effects of a transaction are not visible to other transactions.
• Durability - After a transaction has completed successfully, its effects are saved to storage. The storage may be nonvolatile or volatile.
D.3 Concurrency Control Models
There are two general approaches for supporting isolation in a transacted environment. These are pessimistic and optimistic
concurrency control.
This appendix describes the high level approach taken for pessimistic and optimistic concurrency control. It is intended to
provide the developer and administrator knowledge of the general approaches, as the algorithms used to support pessimistic and
optimistic concurrency control vary depending on the underlying Resource Manager (for example different relational databases
may support one and not the other, or may use different variations of algorithms than those described here).
D.3.1
Pessimistic Concurrency Control
Under the pessimistic model the resource manager acquires a lock (shared or exclusive depending on the semantics of the
access) as each addressable unit of transacted state is first accessed. Units of transacted state in JAIN SLEE include SBB
185
entities, profiles, Activity Context state, and event queues. The transaction that has successfully acquired the exclusive lock on
a unit of transacted state will not release this lock until the transaction has either committed or rolled back.
Concurrent transactions may deadlock against each other, when more than one lock is held by each transaction and the locks
are acquired in different orders in the concurrent transactions.
D.3.2
Optimistic Concurrency Control
In the optimistic model, each unit of transacted state has a version number and a value. When a transaction first accesses a
unit of transacted state, a copy of both the committed version number and value are made, and used for all operations in the
transaction. If the transaction rolls back, the copies are simply discarded. If the transaction attempts to commit, the version of
the committed state is compared against the version of the isolated state. If the version numbers match, the commit is applied
and the committed version number is modified according to some Resource Manager specific function. If the version numbers
do not match, the transaction will roll back as committing the transaction would violate the isolation guarantees.
D.3.3
Summary
The optimistic model has the advantages that no locks are acquired, so the overhead of lock acquisition is not incurred during
transaction processing, and deadlock detection algorithms are not required to execute. The pessimistic model has the advantage
that the data used inside the transaction is not necessarily copied, and therefore cannot ‘change underneath’ the transaction.
Whether one approach is better than the other approach depends on the characteristics of the application in terms of concurrent
access. It is also possible that different resource managers exhibit greater performance when using one concurrency control
mechanism over another.
D.4 Processing Components and Commit Protocols
D.4.1
Transaction Processing Components
Transacted Resource
A Transacted Resource allows operations to be performed on it in a manner that maintains the ACID properties of the transacted
programming model. Common examples of transacted resources include Relational Databases, Object Databases, and JMS
message queues when used in transacted mode.
Resource Manager
A Resource Manager manages one or more instances of a Transacted Resource. For example a Relational Database Server may
serve several Relational Databases. A Resource Manager typically supports a one-phase commit, and may or may not support
two-phase commit.
Transaction Manager, Transaction Co-ordinator
A Transaction Manager or Transaction Co-ordinator is responsible for demarcating transaction boundaries in a Transacted
Resource, and may co-ordinate several transacted resources in a single transaction. A Resource Manager may or may not
include a Transaction Manager.
D.4.2
Multiple Resource Managers
There are certain scenarios where it is possible to use multiple Resource Managers in a single transaction. These scenarios use
a two-phase commit protocol between the Transaction Manager and the Resource Manager 1 .
1 A two-phase commit protocol is a contract between the Transaction Manager and a Resource Manager rather than a wire protocol. For example the
two-phase commit protocol is often realised as a local API, a remote API, or a wire protocol carrying the semantics of the two-phase commit protocol.
Open Cloud Rhino 1.4.3 Administration Manual v1.1
186
When multiple Resource Managers are combined into a single transaction it is commonplace that both Resource Managers
support a two-phase commit protocol.
D.4.3
Commit Protocols
One-phase Commit
A one-phase commit protocol will commit the transaction as a single action. It is most often used when a transaction is involved
with a single Transacted Resource. Most Transacted Resources support a one-phase commit protocol. It is sometimes used in
a last resource commit optimisation.
Two-phase Commit
The two-phase commit protocol prepares all two-phase Resource Managers involved in the transaction. Each Resource Manager
responds whether or not it was able to prepare the transaction. When a Resource Manager responds that it is able to prepare
a transaction, it is making the promise that it will be able to commit the transaction2 . If the Transaction Manager receives a
negative confirmation of prepare it will roll-back the transaction. When the Transaction Manager receives positive confirmation
of prepare from every Resource Manager it will commit the transaction by instructing each Resource Manager to commit the
transaction.
Last Resource Commit Optimisation
There is an optimisation in the two phase commit protocol termed Last Resource Commit. Last Resource Commit means that the
Transaction Manager will prepare all but one Resource Manager in the transaction, and wait for the responses from the Resource
Managers. When it has positive acknowledgment of the ability to prepare a transaction it will instruct the last Resource Manager
to commit the transaction. The outcome of the commit (either the commit was successful or failed) is used as a vote for prepare,
if the last Resource Manager committed the Transaction Manager will instruct the other Resource Managers to commit, if the
last Resource Manager did not commit the transaction the Transaction Manager will instruct the other Resource Managers to
roll-back.
The reason why this optimisation is mentioned is because a Resource Manager that does not support the two-phase commit
protocol can be used as the last resource, and provided that there is at most one Resource Manager that supports only one-phase
commit the system as a whole will provide reasonable semantics.
The developer should be aware of the following case when using the Last Resource Commit optimisation: the last Resource
which will be instructed to perform a one-phase commit fails before returning the success or failure of the commit to the
Transaction Manager.
In this case the Transaction Manager is unable to ascertain the state of the Resource Manager3 . This means that the last
Resource may or may not have committed the transaction, but the Transaction Manager may or may not commit or roll-back
the two-phase resources.
2 Resource
3
Managers support the roll-back a transaction at any point prior to committing the transaction.
For example the Resource Manager becomes unreachable due to network failure or Resource Manager failure
Open Cloud Rhino 1.4.3 Administration Manual v1.1
187
Appendix E
Audit Logs
E.1 File Format
The format for license audit log files is as follows:
{
CLUSTER_MEMBERS_CHANGED [comma separated node list]
}
{
INSTALLED_LICENSES nLicenses
{
[LicenseInfo field=value,field=value,field=value...]
} * nLicenses
}
{
USAGE_DATA start_time end_time nFunctions
{
FunctionName AccountedMin AccountedMax AccountedAvg
UnaccountedMin UnaccountedMax UnaccountedAvg
LicensedCapacity HardLimited
} * nFunctions
}
E.1.1 Data Types
There are currently three data subsection types:
• CLUSTER_MEMBERS_CHANGED
• INSTALLED_LICENSES
• USAGE_DATA
CLUSTER_MEMBERS_CHANGED
This is logged whenever the active node set in the cluster changes.
CLUSTER_MEMBERS_CHANGED [Comma,Separated,Node,List]
188
INSTALLED_LICENSES
This is logged whenever the set of valid licenses changes. This may occur when a license is installed or uninstalled, when an
installed license becomes valid or when an installed license expires.
INSTALLED_LICENSES <nLicenses>
[LicenseInfo name=value,name=value,name=value]
(repeated nLicenses times)
For example:
INSTALLED_LICENSES 2
[LicenseInfo serial=1074e3ffde9,validFrom=Wed Nov 02 12:53:35 NZDT 2005,...
[LicenseInfo serial=2e31e311eca,validFrom=Wed Nov 01 15:01:25 NZDT 2005,...
USAGE_DATA
This is logged every ten minutes. The start and end timestamp of the period for which it applies is logged, along with the
number of records that follow. Each logged period is made up of several smaller periods from which the minimum, maximum
and average values are calculated.
Each record represents a single function and contains the following information:
• The license function being reported. (function)
• The minimum, maximum and average number of accounted units. (accMin, accMax, accAvg)
• The minimum, maximum and average number of unaccounted units. (unaccMin, unaccMax, unaccAvg) These do not
count towards licensed capacity but is presented for informational purposes.
• The current licensed capacity for the reported function. (capacity)
• A flag indicating whether the function is considered over capacity or not. (overLimit)
USAGE_DATA <startTimeMillis> <endTimeMillis> <nRecords>
<function> <accMin> <accMax> <accAvg> <unaccMin> <unaccMax> <unaccAvg> \
<capacity> <overLimit> (repeated nRecords times)
An example entry might look like:
USAGE_DATA 1130902819320 1130903419320 1
Rhino-SDK 2.00 10.05 7.02 0.00 0.00 0.00 10000 0
Open Cloud Rhino 1.4.3 Administration Manual v1.1
189
E.2 Example Audit Logfile
CLUSTER_MEMBERS_CHANGED [102]
INSTALLED_LICENSES 2
[LicenseInfo serial=106d78577f5,
validFrom=Mon Oct 10 11:34:39
NZDT 2005,
validUntil=Sun Jan 08 11:34:39 NZDT 2006,
capacity=100,
hardLimited=false,
valid=true,
functions=[IN],
versions=[Development],
supercedes=[]]
[LicenseInfo serial=106c2e2fdf5,
validFrom=Thu Oct 06 11:24:47 NZDT 2005,
validUntil=Mon Dec 05 11:24:47 NZDT 2005,
capacity=10000,
hardLimited=false,
valid=true,
functions=[Rhino],
versions=[Development],
supercedes=[]]
CLUSTER_MEMBERS_CHANGED [101,102]
USAGE_DATA 1128998383039 1128998923055 2
Rhino 60.02 150.02 136.40 60.02 150.01 136.40 10000 0
IN 60.05 150.05 136.40 0.00 0.00 0.00 100 0
USAGE_DATA 1128998923055 1128999523051 2
Rhino 149.83 150.18 150.02 149.85 150.18 150.03 10000 0
IN 149.88 150.16 150.02 0.00 0.00 0.00 100 0
Open Cloud Rhino 1.4.3 Administration Manual v1.1
190
Appendix F
Glossary
Administrator – A person who maintains the Rhino SLEE, deploys services and resource adaptors and provides access to the
Web Console and Command Console.
Ant – The Apache Ant build tool.
Activity – A SLEE Activity on which events are delivered.
Command Console – The interactive command–line interface use by administrators to issue on–line management commands
to the Rhino SLEE.
Configuration – The off line Rhino SLEE config files.
Cluster – A group of Rhino SLEE nodes which are managed as a single system image.
Developer – A person who writes and compiles components and deployment descriptors according to the JAIN SLEE 1.0
specification
Extension deployment descriptor – A Open Cloud proprietary descriptor included in the deployable unit.
Host – The machine running the Rhino SLEE
JMX – Java Management Extensions
Keystore – A Java JKS key store
Logger – A logging component which sends log messages to an log appender.
Log Appender – A configurable logging component which writes log messages to a medium such as a file or network.
Main Working Memory – The mechanism used to hold the runtime state and the working configuration.
MemDB – The memory database which holds the Main Working Memory.
MLet – An manageable extension to the Rhino SLEE.
Notificationlistener – A callback handler for JMX notifications.
Notification – A notification emitted or delivered to a notification listener.
Non–volatile – The ability to survive a system failure.
Node – An operational participant of a Rhino SLEE in a cluster.
Object pool – Internal grouping of similar objects for performance.
Output console – Typically standard output from the Rhino SLEE execution.
PostgreSQL – The PostgreSQL database server.
Process – A operating system process such as the Java VM.
191
Primary Component – The group of nodes in a cluster which can process work.
Public Key – A certificate containing an aliased asymmetric public key.
Private Key – A certificate containing an aliased asymmetric private key.
Policy – A Java sandbox security policy which allocates permissions to codebases.
Ready object – An object which has been initialised and is ready to perform work.
Rhino platform – The total set of modules, components and application servers which run on JAIN SLEE.
Resource manager – A configurable component which provides access to an external transactional system.
Resource adaptor entity – An logical instance for a Resource Adaptor which performs work.
Runtime state – The configuration of the Rhino SLEE. See runtime state.
Sbb entity – An object instance of an SBB which performs work.
Sign – To sign a jar using the Java jarsigner tool.
SecurityManager – The Java security manager.
Statistics – Metrics gathered by the running Rhino SLEE.
Transaction – An isolated unit of work.
Work directory – The copy of the configuration files that are actually used by the Rhino SLEE codebase.
Work – What the SLEE does while it is in the RUNNING state: processing activities and events.
Working configuration – The deployable units, profiles, and resource adaptors configured in the main working memory.
Web Console – The HTTP interface to the Rhino SLEE management facility.
Working Memory – The mechanism used to hold the runtime state and the working configuration.
Open Cloud Rhino 1.4.3 Administration Manual v1.1
192