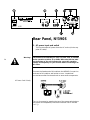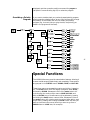
1
Owner’s Manual
Nº390S
CD
Processor
WARNING: TO REDUCE THE RISK OF FIRE OR ELECTRIC SHOCK, DO
NOT EXPOSE THIS APPLIANCE TO RAIN OR MOISTURE.
CAUTION
RISK OF ELECTRIC SHOCK
DO NOT OPEN
CAUTION: TO REDUCE THE RISK OF ELECTRICAL SHOCK, DO NOT
REMOVE COVER. NO USER-SERVICEABLE PARTS INSIDE. REFER
SERVICING TO QUALIFIED PERSONNEL.
The lightning flash with arrowhead symbol, within an equilateral triangle, is
intended to alert the user to the presence of uninsulated “dangerous voltage” within
the product’s enclosure that may be of sufficient magnitude to constitute a risk of
electric shock to persons.
The exclamation point within an equilateral triangle is intended to alert the user to
the presence of important operating and maintenance (servicing) instructions in
the literature accompanying the appliance.
Marking by the “CE” symbol (shown left) indicates compliance of this device with
the EMC (Electromagnetic Compatibility) and LVD (Low Voltage Directive) standards
of the European Community.
NOTICE
This equipment has been tested and found to comply with the limits for a Class B digital device,
pursuant to Part 15 of the FCC Rules. These limits are designed to provide reasonable protection
against harmful interference in a residential installation. This equipment generates, uses and can
radiate radio frequency energy and, if not installed and used in accordance with the instructions,
may cause harmful interference to radio communications. However, there is no guarantee that
interference will not occur in a particular installation. If this equipment does cause interference to
radio or television reception, which can be determined by turning the equipment on and off, the
user is encouraged to try to correct the interference by one or more of the following measures:
•
Reorient or relocate the receiving antenna;
•
Increase the separation between the equipment and the receiver;
•
Connect the equipment into an outlet on a circuit different from that to which the receiver is
connected;
•
Consult the dealer or an experienced radio/TV technician for help.
CAUTION: Changes or modifications to this equipment not expressly approved by the manufacturer
could void the user’s authority to operate the equipment.
Important Safety Instructions
Please read all instructions and precautions carefully and completely before operating your Mark
Levinson preamplifier.
1. ALWAYS disconnect your entire system from the AC mains before connecting
or disconnecting any cables, or when cleaning any component.
2. This product must be terminated with a three-conductor AC mains power cord
that includes an earth ground connection. To prevent shock hazard, all three
connections must ALWAYS be used.
3. AC extension cords are not recommended for use with this product.
4. NEVER use flammable or combustible chemicals for cleaning audio components.
5. NEVER operate this product with any covers removed.
6. NEVER wet the inside of this product with any liquid.
7. NEVER pour or spill liquids directly onto this unit.
8. NEVER block airflow through ventilation slots or heat sinks.
9. NEVER bypass any fuse.
10. NEVER replace any fuse with a value or type other than those specified.
11. NEVER attempt to repair this product. If a problem occurs, contact your Mark
Levinson retailer.
12. NEVER expose this product to extremely high or low temperatures.
13. NEVER operate this product in an explosive atmosphere.
14. ALWAYS keep electrical equipment out of the reach of children.
15. ALWAYS unplug sensitive electronic equipment during lightning storms.
From all of us at Mark Levinson, thank you for choosing the Mark
Levinson Nº390S CD Processor.
A great deal of effort went into the design and construction of this
precision device. Used properly, it will give you many years of enjoyment.
4
3 Oak Park
Bedford, MA 01730-1413 USA
Telephone:
781-280-0300
Fax:
781-280-0490
www.marklevinson.com
Customer Support
Telephone:
781-280-0300
Sales Fax:
781-280-0495
Service Fax: 781-280-0499
Product Shipments
16 Progress Road
Billerica, MA 01821-5730 USA
Part No. 070-630457 | Rev 1 | 04/04
“Mark Levinson” and the Mark Levinson logo are registered trademarks of
Harman International Industries. U.S. patent numbers and other worldwide
patents issued and pending.
“Madrigal Audio Laboratories” and the Madrigal Audio Laboratories logo
are registered trademarks of Harman International Industries. U.S. patent
numbers and other worldwide patents issued and pending.
©2004 Harman Specialty Group. All rights reserved.
This document should not be construed as a commitment on the part of
Harman Specialty Group. The information it contains is subject to change
without notice. Harman Specialty Group assumes no responsibility for
errors that may appear within this document.
Table of Contents
Unpacking and Placement . . . . . . . . . . . . . . . . . . . . . . . . . . .8
Unpacking the Nº390S . . . . . . . . . . . . . . . . . . . . . . . . . . . . . . . .8
Remove the Transport Screw . . . . . . . . . . . . . . . . . . . . . . . . . . . .8
Placement of the Nº390S . . . . . . . . . . . . . . . . . . . . . . . . . . . . . .8
Operating Voltage & Frequency . . . . . . . . . . . . . . . . . . . . . . .9
A Quick Start . . . . . . . . . . . . . . . . . . . . . . . . . . . . . . . . . . .10
Break-in Period . . . . . . . . . . . . . . . . . . . . . . . . . . . . . . . . . . . . .11
Special Design Features . . . . . . . . . . . . . . . . . . . . . . . . . . . .12
A New Generation
. . . . . . . . . . . . . . . . . . . . . . . . . . . . . . . . .12
Digital Servo Control . . . . . . . . . . . . . . . . . . . . . . . . . . . . . . . .13
Digital Input/Output Versatility . . . . . . . . . . . . . . . . . . . . . . . . .13
Industrial Design . . . . . . . . . . . . . . . . . . . . . . . . . . . . . . . . . . .13
Convenience Features . . . . . . . . . . . . . . . . . . . . . . . . . . . . . . .14
Communications Links . . . . . . . . . . . . . . . . . . . . . . . . . . . . . . .14
Fully Balanced Design . . . . . . . . . . . . . . . . . . . . . . . . . . . . . . .14
Advanced Digital Filter Techniques . . . . . . . . . . . . . . . . . . . . . .15
Digital to Analog Conversion . . . . . . . . . . . . . . . . . . . . . . . . . .15
Balanced Analog Volume Control . . . . . . . . . . . . . . . . . . . . . . .16
State-of-the-Art Output Buffer . . . . . . . . . . . . . . . . . . . . . . . . . .16
Front Panel, Nº390S . . . . . . . . . . . . . . . . . . . . . . . . . . . . . 16
The Extended Pause Mode . . . . . . . . . . . . . . . . . . . . . . . . . . . .22
Sleep Timer . . . . . . . . . . . . . . . . . . . . . . . . . . . . . . . . . . . . . . .23
Rear Panel, Nº390S . . . . . . . . . . . . . . . . . . . . . . . . . . . . . . 24
AC Power Cord Polarity . . . . . . . . . . . . . . . . . . . . . . . . . . . . . .24
IR Input Tip Polarity . . . . . . . . . . . . . . . . . . . . . . . . . . . . . . . . .27
Linking Connections . . . . . . . . . . . . . . . . . . . . . . . . . . . . . . . . .28
Standard Link Cables . . . . . . . . . . . . . . . . . . . . . . . . . . . . . . . .29
Amplifier Link Cables . . . . . . . . . . . . . . . . . . . . . . . . . . . . . . . . .29
Remote Control, Nº390S . . . . . . . . . . . . . . . . . . . . . . . . . . .30
Random Play . . . . . . . . . . . . . . . . . . . . . . . . . . . . . . . . . . . . . 32
Analog Input Switching . . . . . . . . . . . . . . . . . . . . . . . . . . . . . . 34
Conditions that Affect IR Performance . . . . . . . . . . . . . . . . . . . . 35
Optimum IR Reception Window . . . . . . . . . . . . . . . . . . . . . . . . 35
Setup and Installation . . . . . . . . . . . . . . . . . . . . . . . . . . . . .36
Connecting AC Mains . . . . . . . . . . . . . . . . . . . . . . . . . . . . . . . 36
Connecting Digital Audio Sources . . . . . . . . . . . . . . . . . . . . . . 36
Connecting the Digital Audio Outputs . . . . . . . . . . . . . . . . . . . 37
Making Link Connections . . . . . . . . . . . . . . . . . . . . . . . . . . . . . 37
Connecting Analog Outputs . . . . . . . . . . . . . . . . . . . . . . . . . . 37
5
Basic Operation . . . . . . . . . . . . . . . . . . . . . . . . . . . . . . . . .38
Loading a CD . . . . . . . . . . . . . . . . . . . . . . . . . . . . . . . . . . . . .38
Playing a CD . . . . . . . . . . . . . . . . . . . . . . . . . . . . . . . . . . . . . .38
Random Play . . . . . . . . . . . . . . . . . . . . . . . . . . . . . . . . . . . . . 38
Navigating the Disc . . . . . . . . . . . . . . . . . . . . . . . . . . . . . . . . . 39
Direct Time Access . . . . . . . . . . . . . . . . . . . . . . . . . . . . . . . . . . 39
Pause . . . . . . . . . . . . . . . . . . . . . . . . . . . . . . . . . . . . . . . . . . .40
Repeat Disc . . . . . . . . . . . . . . . . . . . . . . . . . . . . . . . . . . . . . . 40
Repeat Track . . . . . . . . . . . . . . . . . . . . . . . . . . . . . . . . . . . . . . 40
A-B Repeat . . . . . . . . . . . . . . . . . . . . . . . . . . . . . . . . . . . . . . .41
Polarity . . . . . . . . . . . . . . . . . . . . . . . . . . . . . . . . . . . . . . . . . . 41
Programming the Nº390S . . . . . . . . . . . . . . . . . . . . . . . . . . 41
Introduction to Play Lists . . . . . . . . . . . . . . . . . . . . . . . . . . . . . 41
Assembling a Play List . . . . . . . . . . . . . . . . . . . . . . . . . . . . . . . 42
Programming by Omission . . . . . . . . . . . . . . . . . . . . . . . . . . . 43
Saving a Play List . . . . . . . . . . . . . . . . . . . . . . . . . . . . . . . . . . . 43
Reviewing a Play List . . . . . . . . . . . . . . . . . . . . . . . . . . . . . . . . 43
Deleting a Track from a Play List . . . . . . . . . . . . . . . . . . . . . . . . 44
Adding a Track to a Play List . . . . . . . . . . . . . . . . . . . . . . . . . . . 44
Overriding a Play List . . . . . . . . . . . . . . . . . . . . . . . . . . . . . . . . 45
Erasing Play Lists from Memory . . . . . . . . . . . . . . . . . . . . . . . . 45
6
Why Polarity Programming? . . . . . . . . . . . . . . . . . . . . . . . . . . . 45
Whole-Disc Polarity Programming . . . . . . . . . . . . . . . . . . . . . . . 46
Track-by-Track Polarity Programming . . . . . . . . . . . . . . . . . . . . .46
Overriding a Polarity Program . . . . . . . . . . . . . . . . . . . . . . . . . 47
Special Functions . . . . . . . . . . . . . . . . . . . . . . . . . . . . . . . . 47
SOUND Menu Items: . . . . . . . . . . . . . . . . . . . . . . . . . . . . . . . . 48
Fixed/Variable Volume . . . . . . . . . . . . . . . . . . . . . . . . . . . . . . . 48
Silent/Audible Cueing . . . . . . . . . . . . . . . . . . . . . . . . . . . . . . . 48
Balance Control . . . . . . . . . . . . . . . . . . . . . . . . . . . . . . . . . . . 48
Mute Control . . . . . . . . . . . . . . . . . . . . . . . . . . . . . . . . . . . . . 48
Locked Volume . . . . . . . . . . . . . . . . . . . . . . . . . . . . . . . . . . . .49
LINK Menu Items: . . . . . . . . . . . . . . . . . . . . . . . . . . . . . . . . . . 49
Standby Link . . . . . . . . . . . . . . . . . . . . . . . . . . . . . . . . . . . . . . 49
Name Link . . . . . . . . . . . . . . . . . . . . . . . . . . . . . . . . . . . . . . . .49
Play Link . . . . . . . . . . . . . . . . . . . . . . . . . . . . . . . . . . . . . . . . . 49
Display Link . . . . . . . . . . . . . . . . . . . . . . . . . . . . . . . . . . . . . . 50
AUX IN’s Menu Items . . . . . . . . . . . . . . . . . . . . . . . . . . . . . . . . 50
Changing Link Options . . . . . . . . . . . . . . . . . . . . . . . . . . . . . . 51
Sleep Timer . . . . . . . . . . . . . . . . . . . . . . . . . . . . . . . . . . . . . . .51
Using Learning Remote Controls . . . . . . . . . . . . . . . . . . . . .52
Teaching Nº390S Front Panel Commands . . . . . . . . . . . . . . . . . 52
Teaching Other Nº390S Commands . . . . . . . . . . . . . . . . . . . . .53
Special Commands Table . . . . . . . . . . . . . . . . . . . . . . . . . . . . . 55
Troubleshooting . . . . . . . . . . . . . . . . . . . . . . . . . . . . . . . . .56
Care and Maintenance . . . . . . . . . . . . . . . . . . . . . . . . . . . . 58
Specifications . . . . . . . . . . . . . . . . . . . . . . . . . . . . . . . . . . 59
Dimensions . . . . . . . . . . . . . . . . . . . . . . . . . . . . . . . . . . . . 61
Installation Notes . . . . . . . . . . . . . . . . . . . . . . . . . . . . . . . .62
7
Unpacking and Placement
Unpacking the Nº390S
Important!
Unpack your Nº390S CD Processor and remove all accessories
from the carton.
Keep all packing materials for future transport of your Nº390S.
Shipping your new component in anything other than its
purpose-designed packing material may result in damage that is
not covered by the warranty.
Included with your new Mark Levinson CD processor is a pair of
knit, white gloves designed to assist you in the initial unpacking
and placement of your new purchase. Please accept them as a
token of our appreciation for having purchased one of our
products.
Remove the Transport
Screw
Place the Nº390S CD Processor upside-down on a soft, clean
surface. Remove the transport screw from the bottom of the unit
and save it with the packing materials for future use.
Warning!
The transport screw must be removed before operating the
Nº390S, since it immobilizes the transport mechanism during
shipping to prevent damage. This screw must also be replaced
before shipping the unit.
8
Placement of the
Nº390S
The Nº390S should be placed close to your digital audio processor,
thus keeping interconnect cabling reasonably short. It may be
placed on a shelf or in a cabinet where it is convenient to operate,
but should not be rack mounted, so as to leave access to the rear
panel power switch.
The Nº390S is designed for continuous operation—hence the
standby button on the front panel rather than a power button.
However, a rear panel power switch is provided for your convenience
should you want to disconnect the unit from the AC mains (as
when taking a vacation, for example).
Drawings are included in this manual to facilitate special
installations and custom cabinetry (see Dimensions on page 61).
Operating Voltage &
Frequency
The Nº390S CD Processor is set at the factory (internally) for 100V,
120V, 200V, 220V, or 240V AC mains operation as appropriate for
the country in which it is to be sold. Make sure that the label on
the rear of the Nº390S (adjacent to the power cord) indicates the
correct AC operating voltage for your location, as attempting to
operate the Nº390S at an incorrect voltage can damage the unit.
The Nº390S CD Processor is also set at the factory for operation
on either 50 or 60 Hz AC line frequencies, as appropriate for the
country in which it is to be sold. It will not operate if it senses an
incorrect line frequency.
Warning!
Neither the voltage nor the line frequency setting may be
changed by the user. There are no user serviceable parts inside
the Nº390S. Only qualified, authorized service personnel may
open the Nº390S CD Processor, as hazardous voltages exist
within the unit.
If the AC mains voltage or frequency indicated on your Nº390S is
incorrect, please contact your local, authorized Mark Levinson
dealer or distributor.
The Nº390S can easily be powered by a normal 15-ampere AC
mains line. If other devices are also powered from the same AC
line, their additional power consumption should be taken into
account.
9
A Quick Start . . .
We recognize that many people are understandably eager to begin
listening to their new components, and that reading the manual
is often done (if at all) at a later time—perhaps while listening to
music with the new product itself. We strongly recommend that
you read this manual thoroughly, as the Nº390S CD Processor
incorporates many unusual features that enhance its operation.
Fortunately, we can help you get some music up and running on
your system quickly, so that you may begin enjoying your new
CD player while reading more about it. The goal here is simply to
make some music as quickly as possible. The following procedure
assumes that you have a relatively conventional system and it is
already connected with the exception of the Nº390S (e.g.,
preamplifier to power amplifier, to speakers, etc.).
1. Turn off your associated components.
This minimizes the opportunity for a momentary electrical
surge disturbing your system while making connections. If
you have a large power amplifier, allow its power supply to
fully discharge before proceeding (which may take as long as
several minutes, depending on its design).
10
2. Remove the transport screw from the bottom of the Nº390S.
If you have not done so already, remove the knurled transport
screw from the bottom of the Nº390S now. Be sure to save it
and all packing material for possible future use. (Shipping the
Nº390S without proper packing material and without the transport
screw in its proper position may cause damage to the unit that
would not be covered by the warranty.)
3. Connect the Nº390S to AC power.
Connect the AC cord to the Nº390S at the receptacle on the
rear panel, and then to your AC outlet. Then turn on the
power switch just above the AC power receptacle. (The
international symbol for “on” is a single vertical line: |. “Off”
is symbolized by a circle: O.) The Nº390S will take a few
moments to initialize and will then be ready to use.
4. Connect either the XLR or the RCA analog outputs on the
Nº390S to an appropriate input of your preamplifier.
When properly implemented, balanced interconnection via
XLR connectors and high quality balanced cables offers superior
performance, and is preferred to single-ended RCA
interconnection. Both sets of outputs on your Nº390S have
been optimized to ensure maximum compatibility in a wide
range of systems. (Note that you should never connect a line-level
component such as a CD player to a phono input on a preamplifier.
Although no damage is likely to result to either CD player or
preamplifier, the sound will be badly distorted and the volume may
be much louder than you expect.)
4a. If going direct from the Nº390S to an amplifier!
See Special Functions setup on page 47 to set the Nº390S to
variable output mode.
5. Power up the rest of the system, leaving the power amplifiers
for last.
Always turn the power amplifier(s) off first, and on last. This
good habit minimizes the opportunity for unexpected transients to be passed to your loudspeakers. Another good habit
is to reduce the volume on your preamplifier to minimum
value before you restore power to the system. When the
Nº390S is in its variable preamp mode, it powers up at a low
volume to minimize sudden changes in volume.
6. Load a disc in the drawer and press Play; slowly raise the
volume on your preamplifier.
Congratulations! You should now be able to enjoy your
favorite music while reading the rest of this manual. (Please,
do read the rest of this manual.)
11
Break-in Period
Although your Mark Levinson Nº390S CD Processor delivers
outstanding performance straight out of the box, you should
expect to hear it continue to improve as it reaches its normal
operating temperatures and its various components “break-in.” It
has been our experience that the greatest changes occur within
the first 300 hours, as the Nº390S reaches thermal equilibrium
and capacitors become fully formed. After this initial break-in, its
performance will remain quite constant.
The only exception to this rule is if power is removed from the
unit for more than a few minutes, allowing it to cool down.
Depending on the degree of cooling involved, you should expect
a brief warm-up period before the Nº390S’s sound quality is at its
best. Unless your Nº390S was allowed to become quite chilled,
subsequent thermal re-stabilization should not take long.
Special Design Features
Congratulations on your purchase of the Nº390S CD Processor.
The design team is confident you will enjoy the outstanding
performance of the Nº390S for many years. In case you are
interested in technical details, what follows is a brief outline of
some of the key technologies in your new CD player.
A New Generation
12
The task of a CD player is easy to define: it must recover the
correct data from the disc and convert that data to a series of
analog voltages with neither amplitude nor timing errors
(sometimes called “jitter”). As simple as this sounds, achieving it
in reality has been extremely difficult—as evidenced by the
significant sonic differences between various CD players.
Conventional CD player design depends heavily on the quality of
the oscillator used to control the rate at which the disc spins. This
oscillator exists in an extremely “noisy” electrical environment
close to the motor that spins the disc. The electrical noise
introduces timing errors in the delivery of the digital signal that
have come to be known as “jitter.” Subsequent handling of the
digital audio signal in traditional CD player designs cannot
improve upon this “jittery” signal, lacking a better reference. To
the contrary, the various stages of signal processing between the
laser pickup and the actual conversion to analog can only
contribute additional jitter of their own.
The Mark Levinson Nº390S leaps beyond conventional digital
audio technology by employing a proprietary, closed-loop jitterreduction system in conjunction with a double speed CD-ROM
drive. Using a custom-made crystal oscillator with better than five
part-per-million accuracy, the digital signal is re-clocked immediately
before its conversion to analog, eliminating transport-related jitter
from the digital audio signal. This same crystal oscillator controls
the all-digital servo used to control the rate at which the disc
spins, and the digital to analog conversion process.
In effect, the design of the Nº390S turns the accepted status quo on
its head. By placing the all-important reference clock immediately
prior to digital to analog conversion, and slaving all the mechanical
sub-assemblies to it rather than the other way around, the signal
presented to the outputs of the Nº390S is uncontaminated by
electrically- or mechanically-induced jitter. The sonic advantages
of this design are immediately apparent in the clarity, warmth and
stunning dynamic contrasts exhibited by the Nº390S.
Digital Servo Control
The laser mechanism used in the Nº390S uses all digital servo
controls of its operations. Critical functions such as focus and
tracking are handled completely in the digital domain with
mathematical precision. A digital servo remains stable over time,
never needing readjustment under normal conditions.
Digital Input/Output
Versatility
The Nº390S CD player incorporates two digital inputs, allowing
two external digital sources such as a laser disc player and digital
cable radio to benefit from the excellent digital processor
incorporated within. The two most common digital interfaces are
supported for the widest compatibility: EIAJ (sometimes called
“TosLink™”) and S/PDIF coaxial, via an RCA connector.
Two high quality digital output configurations are also supported
in the Nº390S. A new complementary driver for the balanced
AES/EBU electrical output delivers outstanding performance to the
high quality XLR connector. A single-ended S/PDIF electrical
output is also provided via an RCA connector. These digital
outputs may be used to feed the input of digital recorders or an
outboard digital processor, and they both benefit from the closedloop jitter reduction circuitry described above. (In effect, they
duplicate the functionality and performance of the corresponding
outputs on a Mark Levinson Nº37 CD transport.)
All digital interfaces have been carefully optimized to deliver the
finest performance each interface standard allows. As a direct
result, the Nº390S performs optimally with any digital processor,
without having to resort to techniques which would limit its
compatibility with other products.
Industrial Design
The Nº390S shares the handsome industrial design of other Mark
Levinson components such as the Nº380 preamplifier. The
combination of the hand-brushed, black-anodized aluminum
faceplate and bead-blasted custom-machined buttons make
operating the Nº390S a tactile as well as a sonic pleasure.
A large, easily read display provides information as to the
operational status of the Nº390S from across the room, making
the supplied remote control more genuinely useful than on
products lacking such a display.
In keeping with its sophisticated design, the Nº390S also
incorporates a Mark Levinson-designed loading mechanism.
Contrasting strongly with the bulky, plastic drawers commonly
used, the slim 1⁄8 inch drawer is machined from a solid piece of
aluminum and rides on highly polished bearings. Its variablespeed design opens and closes quickly, but without jarring the
disc contained within, nor risking a jam from dislodging it.
13
Convenience Features
Too often, high performance CD players have eschewed convenience
in the hopes of seeming more “performance-oriented.” While there
were good arguments for such a “minimalist” design in the days
of analog turntables, the time is long gone when the audiophile
needed to give up operational convenience for musical performance.
After all, convenience features in a digital product are largely a
matter of writing appropriate software, and have no affect on the
quality of the digital data itself.
The Nº390S supports a variety of custom programming options,
including “delete programming” wherein selected tracks are
omitted from the play list. This allows the user to skip the one or
two songs on an otherwise good disc that have been overplayed
ad nauseam. The Nº390S will remember such programs for
thousands of discs, should you want to save that many programs.
Communications Links
As with all Mark Levinson 30-series components, the Nº390S
incorporates a sophisticated inter-component communications
bus. Unique among high performance audio systems, Mark
Levinson 30-series components offer a degree of system integration
that makes even complex systems a pleasure to use.
For example, bringing the Nº390S CD Processor out of standby
will also bring the Linked preamplifier and power amplifier(s) out
of standby, and select the appropriate inputs on the preamplifier
so that a CD can be enjoyed. Even a sophisticated system with
many components can thus offer one-button simplicity of
operation.
14
In short, the Mark Levinson Nº390S establishes a new standard for
performance and practicality among high end CD players and
should be auditioned by anyone who desires the finest in digital
audio.
Fully Balanced Design
The Nº390S is fully balanced in both the analog and digital
domains. Information from the disc and single-ended digital
inputs are immediately converted to balanced signals and routed
to balanced DACs by way of an LVDS (Low Voltage Differential
Signal) transmission line. This design technique, borrowed from
separate Mark Levinson digital processors, preserves the faultless
timing of the digital audio signal made possible by our Closed
Loop Jitter Reduction (CLJR) system mentioned earlier in this
manual.
An Arlon 25N® printed circuit board provides the foundation for
the critical analog audio circuit. First used in the Nº32 Reference
Preamplifier, this superior material offers superb dielectric properties
and helps the Nº390S achieve remarkable performance with
complex audio signals.
Design of the fully balanced DAC/analog output module follows
the Mark Levinson tradition of rigorous component selection. An
unusual hybrid design approach incorporating both advanced
Surface-Mount and “through-hole” technologies, allows us to
utilize the optimum part at each location in the circuit, without
the constraints on parts selection normally associated with
traditional PCB assembly practices. Every active device has been
painstakingly selected for top technical performance, with final
selections of top performing devices determined by numerous,
controlled sonic evaluations.
Advanced Digital Filter
Techniques
Just as with Mark Levinson separate Digital Audio Processors, such
as our Nº30.6 Reference, the Nº390S incorporates advanced digital
filter techniques carefully chosen to optimize the sonic performance
of its on-board digital processor. Whether playing a CD, or decoding
a digital signal received through an auxiliary input, sample depth
is increased to 24 bits and sample rate increased to 352.8kHZ or
384kHz (input rate dependent) prior to conversion to an analog
signal. This sophisticated “processing” of the digital signal before
conversion (referred to variously as “unconversion”, “upsampling”,
or “oversampling”) is a fundamental contributor to the excellent
sound achieved by all Mark Levinson digital processors. The
Nº390S confirms its internal conversion rate on its front panel
display each time a disc is loaded, or an auxiliary input is chosen
and locked.
The Nº390S also incorporates High Definition Compatible
Digital® decoding to take full advantage of the resolution available from HDCD encoded 16-bit CDs. The HDCD format retains
more of the resolution inherent in modern high resolution recordings than can be accommodated by the normal CD standard by
encoding information more efficiently within the 16-bit space
available on the disc.
Digital to Analog
Conversion
Digital to analog conversion within the Nº390S is performed at an
extraordinarily high level and features a Mark Levinson-developed,
balanced implementation of the Analog Devices AD1853—a new
class of multi-bit Sigma/Delta DAC devices delivering superb
technical performance. In addition to its unusual multi-bit
architecture and unlike typical Sigma/Delta devices, the AD-1853
has a differential current output stage, which allows us to optimize
the critical current-to-voltage(I/V) conversion stage with dedicated
operational amplifiers possessing superlative rise time and bandwidth
characteristics. Following this, a new active analog filter circuit,
implemented in a differential amplifier, sums both halves of the
balanced signal and provides superb common mode noise rejection
in addition to its outstanding filter characteristics.
This approach to the Digital-to-Analog circuit block yields distortion
and noise levels that are extraordinarily low and contributes greatly
to the natural sound of the Nº390S.
15
Balanced Analog
Volume Control
State-of-the-Art
Output Buffer
16
Rather than use the digital attenuator on-board the DAC, the
Nº390S incorporates a fully balanced analog volume control similar
to that found in Mark Levinson separate preamplifiers. When
activated (by turning on the variable output function under
setup: sound), the output of the Nº390S may be attenuated in
precise 0.1dB steps through most of the range. Significantly, the
Nº390S maintains the full performance of its remarkable DACs at
all volume levels—something impossible with digital volume
controls, regardless of what techniques may be employed to mask
the sonic consequences of this design approach.
The balanced discrete output buffer circuitry used in the Nº390S
employs the same topology used in the remarkable Mark Levinson
Nº32 Reference Preamplifier. A hallmark of Mark Levinson
preamplifier and digital processor design, this circuit has proven
itself time and time again to be both sonically transparent and
exceptionally immune to adverse interactions with interconnecting
cables and unusual input impedance characteristics of power
amplifiers or preamplifiers. The Nº390S features a new, ultra
compact, implementation of the Mark Levinson output buffer
circuit pushing noise coupling and parasitic effects to vanishingly
small levels. This exceptionally robust output stage allows the
Nº390S to make the most of what whatever combination of
preamplifier, power amplifier, or cables you choose to use.
Front Panel, Nº390S
1. display intensity
Pressing this button varies the brightness of the display. Four
brightness levels are available, including “display off.” All
other front panel LEDs change their brightness levels
appropriately, except that they remain at the dimmest level
when the display itself is off.
When power is first applied to the Nº390S (or when power is
restored after an interruption), the display is automatically set
to its highest level.
Pressing the display intensity button once dims the display
one level; pressing it again turns the display off; pressing
display intensity once more returns the display to its brightest
level; pressing it a fourth time will return it to medium. (If
other Mark Levinson components in the system are “Linked”
to the Nº390S, all display intensities can change in unison.
See Special Functions for more information.)
If the display is set to “off,” pressing any key will cause it to
light at medium intensity for approximately four seconds in
order to display the action of the key press.
2. Infrared Transceiver (within display)
Infrared commands transmitted from the remote control are
received by a receiver behind this section of the display.
Remote control of the Nº390S may be unreliable if there is not
a clear line of sight between the remote control and the
receiver (if the remote is far off-axis, or if the Nº390S is within
a cabinet, for example). In such a case consider using a thirdparty IR repeater to route the signal to the IR input jack on
the rear panel (see Rear Panel, Nº390S).
In addition to receiving IR commands, the Nº390S has the
ability to teach a learning remote control its own commands
from an IR transmitter located in this same area. (See Using
Learning Remote Controls for more information.)
3. Special Mode Indicator
The first character in the display is reserved for indication of
special modes of operation. For example, a P is displayed in
this space to indicate a Program (a special sequence of tracks)
is being played: A and B alternate while an A-B loop is being
repeated. Similarly, an R is displayed to denote random play,
and is displayed to denote pause.
4. Track Indicator
The next two characters are used to indicate the number of
the track being played. When a compact disc is loaded but the
transport is in the stop mode, this same space indicates the
total number of tracks on the disc (or in the program for the
current disc, if programmed).
17
5. Time Indicator
The time section of the display can be set to display any of
the following four indications of time in minutes and seconds:
•
time elapsed in track (neither LED lit)
•
time elapsed on disc (time on disc LED lit)
•
time remaining on track (time remaining LED lit)
•
time remaining on disc (time on disc and time remaining
LEDs lit)
In effect, the Nº390S assumes you will be most interested
seeing elapsed time on the current track; only departures from
that assumption are denoted by LEDs. The Nº390S will
remember the last display mode selected and continue to
display that information until you change it, except in stop
(when it always defaults to showing the time remaining on
disc, or in the disc’s play list if it has been programmed). Once
in stop, the time indication may be changed to show any of
the other display modes (if desired).
18
These four options are accessed by pressing the mode button
to the right of the display until TIMES is shown in the display
(see 6, below). Then, use the mode + or mode – keys to cycle
through the four modes of time display, using the time on
disc and time remaining LEDs to indicate which mode is
chosen at any moment.
6. mode button
The mode button beside the display cycles through the four
functions that can be controlled by the mode + and mode –
buttons (either on the front panel or the remote control).
These four modes are:
•
PROGRAM (for creating custom play lists)
•
INPUTS (for selecting a digital source)
•
TIMES (for selecting a time indication)
•
VOLUME* (for controlling the volume of the Nº390S*)
*
(Note that the volume control is only made available if
the Nº390S’s variable output mode is engaged; see Special
Functions for more information.)
Any of these four modes (three modes if using the fixed output)
may be accessed by repeatedly pressing the mode button,
thereby cycling through the options.
Once a particular mode is chosen, pressing the mode + and
mode – buttons “increases” or “decreases” that particular
function. For example, mode + would either: add a track to a
play list; select the next digital input; advance to the next
time indication; or raise the volume.
Along with mode + and mode –, the mode button is also used
to change the option settings. (See Special Functions.)
7. Repeat button
You may choose to either repeat the entire disc (including any
programs you might have entered for that particular disc) or
an individual track by pressing the repeat button. From
normal operation, the first press of the repeat button will
light the disc repeat LED below the display (number 11 in the
front panel illustration). Pressing the repeat button again will
light the track repeat LED (number 13 in the front panel
illustration). Pressing it a third time will cycle out of any
repeating mode, as will pressing stop/drawer at any time. In
either case, both repeat LEDs will be extinguished to indicate
the absence of any repeat mode.
8. Drawer
The Nº390S employs an elegant, slim drawer that is machined
from a solid piece of aluminum. It is normally opened and
closed by pressing the stop/drawer button (number 15 in the
front panel illustration). If opened, it may also be closed
simply by gently pushing the front edge inward (as though
you were going to close it manually). The Nº390S will interpret
this as a request to close the drawer and take over for you,
smoothly closing the drawer.
If the Nº390S senses an obstruction during opening of the
drawer mechanism, it will attempt to re-close. If successful, it
will read the disc’s table of contents and display the disc’s
number of tracks and total time (followed by the play list’s
track and time information, if one exists). If for any reason
the drawer does not close fully, the display will show DRAWER
to indicate the problem. After removing the obstruction, press
the stop/drawer button again to close the drawer normally.
Similarly, if the Nº390S senses an obstruction during the
closing of its drawer, it is designed to stop immediately and
will attempt to reopen. If the nature of the obstruction
prevents this also, it will stop where it is and wait for your
intervention, displaying STOPPED! to indicate the problem.
After removing the obstruction, press the stop/drawer button
again to close the drawer.
9. HDCD® indicator
This LED will illuminate when the Nº390S is playing HDCDencoded material, whether from the CD transport or from an
external digital source.
19
10. mode – and mode + buttons
Using these two buttons in conjunction with the mode button,
any of four different Nº390S functions can be controlled from
the front panel:
•
PROGRAM (for creating custom play lists)
•
INPUTS (for selecting a digital source)
•
TIMES (for selecting a time indication)
•
VOLUME* (for controlling the volume of the Nº390S*)
*
(Note that the volume control is only made available if
the Nº390S’s variable output mode is engaged; see Special
Functions for more information.)
Any of these four modes (three modes if using the fixed output)
may be accessed by repeatedly pressing the mode button,
thereby cycling through the options.
Once a particular mode is chosen, pressing the mode + and
mode – buttons “increases” or “decreases” that particular
function. For example, mode + would either: add a track to a
play list; select the next digital input; advance to the next
time indication; or raise the volume.
20
Along with mode + and mode –, the mode button is also used
to change the option settings. (See Special Functions.)
For detailed information on programming the Nº390S, see
Programming the Nº390S later in this manual.
11. disc repeat LED
This LED is lit when the Nº390S is set to repeat a disc (or a
disc’s program, if it has one) endlessly. This feature is accessed
using the repeat button (see number 7, page 19).
12. prev/rew button
Pressing this button momentarily will return you to the beginning of the previous track. Pressing and holding this button will
instead perform a reverse scan of the music, reminiscent of
the rewind function found on many tape decks. This scanning
mode may be either audible or silent (according to your
choice in the setup: sound menu; see Special Functions), and it
allows you to quickly find a particular point within a track.
(Incidentally, if you wish to listen to the current track over
again from the beginning, simply press play while the track is
playing.)
13. track repeat LED
This LED is lit when the Nº390S is set to repeat a single track
endlessly. This feature is accessed using the repeat button (see
number 7, page 19).
14. next/f.fwd button
Pressing this button momentarily will advance the Nº390S to
the beginning of the next track. Pressing and holding this
button will instead perform a fast forward scan of the music,
reminiscent of the fast forward function found on many tape
decks. This scanning mode may be either audible or silent
(according to your choice in the setup: sound menu; see
Special Functions), and it allows you to quickly find a particular
point within a track.
15. stop/drawer
Pressing this button once while a disc is playing will stop the
disc, resulting in the total number of tracks and the total time
on the disc being displayed. (Both the time on disc and the
time remaining LEDs are lit to clarify the meaning of the
information being displayed at this point.) Pressing this button
once the disc has stopped, or if there is no disc in the transport,
will cause the drawer to open.
Pressing the stop/drawer button will cause an open drawer to
close. If it senses a disc in the drawer, the Nº390S will confirm
its internal conversion rate on the display (24-bit, 352kHz)
and then read the disc’s table of contents so that it may
display the total number of tracks and the total time on the
disc for your information. If a custom play list exists for the
disc, the total number of tracks and the total time of the play
list is displayed instead.
16. time on disc and time remaining LED indicators
These LEDs are used to indicate which of the four available
display modes the Nº390S is in. The four indications of time
that can be displayed are:
•
time elapsed in track (neither LED lit)
•
time elapsed on disc (time on disc LED lit)
•
time remaining on track (time remaining LED lit)
•
time remaining on disc (time on disc and time remaining
LEDs lit)
These four options are accessed by selecting the TIMES mode
(using the mode button) and repeatedly pressing the mode +
or mode – buttons, which cycle forward or backward through
the four modes, respectively.
21
17. play button
As you might guess, press this button in order to play a disc. If
a programmed sequence of tracks exists for that particular
disc, the program will be played from its beginning. Also, as
you might expect, you may press the play button immediately
after placing a disc in the Nº390S’s drawer; the drawer will
close and the Nº390S will enter the play mode as soon as it
has confirmed its internal conversion rate (24-bit, 352kHz),
has read the disc’s table of contents and checked to see if a
program exists that ought to be played.
The play button has another important function: if you wish
to return to the beginning of the track currently playing,
simply press play to restart at the beginning of that same
track. If the Nº390S is in pause, pressing play will re-cue the
disc at the beginning of the current track.
18. pause button
Pressing this button once during play will pause the Nº390S
at that point within the track; the display will show double
bars () as a reminder that you are in the pause mode.
Pressing the pause button a second time will resume play.
The Extended Pause Mode
22
After two minutes in pause, the Nº390S will go into an
“extended pause” mode. Extended pause stops the disc and
turns off the laser against the possibility that you have been
called away and may not return for some time. The Nº390S
will slowly flash the double bars () to indicate that you are
in the extended pause mode rather than normal pause.
You may force the Nº390S into extended pause mode by
pressing and holding the pause button (on either the front
panel or the remote control) until the double bars begin to
blink.
In effect, extended pause is much like stop, with the
exception that pressing pause will return you to the point on
the disc where you had left off listening after only a
momentary hesitation to spin the disc back up to speed and
scan to the appropriate point.
19. Standby & Standby LED
Assuming that the Nº390S is connected to AC power and the
main power switch on the rear panel is in the “|” position (see
Rear Panel, Nº390S), pressing this button takes the Nº390S out
of standby mode and enables the front-panel controls.
When the Nº390S’s main power switch is first turned on (or
when power is restored after an interruption), the Nº390S will
go through a brief initialization and then be ready to operate
(that is, it won’t be in standby mode).
Pressing standby again places the Nº390S into standby mode,
which turns the display off, turns off all digital outputs, and
disables the front-panel controls. The internal circuitry
remains powered up in order to maintain its thermal stability
and optimum performance at all times.
Pressing standby, drawer, or play will bring the Nº390S out of
standby, enabling the front panel controls, and activating the
display and outputs.
While the Nº390S is in standby, the LED above the standby
button flashes approximately every five seconds. (When the
Nº390S is Linked to other Mark Levinson components, all
their standby lights will blink in unison.) When the Nº390S is
ready to operate (that is, when it is not in standby mode), this
LED remains lit continuously.
Sleep Timer
As shipped from the factory, the Nº390S will remain on until
you deliberately place it in standby. If you prefer for it to
automatically enter standby after a particular period of time,
press and hold the standby button until the display reads
MANUAL. Pressing the next/f.fwd button will advance it in
one minute increments to a maximum of 120 minutes.
Pressing the prev/rew button will decrease the sleep timer by
one minute increments. Reducing the timer setting below 1
minute will return it to normal, MANUAL operation.
These options represent the length of time the Nº390S before
it will automatically go into standby. Having made your
selection, simply allow the Nº390S to time out (when the
display reverts to its normal operation, indicating disc
information). You may change your Nº390S back to manual
standby mode before it enters standby by reversing this
process.
The sleep timer will automatically reset itself to MANUAL after
having been activated. In this fashion, you can set it and forget
it without having a subsequent listening session interrupted
unexpectedly.
23
Rear Panel, Nº390S
1. AC power input and switch
This input accepts AC power from the AC mains (via the supplied AC cable).
Warning!
24
The Nº390S is set internally for 100, 120, 200, 220, or 240VAC
mains operation at either 50 or 60Hz. Make sure that the label
on the bottom of the unit indicates the correct AC operating
voltage and frequency for your location before connecting it to
AC mains.
Connect the female end of this cable to the Nº390S. Connect the
male end of this cable to wall outlet or to an “unswitched”
convenience outlet like those found on some audio components.
AC Power Cord Polarity
Turn on the power by pressing the top of the power switch above
the power cord receptacle (it has a solid vertical line to indicate
“on”: |).
Caution:
Do not switch power off and on rapidly, as this interrupts the
normal power-up sequence. We advise waiting at least five
seconds between power cycles.
2. Digital Outputs
These outputs provide digital audio signal (DAS) via cables
equipped with either XLR-type or RCA-type connectors to a
digital audio processor.
The XLR output conforms to the Audio Engineering Society/
European Broadcast Union (AES/EBU) professional digital
audio standard, which calls for a 110Ω transmission of the
DAS. Use a digital interconnecting cable specifically designed
for the 110Ω AES/EBU standard when using this input, with
pin assignments as indicated below:
Pin 1: Signal ground
Pin 2: Signal + (non-inverting)
Pin 3: Signal – (inverting)
Connector ground lug: chassis ground
It has been Mark Levinson’s experience that the AES/EBU
interconnection standard offers the best quality of all digital
transmission interfaces when fully optimized, and we
recommend its use wherever possible between Mark Levinson
components.
However, optimizing any electrical digital interface completely
represents a significant engineering challenge. It is entirely
possible that a different type of input may actually outperform
a less-than optimized AES/EBU implementation on some
brands of digital components. For this reason, we have gone
to great lengths to fully optimize both of the digital outputs
on the Nº390S. If you are using your Nº390S with a different
brand of processor, we recommend experimenting to determine
which type of input on that component results in the best
audible performance.
The RCA output provides digital audio signal (DAS) via cables
equipped with RCA-type connectors to the digital processor. It
conforms to the Sony/Phillips Digital Interface Standard
(S/PDIF), which calls for a 75Ω transmission of the DAS. Use a
digital interconnecting cable specifically designed for the 75Ω
S/PDIF standard when using this output.
25
3. digital inputs
These inputs accept digital audio signal (DAS) via cables
equipped with either EIAJ optical or RCA (S/PDIF) coaxial
connectors from digital sources such as a compact disc
transport, laser disc transport, digital audio tape transport, or
digital broadcast receiver.
The EIAJ input accepts digital audio signal (DAS) via optical
cable equipped with the EIAJ optical connector (sometimes
called “Toslink™”) from digital sources such as a compact disc
transport, laser disc transport, digital audio tape transport, or
digital broadcast receiver.
The RCA input accepts digital audio signal (DAS) via cables
equipped with RCA-type connectors from digital sources such
as a compact disc transport, laser disc transport, digital audio
tape transport, or digital broadcast receiver.
The RCA input conforms to the Sony/Phillips Digital Interface
Standard (S/PDIF), which calls for a 75Ω transmission of the
DAS. Use a digital interconnecting cable specifically designed
for the 75Ω S/PDIF standard when using this input.
4. balanced analog outputs
26
These outputs normally provide balanced line-level analog audio
(via cables equipped with XLR-type connectors) to a preamplifier,
integrated amplifier, or receiver equipped with balanced inputs
(see “Setup and Installation”). The pin assignments used are
AES-standard, as shown below:
Pin 1: Signal ground
Pin 2: Signal + (non-inverting)
Pin 3: Signal – (inverting)
Connector ground lug: chassis ground
Alternatively, you may elect to use the variable output capability
of the Nº390S as a volume control, driving the power amplifier
in your system directly. For a digital-only system, the Nº390S
is an excellent preamplifier.
Since many people have at least one analog source, they will
be better off having a full preamplifier to coordinate the
operation of the entire system—digital and analog. In this
case, you would leave the Nº390S in its factory-default setting
of having a fixed (line level) output.
5. single-ended analog outputs
These outputs provide single-ended line-level analog audio
(via cables equipped with RCA-type connectors) to a preamplifier,
integrated amplifier, or receiver.
Alternatively, you may elect to use the variable output capability
of the Nº390S as a volume control, driving the power amplifier
in your system directly. Of course, this approach is only
appropriate in relatively simple systems lacking any analog
sources.
Since many people have at least one analog source, they will
be better off having a full preamplifier to coordinate the
operation of the entire system—digital and analog. In this
case, you would leave the Nº390S in its factory-default setting
of having a fixed (line level) output.
6. external IR input
The Nº390S incorporates an infrared repeater input to facilitate
a wide range of installation options. If desired, the Nº390S
may be placed inside a cabinet or outside the normal line-ofsight in the listening area, with the controlling IR signal being
relayed to the Nº390S by any of a number of commerciallyavailable IR repeaters.
The specifications for this IR input call for a triggering voltage
of 5-12 volts at no more than 100 milliamperes of current,
with the tip of the 1⁄8" mini-plug having positive polarity, as
below:
IR Input Tip Polarity
If you would like more information on the possibility of using an
infrared repeater with your Nº390S, please contact your Mark
Levinson dealer.
27
7. communication ports
These communications ports allow the Nº390S to “link” to
certain compatible Mark Levinson components. (See “Special
Functions.”)
Linking Connections
The Mark Levinson Linking system provides for inter-component
communications. Normally, the digital processor in the system
would serve as the “master” of this communications system,
while other components including the transport would be
“slaves” to that master. (The master acts as a central clearinghouse for that information—sort of like the Post Office, but
quite a bit faster.) Since the Nº390S is both a digital transport
and a digital processor in one component, it automatically
configures itself as either a master or a slave, based on the needs
of the rest of the system. (Technically, if the Nº390S senses
another master on the communications bus, it automatically
configures itself as a slave.)
The most common configuration for systems incorporating
the Nº390S is illustrated at left. The Nº390S’s master out port
normally sits at the beginning of the chain, and is connected
to the slave port of a Mark Levinson preamplifier using a
“straight-through” eight conductor modular cable. The
preamplifier, in turn, serves as the “master” for the power
amplifier(s) with which it is used. (See diagram at left for
clarification.)
28
Alternatively, if you elect to use the variable output feature of
the Nº390S to drive a power amplifier directly, it may serve as
the power amplifier’s “master” using a special eight-to-six
conductor Link cable described below. Using this cable
automatically configures the Nº390S as though it were a Mark
Levinson preamplifier in order to control the Mark Levinson
power amplifier. (See diagram at left for clarification.)
Finally, if at some point you end up using your Nº390S as a
transport in conjunction with a separate Mark Levinson digital
processor, simply insert it between the processor and the
preamplifier (connecting the processor’s master port to the
Nº390S’s slave in port, and the Nº390S’s slave out port to the
preamplifier’s slave port) to keep the daisy chain going. Sensing
another “master” on the communications bus, the Nº390S will
automatically configure itself as a slave to that master (hence
the master/slave out nomenclature on the rear panel jack).
(See illustration on page 24 for clarification.)
Important:
If a compatible Mark Levinson preamplifier (i.e., the Nº380 or
Nº380S) is Linked, it must be the last of the line-level components
in the daisy chain. (Technically, it serves to terminate the
communications bus used by the source components.)
Electrically, the Link connection between the preamplifier and
the power amplifier(s) in the system is independent of and
distinct from the communications Links between various
source components and the preamplifier. The reason for this is
simple: the power amplifiers, lacking any microprocessor of
their own, are dependent on the intelligence of the preamplifier
for their Linked functionality. This remains true even when
you employ the Nº390S as your “preamplifier.”
The modular cable needed for the Link connection between
the Nº390S and other Link components may be purchased
from your Mark Levinson dealer. It may also be easily made to
length using two modular connectors and the appropriate
length (up to 100 feet/30 meters) of flat, eight conductor
cable.
Modular cables and connectors are used throughout the world
for both telecommunications and computers, and are widely
available. The connectors are crimped on to the ends of the
cable such that pin 1 at one end is connected to pin 1 at the
other end. Such a “straight-through” connection is made
(counter-intuitively) by introducing a 180° twist in the cable
between the two ends, as shown below.
Standard Link Cables
29
A different Link cable configuration is used when connecting
the Nº390S to a power amplifier as though it were a preamplifier.
It uses six-conductor cable (rather than eight), with a sixconductor modular plug at one end and an eight-conductor
modular connector at the other end (using pins 1 through 6
of the latter), as shown below:
Amplifier Link Cables
(Note that the pins are numbered 1 through 8 from left to right
when the locking tab is down and the metal contacts are pointing
away from you.)
Remote Control, Nº390S
1. IR Transmitter window
The Nº390S’s Remote Control sends infrared (IR) commands
through its projection lens, and the Nº390S receives IR
commands through its Remote sensor window. (See “Front
Panel, Nº390S”). If either of these lenses is obstructed, no IR
commands can be received by the Nº390S. If you notice IR
performance deteriorating, you may want to clean these lenses
with a soft cloth and some glass cleaner. (Spray the cleaner on
the cloth first, and then wipe the lens with the moistened
cloth. Do not spray the cleaner directly on either lens, as this
may allow moisture to migrate into the electronics behind the
lens assemblies.)
2. Transport Buttons
The buttons used for routine operation of transport functions
on the Nº390S are grouped at the top of the remote control.
They include:
• rew ( )
30
When clicked, this will take you to the beginning of the
previous track. ( is the international symbol for previous).
When pressed and held (denoted by the bold dot •), the
Nº390S will enter a reverse scanning mode similar to the
familiar rewind function of many tape decks, allowing a
precise location within a track to be found. This scan may
be silent or audible, depending on your setup: sound
preferences. (See Special Functions.)
• f.fwd ( )
When clicked, this will take you to the beginning of the
next track. ( is the international symbol for next). When
pressed and held (denoted by the bold dot •), the Nº390S
will enter a fast forward scanning mode similar to the
familiar fast forward function of many tape decks, allowing
a precise location within a track to be found. This scan
may be silent or audible, depending on your setup: sound
preferences. (See Special Functions.)
• play ( )
Press to enter the play mode from either stop or standby,
or to restart play at the beginning of the track currently
playing. If there is no disc inside the Nº390S, pressing play
will open the drawer so you may add a disc.
• stop/dwr ()
Press to stop play. The same button will operate the drawer
if stopping the disc has no relevance (e.g., if it is already
stopped, or if there is no disc inside the Nº390S).
• pause ()
Press to pause play in the current location. If left in pause
mode for more than two minutes, the Nº390S will enter
extended pause mode, shutting down both the laser and
the drive motors to enhance longevity and reliability.
Upon pressing pause a second time, the disc will spin up
and begin playing from the location where it had been
paused.
3. A/B repeat button
The Nº390S may be set to repeat any contiguous segment of a
disc. Press once to establish a beginning point (point A) for an
endless playback loop. The display will flash the letter B to
indicate that it is ready to accept your designated ending
point (point B). (Note that A must precede B on the disc.)
Once this has been done, the Nº390S will repeat the segment
of the disc between points A and B until you press stop or A-B
again.
4. mode buttons
Using these three buttons, either of two Nº390S functions can
be controlled from the remote control:
•
PROGRAM (for creating custom play lists)
•
TIMES (for selecting a time indication)
Either of these modes may be accessed by repeatedly pressing
the mode button, thereby toggling back and forth between
the options.
Once a particular mode is chosen, pressing the mode + and
mode – buttons “increases” or “decreases” that particular
function. For example, mode + would either: add a track to a
play list; or advance to the next time indication.
Along with mode + and mode –, the mode button is also used
to change the option settings. (See Special Functions.)
For detailed information on programming the Nº390S, see
Programming the Nº390S later in this manual.
31
5. Numeric Keypad
The numbers 0, 1, 2, 3, 4, 5, 6, 7, 8, and 9 may be used to
directly access individual track numbers of discs played by the
Nº390S. For example, to go directly to track 13, press 1
followed by 3, and then press play. You do not have to add a
0 before a single-digit track number: 7, followed by play, will
take you directly to track number 7. (In fact, if the Nº390S is
already in play, simply pressing the number button will be
sufficient.)
The Nº390S displays a certain amount of intelligence with
respect to direct track access. If the first number entered
identifies a particular track unambiguously (such as 2 on a
12-track disc), the Nº390S is “smart” enough to immediately
move to that track. If the first number entered could be the
first of two digits (such as 1 on a 12-track disc), the Nº390S
will wait for a moment to determine whether you wish to
enter a second number. If not, it will then go to the singledigit track you selected.
Random Play
32
Incidentally, if you press 0 followed by play, the Nº390S will
enter a random play mode in which the order of the current
disc’s play list is scrambled, and then played. The first character
of the display (that shows a P when playing a custom program)
will show R to indicate random play. Moreover, placing the
Nº390S into random play mode while the disc repeat function
is engaged will cause it to play the various tracks on the disc
randomly indefinitely (until you stop it). This can be a great
way to provide background music during a dinner party, for
example.
These numbers may also be used in conjunction with other
features, such as programming and direct access by time. For
example, when in the stop mode, you may press 5 and press
the positive command for program – (see Special Commands
table, page 55) to delete track 5 from your play list. In this case,
the Nº390S would play that particular disc normally, except
that it would automatically skip from track 4 to track 6.
Selecting a particular track does not affect the operating mode.
That is to say, pressing 7 while in play begins playing track 7;
pressing 4 while in pause leaves you paused at the beginning
of track 4.
6. Other Operational Buttons
• time
Pressing this button (followed by appropriate numbers
from the numeric keypad) allows direct access to any
particular time on a disc. Note that this is a context-sensitive control—the time accessed will be according to the
currently selected time display mode, e.g., 30:00 with the
time remaining and time on disc LEDs lit will take you to
that point where thirty minutes remains to the end of the
disc.
• polarity
Pressing this button on the Nº390S remote control will
transparently and automatically invert the polarity of both
channels. Some recordings sound better with one polarity
than the other; on many, the difference is subtle. In any
case, the best place to judge the better polarity for any
given recording is from the listening position (hence the
placement of this feature on the remote control).
• rpt disc/trk
Press once to enter disc repeat mode (repeating the entire
disc, or an entire play list if one is entered). This action
will illuminate the disc repeat LED. Press a second time to
enter the track repeat mode (repeating a single track ad
nauseam). A third press will cycle you back to normal
operation, as will pressing stop.
• mute
Pressing this button will engage the mute function of a
compatible Mark Levinson preamplifier without stopping
the transport. Pressing it a second time will restore the
volume to its previous setting. Since this function depends
on the ability of the Nº390S to pass the instruction to the
Nº380 (for example), the two components must be
connected by a Link cable, and operate within a system
which has a “master” digital processor. (See Special
Functions for more information.) If you are using the
Nº390S’s preamp (variable output) feature, the Nº390S will
engage its own mute circuitry instead.
• intensity/standby
Pressing this button momentarily cycles the Nº390S (and
any Linked Mark Levinson components) through their
four levels of display intensity (bright, medium, dim, off).
When pressed and held (denoted by the bold dot •), this
button will place the Nº390S into standby. When pressed
and released, this button will take the Nº390S out of
standby.
33
• (+) volume
Pressing this button on the Nº390S remote control will
transparently and automatically raise the volume of a
Linked Mark Levinson preamplifier, minimizing the need
to juggle multiple remotes. Since this function depends on
the ability of the Nº390S to pass the instruction to the
Nº380 (for example), the two components must be
connected by a Link cable. (See Special Functions for more
information.) Alternatively, the Nº390S may be configured
to use its own, internal volume control in all-digital systems
lacking a preamplifier. (See Setup Options.)
• (–) volume
Pressing this button on the Nº390S remote control will
transparently and automatically lower the volume of a
Linked Mark Levinson preamplifier, minimizing the need
to juggle multiple remotes. Since this function depends on
the ability of the Nº390S to pass the instruction to the
Nº380 (for example), the two components must be
connected by a Link cable. (See Special Functions for more
information.) Alternatively, the Nº390S may be configured
to use its own, internal volume control in all-digital systems
lacking a preamplifier. (See Setup Options.)
• input select
34
Pressing this button on the Nº390S remote control will
transparently and automatically cycle through its various
active digital inputs, allowing you to select other digital
sources connected to the Nº390S.
Analog Input Switching
Alternatively, you may force the input select button to
select from among your analog inputs on a Linked Mark
Levinson preamplifier by pressing and holding the button
until it shows DIGITAL, then clicking the button to change
it to ANALOG, and then pressing and holding the input
select button a second time to confirm your change. (You
may change it back at any time by reversing this procedure.)
7. Battery Compartment
The two AA batteries used by the Remote Control must be
placed inside the compartment at the bottom of the remote’s
housing. Using the hex wrench provided in your accessory kit
(look inside the slot within the foam rubber), carefully remove
the two screws on the bottom of the housing and insert the
batteries, being careful to orient them as indicated inside the
battery compartment. Then replace the screws using the hex
wrench.
Conditions that Affect
IR Performance
IR communication between the Remote Control and the Nº390S
can be affected by:
•
direct sunlight
•
interior lighting
•
wall, window, ceiling, and floor treatments
•
the angle of the Remote Control relative to the Nº390S
If the Nº390S will be subject to direct sunlight, place it no more
than 10 feet from where you’ll normally operate the Remote
Control. Where bright sunlight virtually floods the room, IR
communication may be inconsistent.
In a room lighted primarily with incandescent fixtures, place the
Nº390S no more than 25-30 feet from where you’ll normally operate
the Remote Control. In a room with fluorescent fixtures, this
range will be reduced. Where bright fluorescent lighting virtually
floods the room, IR communication may be inconsistent.
IR, like visible light, reacts differently when it meets different
surfaces. Carpeting and draperies, for example, tend to diffuse
(scatter) IR and interfere with its transmission. Glossy or reflective
surfaces, such as mirrors and smooth walls, “bounce” (reflect) IR
and won’t interfere with its transmission. When placing the
Nº390S, it’s important to account for potential IR bounce and diffusion. For example, in a room with thick carpeting, heavy
draperies, and many pieces of furniture, you may need to place
the Nº390S closer to where you’ll normally operate the Remote
Control than you would in a sparsely furnished room with bare
walls and hardwood flooring.
Optimum IR Reception
Window
If possible, install the Nº390S directly opposite from where you’ll
normally operate the Remote Control. In practice, the Remote
Control will operate the Nº390S at up to 30 degrees to either side
of this direct line. To either side of this line, successful IR
communication will depend on bounce and ambient lighting.
(Please refer to the diagram at the left).
If the requirements of your installation preclude a clean line of
sight between the Nº390S and your listening position, you may
want to consider using an infrared repeater to route the remote
control’s commands directly to the Nº390S, using the external ir
input on the rear panel. (See item #6 in Rear Panel, Nº390S.) Please
ask your dealer for more information on third-party IR repeaters.
35
Setup and Installation
Caution!
Connecting AC Mains
For your protection, review “Important Safety Instructions”
before you install your Nº390S.
Plug the female end of the AC power cord into the appropriate
socket on the rear panel of the Nº390S, being certain to seat it
firmly, all the way into the receptacle.
Double-check to make sure that the AC power switch is in the off
position (the side of the switch with an “O” should be depressed),
and also that the voltage indicated on your Nº390S corresponds to
the normal voltage for your country. (Connecting a 120-volt
Nº390S to a 220-volt AC outlet is not a good idea.)
Plug the male end of the power cord into the wall outlet, and
then turn on the power switch located on the rear panel of the
Nº390S (by depressing the side of the switch that has a single
vertical line like this: “|”).
36
Connecting Digital
Audio Sources
The Nº390S incorporates EIAJ optical and RCA digital input
connectors for up to two additional digital sources. (See Rear
panel, Nº390S.)
For optical digital interconnection, we recommend the use of
better quality optical EIAJ cable. Your dealer can help you select
an appropriate cable for your system.
Using appropriate cables, connect an output of each additional
source (laser disc, digital tape, etc.) to the appropriate input on
your Nº390S.
Connecting the Digital
Audio Outputs
The Nº390S incorporates AES/EBU and S/PDIF electrical output
connectors for use with either digital recorders or with outboard
digital processors. (See Rear panel, Nº390S.)
Using appropriate cables, connect the appropriate outputs on your
Nº390S to your external digital components.
Making Link
Connections
The Nº390S incorporates sophisticated inter-component
communications capabilities when Linked to compatible Mark
Levinson components. (See “Communication Ports” in Rear panel,
Nº390S.) If you own compatible Mark Levinson components,
connect them to the Nº390S with an eight-conductor modular
cable as described on p. 25. You may find that you need to cycle
power off and on once after making this connection for the first
time (if making the connection to a previously operating
component), in order to ensure that all components in the chain
are aware of each other’s presence. Engaging PLAY on the transport
once from STOP will complete the Link connection by activating
the communications bus between the components. (When using a
preamplifier, you must also name the appropriate input “No390S” as
described in the preamp’s manual in order to complete the Link.)
To help with special installations and custom cabinetry, drawings
are included in this manual. (See Dimensions).
37
Connecting Analog
Outputs
The Nº390S provides both balanced (via XLRs) and single-ended
analog outputs. Either set of outputs may be connected either to a
preamplifier or (with the variable output feature engaged) directly
to a power amplifier. It has been our experience that balanced
interconnection provides superior performance, particularly if
long runs of cable are required.
Using appropriate cables, connect the appropriate outputs on your
Nº390S to your preamplifier or power amplifier.
Basic Operation
Before operating your Nº390S, take a minute to become familiar
with its controls and their locations. (See “Front Panel, Nº390S”
and “Remote Control, Nº390S.”)
Loading a CD
To load a CD:
1. Make sure that the main power switch is set to the “|” position.
2. Press stop/drawer to open the drawer.
3. Place a CD into the recess of the drawer, label side up. Handle
the CD by the outer edges and center hole only.
4. Press stop/drawer.
Note: If you have previously saved a program for the CD, the letter
P will appear preceding the track number on the display. (See
“Programming the Nº390S.”)
To override a previously saved program, briefly press mode – once while
in program mode. All of the CD’s tracks will be accessible for basic
operation, but the program will still be retained in the Nº390S’s memory.
38
Playing a CD
To play all tracks on the CD, press the play button. All tracks will
play in order. Play will stop automatically at the end of the CD.
To begin play with a track other than the first track:
1. Before pressing play, press next until the number of the
desired track shows on the Display. If you pass the track you
want to play, you can “back up” by pressing previous. (You
may also select the track using the numbered buttons on the
Remote Control.)
2. Press play to begin playing that track. The remaining tracks will
play in order. Play will stop automatically at the end of the CD.
To return to the beginning of a track while it is playing, press
play. Play will be suspended briefly, then that track will replay
followed by the remaining tracks on the CD.
Random Play
Using the Remote Control, you may have the Nº390S play tracks
at random. To do this, press the 0 (zero) numbered key, then press
play. The display will show RANDOM briefly to indicate that you
have entered the random-play mode. Subsequently, the letter R
will appear preceding the track number in the display as a
reminder. To cancel random play, press stop.
Navigating the Disc
You may skip to another track any time while a CD is playing. To
move to another track, press next (to go forward) or previous (to
go backward) until the number of the track you want to play
shows on the Display. (You may also select the track using the
numbered buttons on the Remote Control.) Play will resume as
soon as the pickup reaches that track.
You may search for a particular passage on the CD using fast
forward and rewind, by pressing and holding the next and previous
buttons (respectively).
Use the reduced-volume audible scan available during these
modes to search the CD until the laser pickup reaches the passage
you want to hear. (Assuming your CD player is set for audible rather
than silent scanning. If not, see Special Functions.)
As soon as you release the button, play resumes.
If you search past the beginning or end of a track, the laser pickup
will move on to the previous (or next) track. If you try to search
forward past the end of a CD or program, the laser pickup will
stop at the end of the last track. If you try to search backward past
the beginning of a CD or program, the laser pickup will stop at
the beginning of the first track of the disc (or play list).
39
Direct Time Access
You may use time on the Remote Control to begin play at a
specific time on the disc.
To do this:
1. Select the desired track using either next and previous or the
numeric keypad on the Remote Control.
2. Press time, then press the numbered buttons corresponding to
when you would like play to begin. (The numbers you select
will appear in the time portion of the display.)
3. To begin play at that point, press play.
Note: The time you select depends on the selection you’ve made with
the display mode button: elapsed or remaining, CD or track.
For example, if you want to begin play one minute and thirty
seconds into track 2, select track 2 by pressing 2 on the remote
control. Press time, enter 1 3 0, then press play. (This example
assumes that the most recently used display mode was elapsed
time on track.) If you do not press play, the Nº390S will time out
after ten seconds (that is, it will “forget” that you had begun to do
something, and revert to normal operation).
Alternatively, you might want to set the Nº390S to play music for
a specific period of time. Say you’d like to listen to music until the
evening news begins in 30 minutes. Make sure both the time on
disc and time remaining LEDs are on (indicating time remaining
on disc, the default display mode when in stop); press time; enter
3 0 0 0; and press play. This sequence will direct the Nº390S to a
point 30 minutes from the end of the disc, and engage play at
that point. When the music ends, you will know it is time to turn
on the news.
Pause
To suspend play while a CD is playing, press pause. To resume
play at the same point, press pause again.
If left in pause for about two minutes, the transport will stop
spinning and the laser will turn off (thereby enhancing the
longevity of both). This extended pause mode will be indicated
by the display showing a slowly flashing quotation mark () as a
reminder that you are in the extended pause mode (since this
mark mimics the double bars used to indicate pause).
Alternatively, extended pause may be engaged by pressing and
holding the pause button until the double bars begin to blink.
40
Repeat Disc
To repeat (continuously) all tracks on a CD, press repeat until the
disc repeat LED is lit. To return to normal play, press repeat (or
rpt disc/trk on the remote) again two more times (to cycle
through track repeat to normal play). Pressing stop will also
restore the Nº390S to normal (non-repeating) operation.
Repeat Track
To repeat (continuously) the track in (normal) play, press repeat
(or rpt disc/trk on the remote) twice to cycle through disc repeat
to track repeat. While the track repeat function is active, the LED
above the button is lit.
This feature is helpful (for example) when trying to learn how to
play a particular song by playing along with the disc. To learn
sections of the song, you may want to use the A-B repeat function
described on the next page. Once you have most of the sections
learned, you can put them together with a track repeat.
Track repeat takes priority over other functions such as next and
previous. To return to normal operation, press repeat again.
A-B Repeat
To repeat (continuously) a specific phrase or passage on a CD
(when learning how to play a favorite solo, for example), press
A–B on the remote at the beginning of the passage you would like
to repeat. At the end of the passage, press A–B on the remote
again. The passage you selected will repeat continuously.
While the repeat A–B function is active, the letters A and B will
alternate, preceding the track number on the display. To return to
normal play, press the A–B button again.
Polarity
The Nº390S can change its playback polarity to compensate for
the inverted polarity of some recordings. When you first press
polarity on the remote control, the Nº390S will display its current
polarity, either NORMAL or INVERTED. Subsequent clicks on the
polarity button while the display is indicating the current polarity
will toggle between the two possibilities.
Programming the Nº390S
Introduction to Play
Lists
Rather than playing an entire CD, you may choose to play only
certain selections. To do this, you create a “play list.” If this is a
one-time play list, it may be used immediately upon being created
(and will vanish when a new play list is created). Alternatively,
thousands of play lists may be stored in the Nº390S’s permanent
memory, at which point each becomes the default play list for the
particular disc with which it is associated (until you explicitly
change it).
Before using your Nº390S’s programming features, become familiar
with its controls and their locations, as well as their basic functions.
Note: During the playing of a play list, the Nº390S’s basic functions
operate as described in “Basic Operation,” except that they affect the
playback of the program, not the entire CD. For instance, pressing next
during play skips to the next track in the play list, whether or not it is
the next track on the CD. In the same way, engaging disc repeat will
repeat the entire play list, not the entire disc.
The Nº390S allows up to 99 selections per play list, with any given
track appearing once only. In practical terms, the only limitation
on the length of your play list is the number of tracks on your
disc.
Important Note:
Assembling a play list is possible only when the disc is stopped.
41
The Nº390S’s memory can store play lists for thousands of different
CDs. Saved play lists remain in memory when you place the
Nº390S into standby, when you turn off the main power switch
— even if AC power is interrupted.
When you load a CD, the Nº390S reads that CD’s unique
identification code. If you assemble a play list for a particular CD
and save it into the Nº390S’s memory, the Nº390S “remembers”
that CD’s play list.
The next time you load that CD, the Nº390S will recognize the
CD’s identification code and automatically load the previously
saved play list. (The display initially shows the number of tracks
and total time on the disc, preceded by the letter P in the display.)
Even if you have previously saved a play list for a CD, the Nº390S
allows you to temporarily override it (and have access to all tracks
on the CD), without erasing it from memory. This temporary
override applies to polarity programming as well.
To temporarily override a previously saved play list, click the
mode button until PROGRAM is displayed on the front panel, and
press mode – while the CD is loaded but before play has started.
All of the CD’s tracks will subsequently be accessible for normal
operations, but the original play list will still be retained in the
Nº390S’s memory. You can even create a temporary play list as an
alternative to your normal, permanent play list.
42
Assembling a Play List
To assemble a new play list:
1. Load a CD, and wait for the display to show the number of
tracks and their total playing time.
2. Make sure that the Nº390S is in the programming mode by
clicking the mode button until you see PROGRAM in the
display.
3. Using the next and previous buttons (or the numbered buttons
on the Remote Control), select the first track in your play list.
4. Add the first selection to your play list by pressing mode +.
The display will acknowledge your command by showing a P
preceding the track number on the display to indicate that it
has been added to the play list.
5. Assemble the rest of your play list by repeating steps 2 and 3.
Make sure to press mode + after each selection.
Programming by
Omission
If you want to play most of a CD, and just “omit” a few tracks,
you may want to use this shortcut:
1. Load a CD, and wait for the display to show the number of
tracks and their total playing time.
2. Make sure that the Nº390S is in the programming mode by
clicking the mode button until you see PROGRAM in the
display.
3. Using the next and previous buttons (or the numbered buttons
on the Remote Control), select the first track you want to
eliminate from your program.
4. “Omit” the track by pressing mode –. This action deletes the
track from the current play list, indicated by the PRG– in the
display next to the track number.
5. Using next and previous, move to any other tracks you would
prefer to skip, pressing mode – to eliminate each track from
the play list. Once you are in the program mode, a P will
illuminate to indicate a track is in the play list, and extinguish
for any track omitted from the play list.
Saving a Play List
Once you have created the play list you want for a particular disc,
you may either use it as a temporary play list (using it only for
that one occasion), or save it as the default play list for that disc.
To save a play list:
1. When you’ve finished adding selections, you can save the new
play list by pressing and holding the mode + button.
2. The Nº390S will confirm that your play list is saved by
displaying SAVED briefly (or REVISED if you changed an
existing play list).
Reviewing a Play List
To review your play list before playing it:
1. Load a CD for which you’ve already saved a play list (the
letter P will appear preceding the track number on the display);
or load an unprogrammed CD, then assemble and save a play
list.
2. Make sure that the Nº390S is in the programming mode by
clicking the mode button until you see PROGRAM in the
display.
3. Without selecting any particular track, press mode +. The
display will show the first selection in your play list. For
example, if track 3 is the first selection in your program, the
display would show P03 > 1st.
43
Note: If you try to review a nonexistent play list, the display will
show NO PGM.
4. To view the next selection, press mode + again, and so on.
5. After you view the last selection, one more press of mode +
will cause the display to show END PGM momentarily, and
then move on to show the first track in the play list.
Deleting a Track from a
Play List
You may delete any selection from a play list.
To delete a selection:
1. Load a CD for which you’ve already saved a program (the letter
P will appear preceding the track number on the display).
2. Make sure that the Nº390S is in the programming mode by
clicking the mode button until you see PROGRAM in the
display.
3. Press next/f.fwd. The display will show the first selection in
your program.
4. Press next/f.fwd until the selection you want to delete appears
on the display.
5. Press mode – ; the display will remove the P from the displayed
track to indicate that it has been removed from the play list.
44
6. Repeat steps 4 and 5 for each selection you want to erase from
your program.
7. If you would like to make this change permanent, press and
hold mode + when you finish erasing selections from your
program; the display will show REVISED.
Adding a Track to a
Play List
You also may add a selection to a previously saved play list.
To do so:
1. Load a CD for which you’ve already saved a play list (the letter
P will appear preceding the track number on the display); or
load an unprogrammed CD, then assemble and save a play
list.
2. Make sure that the Nº390S is in the programming mode by
clicking the mode button until you see PROGRAM in the
display.
3. Using the next and previous (or the numbered buttons on the
Remote Control), select the track you want to add to your
play list.
4. Add the selection to your play list by pressing mode +. Your
new selection will be added to the end of your existing play
list.
5. Repeat steps 2 and 3 for each selection you want to add to
your program. Make sure to press mode + after each selection.
6. If you would like to make this change permanent, press and
hold mode + when you finish erasing selections from your
program; the display will show REVISED.
Overriding a Play List
When you load a CD, the Nº390S reads its unique identification
code. If you assemble a play list for a particular CD and save it
into the Nº390S’s memory, the Nº390S “remembers” that CD’s
play list.
Even if you have previously saved a play list for a CD, the Nº390S
allows you to temporarily override it (and have access to all tracks
on the CD), without erasing it from memory. You can even create
a temporary play list as an alternative to your normal, permanent
play list.
To temporarily override a previously saved play list:
1. Make sure that the Nº390S is in the programming mode by
clicking the mode button until you see PROGRAM in the
display
2. Press mode – while the CD is loaded, but before play has started.
The display will show CLEARED to indicate that the program has
been temporarily overridden.
The display will show the total number of tracks and the total
time on the disc (as it would if there were no play list associated
with the disc). The P that denotes play list will be turned off. (If
you change your mind, simply press stop to restore the previously
created play list.) All of the CD’s tracks will subsequently be
accessible for normal operations, but the original play list will still
be retained in the Nº390S’s memory.
Erasing Play Lists from
Memory
Why Polarity
Programming?
To permanently erase a previously saved play list from the
Nº390S’s memory, press and hold the mode – button while
stopped in the PROGRAM mode; the display will show DELETED.
During the recording process, the polarity of the recorded signal is
typically inverted many times. If the total number of 180° inversions
is even, the “net” polarity remains unchanged; if odd, a 180°
polarity inversion is introduced. Some people seem quite sensitive
to this distinction. (The difference can be envisioned by imagining
a kick drum being struck: the initial motion of the drum head is
forward, forming a compression wave; if inverted, it would be
reproduced as though the drum head had initially moved backward,
creating a rarefaction.)
45
To complicate matters further, different portions of (or instruments
on) the recording may experience even or odd numbers of inversions,
resulting in no single “correct” playback setting. This problem is
particularly common among multiple-microphone recordings.
Ultimately, only you can decide whether one polarity setting
sounds better than the other, and if so, which you prefer.
Fortunately, if the Nº390S can control the playback polarity of its
processor from the remote control. Moreover, the Nº390S can be
asked to “remember” your preference (should you have one) for
each recording.
Important Note:
Programmed play lists include polarity information. The Nº390S
will ensure the “correct” polarity (that is, the polarity you chose
when creating the program) upon playback of that play list.
This polarity may only be overridden by either temporarily
overriding the play list or by re-programming the play list (see
below). If you are sensitive to polarity (many people are not),
you will want to determine the correct polarity before creating
your play lists.
Whole-Disc Polarity
Programming
If you want to remember only the preferred polarity for an entire
disc, and do not wish to store a custom play list:
1. Press stop. When in stop, the Nº390S displays the total
number of tracks and time on the disc. (You must not have a
preexisting program if you wish to save a single polarity for
the entire disc in one step. To erase a preexisting program,
press and hold the mode – button.)
46
2. Make sure that the Nº390S is in the programming mode by
clicking the mode button until you see PROGRAM in the
display.
3. Choose your preferred polarity. You may use either the
polarity button on the processor or the polarity button on the
Nº390S remote control. Select your preferred setting.
4. Press and hold the mode + button. The display will show
POLARITY to indicate that it has saved your polarity program
for the entire disc. The display will show a small p preceding
the total number of tracks and time on the disc.
Track-by-Track Polarity
Programming
Some discs seem to flip back and forth in polarity between one
track and the next. If you wish to store polarity on a track-bytrack basis, follow the directions for assembling a play list (above),
making certain that the polarity indicated for each track is correct
before you press the positive command for program + (see Special
Commands table, page 55) to add it to the play list. Similarly, you
may “edit” the polarity of an existing program by pressing stop
and then reviewing the play list one track at a time. Change the
polarity of any track you like while its information is being
displayed, and then press the positive command for program +
(see Special Commands table, page 55) to revise the program.
Overriding a Polarity
Program
If you want to double-check you previously-saved polarity program,
simply press the polarity button at any time. Doing so will change
the polarity of the Nº390S, but will not modify the polarity
program (e.g., the next time you play the disc, the polarity you
saved in the program will be used).
47
Special Functions
The Nº390S offers many special customization features, allowing it
to serve a wide range of needs simply and completely. These options
are grouped in three SETUP menus: SOUND, LINKS, and AUX IN’s.
These three menus are accessed by pressing and holding (“camping
on”) the mode button until the display changes to show SETUP,
followed by SOUND. Subsequent clicks of the mode button will
cycle through the various major menus (LINKS, AUX IN’s, and
back to SOUND); any of these menus may be selected by pressing
and holding the mode button a second time. Subsequent clicks of
the mode button will cycle through the various items within each
major menu; pressing and holding the mode button will take you
back to the three main menus (should you want to go from a
SOUND item to a LINK item, for example).
At any point, having selected the menu item you would like to
change, use the mode + and mode – buttons to turn various
options on or off, respectively.
SOUND Menu Items:
• Fixed/Variable Volume
The Nº390S gives you the option of engaging a high quality
analog volume control, allowing you to use the Nº390S as a
digital-sources- only “preamp,” driving a power amplifier
directly. This capability is particularly useful in simple systems
involving only two or three digital sources. When first engaged,
the volume control circuitry will be set to a low volume to
avoid any chance of overdriving your loudspeakers.
The Nº390S has the ability to “link” several of its functions to
compatible Mark Levinson components (like the Nº360/S
Digital Audio Processor and the Nº380/S Preamplifier, and the
Nº33 and 300-series power amplifiers).
Note:
To take advantage of linked functions, you must connect the
Nº390 to the other components via their communication ports.
(See Rear Panel, Nº390S and Setup and Installation.)
48
• Silent/Audible Cueing
The Nº390S also gives you the option of hearing a reducedvolume scan of the program material during fast forward or
rewind, or of having the scan be silent. For some, the audible
cueing helps identify the portion of the track they seek; others
find the broken-up bits of music disconcerting and prefer
silence.
• Balance Control
If you have engaged the volume control circuitry by setting
the + VARIABLE menu item, then you will also see a balance
control within the setup menu, indicated by arrows pointing
in both directions (when at the neutral position). Pressing the
mode + key will move the balance and the image to the right,
indicated by a number of decibels and the arrow pointing to
the right; pressing the mode – key will reverse this process.
(This menu does not appear in the – FIXED volume mode,
since it would not apply.)
• Mute Control
Similarly, a user-adjustable mute control is available when the
volume control circuitry has been engaged. It offers a range of
–3 to –41 decibels of muting in response to the remote control’s
mute button being pushed. The factory default is -20 dB.
• Locked Volume
Lastly, if (and only if) the volume control circuitry is engaged,
you have the option of setting a maximum volume beyond
which the Nº390S will not go. This is particularly helpful if
you have a combination of high sensitivity speakers and high
sensitivity power amplifiers, which might make the normal
maximum volume setting on the Nº390S dangerously loud for
your particular system. (It was designed to be able to drive even
relatively insensitive systems.) Alternatively, it can serve as a
helpful “party control” to guard against indiscrete guests
becoming somewhat overzealous in the heat of the moment.
If you want to set a maximum allowable volume, select your
chosen volume setting and then toggle from UNLOCKED to
LOCKED.
LINK Menu Items:
• Standby Link
This feature links the standby modes of the various Mark
Levinson Linked components. For example:
–
If CD processor, preamplifier and power amplifier(s) are in
standby mode, pressing the CD processor’s standby button
will take all three components out of standby mode
(making them ready to use).
–
If CD processor, preamplifier and power amplifier(s) are
“on” (not in standby mode), pressing the Nº390S’s standby
button will place only the CD processor in standby mode
(presuming that you may wish to use your digital processor
with some digital source other than the Nº390S).
–
If CD processor, preamplifier and power amplifier are “on”
(not in standby mode), pressing the preamp’s standby
button will place all three components into standby
mode.
• Name Link
If you use the Nº390S as a transport with a Linked processor
with your Nº390S (via one of the digital outputs), having the
NAME link on will allow the Nº390S to show up in the display
of the processor by name, e.g., No39 rather than a generic CD.
• Play Link
When you press the Nº390S’s play button, this link automatically
selects the appropriate inputs on the preamplifier so you can
listen to the CD (if you have named that input “No39” as
described in the preamp’s owner’s manual). This function also
works on the Linked processor if the Nº390S is used as a
transport (functioning as a “slave” on the communication
system rather than as the “master.”)
49
• Display Link
This links the display intensity functions of the Nº390S and
the other Linked components. When the components are
linked, all displays will be set to the same brightness. Pressing
display intensity on any of the Linked components will affect
all the displays.
AUX IN’s Menu Items:
The Nº390S also allows you to rename the two auxiliary digital inputs,
in order to give them a name that might be more meaningful in
the context of your system than their factory-default, generic RCA
and OPT input names. You may select from the following list of
names (the same list is available for both inputs).
Input Names
50
DMX
Digital Music Express
DSS
Digital Satellite System
DAT
Digital Audio Tape
DCC
Digital Compact Cassette
MD
Mini-Disc
CDR
Compact Disc-Recordable
CDI
Compact Disc-Interactive
DBS
Direct Broadcast Satellite
LD
Laser Disc
CD
Compact Disc
ADC
Analog to Digital Converter
AUX
Auxiliary
DCA
Digital Cable Audio
PCD
Proceed CD
PDT
Proceed Digital Transport
CDD
Compact Disc Drive
N.U.
Not Used*
If, while playing the Nº390S you decide to change inputs (using
either of its digital inputs), the Nº390S will place itself in pause. If
you haven’t switched back to listen to the Nº390S again within 30
seconds, it will assume you are finished listening to it and place
itself in the stop mode.
Note that if you elect “N.U.” (Not Used) as the name of an input,
that input will be bypassed while cycling through the available
inputs. Thus if you are using one of the two auxiliary inputs and
not the other, setting the unused input to “N.U.” will change the
input selection process to a simple toggle between the two used
inputs. Labeling both auxiliary inputs “N.U.” will effectively disable
the input selection process on the Nº390S, although it will still
control the analog inputs of a Linked preamplifier.
Changing Link Options
The following procedure will guide you through changing your
Link options, should you decide you would like something other
than the factory default settings. (Note that most people are
perfectly satisfied with the default settings, and never need to
concern themselves with this section.)
1. Make sure that the main power switch is set to the “on” (“|”)
position and the unit is not in “standby.”
2. Press and hold the front-panel mode button until SETUP
followed by SOUND appears on the display. Release the mode
button; subsequent “clicks” of the mode button will cycle
through each of your Nº390S’s main menus, in this order:
SOUND, LINKS, AUX IN’s. Continued clicks on the mode
button will return you to the beginning of the list, in case you
accidentally pass the option you want to change.
3. When the display shows the menu you want to access, press
and hold the mode button again. Subsequent clicks of the
mode button will cycle through the various items within that
menu.
4. When an item you wish to change is in the display, use the
mode + and mode – keys (either on the front panel or on the
remote control) to change the setting.
5. Repeat step 4 for each setting you want to change.
6. When you have finished, press and hold the mode button
again to confirm your change(s). The display will return to the
original three main menus.
Once saved, your link settings remain in memory when you place
the Nº390S into standby, when you turn off the main power
switch — even if AC power is interrupted.
Sleep Timer
The Nº390S also may be set to automatically enter standby after a
predefined period. As shipped from the factory, its standby function
is manual (that is, it only enters or leaves standby when told to
do so by the user).
This feature is similar to a “sleep timer” on a clock radio. If playing
a CD, for example, the Nº390S will enter standby automatically
after the user-selected period of time.
51
To change between manual and timed/ automatic standby:
1. Press and hold the standby button until the display reads
MANUAL.
2. Release the standby button and then use the previous and
next buttons to either advance or reduce the amount of time
you want to transpire between the last activity of the Nº390S
and its going into standby. You may select any number of
minutes between 1-120. You may restore normal, manual
operation by pressing previous to go “below” 1 minute, into
MANUAL standby operation.
3. Allow the Nº390S to time out (returning the display to its normal operation).
Using Learning Remote
Controls
The Nº390S includes both an infrared receiver and an infrared
transmitter. With this capability, it can “teach” a learning remote
control any commands that might be needed for remote operation.
Specifically, the Nº390S can send all of the necessary IR commands
from its display window, enabling you to teach a learning remote
any or all of its pre-programmed commands, as well as some
optional special commands that are available to solve specific
installation-related problems.
52
The Nº390S has two special modes of operation into which it may
be placed in order to facilitate the “teaching” of remote control
commands to a learning remote control. The first allows you to
easily teach the commands for which there are corresponding
front panel buttons. The second allows you to teach “special”
commands to the remote control for which there are no
corresponding front panel buttons.
Teaching Nº390S Front
Panel Commands
1. Press and hold the repeat button to enter the front panel
teaching mode.
The display will show TEACH IR to indicate that the Nº390S is
ready to teach a learning remote control the infrared
commands that correspond to its front panel buttons. The
Nº390S sends infrared signals from the left side of the front
panel display. If the learning remote control seems unable to
learn IR commands, try adjusting the distance between the
left side of the front panel display and the learning remote
control.
If you change your mind, simply don’t touch any button for
ten seconds and the Nº390S will return to normal operation.
(Hint: you may remember that this special “hidden” feature of
the Nº390S is accessed via a press-and-hold of the repeat button
by associating its use with the external IR “repeaters” so often
used in custom installations; the functionality found here is of
most value in such installations.)
2. Press any front panel button to cause the Nº390S to send
the corresponding IR command.
Line up the IR window of your remote control with the left
side of the Nº390S display, at a distance of approximately 2"6". Select the to-be-learned button on the remote, then press
the corresponding button on the Nº390S to fire the appropriate IR code.
Most learning remotes need to be held fairly still while they
learn new IR commands; movement can garble the received
IR. If you are uncertain as to how to prepare your remote
control for learning new commands, refer to the instructions
provided with the remote control.
3. Repeat the process of “teaching” new commands to the
various buttons on your remote control until all appropriate
or desired front panel commands have been learned by your
remote.
4. When finished, exit the Teach IR mode by allowing the
Nº390S to “time out.”
You may wish to teach your remote control some of the Nº390S’s
special commands (those for which there is no corresponding
front panel button); in this case, you should go directly to the
next section. Otherwise, simply avoid pressing any buttons for
about ten seconds, and the Nº390S will automatically return
to normal operation.
At some point, however, you should test all your newly “learned”
commands to ensure that they were “learned” correctly.
Teaching Other
Nº390S Commands
As mentioned above, the Nº390S has the capability to teach
learning remote controls special commands for which there are
no front panel counterparts. These commands can be especially
helpful in solving problems in certain kinds of custom installations.
53
These “positive control” commands in the Nº390S will place it
into a certain mode of operation regardless of its current state. For
example, a positive control command to enter standby will leave
the Nº390S in standby if already there, or switch it to standby if
it is currently operating. This type of positive control is especially
helpful when you do not necessarily know the current status of
the Nº390S, as might be the case in a multi-room home
entertainment system (for example).
1. Place the Nº390S in its front panel teaching mode.
As explained on the previous page, you do this by pressing
and holding the repeat button until the display reads TEACH
IR. If no further buttons are pressed within approximately ten
seconds, the Nº390S will “time out” and return to normal
operation.
2. Release, then press and hold the repeat button a second
time to place the Nº390S in its Custom IR mode.
After about five seconds, the display will change from TEACH
IR to OPERATE (the first special IR code available for teaching).
This indicates that the special IR codes that do not correspond
to front panel buttons are now available for teaching to a
learning remote control—including some that are designed to
solve problems unique to custom installations.
54
3. Press the “repeat” button repeatedly to advance to the
desired function.
The table on the next page lists the various commands that
are available for the Nº390S for which there is not front-panel
equivalent. In some cases, they represent “positive control”
alternatives to commands that normally toggle between two
settings (such as standby and operate). In other cases, they
represent functions that exist only on the remote control. In
the second column are the designations that will be displayed
to indicate that the Nº390S is ready to fire the corresponding
IR code.
Pressing repeat will advance you to the next command in the
table. If no button is pushed for more than ten seconds, the
Nº390S will “time out” and return to normal operation.
4. Momentarily press the repeat button to transmit the selected
code.
Line up the IR window of your remote control with the left
side of the display of the Nº390S, at a distance of approximately
2"-6". Select the to-be-learned button on the remote, then fire
the selected code from the Nº390S by pressing mode.
(If you are uncertain as to how to prepare your remote control for
learning new commands, refer to the instructions provided with the
remote control.)
5. Repeat the process of “teaching” new special commands
until all desired commands have been learned by your
remote control.
If you take longer than approximately ten seconds between
button pushes, the Nº390S will time out and return to normal
operation. If this occurs, return to step #1 in this section. You
may move through the entire list by pressing repeat.
6. When finished, return to normal operation by allowing the
Nº390S to “time out.”
The Nº390S will “time out” and return to normal operation
after approximately ten seconds.
Special Commands Table
Command
Display
positive control for operate
OPERATE
positive control for standby
STANDBY
positive control for stop
JUST STOP
set display intensity to off
DISPLAY 0
set display intensity to medium
DISPLAY 2
positive control for unpause
UNPAUSE
positive control for pause
PAUSE
positive control for leaving the repeat mode
NO REPEAT
positive control for open drawer
OPEN
positive control for close drawer
CLOSE
positive control for random play
RANDOM
positive control for selecting analog inputs
ANALOG
positive control for selecting digital inputs
DIGITAL
positive control for program –
PROG –
positive control for program +
PROG +
Select CD input
SET CD
Select RCA input
SET RCA
Select optical (EIAJ) input
SET OPT
55
Troubleshooting
In general, refer any service problems to your Mark Levinson dealer.
Before contacting your dealer, however, check to see if the problem
is listed here. If it is, try the suggested solutions. If none of these
solves the problem, contact your Mark Levinson dealer.
1. The Nº390S won’t function, and the display is
dark.
The unit is in standby. Press the standby button.
The Nº390S isn’t plugged into the AC mains or the main
power switch isn’t turned on.
The wall socket, adapter, or extension cord is faulty.
There’s a tripped circuit breaker or blown fuse in the wall
outlet’s circuit.
A fuse is blown in your Nº390S (contact your Mark
Levinson dealer).
2. The display is lit, but there is no output.
The proper digital input isn’t selected on the Nº390S.
The proper analog input isn’t selected on your preamplifier.
56
The interconnecting cables are connected incorrectly or
are faulty.
The variable output volume adjustment is set to 0.0 (off).
3. The Nº390S display reads “NO DISC.”
There is no disc in the drawer for the transport to read.
The disc is upside down and therefore cannot be read.
The disc has loaded improperly and cannot be read – open
the drawer, ensure that the disc is placed properly in the
drawer, and try again.
4. The Nº390S won’t play a CD inserted in the player.
The CD is inserted upside down.
There may be condensation (moisture) on the laser pickup.
This can happen if the Nº390S is moved from a cold
environment (such as a warehouse or a shipper’s truck) to
a warm one. Set the main power switch to its "|" position,
and leave it on for one hour to warm up, then try playing
a CD again.
5. When a CD is playing, the sound "skips."
The CD is severely scratched or dirty.
The Nº390S is on an unstable surface or is too close to
your speakers.
6. The linked functions don’t work.
The Link cable is disconnected, or is connected incorrectly.
Check your Link connections.
The Link options are turned off.
The preamplifier is not aliased (renamed) for the Nº39.
The processor (if one is being used) does not have one of
its inputs tied to the Nº390S.
Try turning off/disconnecting AC power from both the
preamplifier and the Nº390S. After several seconds, restore
AC power to the preamplifier, then turn on the Nº390S’s
main power switch. Never operate the main power switch
without first making sure that power is turned off to your
receiver, integrated amplifier, or preamplifier/power amplifier.
Some associated Mark Levinson components may have
older versions of the system software that do not fully
support all Linked functions. Contact your Mark Levinson
dealer with the model and serial numbers of your Mark
Levinson components. If needed, new EPROMs will be
provided at no charge.
7. The Remote Control doesn’t operate the Nº390S.
The Remote Control is at the wrong angle relative to the
Nº390S, and the Nº390S can’t receive the signal.
The sensor window on the front panel of the Nº390S is
dirty or blocked.
The Remote Control’s projection lens is dirty.
Fluorescent lighting or sunlight is interfering with the
operation of the Remote Control.
The Remote Control’s batteries are weak and need to be
replaced.
The Remote Control’s batteries are installed incorrectly.
57
Care and Maintenance
To remove dust from the cabinet of the Nº390S, use a feather
duster. To remove dirt and fingerprints, we recommend isopropyl
alcohol and a soft cloth.
Caution!
Always apply the isopropyl alcohol to the soft cloth and then
wipe the Nº390S with the dampened cloth. Never pour or spray
even small amounts of any liquid directly on the Nº390S, as
doing so may allow the liquid to reach the circuitry inside the
unit. Any liquid inside the unit poses a hazard to both the user
and to the unit, and must be avoided.
Make sure that the Remote sensor window on the front panel and
the Remote Control’s projection lens are kept clean and dust-free.
Fluorescent lighting and sunlight may interfere with the operation
of the Remote Control. Avoid placing the Nº390S near fluorescent
lamps or in direct sunlight.
58
When the Remote Control’s batteries need to be replaced, use
only AA batteries; always replace both batteries at the same time.
If you don’t plan to use the Remote Control often, remove the
batteries. When not used for an extended period, even
“leakproof” batteries can leak corrosive acids that will damage the
Remote Control (and will void the warranty).
A CD, handled carefully, will last indefinitely. A warped, dusty, or
scratched CD can cause playback problems, including audible
skipping or other noises. Handle a CD by the outer edges only; if
necessary, support it with your index finger at the center hole.
When you’re finished playing a CD, always return it to its plastic
case. Store your CDs where they won’t be exposed to direct
sunlight, high humidity, or extremely high or low temperatures.
Specifications
The correlation between published specifications and sonic quality is
unreliable. A list of numbers reveals virtually nothing. All technical
measurements must be subject to qualitative as well as quantitative
interpretation.
Measurements of the Nº390S yield excellent results by any standards.
However, only those specifications that apply to its actual operation are
included here.
Frequency Response
•
10Hz - 20kHz, +0dB, –0.3dB
Total Harmonic Distortion
(THD)
•
0.002% @ 1 kHz, 0dBFS (10Hz-30kHz)
Dynamic Range
•
96dB (10Hz-30kHz)
Signal-to-Noise Ratio
•
105dB (10Hz-30kHz)
Channel Separation
•
Better than 110 Db
Intermodulation Distortion
(SMPTE IMD)
•
Less than 0.005%
Maximum Output
(0 dBFS signal)
•
•
4.45V balanced
2.225V single-ended
Volume Control
(attenuation) Range
•
–61.2 to +12 dB
Digital-to-Analog
Conversion
•
Dual differential 24-bit DACs
Conversion Rate
•
352.8kHz or 384kHz(input signal dependent), 24-bit
Analog Filter
•
Bessel-tuned, linear phase to 40kHz
Low-level Linearity
•
deviation less than 2 dB to below –90Dbfs less than 2 dB to
below –102dBFS w/20-bit input
Output Impedance (analog)
•
10 Ω
Direct Digital Output, XLR
•
AES/EBU 110Ω, 3.5V
Direct Digital Output, RCA
•
S/PDIF 75Ω, 0.5V
Mains Voltage
•
100V, 120V, 200V, 220V, 240V, factory set for destination country
Mains Frequency
•
50 or 60 Hz, factory set for destination country
Power Consumption
•
36 watts maximum
Overall Dimensions
•
See “Dimensions”
Shipping Weight
•
50 lbs. (23 kg)
•
1 EIAJ digital input
•
1 S/PDIF (RCA) digital input
Input Complement
59
Output Complement:
Other I/O
60
•
2 male XLR balanced audio outputs
•
2 RCA single-ended audio outputs
•
1 AES/EBU (XLR) digital output
•
1 S/PDIF (RCA) digital output
•
2 RJ-45 modular Communication Links
•
1 3.5mm external IR input jack
•
1 IEC AC mains connector
Dimensions
61
Installation Notes
62
63
3 Oak Park, Bedford, MA, 01730-1413 USA | Telephone: 781-280-0300 | Fax: 781-280-0490 | www.marklevinson.com
Customer Support: Telephone: 781-280-0300 | Sales Fax: 781-280-0495 | Service Fax: 781-280-0499
Product Shipments: 16 Progress Road, Billerica, MA 01821-5730 USA
Part No. 070-630457 | Rev 1 | 04/04