1
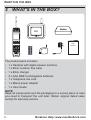
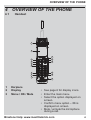
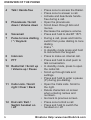
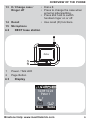
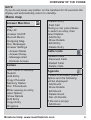
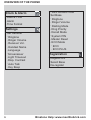
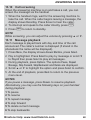
4Home Edition
USER
GUIDE
UK version
WELCOME
1 WELCOME
Thank you for purchasing our product!
You can use the Brick Phone to:
• Make and receive calls
• Receive telephone messages and record memos using the
digital answer machine
• 250 Name and number phonebook
• Copy phonebook entries between handsets
• Screensaver clock display
• Answering machine with up to 30 minutes digital recording time
• Speakerphone for hands-free conversations
• Caller ID shows you who’s calling and see details of the last 50
callers in a Calls Lists1
• Register up to 11 handsets to a single base and register each
handset with up to 4 different bases
• Make internal calls, transfer external calls, hold 3-way
conversation between two internal callers and an external caller
• Intelligent charging
You must subscribe to your network provider’s Caller ID or Call
Waiting service for these features to work. A subscription fee may
be payable.
1
2 IMPORTANT
Your Brick Phone is not designed for making emergency calls
in the event of power failure. Alternative arrangements should
be made for access to Emergency services during such events.
(You are advised to keep a basic phone that is functional without
connection to the power supply.)
Only use the power adapter supplied.
Binatone Help: www.meetthebrick.com
2
WHAT’S IN THE BOX
3 WHAT'S IN THE BOX?
User
Manual
The product pack includes:
• 1 x Handset with digital answer machine
• 1 x Brick Location free base
• 1 x Brick charger
• 2 x AAA NiMH rechargeable batteries
• 1 x Telephone line cord
• 1 x Mains power adapter
• 1 x User Guide
NOTE
Keep all components and the packaging in a secure place in case
you need to transport the unit later. Retain original dated sales
receipt for warranty service.
3
Binatone Help: www.meetthebrick.com
OVERVIEW OF THE PHONE
4 OVERVIEW OF THE PHONE
4.1 Handset
1
2
10
3
11
4
5
12
6
7
13
8
14
9
15
1
Earpiece
2
Display
• See page 6 for display icons.
3
Menu / OK / Mute
• Enter the main menu.
• Select the option displayed on
screen.
• Confirm menu option – OK is
displayed on screen.
• Mute / unmute the microphone
during a call.
Binatone Help: www.meetthebrick.com
4
OVERVIEW OF THE PHONE
4
5
6
7
Talk / Hands-free
• Press once to access the Dialler.
• Press once to answer a call.
• Activate and deactivate handsfree during a call.
Phonebook / Scroll
• Open the phonebook.
down / Volume down • Scroll down through lists and
menus.
• Decrease the earpiece volume.
Voicemail
• Press and hold to dial BT 1571.
8
Pulse to tone dialling • During a call, press and hold to
/ * / Keylock
switch from pulse dialling to tone
dialling.
• Dial a *.
• In standby mode press and hold
to lock/unlock the keypad.
Intercom
• Press to make an internal call.
9
PTT
• Press and hold to start push to
talk conversation.
10 Redial list / Scroll up • In standby mode, press to open
/ Volume up / Pause
the redial list.
• Scroll up through lists and
settings.
• Press and hold to enter a pause
(P) during pre-dialling.
11 Calls Lists / Scroll
• Open the Calls Lists. Scroll to
right / Clear / Back
the right.
• Delete characters on screen
when entering names and
numbers.
• Go back to previous screen.
12 End call / Exit /
• Press once to End a call
Switch handset on
• Press and hold to switch the
/ off
handset on / off
5
Binatone Help: www.meetthebrick.com
OVERVIEW OF THE PHONE
13 # / Change case /
Ringer off
• Dial a #.
• Press to change the case when
entering letters/editing.
• Press and hold to switch
handset ringer on or off.
• Use recall (R) functions.
14 Recall
15 Microphone
4.2 DECT base station
1
2
1
2
Power / Talk LED
Page Button
4.3 Display
16/09 16:24
Peter 1
Menu
Name
Binatone Help: www.meetthebrick.com
6
OVERVIEW OF THE PHONE
DECT signal strength
Displays when ECO is on
Displays when ECO PLUS is on
Handset ringer volume is Off
Displays when in hands-free mode
Answering machine on
The alarm clock has been set
Keylock is activated
Displays when you have missed calls
Displays when you have new answering machine
messages
Displays when you have new voicemails
Battery is fully charged
Battery is partially charged
Battery is running low
Flashes when battery is almost fully discharged
4.4 Basic operations of the Brick Phone
The basic steps of navigating through the menu and on-screen
options.
1 In standby mode, press the left soft key Menu. The main menu
is opened.
2 Use the U or D keys to scroll through the menu.
3 Soft key options Select and Back are displayed.
4 Press the left softkey Select to open a submenu or validate an
option.
5 Press the right softkey Back to go back to the previous menu
level, correct a character or cancel an action.
6 Press
to return to standby mode.
E
7
Binatone Help: www.meetthebrick.com
OVERVIEW OF THE PHONE
NOTE
If you do not press any button on the handset for 30 seconds the
display will automatically return to standby.
Menu map
Answer Machine
--Play
--Play All
--Answer On/Off
--Record Memo
--Outgoing Msg.
--Del. Messages
--Answer Settings
--Answer Mode
--Answer Delay
--Message Alert
--Remote Access
Names
From menu in standby:
--Search
--Add Entry
--Copy Phonebk
--Memory Status
--Del. Phonebook
While viewing an entry,
select Options:
--Show Details
--Edit Entry
--Copy Entry
--Ringtone
--Delete Entry
--Fast Call
During a call, press Names
to select an entry, then
select Options:
--Add Entry
--Show Details
--Edit Entry
--Delete Entry
Calls Lists
--Missed Calls
--Received Calls
--Dialled Calls
--Delete Calls
Agenda
If there is an event, press
Options and the following
will be displayed:
-- Add Event
-- Show Details
-- Edit Event
-- Delete Event
-- Del. All Events
If the list is empty:
-- Add Even
Binatone Help: www.meetthebrick.com
8
OVERVIEW OF THE PHONE
Clock & Alarm
-- Date
& Time
-- Time
Format
-- Alarm
Settings
-- Set
Handset
-- Ringtone
-- Ringer
Volume
Vol.
-- Handset Name
--Language
--Screensaver
--Light Timeoout
--Disp. Contrast
-- Auto Talk
-- Key Beep
-- Receiver
9
-- PBX
Access Code
Base
-- Ringtone
-- Ringer Volume
-- Dialling Mode
-- Ring Priority
-- Recall Mode
-- System PIN
-- Master Reset
-- ECO Mode
-- ECO
-- ECO PLUS
-- Set
Registration
-- Register
HS
Base
-- De-register
-- Select
Binatone Help: www.meetthebrick.com
1 WELCOME.................................................. 2
2 IMPORTANT................................................ 2
3 WHAT'S IN THE BOX?............................... 3
4 OVERVIEW OF THE PHONE...................... 4
4.1 Handset.................................................................... 4
4.2 DECT base station................................................... 6
4.3 Display...................................................................... 6
4.4 Basic operations of the Brick Phone........................ 7
5 GETTING STARTED................................... 14
5.1 Care and maintenance............................................. 14
5.2 Handset range.......................................................... 14
5.3 Signal strength......................................................... 14
5.4 Battery low warning.................................................. 15
5.4.1 Battery performance........................................ 15
5.5 Connecting the power cable and telephone line cord.....15
5.6 Connecting the handset and charger....................... 16
5.7 Removing battery cover and installing battery......... 16
5.8 Switch the handset on / off....................................... 17
5.9 Clock & Alarm........................................................... 17
5.9.1 To set date and time manually......................... 17
5.9.2 To set alarm..................................................... 17
5.9.3 To set time format............................................ 18
5.10 To lock the keypad ................................................... 18
6 USING THE PHONE FUNCTIONS.............. 18
6.1 6.2 6.3 6.4 6.5 6.6 6.7 6.8 6.9 6.10 To make a call........................................................... 18
To make a call by pre-dialling................................... 18
To make a call using fast call keys .......................... 19
To make a hands-free call........................................ 19
Call from the phonebook.......................................... 19
Call from the Calls Lists............................................ 19
To answer a call........................................................ 20
To answer a call in hands-free.................................. 20
To adjust the volume................................................. 20
To mute the microphone........................................... 20
Binatone Help: www.meetthebrick.com
10
6.11 To end a call............................................................. 21
6.12 Intercom................................................................... 21
6.12.1 Make an internal call........................................ 21
6.12.2 Receive an internal call.................................... 21
6.12.3 Transfer a call.................................................. 21
6.12.4 3-way conference call...................................... 22
6.13 Push to Talk (PTT).................................................. 22
7 PHONEBOOK.......................................... 23
7.1 To view and dial phonebook entries......................... 23
7.2 To store an entry....................................................... 23
7.3 Entering names........................................................ 24
7.4 Character map.......................................................... 24
7.5 To enter a pause....................................................... 25
7.6 To search an entry.................................................... 25
7.7 To view details of an entry........................................ 25
7.8 To edit an entry......................................................... 25
7.9 To copy an entry to another handset........................ 26
7.10 To assign a ringtone................................................. 26
7.11 To delete an entry..................................................... 27
7.12 To store a fast call number....................................... 27
7.13 To clear a fast call number....................................... 27
7.14 To access the phonebook during a call.................... 28
7.15 To copy the phonebook to another handset............. 28
7.16 To check memory status........................................... 28
7.17 To delete all entries.................................................. 28
8 CALLS LISTS.......................................... 29
8.1 8.2 8.3 8.4 8.5 8.6 8.7 8.8 8.9 11
New calls alert.......................................................... 29
To view details of the call.......................................... 30
To save a number from the Calls Lists to the phonebook... 30
To delete a Calls Lists entry...................................... 31
To delete entire Calls Lists........................................ 31
To redial the last number.......................................... 31
To view and dial a number in the redial list................. 31
To copy a redial number to the phonebook................. 32
To delete a redial list entry........................................ 32
Binatone Help: www.meetthebrick.com
9 AGENDA.................................................. 32
9.1 9.2 9.3 9.4 9.5 9.6 To add a new event.................................................. 32
To switch off reminder ring........................................ 33
To show event details............................................... 33
To edit an event........................................................ 34
To delete an event.................................................... 34
To delete all events................................................... 34
10 HANDSET SETTINGS............................. 35
10.1 To set the handset ringtone...................................... 35
10.2 To set the handset ringer volume............................. 35
10.3 To set the receiver volume....................................... 36
10.4 To change the handset name................................... 36
10.5 To change the display language............................... 36
10.6 To set the screensaver............................................. 36
10.7 To set light timeout................................................... 37
10.8 To change display contrast....................................... 37
10.9 To switch auto talk on / off........................................ 37
10.10 To switch key beep on / off....................................... 38
10.11 To set PBX Access Code.......................................... 38
11 BASE SETTINGS.................................... 38
11.1 To set the base ringtone........................................... 38
11.2 To set the base ringer volume.................................. 39
11.3 To change the dialling mode..................................... 39
11.4 To set ring priority..................................................... 39
11.5 To change the recall mode....................................... 40
11.6 To change the System PIN....................................... 40
11.7 To reset the phone.................................................... 41
11.8 To switch ECO on / off.............................................. 41
11.9 To switch ECO PLUS on / off.................................... 41
12 REGISTRATION...................................... 42
12.1 To register a handset................................................ 42
12.2 To select a base....................................................... 43
12.3 To de-register a handset........................................... 44
Binatone Help: www.meetthebrick.com
12
13 ANSWERING MACHINE......................... 44
13.1 13.2 13.3 13.4 13.5 13.6 13.7 13.8 13.9 13.10 13.11 13.12 13.13 13.14 13.15 Switch between answering machine on / off........... 44
To change answer delay........................................... 45
To switch message alert tone on / off....................... 45
New messages alert................................................. 45
Outgoing messages................................................. 46
To record a personalised OGM................................ 46
To play or delete your personalised OGM................ 46
To set the answer mode OGM.................................. 47
To record a memo.................................................... 47
Call screening.......................................................... 48
Message playback.................................................... 48
Delete all old messages........................................... 49
Remote access........................................................ 49
To switch remote access on / off.............................. 50
To change the remote access PIN........................... 51
14 HELP........................................................ 51
14.1 Warranty and Service............................................... 53
14.1.1 Servicing Under Warranty................................ 54
14.1.2 Servicing After Warranty Has Expired............. 54
15 TECHNICAL DETAIL............................... 55
13
Binatone Help: www.meetthebrick.com
GETTING STARTED
5 GETTING STARTED
WARNING
• Do not place your Brick Phone in the bathroom or other humid
areas.
• Do not place your Brick Phone near sources of heat and
extreme temperatures, such as fluorescent lighting, microwave
ovens, heating appliances and direct sunlight.
• Do not disassemble your Brick Phone; there are no userserviceable parts inside.
• If the LCD screen breaks, do not touch the glass or liquid.
Contact customer support for assistance.
• Use only the power adapter supplied with your Brick Phone.
5.1 Care and maintenance
• Clean gently with a soft, clean, dry cloth.
• To remove fingerprints on the LCD screen, wipe gently with a
soft, lint-free cloth. Do not use cleaning solutions unless they
are designed specifically for LCD screens.
IMPORTANT
Always switch off and disconnect the power adapter before
cleaning the Brick Phone.
5.2 Handset range
The Brick Phone has a range of 1000 meters outdoors when
there is a clear line of sight between the base and handset. Any
obstruction between the base and handset will reduce the range
significantly. With the base indoors and handset either indoors or
outdoors, the range will normally be up to 50 meters. Thick stone
walls can severely affect the range.
5.3 Signal strength
The
icon on your handset indicates when you are in range.
When out of range of the base, the signal strength will drop out.
If you are on a call, the line will hang up. Move back within range.
The handset will automatically re-connect to the base.
Binatone Help: www.meetthebrick.com
14
GETTING STARTED
5.4 Battery low warning
If you hear a warning beep every 30 seconds during a call, you
will need to recharge the handset before you can use it again.
When charging,
icon will scroll on the display.
5.4.1 Battery performance
Under ideal conditions, fully charged batteries should give about
10 hours talk time or 200 hours standby time on a single charge.
Note that new batteries will not reach full capacity until they have
been in normal use for several days.
To keep your batteries in the best condition, leave the handset off
the base for a few hours at a time.
Drain the batteries completely at least once a week before
charging will help to prolong battery life.
The charge capacity of rechargeable batteries will reduce with
time as they wear out, giving the handset less talk/standby time.
Eventually they will need to be replaced.
After charging your handset for the first time, subsequent charging
time will be about 6 hours a day. Batteries and handset may
become warm during charging. This is normal.
5.5 Connecting the power cable and telephone line cord
1 Plug one end of the power cable and telephone line cord to
the power jack and phone jack respectively on the back of the
DECT base station.
2 Plug the other end into a power and telephone wall socket.
15
Binatone Help: www.meetthebrick.com
GETTING STARTED
5.6 Connecting the handset and charger
1 Plug one end of the power cable into the power jack on the
rear of the charger.
2 Plug the other end into a power wall socket.
5.7 Removing battery cover and installing battery
1 Remove the battery cover from the back of the handset and
insert the rechargeable battery supplied.
1
Press
down
2
Slide
2 Slide the battery cover back into place.
3 If you are charging the batteries for the first time, place
the handset on the charger to charge for at least 24 hours
continuously.
CAUTION
Risk of explosion if battery is replaced by an incorrect type.
Dispose of used batteries according to the instructions.
Binatone Help: www.meetthebrick.com
16
GETTING STARTED
NOTE
Battery performance depends on your usage patterns.
IMPORTANT
Use only the rechargeable battery that is provided with your Brick
Phone.
5.8 Switch the handset on / off
1 Press and hold
E to turn the handset on / off.
5.9 Clock & Alarm
If you have subscribed to your network’s Caller Display service,
the date and time is set automatically for all handsets when you
receive your first call.
If you are not subscribed to Caller Display service, you can set the
date and time manually.
5.9.1 To set date and time manually
1 Press Menu, scroll D to Clock & Alarm and press Select.
2 Date & Time is highlighted. Press Select.
3 Enter the date using the format DD/MM/YY e.g. 04/08/13 for 4
August 2013.
4 Enter the time (HH:MM) and press Save.
If the current time format setting is 12 hour, select am or pm.
5 Press
to return to standby mode.
E
NOTE
The date and time is retained during a power failure or when the
batteries are discharged.
5.9.2 To set alarm
When the alarm is set, the display shows
icon.
Each handset can have a different alarm setting.
1 Press Menu, scroll D to Clock & Alarm and press Select.
2 Scroll D to Alarm and press Select.
3 Scroll U or D to Off or On and press Select.
If Alarm is set to On:
Scroll U or Dto Once, Mon - Fri or On Daily then press Select.
Enter the time (HH:MM) and press Save.
If the current time format setting is 12 hour, select am or pm.
17
Binatone Help: www.meetthebrick.com
USING THE PHONE FUNCTIONS
4 Press
E to return to standby mode.
NOTES
If the alarm is set to Once,
will disappear from the screen after
the alarm has sounded once.
If the alarm is set to On Daily or Mon - Fri,
will remain on the
screen after the alarm has sounded.
When the alarm goes off, press any key to stop the ring.
5.9.3 To set time format
1 Press Menu, scroll D to Clock & Alarm and press Select.
2 Scroll D to Time Format and press Select.
3 Scroll U or D to 12 Hour or 24 Hour and press Select.
4 Press
to return to standby mode.
E
5.10 To lock the keypad
You can lock the keypad to prevent accidental dialling while
carrying it around.
Press and hold *. The
icon is displayed.
To unlock the keypad, press Unlock. The display shows Press * to
Unlock Keys.
Press *.
NOTE
While the keypad is locked, you can answer incoming calls as
normal.
Your phone is now ready for use.
6 USING THE PHONE FUNCTIONS
6.1 To make a call
T
1 Press
.
2 Dial the telephone number.
6.2 To make a call by pre-dialling
1 Enter the phone number (maximum 32 digits). If you make a
mistake, press Clear.
2 Press
to dial the phone number entered.
T
Binatone Help: www.meetthebrick.com
18
USING THE PHONE FUNCTIONS
NOTE
If the dialled number matches an entry in the phonebook, the
name is displayed.
6.3 To make a call using fast call keys
1 Press and hold the relevant keypad number to dial the prestored number directly.
NOTE
To store a fast call number, see page 27.
6.4 To make a hands-free call
T
1 Press
twice.
2 Dial the telephone number.
NOTE
During a hands-free call, press U or D to adjust the volume.
6.5 Call from the phonebook
1 Press D. The first entry in the phonebook is highlighted.
2 Scroll U or D to the entry you want.
Or
To search alphabetically, press the key with the first letter of
the name, e.g. if the name begins with N, press 6 twice. The
display shows the first entry beginning with N. If required, scroll
U or D to the exact entry.
3 Press
to dial the number.
T
6.6 Call from the Calls Lists
NOTE
You need to subscribe to your network’s Call Display service to be
able to see the caller’s number in the Calls Lists.
1 Press Menu, scroll D to Calls Lists and press Select.
2 Scroll U or D to highlight the calls list (Missed Calls, Received Calls,
Dialled Calls, Delete Calls) you want.
3 Press Select to confirm.
4 Scroll U or D to the entry you want.
5 Press
to dial the number.
T
19
Binatone Help: www.meetthebrick.com
USING THE PHONE FUNCTIONS
6.7 To answer a call
When you receive an external call, the phone rings and External Call
shows on the display.
1 If the handset is off the base then press
to answer the
call, or if the handset is on the base simply lift the handset to
answer the call.
T
NOTE
If you prefer to press
when you lift up the handset to answer
a call, you will need to switch Auto Talk off, see page 37.
T
6.8 To answer a call in hands-free
If the handset is on the base and auto answer is switched on, lift
the handset and press
.
If the handset is off the base or auto answer is switched off, press
twice to answer the call.
T
T
IMPORTANT
When the phone is ringing, avoid holding the earpiece too close
to your ear as it may damage your hearing. Hands-free activation
can suddenly increase the volume in the earpiece to a very high
level. Make sure the handset is not too close to your ear.
NOTE
To switch back to earpiece mode, press
T again during the call.
6.9 To adjust the volume
1 During a call, press U or D to adjust the earpiece or
loudspeaker volume.
The level is shown in the handset display.
6.10 To mute the microphone
Mute the microphone so that you can talk to someone else in the
room without your caller hearing you.
1 During a call, press Secrec.. The display shows Secrecy On and
your caller cannot hear you.
2 Press Off to return to your caller.
Binatone Help: www.meetthebrick.com
20
USING THE PHONE FUNCTIONS
6.11 To end a call
1 Press
E or replace the handset on the cradle.
NOTE
After you hang up, the duration of your call is displayed for 5
seconds.
6.12 Intercom
6.12.1 Make an internal call
If you have more than one handset registered to the base, you
can make internal calls between two handsets.
Internal Call and Handset X displays to indicate an internal call.
1 Press
followed by the number (1-11) of the handset you
want to call.
Press and hold 0 to dial handset 10. Press and hold 1 to dial
handset 11.
2 Press OK.
6.12.2 Receive an internal call
When you receive an internal call, Internal Call and Handset X is
displayed.
1 If the handset is off the base then press
to answer the
call, or if the handset is on the base simply lift the handset to
answer the call.
6.12.3 Transfer a call
You can transfer an external call to another handset registered to
the base.
During an external call:
1 Press
followed by the handset number (1-11) that you
want to transfer the call to.
Press and hold 0 to dial handset 10. Press and hold 1 to dial
handset 11.
2 Press OK.
3 When the other handset answers, press
to complete the
transfer.
I
T
I
E
21
Binatone Help: www.meetthebrick.com
USING THE PHONE FUNCTIONS
NOTES
If there is no answer from the other handset and you wish to
return to your external caller, press
.
Your external call resumes automatically after 100 seconds if
there is no answer.
6.12.4 3-way conference call
You can hold a 3-way conference call between 2 internal callers
and 1 external caller.
During a call with an external caller:
1 Press
followed by the handset number (1-11) that you
want to establish a conference call.
Press and hold 0 to dial handset 10. Press and hold 1 to dial
handset 11.
2 Press OK.
3 When the other handset answers, press Join to connect all
three callers and begin the conference call.
4 If there is no answer from the other handset, press
to
return to your external caller.
5 Press
to end the call.
I
I
I
E
6.13 Push to Talk (PTT)
The PTT feature allows handsets 1-5 to work as a walky-talky.
Once the PTT key is pressed and held on a handset the other 4
handset will be able to hear the conversation from it.
1 To start a PTT conversation, press and hold
for 1.5
seconds until you hear a confirmation beep.
2 Keep holding
and talk into the handset.
3 If you started the PTT conversation on handset 1, all other
handsets (2-5) will be able to hear the conversation.
4 Release
to stop the conversation.
P
P
P
NOTES
Any one of the 5 handsets can start a PTT conversation.
If during a PTT conversation and incoming call is received then
the conversation will automatically stop and the phone will ring.
Binatone Help: www.meetthebrick.com
22
PHONEBOOK
7 PHONEBOOK
The handset phonebook can store up to 250 names and numbers.
NOTE
Numbers can be up to 24 digits long and names up to 12
characters long. Entries are stored in alphabetical order.
7.1 To view and dial phonebook entries
In standby mode, press D. The first entry is highlighted on the
display.
1 Scroll U or D to the entry you want.
Or
To search alphabetically, press the key with the first letter of
the name, e.g. if the name begins with N, press 6 twice. The
display shows the first entry beginning with N. If required, scroll
U or D to the exact entry.
2 Press
to dial the entry displayed.
T
7.2 To store an entry
Press Names to enter the phonebook menu.
Scroll D to Add Entry and press Select.
Enter a name and press OK.
Enter a number and press Save.
Scroll U or D to the ringtone you want and press Select. The
entry is stored.
6 To Handset is displayed and the handset will automatically give
you the option to transfer the number to another handset.
7 Press Yes and if there are two or more handsets registered to
the base the number will automatically transfer to the other
handsets one by one. Once the entry is copied the transferring
handset will display successful handset X.
8 Press
to return to standby mode.
1
2
3
4
5
E
NOTE
Cancel storing an entry by pressing
process.
23
E at any time during the
Binatone Help: www.meetthebrick.com
PHONEBOOK
7.3 Entering names
Use the alphanumeric keypad to enter names in the phonebook.
For instance to enter the name Paul
PPress 7 once
APress 2 once
UPress 8 twice
LPress 5 three times
To enter a space, press 0.
Press U or D to move between characters/digits.
Press Clear to delete a character, or press and hold Clear to delete
all characters.
7.4 Character map
Key
Case Assigned characters and symbols
1
L/U*
. , - ? ! ¡ ¿ ‘ @ : ; / 1
2
L
a b c 2 ä æ å à ç
U
A B C 2 Ä Æ Å Ç
3
L
d e f 3 è é
U
D E F 3 É
4
L
g h i 4 ì
U
G H I 4
5
L
j k l 5
U
J K L 5
6
L
m n o 6 ö ø ò ñ
U
M N O 6 Ö Ø Ñ
7
L
p q r s 7 ß
U
P Q R S 7
8
L
t u v 8 ù ü
U
T U V 8 Ü
9
L
w x y z 9
U
W X Y Z 9
0
L/U
Space 0
#
L/U
Short press to switch between Abc, abc, ABC
and 123 mode
*L = Lower
U = Upper
Binatone Help: www.meetthebrick.com
24
PHONEBOOK
7.5 To enter a pause
If the phone is connected to a switchboard, you may need to
enter a pause in a stored number. This gives the switchboard
time to find an outside line. A pause is normally stored after the
switchboard PBX Access Code (e.g. 9)
When storing a number, press and hold U until the display shows
P. You can then continue storing the phone number.
7.6 To search an entry
1 Press Names to enter the phonebook menu.
2 Search is highlighted. Press Select. The first entry is highlighted
on the display.
3 Enter the first letter of the name to search alphabetically then
scroll U or D to the exact entry.
4 Press
to dial the entry or
to return to standby mode.
T
E
7.7 To view details of an entry
1 In standby mode, press D. The first entry is highlighted on the
display.
2 Enter the first letter of the name to search alphabetically then
scroll U or D to the exact entry. Press Options.
3 Show Details is highlighted. Press Select. The name, number and
ringtone of the entry are displayed.
4 Press
to return to standby mode.
E
7.8 To edit an entry
1 In standby mode, press D. The first entry is highlighted on the
display.
2 Enter the first letter of the name to search alphabetically then
scroll U or D to the exact entry. Press Options.
3 Scroll D to Edit Entry and press Select.
4 Edit the name and press OK to confirm. Press Clear to delete a
character, or press and hold Clear to delete all characters.
5 Edit the number and press Save. Press Clear to delete a
character, or press and hold Clear to delete all characters.
25
Binatone Help: www.meetthebrick.com
PHONEBOOK
6 Scroll U or D to the ringtone you want and press Select. The
entry is stored.
7 To Handset is displayed and the handset will automatically give
you the option to transfer the number to another handset.
8 Press Yes and if there are two or more handsets registered to
the base the number will automatically transfer to the other
handsets one by one. When the entry is being copied the
transferring handset will display copying from handset x.
9 Press
to return to standby mode.
E
7.9 To copy an entry to another handset
1 In standby mode, press D. The first entry is highlighted on the
display.
2 Enter the first letter of the name to search alphabetically then
scroll U or D to the exact entry. Press Options.
3 Scroll D to Copy Entry and press Select.
4 The display shows To Handset, press Select.
5 Scroll U or D to the number of the handset you want the entry
to be copied to. Press Select.
6 Copy is completed when the message “<Name> copied” appears
on the display.
7 Press
to return to standby mode.
E
NOTE
If an entry with the same number is already stored in the receiving
handset, it will not be copied.
7.10 To assign a ringtone
1 In standby mode, press D. The first entry is highlighted on the
display.
2 Enter the first letter of the name to search alphabetically then
scroll U or D to the exact entry. Press Options.
3 Scroll D to Ringtone and press Select.
4 Scroll U or D to the ringtone you want and press Select. The
ringtone is saved.
5 Press
to return to standby mode.
E
Binatone Help: www.meetthebrick.com
26
PHONEBOOK
7.11 To delete an entry
1 In standby mode, press D. The first entry is highlighted on the
display.
2 Enter the first letter of the name to search alphabetically then
scroll U or D to the exact entry. Press Options.
3 Scroll D to Delete Entry and press Select.
4 Display shows Delete <Name>?. Press Yes to confirm.
5 Press
to return to standby mode.
E
7.12 To store a fast call number
1 Press Names to enter the phonebook menu.
2 Search is highlighted. Press Select. The first entry is highlighted
on the display.
3 Enter the first letter of the name to search alphabetically then
scroll U or Dto the exact entry, then press Options.
4 Scroll U or D to Fast Call, press Select to confirm.
5 Scroll U or D to Key X where the entry will be stored, press
Select.
6 Assign is highlighted press Select to confirm.
7 Press
to return to standby.
E
NOTES
The BT 1571 voicemail service has been pre-stored under the 1
key on the keypad of your Brick phone.
To dial fast call numbers, see page 19.
7.13 To clear a fast call number
1 Press Names to enter the phonebook menu.
2 Search is highlighted. Press Select. The first entry is highlighted
on the display.
3 Enter the first letter of the name to search alphabetically then
scroll U or D to the exact entry, then press Options.
4 Scroll U or D to Fast Call, press Select.
5 Scroll U or D to Key X where the entry is stored, press Select.
6 Scroll U or D to Clear Entry, press Select to confirm.
27
Binatone Help: www.meetthebrick.com
7 Press
E to return to standby.
PHONEBOOK
7.14 To access the phonebook during a call
1 During a call, press Names.
2 Press Options to select Add Entry, Show Details, Edit Entry or Delete
Entry.
7.15 To copy the phonebook to another handset
Press Names to enter the phonebook menu.
Scroll D to Copy Phonebk and press Select.
The display shows To Handset, press Select.
Scroll U or D to the number of the handset you want the
phonebook to be copied to. Press Select.
5 Copy is completed when the message “X Entries Copied” appears
on the display.
6 Press
to return to standby mode.
1
2
3
4
E
NOTE
If an entry with the same number is already stored in the receiving
handset, it will not be copied.
7.16 To check memory status
You can check how much phonebook memory you have on your
phone.
1 Press Names to enter the phonebook menu.
2 Scroll D to Memory Status and press Select. The display shows
the number of used and free phonebook entries.
3 Press
to return to standby mode.
E
7.17 To delete all entries
1
2
3
4
Press Names to enter the phonebook menu.
Scroll D to Del. Phonebook and press Select.
Display shows Delete All Entries ?. Press Yes.
Press
to return to standby mode.
E
Binatone Help: www.meetthebrick.com
28
CALLS LISTS
8 CALLS LISTS
If you have subscribed to Call Display service, and provided
the identity of the caller is not withheld, the number of the caller
will be displayed together with the date and time of the call (if
provided by the network).
NOTES
If the caller’s number is stored in your phonebook along with a
name, the name will also be displayed.
If the number is unavailable, Unavailable will be displayed.
If the caller has withheld their number, Withheld will be displayed.
If the call is from an international number, International will be
displayed.
If the call is from the operator, Operator will be displayed.
If the call is from a payphone, Payphone will be displayed.
If the call is from a ringback request, Ringback will be displayed.
Information about incoming calls is dependent on the country and
network operator. Some operators may charge a subscription for
their Call Display service.
The Calls Lists contains details of missed and received call.
Details include the date and time of the call. Entries are displayed
in chronological order with the most recent call at the top of the
list.
When the list is full, and a new call is received, the oldest entry
will be deleted automatically.
The received and missed Calls Lists holds details of up to 50
calls.
If you receive more than one call from the same number, only the
most recent call is kept in the Calls Lists.
8.1 New calls alert
When you have new missed calls (incoming calls that you haven’t
answered), the display shows You have X new calls.
1 Press View to see details of the call.
29
Binatone Help: www.meetthebrick.com
CALLS LISTS
2 If you press Back, the screen returns to standby mode and the
icon is displayed.
8.2 To view details of the call
1 Press Menu, scroll D to Calls Lists and press Select.
2 Scroll U or D to highlight the calls list (Missed Calls, Received Calls,
Dialled Calls, Delete Calls) you want.
3 Press Select to confirm. The most recent number or name if
stored in the phonebook is displayed.
4 Scroll U or D to the entry you want and press Options.
5 Display shows Show Details. Press Select.
The number (or name if stored in the phonebook), date and
time of the call are displayed.
6 Press Back to return to the previous menu level or
to return
to standby mode.
E
8.3 To save a number from the Calls Lists to the phonebook
1 Press Menu, scroll D to Calls Lists and press Select.
2 Scroll U or D to highlight the calls list (Missed Calls, Received Calls,
Dialled Calls, Delete Calls) you want.
3 Press Select to confirm. The most recent number or name if
stored in the phonebook is displayed.
4 Scroll U or D to the entry you want and press Options.
5 Scroll D to Save Number and press Select.
6 Enter a name and press OK.
7 Display shows the number of the call. Edit the number if
necessary and press Save.
Press Clear to delete a character, or press and hold Clear to
delete all characters.
8 Scroll U or D to the ringtone you want and press Select. The
entry is stored.
9 To Handset is displayed and the handset will automatically give
you the option to transfer the number to another handset.
Binatone Help: www.meetthebrick.com
30
CALLS LISTS
10Press Yes and if there are two or more handsets registered to
the base the number will automatically transfer to the other
handsets one by one. Once the entry is copied the transferring
handset will display successful handset X.
11Press
to return to standby mode.
E
8.4 To delete a Calls Lists entry
1 Press Menu, scroll D to Calls Lists and press Select.
2 Scroll U or D to highlight the calls list (Missed Calls, Received Calls,
Dialled Calls, Delete Calls) you want.
3 Press Select to confirm. The most recent number or name if
stored in the phonebook is displayed.
4 Scroll U or D to the entry you want and press Options.
5 Scroll D to Delete Call and press Select. The call is deleted.
6 Press
to return to standby mode.
E
8.5 To delete entire Calls Lists
1 Press Menu, scroll D to Calls Lists and press Select.
2 Scroll D to Delete Calls and press Select.
3 Scroll U or D to highlight the calls list (Missed Calls, Received Calls,
Dialled Calls or All Calls) you want.
4 Display shows Delete All Calls ?. Press Yes to confirm.
5 Press
to return to standby mode.
E
8.6 To redial the last number
The phone lets you redial any of the last 20 numbers called.
Numbers can be up to 32 digits long.
1 Press U. The last number dialled is highlighted.
If the number is stored in the Phonebook, the name is
displayed as well.
2 Press
to dial.
T
8.7 To view and dial a number in the redial list
1 Press U. The last number dialled is highlighted.
2 Scroll U or D to the entry you want.
3 Press
to dial the number or press Back to return to standby.
T
31
Binatone Help: www.meetthebrick.com
AGENDA
8.8 To copy a redial number to the phonebook
1
2
3
4
5
6
7
8
9
Press U. The last number dialled is highlighted.
Scroll U or D to the entry you want and press Options.
Scroll D to Save Number and press Select.
Enter a name and press OK.
Display shows the number of the call. Edit the number if
necessary and press Save.
Scroll U or D to the ringtone you want and press Select. The
entry is stored.
To Handset is displayed and the handset will automatically give
you the option to transfer the number to another handset.
Press Yes and if there are two or more handsets registered to
the base the number will automatically transfer to the other
handsets one by one. When the entry is being copied the
transferring handset will display copying from handset x.
Press
to return to standby mode.
E
8.9 To delete a redial list entry
1
2
3
4
Press U. The last number dialled is highlighted.
Scroll U or D to the entry you want and press Options.
Scroll D to Delete Call and press Select. The call is deleted.
Press
to return to standby mode.
E
9 AGENDA
9.1 To add a new event
Use the phone to remind you of details of up to five events such
as birthdays, anniversaries or appointments.
Up to 24 characters can be entered as the subject.
1 Press Menu, scroll D to Agenda and press Select.
2 If no previous event is stored, Add Event is highlighted. Press
Select.
Or
If events are already stored, they are listed. Press Options. Add
Event is highlighted. Press Select.
Binatone Help: www.meetthebrick.com
32
AGENDA
3 Enter the subject and press Save.
4 Enter the date (DD/MM) and time (HH:MM) and press Save.
5 If the current time format setting is 12 hour, select am or pm.
Scroll U or D to Silent or Alarm then press Select.
If you press Alarm:
• Scroll U or D to Once or Annually then press Select.
• If Once is selected, scroll U or D to select when you want to
receive the reminder At event time or 30 min before. Press Select
to save.
• If Annually is selected, then the alarm will sound at the event’s
time.
6 Press
to return to standby mode.
E
NOTES
If you select a silent reminder, the event subject is displayed on
screen but no alarm will sound.
When the event memory is full, the display shows Memory Full. You
must delete an event before you can add a new one.
9.2 To switch off reminder ring
When the event is due, the event subject is displayed. If the
reminder is not set to Silent, the alarm will ring and the
icon is
displayed.
1 Press View to stop the alarm and see the details of the event.
Or
Press Back to stop the alarm and return to standby mode.
NOTE
If no button is pressed, the alarm stops after one minute.
9.3 To show event details
1 Press Menu, scroll D to Agenda and press Select.
2 Stored events are displayed. The first event is highlighted on
the display. If required, scroll D to the event you want and
press Options.
3 Scroll D to Show Details and press Select. The description, date
and time of the agenda are displayed.
33
Binatone Help: www.meetthebrick.com
AGENDA
4 Press Back to return to the previous menu level or E to return
to standby mode.
9.4 To edit an event
1 Press Menu, scroll D to Agenda and press Select.
2 Stored events are displayed. The first event is highlighted on
the display. If required, scroll D to the event you want and
press Options.
3 Scroll D to Edit Event and press Select.
4 Edit the subject and press Save.
Press Clear to delete a character, or press and hold Clear to
delete all characters.
5 Edit the date (DD/MM) and time (HH:MM) and press Save.
If the current time format setting is 12 hour, select am or pm.
6 Scroll U or D to Silent or Alarm then press Select.
If you press Alarm:
Scroll U or D to Once or Annually then press Select.
• If Once is selected, scroll U or D to select when you want to
receive the reminder At event time or 30 min before. Press Select
to save.
• If Annually is selected, then the alarm will sound at the event’s
time.
7 Press
to return to standby mode.
E
9.5 To delete an event
1 Press Menu, scroll D to Agenda and press Select.
2 Stored events are displayed. The first event is highlighted on
the display. If required, scroll D to the event you want and
press Options.
3 Scroll D to Delete Event and press Select.
4 Display shows Delete Event ?. Press Yes to confirm or No to
cancel.
5 Press
to return to standby mode.
E
9.6 To delete all events
1 Press Menu, scroll D to Agenda and press Select.
Binatone Help: www.meetthebrick.com
34
HANDSET SETTINGS
2 Stored events are displayed. The first event is highlighted on
the display. Press Options.
3 Scroll D to Del. All Events and press Select.
4 Display shows Delete All Events ?. Press Yes to confirm or No to
cancel.
5 Press
to return to standby mode.
E
10 HANDSET SETTINGS
10.1 To set the handset ringtone
You can set different ringtones for external calls and internal calls.
Select from 20 handset ringtones.
You will hear a sample ring as you scroll to each ringtone.
1 Press Menu, scroll D to Settings and press Select.
2 Set Handset is highlighted. Press Select.
3 Ringtone is highlighted. Press Select.
4 Scroll U or D to External Call or Internal Call and press Select.
5 Scroll U or D to the ringtone that you want and press Select.
6 Press
to return to standby mode.
E
10.2 To set the handset ringer volume
The handset has 5 ringer volume settings plus Off.
If the volume is set to Off,
icon is displayed.
1 Press Menu, scroll D to Settings and press Select.
2 Set Handset is highlighted. Press Select.
3 Scroll D to Ringer Volume and press Select.
4 Scroll U or D to adjust the ringer volume level and press Select.
5 Press
to return to standby mode.
E
NOTES
When the phone is ringing, you may press Silence to silent the
ringer for that call.
When the handset is in standby mode press and hold # to turn the
ringer off, press and hold # again to turn it on.
35
Binatone Help: www.meetthebrick.com
HANDSET SETTINGS
10.3 To set the receiver volume
This sets the standard volume level for the handset earpiece or
hands-free. There are 8 levels to choose from.
1 Press Menu, scroll D to Settings and press Select.
2 Set Handset is highlighted. Press Select.
3 Scroll D to Receiver Vol. and press Select.
4 Scroll U or D to adjust the receiver volume level and press Select.
5 Press
to return to standby mode.
E
10.4 To change the handset name
If you are using more than one handset with the base, you can
give each handset a personalised name to easily distinguish
between the handsets.
A name can be up to 10 characters long.
1 Press Menu, scroll D to Settings and press Select.
2 Set Handset is highlighted. Press Select.
3 Scroll D to Handset Name and press Select.
4 Enter the name and press Save.
Press Clear to delete a character, or press and hold Clear to
delete all characters.
5 Press
to return to standby mode.
E
10.5 To change the display language
The available languages include:
English, Français, Deutsch, Italiano, Español, Nederlands,
Ελληνικά, Português and Türkçe.
1 Press Menu, scroll D to Settings and press Select.
2 Set Handset is highlighted. Press Select.
3 Scroll D to Language and press Select.
4 Scroll U or D to the language you want and press Select.
5 Press
to return to standby mode.
E
10.6 To set the screensaver
When the screensaver is set to Clock, an analogue clock is
displayed.
Binatone Help: www.meetthebrick.com
36
HANDSET SETTINGS
The screensaver comes on when the screen backlight switches
off in standby mode. To change the backlight timeout setting, see
“To set light timeout” in the next section.
1 Press Menu, scroll D to Settings and press Select.
2 Set Handset is highlighted. Press Select.
3 Scroll D to Screensaver and press Select.
4 Scroll U or D to Clock or Off then press Select.
5 Press
to return to standby mode.
E
10.7 To set light timeout
Set the duration of the backlight after the handset returns to
standby screen.
1 Press Menu, scroll D to Settings and press Select.
2 Set Handset is highlighted. Press Select.
3 Scroll D to Light Timeout and press Select.
4 Scroll U or D to set the timeout period you want and press
Select.
5 Press
to return to standby mode.
E
10.8 To change display contrast
Select from 3 levels of contrast.
The brightness of the display changes you scroll to each contrast
level.
1 Press Menu, scroll D to Settings and press Select.
2 Set Handset is highlighted. Press Select.
3 Scroll D to Disp. Contrast and press Select.
4 Scroll U or D to Low, Medium or High then press Select.
5 Press
to return to standby mode.
E
10.9 To switch auto talk on / off
With Auto Talk switched on, you can answer a call just by lifting
the handset off the base or charger. If switched off, you will have
to press
to answer a call.
1 Press Menu, scroll D to Settings and press Select.
2 Set Handset is highlighted. Press Select.
T
37
Binatone Help: www.meetthebrick.com
BASE SETTINGS
3 Scroll D to Auto Talk and press Select.
4 Scroll U or D to Off or On then press Select.
5 Press
to return to standby mode.
E
10.10 To switch key beep on / off
When you press a button on the handset, you will hear a beep.
You can switch it on or off.
1 Press Menu, scroll D to Settings and press Select.
2 Set Handset is highlighted. Press Select.
3 Scroll D to Key Beep and press Select.
4 Scroll U or D to Off or On then press Select.
5 Press
to return to standby mode.
E
10.11 To set PBX Access Code
If the phone is connected to a switchboard, you may need to
enter an PBX Access Code in the dialling sequence to be able to
connect to the outside line.
The PBX Access Code will be displayed at the beginning of a
number on the screen. The code can be up to 4 digits long.
The PBX Access Code will not be used when you dial the number
manually (such as when you are not dialling from the phonebook).
This allows you to make calls to other switchboard extensions.
1 Press Menu, scroll D to Settings and press Select.
2 Set Handset is highlighted. Press Select.
3 Scroll D to PBX Access Code and press Select.
4 Scroll U or D to Off, On or Set Code then press Select.
If you select Set Code, enter the switchboard access code e.g. 9
then press Save.
5 Press
to return to standby mode.
E
11 BASE SETTINGS
11.1 To set the base ringtone
Select from 5 base ringtones.
You will hear a sample ring as you scroll to each ringtone.
Binatone Help: www.meetthebrick.com
38
BASE SETTINGS
1
2
3
4
5
Press Menu, scroll D to Settings and press Select.
Scroll D to Set Base and press Select.
Ringtone is highlighted. Press Select.
Scroll U or D to the ringtone that you want and press Select.
Press
to return to standby mode.
E
11.2 To set the base ringer volume
The base has 5 ring volume settings plus Off.
1 Press Menu, scroll D to Settings and press Select.
2 Scroll D to Set Base and press Select.
3 Scroll D to Ringer Volume and press Select.
4 Scroll U or D to display the volume level that you want and
press Select.
5 Press
to return to standby mode.
E
11.3 To change the dialling mode
The phone is preset to Tone dialling. It is unlikely that you need to
change this setting.
1 Press Menu, scroll D to Settings and press Select.
2 Scroll D to Set Base and press Select.
3 Scroll D to Dialling Mode and press Select.
4 Scroll U or D to Pulse or Tone then press Select to confirm.
5 Press
to return to standby mode.
E
11.4 To set ring priority
When you have more than one handset registered to your base,
you can set one handset to ring before the other handsets. This
allows one handset user to answer all incoming calls first, for
example, the receptionist.
Choose All Handsets if you want all handsets to ring at the same
time or Select Handset to nominate a handset to ring two times
before the other handsets ring.
1 Press Menu, scroll D to Settings and press Select.
2 Scroll D to Set Base and press Select.
3 Scroll D to Ring Priority and press Select.
39
Binatone Help: www.meetthebrick.com
BASE SETTINGS
4 Scroll U or D to All Handsets or Select Handset then press Select.
If you choose Select Handset, all available handsets are
displayed.
• Scroll U or D to the handset you want then press Select.
• Scroll U or D to the number of rings that you want to set: 2,
4 or 6 and press Select.
5 Press
to return to standby mode.
E
11.5 To change the recall mode
Recall is useful to access certain network services and PABX/
switchboard services.
The default recall mode preset in the phone is suitable for your
country network and therefore you should not need to change it.
NOTE
The use of the phone cannot be guaranteed on all PABX.
1 Press Menu, scroll D to Settings and press Select.
2 Scroll D to Set Base and press Select.
3 Scroll D to Recall Mode and press Select.
4 Scroll U or D to Recall 1 or Recall 2 then press Select to confirm.
5 Press
to return to standby mode.
E
11.6 To change the System PIN
The System PIN is required when changing certain settings and
for registration / de-registration. The default setting is 0000. You
can change this to your own preferred number (up to 4 digits).
When you enter a PIN, the digits are shown as ****.
1 Press Menu, scroll D to Settings and press Select.
2 Scroll D to Set Base and press Select.
3 Scroll D to System PIN and press Select.
4 Enter the old PIN (Default setting = 0000) and press OK.
5 Enter the new PIN and press OK.
6 Re-enter the new PIN and press OK.
7 Press
to return to standby mode.
E
Binatone Help: www.meetthebrick.com
40
BASE SETTINGS
NOTE
It is advisable to make a note of your new PIN code and keep it
somewhere safe.
11.7 To reset the phone
You can restore the phone to its default (original) settings.
Resetting the phone will not affect the phonebook or Calls Lists,
and all handsets registered to the base will be retained. Only the
handset and base settings will be reset.
1 Press Menu, scroll D to Settings and press Select.
2 Scroll D to Set Base and press Select.
3 Scroll D to Master Reset and press Select.
4 Select Yes to confirm or No to cancel.
5 Enter the System PIN (Default setting = 0000) then press OK.
The display will show Reset complete and the unit will restart
automatically.
11.8 To switch ECO on / off
Your Brick offers an ECO function which reduces the transmitted
power and energy consumption when switched on. This feature is
set to Off by default.
1 Press Menu, scroll D to Settings and press Select.
2 Scroll D to Set Base and press Select.
3 Scroll D to ECO Mode and press Select.
4 ECO is highlighted, press Select.
5 Scroll U or D to Off or On and press Select to confirm.
6 Press
to return to standby.
E
11.9 To switch ECO PLUS on / off
When ECO PLUS is activated and the unit has been idle for 1
minute the transmitted power between the handset and the base
will stop, an incoming call or pressing any key will activate the unit
and it will revert back to the normal mode.
This feature is set to Off by default.
1 Press Menu, scroll D to Settings and press Select.
2 Scroll D to Set Base and press Select.
41
Binatone Help: www.meetthebrick.com
REGISTRATION
3
4
5
6
Scroll D to ECO Mode and press Select.
Press U or D to ECO PLUS, press Select.
Press U or D to highlight Off or On then press Select.
Press
to return to standby.
E
NOTES
When ECO is set to on, the
icon is replaced with
The base transmission power will be reduced.
When ECO PLUS is set to On
will be displayed.
icon.
12 REGISTRATION
Up to 11 handsets can be registered to one base station.
Additional handsets must be registered to the base before you
can use them.
• The instructions described below apply specifically to
the handset of this model If you wish to register another
manufacturer’s handset, the instructions may vary. In this case,
please refer to the instruction manual of the additional handset.
• The System PIN is required to register or de-register handsets.
The default PIN is 0000.
12.1 To register a handset
On the base:
1 Press and hold PAGE until the base emits a double beep. The
base will remain in registration mode for 90 seconds.
On the handset:
1 If the handset is new, the display shows Please register. Press
Reg.
2 Display shows Press and Hold Base Find Key.
3 Press OK, display shows Searching Base X. If the system PIN is
0000 (default) the handset will automatically register, if the PIN
has been changed enter the system PIN and press OK.
Binatone Help: www.meetthebrick.com
42
REGISTRATION
4 When registration is complete, the display shows Handset
Registered.
Or
If the handset has already been registered to another base, the
standby display is shown. Press Menu, scroll D to Registration
and press Select.
5 Register HS is highlighted. Press Select.
6 Bases are displayed. If necessary, scroll U or D to a new base
you wish to register the Brick handset to and press Select.
7 If you are replacing a base that is already indicating In Use,
when you press Select the display shows Replace Base X? Press
Yes.
8 The display shows Searching Base X. If the system PIN is 0000
(default) the handset will automatically register, if the PIN has
been changed, enter the system PIN and press OK.
NOTE
If registration is not successful the first time, please repeat the
process again in case the base registration period ran out of time.
If there are already 11 handsets registered to the base, registration will fail. You must de-register a handset before you
can register a new one.
12.2 To select a base
You can register the handset with up to 4 bases. Once registered,
you can switch between bases, for example, bases at home and
at work.
1 Press Menu, scroll D to Registration and press Select.
2 Scroll D to Select Base and press Select.
3 All the base numbers are displayed.
(In use) is shown beside the base number where the handset
was previously registered to. Scroll U or D to the base you
want and press Select.
4 The display shows Searching Base X…. When registration is
complete, the handset returns to standby mode.
43
Binatone Help: www.meetthebrick.com
ANSWERING MACHINE
12.3 To de-register a handset
Use one handset to de-register another. You cannot de-register
the handset that you are using.
1 Press Menu, scroll D to Registration and press Select.
2 Scroll D to De-register and press Select.
3 Enter the System PIN and press OK. (default setting = 0000)
4 Scroll U or D to the handset you want to de-register and press
Select.
5 Press Yes to confirm or No to cancel.
6 Press
to return to standby mode.
E
13 ANSWERING MACHINE
The Brick answering machine records unanswered calls on
the base when it is activated. It can store up to 59 messages
within the maximum recording time of up to 30 minutes. Each
message can be up to 3 minutes long. Your personalised outgoing
messages (OGM) can be up to 3 minutes long.
You can operate your answering machine from:
• the handset.
• remotely, from another phone, see page 49.
NOTE
You will need to set the date and time (if you have not already) so
that you will know when each message was received, see page
17.
13.1 Switch between answering machine on / off
When switched on the handset display shows
in standby
mode.
1 Press Menu, the display shows Answer Machine, press Select.
2 Scroll D to Answer On/Off and press Select.
3 Scroll U or D to Off or On then press Select.
4 Press
to return to standby.
E
Binatone Help: www.meetthebrick.com
44
ANSWERING MACHINE
13.2 To change answer delay
Answer delay sets the number of times the Brick will ring before
the answering machine picks up your call and starts playing the
OGM.
You can change this setting to between 2-9 rings or Time Saver. The
default setting is 5 rings.
1 Press Menu, the display shows Answer Machine, press Select.
2 Scroll D to Answer Settings and press Select.
3 Scroll U or D to Answer Delay and press Select.
4 Scroll U or D to the setting you want and press Select.
5 Press
to return to standby.
E
NOTE
If Time Saver is set, the answering machine will answer after 2
rings during remote access if you have new messages. If you
do not have any new messages, it will answer after 5 rings. This
means you can hang up after 3 rings knowing you have no new
messages, saving you time and the cost of the call.
13.3 To switch message alert tone on / off
When you have new messages, with the audible message alert
switched on, you will hear an audible alert once at the handset
and the answering machine base will beep every 10 seconds. The
default setting is Off.
1 Press Menu, the display shows Answer Machine, press Select.
2 Scroll D to Answer Settings and press Select.
3 Scroll U or D to Message Alert and press Select.
4 Scroll U or D to Off or On then press Select.
5 Press
to return to standby.
E
13.4 New messages alert
When you have new messages, the display shows You have X new
messages.
If you press Back, the screen returns to standby mode and the
icon is displayed.
45
Binatone Help: www.meetthebrick.com
ANSWERING MACHINE
13.5 Outgoing messages
The OGM is the message a caller first hears when the answering
machine picks up their call. The Brick comes with 2 pre-recorded
OGMs, or you can record your own.
13.6 To record a personalised OGM
You can record personalised OGMs up to 3 minutes long for your
callers.
The Answer & Record mode allows your caller to leave a
message after the announcement, while the Answer Only mode
only allows your caller to hear the announcement. You will be
prompted to select the mode before the recording.
1 Press Menu, the display shows Answer Machine, press Select.
2 Scroll D to Outgoing Msg. and press Select.
3 Record is highlighted, press Select.
4 Scroll U or D to Ans. & Rec. or Answer Only then press Select.
5 The display shows Please speak after the tone.
6 After the tone, speak your message clearly into the handset
then press Save to end recording.
7 Your OGM is played back. If you want to delete it, press Delete
during playback. If you press Save or wait for the message to
play back, it will be saved.
8 Press
to return to standby.
E
13.7 To play or delete your personalised OGM
Deleting a personalised OGM automatically reinstates the prerecorded one.
You cannot delete a pre-recorded message.
1 Press Menu, the display shows Answer Machine, press Select.
2 Scroll D to Outgoing Msg. and press Select.
3 Scroll D to Play and press Select.
4 Scroll U or D to Ans. & Rec. or Answer Only then press Select.
5 Scroll D to Personal OGM and press Select.
6 The message is played. Press OK to stop playback or press
Delete to delete the message.
7 Press
to return to standby.
E
Binatone Help: www.meetthebrick.com
46
ANSWERING MACHINE
13.8 To set the answer mode OGM
You can select a pre-recorded or personalised OGM as the
announcement to your callers.
1 Press Menu, the display shows Answer Machine, press Select.
2 Scroll D to Answer Settings and press Select.
3 Scroll D to Answer Mode and press Select.
4 Scroll U or D to Ans. & Rec. or Answer Only then press Select.
5 If there is a personalised OGM saved, scroll U or D to Default
OGM or Personal OGM then press Select to confirm.
Or
If there is no personalised OGM saved, the pre-recorded OGM
will be selected automatically.
6 Press
to return to standby.
E
13.9 To record a memo
You can record a memo which is stored on your answering
machine and played back like a normal message.
1 Press Menu, the display shows Answer Machine, press Select.
2 Scroll D to Record Memo and press Select.
3 The display shows Please speak after the tone.
4 After your hear the tone, speak your memo then press Save to
end recording.
5 Your memo is played back. If you want to delete it, press Delete
during playback. If you press Save or wait for the message to
play back, it will be saved.
6 Press
to return to standby.
E
NOTE
When a memo is played back, Memo is displayed on the handset.
47
Binatone Help: www.meetthebrick.com
ANSWERING MACHINE
13.10 Call screening
When the answering machine is on and takes a call, you can
screen the message via the handset
1 When the handset rings, wait for the answering machine to
take the call. When the caller begins leaving a message, the
display shows Recording. Press Screen to hear the caller.
2 To interrupt and speak to the caller directly, press
.
3 Press
to return to standby.
E
T
NOTE
While screening, you can adjust the volume by pressing U or D.
13.11 Message playback
Each message is played back with day and time of the call
announced. The caller’s number is displayed (if stored in the
phonebook the name will be displayed).
1 Press Menu, the display shows Answer Machine, press Select.
2 Play is highlighted. Press Select to play by message or scroll D
to Play All then press Select to play all messages.
3 During playback, press Options. The options Pause, Repeat
Message, Skip Forward, Skip Backward and Delete are displayed.
4 Scroll U or D to highlight the option and press Select to confirm.
5 At the end of playback, press Back to return to the previous
menu level.
NOTES
If you pause a message, press Resum. to resume playback.
Alternatively, you may use the following keys on your handset
during playback:
1 To pause
2 To resume
3 To repeat message
4 To skip forward
5 To delete current message
6 To skip backwards
Binatone Help: www.meetthebrick.com
48
ANSWERING MACHINE
13.12 Delete all old messages
Answering machine messages that are not deleted are
automatically saved.
New messages or existing messages that have not been played
back cannot be deleted.
1 Press Menu, the display shows Answer Machine, press Select.
2 Scroll D to Del. Messages and press Select.
3 Display shows Delete All Old Messages ?. Press Yes to confirm or No
to cancel.
4 Press
to return to standby.
E
NOTES
If the memory is within 10 seconds of becoming full while a caller
is leaving a message, they will hear, “Please complete your
message within 10 seconds”. If they are still talking when the
memory becomes full the caller hears, “Thank you for calling”, and
the machine will hang up.
When the memory is full, the OGM will automatically be set to
Answer Only. You must delete old messages before the Brick can
record new messages.
13.13 Remote access
Remote access allows you to operate your answering machine
and listen to your messages by calling the Brick from another
phone.
The default setting is On.
1 Call your Brick. When you hear the OGM, press *.
2 Enter your 4 digit remote access PIN (default setting = 0000).
You will hear a confirmation beep.
NOTE
You should change this code for additional security, see “To
change the remote access PIN”.
3 Use the following keys to operate your answering machine:
49
Binatone Help: www.meetthebrick.com
ANSWERING MACHINE
DTMF
code
*
1
2
3
4
5
6
7
8
9
0
Operations
with Voice Prompts
To enter remote access
mode
To hear main menu
To play all messages
To play new messages
To skip back during
messages
To delete during
messages
To skip forward during
messages
To set answer mode
To record a new OGM
To switch answer
machine off
To switch answer
machine on
with Outgoing
Messages
To enter remote access
mode
No action
To play all messages
To play new messages
To skip back during
messages
To delete during
messages
To skip forward during
messages
No action
No action
To switch answer machine
off
To switch answer machine
on
NOTES
If you have any new messages they will be played after you have
entered your remote access PIN code.
If you enter an incorrect PIN code you will hear “Incorrect security
code or two beeps (error beeps). Please enter your security
code”. You can try entering the code again. If it is still incorrect
you will hear the voice prompt or two beeps (error beeps) and the
Brick will hang up.
13.14 To switch remote access on / off
1
2
3
4
5
Press Menu, the display shows Answer Machine, press Select.
Scroll D to Answer Settings and press Select.
Scroll U or D to Remote Access and press Select.
Scroll U or D to Off or On then press Select.
Press
to return to standby.
E
Binatone Help: www.meetthebrick.com
50
HELP
13.15 To change the remote access PIN
The default remote access PIN is 0000.
1 Press Menu, the display shows Answer Machine, press Select.
2 Scroll D to Answer Settings and press Select.
3 Scroll U or D to Remote Access and press Select.
4 Scroll U or D to Set Remote PIN and press Select.
5 Enter the old 4-digit PIN and press Save (default setting = 0000).
6 Enter the new 4-digit PIN and press Save.
7 Re-enter the new PIN and press Save.
8 Press
to return to standby.
E
NOTES
This PIN is different from the System PIN used when resetting the
unit or when registering / de-registering handset.
It is advisable to make a note of your new PIN code and keep it
somewhere safe.
14 HELP
The
icon is not scrolling during charge
.. Bad battery contact – move the handset slightly.
.. Dirty contact – Clean the battery contact with a cloth moistened
with alcohol.
.. Battery is full – no need to charge.
No dialling tone
.. No power – check the connections. Reset the phone: unplug
and plug back in the mains.
.. Batteries are empty – charge the batteries for at least 24 hours.
.. You are too far from the base – move closer to the base.
.. Wrong line cable – use the line cable provided.
.. Line adaptor (when needed) is not connected to the line cord –
connect the line adaptor (when needed) to the line cord.
51
Binatone Help: www.meetthebrick.com
HELP
Poor audio quality
.. The base is too close to electrical appliances, reinforced
concrete walls or metal doorframes – move the base at least
one metre away from any electrical appliances.
The signal icon is blinking
.. Handset is not registered to the base – register the handset to
the base.
.. You are too far from the base – move closer to the base.
No ring tone
.. The ring tone is deactivated.
.. Increase the volume.
Caller ID service does not work
.. Check your subscription with your network operator.
A phonebook entry cannot be stored
.. The phonebook is full. Delete an entry to free memory.
No display
.. Try recharging or replacing the batteries.
.. Try disconnecting and connecting the base power supply.
.. If LED is not lit up, then try disconnecting and connecting the
base power supply.
Unable to register another handset
.. Maximum number of 11 handsets has been reached.
.. The display shows Searching.... You must unregister a handset in
order to register a new one.
Noise interference on your radio or television
.. Your base or charger may be too close. Move it as far away as
possible.
.. Answering machine does not record messages
Binatone Help: www.meetthebrick.com
52
HELP
Switch the answering machine on.
.. The memory may be full. If so, you will need to delete some
messages.
.. Answer mode may have been set to Answer Only. Change
.. the mode to Ans. & Rec..
Cannot access messages remotely
.. Remote access may be switched off.
.. Check that you are using the correct PIN code.
Cannot record outgoing message
.. The memory may be full. If so, you will need to delete some
messages.
Answering machine stops recording
.. The memory may be full. If so, you will need to delete some
messages.
.. The maximum message length is 3 minutes.
14.1 Warranty and Service
The Brick Phone has a warranty of 12 months from the date of
purchase as shown on your sales receipt. The warranty does
not cover any faults or defects caused by accidents, misuse, fair
wear and tear, negligence, faults on the telephone line, lightning,
tampering of the equipment or any attempt to adjust or repair
other than through approved agents.
Please keep your original dated sales receipt as proof of warranty.
You should also keep the contents of the original packaging.
In the unlikely event that you need to return your Brick Phone to
our Repair Centre while it is under warranty, a handling charge
may apply.
53
Binatone Help: www.meetthebrick.com
HELP
14.1.1 Servicing Under Warranty
1 Disconnect the base unit from the telephone line and the main
power supply.
2 Pack all components of your Brick Phone using the original
packaging.
Remember to include the power adapter.
3 Return the unit to the shop where you made your purchase.
Bring along your original dated sales receipt.
14.1.2 Servicing After Warranty Has Expired
If the unit is no longer covered under warranty:
1 Disconnect the base unit from the telephone line and the main
power supply.
2 Pack all components of your Brick Phone using the original
packaging.
Remember to include the power adapter.
3 Contact our website www.meetthebrick.com and request for
a quotation on potential repair charges. Our customer service
staff will provide you with details on where to send your Brick
Phone for repair.
4 Make sure you include the followings:
• Your name and residential address
• A cheque or postal order for the repair charge
5 Bring all the necessary items to the location provided by our
customer service staff.
Binatone Help: www.meetthebrick.com
54
TECHNICAL DETAIL
15 TECHNICAL DETAIL
Standard
Digital Enhanced Cordless
Telecommunication (DECT)
Frequency range Channel Width
1881.7920 MHz (Ch 9) to 1897.3440 MHz (Ch 0)
1.728MHz
Multiple Access
TDMA/FDMA
Operating range
Operating time
Temperature range
Electrical power
Up to 1000m outdoors; Up to 50m indoors
Standby: 200 hours, Talking: 10 hours
Operating 10°C to +40 °C, Storage -20°C to +60 °C
Base unit:
MEIC: MN-A102-U130
Input: 100-240V 50/60Hz 200mA, Output: 6V DC 400mA
Charger unit:
MEIC: MN-A102-U130
Input: 100-240V 50/60Hz 200mA, Output: 6V DC 400mA
Battery Information
Sanik - Rechargeable 2 x 550mAh NIMH Battery
Risk of explosion if battery is replaced by an incorrect type
Dispose of used batteries according to the instructions.
Port specification
The
port (connected to the mains power supply) is a SELV port with respect to
EN 60950
The
port (connected to the telephone line) is a TNV port with respect to EN 60950
CLEANING AND CARE
Do not clean any part of your phone system with benzene, thinners or other solvent
chemicals as this may cause permanent damage which is not covered by the Guarantee.
When necessary, clean it with a damp cloth.
Keep your phone system away from hot, humid conditions or strong sunlight, and
don’t let it get wet.
Every effort has been made to ensure high standards of reliability for your phone
system. However, if something does go wrong, please do not try to repair it
yourself, but consult your supplier or the Helpline.
55
Binatone Help: www.meetthebrick.com
Binatone Electronics International Limited
Floor 23A, 9 Des Voeux Road West, Hong Kong
Tel: (852) 2802 7388 Fax: (852) 2802 8138
________________________________________
.
EC Declaration of Conformity
We the manufacturer / Importer :
Binatone Electronics International Limited
Floor 23A, 9 Des Voeux Road West, Hong Kong
Tel: (852) 2802 7388 Fax: (852) 2802 8138
Declare under our sole responsibility that the following product
Type of equipment:
Model Name:
Country of Origin:
Brand:
Digital cordless telephone with Answering Machine
Brick4Home /Brick4Home Plus series
China
Binatone
complies with the essential protection requirements of R&TTE Directive 1999/5/EC on the
approximation of the laws of the Member States relating to Radio Spectrum Matters, the
Council Directive 2004/108/EC on the approximation of the laws of the Member States
relating to electromagnetic compatibility (EMC) and the European Community Directive
2006/95/EC relating to Electrical Safety , Directive 2011/65/EC on the restriction of use of
hazardous substances (RoHS) and 2009/125/EC relating to ecodesign requirement for
Energy-Related Products (ErP).
Assessment of compliance of the product with the requirements relating to the essential
requirements according to Article 3 R&TTE was based on Annex III of the Directive
1999/5/EC and the following standard / regulation:
Radio Spectrum:
EMC:
Heath & Electrical Safety:
ErP
EN 301406: V2.1.1 (2009-07);
EN 301489-6:V1.3.1 (2008-08);
EN 301489-1:V1.9.2 (2011-09);
EN55022:2010
EN55024:2010
EN61000-3-2:2006 +A1 +A2:2009
EN61000-3-3:2008
EN 60950-1:2006 + A11+A1+A12:2011
EN50360:2001 +A1:2012 & EN50385 : 2002
Implementing regulation EC1275/2008
Manufacturer / Importer
(Signature of authorized person)
22 Oct 2013
Date