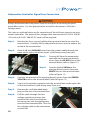
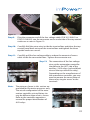
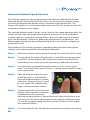
1
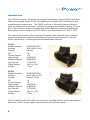
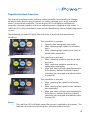
Installation
Guide
www.imPowerDealer.com
Marathon Electric offers a full line of motors for the pool, spa and bath markets.
Poolside contractors prefer our pool and spa motors for their quick installation,
long life and easy serviceability.
Marathon designs motors for a variety of pool and spa applications, including
above-ground pool, in-ground pool, commercial pool, variable-speed, heat
pumps and all other standard applications.
Our variable speed products consume up to 85% fewer watts than standard PSC
induction motors. This not only saves the Earth's precious resources, but also
saves the consumer hundreds of dollars per year in energy costs.
Why Choose Marathon Electric?
Our fast response to customer questions, unmatched engineering expertise
and the delivery speed that comes with maintaining a large inventory makes
Marathon Electric ideally suited to meeting our customers' needs. In addition
Marathon's focus on innovation keeps our customers on the leading edge of
technology.
Marathon Electric
100 East Randolph St.
Wausau, WI 54402
800-683-9144
www.imPowerDealer.com
The information in this document is subject to change without notice.
2
Table of Contents
Safety Considerations 4
Introduction
6
Operation
7
Removing the Existing Motor from Pump
8
Topside Interface Overview
9
Single Speed Connection with Timer
10
Two Speed Connections with Timer 13
Automation Controller Signal Line Connection 16
Automatic Reduced Speed Selection
20
Software Error Code Matrix
22
Troubleshooting Guide 24
Please read the entire instruction manual before
starting the installation.
3
SafetyConsiderations
Considerations
Safety
Considerations
Safety
The following
definitions are used as safety considerations on the
Safety
Considerations
The
following
definitions
used
as
safety
considerations
on
The
following
definitions
areare
as
safety
considerations
thethe all
Evergreen
IM
motor and
inused
this
manual.
Please
read andonobserve
Evergreen
IM
motor
and
in
this
manual.
Please
read
and
observe
Evergreen
IM
motor
and
in
this
manual.
Please
read
and
observe
all all
of these
safety
concerns.
The
following
definitions
are used as safety considerations on the imPower motor
these
safety
concerns.
of of
these
safety
concerns.
and in this manual. Please read and observe all of these safety concerns.
SAFETY
SAFETY
SAFETY
SAFETY
SYMBOLS
SYMBOLS
SYMBOLS
SYMBOLS
Installation and service of this motor should be attempted only by
Installation
and
service
this
motor
should
attempted
only
Installation
and
service
of of
this
motor
should
be be
attempted
only
by by
trained service
technicians
familiar
with
the
Evergreen
instructions
Installation
and
service
of this
motorwith
should
be
attempted
only
by trained service
trained
service
technicians
familiar
with
the
Evergreen
instructions
trained
service
technicians
familiar
the
Evergreen
instructions
and training manual.
technicians
familiar
with the imPower Installation Guide.
and
training
manual.
and
training
manual.
This motor should be installed in accordance with accepted practices
This
motor
should
be
installed
in accordance
with
accepted
practices
and
This
motor
should
be
installed
in
accordance
with
accepted
practices
This
motor
should
be
installed
in
accordance
with
accepted
practices
and
installation
instructions,
and
in compliance
with
all national
and
installation
instructions,
and and
in compliance
with allwith
national
and
localand
codes.
and
installation
instructions,
and
in
compliance
with
all
national
and
and
installation
instructions,
in
compliance
all
national
local codes.
local
codes.
local
codes.
•
Disconnect power before installing, servicing, or repairing electrical
components including motors. Observe all warning notices posted on the
existing equipment, imPower motor, and in these installation instructions.
It is also a good practice to confirm power is disconnected with a meter.
•
The imPower motor can be used to replace induction motors. Proper
wiring selection and installation is critical to provide proper operation and
maintain the proper operation of the in-ground pool pump system
in which it is used.
•
Always keep hands and clothing away from moving parts.
•
Never attempt to measure the temperature rise of a motor by touch.
Temperature rise must be measured by thermometer, resistance, imbedded
detector or thermocouple.
•
Operation of a motor at levels in excess of its nameplate rating may result in
fire, damage to equipment or serious injury to personnel.
4
REG7232_EvergreenIM_Reprint.indd 1
-1- 1 -- 1 4/28/10 2:05:19 PM
Safety Considerations
The following definitions are used as safety considerations on the
Evergreen IM motor and in this manual. Please read and observe all
of
these
safetydefinitions
concerns. are used as safety considerations on the
The
following
Evergreen IM motor and in this manual. Please read and observe all
of these safety concerns.
SAFETY
SafetyConsiderations
Considerations
Safety
SYMBOLS
Safety
Considerations
(continued)
SAFETY
The
following
definitions
used
safety
considerations
The
following
definitions
areare
used
as as
safety
considerations
on on
thethe
Evergreen
motor
and
this
manual.
Please
read
and
observe
Evergreen
IMIM
motor
and
in in
this
manual.
Please
read
and
observe
all all
SYMBOLS
The following definitions are used as safety considerations on the imPower motor
Installation
and
service of this motor should be attempted only by
these
safety
concerns.
of of
these
safety
concerns.
and in this
manual.
Please readfamiliar
and observe
these safety
concerns.
trained
service
technicians
with all
theofEvergreen
instructions
and
trainingand
manual.
Installation
service of this motor should be attempted only by
SAFETY
SAFETY
SAFETY
trained service technicians familiar with the Evergreen instructions
SYMBOLS
SYMBOLS
SYMBOLS
This
motor should
be installed in accordance with accepted practices
and training
manual.
and installation instructions, and in compliance with all national and
local
codes.should be installed in accordance with accepted practices
This motor
Installation
and
service
this
motor
should
attempted
only
Installation
and
service
of of
this
motor
should
be be
attempted
only
by by
and installation instructions, and in compliance with all national and
trained
service
technicians
familiar
with
Evergreen
instructions
trained
service
technicians
familiar
with
thethe
Evergreen
instructions
local codes.
and
training
manual.
and
training
manual.
•
For safety, Buyer or User should provide protective guards over all shaft
This
motor
should
installed
accordance
with
accepted
extensions
and
any
moving
apparatus
mounted
thereon.
Thepractices
User is
This
motor
should
be be
installed
in in
accordance
with
accepted
practices
responsible
for checking
all
applicable
safetywith
codes
his
area and
and
installation
instructions,
and
compliance
with
all
national
and
and
installation
instructions,
and
in in
compliance
allin
national
and
providing suitable guards. Failure to do so may result in bodily injury
local
codes.
local
codes.
and/or damage to equipment.
•
Improper installation, adjustment, alternation, service, maintenance,
or use of a motor other than for its intended application or in excess of its
nameplate rating can cause explosion, fire, electrical shock, or other
conditions that may cause personal injury, death, or property damage.
Consult a qualified installer, service agency, or your distributor or branch
for information or assistance. The qualified installer or agency must use the
supplied or recommended parts when installing or servicing this product.
•
Use of the wires provided with or recommended in this kit is required for
proper operation of the motor. Should additional wires be needed, use
equivalent size wire gauge and rated insulation.
•
Make sure the motor is properly secured and aligned before operation.
-1-
REG7232_EvergreenIM_Reprint.indd 1
-1-
REG7232_EvergreenIM_Reprint.indd 1
4/28/10 2:05:19 PM
4/28/10 2:05:19 PM
5
- 1 -- 1 -
Introduction
The imPower motor is a permanent magnet alternating current (PMAC) electronically commutated motor (ECM), leveraging over 20 years of ECM technical and
manufacturing experience. The PMAC machine is inherently more efficiency
than its induction counterpart, resulting in energy consumption savings of up to
85%. This imPower motor is designed to safely replace existing full-rated pool
filter pump motors rated at 3/4 HP 1.65SF or up-rated motors at 1.0HP 1.25SF.
This motor also features three selectable speeds either through the use of the
patent pending auto speed switch feature, top panel push buttons, external
multi-speed timers, or through external automation controls.
RB003
Model Number
Voltage:
Flange:
HP:
Service Factor:
High Speed
Medium Speed
Low Speed:
Temp Rating:
Weight:
5SME29DFT001
208-230V (±10%)
Square
1.0
1.25
3450 RPM
2600 RPM
1725 RPM
-40C to +55C
11 lbs
RB053
Model Number
Voltage:
Flange:
HP:
Service Factor:
High Speed
Medium Speed
Low Speed:
Temp Rating:
Weight
5SME29DFT002
208-230V (±10%)
Round/C-Face
1.0
1.0
3450 RPM
2600 RPM
1725 RPM
-40C to +55C
11 lbs
The installation manual enables a technician, certified by their local/state agency/
board, to install, service, repair, and maintain the imPower motor.
6
Operation
imPower motors are configured with Constant Speed, meaning they simply maintain
the speed (RPM) they are configured for in each application. This reduces the effect
filter cleanliness and product load have on the operation of the motor, unlike
traditional induction motors. The motor only uses the power (current) necessary to
operate at its programmed speed, and has the ability to automatically increase or
decrease power to maintain that speed.
imPower motors turn on and off with application of line voltage. This is critical to its
effectiveness with all existing line-power cutoff timers and automation controllers.
Start up
During start up, motor current is slowly applied to motor windings. This provides a
controlled smooth start up. The motor/pump will accelerate to the high speed level
of 3450 rpm in approximately 6-8 seconds. Once started, the motor is programmed to
operate on high speed for two minutes to assure a proper prime is achieved, during
which time no attempt to change speeds will be recognized. Only after this two-minute cycle will a change speed signal be accepted.
If no speed change signal is received by the motor after the two-minute prime cycle,
the motor will remain on high speed for a total of two hours, then automatically turn
down to one of the two reduced speeds. The factory default reduced speed setting
is “low” (1725 rpm), though this can be modified to “medium” (2600 rpm) if the flow/
pressure at low is deemed insufficient for operation of certain poolside equipment/
features. The modification of the reduced speed automatic turn-down is found on
page 20 of this guide, titled “Automatic Reduced Speed Selection”.
Stall Detect (Locked Rotor Protection)
This feature protects the motor from external obstructions in the event it does not
achieve high speed operation within 15 seconds of applying voltage or if the RPM
drops below 500 RPM during operation. The imPower is programmed with a hard
fault feature such that the motor will automatically shut down if a stall detect fault
is registered. Power at the timer or automation controller must be removed and
reapplied after one minute of “dwell” time to restart the motor.
Overload Protection (Over-Current or Over-Temperature)
The imPower motor is specified with a series of sensors that continuously monitor the
temperature of critical internal components as well as the current flowing through the
electronics. The motor will automatically shutdown if either limit is exceeded. Like the
stall detection, the timer or controller power must be removed, though it is recommended that the motor power stay removed for at least 15 minutes to allow the motor
to cool and/or to determine the cause of the overload condition.
7
Installation and service of this motor should be attempted only by
trained service technicians familiar with the Evergreen instructions
and training manual.
This motor should be installed in accordance with accepted practices
and installation instructions, and in compliance with all national and
local codes.
Remove
the Existing Motor from Pump
When servicing the pool pump filter motor, always disconnect the main power
from the unit. It is also good practice to confirm the power is off with a meter.
Step 1:
Loosen and remove the screws holding the seal plate to the pump
housing. Pull the seal plate / motor assembly from the pump housing.
Step 2:
Remove the screws holding the diffuser to the seal plate and remove it.
Step 3:
After confirming that the power has been shut off, remove the electrical
connections from the existing motor. Remove the conduit and connector from the motor. Note: the conduit and connector will be re-used.
Step 4:
To remove the impeller lock the shaft by placing a wrench or a flathead
screwdriver at the opening in the rear. Note: Do not reuse the seal
from the existing motor when installing the imPower motor. Remove
the screws holding the seal plate onto the motor.
Step 5:
Remove the pump motor by removing the four bolts holding the motor
to the seal plate of the pump. Also remove the stationary portion of the
seal from seal plate.
-1-
REG7232_EvergreenIM_Reprint.indd 1
8
4/28/10 2:05:19 PM
Topside Interface Overview
The topside interface on the imPower motor provides functionality to change
amongst three distinct preset speeds via either a button press or by a remote
timer / automation controller. Green display LED’s will light to indicate the
currently selected speed as well as to indicate power is applied to the motor. A
red Error LED is also included to show a fault identified by the on-board diagnostic
system.
The following are the LED lights that will shine in each normal operational
condition.
This condition is present:
1. Directly after energizing the motor
2. After selecting high speed via a button
press
3. After selecting high speed via a timer or
automation controller
Figure 1
Figure 2
Figure 3
This condition is present
1. After selecting medium speed via a button press
2. After selecting medium speed via an
automation controller
3. After two hours of high speed operation
if the factory default automatic speed
selection was changed to medium (refer
to page 20)
This condition is present
1. After selecting low speed via a button
press
2. After selecting low speed via an automation controller
3. After two hours of high speed operation
if the factory default automatic speed
selection was changed to medium (refer
to page 20)
Notes:
1. The red Error LED will blink once after power is applied to the motor. This
indicates the internal self-check has returned normal results.
9
Installation and service of this motor should be attempted only by
trained service technicians familiar with the Evergreen instructions
and training manual.
This motor should be installed in accordance with accepted practices
and installation instructions, and in compliance with all national and
local codes.
Single Speed Connection with Timer
Always disconnect the main power from the unit prior to servicing the pool
pump filter motor. It is also good practice to confirm the power is off with a
voltage meter
These steps as outlined below are for connection of the imPower motor to a single
speed timer.
Step 1:
Remove the three screws holding the top control enclosure onto the
motor. Carefully lift the top panel and turn it over to expose the inside
of the terminal box.
Figure 4
Figure 5
Step 2:
Run the L1, L2, and GROUND wires from the conduit cable through the
threaded opening on the right side of the connection box.
Step 3:
Connect the L1 to the terminal block opening directly across from the
ORANGE wire (refer to Figure 6).
-1-
Step 4:
Connect L2 to the block opening directly across from the WHITE wire
(refer to Figure 6).
REG7232_EvergreenIM_Reprint.indd 1
4/28/10
Figure 6
10
Step 5:
Connect the ground to the block
opening directly across from the
GREEN/YELLOW wire (refer to
Figure 6).
Step 6:
Screw in the conduit connector into
the terminal box on the right side of
the terminal box (shaft facing away
from you).
2:05:19 PM
Step 7:
Carefully fold the extra wires inside the terminal box and place the top
control panel back on top of the terminal box.
Step 8:
Tighten the three screws into the terminal box while applying light
pressure to the top control enclosure.
Step 9:
Replace and tighten the screws to mount the seal plate onto the motor.
Step 10: Put a NEW pump seal into the seal plate and onto the motor shaft.
Handle and lubricate seal per manufacturer’s specifications.
Step 11: Replace the impeller. Make sure that the impeller can spin freely in the
housing.
Step 12: Replace the diffuser.
Step 13: Replace and tighten the bolts that retain the motor/seal plate assembly
to the pump.
Step 14: Connect the appropriately sized ground conductor to the supplied
grounding/bonding lug.
Step 15: Open the inlet and outlet valve.
Step 16: Reapply power and allow motor to accelerate to high speed and
operate there for at least two minutes to assure adequate pump
prime has been established.
Notes:
1. In this type of connection, the motor will operate on high speed for
2 hours, followed by an automatic turn-down to a reduced speed. As
noted in the “Operation” section of this manual, the factory default
reduced speed setting is “low” (1725 rpm), though this can be modified
to “medium” (2600 rpm) if the flow/pressure at low is deemed insufficient
for operation of certain poolside equipment/features. The modification
of this reduced speed automatic turn-down is found on page 20 of this
guide, titled “Automatic Reduced Speed Selection”
2. The selectable on-time of the timer should be adjusted so the pool can
meet the total number of turns as required by local/state regulations.
11
3. The user can override the operational speed currently running via the
buttons on the top control panel after the mandatory initial two-minute
prime cycle. The override will continue until the timer removes power or
another button is pressed. The standard operation identified in
Note 1 can be resumed if the power is turned off at the timer and
turned back on.
Extended Functionality
The imPower motor also has the ability
to operate on high speed for only the
mandatory two-minute pump priming
cycle before changing to low speed until
power is removed. Simply change the
connection description noted above by
moving the incoming L1 to the terminal
block across from the Red lead (refer to
Figure 7) to activate this feature. Note
Figure 7
that the automatic reduced speed
function defined on Page 20 of this guide
does not apply with this feature.
12
Installation and service of this motor should be attempted only by
trained service technicians familiar with the Evergreen instructions
and training manual.
This motor should be installed in accordance with accepted practices
and installation instructions, and in compliance with all national and
local Speed
codes. Connections with Timer
Two
Always disconnect the main power from the unit prior to servicing the pool
pump filter motor. It is also good practice to confirm the power is off with a
voltage meter.
If you had a single speed motor prior to this installation, you will need to run a
new conduit with four conductors (High Speed, Low Speed, Neutral, and Ground)
and proceed through the following steps to properly operate the motor with the
multi-speed timer. Proceed to step 5 if a multi-speed timer is already installed and
operating a two-speed induction motor.
Figure 9
Figure 8
Step 1:
Remove the caution / instruction cover from the front of the timer,
exposing the screw terminals underneath (refer to Figure 8).
Step 2:
- 1 - power leads into the two left-most
Connect the L1 and L2 incoming
screw terminals . The timer is connected for 240V from the factory, so
no internal timer changes are required.
REG7232_EvergreenIM_Reprint.indd 1
4/28/10 2:05:19 PM
Step 3:
Connect a jumper lead of at least 18AWG size between the L1 terminal
and the Line-side of Circuit 1. Connect a second jumper lead between
the Load-side of Circuit 1 and the Line-side of Circuit 2 as illustrated
above.
Step 4:
Connect the L2 lead of the new four-conductor conduit to the same
screw terminal as the incoming line L2, the High Speed Black lead to
the Line-side of Circuit 1, and the Low Speed Red lead to the Load-side
of Circuit 2.
13
Step 5:
Remove the three screws holding the top control enclosure onto the
motor. Carefully lift the top panel and turn it over to expose the inside
of the terminal box.
Step 6:
Run the High Speed Black, Low Speed Red, L2, and Ground wires from
the conduit cable through the opening on the right side of the motor.
Step 7:
Connect the wire for Circuit 1 from the timer to the opening directly
across from the BLACK wire on the terminal block (refer to Figure 10).
Step 8:
Connect the wire for the Circuit 2 from the timer to the opening directly
across from the RED wire on the terminal block (refer to Figure 10).
Step 9:
Connect the L2 to the opening directly across from the WHITE wire on
the terminal block (refer to Figure 10).
Figure 10
Step 10: Connect the ground to the opening directly across from the GREEN/
YELLOW wire on the terminal block (refer to Figure 10).
Step 11: Screw in the conduit connector into the terminal box on the right side
of the terminal box.
Step 12: Carefully fold the extra wires inside the terminal box and place the top
control panel back on top of the terminal box.
Step 13: Tighten the three screws into the terminal box while applying light
pressure to the top control enclosure.
Step 14: Replace and tighten the screws to mount the seal plate onto the motor.
Step 15: Put a NEW pump seal into the seal plate and onto the motor shaft.
Handle and lubricate seal per manufacturer’s specifications.
14
Step 16: Replace the impeller. Make sure that the impeller can spin freely in the
housing.
Step 17: Replace the diffuser.
Step 18: Replace and tighten the bolts that retain the motor/seal plate assembly
to the pump.
Step 19: Connect the appropriately sized ground conductor to the supplied
grounding/bonding lug.
Step 20: Open the inlet and outlet valve.
Step 21: Reapply power and allow motor to accelerate to high speed and
operate there for at least two minutes to assure adequate pump prime
has been established.
Notes:
1. This connection allows the high speed and low speed to be operated
at any duration set by the multi-speed timer. At no point will the motor
automatically turn down to the selected reduced speed. The two-minute
prime cycle is still operation at initial start-up. The timer should be set
so that the pool can meet the total number of turns as required by local/
state regulations.
2. The user can override the operational speed currently running via the
buttons on the top control panel after the mandatory initial power-up
two-minute prime cycle. The override will continue until the motor is
either powered off by the multi-speed timer or a new speed is requested
by the multi-speed timer. At anytime, another speed can also be selected via the top side control panel buttons.
3. In this type of connection, the motor will operate on high speed and
a reduced speed as defined by the multi-speed timer programming.
As noted in the “Operation” section of this manual, the factory default
reduced speed red lead setting is “low” (1725 rpm), though this can be
modified to “medium” (2600 rpm) if the flow/pressure at low is deemed
insufficient for operation of certain poolside equipment/features. The
modification of this reduced speed automatic turn-down is found on
page 20 of this guide, titled “Automatic Reduced Speed Selection”.
15
Installation and service of this motor should be attempted only by
trained service technicians familiar with the Evergreen instructions
and training manual.
This motor should be installed in accordance with accepted practices
and installation instructions, and in compliance with all national and
Automation
local codes. Controller Signal Line Connection
Always disconnect the main power from the unit prior to servicing the pool
pump filter motor. It is also good practice to confirm the power is off with a
voltage meter.
The steps as outlined below are for connection of the imPower motor to an automation controller. The optional low voltage cable connection kit P/N 391-200-01
(15’ cord) or P/N 391-200-02 (25’ cord) will be required.
Step 1:
Remove the three screws holding the top control enclosure onto the
terminal box. Carefully lift the top panel and turn it over to expose the
inside of the terminal box.
Step 2:
Run L1, L2, and GROUND wires from the conduit cable through the
open on the right side of the motor (shaft facing away from you).
Figure 11
Step 5:
Step 3:
Connect L1 from the automation
controller to the opening directly
across from the BLACK wire on the
terminal block (refer to Figure 11).
Step 4:
Connect the L2 / White to the
opening directly across from the
WHITE wire on the terminal block
(refer to Figure 11).
Connect the ground to the opening directly across from the GREEN/
YELLOW wire on the terminal- block
(refer to Figure 11).
1-
Step 6:
Screw in the conduit connector into the terminal box on the right side
of the terminal box (shaft facing away from you).
REG7232_EvergreenIM_Reprint.indd 1
4/28/10
Step 7:
Remove the small threaded black
plug on the rear of the terminal box.
Step 8:
Pull the cable through the low
voltage conduit connector contained within the kit and tighten
the connector into the appropriate
terminal box threaded hole. Run the
low voltage cable to the automation
Figure 12
control box.
16
2:05:19 PM
Figure 13
Step 9:
Figure 14
Plug the connector end of the low voltage cable (P/N 391-200-01 or
P/N 391-200-02) into the connector on the underside of the top control
enclosure as seen in Figure 13.
Step 10: Carefully fold the extra wires inside the terminal box and place the top
control panel back on top of the terminal box and tighten the three
topside enclosure screws.
Step 11: Carefully pull the low voltage cable to reduce the amount of excess
cable inside the connection box. Tighten the connector nut.
Figure 15
Step 12: The connection of the low voltage
wires at the automation controller
should be to the HOT side of the
auxiliary / AUX relays (red and black
wire on the top side of the relay).
Depending on the manufacturer of
the automation controller, you may
need to remove the cover plate on
these relays to gain access to the
terminals.
Note: The pictures shown in this section are
provided for illustrative purposes only.
The actual configuration of the automation controller at installation site
may be different than what is shown.
Refer to the controller operations
manual for proper identification of
AUX relays.
Figure 16
17
Step 13: Wire the low voltage cable to the automation controller. The speed
connections and their corresponding lead colors are shown in Figure
17. The (+) marking denotes the positive side controller connection
and the (-) denotes the negative side controller connection.
High Speed:
BLACK (+)
WHITE (-)
Medium Speed:
BROWN (+)
BLUE (-)
Low Speed:
RED (+)
GREEN (-)
Figure 17
Step 14: Replace any access panels on the controller that were removed.
Step 15: Replace and tighten the screws to mount the seal plate onto the motor.
Step 16: Put a NEW pump seal into the seal plate. Handle and lubricate seal per
manufacturer’s specifications.
Step 17: Replace the impeller. Make sure that the impeller can spin freely in the
housing.
Step 18: Replace the diffuser.
Step 19: Replace and tighten the bolts that retain the motor/seal plate assembly
to the pump.
Step 20: Connect the appropriately sized ground conductor to the supplied
grounding/bonding lug.
Step 21: Open the inlet and outlet valve.
Step 22: Reapply power and allow motor to accelerate to high speed and operate there for at least two minutes to assure adequate pump prime has
been established.
18
Notes:
1. The automation controller allows for the programmable operation of
all three speeds. The motor will start on high speed for each speed
selection and operate through its two-minute prime cycle before
reacting to any controller inputs. The on time and speeds should be set
so that the pool can meet the total number of turns as required by local/
state regulations.
2. The user can override the operational speed currently being set by the
automation controller via the buttons on the top control panel. The
override will continue until either the power is removed by the
automation controller or a new speed is requested by the automation
controller. Other than the initial start-up prime cycle, a change in speed
can be initiated at any time via the top side control panel buttons.
19
Automatic Reduced Speed Selection
The imPower motor has been programmed with a feature called the Automatic
Reduced Speed Selection function that allows for the maximum energy savings
via multi-speed operation despite using a standard single-speed timer. This
feature also applies to a multi-speed timer where the Circuit 2 speed can either be
assigned to medium or low speed.
The reduced default speed is factory set to switch to low speed operation after the
initial two-hour high speed operational period. However, it can be modified to
medium speed as required by minimum flow / pressure requirements of various
pool-side equipment / features as defined by manufacturer specifications. The
default speed should only be modified during the first two minutes of applying
power to the unit.
Please follow all local/state regulations regarding pool motor and timer speed
settings when choosing default reduced speed operation.
Step 1:
Allow the pump to achieve prime if starting the system for the first time.
Step 2:
Turn power to the motor off at the timer / controller once pump prime
is reached. Also turn power off to the motor if prime was previously
reached and now motor/pump are operating as defined by the timer.
Step 3:
Turn the motor on after allowing the motor to sit for at least 30 seconds. Ensure that HIGH speed / Circuit 1 is being commanded if using a
multi-speed timer.
Step 4:
After allowing the motor to come
to full speed, press and hold the
high and medium buttons simultaneously as shown in Figure 18 until
the low speed LED indicator light
begins to blink and then release.
Step 5:
The low speed LED will continue to
blink for three seconds to indicate a
Figure 18
modification to the automatic
reduced speed turndown is being requested. After a brief pause, a second series of LED blinks will indicate the new default setting has been
set to either medium speed (medium speed LED blinks) or low speed
(low speed led blinks).
Step 6:
Turn the motor off, wait 30 seconds, turn back on to activate new setting.
20
Default Reduced Speed Operation:
1. For a standard single speed timer connection, the motor will run high
speed for the duration of the two hour initial operation. After this time
period, the speed will convert to the new default speed.
2. For a modified single speed timer connection, the motor will run high
speed for the duration of the two-minute initial operation. After this time
period, the speed will convert to the new default speed.
3. For a multi-speed timer, the motor will stay at high speed for the
remainder of the Circuit 1 time setting. The new default reduced speed
will begin during the second speed Circuit 2 selection time period.
Notes:
1. The motor will run only on high speed during the two-minute window
for automatic default speed changes. There will be no speed change to
indicate initial or new speed settings. The new default reduced speed
is only indicated by the second series of blinking lights as described in
Step 5.
2. Repeat steps 1-6 to revert back to the previous default reduced speed.
21
Software Error Code Matrix
The imPower control panel has a red error display LED to indicate operation
issues. Normal operation is indicated by a single flash of this LED upon startup. Any subsequent blink sequence of this LED indicates that a fault has been
registered by the motor control, with the explanation of these faults given in
the below table. This table also includes the cause for this fault as well as some
potential actions to potentially resolve the issue.
Blinks
22
Faults
Software Cause
Action
1
Micro
controller
failure
Micro controller
is continually
rebooting.
No action can be taken to
resolve issue. Return motor for
warranty.
2
Under
voltage
The line voltage has
dropped below 180
volts AC running.
- The controller will reboot
after voltage comes above 209
volts AC for at least 6 seconds.
- Reduce distance between
motor/pump and breaker.
- Turn off any other noncritical equipment on the
same breaker circuit.
3
Temperature
Internal electronics detected an
over temperature
condition (+100C on
sensor)
- Verify the proper impeller has
been applied (net 1.25Hp max)
- Turn the power off at the
timer / breaker and allow motor to remain off for at least
15 minutes before reapplying
power.
4
Over current
trip
Over current
protection has
tripped.
- Verify the proper impeller has
been applied (net 1.25Hp max)
- Inspect all equipment /
piping in the system
connected to the pump
5
Over voltage
The line voltage has - The controller will reboot
risen above 269 volts after voltage comes below 254
AC
volts AC for at least 6 seconds.
- Check any other equipment
on the same breaker circuit.
Blinks
Faults
Software Cause
Action
6
Output shaft
seized
Motor failed to start.
Motor was stopped.
- Manually rotate the shaft
via the shaft access in the fan
cover
- Inspect all equipment
in-line with the pump for
obstructions or locked pump
parts.
7
Self check
One or more of
the self-tests failed
either at start up or
while running.
- Turn the power off at the
timer / breaker and allow
motor to remain off for at least
15 minutes before reapplying
power.
- Return motor for warranty if
error persists.
8
Motor fault
One or more of the
phases has become
disconnected.
- Turn the power off at the
timer / breaker and wait one
minute before opening the
topside connection enclosure. Verify phase leads from
both the motor and control
connecting into the terminal
block (red, yellow, white leads
on left-most connections of
blocks as viewed from the
conduit entrance) are properly
connected and screws on the
terminal block are tightened
sufficiently.
23
Troubleshooting Guide
1. Issue: Motor will not automatically turn-down to the reduced speed after
two hours when connected to a single speed timer.
Action: Any command to change speeds after the initial mandatory twominute prime cycle will over-ride the automatic turn-down function. Turn the
motor off at the timer / breaker, wait one minute, then turn the power back
on. The software will have reset in this time and should operate as required.
2. Issue: Motor will not automatically turn-down to the reduced speed after
two hours when connected to a single speed timer after changing the default
reduced speed.
Action: It is likely that the default reduced speed change occurred after the
two-minute prime cycle, over-riding the automatic software function. Turn
the motor off at the timer / breaker, wait one minute, then turn the power
back on. The software will have reset in this time and should operate as
required.
3. Issue: Motor will not change speeds when requested by the automation
controller.
Action: Refer to the appropriate section in this guide to confirm the cable
connections to the controller relays have been made correctly. If all three
speeds are wired to the automation controller properly, the likely issue is that
more than one low voltage signal is being received by the motor. Confirm
that only one relay is being activated at a time. As an example, if the motor
is running on HIGH speed, as activated by the relay connected to the HIGH
speed wires [Black (+) and White (-)], that relay will need to be powered down
prior to activating either the MEDIUM or LOW speed.
4. Issue:
24
Solar heating system is not working properly.
Action: Assuming this issue was not pre-existing, the programmed low
speed on the imPower likely does not provide sufficient flow / pressure to
pump the water up to the solar heating units. Change the speed to medium
and determine if this solves the issue. If it does, change the default reduced
speed to medium per the appropriate procedure outlined in this guide.
5. Issue:
Action: Assuming this issue was not pre-existing, the programmed low
speed on the imPower likely does not provide sufficient flow / pressure to
provide desired water feature action. Change the speed to medium and determine if this solves the issue. If it does, change the default reduced speed
to medium per the appropriate procedure outlined in this guide.
6. Issue:
Insufficient flow from water features
Pool cleaner is not working properly
Action: Assuming this issue was not pre-existing, the programmed low
speed on the imPower likely does not provide sufficient flow / pressure to develop the necessary suction / pressure required of the pool cleaner. Change
the speed to medium and determine if this solves the issue. If it does not,
change the speed to high.
Warranty Questions
Contact your local contractor to handle faults identified with the imPower motor.
25
Notes:
26
Notes:
27
Need Additional imPower Help?
Contractor Hotline:
800-683-9144
imPower Website:
www.imPowerDealer.com
Rev 1.4 06/11
7032M/06-11/BH
A Regal Beloit Company