1
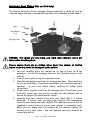
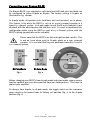
Contents
Page
Introduction
2
Safety Instructions
2
Recycling (WEEE)
3
RoHS
3
Bronze BR1
4
Bronze BR2
5
Bronze BR5
6
Bronze BR6
7
Outrigger Foot Fixing (BR5 and BR6 Only)
8
Bronze BR-LCR
9
Bronze BR-FX
10
Fixing Your BR-FX to the Wall
11
Connecting Your Bronze BR-FX’s
12
Connecting Your Bronze Reference Loudspeakers
13
Positioning
14
Running In
15
Port Bungs
15
Guarantee and Service
16
Claims under this guarantee
16
Data Protection
17
Owner Information
17
1
Rev4. © Monitor Audio 2006
Introduction
Congratulations on purchasing Monitor Audio loudspeakers. We are confident
they will provide a reliable, high performance sound for many years.
Monitor Audio are a highly respected member of the ‘Guild of Master Craftsmen’
and we have over 30 years of experience in the art of traditional wood working
techniques and leading edge drive unit technology. This marriage of old and
new brings you the Bronze Reference Series.
At Monitor Audio we pride ourselves in our ability to make the listening
experience as close as possible to the original ‘music’ production.
This is all achieved by only using quality components developed by our award
winning team, and manufactured to very strict standards and tolerances.
Safety Instructions
1. Read Instructions
Please read and follow all of the instructions in this manual before enjoying you
loudspeakers. Any instructions proceeded by this warning triangle MUST be
followed. Failure to do so may cause personal injury or damage the speakers.
2. Water & Moisture
The loudspeakers should not be used near water - for example, bathtub,
washbowl, kitchen sink, washing machine, in a wet basement or near a
swimming pool. Under no circumstance should plants or fish bowls be placed
on the products.
3. Heat
The speaker/s should not be placed near any heat source such as radiators,
open fires, stoves, direct sunlight and any other appliance that produces heat.
These speakers are designed for use within the home environment. Exposure to
extreme temperatures & humidity when placed on patios or open conditions
could adversely affect the wooden cabinet.
4. Cleaning
Great care and attention has gone into the materials chosen to produce the
Bronze BR loudspeakers. It is our intention that they should provide a lifetime
of musical pleasure. A gentle wipe with a dry, clean cloth is all that is required
to remove any dust. Treat them as you would a fine piece of furniture because
that is how they have been designed. Avoid touching the loudspeaker’s drive
units whilst cleaning, as any damage will impair their performance.
2
Rev4. © Monitor Audio 2006
Re-cycling
Disposal of Waste Electrical and Electronic Equipment (WEEE) by User in
Private Households in the EU
This symbol on the product or accessories indicates that
they must not be disposed of with your house hold
waste. Instead it is your responsibility to dispose of
your waste equipment by handing it over to a
designated collection point for recycling WEEE. The
separate collection and recycling of your waste
equipment will help conserve natural resources and
ensure that it is recycled in a manner that protects
human health and the environment.
For more specific information about where you can take your equipment for
recycling please contact your local city/ council office, your local waste disposal
service or the outlet where you purchased the product.
RoHS Declaration of Conformity
Directive 2002/95/EC of the Europe an Parliament and
of the Council on the reduction of the use of certain
hazardous substances in electrical and electronic
equipment, January 2003
Background
The RoHS directive restricts the use of Lead (Pb), Cadmium (Cd), Mercury (Hg),
hexavalent Chromium (CrVI), polybrominated biphenyl (PBB) compounds, and
polybrominated diphenyl ether (PBDE) compounds in electrical and electronic
equipment sold in the European Union.
3
Rev4. © Monitor Audio 2006
Your Bronze BR1
The BR1 remains the ‘baby’ of the Bronze Reference Series. Improved driver
and tweeter technologies help to propel the BR1 ahead of its predecessor.
Overall bandwidth has been increased with usable frequency response right out
to 30KHz. Improved motor system linearity has resulted in lower distortion and
low frequency damping. The BR1 is now single wired, but improved terminal
quality lifts the overall desirability of this entry level monitor.
Because the BR1 offers huge performance from a small speaker, it lends itself
to a wide range of positioning options. The BR1 will perform equally well no
matter how it is positioned. The BR1 can be placed on a stand, on a book-shelf,
it can even be hung on a wall using a wall bracket (not supplied). The BR1 has a
¼” UNC threaded insert in the back of the cabinet to allow it to be wall
mounted. Please note that when using a wall bracket we would recommend
using the enclosed port bungs to eliminate ‘bass boom’ and unwanted air
turbulence caused by the bracket.
Frequency
Response
Sensitivity
(1W@1m)
Nominal Impedance
(Ohms)
Power
Handling
RMS (W)
Recommended
Amplifier Power
Output.
55Hz – 30KHz
88dB
6
70
15 - 70W
Drive Unit
Complement
Cabinet
Design
Product External
Dimensions
cm (inch)
Weight
(packed)
Kg (lb)
Finishes
8.7 (19.1)
Black Oak,
Walnut, Cherry.
1 x 5.5" MMP® Mk2
Bass mid-range.
Rear ported, 26H x 16.5W x 18D
1 x 25mm Gold Dome bass reflex (10 ¼ x 6 ½ x 7 1/16)
C-CAM® tweeter.
4
Rev4. © Monitor Audio 2006
Your Bronze BR2
Our engineers have been careful not to spoil the talented, multi award winning
B2. Conservative tweaks and general improvements to the crossover
components and drivers have lifted the performance a stage further promising
improved clarity and reduced overall distortion. Overall bandwidth has been
increased with usable frequency response right out to 30KHz. Improved motor
system linearity has resulted in lower distortion and low frequency damping.
The new BR2 still incorporates the special figure eight internal bracing which
gives a very rigid construction, helping the BR2 to achieve a clean, un-boxy
sound reminiscent of high-end speakers using very, heavy and high-tech
construction techniques.
Frequency
Response
Sensitivity
(1W@1m)
Nominal Impedance
(Ohms)
Power
Handling
RMS (W)
Recommended
Amplifier Power
Output.
42Hz - 30KHz
90dB
6
100
30 - 100W
Drive Unit
Complement
Cabinet
Design
Product External
Dimensions
cm (inch)
Weight
(packed)
Kg (lb)
Finishes
13.3 (29.3)
Black Oak,
Walnut, Cherry.
1 x 6.5" MMP® Mk2
Bass mid-range.
Front ported,
35H x 18.5W x 25D
1 x 25mm Gold Dome bass reflex (13 ¾ x 7 5/16 x 9 13/16)
C-CAM® tweeter.
5
Rev4. © Monitor Audio 2006
Your Bronze BR5
BR5 is new to the Bronze Reference Series. The cabinet profile is now slimmer
than its predecessor to offer a more desirable foot print for a typical life-style
setting. The new 5.5” bass drivers replace the 6.5” bass drivers of the B4.
However, bass extension and punch have been maintained and even improved
in terms of overall control. The 2 ½ way design is now optimised with the bass
and bass/ mid-range drivers working in dual chambers, similar to the more
advanced MA designs. Cabinet bracing has been up rated and results in very
rigid construction producing a clean, ‘un boxy’ character. The floor-level
mounted terminal panel now allows easy access without un-necessary trailing
cables.
Unlike the BR2, the BR5 has a reflex port at the rear as well as the front. This is
to provide maximum airflow at low frequencies and reduces air pressure that
can lead to bass compression effects.
Frequency
Response
Sensitivity
(1W@1m)
Nominal Impedance
(Ohms)
Power
Handling
RMS (W)
Recommended
Amplifier Power
Output.
36Hz-30KHz
90dB
6
120
30 - 120W
Drive Unit
Complement
Cabinet
Design
Product External
Dimensions
cm (inch)
Weight
(packed)
Kg (lb)
Finishes
1 x 5.5" MMP® Mk2
Dual Chamber
Bass, 1 x 5.5" MMP®
Bass Reflex. 85H x 16.5W x 24.7D
Mk2 Bass mid-range.
Ported Front (33 7/16 x 6 ½ x 9 ¼ )
1 x 25mm Gold Dome
and Rear.
C-CAM® tweeter.
6
Rev4. © Monitor Audio 2006
14 (30.8)
(Packed
Individually)
Black Oak,
Walnut, Cherry.
Your Bronze BR6
Bronze BR6 is the new 2 ½ way floor-standing flagship of the six-model range
and builds on the considerable musical strengths of the smaller Bronze BR5 by
providing a still wider bandwidth, higher power handling and more effortlessly
realised dynamics.
The Bronze BR6 employs multiple bracing positioned at critical resonance
nodes. Its slim proportions and smoothly profiled front positively contribute to
sound quality by reducing diffraction effects.
The Bronze BR6 utilises three 6.5-inch MMP® Mk2 drivers. The lower two units
handle bass only, the upper unit provides punchy upper bass and a clear,
natural mid-band right up to the crossover point with the tweeter at 2.6 kHz.
Frequency
Response
Sensitivity
(1W@1m)
Nominal Impedance
(Ohms)
Power
Handling
RMS (W)
Recommended
Amplifier Power
Output.
33Hz – 30 KHz
90dB
6
150
40 - 150
Drive Unit Complement
Cabinet
Design
Product External
Dimensions
cm (inch)
Weight
(packed)
Kg (lb)
Finishes
2 x 6.5” MMP® Mk2 Bass
Drivers, 1x 6.5” MMP®
Mk2 Mid-range Driver.
1 x 25mm C-CAM® Gold
Dome tweeter.
Dual Chamber
20.4 (44.9)
97H x 20W x 30D
Bass Reflex.
(Packed
Ported Front (38 3/16 x 7 7/8 x 11 13/16) Individually)
and Rear.
7
Rev4. © Monitor Audio 2006
Black Oak,
Walnut, Cherry.
Outrigger Foot Fixing ( BR5 and BR6 Only)
The Bronze Reference Series outrigger foot incorporates a spike for use on
carpeted floors and also, a soft polymer pad (for use on wooden or tiled floors).
Spike
Soft Polymer
Pad
Outrigger Foot
BEWARE. The spikes are very sharp, and could cause injury if care is not
taken when handling them.
Please ensure there are no hidden wires under the carpet, or trailing
mains leads that could be damaged by the spikes.
1. You can carefully place the cabinet on it’s top or back to fit the
outriggers. Locate the outrigger foot over the threaded inserts in the
cabinet.
2. Screw these in place using the supplied screws.
3. Place the soft polymer pad into it’s locating positions. These pads are
for use on hard floors. If you have hard floors, you can now enjoy your
speakers. If you have carpet please continue to follow these
instructions.
4. Fit the spikes into the inserts on the outrigger feet. If you have a very
thick pile carpet, you may need to remove the soft polymer pad to
ensure the spikes fully penetrate the carpet.
5. Carefully turn your speaker back over and check that it is evenly
balanced. If uneven, you can adjust the height in the appropriate
corner by unscrewing the spike slightly. This operation may need to be
repeated a several times to ensure your cabinet is completely level.
When you are happy with the balance of the cabinet, tighten the
locking nut on each spike. The soft polymer pad may need to be
removed to do this.
8
Rev4. © Monitor Audio 2006
Your Bronze BR-LCR
The new Bronze BR-LCR is the vital aesthetic and sonic link in any Bronze
Reference-based home cinema or multi-channel music system, bringing extra
solidity, depth and realism to the front soundstage, especially with dialogue.
Recognising that the centre is often the hardest working speaker in an A/V
system, the new Bronze BR-LCR has been designed with two 5.5-inch MMP®
Mk2 bass-mid drivers that hand over to the C-CAM® tweeter at 2.6KHz. A special
crossover network ensures the Bronze Centre has excellent vertical and
horizontal off axis frequency response, eliminating the need for a 'hot seat'
listening position and integrating smoothly with the Bronze BR1, BR2, BR5, BR6
or BR-FX in a home theatre set-up. With easy amplifier loading, the new Bronze
Centre will get the best from even lower powered A/V amplifiers (receivers).
Frequency Response
Sensitivity
(1W@1m)
Nominal Impedance
(Ohms)
Power
Handling
RMS (W)
Recommended
Amplifier Power
Output.
60Hz-30KHz
90dB
6
120
20-120W
Drive Unit
Complement
Cabinet
Design
Product External
Dimensions
cm (inch)
Weight
(packed)
Kg (lb)
Finishes
16.5H x 46W x 16.5D
(6 ½ x 18 1/8 x 6 ½)
6.8 (15)
Black Oak,
Walnut, Cherry.
2 x 5.5" MMP® Mk2
Bass mid-range,
Sealed Cabinet
1 x 25mm Gold Dome
®
C-CAM tweeter.
9
Rev4. © Monitor Audio 2006
Your Bronze BR-FX
The BR-FX surround speaker combines amazing performance with modern,
discreet design that can be flush mounted on a wall using the enclosed wall
brackets. The attractive curved grille and end caps conceal a rigid angular
cabinet construction and Monitor Audio’s renowned and highly acclaimed
MMP® Mk2 driver technology and C-CAM® tweeters.
By using low slope linear phase crossover design, Monitor Audio has
engineered the Bronze BR-FX to have seamless integration and almost perfect
180-degree dispersion characteristics. Whilst the bass driver always operates
in phase, the tweeter section can be configured to operate as a bi-pole or dipole. This is adjusted by way of a toggle switch (see page 11). To enable the
correct function of these speakers, they are left and right handed specific.
Frequency
Response
Sensitivity
(1W@1m)
Nominal Impedance
(Ohms)
Power
Handling
RMS (W)
Recommended
Amplifier Power
Output.
65 Hz - 30 KHz
88 dB
6
80
25-80W
Drive Unit
Complement
Cabinet
Design
Product External
Dimensions
cm (inch)
Weight
(packed)
Kg (lb)
Finishes
1 x 5.5” MMP® Mk2
bass/midrange driver,
2 x 25mm Gold dome
C-CAM® tweeters.
Sealed
Cabinet
29.5H x 29W x 13D
(115/8 x 11 7/16 x 5 1/8 )
8 (17.6)
Black Oak,
Walnut, Cherry,
10
Rev4. © Monitor Audio 2006
Fixing Your Bronze BR-FX to a Wall
WARNING: For safety reasons do not attempt to fix these speakers
to your wall if you are unsure of your ability to provide a secure and
safe fixing. You will need to determine where the BR-FX will be fixed
and the structure of the wall. If unsure, please obtain the services of a
competent qualified tradesperson.
Ensure that there are no water pipes, or electricity cables running behind where
the wall bracket is going to be secured. Work from secure steps and avoid
trailing wires. For recommendations on where to fix your BR-FX please refer to
the FAQ’s on our web site: www.monitoraudio.co.uk
220mm
295mm
42mm
63mm
290mm
11
Rev4. © Monitor Audio 2006
Connecting your Bronze BR-FX
The Bronze BR-FX’s are supplied as right hand and left hand units and both can
be configured to either bi-pole or di-pole. The factory setting is bi-pole as
illustrated in fig. 1 below.
In bi-pole mode, all speaker units (mid/bass unit and tweeters) are in phase.
This feature is for when the BR-FX is set up as a rear/surround speaker in a
typical 5.1 channel system. In di-pole mode, one of the HF units (tweeter) is out
of phase with the other tweeter and mid/bass unit. It is best to implement this
configuration when using the BR-FX as part of a 7.1 channel system, with the
BR-FX’s taking up positions on the sidewalls.
Please note that the BR-FX’s are left and right handed specific. This
is not an issue when used in bi-pole mode as a rear surround
speaker. It is essential that they are positioned correctly if used in
a 7.1 channel system.
Bi-Pole Mode
Di-Pole Mode
Fig. 1
Fig. 2
Before changing your BR-FX’s from bi-pole mode to di-pole mode, please ensure
that the speaker wires are disconnected from your loudspeakers. This helps to
protect your amplifier.
To change from bi-pole, to di-pole mode, the toggle switch on the crossover
panel needs to be moved from its factory set position (fig. 1) to the di-pole
position (fig. 2).
12
Rev4. © Monitor Audio 2006
Connecting Your Bronze Reference Loudspeakers
You will notice that when you unpack your loudspeaker, there are plastic
terminal caps in the terminals where the speaker cable connectors should go.
These can be simply removed by placing a thin, flat object underneath them and
carefully levering them free.
The BR2, BR5 & BR6 can be either single or bi-wired. At Monitor Audio, we
would always recommend bi-wiring your loudspeakers for improved sound
quality. If you are going to be connecting your speakers in a bi-wire format,
please remove the terminal links. This is done by unscrewing the red and black
terminals slightly and removing the link. Connect them as in the below, left.
You can also bi-amp your loudspeakers. The top terminals are for the HF, and
the bottom terminals are for the LF. In the cases where there is a mid bass unit
(BR5 and BR6), this is connected to the top terminals
The BR1, BR-LCR & BR-FX are single wire only.
illustration below, centre.
This can be seen in the
However if neither of these options are open to you, please connect your
loudspeakers as in the illustration below, right. Please remember to leave the
terminal links in.
Bi- Wire Format
Single-Wire Format
BR1, LCR Wiring
13
Rev4. © Monitor Audio 2006
Positioning
The positioning of your loudspeakers for a two channel, stereo system very
much depends on your listening environment. Ideally you would place your
speakers 2 – 3m (6 – 10 ft) apart in the middle of your wall and you would sit
approximately 2m away. However, the ideal listening position is not always
possible. Therefore, we would recommend that you try and position them as
close as possible to the ideal.
Start by playing some different pieces of music that are familiar to you. If you
have a rear ported speaker (BR1, BR5, BR6) try not to place them too close to
the wall. If they are too close you will find that the bass is very prominent.
Start by placing them approximately 20cm (8”) from the wall. If you find there
is too much bass place them further away from the wall. If, on the other hand,
you find there isn’t enough bass for your liking, place them slightly closer to the
wall. The same applies with placing you loudspeakers next to a side-wall. If
possible do not place your loudspeakers any closer than 50cm (20”) to your
side-wall.
Try varying the distance your loudspeakers are apart from each other. If they
are too close together, this may result in poor stereo imaging. This is when
sound moves from left to right or right to left, for example a car in a movie
sound track. But if you place them too far apart, there will be a big gap in the
imaging. When listening to music through your speakers, if you have them set
up correctly, you shouldn’t notice that the speakers are even there, the music
should sound as if it is coming from the centre of the two speakers.
For the positioning of a multi channel home cinema system, please refer to the
illustration below or your AV amplifier/receiver manual.
BR5/6
BR1/2/LCR +
Stand *
BR-FX
BR-FX
BR5/6
BR1/2/LCR +
Stand *
BR-FX
BR-LCR
Subwoofer.
Please refer to
subwoofer owners manual.
* Not supplied
14
Rev4. © Monitor Audio 2006
Note to scale
Running-In
As with all speakers, the Bronze Reference requires a certain amount of
running-in time before the best is achieved from your loudspeakers. A runningin period of approximately 50 hours should be enough for the Bronze Reference
Series.
Running-in loudspeakers is similar to running-in a car engine. Play them at
approximately half of your normal listening level to run them in so that
permanent damage is not caused.
If you wish to speed up the running-in process, this can be done by placing
them face to face (almost touching) and connecting one of the pair out of phase
(black to red and red to black). This way the sound waves cancel each other out
and very little sound level is actually heard. This is a convenient solution, as
they can be left to run-in while you are away from home.
Port Bungs
Bookshelf Loudspeakers
The BR1 is a rear ported cabinet design. Because of this design, we recommend
that when fixing the loudspeakers to a wall that the port bungs are used. This
may also apply when they are positioned very close to a rear/side wall. The
BR2’s, by contrast, are front ported in design. This means that they can be
positioned more or less anywhere and it won’t affect the sound greatly. The
only time that the port bungs may be needed is if the loudspeakers are close to
a side-wall. The bass may seem to ‘boom’ off of the surrounding walls in the
listening room and seem over-powering.
Floor-Standing Loudspeakers
The BR5 and BR6 are both designed using two ATR port tubes. One is located
on the front of the cabinet, the other on the rear. These ports should not need
to be blocked if you are using your loudspeaker in a room greater than
approximately 9m2. However, if you cannot implement the ideal speaker
positioning, then experiment using the port bungs. Firstly start by fitting them
in the rear port, then the front, and then both to see which configuration is best
suited to your personal tastes and room constraints.
Foam port bungs are supplied for all speakers with and ATR port tube. The port
bungs are another way of fine-tuning the loudspeaker to fit in sonically in your
home environment.
WARNING: Care must be taken not to insert the port bungs too far into the port
as this may result in the foam bung being lost inside the cabinet.
15
Rev4. © Monitor Audio 2006
Guarantee and Service
Valid upon completion of the guarantee card and its return within 30 days of
purchase.
This equipment has been fully tested prior to dispatch from the factory. Both
the craftsmanship and the performance of this product is guaranteed against
manufacturing defects for the period of three years from the date of purchase
(see conditions below), provided that the product was supplied by an
authorised Monitor Audio retailer under the consumer sale agreement. (The
words ‘consumer sale’ shall be construed in accordance with section 15 of the
supply of goods act 1973). Monitor Audio accepts no responsibility for defects
arising from accident, misuse, abuse, wear and tear, modification or operation
outside of that specified within this instruction manual. Neither will
responsibility be accepted for damage or loss occurring during transit to or from
the parties claiming under this guarantee.
This guarantee covers both labour and parts. The liability of Monitor Audio is
limited to the cost of repair or replacement of the defective parts (at the
discretion of Monitor Audio) and under no circumstances extends to
consequential losses or damage.
Claims under this Guarantee
The equipment should be returned in its packaging to the original supplier
where possible, or to any other authorised Monitor Audio dealer. If it is not
possible to return the equipment by hand, then it should be sent carriage
prepaid via a reputable carrier. If the original packing is not available
replacement packaging can be purchased from Monitor Audio. If you have any
difficulties complying with these requirements please contact us at the
following address:
Monitor Audio Ltd.
Unit 2, 24 Brook Road
Rayleigh
Essex
SS6 7XL
England
Tel:
44 (0) 1268 740580
Fax:
44 (0) 1268 740589
Internet: www.monitoraudio.co.uk
Email: [email protected]
This guarantee does not affect the statutory rights of the consumer under UK
law.
Monitor Audio reserve the right to alter specifications without notice if it is
considered that an improvement can be made to the product.
16
Rev4. © Monitor Audio 2006
Data Protection
We at Monitor Audio are committed to respecting the wishes and privacy of our
customers. Any information you provide will be held in the strictest confidence
and only used within the Monitor Audio organisation for the provision of
services such as warranty claims or spare parts.
We may wish to contact you in the future to ensure you are happy with the
products and standards of service we provide and to keep you up-to-date with
the latest products and promotions we have to offer.
Should you wish not to be contacted by us either by post, e-mail or phone,
please tick the box on the warranty card. Alternatively you can request not to
be contacted in future by writing to Customer Service, at the address on the
previous page.
Owner Information
Product Details
Model (s) ……………………………………………………………………..………………………………
Product Serial No (s) …………………………………………………..………………………………..
Date of Purchase ……………………………………
Dealer Details
Dealer Name ……………………………………………………………………………………………….
Address ………………………………………………………………………………………………………
Town, Post code, Country …………………………………………………………………………….
e-mail address ……………………………………………………………………………………………
Monitor Audio reserves the right to alter specifications without notice.
17
Rev4. © Monitor Audio 2006