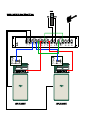
1
Owner's Manual 222
Ampete
222
Owner's Manual
Ampete Engineering GbR
Gutenbergstrasse 48
50823 Cologne
Germany
fon
fax
49 (0) 221 55 94 118
49 (0) 221 55 94 974
mail
web
[email protected]
www.ampete.com
1
Owner's Manual 222
__________________________
Ampete Engineering GbR, January 2015
Ampete is a registered trademark
copyright 2015, all rights reserved
2
Owner's Manual 222
We all...
... produce electronic waste! It's just a matter of time!
We here at Ampete Engineering are not only consumers, like you yourselves, but also engineers of electronic
products that we want to place into a modern world. Here it looks at first glance that everything has been
invented already. But demands are getting more refined and specific by the day and as in the economics, the
sports- or even spiritual world, performance, utility and consistency depend on small changes and nuances
in improvements. In other words we are supposed to get better every day. This is not a one way street, it's a
huge responsibility in the other hands!
For us it means more than wanting a slice of the pie. It means to review every single product we design for
its added values, to anticipate the circumstance you put it into in order to ‚simply' be able to maintain it
everywhere it has been sold to.
Today our whole life is determined by electronics, at home, on the road, at work or vacation, in
supermarkets, concert arenas or even in natural resorts.
Today in general electronics aren`t built any longer to last! They`re cheap.
For people from the 70ies like us it is a turning point. We grew up in a world where an electronic device is
nothing short of a masterpiece. Today 90% of electronic applications are manufactured by using robots or
exploitation in countries where `global players` celebrate the abolition of workers protection and minimum
salaries. But it doesn’t end there.
After an expected life cycle, more or less short, the cheap electronic waste is gonna be ‚disposed‘ of. Dispose
might suggest that components like housing, metal and synthetics will be recycled to find their way back into
a product. But of course often this is not how it is done!
If you ever heard of 'toxic city' (and I don't mean the fantastic album of a great band) you probably know
what we speaking of.
It might surprise you to read this in a manual for an electronic device.
We want to make sure you understand that by purchasing an Ampete Engineering Product you will get a
device in which we put all our passion, belief and knowledge and that you get a product in the tradition of
many great people before us, for whom electronics were and still are wonderful masterpieces.
But you also purchased a little piece of responsibility. Maintain your Ampete Engineering Product – we will be
here to support you, we built this to survive… possibly even us.
In case you should be faced with any issue on any day at any place somewhere in the world, we are here as
you would expect us to be.
This is not a promise, it is our view of life.
Thanks for letting us be a part in enabling your musical world.
Yours sincerely,
Ampete
3
Owner's Manual 222
Table of Contents
Foreword............................................................................... 3
Introduction........................................................................... 5
Features................................................................................ 5
Front panel............................................................................ 6
Rear panel............................................................................. 7
Hook up................................................................................. 9
A typical setup in general........................................................ 9
detailed hook up of amps with FX-Loop.................................... 10
detailed hook up of amps without FX-Loop. ............................... 11
Controlling the 222 via the front panel..................................... 12
Selecting Amplifiers and Cabinets / Switching rules & protection ....... 12
Amplifiers with FX Loops .................................................... 12
Amplifiers without FX Loops ................................................ 12
Stereo Mode …............................................................... 13
Controlling the 222 via MIDI
Checking and setting the MIDI Channel...................................
14
14
MIDI Control Change........................................................ 14
MIDI Control Change modes................................................ 14
Setting the Control Change mode.......................................... 15
MIDI Program Change.......................................................
MIDI Control Change messages table...................................... 15
Grounding.............................................................................. 16
Troubleshooting..................................................................... 17
A word on impedances........................................................... 18
technical Specifications........................................................... 21
4
Owner's Manual 222
Introduction
The 222 is designed to combine guitar amplifiers, guitar cabinets and guitar effects! Where our bigger
model 444 is for the very few Pros amongst us, the 222 is designed for all of us who have to carry their
equipment by themselves. And to be honest, who ain't one of those?
The 222 is made for all those guitarists, who don't want to relinquish the huge differences of speakers
and cabinets. What is a Deluxe Reverbs Clean without an open back, a heavy crunch of a 2203 without
a 4x12. Or imagine to be able to switch between Greenbacks and Vintage 30... or simply combine
them.
Another simple lineup could be a 4x12 speaker cabinet driven as two 2x12 units from two amplifiers.
Maybe loaded with two different speakers...
Well, you notice the 222 gives you many options. We just want to give you some ideas and the
knowledge of how to do it, but we are sure you'll find many more combinations than we can imagine.
Let us know and send us a picture showing you and your lineup. We're looking forward hearing from
you!
Features
–
–
–
–
–
–
–
–
–
–
–
2 amplifiers selectable
one or both speaker cabinets selectable to any amp
FX-Loops from both amplifiers assignable to one common FX Loop
Stereo mode for using both amps and both cabinets at a time
buffered and unbuffered inputs
feed thru jacks for easy wiring in the rack
amplifier and cabinet selection without loss in sound, dynamics or noise
no switching noises
no switching latency
protection circuits to prevent amplifiers from damage
midi controllable via program change or control change
5
Owner's Manual 222
Front Panel
1. FEED THRU: Jack for an ungrounded direct signal connection from/to the backpanel FEED THRU.
Use it for connecting tuners, wireless systems or any connection you need from back to front
without using long cable connections.
2. BUFFER IN: Front Panel instrument input, which routes the instrument signal to your connected
amplifier inputs via a high to low impedance buffer, for keeping signal clean and noiseless without
coloring it.
3. AMPS 1-2: Select one of two possible connected amplifiers by pushing the corresponding
illuminated switch. The other amplifier is connected to an internal load to prevent it from any
damage. Input signal is only routed to the selected amplifier.
4. CABS 1-2: Select up to two cabinets at the same time by pushing the corresponding illuminated
switch.
5. FX LOOPS 1-2 ON/OFF: Switches the FX Loop Send/Return jacks of the corresponding amplifier to
the FX In and FX Out jacks to share one FX unit or FX rig with both amplifiers. That way spillover
effects from reverb or delay effects are possible between the different amplifiers. Please be aware to
set the send and return levels of the connected amplifiers equally to avoid changes in volume.
6. MIDI CHANNEL/CC MODE: Displays and selects the Midi Channel when pressed short. Toggles
the Control Change mode when pressed long. See „Controlling via MIDI“ for more informations
about the MIDI Control Change Modes
7.
SAVE/STEREO MODE: When pressed short this switch saves the current state of the 222 to the
previously selected Program Change preset. When pressed long, the „Stereo Mode“ is toggled on or
off.
8. Display: Gives informations about the selected Program Change preset, Midi Channel, or Control
Change mode.
9. Power On/Off: I bet you know what this is for...
6
Owner's Manual 222
Rear Panel
1. DC In Jack: Connect a 18-24V, 0.6A DC power supply for powering the 222. The power supply
included in delivery is verified for best performance and can be used in most countries providing
90VAC to 240 VAC line voltage.
2. GROUND LIFT: Controls whether the 222's audio ground is connected to the metal chassis or not.
The chassis is grounded when the switch is in the 'Out' position. Note that the DC power supply
does not provide a connection to earth conductor. Therefore you might only expericence any
difference in the ground lift setting when using the 222 in a rack together with other equipment
providing the earth connection via its metal chassis.
3. MIDI THRU: If you have several MIDI devices in your setup, connect the MIDI Thru with the MIDI
In of the following device.
4. MIDI IN: Connect a MIDI pedal or any other MIDI device, to control the 222 via Program Change
or Control Change messages.
5. SPEAKER CABINETS 1-2: Connect your speaker cabinets here. No matter which cabinets you
choose, from 1x12“ to 4x12“ with every impedance everything is possible, but consider not to
exceed the power handling of the speaker cabinet to avoid any damage to the speakers and/or the
amplifier. Use speaker cables only!
6. AMP OUTPUTS 1: Connect the loudspeaker/cabinet/amp output of amplifier 1 here. This is NOT
an independent output but it corresponds to the number of the AMP INPUT 1 and the AMP1 SEND
and RETURN jacks of the 222. Use speaker cables only!
7.
AMP OUTPUTS 2: use like AMP OUTPUTS 1 for your second amplifier.
8. AMP1 SEND: Connect the FX Loop Send/preamp out/line out of Amplifier 1 to the AMP 1 SEND jack
of the 222. Please be aware that this is not an independent loop but the corresponding FX loop of
the amplifier you drive with the AMP INPUT 1 and AMP OUTPUT 1 jacks of the 222!
9. AMP1 RETURN: Connect the FX Loop Return/power amp in/line in of Amplifier 1 to the AMP 1
RETURN of the 222. Like before mentioned, this is not an independent loop but the corresponding
FX loop of the amplifier you drive with the AMP INPUT 1 and AMP OUTPUT 1 jacks of the 222!
10. AMP2 SEND and AMP2 Return: Proceed like described under point 8 and 9.
11. FX IN: Connect the FX IN jack of the 222 to the input of your effect, whether it is a single unit like a
delay pedal, a chain of pedals or rack units or another audio looper. This is exactly like you would
connect it to your amp's FX Loop Send. When switching between amps on the 222, it automatically
switches your effects to the currently selected amp.
7
Owner's Manual 222
12. FX OUT: Connect the FX OUT jack of the 222 to the Output of your effect, whether it is a single unit
like a delay pedal, a chain of pedals or rack units or another audio looper. This is exactly like you
would connect it to your amp's FX Loop Return. When switching between amps on the 222, it
automatically switches your effects to the currently selected amp.
13. FX LOOP GND LIFT: The FX LOOP GND LIFT lets you suppress possible pops when switching
between 2 amps using spillover effects like long delays or reverbs. This is most often caused by a
static voltage growing to a non grounded electronic signal path or switching between one audio
ground to another. In almost any case that switch will solve the issue
14. AMP INPUTS 1-2: Connect the instrument inputs of your amps here. This is the most sensitive
connection setting up the 222, make sure to use high quality instrument cables.
15. AMP1-2 GND LIFT: When this switch is set „In“, it lifts the ground connection between the audio
ground of the 222 and the audio ground of the corresponding amplifier. This should be the default
setting. If you experience any hum in your setup, you can try to achieve better results by grouding
one of the two amps by setting its GND LIFT switch „OUT“.
16. UNBUFFERED IN: Input between the BUFFER IN and AMP INPUTS. This input bypasses the buffer,
when it is used, the BUFFER IN jacks are disconnected. We recommend this input when using
preceded buffer units or preamps.
17. BUFFER IN: Use BUFFER IN to drive the AMP INPUTS of the 222. Same as BUFFER IN at the front
side, but disconnected when front panels BUFFER IN is in use.
18. FEED THRU: Direct ungrounded signal connection to the front panel FEED THRU jack only to
simplify the rack wiring.
8
Owner's Manual 222
Controlling the 222 via the front panel
Selecting Amplifiers and Cabinets / Switching rules & protection
At this point you hooked up your amplifiers and cabinets to the 222. Let's start switching!
You should establish a certain operating process when operating the 222. Either in the operating way via the
front panel switches, or when programming midi presets, a cabinet has to be chosen by pressing the
corresponding front panel CABS switch. It is NOT possible to select an AMPS switch before.
Again, a CABS button can only be selected with a speaker cabinet hooked up to the corresponding SPEAKER
CABINETS jack. Thereby the 222 not only tests if a plug is connected to the SPEAKER CABINETS jack, but
also the attached load for its impedance. Hereby a low impedance is interpreted as a speaker cabinet, a high
impedance could be a non connected cable, a defective speaker cable or even a speaker in form of a
ruptured speaker coil etc. In that case the 222 would refuse the selection and state an „n.c.“ in the display
for 'no connection'. This way the 222 prevents your amplifier from damage because of running without a
load. The display will state an error status (Er).
A short summary:
–
–
Select CABS button first. Both cabinets can be selected at a time.
Select AMPS button next. One amp at a time can be selected, which means by selecting the other
AMPS button the 222 disables the previously chosen amplifier.
FX Loops
The FX loop option of the 222 allows to run one single effect unit or even a complex FX rig to any of the FX
loops of your connected amplifiers. That way you are not in need of several effect units for several
amplifiers. Here it surely does not matter if you run a single or a chain of effect units for instance connected
to a further audio looper unit.
FX LOOP ON/OFF button can not be selected without a cabinet and an amplifier selected. When engaged,
the FXLOOP ON/OFF switch will light up to show its active status.
The FX IN / FX OUT jacks are now connected to the FX Loop Send/Return of the selected amplifier.
When switching between amplifiers, the 222 switches the FX IN / FX OUT jacks to the selected amp's FX
Loop at the same time.
Amplifiers without FX Loop
There are many especially classic amps like Fender Brown-, Black-, Silverfaces, Vox ACs or Marshall
Plexis, JMPs, JCM800s, but also many newer amps in the tradition of those not featuring any kind of
insert between pre- and poweramp such as an FX loop.
The 222 gives you the option of sharing a single FX unit or a complex effect rig not only with any of
your FX loop equipped amp, but also with those classic style amps not featuring an FX loop.
All you need to do is connect the AMP(1 or 2) SEND and RETURN in front of the amp!!!
This is simply done by patching a short cable from the AMP INPUTs (1 or 2) to the corresponding
AMP(1 or 2) SEND. Next connect the RETURN of that FX loop to the ampflifiers input.
Now you can assign the 222s FX loop (FX IN and FX OUT) both in front of your amp without FX loop or
in between pre- and poweramp of your amp with FX loop.
12
Owner's Manual 222
Stereo Mode
The stereo mode surely requires two amplifiers and two cabinets connected to the 222. It can not be
activated if only one cabinet is connected.
Activate the Stereo Mode by pressing and holding „SAVE/STEREO MODE“. All AMP and CAB switches light up
to display AMP1 is connected to CAB1 and AMP2 is connected to CAB2. The guitar input signal is split to both
amps, which gives the opportunity to use two amps and two cabinets as a stereo setup. The FX Loop can be
assigned to either AMP1 or AMP2, but not both.
Deactivate the Stereo Mode by again pressing and holding „SAVE/STEREO MODE“. The 222 returns to your
previously selected mono setup, but will keep the FX Loop ON/OFF setting used in Stereo Mode.
HINT: A truly remarkable effect is from switching one amplifier with both cabinets connected to the stereo
mode. It keeps all loudspeaker activated while extending the power and widening the panorama
tremendously. Hereby the 222 also works excellent with a single 4x12 cabinet divided into 2 halfes each
connected to one of the CAB jacks.
13
Owner's Manual 222
Controlling the 222 via MIDI
Checking and setting the MIDI Channel
By pressing the MIDI CHANNEL button, the display will show the currently active MIDI channel. This is
indicated by an additional decimal point at the lower right corner of the display for only a few seconds
before the display switches back to the MIDI program number.
To set the MIDI channel, consecutively press MIDI CHANNEL for a short period of time. The displayed
number counts up to '16', and starts again at '0'. Stop pressing MIDI CHANNEL if the desired MIDI Channel
number is reached. '0' stands for 'all channels' or 'omni mode'.
As soon as the display switches back to the previous state, the MIDI channel is saved to the non-volatile
memory of the 222.
MIDI Program Change
The 222 is capable of storing up to 99 presets of different amplifier / cabinets combinations.
You can switch between presets by sending MIDI Program Change messages from your MIDI foot controler,
or any other MIDI device connected to the 222's „MIDI IN“ connector.
To save a preset, send a MIDI Program Change message of the desired preset number. The switcher status
saved with the preset number is called, and the preset number is shown in the front panel display.
Note that the 222 starts counting the presets at „1“, even thought the MIDI standard internally starts at „0“.
This matches almost any MIDI foot controler standard.
If the preset is changed by the front panel controls, the SAVE knob starts flashing. Press SAVE to save the
current status to the preset.
To protect the connected amplifiers, a preset can not be activated if at least one of the cabinets saved with
the preset is not connected to the 222. The display will show the status „n.c.“.
MIDI Control Change
All front panel controls can additionally be remote controlled by MIDI Control Change messages.
In contrast to calling complete presets via MIDI Program Changes, every Control Change message switches
only one function at a time. That is why you might have heard people calling this method „Direct Access“.
See „Control Change messages table“ for a detailed description of the 222 Control Change messages.
MIDI Control Change modes
Even though Control Change messages only access one function at a time, some people prefer programing
presets of several Control Change messages inside their MIDI controler, instead of sending Program Change
messages to access a preset stored in the 222.
MIDI controller in a higher price range like the RJM Mastermind GT offer the possibility to send the Control
Change presets in an „intelligent“ way, meaning it also sends CC messages to switch the currently used amp
or cabinet off before switching on another one. This is important as the 222 has certain rules and orders for
the switching process to protect your amps from any damage. (see „switching rules & protection).
For this scenario you should use the 222 Control Change mode „0“.
14
Owner's Manual 222
If you are using a MIDI controller pedal with a let's say more simple software structure – meaning the
controller pedal does not „know“ which amp or cabinet is currently in use - or if the number if CC messages
in a preset is limited, it might work for you to use the 222 Control Change mode „1“.
In this mode the 222 only processes Control Change messages having the value 127 („switch on“), after
switching off every amp or cabinet which is currently in use.
If you are not sure which CC Mode is best for you, always start out with CC Mode 0, which is the 222 factory
default. This is the correct mode for most cases, especially if you are sending single CC messages, and not
presets of several CC messages.
When programing presets of CC messages to your MIDI controler, always keep in mind that the 222 works
after certain rules for the switching process mentioned before.
I.e. if you prgram a preset that sends commands to switch on two amps at a time, the 222 will only show an
error status (Er) in the display.
Setting the Control Change mode
To set the Control Change mode on the 222, press and hold „MIDI CHANNEL“ until the display shows „0“ or
„1“ with an additional decimal point in the lower right corner.
Note that in contrast to setting the MIDI Channel this action directly toggles the CC Mode, there is no way to
check the current setting first.
MIDI Control Change messages table
CC Controller Number
Function
Value
80
AMP 1
0=off, 127=on
81
AMP 2
0=off, 127=on
88
FX LOOP1
0=off, 127=on
89
FX LOOP2
0=off, 127=on
90
SAVE
127=save
91
STEREO MODE
0=off, 127=on
104
CAB 1
0=off, 127=on
105
CAB 2
0=off, 127=on
15
Owner's Manual 222
Grounding
As mentioned before the default setup of the AMP1-2 GND LIFT switches should be both „In“. This is
because the necessary ground connection is already present via the amplifiers speaker output. Usually this is
the best solution for avoiding ground loops in your setup.
In case you are using any preamps or effect units with earth connection (AC inlet instead of DC or battery
supply) at the input of the 222 you will create a ground loop which can not be solved with any of the 222's
GND lift switches. In this case use a line box with a transformer for a galvanic isolation.
16
Owner's Manual 222
Troubleshooting
Problem:
No signal when an amplifier (AMP1 or 2) is chosen.
Make sure all amp inputs and speaker outputs are properly connected. Never mix amp
in- and outputs to different amplifiers!
Problem:
No effect signal when switching FX loop.
Make sure the FX Loop of the chosen amplifier is connected correctly to the 222s
matching FX Loop. For example, if AMP1 is chosen, the AMP1 FX SEND and RETURN
have to be connected to the same amplifier, which is connected to AMP1 INPUT and
AMP1 OUTPUT of the 222!
Problem:
No amp can be selected.
Check the display for its status while pressing the AMP 1 or 2 button, when showing
„Er“ a cabinet has not been selected. Activate CAB 1 or 2 button and try again.
Problem:
No cabinet can be selected.
Check if the chosen cabinet and cable is connected properly.
Also check the cable and/or speakers for any defects.
Problem:
drastic volume increase or decrease in reverb or delay spillovers when
switching between amplifiers with FX loop option.
The send and return levels of the connected amplifiers have to be set equally. Most
often the send level is controled by the channel volumes, sometimes a separate send
level is present
Problem:
Popping noise when switching FX on and off.
No proper grounding at the FX loop circuit. Make sure the FX LOOP GND LIFT is set
OUT. This will solve the issue in almost any case.
Problem:
erratic behaviour when switching via MIDI Control Changes.
Check if the correct CC Mode is set (see page 11)
Problem:
No function when switching via MIDI.
Check if the correct MIDI channel has been set (see page 11)
17
Owner's Manual 222
A word on impedances
When it comes to impedances and matching of valve amplifiers and speaker cabinets, there have been
written a lot of words and there have been told many opinions, myths and beliefs. And as it is so often
in our world, all of them are in between the truth and the untruth. Some more, some less. Don't expect
mine to be the only truth! But I give you some arguments on hand, why it is not necessary to match
your amp and cabinet and why your amplifier will not get damaged when the load does not match the
impedance switch setting.
Let's start with one of the most often heard opinions. Some claim that a mismatch between amplifier
and cabinet causes the valves to wear out quicker or can cause damage to the output transformer
and/or valves while at the same time advertising their amplifiers to work with any kind of valves,
doesn't matter if EL34, 6L6, KT66, KT88 etc.
Don't get me wrong that this is not possible, but the matching between amplifier and cabinet isn't
isolated on the secondary winding of the output transformer and the speaker. It's an interaction
between valves, primary winding of the output transformer, secondary winding of the output
transformer and speaker. It starts with a certain impedance each valve type has and which would
require (if we go on with the argumentation) a specific primary winding and thus again an impedance
of the output transformer to be 'matched'. The output transformer itself not only transforms the
voltage, it also transforms the impedance. It continues to the output transformers secondary winding
(with another you know what) and ends with the speaker (sorry, but yes...).
As mentioned above, this is not a one way street, it's an interaction, which means the speaker
influences the power amplifier and the power amplifier influences the speaker. Surely this is not a linear
process, it is dependend on frequency, power or wattage, electric and even mechanic speaker
specifications.
And if this wouldn't be enough, remember that it's called impedance because it alters with the
frequency... if you have ever seen the impedance curves of a speaker you know what that means.
There are several ways to 'mismatch', using different speaker impedances is only one possibility.
Different valve types or 2 instead of 4 valves are others. But none of them causes the power amp,
valves or output transformers to fail.
18
Owner's Manual 222
The diagram below shows some simple measurements (in that particular case taken with our Amp
TWO, a 110 Hz, 150mV sine wave, which is similar to the 'A' strings first harmonic of a Humbucker
guitar). The amp impedance switch has been set to either 4 (blue color), 8 (orange) and 16 (yellow)
Ohm and in every of these settings a reactive load of 2, 4, 8 and 16 Ohm has been attached to the
power amp. Let's point out only the two essential characters.
1. When the amp impedance switch and cabinet load are matched, the wattage is nearly identical
in either 4, 8 or 16 Ohm case;
2. The higher the load the higher the wattage, or equivalent the lower the load, the lower the
wattage.
Wattage dependent from load
25
Power / Watt
20
15
Amp Imp switch 4 Ohm
Amp Imp switch 8 Ohm
Amp Imp switch 16 Ohm
10
5
0
0
2
4
6
8
10
12
14
16
18
Cabinet
R Load / Ohm
Is it as simple as that? Yes and No.
No, as mentioned above this is not as linear as it looks at first glance as it is dependend from several
parameters.
Yes, because - and this is the main fact for all the 222 users – it will never be the other way round. The
Power will not increase when the load impedance is lower than the chosen amp output impedance
(surely as long as we are talking about valve driven amplifiers). And not only the wattage will not
increase, also the voltage - primary and secondary – decreases with a lower load.
For those who are interested, the current increases. On the primary side it does not exceed the
maximum current flowing when the amp impedance switch and load are set to its minimum position
(most often 4Ohm). The current flowing on the secondary side increases slightly about 10-15%.
The 222 is capable of switching 1 or 2 cabinets to both of the connected amplifiers. That means, the
load to the amplifiers output will change when the second cabinet is assigned to it. Let's assume your
amplifiers impedance switch is set to 16 Ohm, you run a single 16 Ohm cabinet with your amplifier and
you add a second 16 Ohm cabinet, then the total load will change to 8 Ohm.
Now refer to the diagram and you see the power of the amplifier drops.
19
Owner's Manual 222
But even if the power decreases by almost one third compared to a matching load, the subjective
impression will be the volume is nearly the same (as long as the phases of the speaker cabinets are the
same). This is simply because more speakers are now driven by the amplifier. You will notice a slightly
different feel, which is caused by a different damping factor the power amp of your amplifier 'sees'.
Hereby a lower impedance from your cabinet will feel more 'loose', a higher impedance will give you a
more 'tight' feeling. There is a simple reason for that. As seen before the higher impedance causes the
amplifier to emit more power, more 'headroom'. Because the bass frequencies require more power than
the higher frequencies, it can be amplified more accurate, more 'tight' as it's often called. The dynamic
does not drop when especially palm muted low strings are hitted. In contrast there's a natural sag with
the lower impedance because of the lowered power.
But don't expect these changes to be drastically, we are talking about nuances in sound. This will be
even more hard to notice because the number of speakers has changed.
Having said that, we recommend to undermatch the cabinet load when using 2 cabinets at the same
time.
–
–
–
one or two 16 Ohm Cabinets (=8 Ohm) → Impedance switch 16 Ohm
one or two 8 Ohm Cabinets (=4 Ohm) → Impedance switch 8 Ohm
one or two 4 Ohm Cabinets (=2 Ohm) → Impedance switch 4 Ohm
It is also possible to mix cabinets with different impedances, you only have to be aware that the power
to the cabinets will be different as well, to be precise it will be twice as high at the cabinet with half the
impedance.
–
–
one 16 and one 8 Ohm Cabinet (=5,33 Ohm) → Impedance switch 16 Ohm
one 8 and one 4 Ohm Cabinet (= 2,66 Ohm) → Impedance switch 8 Ohm
In any case do not exceed the power handling of the speaker cabinet! Be aware of, that the setting of
your volume control is not an indicator for the power your amplifier emits.
This is just a rough overview on the interaction between a valve driven power amplifier and a
loudspeaker. Believe me, that process is far too complex to put it in such a manual, and to be honest in
it's entirity it would exceed my knowledge. And even if the era of valves is long gone, this is why some
very few people - including me - are still researching on it.
… and we keep you informed!
20
Owner's Manual 222
Technical Specifications
_______________________________________________________________
Dimensions
W 17,2“ (438mm), H 1,75“ (44mm), D 5,6“ (143mm)
Front Panel:
Weight
5 lbs (2,3kg)
Power consumption
8W max.
W 19“ (482mm)
_______________________________________________________________
Ampete Engineering reserves the right to change specifications, wether it's technical, dimensional or in the owner's manual.
Fender, Marshall, Vox, RJM or other brands or models are registered trademarks to their respective holders. Ampete Engineering isn't affiliated with them in any way.
21
Owner's Manual 222
__________________________
Ampete Engineering GbR, 2015
Ampete is a registered trademark
copyright 2015, all rights reserved
22