1
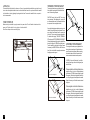
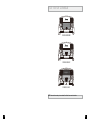
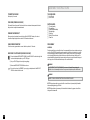
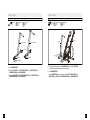
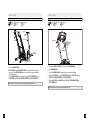
FOR MODEL :
T103
T104
T105
TREADMILL OWNER’S GUIDE
INTRODUCTION
CONGRATULATIONS and THANK YOU for your purchase of this Treo Fitness treadmill!
Whether your goal is to win a race or simply enjoy a fuller, healthier lifestyle, a Treo treadmill can help you
attain it – adding club-quality performance to your at-home workouts, with the ergonomics and innovative
features you need to get stronger, healthier and faster. We’re committed to designing fitness equipment from
the inside out, so we use only the highest quality components.
You want exercise equipment that offers the most comfort, the best reliability and the highest quality in its
class. A Treo Fitness Treadmill delivers!
TABLE OF CONTENTS
Introduction
3
Before You Begin
4
T103 104 105 Console
9
Console Operation
10
Console Display Windows
14
Getting Started
16
Available Programs
18
Assembly Instructions
21
Conditioning Guidelines
27
Limited Home-use warranty
30
3
PROPER USAGE
BEFORE YOU BEGIN
CONGRATULATIONS! on choosing your treadmill! You’ve taken an important step in developing
and sustaining an exercise program! Your treadmill is a tremendously effective tool for achieving your
personal fitness goals. Regular use of your treadmill can improve the quality of your life in so many ways.
HERE ARE JUST A FEW OF THE HEALTH BENEFITS OF EXERCISE:
• Weight Loss
• A Healthier Heart
• Improved Muscle Tone
• Increased Daily Energy Levels
• Reduced Stress
• Help In Countering Anxiety and Depression
• An Improved Self Image
The key to reaping these benefits is to develop the exercise habit.Your newTreo Fitness
Treadmill will help you eliminate the obstacles that prevent you from getting in your exercise
time. Inclement weather and darknesswon’t interferewith your workout when you see your
Treo Fitness Treadmill in the comfort of your home. This manual provides you with basic
information for using and enjoyingn your new machine. A more complete knowledge of your
new Treo Fitness Treadmlil will assist you in realising your goal of a healthy lifestyle.
Your treadmill is capable of reaching high speeds. Always start off using a slower speed and adjust the
speed in small increments to reach a higher speed level. Never leave the treadmill unattended while it
is running. When not in use, remove the safety key, turn the on/off switch to off and unplug the power
cord. Make sure to follow the MAINTENANCE schedule in this manual. Keep your body and head facing
forward. Do not attempt to turn around or look backwards while the treadmill is running. Stop your workout
immediately if you feel pain, faint, dizzy or are short of breath.
WARNING
Do not operate the treadmill if the power cord or plug is damaged.
If the treadmill appears to not be working properly, do not use the treadmill.
FOLDING
Firmly grasp the back end of the treadmill. Carefully lift the end of the treadmill deck into the upright
position until the deck is securely engaged by the lock latch. Make sure the deck is securely latched before
letting go. To unfold, firmly grasp the back end of the treadmill. Gently release the lock latch with your feet
until it disengages. Carefully lower the deck to the ground.
LOCATION OF THE TREADMILL
Place the treadmill on a level surface. We advise there should be 6 feet
of clearance behind the treadmill, 3 feet on each side and one foot in
front for folding and the power cord. Do not place the treadmill in any
area that will block any vent or air openings. The treadmill should not be
located in a garage, covered patio, near water or outdoors.
1 foot (30cm)
3 feet
3 feet (91cm)
WARNING
DO NOT STAND ON THE BELT
While you are preparing to use the treadmill, do not stand on the belt.
Place your feet on the side rails before starting the treadmill. Start
walking on the belt only after the belt has begun to move. Never start
the treadmill at a fast running speed and attempt to jump on!
MOVING
Your Treo Finess treadmill has a pair of transport wheels built into the base frame.To move,make sure
the treadmill is folded and securely latched.Then firmly grasp the handebars,tilt treadmill back and roll.
6 feet (183cm)
SAFETY KEY
Your treadmill will not start unless the safety key is placed in position. Attach the clip end securely to
your clothing. This safety key is designed to cut the power to the treadmill if you should fall. Check the
operation of the safety key every 2 weeks.
WARNING
4
NEVER USE THE TREADMILL WITHOUT SECURING THE SAFETY KEY
CLIP TO YOUR CLOTHING. PULL ON THE SAFETY KEY CLIP FIRST TO
MAKE SURE IT WILL NOT COME OFF YOUR CLOTHING.
5
LEVELLING
The treadmill should be leveled for optimum use. Once you have placed the treadmill where you intend to use it,
raise or lower the adjustable levellers located on the treadmill base frame. Once you have levelled the treadmill,
lock the levellers in lace by tightening the pad against the frame. To assure the treadmill is level, a carpenter’s
level is recommended.
TURN POWER ON
Make sure that your treadmill is properly connected to a power outlet. The on/off switch is located next to the
power cord. Flip this switch to the ‘on’ position, so that the switch is lit.
You will hear a beep and the console will light up.
TENSIONING THE RUNNING BLET
The running belt has been properly adjusted at the
factory before it was shipped. At times the belt can
move off-center during shipment.
CAUTION: Running belt should NOT be moving
during tensioning. Over-tightening the running belt
can cause excessive wear on the treadmill as well as
its components. Never overtighten the belt.
If you can feel a slipping sensation when running on the
treadmill, the running belt must be tightened. In most
cases, the belt has stretched from use, causing the
belt to slip. This is a normal and common adjustment.
To eliminate this slipping, TURN THE TREADMILL
OFF and tension BOTH THE REAR ROLLER BOLTS
(left and right adjustment bolt) using the supplied Allen
wrench, turning them 1/4 TURN to the right as shown.
Turn the treadmill on and check for slipping. Repeat
if necessary, but NEVER TURN the roller bolts more
than 1/4 turn at a time. Belt is properly tensioned when
the slipping sensation is gone.
CENTERING THE RUNNING BELT
The running belt has been properly adjusted at the
factory before it was shipped. At times the belt can
move off-center during shipment. Before operating
the treadmill, make sure the belt is centered and
remains centered to maintain smooth operation.
CAUTION: Do not run belt faster than 1 mph while
centering. Keep fingers, hair and clothing away from
belt at all times.
If the running belt is too far to the right side: With the
Belt is too far to the right side
Belt is too far to the left side
6
treadmill running at 1 mph, turn the right adjustment
bolt clockwise 1/4 TURN at a time (using the supplied
Allen wrench). Check the belt alignment. Allow belt to
run a full cycle to gauge if more adjustment is needed.
Repeat if necessary, until the belt remains centered
during use.
If the running belt is too far to the left side: With the
treadmill running at 1 mph, turn the left adjustment
bolt clockwise 1/4 TURN at a time (using the supplied
Allen wrench). Check the belt alignment. Allow belt to
run a full cycle to gauge if more adjustment is needed.
Repeat if necessary, until the belt remains centered
during use.
7
T103 104 105 CONSOLE
H
CONSOLE BRONZE
H
H
CONSOLE SILVER
P
P
S
S
CONSOLE GOLD
NOTE: Please note the console you have selected, then follow these console instructions.
8
9
CONSOLE BRONZE OPERATION
A
CONSOLE SILVER OPERATION
A
J
H
H
F
D
B
I
C
E
G
Note: There is a thin protective sheet of clear plastic on the overlay of the console that should
be removed before use.
A)
B)
C)
D)
E)
F)
G)
H)
I)
J)
10
LED display windows: time, distance, calories, heart rate, speed, and incline.
START: press to begin exercising, start your workout, or resume exercising after pause.
Stop: press to pause/end your workout. Hold for 3 seconds to reset the console.
Incline / keys: used to adjust incline in small increments (0.5% Increments).
Speed + / - keys: used to adjust speed in small increments (0.1 Mph or 0.1 KMph increments).
Incline quick keys: used to reach desired incline more quickly.
Speed quick keys: used to reach desired speed more quickly.
Water bottle pockets: holds personal workout equipment.
Safety key position: enables treadmill when safety key is inserted.
QUICK PROGRAM KEY: Press key to turn select program.
L
H
F
D K B
I
C
J
E
G
Note: There is a thin protective sheet of clear plastic on the overlay of the console that should
be removed before use.
A)
B)
C)
D)
E)
F)
G)
H)
I)
J)
K)
L)
LED display windows: time, distance, calories, heart rate, speed, incline and workout profiles.
START: press to begin exercising, start your workout, or resume exercising after pause.
Stop: press to pause/end your workout. Hold for 3 seconds to reset the console.
Incline / keys: used to adjust incline in small increments (0.5% Increments).
Speed + / - keys: used to adjust speed in small increments (0.1 Mph or 0.1 KMph increments).
Incline quick keys: used to reach desired incline more quickly.
Speed quick keys: used to reach desired speed more quickly.
Water bottle pockets: holds personal workout equipment.
Safety key position: enables treadmill when safety key is inserted.
FAN KEY: Press to turn fan on/off.
ENTER: Used to select program and time.
FAN: Personal workout fan.
11
CONSOLE GOLD OPERATION
K B
H
A
M O
N
C
P
Q) Audio in jack: plug your cd / mp3 player into the console using the included audio adaptor cable.
R) Audio out / headphone jack: plug your headphones into this jack to listen to your music through
the headphones. Note: when headphones are plugged into the headphone jack the sound will no
longer come out through the speakers.
S) Water bottle pockets: holds personal workout equipment.
T) Safety key position: enables treadmill when safety key is inserted.
L
P
S
S
Q
I
F D
T
E G
J
R
Note: There is a thin protective sheet of clear plastic on the overlay of the console that should
be removed before use.
A) LED display windows: time, distance, calories, heart rate, speed, incline and workout profiles.
B) Target LED indicators: indicate what target (if any) is set for the current program.
C) Workout LED indicators: indicate what workout is set for the current program.
D) Select target: press to select your desired target.
E) Select workout: press to select your desired workout.
F) START: press to begin exercising, start your workout, or resume exercising after pause.
G) Stop: press to pause/end your workout. Hold for 3 seconds to reset the console.
H) Cool down: press to enter cool down mode. Cool down lasts for 4 minutes and reduces speed
and incline to allow your heart to readjust to decreased demand.
I) Incline / keys: used to adjust incline in small increments (0.5% Increments).
J) Speed + / - keys: used to adjust speed in small increments (0.1 Mph or 0.1 KMph increments).
K) Incline quick keys: used to reach desired incline more quickly.
L) Speed quick keys: used to reach desired speed more quickly.
M) Enter/Display: used to adjust target and workout settings. Press enter to change display
feedback during workout.
N) Fan key: press to turn fan on and off.
O) Fan: personal workout fan.
P) Speakers: music plays through speakers when your cd / mp3 player is connected to the console.
12
13
CONSOLE BRONZE & SILVER DISPLAY WINDOWS
CONSOLE BRONZE DISPLAYS
CONSOLE GOLD DISPLAY WINDOWS
CONSOLE GOLD DISPLAYS
CONSOLE SILVER DISPLAYS
• TARGETS: (CONSOLE GOLD ONLY)
LED lights up next to currently selected target. If no LED is lit, no target is activated.
• WORKOUTS: (CONSOLE GOLD ONLY)
LED lights up next to currently selected workout.
• TIME
Shown as minutes : seconds. View the time remaining or the time elapsed in your workout.
• DISTANCE
Shown as miles or kilometer. Indicates distance traveled or distance remaining during your
workout.
• SPEED
Shown as MPH or KMPH. Indicates how fast your walking or running surface is moving.
• INCLINE
Shown as percent. Indicates the incline of your walking or running surface.
• CALORIES
Total calories burned or calories remaining left to burn during your workout.
• HEART RATE
Shown as BPM (beats per minute). Used to monitor your heart rate (displayed when contact is
made with both pulse grips).
• PROGRAM PROFILES (CONSOLE SILVER & GOLD)
Represents the profile of the program being used (speed during speed based programs and
incline during incline based programs).
14
15
GETTING STARTED
1) Check to make sure no objects are placed on the belt that will hinder the movement of the treadmill.
CHANGING YOUR TARGET MID-WORKOUT
2) Plug in the power cord and turn the treadmill ON.
You can change your target “on-the-fly” without losing your current workout stats.
3) Stand on the side rails of the treadmill.
Anytime during your workout, press the select target key until you have selected the new target you
4) Attach the safety key clip to part of your clothing making sure that it is secure and will not become
detached during operation.
would like.
5) Insert the safety key into the safety keyhole in the console.
6) You have two options to start your workout:
Use the / Or + / – keys to enter in the value of your new target and press enter. All previous workout
statistics will be rolled into the new target, so you’ll never miss a beat.
NOTE: If you accidentally press the SELECT TARGET key during a workout, if no buttons are pressed
after 5 seconds, the current target will resume.
A) QUICK START UP
Simply press the go/START key to begin working out.
Time, distance, and calories will all count up from zero. OR...
B) Select a target and workout (Console Gold)
1) Select a target using the select target key.
CHANGING YOUR workout MID-WORKOUT
You can change your Workout “on-the-fly”.
Anytime during your workout, press the SELECT WORKOUT key until you have selected the new
WORKOUT you would like. Press ENTER.
New workout will begin at the first segment after warm up and all workout statistics will roll over.
2) Adjust the target settings using the arrow keys.
3) Press enter to advance.
4) Select a workout using the select workout key.
5) Press go/start to begin workout.
NOTE: If no target or workout is selected, the program will function as a manual program. All
changes in speed and incline will need to be from the user in this setting.
16
17
AVAILABLE PROGRAMS
Console Bronze / Console Silver
Console Gold ONLY (TARGET PROFILES)
TARGET 1 – TIME: Allows user to set a target based on how long they would like to
workout. Time targets can range from 15:00 – 99:00. TIME will count down. DISTANCE and
CALORIES will count up from zero.
1) Manual: Allows ‘on the fly’ manual speed and incline changes. Time-based goal.
2) intervals: Walk or run a series of alternation paced speed levels. Time-based goal.
TARGET 2 – DISTANCE: Allows user to set a target based on distance they would like to
complete. Distance target can range from 0.25 – 26.25 MILE or 0.4-42 KM. DISTANCE will
count down. TIME and CALORIES will count up from zero.
3) ROLLIng: Creates the feel of walking or running over hills. Time-based goal.
4) Weight loss: Keeps user in their optimal fat buming zone.
Target 3 – calories: Allows user to set a target based on the number of calories they
would like to burn. Calories target can range from 20 – 980 calories. CALORIES will count
down. TIME and DISTANCE will count up from zero.
NO TARGET: Allows user to select a workout profile that has no specified time, distance, or
calorie target. TIME, DISTANCE, and CALORIES will all count up from zero.
Console Silver only
5) FAT BLAST: Burn fat at an increased rate.
6) CARDIO BURN: Burn carbs and tones muscles. Time-based goal.
WORKOUT PROFILES (Console Gold only)
7) ENDURANCE CHALLENGE: Tones muscle and challenges cardiovascular system.
1) manual: Allows ‘on the fly’ manual speed and incline changes.
2) intervals: Improves your strength, speed and endurance by increasing and decreasing the speed
throughout your workout to involve your heart and other muscles.
Segment
Warm Up
1
2
Time
2:00 Mins
2:00 Mins
90 sec
30 sec
Speed
1
1.5
2
4
Incline
1
1.5
0.5
1.5
Segments 1 & 2 repeat
until target is complete
3) weight loss: Promotes weight loss by increasing and decreasing the speed, while keeping you in
your fat burning zone.
Segment
Warm Up
1
2
3
4
5
6
7
8
Time
4:00 Mins
30 sec
30 sec
30 sec
30 sec
30 sec
30 sec
30 sec
30 sec
Level 1
18
Incline
0
0.5
1.5
1.5
1
0.5
0.5
0.5
1
1.5
Speed
1
1.5
2
2.5
3
3.5
4
3.5
3
2.5
Segments 1–8
repeat until target
is complete
19
ASSEMBLY INSTRUCTIONS
To reset the console
Hold stop key for 3 seconds.
COOL DOWN (Console Gold only)
Puts treadmill into cool down mode. Cool down lasts for four minutes and reduces speed and incline to
allow your heart to readjust to decreased demand.
TOOLS INCLUDED:
FF 6
FF 5
mm T-Wrench
mm L-Wrench
PARTS INCLUDED:
When your workout is complete, the monitor display will flash “FINISHED” and beep. Your workout
information will stay displayed on the console for 30-45 seconds and then reset.
FF 1 Console Assembly
FF 2 Console Masts
FF 2 Socket (Console Mast Scoket)
FF 3 Hardware Bags
FF 1 Safety Key
FF 1 Bottle of Silicone Lubricant
FF 1 Power Cord
Clear current selection
PRE ASSEMBLY
To clear the current program selection or screen, hold the stop button for 3-5 seconds.
UNPACKING
Finishing your workout
Using your CD / MP3 player (Console Gold only)
1) Connect the included audio adaptor cable to the audio in jack on the bottom right of the
console and the headphone jack on your cd / mp3 player.
Place the treadmill carton on a level flat surface. It is recommended that you place a protective covering on
your floor. Take CAUTION when handling and transporting this unit. Never open box when it is on its side.
Once the banding straps have been removed, do not lift or transport this unit unless it is fully assembled
and in the upright folded position, with the lock latch secure. Unpack the unit where it will be used. The
enclosed treadmill is equipped with high-pressure shocks and may spring open if mishandled. Never grab
hold of any portion of the incline frame and attempt to lift or move the treadmill.
2) Use your cd / mp3 player buttons to adjust song settings.
3) Remove the audio adaptor cable when not in use.
4) If you don’t want to use the speakers, you can plug your headphones into the audio out
jack at the bottom of the left console.
WARNING
DO NOT ATTEMPT TO LIFT THE TREADMILL! Do not move or lift treadmill from packaging until
specified to do so in the assembly instructions. You may remove the plastic wrap from console masts.
WARNING
FAILURE TO FOLLOW THESE INSTRUCTIONS COULD RESULT IN INJURY!
NOTE: During each assembly step, ensure that ALL nuts and bolts are in place and partially threaded in
before completely tightening any ONE bolt.
NOTE: A light application of grease may aid in the installation of hardware. Any grease, such as lithium
bike grease is recommended.
20
21
ASSEMBLY
TOOLS
ASSEMBLY STEP
1
ASSEMBLY
TOOLS
ASSEMBLY STEP
2
HARDWARE BAG 1 CONTENTS :
SOCKET BOLT (A)
50 mm
Qty: 8
SPRING WASHER (B)
15 mm
Qty: 8
HARDWARE BAG 2 CONTENTS :
BOLT (A)
25 mm
Qty: 4
FLAT WASHER (C)
15 mm
Qty: 8
SPRING WASHER (B)
15 mm
Qty: 4
FLAT WASHER (C)
15 mm
Qty: 4
RUNNING DECK
LEFT CONSOLE MAST
LEFT
CONSOLE
MAST
RIGHT CONSOLE MAST
LEFT SOCKET
FLAT WASHERS (C)
SPRING WASHERS (B)
BOLTS (A)
FLAT WASHER (C)
RIGHT SOCKET
BASE FRAME
SPRING WASHER (B)
FOOT LATCH
SOCKET BOLT (A)
A Open hardware bag 1.
B Attach the LEFT SOCKET to the LEFT console mast using 4 SOCKET bolts (a), 4
sPRING WASHERS(B), and 4 FLAT WASHER(C).
C Attach the RIGHT SOCKET to the RIGHT console mast using 4 SOCKET bolts (a). 4
sPRING WASHERS(B), and 4 FLAT WASHER(C).
22
A Cut the yellow banding straps and lift the running deck upward until the foot latch
locks. Remove all contents from underneath the running deck.
B Open hardware bag 2.
C With the running deck in the raised position, attach the left console mast to the
base frame using 4 bolts (a), 4 spring washers (b) and 4 flat washers (c).
23
ASSEMBLY
TOOLS
ASSEMBLY STEP
3
ASSEMBLY
TOOLS
ASSEMBLY STEP
4
HARDWARE BAG 2 CONTENTS :
BOLT (A)
25 mm
Qty: 4
SPRING WASHER (B)
15 mm
Qty: 4
HARDWARE BAG 3 CONTENTS :
FLAT WASHER (C)
15 mm
Qty: 4
BOLT (D)
20 mm
Qty: 4
SPRING WASHER (B)
15 mm
Qty: 4
FLAT WASHER (C)
15 mm
Qty: 4
CONSOLE
CONSOLE CABLE
LEAD WIRE
RIGHT CONSOLE MAST
CONSOLE CABLES
RUNNING DECK
BOLTS (D)
SPRING WASHERS (B)
FLAT WASHERS (C)
ASSEMBLE
LEFT SIDE
FIRST
CONSOLE CABLE
CONSOLE MAST
FLAT WASHERS (C)
SPRING WASHERS (B)
BOLTS (A)
BASE FRAME
A Still open hardware bag 2.
A Disengage the deck lock latch with your foot to lower the running deck.
B Pull lead wire through right console mast. After pulling the lead wire through the
mast, the top of the console cable should be located at the top of the mast. Detach and
discard the lead wire.
B Open hardware bag 3.
C With the running deck in the raised position, attach the right console mast to the
base frame using 4 bolts (a), 4 spring washers (b) and 4 flat washers (c).
Note: Be careful not to pinch any wires while assembling the right console mast.
C Connect the console cables, carefully tucking wires in masts to avoid damage.
D Gently place the console on top of the console masts. Attach the left side first using
2 bolts (d), 2 spring washers (b) and 2 flat washers (c).
E Attach the right side of the console using 2 bolts (d), 2 spring washers (b) and
2 flat washers (c).
Note: Be careful not to pinch any wires while assembling the mast.
24
25
CONDITIONING GUIDELINES
ALWAYS CONSULT YOUR PHYSICIAN BEFORE BEGINNING AN EXERCISE PROGRAM.
ASSEMBLY
TOOLS
ASSEMBLY STEP
5
HOW OFTEN? (Frequency of Workouts)
The American Heart Association recommends that you exercise at least 3 to 4 days per week to
maintain cardiovascular fitness. If you have other goals such as weight or fat loss, you will
achieve your goal faster with more frequent exercise. Whether it’s 3 days or 6 days, remember
that your ultimate goal should be to make exercise a lifetime habit. Many people are successful
staying with a fitness program if they set aside a specific time of day to exercise. It doesn’t
matter whether it’s in the morning before breakfast,during lunch hour or while watching the
evening news. What’s more important is that it’s a time that allows you to keep a schedule, and
a time when you won’t be interrupted. To be successful with your fitness program, you have to
make it a priority in your life. So decide on a time, pull out your day planner and pencil in your
exercise times for the next month!
Console Bronze
HOW LONG? (Duration of Workouts)
For aerobic exercise benefits, it’s recommended that you exercise from between 24 and 60
minutes per session. But start slowly and gradually increase your exercise times. If you’ve been
sedentary during the past year, it may be a good idea to keep your exercise times to as little
as five minutes initially. Your body will need time to adjust to the new activity. If your goal is
weight loss, a longer exercise session at lower intensitieshas been found to be most effective. A
workout time of 48 minutes or more is recommended for best weight loss results.
Console Silver
Console Gold
P
H
YOU ARE FINISHED!
26
H
S
P
S
HOW HARD? (Intensity of Workouts)
How hard you workout is also determined by your goals. If you use your treadmill to prepare
for a 5K run, you will probably work out at a higher intensity than if your goal is general fitness.
Regardless of your long term goals, always begin an exercise program at low intensity. Aerobic
exercise does not have to be painful to be beneficial! There are two ways to measure your
exercise intensity. The first is by monitoring your heart rate (using the grip pulse handlebars or
a wireless chest transmitter - may be sold separately), and the second is by evaluating your
perceived exertion level (this is simpler than it sounds!).
PERCEIVED EXERTION LEVEL
A simple way to gauge your exercise intensity is to evaluate your perceived exertion level. While
exercising, if you are too winded to maintain a conversation without gasping, you are working
out too hard. A good rule of thumb is to work to the point of exhilaration, not exhaustion. If you
cannot catch your breath, it’s time to slow down. Always be aware of these warning signs of
overexertion.
27
TIPS
TIPS
STRETCHING
THE INPORTANCE OF WARM UP & COOL DOWN
STRETCH FIRST
WARM UP
Before using your product, it is best to take a few minutes to do a few gentle stretching exercises.
Stretching prior to exercise will improve flexibility and reduce chances of exercise related injury. Ease
into each of these stretches with a slow gentle motion. Do not stretch to the point of pain. Make sure
not to bounce while doing these stretches.
The first 2 to 5 minutes of a workout should be devoted to warming up. The warm-up will limber your
muscles and prepare them for more strenuous exercise. Make sure that you warm-up on your product
at a slow pace. The warm up should gradually bring your heart rate into your Target Heart Rate Zone.
1. STANDING CALF MUSCLE STRETCH
COOL DOWN
Never stop exercising suddenly! A cool-down period of 3-5 minutes allows your heart to readjust to the
decreased demand. Make sure that your cool down period consists of a very slow pace to allow your
heart rate to lower. After the cool-down, repeat the stretching exercises listed above to loosen and relax
your muscles.
Stand near a wall with the toes of your left foot about 18" from the wall,
and the right foot about 12" behind the other foot. Lean forward, pushing
against the wall with your palms. Keep your heels flat and hold this position
for a count of 15 seconds. Make sure that you do not bounce while
stretching. Repeat on the other side.
TIPS
ACHIEVING YOUR FITNESS GOALS
An important step in developing a long term fitness program is to determine your goals. Is your primary
goal for exercising to lose weight? Improve muscle? Reduce stress? Prepare for the spring racing
schedule? Knowing what your goals are will help you develop a more successful exercise program.
Below are some common exercise goals:
2. STANDING QUADRICEP STRETCH
Using a wall to provide balance, grasp your left ankle
with your left hand and hold your foot against the back
of your thigh for 15 seconds. Repeat with your right
ankle and hand.
3. SITTING HAMSTRING & LOWER BACK MUSCLE STRETCH
Sit on the floor with your legs together and straight out in front of you. Do
not lock your knees. Extend your fingers towards your toes and hold for a
count of 15 seconds. Make sure that you do not bounce while stretching.
Sit upright again. Repeat one time.
28
•
•
•
•
•
Weight Loss - lower intensity, longer duration workouts
Improve Body Shape and Tone - interval workouts, alternate between high and low intensities
Increased Energy Level - more frequent daily workouts
Improved Sports Performance - high intensity workouts
Improved Cardiovascular Endurance - moderate intensity, longer duration workouts
If possible try to define your personal goals in precise, measurable terms, and then put your goals
in writing. The more specific you can be, the easier it will be to track your progress. If your goals are
long term, divide them up into monthly and weekly segments. Longer term goals can lose some of the
immediate motivation benefits. Short term goals are easier to achieve. Your console provides you with
several readouts that can be used to record your progress. You can track Distance, Calories or Time.
29
LIMITED HOME-USE WARRANTY
Maximum user’s weight = 110 kg / 242 lbs (T103).
• Incidental or consequential damages. Treo
125 kg / 275 lbs (T104. T105). Fitness is not responsible or liable for indirect,
special or consequential damages, economic
EXCLUSIONS AND LIMITATIONS
loss, loss of property, or profits, loss of enjoyment
Who IS covered:
or use, or other consequential damages of what so
• The original owner and is not transferable.
ever nature in connection with the purchase, use,
repair or maintenance of the equipment.
What IS covered:
• Repair or replacement of a defective motor, electronic • Equipment used for commercial purposes or any
use other than a single family or Household,
component, or defective part and is the sole remedy of
unless endorsed by Treo Fitness for coverage.
the warranty.
• Delivery, assembly, installation, setup for original
What IS NOT covered:
or replacement units or labor or other costs
• Normal wear and tear, improper assembly or neglect to associated with removal or replacement of the
maintenance, or installation of parts or accessories not
covered unit.
originally intended or compatible with the equipment as
• Any attempt to repair this equipment creates a
sold.
risk of injury. Treo Fitness is not responsible
• Damage or failure due to accident, abuse, corrosion,
or liable for any damage, loss or liability arising
discoloration of paint or plastic, neglect, theft, vandalism,
from any personal injury incurred during the course
fire, flood, wind, lightning, freezing, or other natural
disasters of any kind, power reduction, fluctuation or of, or as a result of any repair or attempted repair of
failure from whatever cause, unusual atmospheric your fitness equipment by other than an authorized
conditions, collision, introduction of foreign objects into service technician. All repairs attempted by you on
the covered unit, or modifications that are unauthorized your fitness equipment are undertaken AT YOUR
OWN RISK and Treo Fitness shall have no
or not recommended by Treo Fitness.
liability for any injury to the person or property
arising from such repairs.
*Please consult your local dealer for more warranty
details.
30
T103 & T104 & 105 072310 © 2010 Treo Fitness Products | Made in China