1
User’s Guide
Creative Sound Blaster PCl512
Information in this document is subject to change without notice and does not represent a commitment on the part of Creative Technology Ltd. No part of this
manual may be reproduced or transmitted in any form or by any means, electronic or mechanical, including photocopying and recording, for any purpose
without the written permission of Creative Technology Ltd. The software described in this document is furnished under a license agreement and may be used
or copied only in accordance with the terms of the license agreement. It is against the law to copy the software on any other medium except as specifically
allowed in the license agreement. The licensee may make one copy of the software for backup purposes.
Copyright © 1999-2000 by Creative Technology Ltd. All rights reserved.
Version 1.0
September 2000
Sound Blaster and Blaster are registered trademarks, and the Sound Blaster Live! logo, the Sound Blaster PCI logo, EMU10K1, Environmental Audio, Creative
Multi Speaker Surround, and LAVA! are trademarks of Creative Technology Ltd. in the United States and/or other countries. E-Mu and SoundFont are registered
trademarks of E-mu Systems, Inc.. SoundWorks is a registered trademark, and MicroWorks, PCWorks and FourPointSurround are trademarks of Cambridge
SoundWorks, Inc.. Microsoft, MS-DOS, and Windows are registered trademarks of Microsoft Corporation. All other products are trademarks or registered
trademarks of their respective owners.
This product is covered by one or more of the following U.S. patents:
4,506,579; 4,699,038; 4,987,600; 5,013,105; 5,072,645; 5,111,727; 5,144,676; 5,170,369; 5,248,845; 5,298,671; 5,303,309; 5,317,104; 5,342,990; 5,430,244;
5,524,074; 5,698,803; 5,698,807; 5,748,747; 5,763,800; 5,790,837.
C reat iv e E nd -U se r S oft wa re L ice ns e A gree m en t
Ver si o n 2 . 4, Jun e 2 00 0
PLEASE READ THIS DOCUMENT CAREFULLY BEFORE INSTALLING THE SOFTWARE. BY INSTALLING AND USING THE SOFTWARE,
YOU AGREE TO BE BOUND BY THE TERMS OF THIS AGREEMENT. IF YOU DO NOT AGREE TO THE TERMS OF THIS AGREEMENT, DO
NOT INSTALL OR USE THE SOFTWARE. PROMPTLY RETURN, WITHIN 15 DAYS, THE SOFTWARE, ALL RELATED DOCUMENTATION AND
ACCOMPANYING ITEMS TO THE PLACE OF ACQUISITION FOR A FULL REFUND.
This is a legal agreement between you and Creative
Technology Ltd. and its subsidiaries (“Creative”).
This Agreement states the terms and conditions
upon which Creative offers to license the software
sealed in the disk package together with all related
documentation and accompanying items including,
but not limited to, the executable programs, drivers,
libraries and data files associated with such
programs (collectively, the “Software”).
LICENSE
1. Grant of License
The Software is licensed, not sold, to you for use
only under the terms of this Agreement. You own
the disk or other media on which the Software is
originally or subsequently recorded or fixed; but,
as between you and Creative (and, to the extent
applicable, its licensors), Creative retains all title
to and ownership of the Software and reserves all
rights not expressly granted to you.
2. For Use on a Single Computer
The Software may be used only on a single
computer by a single user at any time. You may
transfer the machine-readable portion of the
Software from one computer to another computer,
provided that (a) the Software (including any
portion or copy thereof) is erased from the first
computer and (b) there is no possibility that the
Software will be used on more than one computer
at a time.
3. Stand-Alone Basis
You may use the Software only on a stand-alone
basis, such that the Software and the functions it
provides are accessible only to persons who are
physically present at the location of the computer
on which the Software is loaded. You may not
allow the Software or its functions to be accessed
remotely, or transmit all or any portion of the
Software through any network or communication
line.
4. Copyright
The Software is owned by Creative and/or its
licensees and is protected by United States
copyright laws and international treaty provisions.
You may not remove the copyright notice from
any copy of the Software or any copy of the
written materials, if any, accompanying the
Software.
5. One Archival Copy
You may make one (1) archival copy of the
machine-readable portion of the Software for
backup purposes only in support of your use of the
Software on a single computer, provided that you
reproduce on the copy all copyright and other
proprietary rights notices included on the
originals of the Software.
6. No Merger or Integration
You may not merge any portion of the Software
into, or integrate any portion of the Software with,
any other program, except to the extent expressly
permitted by the laws of the jurisdiction where
you are located. Any portion of the Software
merged into or integrated with another program, if
any, will continue to be subject to the terms and
conditions of this Agreement, and you must
reproduce on the merged or integrated portion all
copyright and other proprietary rights notices
included in the originals of the Software.
7. Network Version
If you have purchased a “network” version of the
Software, this Agreement applies to the
installation of the Software on a single “file
server”. It may not be copied onto multiple
systems. Each “node” connected to the “file
server” must also have its own license of a “node
copy” of the Software, which becomes a license
only for that specific “node”.
8. Transfer of License
You may transfer your license of the Software,
provided that (a) you transfer all portions of the
Software or copies thereof, (b) you do not retain
any portion of the Software or any copy thereof,
and (c) the transferee reads and agrees to be bound
by the terms and conditions of this Agreement.
9. Limitations on Using, Copying, and Modifying
the Software
Except to the extent expressly permitted by this
Agreement or by the laws of the jurisdiction
where you acquired the Software, you may not
use, copy or modify the Software. Nor may you
sub-license any of your rights under this
Agreement. You may use the software for your
personal use only, and not for public performance
or for the creation of publicly displayed
videotapes.
10.Decompiling, Disassembling, or Reverse
Engineering
You acknowledge that the Software contains trade
secrets and other proprietary information of
Creative and its licensors. Except to the extent
expressly permitted by this Agreement or by the
laws of the jurisdiction where you are located, you
may not decompile, disassemble or otherwise
reverse engineer the Software, or engage in any
other activities to obtain underlying information
that is not visible to the user in connection with
normal use of the Software.
In particular, you agree not for any purpose to
transmit the Software or display the Software's
object code on any computer screen or to make
any hardcopy memory dumps of the Software's
object code. If you believe you require
information related to the interoperability of the
Software with other programs, you shall not
decompile or disassemble the Software to obtain
such information, and you agree to request such
information from Creative at the address listed
below. Upon receiving such a request, Creative
shall determine whether you require such
information for a legitimate purpose and, if so,
Creative will provide such information to you
within a reasonable time and on reasonable
conditions.
In any event, you will notify Creative of any
information derived from reverse engineering or
such other activities, and the results thereof will
constitute the confidential information of Creative
that may be used only in connection with the
Software.
11.For Software With CDDB Features.
This package includes applications which may
contain software from CDDB, Inc.of Berkeley
California ("CDDB"). The software from CDDB
(the "CDDB Client") enables the application to do
online disc identification and obtain music-related
information, including name, artist, track and title
information ("CDDB Data") from online servers
("CDDB Servers") and to perform other
functions.
You agree that you will use CDDB Data, the
CDDB Client and CDDB Servers for your own
personal non-commercial use only. You agree not
to assign, copy, transfer or transmit the CDDB
Client or any CDDB Data to any third party. YOU
AGREE NOT TO USE OR EXPLOIT CDDB
DATA, THE CDDB CLIENT,OR CDDB
SERVERS,EXCEPT AS EXPRESSLY
PERMITTED HEREIN.
You agree that your non-exclusive license to use
the CDDB Data, the CDDB Client and CDDB
Servers will terminate if you violate these
restrictions. If your license terminates, you agree
to cease any and all use of the CDDB Data, the
CDDB Client and CDDB Servers. CDDB
reserves all rights in CDDB Data, the CDDB
Client and the CDDB Servers, including all
ownership rights.
You agree that CDDB, Inc. may enforce its rights
under this Agreement against you directly in its
own name.
The CDDB Client and each item of CDDB Data
are licensed to you "AS IS." CDDB makes no
representations or warranties, express or implied,
regarding the accuracy of any CDDB Data from in
the CDDB Servers. CDDB reserves the right to
delete data from the CDDB Servers or to change
data categories for any cause that CDDB deems
sufficient. No warranty is made that the CDDB
Client or CDDB Servers are error-free or that
functioning of CDDB Client or CDDB Servers
will be uninterrupted. CDDB is not obligated to
provide you with any new enhanced or additional
data types or categories that CDDB may chose to
provide in the future.
CDDB DISCLAIMS ALL WARRANTIES
EXPRESS OR IMPLIED, INCLUDING, BUT
NOT LIMITED TO, IMPLIED WARRANTIES
OF MERCHANTABILITY, FITNESS FOR A
PARTICULAR PURPOSE, TITLE AND NONINFRINGEMENT. CDDB does not warrant the
results that will be obtained by your use of the
CDDB Client or any CDDB Server. IN NO CASE
WILL CDDB BE LIABLE FOR ANY
CONSEQUENTIAL OR INCIDENTIAL
DAMAGES OR FOR ANY LOST PROFITS, OR
LOST REVENUES.
TERMINATION
The license granted to you is effective until
terminated. You may terminate it at any time by
returning the Software (including any portions or
copies thereof) to Creative. The license will also
terminate automatically without any notice from
Creative if you fail to comply with any term or
condition of this Agreement. You agree upon such
termination to return the Software (including any
portions or copies thereof) to Creative. Upon
termination, Creative may also enforce any rights
provided by law. The provisions of this Agreement
that protect the proprietary rights of Creative will
continue in force after termination.
LIMITED WARRANTY
Creative warrants, as the sole warranty, that the
disks on which the Software is furnished will be free
of defects, as set forth in the Warranty Card or
printed manual included with the Software. No
distributor, dealer or any other entity or person is
authorized to expand or alter this warranty or any
other provisions of this Agreement. Any
representation, other than the warranties set forth in
this Agreement, will not bind Creative.
Creative does not warrant that the functions
contained in the Software will meet your
requirements or that the operation of the Software
will be uninterrupted, error-free or free from
malicious code. For purposes of this paragraph,
“malicious code” means any program code designed
to contaminate other computer programs or
computer data, consume computer resources,
modify, destroy, record, or transmit data, or in some
other fashion usurp the normal operation of the
computer, computer system, or computer network,
including viruses, Trojan horses, droppers, worms,
logic bombs, and the like. EXCEPT AS STATED
ABOVE IN THIS AGREEMENT, THE
SOFTWARE IS PROVIDED AS-IS WITHOUT
WARRANTY OF ANY KIND, EITHER
EXPRESS OR IMPLIED, INCLUDING, BUT
NOT LIMITED TO, ANY IMPLIED
WARRANTIES OF MERCHANTABILITY
AND FITNESS FOR A PARTICULAR
PURPOSE. CREATIVE IS NOT OBLIGATED
TO PROVIDE ANY UPDATES, UPGRADES
OR TECHNICAL SUPPORT FOR THE
SOFTWARE.
Further, Creative shall not be liable for the accuracy
of any information provided by Creative or third
party technical support personnel, or any damages
caused, either directly or indirectly, by acts taken or
omissions made by you as a result of such technical
support.
You assume full responsibility for the selection of
the Software to achieve your intended results, and
for the installation, use and results obtained from the
Software. You also assume the entire risk as it
applies to the quality and performance of the
Software. Should the Software prove defective, you
(and not Creative, or its distributors or dealers)
assume the entire cost of all necessary servicing,
repair or correction.
This warranty gives you specific legal rights, and
you may also have other rights which vary from
country/state to country/state. Some countries/states
do not allow the exclusion of implied warranties, so
the above exclusion may not apply to you. Creative
disclaims all warranties of any kind if the Software
was customized, repackaged or altered in any way
by any third party other than Creative.
LIMITATION OF REMEDIES AND
DAMAGES
THE ONLY REMEDY FOR BREACH OF
WARRANTY WILL BE THAT SET FORTH IN
THE WARRANTY CARD OR PRINTED
MANUAL INCLUDED WITH THE
SOFTWARE. IN NO EVENT WILL
CREATIVE OR ITS LICENSORS BE LIABLE
FOR ANY INDIRECT, INCIDENTAL,
SPECIAL OR CONSEQUENTIAL DAMAGES
OR FOR ANY LOST PROFITS, LOST
SAVINGS, LOST REVENUES OR LOST DATA
ARISING FROM OR RELATING TO THE
SOFTWARE OR THIS AGREEMENT, EVEN
IF CREATIVE OR ITS LICENSORS HAVE
BEEN ADVISED OF THE POSSIBILITY OF
SUCH DAMAGES. IN NO EVENT WILL
CREATIVE’S LIABILITY OR DAMAGES TO
YOU OR ANY OTHER PERSON EVER
EXCEED THE AMOUNT PAID BY YOU TO
USE THE SOFTWARE, REGARDLESS OF
THE FORM OF THE CLAIM.
Some countries/states do not allow the limitation or
exclusion of liability for incidental or consequential
damages, so the above limitation or exclusion may
not apply to you.
PRODUCT RETURNS
If you must ship the software to Creative or an
authorized Creative distributor or dealer, you must
prepay shipping and either insure the software or
assume all risk of loss or damage in transit.
U.S. GOVERNMENT RESTRICTED RIGHTS
All Software and related documentation are
provided with restricted rights. Use, duplication or
disclosure by the U.S. Government is subject to
restrictions as set forth in subdivision (b)(3)(ii) of
the Rights in Technical Data and Computer
Software Clause at 252.227-7013. If you are sublicensing or using the Software outside of the United
States, you will comply with the applicable local
laws of your country, U.S. export control law, and
the English version of this Agreement.
CONTRACTOR/MANUFACTURER
The Contractor/Manufacturer for the Software is:
Creative Technology Ltd
31, International Business Park
Creative Resource
Singapore 609921
GENERAL
This Agreement is binding on you as well as your
employees, employers, contractors and agents, and
on any successors and assignees. Neither the
Software nor any information derived therefrom
may be exported except in accordance with the laws
of the U.S. or other applicable provisions. This
Agreement is governed by the laws of the State of
California (except to the extent federal law governs
copyrights and federally registered trademarks).
This Agreement is the entire agreement between us
and supersedes any other understandings or
agreements, including, but not limited to,
advertising, with respect to the Software. If any
provision of this Agreement is deemed invalid or
unenforceable by any country or government agency
having jurisdiction, that particular provision will be
deemed modified to the extent necessary to make the
provision valid and enforceable, and the remaining
provisions will remain in full force and effect.
For questions concerning this Agreement, please
contact Creative at the address stated above. For
questions on product or technical matters, contact
the Creative technical support center nearest you.
ADDENDUM TO THE MICROSOFT
SOFTWARE LICENSE AGREEMENT
(WINDOWS 95)
IMPORTANT: By using the Microsoft software
files (the “Microsoft Software”) provided with this
Addendum, you are agreeing to be bound by the
following terms. If you do not agree to be bound by
these terms, you may not use the Microsoft
Software.
The Microsoft Software is provided for the sole
purpose of replacing the corresponding files
provided with a previously licensed copy of the
Microsoft software product identified above
(“ORIGINAL PRODUCT”). Upon installation, the
Microsoft Software files become part of the
ORIGINAL PRODUCT and are subject to the same
warranty and license terms and conditions as the
ORIGINAL PRODUCT. If you do not have a valid
license to use the ORIGINAL PRODUCT, you may
not use the Microsoft Software. Any other use of the
Microsoft Software is prohibited.
SPECIAL PROVISIONS APPLICABLE TO
THE EUROPEAN UNION
IF YOU ACQUIRED THE SOFTWARE IN THE
EUROPEAN UNION (EU), THE FOLLOWING
PROVISIONS ALSO APPLY TO YOU. IF THERE
IS ANY INCONSISTENCY BETWEEN THE
TERMS OF THE SOFTWARE LICENSE
AGREEMENT SET OUT EARLIER AND IN THE
FOLLOWING PROVISIONS, THE FOLLOWING
PROVISIONS SHALL TAKE PRECEDENCE.
DECOMPILATION
You agree not for any purpose to transmit the
Software or display the Software’s object code on
any computer screen or to make any hard copy
memory dumps of the Software’s object code. If you
believe you require information related to the
interoperability of the Software with other
programs, you shall not decompile or disassemble
the Software to obtain such information, and you
agree to request such information from Creative at
the address listed earlier. Upon receiving such a
request, Creative shall determine whether you
require such information for a legitimate purpose
and, if so, Creative will provide such information to
you within a reasonable time and on reasonable
conditions.
LIMITED WARRANTY
EXCEPT AS STATED EARLIER IN THIS
AGREEMENT, AND AS PROVIDED UNDER
THE HEADING “STATUTORY RIGHTS”,
THE SOFTWARE IS PROVIDED AS-IS
WITHOUT WARRANTY OF ANY KIND,
EITHER EXPRESS OR IMPLIED,
INCLUDING, BUT NOT LIMITED TO, ANY
IMPLIED WARRANTIES OR CONDITIONS
OF MERCHANTABILITY, QUALITY AND
FITNESS FOR A PARTICULAR PURPOSE.
LIMITATION OF REMEDY AND DAMAGES
THE LIMITATIONS OF REMEDIES AND
DAMAGES IN THE SOFTWARE LICENSE
AGREEMENT SHALL NOT APPLY TO
PERSONAL INJURY (INCLUDING DEATH)
TO ANY PERSON CAUSED BY CREATIVE’S
NEGLIGENCE AND ARE SUBJECT TO THE
PROVISION SET OUT UNDER THE
HEADING “STATUTORY RIGHTS”.
STATUTORY RIGHTS
Irish law provides that certain conditions and
warranties may be implied in contracts for the sale
of goods and in contracts for the supply of services.
Such conditions and warranties are hereby excluded,
to the extent such exclusion, in the context of this
transaction, is lawful under Irish law. Conversely,
such conditions and warranties, insofar as they may
not be lawfully excluded, shall apply.
Accordingly nothing in this Agreement shall
prejudice any rights that you may enjoy by virtue of
Sections 12, 13, 14 or 15 of the Irish Sale of Goods
Act 1893 (as amended).
GENERAL
This Agreement is governed by the laws of the
Republic of Ireland. The local language version of
this agreement shall apply to Software acquired in
the EU. This Agreement is the entire agreement
between us, and you agree that Creative will not
have any liability for any untrue statement or
representation made by it, its agents or anyone else
(whether innocently or negligently) upon which you
relied upon entering this Agreement, unless such
untrue statement or representation was made
fraudulently.
Safety Information
The following sections contain notices for
various countries:
CAUTION: This device is intended to be installed
by the user in a CSA/TUV/UL certified/listed IBM
AT or compatible personal computers in the
manufacturer’s defined operator access area. Check
the equipment operating/installation manual and/or
with the equipment manufacturer to verify/confirm
if your equipment is suitable for user-installed
application cards.
Modifications
Any changes or modifications not expressly
approved by the grantee of this device could void the
user’s authority to operate the device.
Compliance
This product conforms to the following Council
Directive:
❑
Directive 89/336/EEC, 92/31/EEC (EMC)
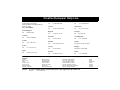
Contents
Introduction
3
System Requirements ..........................................................x
Before You Begin ....................................................x
Getting More Information .......................................x
Document Conventions ...........................................x
1
2
Installing the Software ..................................................... 3-1
Setting Up Joystick Drivers in Windows NT 4.0 ........... 3-1
Uninstalling Sound Blaster PCI512 ................................ 3-2
Reinstalling the Audio Drivers From the Installation
Disc................................................................................. 3-2
Knowing and Installing Your Card
On the Audio Card........................................................... 1-1
Installing the Card and Related Peripherals.................... 1-2
Positioning Your Speakers............................................... 1-4
A
General Specifications
Features............................................................................ A-1
Connectivity .................................................................... A-2
Installing Software in Windows 95/98
Setting Up the Audio Drivers .......................................... 2-1
Installing the Applications............................................... 2-3
Using Sound Blaster PCI512........................................... 2-3
Configuring Your Speakers ............................................. 2-4
Uninstalling the Applications.......................................... 2-4
Reinstalling the Audio Drivers From the Installation
Disc................................................................................. 2-4
Playing Legacy Games .................................................... 2-4
Installing Software in Windows NT 4.0
/ Windows 2000 / Windows ME
B
SB Emulation in MS-DOS/ Window
95/98
Background ..................................................................... B-1
Understanding the Installation Program in Windows
95/98.............................................................................. B-1
The AUTOEXEC.BAT File Settings................. B-1
The CONFIG.SYS File Settings........................ B-2
Understanding the System Resource Settings ............... B-2
Input/Output (I/O) Addresses............................. B-2
Interrupt Request (IRQ) Line ............................. B-3
Direct Memory Access (DMA) Channel........... B-3
Understanding the Environment Variables .................... B-3
CTSYN Environment Variable .......................... B-3
BLASTER Environment Variable...................... B-3
Determining Resources................................................... B-3
Selecting the Best Audio Options in a Game ................ B-4
Music Options..................................................... B-4
Digital Audio Options......................................... B-5
MS-DOS Mode Utilities................................................. B-5
SBECFG.EXE .................................................... B-5
SBEMIXER.EXE ............................................... B-5
SBESET.EXE...................................................... B-6
SBEGO.EXE....................................................... B-6
C
Changing Audio Card Settings
Enabling/Disabling Gameport Joystick Interface.......... C-1
Enabling/Disabling Other Features ................................ C-1
D
Troubleshooting
Problems Installing Software.......................................... D-1
Problems With Sound ..................................................... D-1
Insufficient SoundFont Cache ........................................ D-3
Problems With Joystick................................................... D-3
Resolving I/O Conflicts .................................................. D-3
Problems in Windows NT 4.0 ........................................ D-4
Creative European Help Line
Introduction
Sound Blaster PCI512 is Creative’s entrylevel Environmental Audio™ audio card for
high quality 3D gaming. It offers SB PCI
compatibility, real-time special effects, high
quality 4-speaker output, and full
environmental support for the largest number
of supported titles and applications from the
past, present and future.
Powerful Audio Processing Engine
The EMU10K1™ audio processor is the
most powerful integrated music, audio
and effects engine available. Every
signal is processed at 32-bit, 48 kHz
using 8-point interpolation to smoothen
the sound—instantly improving any
audio source. Besides advanced signal
processing, the EMU10K1 also provides
real-time effects including Reverb,
Chorus, Flanger, Echo, and Pitch Shifter,
that rival a stand-alone effects processor
worth US$500.
Environmental Audio™ Enhances
Existing Contents
Experience depth and realism beyond
existing 3D audio. Apply preset environments
such as hall, cave or underwater that can be
applied to your existing games and
applications for incredibly true sound. Game
environmental settings also make your
existing games come “alive” instantaneously.
Multiple Speaker Output
Produce surround-sound audio on your
PC with built-in support for two or four
analog speakers.
Sound Blaster PCI Standard
You can be assured of near-perfect Sound
Blaster compatibility on the PCI bus while
enjoying all its benefits. It works with the
existing MS-DOS®-based and Windows®based titles, providing support on these legacy
applications.
ix
System Requirements
Before You Begin
Document Conventions
For Creative software, your card requires at
least:
❑ Pentium® class processor:
133 MHz for Windows 95/98/ME,
200 MHz for Windows NT 4.0/
Windows 2000
❑ Windows 95, 98 or Windows NT 4.0 or
Windows 2000
❑ 16 MB RAM for Windows 95/98/ME
(32 MB RAM recommended),
32 MB RAM for Windows NT 4.0
64 MB RAM for Windows 2000
❑ 33 MB of free hard disk space
❑ One free PCI bus slot
❑ Powered speakers or external amplifier
(recommended: Cambridge SoundWorks
speakers)
Sound Blaster PCI512 gives you an estimate
of the hard disk space required when you
select it on the installation screen. Some
applications may require a system
configuration greater than that listed above.
Refer to online documentation (README or
HLP files) or specifications on the outer box
for details.
The README file on the installation CDROM contains information and changes not
available at the time of printing. Read the file
before you continue.
The following typographical conventions are
used throughout this document:
x
bold
Text that must be entered
exactly as it appears.
italic
Title of a book or a
placeholder, which
represents the
information you must
provide.
UPPERCASE
Directory name, file
name, or acronym.
Getting More Information
See the online User’s Guide for MIDI
specifications and connector pin assignments,
as well as instructions on using the various
applications in your audio package.
The notepad icon
indicates information
that is of particular
importance and should
be considered before
continuing.
The exclamation mark
icon designates a caution
or warning that can help
you avoid situations
involving risk.
1
Chapter
Knowing and Installing Your Card
This chapter is organized as follows:
❑ On the Audio Card
❑ Installing the Card and Related
Peripherals
❑ Positioning Your Speakers
Jacks are one-hole connecting
interfaces whereas connectors
consist of many pairs of pins.
Some connectors here may not
be available on your card. Refer
to the online User’s Guide,
“Hardware Information”, for
details on connector pin
assignments.
Line Out and Rear Out jacks
can be used simultaneously to
power 4.1 channel speaker
systems, for example, the
FourPointSurround™ series
from Cambridge SoundWorks.
On the Audio Card
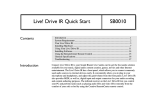
Your audio card has these jacks and connectors which allow you to attach other devices:
Telephone Answering Device connector
Provides a mono connection from a standard
voice modem, and transmits microphone signals
to the modem.
Line In jack (blue)
Connects to external devices (such as
a cassette player.
Microphone In jack (red)
CD Audio connector
Connects to the Analog Audio
output on a CD-ROM or DVD-ROM
drive using a CD audio cable.
AUX connector
Connects to internal audio
sources such as TV Tuner,
MPEG, or other similar cards
Connects to an external microphone
for voice input.
Line Out jack (green)
Connects to powered speakers or
an external amplifier for audio
output. Also supports headphones.
Rear Out jack (black)
Connects to powered speakers or an
external amplifier for audio output.
Joystick/MIDI connector
Connects to a joystick or a MIDI device.
You can buy an optional MIDI kit that
allows you to plug in the joystick and
MIDI device simultaneously.
Figure 1-1: Jacks and connectors on the Sound Blaster PCI512 card.
Knowing and Installing Your Card 1-1
Installing the Card
and Related
Peripherals
1. Switch off your system and all peripheral
devices.
2. Touch a metal plate on your system to
ground yourself and to discharge any static
electricity, and then unplug the power cord
from the wall outlet.
3. Remove the cover from your system.
4. Remove the metal plate from an unused
PCI expansion slot in your system and put
the screw aside, to be used later.
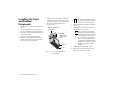
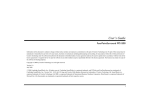
5. Align the audio card with the vacant PCI
expansion slot. Press the card gently and
evenly into the slot as shown. Ensure that
the card sits firmly inside the PCI
expansion slot.
6.
7.
ii. Fasten the card to the slot
with a screw.
Unused brackets
i. Gently press the
audio card into
the slot.
PCI slot
ISA slot
Figure 1-2: Securing the audio card to the
PCI expansion slot.
1-2 Knowing and Installing Your Card
8.
9.
Do not force the audio card into
the slot. If it does not fit properly,
gently remove it and try again.
Secure the card to the expansion slot with
a screw.
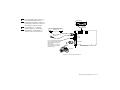
See Figure 1-3 to learn how to connect
various devices to your card.
The joystick connector on your
audio card is identical to that on a
standard PC game control adapter
or the game I/O connector. You
can connect any analog joystick
with a 15-pin D-shell connector
or any device compatible with the
standard PC joystick. To use two
joysticks, you need a Y-cable
splitter.
Replace the cover onto your system.
Plug the power cord back into the wall
outlet, and switch on the system.
For a 4-channel speaker system (e.g.,
the FourPointSurround series by
Cambridge SoundWorks), connect its
F(ront) plug to the Line Out jack and
R(ear) plug to the Rear Out jack.
For headphones or a 2-channel
speaker system (e.g., PCWorks™,
SoundWorks® or MicroWorks™):
connect to the Line Out jack only.
CD-ROM drive
MPC-to-MP
C (4-pin)
audio cable
Line-out Cassette and CD player,
Synthesizer, etc.
Line In
Mic In
Microphone
Line Out
Rear Out
For a 4-channel speaker system.
Connect its F(ront) plug to the Line
Out jack and R(ear) plug to the
Rear Out jack.
For headphones or a 2-channel
speaker system, connect to the
Line Out jack only.
Joystick/MIDI
SB PCI512 card
GamePad
Figure 1-3: Connecting other devices.
Knowing and Installing Your Card 1-3
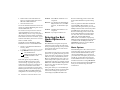
Positioning Your
Speakers
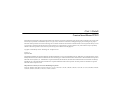
If you are using four speakers, place them such that they form the corners of a square with you
exactly in the center (as in Figure 1-4) and that they are angled toward you. Make sure the
computer monitor is not blocking the path of your front speakers. You may want to adjust the
relative positions of the speakers until you get the audio experience you like best. If you have a
subwoofer, place the unit in a corner of the room for the best bass experience.
Subwoofer
Computer monitor
Front right
speaker
Front left
speaker
You
Rear left
speaker
Rear right
speaker
Figure 1-4: Recommended speaker positions for the 4-speaker configuration.
1-4 Knowing and Installing Your Card
2
Chapter
Installing Software in Windows 95/98
This chapter shows you how to install the
audio software in Windows 95/98 after
installing your card. It consists of the
following sections:
❑ Setting Up the Audio Drivers
❑ Installing the Applications
drivers. You may encounter the following
messages, which may not be in the sequence
shown.
❑ If a message similar to Figure 2-1 appears,
just take note of it and wait for the next
message.
❑ If a dialog box similar to Figure 2-2
appears, click the Driver from disk
provided by hardware manufacturer
option, and then click the OK button.
❑ Using Sound Blaster PCI512
❑ Configuring Your Speakers
❑ Uninstalling the Applications
❑ Reinstalling the Audio Drivers From the
Installation Disc
❑ Playing Legacy Games
Setting Up the Audio
Drivers
You need device drivers to control the
components on your audio card. After you
have installed the card and switched on your
system, Windows 95/98 automatically detects
the components, and then either installs the
drivers automatically or prompts you for the
Figure 2-1: Message box indicating the detection
of a device.
Figure 2-2: Driver installation dialog box where
the Windows default driver option is
not available.
❑ If the Install From Disk dialog box or a
dialog box similar to Figure 2-3 appears:
1. Insert the installation disc into your
CD-ROM drive and select the drive.
Installing Software in Windows 95/98 2-1
2. If there is a Specify a location check box,
make sure it is selected and clear the other
check boxes.
❑ If a dialog box similar to Figure 2-4
appears:
3. Click the Browse button and select the
folder
AUDIO\Language\WIN9XDRV
where Language is the language of the
software that you want to install.
5. At the Copying Files dialog box, click
the Browse button and select the folder
AUDIO\Language\WIN9XDRV
where Language is the language of the
software that you want to install.
6. Click the Open button, and then click the
OK button twice.
The file is copied to your hard disk.
❑ If a dialog box similar to Figure 2-5
appears, click the Next button, and follow
the instructions on the screen to complete
the installation of the driver.
4. Click the OK button.
The required files are copied to your hard
disk.
Figure 2-4: Update Device Driver Wizard
dialog box when driver cannot be
found.
1. Click the Other Locations button.
Figure 2-3: Windows 98 Add New Hardware
Wizard dialog box.
2. At the Select Other Locations dialog
box, click the Browse button and select
the folder
AUDIO\Language\WIN9XDRV
where Language is the language of the
software that you want to install.
3. Click the OK button, and then click the
Finish button.
Some of the required files are copied to
your hard disk. However, an error
message stating that a file
(2GMGSMT.SF2 or otherwise) cannot be
found also appears.
4. Click the OK button.
2-2 Installing Software in Windows 95/98
Figure 2-5: Update Device Driver Wizard dialog
box at start of installation.
❑ If a Version Conflict message box
appears about VJOYD.VXD and
MSJSTICK.DRV, click the Yes button to
keep the files.
Installing the
Applications
Using Sound Blaster PCI512
1. If your installation disc is already in your
CD-ROM drive, eject the disc and insert it
again.
The disc supports Windows AutoPlay
mode and starts running automatically. If
not, see “Problems Installing Software”
on page D-1.
2. Follow the instructions on the screen to
complete the installation
Creative Launcher is a one-stop shortcut to quickly start your applications.
To display Launcher, bring your pointer to the top of the screen.
Every bundled application provides online help to guide you along when you use it.
Figure 2-6: Creative Launcher.
Creative PlayCenter allows you to play most types of media—multimedia files (MIDI, Wave,
etc.), audio CDs, and Video CDs—using a single player! There is no need to use different players
to play different media types. Just insert or select your media and PlayCenter will do the rest.
Figure 2-7: Creative PlayCenter.
To run PlayCenter, bring your pointer to the top of the screen to display Creative Launcher, click
your Sound Blaster tab, and then click the PlayCenter icon.
Installing Software in Windows 95/98 2-3
Configuring Your
Speakers
Uninstalling the
Applications
1. Bring your pointer to the top of the
screen to display Creative Launcher,
click the AudioHQ tab, and then click
the Speaker icon.
The Speaker dialog box appears.
2. On the Configuration tabbed page, make
sure that the value in the Output box
corresponds to the number of speakers
you are using. For example, if you are
using two pairs of speakers, select the “4
Speakers” option; if you leave the
Output value as “2 Speakers”, there will
be no sound from your rear speakers.
The Windows Uninstall feature allows you to
cleanly remove applications and to reinstall
them in order to correct problems, change
configurations, or make version upgrades.
If you have a 4-speaker
configuration (2 in the front, 2 in
the rear), and there is no sound
coming from the rear speakers,
open the Speaker applet to change
to the correct speaker output
setting.
3. Using Creative PlayCenter or Windows
Media Player, open a Wave file in your
computer and play it. In the Speaker
dialog box, drag the Wave source icon
from the Panning Source box to each
speaker in the Preview box in turn.
You should hear the selected sound being
played. If you do not, see “Problems With
Sound” on page D-1.
2-4 Installing Software in Windows 95/98
Reinstalling the Audio
Drivers From the
Installation Disc
You may want to reinstall the audio drivers if
you think they have been corrupted.
To uninstall the applications:
To do so:
1. Click Start -> Settings -> Control
Panel.
1. Insert the installation disc into your
CD-ROM drive.
2. Double-click the Add/Remove
Programs icon.
3. In the Add/Remove Programs
Properties dialog box, select the target
programs including Sound Blaster
PCI512, and then click the Add/Remove
button.
2. Run the UPDDRV95.EXE program from the
AUDIO\Language\WIN9XDRV folder
of your CD-ROM drive, where Language
is the language of the software that you
want to install.The updating process may
take a while. When the progress indicator
box disappears, the update is complete.
4. Follow the instructions on the screen to
uninstall.
Playing Legacy Games
Quit the audio card’s applications
before uninstalling. Applications
that are still running during
uninstallation will not be
uninstalled.
Some applications may share files
with other Windows applications.
If so, the uninstallation program
will prompt you when it tries to
delete these files. Do not delete the
files unless you are sure that you
do not need to use them.
For more information, see Appendix B, “SB
Emulation in MS-DOS/ Window 95/98”.
3
Chapter
Installing Software in Windows NT 4.0 /
Windows 2000 / Windows ME
This chapter shows you how to install the
audio software in Windows NT 4.0/Windows
2000 and Windows ME after installing your
card. It consists of the following sections:
❑ Installing the Software
❑ Setting Up Joystick Drivers in Windows
NT 4.0
❑ Uninstalling Sound Blaster PCI512
❑ Reinstalling the Audio Drivers From the
Installation Disc
You cannot install more than one
Sound Blaster audio card of the same
type on your computer.
Installing the
Software
The software installation in NT 4.0/Windows
2000/Windows ME includes the installation of
audio drivers.
1. Insert the installation disc into your
CD-ROM drive.
The AutoPlay screen appears.
2. Follow the instructions on the screen to
complete the installation.
Windows 2000 only installs a set of
basic audio drivers for your card. To
install the latest audio drivers, use the
installation CD provided.
Setting Up Joystick
Drivers in Windows
NT 4.0
1. Log on to your computer as Administrator.
2. Click Start -> Settings -> Control Panel.
3. Double-click the Multimedia icon, click
the Devices tab, and then click the Add
button.
4. Insert the Windows NT 4.0 CD-ROM
which contains the JOYSTICK.SYS file
into the CD-ROM drive.
5. In the List of Drivers box of the Add
dialog box, select Unlisted Or Updated
Driver, and then click the OK button.
6. In the Install Driver dialog box, type
E:\DRVLIB\MULTIMED\JOYSTICK\X86
if E:\ is the CD-ROM drive letter, and then
click the OK button.
7. In the Add Unlisted Or Updated Driver
dialog box, click Analog Joystick Driver,
and then click the OK button.
Installing Software in Windows NT 4.0 / Windows 2000 / Windows ME 3-1
8. In the Microsoft Joystick Configuration
dialog box, select your configuration, and
then click the OK button.
9. Restart your computer when prompted.
In Windows 2000, the joystick drivers
are automatically set up.
See “Using Sound Blaster PCI512” on page
2-3 and “Configuring Your Speakers” on page
2-4. They also apply in Windows NT 4.0.
Uninstalling Sound
Blaster PCI512
To uninstall the Sound Blaster PCI512
software, follow the steps listed in the section
“Uninstalling the Applications” on page 2-4.
They also apply in Windows NT 4.0/Windows
2000 and Windows ME.
Reinstalling the Audio
Drivers From the
Installation Disc
You may want to reinstall the audio drivers if
you think they are corrupted.
Windows NT 4.0
1. Insert the installation CD into your
CD-ROM drive.
2. Run the UPDPCINT.EXE program from the
AUDIO\Language\NT4DRV folder of your
CD-ROM drive, where Language is the
language of the software that you want to
install.
3. Restart your computer when prompted.
You may be prompted to restart more than
once.
4. If a Windows NT 4.0 Service Control
Manager error message appears,
see “Resolving I/O Conflicts” on page
D-3.
Windows 2000 / Windows ME
1. Insert the installation disc into your
CD-ROM drive.
2. Click Start -> Settings -> Control Panel.
3. Double-click the System icon.
4. In the dialog box that appears, click the
Hardware tab and then click the Device
Manager button.
3-2 Installing Software in Windows NT 4.0 / Windows 2000 / Windows ME
5. On the Devices tabbed page, expand the
Sound, video and game controllers
branch.
6. Select Creative SB PCI512 (WDM), and
then click the Properties button.
7. On the Driver tabbed page, click the
Update Driver button.
8. In the Upgrade Device Driver Wizard
dialog box, click the Next button.
9. In the dialog box that appears, select the
Display a list of the known drivers for
this device so that I can choose a specific
driver option, and then click the Next
button.
10. In the dialog box that appears, click the
Have Disk button.
11. In the Install from Disk dialog box, click
the Browse button to browse to the
AUDIO_W\Language\WDMDRV or
AUDIO\Language\WINMEDRV folder
of your CD-ROM drive, where Language
is the language of the software that you
want to install, and then click the OK
button.
12. In the Upgrade Device Driver Wizard
dialog box, select Creative Sound
Blaster PCI512, and then click the Next
button twice.
13. In the dialog box that appears, click the
Yes button.
14. Click the Finish button.
A
Appendix
General Specifications
This section lists the specifications of your
card.
Stereo Digitized Voice Channel
Volume Control
❑ True 16-bit Full Duplex operation
❑ Software record and playback control of
Master, Digitized Voice, and inputs from
MIDI device, CD Audio, Line,
Microphone, Auxiliary, TAD, and
Wave/DirectSound device
Features
❑ 16-bit and 8-bit digitizing in stereo and
mono modes
PCI Bus Mastering
❑ Playback of 64 audio channels, each at an
arbitrary sample rate
❑ PCI Specification Version 2.1 compliant
❑ Bus mastering reduces latency and speeds
up system performance
❑ ADC recording sampling rates: 8, 11.025,
16, 22.05, 24, 32, 44.1 and 48 kHz
❑ Dithering for 8-bit and 16-bit recording
EMU10K1
AC ’97 Codec Mixer
❑ Advanced hardware accelerated digital
effects processing
❑ Mixes EMU10K1 audio sources and
analog sources such as CD Audio, Line In,
Microphone, Auxiliary, and TAD
❑ 32-bit digital processing while
maintaining a 192 dB dynamic range
❑ Patented 8-point interpolation that
achieves the highest quality of audio
reproduction
❑ 64-voice hardware wavetable synthesizer
❑ Separate bass and treble control
❑ Front and Rear Balance control
❑ Muting and balance control for individual
playback sources
❑ Selectable input source or mixing of
various audio sources for recording
❑ High quality Analog-to-Digital
conversion of analog inputs at 48 kHz
sample rate
❑ Professional-quality digital mixing and
equalization
General Specifications A-1
Connectivity
Audio Inputs
❑ One line-level analog Line input via (blue)
stereo jack on rear bracket
❑ One mono Microphone analog input via
(red) stereo jack on rear bracket
❑ CD_IN line-level analog input via 4-pin
Molex connector on card
❑ AUX_IN line-level analog input via 4-pin
Molex connector on card
❑ TAD line-level analog input via 4-pin
Molex connector on card
Audio Outputs
❑ Two line-level analog outputs via stereo
jacks on rear bracket, Front and Rear
Line-Outs
❑ Stereo headphone (32-ohm load) support
on Front Line-Out
A-2 General Specifications
B
Appendix
SB Emulation in MS-DOS/ Window 95/98
This appendix is organized as follows:
❑ Background
❑ Understanding the Installation Program in
Windows 95/98
❑ Understanding the System Resource
Settings
❑ Understanding the Environment Variables
❑ Determining Resources
❑ Selecting the Best Audio Options in a
Game
❑ MS-DOS Mode Utilities
Background
Legacy games in the market have been
designed for only MS-DOS. SB PCI512
supports MS-DOS games. There are two ways
to play MS-DOS games:
❑ From the MS-DOS box in Windows
95/98
This is the recommended method.
To open the box:
•
Click the Start button on the taskbar of
Windows 95/98, point to Programs,
and then click MS-DOS Prompt.
❑ In the Windows 95/98 MS-DOS mode
There could be times when you do not
want to or cannot run a game from the
MS-DOS box. The game may be
incompatible with Windows 95/98, or
there is insufficient system resources to
play the game with Windows 95/98
loaded. In such cases, use the MS-DOS
mode, in which only the real-mode
portions of Windows 95/98 are loaded.
To restart the system in MS-DOS mode
when you are already in Windows 95/98:
1. Click the Start button on the taskbar, and
then click Shutdown.
2. Click the Restart The Computer In
MS-DOS Mode option button, and then
click the OK button.
To start the system in MS-DOS mode at
system startup:
1. At startup as Windows 95/98 is loading,
hold the F8 key.
2. At the startup menu, choose the Command
Prompt Only option, and then press
<Enter>.
Understanding the
Installation Program
in Windows 95/98
The installation program modifies your
AUTOEXEC.BAT and CONFIG.SYS files.
The AUTOEXEC.BAT File
Settings
The installation program adds the following
statements to the AUTOEXEC.BAT file:
SET CTSYN=C:\WINDOWS
SET BLASTER=A220 I5 D1 H5 P330 T6
C:\PROGRA~1\CREATIVE\SBPCI512\DOSDRV\SBEINIT.C
OM
SB Emulation in MS-DOS/ Window 95/98 B-1
The first two statements set up the
environment variables for your audio card. For
an explanation of the variables, see
“Understanding the Environment Variables”
on page B-3.
The third statement runs the SBEINIT.COM
driver. SBEINIT.COM is the SB PCI512
MS-DOS driver. It is required for the SB
PCI512 card to function properly under
MS-DOS mode. The syntax for the statement
is as follows:
<SB PCI512 path>\SBEINIT.COM
SBEINIT.COM requires that the
HIMEM.SYS and EMM386.EXE files are
loaded. If needed, the installation program
adds the necessary HIMEM.SYS and
EMM386.EXE lines to your CONFIG.SYS file,
creating the file if it is not present.
On the rare occasion a program does not work
with expanded memory, simply add the
NOEMS parameter to your memory manager.
For example:
DEVICE=C:\WINDOWS\EMM386.EXE NOEMS
if C:\WINDOWS is your Windows directory.
You may load this driver into high memory in
the AUTOEXEC.BAT file, even though the
default is not. For example:
LOADHIGH=C:\PROGRA~1\CREATIVE\SBPCI512\DOSDRV\
SBEINIT.COM
Do not remove the memory manager
altogether. Do not attempt to load
SBEINIT.COM into high memory when using
the NOEMS option if SBEINIT.COM fails to
run SBELOAD.EXE or SBECFG.EXE.
B-2 SB Emulation in MS-DOS/ Window 95/98
In the rare case that an MS-DOS game will not
work with a memory manager, you will not be
able to use the SB PCI512 card with the game.
The CONFIG.SYS File
Settings
The installation program adds the following
statements to the CONFIG.SYS file:
DEVICE=C:\WINDOWS\HIMEM.SYS
DEVICE=C:\WINDOWS\EMM386.EXE
Understanding the
System Resource
Settings
This section explains the following software
SB emulation resources—not hardware
resources—of your card:
❑ Input/Output (I/O) Addresses
❑ Interrupt Request (IRQ) Line
❑ Direct Memory Access (DMA) Channel
If your card encounters a conflict with
a peripheral device, you may need to
change its resource settings. For
details, see “Resolving I/O Conflicts”
on page D-3.
When any resource setting is changed,
make sure that the environment
variables (see “Understanding the
Environment Variables” on page B-3)
reflect the changes as well. You can
view your system environment by
typing SET at the DOS prompt.
In the following tables, the preferred
values are in bold.
Input/Output (I/O)
Addresses
I/O addresses are communication areas used
by your computer’s central processor to
distinguish among various peripheral devices
connected to your system when sending or
receiving data.
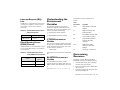
Table B-1: Possible default input/output (I/O)
addresses.
Device
Default I/O
Address Range
SB interface
220H to 22FH
240H to 24FH
260H to 26FH
280H to 28FH
300H to 301H
MPU-401 UART MIDI 310H to 311H
interface
320H to 321H
330H to 331H
Stereo music
synthesizer
388H to 38BH
Interrupt Request (IRQ)
Line
An IRQ line is a signal line that a device uses
to notify your computer’s central processor
that it wants to send or receive data for
processing.
Table B-2: Possible default interrupt request
(IRQ) line assignment.
Device
SB interface
Default IRQ Line
5, 7, 9, 10
Direct Memory Access
(DMA) Channel
A DMA channel is a data channel that a device
uses to transfer data directly to and from the
system memory.
Table B-3: Possible default direct memory
access (DMA) channel assignment.
Understanding the
Environment
Variables
Environment variables are used to pass
hardware configuration information to the
software in your system. For MS-DOS, your
audio card includes the following:
This
Parameter
Axxx
Ix
❑ CTSYN Environment Variable
❑ BLASTER Environment Variable
Dx
CTSYN Environment
Variable
Hx
The CTSYN environment variable points to the
location of the CTSYN.INI file, which usually
resides in the Windows directory. The syntax
for this variable is as follows:
CTSYN=path
where path is the location of the CTSYN.INI
file.
Default DMA
Channel
BLASTER Environment
Variable
First DMA channel
0, 1, 3
Second DMA channel
5, 6, 7
The BLASTER environment variable
specifies the base I/O address, IRQ line, and
DMA channels of the SB interface. Its syntax
is:
Usage
The parameters in the command are as
follows.
BLASTER=A220 I5 D1 H5 P330 T6
Pxxx
Tx
Specifies
SB interface’s base I/O
address.
IRQ line used by the
audio interface.
First DMA channel used
by the audio interface.
Second DMA channel
used by the audio
interface.
MPU-401 UART
interface’s base I/O
address.
Card type. x must be 6.
Determining
Resources
To find the current SB PCI512 SB16
Emulation resources in Windows 95/98:
1. Click the Start button, point to Settings,
and then click Control Panel.
2. In the Control Panel window, double-click
the System icon.
3. In the System Properties dialog box, click
the Device Manager tab.
SB Emulation in MS-DOS/ Window 95/98 B-3
4. Double-click Creative Miscellaneous
Devices, and then double-click Creative
SB PCI512 SB16 Emulation.
5. Click the Resources tab.
You can use the information in the resource list
to help you configure MS-DOS games for use
with the SB PCI512 card.
The resource list may show three entries of
“Input/Output Range” and two entries of
“Direct Memory Access”. They correspond to
the sequence of entries in Table 1 and Table 3.
If the number of entries do not match, a good
estimate of the identity of the device is its I/O
address or DMA channel.
To find the current SB PCI512 SB16
Emulation resources in MS-DOS mode:
1. Switch to your SB PCI512 DOS driver
directory, that is:
C:\PROGRA~1\CREATIVE\SBPCI512\DOSDRV
2. Type SBECFG and then press <Enter>.
The MS-DOS driver
SBEINIT.COM must be running
for SBECFG.EXE to work
properly.
Some older games may have difficulty
detecting the SB PCI512 card at certain
resource settings. Typically, these games
would expect the card to be at a fixed set of
resources and would fail to load if those
resources are not detected. If you have older
MS-DOS games that do not work properly, try
changing the SB PCI512 SB16 Emulation
configuration. Use the following as a guide:
B-4 SB Emulation in MS-DOS/ Window 95/98
Problem: Sound Blaster emulation is not
recognized.
Resource: Try switching the SB Emulation
IRQ between 5 and 7, use DMA
channel 1, use SB interface port
220.
Problem: The MPU-401emulation is not
recognized.
Resource: Try using Port address 330.
Selecting the Best
Audio Options in a
Game
Most MS-DOS–based games that provide
sound have some procedure for audio setup.
These procedures generally present you with a
list of popular audio cards or audio devices
from which to choose.
The methods used by games to present audio
options can vary greatly. Some may present a
single choice that corresponds to a particular
audio device, that is, Sound Blaster, Sound
Blaster 16, Roland Sound Canvas, and so on.
Others will provide an option for music and
digital audio separately; for example, General
MIDI music with Sound Blaster digital audio.
In such a case, there are often two separate
menus to configure.
Some games allow you to set the MIDI port
address and IRQ for music and sound. Make
sure that these settings correspond to the
values displayed by SBECFG.EXE or the
Resources tabbed page of the Creative SB
PCI512 SB16 Emulation Properties dialog
box.
There are games that offer MPU-401/Roland
(General MIDI or MT-32/LAPC-1) as an
option. Often these games allow you to set the
MIDI port address. Make sure that they match
the MIDI address in the Resources list on
Resources tabbed page of the Creative SB
PCI512 SB16 Emulation Properties dialog
box. The same values can be found under
“MPU-401 (General MIDI, Roland
MT-32/LAPC-1) Emulation”, displayed by
SBECFG.EXE in MS-DOS mode. Remember
to enable the MT-32 MIDI patch with the
SBEMIXER program if you select Roland
MT-32 or LAPC-1 for music.
Music Options
Most MS-DOS games offer a menu choice for
sound when they start up. If you have a choice
between General MIDI and MT-32, always
choose General MIDI, since it will provide
you with the best sound quality. If you need to
use MT-32, you must first switch from the
General MIDI instrument set (the default) to
the MT-32 instrument set using SBEMIXER.
Be sure to switch back to the General MIDI set
when you are finished using the MT-32
instrument set.
Digital Audio Options
SB PCI512 supports Sound Blaster, Sound
Blaster Pro, Sound Blaster 16, and Adlib
digital audio emulation. If an application
provides all these as options, specify the
choices in this order:
1.
2.
3.
4.
Sound Blaster 16
Sound Blaster Pro
Sound Blaster
Adlib
MS-DOS Mode
Utilities
The SB PCI512 card includes a few MS-DOS
utilities. These utilities require the SB PCI512
DOS driver SBEINIT.COM to be loaded.
The emulation settings appear only if they are
enabled.
SBEMIXER.EXE
Use SBEMIXER.EXE to change the volume
levels of the MPU-401 instrument set used on
the SB PCI512 card. You can use
SBEMIXER.EXE from the command
line—useful for advanced users who want to
set up batch files with particular volume
levels—or within the SBEMIXER screen. The
settings for SBEMIXER.EXE are independent
of the Creative Mixer settings in Windows
95/98.
To set SBEMIXER values in the command
line:
• At the DOS prompt, type the SBEMIXER
command in a single line. Its syntax is:
SBEMIXER [/S:x] [/W:x] [/C:x] [/M:x] [/?]
SBECFG.EXE
where square brackets [ ] denote optional
parameters, and:
Use the SBECFG.EXE utility to obtain the
hardware settings and the status of the SB
PCI512 card.Typing SBECFG.EXE at the
command prompt displays the following
hardware settings:
This
Parameter
/S:x
❑ PCI Hardware Settings: Port, IRQ
❑ Sound Blaster Emulation: Port, IRQ,
DMA
❑ MPU-401 Emulation (GM, Roland
MT-32/LAPC-1) Emulation: Port
❑ Adlib Emulation: Port
/W:x
/C:x
/M:x
/?
Synth MT-32/LAPC-1
mode.
For x, 0 is Off, 1 is On.
View a short description
of the parameters.
An example of an SBEMIXER command is
SBEMIXER /S:64 /W:120 /C:50 /M:0
which corresponds to “set the synth volume to
64, the Wave volume to 120, the CD audio
volume to 50, and turn off the Synth
MT-32/LAPC-1 mode”.
To set SBEMIXER values within the
Mixer screen:
• At the DOS prompt, type
SBEMIXER
The interactive editor mode allows you to
change the mixer settings with the mouse,
<Tab>, <PgUp>, <PgDn>, or arrow keys.
Use the Save button to save the settings for the
next session.
Specifies
Synth volume. x can be a
value from the range 0 to
127.
Wave volume. x can be a
value from the range 0 to
127.
CD audio volume. x can
be a value from the range
0 to 127.
SB Emulation in MS-DOS/ Window 95/98 B-5
SBESET.EXE
Use SBESET.EXE to manually configure SB
resources or disable SB Emulation. By default,
SB Emulation in DOS follows the Windows
settings. For example, if you disable SB
Emulation in Windows, in the next boot to
DOS SB Emulation in DOS disabled. Under
rare circumstances you may need to manually
reconfigure DOS SB Emulation, for example,
if there is conflict in DOS before it can boot to
Windows. SBESET.EXE is run from the
command line.
To set SBESET values in the command
line:
At the DOS prompt, type the SBESET
command in a single line. Its syntax is:
-Pxxx
-dx
-wx
MPU-401 UART
interface’s base I/O
address.
SB Emulation mode.
For x, 1 is Off, 0 is On.
Set x to 1 to use the
Windows-assigned
resource configuration.
Set x to 0 to use (your)
user-assigned resource
configuration.
See “Understanding the System
Resource Settings” on page B-2 for
a list of possible values.
An example of an SBESET command is
SBESET [-Axxx] [-Ix] [-Dx] [-Hx] [-Pxxx] [-dx] [-wx]
where square brackets [ ] denote optional
parameters, and:
This
Parameter
-Axxx
-Ix
-Dx
-Hx
Specifies
SB interface’s base I/O
address.
IRQ line used by the
audio interface.
First DMA channel used
by the audio interface.
Second DMA channel
used by the audio
interface.
B-6 SB Emulation in MS-DOS/ Window 95/98
SBESET -A240 -I5 -D3 -w0
which corresponds to “set the SB interface’s
base I/O address to 240, the IRQ line used by
the audio interface to 5, the First DMA
channel used by the audio interface to 3, and
use the Windows-assigned resource
configuration”.
SBEGO.EXE
Use this to confirm whether SB16 Emulation
is properly installed and working.
C
Appendix
Changing Audio Card Settings
You might want to disable interfaces that you
are not using to free up resources, for example,
when you do not have enough IRQ lines.
This appendix is organized as follows:
❑ Enabling/Disabling Gameport Joystick
Interface
❑ Enabling/Disabling Other Features
Enabling/Disabling
Gameport Joystick
Interface
The Gameport Joystick interface on your
audio card can be enabled or disabled in
Windows 95/98.
To enable or disable the interface in
Windows 95/98:
1. Click the Start button, point to Settings,
and then click Control Panel.
2. In the Control Panel window, double-click
the System icon.
3. In the System Properties dialog box, click
the Device Manager tab.
4. Double-click Sound, Video And Game
Controllers, and then select Creative
Gameport Joystick.
5. Click the Properties button.
6. In the Properties dialog box:
If you have an Original Configuration
(Current) check box:
• To enable the interface, make sure that
the check box is selected.
To disable it, clear the check box.
Enabling/Disabling
Other Features
In Windows 95/98 and Windows NT
4.0
Use the applications in Creative Launcher,
particularly those found in your Sound Blaster
and Creative AudioHQ tabs.
If you have a Disable In This Hardware
Profile check box:
• To enable the interface, clear the check
box.
To disable it, make sure that the check
box is selected.
7. Click OK to restart Windows and for the
change to take effect.
When the Gameport Joystick interface is
disabled, the entry in Device Manager has a
red cross.
Changing Audio Card Settings C-1
D
Appendix
Troubleshooting
This appendix provides tips for solving
problems you may encounter during
installation or normal use.
Problems Installing
Software
In Windows 95/98, the installation does
not start automatically after the
CD-ROM is inserted.
The AutoPlay feature in your Windows 95/98
system may not be enabled.
To start the installation program through
the My Computer shortcut menu:
1. Double-click the My Computer icon on
your Windows desktop.
2. In the My Computer window, right-click
the CD-ROM drive icon.
3. On the shortcut menu, click AutoPlay and
follow the instructions on the screen.
To enable AutoPlay through Auto Insert
Notification:
1. Click the Start button, select Settings, and
then click Control Panel.
2. In the Control Panel window, double-click
the System icon.
3. In the System Properties dialog box, click
the Device Manager tab and select your
CD-ROM drive.
4. Click the Properties button.
5. In the Properties dialog box, click the
Settings tab and select Auto Insert
Notification.
6. Click the OK button to exit from the dialog
box.
Problems With Sound
There is unexpected excessive
environmental sound or effects when
an audio file is being played.
To switch to an appropriate environment:
1. Open Environmental Audio Control
applet.
OR
Display Creative Launcher at the top or
bottom of your screen (bring your mouse
pointer to the top edge of the screen to
display Launcher). Then, click the
Environments tab.
2. In the Environment list, select “No
effects” or an appropriate environment.
No sound from the headphones.
Check the following:
❑ The headphones are connected to the Line
Out jack.
❑ In the Speaker applet (click the AudioHQ
icon on the taskbar, and then click the
Speaker icon), make sure the Output field
is set to Headphones.
The last selected preset is an inappropriate
environment for the current audio file.
Troubleshooting D-1
In a 4-speaker configuration, there is
no sound from the rear speakers.
Check the following:
❑ The rear speakers are connected to the
audio card’s Rear Out jack.
If, instead, you decide to select the
“What U Hear” device icon in the
Record Control view, then of these
five sources in the Play Control
view, you can unmute only one at a
time. Therefore, you can get sound
from the rear speakers only from
the unmuted source.
❑ If you are playing sound from one of these
sources.
the Play Control view and select the
Auxiliary device in the Record Control
view.
❑ If you have changed environments, go to
the Record Control view of Creative Mixer
and make sure that the check boxes of your
active sources are selected.
No audio output when playing digital
files such as.WAV, MIDI files or AVI
clips.
Possible causes:
❑ The speaker volume knob (if any) is not
set properly.
•
CD Audio
❑ The external amplifier or speakers are
connected to the wrong jack.
•
Line In
❑ There is a hardware conflict.
•
TAD
•
Auxiliary (AUX)
❑ The output selection in the Configuration
tabbed page of the Speaker applet is
incorrectly selected.
•
Microphone
To solve the problem:
1. In Creative Mixer’s Play Control view,
make sure the check box of the source
being played is unmuted, that is, enabled.
2. In the Record Control view, make sure the
corresponding check box is also selected.
For example, if you are playing DVD
games or movies, make sure in Creative
Mixer you unmute the Auxiliary device in
D-2 Troubleshooting
❑ The Original Sound slider in the Master
tabbed page of the Environmental Audio
applet is set at or near 0%.
Make sure that:
❑ The speakers’ volume control knob, if any,
is set at mid-range. Use Creative Mixer to
adjust the volume, if necessary.
❑ The powered speakers or external
amplifier are connected to the card’s Line
Out or Rear Out jack.
❑ No hardware conflict between the card
and a peripheral device. See “Resolving
I/O Conflicts” on page D-3.
❑ The output selection in the Speaker applet
corresponds to your speaker or headphone
configuration.
❑ The Original Sound slider in the Master
tabbed page of the Environmental Audio
applet is set to 100%.
No audio output when playing
CD-Audio.
OR
No audio output when playing DOS
games that require a CD-ROM.
To solve this problem:
•
Make sure the CD audio cable between the
CD-ROM drive and the audio card is
connected.
Insufficient
SoundFont Cache
Problems With
Joystick
Resolving I/O
Conflicts
There is insufficient memory to load
SoundFonts.
The joystick port is not working.
Conflicts between your audio card and another
peripheral device may occur if your card and
the other device are set to use the same I/O
address.
This may occur when a SoundFont-compatible
MIDI file is loaded or played.
Cause: There is insufficient memory
allocated to SoundFonts.
The audio card’s joystick port conflicts with
the system’s joystick port.
To solve this problem:
•
To use a smaller SoundFont bank:
•
On the Configure Banks tabbed page of
the SoundFont Control applet, select a
smaller SoundFont bank from the Select
Bank box.
The smallest SoundFont bank available is
2 MB (2GMGSMT.SF2).
The trade-off of a smaller SoundFont
bank is its lower sound quality.
Disable the audio card’s joystick port and
use the system port instead. For details,
see “Enabling/Disabling Gameport
Joystick Interface” on page C-1.
The joystick is not working properly in
some programs.
The program may use the system processor
timing to calculate the joystick position. When
the processor is fast, the program may
determine the position of the joystick
incorrectly, assuming that the position is out of
range.
To solve this problem:
•
Increase your system's 8 bit I/O recovery
time of the BIOS setting, usually under the
Chipset Feature Settings section. Or, if
available, you may adjust the AT Bus
speed to a slower clock. If the problem
persists, try a different joystick.
Do not attempt to make changes to the
BIOS unless you have experience with
system software.
To resolve I/O conflicts, change the resource
settings of your audio card or the conflicting
peripheral device in your system using Device
Manager in Windows 95/98.
If you still do not know which card is causing
the conflict, remove all cards except the audio
card and other essential cards (for example,
disk controller and graphics cards). Add each
card back until Device Manager indicates that
a conflict has occurred.
To resolve hardware conflicts in Windows
95/98:
1. Click the Start button, point to Settings,
and then click Control Panel.
2. In the Control Panel window, double-click
the System icon.
3. In the System Properties dialog box, click
the Device Manager tab.
4. Under the Sound, Video And Game
Controllers entry, select the conflicting
audio card driver—indicated by an
exclamation mark (!)—and click the
Properties button.
5. In the Properties dialog box, click the
Resources tab.
Troubleshooting D-3
6. Make sure that the Use Automatic Settings
check box is selected, and click the OK
button.
You can also refer to the
Troubleshooting section in the Help
file of Windows 95/98.
7. Restart your system to allow Windows
95/98 to reassign resources to your audio
card and/or the conflicting device.
Problems in Windows
NT 4.0
A Service Control Manager error
message appears with one or more
other error messages at system restart.
This occurs after you remove an audio card
from your computer after you have
successfully installed the Sound Blaster
PCI512 card. Windows is trying to match the
drivers to the removed audio card.
To solve this problem:
1. Log on to your computer as Administrator.
2. Click the Start button, point to Settings,
and then click Control Panel.
3. Double-click the Multimedia icon, and
then click the Devices tab.
4. In the list, remove from under these entries
•
Audio Devices
•
MIDI Devices And Instruments
the items other than
•
Audio for Creative SB PCI512
•
MIDI for Creative SB PCI512
•
MIDI for Creative S/W Synth
5. Click the OK button to close the dialog
box.
The drivers are removed.
D-4 Troubleshooting
Creative European Help Line
CREATIVE LABS (IRELAND) LTD.,
Technical Support Department,
Ballycoolin Business Park, Blanchardstown,
Dublin 15, Ireland.
Fax: +353 1 8205052
United Kingdom
Tel
0870-8760876
Germany
Tel
+49 69-66982900
Ireland
Tel
+353 1 820 7555
France
Tel
+33 1 55 46 87 77
Spain
Tel
+34 (91) 66 25 116
Italy
Tel
Holland
Tel
+31 (0) 205040616
+39 02 4828 0000
Austria
Tel
+43 (01) 589 244 320
Switzerland
Tel
+41 (01) 2121 868
Belgium
Tel
+32 (02) 7171 198
Portugal
Tel
800 8 53066
Denmark
Tel
+45 3525 9498
Czech Republic
Tel
+353 1 8066964
Finland
Tel
+358 (09) 2294 3101
Poland
Freephone 00 800 353 1229
Norway
Tel
+47 2305 0401
Hungary
Freephone 06 800 1222
Sweden
Tel
+46 (08) 7519 147
Russia
Tel
+353 1 8066967
Operating Hours / Heures d’ouverture / Öffnungszeiten / Ore d’ufficio / Horario de oficina / Openingstijden / Horário de abertura
EUROPE
Mon-Fri
Lun. au vend.
Mo-Fr
Lunedì-venerdì
Lunes-Viernes
Maandag-Vrijdag
Segunda a sexta-feira
Internet
:
:
:
:
:
:
:
Business Hours
Heures de bureau
Geschäftszeiten
Orario d’ufficio
Horario de oficina
Kantooruren
Horário de expediente
Sat-Sun & Public Holidays
Sam., dim. et jours fériés
Sa, So & gesetzl. Feiertage
Sabato, domenica e festivi
Sábados, domingos y festivos
Zat.-Zon. & Nationale Feestdagen
Sábado, domingo e feriados
To receive technical support via the Internet, please e-mail: [email protected]
Web Site
www.creative.com
:
:
:
:
:
:
:
Closed
Fermé
Geschlossen
Chiuso
Cerrado
Gesloten
Fechado