1
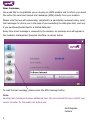
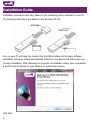
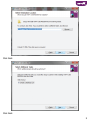
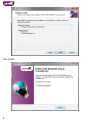
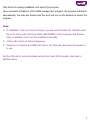
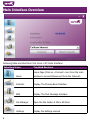
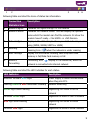
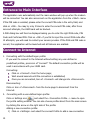
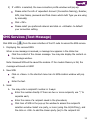
USB One Touch X200 HSPA Modem User Guide For more details regarding internet plans and for technical assistance please call *320 from your Cellcom phone or 052-9986935 from any other phone 1 Dear Customer, We would like to congratulate you on buying an HSPA modem and to inform you about the option the send and receive text messages (SMS) directly from your modem. Please note that we will occasionally, subjected to a periodically reviewed policy, send text messages to inform you in the case of use exceeding the data plan limit, and only if you purchased/subscribed to a limited data plan. Every time a text message is received by the modem, an envelope icon will appear in the modem's management program interface, as shown below: To read the text message, please press the SMS message button. Note: Sending text messages involves additional fees. We recommend that you contact your service provider for the exact cost before use. Kind Regards, Cellcom 2 Table of Contents Installation Guide................................................................................................... 4 Main Interface Overview......................................................................................... 8 Entrance to Main Interface.................................................................................... 10 Connect to Internet.............................................................................................. 10 SMS Services (Text Message)................................................................................ 11 Contacts.............................................................................................................. 13 Settings............................................................................................................... 14 Safety and Use..................................................................................................... 17 Traffic Safety........................................................................................................ 17 Conditions of Use................................................................................................. 17 Protection against theft........................................................................................ 18 Disclaimer............................................................................................................ 18 General Information............................................................................................. 18 FAQs................................................................................................................... 19 3 Installation Guide Installation procedures may vary based on the operating system installed on your PC. The following instructions are based on the Windows XP OS: USB Cap USIM card Micro SD LED Turn on your PC and plug the modem into the USB interface slot to begin software installation. Windows should automatically detect the new device and will prompt you to begin installation. After following the prompts of installation setup, upon completion, a shortcut will be placed on your desktop for quick future access. Click Next. 4 Click Next. Click Next. 5 Click Install. 6 Click Finish for ending installation and launch the program. Upon successful installation of the HSPA management program, the program will launch automatically. You may also double-click the short cut icon on the desktop to launch the program. Note: 1. If installation “auto-run” does not begin, you will need to locate the “autoRun.exe)” file in the driver path (CD Drive HSPA USB MODEM) in My Computer, and DoubleClick on AutoRun.exe to run the installation manually. 2. A Micro-SD card is an optional accessory. 3. Please do not remove the USIM card and or the Micro-SD card when the modem is in use. For Mac OS and for more information about One Touch X200 modem, click Help in Settinds menu. 7 Main Interface Overview Following table are listed Short Cut Icons in PC Suite Interface. Interface Icons Provided Services Home Page (Click on <Connect> icon from the main 8 Home window to connect/disconnect from the Internet) Contacts Display The Phones Book Interface SMS Display The Text Message Interface File Manager Open the File Folder of Micro SD Card Settings Display the Settings manual 1 2 3 5 6 Following table are listed the Icons of status bar information. Connection Description Statistics Icon 1 Network Signal Indicates the signal strength of the network 2 Network Status Indicates the network status. This will display the operator name which the modem can find the network. Or show the modem haven’t ready. < No USIM> or <NO Device> 3 Network Type Display in the status bar, to show you which network you are using (GPRS / EDGE/ UMTS or HSPA) 4 Roaming 5 New Message Roaming Icon when the network is under roaming Display the SMS status including new SMS/USIM card memory is full/Data Card memory is full 6 Network Connecting Icon " Connecting network is connected into internet network “display in the status bar, when the Following table are listed the LED Indicates for each status.. LED Indicator Desctiption Indicator constant Blue Light Power Supply is under normal status when Plug into PC’s Flashing Green & Red multicolour circularly Network Searching Green Light Slow Flashing Registering into HSPA or UMTS network Constant Green Light Registered to HSPA or UMTS network Red Light Slow Flashing Registering into GPRS or EDGE network Constant Red Light Registered to GPRS or EDGE network 9 Entrance to Main Interface The application runs automatically and the main window will pop up when the modem will be connected. You can also access and run the application from the <Start> menu. If the PIN code is enabled, please enter the correct PIN code in the entry field, and click on <OK>. You may try only 3 times to enter the correct PIN code; after three incorrect attempts, the USIM card will be blocked. A PUK dialog box will then be displayed asking you to enter the right PUK code, PIN Code and Confirmed PIN. Click on <OK> if you fail to input the correct PUK code after 10 attempts, you will need to contact your service provider. If the PUK and PIN code is correct, the application will be launched and all features are enabled. Connect to Internet 1. Connecting with the default logon profile: If you want to connect to the Internet without setting any user-defined or predefined profiles, press icon of “connect”. The default connection profile will be used in accordance with your USIM card. Connecting: • Click on <Connect> from the home page; • Wait several seconds until the connection is established; • Once you are connected, Icon of <Connect> will change into <Disconnect>. Disconnecting: Click on Icon of <Disconnect> from the home page to disconnect from the Internet. 2. Connecting with a user-defined logon profile: Click on Settings icon and select the <Connection Profile…> menu to open the profile setting window. You can also choose profiles direct from the main screen by clicking the arrow on the right side of the profile. Adding a new connection profile: 1) Click on <Settings> and select the connect Profile to add a new connection. 10 2) If <ADD> is selected, the new connection profile windows will pop up. • Please enter the info of requested: Account (Connection Naming), Number, APN, User Name, password and final choice which Auth Type you are using by manually; • Click <OK>. • Please select you preferred network and click on <Activate> to default your connection setting. SMS Services (Text Message) Click SMS icon from the main interface of the PC suite to access the SMS service. 1. Displaying the received SMS: When a new message is received, a message box appears in the status bar. • Click the content of the chosen message. You may also display the content on the message window. Note: Received SMS will be saved the modem. If the modem Memory is full, the message will saved on USIM 2. New SMS: • Click on <New> in the shortcut menu bar. An SMS creation window will pop up; • Enter the text. 3. Send: A. You may enter a recipient’s number in 3 ways: • Enter the number directly. If there are two or more recipients, use “;” to separate each; • Enter the name of a recipient saved in the phonebook; • Click Icon of SMS in the pop up the window to access the recipient’s selection window. Select one party, or more (using the ctrl/shift key), and the click on <OK> to add the chosen party (ies) to the recipient list. 11 B. Click on <Send> to send the message. If the message is not sent, it will be saved in the Outbox. 4. Reply: • Select a message in the inbox and then click on <Reply> in the shortcut menu bar; 5. • The recipient’s / number will appear. It can now be modified; • Enter the reply in input field, and then click on <Send>. Forward: • Select a message and then click on <Forward> in the shortcut menu bar; • The content of the selected message will appear in the input field. It can now be modified; • 6. 7. Enter the recipient’s number and then click on <Send>. Edit: • Access the draft list to select a message, and open it by double-clicking on it; • Click on <Save> or <Send> when you have finished editing. Delete: • Select a message, or several messages (using the ctrl/shift key); • Click on <Delete> in the tool bar. A dialog box will ask “Are you sure to delete the message(s)” • Click on <OK> and the SMS will be deleted. Once deleted, SMS messages cannot be restored. 8. Resend: • Access the Outbox to select a message or several messages (using the ctrl/shift key); 9. • Click on <Resend> in the tool bar; • The application will resend the unsent/sent message(s). Export: • Select a message or several messages (using the ctrl/shift key) in the current list; • 12 Then right click mouse, to export SMS to the chosen location and saved as a text file. Contacts Click contacts from the main interface of PC suite to access the contacts management. The contacts list column contains: USIM /Modem /Computer. You can use contacts stored either on the USIM, modem or on computer in the corresponding window. 1. New: • Select a contact and access the contact editor by selecting <Edit> from the tool bar or by double-clicking on the contact; • Modify the relevant contact information, and select <OK> to save the changes. 2. Edit: • Select a contact and access the contact editor by selecting <Edit> from the tool bar or by double-clicking on the contact; • Modify the relevant contact information, and select <OK> to save the changes. 3. Delete: • Select one contact, or more (using the ctrl/shift key); • Click on <Delete> from the tool bar. A dialog box will ask “Are you sure to delete the contacts” • Click on <OK> and the contact(s) will be deleted; deleted contacts will not be restored. 4. Send SMS: • Select one contact or more (using ctrl/shift key); • Click on <Send SMS> in the tool bar; • When the message is completed, you may send it by clicking on <Send>. 5. Copy to USIM card/Modem/Computer • Select one contact, or more (using ctrl/shift key) stored in the same memory. • Right-Click your mouse pointer, if selected <Copy to> in the manual and select a target memory different from the memory being used; • Contact(s) will be copied to the target memory. 13 Settings Click on settings icon from the main interface of PC Suite. A menu with various settings will appear. 1. Network select: • Select <Network selection> in the Settings menu. The default setting is<Auto>; • Click on<Manual…> to activate the network list window; • A list of networks appears when the search is complete; • Click <Search> an available network from the list of available operators and click on <Select>. It will register the selected network. 2. Network mode: • Select <Network mode> in Settings menu. The default setting is <Auto>; • Click on the mode which you prefer, it will search and register the network mode which was chosen at next time of device connection. 3. Network Band: • Select <Network band> in Settings menu. The default setting is <Auto>; • Click on the band which you prefer, it will search and register the network band which was chosen at next time of device connection. 4. SMS settings: Choose <SMS settings> in the Settings menu to access the SMS settings window. A. Service Center: The default number is found in the USIM card. You may change it. B. Validity period: You can choose between: 6 hours/1 day/1 week. C. Message Alert: Click √ to validate the message alert sound. 14 5. Connection profile settings: Select<Connection profile…> in the Settings menu to access the connection profile setting window. <ADD> Adding a new connection profile A. Click on <Settings> and select the connect Profile to add a new connection. B. If <ADD> is selected, the new connection profile windows will pop up; • Please enter the info of requested: Account (Connection Naming), Number, APN, User Name, password and final choice which Auth Type you are using by manually; • Click <OK>; • Please select you preferred network and click on <Activate> to default your connection setting. <Delete>: • Select an item in the connection profile list; • Click on <Delete> on the keyboard. You will be asked if you “Are sure you delete”. • Choose <OK> to delete the profile from the list. <Modify>: • Select an item in the connection profile list; • Click on <Modify> to access the profile edit window; • Modify the parameters and click on <OK> to save the modification. <Deactivate>: • Select an item in the connection profile list; • Click on <Deactivate> to release default setting. 6. System settings: Click √ to validate the sound prompt when the Internet will be connected/ disconnected. 15 7. Request PIN: • Click on the <Request PIN> menu and select <Enable/Disable PIN>. Activate the PIN input dialog box; • Select <Enable PIN> and enter the correct PIN code; • Click on <OK>. 8. Change PIN: • Click on <Change PIN>, and activate the PIN modify dialog box; • Input the old PIN and the new PIN, then confirm; • Click on <OK> to confirm the new PIN code. Note: You can only access the modify menu if the PIN is enabled. 9. Unlock USIM Card: Click on <USIM Unlock>, and activate the code which is requested in dialog box to unlock this function, Then click on <OK> to confirm; Note: All about code is supplied by your network provider (except PIN Code). 10.Diagnostics Statistic: This menu is used to display the diagnostic information, including: • Model Information: Modem Name/ Firmware version/IMEI/IMSI. • Operator Information: PIN code status/Network code/Network selection mode/ Network mode/Signal strength. • Network Status: CS network registration / PS network registration / PS network attachment. 11.About: You can get information on the version in the <About> menu. 12.Help: When the application is open, you can read the instructions about the modem. 16 Safety and Use We recommend that you read this chapter carefully before using your modem. The manufacturer disclaims any liability for damage, which may result as a consequence of improper use of the modem or of use contrary to the instructions contained herein. Traffic Safety When driving, do not use the modem: When switched on, the modem emits electromagnetic waves that can interfere with the vehicle’s electronic systems such as ABS anti-lock brakes or airbags. To ensure that there is no problem, please do not place the modem on top of the dashboard or within an airbag deployment area. Check with your car dealer or the car manufacturer to make sure that the dashboard is adequately shielded from modem RF energy. Conditions of Use 1. Switch the modem off before boarding an aircraft. 2. Switch the modem off when you are in health care facilities, except in designated areas. As with many other types of equipment now in regular use, mobile telemodems can interfere with other electrical or electronic devices, or equipmentusing radio frequencies.. 3. Switch the modem off when you are near gas or flammable liquids. Strictly obey all signs and instructions posted in a fuel depot, petrol station, chemical plant, or in any potentially explosive atmosphere. 4. When the modem is switched on, it should be kept at least 15 cm from any medical device such as a pacemaker, a hearing aid or insulin pump, etc. 5. Do not let children use the modem without supervision. The modem may contain small parts that could become detached and create a choking hazard. 17 6. When replacing the cover, please note that the modem may contain substances that could create an allergic reaction. 7. Always handle the modem with care and keep it in a clean and dust-free place. 8. Do not open, dismantle or attempt to repair the modem yourself. 9. Do not drop, throw or bend the modem. 10.Do not paint the modem. Protection against theft The modem is identified by an IMEI (modem serial number) shown on the packaging label and in the modem’s dashboard. We recommend that you note the number the first time you use the modem by opening the dashboard “Settings” > “Diagnostics” to get it. Disclaimer There may be certain differences between the user manual description and the modem’s operation, depending on the software release of the modem or specific operator services. General Information The modem is a transceiver that operates on GSM networks with 850, 900, 1800 and 1900 MHz and on WCDMA 850, 1900 and 2100 MHz bands. 18 FAQs 1. Q: Which operation systems does the software support? A: It supports Windows 2000, Windows XP, Windows Vista (32bit, 64bit), and Mac OS (X 10.4.9 -10.6). 2. Q: I cannot install the driver. A: On some PCs, installation of the modem may take a long time because of the PC configuration. So please wait and do not cancel the process or you will have to uninstall and re-install again. 3. Q: What should I do if the main interface continues to display “Searching device”<”Initializing”>? A: Please remove the modem and reinsert it. 4. Q: What should I do if the USIM card is unplugged during the application? A: Please disconnect the modem first, and then restart the application. 5. Q: The USIM card does not register any networks. A: The reasons are shown below: 1) Unstable local signal; 2) The software is an old version; 3) Hardware problem. You may: 1) Try to logon from another location; 2) Update the software; 3) Check the hardware or use another data card and retry. 6. Q: Why does the prompt “No available connection profile. Please set an available default one in connection profile” appear? A: Please add a connection profile manually. 19 7. Q: It failed to connect to the internet. A: Please make sure the connection profile and settings are correct. 8. Q: The connection speed and data transfer rates are too slow. A: Please check the local network signal strength. 9. Q: Sending an SMS failed. A: Please make sure the SMS center number is correct. 10.Q: I cannot receive an SMS. A: Please check whether your USIM card’s memory is full. 11.Q: Why can I only save part of the name when adding a new contact? A: The USIM card can only hold 12 SBC characters, and 6 DBC characters. 12.Q: Does it support roaming? A: This depends on the local operator. Please check with your local operator or service provider. 20 www.amobile.co.il Importer: Clinphone Ltd. Retailer: Accel Telecom Ltd. 34 Habarzel St. Ramat Ha-Hayal, Tel-Aviv Alcatel is a trademark of Alcatel-Lucent used under license by TCT Mobile Limited. 21