1
BUBBLE JET PRINTER
User’s Guide
V1
Table of Contents
Table of Contents
Introduction .....................................................................................................5
How to Use This Manual .................................................................................6
Safety Precautions .........................................................................................8
Printer Parts and Their Functions .................................................................14
Front View ................................................................................................... 15
Rear View .................................................................................................... 16
Inside the Printer ......................................................................................... 17
Printer Driver Functions (Windows) ..............................................................18
Opening the Printer Properties Dialog Box ................................................. 19
Super Economy Mode ................................................................................. 21
Printer Properties Dialog Box Description ................................................... 23
BJ Status Monitor Functions ....................................................................... 40
Cancelling a Print Job ................................................................................. 43
Uninstalling Printer Drivers .......................................................................... 44
Printer Driver Functions (Macintosh) ............................................................45
Super Economy Print Mode ........................................................................ 46
Description of Print Settings ........................................................................ 47
BJ Print Monitor ........................................................................................... 61
2
Table of Contents
Cancelling a Print Job ................................................................................. 63
Using the Printer with a Network ................................................................. 64
Uninstalling Printer Drivers .......................................................................... 68
Routine Maintenance ....................................................................................69
When to Replace the Cartridge and Maintain Print Head ........................... 70
Replacing the Ink Cartridge ......................................................................... 71
Replacing the BJ Cartridge ......................................................................... 76
Printing the Nozzle Check Pattern .............................................................. 82
Print Head Cleaning .................................................................................... 86
Cleaning the Printer ..................................................................................... 89
Transporting the Printer ............................................................................... 91
Printing Media ...............................................................................................94
Compatible Media Types ............................................................................. 95
Envelopes .................................................................................................... 97
High Resolution Paper HR-101N .............................................................. 101
Glossy Photo Paper GP-301N/GP-301 ..................................................... 103
High Gloss Film HG-101 ............................................................................ 105
Glossy Photo Cards FM-101 ..................................................................... 107
Transparencies CF-102 ............................................................................. 109
T-Shirt Transfers TR-201 ........................................................................... 111
Banner Paper ............................................................................................ 113
Troubleshooting ..........................................................................................116
Cannot Install the Printer Driver ................................................................ 117
Print Quality is Poor or Contains Errors ..................................................... 119
Printer Does Not Start or Stops During Print Jobs .................................... 133
3
Table of Contents
Paper Does Not Feed Properly or Paper Jams ......................................... 140
Ink Runs Out Too Quickly ......................................................................... 143
An Error Message is Displayed on the Screen .......................................... 144
Problems Unique to Windows ................................................................... 153
Problems Unique to the Macintosh ........................................................... 157
Appendices .................................................................................................160
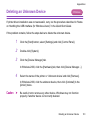
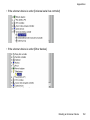
Deleting an Unknown Device ................................................................... 161
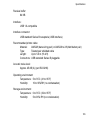
Specifications .............................................................................................164
Index ...........................................................................................................178
4
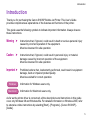
Introduction
Introduction
Thank you for purchasing the Canon S100SP Bubble Jet Printer. This User’s Guide
provides comprehensive explanations of the features and functions of the printer.
This guide uses the following symbols to indicate important information. Always observe
these instructions.
Warning ➤
Instructions that, if ignored, could result in death or serious personal injury
caused by incorrect operation of the equipment.
Must be observed for safe operation.
Caution ➤
Instructions that, if ignored, could result in personal injury or material
damage caused by incorrect operation of the equipment.
Must be observed for safe operation.
Important ➤
Prohibited actions that, inadvertently performed, could result in equipment
damage, faults or impaired product quality.
Must be avoided for correct operation.
Windows
Information for Windows users only.
Macintosh
Information for Macintosh users only.
As far as the printer driver is concerned, all the descriptions and instructions in this guide
cover only Windows 98 and Windows Me. For detailed information on Windows 2000, refer
to extensive online instructions by selecting [Start] - [Programs] - [Canon S100SP] [Guide].
5
How to Use This Manual
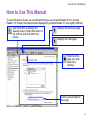
How to Use This Manual
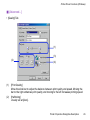
To view this User’s Guide, we recommend that you use Acrobat Reader 4.0 or Acrobat
Reader 3.0. Please note that screens displayed by Acrobat Reader 3.0 are slightly different.
Use this button to enlarge the
viewing screen. Select this button in
the tool bar and click within the
screen.
Displays the previous page.
Displays the next page.
Returns to the
page you were
previously
viewing.
Click to jump straight to
this page.
6
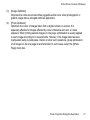
How to Use This Manual
Use this button to
search for a word.
Displays the table of contents.
Click the heading to jump to the topic.
Click the " " symbol to see the headings for each chapter.
Click the " " symbol to close the headings.
7
Safety Precautions
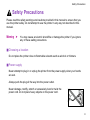
Safety Precautions
Please read the safety warnings and cautions provided in this manual to ensure that you
use the printer safely. Do not attempt to use the printer in any way not described in this
manual.
Warning ➤
You may cause an electric shock/fire or damage the printer if you ignore
any of these safety precautions.
■ Choosing a location
Do not place the printer close to flammable solvents such as alcohol or thinners.
■ Power supply
Never attempt to plug in or unplug the printer from the power supply when your hands
are wet.
Always push the plug all the way into the power outlet.
Never damage, modify, stretch or excessively bend or twist the
power cord. Do not place heavy objects on the power cord.
8
Safety Precautions
Never plug the printer into a power socket that is shared with other
equipment (extension lead, double adapter, etc.).
Never use the printer if the power cord is bundled or knotted.
If you detect smoke, unusual smells or strange noises around the printer, immediately
unplug the printer at the power supply and call for service.
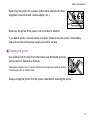
■ Cleaning the printer
Use a damp cloth to clean the printer. Never use flammable solvents
such as alcohol, benzene or thinners.
If flammable solvents come in contact with electrical components inside the printer,
it could cause a fire or electric shock.
Always unplug the printer from the power outlet before cleaning the printer.
9
Safety Precautions
■ Maintaining the printer
Do not attempt to disassemble or modify the printer. There are no user serviceable parts
inside the printer.
The printer contains high-voltage components. Never attempt any maintenance procedure not described in
this guide.
■ Working around the printer
Do not use inflammable sprays near the printer.
This could cause a fire or electric shock if the spray comes into contact with electrical components inside
the printer.
10
Safety Precautions
Caution ➤
You may cause injury or damage the printer if you ignore any of these
safety precautions.
■ Choosing a location
Do not install the printer in a location that is unstable or subject to excessive vibration.
Do not install the printer in locations that are very humid or dusty, in direct sunlight,
outdoors, or close to a heating source.
To avoid the risk of fire or electric shocks, install the printer in a location with an ambient temperature range
of 5°C to 35°C (41°F to 95°F) and humidity of 10% to 90% (condensation free).
Do not place the printer on a thick rug or carpet.
Ensure that the area around the power outlet is kept clear at all times
so you can easily unplug the power cord if necessary.
When moving the printer, carry the printer at both ends.
11
Safety Precautions
■ Power supply
Never remove the plug by pulling on the cord.
Do not use an extension lead.
If you do not intend to use the printer for a long period of time, unplug the printer.
Never use a power supply voltage other than that supplied in the country of purchase.
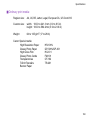
The correct power supply voltage and frequency is as follows:
Europe: AC 230V ± 10%, 50Hz
USA/Canada: AC 120V, 60Hz
Australia: AC 240V, 50Hz
12
Safety Precautions
■ Working around the printer
Never put your hands or fingers in the printer while it is printing.
Do not place metal objects (paper clips, staples, etc.) or containers of flammable
solvents (alcohol, thinners. etc.) on top of the printer.
If any foreign object (metal or liquid) falls into the printer, unplug the power cord and call
for service.
■ BJ cartridges and ink cartridges
For safety reasons store BJ cartridges and ink cartridges out of the reach of small
children.
If a child ingests any ink, consult a doctor immediately.
Do not shake BJ cartridges or ink cartridges.
Ink may leak out and stain clothing or the surrounding area.
Never touch the electrical contacts on a BJ cartridge after printing.
The metal parts may be very hot and could cause burns.
13
Printer Parts and Their Functions
Printer Parts and Their Functions
• Front View
• Rear View
• Inside the Printer
14
Printer Parts and Their Functions
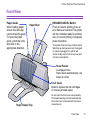
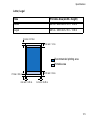
Front View
Paper Guide
When loading paper,
ensure the left edge
just touches this guide.
To move the paper
guide, pinch the knob
and slide in the
appropriate direction.
Paper Rest
RESUME/CANCEL Button
Press to resume printing once an
error has been resolved. The printer
will then initialise ready for printing.
Also, to cancel printing in progress,
press this button.
This printer does not have a Power switch.
Warming up starts as soon as it is plugged
in. Unless unplugged, the printer will
remain ready to print with a very low level
of power consumption.
Sheet Feeder
Load paper here.
Paper feeds automatically, one
sheet at a time.
Front Cover
Open to replace the ink cartridges
or remove jammed paper.
Paper Output Tray
Do not open the front cover unnecessarily.
Print head cleaning will start automatically
when the cover is closed and this process
consumes ink.
Front View
15
Printer Parts and Their Functions
Rear View
USB Port
Connects the printer to a computer
through a USB interface.
Rear View
16
Printer Parts and Their Functions
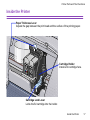
Inside the Printer
Paper Thickness Lever
Adjusts the gap between the print head and the surface of the printing paper.
Cartridge Holder
Install a BJ cartridge here.
Cartridge Lock Lever
Locks the BJ cartridge into the holder.
Inside the Printer
17
Printer Driver Functions (Windows)
Printer Driver Functions (Windows)
• Opening the Printer Properties Dialog Box
• Super Economy Mode
• Printer Properties Dialog Box Description
• BJ Status Monitor Functions
• Cancelling a Print Job
• Uninstalling Printer Drivers
Note
➤
As far as the printer driver is concerned, all the descriptions and
instructions in this guide cover only Windows 98 and Windows Me. For
detailed information on Windows 2000, refer to extensive online instructions
by selecting [Start] - [Programs] - [Canon S100SP] - [Guide].
18
Printer Driver Functions (Windows)
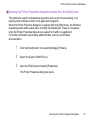
Opening the Printer Properties Dialog Box
The Printer Properties dialog box can be opened from either within an application, or
directly from the Windows [Start] menu.
■ Opening the Printer Properties dialog box from your application program
This method is generally used to specify printer settings just before printing.
The operations may vary slightly depending on your application program. This section
describes only the general procedure for opening the Printer Properties dialog box.
1
In your application, select the command to print a document.
The [Print] dialog box can usually be opened by selecting [Print] from the
[File] menu.
2
Ensure that [Canon S100SP] is selected in the [Name] field. Then click the
[Properties] button.
The Printer Properties dialog box opens.
Note
➤
Depending on your application program, the command and menu names
may differ, and there may be more steps involved in opening the Printer
Properties dialog box. For further details, see the user's manual for your
application.
Opening the Printer Properties Dialog Box
19
Printer Driver Functions (Windows)
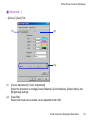
■ Opening the Printer Properties dialog box directly from the [Start] menu
This method is used for maintenance operations such as print head cleaning, or to
specify printer settings common to all application programs.
When the Printer Properties dialog box is opened from the [Start] menu, the Windows
operating system adds several tabs, including the [Details] tab. These do not appear
when the Printer Properties dialog box is opened from within an application.
For further information about these additional tabs, refer to your Windows
documentation.
1
Click the [Start] button, then select [Settings], [Printers].
2
Select the [Canon S100SP] icon.
3
Open the [File] menu and select [Properties].
The Printer Properties dialog box opens.
Opening the Printer Properties Dialog Box
20
Printer Driver Functions (Windows)
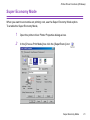
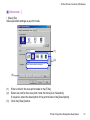
Super Economy Mode
When you want to economise on printing cost, use the Super Economy Mode option.
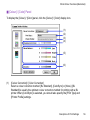
To enable the Super Economy Mode,
1
Open the printer driver Printer Properties dialogue box.
2
In the [Choose Print Mode] box click the [SuperEcono] icon
.
Super Economy Mode
21
Printer Driver Functions (Windows)
Note
➤
• The print quality may diminish slightly because the Super Economy Mode
uses the lowest resolution setting of your BJ Series Printer.
• Do not change the [Print Quality] from [Fast].
Super Economy Mode
22
Printer Driver Functions (Windows)
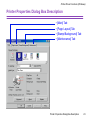
Printer Properties Dialog Box Description
• [Main] Tab
• [Page Layout] Tab
• [Stamp/Background] Tab
• [Maintenance] Tab
Printer Properties Dialog Box Description
23
Printer Driver Functions (Windows)
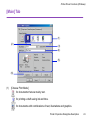
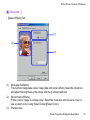
[Main] Tab
(1)
(2)
(3)
(4)
(5)
(6)
(1)
[Choose Print Mode]
for documents that are mainly text.
for printing a draft saving ink and time.
for documents with combinations of text, illustrations and graphics.
Printer Properties Dialog Box Description
24
Printer Driver Functions (Windows)
for photographs.
(2)
(3)
(4)
(5)
(6)
To specify more detailed settings for the print quality or colour, click the [Advanced...]
button.
[BJ Cartridge]
Select the type of BJ cartridge installed in the printer.
[Grayscale Print]
Select to print a greyscale version of a colour document.
[Media Type]
Ensure this setting matches the type of media loaded in the printer.
Preview Area
Before printing, verify that settings such as the lever position are correct.
[Advanced...]
Click to specify detailed settings for the print quality, special effects or colour.
Note
➤
To see a description of any item in the Printer Properties dialog box, click
the [?] mark then click the desired item. To see a description of operating
procedures, click the [Help] button.
Printer Properties Dialog Box Description
25
Printer Driver Functions (Windows)
■ [Advanced...]
• [Quality] Tab
(1)
(3)
(2)
(1)
(2)
(4)
[Print Quality]
Move the slide bar to adjust the balance between print quality and speed. Moving the
bar to the right enhances print quality, and moving to the left increases printing speed.
[Halftoning]
Usually set at [Auto].
Printer Properties Dialog Box Description
26
Printer Driver Functions (Windows)
(3)
(4)
[Image Optimizer]
Improves the contours and smoothes jaggedness that occur when photographic or
graphic image data is enlarged within an application.
[Photo Optimizer]
Optimises the colour of images taken from a digital camera or scanner. It is
especially effective for images affected by colour imbalance and over- or under
exposure. When printing several images on one page, optimisation is usually applied
to each image according to its requirements. However, if the image data has been
manipulated using cut and paste, rotation or other such operations, group optimisation
of all images on the one page is recommended. In such cases, select the [Whole
Page] check box.
Printer Properties Dialog Box Description
27
Printer Driver Functions (Windows)
■ [Advanced...]
• [Special Effects] Tab
(1)
(3)
(2)
(1)
(2)
(3)
[Simulate Illustration]
This function manipulates colour image data with certain effects. Select the check box
and adjust the brightness of the image with the [Contrast] slide bar.
[Monochrome Effects]
Prints a colour image in a single colour. Select the check box and choose a colour or
use a custom colour using [Select Colour]/[Select Color].
Preview Area
Printer Properties Dialog Box Description
28
Printer Driver Functions (Windows)
■ [Advanced...]
• [Colour] / [Color] Tab
(1)
(2)
(3)
(1)
(2)
[Colour Adjustment] / [Color Adjustment]
Select the check box to change [Colour Balance] / [Color Balance], [Output Style], and
[Brightness] settings.
[Use ICM]
Select this check box to enable colour adjustment with ICM.
Printer Properties Dialog Box Description
29
Printer Driver Functions (Windows)
(3)
[Intensity]
Move the slide bar to adjust the print density. Moving the bar to the right increases the
density.
Printer Properties Dialog Box Description
30
Printer Driver Functions (Windows)
■ [Advanced...]
• [Save] Tab
Save specified settings as a print mode.
(1)
(2)
(3)
(1)
(2)
(3)
Enter a title for the new print mode in the [Title].
Select an icon for the new print mode from the [Icon Selection].
If required, enter the description of the print mode in the [Description].
Click the [Save] button.
Printer Properties Dialog Box Description
31
Printer Driver Functions (Windows)
Note
➤
You can also delete print modes. Select an icon in the [Saved Settings],
click the [Delete] button.
Printer Properties Dialog Box Description
32
Printer Driver Functions (Windows)
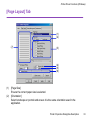
[Page Layout] Tab
(1)
(2)
(7)
(3)
(4)
(5)
(6)
(1)
(2)
[Page Size]
Ensure the correct paper size is selected.
[Orientation]
Select landscape or portrait and ensure it is the same orientation used in the
application.
Printer Properties Dialog Box Description
33
Printer Driver Functions (Windows)
(3)
(4)
(5)
[Printing Type]
Select the printing method from among the following.
[Normal-size Printing] The document is printed according to the original
dimensions. This setting is usually selected by default.
[Scaled Printing]
The document is resized when printed. When this is
selected, you can specify the [Printer Paper Size] and
[Scaling].
[Page Layout Printing] Pages are reduced and printed so that two or four document
pages fit on each printed page.
[Booklet Printing]
This prints on both sides of the paper so that pages are in
order when stapled in the middle. You can execute this only
when selected [Plain Paper] as a [Media Type].
[Poster Printing]
This enlarges and splits the print image across several
sheets of paper. The printed sheets can then be assembled
to make a large poster.
[Banner Printing]
Select this when printing on banner paper.
[Reverse order]
Prints the document starting with the last page.
If greyed out, select [Background Printing] check box.
[Collate]
Prints multiple copies of the document one copy at a time.
If greyed out, select [Background Printing] check box.
Printer Properties Dialog Box Description
34
Printer Driver Functions (Windows)
(6)
(7)
[Duplex Printing]
Select to print on both sides of the paper.
You can execute this only when selected [Plain Paper] as a [Media Type]. If greyed
out, select [Background Printing] check box. You can also select the stapling position.
When [Booklet Printing], [Poster Printing], or [Banner Printing] are selected, this is
disabled.
Preview Area
Verify the overall layout, stamps, background, etc., to be applied to the print job.
Printer Properties Dialog Box Description
35
Printer Driver Functions (Windows)
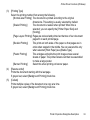
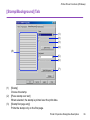
[Stamp/Background] Tab
(1)
(2)
(3)
(4)
(8)
(5)
(6)
(7)
(1)
(2)
(3)
[Stamp]
Choose the stamp.
[Place stamp over text]
When selected, the stamp is printed over the print data.
[Stamp first page only]
Prints the stamp only on the first page.
Printer Properties Dialog Box Description
36
Printer Driver Functions (Windows)
(4)
(5)
(6)
(7)
(8)
[Define Stamp...]
This allows you to create new stamps, or modify details of a selected stamp.
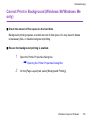
[Background]
Choose the background image you wish to use.
[Background first page only]
Prints the background image only on the first page.
[Select Background...]
This allows you to register a new background, or to display details of the background
you have selected.
Preview Area
Printer Properties Dialog Box Description
37
Printer Driver Functions (Windows)
[Maintenance] Tab
(1)
(2)
(3)
(1)
(2)
Click to start print head cleaning. For more details, refer to "Print Head Cleaning".
Click to print a nozzle check pattern to ensure that ink is being discharged properly.
For more details, refer to "Printing the Nozzle Check Pattern".
Printer Properties Dialog Box Description
38
Printer Driver Functions (Windows)
(3)
[Start Status Monitor]
Checks the printer status and the progress of printing jobs.
Printer Properties Dialog Box Description
39
Printer Driver Functions (Windows)
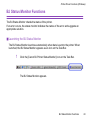
BJ Status Monitor Functions
The BJ Status Monitor checks the status of the printer.
If an error occurs, the status monitor indicates the nature of the error and suggests an
appropriate solution.
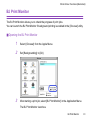
■ Launching the BJ Status Monitor
The BJ Status Monitor launches automatically when data is sent to the printer. When
launched, the BJ Status Monitor appears as an icon on the Task Bar.
1
Click the [Canon BJ Printer Status Monitor] icon on the Task Bar.
The BJ Status Monitor appears.
BJ Status Monitor Functions
40
Printer Driver Functions (Windows)
Note
➤
To open the BJ Status Monitor when the printer is not printing, click the
[Maintenance] tab in the Printer Properties dialog box and click the [Start
Status Monitor] button.
BJ Status Monitor Functions
41
Printer Driver Functions (Windows)
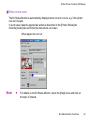
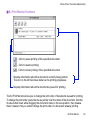
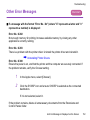
■ When errors occur
The BJ Status Monitor is automatically displayed when an error occurs, e.g. if the printer
runs out of paper.
In such cases, take the appropriate action as described in the [Printer Status] tab.
Click the [Guide] tab and follow the instructions on screen.
When paper has run out:
Note
➤
For details on the BJ Status Monitor, select the [Help] menu and click on
the topic of interest.
BJ Status Monitor Functions
42
Printer Driver Functions (Windows)
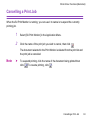
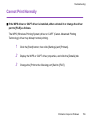
Cancelling a Print Job
To cancel the current print job, first open the BJ Status Monitor.
Note
1
Click the [Canon BJ Printer Status Monitor] icon on the Task Bar.
2
Click [Cancel Printing].
➤
If [Cancel Printing] is greyed out, press the printer's RESUME/CANCEL
button to terminate the print job.
Cancelling a Print Job
43
Printer Driver Functions (Windows)
Uninstalling Printer Drivers
Use the Uninstaller to delete any unwanted printer drivers and any associated files at the
same time.
1
Click the [Start] button and select [Programs], [BJ Printer], [Uninstall].
2
Click [Yes] when the confirmation message appears.
3
When all the files have been deleted, click [OK].
The deletion of the printer driver is complete.
If a message prompts you to restart your computer, click [OK] to restart your computer.
Note
➤
You can also start the Uninstaller by double-clicking on [Uninstall] in the [BJ
Printer] folder on the desktop.
Uninstalling Printer Drivers
44
Printer Driver Functions (Macintosh)
Printer Driver Functions (Macintosh)
• Super Economy Print Mode
• Description of Print Settings
• BJ Print Monitor
• Cancelling a Print Job
• Using the Printer with a Network
• Uninstalling Printer Drivers
45
Printer Driver Functions (Macintosh)
Super Economy Print Mode
Selecting
(Text) as the print mode automatically sets the print quality at [Super
Economy]. This mode is designed to minimise printing cost, and is recommended for draft
printing, but also significantly diminishes print quality. If you want to improve the quality,
select the
(Manual) print mode to change the print quality into [Normal (Fast)].
Super Economy Print Mode
46
Printer Driver Functions (Macintosh)
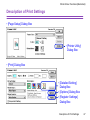
Description of Print Settings
• [Page Setup] Dialog Box
• [Printer Utility]
Dialog Box
• [Print] Dialog Box
• [Detailed Setting]
Dialog Box
• [Options] Dialog Box
• [Register Settings]
Dialog Box
Description of Print Settings
47
Printer Driver Functions (Macintosh)
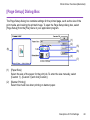
[Page Setup] Dialog Box
The Page Setup dialog box contains settings for the printed page, such as the size of the
print media, and resizing the printed image. To open the Page Setup dialog box, select
[Page Setup] from the [File] menu in your application program.
(1)
(2)
(8)
(3)
(5)
(6)
(4)
(7)
(1)
(2)
[Paper Size]
Select the size of the paper for the print job. To enter the size manually, select
[Custom 1] - [Custom 3] and click [Custom].
[Banner Printing]
Select this check box when printing on banner paper.
Description of Print Settings
48
Printer Driver Functions (Macintosh)
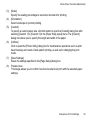
(3)
(4)
(5)
(6)
(7)
(8)
[Scale]
Specify the scaling percentage to resize the document for printing.
[Orientation]
Select landscape or portrait printing.
[Custom]
To specify a custom paper size, click this button to open the [Custom] dialog box after
selecting [Custom 1] to [Custom 3] in the [Paper Size] popup menu. The [Custom]
dialog box allows you to specify the length and width of the paper.
[Utilities]
Click to open the [Printer Utility] dialog box for maintenance operations such as print
head cleaning and nozzle check pattern printing, as well as for changing the print
mode.
[Save Settings]
Saves the settings specified in the [Page Setup] dialog box.
Preview Area
This image allows you to confirm how the document will print with the selected paper
settings.
Description of Print Settings
49
Printer Driver Functions (Macintosh)
[Printer Utility] Dialog Box
The [Printer Utility] dialog box is displayed when you click the [Utilities] button in the [Page
Setup] dialog box.
(1)
(2)
(1)
(2)
Select the function you wish to perform.
Display area showing the various maintenance functions, including cleaning and test
pattern printing. Click the icon to start this function. For further details, refer to
"Routine Maintenance".
➡ Printing the Nozzle Check Pattern
➡ Print Head Cleaning
Description of Print Settings
50
Printer Driver Functions (Macintosh)
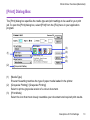
[Print] Dialog Box
The [Print] dialog box specifies the media type and print settings to be used for your print
job. To open the [Print] dialog box, select [Print] from the [File] menu in your application
program.
(1)
(3)
(4)
(5)
(6)
(2)
(1)
(2)
(3)
[Media Type]
Ensure this setting matches the type of paper media loaded in the printer.
[Greyscale Printing] / [Grayscale Printing]
Select to print a greyscale version of a colour document.
[Print Mode]
Select the icon that most closely resembles your document and required print results.
Description of Print Settings
51
Printer Driver Functions (Macintosh)
(4)
(5)
(6)
[Details...]
Allows you to manually set the print quality and colour settings in the [Detailed Setting]
Dialog Box.
[Options...]
Specify the output destination, print order and page layout for the document you are
printing.
[Apply...]
Allows you to register print settings or to implement a previously registered print
setting.
Description of Print Settings
52
Printer Driver Functions (Macintosh)
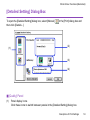
[Detailed Setting] Dialog Box
To open the [Detailed Setting] dialog box, select [Manual]
then click [Details...].
in the [Print] dialog box and
(2)
(1)
(3)
(4)
■ [Quality] Panel
(1)
Panel display icons
Click these icons to switch between panels in the [Detailed Setting] dialog box.
Description of Print Settings
53
Printer Driver Functions (Macintosh)
(2)
(3)
(4)
[Print Quality]
Move the slide bar to adjust the balance between print quality and speed. Moving the
bar to the right enhances print quality, and moving it to the left increases printing
speed.
[Halftoning]
Select either [Dither] or [Diffusion] ink dot configurations.
[Photo Optimizer PRO]
Optimises the colour of images taken from a digital camera or scanner. It is especially
effective for images affected by colour imbalance and over- or under exposure.
When printing several images on one printing page, optimisation is usually applied to
each image according to its requirements. However, if the image data has been
manipulated using cut and paste, rotation or other such operations, group optimisation
of all images on the page is recommended. In such cases, select the [Apply
Throughout Page] check box.
Description of Print Settings
54
Printer Driver Functions (Macintosh)
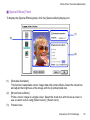
■ [Special Effects] Panel
To display the [Special Effects] panel, click the [Special effects] display icon.
(1)
(3)
(2)
(1)
(2)
(3)
[Simulate illustration]
This function manipulates colour image data with certain effects. Select the check box
and adjust the brightness of the image with the [Contrast] slide bar.
[Monochrome effects]
Prints a colour image in a single colour. Select the check box and choose a colour or
use a custom colour using [Select colour] / [Select color].
Preview Area
Description of Print Settings
55
Printer Driver Functions (Macintosh)
■ [Colour] / [Color] Panel
To display the [Colour] / [Color] panel, click the [Colour] / [Color] display icon.
(1)
(2)
(3)
(4)
(5)
(6)
(1)
[Colour Correction] / [Color Correction]
Select a colour correction method: [BJ Standard], [ColorSync] or [None]. [BJ
Standard] is usually the optimum colour correction method for printing with a BJ
printer. When [ColorSync] is selected, you should also specify the [Print Type] and
[Printer Profile] settings.
Description of Print Settings
56
Printer Driver Functions (Macintosh)
(2)
(3)
(4)
(5)
(6)
[Print Type]
For printing that emphasises intermediate colours, select [Photo]. For printing that
emphasises the brightness of primary colours, select [Graphics]. For documents that
contain large amounts of a basic colour, select [Spot Colour] / [Spot Color].
[Printer Profile]
Select optimised colour characteristics (a profile) for the media type and other factors.
[Gamma Correction]
This function adjusts the colour contrast (not including pure black and white). To adjust
the contrast, select the check box and move the slide bar. Moving the bar to the right
darkens the entire image while increasing contrast in the lighter areas and decreasing
contrast in the darker areas.
[Colour Balance] / [Color Balance]
Move the bar for each colour to adjust the balance of colour intensity. Moving the bar
to the right intensifies the colour.
[Intensity]
Move the slide bar to adjust the print density. Moving the bar to the right increases the
density.
Description of Print Settings
57
Printer Driver Functions (Macintosh)
[Options] Dialog Box
(1)
(7)
(2)
(3)
(4)
(1)
(5)
(6)
[Layout]
Use this function to print more than one page on a single sheet of paper. Typically, this
setting is set to display [1Page/Sheet Printing]. If another option is selected, [Page
Order] and [Border] can be specified.
[2Page/Sheet Printing]/[4Page/Sheet Printing]
Pages are reduced and printed so that two or four pages fit on each printed page.
You can also select page order and whether to place a border around each page.
Description of Print Settings
58
Printer Driver Functions (Macintosh)
[Poster (Divided into 4) / (Divided into 9) / (Divided into 16)]
These enlarge and split the print image across several sheets of paper. The printer
sheets can then be assembled to make a large poster. You can also select [Cut/
Paste lines] and [Cut/Paste string]. To print only the certain pages, click the specific
pages on the preview area.
(2)
(3)
(4)
(5)
(6)
(7)
[Booklet (Left Stapling) / (Right Stapling)]
These print on both sides of the paper so that pages in order when stapled in the
middle. Use plain paper to execute this printing method. You can also select
whether to place a border around each page.
[Two-sided Printing]
Select to print on both sides of the paper. You can execute this only when [Plain Paper]
as a [Media Type]. You can also select the stapling side.
[Fit-to-page Printing]
Executes the scaled printing automatically. When selected, you can specify the
[Printer Paper Size]. Fits the document paper size set in the application to the paper
size loaded in the printer.
[Destination]
Select the print output destination. [Printer] is the usual selection.
To check the layout or other image elements before printing, select [Preview]. To save
the document as a PICT file, select [PICT File].
[Print in reverse order]
Prints the document starting with the last page.
[Print collated pages]
Prints multiple copies of the document one copy at a time.
Preview Area
Description of Print Settings
59
Printer Driver Functions (Macintosh)
[Register Settings] Dialog Box
To open the [Register Settings] dialog box, click the [Apply...] button in the [Print] dialog box.
(1)
(1)
(2)
(3)
(4)
(5)
(2)
(3)
(4)
(5)
[Settings]
Displays a list of the registered print settings.
[Import]
Imports a set of print settings. To use the settings, select the desired settings in the
[Settings] list and click the [Import] button.
[Apply]
Saves the settings currently specified in the [Print] dialog box. After clicking the button,
enter the name under which the settings are to be saved.
[Remove]
Deletes unwanted print settings. To delete unwanted settings, select the settings in
[Settings] and click the [Remove] button.
[Defaults]
Restores the print settings selected in [Settings] to defaults. A check mark appears
next to the selected print settings.
Description of Print Settings
60
Printer Driver Functions (Macintosh)
BJ Print Monitor
The BJ Print Monitor allows you to check the progress of print jobs.
You can launch the BJ Print Monitor if background printing is enabled in the [Chooser] utility.
■ Opening the BJ Print Monitor
1
Select [Chooser] from the Apple Menu.
2
Set [Backgrounding] to [On].
3
After starting a print job, select [BJ Print Monitor] in the Application Menu.
The BJ Print Monitor launches.
BJ Print Monitor
61
Printer Driver Functions (Macintosh)
■ BJ Print Monitor Functions
... Click to pause printing of the specified document.
... Click to resume printing.
... Click to cancel printing of the specified document.
Displays information about the document currently being printed.
The icon on the left becomes darker as the printing progresses.
Displays information about the documents queued for printing.
The BJ Print Monitor allows you to change the print order of documents queued for printing.
To change the print order, place the mouse pointer over the name of the document, hold the
mouse button down while dragging the document name to the new position, then release.
Note, however, that you cannot change the print order of a document already printing.
BJ Print Monitor
62
Printer Driver Functions (Macintosh)
Cancelling a Print Job
When the BJ Print Monitor is running, you can use it to cancel or suspend the currently
printing job.
1
Select [BJ Print Monitor] in the Application Menu.
2
Click the name of the print job you wish to cancel, then click
.
The document selected in the Print Monitor is deleted from the print list and
the print job is cancelled.
Note
➤
To suspend printing, click the name of the document being printed then
click
. To resume printing, click
.
Cancelling a Print Job
63
Printer Driver Functions (Macintosh)
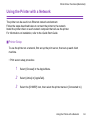
Using the Printer with a Network
The printer can be used in an Ethernet network environment.
Follow the steps described below to connect the printer to the network.
Install the printer driver on each network computer that will use the printer.
For information on installation, refer to the Quick Start Guide.
■ Printer Setup
To use the printer on a network, first set up the print server, then set up each client
machine.
• Print server setup procedure
1
Select [Chooser] in the Apple Menu.
2
Select [Active] in [AppleTalk].
3
Select the [S100SP] icon, then select the printer name in [Connected to:].
Using the Printer with a Network
64
Printer Driver Functions (Macintosh)
4
Click [Share].
5
Confirm that [S100SP server] is selected in [Enter new print server name:]
then click [Send].
6
Confirm that the new print server name has been added to [Current print
servers] then click [Close].
7
Click the close box to close the Chooser.
• Client setup procedure
1
Select [Chooser] in the Apple Menu.
2
Select [Active] in [AppleTalk].
3
Select the [S100SP (Server)] icon, then select the printer server in
[Connected to:].
4
Click the close box to close the Chooser.
Using the Printer with a Network
65
Printer Driver Functions (Macintosh)
■ Checking Print Status
• Checking print status from the print server
To check the status of a print job from the print server, start the BJ Print Monitor.
Select [BJ Print Monitor] in the Application Menu.
To close the BJ Print Monitor, select [Close Status Window] in the [File] menu.
• Checking print status from a client
To check the status of a print job from a client, start the BJ Status Monitor. Click the
[BJ Status Monitor] icon in the [BJ Extras] folder.
To close the BJ Status Monitor, select [Quit] in the [File] menu.
• The BJ Print Monitor and BJ Status Monitor
The BJ Print Monitor and the BJ Status Monitor both display a list of information
concerning documents queued for printing. This information includes the document
name, number of pages, number of copies and the time when the print job was
accepted. The total number of queued documents is also displayed.
The BJ Print Monitor allows you to change the print order of the queued documents.
➡ BJ Print Monitor Functions
➡ BJ Status Monitor Functions
Using the Printer with a Network
66
Printer Driver Functions (Macintosh)
■ BJ Status Monitor Functions
.... Click to pause printing of the specified document.
.... Click to resume printing.
.... Click to cancel printing of the specified document.
Note
➤
• You can determine the owner of a computer by selecting the [File
Sharing] control panel and checking the [Owner Name] item.
• If you are using two or more printer servers, you can switch between the
BJ Status Monitor displays. Select [Print Server] in the [File] menu, then
select the desired print server and click [OK].
Using the Printer with a Network
67
Printer Driver Functions (Macintosh)
Uninstalling Printer Drivers
When a printer driver is no longer needed, use the Installer to delete, all the program files
associated with it at the same time.
Before proceeding, ensure you save any unsaved files in any currently running applications.
Note
1
Load the Setup Software & User's Guide CD-ROM.
2
Double-click the [Printer Driver] folder.
3
Double-click the [Installer] icon.
4
When the Software License Agreement is displayed, click [Accept].
5
Select [Uninstall] from the popup menu and then click [Uninstall].
➤
If a warning message appears indicating that other applications are
running:
• Click [Cancel] and save the document(s) if there are any unsaved
documents open in the other applications.
• Click [Continue] to continue the uninstall operation.
6
After the uninstall is complete, a message appears prompting you to restart
your computer. Click [Restart].
Uninstalling Printer Drivers
68
Routine Maintenance
Routine Maintenance
• When to Replace the Cartridge and Maintain Print Head
• Replacing the Ink Cartridge
• Replacing the BJ Cartridge
• Printing the Nozzle Check Pattern
• Print Head Cleaning
• Cleaning the Printer
• Transporting the Printer
69
Routine Maintenance
When to Replace the Cartridge and Maintain Print Head
When printing becomes faint or colours are incorrect, clean the print head. If the problems
persist after cleaning, you may need to replace a cartridge.
➡ Printing the Nozzle Check Pattern
If the print quality is poor
➡ Print Head Cleaning
If the problem remains
➡ Replacing the Ink Cartridge
If print head cleaning and ink cartridge replacement do not resolve the problem, the print
head may be worn out. Replace the whole BJ cartridge.
➡ Replacing the BJ Cartridge
When to Replace the Cartridge and Maintain Print Head
70
Routine Maintenance
Replacing the Ink Cartridge
When the Color BJ Cartridge BC-21e runs out of ink, replace either of ink cartridges.
• Colour:
• Black:
Note
BCI-21 Color
BCI-21 Black
➤
Damage caused by using a refilled cartridge is not covered by the Canon
warranty. Canon recommends using only original Canon ink cartridges to
ensure the best quality.
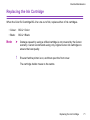
1
Ensure that the printer is on, and then open the front cover.
The cartridge holder moves to the centre.
Replacing the Ink Cartridge
71
Routine Maintenance
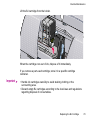
2
Remove the empty ink cartridge.
Pull the tab on the ink cartridge towards you to release. Then lift it from its
slot.
Do not touch the lock lever; remove only the ink cartridge.
Important ➤
• Handle ink cartridges carefully to avoid staining clothing or the
surrounding area.
• Discard empty ink cartridges according to the local laws and regulations
regarding disposal of consumables.
Replacing the Ink Cartridge
72
Routine Maintenance
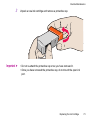
3
Important ➤
Unpack a new ink cartridge and remove a protective cap.
• Do not re-attach the protective cap once you have removed it.
• Once you have removed the protective cap, do not touch the open ink
port.
Replacing the Ink Cartridge
73
Routine Maintenance
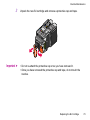
4
Insert the ink cartridge into a slot.
Replacing the Ink Cartridge
74
Routine Maintenance
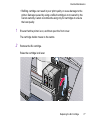
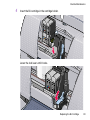
5
Press the ink cartridge tab until it snaps firmly into place.
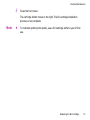
6
Close the front cover.
The cartridge holder moves to the right. The ink cartridge installation
process is now complete.
Note
➤
• To maintain optimal print quality, use an ink cartridge within six months of
first use.
• Once an ink cartridge has been used, do not remove it from the printer
and leave it out in the open. Cartridges left out in the open then reinstalled
in the printer may not work correctly.
Replacing the Ink Cartridge
75
Routine Maintenance
Replacing the BJ Cartridge
When print head nozzles seem to be worn out, replace the whole BJ cartridge with new
one.
These two types of BJ cartridges are available.
• Color BJ Cartridge BC-21e:
• Black BJ Cartridge BC-20:
holds a set of ink cartridges BCI-21 color and black.
for monochrome printing.
You can change a usable BJ cartridge for the other type. Store removed one in a specific
cartridge container to prevent ink from drying.
Note
➤
• You cannot use the Color BJ Cartridge BC-22e Photo and Color Image
Scanner Cartridge IS-22.
• BJ Cartridge Container SB-21 is available.
Replacing the BJ Cartridge
76
Routine Maintenance
• Refilling cartridge can result in poor print quality or cause damage to the
printer. Damage caused by using a refilled cartridge is not covered by the
Canon warranty. Canon recommends using only BJ cartridges to ensure
the best quality.
1
Ensure that the printer is on, and then open the front cover.
The cartridge holder moves to the centre.
2
Remove the BJ cartridge.
Raise the cartridge lock lever.
Replacing the BJ Cartridge
77
Routine Maintenance
Lift the BJ cartridge from the holder.
When the cartridge runs out of ink, dispose of it immediately.
If you remove a part-used cartridge, store it in a specific cartridge
container.
Important ➤
• Handle ink cartridges carefully to avoid staining clothing or the
surrounding area.
• Discard empty BJ cartridges according to the local laws and regulations
regarding disposal of consumables.
Replacing the BJ Cartridge
78
Routine Maintenance
3
Important ➤
Unpack the new BJ cartridge and remove a protective cap and tape.
• Do not re-attach the protective cap once you have removed it.
• Once you have removed the protective cap and tape, do not touch the
nozzles.
Replacing the BJ Cartridge
79
Routine Maintenance
4
Insert the BJ cartridge in the cartridge holder.
Lower the lock lever until it locks.
Replacing the BJ Cartridge
80
Routine Maintenance
5
Close the front cover.
The cartridge holder moves to the right. The BJ cartridge installation
process is now complete.
Note
➤
To maintain optimal print quality, use a BJ cartridge within a year of first
use.
Replacing the BJ Cartridge
81
Routine Maintenance
Printing the Nozzle Check Pattern
Print the nozzle check pattern to determine whether the ink is discharged properly. Use this
function when printed results are blurred or colours are incorrect.
Nozzle check pattern printing can be executed from the Windows and Macintosh printer
drivers, or from the printer itself.
■ Printing the Nozzle Check Pattern from the Printer Drivers
Windows
1
Ensure the printer is on and load a sheet of A4 or Letter paper in the
printer.
2
Open the Printer Properties dialog box.
➡ Opening the Printer Properties Dialog Box
3
Click the [Maintenance] tab and then click the nozzle check pattern icon.
4
When the confirmation message is displayed, click [OK].
➡ Examining the Nozzle Check Pattern
Printing the Nozzle Check Pattern
82
Routine Maintenance
Macintosh
1
Ensure the printer is on and load a sheet of A4 or Letter paper in the
printer.
2
Open the Page Setup dialog box.
The Page Setup dialog box can normally be opened by selecting [Page
Setup...] in the [File] menu.
3
Click the [Utilities] button to open the Printer Utilities dialog box.
4
Select [Test Print] from the pull-down menu, and then click the [Nozzle
Check] icon.
5
When the confirmation message is displayed, click [OK].
➡ Examining the Nozzle Check Pattern
Printing the Nozzle Check Pattern
83
Routine Maintenance
■ Printing the Nozzle Check Pattern through the Printer
1
Ensure the printer is on and load a sheet of A4 or Letter paper in the
printer.
2
Press the RESUME/CANCEL button twice quickly.
➡ Examining the Nozzle Check Pattern
Printing the Nozzle Check Pattern
84
Routine Maintenance
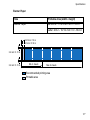
■ Examining the Nozzle Check Pattern
The nozzle check pattern should appear as follows when ink is discharged properly.
Examine the nozzle check pattern output by the printer.
Color BJ Cartridge
24
24
24
64
24
24
24
24
Black BJ Cartridge
128
If the pattern is broken, missing or any of the colours is not printed, clean the print head.
Printing the Nozzle Check Pattern
85
Routine Maintenance
Print Head Cleaning
Clean the print head if you suspect that the nozzles might be clogged.
Head cleaning can be performed either from the printer drivers or from the printer itself.
Note
➤
Cleaning the head consumes ink, so perform head cleaning only when
necessary.
Do not perform any other operations during the head cleaning. This takes about 30
seconds.
After print head cleaning finishes, print the nozzle check pattern to verify that the print
heads are clean.
➡ Printing the Nozzle Check Pattern
■ Cleaning the Print Head from the Printer Drivers
Windows
1
Ensure that the printer is on.
2
Open the Printer Properties dialog box.
➡ Opening the Printer Properties Dialog Box
Print Head Cleaning
86
Routine Maintenance
3
Click the [Maintenance] tab and then click the print head cleaning icon.
4
When a confirmation message is displayed, click [OK].
Macintosh
1
Ensure the printer is on.
2
Open the Page Setup dialog box.
The Page Setup dialog box can normally be opened by selecting [Page
Setup...] in the [File] menu.
3
Click the [Utilities] button to open the Printer Utility dialog box.
4
Select [Cleaning] from the pull-down menu, and then click the [Cleaning]
icon.
5
When a confirmation message appears, click [OK].
Print Head Cleaning
87
Routine Maintenance
■ Cleaning the Print Head from the Printer
This method resets the printer so any print data stored in the printer is lost.
1
Ensure the printer is on.
2
Hold down the RESUME/CANCEL button for longer than 2 seconds.
Print Head Cleaning
88
Routine Maintenance
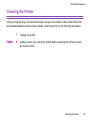
Cleaning the Printer
During normal printing, ink and small scraps of paper accumulate in the printer. When the
accumulated debris becomes clearly visible, clean the printer by the following procedure.
1
Caution ➤
Unplug the printer.
Always ensure you unplug the printer before cleaning the printer to avoid
an electric shock.
Cleaning the Printer
89
Routine Maintenance
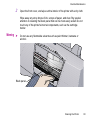
2
Open the front cover, and wipe out the interior of the printer with a dry cloth.
Wipe away any stray drops of ink, scraps of paper, and dust. Pay special
attention to cleaning the black panel that can be most easily soiled. Do not
touch any of the printer's internal components, such as the cartridge
holder.
Warning ➤
Do not use any flammable solvents such as paint thinner, benzene or
alcohol.
Black panel
Cleaning the Printer
90
Routine Maintenance
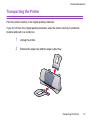
Transporting the Printer
Pack the printer carefully in its original packing materials.
If you do not have the original packing materials, wrap the printer carefully in protective
material and pack in a sturdy box.
1
Unplug the printer.
2
Remove the paper rest and the paper output tray.
Transporting the Printer
91
Routine Maintenance
3
Disconnect the printer cable from the computer and the printer, and then
disconnect the power cord from the printer.
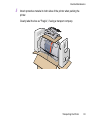
4
Secure the printer with adhesive tape as shown, and then pack it in a
plastic bag.
Transporting the Printer
92
Routine Maintenance
5
Attach protective material to both sides of the printer when packing the
printer.
Clearly label the box as "Fragile", if using a transport company.
Transporting the Printer
93
Printing Media
Printing Media
• Compatible Media Types
• Envelopes
• High Resolution Paper HR-101N
• Glossy Photo Paper GP-301N/GP-301
• High Gloss Film HG-101
• Glossy Photo Cards FM-101
• Transparencies CF-102
• T-Shirt Transfers TR-201
• Banner Paper
94
Printing Media
Compatible Media Types
You can use the following types of paper and other media.
■ Size
• Standard paper: From A5 size (148.0 x 210.0 mm / 5.83 x 8.27 in) to legal size (215.9 x
355.6 mm / 8.5 x 14.0 in)
• Non-standard paper: From 100.0 x 100.0 mm to 241.3 x 584.2 mm
(From 3.9 x 3.9 in to 9.5 x 23.0 in)
• Others: Envelopes (European DL and US Com. #10)
Important ➤
Do not use the following types of paper. Using such paper will not only
produce unsatisfactory results, but can also cause the printer to jam or
malfunction.
• Folded, curled or wrinkled paper
• Wet paper
• Paper that is too thin (less than 64 g/m2 / 17 lb)
• Paper that is too thick (more than 105 g/m2 / 28 lb)
• Picture postcards
• Postcards with an adhered photo or sticker
• Envelopes with a double flap
• Sealed envelopes
• Envelopes with an embossed or treated surface
• Paper with holes (such as loose-leaf paper)
Compatible Media Types
95
Printing Media
■ Weight
64 to 105 g/m2 (17 to 28 lb)
Do not use paper heavier than this, as it could jam in the printer.
■ Types
The following types of media can be used.
For more information about the media and the printing methods, refer to the specific
sections.
Plain paper: Refer to the Quick Start Guide.
➡ Envelopes
➡ High Resolution Paper HR-101N
➡ Glossy Photo Paper GP-301N/GP-301
➡ High Gloss Film HG-101
➡ Glossy Photo Cards FM-101
➡ Transparencies CF-102
➡ T-Shirt Transfers TR-201
➡ Banner Paper
Compatible Media Types
96
Printing Media
Envelopes
Use either European DL or US Com. #10 size envelopes.
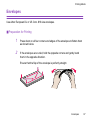
■ Preparation for Printing
1
Press down on all four corners and edges of the envelopes to flatten them
as shown below.
2
If the envelopes are curled, hold the opposite corners and gently bend
them in the opposite direction.
Ensure that the flap of the envelope is perfectly straight.
Envelopes
97
Printing Media
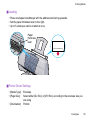
3
If the leading edge of an envelope is puffed up or curled, use a pen to press
the envelope flat and sharpen the crease.
Press the envelope completely flat,
working from the middle to the edge.
* The above illustrations show a side view of the leading edge of the
envelope.
The envelopes may jam in the printer if they are not completely flat and the
edges are not aligned.
Ensure that no curl or puff exceeds 3 mm (1/8 in).
■ Unsuitable Envelopes
• Envelopes with an embossed or treated surface
• Envelopes with a double flap or pressure seals
Envelopes
98
Printing Media
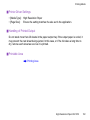
■ Loading
• Place envelopes breadthways with the address side facing upwards.
• Set the paper thickness lever to the right.
• Up to 5 envelopes can be loaded at once.
Paper
thickness
lever
■ Printer Driver Settings
• [Media Type]: Envelope
• [Page Size]:
Select either [DL Env.] or [#10 Env.] according to the envelope size you
are using
• [Orientation]: Portrait
Envelopes
99
Printing Media
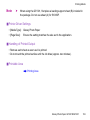
■ Handling of Printed Output
Remove each envelope as it is printed.
■ Printable Area
➡ Printing Area
Envelopes
100
Printing Media
High Resolution Paper HR-101N
This type of paper provides better colour reproduction than plain paper. It is suitable for
printing business documents that feature graphics, and for photographs.
■ Loading
• Load the paper with the whiter side facing up.
• Set the paper thickness lever to the left.
• Do not load paper higher than the limit mark. A maximum of 40 sheets can be loaded.
Paper thickness lever
Print side
(Whiter side)
High Resolution Paper HR-101N
101
Printing Media
■ Printer Driver Settings
• [Media Type]: High Resolution Paper
• [Page Size]:
Ensure the setting matches the size set in the application.
■ Handling of Printed Output
Do not stack more than 20 sheets in the paper output tray. If the output paper is curled, it
may prevent the next sheet being ejected. In this case, or if the ink takes a long time to
dry, remove each sheet as soon as it is printed.
■ Printable Area
➡ Printing Area
High Resolution Paper HR-101N
102
Printing Media
Glossy Photo Paper GP-301N/GP-301
This media is still thicker than High Resolution Paper with a glossy printing surface to
produce print-outs close to photograph quality.
■ Loading
• Load the paper with the whiter side facing up.
• Set the paper thickness lever to the left.
• Load one sheet at a time.
Paper thickness lever
Print side
(Whiter side)
Glossy Photo Paper GP-301N/GP-301
103
Printing Media
Note
➤
When using the GP-301, first place a loading support sheet (B) included in
the package. Do not use sheet (A) for S100SP.
■ Printer Driver Settings
• [Media Type]: Glossy Photo Paper
• [Page Size]:
Ensure the setting matches the size set in the application.
■ Handling of Printed Output
• Remove each sheet as soon as it is printed.
• Do not touch the printed surface until the ink dries (approx. two minutes).
■ Printable Area
➡ Printing Area
Glossy Photo Paper GP-301N/GP-301
104
Printing Media
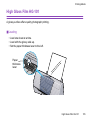
High Gloss Film HG-101
A glossy surface offers quality photograph printing.
■ Loading
• Load one sheet at a time.
• Load with the glossy side up.
• Set the paper thickness lever to the left.
Paper
thickness
lever
High Gloss Film HG-101
105
Printing Media
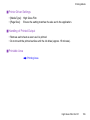
■ Printer Driver Settings
• [Media Type]: High Gloss Film
• [Page Size]:
Ensure the setting matches the size set in the application.
■ Handling of Printed Output
• Remove each sheet as soon as it is printed.
• Do not touch the printed surface until the ink dries (approx. 15 minutes).
■ Printable Area
➡ Printing Area
High Gloss Film HG-101
106
Printing Media
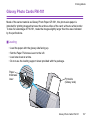
Glossy Photo Cards FM-101
Made of the same material as Glossy Photo Paper GP-301, this photo-size paper is
intended for printing images that cover the entire surface of the card, without a white border.
To take full advantage of FM-101, make the images slightly larger than the area indicated
by the perforations.
■ Loading
•
•
•
•
Load the paper with the glossy side facing up.
Set the Paper Thickness Lever to the left.
Load one sheet at a time.
Do not use the loading support sheet provided with the package.
Paper
thickness
lever
Print side
(Glossy side)
Glossy Photo Cards FM-101
107
Printing Media
■ Printer Driver Settings
• [Media Type]: Glossy Photo Cards
• [Page Size]:
Canon 101.6 x 152.4 mm (Canon 4 x 6 in)
■ Handling of Printed Output
• Remove each card as soon as it is printed.
• Do not touch the printed surface until the ink dries (approx. two minutes).
■ Printable Area
➡ Printing Area
Glossy Photo Cards FM-101
108
Printing Media
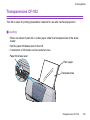
Transparencies CF-102
This film is ideal for printing presentation material for use with overhead projectors.
■ Loading
• Place one sheet of plain A4 or Letter paper under the transparencies in the sheet
feeder.
• Set the paper thickness lever to the left.
• A maximum of 20 sheets can be loaded at once.
Paper thickness lever
Plain paper
Transparencies
Transparencies CF-102
109
Printing Media
• Although you can print on either side of CF-102, best results can be obtained by
printing on the side toward which it curls when held by the edge.
Print side
■ Printer Driver Settings
• [Media Type]: Transparency
• [Page Size]:
Ensure the setting matches the size set in the application.
■ Handling of Printed Output
• Remove each transparency as soon as it is printed.
• Do not touch the printed surface until the ink dries (approx. 15 minutes).
■ Printable Area
➡ Printing Area
Transparencies CF-102
110
Printing Media
T-Shirt Transfers TR-201
This paper is used to produce iron-on transfers. The image is printed backwards when
[Media Type] is set to T-Shirt Transfer in the printer driver.
■ Loading
•
•
•
•
Load one sheet at a time.
If the T-shirt transfer is curled, flatten it by curling it in the opposite direction.
Load the paper with the side that does not have green lines facing up.
Set the paper thickness lever to the left.
Paper thickness lever
T-Shirt Transfers TR-201
111
Printing Media
■ Printer Driver Settings
• [Media Type]: T-Shirt Transfer
• [Page Size]:
Ensure the setting matches the size set in the application.
■ Handling of Printed Output
• Remove each T-shirt transfer as soon as it is printed.
• The T-shirt transfer should be used as soon as possible. Refer to the supplied
instructions for details on how to use the paper.
■ Printable Area
➡ Printing Area
T-Shirt Transfers TR-201
112
Printing Media
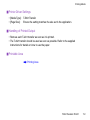
Banner Paper
This is long paper that consists of perforated sheets of A4 or Letter size paper, ideal for
printing long posters or banners (up to six sheets long).
■ Preparation for Printing
• When tearing the banner paper, tear off one more sheet than you actually need to print.
• The maximum length for one print job is six sheets, so if you will be printing on six
sheets, tear off a seven-sheet length.
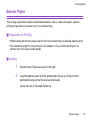
■ Loading
1
Set the Paper Thickness Lever to the right.
2
Load the banner paper with the printing side facing up. Gently fold the
perforation between the first and second sheets.
Leave the rest of the paper folded up.
Banner Paper
113
Printing Media
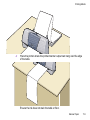
3
Place the printer where the printed banner output can hang over the edge
of the table.
Ensure the ink does not stain the table or floor.
Banner Paper
114
Printing Media
■ Printer Driver Settings
• [Media Type]: Plain Paper
• [Page Size]:
When using A4 banner paper: A4
When using letter size banner paper: Letter
• [Printing Type]: Banner Printing for Windows.
On a Macintosh, before creating the document, select [Banner Printing]
in the [Page Setup] dialog box.
• [Copies]:
Must be set to "1" to print correctly.
• In Windows 98 or Windows Me, select [Banner Printing] for [Printing Type] on the [Page
Layout] tab.
■ Printable Area
➡ Printing Area
Banner Paper
115
Troubleshooting
Troubleshooting
• Cannot Install the Printer Driver
• Print Quality is Poor or Contains Errors
• Printer Does Not Start or Stops During Print Jobs
• Paper Does Not Feed Properly or Paper Jams
• Ink Runs Out Too Quickly
• An Error Message is Displayed on the Screen
• Problems Unique to Windows
Windows
• Problems Unique to the Macintosh
Macintosh
116
Troubleshooting
Cannot Install the Printer Driver
■ Follow the installation procedure correctly.
Install the printer driver carefully following the procedures described in the Quick Start
Guide.
If the printer driver was not installed correctly, reinstall it. If you are using Windows,
delete the printer driver before reinstalling it.
➡ Uninstalling Printer Drivers
Note
➤
If the Installer was forcibly terminated due to an error in Windows, Windows
may be unstable and this will prevent the printer driver from being installed.
Restart the computer before reinstalling the printer driver.
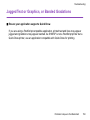
■ Close any other applications before installation.
Sometimes the printer driver cannot be installed because another application is running.
Cannot Install the Printer Driver
117
Troubleshooting
■ If the Installer for the printer driver does not start up automatically when you insert
the Setup Software & User’s Guide CD-ROM, open the [My Computer] window, and
then double-click the CD-ROM icon.
Windows
Note
➤
If you are typing in the file name, you must specify the CD-ROM drive letter
and the installation program ("MSetup.exe"). The CD-ROM drive letter is
computer dependent.
■ Confirm that there are no problems with the Setup Software & User’s Guide
CD-ROM.
In Windows, use Explorer to ensure that the CD-ROM can be read. In a Macintosh,
check that the CD-ROM icon is visible. If there is a problem with the CD-ROM, contact a
Canon service representative.
Cannot Install the Printer Driver
118
Troubleshooting
Print Quality is Poor or Contains Errors
• Cannot Print to End of Job
• Colours are Unclear
• Meaningless Characters or Symbols are Printed
• Printing is Blurred/Colours are Wrong
• Straight Lines are Misaligned
• Printed Paper Curls or Ink Blots
• Back of Paper is Smudged
• Printed Surface is Scratched
• White Streaks
• Colours are Uneven or Streaked
Print Quality is Poor or Contains Errors
119
Troubleshooting
Cannot Print to End of Job
■ Confirm the Page Size setting matches the size of the paper loaded in the printer.
First, check the page size setting in the application.
Then check the [Page Size] setting in the Printer Properties dialog box for Windows or
the Page Setup dialog box for Macintosh.
Print Quality is Poor or Contains Errors
120
Troubleshooting
Colours are Unclear
■ Confirm the media type setting in the printer driver matches the type of paper
loaded in the printer.
If you are printing a photograph or an illustration from a Windows environment, also
increase [Print Quality]. Click [Advanced...] on the [Main] tab to find the [Print Quality]
slide bar.
If you are working in a Macintosh environment, select the [Photo] or [Graphic] icon for
the [Print Mode] in the Print dialog box.
■ Confirm the specified cartridge are installed.
When an ink cartridge or a black BJ cartridge runs out of ink, replace it with a new
one.
Note
➤
Printed colours may not match screen colours perfectly due to basic
differences in the methods used to produce colours. Colour control settings
and environmental differences can also affect how colours appear on the
screen.
Print Quality is Poor or Contains Errors
121
Troubleshooting
Meaningless Characters or Symbols are Printed
■ If the problem only occurs when printing a specific document, try editing the
document and then printing it.
If this does not resolve the problem, there may be a problem with your application
program.
Print Quality is Poor or Contains Errors
122
Troubleshooting
Printing is Blurred/Colours are Wrong
■ Print the nozzle check pattern to ensure that ink is output correctly.
If the nozzle check pattern does not print correctly, clean the print head.
➡ Printing the Nozzle Check Pattern
➡ Print Head Cleaning
If the problem is not resolved after cleaning the print head several times and you use a
black BJ cartridge, replace it immediately. If you use a colour BJ cartridge, replace either
of ink cartridges which runs out of ink first. Then if print quality still remains poor, the print
head may be worn out. Replace the BJ cartridge.
➡ Replacing the Ink Cartridge
➡ Replacing the BJ Cartridge
Note
➤
Always ensure you dispose of the protective cap and protective tape from a
print head.
■ Ensure you are printing on the correct side of the media.
You can only print on one side of certain media.
Print Quality is Poor or Contains Errors
123
Troubleshooting
Straight Lines are Misaligned
■ Remove the BJ cartridge and then reinstall it correctly.
■ In the printer driver settings, select a higher print quality setting.
Windows
1
Open the Printer Properties dialog box.
2
On the [Main] tab, click [Advanced...], open the [Quality] tab and drag the
[Printer Quality] slide bar to the [Fine] end.
Macintosh
1
Open the Print dialog box.
2
For [Print Mode], select [Manual] and then click [Details].
3
Click the [Quality] icon and then drag the [Print Quality] slide bar to the
[Fine] end.
Print Quality is Poor or Contains Errors
124
Troubleshooting
Printed Paper Curls or Ink Blots
■ Use high resolution paper or photo paper to print images that require a lot of ink,
(i.e. pictures with intense colours or photographs).
■ Reduce the [Intensity] setting in the printer driver and try printing again.
Windows
1
Open the Printer Properties dialog box.
2
On the [Main] tab, click [Advanced...] and select the [Colour] / [Color] tab.
3
Drag the [Intensity] slide bar to adjust the intensity.
Print Quality is Poor or Contains Errors
125
Troubleshooting
Macintosh
1
Open the Print dialog box.
2
For [Print Mode], select [Manual] and then click [Details].
3
Click the [Colour] / [Color] icon and then drag the [Intensity] slide bar to set
the intensity.
Print Quality is Poor or Contains Errors
126
Troubleshooting
Back of Paper is Smudged
■ Remove each printed sheet from the output tray as soon as it is ejected.
Print Quality is Poor or Contains Errors
127
Troubleshooting
Printed Surface is Scratched
■ Ensure you are using suitable paper.
• The paper weight must be less than 105 g/m2 (28 lb).
If you use paper heavier than 105 g/m2 (28 lb), the print head may scratch the printed
surface.
Clean the print head first and print with the correct paper.
• The paper must not be curled.
This problem can be resolved by simply turning the paper over.
■ When printing on thick paper, set the paper thickness lever to the "
" mark.
This widens a gap between the print head and the paper. If the paper is scratched even
when printing on plain paper, also try this.
■ Reduce the [Intensity] setting in the printer driver and try printing again.
When printing an image with high intensity, especially on plain paper, the paper may
absorb too much ink and become wavy. This may cause the printed surface to become
scratched.
Print Quality is Poor or Contains Errors
128
Troubleshooting
Windows
1
Open the Printer Properties dialog box.
2
On the [Main] tab, click [Advenced...] and open the [Colour] / [Color] tab.
3
Drag the [Intensity] slide bar to adjust the intensity.
Macintosh
1
Open the Print dialog box.
2
For [Print Mode], select [Manual] and then click [Details].
3
Click the [Colour] / [Color] icon and drag the [Intensity] slide bar to set the
intensity.
■ Ensure you are printing within the recommended printing area.
➡
Printing Area
Print Quality is Poor or Contains Errors
129
Troubleshooting
White Streaks
■ Print the nozzle check pattern to check the ink output.
If the pattern is broken, missing or a specific colour does not print, clean the print head.
➡ Printing the Nozzle Check Pattern
➡ Print Head Cleaning
Print Quality is Poor or Contains Errors
130
Troubleshooting
Colours are Uneven or Streaked
■ Increase the print quality setting in the printer driver settings.
Windows
1
Open the Printer Properties dialog box.
2
On the [Main] tab, click [Advanced...] to increase the [Print Quality] on the
[Quality] tab.
Macintosh
1
Open the Print dialog box.
2
For [Print Mode], select [Manual] and then click [Details].
3
Click the [Quality] icon and then drag the [Print Quality] slide bar to the
[Fine] end.
Print Quality is Poor or Contains Errors
131
Troubleshooting
■ Set the halftoning method to [Diffusion] in the printer driver settings.
Windows
1
Open the Printer Properties dialog box.
2
On the [Main] tab, click [Advanced...] and open the [Quality] tab.
3
Clear the [Auto] checkbox off and select [Diffusion] for the [Halftoning]
setting.
Macintosh
1
Open the Print dialog box.
2
For [Print Mode], select [Manual] and then click [Details].
3
Click the [Quality] icon and then click [Diffusion] for the [Halftoning] setting.
Print Quality is Poor or Contains Errors
132
Troubleshooting
Printer Does Not Start or Stops During Print Jobs
• Printing Does Not Start
• Printing Stops Before It is Completed
• Printer Moves But Does Not Print
• Cartridge Holder Does Not Move to the Centre
• Cartridge Holder Does Not Return to the Home
Printer Does Not Start or Stops During Print Jobs
133
Troubleshooting
Printing Does Not Start
■ Ensure the printer is securely plugged in.
Note
➤
When printing a large amount of data such as a photo or graphics, it takes
longer than usual for the computer to process the data and send it to the
printer. Simply wait until the processing is completed.
■ Ensure the printer is securely connected to the computer.
Note
➤
If you are using a switch box or other device, remove and reconnect the
printer directly to the computer. Try printing again.
If printing is now successful, there may be a problem with the device.
Also there could be a problem with the cable(s). Replace the cable(s) and
try printing again.
Printer Does Not Start or Stops During Print Jobs
134
Troubleshooting
■ Ensure the correct printer driver is selected.
In Windows, ensure that [Canon S100SP] is selected in the [Print] dialog box.
In Macintosh, ensure that [S100SP] is selected in the [Chooser].
Note
➤
In Windows, you can set the Canon S100SP as the default printer.
■ Ensure the printer port is set correctly.
Windows
Set "USBPRNnn" or "USBnnn" ("n" represents a number) as the printer port.
1
Open the Printer Properties dialog box from the [Start] menu.
➡ Opening the Printer Properties dialog box directly from the [Start]
menu
2
Click the [Details] tab and set the printer port.
Printer Does Not Start or Stops During Print Jobs
135
Troubleshooting
Printing Stops Before It is Completed
■ Wait for a while.
Printing a large amount of data such as a photo or graphics takes time for the computer
to process the data, during which the printer may appear to not be functioning.
In addition, when continuously printing material that uses a large amount of black ink on
plain paper, the printer will sometimes pause. In either case, simply wait until the
processing is completed.
■ Halt the print job and unplug the printer for at least 15 minutes to cool the print
head down.
The print head can overheat when continuously printing for long time. To protect the print
head, the printer will sometimes pause automatically at a line break before resuming.
In this event, interrupt the print job at a convenient time and unplug the printer for at least
15 minutes.
Furthermore, when continuously printing graphics or photos with intense colours,
printing may stop to protect the print head. In this case, printing will not resume. Unplug
the printer and wait for at least 15 minutes.
Caution ➤
Inside the printer, the area around the print head can become extremely
hot. Do not touch the print head or nearby components.
Printer Does Not Start or Stops During Print Jobs
136
Troubleshooting
Printer Moves But Does Not Print
■ Either of the ink cartridges or a BJ cartridge may empty. Replace with a new one.
➡ Replacing the Ink Cartridge
■ If there is plenty of ink but the printer does not print, clean the print head.
After cleaning the print head, print the nozzle check pattern to check that ink is being
output normally.
➡ Print Head Cleaning
➡ Printing the Nozzle Check Pattern
If the problem is not resolved by cleaning the print head several times, the print head may
be worn out. Replace the BJ cartridge.
➡ Replacing the BJ Cartridge
■ Check the protective tape has been removed from the BJ cartridge.
Printer Does Not Start or Stops During Print Jobs
137
Troubleshooting
Cartridge Holder Does Not Move to the Centre
■ Ensure the printer is securely plugged in.
The cartridge holder will not move unless the power is on.
■ If the front cover has been left open for a while, close and reopen it.
If the front cover is left open for more than 10 minutes, the cartridge holder moves to the
right to prevent the print head from drying out. Close and reopen the front cover to return
the holder to the centre.
■ Cool the print head down for 15 minutes.
The cartridge holder stops moving to protect an overheated print head when it has been
printing continuously for a long time.
Printer Does Not Start or Stops During Print Jobs
138
Troubleshooting
Cartridge Holder Does Not Return to the Home
■ Unplug and plug the printer back, and reinstall the BJ cartridge correctly.
If the problem remains, replace the BJ cartridge with another one.
➡ Replacing the BJ Cartridge
Printer Does Not Start or Stops During Print Jobs
139
Troubleshooting
Paper Does Not Feed Properly or Paper Jams
• Paper Does Not Feed Properly
• Paper Jams
Paper Does Not Feed Properly or Paper Jams
140
Troubleshooting
Paper Does Not Feed Properly
■ Confirm the paper conditions.
• The paper is not too thick (less than 105g/m2 / 28 lb).
• The number of sheets loaded does not exceed the recommended level.
• The paper is not creased, curled or wrinkled.
➡ Compatible Media Types
■ Ensure that the left edge of the paper just touches the paper guide.
■ When printing envelopes, refer to "Envelopes" in "Printing Media," and prepare
the envelopes before printing.
Once you have prepared the envelopes, load them in the printer in landscape orientation.
If the envelopes are placed in portrait orientation, they may not feed properly.
■ When using transparencies, load one sheet of plain paper in the printer first, and
then place the transparencies on top of it.
The last transparency may not feed properly unless there is a sheet of plain paper
beneath it.
Paper Does Not Feed Properly or Paper Jams
141
Troubleshooting
Paper Jams
Remove the paper according to the following procedure.
1
Slowly pull the paper out, either from the sheet feeder or from the paper
output slot, whichever is easier.
If the paper tears and a piece remains inside the printer, open the front
cover and remove it.
Note
2
After removing all paper, close the front cover.
3
Reload the paper into the printer and press the RESUME/CANCEL button.
➤
When reloading the paper into the printer, refer to "Paper Does Not Feed
Properly" to confirm that you are using the correct paper and are loading it
into the printer correctly.
Paper Does Not Feed Properly or Paper Jams
142
Troubleshooting
Ink Runs Out Too Quickly
■ Do not open and shut the front cover too often.
The printer automatically starts print head cleaning as you shut the front cover after
leaving it opened for longer than 5 seconds. Do not open the cover unnecessarily since
the cleaning consumes ink.
Ink Runs Out Too Quickly
143
Troubleshooting
An Error Message is Displayed on the Screen
• Error Writing to USBxxx
Windows
• Application Error or General Protection Fault
• Other Error Messages
Windows
• Other Error Messages
Macintosh
Windows
An Error Message is Displayed on the Screen
144
Troubleshooting
Error Writing to USBxxx
Windows
■ Ensure the printer is securely plugged in.
■ Ensure the printer is securely connected to the computer.
Note
➤
If you are using a switch box or other devices, remove and reconnect the
printer directly to the computer and try printing again.
If printing is now successful, there may be a problem with the device.
Also there could be a problem with the cable(s). Replace the cable(s) and
try printing again.
■ If spooling is enabled, disable it to send the print data directly to the printer and try
printing again.
1
Open the Printer Properties dialog box from the [Start] menu.
➡ Opening the Printer Properties dialog box directly from the [Start]
menu
2
On the [Details] tab, click [Spool Settings] and then select [Print directly to
printer].
An Error Message is Displayed on the Screen
145
Troubleshooting
■ Verify the USB port status.
1
Right-click [My Computer] and select [Properties].
2
On the [Device Manager] tab, double-click [Universal serial bus controller],
and then double-click [Canon S100SP].
3
On the [General] tab, check for any indication of a problem with the device.
If an error has occurred, follow the instruction of "Notes on Handling the
USB Interface (for Windows Users)" in the Quick Start Guide.
■ Ensure that the printer port setting covers ports to the printer interface
connection.
1
Open the Printer Properties dialog box from the [Start] menu.
➡ Opening the Printer Properties dialog box directly from the [Start]
menu
2
On the [Details] tab (on [Ports] tab), select [USBPRNnn (Canon S100SP)]
or [USBnnn (Canon S100SP)] ("n" represents a number) in the [Print to the
following port].
An Error Message is Displayed on the Screen
146
Troubleshooting
■ There may be a problem in the printer driver. Uninstall the printer driver and
reinstall it.
➡ Uninstalling Printer Drivers
Also refer to the procedure “Notes on Handling the USB Interface (for Windows Users)”
in the Quick Start Guide.
■ If the WPS driver or CAPT driver is installed, either uninstall it or change the driver
port to [FILE] as follows.
1
Click the [Start] button, then click [Settings] and [Printers].
2
Display the WPS or CAPT driver properties, and click the [Details] tab.
3
Change the [Print to the following port] field to [FILE].
An Error Message is Displayed on the Screen
147
Troubleshooting
Application Error or General Protection Fault
Windows
■ Ensure the application program you are using is intended for your operating
system.
For example, if you attempt to print with a Windows 3.1 application under Windows 98,
the application may not function correctly and an error may occur.
Use an application program intended for your operating system.
■ If other applications are running, close them to increase available memory and try
printing again.
■ Ensure that enough memory is allocated to the application.
Refer to the memory requirements of your application.
An Error Message is Displayed on the Screen
148
Troubleshooting
■ Check the amount of free space on the hard disk.
You may need to increase the amount of free space by deleting any unnecessary files.
■ If the problem only occurs when printing a specific document, try editing the
document and then printing it.
If this resolves the problem, there may have been a problem in the original document. If
the same problem occurs with the edited document, contact the manufacturer of your
application.
■ There may be a problem in the printer driver. Uninstall the printer driver and
reinstall it.
Also refer to the procedure “Notes on Handling the USB Interface (for Windows Users)”
in the Quick Start Guide.
➡ Uninstalling Printer Drivers
An Error Message is Displayed on the Screen
149
Troubleshooting
Other Error Messages
Windows
■ If the BJ Status Monitor is displayed, follow the instructions on screen.
If an error occurs during printing, the BJ Status Monitor displays the error on the [Printer
Status] tab. Follow the instructions on screen.
In Windows 98 or Windows Me, click the [Guide] tab for action to be taken in response to
the error.
An Error Message is Displayed on the Screen
150
Troubleshooting
■ If one of the following messages is displayed outside of the BJ Status Monitor:
Could not spool successfully due to insufficient disk space
Increase the amount of free space on the disk by deleting any unnecessary files.
Could not spool successfully due to insufficient memory
Increase available memory by closing any other applications currently running.
Printer driver could not be found
Uninstall the printer driver and reinstall it.
➡ Uninstalling Printer Drivers
Background printing failed (Windows 98/Windows Me only)
Restart Windows and try printing again.
Could not print [application name] – [file name]
Try printing again once the current job is finished.
An Error Message is Displayed on the Screen
151
Troubleshooting
Other Error Messages
Macintosh
■ If a message with the format "Error No.: Xn" (where "X" represents a letter and "n"
represents a number) is displayed:
Error No.: X202
Not enough memory for printing. Increase available memory by closing any other
applications currently running.
Error No.: X203
There is a problem with the printer driver. Uninstall the printer driver and reinstall it.
➡
Uninstalling Printer Drivers
Error No.: X300
Ensure the power is on, and that the printer and the computer are securely connected. If
the problem remains, verify the Chooser setting.
1
In the Apple menu, select [Chooser].
2
Click the S100SP icon and ensure S100SP is selected as the connected
destination.
If it is not selected, select it.
If the problem remains, delete all unnecessary documents from the Extensions and
Control Panels folder.
An Error Message is Displayed on the Screen
152
Troubleshooting
Windows
Problems Unique to Windows
• The BJ Status Monitor is Not Displayed
• Cannot Print in Background (Windows 98/Windows Me only)
• Cannot Print Normally
Problems Unique to Windows
153
Troubleshooting
The BJ Status Monitor is Not Displayed
■ Ensure "Enable bi-directional support for this printer" is selected.
1
Open the Printer Properties dialog box from the [Start] menu.
➡ Opening the Printer Properties dialog box directly from the [Start]
menu
2
On the [Details] tab (or [Ports] tab), click [Spool Settings] and select
"Enable bi-directional support for this printer."
Problems Unique to Windows
154
Troubleshooting
Cannot Print in Background (Windows 98/Windows Me
only)
■ Check the amount of free space on the hard disk.
Background printing requires a certain amount of disk space. You may need to delete
unnecessary files, or disable background printing.
■ Ensure that background printing is enabled.
1
Open the Printer Properties dialog box.
➡ Opening the Printer Properties Dialog Box
2
On the [Page Layout] tab, select [Background Printing].
Problems Unique to Windows
155
Troubleshooting
Cannot Print Normally
■ If the WPS driver or CAPT driver is installed, either uninstall it or change the driver
port to [FILE] as follows.
The WPS (Windows Printing System) driver or CAPT (Canon Advanced Printing
Technology) driver may disrupt normal printing.
1
Click the [Start] button, then click [Settings] and [Printers].
2
Display the WPS or CAPT driver properties, and click the [Details] tab.
3
Change the [Print to the following port] field to [FILE].
Problems Unique to Windows
156
Troubleshooting
Problems Unique to the Macintosh
Macintosh
• Jagged Text or Graphics, or Banded Gradations
• Cannot Print in Background
Problems Unique to the Macintosh
157
Troubleshooting
Jagged Text or Graphics, or Banded Gradations
■ Ensure your application supports Quick Draw.
If you are using a PostScript-compatible application, printed text and lines may appear
jagged and gradations may appear banded. As S100SP is not a PostScript printer but a
Quick Draw printer, use an application compatible with Quick Draw for printing.
Problems Unique to the Macintosh
158
Troubleshooting
Cannot Print in Background
■ Ensure background printing is enabled.
1
In the Apple menu, select [Chooser].
2
Click [Backgrounding] on.
■ Check the amount of free space on the hard disk.
Background printing requires a certain amount of disk space.
You may need to remove unnecessary files, or disable background printing.
Problems Unique to the Macintosh
159
Appendices
Appendices
• Deleting an Unknown Device
Windows
160
Appendices
Deleting an Unknown Device
Windows
If printer driver installation was not seccessful, carry out the procedure described in “Notes
on Handling the USB interface (for Windows Users)” in the Quick Start Guide.
If the problem remains, follow the steps below to delete the unknown device.
1
Click the [Start] button, select [Settings] and click [Control Panel].
2
Double-click [System].
3
Click the [Device Manager] tab.
In Windows 2000, click the [Hardware] tab, then click [Device Manager...].
4
Select the name of the printer or ‘Unknown device’ and click [Remove].
In Windows 2000, click the unknown device, then click [Uninstall] in the
[Action] menu.
Caution ➤
Be careful not to remove any other device. Windows may not function
properly if another device is incorrectly deleted.
Deleting an Unknown Device
161
Appendices
• If the unknown device is under [Universal serial bus controller]
• If the unknown device is under [Other devices]
Deleting an Unknown Device
162
Appendices
5
When the confirmation message appears, click [OK].
6
Click [Close] to close the [System Properties] window.
In Windows 2000, click
window.
and then click [OK] in the [System Properties]
7
Click
8
Unplug the printer.
9
Remove the Setup Software & User’s Guide CD-ROM, if it is in the drive.
10
Restart Windows.
11
Install the printer driver again following the instructions in the Quick Start
Guide.
at the top right of the [Control Panel] window to close it.
Deleting an Unknown Device
163
Specifications
Specifications
Printing method:
Bubble Jet on-demand
Printing resolution:
720 (horizontal) × 360 (vertical) dpi. max.
Print speed (printing with Canon standard pattern):
Black printing
Fast:
5 ppm
Normal:
4.5 ppm
Colour printing
Fast:
2 ppm
Normal:
1.6 ppm
Print direction:
Bi-directional
Print width:
203.2 mm max. (8.0 in)
Resident print control mode:
Canon extended mode
164
Specifications
Receive buffer:
64 KB
Interface:
USB 1.0-compatible
Interface connector:
USB standard Series B receptacle (USB interface)
Recommended printer cable:
Material:
AWG28 (data wiring pair) or AWG20 to 28 (distribution pair)
Type:
Twisted-pair shielded cable
Length:
Up to 5.0 m (16.4 ft)
Connectors: USB standard Series B pluggable
Acoustic noise level:
Approx. 45 dB (A) (per ISO 9296)
Operating environment:
Temperature: 5 to 35˚C (41 to 95˚F)
Humidity:
10 to 90%RH (no condensation)
Storage environment:
Temperature: 0 to 35˚C (32 to 95˚F)
Humidity:
5 to 90% RH (no condensation)
165
Specifications
Power supply:
Europe
AC 230 V±10%, 50 Hz
USA/Canada AC 120 V, 60 Hz
Australia
AC 240 V, 50 Hz
Power consumption:
Standby:
Printing:
Approx. 2 W
Approx. 18 W
Dimensions (without a paper rest and paper output tray):
370 (W) × 191 (D) × 164 (H) mm
14.6 (W) × 7.5 (D) × 6.4 (H) in
Weight:
Approx. 2.4 kg (5.5 lb.)
■ Feed method:
Continuous feed through auto sheet feeder
For Plain Paper, Envelopes, High Resolution Paper,
Glossy Photo Paper, High Gloss Film,
Glossy Photo Cards, Transparencies, T-shirt Transfers, Banner Paper
166
Specifications
■ Sheet feeder capacity:
Plain Paper (75 gsm)
High Resolution Paper
Envelopes
Glossy Photo Paper
High Gloss Film
Glossy Photo Cards
Transparencies
T-Shirt Transfers
Banner Paper
50 sheets max.
40 sheets max.
5 pieces max.
1 sheet.
1 sheet
1 sheet.
20 sheets max.
1 sheet
1 sheet
167
Specifications
■ Ordinary print media:
Regular size:
A4, A5, B5, Letter, Legal, European DL, US Com.#10
Custom size:
width: 100.0 to 241.3 mm (3.9 to 9.5 in)
height: 100.0 to 584.2mm (3.9 to 23.0 in)
Weight:
64 to 105 g/m2 (17 to 28 lb)
Canon Special media:
High Resolution Paper
Glossy Photo Paper
High Gloss Film
Glossy Photo Cards
Transparencies
T-Shirt Transfers
Banner Paper
HR-101N
GP-301N/GP-301
HG-101
FM-101
CF-102
TR-201
168
Specifications
■ Graphic image printing:
Data format:
Canon extended mode: Raster image format
Resolution:
Canon extended mode: 180, 360, 720 dpi
■ BJ Cartridge:
Black BJ Cartridge BC-20:
Nozzles:
128
Ink colours: Black only
Capacity:
Approx. 1800 sheets*1
(Approx. 7200 sheets *2)
Color BJ Cartridge BC-21e:
Nozzles:
24 per colour, 64 for black
Ink cartridge:BCI-21 Color (Cyan, Yellow, Magenta)
BCI-21 Black (Black)
Capacity:
BCI-21 Color: Approx. 130 sheets*3
(Approx. 650 sheets *4)
BCI-21 Black: Approx. 150 sheets*3
(Approx. 560 sheets *4)
169
Specifications
*1 1500 characters per page, normal text, at standard and plain paper mode with
Windows 98/Windows Me
*2 1500 characters per page, normal text, at Super Economy mode with Windows
98/Windows Me
*3 Based on printing the ISO JIS-SCID No.5 pattern at standard and plain paper
mode with Windows 98/Windows Me
*4 Based on printing the ISO JIS-SCID No.5 pattern at Super Economy mode with
Windows 98/Windows Me
170
Specifications
■ Printer driver operating environment:
IBM PC/AT-compatible computer running on Windows 98, Windows Me, Windows
2000 or Macintosh computers with USB interface running on Mac OS 8.5 - Mac OS
9.x Hard disk space:
Approx. 40 MB to install on Windows 98 and Windows Me, 30 MB on Mac OS, or
approx. 25 MB on Windows 2000 (including temporary files)
Note
➤
• BJ Status Monitor cannot be used when printer is used in network
operating environment.
• When connecting printer and computer through USB interface, use the
system under the following operating environment.
Windows
Computer with Microsoft Windows 98 or Windows Me, which is preinstalled
by a computer manufacturer on purchase. (USB port operation also needs
to be assured by the manufacturer.)
Macintosh
Macintosh computers with USB and Mac OS 8.5 - Mac OS 9.x which is
preinstalled by a computer manufacturer on purchase.
Specifications subject to change without prior notice.
171
Specifications
■ Printing Area
To ensure the best print quality, the printer allows a margin along each edge of
media.
Printing area (dark blue): Canon recommends that you print within this area.
(
)
Printable area (light blue): The area where it is possible to print. However, printing
in this area can adversely affect the print quality or the
)
paper feed precision. (
➡ A4, B5, A5
➡ Letter, Legal
➡ Glossy Photo Cards
➡ Envelopes
➡ Banner Paper
172
Specifications
A4, B5, A5
Size
Printable Area (width x height)
A4
203.2 × 287.0 mm / 8.0 × 11.3 in
B5
175.2 × 247.0 mm / 6.9 × 9.7 in
A5
141.2 × 200.0 mm / 5.6 × 7.9 in
3.0 mm / 0.12 in
25.4 mm / 1.0 in
Recommended printing area
Printable area
7.0 mm / 0.3 in
3.4 mm / 0.13 in
23.5 mm / 0.9 in
3.4 mm / 0.13 in
173
Specifications
Letter, Legal
Size
Printable Area (width x height)
Letter
203.2 × 269.4 mm / 8.0 × 10.6 in
Legal
203.2 × 345.6 mm / 8.0 × 13.6 in
3.0 mm / 0.12 in
25.4 mm / 1.0 in
Recommended printing area
Printable area
7.0 mm / 0.3 in
6.4 mm / 0.25 in
23.5 mm / 0.9 in
6.3 mm / 0.25 in
174
Specifications
Glossy Photo Cards
Size
Printable Area (width x height)
Glossy Photo Card
109.4 × 159.9 mm / 4.3 × 6.3 in
28.0 mm / 1.1 in
Recommended printing area
(Printable area is the same.)
25.9 mm / 1.1 in
5.1 mm / 0.16 in
4.1 mm / 0.16 in
175
Specifications
Envelopes
Size
Printable Area (width x height)
European DL
203.2 × 100.0 mm / 8 × 4 in
US Com. #10
203.2 × 94.7 mm / 8 × 3.7 in
3.0 mm / 0.12 in
25.4 mm / 1.0 in
7.0 mm / 0.3 in
6.4 mm / 0.25 in
Recommended printing
area.
23.5 mm / 0.9 in
Printable area
10.4 mm / 0.4 in (DL)
31.7 mm / 1.25 in (#10)
176
Specifications
Banner Paper
Size
Printable Area (width x height)
Banner Paper
A4: 203.2 × 1779.0 mm / 8.0 × 70.0 in
Letter: 203.2 × 1673.4 mm / 8.0 × 66.0 in
24.5 mm / 1.0 in
3.0 mm / 0.12 in
3.4 mm / 0.13 in
3.4 mm / 0.13 in
Min. 2 sheets
Max. 6 sheets
Recommended printing area
Printable area
177
Index
Index
A
Application Error
148
B
Background printing (Macintosh)
Background printing (Windows)
Banner Paper
BJ Cartridge
BJ Print Monitor (Macintosh)
BJ Status Monitor (Macintosh)
BJ Status Monitor (Windows)
61
155
113
70, 76
61
67
40, 150, 154
C
Cancelling a Print Job (Macintosh)
Cancelling a Print Job (Windows)
CAPT driver
Cartridge Holder
Cartridge Lock Lever
Chooser (Macintosh)
Cleaning
Cleaning the Printer
63
43
147, 156
17
17
61
38, 50, 86
89
178
Index
Client (Macintosh)
Compatible Media Types
65
95
D
Deleting an Unknown Device
161
E
Envelopes
Error Message
97
144, 150, 152
F
Front cover
15, 138
G
Gamma Correction (Macintosh)
General Protection Fault
Glossy Photo Cards FM-101
Glossy Photo Paper GP-301
Glossy Photo Paper GP-301N
57
148
107
103
103
High Gloss Film HG-101
High Resolution Paper HR-101N
105
101
H
I
Ink Cartridge
70, 71
179
Index
M
Media Type (Macintosh)
Media Type (Windows)
51
25
Network (Macintosh)
Nozzle Check Pattern
64
85
Opening the Printer Properties Dialog Box (Windows)
19
N
O
P
[Page Setup] Dialog Box (Macintosh)
Page Size (Windows)
Paper Guide
Paper Jams
Paper Output Tray
Paper Rest
Paper Size (Macintosh)
Paper Thickness Lever
Photo Optimizer (Windows)
Photo Optimizer PRO (Macintosh)
PICT File (Macintosh)
[Print] Dialog Box (Macintosh)
Print Mode (Macintosh)
Print server (Macintosh)
Printable area
Printer Driver (Macintosh)
48
33
15
142
15
15
48
17
27
54
59
51
51
64
172
45
180
Index
Printer Driver (Windows)
Printer Properties Dialog Box (Windows)
Printing Area
Printing the Nozzle Check Pattern
18
19, 23
172
82
R
Replacing BJ Cartridge
Replacing Ink Cartridge
RESUME/CANCEL Button
76
71
15
S
Sheet Feeder
Simulate illustration (Macintosh)
Simulate Illustration (Windows)
Specifications
Super Economy Mode
Super Economy Print Mode
15
55
28
164
21
46
Transparencies CF-102
Transporting the Printer
T-Shirt Transfers TR-201
109
91
111
T
U
Uninstalling Printer Drivers (Macintosh)
Uninstalling Printer Drivers (Windows)
USB Port
68
44
16, 146
181
Index
W
When to Replace Cartridge and Maintain Print Head
WPS driver
70
147, 156
182