1
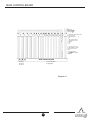
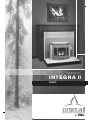
MANUAL
I NTEG RA II
EInsert
NGLISH
Freestanding
TABLE OF CONTENTS
AUSTROFLAMM INTEGRA II
FREESTANDING
SAFETY NOTICE
INSTALLATION AND ASSEMBLY
Austroflamm: An Overview
Safety Precautions
Labels
Main Control Board
Parts Illustration
Specification/Capacity
Automatic Safety Functions
Assembly
Installation Instructions
3
4,5
6,7
8
9,10
11
12
13
14,15,16
A New Heating Philosophy
17
IF THIS WOOD PELLET STOVE
IS NOT PROPERLY INSTALLED,
A HOUSE FIRE MAY RESULT.
FOR YOUR SAFETY, FOLLOW THE
INSTALLATION DIRECTIONS.
CONTACT LOCAL BUILDING OR
FIRE OFFICIALS ABOUT
RESTRICTIONS AND INSTALLATION
INSPECTION REQUIREMENTS IN
YOUR AREA.
PELLETS / GENERAL
What Are Pellets?
Storing Pellets
18
19
OPERATING INSTRUCTIONS/FEATURES
Basic Operation
Starting Procedure
20
21,22
MAINTENANCE / CLEANING
Maintenance and Cleaning
Faults/Causes/Solutions
PLEASE READ THIS ENTIRE
MANUAL BEFORE INSTALLATION
AND USE OF THIS WOOD PELLET
FUEL-BURNING ROOM HEATER.
FAILURE TO FOLLOW THESE INSTRUCTIONS COULD RESULT IN
PROPERTY DAMAGE, BODILY
INJURY OR EVEN DEATH.
SAVE THESE INSTRUCTIONS
FOR FUTURE REFERENCE
23,24,25
26,27
WARNING
This stove is not intended for
use in commerical installations.
QUALITY / WARRANTY
Key Word Abbreviations
Warranty
Warranty Registration
28
29
30
2
This stove should be installed
by a certified service technician.
Congratulations on pellet
your purchase
of
stove.
a quality Austroflamm wood pellet stove
made by Rika. You are now a member
of a group of over 100,000 Rika owners.
Rika before your
purchase, please
Europe. State of the art processes,
such as; robotic welding, laser cutting,
and complete micro-processor control
weinfeel
unequalled.
theisindustry.
RIKA was founded over
50 years ago in
Micheldorf, Austria by
Karl Riener and his family.
We appreciate quality
and feel that our company manufacturers some of the finest pellet and
wood burning stoves
50 available in
today’s marketplace. From a small
company, specializing in hand made
wrought iron products, grew a large,
well known company known today as
Rika Metallwarengesellschaft.
Unique designs and emphasis on
quality, performance and superior
workmanship have made us a
leading stove manufacturer in
Free
standing fireplaces and water heater
units.
a
leading stove manufacturer in
3
3
READ THESE SAFETY
PRECAUTIONS BEFORE
INSTALLING OR USING STOVE
Do not use gasoline, gasoline-type lantern
fuel, kerosene, charcoal lighter fluid or
similar liquids to start or “freshen up” a
fire in this stove. Keep these flammable
liquids well away from this stove when it is
in use.
The Austroflamm Integra II Insert
wood pellet stove must be properly
installed in order to prevent the
possibility of a house fire. For your
own safety, you must adhere strictly
to the installation instructions. Contact your local building officials to
obtain a permit and information on
any installation restrictions and
inspection requirement in your area.
Failure to follow these instructions
could result in property damage,
bodily injury or even death.
Build-up of dust, soot, or creosote in the
chimney connector and in the exhaust vent can
cause a house fire. Although this will be
minimal with correct operation, it is advisable
to inspect the chimney connector and exhaust
vent on a regular basis and
clean ifbasis.
necessary.
a regular
Ashes removed from the stove may be
hot. Ash must be deposited in a metal
container with a tight fitting lid. The
closed ash container should be placed on
a non-combustable surface and the ash
should be cold pending final disposal.
The word “stove”, as used in this manual,
means the Austroflamm Integra II Insert
wood pellet stove
The stove’s exhaust system works with
negative combustion chamber pressure and
a slightly positive chimney pressure. It is
therefore imperative that the air intake
and exhaust system be air tight and
installed correctly.
7’ to 8’
100
WARNING
BURN WOOD PELLET FUEL ONLY!
NEVER BURN ANY OTHER FUEL
SUCH AS PAPER, SOLID WOOD
OR CHARCOAL!
When operated properly, the stove
cannot be over fired.
However,
continuous operation at maximum burn
may shorten life of the electrical components and is not recommended.
4 4
4
Avoid direct contact with
stove while in use as surfaces are hot and may
cause burns.
Never let unsupervised
children around stove while
in use as children may
contact hot stove surfaces,
which may cause burns.
the combustion air as required.
Do not cook food, hot
beverages or place anything on top of stove.
.
The auger may start at any time
when the stove is running! Keep
hands and fingers away from
auger at all times as contact with
auger may cause personal injury.
Austroflamm
Integra
Freestanding
Austroflamm
Integra
II Insert
stoves have
been independently tested and listed
Labs in OR.,
OR. an
with OMNI LabsOMNI
in Beaverton,
accredited testing laboratory, in
5 5
OMNI SAMPLE LABEL FOR AUSTROFLAMM INTEGRA II
Insert
6
OMNI SAMPLE LABEL FOR AUSTROFLAMM INTEGRA II
Insert
7
MAIN CONTROL BOARD
yellow/green
blue
brown
a
3
2
1
4
5 6 7 8 9 VII VI
V
IV
III
II
I
PE yellow/green
b
A
B
MAIN CONTROL BOARD
C
a Fine-wire fuse
b Capacitor
A Bus 1
B Bus 2
C Bus 3
Fig. 6
4
Diagram A
8
PE
N
L
1.
2.
3.
4.
5.
6.
7.
8.
9.
HAL-RG-fan
Hall IC combustion motor
Control
board
User board
Tele/Pellet-Control
Thermostate
Air sensor
UTB
Low limit sensor
OTB limit sensor
High
FKY
Open1
FKY
Open2
Alarm
I.
II.
III
IV
V
VI
VII
Network
230VAC
110V
power
cord 50Hz
RG-fan
Combustion motor
Cross
flow
fan
Convection fan
Ignition element
Auger motor
Circulating
pump
Open
Reserve
Open
Parts Illustration
Fig. 1
Parts Descriptions (1-12):
Fiqure 2
1. Ceramic Side Glass
2. Ceramic Front Glass
3. Cast Iron Door
4. Door Handle Bolt
5. Door Handle
6. Auger Cover
7. Heat Shield
8. Rear Heat Exchanger Access Plate
9. Auger
10. Auger End Plate
11. Auger Motor
12. Rear Cover Plate
Fig. 2
2
9
Parts Illustration
Parts Descriptions (13-28):
Fiqure 3
15.
16.
17.
18.
19.
21.
22.
23.
24.
25.
27.
28.
27
28
Hopper Cover
Air Sensor
Top Grill
Ash Pan
Burn Pot
Lower Cast Wall
Lower Cast Wall Gasket
Upper Cast Wall
High Limit switch
Adjustable Door Latch
Main Circuit Board
Tele-Control (Europe Only)
Fig. 3
Parts Descriptions (29-40):
Fiqure 4
Fig. 4
3
10
29.
30.
31.
32.
33.
34.
35.
36.
37.
38.
39.
40.
Power Cord
Flue Adapter
Connecting Band
Low Limit Switch
Low Limit Gasket
Combustion Motor Housing
Combustion Motor
Covection Fan
Upper Door Hinge
Lower Door Hinge
Ignitor Element
Ignitor Bracket
Specification/Capacity
Shroud Sizes
S 29” x 42”
L 32” X 46”
28 1/2”
1-1/2”
25 3/4”
7 1/2”
13 3/4”
27 1/4”
2 1/4”
37 1/2”
(Front)
(Front)
(Total)
28 1/2”
25 3/4”
258 lbs.
Exhaust Outlet
7,000 - 44,000
99
Hopper
Power
19 3/4”
11 1/2”
Rear Height
Rear Depth into Fireplace
Rear Width
27 1/4”
11
11
AUTOMATIC SAFETY FUNCTIONS
1. AFTER A POWER FAILURE OPERATION MODES
In the case of a brief power failure, the stove resumes the same operating functions that were set before the
power failure occured.
ON-Mode (Manual mode):
The control switches into ST (Start Phase) and the stove then goes into ON mode.
TM-Mode (Automatic mode):
The control switches into ST (Start Phase) and the stove then continues to run in TM-mode.
SB-Mode (Standby mode):
The control switches into SB-Mode after approximately 2 seconds.
In the case of any power failure, a small quantity of smoke can escape from the stove. This should not last
longer than three to five minutes.
2. OVERHEATING
If the stove overheats, an excess temperature switch (Hi-Limit) will shut-off the stove fuel feed.
After the stove has cooled down, the stove defaults back to the original control program. However, heating only
continues if there are embers in the burn pot. If the stove does not re-ignite when fuel is fed again, then the
shut-down process (cleaning, after-running phase) is carried out.
ATTENTION: If overheating has occured then maintenance, cleaning and inspection must be carried out
by an authorized service technician.
3. LOW TEMPERATURE SWITCH OFF
If the stove cools down below minimum temperature, then the stove will go into automatic shut down mode.
4. AUGER MOTER
When the hopper lid is raised, the auger motor will stop feeding pellets, this safety feature is installed
to protect from potential injury from the auger shaft.
*Please note this stove will only operate with the hopper lid closed.
12
ASSEMBLY
GENERAL
ATTENTION! Only
when
ATTENTION!
Only work
workon
onthe
unitfire
when
thethe
power
cord
hasplug
been
from from
the wall.
mains
hasunplugged
been removed
the socket.
Your furnace
stove must be switched off and have
cooled down before carrying out any work on it.
During
any
items
(screws)
Duringassembly
assemblydodonot
notdrop
drop
any
items
(screws)
etc.
into
the
hopper.
Foreign
itemsthe
etc. into the fuel container - they can block
will block the auger and damage the unit.
conveyor helix and damage the furnace.
SIDE CLADDING
1. Place the sidepieces on the mounts provided on the base.
2. Push the side against the furnace
stove until it
stands
vertically.
is stood vertically.
inside
at thecon3. Then,
Then fasten at
the the
top hopper
in the pellet
top,
using
two
(2)
screws.
tainer using two screws.
Repeat this procedure on the other side of
the stove.
furnace.
CONTROL AND CONTROL BOARD
stove has an elecThe INTEGRA II pellet furnace
tronic control
controlfitted
fittedinternally
internallyin in
the
furnathe
stove
and
a
control
board
that
is
fitted
to
unit
ce and a control board that is fitted to furcladding.
nace
cladding.
The control (main board) and the control
The control (main board) and the control
board may only be altered by trained speciboard may only be altered by specially
alist dealers or the service department.
trained dealers or service department.
Improper handling of these parts leads to
Improper handling of these parts will lead
the warranty becoming null and void.
to the warranty becoming null and void.
13
INSTALLATION INSTRUCTIONS INTEGRA II INSERT
The total length of the horizontal vent must not
exceed 30 feet. The “PL” vent exhaust system
must be installed and sealed with 3 screws per
joint. The chimney manufacturer’s installation
procedures must be followed. In addition,
pipe connections, joints, and all pipe seams
within the home should be sealed with hightemperature silicone sealer, (RTV) aluminum
tape.
Before installing, contact your local
building or fire officials about
resrictions and installation inspection
requirements in your area.
Manufacturer and distributor have no
control over the installation of the stove
and assume no responsibility for any
special, incidental or consequential
damages.
ELECTRICAL CONNECTION
The stove is supplied with an approx. 7’ to 8’
long connecting cable. This cable is to be connected
to a normal 110 V, 60 Hz electrical connection. The
average power consumption is approx. 100 watts.
During the ignition process (duration 10 minutes)
approx. 300 watts. The connection cable must be
run so that any contact with hot or sharp-edged
external surfaces on the stove is avoided.
The stove must be connected to an approved
3” or 4” pellet vent chimney.
DO NOT INSTALL A FLUE
DAMPER IN THE EXHAUST
VENTING SYSTEM OF THIS UNIT!
DO NOT CONNECT THIS UNIT TO
A CHIMNEY FLUE SERVING
ANOTHER APPLIANCE!
COMBUSTION AIR
Each combustion process requires oxygen or air. As a rule,
the combustion air is taken from the living area in the
house. The air taken from the living area must be reintroduced. In modern homes, very tight fitting windows and
doors mean too little air flows into the house for proper
combustion. This situation becomes problematic due to
additional ventilation in the house (e.g. in the kitchen and
bath exhaust fans). Outside air is recommended, but not
required, except in mobile home installation.
The exit terminal must be located no less
than 60 inches from any opening through
which combustion products could enter the
building (i.e. windows and doors), no less
than 24 inches from an adjacent building,
and no less than seven foot above grade,
when located adjacent to public walkways.
It must be arranged so that exiting flue
gases will not be a hazard to people,
overheat combustible structures, or enter
the building.
29” x 42”
14
INSTALLATION
INTEGRA II INSERT
15
INSTALLATION
INTEGRA II INSERT
Below 2,500 ft. altitude, a
three inch or four inch diameter is
appropriate.
16
A NEW HEATING PHILOSOPHY
17
WHAT ARE PELLETS?
association of the Pellet Fuel
Institute,
18
cause
Pellet Fuel Institute
1601 N. Kent Street, Suite 1001
Arlington, VA 22209
Phone: 703/522-6778
19
BASIC OPERATION
BASIC INFORMATION
Internal control unit
DO NOT start your stove until the
venting
installation
is complete!
The fire must
only be started
when fully fitted.
All settings and functions can be regulated
via this unit.
Your pellet furnace
stove is exclusively for burning
pellets made from wood of a controlled quality.
Non-pelletised solid fuels (straw, maize, chopped matter etc.) are not permitted. Failure to
adhere totothese
will could
make void
all guaadhere
theseguidelines
guidelines
ranteewarranty.
and warranty claims null and void and
your
could have a negative effect on the safety of
your fire.
When run correctly your pellet furnace
cannot
stove will
not
overheat. Improper operation can however shorten the life expectancy of the stove
electricand
furnace
its
components (fan, motors and electric control)
and is not permitted.
„MENU“ key
Display box
„MINUS“ key
„ENTER“ key
„ON/OFF“ key
„PLUS“ key
Fig. 1 Internal control unit, key assignment
DISPLAY BOX:
Displays the operating modes in illuminated
letters.
CONTROL AND INTERNAL CONTROL
UNIT - FUNCTION
(Fig. 5, Part 45)
MENU:
Navigation in and to the different submenu levels.
Your pellet
pelletstove
furnace
is fitted with
with aa modern
modern
Your
is equipped
programmable microprocessor control.
The user can preset the individual equipment functions via the internal control unit
(keypad with operating display) fitted on
the right hand rear wall.
The control (main board) and the control
board may only be altered by trained specialist dealers or the service department.
Improper handling of these parts leads to
the guarantee and warranty becoming null
and void.
ENTER:
Navigation in the main menus (SB; ON; TM)
and confirming user entries.
MINUS/PLUS:
Lowering or increasing user values.
ON/OFF:
Switching the fire on or off.
See the APPENDIX page 26 for a graphic
display of the menu driven operation.
Your Austroflamm pellet stove is equipped with an electronic ignition
start-up system. Starter fluids or gels are not necessary. Simply push
the start button and the unit will ignite within a ten minute period.
20
STARTING PROCEDURE
Initial Start-up
Turn stove on, press enter button twice and SB will show in display box. Turn stove off and let
it go through shutdown. At conclusion of shut down stove will return to SB mode now you can
program.
Stove can be run in a manual or Time Mode (TM).
1. To run in manual mode press on/off button and stove can run manually.
2. At start-up stove will read ST/21. ST stands for start-up and 21 is start-up time. During
start-up only the auger and combustion fan come on. Convection fan comes on 20
minutes after start-up. You now have control of stove.
3. Digital readout will read ON (for manual).
4. Under the ON is a number that reflects the fire intensity. The setting can be from 0 to
100. O being the lowest setting and still have the stove running.
5. Set these with the plus and minus buttons.
If stove needs to be turned off push on/off button and stove will go through shut down mode.
When SB appears in digital readout shut down is complete.
Time Mode
In TM mode the stove can be set to come on at programmed times. You can set 2 programs
per day, and set heat intensity as well.
1. From SB push menu button.
2. MO(Monday) shows up in digital display.
3. Press enter and S1 is displayed and a number is displayed under S1. The number
under S1 is the time (displayed as a 24 hour clock).
4. Press the ‘plus’ or ‘minus’ button to adjust start time. Time can only be set to come on
in hourly increments and off in hourly increments.
5. Press enter and E1 is displayed. This stand for end of 1st heating period.
6. Press enter again and S2 is displayed. This for the second heating period. Set as in
S1.
7. Press enter and E2 appears. Set end time as in E1
8. Press enter and display returns to MO
9. Press Menu and the next day (TU) will appear. Program according to needs. Do this
for the remaining days.
21
STARTING PROCEDURE
Setting heat modes and time
1. After setting E2 value for SU (Sunday) by pressing enter now press the menu button.
2. PS (Power start) will appear in the display. Under PS will be displayed a number this is
for heat intensity. Press ‘plus’ or ‘minus’ to set heat intensity 0 being the lowest up to 100
(highest).
3. Press enter to confirm values.
4. The display will now show PE (Power end) with the word ‘off’ under PE. Off means the
fire is switched off between heating programs. If you want the stove to run at a low
setting between heating programs use the ‘plus’/’minus’ to set the heat output.
5. Press enter again and the values are saved.
6. The display now reads CL(cleaning cycle) and 60 under the CL. Once each hour the
stove will ramp up to the heat setting for 1 ½ minutes to clean out the burn pot. After
which it will return to its original setting. This can be changed by pressing the ‘plus’ or
‘minus’ button. We highly recommend leaving this at 60
7. Press enter and VA (software version). Under this will appear the software version
1.22,ie.
8. Press menu and H (hour) appears with a number below on the display. This a 24 hour
clock using the ‘plus’ ‘minus’ buttons sets hour.
9. Press enter and M (minute) appears using the ‘plus’ ‘minus button set minutes.
10. Press enter and D(day) appears in the display. Set the current day by pressing ‘plus’ or
‘minus’ (1=Monday, 2= Tuesday etc.) Press enter confirming the new values.
11. Press Menu and return to SB (stand-by)
22
E NG LI
MAINTENANCE AND CLEANING
BASIC INFORMATION
Your furnace
stove must be switched off and have
cooled down before carrying out any maintenance activities.
The frequency your unit
fire must be cleaned
as well as the maintenance intervals
depends on the fuel and
usedthe
by you.
amount of usage.
High moisture contents, ash, dust and chips
can more than double the necessary maintenance intervals.
We would like to point out once again that
you should only use tested and recommended wooden pellets as a fuel.
POKER
A poker is supplied with your new pellet
stove.
furnace.
Please use this poker for:
1. Cleaning the heat exchanger.
2. Cleaning
Cleaning the
pan;
the fire
burn
pot.
3. Loosening
Loosening the pellets in the pellet
pellet conburn
should
they
stick
side
walls;
tainerpot
should
they
stick
to to
thethe
side
walls;
DAILY
daily!
FIRE
PAN
BURN
POT
burnpan
pot should be looked at to ensure
The fire
that ash or clinker does not block the air
burnpan
pot can easily be
feed openings. The fire
cleaned when in position. After removing
the pan the area underneath can be vacuumed free.
daily!
DAILY
HEAT EXCHANGER
Two
Twocleaning
pusher rods are located directly under
the
piece these are used for cleathefront
lid cover
(ceramic),
ning the heat exchanger (remove lid). To
enable
heatheating
emission
these these
rods
maintainefficient
the maximum
effeciency,
should
be
pulled
upward
several
times
rods should be pulled up and down several and
then
back down.
the
times pushed
. This removes
the flueThis
ash removes
from the heat
flue
dust
from
the
heat
exchanger
tubes.
ash
exchanger tubes, and increases heat transfer ,to
androom.
increases heat transfer to the room.
the
21
23
MAINTENANCE AND CLEANING Con’t
ASHTRAY
Empty
theashtray
ashtray
as required.
must
Empty the
as required.
It mustIt only
only
be
removed
when
the
stove
is
be removed from the fire, when the fire is
switched off and cooled down.
switched off and cooled down.
WOOD ASH AS A FERTLISER
Wood mineral percentages (approx. 1 - 2%)
remain as combustion remains as ash in the
combustion chamber. This ash is natural
product and is an excellent fertiliser for all
plants in the garden.
However the ash
should be aged first and “quenched” with
water.
Please TAKE
CARE:
Embers Remove
can be hidden in
Please
TAKE
CARE:
the ash - only
into metal
containers.ONLY
embers
intofillmetal
containers,
panashbox
is
Vacuuming using the ash
RIKA
is
recommended to remove the ash.
GLASS CLEANING
The best
glass
is using a
The
best way
way totoclean
cleanthethe
combustion
damp
cloth
or
stubborn
dirt
can
be
chamber doors is using a damp cloth.removed
using the glass cleaner (obtainable from
Stubborn
can be removed using the
your local dirt
dealer).
RIKA glass cleaner (obtainable from your
local
specialist
firedealer).
dealer).
monthly!
FLUE
OUTLETS OUTLETS
HEATGAS
EXCHANGER
(if used frequently)
Remove the upper and lower cast
flue plate
wallsfor
in
the rear of
wallthe
and
vacuum
the flue ash that
firebox
as shown.
has
collected
there
out
of
Hex head tool provided. the flue gas outlets
bare.
.that are
Vacuum
thenow
arealaid
thoroughly.
monthly!
FLUE GAS
Rear
Ash BOX
Chamber
Remove
ash that
trap sits
door
located
Clean
the the
fluerear
gas box
behind
the
behind
the rightinside
rear panel.
heat
exchangers
the same
way. To Vacuum
do this
the chamber that extends across to the
combustion motor housing. Pay close
the
cleaning
lid (see
3, Part holes
8) unscreattention
to the
passFig.
through
coming
wed.
from the front of the heat exchanger area and
make sure they are clean and clear from any
obstruction.
these holes
are blocked
If
the outlet If
openings
are blocked,
then the
unit will not operate properly and might not
these must be freed and vacuumed (if
run at all. This should be checked for every 1
required).
ton of fuel to see if the cleaning intervals
might be increased or decreased. Fuel
quality and extended low burn rates will
increase the frequency required.
the right hand rear cladding is removed and
22
24
MAINTENANCE AND CLEANING
Con’t
Combustion
Housing
FLUE GAS FANMotor
HOUSING
This maintenance procedure should be cardoneout
ondependent
a regular basis
depending
fuel
ried
on the
fire usageon
and
the
quality and amount of useage.
fuel
used, as frequently as required.
fan and to
In order to inspect the
thecombustion
flue gas fan
clean it, remove four screws (see drawing)
and pull the motor out of the housing carefromfrom
fan and
outfully. Remove the ash
flue dust
the fan
and
lets
using
an
approved
vacuum
cleaner.
flue gas outlets using a vacuum cleaner.
Replace the combustion motor
When closing care must be taken that there
gasket as required.
are no leaks.
Only carry out maintenance when the mains
Only carry out maintenance when the power
plug has
of the
fire removed
has been from
removed
from the
cord
been
the wall.
socket.
Note: All motors have sealed ball bearings.
Lubrication is not required!
HOPPER
FUEL
CONTAINER
At least once a year, allow your hopper to empty
Do not fill and
the vacuum
container
immediahopper
completely
outup
theagain
bottom
of the hopper
assembly.
tely but remove residues (dust, chips etc.)
from the empty container using a vacuum
cleaner and the RIKA Ashbox.
Door
DOORGasket
SEAL
The condition
state of ofthe
ononthe
and
The
theseals
gasket
thedoors
doors and
glass should be checked from time to time.
Repair or
or replace
maintain
Repair
replace in
theorder
sealstoas
dependent
needed.airon
tight
seal.
the state.
months!
every sixSIX
EVERY
MONTHS
FLUE CONNECTION
Inspect
clean the
the connection.
chimney system.
Inspect and
and clean
The colThe
collected
ash
can
have
a negative
lected
flue dust
can
have
a negative
effect
effect on the stove performance and
on the fire performance and represent a
represent a safety risk.
safety risk.
AIR SENSOR
The
sensor
should
maintained
The air
sensor
should
be be
maintained
andand
clecleaned
by
an
authorized
service
technician.
aned by an authorised service technician.
Cleaning should be carried out using a non± Cleaning should be carried out using a
petroleum based electronic spray.
soft brush.
±
Ensure the fitting is correct (the print
plate must be at the front).
25
FAULTS - CAUSES - SOLUTIONS
PROBLEM
PROBLEM
The fire is burning with a weak, orange
burn
flame. Pellets are building up in the fire
pot windows are covered with
pan,
soot..soot.
Pellets were not fed
in
feeding
Cause:
High limit
switch
faulty
2. Auger,
switch
plate
are fault
1. Inadequate combustion air
3. Auger is blocked (objects, wood etc.)
possible solutions:
possible solutions:
1. Remove any ash or clinker that is blocking the air inlet openings, from the burn
fire
pot. If possible change over to a better
pan.
pellet quality.
1. Check the container contents, if necessary refill pellets
Cause(s):
1. Pellet container
hopper is empty
authorized
dealer
determine
2. Have your specialist
dealer
determine
the fault
2. Check if the flue gas outlet is blocked
with ash (see “Maintenance” page)
3. Clean the pellet container
hopper and the conaugerhelix
system.
veyor
3. Check if the air inlet channel or flue
tube is blocked
leaks
4. Check the door gasket
seal for for
leaks
5. Clean the impeller on the combustion motor
6.
6. Have
Havethe
the fire
unit serviced
serviced by
by an
an authorised
specialist
the control,
authorizedcompany
dealer or(adjust
technician
flue gas fan).
PROBLEM
Fire goes out or the unit
furnace
switches
switches
off automatically.
Cause(s):
1. Pellet hopper
container
is empty
is empty
Auger isare
jammed
2. Pellets
not fed in
3. Thermal
High limitswitch
switch(upper temperature
limit) was triggered
4. Doors leaking or not closed properly
5. Poor
pellet
quality
Hopper
lid left
open
6. Pellet feed rate too low
7. Thermal switch (lower temperature
limit) was triggered
possible solutions:
1. Fill up pellet container
hopper
2. See the following section “Pellets not
fed in”
3. Leave the furnace
to cool
down
for an
unit to cool
down
for an
hour and then start again
4. See “Maintenance” and “Cleaning”
5. Only
use fuel
pellets
recommended by us
Change
brand
6. Have your specialist dealer set the fuel
regulation
26
FAULTS - CAUSES - SOLUTIONS
COMBUSTION
PROBLEM
PROBLEM
Please note that checks may be carried out on
the control and the cabling only when the fire
is currentless. Any repairs may only be carried
out by trained personnel.
Fan not running.
Cause(s):
Unit not not
receiving
anyany
power.
1. Furnace
receiving
power
2. Control board not receiving any power
possible solutions:
stove plug is inserted in
1. Check if the furnace
the wall socket, check if the current circuit breaker on the electrical control
panel has been triggered.
stove.
2. Look at the fuse in the back of the fire.
PROBLEM
ash outside
of stove.
Soot or flue
dust outside
of the furnace.
Cause(s):
1. Combustion chamber doors open when
the fire is on
2. Leaks in the seams between the combustion fan and venting;
the flue gas line;
Signs of this are the dust on the convection fan and in the heat exchanger tubes
or dust on the floor behind the unit.
furnace.
User Board Error Messages
Error messages control
stove stops because it is programmIf the heater
hopper empty,
ed to do so (e.g.: Pellet container
excess temperature protection triggered,
low temperature protection message, air
sensor faulty, combustion problems (e.g.:
slag in the combustion pan, leaking combustion chamber door, glass in the combustion chamber door broken, etc...) the
display shows: the error message “Err”
(Error).
When an error message occurs the corresponding cause must be rectified,
firethe
correctedthen
before
can
be started
startedagain
againby by
pressing
stovethen
can be
pressing
the
“ON/OFF”.
on-off. Contact your authorized service
technician for repair.
3.
Check solutions:
inside venting for possible leaks at the
possible
joints. Make sure the joints are sealed with high
1. Always keep the combustion chamber
temperature silicone or metalic tape.
door closed and if possible only open
stove is not on.
when the furnace
Possible
Solutions:
2. Rectify
leaks in the extraction system
(e.g. use heat resistant aluminium adhe1. sive
Always
keep
the
combustion
chamber
strip,
heat
resistant
adhesive
strip door
or
closed and if possible only open when the stove
heat resistant silicone)
is not on.
2.
Check the chimney joints for proper seal starting
at the combustion motor housing.
27
WORD
-
LIST
OF
A B B R E V I AT I O N S
Key word / Abbreviation
Name
Description
SB
Standby-Mode
Standby mode (fire switched off, but
active for triggering via Tele-control)
ON
ON-Mode
Manual operation
TM
Time-Mode
Automatic operation
MO, TU, WE, TH, FR, SA, SU
Weekdays
Monday to Sunday
S1, S2, E1, E2
Start 1, Start 2,
Heating start times, heating end
times for automatic mode (TM)
End 1, End 2
PS
Power-Start
Output value from the beginning of
heating time in TM-Mode
PE
Power-End
Output value from the end of heating in TM Mode
CL
Clean
Cleaning mode
V
Version
Controller software version
H, M, D
Hour, Minute, Day
Hour, minute, day memory for internal clock
RI
RING
Ring tone memory
PN
PIN
User code memory
ST
Start
Pre-heating program run
EX
Exit
Exit program run
MENU
Menu botton
Navigation in and to the different
sub-menu levels
ENTER
Navigation in the main menus (SB;
Enter key
ON; TM) and confirming user entries.
+/-
Plus/ Minus-key
Increasing or lowering user values
ON/OFF
ON / OFF key
ON/OFF
28
E NG LI S H
KEY
(except the burn pot)
two year
There is expressly no warranty
on the following components:
•
•
•
•
•
•
•
Glass
Paint
Metal Plating
Gasket Material
Burn Pots
Ceramics
Natural Stone
An optional five year
extended warranty on all
electrical components is
available.
WARRANTY LIMITATIONS:
MANUFACTURER, DISTRIBUTOR AND
SUPPLIER MAKE NO OTHER WARRANTIES, EXPRESS OR IMPLIED,
INCLUDING ANY WARRANTY OF
MERCHANTABILITY OR WARRANTY
OF FITNESS FOR A PARTICULAR
PURPOSE.
LIMITATION OF LIABILITY:
limiting the foregoing, the use of
fuel other than wood pellets and
improper installation of the
product voids all warranties.
AUSTROFLAMM/HPG
8111 NE Columbia Blvd.
Portland, OR 97218
MANUFACTURER, DISTRIBUTOR AND
SUPPLIER SHALL NOT BE LIABLE FOR
ANY INCIDENTAL OR CONSEQUENTIAL DAMAGES TO PROPERTY OR
PERSONS ARISING FROM OR
RELATED TO USE OF THIS PRODUCT.
USER’S SOLE AND EXCLUSIVE
REMEDY FOR ANY NONCONFORMITY IN THE PRODUCT OR ANY
CLAIM RELATED TO THE USE OF THE
PRODUCT SHALL BE, AT
MANUFACTURER’S OPTION, REPAIR
OR REPLACEMENT OF THE PRODUCT
OR RETURN OF THE PURCHASE
PRICE FOR THE PRODUCT.
29
5 years unimpared functioning of all steel
DAMAGE caused by non-compliance of the
components. The Guarantee includes
8111 NE Columbia Blvd.
materialPortland,
defects and
OR defective
97218 treatment. A
manufacturer’s instructions for operation of
condition of this Guarantee is that the
unsuitable materials, etc.)
the appliance (e.g. overhea-ting , burning of
appliance has been installed and operated
E NG LI S H
WAR R ANT Y CAR D
GUARANTEE CLAIMS are to be supported
in accordance with this handbook. The
by production of the invoice and the fully
connection must be carried out by an
completed guarantee card. The GUARAN-
appropriate specialist.
TEE covers the free delivery of spare parts.
The following are excluded from the gua-
Working hours and travelling time are not
rantee:
covered by the Manufacturer’s Guarantee.
All costs (e.g. transport, repairs, etc.) incur-
PARTS SUBJECT TO WEAR, such as
red by the manufacturer due to an unjusti± Glass
Paint finish
± Lacquer
AUSTROFLAMM /fied
RIKA
Guarantee claim are borne by the ope-
8111 NE Columbia Blvd.
rator.
Portland, OR 97218-9901
± Surface coating (e.g. on handles)
Gaskets
Burn Pot
Fire Brick
This warranty registration guarantees your coverage.
To register your new RIKA stove,
completely fill out the card below:
Fax it: 1-800-777-7069 or
Mail it: Postage is already paid.
Warranty Proof: Your registration
serves as proof of purchase for your
warranty coverage. Please make sure
the card is completed in order to
guarantee coverage.
AUSTROFLAMM/RIKA Customer Service: 1-800-777-5594 FAX: 1-800-777-7069
Pellet Stove Serial #
Pellet Stove Serial #
Pellet Stove Serial #
Wood Stove Serial #
Wood Stove Serial #
Wood Stove Serial #
Wood Stove Serial #
WHERE DID YOU HEAR ABOUT AUSTROFLAMM/RIKA?
30
Rev. 9/06